exploring density — lower middle years (4, 5, 6) an ... · pdf fileapproach means that...
TRANSCRIPT

Exploring Density — Lower Middle Years (4, 5, 6) An integrated Science and Mathematics exploration
Developed by S Dole1, D. Clarke2, T. Wright1 & G. Hilton1
1 2

Formatted by CQU student group Aurora © MCSAM 2009 MC SAM - Making Connections Science and Mathematics Draft Materials May 2008 S. Dole, D. Clarke, T. Wright & G. Hilton. ARC Linkage Project 2007 - 2009

CONTENTS
i
Introduction Exploring Density
Density in the Middle Years Science and Mathematics Curriculum An investigative approach Mathematics and Science Integration Learning Objectives Unit Overview The complexity of the Density concept Prior knowledge Unit adaptability
EPISODES
1 5 2 11 3 15 4 19
Diagnostic Pretest Introductory Activity
Exploring Mass Exploring Volume Exploring Density
5 23 6 29 7 31 8 39
Exploring Density Formula
Consolidation of concept of density
Eggsperiments Investigative Assessment Task

NOTES
2
Refer to Queensland Studies Authorities www.qsa.qld.edu.au/assessment/qcar.html Mathematics www.qsa.qld.edu.au/downloads/assessment/qcar_el_maths_laf.pdf www.qsa.qld.edu.au/downloads/assessment/qcar_el_maths_kau.pdf Science www.qsa.qld.edu.au/downloads/assessment/qcar_el_science_laf.pdf www.qsa.qld.edu.au/downloads/assessment/qcar_el_science_kau.pdf Mathematics Assessable Elements K&U Knowledge and Understanding T&R Thinking and Reasoning C Communicating R Reflecting Core Content N Numbers PA Patterns & Algebra M Measurement CD Chance & Data S Space
Science Assessable Elements K&U Knowledge and Understanding I Investigating C Communicating R Reflecting Core Content SHE Science as Human Endeavour E&B Earth & Beyond E&C Energy and Change L&L Life & Living N&PM Natural & Processed Materials
INTRODUCTION
1
Density in the Middle Years Science and Mathematics Curriculum This unit of work has been designed to promote students’ understanding of density. Density is a topic studied in the Middle Years Science curriculum, but conceptual understanding of density requires understanding of many topics associated with the Middle Years Mathematics curriculum. Such mathematics topics include mass and volume as well as number sense and mental computation. Other knowledge and skills located in both the Middle Years Science and Mathematics curriculum include data gathering, data analysis, interpretation of data, graphing, measuring, using measuring instruments, problem solving, problem posing, conducting experiments and controlling variables.
An investigative approach This unit takes an investigative approach to the topic of density where learning experiences are designed for active student participation to foster rich conceptual understanding. An investigative approach means that students are provided with opportunities to learn and apply key mathematical and scientific skills in meaningful contexts, rather than being provided with de-contextualised practice exercises that they then apply to realistic situations. An investigative approach is a guided discovery approach where formulae derive from experience and gentle teacher scaffolding. An investigative approach is the principle philosophy of both the Queensland 1-10 Mathematics and Science syllabuses.
Mathematics and Science Integration This unit is designed as a unit that can be implemented equally with both Middle Years mathematics and science classes. That is, the unit is designed so that both mathematics and science core learning outcomes for the middle years are being targeted simultaneously. The activities can be identified specifically as being either science or maths activities, but they have been interwoven throughout the unit to build key knowledge, skills and concepts required for an understanding of density. The unit is designed for implementation either in junior secondary mathematics classes, junior secondary science classes, or integrated upper primary classes.
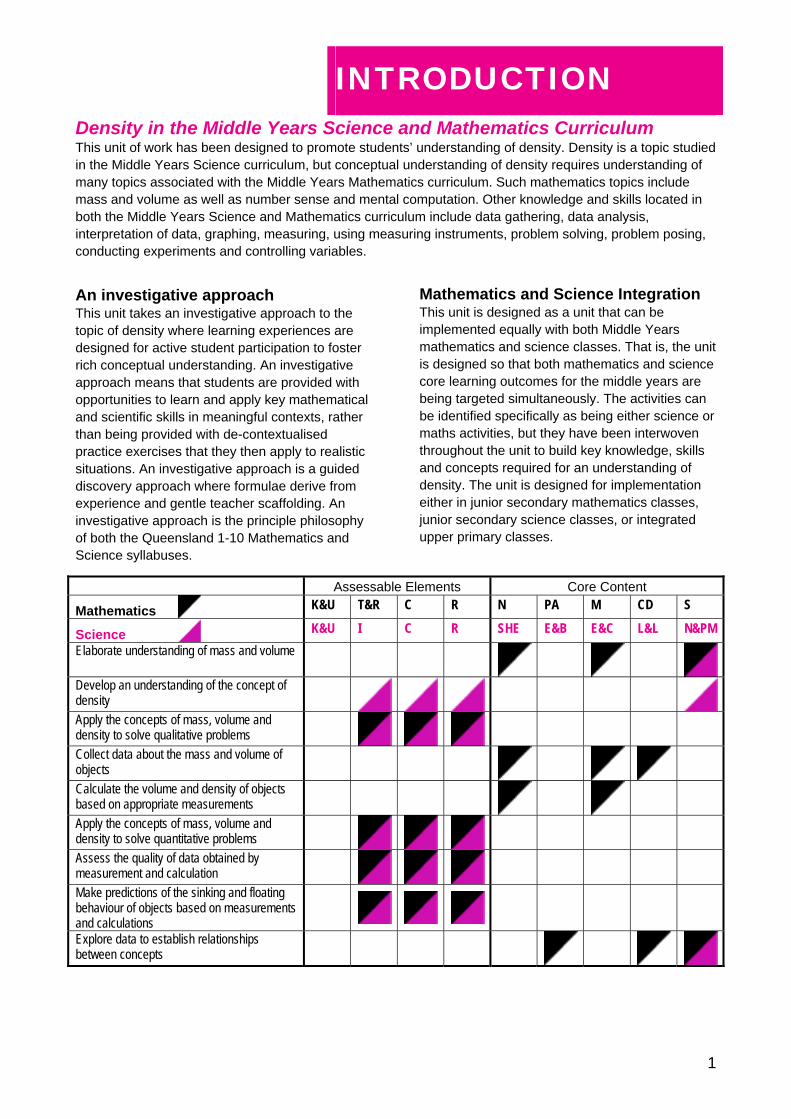
Assessable Elements Core Content
Mathematics K&U T&R C R N PA M CD S
Science K&U I C R SHE E&B E&C L&L N&PM
Elaborate understanding of mass and volume
Develop an understanding of the concept of density
Apply the concepts of mass, volume and density to solve qualitative problems
Collect data about the mass and volume of objects
Calculate the volume and density of objects based on appropriate measurements
Apply the concepts of mass, volume and density to solve quantitative problems
Assess the quality of data obtained by measurement and calculation
Make predictions of the sinking and floating behaviour of objects based on measurements and calculations
Explore data to establish relationships between concepts

INTRODUCTION
2
Unit Overview The unit is made up of a series of episodes, each designed to be of approximately 35 minutes duration. The unit includes a pretest for diagnostic purposes and a posttest for comparative purposes. An investigative assessment task concludes this unit. An outline of the focus of each teaching episode is provided in the table below.
Episode Focus
1 Diagnostic Pretest Introductory Activity – does it sink or float?
2 Explore and consolidate Mass
3 Exploring volume by displacement
4 Exploring density – Density jars
5 Exploring density formula
6 Consolidation of concept of density
7 Eggsperiments
8 Investigative Assessment Task
The complexity of the density concept Density is the relationship between an object’s mass and volume. Mass and volume are topics firmly located in the school mathematics curriculum. However, taking a scientific view of mass and volume provides a new dimension to conceptualising these two properties of objects.
Mass, volume and density Science is about understanding the world, and one of the ways of doing this systematically is to investigate the properties of objects and the relationships between them. Two of the most obvious properties of objects are their mass and volume.
Mass is one of the fundamental concepts of physics and corresponds to the amount of matter in an object. The most common units are grams (g) and kilograms (kg).
The mass of an object is constant in everyday life provided that no matter is added or lost. This is the basis of the Law of Conservation of Mass which indicates that whenever there is a change, the total mass before the change is the same as the total mass after the change. For this unit, the important consequence is that the mass of an object is always the sum of the masses of its component parts.
From an educational point of view, there is a major stumbling block for students because of the way we measure mass. The problem is that we measure it indirectly. What we measure is a force (the gravitational attraction of the object to the Earth) which is proportional to the mass. The mass can be calculated from the force (the weight) by calibrating the scales appropriately in the units of mass. The confusion for students arises because we often use the terms weight and mass interchangeably at a time when students are starting to learn about forces. For the purposes of this unit it is probably best to use the term mass wherever possible rather than the problematic term weight.
Volume is the three-dimensional concept of the amount of space occupied by an object. The strict SI unit for volume is the cubic metre (m3) but the derived unit litres (L) is accepted for use in the SI system. 1 m3 = 1000 L. Technically the symbol for litres can be l or L, but in practice L is more commonly used because a lower case l is easily confused with the number 1.
The volume of any objects can be measured by displacement, and the volume of regular objects can be calculated from measured dimensions.
Unlike the mass of an object which is independent of its temperature, the volume changes with temperature. This is because all matter is composed of atoms and all atoms are constantly vibrating (moving). They vibrate more as the temperature increases and so the general effect is that volume increases with temperature. There are exceptions (such as ice floating) which can be explained when the atomic structure is considered.

INTRODUCTION
3
Relationships Much of our scientific understanding comes from thinking about the relationships between the properties of objects and concepts in a more general sense. For example in this unit students will be exploring the relationship between mass and volume and the consequences for whether an object sinks or floats.
This relationship is captured in a derived property, density, which is the ratio of mass to volume. This ratio (which can be expressed as a number) can be used to think about sinking and floating issues much more easily than the underlying concepts of mass and volume. It is therefore a useful concept that is an inherent property of substances and objects. However it is only useful for solving everyday problems if the relationship with mass and volume is well understood.
For example if a swimmer wants to float for a few minutes on the surface of a swimming pool they need to decrease their density so that they are less dense than the water in the pool. The easiest way of doing this is to take a deep breath so that they inflate their lungs and increase their volume without significantly increasing their mass.
Density The formal definition of density is mass per unit volume and is represented by the formula:
V
m
units of g/mL g/cm3 or kg/m3
For younger students it might be best to stick to liquid volume as we are using displacement and not doing formal calculations of volume.
The density of an object changes with temperature because the volume is temperature dependent (see above).
At a given temperature the density of a pure substance is a useful property of the substance and is constant. For example the density of pure water at 4 oC is 1.0 g/mL. This relationship was a key element in the development of the metric
system. It has since been superseded by more scientific methods as there were confounding factors such as effect of temperature. However, this relationship is still a valuable way of teaching young students the relationships involved in the metric system as well as the key relationship of density. Part of the utility of density as a property arises because it is an intensive property (which is independent of the amount of the substance) unlike mass and volume which are extensive properties. You can see the value of this idea because you can say that the density of water is one (g/mL) whereas to say that the mass of water is 1 kg is nonsense.
From an educational point of view, the concept of density has a long and problematic history partly because understanding density requires a measure of proportional reasoning and partly because it is a property that is more abstract than mass or volume. However learning about density has value both because it rehearses student’s ideas about proportional reasoning and because it is one of a number of concepts that appear in the introductory science curricula such as speed, force and concentration that have similar forms and cognitive demands.
Prior Knowledge Density requires knowledge of mass and volume. During this unit, students are engaged in activities that introduce and/or consolidate understanding of both of these concepts,
Expected prior knowledge includes:
conceptualisation of mass as ‘heaviness’ of an object, or amount of heft required to lift the object
conceptualisation of volume as amount of space taken up by an object
knowledge of common units for mass (g, kg)
knowledge of common units of liquid volume (mL, L)

INTRODUCTION
4
Unit Adaptability This is an eight episode unit that targets the concept of density in a focused way. However, further episodes may be added to this unit depending upon the prior knowledge of the students. If students have a limited prior knowledge (see list above), further episodes may be developed and slotted into the unit to match
the specific learning needs of the students. The pretest will provide further evidence of students’ prior knowledge as will the introductory activity following. Hence, this unit can be implemented in a web-like manner with diversions into other episodes to complement the original eight episodes.
Teaching Approach Science Teaching Strategy
P-O-E Predict – Observe – Explain
The strategy is a powerful tool for encouraging higher order thinking.

EPISODE 1
5
Diagnostic Pretest and Introductory Activity Diagnostic Pretest
Overview The diagnostic pretest is designed to provide a quick survey of students’ current knowledge of density, mass, volume. This is a pen and paper test with students required to provide written responses to each item. Students should be allowed 20 minutes for the test completion. Teachers will be able to quickly glance through students’ responses on particular items to gauge prior knowledge of density. Formal scoring and recording of students’ responses can be undertaken for a more detailed analysis.
Purpose To provide a snapshot of students’ prior knowledge of density
Time 20 minutes
Materials Diagnostic Pretest
Procedure 1. Ask students to prepare themselves for a quick quiz.
2. Ensure students have a pen to write their responses to each item.
3. Instructions to students:
This is not a test Your results will not affect your report card Don’t worry if you are unsure of how to answer some questions Just do your best and try to show your thinking Do your own work because I want to know what you know not how well you can copy what your neighbour has written If you’re unsure, just leave that question and go on to the next one
4. Provide students with maximum 20 minutes to complete the test.
5. Collect and peruse.
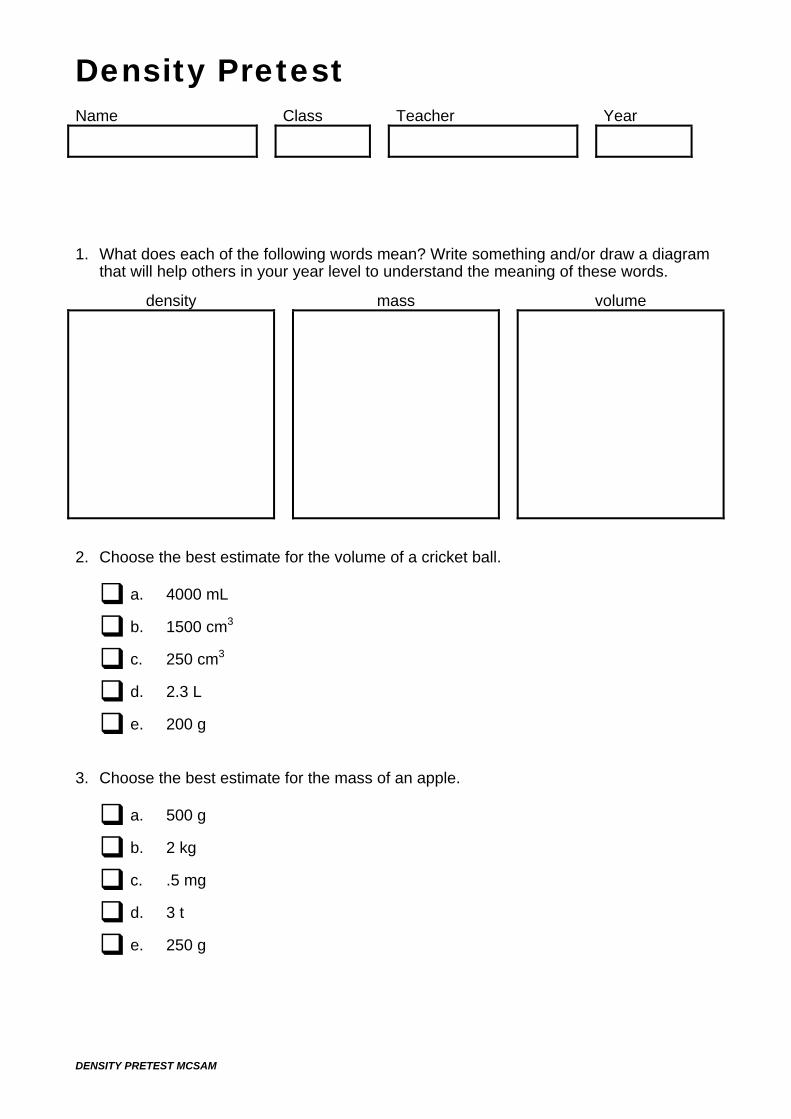
Density Pretest
DENSITY PRETEST MCSAM
Name Class Teacher Year
1. What does each of the following words mean? Write something and/or draw a diagram that will help others in your year level to understand the meaning of these words.
density mass volume
2. Choose the best estimate for the volume of a cricket ball.
a. 4000 mL
b. 1500 cm3
c. 250 cm3
d. 2.3 L
e. 200 g
3. Choose the best estimate for the mass of an apple.
a. 500 g
b. 2 kg
c. .5 mg
d. 3 t
e. 250 g
Density Pretest
DENSITY PRETEST MCSAM
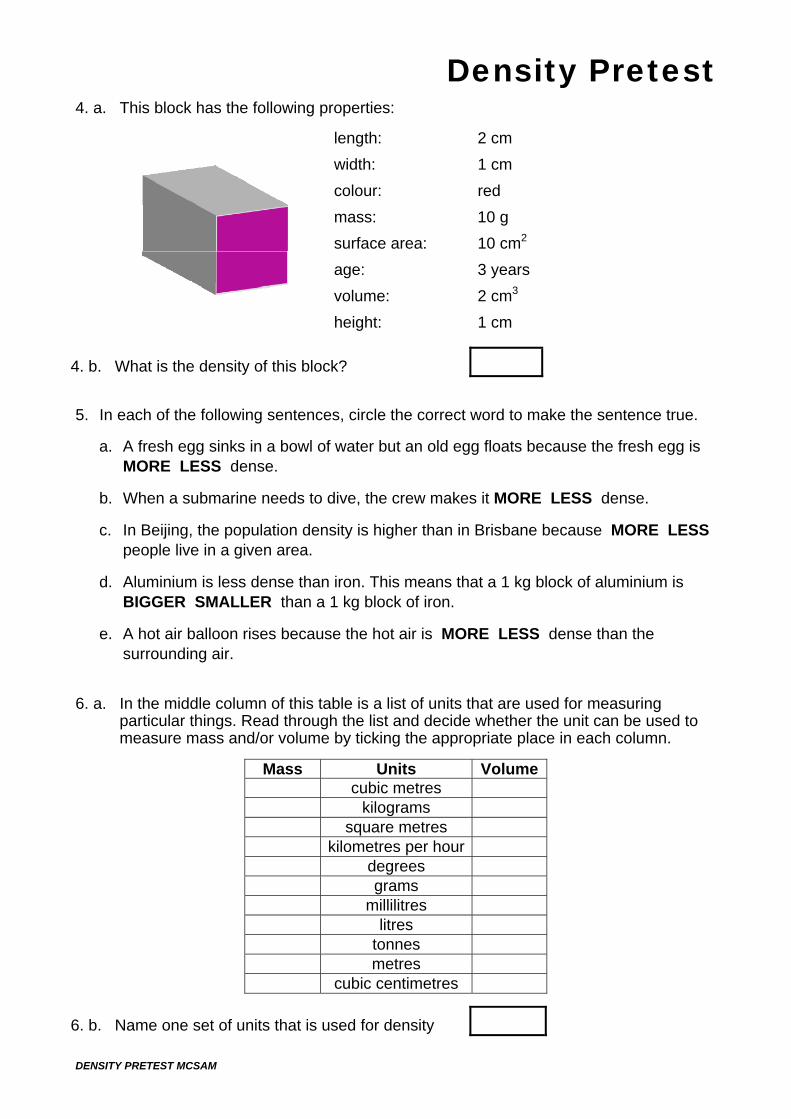
4. a. This block has the following properties:
length: 2 cm
width: 1 cm
colour: red
mass: 10 g
surface area: 10 cm2
age: 3 years
volume: 2 cm3
height: 1 cm
4. b. What is the density of this block?
5. In each of the following sentences, circle the correct word to make the sentence true.
a. A fresh egg sinks in a bowl of water but an old egg floats because the fresh egg is MORE LESS dense.
b. When a submarine needs to dive, the crew makes it MORE LESS dense.
c. In Beijing, the population density is higher than in Brisbane because MORE LESS people live in a given area.
d. Aluminium is less dense than iron. This means that a 1 kg block of aluminium is BIGGER SMALLER than a 1 kg block of iron.
e. A hot air balloon rises because the hot air is MORE LESS dense than the surrounding air.
6. a. In the middle column of this table is a list of units that are used for measuring
particular things. Read through the list and decide whether the unit can be used to measure mass and/or volume by ticking the appropriate place in each column.
Mass Units Volume cubic metres kilograms square metres kilometres per hour degrees grams millilitres litres tonnes metres cubic centimetres
6. b. Name one set of units that is used for density
EPISODE 1
8
Diagnostic Pretest and Introductory Activity Introductory Activity
Overview This activity gives students the chance to explore the phenomenon of sinking and floating and the factors that influence it. This activity is designed to augment the Diagnostic Pretest and further explores students’ prior knowledge on the topic. During this activity, try to resist any temptation to tell students current science and mathematical ideas. This opportunity comes later when the students are immersed in activities that will help them develop their ideas.
The primary aim of this activity is to discover how students are thinking about the concepts of mass and volume. The secondary aim is to find out whether students can think qualitatively about proportional relationships. Lastly the activity will uncover students’ ideas about density. The unit is written to introduce the concept of density but can be readily adapted to elaborate the understandings of students who have prior knowledge of the concept.
Purpose Exploration of factors influencing sinking and floating of objects in water
Time 15 minutes
Materials Collection of four objects of the following criteria
a large object that floats (e.g., apple) a large object that sinks (e.g., potato of similar size as apple) a small object that floats (e.g., 2cm plastic cube) a small object that sinks (e.g., pebble of similar size as cube)
Collection of other objects that may sink or float. Plastic bucket (10 Litre) or transparent container of similar size (storage box)
Procedure 1. Orient students to the focus of the lesson by asking students to suggest three objects that sink and three objects that float in water.
2. Draw a table on the board and have students create a similar table in their books. Ask students to volunteer other objects that can be listed in the appropriate columns:
Sinking and Floating
Objects that sink in water Objects that float in water
3. Pose the question: What makes objects sink or float in water? Note students’ responses on the board, organising words, terms, phrases that particularly refer to either mass (heaviness), or volume (size) in one part of the board and putting other words, terms, phrases in another part (e.g., type of material, colour). Indicate that all these variables will be tested in this activity.

EPISODE 1
9
Introductory Activity (continued)
Procedure 4. Show students the collection of 4 objects (apple, potato, cube, and pebble), informing them that they will be testing these objects to see whether they sink or float. Draw students’ attention to the shape of each object and the similarities and differences between them. Ask students to construct another table in their books
Object Prediction (sink or float)
Reason Test Result
Explanation
apple potato cube
pebble
5. Distribute a collection of 4 objects to each group of students (3-4 students per group) and a bucket (empty). Instruct students to take each (of the four) objects in turn and record their prediction of whether it will sink or float. Ensure students record a reason for their prediction.
6. When they have made all four predictions, allow the groups to add water to their bucket and test their objects, recording their results with explanations.
This is probably the most critical part of the lesson. Encourage students to express relationships. You want to know if they can think about both mass and volume at the same time, but, at this stage identifying the single relationships and perhaps the nature of the proportionality is more important than working with both mass and volume at the same time. This will be the focus of later activities in the Unit.
7. Provide students with other objects from the second collection and test whether they correctly predicted if the object would sink or float. Encourage exploration and discussion.
Concluding discussion
8. Bring the class back together at the end of the lesson and have the groups report on what they have found. Draw up a list of questions that have arisen that remain to be answered. Encourage students to use the terms mass and volume rather than describing how big and how heavy objects are.
9. Close with the idea that measuring the objects will allow much more confident predictions and a much more detailed understanding of sinking and floating.
Possible Variations
If time and equipment is an issue, this activity can be undertaken as a demonstration at the front of the class using a transparent container so that all students can see the result as different objects are tested.


EPISODE 2
11
Exploring Mass
Overview In this episode students compare, estimate, and measure the mass of objects.
Purpose The lesson is designed to promote students’ understanding of the standard units of measure for mass and to improve their concepts of mass through comparing and estimating the mass of selected items.
Time 35-40 minutes
Materials Apparatus for measuring mass, e.g. electronic scales, kitchen scales, balance scales,
bathroom scales.
Collection of objects which require the use of measurement units of g, kg (perhaps also investigate/discuss objects requiring measurement in mg or t). Try to gather objects which demonstrate the characteristics of big and heavy, big but light, small and light, small but heavy
Mass Data Worksheet
Procedure Orienting Activity (5 minutes)
1. Ask students what is meant by measuring the mass of an object.
2. Ask students the name of units for measuring mass (mg, g, kg, t).
3. Reiterate the relationship among these measures e.g.1000g = 1 kg
4. Using a selection of 3 objects gathered for this lesson, ask students to state which they think has the greatest mass, the least mass (Students to view objects only, no feeling of the objects yet)
5. Ask students how they could confirm if their choices of greatest and least mass were correct. (Students may offer responses such as picking them up, putting them on a balance scale, or using a calibrated device such as kitchen/bathroom/electronic scale
6. Try a number of methods to confirm students’ predictions.
Exploring Mass by comparing, estimating, and measuring (25 minutes)
1. Provide each group of students with 4 objects and a means of measuring mass.
2. Distribute Mass Data Worksheet to each student (also displayed as Table 1 below.)
3. Encourage student discussion within the groups throughout each step.
4. Students work as a group to attempt to order objects from least to greatest mass by heft only. Individuals record the objects from least to greatest mass in column one of their worksheet. (It’s OK if group members disagree).
5. Students choose what they believe to be the most appropriate unit of measure (g or kg) and record.
6. Students estimate the mass of each object and record.
7. Students measure the mass of their objects.
8. Compare actually measurements (Column 4) with data from column 1 and 3. Students could discuss what they believe would be a fair range to accept estimates as ‘close’. Would this range vary from object to object? Why? e.g. is a 10 g variation acceptable for an object with a mass of 5 g? 50g? 500g?

EPISODE 2
Exploring Mass (continued)
Procedure Table 1 Mass Data Worksheet
List of objects estimated least to greatest mass
Most appropriate measurement unit
Estimate mass Measured mass
9. Now that students have had experience with this activity, they would benefit from a repetition but with a different set of 4 objects. Their initial estimates may have been considerably inaccurate and they may enjoy an opportunity to improve. Therefore if time permits, repeat this activity using the second Mass data sheet (Table 2).
Table 2 Mass Data Worksheet
List of objects estimated least to greatest mass
Most appropriate measurement unit
Estimate mass Measured mass
Concluding discussion
Bring class together and ask each group to report on their data (briefly). Guide the discussion by directing students’ attention to the data:
Report on comparison by heft, (did the group agree?)
How accurate did they feel their estimates were? What range of measures did the group accept as being ‘close’? Did this range vary from object to object why? Did the group feel that their estimation skills improved in the second trial?
Ask about generalisations. Is it true to say the bigger the object the greater the mass?
Reiterate the terminology used and the units of measure. Perhaps mention again the units of measure which were not possible to use in this activity, i.e. mg and t. Discuss circumstances where these might be used

Mass Data Worksheets
MASS DATA WORKSHEET MCSAM
Name Class Teacher Year
Table 1 Mass Data Worksheet
List of objects estimated least to greatest mass
Most appropriate measurement unit
Estimate mass Measured mass
Table 2 Mass Data Worksheet
List of objects estimated least to greatest mass
Most appropriate measurement unit
Estimate mass Measured mass


EPISODE 3
15
Exploring Volume
Overview In this episode students are introduced to the concept of volume by displacement. As these students may not yet be ready for calculating volume by measuring dimensions of objects the focus will be on the concept of volume using liquid volume measurements of mL and L. The key concept here is that objects take up space which can be measured by the water they displace.
Purpose This lesson is designed to introduce students to the concept of volume and to facilitate initial understanding of volume as a liquid measure and also initial attempts at estimating (objects having greater or less volumes than each other).
Time 35-40 minutes
Materials Measuring cylinder/s (Enough for one per group of four if possible)
Collection of objects able to be submerged in a liquid volume measuring cylinder.(not necessarily objects that sink)
Water
Volume Data Worksheet
Procedure Orienting Activity (5 minutes)
1. Show a transparent measuring jar of water at the front of the class
2. Ask students to name what the water is measured in (L/mL) refer them to common drinks they may buy (milk, poppers, cans)
3. Ask students what they think will happen when a particular object is lowered into the jar (Select object that sinks) Response: the water level will rise
4. One by one put other objects into the jar (Ask students to predict if water level will rise more or less than another object. For objects which don’t sink perhaps push them under with finger).
5. After a little experience ask students to estimate the rise in L or mL. Introduce the terminology of liquid volume. Make the point that the volume of liquid displaced (how much it rises) is equal to the volume of the object.
Exploring Volume by displacement (15 minutes)
1. Provide each group of students with 4 objects, a measuring jar and water
2. Distribute Volume Data Worksheet to each student (also displayed as Table 1 below).
3. As a group, students attempt to array the objects in order of volume (it’s OK if they disagree, individuals record their decisions) then take each object in turn and estimate its volume in mL. Record estimate of order of volume from least to greatest and estimate of liquid volume in the appropriate column on the Volume Data Worksheet.
4. Place each object into the measuring jar and note rise in water level (This will require various levels of skill from students, some may calculate mentally, others may need a written computation i.e. new water level – original water level; or some may need a calculator)
5. As for the Mass activity, compare actual measurements (Column 4) with data from column 1 and 3. Students could discuss what they believe would be a fair range to accept estimates as ‘close’. Would this range vary from object to object? Why? e.g. is a 10 ml variation acceptable for and object with a mass of 5 ml? 50ml? 500ml?

EPISODE 3
16
Exploring Volume (continued)
Procedure Table 1 Volume Data Worksheet
List of objects estimated least to greatest volume
Most appropriate measurement unit
Estimate of volume Measured volume by displacement
6. As in the Mass activity, now that students have had experience with this activity, they would benefit from a repetition but with a different set of 4 objects. Their initial estimates may have been considerably inaccurate and they may enjoy an opportunity to improve. Therefore if time permits, repeat this activity using the second Volume Data Worksheet (Table 2).
Table 2 Volume Data Worksheet
List of objects estimated least to greatest volume
Most appropriate measurement unit
Estimate of volume Measured volume by displacement
Concluding discussion
Bring class together and ask each group to report on their data (briefly). Guide the discussion by directing students’ attention to the data:
Look at estimates and measured volumes. Were they close? Did your estimates become more accurate?
Reiterate the terminology used
Indicate that in higher grades students could work out the volume of regular shapes without using displacement. Ask if any student has suggestions as to how this might be done.
Conclude by doing two further class demos asking students to estimate volume of two new objects. (Gives an opportunity for students to show their new volume estimating skills)
Additional Activities
Alternative volume activities can be built around the use of blocks (layers) and students can estimate number of blocks in a stack and then look for ways of calculating (introduce l X w X h and cm3)
Might be a good time to read the story of the king and the gold crown.

Volume Data Worksheet
VOLUME DATA WORKSHEET MCSAM
Name Class Teacher Year
Table 1 Volume Data Worksheet
List of objects estimated least to greatest volume
Most appropriate measurement unit
Estimate of volume Measured volume by displacement
Table 2 Volume Data Worksheet
List of objects estimated least to greatest volume
Most appropriate measurement unit
Estimate of volume Measured volume by displacement


EPISODE 4
19
Exploring Density
Overview In this episode, students are provided with two sets of jars. The first set of jars has the same volume but each one has a different mass. The second set of jars all have the same mass but vary in volume. There are three tasks in this episode. The first task requires students to measure and calculate the mass and volume of the first set of jars. The second task is to do the same for the second set of jars. Time is required to discuss accuracy in measurement and to reach consensus on the measures of mass and calculations of volume. The third activity requires students to create a graph showing an object’s mass and volume and to write the mass and volume of each jar as a ratio. Students also predict whether each jar will sink or float. The lesson concludes with each jar being tested in water.
Purpose To draw students’ attention to consideration of both the mass and volume of an object when predicting whether an object will sink or float in water. This lesson is designed so that students might discover the formula for density as mass divided by volume.
Time 35-40 minutes
Materials Set of 6 jars (labelled A-F) of same size
Set of 5 jars (labelled 1-5) of different sizes but with same mass
Weighing scales
Pen and paper
Calculators
Sinking and Floating Worksheet
Procedure Activity 1—Jars A-F Mass and Volume
1. Provide each group of students with the first set of jars (labelled A-F) and other equipment. Without using the weighing scales, students are to arrange the jars in order of heaviness by heft (lifting them and feeling how heavy they are). Write down the order in the Exploring Density Worksheet. Reassure students that it is possible that members within their group will not agree on the order.
2. Estimate the mass of each jar and record it in the Exploring Density Worksheet.
3. Using the weighing scales, students find the mass of each container and reorder the jars. Record the mass of each jar in the Exploring Density Worksheet.
4. Teacher uses measuring cylinder to submerge an empty jar identical to jars A-F to determine the liquid volume by displacement. (If enough measuring cylinders are available student groups could complete this measurement task and then the class could find the average of the measures to determine the volume of the jar.)
EPISODE 4
20
Exploring Density (continued)
Procedure Activity 2—Jars 1-5 Mass and Volume
1. Provide each group of students with a set of jars labelled 1-5. Ask students to order the jars from greatest to least volume. Ask students to consider whether they need to actually calculate the volume of each container to complete this task.
2. Ask students to arrange the jars in order of heaviness by heft (lifting them and feeling how heavy they are). Reassure them that it is possible that all group members will not agree on the order.
3. Ask students to estimate the mass of each jar and record this on the Exploring Density Worksheet. Ask students to measure the mass of each container using the weighing scales and to reorder the jars. Record the mass of each jar on the worksheet.
4. Students estimate the volume of each jar
5. Volume of each jar to be given to students (This is to prevent students from measuring by displacement which would pre-empt the next sinking and floating activity.)
6. Bring students back together to compare their results. Were all students’ results the same? Why were there variations in measurement? How do we know how accurate we should be? What is the level of accuracy that can be tolerated in this activity?
Activity 3— Sinking and Floating
1. Ask students to transfer the data they have collected from the first two activities onto Table 3 of the Exploring Density Worksheet.
2. Ask students to draw a graph of the relationship of the mass and volume of each shape. Younger grades may need more scaffolding for this activity.
3. Bring students back together and discuss their graphs. Do they look similar? Should they? What is the graph showing?
4. Inform students that a demonstration will be performed to determine whether each jar sinks or floats. Ensure that all students have made and recorded their prediction in the table.
5. One at a time, place each jar in the water. Discuss the result. Prior to placing each jar in the water, draw students’ attention to the mass and volume of each jar. Ask them to particularly focus on the ratio representation. Draw attention to the location of each jar on the graph. Ask what they notice about the result of each test and the data on the graph.
6. Ask students to write a statement about how they can predict whether something might sink or float in water. If the word density arises, ask students to elaborate.

Sinking & Floating Worksheet
SINKING & FLOATING WORKSHEET MCSAM
Name Class Teacher Year
Activity 1—Jars A-F Mass and Volume
1. Reorder the jars in order of heft from lightest to heaviest
2. Estimate the mass of each jar and record your estimate in the table below.
3. Measure the mass of each jar. Record your results in the table below.
Jar: least to greatest mass
Estimate of mass
Actual mass
4. Teacher or groups measure by displacement the liquid volume of a jar the same size as Jars A-F. Record the liquid volume on the diagram below
Liquid volume off jar:
Activity 2— Mass and Volume of Jars 1-5
Item Estimation of mass (g)
Actual mass (g)
Estimation of volume (mL)
Actual volume (mL)
1
2
3
4
5

Sinking & Floating Worksheet
SINKING & FLOATING WORKSHEET MCSAM
Activity 3— Sinking and Floating
Sink (S) or Float (F)? Jar Mass (g)
Volume (mL)
Ratio Mass:Volume Prediction Outcome
A B C D E F 1 2 3 4 5
Draw a graph to show the relationship between the mass of each jar and its volume. Put mass on the X axis and volume on the Y axis.
How can you predict if something will sink or float in water? Refer to examples in the table and your graph to support your statement.

EPISODE 5
23
Exploring Density Formula
Overview In this episode, students are provided with a range of objects that are measured for mass and volume. They are directed to predict whether an object will sink or float as they analyse the relationship between the mass and volume. The worksheet provides further consideration of density.
Purpose To further develop the concept of density as the relationship between an object’s mass and volume.
Time 35-40 minutes
Set of 6-8 cans of household products of various volumes and masses (e.g, tinned pineapple, corn, mushrooms, etc).
Materials
Weighing scales
Cloth for wiping up spills
Pen and paper
Calculators
Water bath
Tea towel for wiping jars
Large measuring jug marked in mL
OHT Sinking and Floating data table and graph
Procedure Introductory activity
Brief explanation of the origins of the metric system which includes the relationship of 1ml of water having the mass of 1 gram and taking up 1 cm3 space. Discuss the importance of this relationship and lead the discussion to the density of water being 1g divided by 1 ml or cm3.and relate to why some objects sink or float depending on their relationship to the density of water.
1. Revise findings from previous lesson. Select some students to share their ideas about predicting whether objects will sink or float. Using OHT or data projector, select specific examples from the data table or graph from the previous lesson’s activity.
2. Draw students’ attention to the ratio column of the data table. If it has not come up in discussion previously, draw students’ attention to the comparison of the mass and the volume and whether an object sinks or floats. Taking specific examples from the graph write the ratio of the mass to the volume as a fraction and use a calculator to look at the final answer < = > 1.
3. Take each jar one at a time and inform students of its volume. All students should record the details on their worksheet (Exploring Density Formula). Have a student weigh each item. All students now determine the density of each object using a calculator.
4. Ask students to record whether they think each jar will sink or float.
5. Draw students’ attention to the remaining tasks on the worksheet. Ask them to continue working through the activities on the worksheet. Periodically review particular tasks to focus students’ attention.

EPISODE 5
24
Exploring Density Formula (continued)
Procedure Concluding discussion
1. Check the answers on the worksheet.
2. Draw students’ attention to the table at the top of the worksheet where they had to determine the density of each of the jars in the set and predict whether they would sink or float.
3. Ask students how to calculate density. Ask students which jar has the greatest density and how they know.
4. Place each jar in turn, in the water, to test their predictions.
5. As a concluding comment, remind students that all these objects were tested for sinking and floating in water. Ask them to consider what might happen if they were placed in some other liquid (such as salty water, oil, cordial, muddy water, soy sauce).

OHT Sinking & Floating Data Table & Graph
OHT SINKING & FLOATING DATA TABLE & GRAPH MCSAM
Sink (S) or Float (F)? Jar Mass (g)
Volume (mL)
Ratio Mass:Volume Prediction Outcome
A B C D E F 1 2 3 4 5
Draw a graph to show the relationship between the mass of each jar and its volume. Put mass on the X axis and volume on the Y axis.
How can you predict if something will sink or float in water? Refer to examples in the table and your graph to support your statement.
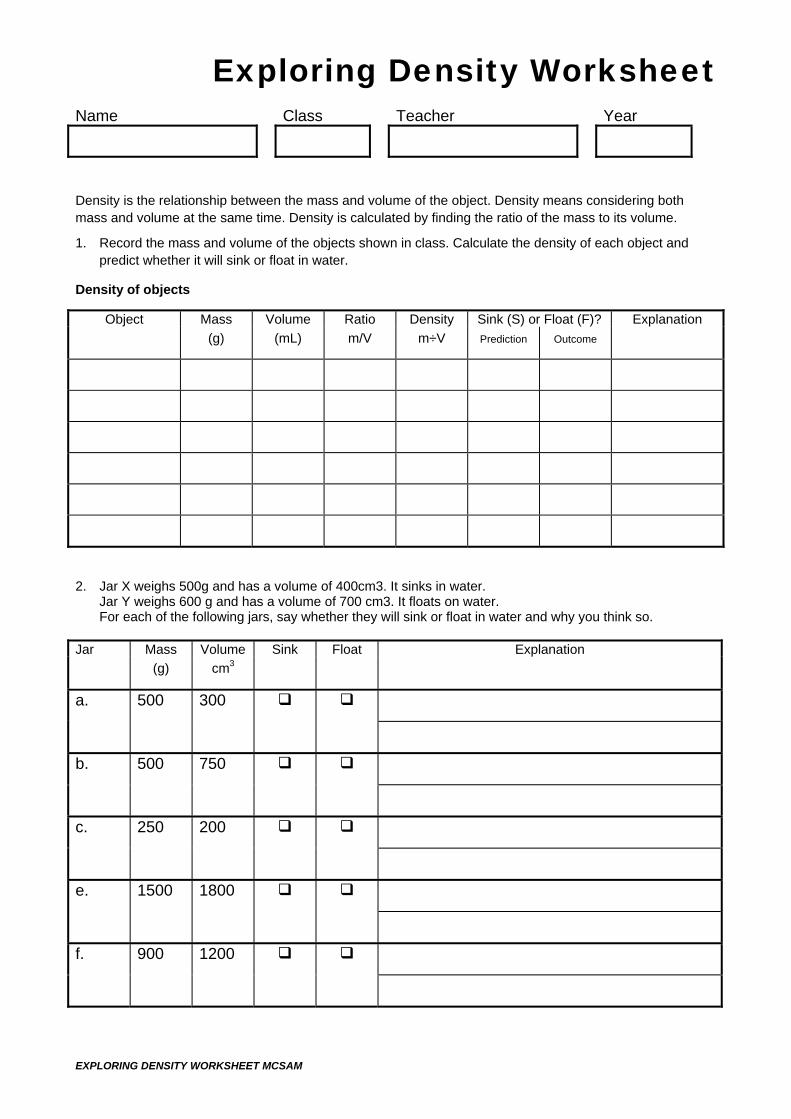
Exploring Density Worksheet
EXPLORING DENSITY WORKSHEET MCSAM
Name Class Teacher Year
Density is the relationship between the mass and volume of the object. Density means considering both mass and volume at the same time. Density is calculated by finding the ratio of the mass to its volume.
1. Record the mass and volume of the objects shown in class. Calculate the density of each object and predict whether it will sink or float in water.
Density of objects
Object Mass Volume Ratio Density Sink (S) or Float (F)? Explanation
(g) (mL) m/V m÷V Prediction Outcome
2. Jar X weighs 500g and has a volume of 400cm3. It sinks in water.
Jar Y weighs 600 g and has a volume of 700 cm3. It floats on water. For each of the following jars, say whether they will sink or float in water and why you think so.
Jar Mass Volume Sink Float Explanation
(g) cm3
a. 500 300
b. 500 750
c. 250 200
e. 1500 1800
f. 900 1200

Exploring Density Worksheet
EXPLORING DENSITY WORKSHEET MCSAM
3. A model ship weighs 3000 g. If it is to float, what can you say
about its total volume?
4. I got a plastic submarine out of my cereal packet this morning. Sometimes it floats and sometimes it sinks. Its total volume is 5cm3.
a. What must its mass be to make it sink?
b. What must its mass be if it is to float?
5. Feathers and bricks … a. What size will the bag of feathers be that would weigh the same as a brick? Explain.
b. What must its mass be if it is to float?
c. Will a kilogram of feathers have the same density as a kilogram of feathers? Explain.
d. Which has the greater density, a brick made out of clay or a brick the same size made out of foam? Explain.


EPISODE 6
29
Consolidation of concept of density
Overview
Purpose
Time
Materials Small heavy object (e.g. bolts or nuts)
Plastic bottle/jar drilled with holes
Gravel
Two sealable containers one about twice the size of the other.
Transparent buckets, storage boxes, measuring cylinders or jugs; one for each group (storage boxes are best)
Procedure Introduction
1. Ask students to indicate what attributes of an object must be determined to accurately predict if it will sink or float (Mass and Volume)
2. Ask how these two attributes must be used to determine if they sink or float. What is the term used to describe the relationship between mass and volume?
3. Ask students about the ratio required for an object to sink (density >water); to float (density < water)
4. Review the density of water: what is it, what importance did it play in the development of the metric system?
5. Distribute equipment to each group
Teacher Demonstration
1. Place gravel in the small plastic sealable container (Check earlier that this will sink).
2. Ask students to predict wether they think it will sink or float. Again ask questions about mass, volume, density etc.
3. Place the gravel container in the transparent box/bucket of water (It should sink)
4. Now tip the gravel from the small container into the larger container (Check earlier that this will float)
5. Ask the students to predict if it will sink or float. Some students may believe it will still sink, and others may believe it will float.
6. Again elicit from the students why they think it will sink or float and encourage them to use their understanding of mass, volume and density.(Response: Mass has stayed the same but volume has increased so density is less and may be now less than water)
7. If you wish this same experiment can be conducted where measurements of mass and volume are determined/given and students can work out density with their calculators.

EPISODE 6
30
Consolidation of concept of density (continued)
Procedure Concluding discussion
Throughout this task ask students to attempt to explain what they are observing in terms of mass, volume and density. Place the nut or bolt into the plastic jar with holes in it. Place it in water. (It should initially float and then gradually sink as the jar fills with water; make sure there is a hole in the top of the container so no air can be trapped in it) Ask student to explain why it sinks. (As jar fills with water less air is held in the jar and therefore mass increases to a point where density of jar and metal object is greater than water and it sinks) Relate to the sinking of a ship e.g. Titanic; as each section of the ship filled with water it gradually lowered in the water and sunk. (The volume of the ship remains the same but the mass increases as water replaces air to a point where the ship is denser than water and sinks)
Why are boats registered to maximum number of passengers?
EPISODE 7
31
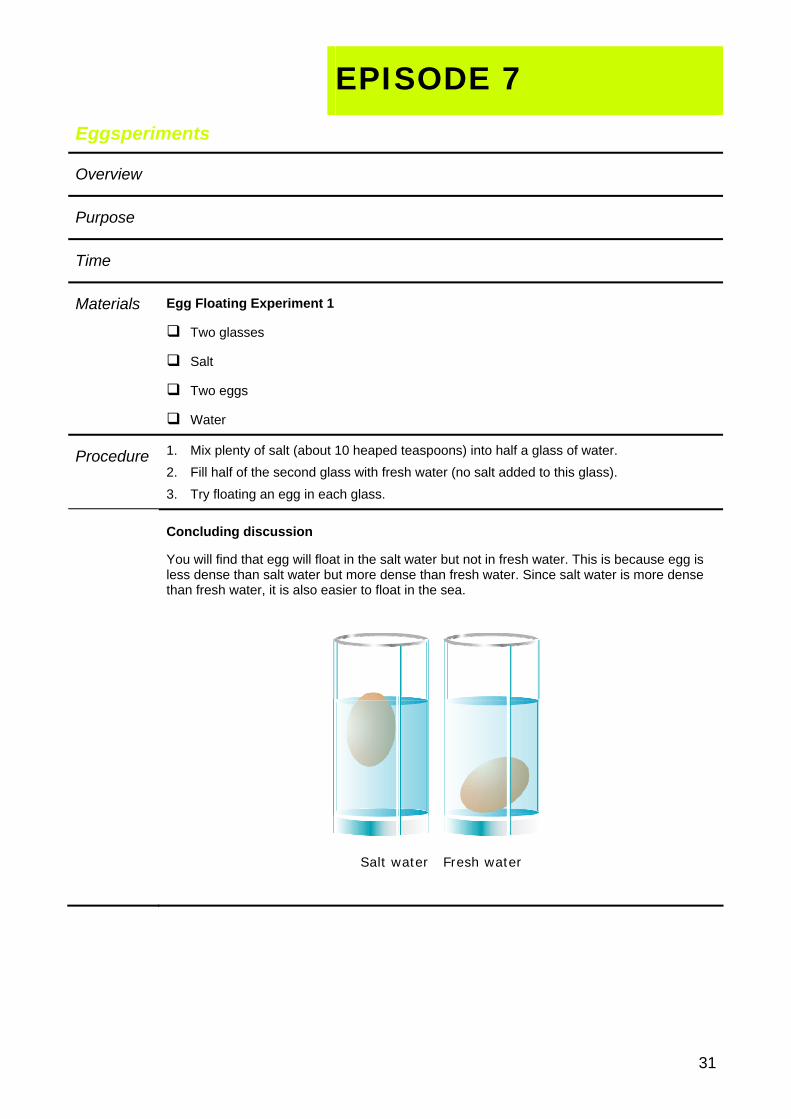
Eggsperiments
Overview
Purpose
Time
Materials Egg Floating Experiment 1
Two glasses
Salt
Two eggs
Water
Procedure 1. Mix plenty of salt (about 10 heaped teaspoons) into half a glass of water.
2. Fill half of the second glass with fresh water (no salt added to this glass).
3. Try floating an egg in each glass.
Concluding discussion
You will find that egg will float in the salt water but not in fresh water. This is because egg is less dense than salt water but more dense than fresh water. Since salt water is more dense than fresh water, it is also easier to float in the sea.
Salt water Fresh water

EPISODE 7
32
Eggsperiments (continued)
Overview
Purpose
Time
Materials Egg Floating Experiment 2
Two glasses
Salt
One eggs
Water
Procedure 1. Fill one glass half full of fresh water.
2. Fill one glass half full of very salty water (such as from the original Egg floating experiment).
3. Very carefully pour the fresh water into the salt water. Try not to let the liquids mix.
4. Gently lower the egg into the water that is half salt water and half fresh water.
Concluding discussion
The egg should float on salt water and sink in fresh water. The result looks like the egg is suspended in the middle of the glass. This is sometimes used in Magic Shows for children.
Without dye With dye
Repeat this experiment, but add food dye to the salty water so that the layering of the water can be seen more clearly.

EPISODE 7
33
Eggsperiments (continued)
Overview
Purpose Place a hard boiled egg in water. Does it sink or float?
Time
Materials Egg Floating Experiment 3
3-4 clear plastic cups
2 raw eggs
2 hard boiled eggs
Measuring teaspoon
Spatula (or plastic knife)
Salt
1x 1000 cm3 measuring cylinder
Procedure Task
Experiment with mixtures of salt and water to see if there is a difference between raw eggs and boiled eggs in terms of floating or sinking.
Test your hypothesis by trying to make a mixture of salt that allows the raw egg to sink and the boiled egg to float.
It might help to mark each egg with a waterproof marker so that you can distinguish between each egg.
Controlling variables
To test your predictions and hypotheses more precisely, try to make your measurements as accurately as possible:
Measure the amount of water placed in the cup
Make sure that every cup of water that you experiment with contains the same amount of water
Measure the salt very precisely every time
Recording results
Record the amount of salt that you put into the water and note whether the egg sinks or floats
Sink (S) or Float (F)? Amount of water Amount of salt Egg 1 Egg 2 Egg 3 Egg 4
100 mL 1 teaspoon

EPISODE 7
34
Eggsperiments (continued)
Procedure Finding the volume of each egg by displacement
1. Fill the measuring cylinder to a level that will enable the egg to be covered by water.
2. Note the level of the water in the cylinder without the egg.
3. Place the egg into the water and watch the water level rise.
4. Note the new water level.
5. Subtract the original water level from the new water level and you have the volume of the egg.
1 cm3 = 1 g = 1 mL (water under normal circumstances)
The metric system is based on water as a measuring tool (especially temperature).

EPISODE 7
35
Egg Floating Experiment – Teacher Demonstration
Overview
Purpose Place a hard boiled egg in water. Does it sink or float?
Time
Materials 2 raw eggs
2 hard boiled eggs
4 plastic cups with different salt solutions *
(*you need to ensure that two of your salt solutions enable (a) both types of eggs sink; and (b) the raw eggs to sink and the boiled eggs to float. This depends upon the size of the eggs. For a 50 g egg, a solution of 80 g salt per litre of water generally enables the distinction to be seen).
The following solutions should work for a 50 g egg.
Cup Water Salt Bulk mixture
1 100 mL 10 g Stir 100 g salt in 1 L water
2 100 mL 8 g Stir 80 g salt in 1 L water
3 100 mL 5g Stir 50 g salt in 1 L water
4 100 mL 0 g No salt in the water
Draw up the following table and record whether each egg sinks or floats as it is placed in each of the salt solutions
Salt Concentration Egg 1 Egg 2 Egg 3 Egg 4
10 / 100 mL
8 / 100 mL
5 / 100 mL
0 / 100 mL

Eggsperiments Worksheet
EGGSPERIMENTS WORKSHEET MCSAM
Name Class Teacher Year
Sink (S) or Float (F)? Amount of water Amount of salt Egg 1 Egg 2 Egg 3 Egg 4
100 mL 1 teaspoon
Sink (S) or Float (F)? Salt Concentration Egg 1 Egg 2 Egg 3 Egg 4
10 / 100 mL
8 / 100 mL
5 / 100 mL
0 / 100 mL
1. What salt concentration is required to tell if an egg is boiled or raw?
2. Why do boiled eggs float and raw eggs sink at this salt concentration?
3. How much salt would need to be added to 1 L of water to make boiled eggs float?
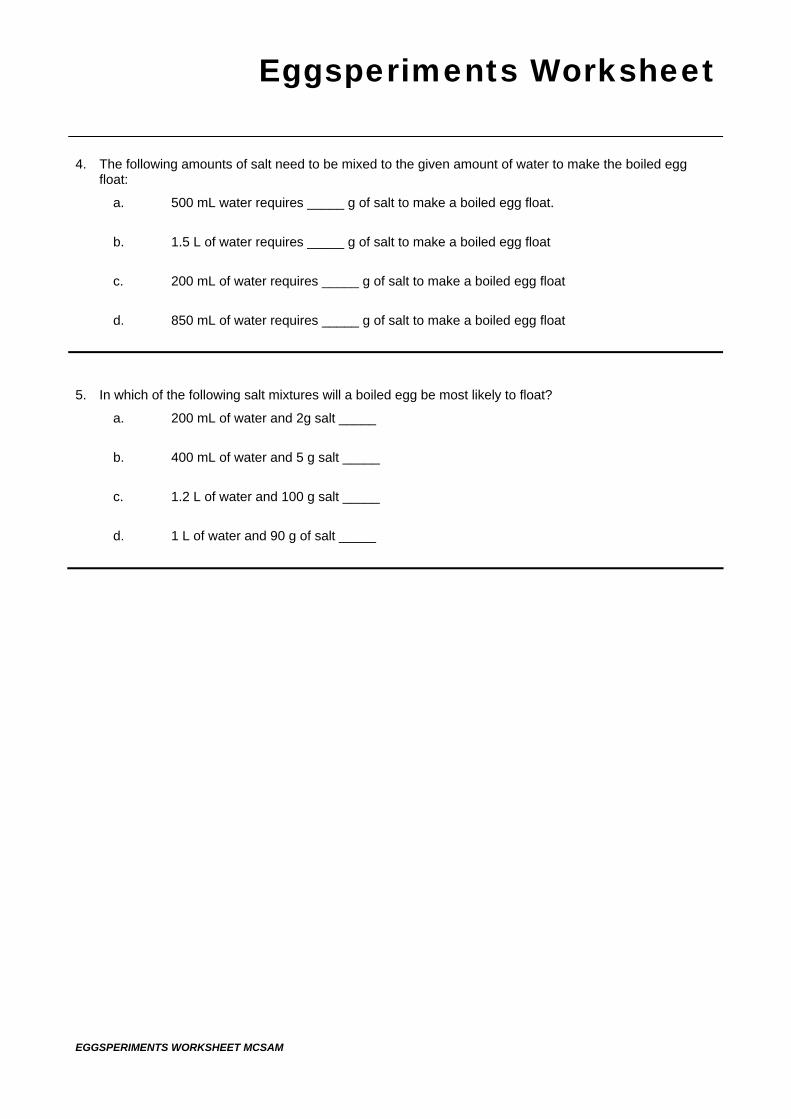
Eggsperiments Worksheet
EGGSPERIMENTS WORKSHEET MCSAM
4. The following amounts of salt need to be mixed to the given amount of water to make the boiled egg float:
a. 500 mL water requires _____ g of salt to make a boiled egg float.
b. 1.5 L of water requires _____ g of salt to make a boiled egg float
c. 200 mL of water requires _____ g of salt to make a boiled egg float
d. 850 mL of water requires _____ g of salt to make a boiled egg float
5. In which of the following salt mixtures will a boiled egg be most likely to float?
a. 200 mL of water and 2g salt _____
b. 400 mL of water and 5 g salt _____
c. 1.2 L of water and 100 g salt _____
d. 1 L of water and 90 g of salt _____

EPISODE 8
39
Investigative Assessment Task
Overview
Purpose
Time
Materials Plasticine
Tubs of water
Procedure Activity 1
1. Each student to use plasticine to make a model of a person. Place the model person in water (It should sink) and then retrieve it. (If it sinks what does this means: density > water)
2. Students’ task is to now make a boat/raft/ship out of cardboard and sticky tape which could be used to keep the model person afloat.
3. Some students may find that their craft is successful and others may find their craft becomes water logged and may eventually allow their passenger to sink.
4. Depending on the success or failure of the rescue mission students could attempt to explain what happened using their understanding of mass, volume, and density.
5. This explanation could be presented as a short report or poster or perhaps
6. if digital cameras are available ask students to photograph
a. their model person
b. their craft,
c. their craft in the water,
d. their craft carrying the object and
e. perhaps their craft sinking.
Students make a report or brief power point presentation which explains scientifically/mathematically (using the terminology they have learned i.e. mass, volume, ratio, density) what has occurred
Discussion
1. Why did their model person sink (it was more dense than water)
2. By making a craft what were they attempting to do? (Make an object with a volume large enough to cater for the mass of the passenger and still be less dense than water; thus float)
3. Was their craft successful? Did it sink immediately or slowly? Did it float?
4. If their craft sunk; what do they think happened (Water seeped in and increased the mass of the craft eventually allowing the passenger to sink)could discuss what they believe would be a fair range to accept estimates as ‘close’. Would this range vary from object to object? Why? e.g. is a 10 g variation acceptable for an object with a mass of 5 g? 50g? 500g?