experiment hm-7: electromyogram (emg) activity in ... · iworx sample lab exercise 2: antagonistic...
TRANSCRIPT

iWor
x Sam
ple La
b
Experiment HM-7: Electromyogram (EMG) Activity in Antagonistic Muscles and
Range of Motion
Exercise 1: Antagonistic Muscles in Forearm
Aim: To study the EMG activity in muscles that work in opposition to each other to flex or extend the
hand.
Approximate Time: 20 minutes
Procedure
1. Place the recording electrodes on the subject’s right arm as stated in the previous directions.
2. Strap the GN-100 goniometer to the right wrist of the subject using the Velcro straps so that the
goniometer axis is located at the joint of the carpals with the radius and ulna. The straps should
hold the goniometer firmly to the wrist but not restrict any movement. (Figure HM-7-L1).
Figure HM-7-L1 Position of the GN-100 on the right wrist.
3. Instruct the subject that he or she will be doing the following during this exercise:
• Before the recording begins, the subject extends his or her arm in front of their body
with the palm facing upward. This position is defined as the neutral position (Figure
HM-7-L2).
• Keep his or her hand open (fingers extended) during the recording.
• Move his or her hand upward (palmar flexion) from the neutral position as far as
possible and hold it in this position for five seconds (Figure HM-7-L2).
• Return the hand to the neutral position (extension) for five seconds.
• Continue recording as the subject repeats the cycle of flexion and extension two more
times.
4. Before starting the recording, type Neutral-Open in the Mark box to the right of the Mark
button. Instruct the subject to place his or her hand in the neutral position.
5. Click the Record button in the upper right corner of the LabScribe Main window. Click on the
Mark button to label the recording.
Human Muscle - AntagonisticMusclesROM – Labs HM-7-1

iWor
x Sam
ple La
bFigure HM-7-L2: Movements performed while recording palmar flexion and extension of the wrist.
6. While the subject’s hand is in the neutral position, type Palmar Flexion-Open in the Mark box.
7. Instruct the subject to flex his or her hand. When the subject’s hand reaches the flexed position,
click on the Mark button to label the recording.
8. While the subject’s hand is in the flexed position, type Neutral in the Mark box.
9. Instruct the subject to extend his or her hand to the neutral. When the subject’s hand reaches the
neutral position, click on the Mark button to label the recording.
10. Repeat Steps 3 through 8 for two more cycles of palmar flexion and extension.
11. Instruct the subject to curl his or her fingers into a tight fist. Repeat Steps 3 through 8 three
times while the subject the subject is forming a tight fist. Mark the recording with appropriate
comments to indicate when the subject’s fist underwent palmar flexion or extension to the
neutral position.
12. When the last cycle is completed, click the Stop button.
13. Select Save As in the File menu, type a name for the file. Click on the Save button to save the
data file.
14. Optional Exercise 1: Attach the goniometer to the inside of the subject’s left wrist. On this wrist,
the moveable arm of the GN-100 can go below the neutral position. Use the same techniques
used in Steps 3 through 9 to measure the range of motion of the subject’s left hand as it
undergoes dorsiflexion.
Human Muscle - AntagonisticMusclesROM – Labs HM-7-2
iWor
x Sam
ple La
b
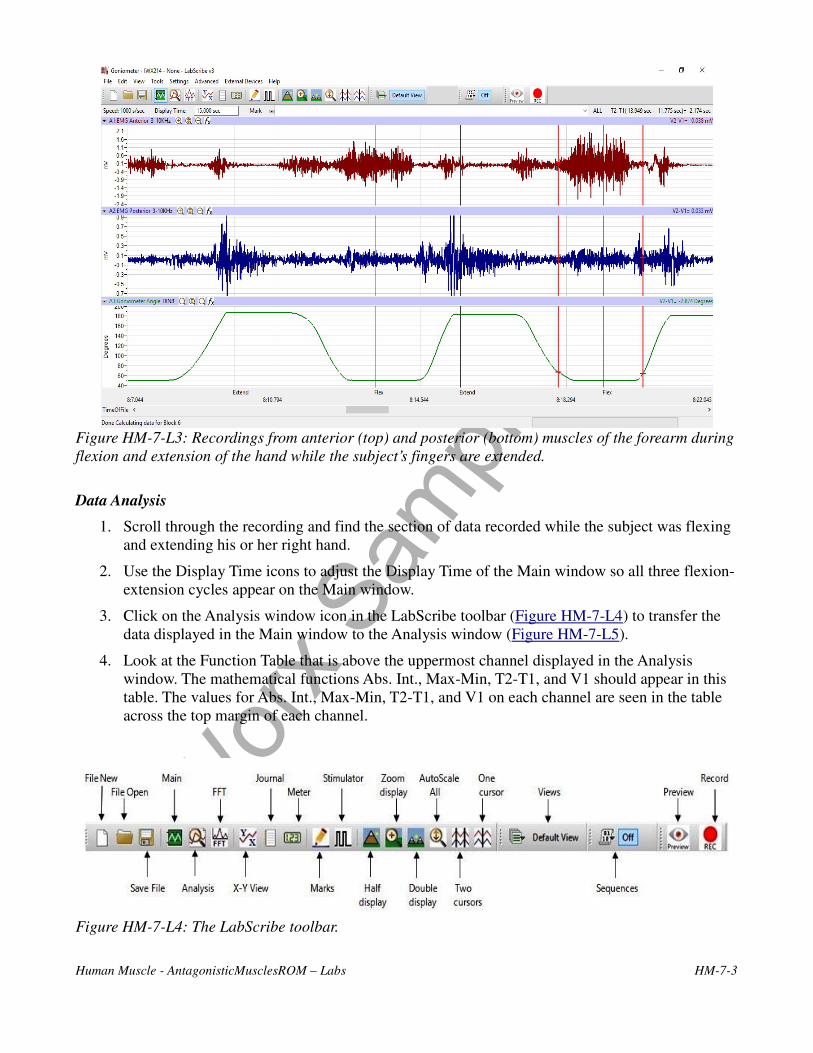
Figure HM-7-L3: Recordings from anterior (top) and posterior (bottom) muscles of the forearm during
flexion and extension of the hand while the subject’s fingers are extended.
Data Analysis
1. Scroll through the recording and find the section of data recorded while the subject was flexing
and extending his or her right hand.
2. Use the Display Time icons to adjust the Display Time of the Main window so all three flexion-
extension cycles appear on the Main window.
3. Click on the Analysis window icon in the LabScribe toolbar (Figure HM-7-L4) to transfer the
data displayed in the Main window to the Analysis window (Figure HM-7-L5).
4. Look at the Function Table that is above the uppermost channel displayed in the Analysis
window. The mathematical functions Abs. Int., Max-Min, T2-T1, and V1 should appear in this
table. The values for Abs. Int., Max-Min, T2-T1, and V1 on each channel are seen in the table
across the top margin of each channel.
Figure HM-7-L4: The LabScribe toolbar.
Human Muscle - AntagonisticMusclesROM – Labs HM-7-3
iWor
x Sam
ple La
b
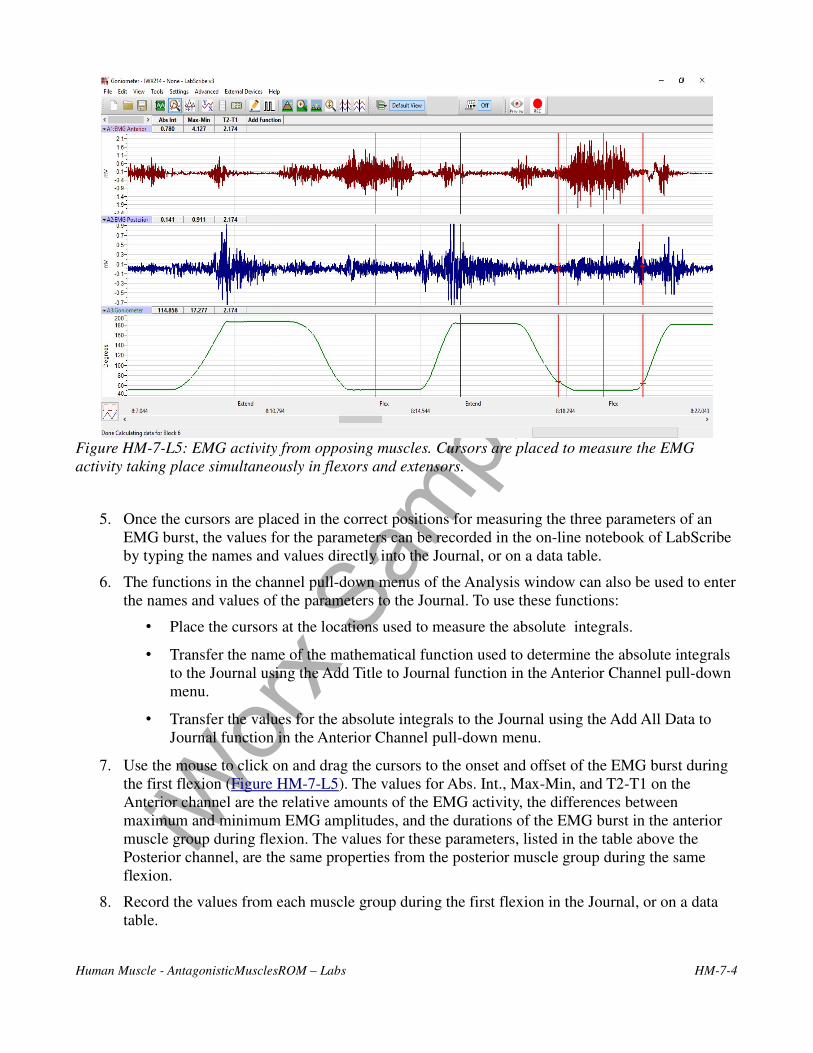
Figure HM-7-L5: EMG activity from opposing muscles. Cursors are placed to measure the EMG
activity taking place simultaneously in flexors and extensors.
5. Once the cursors are placed in the correct positions for measuring the three parameters of an
EMG burst, the values for the parameters can be recorded in the on-line notebook of LabScribe
by typing the names and values directly into the Journal, or on a data table.
6. The functions in the channel pull-down menus of the Analysis window can also be used to enter
the names and values of the parameters to the Journal. To use these functions:
• Place the cursors at the locations used to measure the absolute integrals.
• Transfer the name of the mathematical function used to determine the absolute integrals
to the Journal using the Add Title to Journal function in the Anterior Channel pull-down
menu.
• Transfer the values for the absolute integrals to the Journal using the Add All Data to
Journal function in the Anterior Channel pull-down menu.
7. Use the mouse to click on and drag the cursors to the onset and offset of the EMG burst during
the first flexion (Figure HM-7-L5). The values for Abs. Int., Max-Min, and T2-T1 on the
Anterior channel are the relative amounts of the EMG activity, the differences between
maximum and minimum EMG amplitudes, and the durations of the EMG burst in the anterior
muscle group during flexion. The values for these parameters, listed in the table above the
Posterior channel, are the same properties from the posterior muscle group during the same
flexion.
8. Record the values from each muscle group during the first flexion in the Journal, or on a data
table.
Human Muscle - AntagonisticMusclesROM – Labs HM-7-4

iWor
x Sam
ple La
b
9. Use the mouse to move the cursors to onset and offset of the next EMG burst, which is the first
burst that occurs during extension. Measure and record the values for Abs. Int., Max-Min, and
T2-T1 from both groups of muscles during this extension.
10. Measure the Abs. Int., Max-Min, and T2-T1 for the EMG bursts from the anterior and posterior
muscles from the remaining flexions and extensions.
11. Average the values for each parameter taken from the anterior muscles during flexion. Find the
average for each parameter from the anterior muscles during extension. Also, find the averages
for the parameters from the posterior muscles during flexion and during extension. Enter the
averages for each parameter, from each muscle group during flexion and during extension, on
Table HM-7-L1.
12. Click the Single cursor icon in the LabScribe toolbar.
13. Once the cursor is placed in the correct position for measuring the angles of flexion and
extension, the values for the parameters can be recorded in the on-line notebook of LabScribe
by typing the names and values directly into the Journal, or on a data table.
14. Use the mouse to click on and drag the cursor to the level area of the trace during the first
flexion. The value for V1 on the Range of Motion channel is the angle of flexibility during
flexion of the wrist.
15. Record the value of the angle of flexibility during the first flexion in the Journal, or on a data
table.
16. Use the mouse to move the cursor to the level area of the trace during extension. Measure and
record the value for V1 during this extension.
17. Measure the V1 Angle of Flexibility from the remaining flexions and extensions. Enter these
values in Table HM-7-L1.
18. Average the values taken during flexion. Find the average during extension. Enter these values
in the data table.
19. Select Save from the File menu.
20. Repeat data analysis for Optional Exercise 1.
Questions
1. Which muscles, anterior or posterior, had the most EMG activity during flexion?
2. Which muscles, anterior or posterior, had the most EMG activity during extension?
3. Does flexion or extension of the fingers affect the strength of EMG activity in either group of
muscles?
4. Does the angle of flexibility differ between flexion and extension of the wrist?
5. Does the positon of the fingers affect the flexibility of the wrist?
6. What do you think would happen to the range of motion of the wrist if the hand was turned at a
90 degree angle (perpendicular to the neutral plane of motion)?
Human Muscle - AntagonisticMusclesROM – Labs HM-7-5

iWor
x Sam
ple La
b
Exercise 2: Antagonistic Muscles Doing Work
Aim: To study the EMG activity in muscles that lift weight by flexion or by extension.
Approximate Time: 20 minutes
Procedure
1. Use the same experimental setup used in Exercise 1. Instruct the subject to rest his or her
forearm, with the electrodes, on a flat surface with the palm up. Place a weight (2-3kg) in the
palm of the subject’s hand (Figure HM-7-L6).
2. Click Record. Record the EMG activity from the muscles of the forearm as the subject lifts the
weight by flexion of the wrist. The subject should raise and hold the weight up for four seconds
and then return the weight to the table top for four seconds. Repeat this cycle two more times.
3. Click Stop to halt the recording.
Figure HM-7-L6: Hand in the palm-up position for lifting the weight by flexion (on the left), and the
hand in the palm-down position for lifting the weight by extension (on the right).
4. Instruct the subject to rest his or her forearm on a flat surface with the palm down (Figure HM-
7-L6).
5. Have the subject grip the same weight (2-3kg).
6. Click Record. Record the EMG activity from the muscles of the forearm as the subject lifts the
weight by extension. The subject should raise and hold the weight up for four seconds and then
return the weight to the table top for four seconds. Repeat this cycle two more times.
7. Click Stop to halt the recording.
8. Select Save in the File menu.
Data Analysis
1. Scroll through the recording and find the section of data recorded while the subject was lifting a
weight by flexion and extension.
2. Use the same procedures used in Exercise 1 to measure and record the Abs. Int., Max-Min, T2-
T1, and V1 from each muscle group while the weight was lifted by flexion and by extension.
Human Muscle - AntagonisticMusclesROM – Labs HM-7-6

iWor
x Sam
ple La
b
3. Average the values for each parameter taken from the anterior muscles while weight was lifted
by flexion. Also, find the averages for the parameters from the posterior muscles while the
weight was lifted by flexion and by extension. Enter the means on Table HM-7-L1.
4. Select Save from the File menu.
Questions
1. Does the strength of the EMG activity in the muscles of the anterior forearm differ between
flexion with a weight and without a weight?
2. Does the strength of the EMG activity in the muscles of the posterior forearm differ between
extension with a weight and without a weight?
3. What is the effect of the weight on the ROM/angle of flexibility of the wrist joint? Is either
flexion or extension affected more than the other?
Table HM-7-L1: Relative EMG Activity in the Muscles of the Forearm during Flexion and
Extension.
Averages: Anterior Muscles ROM Averages: Posterior Muscles ROM
Forearm Action Abs. Int.V2-V1
(V)
T2-T1
(sec)
V1
(degrees)Abs. Int.
V2-V1
(V)
T2-T1
(sec)
V1
(degrees)
Flexion, Hand Open
Extension, Hand
Open
Flexion, Hand
Closed
Extension, Hand
Closed
Flexion, Lifting
Weight
Extension, Lifting
Weight
Dorsiflexion, Hand
Open
Dorsiflexion -
Closed
Dorsiflexion -
Weight
Human Muscle - AntagonisticMusclesROM – Labs HM-7-7
iWor
x Sam
ple La
b
Exercise 3: Antagonistic Muscles in Lower Leg
Aim: To study muscles working in opposition to each other to maintain balance while standing.
Approximate Time: 30 minutes
Procedure
1. Locate the muscles of the lower leg over which the recording electrodes will be attached.
Muscles can be located by performing dorsiflexion (lifting the toes towards the shin), or plantar
flexion (pointing the toes toward the ground), and noting the areas of the lower leg where the
muscles are tense during each flexion:
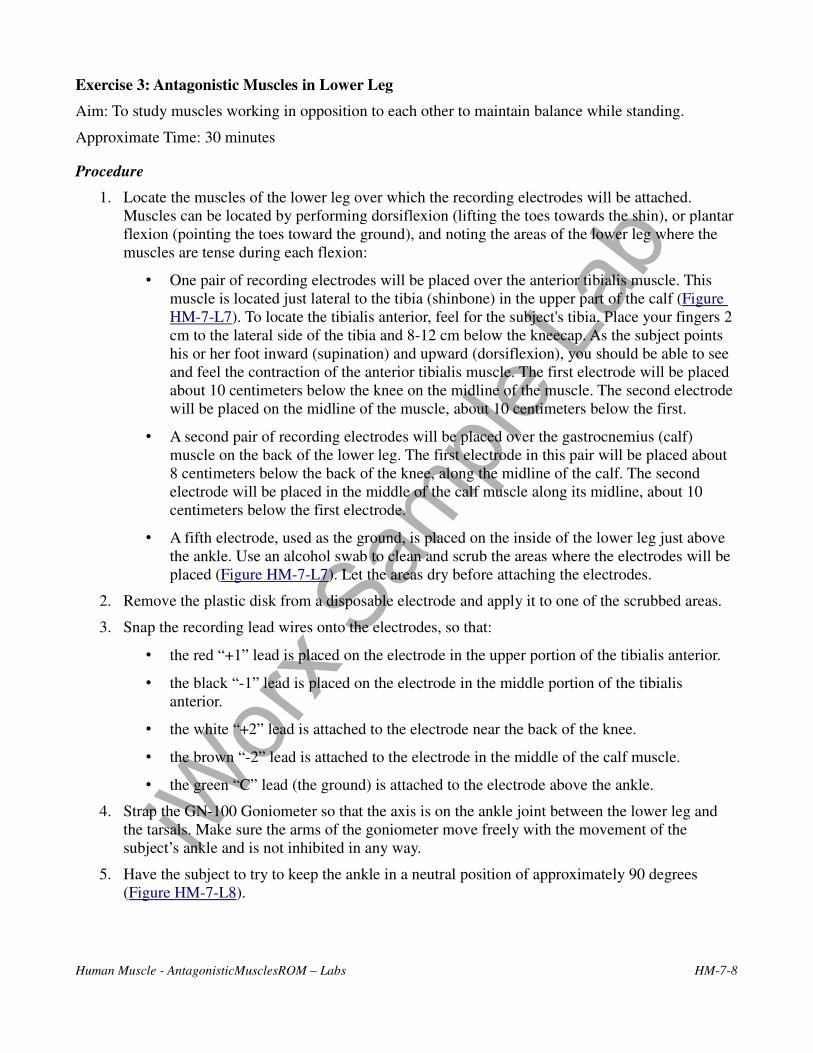
• One pair of recording electrodes will be placed over the anterior tibialis muscle. This
muscle is located just lateral to the tibia (shinbone) in the upper part of the calf (Figure
HM-7-L7). To locate the tibialis anterior, feel for the subject's tibia. Place your fingers 2
cm to the lateral side of the tibia and 8-12 cm below the kneecap. As the subject points
his or her foot inward (supination) and upward (dorsiflexion), you should be able to see
and feel the contraction of the anterior tibialis muscle. The first electrode will be placed
about 10 centimeters below the knee on the midline of the muscle. The second electrode
will be placed on the midline of the muscle, about 10 centimeters below the first.
• A second pair of recording electrodes will be placed over the gastrocnemius (calf)
muscle on the back of the lower leg. The first electrode in this pair will be placed about
8 centimeters below the back of the knee, along the midline of the calf. The second
electrode will be placed in the middle of the calf muscle along its midline, about 10
centimeters below the first electrode.
• A fifth electrode, used as the ground, is placed on the inside of the lower leg just above
the ankle. Use an alcohol swab to clean and scrub the areas where the electrodes will be
placed (Figure HM-7-L7). Let the areas dry before attaching the electrodes.
2. Remove the plastic disk from a disposable electrode and apply it to one of the scrubbed areas.
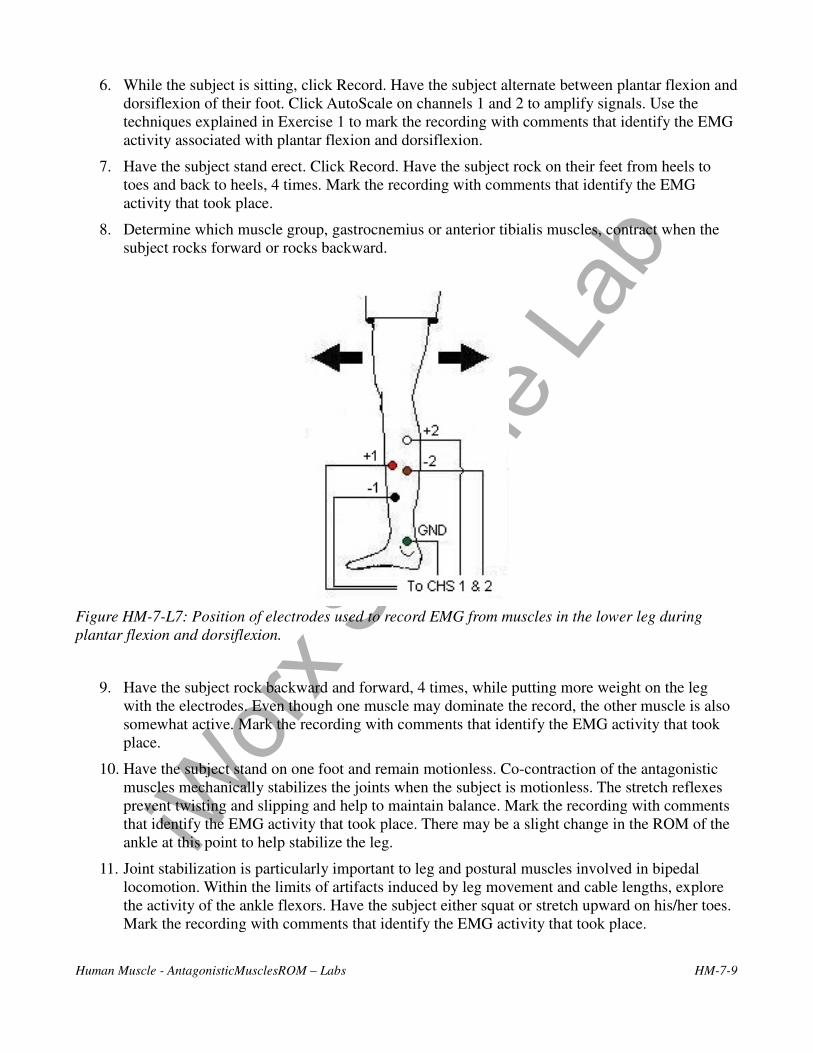
3. Snap the recording lead wires onto the electrodes, so that:
• the red “+1” lead is placed on the electrode in the upper portion of the tibialis anterior.
• the black “-1” lead is placed on the electrode in the middle portion of the tibialis
anterior.
• the white “+2” lead is attached to the electrode near the back of the knee.
• the brown “-2” lead is attached to the electrode in the middle of the calf muscle.
• the green “C” lead (the ground) is attached to the electrode above the ankle.
4. Strap the GN-100 Goniometer so that the axis is on the ankle joint between the lower leg and
the tarsals. Make sure the arms of the goniometer move freely with the movement of the
subject’s ankle and is not inhibited in any way.
5. Have the subject to try to keep the ankle in a neutral position of approximately 90 degrees
(Figure HM-7-L8).
Human Muscle - AntagonisticMusclesROM – Labs HM-7-8
iWor
x Sam
ple La
b
6. While the subject is sitting, click Record. Have the subject alternate between plantar flexion and
dorsiflexion of their foot. Click AutoScale on channels 1 and 2 to amplify signals. Use the
techniques explained in Exercise 1 to mark the recording with comments that identify the EMG
activity associated with plantar flexion and dorsiflexion.
7. Have the subject stand erect. Click Record. Have the subject rock on their feet from heels to
toes and back to heels, 4 times. Mark the recording with comments that identify the EMG
activity that took place.
8. Determine which muscle group, gastrocnemius or anterior tibialis muscles, contract when the
subject rocks forward or rocks backward.
Figure HM-7-L7: Position of electrodes used to record EMG from muscles in the lower leg during
plantar flexion and dorsiflexion.
9. Have the subject rock backward and forward, 4 times, while putting more weight on the leg
with the electrodes. Even though one muscle may dominate the record, the other muscle is also
somewhat active. Mark the recording with comments that identify the EMG activity that took
place.
10. Have the subject stand on one foot and remain motionless. Co-contraction of the antagonistic
muscles mechanically stabilizes the joints when the subject is motionless. The stretch reflexes
prevent twisting and slipping and help to maintain balance. Mark the recording with comments
that identify the EMG activity that took place. There may be a slight change in the ROM of the
ankle at this point to help stabilize the leg.
11. Joint stabilization is particularly important to leg and postural muscles involved in bipedal
locomotion. Within the limits of artifacts induced by leg movement and cable lengths, explore
the activity of the ankle flexors. Have the subject either squat or stretch upward on his/her toes.
Mark the recording with comments that identify the EMG activity that took place.
Human Muscle - AntagonisticMusclesROM – Labs HM-7-9

iWor
x Sam
ple La
b
Figure HM-7-L8: Position of the GN-100 on the right ankle.
12. Ask the subject to sit comfortably .
13. As the subject is sitting, have he or she move the ankle as far as possible in both the plantar and
dorsiflexion position.
• Record plantar flexion of the ankle for five seconds. Mark the recording appropriately.
• Record the ankle in neutral position for five seconds.
• Record dorsiflexion for 5 seconds and mark the recording.
14. Click Stop to halt recording.
15. Select Save in the File menu.
Data Analysis
1. Scroll to the data where EMG activity was recorded from the muscles of the anterior and
posterior lower leg.
2. Use the same procedures used in Exercise 1 to measure and record the absolute integral,
difference in amplitudes, and durations of the EMG bursts from the anterior and posterior
muscles of the lower leg while the subject moved his or her legs and body in different positions:
• Standing erect on both legs;
• Rocking back and forth on both legs;
• Rocking back and forth on the leg with the electrodes;
• Standing erect on the leg with the electrodes;
Human Muscle - AntagonisticMusclesROM – Labs HM-7-10

iWor
x Sam
ple La
b
• Ankle flexing by squatting or standing on the toes;
• Sitting, plantar flexion;
• Sitting, dorsiflexion
3. Enter the means for each parameter, from each muscle group during the various motions, on
Table HM-7-L2
4. Use the same procedures from Exercise 1 to measure the ROM of the ankle while subject
moved his or her ankle in the different positions.
5. Record this data in the data table.
Questions
1. Compare the parameters for the EMG bursts from the tibialis anterior during each of the
activities. When was tibialis anterior activity the greatest? The least?
2. Compare the parameters for the EMG bursts from the gastrocnemius during each of the
activities. When was gastrocnemius activity the greatest? The least?
3. How does EMG activity in the gastrocnemius correlate to EMG activity in the tibialis anterior?
4. How is the ROM of the ankle affected by the different movements?
5. Which movement, plantar flexion or dorsiflexion, has the wider ROM? Is there any anatomical
reason for this?
6. Was the ROM of the ankle greatest while the subject was sitting? What is the reason for your
answer?
Human Muscle - AntagonisticMusclesROM – Labs HM-7-11

iWor
x Sam
ple La
b
Table HM-7-L2:Relative EMG Activity in the Muscles of the Lower Leg during Changes in
Posture.
Averages from Anterior
TibialisROM
Averages from
GastrocnemiusROM
Leg Activity Abs. Int.V2-V1
(V)
T2-T1
(sec)
V1
(degrees)Abs. Int.
V2-V1
(V)
T2-T1
(sec)
V1
(degrees)
Standing Erect,
Both Legs
Rocking
Forward,
Both Legs
Rocking
Backward,
Both Legs
Rocking
Forward,
One Leg
Rocking
Backward,
One Leg
Standing Erect,
One Leg
Ankle Flex,
Squat
Ankle Flex,
Standing on
Toes
Sitting,
Plantar Flexion
Sitting,
Dorsiflexion
Human Muscle - AntagonisticMusclesROM – Labs HM-7-12

iWor
x Sam
ple La
b
Table HM-7-L3:Average ROMs (Adapted from Luttgens & Hamilton, 1997 and the American
Academy of Orthopaedic Surgeons, 1994)
Human Muscle - AntagonisticMusclesROM – Labs HM-7-13