experience manager configuring workfront with adobe · (aem) assets and provide your organization...
TRANSCRIPT

2/25/2019 Configuring Workfront with Adobe Experience Manager – Workfront
https://support.workfront.com/hc/en-us/articles/235163608-Configuring-Workfront-with-Adobe-Experience-Manager 1/17
Configuring Workfront with AdobeExperience ManagerAs a system administrator, you can integrate Workfront with Adobe Experience Manager(AEM) Assets and provide your organization with a comprehensive content management solution forthe creation, sharing, and maintenance of assets within your workflow.
Understanding Workfront for AEM Assets
Prerequisites for Installing the AEM Assets Connector
Installing the Workfront for AEM Assets Connector Package
Configuring AEM Assets to Integrate with Workfront
Configuring Workfront to Integrate with AEM Assets
Setting Up Workfront Users in AEM Assets
Understanding Workfront for AEM AssetsThe Workfront for AEM Assets connector allows your organization to do the following:
Collaborate and manage creative content by linking AEM assets and folders to projects,tasks, issues, and requests in Workfront.
For more information about configuring documentation integrations with third-partyapplications, see "Configuring Document Integrations."
Integrate with the AEM Digital Asset Management (DAM) repository, allowing you to useWorkfront to manage and share digital assets stored in the DAM.
For more information about linking documents and asset folders, see the "Linking IndividualDocuments" section in "Linking Documents from External Applications."
Combine and apply metadata from both applications to an asset.
View an all-inclusive communication stream for an asset. Updates and comments made toan asset either in Workfront or AEM Assets are synchronized to the other application,establishing a comprehensive history of communications made to the asset.
For more information about making comments in Workfront, see "Adding Updates andComments to a Document."
Prerequisites for Installing the AEM Assets ConnectorBefore you can install the Workfront Connector for AEM Assets, ensure that the followingprerequisites are met:
AEM Assets installed and configured, version 6.0 or later

2/25/2019 Configuring Workfront with Adobe Experience Manager – Workfront
https://support.workfront.com/hc/en-us/articles/235163608-Configuring-Workfront-with-Adobe-Experience-Manager 2/17
For information about installing AEM Assets, see the Adobe Experience Managerdocumentation.
AEM Touch-Optimized User Interface activated
Installing the Workfront for AEM Assets Connector PackageTo install the Workfront for AEM Assets connector, you must import the connector into AEM as a packageusing the CRX Package Manager.
1. On a workstation where you have already installed AEM, download the Workfront for AEMAssets Connector installation file.
You can get the Workfront for AEM Assets connector from your Workfront representative.
2. Log in to AEM using an administrator account.
3. Click Tools > Deployment > Packages.
The CRX Package Manager opens.
4. Click Upload Package.
5. In the Upload Package dialog box, browse for and select the Workfront Connector package,then click OK.
The package displays in the CRX Package Manager.
6. Click Install.

2/25/2019 Configuring Workfront with Adobe Experience Manager – Workfront
https://support.workfront.com/hc/en-us/articles/235163608-Configuring-Workfront-with-Adobe-Experience-Manager 3/17
7. On the Package dialog box, ignore the advanced settings and click Install.
8. (Optional) To confirm the connector successfully installed, ensure the following statementdisplays in the Activity Log:
Package installed in <time>
9. Close the CRX Package Manager.
The connector is installed and you can now configure AEM Assets to integrate withWorkfront.
10. Continue with "Configuring AEM Assets to Integrate with Workfront."
Configuring AEM Assets to Integrate with WorkfrontAfter you install the connector, import the connector package to AEM and configure AEM to link withdocuments in Workfront.
For information on installing the connector, see "Installing the Workfront for AEM Assets ConnectorPackage."
Installing the Connector Package on AEM Assets Version 6.4 (Touch UI)
Installing the Connector Package on AEM Assets Versions 6.3 or Older (Classic UI)
Configuring the AEM Externalizer
Installing the Connector Package on AEM Assets Version 6.4 (Touch UI)
1. Log in to AEM Assets as a system administrator.
2. Click Tools > Cloud Services > Workfront Integration Configuration > Global-Workfront.
3. (Conditional) If you have not yet done so, create a Workfront cloud configuration file.
1. Click Create in the upper-right corner of the Global-Workfront page.

2/25/2019 Configuring Workfront with Adobe Experience Manager – Workfront
https://support.workfront.com/hc/en-us/articles/235163608-Configuring-Workfront-with-Adobe-Experience-Manager 4/17
2. In the Workfront URL box, specify the URL for your Workfront instance.
For example, https://<account>.my.workfront.com, where <account> is theaccount you use for integrations with AEM.
3. Click the Base Folder box, then in the drop-down menu select the path wheredocuments that are linked to Workfront objects are stored.
4. Click Select in the upper-right corner.
You can link to any folder beneath the root /content/dam/.
NOTE The /content/dam/ root folder is automatically created and configured whenyou install the Workfront for AEM Assets connector.
5. In the Workfront API Key box, specify your Workfront API Key.
For information on API keys, see "Managing API Keys for the Workfront System."
To retrieve your Workfront API key:
1. Open a browser tab, and log into your Workfront account as a systemadministrator.
2. In the Global Navigation Bar, click Setup.
3. Click System > Customer Info.
If you have already generated an API key, your Workfront API Keydisplays under the Your User's API Key label.
4. (Conditional) If you have not yet generated an API key, you need togenerate one:
1. In the API Key Settings section, ensure that the After Creation,API keys expire in option is set to None.

2/25/2019 Configuring Workfront with Adobe Experience Manager – Workfront
https://support.workfront.com/hc/en-us/articles/235163608-Configuring-Workfront-with-Adobe-Experience-Manager 5/17
If you select an expiration period, the connector will stopworking after the API Key expires. You will then to need to re-generate an API Key and update your Workfront configuration.
2. Under the Your User's API Key label, click Generate API Key.
An API Key for Workfront generates and displays.
5. Copy the API Key to your clipboard.
6. Open the browser tab for AEM Connector and in the Workfront APIKey box, paste the API Key you copied.
6. (Conditional) Click the Advanced tab in the upper-left corner of the WorkfrontIntegration Configuration page, and select the following options if applicable:
Allow Collection Browsing: Select this option if your organization allows Workfrontusers to link AEM Assets collections to Workfront objects.
User Federated ID: Select this option if your organization is using Federated IDs orSingle Sign-On (SSO) when logging into Workfront.
Ignore Email Domain: Select this option if your AEM users do not use the domainname in their user ID.
Restrict Access: Select this option to specify the appropriate Workfront IPaddresses that need to be whitelisted. For more information about whitelisting, seethe "Adding IP Addresses to the Whitelist" section in "Configuring Your Firewall."
7. Click the Basic tab in the upper-left corner of the Workfront IntegrationConfiguration page, and then click Connect.
4. (Conditional) If you already created a Workfront cloud configuration file, select Global-Workfront, and then in the upper-left corner, click Properties.
5. Generate the AEM API Key by clicking Generate Key, then copy the AEM API key to yourclipboard.
You will need the AEM API Key later when you configure Workfront to integrate with AEMAssets. For more information, see "Configuring Workfront to Integrate with AEM Assets."
6. In the upper-right corner, click Save.
The Global-Workfront window displays.

2/25/2019 Configuring Workfront with Adobe Experience Manager – Workfront
https://support.workfront.com/hc/en-us/articles/235163608-Configuring-Workfront-with-Adobe-Experience-Manager 6/17
7. (Optional) Synchronize bi-directional communication between AEM and Workfront.
1. Click Global-Workfront.
2. In the upper-left corner of the window, click Properties.
The Workfront Integration Configuration page displays.
2/25/2019 Configuring Workfront with Adobe Experience Manager – Workfront
https://support.workfront.com/hc/en-us/articles/235163608-Configuring-Workfront-with-Adobe-Experience-Manager 7/17
3. (Optional) To enable the synchronization of comments between AEM Assets andWorkfront, click Enable Comment Sync.
4. (Optional) To turn off comment synchronization, click Disable Comment Sync.
Or
Delete the NOTE CREATE event subscription registered to your AEM instance.
For information on event subscriptions, see the "Deleting EventSubscriptions" section in the article "Event Subscriptions API."
8. Continue with "Configuring the AEM Extender."
Installing the Connector Package on AEM Assets Versions 6.3 or Older (Classic UI)
1. Log in to AEM Assets as a system administrator.
2. Click Tools > Deployment > Cloud Services.
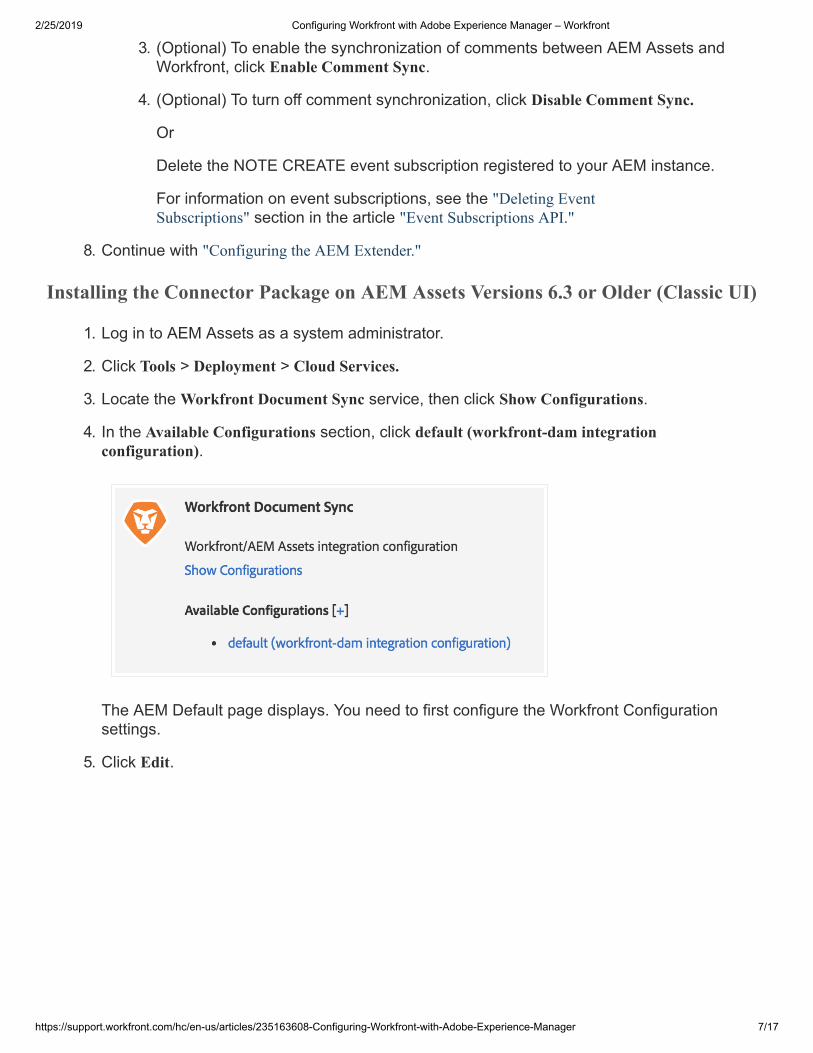
3. Locate the Workfront Document Sync service, then click Show Configurations.
4. In the Available Configurations section, click default (workfront-dam integrationconfiguration).
The AEM Default page displays. You need to first configure the Workfront Configurationsettings.
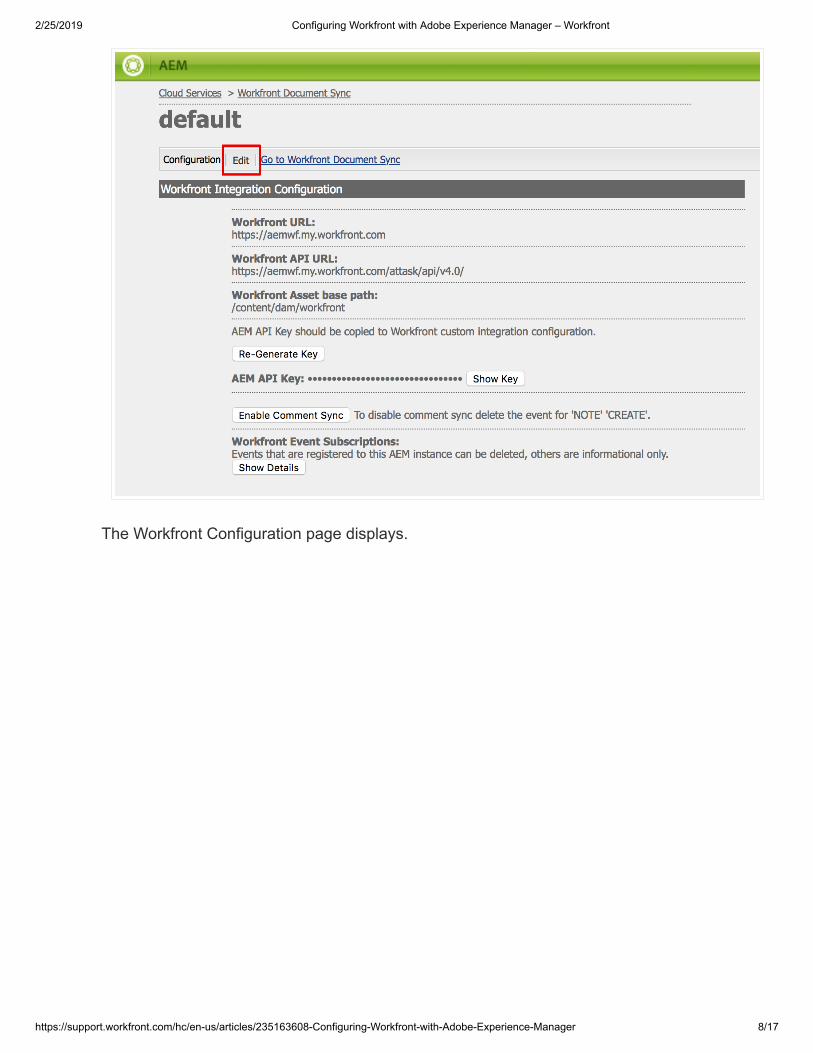
5. Click Edit.
2/25/2019 Configuring Workfront with Adobe Experience Manager – Workfront
https://support.workfront.com/hc/en-us/articles/235163608-Configuring-Workfront-with-Adobe-Experience-Manager 8/17
The Workfront Configuration page displays.

2/25/2019 Configuring Workfront with Adobe Experience Manager – Workfront
https://support.workfront.com/hc/en-us/articles/235163608-Configuring-Workfront-with-Adobe-Experience-Manager 9/17
Replace this screen once the misspellings are corrected.
6. In the Workfront URL box, specify the URL for your Workfront instance.
For example, https://<account>.my.workfront.com, where <account> is the account you usefor integrations with AEM Assets. This is a required field.
7. In the Base Folder box, specify the path where documents that are linked to Workfrontobjects are stored. You can link to any folder beneath the root /content/dam/.
NOTE The /content/dam/ root folder is automatically created and configured when you installthe Workfront for AEM Assets connector.
This is a required field.
8. In the Workfront API Key box, specify your Workfront API Key.
For information on API keys, see "Managing API Keys for the Workfront System."
To retrieve your Workfront API key:
1. Open a browser tab, and log into your Workfront account as a systemadministrator.
2. In the Global Navigation Bar, click Setup.
3. Click System > Customer Info.
2/25/2019 Configuring Workfront with Adobe Experience Manager – Workfront
https://support.workfront.com/hc/en-us/articles/235163608-Configuring-Workfront-with-Adobe-Experience-Manager 10/17
If you have already generated an API key, your Workfront API Key displays underthe Your User's API Key label.
4. (Conditional) If you have not yet generated an API key, you need to generate one:
1. In the API Key Settings section, ensure that the After Creation, API keysexpire in option is set to None.
If you select an expiration period, the connector will stop working afterthe API Key expires. You will then to need to re-generate an API Keyand update your Workfront configuration.
2. Under the Your User's API Key label, click Generate API Key.
An API Key for Workfront generates and displays.
5. Copy the API Key to your clipboard.
6. Open the browser tab for AEM and in the Workfront API Key box, paste the APIKey you copied.
9. (Conditional) Select the following options, if applicable for your configuration:
User Federated ID: Select this option if your organization is using Federated IDs or SingleSign-On (SSO) when logging into Workfront.
Ignore Email Domain: Select this option if your AEM users do not use the domain name intheir user ID.
Restrict Access: Select this option to specify the appropriate Workfront IP addresses thatneed to be whitelisted. For more information about whitelisting, see the "Adding IP Addressesto the Whitelist" section in the article "Configuring Your Firewall."
10. Click OK.
The Workfront Configuration page closes.
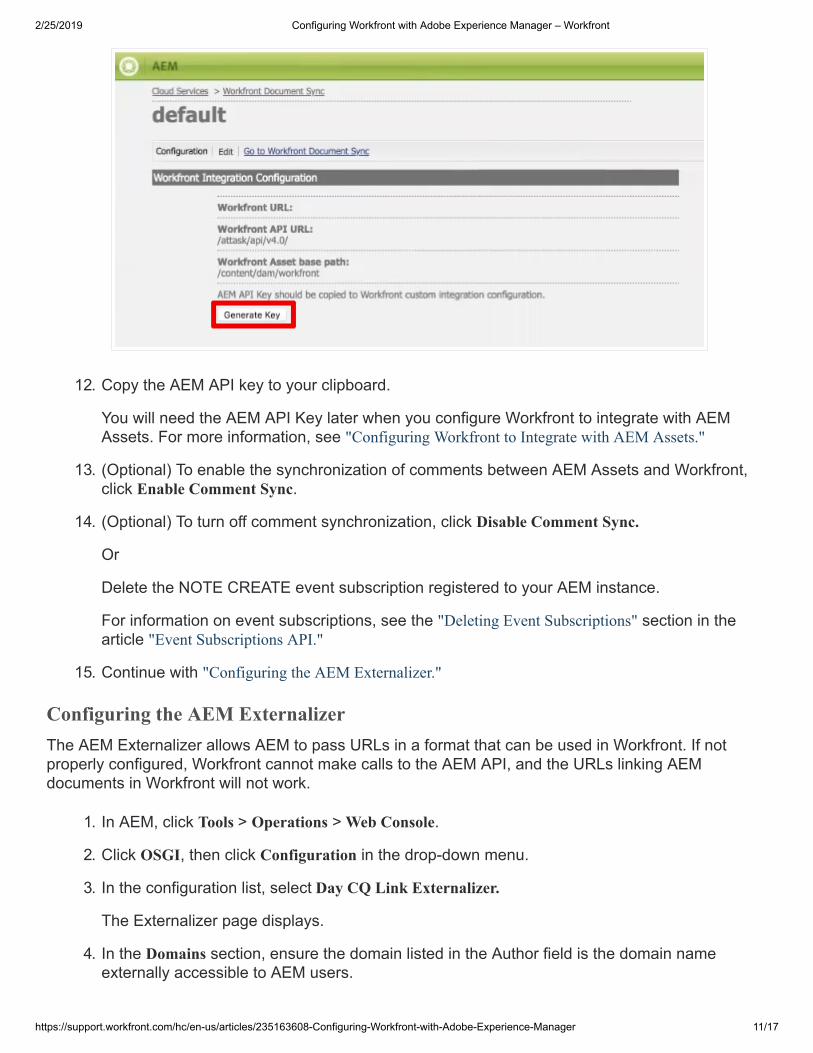
11. (Conditional) If no AEM API Key displays, click Generate Key to generate an API Key.
2/25/2019 Configuring Workfront with Adobe Experience Manager – Workfront
https://support.workfront.com/hc/en-us/articles/235163608-Configuring-Workfront-with-Adobe-Experience-Manager 11/17
12. Copy the AEM API key to your clipboard.
You will need the AEM API Key later when you configure Workfront to integrate with AEMAssets. For more information, see "Configuring Workfront to Integrate with AEM Assets."
13. (Optional) To enable the synchronization of comments between AEM Assets and Workfront,click Enable Comment Sync.
14. (Optional) To turn off comment synchronization, click Disable Comment Sync.
Or
Delete the NOTE CREATE event subscription registered to your AEM instance.
For information on event subscriptions, see the "Deleting Event Subscriptions" section in thearticle "Event Subscriptions API."
15. Continue with "Configuring the AEM Externalizer."
Configuring the AEM ExternalizerThe AEM Externalizer allows AEM to pass URLs in a format that can be used in Workfront. If notproperly configured, Workfront cannot make calls to the AEM API, and the URLs linking AEMdocuments in Workfront will not work.
1. In AEM, click Tools > Operations > Web Console.
2. Click OSGI, then click Configuration in the drop-down menu.
3. In the configuration list, select Day CQ Link Externalizer.
The Externalizer page displays.
4. In the Domains section, ensure the domain listed in the Author field is the domain nameexternally accessible to AEM users.

2/25/2019 Configuring Workfront with Adobe Experience Manager – Workfront
https://support.workfront.com/hc/en-us/articles/235163608-Configuring-Workfront-with-Adobe-Experience-Manager 12/17
The domain name in the author field should match the domain listed in the URL line of yourAEM instance.
5. (Conditional) If necessary, update the domain in the Author field.
6. Click Save.
AEM Assets is now configured to link documents with Workfront.
7. Continue with "Configuring Workfront to Integrate with AEM Assets."
Configuring Workfront to Integrate with AEM Assets After you install the Workfront for AEM Assets Connector (as described in "Installing the Workfront forAEM Assets Connector Package") and configure AEM Assets (as described in "Configuring AEM Assets toIntegrate with Workfront"), you need to configure Workfront to link documents between Workfront andAEM Assets.
1. Log in to Workfront as a system administrator.
NOTE Workfront recommends creating a system administrator dedicated solely to your AEMintegration. For more information about assigning the System Administrator access level toa user, see "Administrative Access."
2. Go to the Setup area in the Global Navigation Bar, click Setup.
3. Click Documents > Custom Integration.
4. Click Add Custom Integration.
5. In the Name box, specify the name of the custom integration.
This is the name users see when using the integration within Workfront; for example, youcould enter "AEM Assets" for the name.
6. In the Base API URL box, specify the URL for your AEM instance.
The base API URL consists of the URL for your AEM instance followed by the path:/bin/webhooks/api/
2/25/2019 Configuring Workfront with Adobe Experience Manager – Workfront
https://support.workfront.com/hc/en-us/articles/235163608-Configuring-Workfront-with-Adobe-Experience-Manager 13/17
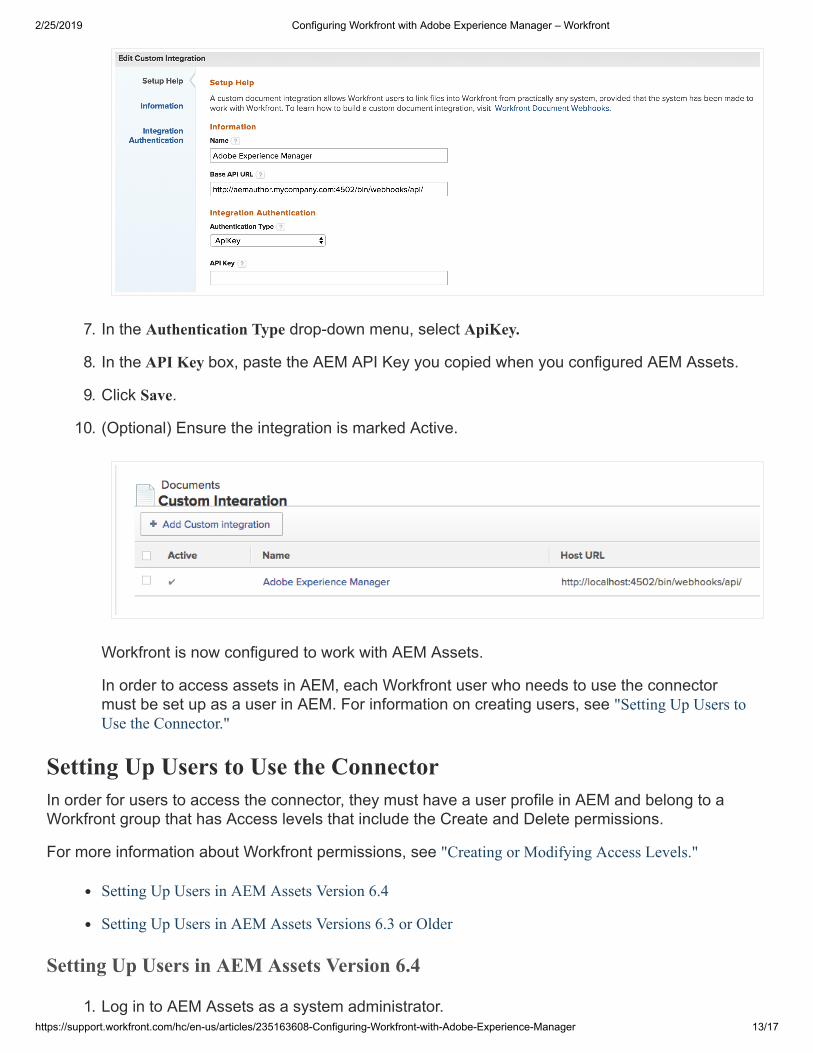
7. In the Authentication Type drop-down menu, select ApiKey.
8. In the API Key box, paste the AEM API Key you copied when you configured AEM Assets.
9. Click Save.
10. (Optional) Ensure the integration is marked Active.
Workfront is now configured to work with AEM Assets.
In order to access assets in AEM, each Workfront user who needs to use the connectormust be set up as a user in AEM. For information on creating users, see "Setting Up Users toUse the Connector."
Setting Up Users to Use the ConnectorIn order for users to access the connector, they must have a user profile in AEM and belong to aWorkfront group that has Access levels that include the Create and Delete permissions.
For more information about Workfront permissions, see "Creating or Modifying Access Levels."
Setting Up Users in AEM Assets Version 6.4
Setting Up Users in AEM Assets Versions 6.3 or Older
Setting Up Users in AEM Assets Version 6.4
1. Log in to AEM Assets as a system administrator.

2/25/2019 Configuring Workfront with Adobe Experience Manager – Workfront
https://support.workfront.com/hc/en-us/articles/235163608-Configuring-Workfront-with-Adobe-Experience-Manager 14/17
2. Click Tools > Security > Users.
3. (Conditional) If the user does not have a user profile in AEM, create an AEM user profile.
1. Click Create User.
2. Enter the user's personal information.

2/25/2019 Configuring Workfront with Adobe Experience Manager – Workfront
https://support.workfront.com/hc/en-us/articles/235163608-Configuring-Workfront-with-Adobe-Experience-Manager 15/17
***Need to replace this screen with New User screen
The only required field is the ID field. The user's AEM ID must match theirWorkfront ID, which is the user's Workfront email address.
If you selected the Ignore Email Domain option when you configured AEM tointegrate with Workfront, then the AEM ID will not match the Workfront emailaddress.
4. (Conditional) If the user has an AEM profile, open the user's AEM profile.
1. Click User.
The User Management page displays.
2. Click the user you want to add, then click Properties.
The user's settings page displays.
5. Click the Groups tab.
6. Ensure the user belongs to at least one Workfront group that has Access levels that includethe Create and Delete permissions.
1. To add the user to an existing group, begin typing the group name in the Type GroupName box, then select the group when it appears in the drop-down menu.
Or
To select a group to which the user is a member, select a group in the Groups thatthis user is a member of section.
7. Click Save.
Setting Up Users in AEM Assets Versions 6.3 or Older
1. Log in to AEM Assets as a system administrator.
2. Click Tools > Security > Users.
3. (Conditional) If the user does not have a user profile in AEM, create an AEM user profile.

2/25/2019 Configuring Workfront with Adobe Experience Manager – Workfront
https://support.workfront.com/hc/en-us/articles/235163608-Configuring-Workfront-with-Adobe-Experience-Manager 16/17
1. Click Create User in the upper-right corner of the User Management page.
2. Enter the user's personal information, then continue with Step 5.
The only required fields are the ID, Password, and Retype Password fields. Theuser's AEM ID must match their Workfront ID, which is the user's Workfront emailaddress.

2/25/2019 Configuring Workfront with Adobe Experience Manager – Workfront
https://support.workfront.com/hc/en-us/articles/235163608-Configuring-Workfront-with-Adobe-Experience-Manager 17/17
If you selected the Ignore Email Domain option when you configured AEM tointegrate with Workfront, then the AEM ID will not match the Workfront emailaddress.
4. (Conditional) If the user has an AEM profile, open the user's AEM profile.
The Edit Users Settings page displays.
5. (Conditional) If the user is not a member of a Workfront group, in the Add User toGroupssection, begin typing the name of a Workfront group to which the user belongs, thenselect the group when it displays in the drop-down menu.
The user must belong to at least one Workfront group that has Access levels that includethe Create and Delete permissions. For information about Workfront groups, see"Understanding Groups."
6. Click Save in the upper-right corner.