expenses: request authorization · expenses: request authorization ... c. when returning to the...
TRANSCRIPT
Expenses: Request Authorization
Updated as of March 10, 2020 Page 1 of 11
Overview An authorization is a request by an employee for approval of estimated expenses for a
future activity.
An itemized list of the expected expense items and their cost is required information in the authorization request.
Authorization requests can be saved and stored in progress to be submitted or edited at a later time.
An authorization request proceeds through the following process, which the employee initiates:
o Employee submits a spend authorization request o Line manager approves the authorization request o Employee submits an expense report

Expenses: Request Authorization
Updated as of March 10, 2020 Page 2 of 11
1. Navigating to the Self-Service Module
1. You can access the Expenses section in two ways: a. Click the Navigator icon in upper left-hand corner of the Ignite landing page.
b. (Option 1) Under the Me section, click the drop down arrow, and select
Expenses from the drop down list.

Expenses: Request Authorization
Updated as of March 10, 2020 Page 3 of 11
c. (Option 2) Under the Me heading on the home page, you can scroll down and click on the Expenses tile on the Main Page.

Expenses: Request Authorization
Updated as of March 10, 2020 Page 4 of 11
2. Request an Authorization
1. Upon entering the Travel and Expenses work area, click the Actions icon (top right side of screen.)
2. Select Request Authorization.
Expenses: Request Authorization
Updated as of March 10, 2020 Page 5 of 11
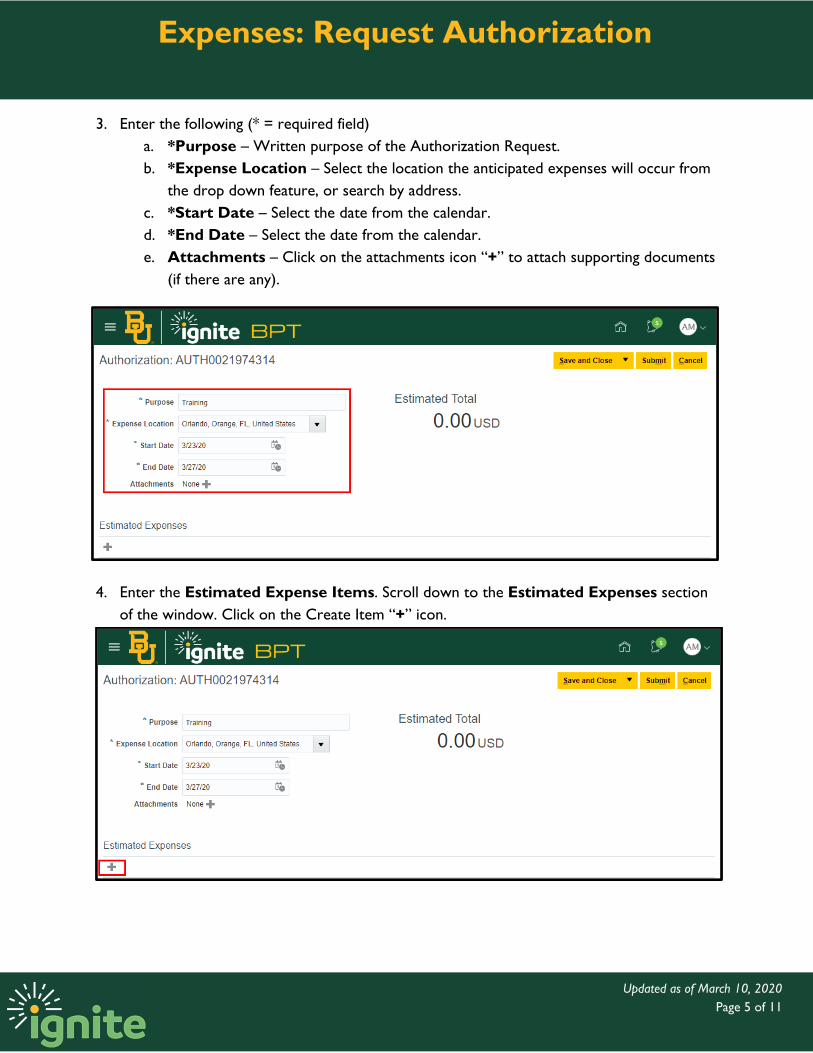
3. Enter the following (* = required field) a. *Purpose – Written purpose of the Authorization Request. b. *Expense Location – Select the location the anticipated expenses will occur from
the drop down feature, or search by address. c. *Start Date – Select the date from the calendar. d. *End Date – Select the date from the calendar. e. Attachments – Click on the attachments icon “+” to attach supporting documents
(if there are any).
4. Enter the Estimated Expense Items. Scroll down to the Estimated Expenses section
of the window. Click on the Create Item “+” icon.

Expenses: Request Authorization
Updated as of March 10, 2020 Page 6 of 11
5. Enter the following (* = required field) a. *Template – Select the Expense Template to select your Estimated Expense Item
from. b. *Type – Select the Expense Type from the drop down list.
i. Note: Depending on the Expense Type chosen, additional fields will be displayed, some of them optional, some of them required.
c. *Amount – Enter amount (default currency is USD, do not change). d. *Description – Describe the nature of the expense in the written text box. e. Note: Additional fields may be required depending on expense type.

Expenses: Request Authorization
Updated as of March 10, 2020 Page 7 of 11
6. There are two different ways to add additional Estimated Expense Items to the
Authorization Request. a. (Option 1) Click the “Save and Create Another” button in the top right corner.
This will take you automatically to another estimated expense item.
i. Repeat step 5, entering all required and optional fields. ii. Repeat steps until all Estimated Expense Items have been added. iii. Click the “Save and Close” button in the top right corner.
b. (Option 2) Click the “Save and Close” button in the top right corner.
i. To add another Estimated Expense Item, scroll down to the Estimated
Expenses section of the window. Click on the Create Item “+” icon. ii. Repeat step 5, entering the required and optional fields. iii. Repeat steps until all Estimated Expense Items have been added.
Expenses: Request Authorization
Updated as of March 10, 2020 Page 8 of 11
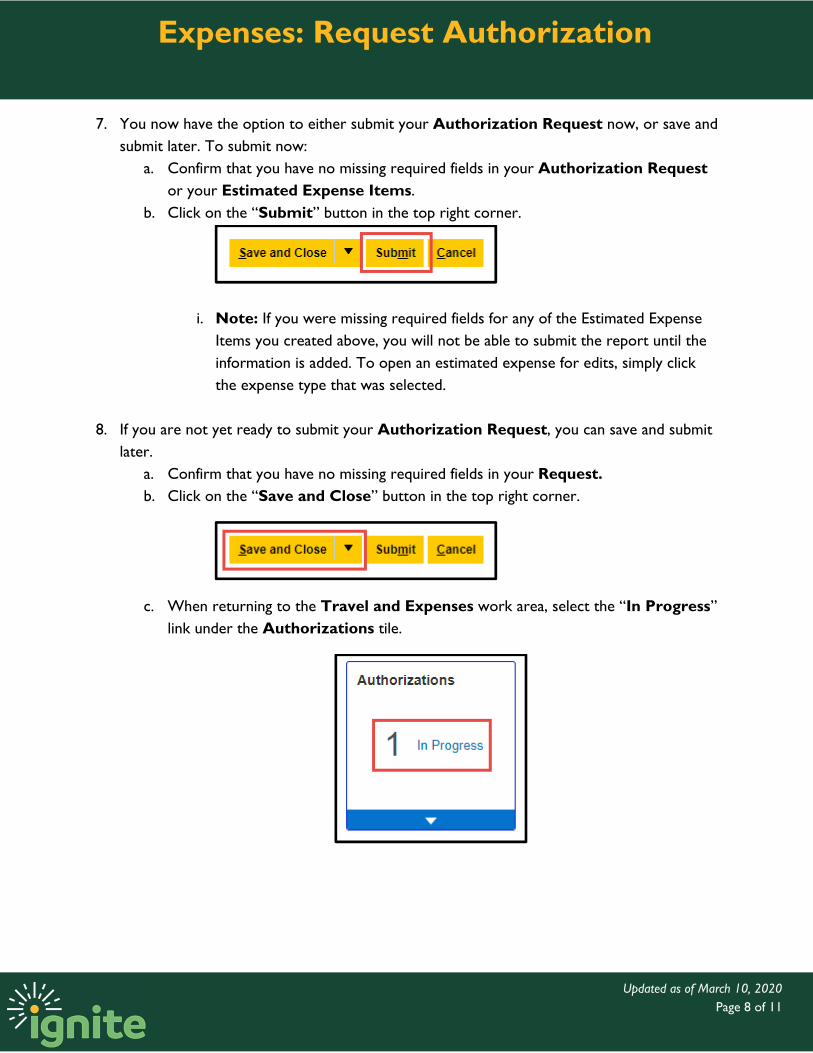
7. You now have the option to either submit your Authorization Request now, or save and submit later. To submit now:
a. Confirm that you have no missing required fields in your Authorization Request or your Estimated Expense Items.
b. Click on the “Submit” button in the top right corner.
i. Note: If you were missing required fields for any of the Estimated Expense Items you created above, you will not be able to submit the report until the information is added. To open an estimated expense for edits, simply click the expense type that was selected.
8. If you are not yet ready to submit your Authorization Request, you can save and submit later.
a. Confirm that you have no missing required fields in your Request. b. Click on the “Save and Close” button in the top right corner.
c. When returning to the Travel and Expenses work area, select the “In Progress” link under the Authorizations tile.

Expenses: Request Authorization
Updated as of March 10, 2020 Page 9 of 11
d. Find the Authorization Request number and click on the request number hyperlink to open it.
e. Click on the “Submit” button in the top right corner of the window. Your report has now been submitted to your line manager for approval.
i. Note: If you were missing required fields for any of the Estimated Expense Items you created above, you will not be able to submit the report until the information is added. To open an estimated expense for edits, simply click the expense type that was selected.

Expenses: Request Authorization
Updated as of March 10, 2020 Page 10 of 11
3. Withdrawing and Deleting an Authorization 1. Select the report you wish to withdraw by clicking in the white part of the line (clicking the
request number will open the report), the selected line will be highlighted blue.
2. Click the Actions button, then select Withdraw.
3. The report is now back in the user’s queue to edit, resubmit, or delete (if the report failed to withdraw, you may need to clear your browser’s cache). Status will be shown as withdrawn.

Expenses: Request Authorization
Updated as of March 10, 2020 Page 11 of 11
4. To delete an Authorization that is in your queue, click the X on the right of the screen and confirm that you want to delete it.
Note: Approved Authorizations cannot be withdrawn or deleted. If the Authorization is not used within 180 days it will expire, and cannot be applied to a future expense report.