exercise packet - calplanningcalplanning.berkeley.edu/sites/default/files/smart... · 13.from the...
TRANSCRIPT

Smart View Ad Hoc Basics 1
Exercise Packet
October 27, 2016
Smart View Ad Hoc Basics 1 October 2016
1 | P a g e
Contents Exercise 1 – Getting Started with Smart View Ad Hoc Query ................................... 2
Logging into Citrix and Connecting to Oracle Essbase Shared Connection ..................................................................2
EXERCISE 2: SETTING YOUR POINT OF VIEW (POV) ....................................................................... 7 Using Member Selection from the Essbase Ribbon ......................................................................................................7 Member Selection: Dimension Label Drop-Down Member Selection ..........................................................................9 Direct Entry into POV Box for Setting POV .................................................................................................................13
EXERCISE 3: SPEED POV ......................................................................................................................... 19
EXERCISE 3: SPEED POV – ANSWERS, AS OF 10.05.16 .................................................................. 19
EXERCISE 4: SETTING SMART VIEW OPTIONS ............................................................................... 21
EXERCISE 5: OPENING A SAVED SMART VIEW WORKBOOK ..................................................... 25
EXERCISE 6: FILLING AND DRILLING IN THE AD HOC GRID ..................................................... 28
EXTRA CREDIT: AD-HOC ANALYSIS ................................................................................................... 32
Smart View Ad Hoc Basics 1 October 2016
2 | P a g e
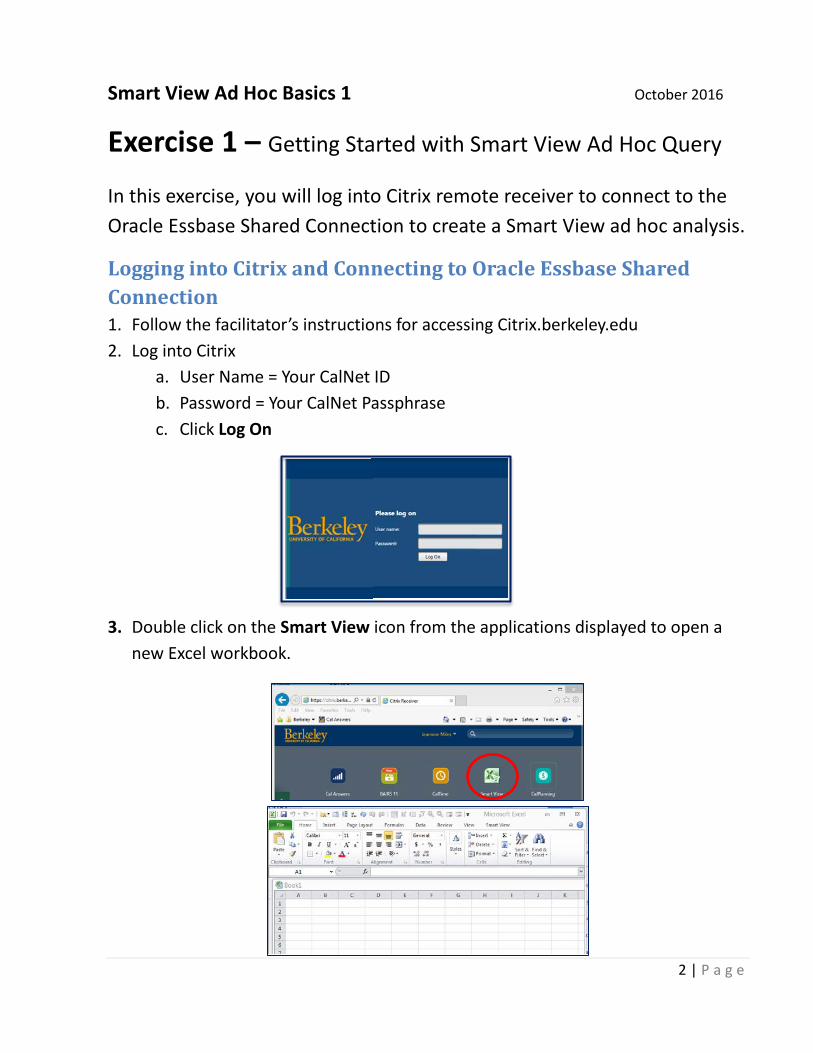
Exercise 1 – Getting Started with Smart View Ad Hoc Query
In this exercise, you will log into Citrix remote receiver to connect to the Oracle Essbase Shared Connection to create a Smart View ad hoc analysis.
Logging into Citrix and Connecting to Oracle Essbase Shared Connection 1. Follow the facilitator’s instructions for accessing Citrix.berkeley.edu 2. Log into Citrix
a. User Name = Your CalNet ID b. Password = Your CalNet Passphrase c. Click Log On
3. Double click on the Smart View icon from the applications displayed to open a
new Excel workbook.
Smart View Ad Hoc Basics 1 October 2016
3 | P a g e
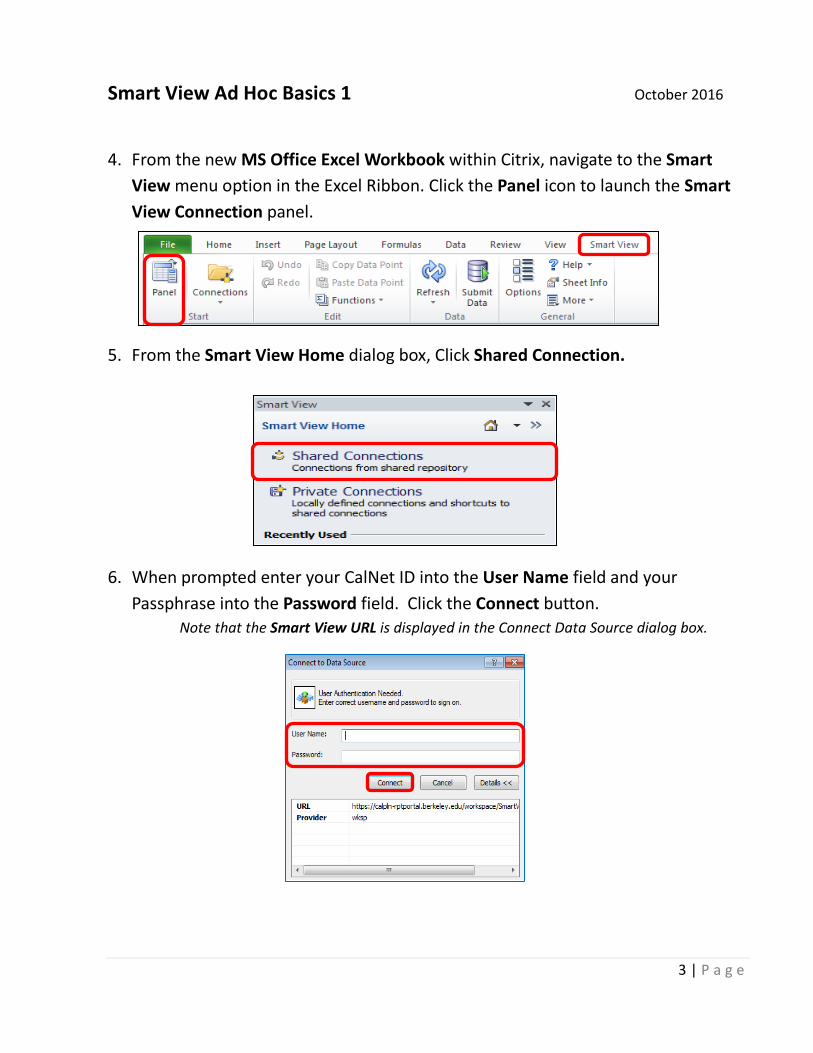
4. From the new MS Office Excel Workbook within Citrix, navigate to the Smart
View menu option in the Excel Ribbon. Click the Panel icon to launch the Smart View Connection panel.
5. From the Smart View Home dialog box, Click Shared Connection.
6. When prompted enter your CalNet ID into the User Name field and your Passphrase into the Password field. Click the Connect button.
Note that the Smart View URL is displayed in the Connect Data Source dialog box.
Smart View Ad Hoc Basics 1 October 2016
4 | P a g e
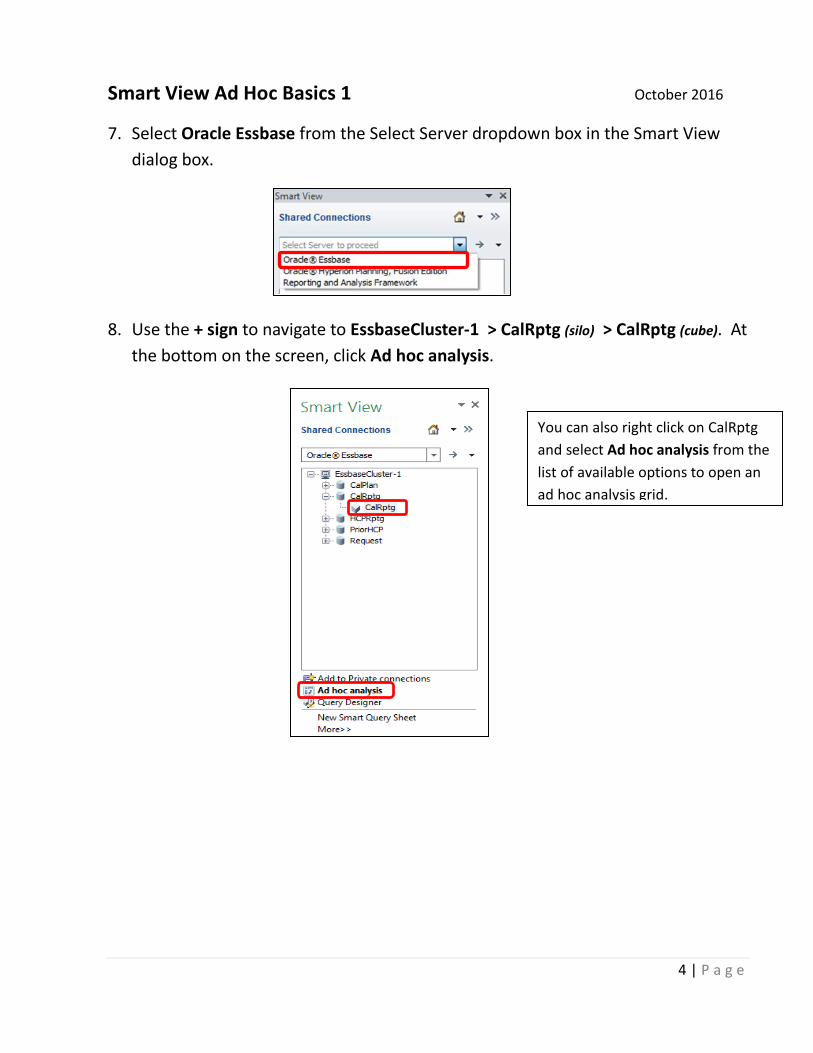
7. Select Oracle Essbase from the Select Server dropdown box in the Smart View dialog box.
8. Use the + sign to navigate to EssbaseCluster-1 > CalRptg (silo) > CalRptg (cube). At
the bottom on the screen, click Ad hoc analysis.
You can also right click on CalRptg and select Ad hoc analysis from the list of available options to open an ad hoc analysis grid.
Smart View Ad Hoc Basics 1 October 2016
5 | P a g e
Default POV location in Row 1
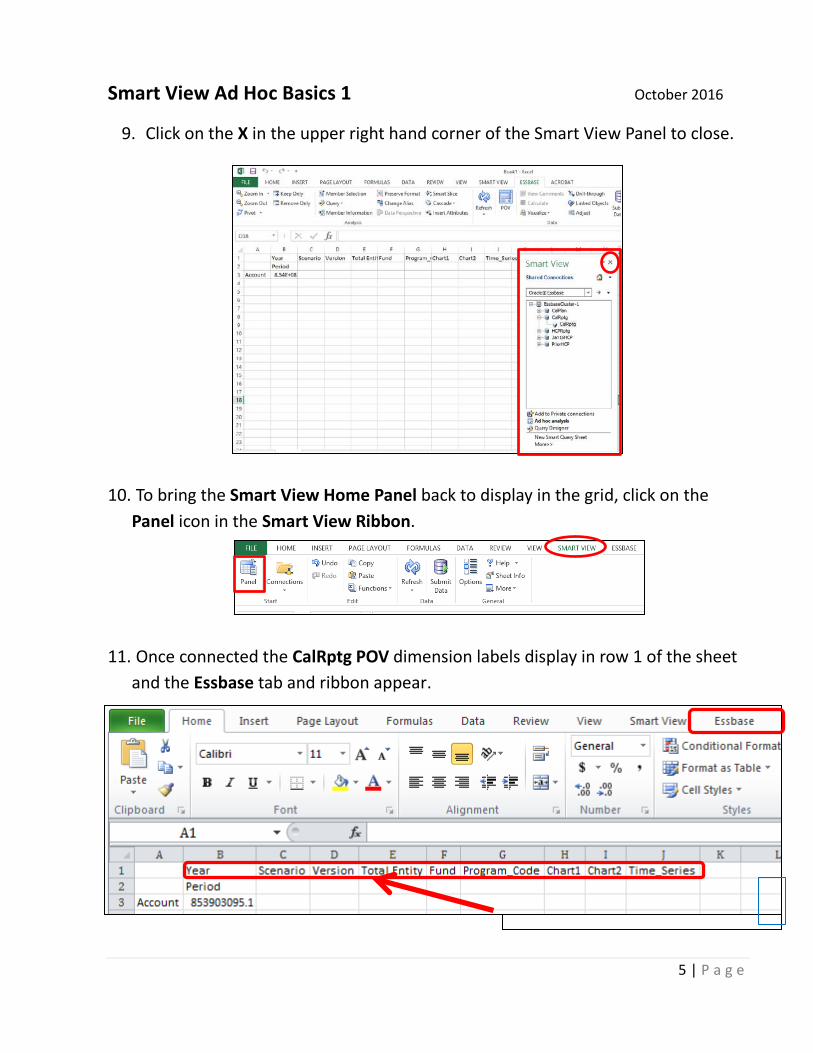
9. Click on the X in the upper right hand corner of the Smart View Panel to close.
10. To bring the Smart View Home Panel back to display in the grid, click on the Panel icon in the Smart View Ribbon.
11. Once connected the CalRptg POV dimension labels display in row 1 of the sheet
and the Essbase tab and ribbon appear.
Smart View Ad Hoc Basics 1 October 2016
6 | P a g e
Default POV location in Row 1
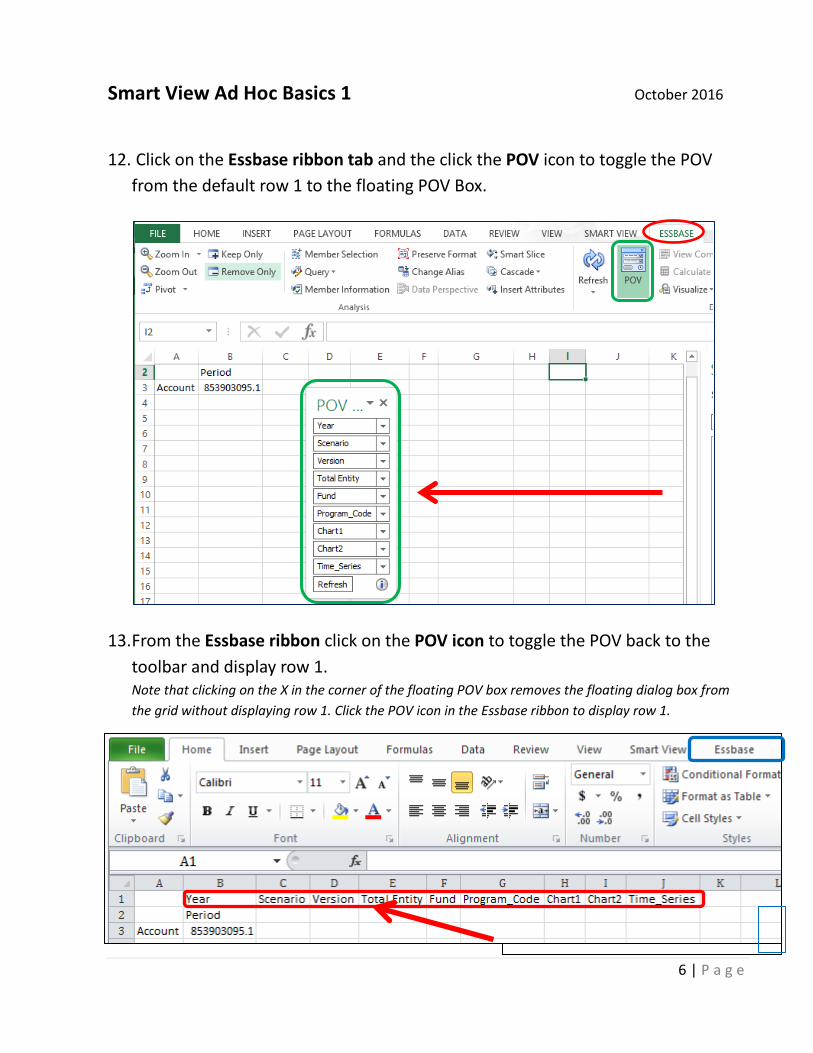
12. Click on the Essbase ribbon tab and the click the POV icon to toggle the POV
from the default row 1 to the floating POV Box.
13. From the Essbase ribbon click on the POV icon to toggle the POV back to the toolbar and display row 1. Note that clicking on the X in the corner of the floating POV box removes the floating dialog box from the grid without displaying row 1. Click the POV icon in the Essbase ribbon to display row 1.

Smart View Ad Hoc Basics 1 October 2016
7 | P a g e
Exercise 2: Setting your Point of View (POV)
In this lesson you will set the Point of View (POV) by using all four of the available Member selection options.
Using Member Selection from the Essbase Ribbon We will now navigate to the Essbase ribbon to set the POV for the Year dimension using the Member Selection option. 1. Navigate to the Essbase ribbon and click on the POV icon if needed to display the
POV in the default row 1 position if not currently visible. Click on the cell in the grid with the Year dimension label.
2. On the Essbase ribbon click Member Selection to display the Member Selection dialog box with the Year dimension options populated.
Smart View Ad Hoc Basics 1 October 2016
8 | P a g e
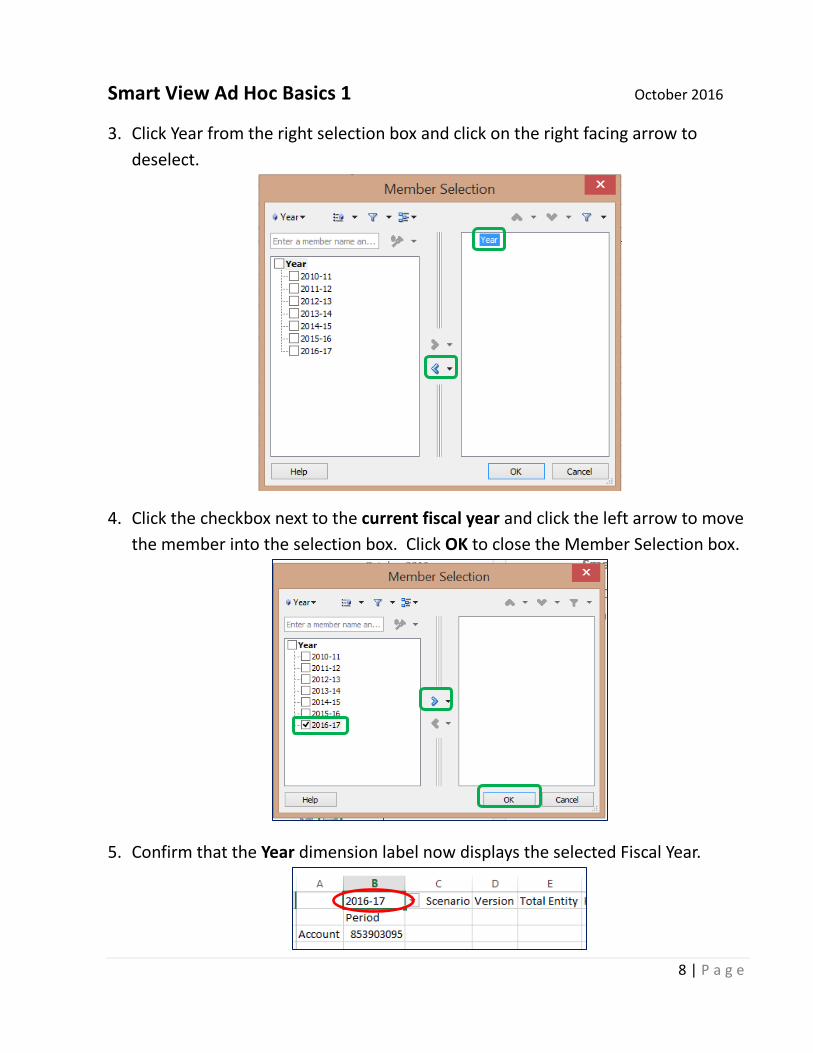
3. Click Year from the right selection box and click on the right facing arrow to deselect.
4. Click the checkbox next to the current fiscal year and click the left arrow to move the member into the selection box. Click OK to close the Member Selection box.
5. Confirm that the Year dimension label now displays the selected Fiscal Year.
Smart View Ad Hoc Basics 1 October 2016
9 | P a g e
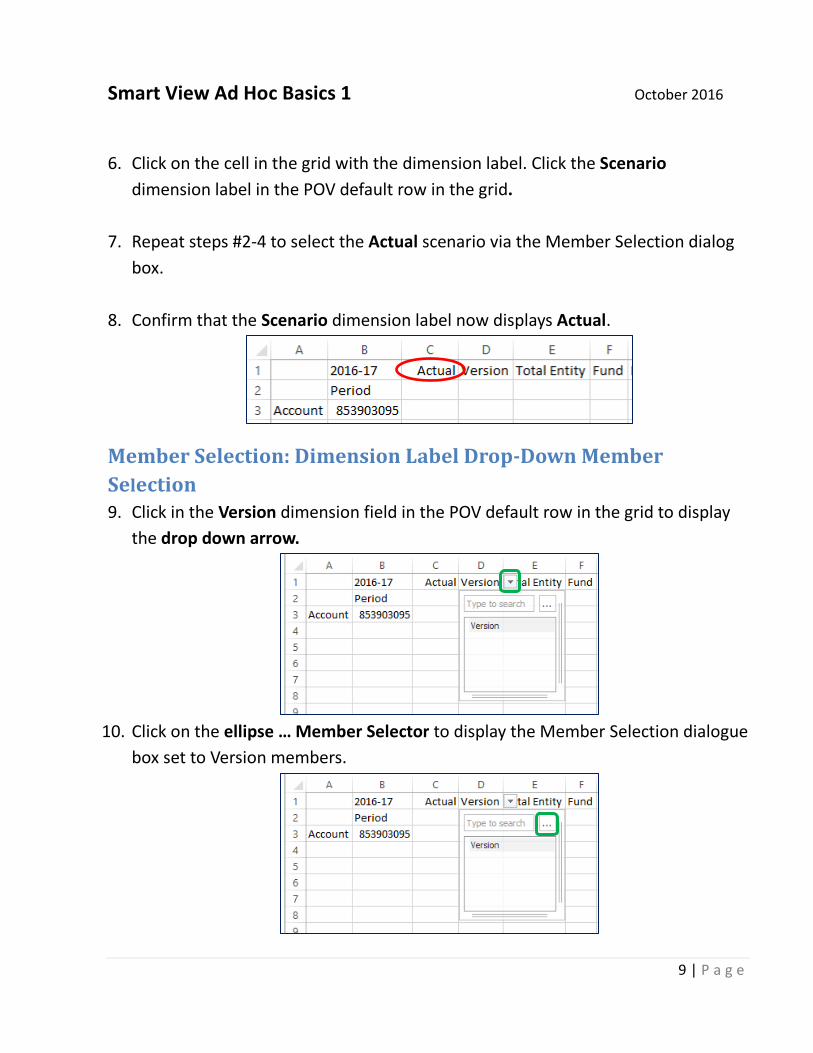
6. Click on the cell in the grid with the dimension label. Click the Scenario
dimension label in the POV default row in the grid.
7. Repeat steps #2-4 to select the Actual scenario via the Member Selection dialog box.
8. Confirm that the Scenario dimension label now displays Actual.
Member Selection: Dimension Label Drop-Down Member Selection 9. Click in the Version dimension field in the POV default row in the grid to display
the drop down arrow.
10. Click on the ellipse … Member Selector to display the Member Selection dialogue
box set to Version members.
Smart View Ad Hoc Basics 1 October 2016
10 | P a g e
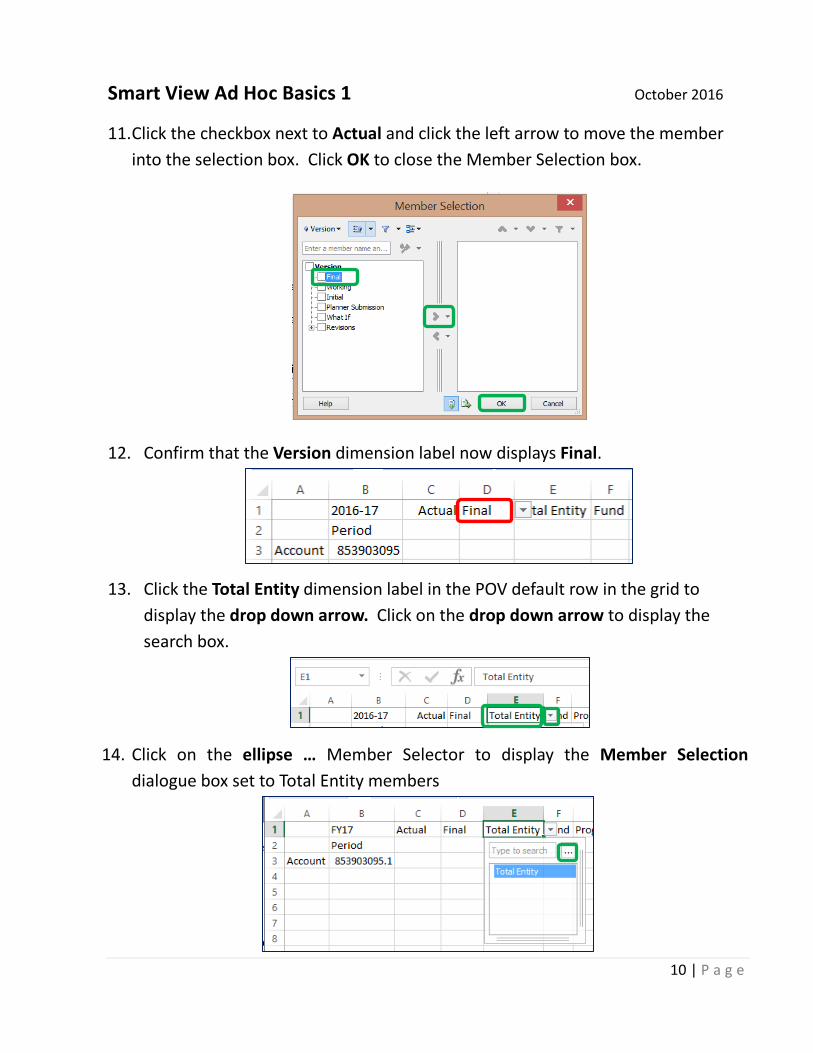
11. Click the checkbox next to Actual and click the left arrow to move the member into the selection box. Click OK to close the Member Selection box.
12. Confirm that the Version dimension label now displays Final.
13. Click the Total Entity dimension label in the POV default row in the grid to display the drop down arrow. Click on the drop down arrow to display the search box.
14. Click on the ellipse … Member Selector to display the Member Selection dialogue box set to Total Entity members
Smart View Ad Hoc Basics 1 October 2016
11 | P a g e
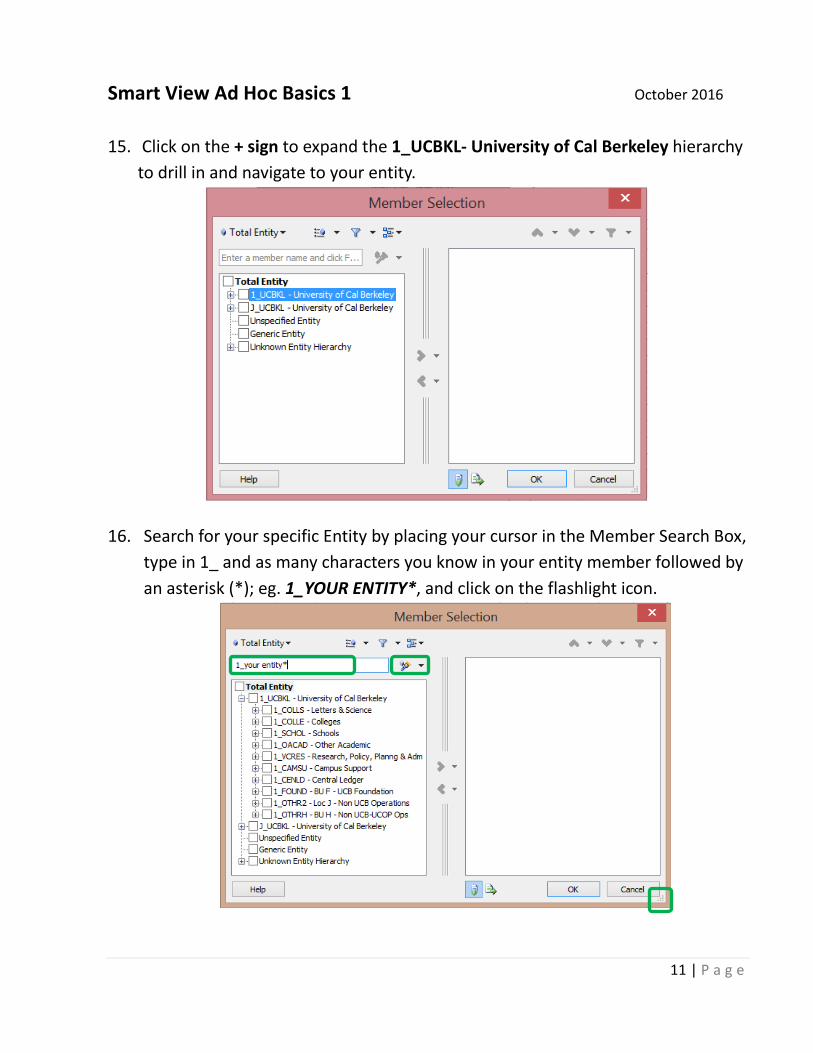
15. Click on the + sign to expand the 1_UCBKL- University of Cal Berkeley hierarchy to drill in and navigate to your entity.
16. Search for your specific Entity by placing your cursor in the Member Search Box, type in 1_ and as many characters you know in your entity member followed by an asterisk (*); eg. 1_YOUR ENTITY*, and click on the flashlight icon.
Smart View Ad Hoc Basics 1 October 2016
12 | P a g e
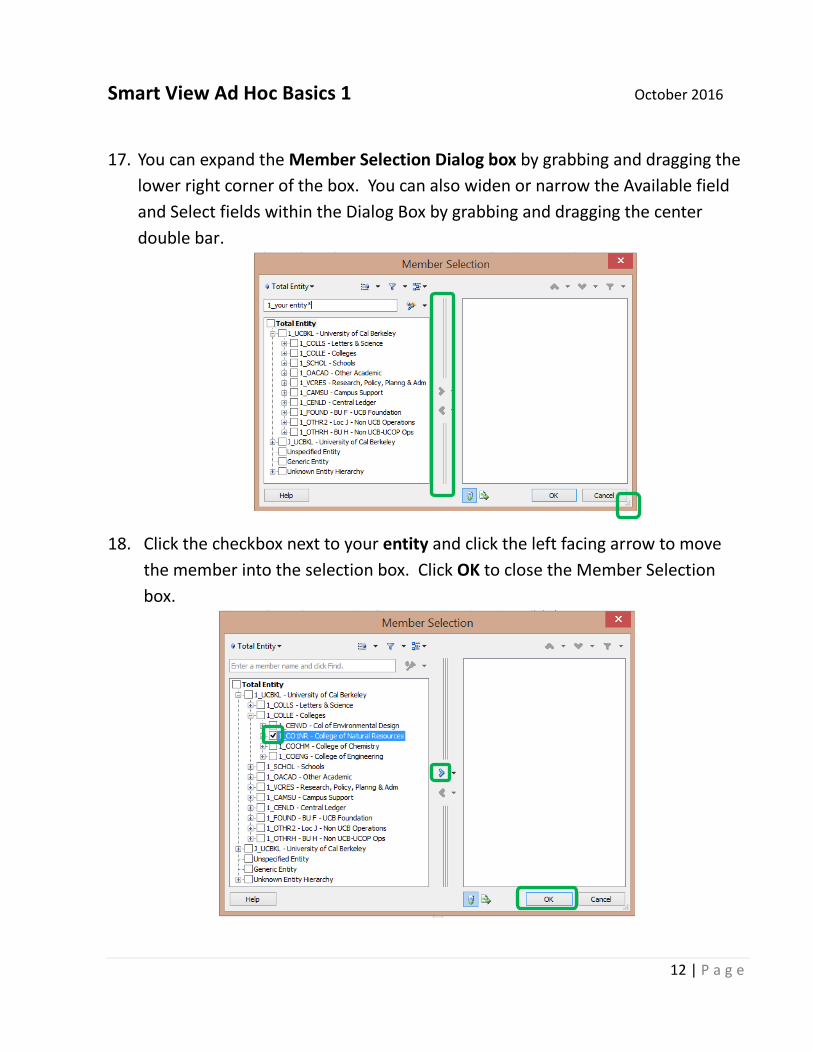
17. You can expand the Member Selection Dialog box by grabbing and dragging the
lower right corner of the box. You can also widen or narrow the Available field and Select fields within the Dialog Box by grabbing and dragging the center double bar.
18. Click the checkbox next to your entity and click the left facing arrow to move the member into the selection box. Click OK to close the Member Selection box.
Smart View Ad Hoc Basics 1 October 2016
13 | P a g e
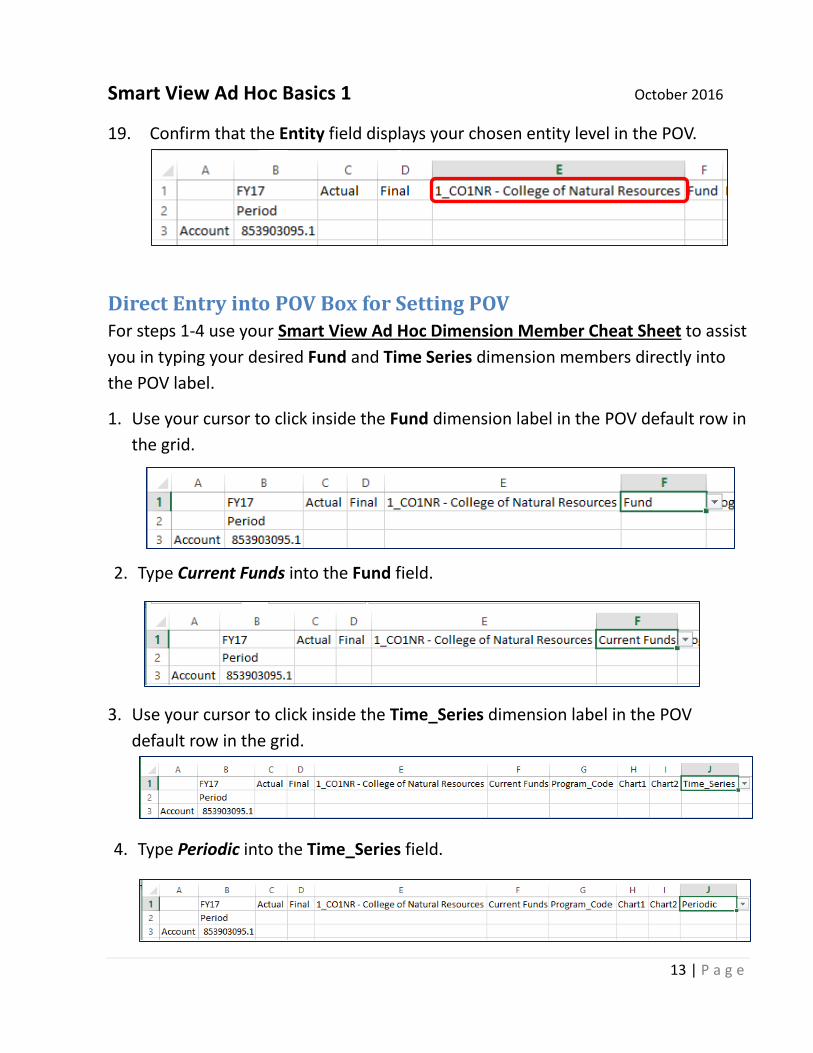
19. Confirm that the Entity field displays your chosen entity level in the POV.
Direct Entry into POV Box for Setting POV For steps 1-4 use your Smart View Ad Hoc Dimension Member Cheat Sheet to assist you in typing your desired Fund and Time Series dimension members directly into the POV label.
1. Use your cursor to click inside the Fund dimension label in the POV default row in the grid.
2. Type Current Funds into the Fund field.
3. Use your cursor to click inside the Time_Series dimension label in the POV default row in the grid.
4. Type Periodic into the Time_Series field.
Smart View Ad Hoc Basics 1 October 2016
14 | P a g e
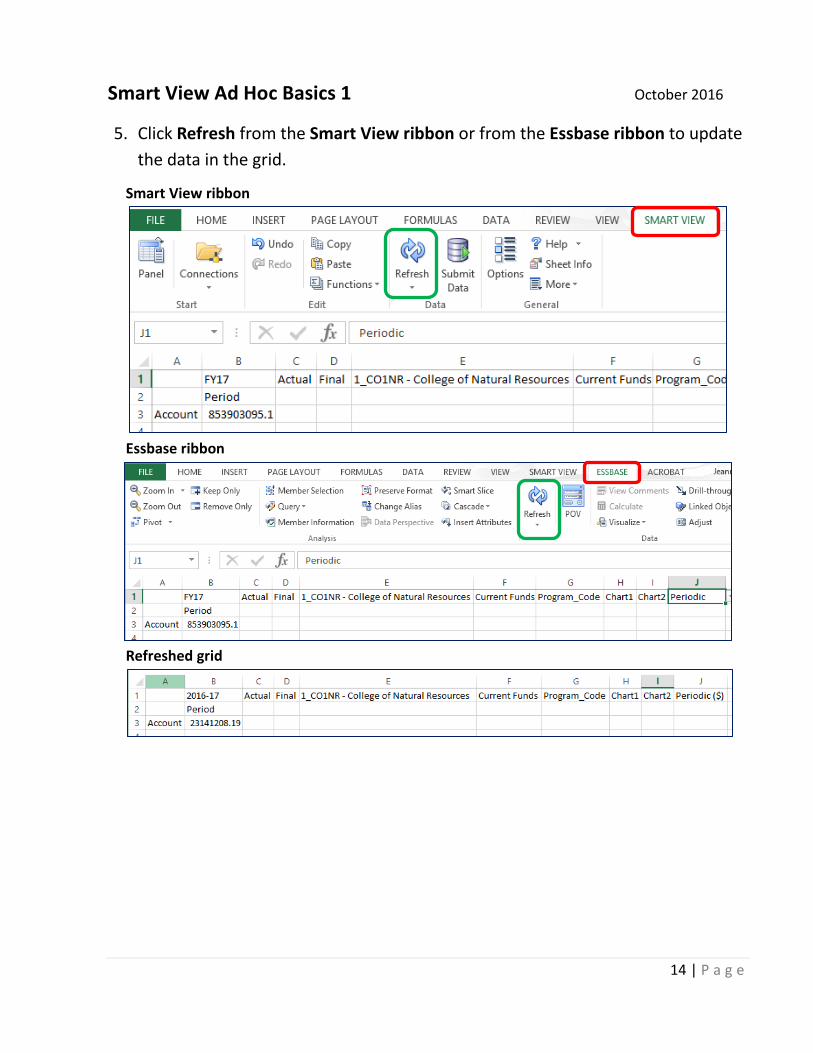
5. Click Refresh from the Smart View ribbon or from the Essbase ribbon to update the data in the grid.
Smart View ribbon
Essbase ribbon
Refreshed grid
Smart View Ad Hoc Basics 1 October 2016
15 | P a g e
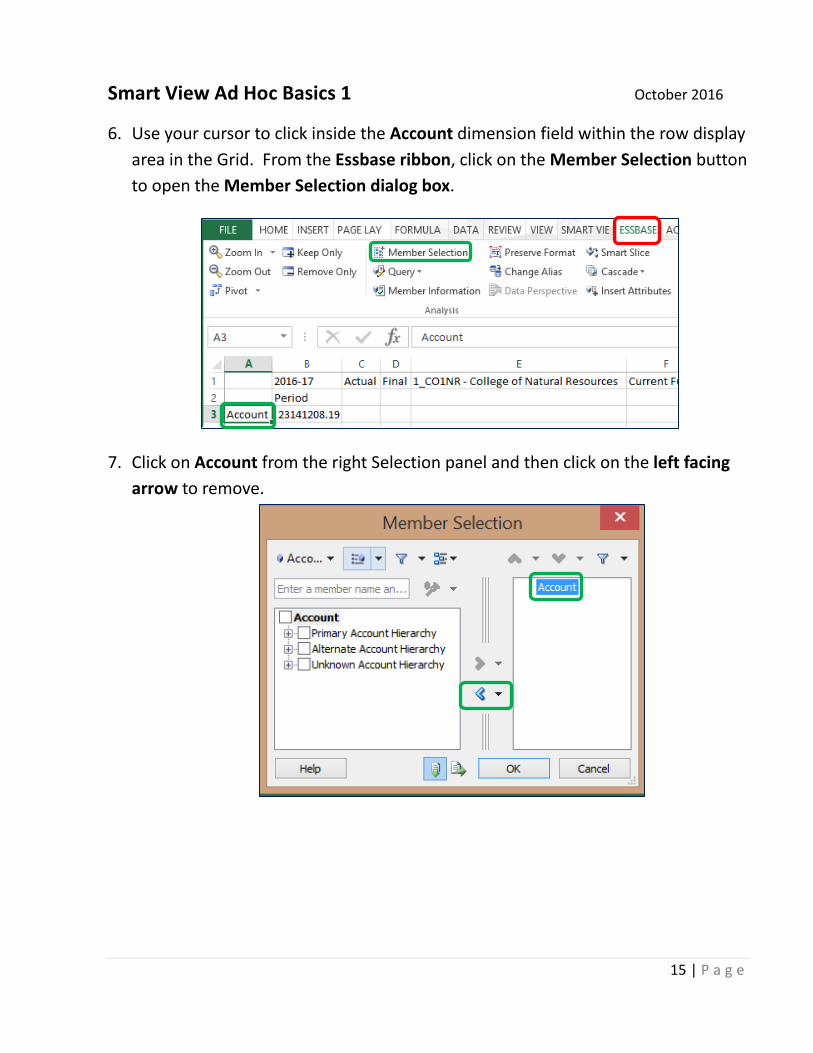
6. Use your cursor to click inside the Account dimension field within the row display area in the Grid. From the Essbase ribbon, click on the Member Selection button to open the Member Selection dialog box.
7. Click on Account from the right Selection panel and then click on the left facing arrow to remove.
Smart View Ad Hoc Basics 1 October 2016
16 | P a g e
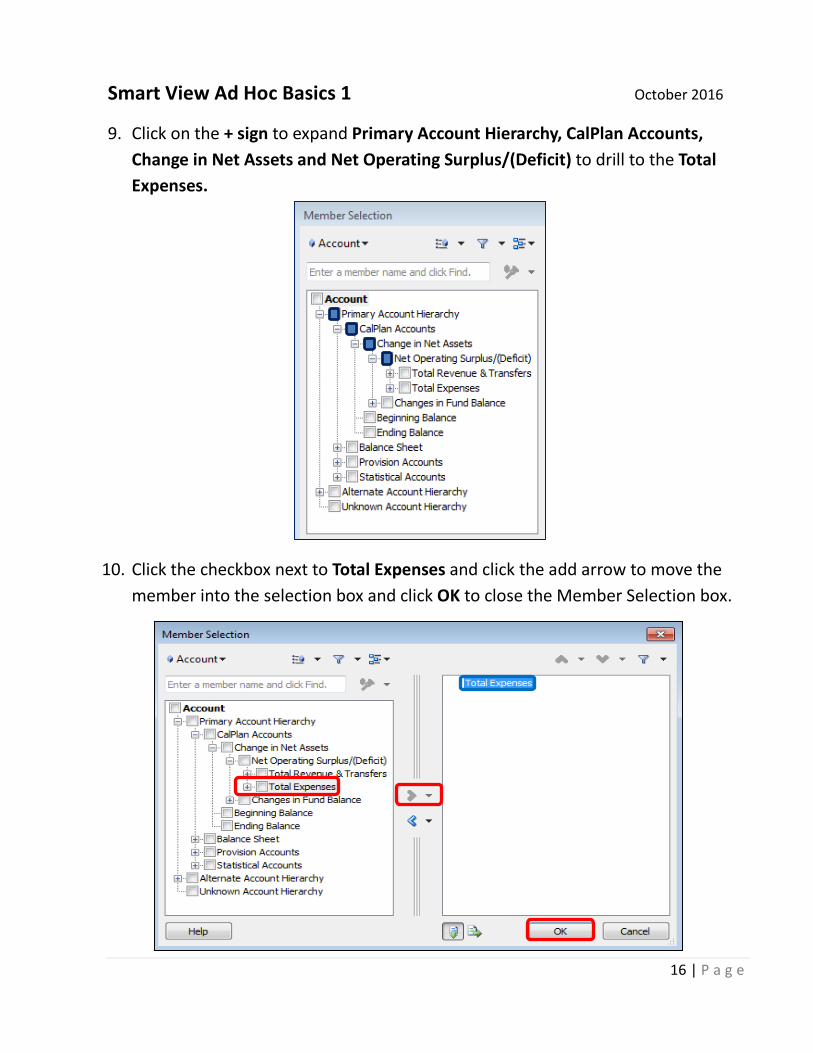
9. Click on the + sign to expand Primary Account Hierarchy, CalPlan Accounts, Change in Net Assets and Net Operating Surplus/(Deficit) to drill to the Total Expenses.
10. Click the checkbox next to Total Expenses and click the add arrow to move the member into the selection box and click OK to close the Member Selection box.
Smart View Ad Hoc Basics 1 October 2016
17 | P a g e
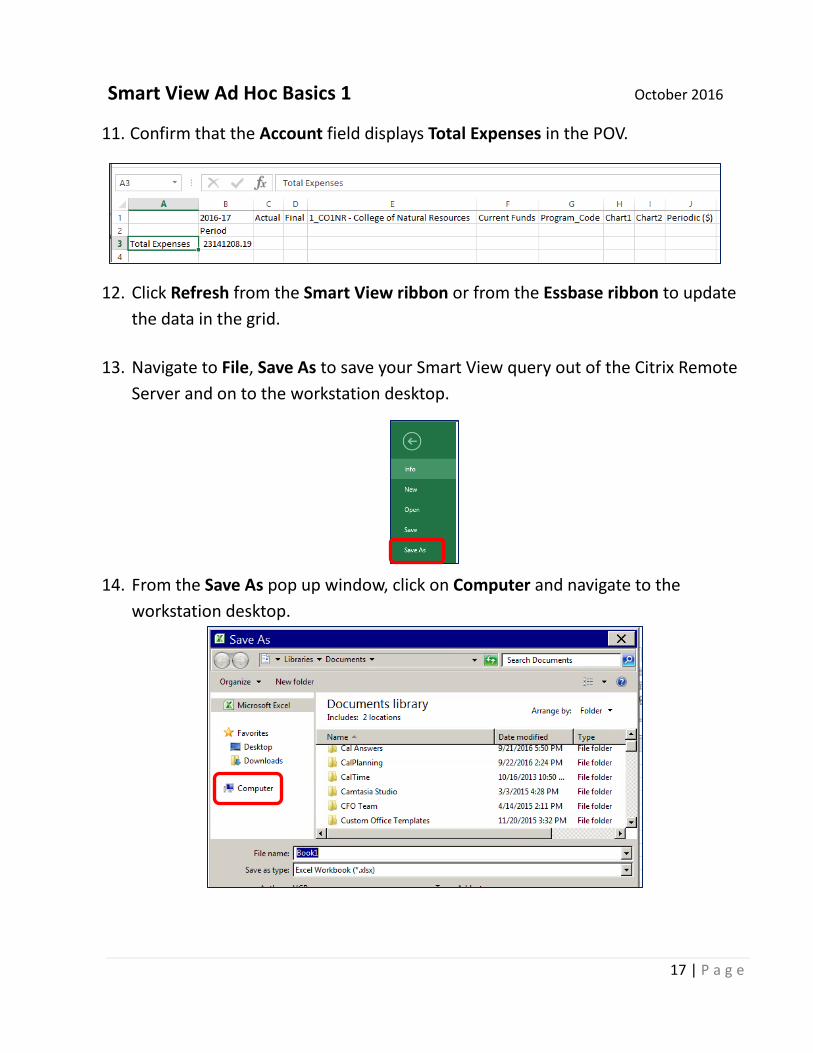
11. Confirm that the Account field displays Total Expenses in the POV.
12. Click Refresh from the Smart View ribbon or from the Essbase ribbon to update the data in the grid.
13. Navigate to File, Save As to save your Smart View query out of the Citrix Remote
Server and on to the workstation desktop.
14. From the Save As pop up window, click on Computer and navigate to the workstation desktop.
Smart View Ad Hoc Basics 1 October 2016
18 | P a g e
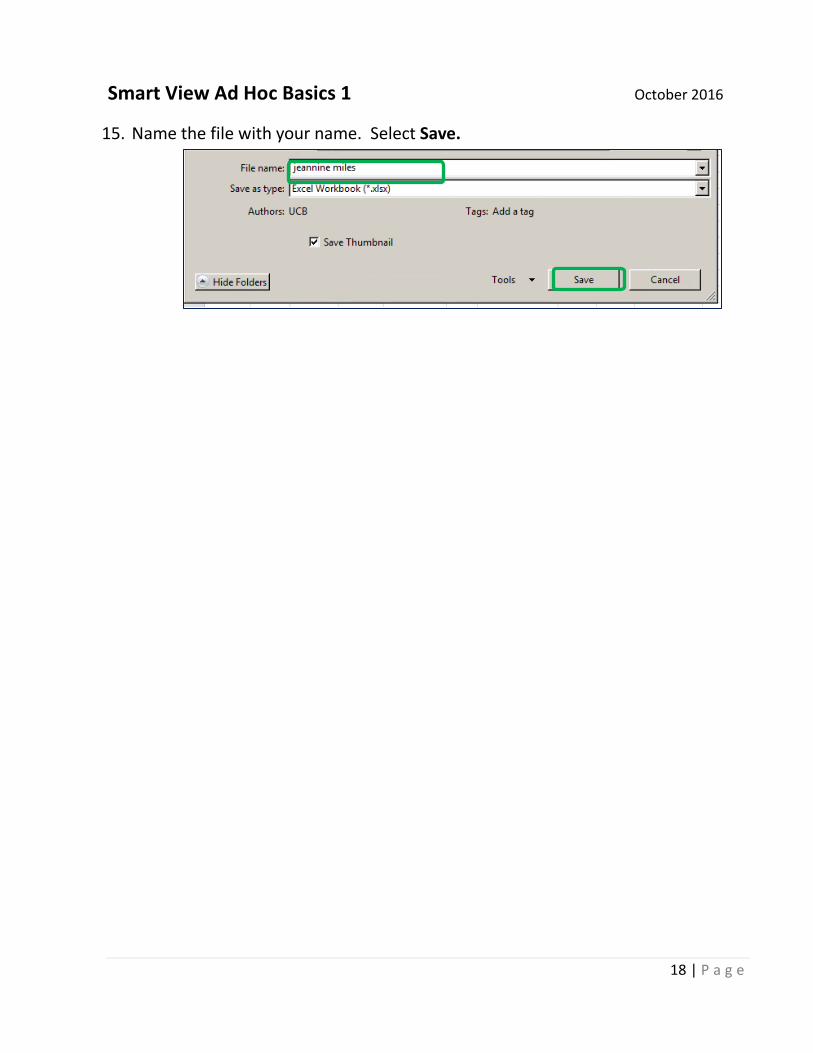
15. Name the file with your name. Select Save.
Smart View Ad Hoc Basics 1 October 2016
19 | P a g e
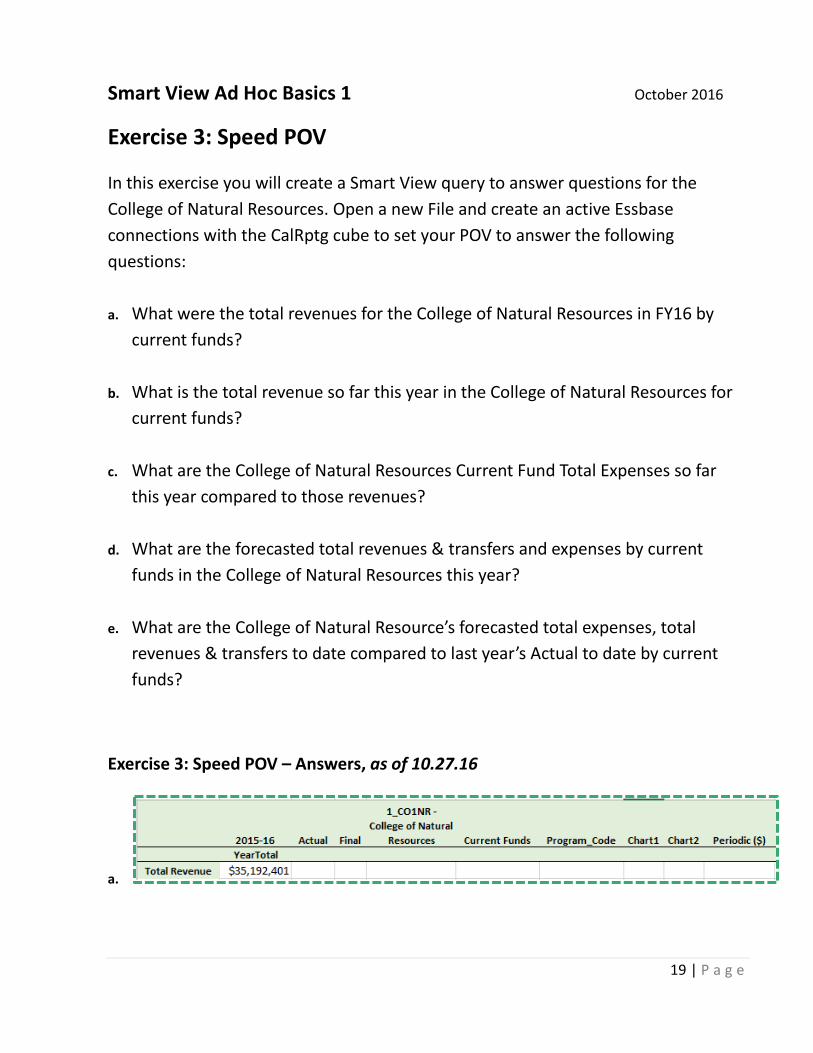
Exercise 3: Speed POV
In this exercise you will create a Smart View query to answer questions for the College of Natural Resources. Open a new File and create an active Essbase connections with the CalRptg cube to set your POV to answer the following questions:
a. What were the total revenues for the College of Natural Resources in FY16 by
current funds?
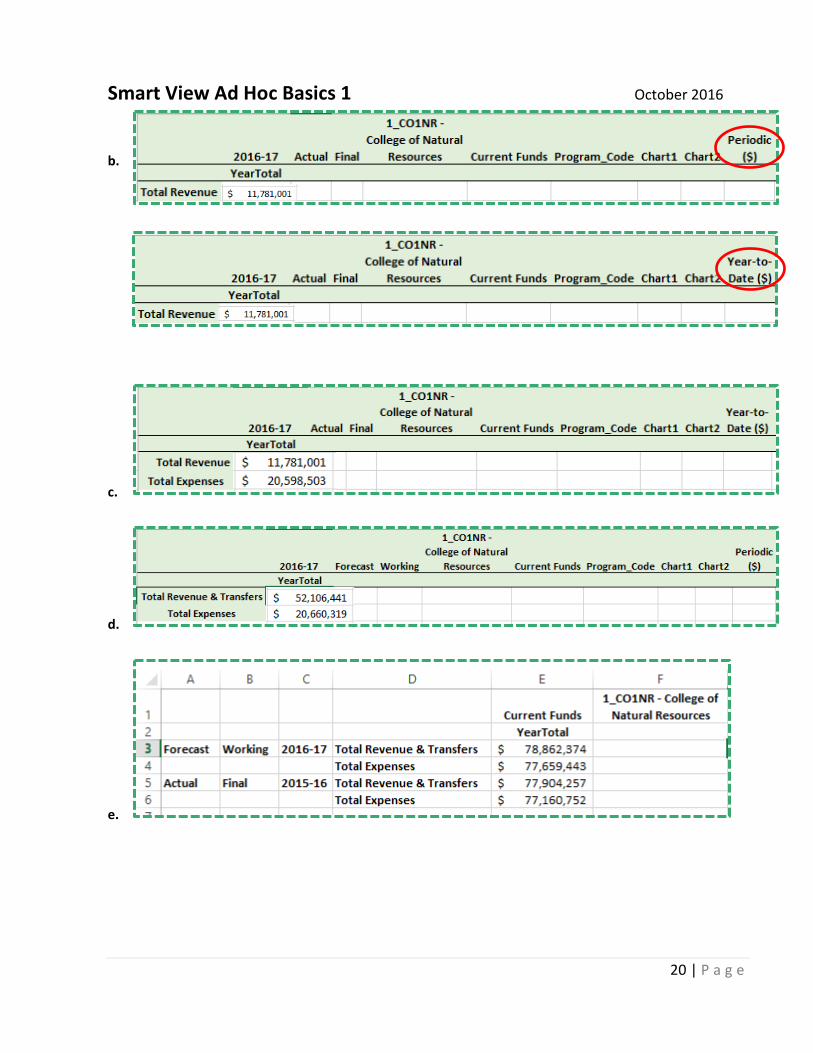
b. What is the total revenue so far this year in the College of Natural Resources for current funds?
c. What are the College of Natural Resources Current Fund Total Expenses so far
this year compared to those revenues?
d. What are the forecasted total revenues & transfers and expenses by current funds in the College of Natural Resources this year?
e. What are the College of Natural Resource’s forecasted total expenses, total
revenues & transfers to date compared to last year’s Actual to date by current funds?
Exercise 3: Speed POV – Answers, as of 10.27.16
a.
Smart View Ad Hoc Basics 1 October 2016
20 | P a g e
b.
c.
d.
e.
Smart View Ad Hoc Basics 1 October 2016
21 | P a g e
Exercise 4: Setting Smart View Options
In this exercise you will set your Smart View Options or preferences. (Note: you will need to do this at your desk as well. The Options settings only apply to this computer.) We will now navigate from the Essbase ribbon to open the Smart View Options screen to review and set personal options.
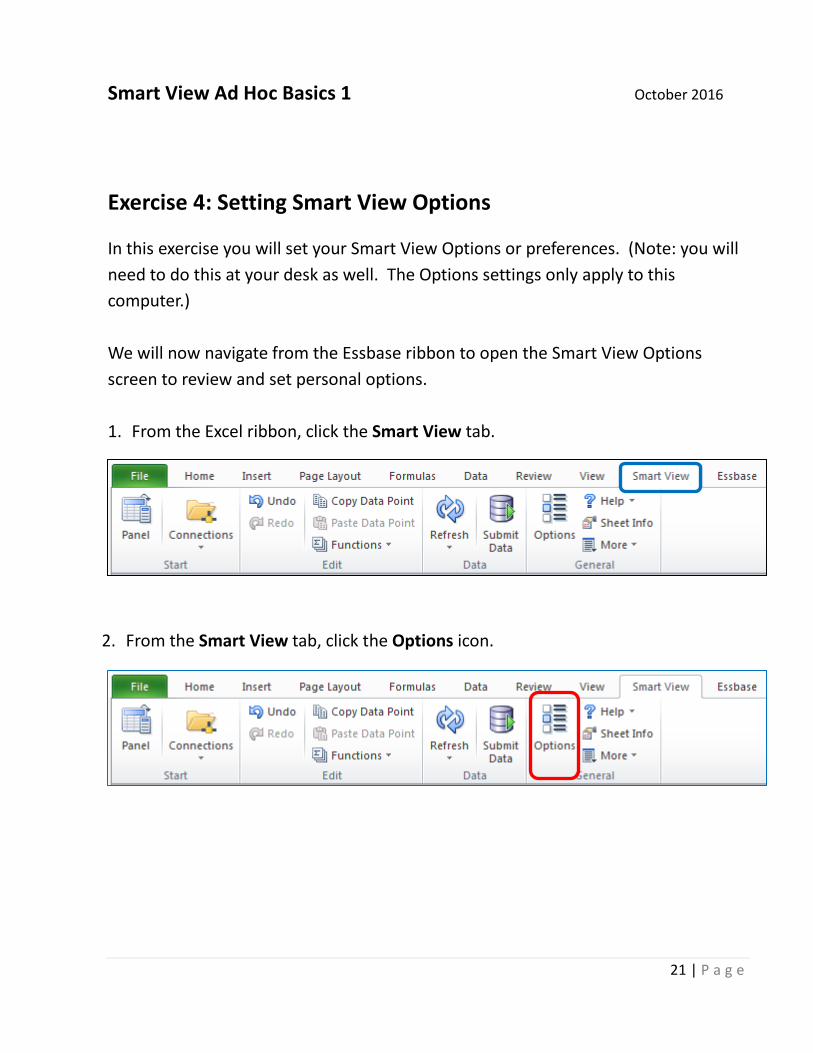
1. From the Excel ribbon, click the Smart View tab.
2. From the Smart View tab, click the Options icon.
/
Smart View Ad Hoc Basics 1 October 2016
22 | P a g e
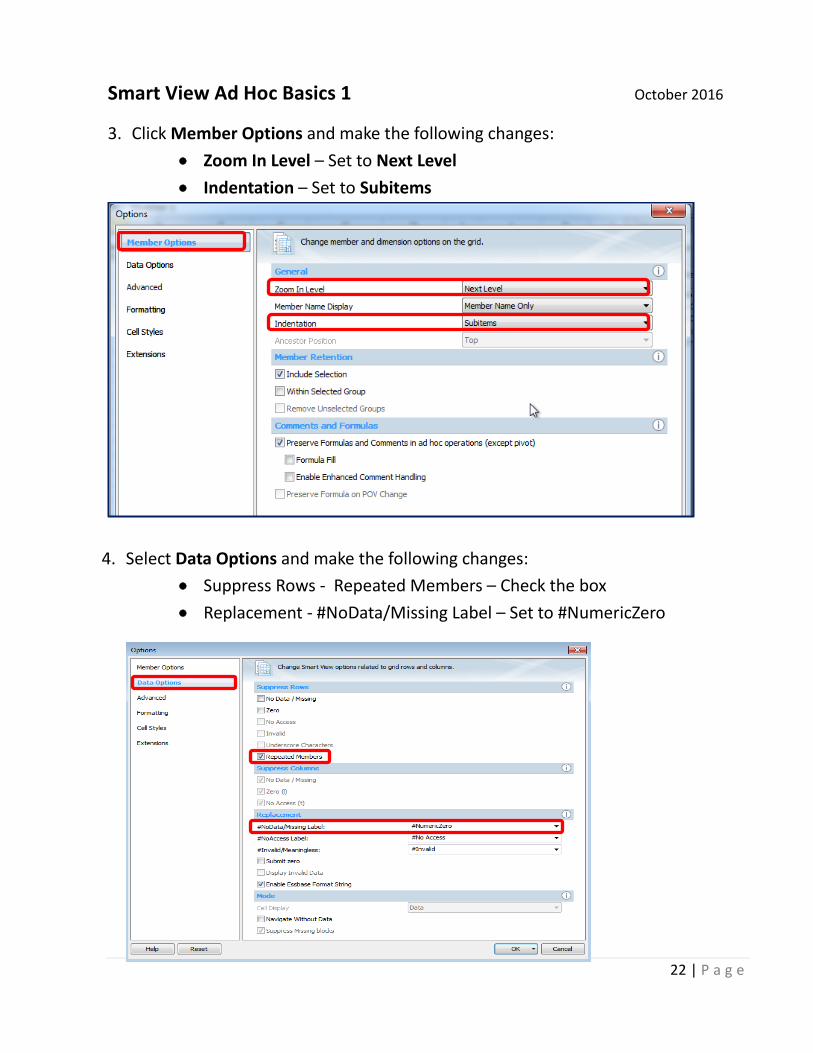
3. Click Member Options and make the following changes: • Zoom In Level – Set to Next Level • Indentation – Set to Subitems
4. Select Data Options and make the following changes: • Suppress Rows - Repeated Members – Check the box • Replacement - #NoData/Missing Label – Set to #NumericZero
Smart View Ad Hoc Basics 1 October 2016
23 | P a g e
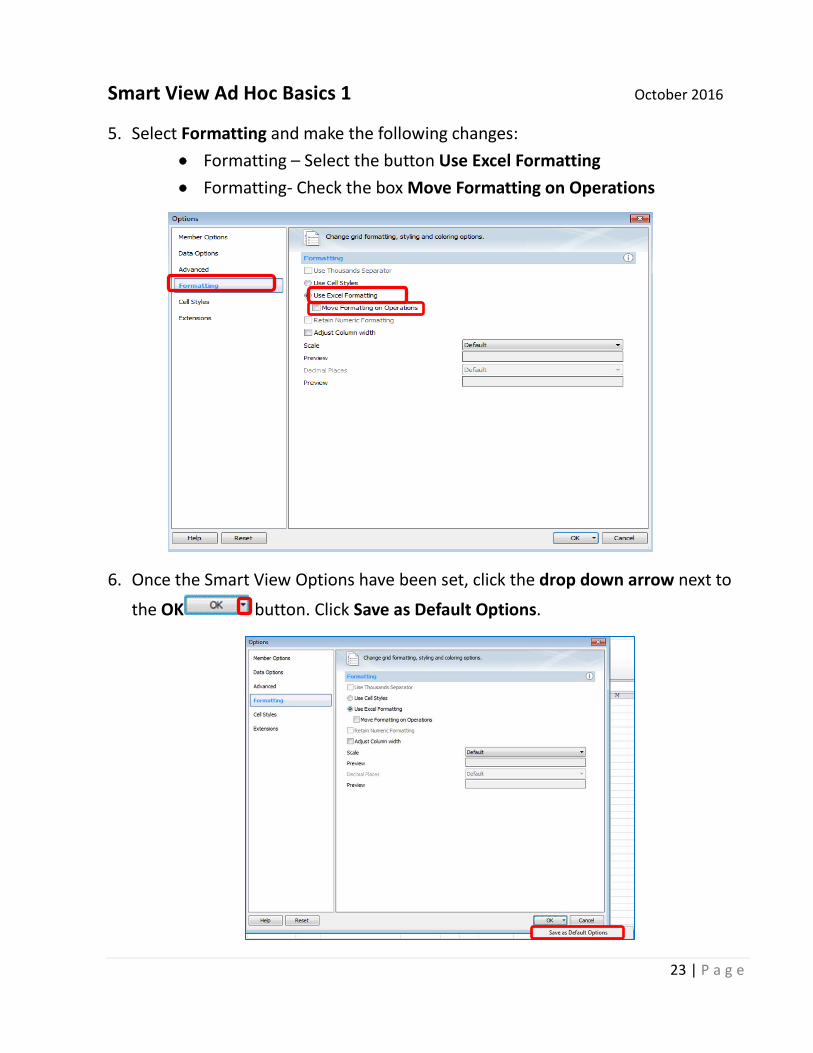
5. Select Formatting and make the following changes: • Formatting – Select the button Use Excel Formatting • Formatting- Check the box Move Formatting on Operations
6. Once the Smart View Options have been set, click the drop down arrow next to
the OK button. Click Save as Default Options.
Smart View Ad Hoc Basics 1 October 2016
24 | P a g e
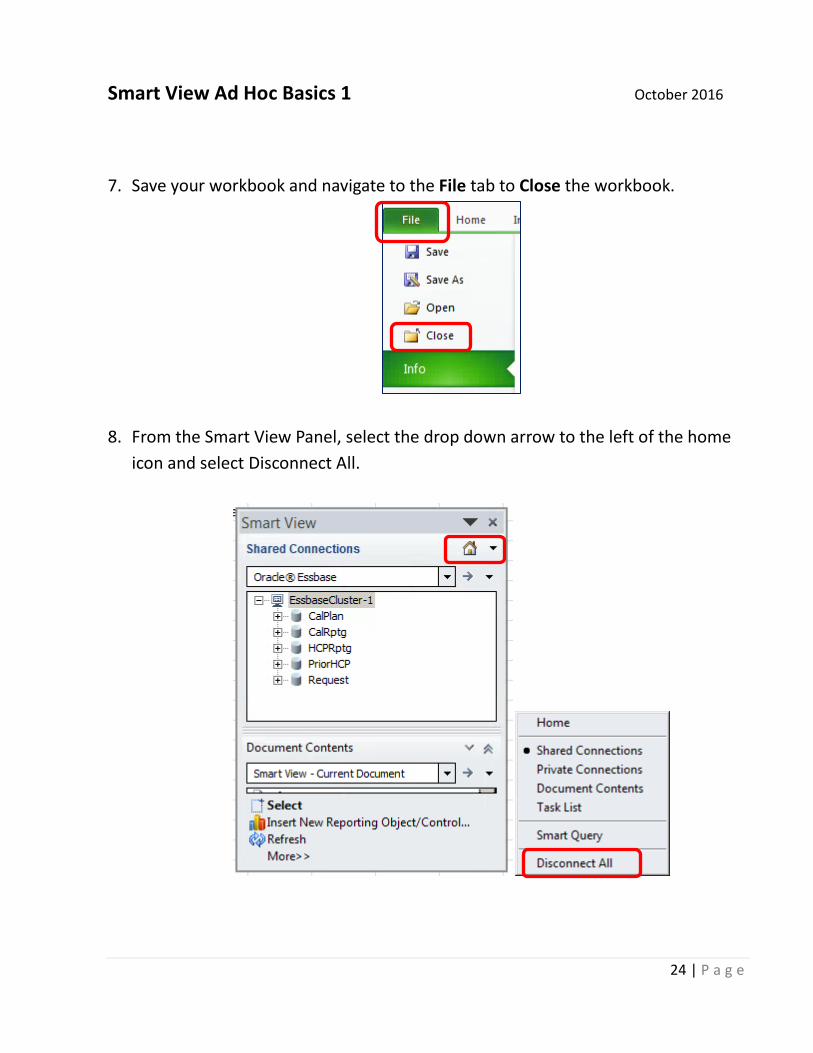
7. Save your workbook and navigate to the File tab to Close the workbook.
8. From the Smart View Panel, select the drop down arrow to the left of the home icon and select Disconnect All.
Smart View Ad Hoc Basics 1 October 2016
25 | P a g e
Exercise 5: Opening a Saved Smart View Workbook
In this exercise, you will open a previously saved workbook containing a Smart View ad hoc grid.
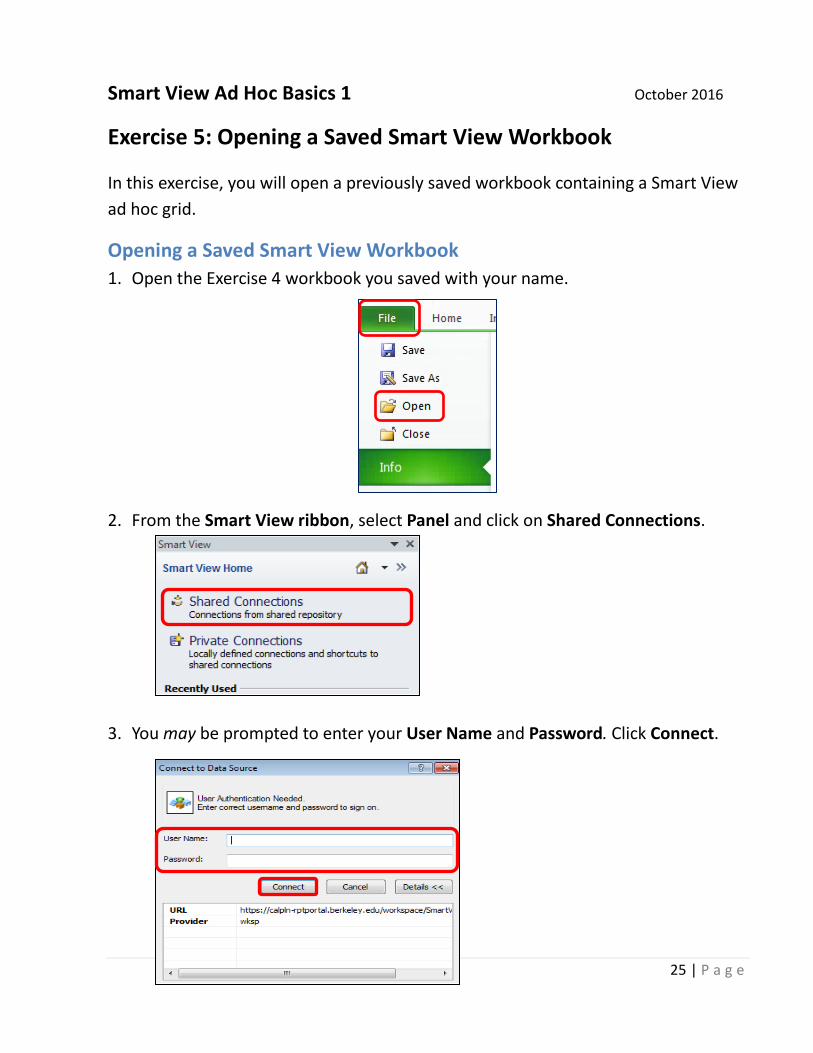
Opening a Saved Smart View Workbook 1. Open the Exercise 4 workbook you saved with your name.
2. From the Smart View ribbon, select Panel and click on Shared Connections.
3. You may be prompted to enter your User Name and Password. Click Connect.
Smart View Ad Hoc Basics 1 October 2016
26 | P a g e
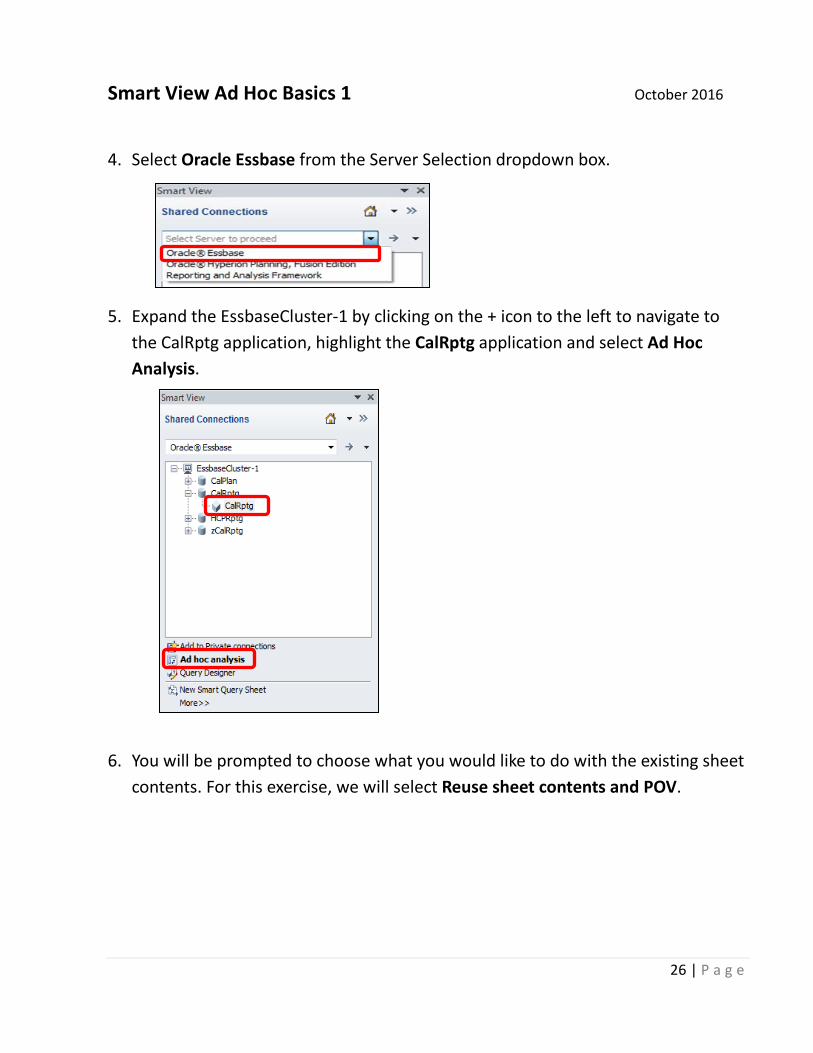
4. Select Oracle Essbase from the Server Selection dropdown box. 5. Expand the EssbaseCluster-1 by clicking on the + icon to the left to navigate to
the CalRptg application, highlight the CalRptg application and select Ad Hoc Analysis.
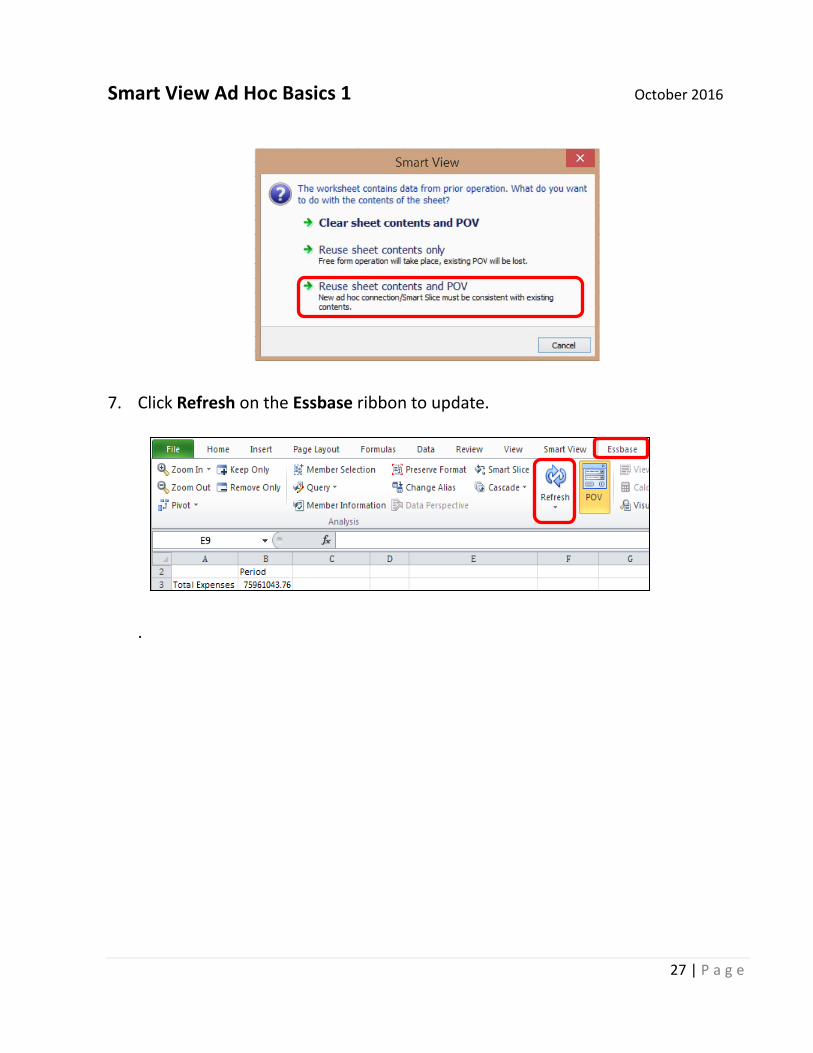
6. You will be prompted to choose what you would like to do with the existing sheet
contents. For this exercise, we will select Reuse sheet contents and POV.
Smart View Ad Hoc Basics 1 October 2016
27 | P a g e
7. Click Refresh on the Essbase ribbon to update.
.
Smart View Ad Hoc Basics 1 October 2016
28 | P a g e
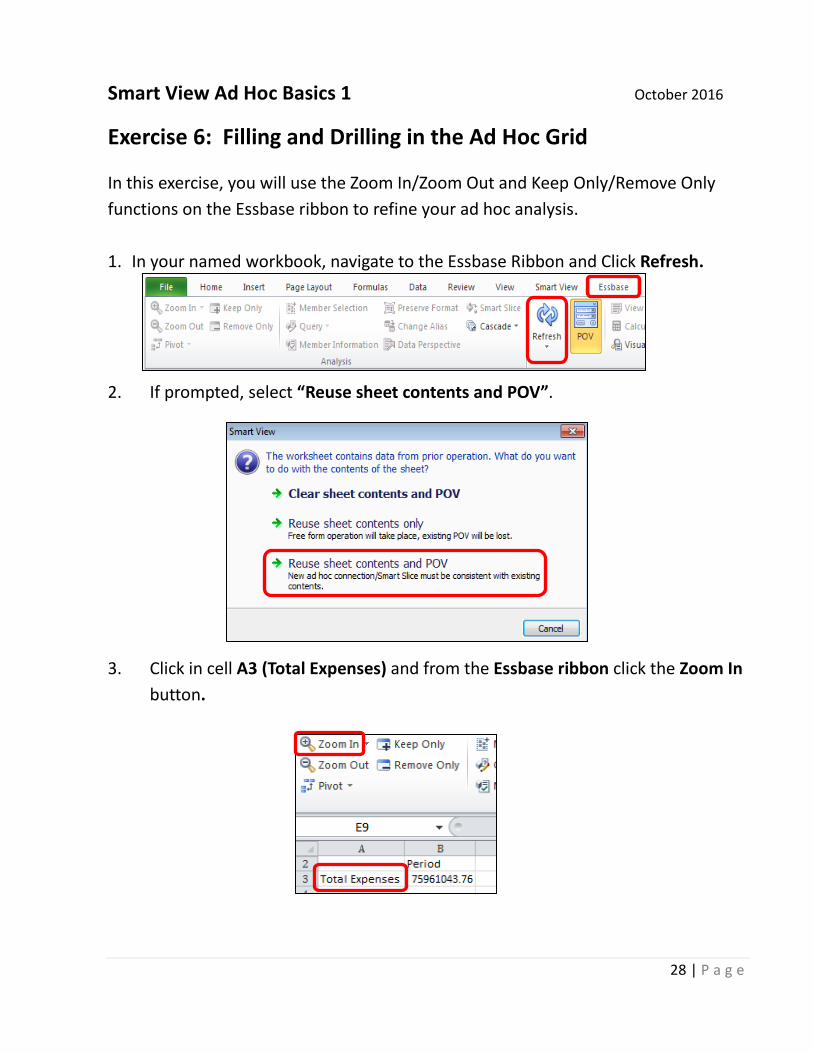
Exercise 6: Filling and Drilling in the Ad Hoc Grid
In this exercise, you will use the Zoom In/Zoom Out and Keep Only/Remove Only functions on the Essbase ribbon to refine your ad hoc analysis. 1. In your named workbook, navigate to the Essbase Ribbon and Click Refresh. 2. If prompted, select “Reuse sheet contents and POV”.
3. Click in cell A3 (Total Expenses) and from the Essbase ribbon click the Zoom In
button.
Smart View Ad Hoc Basics 1 October 2016
29 | P a g e
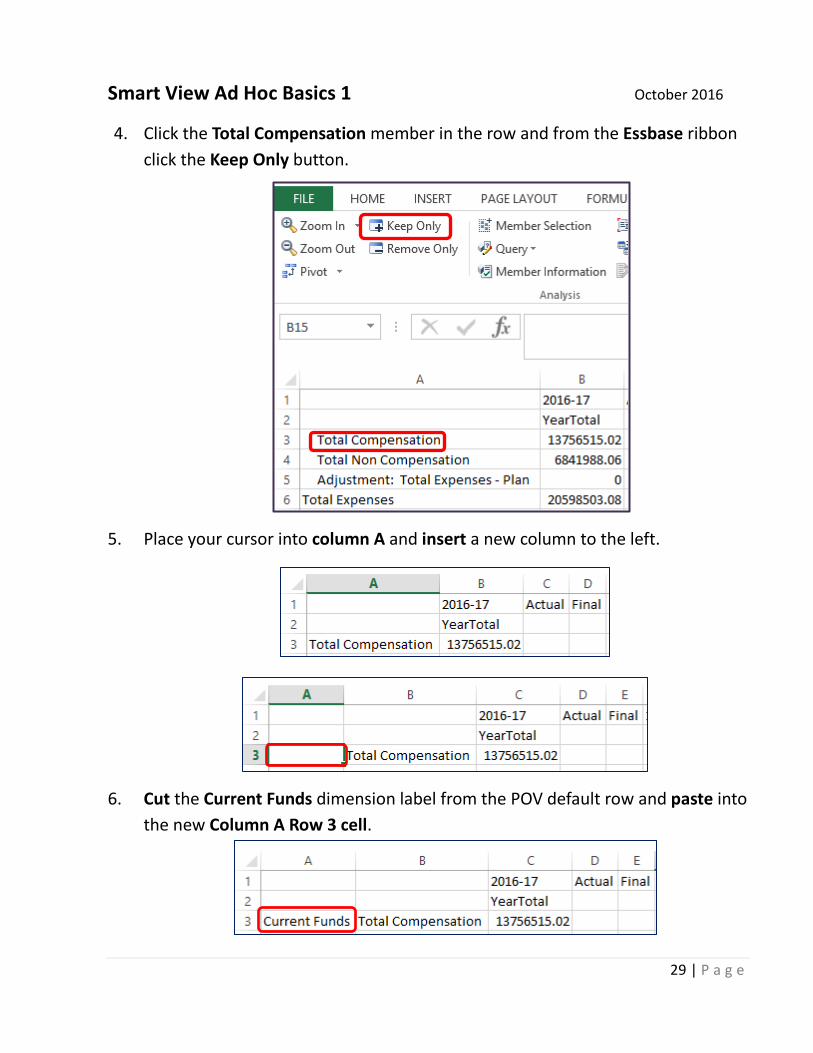
4. Click the Total Compensation member in the row and from the Essbase ribbon click the Keep Only button.
5. Place your cursor into column A and insert a new column to the left.
6. Cut the Current Funds dimension label from the POV default row and paste into the new Column A Row 3 cell.
Smart View Ad Hoc Basics 1 October 2016
30 | P a g e
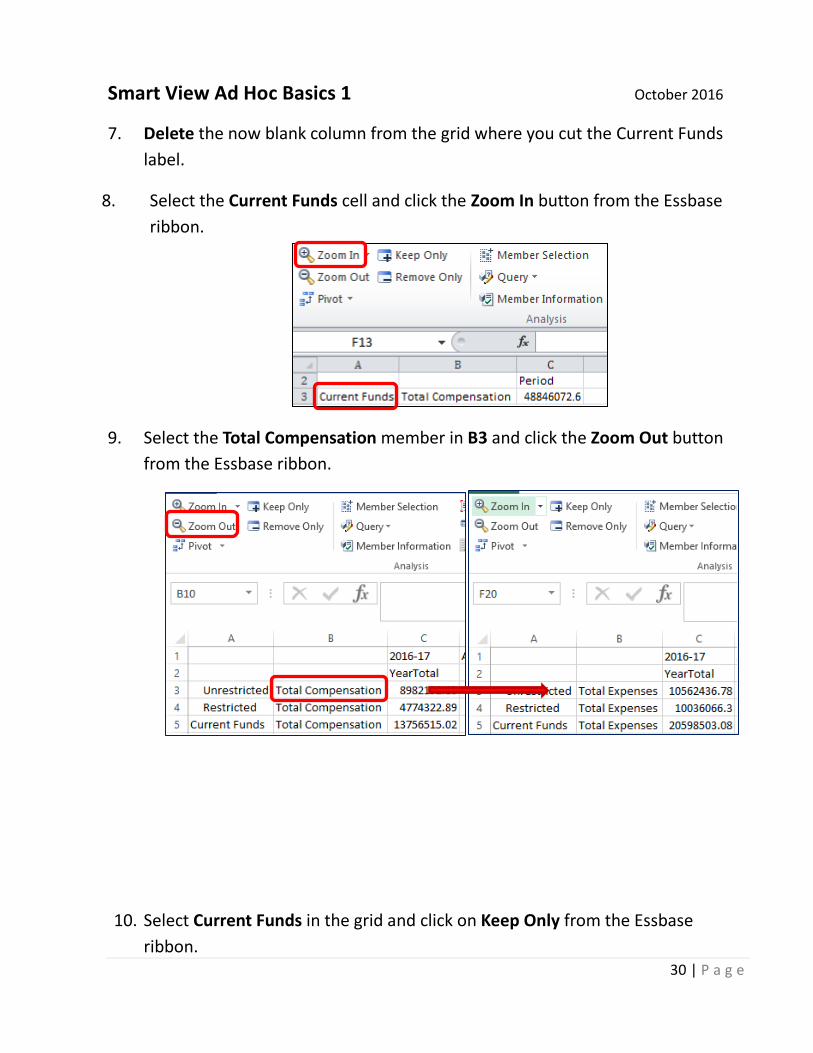
7. Delete the now blank column from the grid where you cut the Current Funds label.
8. Select the Current Funds cell and click the Zoom In button from the Essbase ribbon.
9. Select the Total Compensation member in B3 and click the Zoom Out button from the Essbase ribbon.
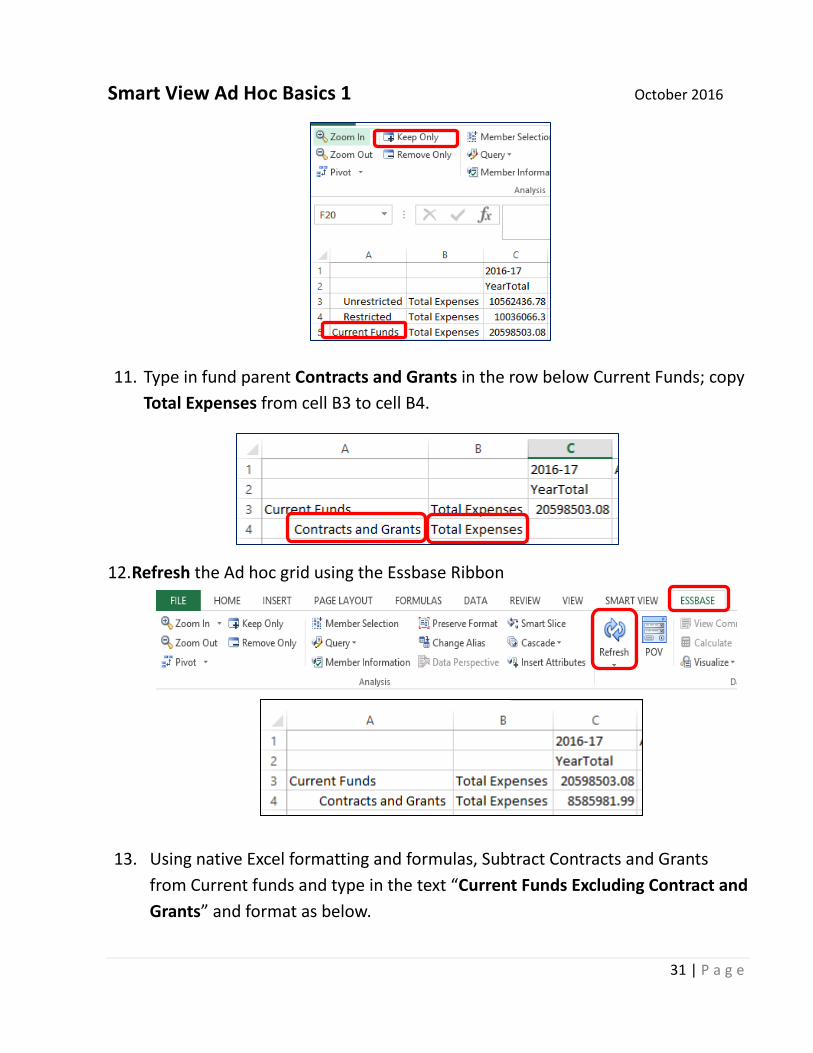
10. Select Current Funds in the grid and click on Keep Only from the Essbase ribbon.
Smart View Ad Hoc Basics 1 October 2016
31 | P a g e
11. Type in fund parent Contracts and Grants in the row below Current Funds; copy Total Expenses from cell B3 to cell B4.
12. Refresh the Ad hoc grid using the Essbase Ribbon
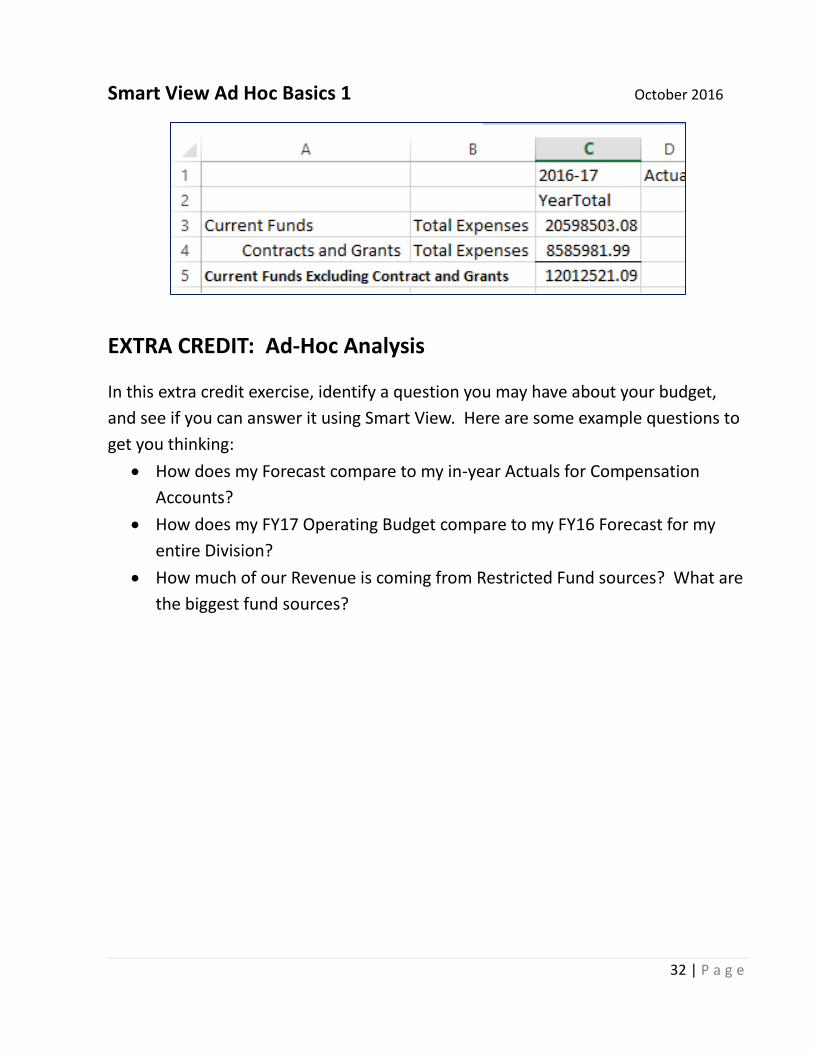
13. Using native Excel formatting and formulas, Subtract Contracts and Grants from Current funds and type in the text “Current Funds Excluding Contract and Grants” and format as below.
Smart View Ad Hoc Basics 1 October 2016
32 | P a g e
EXTRA CREDIT: Ad-Hoc Analysis
In this extra credit exercise, identify a question you may have about your budget, and see if you can answer it using Smart View. Here are some example questions to get you thinking:
• How does my Forecast compare to my in-year Actuals for Compensation Accounts?
• How does my FY17 Operating Budget compare to my FY16 Forecast for my entire Division?
• How much of our Revenue is coming from Restricted Fund sources? What are the biggest fund sources?