exercise 5 – using arcpad tools – check out process
TRANSCRIPT

GPS SharePoint 2010 U.S. Fish and Wildlife Service National Conservation Training Center
Data Check-out and Check-in Process 1
Data Check-out and Check-in Process Using the ArcPad Data Manager Toolbar
Session Objectives: At the conclusion of this session, you will be able to:
Check-out data from a geodatabase for editing in the field using the ArcPad
Data Manager Toolbar in ArcMap. Check-in field data and update a geodatabase using ArcPad Data Manager
Toolbar Create metadata for geodatabase Feature Class using ArcCatalog
Identify information that would be good to include in your GPS metadata

GPS SharePoint 2010 U.S. Fish and Wildlife Service National Conservation Training Center
Data Check-out and Check-in Process 2
Material Created By: Eric Kelchlin (June 2010)
Software: ArcGIS 9.3.1, ArcPad 8.02

GPS SharePoint 2010 U.S. Fish and Wildlife Service National Conservation Training Center
Data Check-out and Check-in Process 3
SECTION 1 – Establishing a Connection with your Mobile GPS Device
The software used to transfer files from your mobile GPS device to your PC or vice versa is called ActiveSync. This software is free and can be downloaded from: http://www.microsoft.com/windowsmobile/default.mspx. You will need administrative privileges to install the program. These instructions were developed using ActiveSync version 4.5 and assume that you have not established a partnership between a mobile GPS device and your PC. A “partnership” is not recommended.
Connect as a “Guest”.
1. Connect your GPS device to a USB port on your PC. An ActiveSync pop-up screen will appear.
2. Click the button on the Microsoft ActiveSync screen. You may have
to click OK twice, depending on your computer software configuration. 3. Click the button at the Synchronization Setup Wizard screen. You
should now be connected as a Guest.

GPS SharePoint 2010 U.S. Fish and Wildlife Service National Conservation Training Center
Data Check-out and Check-in Process 4
SECTION 2 – Preparing Data for Checkout You can send multiple data types to your GPS device using the ArcPad Data Manager Toolbar in ArcMap. These include shapefiles, graphical drawings, geodatabase feature classes, relationship classes and many different types of imagery (i.e., raster data). The most effective use of the Arcpad Data Manager Toolbar is by using geodatabases with built-in domains for in-the-field drop down menu items and relationship classes for non-spatial tabular data entry. Therefore, this section illustrates the geodatabase check-out process.
1. Open ArcMap . 2. Open an existing map document with links to your data or simply use the Add
Data button to add your layers and background imagery.
3. Since the data being checked out will be displayed on a much smaller screen, change the layer symbology to something much easier to see in the field. Follow these general guidelines:
• Colors – bright colors that are visible on white or black background • Points – use a size of 10 -15 • Lines – use a width of 1.5 -2.0 • Polygons – no fill, line width of 1.5 – 2.0
4. Save your map document.

GPS SharePoint 2010 U.S. Fish and Wildlife Service National Conservation Training Center
Data Check-out and Check-in Process 5
SECTION 3 – Using the Arcpad Data Manager Toolbar to Checkout Data
1. Ensure that you have the ArcPad Data Manager Toolbar visible. Click on the Get Data for ArcPad button.
2. Click on the Do not export in the Action column and change it to Check Out for disconnected editing in ArcPad > Data based on defined extent. Repeat this process for all the layers except
the raster layer.
3. Export the raster layer as a MrSID (Gen2) file type.
4. Click .

GPS SharePoint 2010 U.S. Fish and Wildlife Service National Conservation Training Center
Data Check-out and Check-in Process 6
5. Ensure that all the boxes are checked as shown below. Use the following file naming convention: Initials_Project Title_ddmmyy.
6. Store the ArcPad project data in a known location on your PC. See the screen
shot above for an example.
7. Name the ArcPad map the same name as the project folder. Click .
8. Click on the next screen, accepting the defaults. 9. After several seconds, you will be notified that your operation was successful.
Click . If you received an error message during this process, you may have exceeded the 50 MB file size limitation for encoding raster data in ArcGIS. Zoom into a smaller screen extent and redo the ArcPad Tools checkout process.

GPS SharePoint 2010 U.S. Fish and Wildlife Service National Conservation Training Center
Data Check-out and Check-in Process 7
SECTION 4 – Copying the Project Folder onto your GPS Device The next step is to manually copy the project folder you just created and paste it on the mobile device. This is really a simple process but please follow the steps carefully because it usually gets all messed-up. This should be an automated process, but it’s not and we have to “go old school” as a workaround solution.
1. From the Active Sync dialog, click on the Explore button and navigate to your project folder on your PC. Right click and copy the folder you just created.
2. Navigate to your Mobile Device drive and paste the folder in the My Windows Mobile-Based Device\My Documents folder.
3. Click at the File Conversion screen.
SECTION 5 – Open the Project on your Mobile Device
It’s always good practice to open ArcPad on your mobile device and make sure all your data came over correctly before you head-out into the field.
1. Open ArcPad on your Trimble unit by single tapping the large ArcPad Icon on the
Today Toolbar. It will take 20-30 seconds to load.

GPS SharePoint 2010 U.S. Fish and Wildlife Service National Conservation Training Center
Data Check-out and Check-in Process 8
2. At the Open Map screen, tap on the map to select it and tap in the Command Toolbar to open the map.
3. Tap on the Table of Contents (TOC) button on the Main Toolbar to view all the layers that were checked out.
4. Repeat the check-out process if all of your layers are not visible in the TOC.

GPS SharePoint 2010 U.S. Fish and Wildlife Service National Conservation Training Center
Data Check-out and Check-in Process 9
SECTION 6 – Checking-in GPS Field Data
In this section you will update a geodatabase with newly collected GPS field data using the ArcPad Data Manager Toolbar.
1. Exit ArcPad on your mobile device if you haven’t done so already. Connect the GPS device to your computer as a Guest via ActiveSync.
2. From the Active Sync dialog, click Explore and navigate to My Windows-Mobile Based Device\My Documents folder.
3. Right mouse click on your GPS project folder and select Copy.
COPY THE WHOLE FOLDER.
4. Browse to the location of your project folder on your PC using the address bar or
Up Folder button.
5. Right mouse click on the project folder and select Paste, completely replacing our prior checked out ArcPad project. Click on the Yes to All button at the Confirm Folder Replace dialogue.

GPS SharePoint 2010 U.S. Fish and Wildlife Service National Conservation Training Center
Data Check-out and Check-in Process 10
6. Open ArcMap . 7. Open the your map document we saved earlier as part of the check-out process. 8. You should be in an edit session to perform the check-in process
. To load the Editor Toolbar click on the View Menu, select Toolbars, and put a check next to Editor. Dock or float the toolbar as desired.
9. From the dropdown on the Editor Toolbar select Start Editing.
10. Select your working geodatabase and click .
11. On the ArcPad Data Manager Toolbar, click the Check In Edits From ArcPad
button.

GPS SharePoint 2010 U.S. Fish and Wildlife Service National Conservation Training Center
Data Check-out and Check-in Process 11
12. Click the Browse for ArcPad AXF files button.
13. Browse to and select the appropriate .axf file. Click .
14. Check the boxes where you added or modified data to an existing Feature
Class/Table and click . Click Yes and then OK to accept the updates.
15. Click Yes, when asked: Are you sure you want to check in the selected item(s). Click OK at the status screen.
16. Click or to close the Check in window. 17. Select Stop editing from the drop down list on Editor Toolbar and Save your
edits.
GPS SharePoint 2010 U.S. Fish and Wildlife Service National Conservation Training Center
Data Check-out and Check-in Process 12
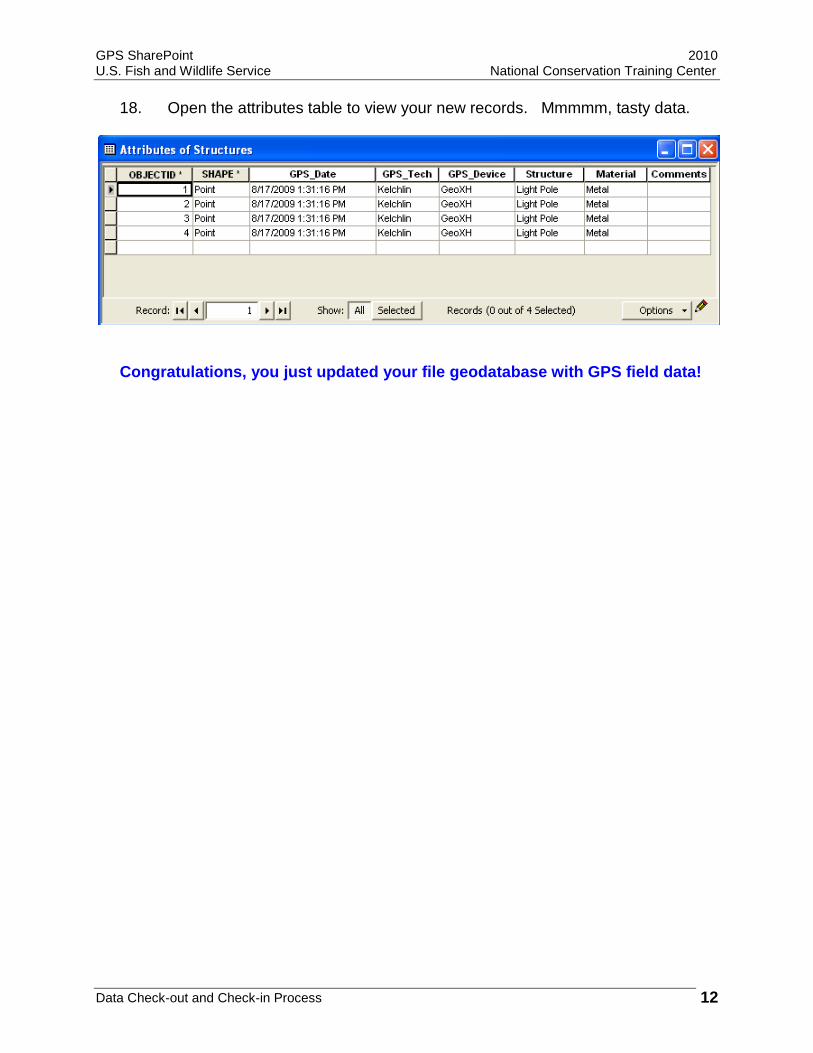
18. Open the attributes table to view your new records. Mmmmm, tasty data.
Congratulations, you just updated your file geodatabase with GPS field data!

GPS SharePoint 2010 U.S. Fish and Wildlife Service National Conservation Training Center
Data Check-out and Check-in Process 13
SECTION 7 – Creating Metadata in ArcCatalog What is metadata? Simply put, metadata is “data about the data”. All federal agencies are required to produce metadata for their spatial data layers. ArcCatalog extracts “basic” metadata from your datasets automatically, but you still need to create a lot of information manually. In this section, you will utilize the metadata editor in ArcCatalog to generate metadata for your GPS layer.
1. Launch ArcCatalog from the desktop.
2. From the Tools menu, select Options.
3. Click on the Metadata tab and ensure the Default Stylesheet is FGDC ESRI and the Creating metadata and Updating metadata boxes are checked as in the example below. Click OK.
4. In the catalog tree on the left hand side of the screen, navigate to the location of your project geodatabase.
5. Select a feature class that needs metadata. We will be using the
ntc_structures feature class as an example here. Notice that you can view your data on the right side of the split screen.

GPS SharePoint 2010 U.S. Fish and Wildlife Service National Conservation Training Center
Data Check-out and Check-in Process 14
6. Click on the Metadata >Spatial tab. Notice the horizontal coordinate system and bounding coordinates are automatically populated.
7. Let’s create metadata for this Feature Class to document our GPS methodologies before we forget all about it. On the Metadata toolbar, click on
the Edit metadata tool.
8. Seven metadata sections appear across the top of the dialog. Identification is in bold with the General tab currently activated. Required fields are highlighted in red. But don’t worry; we’re not going to fill out all of the required fields, only a few of the common ones.

GPS SharePoint 2010 U.S. Fish and Wildlife Service National Conservation Training Center
Data Check-out and Check-in Process 15
9. Highlight and delete the red text in the Abstract
text box and enter the following information:
NCTC structure locations collected via a Trimble GeoXM 2005 series GPS receiver running ArcPad 8.02
10. In the Purpose
text box and enter the following information:
GPS training dataset for TEC7133, June 2010 11. Next, click on the Contact tab, then the Details button. Enter your contact
information. Click OK.
12. Click on the Time Period tab. Click on Currentness Reference and change it to ground condition. Also, change the Calendar Date to today.
13. Click on the Status tab. Enter Complete in the Progress field and None
planned in the Update Frequency field.
14. Click on the Keywords tab. In the Theme field enter Structures, GPS and Trimble GeoXM for keywords. Click on the sign to add each new keyword.
15. In the Place field enter NCTC and USFWS.
16. Next, click on the Data Quality section. The Logical Consistency Report field details the topological (i.e., spatial) integrity of the data. Documenting topological integrity is a good idea if you edited the data in ArcGIS after you downloaded the field data. Since we did not edit the data enter the following:
Unedited, raw GPS field data.

GPS SharePoint 2010 U.S. Fish and Wildlife Service National Conservation Training Center
Data Check-out and Check-in Process 16
17. Your stations GPS data collection protocol goes in the Completeness Report field. Basically the methodology, rules and selection criteria used to derive the data. Enter the following information:
We used a Trimble GeoXM running ArcPad 8.01 to collect the GPS data in the field. Averaging was enabled (10 seconds for points, 5 seconds for vertices). A 2 second logging rate was used for streaming line and polygon features. WAAS was enabled to improve accuracy. No PDOP limit was applied. Mission planning was not conducted.
18. Click on the Positional Accuracy tab and enter <3 meters in the Horizontal
Accuracy Report field and <15 meters in the Vertical Accuracy Report field.
19. Click the Save button when finished. Click on the Preview tab and view your metadata. We will use this metadata file as a template for later exercises.
Congratulations! You just created metadata for your GPS data.

GPS SharePoint 2010 U.S. Fish and Wildlife Service National Conservation Training Center
Data Check-out and Check-in Process 17
SECTION 8 – GPS Data for your Metadata If you plan your GPS data collection project, set objectives and create a geodatabase with domains and relationship tables, then most of this data should already exist in the attribute tables. If not, much of these data can be copied and pasted from Trimble Pathfinder Office output files or manually input into the XML metadata file through ArcCatalog. Most of these data should be added to the Identification or Data Quality sections in your FGDC metadata. No GPS section exists, so we have to make the best of it. GPS Project Planning Project purpose and objective(s) Datum and projection used to collected the field data Date(s) and time data were collected Data collector name(s) or initials GPS receiver make and model (i.e. Trimble GeoXM 2005 Series) GPS receiver firmware version and last date updated GPS field software and version
Data Collection Techniques Cite any GPS field data collection protocols if you used them. Did you perform missing planning, if so what were the results? What were the GPS data collection settings? In ArcPad refer to your GPS
Preferences or Trimble GPSCorrect settings. Logging rate used for lines and polygons Did you use offsets, if so what were the conditions and settings? Mode of data collection (walking, vehicle, ATV, boat, plane, hoarse, etc.)
Differential Correction Correction Type (real-time WAAS, Real-time beacon, post-processed) Post-processing software and version Name of the base station(s) used for correction Settings used to perform the differential correction

GPS SharePoint 2010 U.S. Fish and Wildlife Service National Conservation Training Center
Data Check-out and Check-in Process 18
Accuracy Indices These are automatically created with Trimble Pathfinder Office if the data are post-process or if the data were collected in ArcPad through the Track Log feature.
Average Positional Dilution Of Precision (PDOP) Maximum PDOP Average Horizontal Precision (95% or 68% confidence ellipse) Worst Horizontal Precision (95% or 68% confidence ellipse) Vertical Precision (95% or 68% confidence ellipse) Number of points recorded per feature
Deliverables Was the original GPS field data reprojected, if so what software and
transformations did you use? Did you edit the raw data to create the final layer, if so what process steps did
you use? Who or what organization will maintain and distribute the dataset? Is this dataset updated on a regular schedule, or is this complete?
Can you think of any additional data that would be useful to include in the GPS metadata? If so, write them down below:
1. _______________________________________________________________ 2. _______________________________________________________________
3. _______________________________________________________________
4. _______________________________________________________________
5. _______________________________________________________________