exchange staged migration step by step · 3. type your domain name in the setup wizard and click...
TRANSCRIPT

1
Exchange staged migration step by step
Version 1.0
An Exchange staged migration is recommended when your existing email system is Exchange Server
2003 or Exchange Server 2007 and you want to move user accounts and mailbox content to Office 365 in
stages over time.
Contents Step 1: Getting started .................................................................................................................................. 2
Step 2: Prepare your environment ............................................................................................................... 2
Step 3: Add your domain .............................................................................................................................. 3
Step 4: Set up directory synchronization ...................................................................................................... 5
4-1: Getting started with directory synchronization ................................................................................ 6
4-2: Learn about IdFix ............................................................................................................................... 6
4-3: Run IdFix tool ..................................................................................................................................... 7
4-4: Prepare for Azure AD Connect ......................................................................................................... 10
4-5: Run Azure AD Connect ..................................................................................................................... 10
Step 5: Finish your Exchange staged migration .......................................................................................... 13
5-1: Create mailbox list ........................................................................................................................... 14
5-2: Connect to your email system ......................................................................................................... 15
5-3: Run the first migration batch ........................................................................................................... 16
5-4: Assign Licenses................................................................................................................................. 20
5-5: Configure mail-enabled users .......................................................................................................... 20
5-6: Run more migration batches ........................................................................................................... 20
5-7: Reduce email delays ........................................................................................................................ 21
5-8: Route email ...................................................................................................................................... 21
5-9: Delete migration batch .................................................................................................................... 23
5-10: Create autodiscover record ........................................................................................................... 24
5-11: Decommission Servers ................................................................................................................... 24
5-12: Install Office ................................................................................................................................... 25
5-13: Help everyone get started ............................................................................................................. 27

2
Step 1: Getting started
Overview of Exchange staged migration tasks
Here's a summary of the tasks you perform for an Exchange staged migration.
1. Get familiar with the steps involved in a staged migration.
2. Prepare your on-premises environment.
3. Add your domain to Office 365.
4. Set up directory synchronization to create users in Office 365.
5. Create a list of on-premises mailboxes to migrate.
6. Connect Office 365 to your email system.
7. Create a staged migration batch and start the mailbox migration.
8. Assign Office 365 licenses to users.
9. Convert on-premises mailboxes to mail-enabled users.
10. Configure DNS to reduce email delivery delays.
11. Route your email directly to Office 365.
12. Create an Autodiscover record in DNS.
13. Delete the staged migration batch.
14. Help users install the latest version of Office on their computers.
15. Provide users with the information they need to start using Office 365.
Step 2: Prepare your environment
Prepare your Exchange environment for a staged migration
Before you migrate mailboxes to Office 365 by using a staged migration, there are a few changes
you must make first to your Exchange Server environment.
To prepare for a staged migration
1. Configure Outlook Anywhere on your on-premises Exchange Server. The email migration service
uses Outlook Anywhere (also known as RPC over HTTP), to connect to your on-premises Exchange
Server. For information about how to set up Outlook Anywhere for Exchange 2007, and Exchange
2003, see the following:
Exchange 2007: How to Enable Outlook Anywhere
How to configure Outlook Anywhere with Exchange 2003
Important! You must use a certificate issued by a trusted certification authority (CA) with your
Outlook Anywhere configuration. Outlook Anywhere can't be configured with a self-signed
certificate. For more information, see How to configure SSL for Outlook Anywhere.
2. Optional: Verify that you can connect to your Exchange organization using Outlook Anywhere.
Try one of the following methods to test your connection settings.

3
Use Outlook from outside your corporate network to connect to your on-premises Exchange
mailbox.
Use the Microsoft Exchange Remote Connectivity Analyzer to test your connection settings. Use
the Outlook Anywhere (RPC over HTTP) or Outlook Autodiscover tests.
Wait for the connection to automatically be tested when you connect Office 365 to your email
system later.
3. Set permissions. The on-premises user account that you use to connect to your on-premises
Exchange organization (also called the migration administrator) must have the necessary permissions
to access the on-premises mailboxes that you want to migrate to Office 365. This user account is
used when you connect Office 365 to your email system later. To migrate the mailboxes, the admin
must have one of the following permission sets:
Be assigned the FullAccess permission for each on-premises mailbox and be assigned the
WriteProperty permission to modify the TargetAddress property on the on-premises user
accounts.
or
Be assigned the Receive As permission on the on-premises mailbox database that stores user
mailboxes, and the WriteProperty permission to modify the TargetAddress property on the on-
premises user accounts.
For instructions about how to set these permissions, see Assign permissions to migrate mailboxes to
Office 365
4. Disable Unified Messaging (UM). If UM is turned on for the on-premises mailboxes you’re
migrating, turn off UM before migration. Turn on UM for the mailboxes after migration is complete.
For how-to steps, see disable unified messaging.
Step 3: Add your domain
Add and verify your domain
As with most types of Office 365 migrations, you start by adding your domain to Office 365.
Office 365 includes a setup wizard that walks you through the steps.
To add your domain to Office 365
4
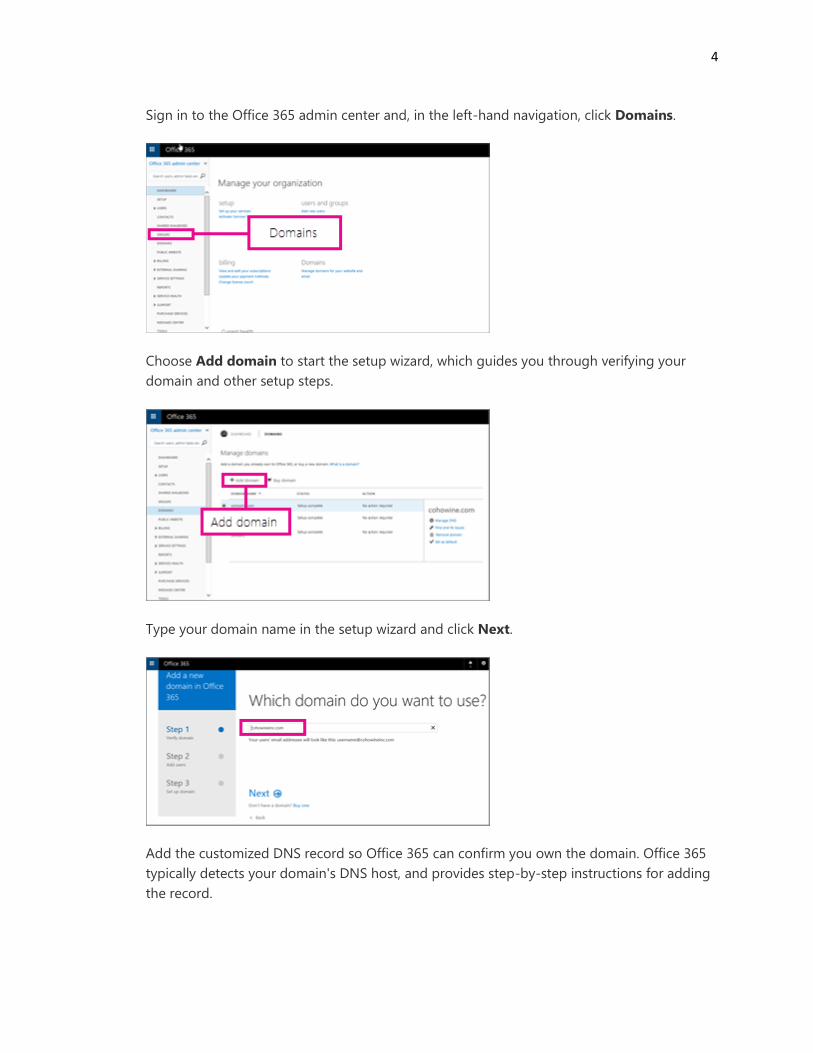
1. Sign in to the Office 365 admin center and, in the left-hand navigation, click Domains.
2. Choose Add domain to start the setup wizard, which guides you through verifying your
domain and other setup steps.
3. Type your domain name in the setup wizard and click Next.
4. Add the customized DNS record so Office 365 can confirm you own the domain. Office 365
typically detects your domain's DNS host, and provides step-by-step instructions for adding
the record.

5
5. When you've added the record at your DNS hosting provider, finish this step by choosing
Okay, I've added the record. Then cancel out of the setup wizard by clicking the X in the
upper right hand corner of the page.
Now click Next to start setting up directory synchronization.
Step 4: Set up directory synchronization
Set up directory synchronization to add users
In an Exchange staged migration, you set up directory synchronization in order to add your on-premises
users to Office 365. With directory synchronization, you'll manage user accounts in your on-premises
Exchange organization and all changes you make there are synchronized to Azure Active Directory in
your Office 365 organization.

6
4-1: Getting started with directory synchronization
The steps that follow show you how to enable directory integration and synchronization for these
Office 365 setup scenarios:
Exchange Server 2016 hybrid deployments
Exchange Server 2013 hybrid deployments
Exchange Server 2010 hybrid deployments
Exchange Server 2007 and Exchange Server 2003 staged migrations
In Office 365, directory integration means you synchronize user account information from your
organization's on-premises directory service to the Office 365 directory service called Azure Active
Directory. After directory integration setup is complete, users who have mailboxes in your on-
premises Exchange Server environment and users who have Office 365 mailboxes are able to find
one another in the global address list (GAL). Users can also send, receive, and reply to email
regardless of which system is hosting their mailbox.
You set up directory synchronization with the Azure Active Directory Connect tool. To learn more
about directory sync with Azure AD Connect, see Integrating your on-premises identities with Azure
Active Directory.
Overview of directory synchronization tasks
Setting up directory integration and synchronization can take time. Here are the tasks you'll need to
complete:
Install and run the IdFix tool to discover and fix any problems in your on-premises Active
Directory.
Turn on Active Directory synchronization in Office 365.
Prepare to run Azure Active Directory Connect in your environment.
Download and run the Azure AD Connect.
Test directory synchronization to verify it works.
4-2: Learn about IdFix
Learn about the IdFix tool
To avoid directory synchronization problems, you'll want to run the IdFix DirSync Error Remediation
Tool before you synchronize your Active Directory to Office 365. You should be comfortable working
with user, group, and contact objects in Active Directory when using IdFix. If you're not, consider
hiring a consultant to help get your directory synchronized.
IdFix identifies the following types of directory problems.
Duplicate email (SMTP) addresses and user principal names (UPNs)
Invalid characters and formatting for object attributes

7
UPNs that have non-routable domains (such as [email protected])
What's required to run IdFix
The easiest way to get IdFix up and running is to install it on a computer that is joined to your
domain. You can run it on the domain controller, but it’s not necessary.
The computer where you install IdFix needs to meet these requirements:
4 GB RAM (minimum).
10 GB of hard disk space (minimum).
Windows Server 2008 or Windows Server 2012 operating system.
Be joined to the same Active Directory domain from which you want to synchronize users to
Office 365.
Have .NET Framework 4.0 installed. If you are running Windows Server 2008 or Windows Server
2012, then .NET Framework is probably already installed. If not, you can download .NET 4.0 from
the download center or by using Windows Update.
In addition, the user account that you use to run IdFix needs to have read/write access to the
directory.
Want to know more?
To learn more about using IdFix and preparing for directory synchronization, see the following:
Prepare directory attributes for synchronization with Office 365 by using the IdFix tool
How to prepare a non-routable domain (such as .local domain) for directory synchronization
Reference: IdFix excluded and supported objects and attributes
4-3: Run IdFix tool
Install and run the IdFix tool
If you think you're comfortable using IdFix, here are the steps to install and run it.
To install IdFix To install IdFix, you download and unzip IdFix.exe as described in these steps:
1. Log on to the computer where you want to install the IdFix tool.
2. Go to the Microsoft download site for the IdFix DirSync Error Remediation Tool.
3. Choose Download.
4. When prompted, choose Run.
8
5. On the WinZip Self-Extractor dialog box, in the Unzip to folder text box, type or browse to the
location where you want to install the IdFix tool. By default, IdFix is installed into C:\Deployment
Tools\.
6. Choose Unzip.
To run IdFix
After you install IdFix, run the tool to search for problems in your directory:
1. Using an account that has read/write access to the directory, log on to the computer where you
installed IdFix.
2. In File Explorer, go to the location where you installed IdFix. If you chose the default folder during
installation, go to C:\Deployment Tools\IdFix.
3. Double-click IdFix.exe.
4. By default, IdFix uses the Multi-Tenant rule set to test the entries in your directory. This is the right
rule set for most Office 365 customers. However, if you are an Office 365 Dedicated or ITAR
(International Traffic in Arms Regulations) customer, you can configure IdFix to use the Dedicated
rule set instead. If you are not sure what type of customer you are, you can safely skip this step. To
set the rule set to Dedicated, click the gear icon in the menu bar and then choose Dedicated.
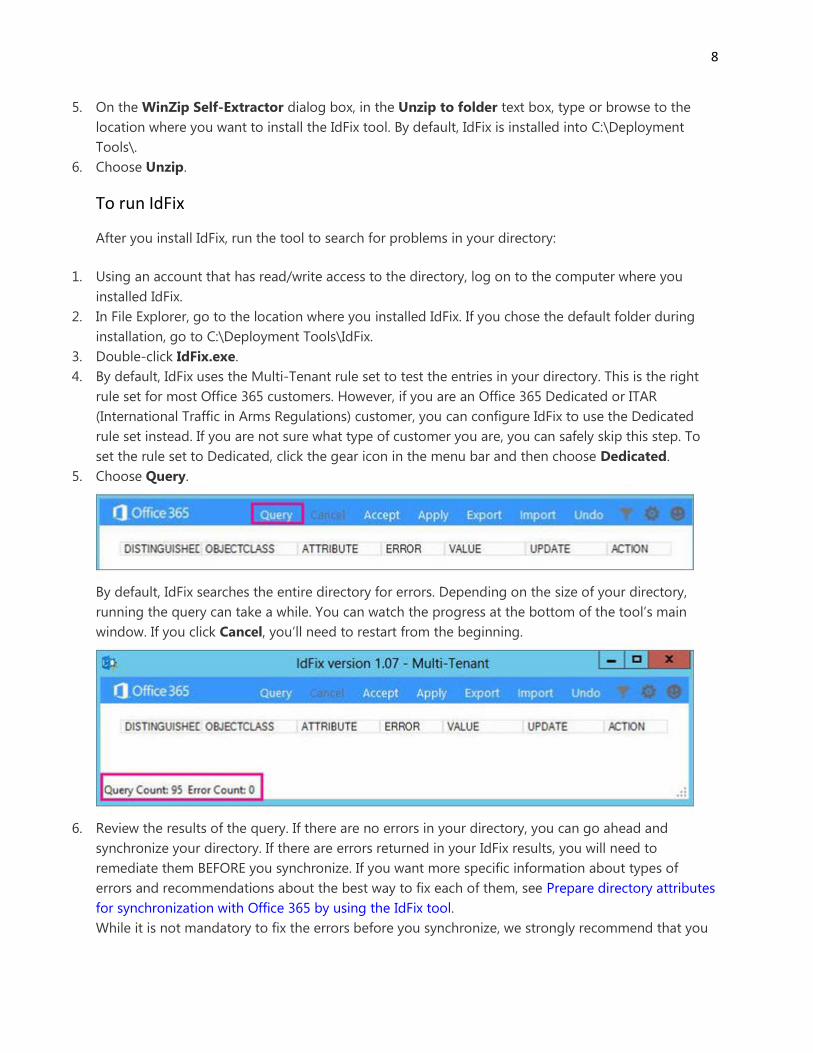
5. Choose Query.
By default, IdFix searches the entire directory for errors. Depending on the size of your directory,
running the query can take a while. You can watch the progress at the bottom of the tool’s main
window. If you click Cancel, you’ll need to restart from the beginning.
6. Review the results of the query. If there are no errors in your directory, you can go ahead and
synchronize your directory. If there are errors returned in your IdFix results, you will need to
remediate them BEFORE you synchronize. If you want more specific information about types of
errors and recommendations about the best way to fix each of them, see Prepare directory attributes
for synchronization with Office 365 by using the IdFix tool.
While it is not mandatory to fix the errors before you synchronize, we strongly recommend that you

9
at least review all the errors returned by IdFix.
Each error is displayed in a separate row in the tool’s main window.
7. If you agree with the suggested change in the UPDATE column, in the ACTION column select what
you want IdFix to do to implement the change and then click Apply. When you click Apply, the tool
makes the changes in the directory.
Here are a few tips for using IdFix:
You don’t have to click Apply after each update. Instead, you can fix several errors before you
click Apply and IdFix will change them all at the same time.
You can sort the errors by error type by clicking ERROR at the top of the column that lists the
error types. One strategy is to fix all the errors of the same type; for example, fix all the duplicates
first, and apply them. Next, fix the character format errors, and so on. Each time you apply the
changes, the IdFix tool creates a separate log file that you can use to undo your changes in case
you make a mistake.
The transaction log is stored by default in the folder C:\Deployment Tools\IdFix. To learn more,
see Reference: Office 365 IdFix transaction log.
8. After all of your changes are made to the directory, run IdFix again to ensure that the fixes you made
didn't introduce new errors. You can repeat these steps as many times as you need to. It’s a good
idea to go through the process a few times before you synchronize.

10
Return to this page when you've completed your Active Directory repairs using IdFix.
4-4: Prepare for Azure AD Connect
Prepare for Azure Active Directory Connect
Azure Active Directory Connect is a tool that helps you connect your on-premises directory service to
the Office 365 directory service. When you are using Office 365 you do not need an Azure
subscription to use Azure AD Connect.
Azure AD Connect prerequisites
To install Azure AD Connect you must have: the following:
An on-premises Active Directory domain. The domain controller must run Windows Server
2008 or later, but a Windows Server 2003 forest functional level is OK.
A server on which to install Azure AD Connect. The server must be running Windows Server
2008 R2 or later. Azure AD Connect can be installed on your domain controller.
A dedicated Office 365 cloud identity. For example, [email protected]. The account
must have the global administrator role assigned. It’s often desirable to set this account to
Password Never Expires.
Your on-premises Active Directory enterprise administrator sign-in credentials. This account
is only used during the installation of Azure AD Connect.
If all these requirements are met, you're ready to install and run Azure AD Connect.
4-5: Run Azure AD Connect
Download and run Azure Active Directory Connect
You'll now deploy directory synchronization with Azure Active Directory Connect. In the following
procedure, Azure AD Connect express settings are used to configure directory synchronization with
password synchronization for a single forest. Password synchronization enables users to sign in to
Office 365 services with their on-premises Active Directory passwords.
Watch the video. This video provides a quick overview of how to run an express settings installation
of Azure AD Connect. Step-by-step instructions follow.
https://www.youtube.com/watch?v=P8azep7OROg
To install and run Azure AD Connect
1. Select the on-premises server on which you will install Azure AD Connect.
2. Download Azure AD Connect to your server from the Microsoft Download Center.
3. Locate the AzureADConnect.msi file on your server and double-click it to run the installation wizard.

11
4. On the Welcome to Azure AD Connect page, select the licensing terms box and click Continue.
5. On the Express Settings page, clickUse express settings.
6. On the Connect to Azure AD page, enter the username and password of an Azure global
administrator for your Azure AD. ClickNext.

12
7. On the Connect to AD DS page, enter the username and password for an enterprise admin account.
Click Next.
8. On the Ready to configure page, clickInstall.
Optionally on the Ready to Configure page, you can un-check theStart the synchronization
process as soon as configuration completescheck box. If you do this, the wizard will configure
sync but will leave the task disabled so it will not run until you enable it manually in the Task
Scheduler. After the task is enabled, synchronization will run every three hours.

13
Also optionally you can choose to configure sync services forExchange Hybrid deploymentby
checking the corresponding check box. If you don’t plan to have Exchange mailboxes both in the
cloud and on premises, you do not need this.
9. After the installation completes, click Exit.
Verify that directory synchronization works
To confirm that directory synchronization is provisioning users, groups, and contacts from your on-
premises Active Directory to Office 365, see Verify directory synchronization.
If you're having problems getting directory synchronization to work properly, check out Fixing
problems with directory synchronization for Office 365.
Step 5: Finish your Exchange staged migration
At this point in your staged migration you have synchronized your on-premises directory with Office
365, creating Office 365 users in the process.
Now you want to identify the users with on-premises mailboxes that you want to migrate to Office
365. To do this you'll use a comma separated value (CSV) file to create a migration batch, a list of
specific mailboxes you want to migrate. Office 365 uses this file to run the migration.

14
Note. The CSV file for a migration batch can contain a maximum of 2,000 rows. This means that you
are limited to migrating 2,000 mailboxes at a time. To migrate more than 2,000 mailboxes, create
additional CSV files and use each file to create a new migration batch.
5-1: Create mailbox list
Create a list of mailboxes to migrate
To create a CSV migration batch file
When you create your CSV file, you supply Office 365 with a row of information about the on-
premises mailbox you want to migrate. This information consists of the three attributes shown in the
table below.
Attribute Description Required?
EmailAddress
Specifies the primary SMTP email address, for example, [email protected], for on-premises
mailboxes.
Use the primary SMTP address for on-premises mailboxes and not user IDs from the Office 365.
For example, if the on-premises domain is named contoso.com but the Office 365 email
domain is named service.contoso.com, you would use the contoso.com domain name for email
addresses in the CSV file.
Required
Password The password to be set for the new Office 365 mailbox. Any password restrictions that are
applied to your Office 365 organization also apply to the passwords included in the CSV file.
Note: If you enable password synchronization when you configured directory integration, leave
this field attribute field blank so that users aren't confused about what the password will be.
Optional
ForceChangePassword Specifies whether a user must change the password the first time they sign in to their new
Office 365 mailbox. Enter True or False for the value of this parameter.
Note: If you enable password synchronization when you configured directory integration, leave
this attribute field blank so that users aren't confused about what the password will be.
Note. If you've implemented a single sign-on solution by deploying Active Directory Federation
Services (AD FS) 2.0 (AD FS 2.0) or greater in your on-premises organization, you must use False
for the value of the ForceChangePassword attribute.
Optional
When you create your CSV file, the first row, or header row, lists the attributes. The rows under it
contain the information specific to the mailbox. Note that each attribute name is separated by a
comma and that attribute values in each row are in the same order as the attribute names in the
header row. Here's an example of the CSV format for a migration batch with three on-premises
mailboxes.
EmailAddress,Password,ForceChangePassword

15
[email protected],Pa$$w0rd,False
[email protected],Pa$$w0rd,False
[email protected],Pa$$w0rd,False
You can use a text editor such as Notepad, or spreadsheet application like Excel, to create your CSV
file. Just be sure to save it as a .csv file. Here's how you would create the CSV file in Excel.
Note. If the CSV file contains non-ASCII or special characters, save the CSV file with UTF-8 or other
Unicode encoding. Depending on the application, saving the CSV file with UTF-8 or other Unicode
encoding may be easier when the system locale of the computer matches the language used in the
CSV file.
5-2: Connect to your email system
Connect Office 365 to your email system
After you create the CSV file for your migration batch, you need to set up a migration endpoint. A
migration endpoint contains the settings and credentials needed to connect the on-premises server
that hosts the mailboxes you're migrating with Office 365. For a staged migration, you create an
Outlook Anywhere migration endpoint. One migration endpoint is created to use for all of your
migration batches.
To create a migration endpoint
1. In the Office 365 admin center, in the lower left navigation, expand Admin and then click Exchange.
This opens the Exchange admin center.
2. In the Exchange admin center, go to Recipients > Migration.
3. Choose More ... > Migration endpoints.
4. On the Migration endpoints page, choose New +.
5. On the Select the migration endpoint type page, choose Outlook Anywhere > Next.
6. On the Enter on-premises account credentials page, enter the following information:

16
Email address. Type the email address of any user in the on-premises Exchange organization that
will be migrated. Office 365 will test the connectivity to this user's mailbox.
Account with privileges. Type the user name (domain\user name format or an email address) for
an account that has the necessary administrative permissions in the on-premises organization.
Office 365 will use this account to detect the migration endpoint and to test the permissions
assigned to this account by attempting to access the mailbox with the specified email address.
Password of account with privileges. Type the password for the account with privileges that is
the administrator account.
7. Choose Next and then do one of the following:
If Office 365 successfully connects to the source server, the connection settings are displayed.
Choose Next.
If the test connection to the source server isn't successful, provide the following information:
Exchange server. Type the fully qualified domain name (FQDN) for the on-premises Exchange
Server. This is the host name for your Mailbox server; for example, EXCH-SRV-
01.corp.contoso.com.
RPC proxy server. Type the FQDN for the RPC proxy server for Outlook Anywhere. Typically,
the proxy server is the same as your Outlook Web App URL. For example, mail.contoso.com,
which is also the URL for the proxy server that Outlook uses to connect to an Exchange Server
8. On the Enter general information page, type a migration endpoint name, for example, Test5-
endpoint. Leave the other two boxes blank to use the default values.
9. Choose New to create the migration endpoint.
5-3: Run the first migration batch
Migrate your mailboxes to Office 365

17
So far you have created the CSV file and migration endpoint for your migration batch. Now it's time
to create the migration batch and start mailbox migrations. When you run the migration batch, the
initial mailbox synchronization migrates all email messages, contacts, and calendar items from the
on-premises mailboxes to Office 365 mailboxes.
Here are some things to think about before you begin.
It's a good idea to create a test migration batch with a small number of mailboxes to first test the
process.
Use migration files with the same number of rows, and run the batches at similar times during the
day. Then compare the total running time for each test batch. This helps you estimate how long it
could take to migrate all your mailboxes, how large each migration batch should be, and how
many simultaneous connections to the source email system you should use to balance migration
speed and Internet bandwidth.
You can run batches simultaneously or one by one. Do what is convenient for your schedule and
ability to help people as they complete their migration. Remember, each migration batch has a
limit of 2,000 mailboxes.
When you’re done migrating everyone to Office 365, you’ll be ready to start sending email directly to
Office 365.
To create a migration batch and begin migrating mailboxes
1. In the Office 365 admin center, in the left-hand column, choose Admin > Exchange. This opens the
Exchange admin center.
2. In the Exchange admin center, go to recipients > migration.

18
3. Choose New > Migrate to Exchange Online.
4. Choose Staged migration > Next.
5. On the Select the users page, choose Browse to specify the migration file you created. After you
select your migration file, Office 365 checks it to make sure:
It isn't empty.
It uses comma-separated formatting.
It doesn't contain more than 2,000 rows.
It includes the required EmailAddress attribute in the header row.
It contains rows with the same number of columns as the header row.
If any one of these checks fails, you'll get an error that describes the reason for the failure. At this
point, you must fix any errors in the CSV file and resubmit it to create a migration batch. After the
CSV file is validated, the number of users listed in the CSV file is displayed as the number of
mailboxes to migrate.
6. Choose Next.
7. On the Confirm the migration endpoint page, verify the migration endpoint information that is
listed and then choose Next.
19
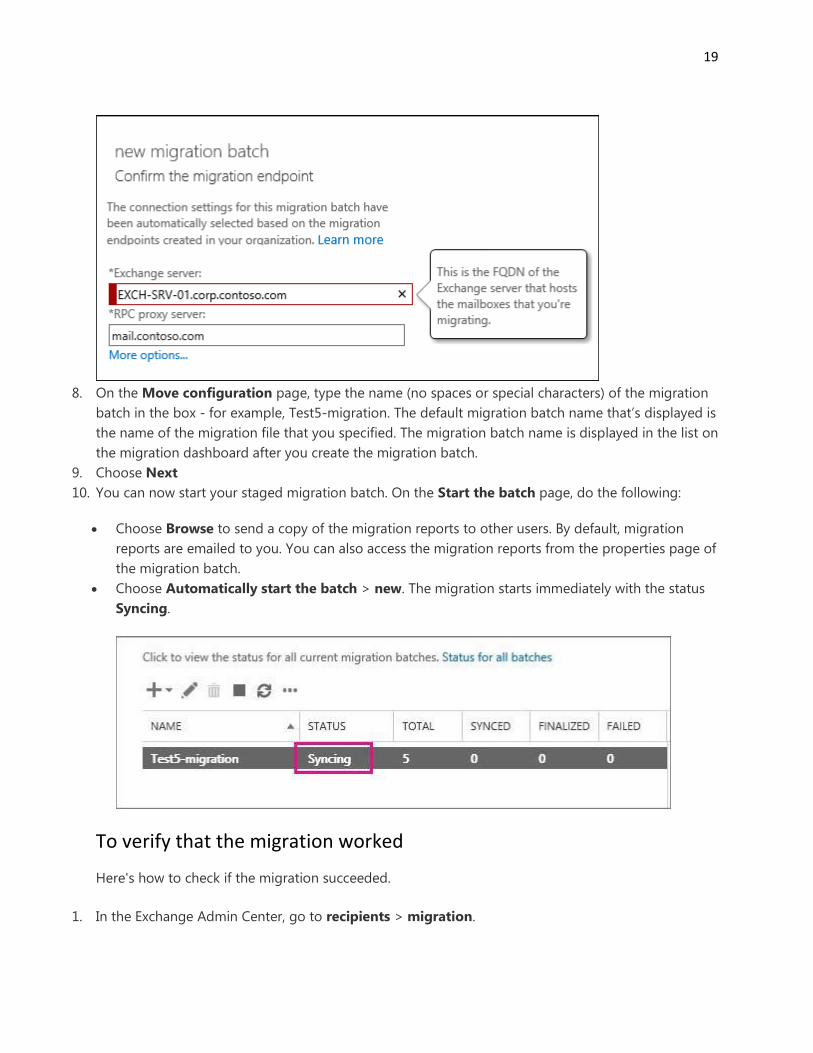
8. On the Move configuration page, type the name (no spaces or special characters) of the migration
batch in the box - for example, Test5-migration. The default migration batch name that’s displayed is
the name of the migration file that you specified. The migration batch name is displayed in the list on
the migration dashboard after you create the migration batch.
9. Choose Next
10. You can now start your staged migration batch. On the Start the batch page, do the following:
Choose Browse to send a copy of the migration reports to other users. By default, migration
reports are emailed to you. You can also access the migration reports from the properties page of
the migration batch.
Choose Automatically start the batch > new. The migration starts immediately with the status
Syncing.
To verify that the migration worked
Here's how to check if the migration succeeded.
1. In the Exchange Admin Center, go to recipients > migration.

20
2. Verify that the batch is displayed in the migration dashboard. If the migration completed
successfully, the status is Synced.
If the migration fails, check the associated Mailbox status reports for specific errors, and double-
check that your migration file has the correct Office 365 email address in the EmailAddress column.
5-4: Assign Licenses
Assign licenses to Office 365 user accounts
After migrating a batch of users to Office 365, you need to assign each user a license to use their
Office 365 mailbox and other Office 365 services. If you don't assign a license, the mailbox is disabled
when the grace period (30 days) ends.
To learn how to assign a license to one user or multiple users using the Office 365 admin center, see
Assign or unassign licenses for Office 365 for business.
5-5: Configure mail-enabled users
Convert on-premises mailboxes to mail-enabled users
After you have successfully migrated a batch of mailboxes, a user whose mailbox has been migrated
now has both a mailbox on-premises and one in Office 365. Users who have a mailbox in Office 365
will stop receiving new mail in their on-premises mailbox.
If you're not done with your migrations, directing all users to Office 365 for their email is not really
an option. So what do you do for those people who have mailboxes both on-premises and in Office
365? What you can do is change the on-premises mailboxes that you've already migrated to mail-
enabled users. When you change from a mailbox to a mail-enabled user, you can direct the user to
Office 365 for their email instead of going to their on-premises mailbox.
Another important reason to convert on-premises mailboxes to mail-enabled users is to retain proxy
addresses from the Office 365 mailboxes by copying proxy addresses to the mail-enabled users. This
lets you manage your Office 365 users from your on-premises organization by using Active Directory.
Also, if you decide to decommission your on-premises Exchange organization after all mailboxes are
migrated to Office 365, the proxy addresses you’ve copied to the mail-enabled users will remain in
your on-premises Active Directory.
For instructions and scripts that you can run to convert mailboxes to mail-enabled users, see the
following:
Convert Exchange 2007 mailboxes to mail-enabled users
Convert Exchange 2003 mailboxes to mail-enabled users
5-6: Run more migration batches
Optional: Repeat migration steps

21
Depending on how many users you're migrating to Office 365, you may need to run several
migration batches to complete your staged migration. You can run your batches simultaneously or
one by one. Do what is best for your organization and users as you work to complete the migration.
Remember, each migration batch has a limit of 2,000 mailboxes.
When you’re done migrating everyone to Office 365, you’ll be ready to start sending email directly to
Office 365.
5-7: Reduce email delays
Optional: Reduce email delays
Although this task is optional, doing it can help avoid delays in the receiving email in the new Office
365 mailboxes.
When people outside of your organization send you email, their email systems don’t double-check
where to send that email every time. Instead, their systems save the location of your email system
based on a setting in your DNS server known as a time-to-live (TTL). If you change the location of
your email system before the TTL expires, the sender's email system tries to send email to the old
location before figuring out that the location changed. This can result in a mail delivery delay. One
way to avoid this is to lower the TTL that your DNS server gives to servers outside of your
organization. This will make the other organizations refresh the location of your email system more
often.
Most email systems ask for an update each hour if a short interval such as 3,600 seconds (one hour)
is set. We recommend that you set the interval at least this low before you start the email migration.
This setting allows all the systems that send you email enough time to process the change. Then,
when you make the final switch over to Office 365, you can change the TTL back to a longer interval.
The place to change the TTL setting is on your email system’s mail exchanger record, also called an
MX record. This lives in your public facing DNS. If you have more than one MX record, you need to
change the value on each record to 3,600 seconds or less.
Don’t worry if you skip this task. It might take longer for email to start showing up in your new Office
365 mailboxes, but it will get there. If you need some help configuring your DNS settings, see Create
DNS records for Office 365 when you manage your DNS records.
Whether you choose to modify your TTL or not, you should now be ready to change your MX
records so that your new mail will begin flowing to Office 365 instead of to Gmail.
5-8: Route email
Route email to Office 365
You want to update (or add) two important DNS records to make sure mail properly flows to and
from Office 365. These are your MX record and SPF record.

22
MX record. Email systems use an MX record to figure out where to deliver emails. Now that your
email migration to Office 365 is complete, it’s time to change your MX record to make sure that
email is delivered to your Office 365 mailboxes instead of your former mail system. For the
company contoso.com., an MX record that's been updated to point to Office 365 would look like
this: contoso-com.mail.protection.outlook.com
SPF record. An SPF records is a TXT record that ensures only the organization that owns a
domain is actually sending email from that domain. It helps prevent somebody from using your
domain to send spam. Because Office 365 is sending all your messages, you'll only list Office 365
as a valid sender for your domain. The SPF record for an organization’s domain that uses Office
365 to send all their mail should look like this: v=spf1 include:spf.protection.outlook.com -all
Your MX and SPF record changes are made at your DNS hosting provider, also known as a domain
host. The Office 365 admin center will guide you through the process.
For more about Office 365 mail routing, see Mail flow best practices for Exchange Online and Office
365.
To update your MX and SPF records
1. Open the Office 365 admin center.
2. Click Domains to open the Manage domains page.
3. Select your domain and then choose Fix issues.
The Action column shows Fix issues because we asked you to stop the wizard partway through so
you could migrate your email to Office 365 before switching your MX record.
4. Based on your domain host, you'll see one of two options for adding the MX record:
If your domain host is GoDaddy, the DNS records you need to add - including MX and SPF
records - are displayed on a page. Click the Add the records button at the bottom of the page to
have Office 365 automatically fix the MX and other DNS records for your domain.
If you have a different domain host than GoDaddy, the DNS records you need to add - including
MX and SPF records - are displayed on a page. For each record, choose What do I fix? and follow
the step-by-step instructions to update the record.
Note. For instructions for changing an MX record at specific DNS hosts, see Create DNS records

23
for Office 365 when you manage your DNS records. If your DNS provider isn't included, or if you
want to get a sense of the general directions, general MX record instructions are available at
Create DNS records at any DNS hosting provider for Office 365.
5. After you've added all the records, you'll see a message that your domain is set up correctly and that
no action is required.
It can take up to 72 hours for the email systems of your customers and partners to recognize the
changed MX record. We recommend you wait at least 72 hours before you stop Office 365
synchronization with your source system.
5-9: Delete migration batch
Delete the staged migration batch
After you change the MX record and verify that all email is being routed to Office 365 mailboxes, you
can delete the staged migration batches. Verify the following before you delete a migration batch:
All users in the batch are using their Office 365 mailboxes. After the batch is deleted, mail sent to
mailboxes on the on-premises Exchange Server isn't copied to the corresponding Office 365
mailboxes.
Office 365 mailboxes were synchronized at least once after mail began being sent directly to
them. To do this, make sure that the value in the Last Synced Time box for the migration batch is
more recent than when mail started being routed directly to Office 365 mailboxes.
When you delete a staged migration batch, the migration service cleans up any records related to
the migration batch and then deletes the migration batch. The batch is removed from the list of
migration batches on the migration dashboard.
To delete the staged migration batch
24
1. In the Office 365 admin center, in the left-hand column, choose Admin > Exchange. This opens the
Exchange admin center.
2. In the Exchange admin center, go to recipients > migration.
3. On the migration dashboard, select the batch, and then choose Delete.
It might take a few minutes for the batch to be deleted.
4. In the Exchange admin center, go to recipients > migration.
5. Verify that the migration batch is no longer listed on the migration dashboard.
5-10: Create autodiscover record
Create an Autodiscover DNS record
After all on-premises mailboxes are migrated to Office 365, you can configure an Autodiscover DNS
record for your Office 365 organization to enable users to easily connect to their new Office 365
mailboxes with Outlook and mobile clients. This new Autodiscover DNS record has to use the same
namespace that you’re using for your Office 365 organization. For example, if your cloud-based
namespace is cloud.contoso.com, the Autodiscover DNS record you need to create is
autodiscover.contoso.com.
Office 365 uses a CNAME record to implement the Autodiscover service for Outlook and mobile
clients. The Autodiscover CNAME record must contain the following information:
Alias: autodiscover
Target: autodiscover.outlook.com
For more information, see Create DNS records for Office 365 when you manage your DNS records.
5-11: Decommission Servers
Decommission on-premises Exchange servers
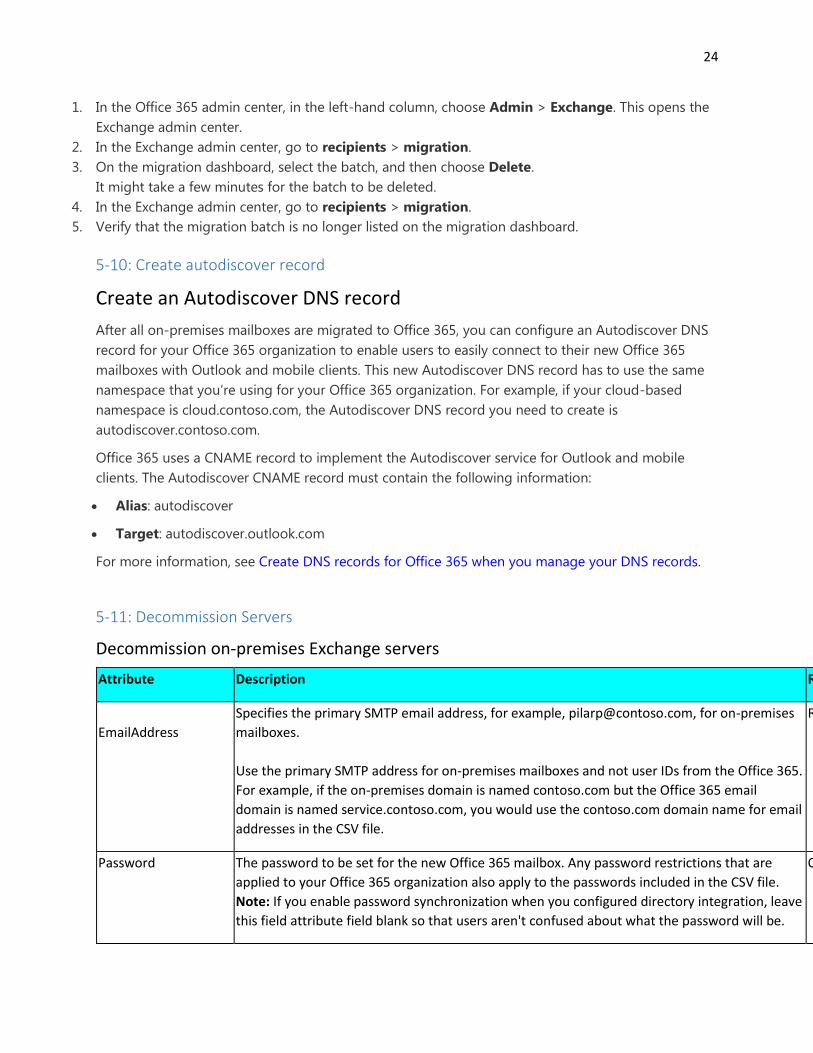
Attribute Description Required?
EmailAddress
Specifies the primary SMTP email address, for example, [email protected], for on-premises
mailboxes.
Use the primary SMTP address for on-premises mailboxes and not user IDs from the Office 365.
For example, if the on-premises domain is named contoso.com but the Office 365 email
domain is named service.contoso.com, you would use the contoso.com domain name for email
addresses in the CSV file.
Required
Password The password to be set for the new Office 365 mailbox. Any password restrictions that are
applied to your Office 365 organization also apply to the passwords included in the CSV file.
Note: If you enable password synchronization when you configured directory integration, leave
this field attribute field blank so that users aren't confused about what the password will be.
Optional

25
ForceChangePassword Specifies whether a user must change the password the first time they sign in to their new
Office 365 mailbox. Enter True or False for the value of this parameter.
Note: If you enable password synchronization when you configured directory integration, leave
this attribute field blank so that users aren't confused about what the password will be.
Note. If you've implemented a single sign-on solution by deploying Active Directory Federation
Services (AD FS) 2.0 (AD FS 2.0) or greater in your on-premises organization, you must use False
for the value of the ForceChangePassword attribute.
Optional
Important! Decommissioning your Exchange organization can have unintended consequences. As
long as directory synchronization is required, your organization should have at least one Exchange
server to manage mail-enabled objects that synchronize with Office 365. We recommend that you
contact Microsoft Support before decommissioning your on-premises Exchange organization.
If you're ready to decomission your Exchange servers, verify the following before you begin:
All email is being routed directly to Office 365 mailboxes.
All migrationsare completed.
You no longer need to maintain your on-premises email organization.
For more information, see the following:
How to Remove an Exchange 2007 Organization
How to Uninstall Exchange Server 2003
5-12: Install Office
Have users install Office on their computers
Attribute Description Required?
EmailAddress
Specifies the primary SMTP email address, for example, [email protected], for on-premises
mailboxes.
Use the primary SMTP address for on-premises mailboxes and not user IDs from the Office 365.
For example, if the on-premises domain is named contoso.com but the Office 365 email
domain is named service.contoso.com, you would use the contoso.com domain name for email
addresses in the CSV file.
Required
Password The password to be set for the new Office 365 mailbox. Any password restrictions that are
applied to your Office 365 organization also apply to the passwords included in the CSV file.
Note: If you enable password synchronization when you configured directory integration, leave
this field attribute field blank so that users aren't confused about what the password will be.
Optional

26
ForceChangePassword Specifies whether a user must change the password the first time they sign in to their new
Office 365 mailbox. Enter True or False for the value of this parameter.
Note: If you enable password synchronization when you configured directory integration, leave
this attribute field blank so that users aren't confused about what the password will be.
Note. If you've implemented a single sign-on solution by deploying Active Directory Federation
Services (AD FS) 2.0 (AD FS 2.0) or greater in your on-premises organization, you must use False
for the value of the ForceChangePassword attribute.
Optional
Each Office 365 user may install Office 365 ProPlus on their computers if your organization has a
qualifying Office 365 subscription. Office 365 ProPlus has the latest versions of Word, PowerPoint,
Excel, Outlook, OneNote, Publisher, and Access, and also includes Skype for Business, InfoPath, and
OneDrive for Business.
We encourage users to install Office as soon as they're able to sign in to their Office 365 account.
To install Office on a Windows 7 or higher computer
1. Go to https://aka.ms/installofficeonmypc from an Internet Explorer or Firefox browser.
2. Sign in with your Office 365 credentials.
The Office installer will run readiness checks to ensure the computer meets the system requirements
for Office 365 ProPlus.
3. In the installation page, click Install.

27
Note. Office installation files are streamed from the Internet. If you have a large number of users
simultaneously performing the Office installations, you may experience bandwidth issues, so plan
accordingly.
To use other options to install Office
For Windows computers or Macs that cannot use the above installation link, follow the directions
here.
For administrators who prefer to use different methods to deploy the Office 365 ProPlus suite to
their end users, such as System Center Configuration Manager, please review this link.
5-13: Help everyone get started
Help your users get started with Office 365
With your stage migraton complete, it's important that users in your organization understand how to
be productive with Office 365. As the admin, you're responsible for making sure everyone has their
sign-in information and knows how to get started with Office 365.
To help people get started with Office 365
Your users may want to use the web-based versions of their Office 365 apps when signing in from
home or temporary computers.
How to sign in to Office 365 for business
Your users may also want to install Office Pro Plus on their home computer so they can work from
home.
Install Office using Office 365 for business (Users can also just use this link:
https://aka.ms/installofficeonmypc )
Many users will want Office 365 on their mobile phone or tablet. Lync (Skype for Business,) Outlook,
and the other Office applications also have app versions available in the Google Play and Apple App
Store.
Set up a mobile device using Office 365 for business
And finally, here are few training resources that can help your Office 365 users achieve more.
Learn your way around Office 365 for business
Office training and tutorials
Office 365 Learning Center