exchange pro 19 - de.binarytree.com€¦ · • public folder migration support for exchange 2003,...
TRANSCRIPT
Exchange Pro 19.12
Installation and Configuration Guide December 2019

2
Exchange Pro 19.12 Installation and Configuration Guide
Table of Contents
1. Introduction ..............................................................................................................................3
1.1 Purpose ........................................................................................................................................ 3
1.2 Audience ...................................................................................................................................... 3
1.3 Getting More Information ............................................................................................................. 3
1.4 About Exchange Pro ...................................................................................................................... 3
Key Features and Functions ..................................................................................................... 3
2. Installing Exchange Pro.............................................................................................................4
2.1 Upgrading Exchange Pro from an Earlier Version............................................................................. 4
2.2 Necessary Pre-Installation Preparations.......................................................................................... 4
Default Installation vs. Advanced Installation ........................................................................... 6 2.3 Exchange Pro Default Installation................................................................................................... 7
2.4 Exchange Pro Advanced Installation or Upgrade ........................................................................... 10
2.5 Uninstalling Exchange Pro............................................................................................................ 16
3. Configuring Exchange Pro .........................................................................................................17
3.1 Defining an Office 365 (Tenant) Target Forest ............................................................................... 18
3.2 Defining a Local Exchange Target Forest ....................................................................................... 21
4. Installing Exchange Pro Public Folder Workers .....................................................................25
5. Components of Exchange Pro ................................................................................................28
5.1 MCP Windows Service ................................................................................................................. 28
5.2 Admin Portal............................................................................................................................... 28
5.3 User Portal ................................................................................................................................. 29
6. Introduction to the Admin Portal ..........................................................................................30
Learn more about Binary Tree ........................................................................................................32
Binary Tree Social Media Resources ................................................................................................... 32
3
Exchange Pro 19.12 Installation and Configuration Guide
1. Introduction
1.1 Purpose
The purpose of this document is to provide information on how to get started using Binary Tree Exchange Pro including prerequisites, installation and configuration instructions, and an introduction to the Admin Portal.
1.2 Audience
This document assumes the reader has some experience using Microsoft Exchange and some basic Administration skil ls. If Outlook Client and Exchange Administration topics mentioned in this document are not understood, please
reference the Microsoft Outlook and Exchange System Administration documentation.
1.3 Getting More Information
The Exchange Pro User Guide, available from Binary Tree, provides information on how to use Binary Tree Exchange Pro to perform a migration from Microsoft Exchange 2003, 2007, 2010, 2013, or 2016 to Microsoft Exchange 2010, 2013, 2016, or Microsoft Office 365 Exchange Online.
For additional resources, refer to Support: http://www.binarytree.com/Support.aspx
1.4 About Exchange Pro
Exchange Pro enables migration from one version of Microsoft Exchange to another. It combines a backend policy
engine with front-end management components, which give project managers and administrators more control across their Exchange upgrades.
Key Features and Functions
• The workflow engine allows administrators to create migration tasks, select objects, schedule jobs, and
provide user self-service.
• The unified console enables flexible fi ltering and selection of mailbox objects.
• Content included in the mailbox is moved in one transaction, therefore mailbox security and permissions
(delegates) are retained.
• Reports on object state and migration status feed into the console to reduce the effort required to create
tasks.
• Does not require server hosted agents for any of its functionality.
• Public Folder migration support for Exchange 2003, Exchange 2007, Exc hange 2010, Exchange 2013,
Exchange 2016, and Office 365.
• Support for migrations to Office 365, resource forest migrations, and Outlook 2003 profile updates.
4
Exchange Pro 19.12 Installation and Configuration Guide
2. Installing Exchange Pro
This section provides information for:
• Upgrading Exchange Pro from an Earlier Version
• Necessary Pre-Installation Preparations
• Exchange Pro Default Installation
• Exchange Pro Advanced Installation or Upgrade
• Uninstall ing Exchange Pro
2.1 Upgrading Exchange Pro from an Earlier Version
Exchange Pro can be easily upgraded to a newer version by running the installation wizard for the new release. The wizard will detect any previous version and offer you the option to upgrade. The previously existing SQL database and configuration settings are preserved when upgrading.
Exchange Pro provides a direct upgrade path only from its most recent prior GA version (and any subsequent minor releases). If you want to upgrade from an earlier version, we recommend incremental upgrades, one version at a time.
If the Exchange Pro Installer detects a previous version of Exchange Pro, it will skip the screen that offers the
Default Installation option (as described in section 2.3 below), and will perform an upgrade using the Advanced Installation (as described in section 2.4 below).
Even if a prior Exchange Pro version has been uninstalled, the Installer will still perform the installation as an upgrade (by an Advanced Installation) if it finds this entry remaining in the
Windows registry:
HK_Local_Machine\Software\Binary Tree\E2E
If you have uninstalled a prior Exchange Pro version and now want to run the Default Installation
option for the new version, you must first remove that entry from the registry.
2.2 Necessary Pre-Installation Preparations
The Exchange Pro server should be installed in one of the following locations:
• For Intra-org (same forest) or Office 365 installations the Exchange Pro server should be installed in the
Source forest.
• For Inter-org (cross forest) migrations, the Exchange Pro server should be installed in the Target forest.
• For migrations to an Exchange resource forest, the Exchange Pro server should be installed in the resource
forest.
Prior to installing Exchange Pro, you need to identify the primary Exchange 2010 and/or Exchange 2013 servers
util ized as the PowerShell hosts.
Note also that Outlook must be installed on the Exchange Pro server to facil itate MAPI transport for migrations.
See the Exchange Pro Requirements document for supported versions and other relevant notes.
5
Exchange Pro 19.12 Installation and Configuration Guide
Exchange Pro supports either non-SSL or SSL mode for the PowerShell provider. If you want to util ize non-SSL, then no further action is required; however, if you want to util ize SSL mode for the
PowerShell provider, you must make sure that the Exchange Pro system trusts the certificate on your Exchange server.
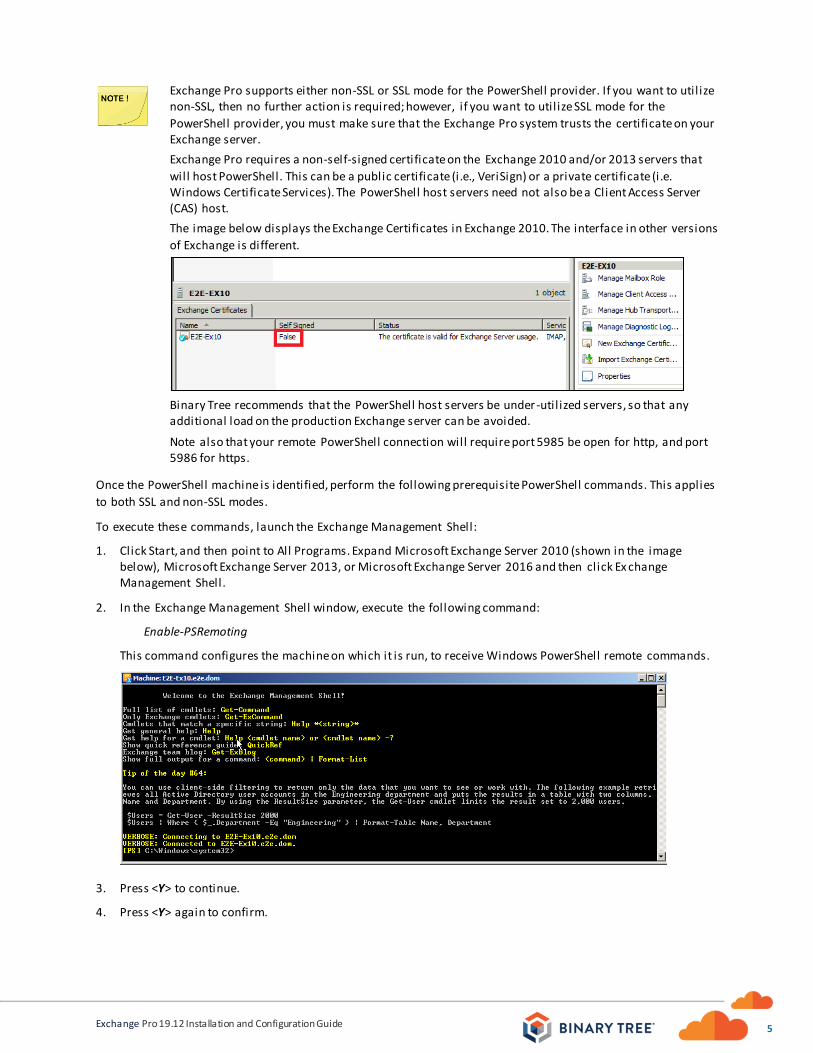
Exchange Pro requires a non-self-signed certificate on the Exchange 2010 and/or 2013 servers that
will host PowerShell. This can be a public certificate (i.e., VeriSign) or a private certificate (i.e. Windows Certificate Services). The PowerShell host servers need not also be a Client Access Server (CAS) host.
The image below displays the Exchange Certificates in Exchange 2010. The interface in other versions
of Exchange is different.
Binary Tree recommends that the PowerShell host servers be under-util ized servers, so that any additional load on the production Exchange server can be avoided.
Note also that your remote PowerShell connection will require port 5985 be open for http, and port 5986 for https.
Once the PowerShell machine is identified, perform the following prerequisite PowerShell commands. This applies
to both SSL and non-SSL modes.
To execute these commands, launch the Exchange Management Shell:
1. Click Start, and then point to All Programs. Expand Microsoft Exchange Server 2010 (shown in the image below), Microsoft Exchange Server 2013, or Microsoft Exchange Server 2016 and then click Ex change Management Shell.
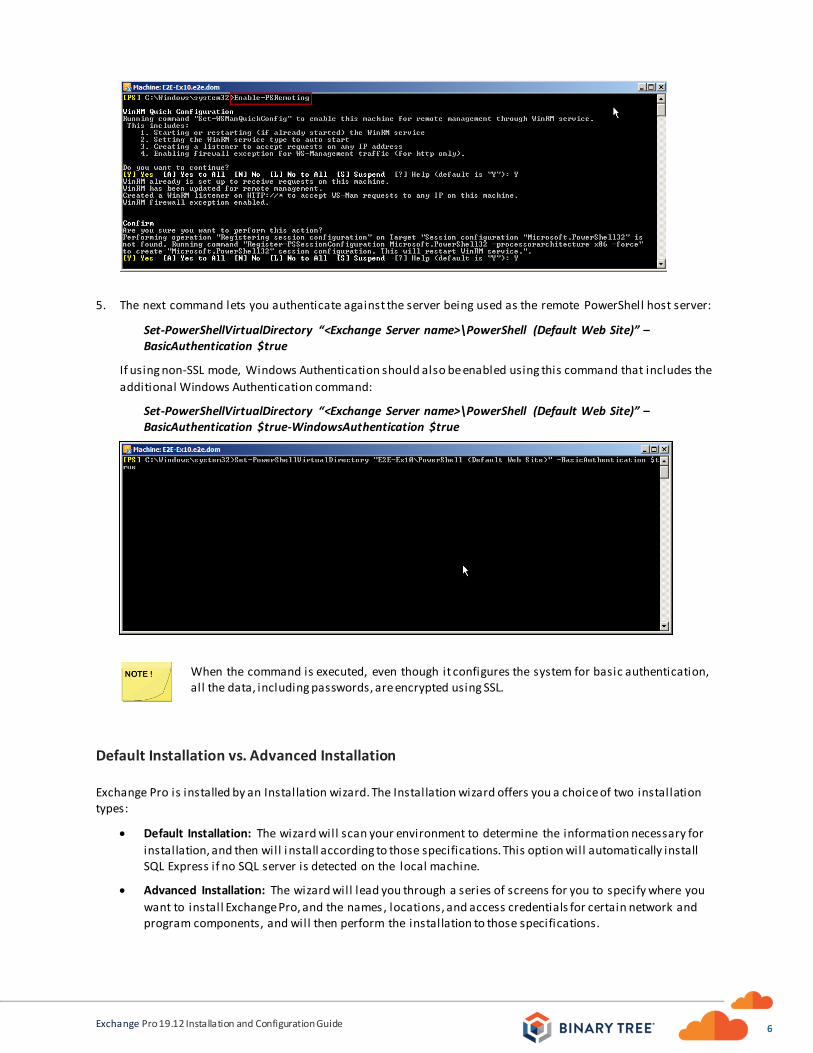
2. In the Exchange Management Shell window, execute the following command:
Enable-PSRemoting
This command configures the machine on which it is run, to receive Windows PowerShell remote commands.
3. Press <Y> to continue.
4. Press <Y> again to confirm.
6
Exchange Pro 19.12 Installation and Configuration Guide
5. The next command lets you authenticate against the server being used as the remote PowerShell host server:
Set-PowerShellVirtualDirectory “<Exchange Server name>\PowerShell (Default Web Site)” –BasicAuthentication $true
If using non-SSL mode, Windows Authentication should also be enabled using this command that includes the
additional Windows Authentication command:
Set-PowerShellVirtualDirectory “<Exchange Server name>\PowerShell (Default Web Site)” –BasicAuthentication $true-WindowsAuthentication $true
When the command is executed, even though it configures the system for basic authentication, all the data, including passwords, are encrypted using SSL.
Default Installation vs. Advanced Installation
Exchange Pro is installed by an Installation wizard. The Installation wizard offers you a choice of two installation types:
• Default Installation: The wizard will scan your environment to determine the information necessary for
installation, and then will install according to those specifications. This option will automatically install SQL Express if no SQL server is detected on the local machine.
• Advanced Installation: The wizard will lead you through a series of screens for you to specify where you
want to install Exchange Pro, and the names, locations, and access credentials for certain network and program components, and will then perform the installation to those specifications.
7
Exchange Pro 19.12 Installation and Configuration Guide
The Default Installation option will suit most organizations. The Advanced Installation will be appropriate if you
want to specify particular components other than those the wizard would find and use by default. The two options are described separately in the next two sections below.
2.3 Exchange Pro Default Installation
To run the Default Installation option in the Installation wizard:
1. Once the PowerShell commands are successfully executed, navigate to the folder where you saved the Exchange Pro Installation fi les, then right-click on the Exchange Pro Install fi le and select to Run as
Administrator.
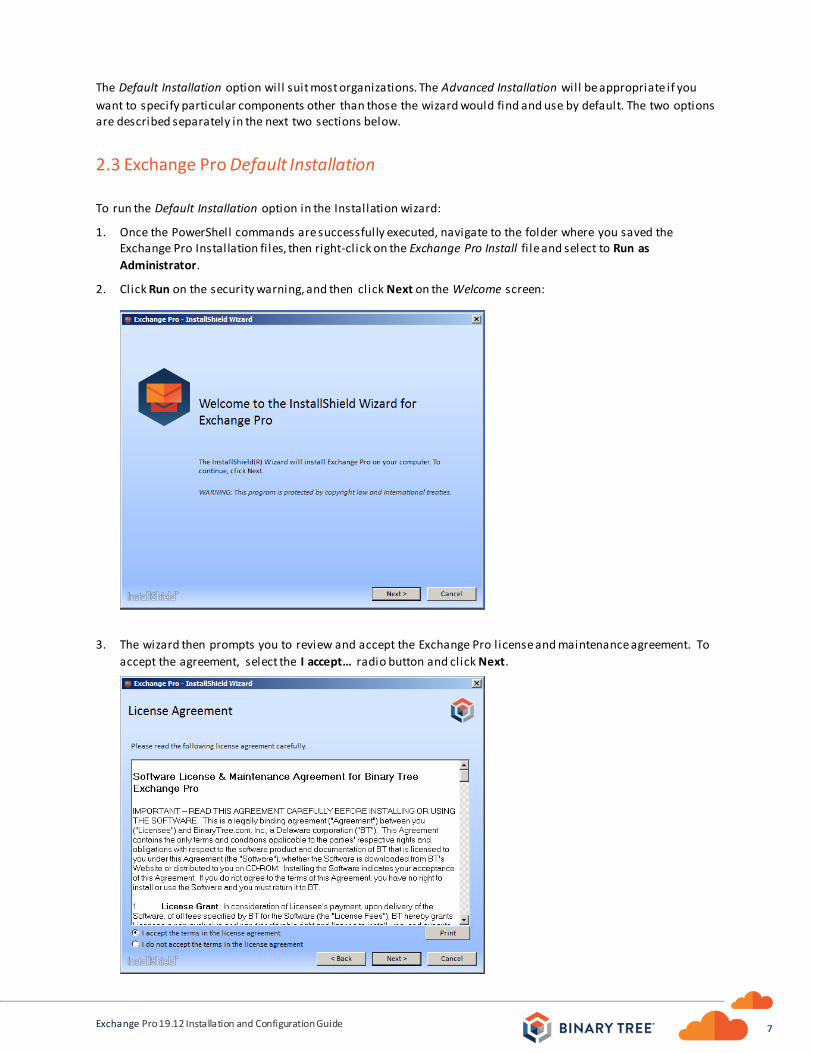
2. Click Run on the security warning, and then click Next on the Welcome screen:
3. The wizard then prompts you to review and accept the Exchange Pro license and maintenance agreement. To
accept the agreement, select the I accept… radio button and click Next.
8
Exchange Pro 19.12 Installation and Configuration Guide
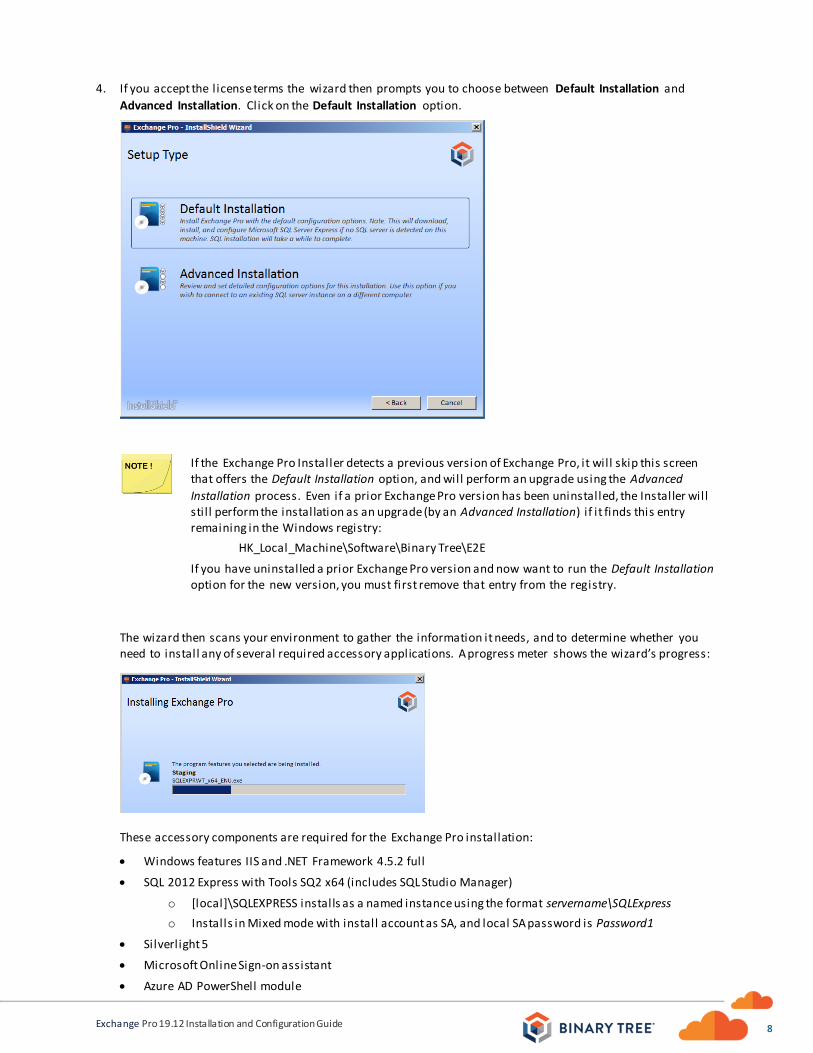
4. If you accept the license terms the wizard then prompts you to choose between Default Installation and
Advanced Installation. Click on the Default Installation option.
If the Exchange Pro Installer detects a previous version of Exchange Pro, it will skip this screen that offers the Default Installation option, and will perform an upgrade using the Advanced
Installation process. Even if a prior Exchange Pro version has been uninstalled, the Installer will sti l l perform the installation as an upgrade (by an Advanced Installation) if it finds this entry remaining in the Windows registry:
HK_Local_Machine\Software\Binary Tree\E2E
If you have uninstalled a prior Exchange Pro version and now want to run the Default Installation option for the new version, you must first remove that entry from the registry.
The wizard then scans your environment to gather the information it needs, and to determine whether you need to install any of several required accessory applications. A progress meter shows the wizard’s progress:
These accessory components are required for the Exchange Pro installation:
• Windows features IIS and .NET Framework 4.5.2 full
• SQL 2012 Express with Tools SQ2 x64 (includes SQL Studio Manager)
o [local]\SQLEXPRESS installs as a named instance using the format servername\SQLExpress
o Installs in Mixed mode with install account as SA, and local SA password is Password1
• Silverlight 5
• Microsoft Online Sign-on assistant
• Azure AD PowerShell module
9
Exchange Pro 19.12 Installation and Configuration Guide
If you already have these accessory apps installed, you can just skip ahead to the next step below. Otherwise,
the Exchange Pro installer will prompt you to authorize the installation of the ones you need. In that case, click the Install button to accept. If you have to install Microsoft .NET 4.5.2 Framework, you may also be prompted to accept Microsoft’s l icense agreement. If so, mark the checkbox for I have read and accept…, and click Install.
The installation of accessory applications may take several minutes. Some of the newly installed components may then require a system reboot, in which case the wizard will also prompt you to authorize the reboot. Click Yes to authorize the reboot. If you do have to reboot, the wizard will automatically resume at the next screen in this process (next step below).
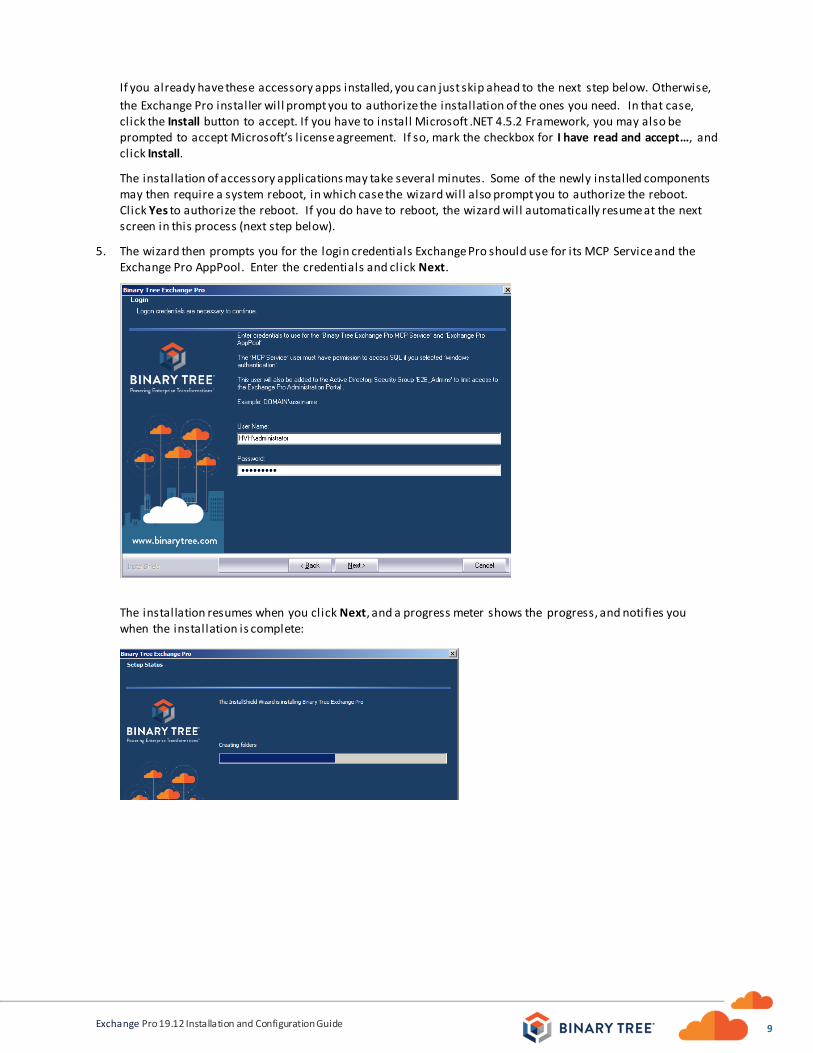
5. The wizard then prompts you for the login credentials Exchange Pro should use for its MCP Service and the Exchange Pro AppPool. Enter the credentials and click Next.
The installation resumes when you click Next, and a progress meter shows the progress, and notifies you when the installation is complete:
10
Exchange Pro 19.12 Installation and Configuration Guide
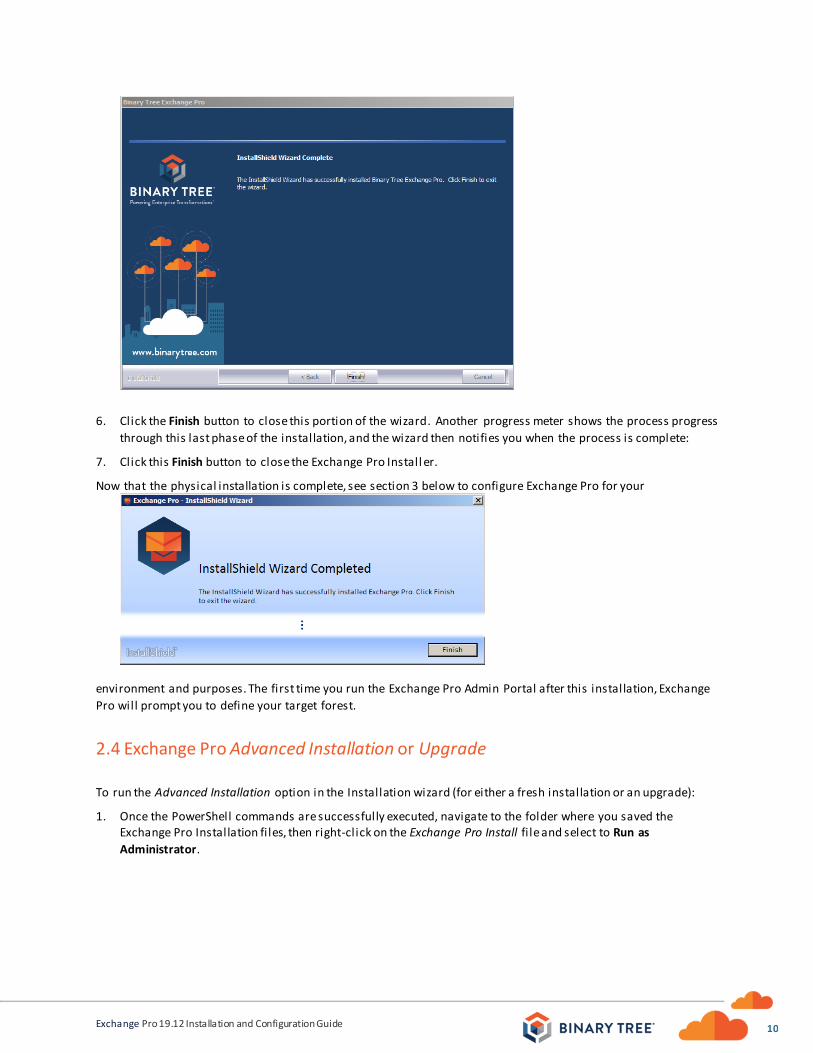
6. Click the Finish button to close this portion of the wizard. Another progress meter shows the process progress
through this last phase of the installation, and the wizard then notifies you when the process is complete:
7. Click this Finish button to close the Exchange Pro Install er.
Now that the physical installation is complete, see section 3 below to configure Exchange Pro for your
environment and purposes. The first time you run the Exchange Pro Admin Portal after this installation, Exchange
Pro will prompt you to define your target forest.
2.4 Exchange Pro Advanced Installation or Upgrade
To run the Advanced Installation option in the Installation wizard (for either a fresh installation or an upgrade):
1. Once the PowerShell commands are successfully executed, navigate to the folder where you saved the Exchange Pro Installation fi les, then right-click on the Exchange Pro Install fi le and select to Run as
Administrator.
11
Exchange Pro 19.12 Installation and Configuration Guide
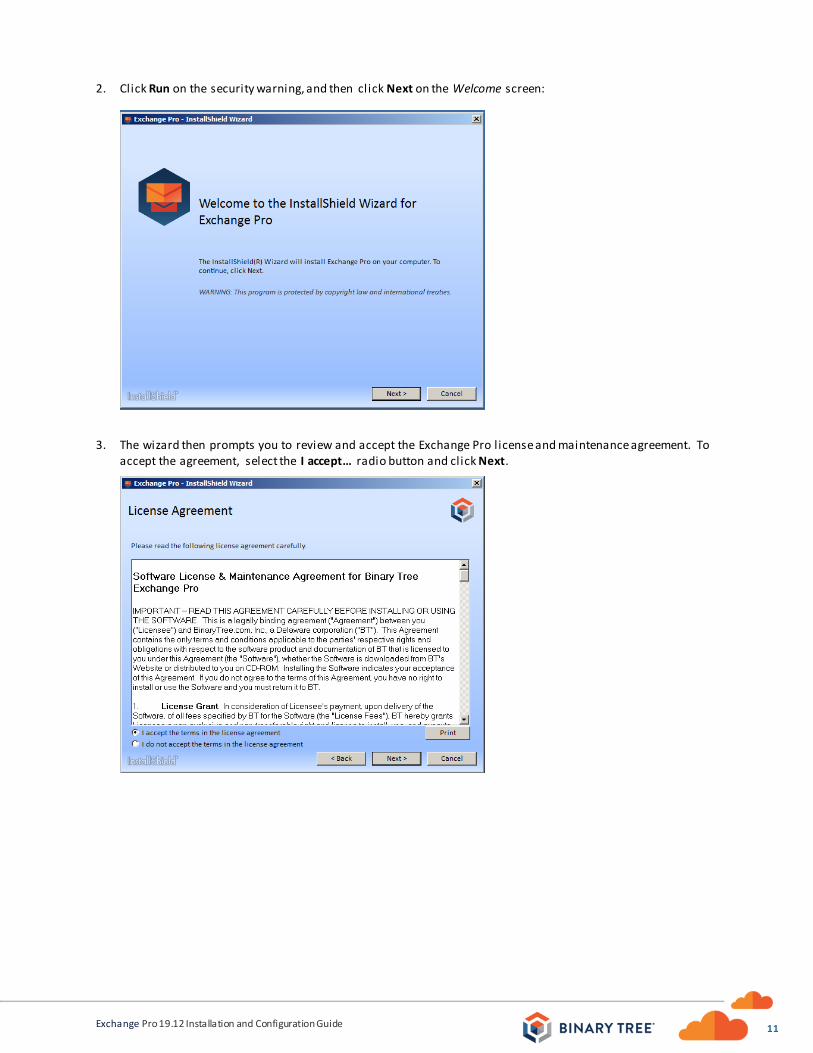
2. Click Run on the security warning, and then click Next on the Welcome screen:
3. The wizard then prompts you to review and accept the Exchange Pro license and maintenance agreement. To accept the agreement, select the I accept… radio button and click Next.

12
Exchange Pro 19.12 Installation and Configuration Guide
4. If you accept the license terms the next prompt asks you to choose between Default Installation and
Advanced Installation. Click on the Advanced Installation option.
If the Exchange Pro Installer detects a previous version of Exchange Pro, it will skip this screen that offers the Default Installation option, and will perform an upgrade using the Advanced
Installation process.
The wizard then scans your environment to gather the information it needs for installation, and to determine
whether you also need to install any required accessory applications. A progress meter shows the progress:
These accessory components are required for the Exchange Pro installation:
• Windows features IIS and .NET Framework 4.5.2 full
• Silverlight 5
• Microsoft Online Sign-on assistant
• Azure AD PowerShell module
If you already have these accessory apps installed, you can just skip ahead to the next step below. Otherwise,
the Exchange Pro installer will prompt you to authorize the installation of the ones you need. In that case, click the Install button to accept. If you have to install Microsoft .NET 4.5.2 Framework, you may also be
prompted to accept Microsoft’s l icense agreement. If so, mark the checkbox for I have read and accept…, and click Install.
The installation of accessory applications may take several minutes. Some of the newly installed components
may then require a system reboot, in which case the wizard will also prompt you to authorize the reboot. Click Yes to authorize the reboot. If you do have to reboot, the wizard will automatically resume at the next screen in this process (next step below).
5. On the installation wizard Welcome screen, click Next.
13
Exchange Pro 19.12 Installation and Configuration Guide
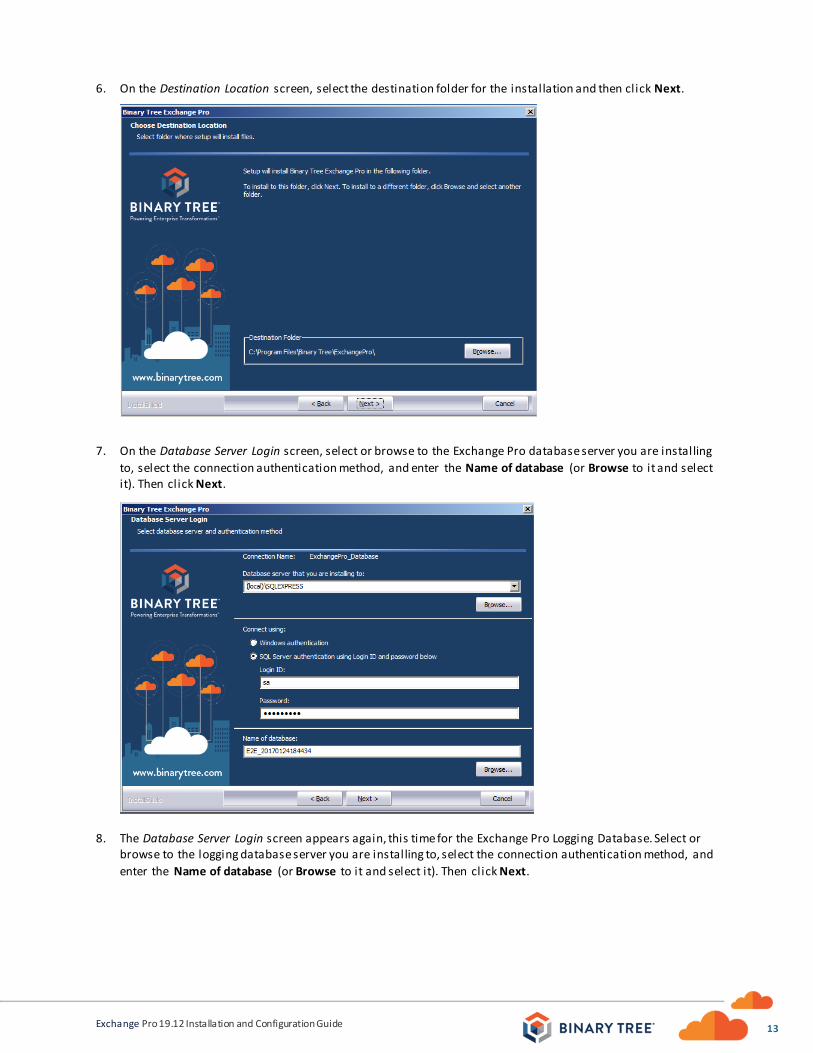
6. On the Destination Location screen, select the destination folder for the installation and then click Next.
7. On the Database Server Login screen, select or browse to the Exchange Pro database server you are installing
to, select the connection authentication method, and enter the Name of database (or Browse to it and select it). Then click Next.
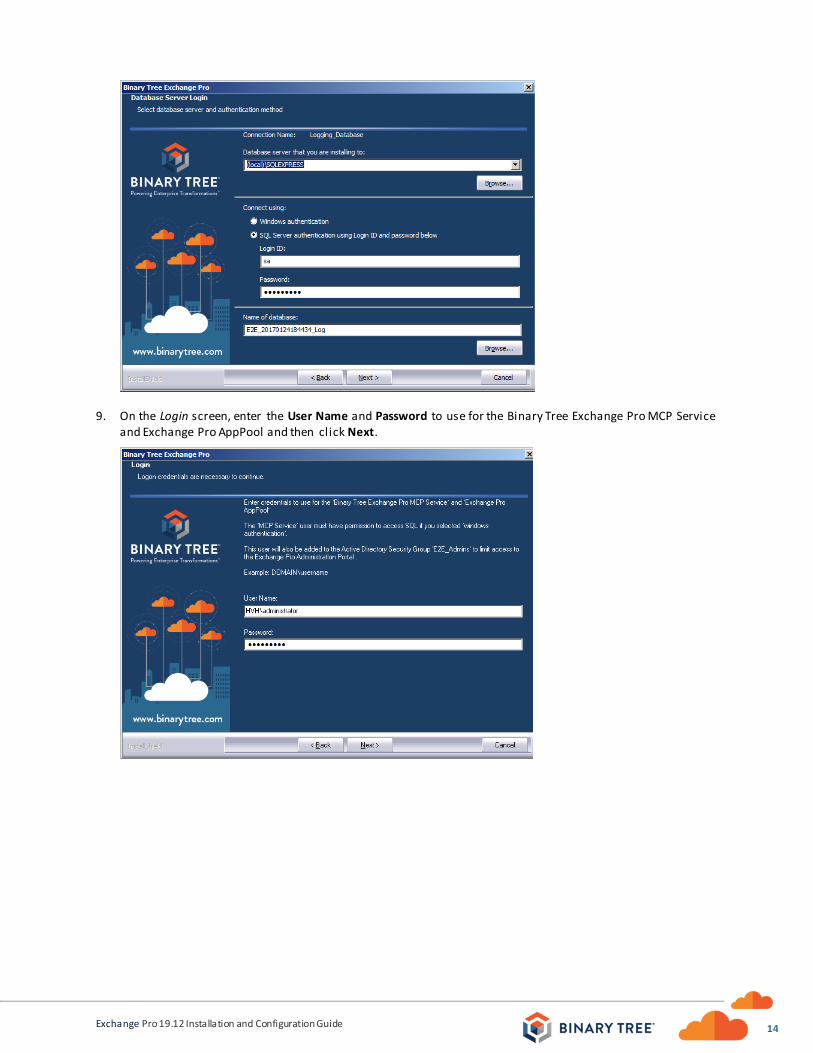
8. The Database Server Login screen appears again, this time for the Exchange Pro Logging Database. Select or browse to the logging database server you are installing to, select the connection authentication method, and
enter the Name of database (or Browse to it and select it). Then click Next.
14
Exchange Pro 19.12 Installation and Configuration Guide
9. On the Login screen, enter the User Name and Password to use for the Binary Tree Exchange Pro MCP Service and Exchange Pro AppPool and then click Next.
15
Exchange Pro 19.12 Installation and Configuration Guide
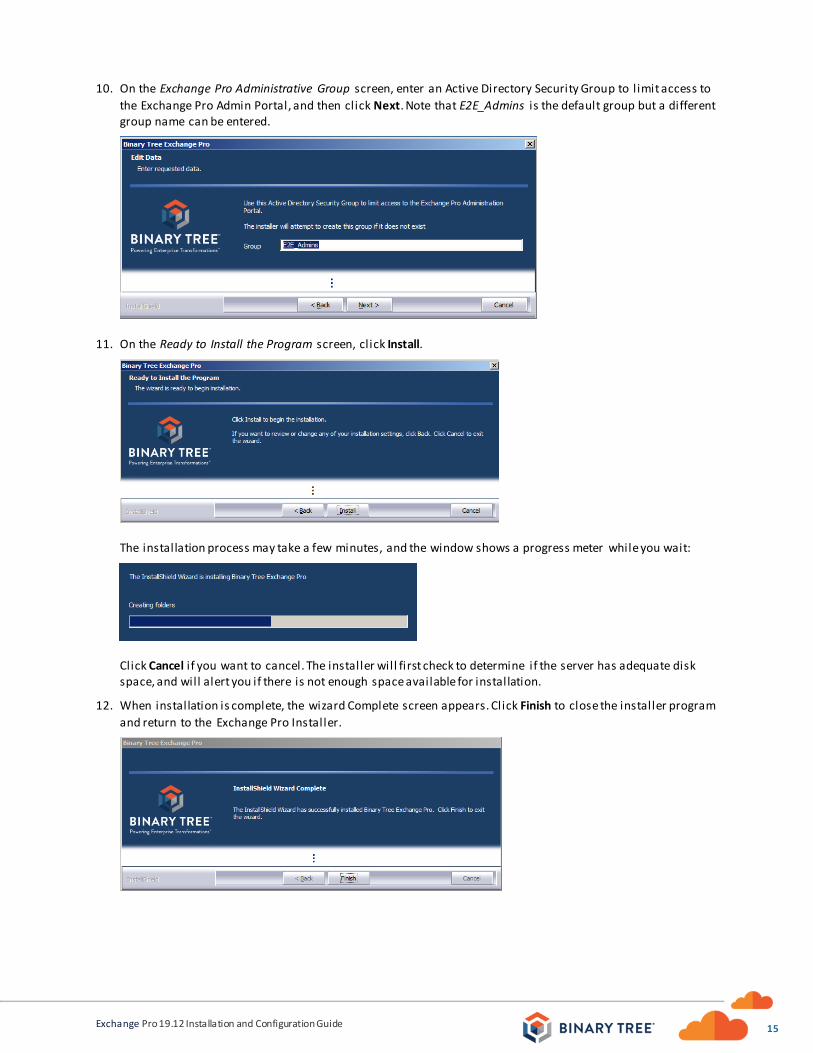
10. On the Exchange Pro Administrative Group screen, enter an Active Directory Security Group to l imit access to
the Exchange Pro Admin Portal, and then click Next. Note that E2E_Admins is the default group but a different group name can be entered.
11. On the Ready to Install the Program screen, click Install.
The installation process may take a few minutes, and the window shows a progress meter while you wait:
Click Cancel if you want to cancel. The installer will first check to determine if the server has adequate disk space, and will alert you if there is not enough space available for installation.
12. When installation is complete, the wizard Complete screen appears. Click Finish to close the installer program
and return to the Exchange Pro Installer.
16
Exchange Pro 19.12 Installation and Configuration Guide
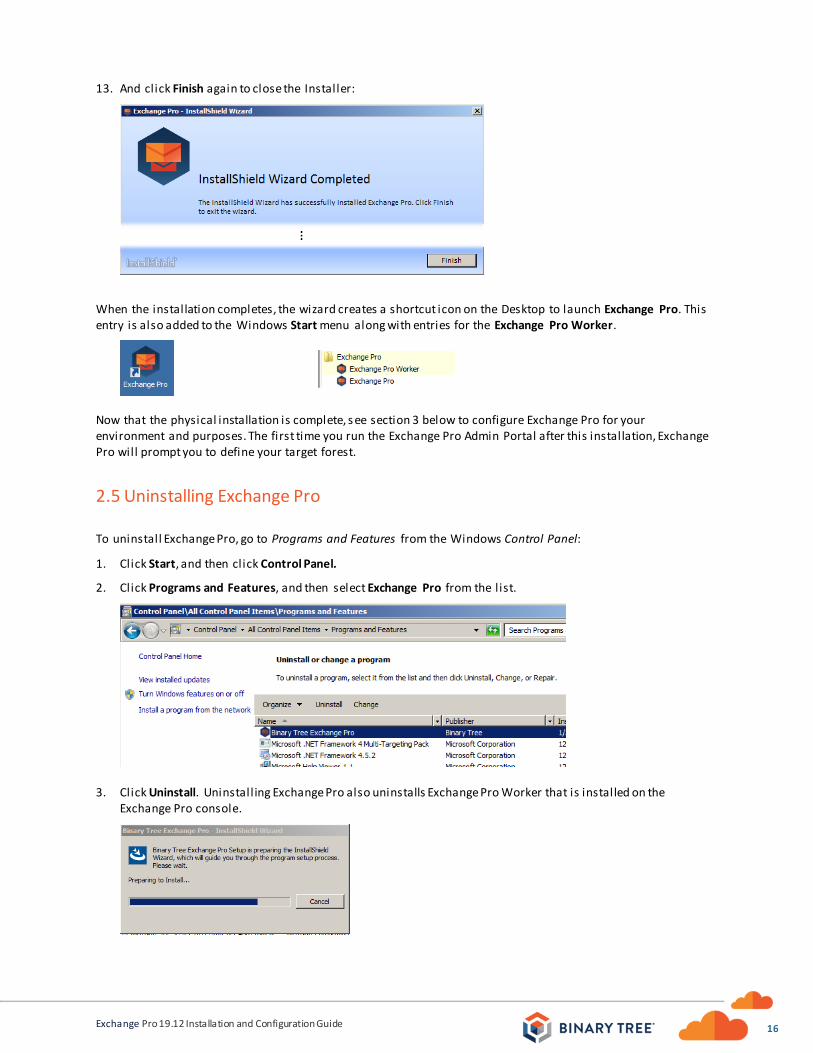
13. And click Finish again to close the Installer:
When the installation completes, the wizard creates a shortcut icon on the Desktop to launch Exchange Pro. This entry is also added to the Windows Start menu along with entries for the Exchange Pro Worker.
Now that the physical installation is complete, s ee section 3 below to configure Exchange Pro for your environment and purposes. The first time you run the Exchange Pro Admin Portal after this installation, Exchange Pro will prompt you to define your target forest.
2.5 Uninstalling Exchange Pro
To uninstall Exchange Pro, go to Programs and Features from the Windows Control Panel:
1. Click Start, and then click Control Panel.
2. Click Programs and Features, and then select Exchange Pro from the list.
3. Click Uninstall. Uninstall ing Exchange Pro also uninstalls Exchange Pro Worker that is installed on the Exchange Pro console.
17
Exchange Pro 19.12 Installation and Configuration Guide
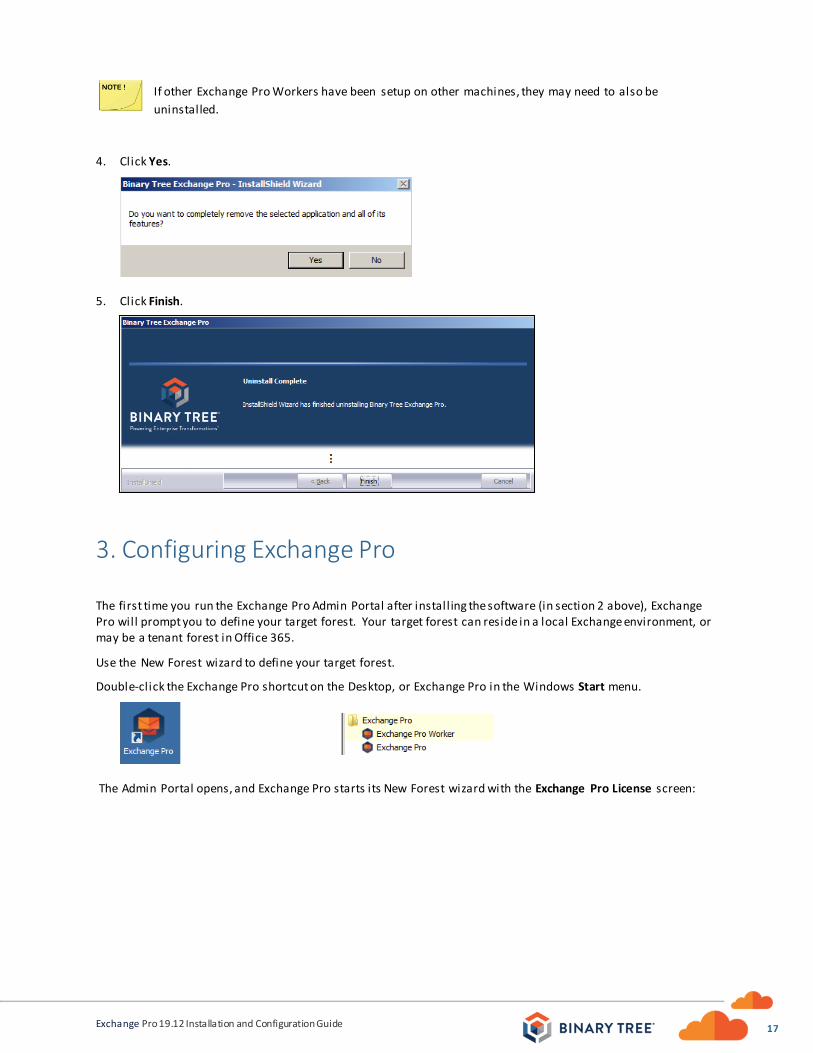
If other Exchange Pro Workers have been setup on other machines, they may need to also be
uninstalled.
4. Click Yes.
5. Click Finish.
3. Configuring Exchange Pro
The first time you run the Exchange Pro Admin Portal after install ing the software (in section 2 above), Exchange Pro will prompt you to define your target forest. Your target forest can reside in a local Exchange environment, or may be a tenant forest in Office 365.
Use the New Forest wizard to define your target forest.
Double-click the Exchange Pro shortcut on the Desktop, or Exchange Pro in the Windows Start menu.
The Admin Portal opens, and Exchange Pro starts its New Forest wizard with the Exchange Pro License screen:

18
Exchange Pro 19.12 Installation and Configuration Guide
Click Browse to locate your l icense fi le (*.lic) or copy and paste the
license key and click Add License. Then click Next. Exchange Pro then validates the license fi le and displays the license details. Click Next.
Exchange Pro then begins a series of screens for you to define your target forest.
This screen asks whether your target forest is a local Exchange forest, or a tenant forest in Office 365.
If you are migrating to an Office 365 target forest: Click the Yes option,
then click Next, and continue this procedure in section 3.1.1 below.
If you are migrating to an on-premises Exchange forest: Click the No option, then click Next, and continue this procedure in section 3.1.2 below.
If you are migrating to Office 365 but you don’t configure the O365 forest now, you can configure an on-premises Exchange forest first, and then the O365 forest later, and
Exchange Pro will automatically switch the two. That is, Exchange Pro will correctly configure the on-premises forest as the source and the O365 forest as the target.
3.1 Defining an Office 365 (Tenant) Target Forest
If your target forest is in a local Exchange environment (not in Office 365), skip ahead to section 3.1.2 below.
Continuing this procedure from the Office 365 Migration screen, where you clicked Yes to begin defining an Office
365 Tenant forest:
Enter the name of the tenant target forest, and click Next.
19
Exchange Pro 19.12 Installation and Configuration Guide
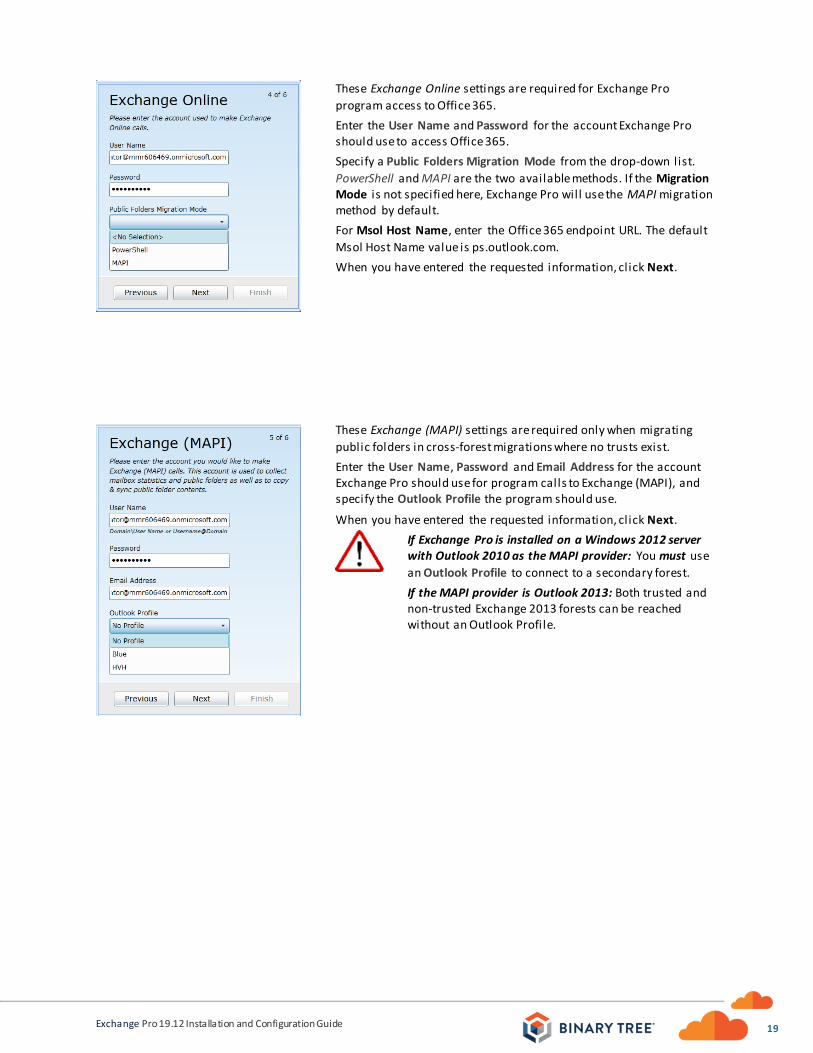
These Exchange Online settings are required for Exchange Pro
program access to Office 365.
Enter the User Name and Password for the account Exchange Pro should use to access Office 365.
Specify a Public Folders Migration Mode from the drop-down list.
PowerShell and MAPI are the two available methods. If the Migration Mode is not specified here, Exchange Pro will use the MAPI migration method by default.
For Msol Host Name, enter the Office 365 endpoint URL. The default
Msol Host Name value is ps.outlook.com.
When you have entered the requested information, click Next.
These Exchange (MAPI) settings are required only when migrating
public folders in cross-forest migrations where no trusts exist.
Enter the User Name, Password and Email Address for the account Exchange Pro should use for program calls to Exchange (MAPI), and specify the Outlook Profile the program should use.
When you have entered the requested information, click Next.
If Exchange Pro is installed on a Windows 2012 server with Outlook 2010 as the MAPI provider: You must use
an Outlook Profile to connect to a secondary forest.
If the MAPI provider is Outlook 2013: Both trusted and non-trusted Exchange 2013 forests can be reached without an Outlook Profile.
20
Exchange Pro 19.12 Installation and Configuration Guide
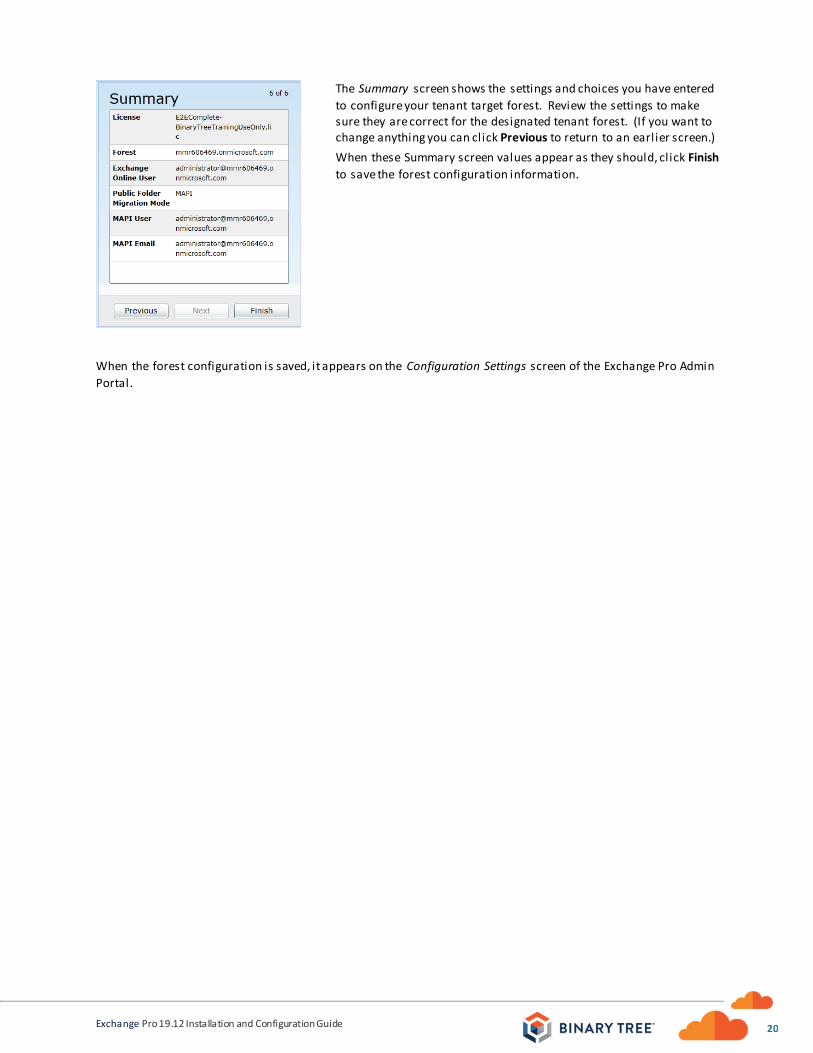
The Summary screen shows the settings and choices you have entered
to configure your tenant target forest. Review the settings to make sure they are correct for the designated tenant forest. (If you want to change anything you can click Previous to return to an earlier screen.)
When these Summary screen values appear as they should, click Finish
to save the forest configuration information.
When the forest configuration is saved, it appears on the Configuration Settings screen of the Exchange Pro Admin
Portal.
21
Exchange Pro 19.12 Installation and Configuration Guide
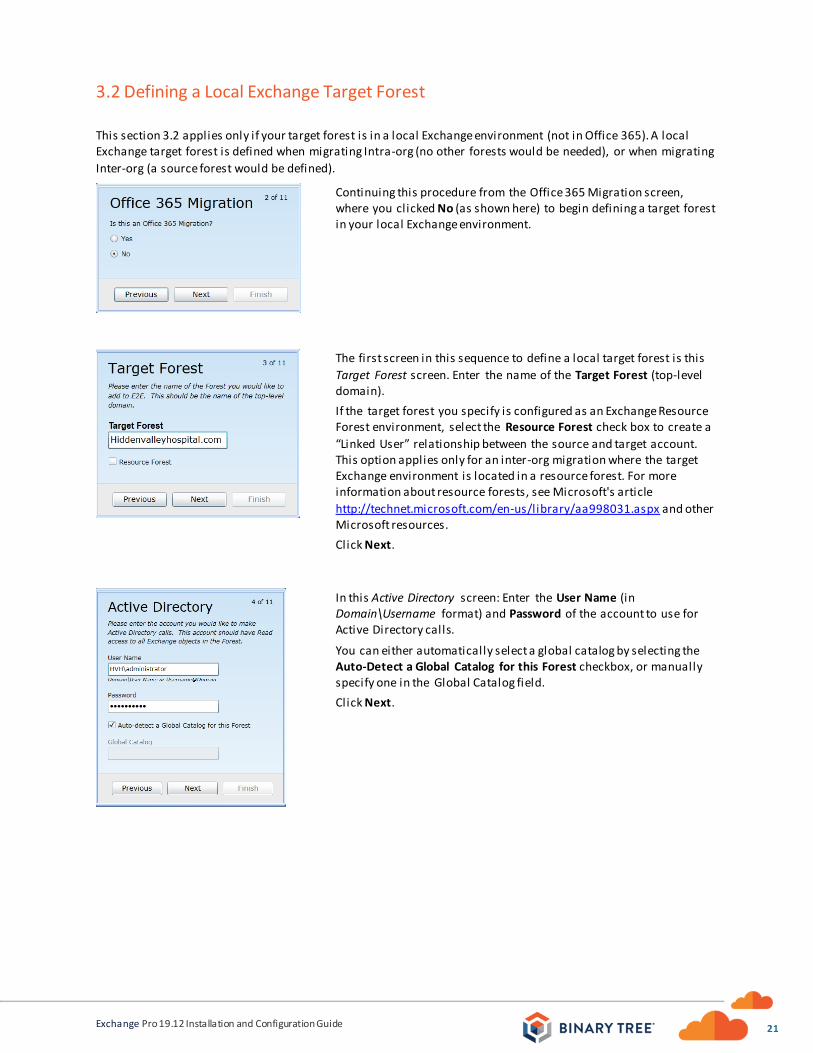
3.2 Defining a Local Exchange Target Forest
This section 3.2 applies only if your target forest is in a local Exchange environment (not in Office 365). A local Exchange target forest is defined when migrating Intra-org (no other forests would be needed), or when migrating
Inter-org (a source forest would be defined).
Continuing this procedure from the Office 365 Migration screen, where you clicked No (as shown here) to begin defining a target forest in your local Exchange environment.
The first screen in this sequence to define a local target forest is this
Target Forest screen. Enter the name of the Target Forest (top-level domain).
If the target forest you specify is configured as an Exchange Resource Forest environment, select the Resource Forest check box to create a
“Linked User” relationship between the source and target account. This option applies only for an inter-org migration where the target Exchange environment is located in a resource forest. For more information about resource forests, see Microsoft's article
http://technet.microsoft.com/en-us/library/aa998031.aspx and other Microsoft resources.
Click Next.
In this Active Directory screen: Enter the User Name (in Domain\Username format) and Password of the account to use for Active Directory calls.
You can either automatically select a global catalog by selecting the Auto-Detect a Global Catalog for this Forest checkbox, or manually specify one in the Global Catalog field.
Click Next.
22
Exchange Pro 19.12 Installation and Configuration Guide
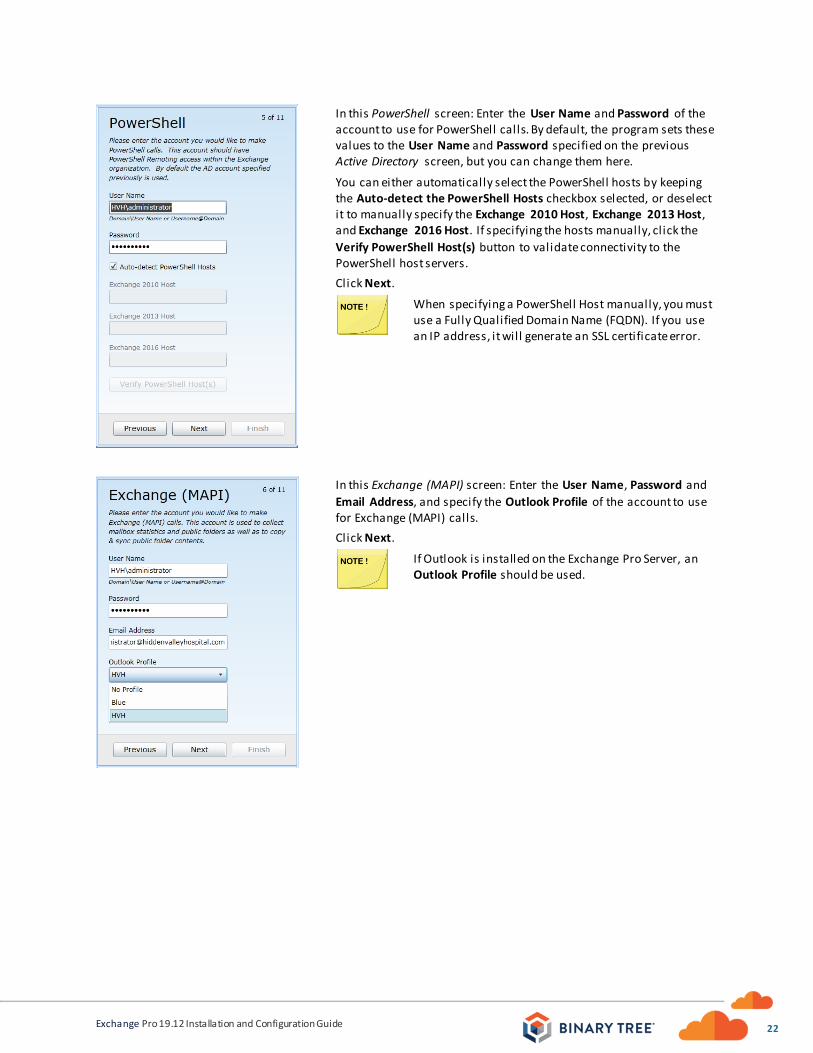
In this PowerShell screen: Enter the User Name and Password of the account to use for PowerShell calls. By default, the program sets these values to the User Name and Password specified on the previous Active Directory screen, but you can change them here.
You can either automatically select the PowerShell hosts by keeping the Auto-detect the PowerShell Hosts checkbox selected, or deselect it to manually specify the Exchange 2010 Host, Exchange 2013 Host, and Exchange 2016 Host. If specifying the hosts manually, click the
Verify PowerShell Host(s) button to validate connectivity to the PowerShell host servers.
Click Next.
When specifying a PowerShell Host manually, you must use a Fully Qualified Domain Name (FQDN). If you use an IP address, it will generate an SSL certificate error.
In this Exchange (MAPI) screen: Enter the User Name, Password and
Email Address, and specify the Outlook Profile of the account to use for Exchange (MAPI) calls.
Click Next.
If Outlook is installed on the Exchange Pro Server, an Outlook Profile should be used.
23
Exchange Pro 19.12 Installation and Configuration Guide
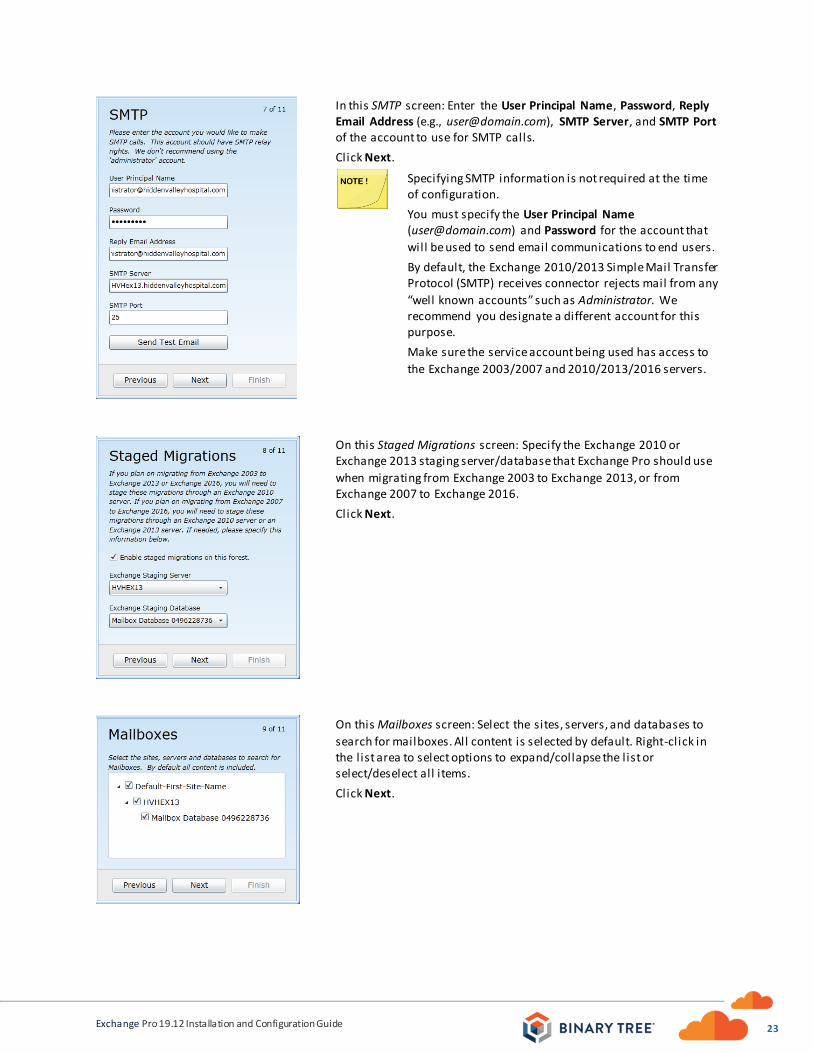
In this SMTP screen: Enter the User Principal Name, Password, Reply Email Address (e.g., [email protected]), SMTP Server, and SMTP Port of the account to use for SMTP calls.
Click Next.
Specifying SMTP information is not required at the time of configuration.
You must specify the User Principal Name ([email protected]) and Password for the account that
will be used to send email communications to end users.
By default, the Exchange 2010/2013 Simple Mail Transfer Protocol (SMTP) receives connector rejects mail from any
“well known accounts” such as Administrator. We recommend you designate a different account for this purpose.
Make sure the service account being used has access to
the Exchange 2003/2007 and 2010/2013/2016 servers.
On this Staged Migrations screen: Specify the Exchange 2010 or Exchange 2013 staging server/database that Exchange Pro should use
when migrating from Exchange 2003 to Exchange 2013, or from Exchange 2007 to Exchange 2016.
Click Next.
On this Mailboxes screen: Select the sites, servers, and databases to
search for mailboxes. All content is selected by default. Right-click in the list area to select options to expand/collapse the list or select/deselect all items.
Click Next.
24
Exchange Pro 19.12 Installation and Configuration Guide
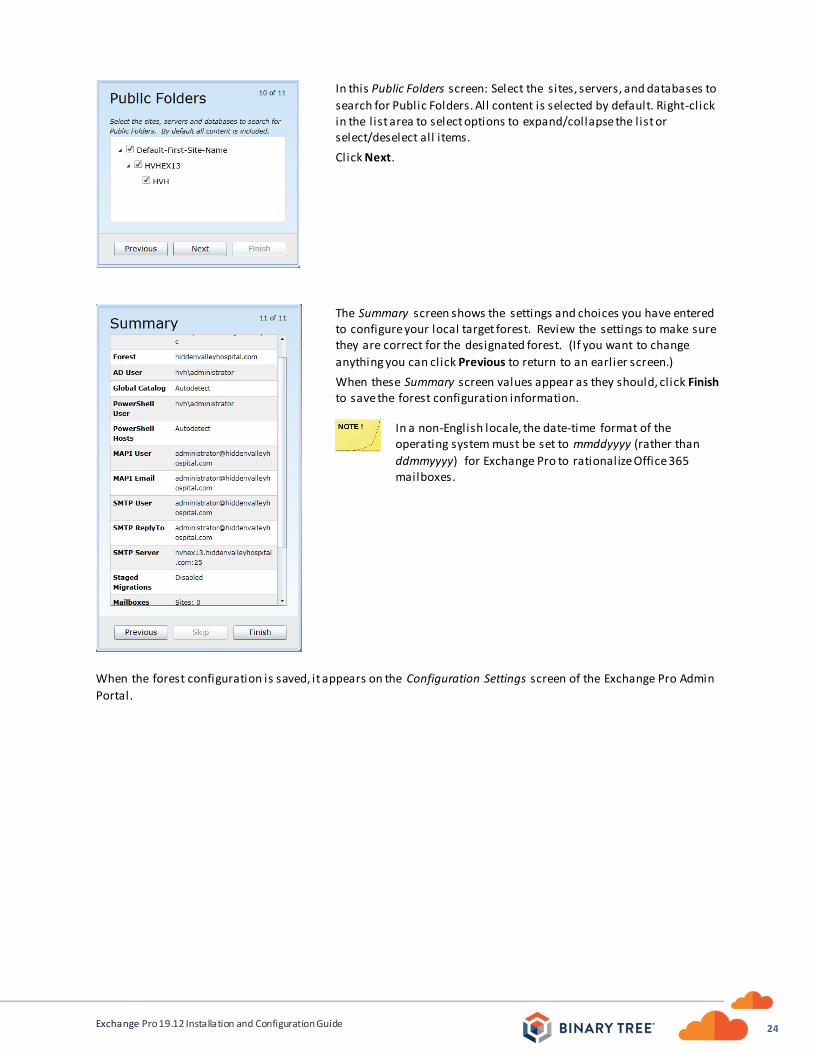
In this Public Folders screen: Select the sites, servers, and databases to
search for Public Folders. All content is selected by default. Right-click in the list area to select options to expand/collapse the list or select/deselect all items.
Click Next.
The Summary screen shows the settings and choices you have entered to configure your local target forest. Review the settings to make sure they are correct for the designated forest. (If you want to change
anything you can click Previous to return to an earlier screen.)
When these Summary screen values appear as they should, click Finish to save the forest configuration information.
In a non-English locale, the date-time format of the operating system must be set to mmddyyyy (rather than
ddmmyyyy) for Exchange Pro to rationalize Office 365 mailboxes.
When the forest configuration is saved, it appears on the Configuration Settings screen of the Exchange Pro Admin
Portal.
25
Exchange Pro 19.12 Installation and Configuration Guide
4. Installing Exchange Pro Public Folder Workers
This section includes instructions for the install ing Exchange Pro Public Folder Workers. Public Folder Workers can be used to allow distribution of Public Folder processing. Public Folder Workers can be assigned specific Public Folder processing roles including provisioning, content sync, change detection, and reporting.
To install the Exchange Pro Public Folder Worker:
1. Download or copy the Exchange Pro Public Folder Worker installation executable (Exchange Pro Worker Installer) to the device that will be used as a Public Folder Worker.
2. Right-click on the Exchange Pro Worker Installer fi le and select to Run as Administrator. Click Run on the
security warning.
3. The installer then scans your environment to gather the information it needs for installation, an d to determine whether you need to install any of several required accessory applications.
If these accessory apps are already installed, just skip ahead to the next step below. Otherwise, the Exchange Pro installer will prompt you to authorize the installation of the ones you need. In that case, click the Install button to accept. If you have to install Microsoft .NET 4.5.2 Framework, you may also be prompted to accept Microsoft’s l icense agreement. If so, mark the checkbox for I have read and accept…, and click Install.
The installation of accessory applications may take several minutes.
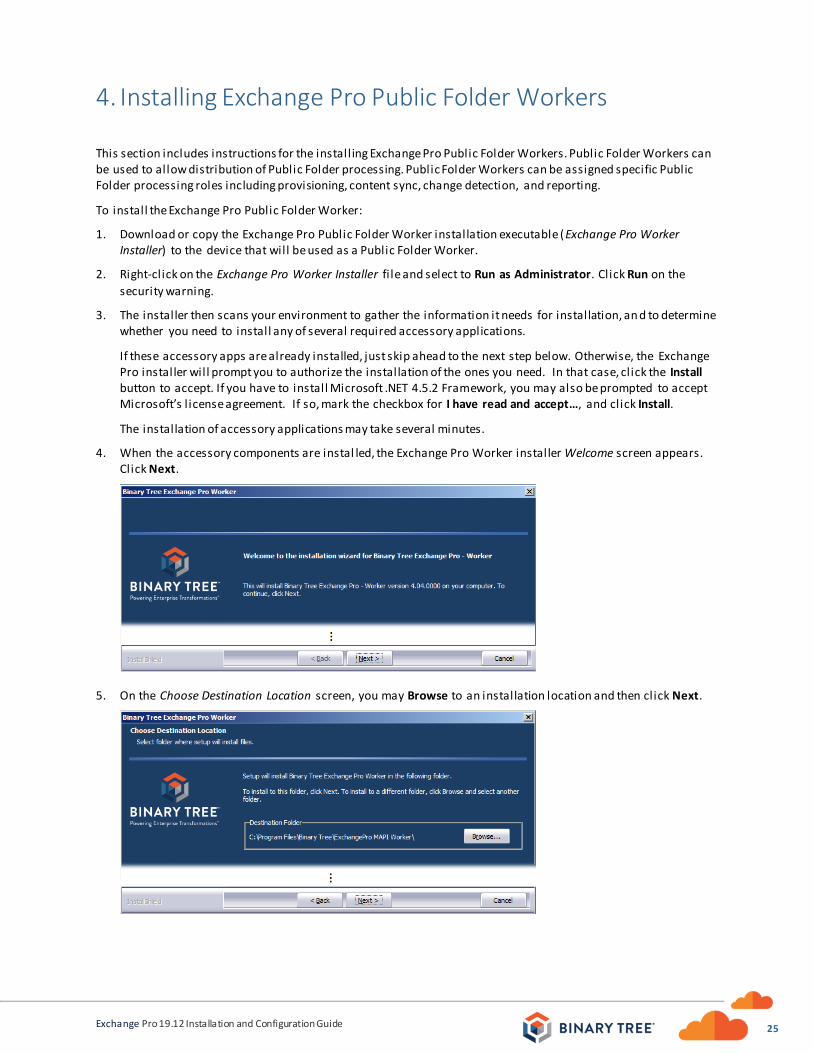
4. When the accessory components are instal led, the Exchange Pro Worker installer Welcome screen appears. Click Next.
5. On the Choose Destination Location screen, you may Browse to an installation location and then click Next.
26
Exchange Pro 19.12 Installation and Configuration Guide
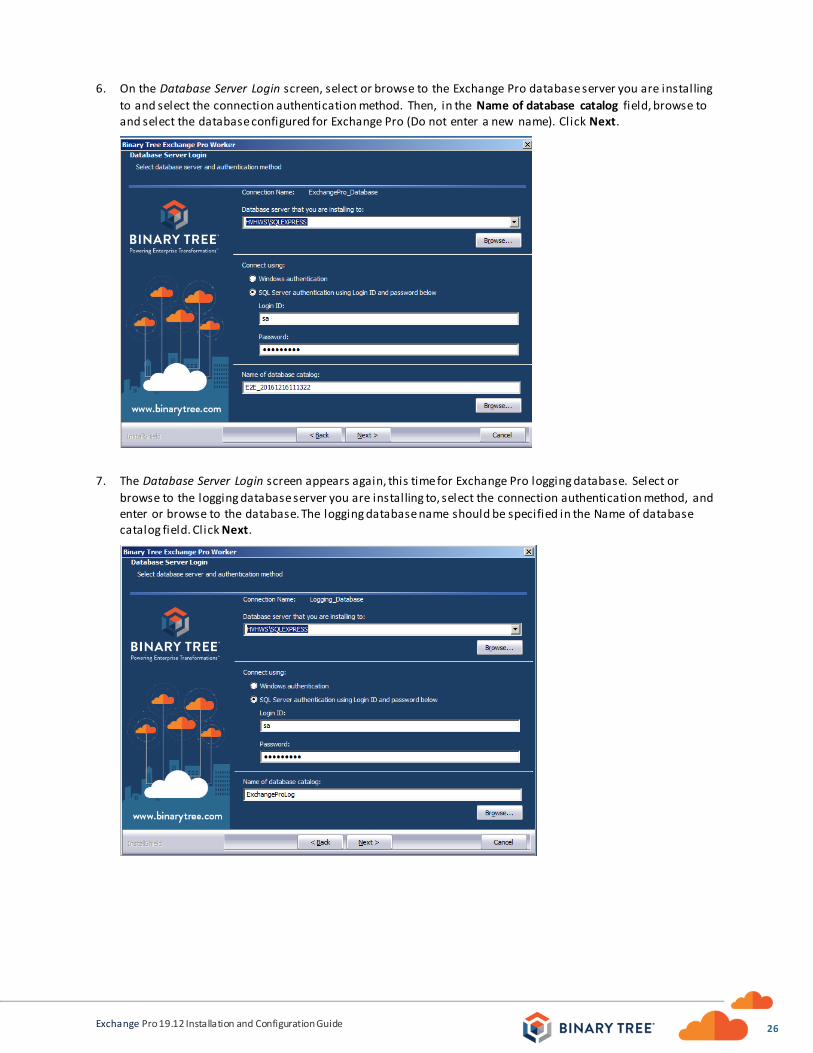
6. On the Database Server Login screen, select or browse to the Exchange Pro database server you are installing
to and select the connection authentication method. Then, in the Name of database catalog field, browse to and select the database configured for Exchange Pro (Do not enter a new name). Click Next.
7. The Database Server Login screen appears again, this time for Exchange Pro logging database. Select or
browse to the logging database server you are installing to, select the connection authentication method, and enter or browse to the database. The logging database name should be specified in the Name of database catalog field. Click Next.
27
Exchange Pro 19.12 Installation and Configuration Guide
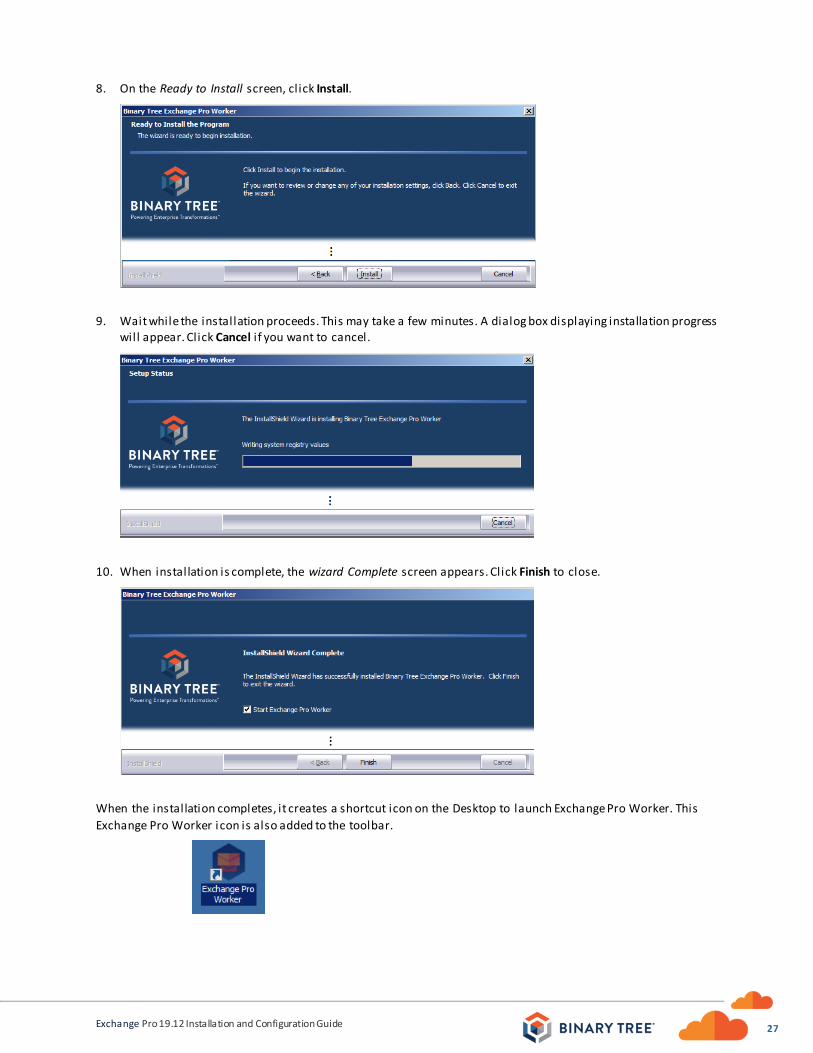
8. On the Ready to Install screen, click Install.
9. Wait while the installation proceeds. This may take a few minutes. A dialog box displaying installation progress will appear. Click Cancel if you want to cancel.
10. When installation is complete, the wizard Complete screen appears. Click Finish to close.
When the installation completes, it creates a shortcut icon on the Desktop to launch Exchange Pro Worker. This
Exchange Pro Worker icon is also added to the toolbar.
28
Exchange Pro 19.12 Installation and Configuration Guide
5. Components of Exchange Pro
The main components of Exchange Pro are: the MCP Windows Service, the Admin Portal , and the User Portal.
5.1 MCP Windows Service
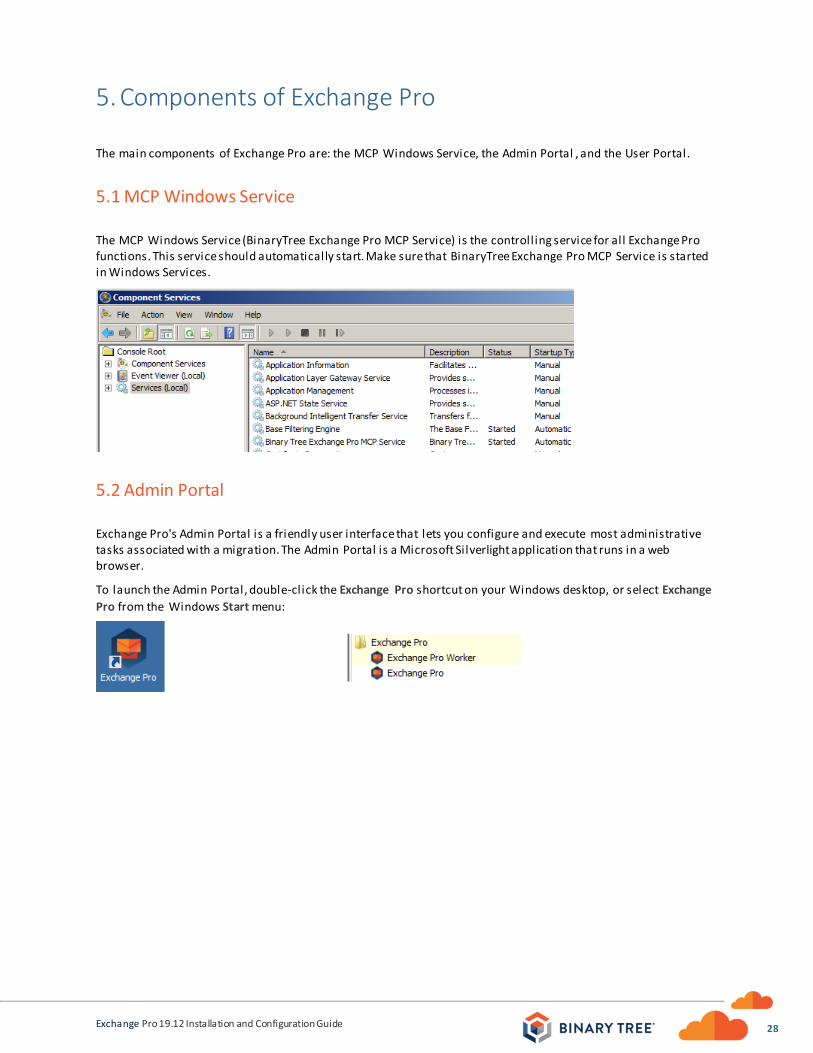
The MCP Windows Service (BinaryTree Exchange Pro MCP Service) is the controlling service for all Exchange Pro functions. This service should automatically start. Make sure that BinaryTree Exchange Pro MCP Service is started in Windows Services.
5.2 Admin Portal
Exchange Pro's Admin Portal is a friendly user interface that lets you configure and execute most administrative tasks associated with a migration. The Admin Portal is a Microsoft Silverlight application that runs in a web browser.
To launch the Admin Portal, double-click the Exchange Pro shortcut on your Windows desktop, or select Exchange
Pro from the Windows Start menu:
29
Exchange Pro 19.12 Installation and Configuration Guide
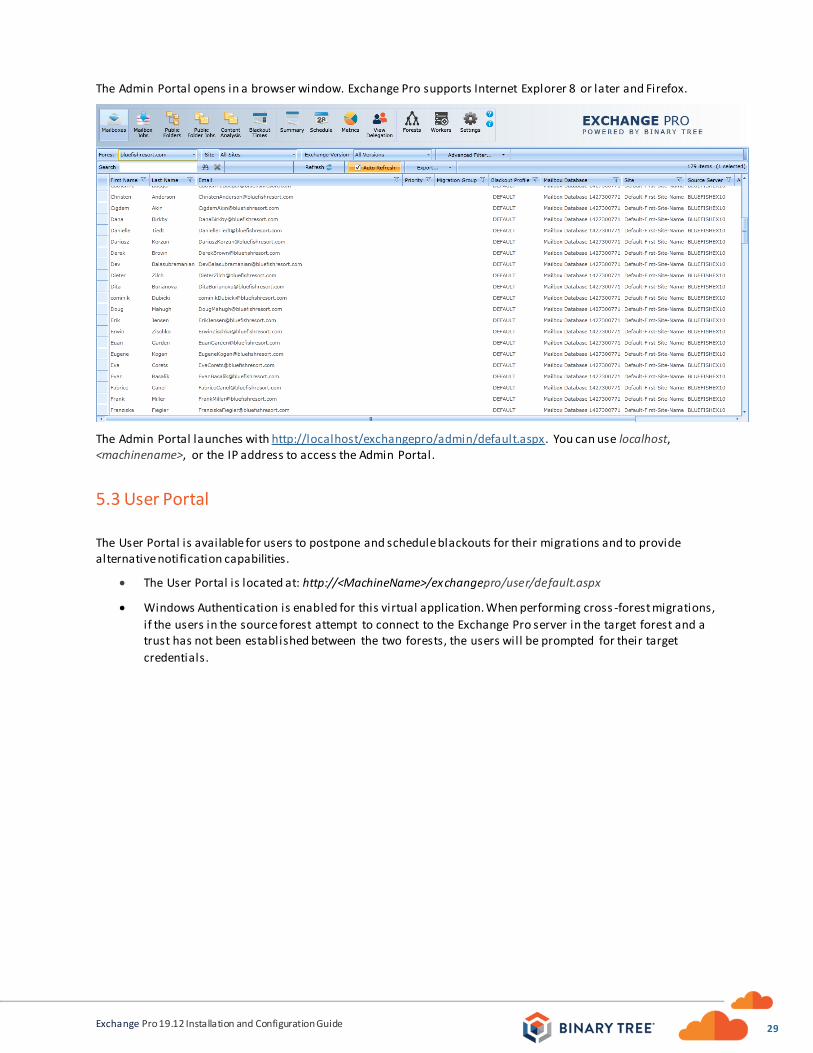
The Admin Portal opens in a browser window. Exchange Pro supports Internet Explorer 8 or later and Firefox.
The Admin Portal launches with http://localhost/exchangepro/admin/default.aspx. You can use localhost, <machinename>, or the IP address to access the Admin Portal.
5.3 User Portal
The User Portal is available for users to postpone and schedule blackouts for their migrations and to provide alternative notification capabilities.
• The User Portal is located at: http://<MachineName>/exchangepro/user/default.aspx
• Windows Authentication is enabled for this virtual application. When performing cross -forest migrations,
if the users in the source forest attempt to connect to the Exchange Pro server in the target forest and a trust has not been established between the two forests, the users will be prompted for their target
credentials.
30
Exchange Pro 19.12 Installation and Configuration Guide
6. Introduction to the Admin Portal
Exchange Pro's Admin Portal is a friendly user interface that lets you control various administrative tasks related to Exchange mailbox migration.
The first time you run the Admin Portal after installing Exchange Pro, the program leads you through a series of
screens for you to enter your Exchange Pro license key and configure Exchange Pro communications with other programs and hardware. After that initial configuration, the Admin Por tal lets you update configuration data, define new forests to Exchange Pro, designate mailboxes and public folders for migration, schedule and execute migrations, pause and resume migrations, review migration statistics, and so forth.
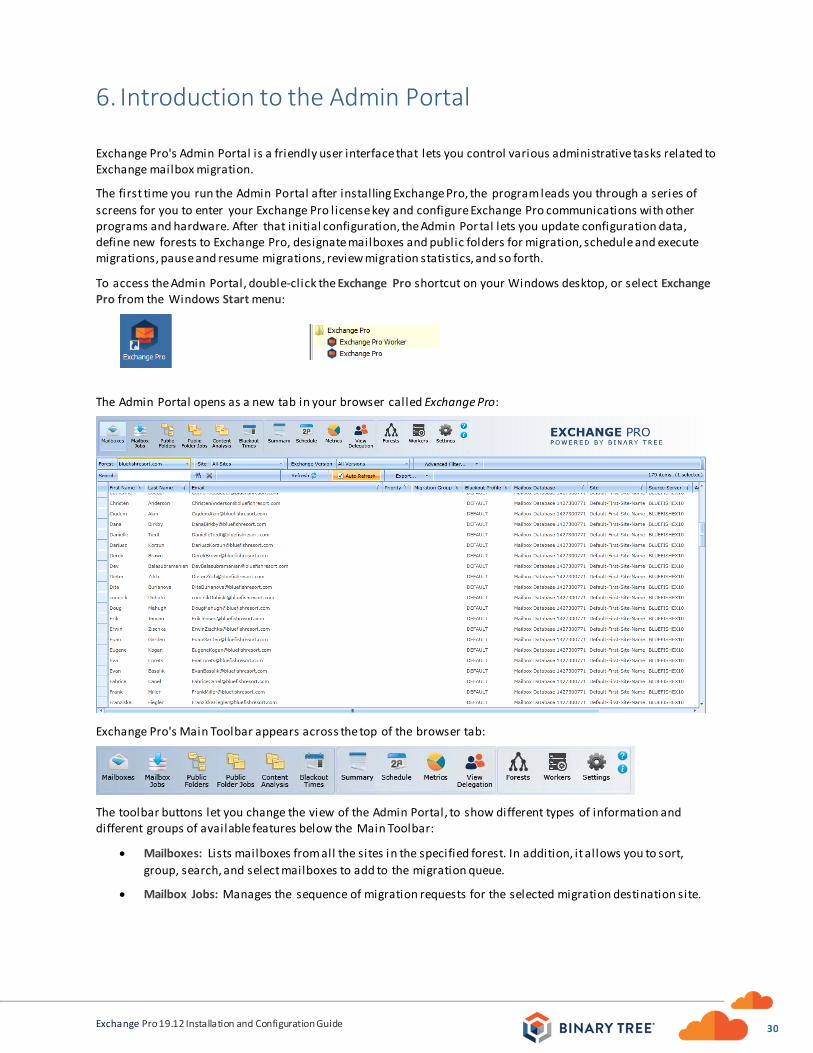
To access the Admin Portal, double-click the Exchange Pro shortcut on your Windows desktop, or select Exchange Pro from the Windows Start menu:
The Admin Portal opens as a new tab in your browser called Exchange Pro:
Exchange Pro's Main Toolbar appears across the top of the browser tab:
The toolbar buttons let you change the view of the Admin Portal, to show different types of information and different groups of available features below the Main Toolbar:
• Mailboxes: Lists mailboxes from all the sites in the specified forest. In addition, it allows you to sort,
group, search, and select mailboxes to add to the migration queue.
• Mailbox Jobs: Manages the sequence of migration requests for the selected migration destination site.
31
Exchange Pro 19.12 Installation and Configuration Guide
• Public Folders: Displays the Public Folder tree from the selected Source and Target forest. In addition, it
allows you to sort, group, search, and select public folders to add to the migration queue. Public folder
migration is only enabled during on-premises cross forest migration projects.
• Public Folder Jobs: Manages the sequence of migration requests for the selected migration destination.
Public folder migration is only enabled during on-premises cross forest migration projects.
• Content Analysis: Allows Public Folder content information collection and analysis in SQL for data
remediation.
• Blackout Times: Allows the configuration of time periods when mailboxes cannot be migrated for the
selected migration site.
• Summary: Displays high-level accounting of mailbox migrations, which allows you to view all status levels.
• Schedule: Displays estimated migration sequence for the selected migration site. It is a read-only view.
• Metrics: Provides historical data and throughput measurements of migrations in a graphical format.
• View Delegation: Displays delegation data, so you can migrate mailboxes associated by delegation rights
together (to preserve delegation rights after the migration).
• Forests: Configure global forest settings, add new forest, etc.
• Workers: Administer Public Folder migration workers.
• Settings: Configure general settings, activities, mailboxes, Public Folders, workers, scripts, notification
templates, and licenses.
• Help: Open a browser window of information and field notes about the currently active Exchange Pro
screen or tab.
• About: Displays version information about the Exchange Pro product.
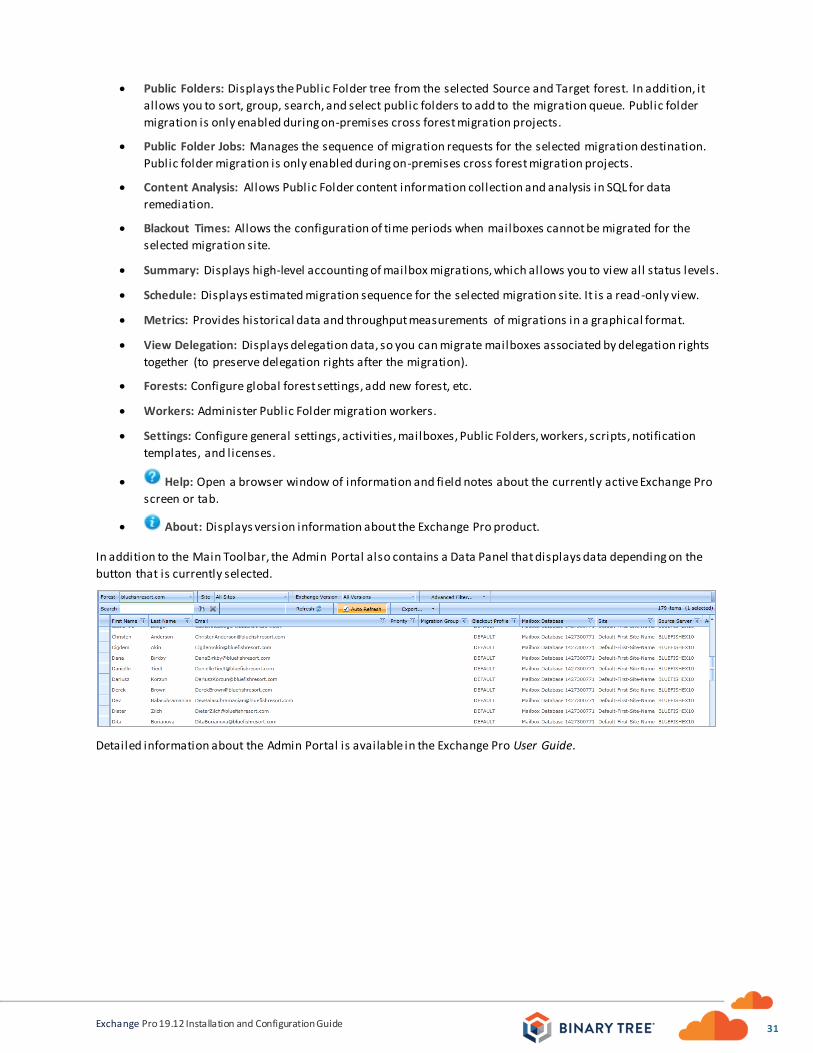
In addition to the Main Toolbar, the Admin Portal also contains a Data Panel that displays data depending on the
button that is currently selected.
Detailed information about the Admin Portal is available in the Exchange Pro User Guide.
32
Exchange Pro 19.12 Installation and Configuration Guide
Learn more about Binary Tree For more information on Binary Tree, visit us at www.binarytree.com/company/about-binary-tree.
Binary Tree Social Media Resources
© Copyright 2019, Binary Tree, Inc. All rights reserved.
The Binary Tree logo and the tagline “Powering Enterprise Transformations” are registered trademarks, and any references to Binary Tree’s products and services are trademarks, of Binary Tree, Inc. All other trademarks are the trademarks or registered trademarks of their respective rights holders.