exchange 2013 migration guide
DESCRIPTION
Migrating to Microsoft Exchange Server 2013; mistakes to avoid, checklists, and walkthroughs.TRANSCRIPT

Making a smooth transition to Exchange Server 2013Exchange Server 2013 migration guide
Authors:Konrad Sagała (Microsoft Exchange MVP)Robert Mandziarz (CodeTwo Admin, MCTS)
Brought to you by CodeTwo
January 2014 |

Table of Contents
Abstract
About the Authors
Will 2014 be the year of Exchange Server migrations? (Survey by CodeTwo)
Migrating email to Exchange 2013 or Office 365 – environment preparation (Konrad Sagala, MS Exchange MVP)
Exchange 2003 to Exchange 2013 migration walkthrough (Robert Mandziarz, CodeTwo Admin, MCTS)
Exchange 2013 migration checklist
2
4
5
8
11
19

AbstractThe extended support phase for Exchange Server 2003 ends April 8, 2014 as announced on
TechNet Blog. Since Microsoft is going to stop supporting Exchange Server 2003 soon, many
companies are at the crossroads whether to migrate to a new email platform this year, or not.
Doing nothing and keeping an old email server regardless of the fact that it is on longer supported
by the manufacturer can be risky. On the other hand, the migration from Exchange 2003 directly to
Exchange 2013 is a complex and time-consuming project that requires a lot of research.
The main purpose of this paper is to give you a wider overview of things that need to be taken into
consideration when moving to Exchange 2013. We did our best to include as much information as
possible that could help gain a better understanding of what troubles you may bump into and what
should be done to avoid them. Finally, we described one of the ways of migrating from Exchange
2003 to Exchange 2013 that includes using one of our migration tools, CodeTwo Exchange
Migration. Following this path will help you avoid one of the biggest problems while migrating from
Exchange 2003 to Exchange 2013 - conducting the “double-hop” migration.

About the Authors
Konrad Sagała (MS Exchange MVP) Dealing with server systems since 1993. For nearly 20 years he has been
focused exclusively on Windows Server, Active Directory and Exchange Server.
Konrad is the community leader and founder of Polish Exchange Pro and User
Group. He currently works as an IT System Architect in APN Promise S.A. He’s
an active MCT and Microsoft Most Valuable Professional awardee since 2007.
Visit his expert blog on: http://pepugmaster.blogspot.com
Robert Mandziarz (CodeTwo Chief IT Administrator, MCTS) Windows Server, VMWare and Exchange Server administrator at CodeTwo.
He manages the company’s main IT infrastructure, development and test
environments on a daily basis. He’s mainly focused on solving day-to-day
technical problems and deploying various editions of Exchange.
CodeTwoMicrosoft Partner (Gold Application Development competency) and
independent solutions provider for IT professionals dealing with Exchange
Server, Office 365 and Outlook. CodeTwo products streamline email flow
administration, enhance online collaboration and help system engineers
perform email server migrations. In 2013 CodeTwo launched two new migration
tools for Exchange Server and Office 365, which were acclaimed by portals like
MSExchange.org, and recommended by some of most recognized IT experts
from all over the world.

Will 2014 be the year of Exchange Server migrations?
As the end-of-support date for Exchange 2003 approaches, it becomes clear that many Exchange
Server administrators already think about moving their companies to Exchange 2013, or Office
365. Many of them have already made final decisions and are right about to start the migration.
To support this thesis, CodeTwo conducted a survey on a group of IT professionals to find out
about their plans for the forthcoming months.
The survey was carried out between October 22 and December 23, 2013 and it was sent online
to a group of IT administrators working with Exchange Server on a daily basis. The response rate
was different in the case of each question, but in total 159 Exchange Server administrators took
part. Let’s take a look at the results…
Over a half of surveyed administrators
declared that they are planning to move to
Exchange 2013 this year, and more than 11%
of participants reported they had recently
conducted the migration to this platform:
I have already completed the migration
Are you planning to migrate to Exchange Server 2013 within the next year?
No
Yes
A survey by CodeTwo

Obviously, the migration to Exchange 2013 (especially from Exchange 2003) is widely considered
to be risky and difficult to perform. Administrators are concerned about many different aspects
of the entire process, especially when it comes to general technical problems, email service
availability, or potential data loss.
Data loss
Technical issues
Budget
Services availability during the migration
Staff has to learn new software
High time consumption of the entire process
Other (2%)
What is your biggest concern about migrating to Exchange 2013?
Surprisingly, although administrators who took part in the survey feel there are so many things that
can go wrong, they are unlikely to have any 3rd parties or consultants conduct the migration for
them. The majority of them plans to carry out the migration all by themselves, or with a very little
help from their consultants.
Are you going to perform the migration using your own resources, or will you hire a 3rd party company / consultant?
I'm going to do it using only own resources
I'm going to hire a consulting company
Mixed mode
Other (1%)

Will 2014 be the year of Exchange Server migrations?
However, when it comes to 3rd party migration tools, the attitude of survey participants seems to
be completely different. Most of them revealed, they are thinking about using additional software
during the migration. Interestingly, they still haven’t made up their minds which software they
should use.
Yes
Are you going to use any 3rd party software / tools?
No It's possible but I don't know yet
The results of this short survey show clearly that although the process of migrating to Exchange
2013 is not easy to perform, many organizations are going to take that risk and make the transition
this year. The success of the entire operation will be determined by proper planning and the
usage of high-quality resources, including 3rd party software.
The next part of this guide will focus on possible infrastructure configuration problems an
administrator has to take into account while planning the transition to Exchange 2013.
Summary

Migrating email to Exchange 2013 or Office 365 - environment preparation
What are the most important things you need to consider before starting the migration to
Exchange 2013 or Office 365? Although the specifications of server machines and hard drives
performance may be crucial for on-premises Exchange installations, local server infrastructure
isn’t so important when moving your users to Office 365 - perhaps only in terms of integrating
your local Active Directory with Office 365 users database. However, in both cases the bottleneck
can be found somewhere else, e.g. at WAN or Internet connections quality. Network performance
is especially important in terms of additional Exchange Server features used by employees, e.g.
central management of calendars, company contacts, Global Address List (GAL), or delegation of
tasks. In the end Exchange Server isn’t just only about email.
All pre-configuration steps required to prepare your existing Active Directory and server
infrastructure for Exchange Server 2013 installation are thoroughly described in the official
documentation of the product, especially in the Planning and Deployment part, as well as on
the official page of the Exchange Server Deployment Assistant. You may also consider making
some calculations before you actually decide anything about your hardware configuration. Some
useful information on that topic, suggestions about physical placement of servers, as well as a
list of handy calculation tools can be found on Prabhat Nigam’s blog post on MSExchangeGuru.
com. To sum it up briefly, you can use the Exchange 2013 Server Role Calculator to specify such
important things as the number of necessary servers or the amount of needed hard drives. Please
note that the required amount of RAM for Exchange 2013 is twice as big as in Exchange 2010.
The Exchange Client Network Bandwidth Calculator may also come in handy, especially when
you plan to change the architecture of connections (e.g. during Exchange Server centralization or
while switching to Office 365). It is also important to remember that before you actually begin the
calculations you need to determine how many emails (and of what size) users generate daily or
monthly.
By Konrad Sagala (Microsoft Exchange MVP)

Planning Office 365 deployment is easier than Exchange 2013 on-premises. Because Exchange
Online is located in the Cloud, you don’t have to think about things like system scalability, or
its performance. In the case of Office 365, these things are completely covered by Microsoft’s
datacenter engineers. You can also use a rich set of documents and tools that were designed to
support the administrator during Office 365 deployment. The best place to start is the Office 365
deployment guide. You can also use OnRamp (previously known as Office 365 Readiness Tool),
which may give you some additional useful information on the environment setup. If you plan to
run a hybrid configuration and want to integrate your local Active Directory with the Cloud, you
may want to have a look at IdFix (DirSync Error Remediation Tool). This tool will help you identify
and resolve possible problems with Active Directory attributes that, if not eliminated, may affect
data synchronization between the local Active Directory forest and Office 365. If you migrate
from Lotus Notes, you will probably like to try the Online Notes Inspector (MONTI), which can be
downloaded from here.
Although the above mentioned tools may be helpful in the planning stage, they won’t protect you
from unexpected problems with client machines you might encounter after migrating to Exchange
2013, or Office 365. Microsoft expects that your users will only use client software that is fully
supported by Exchange 2013/Office 365. Unfortunately, many companies still utilize Outlook
2003, Windows XP or even Windows Vista. Office 365 enterprise plans E3, E4 as well as SMB
can only work with Windows 7 (or newer). This automatically eliminates almost a half of the client
machines that still operate on the market. In addition, the clock is ticking and soon Microsoft will
withdraw support for Windows XP and related products, regardless of the fact that at least 30%
of the market still uses it. Even though Outlook 2007 is officially supported by Exchange 2013,
it doesn’t allow to use all of its features as effectively as Outlook 2010 or 2013. In fact, Office
365 team officially suggests that only products with mainstream support should be used with
Office 365 (Learn more here). It means that Outlook 2007 may now work with Exchange Online,
but each new update in the cloud can change this situation in the future. You could try using
the web browser and Outlook Web App instead, which theoretically supports all of Exchange
2013 features, however, the release of the Cumulative Update 3 back in November showed that
Microsoft doesn’t care about the limitations of Internet Explorer 8 (or even IE9!) and future updates
will presumably only focus on Internet Explorer 11 and Internet Explorer 10 versions.
While preparing your migration to Exchange 2013, no matter if it’s installed on-premises, or in the
Cloud (Office 365), you should analyze your environment first. Contrary to what you may think,
the biggest challenge is not connected with the server configuration but with the client machines.
It often happens that in large organizations administrators simply don’t know which versions of

operating systems (and their Service Packs) and mail clients are installed. Some companies use
dedicated software to manage client PCs (e.g. SCCM or LanDesk), but you can also try a free
tool from Microsoft instead, which is called Microsoft Assesment and Planning Toolkit (MAP). The
program in its current version 9.0 has been just optimized for better compatibility with the newest
Microsoft products. It will help you investigate the workstations and prepare reports containing
some useful information about your environment preparation, operating system versions or Office
and Office 365 editions.
To sum up, the above-mentioned tools can help you easily address some possible problems you
may encounter during the migration. Using them, however, will not let you solve all of the issues
you may have, but it will definitely help you prepare the migration in a better way and identify
the parts of the environment that still need to be adjusted to Exchange 2013 and Office 365
requirements.
Tools in spotlight:
Microsoft Exchange Server Deployment Assistant
Exchange 2013 Mailbox Server Role Requirements
Exchange Client Network Bandwidth Calculator
OnRamp for Office 365
IdFix DirSync Error Remediation Tool
Microsoft Online Notes Inspector (MONTI)
Microsoft Assessment and Planning Toolkit

Migration from Exchange 2003 to Exchange 2013 - step by step walkthroughBy Robert Mandziarz (CodeTwo Chief IT Administrator, MCTS)
Since Microsoft doesn’t support the co-existence of Exchange 2003 and Exchange 2013, mailbox
migration between these two platforms is quite complicated. It doesn’t mean, however, the
administrator can’t do anything to make it more seamless and less time-consuming. There are
basically two options that are possible:
• Carrying out the double hop migration, with Exchange 2010 pre-installed first
• Moving users’ mailboxes between forests (cross-forest migration) with a 3rd party migration tool
Because the first option in my opinion requires additional work and involves too many resources,
I am going to focus on the second scenario, which makes the migration far easier and involves the
usage of CodeTwo Exchange Migration, a mailbox migration tool from CodeTwo. Here’s a step-by-
step guide on how to migrate from Exchange 2003 to Exchange 2013!
CodeTwo Exchange Migration
The program was designed to enable easy inter- and cross-forest migrations of Exchange Server mailboxes. It copies all mailbox data between Exchange Server installations using the EWS (Exchange Web Services), also between Exchange 2003 and Exchange 2013. Since it is equipped with a graphical user’s interface, it doesn’t require running any PowerShell commands. It also features some additional tools, such as the mailbox Automatcher and migration Scheduler that make the entire migration process even more seamless.
More information, together with full pricing details can be found on the program’s official website: www.codetwo.com/exchange-migration/

Before you install and configure CodeTwo Exchange Migration make sure that your environment (both source and target server) is prepared for migration.
Below you will find the list of key points to be considered:
IPre-migration
activities
STEP 1 Prepare a clean Exchange 2013 environment in a new Active Directory forest
The following points need to be revised:
• Accepted Domains• Send/receive Connectors• Servers' Certificates• Default Email Address Policy• Internal/External URL's
Learn more
STEP 2 Enable a two-way trust relationship between the forests
Learn more about creating a forest trust
STEP 3 Configure mailflow between the source and the target server
• Configure SMTP Connector on Exchange 2003 • Configure Send and Receive Connectors on Exchange 2013
STEP 4 Configure synchronization (sharing) of Free/Busy Info on the target server
Learn more about the Configuration of Free/Busy Sharing between Exchange organizations
STEP 5 Prepare domain accounts on the target server
• Migrate domain accounts between the Active Directory forests. You may do it automatically using ADMT (Active Directory Migration Tool) or create the accounts manually in the target forest. If you choose the manual approach please bear in mind that the accounts' data like permissions' resources will not be migrated.
• Merge Active Directory Exchange Attributes using Prepare-MoveRequest.ps1 script in the PowerShell
Learn more
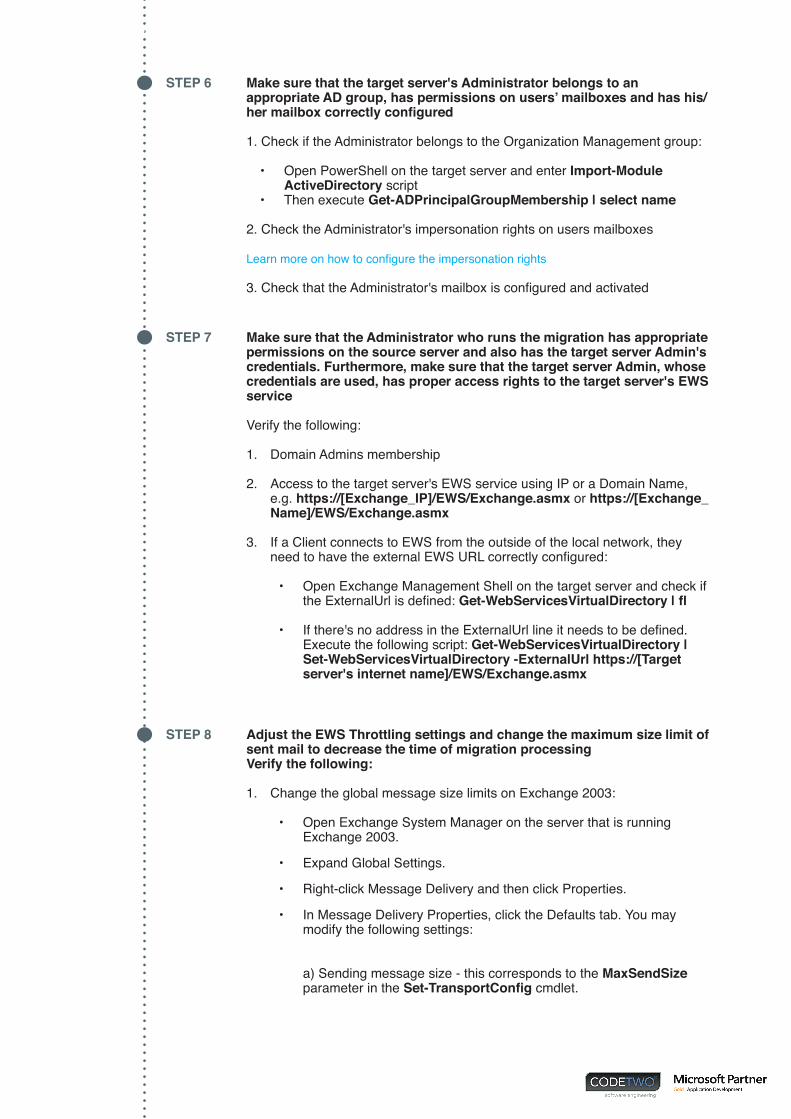
STEP 6 Make sure that the target server's Administrator belongs to an appropriate AD group, has permissions on users’ mailboxes and has his/her mailbox correctly configured
1. Check if the Administrator belongs to the Organization Management group:
• Open PowerShell on the target server and enter Import-Module ActiveDirectory script
• Then execute Get-ADPrincipalGroupMembership | select name
2. Check the Administrator's impersonation rights on users mailboxes
Learn more on how to configure the impersonation rights
3. Check that the Administrator's mailbox is configured and activated
Migration from Exchange 2003 to Exchange 2013 - step by step walkthrough
STEP 7 Make sure that the Administrator who runs the migration has appropriate permissions on the source server and also has the target server Admin's credentials. Furthermore, make sure that the target server Admin, whose credentials are used, has proper access rights to the target server's EWS service
Verify the following:
1. Domain Admins membership
2. Access to the target server's EWS service using IP or a Domain Name, e.g. https://[Exchange_IP]/EWS/Exchange.asmx or https://[Exchange_Name]/EWS/Exchange.asmx
3. If a Client connects to EWS from the outside of the local network, they need to have the external EWS URL correctly configured:
• Open Exchange Management Shell on the target server and check if the ExternalUrl is defined: Get-WebServicesVirtualDirectory | fl
• If there's no address in the ExternalUrl line it needs to be defined. Execute the following script: Get-WebServicesVirtualDirectory | Set-WebServicesVirtualDirectory -ExternalUrl https://[Target server's internet name]/EWS/Exchange.asmx
STEP 8 Adjust the EWS Throttling settings and change the maximum size limit of sent mail to decrease the time of migration processingVerify the following:
1. Change the global message size limits on Exchange 2003:
• Open Exchange System Manager on the server that is running Exchange 2003.
• Expand Global Settings.
• Right-click Message Delivery and then click Properties.
• In Message Delivery Properties, click the Defaults tab. You may modify the following settings:
a) Sending message size - this corresponds to the MaxSendSize parameter in the Set-TransportConfig cmdlet.

Migration from Exchange 2003 to Exchange 2013 - step by step walkthrough
You can select No limit, or you can select Maximum (KB) to enter an outgoing message size limit in kilobytes (KB). The default value is 10240 KB. Valid input for this parameter is 0 to 2097151 KB
We recommend that you set each global message size limit to match the value of the corresponding organization message size limit. b) Receiving message size - this corresponds to the MaxReceiveSize parameter in the Set-TransportConfig cmdlet.
c) Recipient limits
d) Click OK to close Message Delivery Properties
2. Change Throttling settings on Exchange 2013:
• Open Exchange Management Shell on the target server. To change your connection speed limits please edit the following PowerShell Cmdlets to suit your environment and execute it in the Shell: a) New-ThrottlingPolicy CodeTwoMigrationPolicy
b) Set-ThrottlingPolicy CodeTwoMigrationPolicy -RCAMaxConcurrency Unlimited -EWSMaxConcurrency Unlimited -EWSMaxSubscriptions Unlimited -CPAMaxConcurrency Unlimited -EwsCutoffBalance Unlimited -EwsMaxBurst Unlimited -EwsRechargeRate Unlimited
c) Set-Mailbox "mailbox_name" -ThrottlingPolicy CodeTwoMigrationPolicy (mailbox_name corresponds to the mailbox that belongs to the target server administrator account you will be using for migration)
3. Change the global message size limits on Exchange 2013:
• Open Exchange Management Shell and verify the existing message size limits by executing these PowerShell Cmdlets: a) Get-TransportConfig | Format-List -Property MaxReceiveSize, MaxSendSize
b) Get-SendConnector | Format-List -Property Identity, MaxMessageSize
c) Get-ReceiveConnector | Format-List -Property Identity, MaxMessageSize
• To change your message size limits please edit the following PowerShell Cmdlets to suit your needs and execute it in the Shell: a) Set-TransportConfig -MaxReceiveSize 50MB -MaxSendSize 50MB
b) Set-SendConnector -Identity "" -MaxMessageSize 50MB
c) Set-ReceiveConnector -Identity "" -MaxMessageSize 50MB
Learn more about changing the message size and the connection speed limits.

STEP 9 Installation of components required to install Codetwo Exchange Migration on the source server (the installation wizard will guide you through this process)
Verify the following:
• WIC (Windows Imaging Component) Learn more
• .NET 4.0 Learn more
• .NET 2.0 SP1 Learn more
• System update for PowerShell 2.0 Windows server 2003 (x86)Windows server 2003 (x64)
STEP 10 Installation and activation of CodeTwo Exchange Migration
The program needs to be installed and activated on a machine within the source server domain.
• Please note that it is recommended to install the migration tool directly on the source server.
• Make sure you meet the system requirements prior to installing the software.
The steps below will guide through the correct configuration of CodeTwo Exchange Migration:
IIMigration process
STEP 1 Connect to the source server
Once the program's installation is completed, choose On-premises Exchange Server in the source server Connection wizard and go through the two following steps:
• Exchange Connection - enter the source server's name and the mailbox (source server administrator's MAPI profile that belongs to Domain Admins group) the program will work under. By default, these fields should be filled automatically.
• Verification - this process checks the connection to the source server using the source server Administrator's MAPI profile and the Admin's group membership.
If all data has been correctly entered, the source server mailboxes should be listed in the main window of the program.
Learn more about troubleshooting the source server connection settings

STEP 2 Connect to the target server
After successfully listing the source server mailboxes move on to define the target server:
• Open up the target server connection wizard - it is available in the Click to select target field in the target mailbox column.
• Server connection - choose Autodiscover Exchange Server (default option) to automatically find the proper Target Server.
• Admin's credentials - specify the UPN of the target server Administrator via the Browse... option. It will let you define which target server's Administrator you are referring to. Next, enter the Admin's credentials and move on to verification. UPN (User Principal Name) is an internal account name of a user in an email address format.
• Verification - this process verifies the target server Administrator's credentials and his group membership.
a) Once the verification is completed there should be no errors under the three following points. However, if any errors appear please consult the Learn more sections describing the most common configuration mistakes. b) Now is the time to test the Administrator's impersonation rights on the chosen target mailbox. Under the Test button provide the Active Directory user's email address and hit Test. If your rights have been successfully granted, you will be notified about it with an adequate information. c) Finally, after closing the Wizard the Select target mailbox window will display where you can choose the desirable target mailbox for migration.
STEP 3 Match the source mailboxes with the target mailboxes
Matching the source with the target mailbox can be done in two ways: automatically via the built-in Automatch feature or manually.
1. Automatch - this mechanism automatically matches the source mailboxes with the corresponding target mailboxes based on users' first and last names.
• Choose as many source mailboxes as you want to migrate (shift + mailbox line for specific ones or Ctrl + A to choose all) and click Automatch.
• In the Automatch mailboxes window make sure that you're connected to the correct target server. Once you run the Automatch, a result of corresponding target mailboxes will show. You can open up the HTML Automatic Matching Report showing which mailboxes were actually matched and those that were left unmatched.
• Close the Automatch and the HTML windows. In the main window of the program you will notice the Auto entry next to target mailboxes in the Matching column. If there are any target mailboxes that haven't been matched automatically, you need to link them manually.

2. Manual matching
• In the main window of the program choose Click to select target field in the Target mailbox column next to the source mailbox you want to migrate.
• Once you confirm your choice, the given mailbox should appear in the Target mailbox column in the source mailbox row within the main window of the program (the Manual entry will show in the Matching column). In order to manually add other target mailboxes please repeat the abovementioned steps.
• In the Select target mailbox window that displays, make sure the correct target server Admin's mailbox is visible. Then choose one of the listed target mailboxes or enter the desirable one manually. If the target server mailboxes are not listed please consult this article
STEP 4 Set the maximum number of concurrent connections with the target server and enable the mechanism changing the local EX addresses into the corresponding SMTP ones
In the Settings tab (accessible from the main window of the Administration Panel) define the following features:
• Concurrent Connections• Address rewriting
STEP 5 Start the migration
Once you start the migration, all items from the source mailboxes will be migrated to their corresponding target mailboxes.
The migration processing time depends on several different factors, e.g. the number of mailboxes and items, the speed of internet connection, EWS Throttling settings and so forth.
STEP 6 Check if the number of migrated items in the target mailbox folder corresponds to its equivalent on the source server
If you notice any missing items in the target mailbox restart the migration using the Rescan feature.
If any problems appear during the migration process, they will be indicated by the yellow or red triangle visible in the Migration Status column in the main window of the program. Details of the problems can be checked in the diagnostic files.
STEP 7 Check if there aren't any new items in the source mailbox after migration
Once the migration is finished and you've noticed that some new items appeared in the migrated source mailbox, just restart the migration using the Rescan feature.

Once the migration is completed please follow the points below:
III Post-migration
cleanup
STEP 1 MX records
Change MX records to enable mailflow to new servers. Please note that this process may take several hours.
If any new items appear in a source mailbox while the MX records are being changed, it is possible to migrate them after the records' migration process is completed. It can be done via the Administration Panel of the program by choosing the Rescan feature.
STEP 2 The previous domain
Disconnect the previous domain and Exchange Servers.
If you have any problems with disconnecting your domain please consult your Domain Provider.
Troubleshooting:
For troubleshooting information, refer to our Knowledge Base.
For additional resources, refer to Frequently Asked Questions or give us a call.
To see how the program performs in action watch this video presentation on YouTube
Still have questions? Please contact us:CodeTwo experts will help you solve technical problems with CodeTwo Exchange Migration for free.
Toll Free (USA & Canada): + 1 888 725 33 64 | Phone (United Kingdom): + 44 20 3318 2001 | Phone (All Countries): + 48 71 71 66 [email protected] | www.codetwo.com | www.facebook.com/codetwo
Microsoft, Windows, Outlook, ActiveSync, Active Directory are either registered trademarks or trademarks of Microsoft Corporation in the United States and/or other countries. CodeTwo is a registered trademark of CodeTwo company in the United States and other countries. All other trademarks are the property of their respective owners. CodeTwo is an independent company and is not affiliated with Microsoft Corporation.

Exchange 2013 migration checklistUse the checklist below to carry out a cross-forest migration from Exchange 2003
to Exchange 2013, using a 3rd party migration tool, CodeTwo Exchange Migration.
Step Activity Check?
Pre-migration activities
1 Prepare a clean Exchange 2013 environment in a new Active Directory forest
2 Enable the two-way trust relationship between the forests
3 Configure mail flow between the source and the target server
4 Configure synchronization (sharing) of Free/Busy Info on the target server
5 Prepare domain accounts on the target server
6 Configure the Administrator’s account on the target server (group membership, admin’s permissions, enabled mailbox)
7 Verify the permissions of administrative accounts on the source and target servers (Domain Admins membership, access EWS external address)
8 Adjust the EWS throttling settings
9 Verify if all components needed to run CodeTwo migration tool are present (WIC, MAPI CDO, .NET 2.0 SP1 & .NET 4.0, System update for PowerShell)
10 Install and activate CodeTwo Exchange Migration
Migration process
1 Connect to the source server
2 Connect to the target server
3 Match the source mailboxes with the target mailboxes
4 Set the maximum number of concurrent connections with the target server
5 Start migration
6 Check if the number of migrated items in the target mailbox folder corresponds with its equivalent on the source server
7 Check if there aren't any new items in the source mailbox after migration
Post-migration cleanup
1 Change MX records to enable mail flow to new servers.
2 Disconnect the previous domain and Exchange Servers.