excel’s three tables - the georgia society of cpas sessions/2011... · excel’s three tables...
TRANSCRIPT

Excel’s Three Tables
Presented By
Excel has three very powerful table features. Each one is unique and is used in different ways to save accountants and other business professionals significant amounts of time. This session will cover Data Tables, PivotTables, and Excel Tables to an intermediate level. Armed with these three tables, you will seldom encounter a data analysis problem that cannot be solved in a reasonable amount of time.
1Copyright © 2011. Reproduction or reuse for purposes other than a K2 Enterprises' training event is prohibited.

Contents Introducing Excel’s Three Tables .................................................................................................................. 3
Using Data Tables for Sensitivity Analysis ..................................................................................................... 3
Simple Formulas ....................................................................................................................................... 3
Multiple Answers in a Column (Row) Data Table ..................................................................................... 5
A Greater Value ........................................................................................................................................ 5
Analysis of Interest ................................................................................................................................... 5
Named Cells .............................................................................................................................................. 7
Off-worksheet Data Table ........................................................................................................................ 7
Drivers ....................................................................................................................................................... 7
Formula Needed ....................................................................................................................................... 7
20 PivotTable Tips ......................................................................................................................................... 7
Fundamentals of PivotTables ................................................................................................................. 10
Grouping Data......................................................................................................................................... 13
PivotTables Based on Dynamic Defined Names ..................................................................................... 14
Excel Tables ................................................................................................................................................. 16
Creating a Table ...................................................................................................................................... 16
Using Table Names ................................................................................................................................. 17
PivotTables Based on Tables .................................................................................................................. 18
Turning a Table into a Range .................................................................................................................. 18
Working with Tables ............................................................................................................................... 19
Quick-Add Column, Row ......................................................................................................................... 22
Freeze Column and Row ......................................................................................................................... 22
Filtering and Sorting ............................................................................................................................... 22
Structured Referencing ........................................................................................................................... 27
Removing Duplicate Records .................................................................................................................. 29
Selecting Table Rows or Columns ........................................................................................................... 29
Using Advanced Filters to Identify Unique Records ............................................................................... 31
Filtering Duplicate Records ..................................................................................................................... 31
2Copyright © 2011. Reproduction or reuse for purposes other than a K2 Enterprises' training event is prohibited.

Introducing Excel’s Three Tables Excel now contains three tables that can be of great benefit to accountants. The third table was added to Excel in Office 2007. The first two, Data Tables and PivotTables, were actually part of Lotus 1-2-3. Microsoft followed suit, enhanced both, and added them to Excel 5.0 in 1993. The third Excel table is known as a Table and was added to Excel with the 2007 release.
Each table has its own distinct set of features and is used for different purposes. Do not let the phrase, “tables” fool you; the three tables are not similar in any fashion.
The primary function of each table is as follows:
• Data Tables One or two variable sensitivity analysis • PivotTables Summarize and categorize data • Tables Control a block of data
Despite being part of Lotus 1-2-3 and the early versions of Excel, Data Tables and PivotTables have been misunderstood for years. PivotTables are now becoming popular while Data Tables rarely are used correctly. Tables – the newest of the three – is new enough that most users have not yet explored them in detail and think that they offer little more than formatting; as you will see, Tables are much more than that and may revolutionize how you work with data in Excel. By the end of this session, you will understand how to use each of these three tables in an appropriate fashion.
Using Data Tables for Sensitivity Analysis One-variable and two-variable Data Tables have been a major spreadsheet analytical tool since Lotus 1-2-3, but for many accountants, Data Tables have become a lost art. Data Tables are an excellent method of conducting sensitivity or what-if analysis. In a simple one-variable data table, one variable is manipulated when calculating a result. In a two-variable data table, two variables are manipulated when calculating a result.
Many users only use Data Tables to replicate formulas. This type of use is not very beneficial. Accountants who understand Data Tables know they can use them to analyze large models to provide summaries of complex calculations based on one or two variable changes. The value of the Data Table analysis is directly related to the size or complexity of the calculations used in the tables.
Simple Formulas In our first example, Debbie Nelson, the CFO of a small manufacturing company, is trying to understand the impact of a change in unit sales price on the total sales revenue expected from a new product to be introduced in the coming year. Her analysis can be done quickly and easily with a simple one-way data table. In the example table, the planned sales volume and unit sales price are known. However, Nelson would like to calculate the sales revenue generated by unit prices ranging from $6.50 to $9.00 per unit in twenty-five cent increments. First, create a workbook with a layout similar to the one displayed at the left in Figure 1. Put the alternative prices in a single column, in this case in cells C11 through C21. Build a
3Copyright © 2011. Reproduction or reuse for purposes other than a K2 Enterprises' training event is prohibited.

formula in cell D7 to calculate the estimated sales revenue from the planned sales volume and unit price. In a one-way data table, the formula at the top of each column of the data table area is recalculated for each of the values in a single variable, in this case unit sales price. Multiple columns can be recalculated but only on one variable.
To create the data table, highlight the range C10:D21 and select What-If Analysis, Data Table from the Data tab of the Ribbon. In the Data Table dialog box, click in the box for the Column input cell and then click on cell D7. This process indicates to Excel where it is to substitute the values $6.50 through $9.00 in recalculating the total sales revenue. Click OK to produce the data table shown in the lower right of Figure 1.
Figure 1 - Creating a One-Way Data Table to Calculate Sales Revenue from Multiple Prices
4Copyright © 2011. Reproduction or reuse for purposes other than a K2 Enterprises' training event is prohibited.

Multiple Answers in a Column (Row) Data Table You can use as many available rows as you have in your worksheet for changes in the variable and as many available columns as answers. If you create a Data Table with a row of variables, then the above rules flip and you can use as many available columns for the variable and as many rows for the answer. This option becomes very powerful. We can change the interest rate and find out three answers: payment, total loan interest, and total payments on loan.
Given Excel 2007 or Excel 2010, Data Tables can become a very powerful tool because you now have over sixteen thousand columns and over one million rows, as shown in Figure 2.
Figure 2 - Excel Capacities
A Greater Value A greater value can be found by using Data Tables in combination with complex calculations that cannot be done in a single cell. For example, you can easily create a simple formula to calculate a loan payment: =PMT(rate,nper,pv). Using at Data Table when you can easily create a partially absolute formula is not all that helpful.
Using the loan amortization analogy, you would need a Data Table to compare total loan interest with different rates as the variable. Without the Data Table, you cannot easily compare a column of rates and the total loan interest; that analysis requires the body of the amortization in the worksheet that calculates this answer. Hence, the more complex the answer, the more valuable the Data Table analysis is. Companies with large financial models can reap great insight from using Data Tables with key variables on large calculations.
Analysis of Interest To create the two-variable data table, begin by creating the outline of the data table as shown in Figure 3. Note that in the outline shown, cell Q3 contains the formula =PAYMENT.
5Copyright © 2011. Reproduction or reuse for purposes other than a K2 Enterprises' training event is prohibited.

Figure 3 - Outline of Two-Variable Data Table
Once the outline of the two-variable data table is complete, select the range from cell Q3 through cell X13. Then, from the Data tab of the Ribbon, select What-If Analysis and Data Table to open the Data Table dialog box shown in Figure 4. In the Data Table dialog box, enter cell H7 as the Row input cell and cell H8 as the Column input cell and click OK.
This instructs the data table to substitute the contents of the first row of the data table into cell H6 and the contents of the left-most column of the data table into cell H8 and to recalculate the formula in the cells.
Figure 4 - Data Table Dialog Box
6Copyright © 2011. Reproduction or reuse for purposes other than a K2 Enterprises' training event is prohibited.

Named Cells A more useful approach when creating Data Tables is to name the cells of key variables so that during Data Table construction you can reference the named cell and not worry about specific cell addresses.
Off-worksheet Data Table Three variables can be done, sort of. If you think about it for a moment, you will realize we have not touched the idea of an array. In other words, let’s go back through multiple sheets using each sheet with a different variable. While the feature to handle this type of Data Table is NOT directly built into Excel, users can build a few workarounds that will provide the ability to get an off-worksheet Data Table. The third variable capability is one of the “promised but forgotten” features of Excel.
Drivers To accomplish three variables, users must setup extra sheets with all the variables in place. Then they must setup cells to “drive” the variables on the base calculation worksheet. These “drivers” will satisfy Microsoft’s requirement that the Data Table input cells must be on the same worksheet.
Formula Needed So that the base worksheet calculation does not become a one-sided calculation using the current sheet variable, we must put an If statement in the base input cells. One IF statement for each variable. You can also setup a third variable but this workaround only works for one off-worksheet Data Table.
20 PivotTable Tips 1. Before pivoting data, you should make sure you have data that is clean and can be pivoted with
no blanks or different characters in the data. Handling blanks or different characters in the data requires advanced tricks.
2. "Save As" often. Always save versions as you work because sooner or later you will have an errant drop. Most errant drops can easily be fixed with an Undo command, but many will not undo.
3. When selecting the data range for the PivotTable, you must include the column (field) headings (names) in the first row which will become the data titles for the PivotTable.
7Copyright © 2011. Reproduction or reuse for purposes other than a K2 Enterprises' training event is prohibited.
4. If you happen to include any empty cells, text, or mixed data, in your data range, the PivotTable command will automatically default back to count as the field setting instead of sum. To fix, change the field setting back to sum.
5. To re-activate the field list box and PivotTable toolbar, you need to click back in the PivotTable range or, right-click and select show field list box then issue a View, PivotTable Toolbar command.
6. Excel 2007/2010 has a vastly improved PivotTable interface, filters, and data handling, but a poor choice of icon on the Ribbon found in Insert, PivotTable.
7. If you want the classic blue grid layout from Excel 2003, in Excel 2007/2010 select PivotTable options, display, and Classic PivotTable Layout.
8. All the functionality of Excel 2003 is included, just hiding behind the icon "PivotTable and PivotChart Wizard", in which Excel 2007/2010 users must add to the Quick Access toolbar manually. Otherwise, there is no way to get to the Multiple Consolidation Ranges command.
9. If you want 4 different elements of a data item, such as, sales in your table, you must drag and drop four instances of that data item into the data range of the PivotTable.
10. You cannot limit or use the pull down filter box on a data item while it is in the page field area in Excel 2003 (and prior). You can easily filter the page field in Excel 2007/2010. With Excel 2003 (and prior), you can either double-click on the item or move it down to a row or column field first, then edit and put it back in the page field area.
11. Spaces, blanks, or text in the data range may create problems with the PivotTable, especially grouping.
12. To group dates, you must have real dates and not text dates. Convert the text dates to real dates using Data, Text to Columns command and then group. An easy way to test for this is apply any number format to the date field. If you see a number, it is a real date, if not, it is text.
13. Hide annoying item titles, such as, “Sum of Sales”, by changing the name to space, space space, etc. Simply click on the item title and change.
14. Never name a calculated item or field with the same title you want to use in the actual PivotTable summary. You cannot duplicate names of any items, fields, or calculations in any one PivotTable.
15. You can have one table (data item) per worksheet but almost unlimited worksheets per workbook. This is also true for Data Tables, Data Queries, Data Imports, etc.
8Copyright © 2011. Reproduction or reuse for purposes other than a K2 Enterprises' training event is prohibited.

16. By default, any grouped item will not have a subtotal on that item. You will need to add those manually, if desired. Fix this in the field settings box.
17. Turn on filters just outside the table by placing any text in the heading line and then activate filters from the cell just below and the table will back-fire filters into the PivotTable.
18. When creating a relative reference formula, do not point at the cells in the pivot table. Instead, use the actual cell addresses and this will avoid the GETPIVOTDATA function.
19. Use the GETPIVOTDATA function when you want to lock down the reference to a calculation so it will not change the source as you move items from row fields to column fields or even into page field area (report filters in 2007/2010).
20. There are four methods of dealing with a variable data range:
a. Use a named (defined) range to build the PivotTable. Change the definition of the range as the data changes and then use the Data Refresh command in the PivotTable. While this is a manual process, many users find this the easiest way to deal with a variable range.
b. Use an Excel Table (Excel 2007/2010 only) to build the PivotTable. An Excel Table is dynamic and will adjust as the data changes.
c. Select the entire column for each element when building the PivotTable. This will add an element called "Blank" to your report which you need to filter out in the Row Fields. There is a chance that this will not group for you later as you have defined a range with mixed data (numbers and blanks). A PivotTable created in Excel 2007 using a real Excel 2007 file (not in compatibility mode) will have no problem grouping data using this trick. Excel 2003 cannot.
d. Use the OFFSET function combined with the COUNTA function to create a dynamic named range. Use the formula below to actually name the range. For example, a data range that starts at C9 and continues to F2030 would read as follows: =OFFSET($C$9,0,0,COUNTA($A:$A),4). If you add more columns, you will need to adjust the 4 to be 5,6… or you could add another COUNTA function for columns which would read as follows: =OFFSET($C$9,0,0,COUNTA($A:$A),COUNTA($9:$9)) There are also advanced versions of this function to deal with data gaps, but you have to be precise as to numbers or text.
9Copyright © 2011. Reproduction or reuse for purposes other than a K2 Enterprises' training event is prohibited.

Fundamentals of PivotTables To create a PivotTable, first ensure that the underlying data resides in columns with column headers at the top of each column. Though not required, removing blank rows and replacing blank cells with zeroes is recommended. Note that sorting the data prior to creating the PivotTable is not necessary. The data should resemble that shown in Figure 5.
Figure 5 - Sample PivotTable Data
Once the data is in proper order, simply click anywhere inside the data range and choose Insert and PivotTable from the Ribbon to open the dialog box shown in Figure 6. Accept the defaults and click OK to create the basic outline of the PivotTable.
Figure 6 - Create PivotTable Dialog Box
Upon clicking OK in the Create PivotTable dialog box shown in Figure 6, Excel displays the PivotTable Field List and an outline of the PivotTable as shown in Figure 7.
10Copyright © 2011. Reproduction or reuse for purposes other than a K2 Enterprises' training event is prohibited.

Figure 7 - Creating a PivotTable
In the PivotTable Field List, click and drag the items to display in the PivotTable into the appropriate quadrants in the bottom half of the PivotTable Field List to finish constructing the basic PivotTable. For example, to construct the PivotTable with Dates as columns, Models as rows, Sales Units summed at the intersection of each unique combination of Date and Model, and Region and Product as top-level filters, drag each of those fields to the quadrants as shown in Figure 8.
11Copyright © 2011. Reproduction or reuse for purposes other than a K2 Enterprises' training event is prohibited.

Figure 8 – Arranging Fields in the PivotTable Field List
12Copyright © 2011. Reproduction or reuse for purposes other than a K2 Enterprises' training event is prohibited.

Grouping Data PivotTables’ Grouping features allow users to extend the process of analyzing data in a PivotTable. Grouping can occur automatically – such as with dates – or users can create custom groups to facilitate specific needs. In the example shown in Figure 9, automatic grouping organizes the date data by months, quarters, and years. In this example, automatic grouping was accessed by right-clicking on one of the dates.
Figure 9 - Using Automatic Grouping in a PivotTable
Custom grouping allows users to group fields in any order desired. For instance, selecting all of the models that begin with “5400” and then right-clicking and choosing Group from the pop-up menu allows a user to create a custom grouping of all of the “5400 RPM Hard Disks” as shown in Figure 10 (formatting applied). Note that custom grouping is also useful when grouping date-oriented data in fiscal years.
Figure 10 - Custom Grouping of Data in a PivotTable
13Copyright © 2011. Reproduction or reuse for purposes other than a K2 Enterprises' training event is prohibited.

PivotTables Based on Dynamic Defined Names Prior to Excel 2007, tables were not available. Thus, if faced with a situation where the volume of data feeding into a PivotTable might change, users required a method of building the PivotTable so that it automatically reflected varying volumes of data. Dynamic Defined Names solve this, and potentially other problems, associated with building PivotTables.
A dynamic defined name is a defined name built based on a formula that causes the definition of the dynamic defined name to vary based on the volume of data present. The formula that creates the dynamic defined name typically depends on an OFFSET function and one or more COUNTA functions to create the named range based on a variable number of rows, columns, or both. To create a dynamic defined name, click Define Name in the Formulas tab of the Ribbon to open the New Name dialog box. There, enter the desired name to assign to the range and a formula that defines the range. For example, the formula shown Figure 11 creates a dynamic defined name that:
• Is “anchored” in cell A1, • Does not “jump over” any rows away from the “anchor” when defining the first row in the
range, • Does not “jump over” any columns away from the “anchor” when defining the first column in
the range, • Is as many rows long as is returned by the COUNTA function, and • Is five columns wide.
Figure 11 - Creating a Dynamic Defined Name
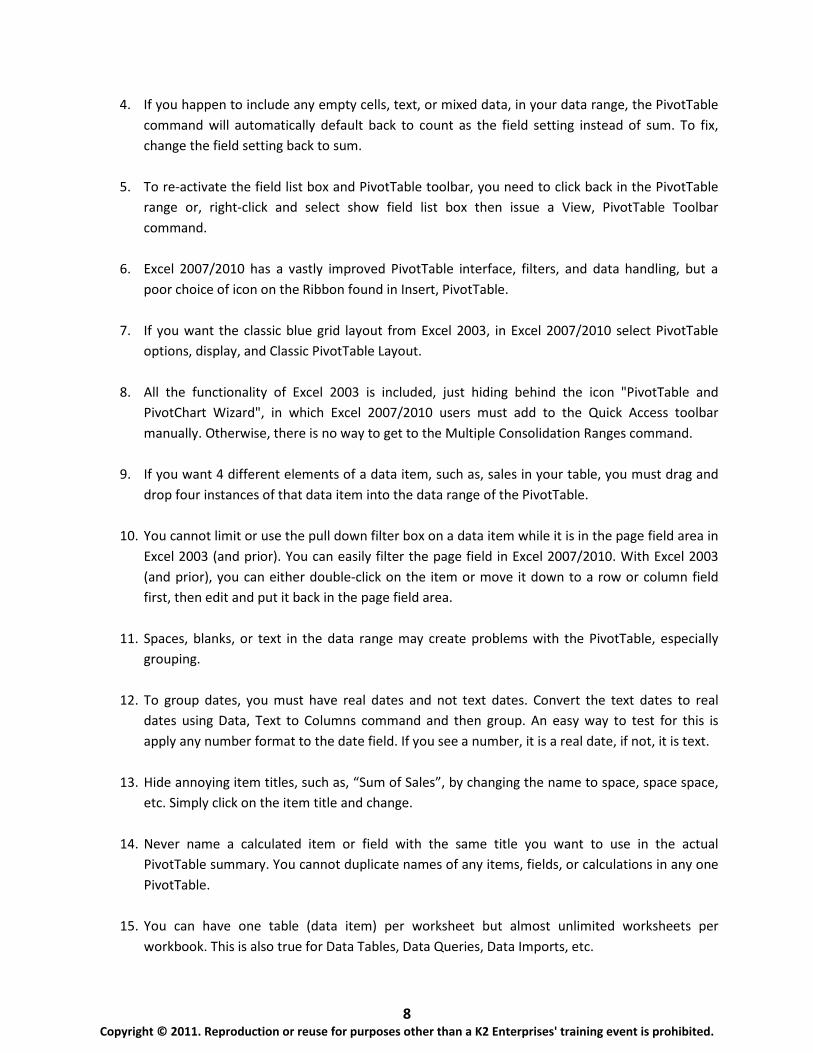
Whereas the dynamic defined name in Figure 11 is dynamic with respect to the number of rows, the formula can be dynamic with respect to the number of columns by changing the location of the COUNTA function as shown in Figure 12. Likewise, users could modify the formula to include two COUNTA functions – one for the number of rows and one for the number of columns – so that the dynamic defined name was dynamic with respect to both.
14Copyright © 2011. Reproduction or reuse for purposes other than a K2 Enterprises' training event is prohibited.
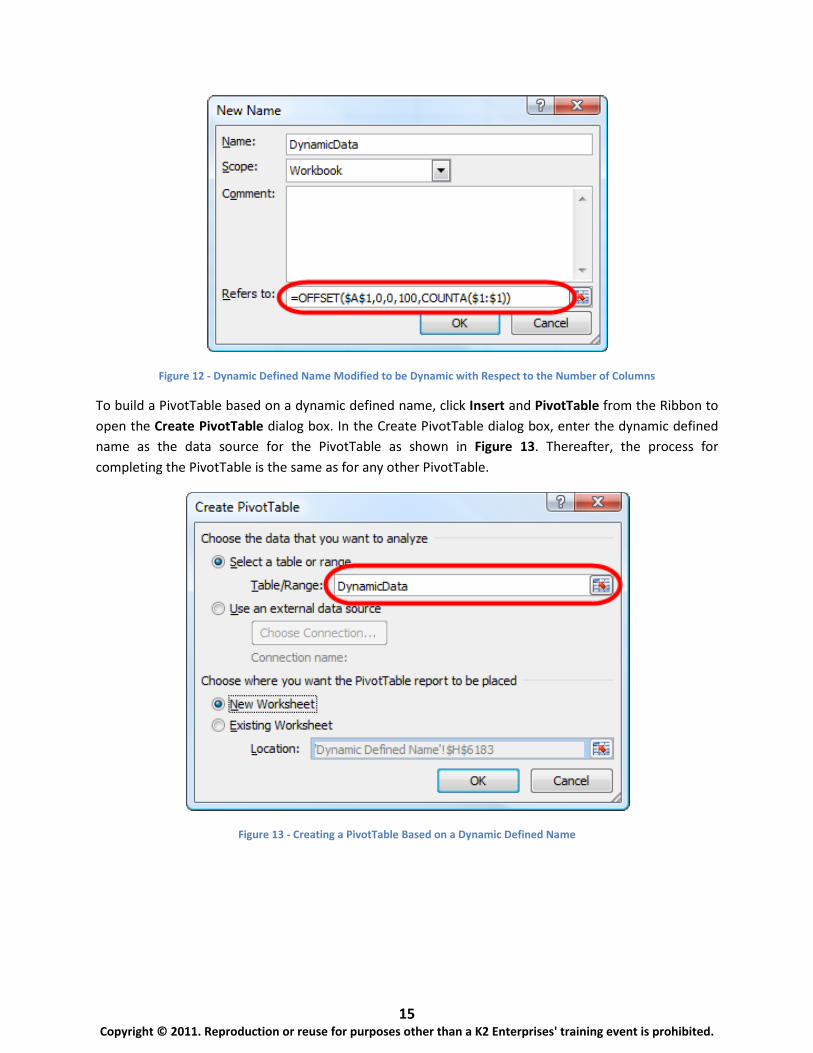
Figure 12 - Dynamic Defined Name Modified to be Dynamic with Respect to the Number of Columns
To build a PivotTable based on a dynamic defined name, click Insert and PivotTable from the Ribbon to open the Create PivotTable dialog box. In the Create PivotTable dialog box, enter the dynamic defined name as the data source for the PivotTable as shown in Figure 13. Thereafter, the process for completing the PivotTable is the same as for any other PivotTable.
Figure 13 - Creating a PivotTable Based on a Dynamic Defined Name
15Copyright © 2011. Reproduction or reuse for purposes other than a K2 Enterprises' training event is prohibited.

Excel Tables The table features in Excel 2007 and Excel 2010 are designed to ease and enhance the way users sort, filter, format, and analyze information in tables. Here are some of the built-in features for managing and manipulating tables.
• Auto Expansion – Tables expand automatically to include new data entered in adjacent rows or columns. All styles, calculations, data validation, and conditional formats are applied to extensions.
• Sorting – Users can sort on unlimited columns and on font or fill colors. Sorts can be made case-sensitive.
• Filtering – Users can filter on single or multiple criteria, icon sets, and on dynamic dates, such as last week or last month.
• Formula Replication – Any formula created in an adjacent column to make calculations on table data is automatically replicated across all rows.
• Duplicate Data – Users can highlight or remove duplicate rows with a few simple commands. • Table Styles – A large gallery of table styles is available for automatically formatting tables.
Styles with banded rows auto-adjust the color bands for record additions, deletions, sorting, and filtering. Styles interact with Themes to provide greater flexibility in formatting tables.
• Structured Referencing – Formulas that reference elements of a table can use row and column tags rather than cell references in the formula for clarity and ease of use.
Think of a table as a two-dimensional Excel database with special functionality. The data should be properly laid out with columns as fields and rows as records. The first row should contain the names of each field. If the first row does not contain field names, Excel will create generic field names automatically.
Creating a Table To create a table in Excel using the default style, place the cursor inside of the data range and press CTRL + T. In the Create Table dialog box, confirm the table range and check My table has headers as shown in Figure 14.
Figure 14 - Create Table Dialog Box
Click OK to create the table as shown in Figure 15. Instantly, the table is created with the default style. In this case, the default style bands adjacent rows with different colors for readability. Drop-down filter arrows are visible at the top of each column. The arrows are for setting filters and sorting and are not
16Copyright © 2011. Reproduction or reuse for purposes other than a K2 Enterprises' training event is prohibited.

visible on printouts. Any fields that do not have a name at the top of the column will be named Column1, Column2, etc. These fields can be renamed by typing over the labels.
Figure 15 - Creating a Table Instantly with CTRL+T
Alternatively, the table could have been created from the Ribbon. Again, position the cursor inside the data range. From the Ribbon, select Format as Table from the Home tab of the Ribbon. Select a style from the gallery and then confirm the table range in the Create Table dialog box. Click OK to create the table.
Using CTRL + T is a faster and easier process to create a table, but it always creates a table in the default table style. To change the default table style, click on Format as Table on the Home tab of the Ribbon, right-click on a style, and choose Set As Default.
Styles interact with Themes. Themes contain attributes for fonts, line and fill effects, and the color palette. By changing the Theme, the colors and formats of a Table Style will be affected. To see the impact, select Themes from the Page Layout tab. Then, roll your mouse over the various themes and watch the table formats change. Themes give users even greater flexibility in formatting their tables.
Using Table Names Excel names each table with a generic name and displays it in the Properties group of Table Tools, Design. The table name is part of structured referencing, which will be discussed later. Naming tables with a representative name, such as Sales or Invoices, will make building formulas with structured referencing easier and more intuitive, especially if multiple tables are present in a single workbook.
17Copyright © 2011. Reproduction or reuse for purposes other than a K2 Enterprises' training event is prohibited.

PivotTables Based on Tables Tables provide users with dynamic definitions of data – that is, as the volume of data in the Table changes, so, too, does the definition of the table and, by extension, any object (such as a PivotTable) that uses the table as its data source. This means that as users add or delete rows or columns to or from a table, any PivotTable based on the Table automatically reflects the new volume of data upon its next refresh.
As shown in Figure 16, to construct a PivotTable from a table, simply click inside the Table and choose Summarize with PivotTable from the Table Tools Design contextual tab on the Ribbon.
Figure 16 - Building a PivotTable from a Table
Upon clicking Summarize with PivotTable, the dialog box shown in Figure 16 opens, and the remainder of the process for creating a PivotTable is unchanged from that described previously.
Turning a Table into a Range Some accounting professionals will just want to format their lists with a few clicks. They don't need filtering, sorting, or any of the other advanced features, and they certainly don't want the filter arrows at the top of each column. Here's the trick. Create a table from the data selecting the desired style in the process. Then, change the table back into an ordinary range from the Ribbon by selecting Convert to Range on the Table Tools, Design tab. Click OK in the confirmation dialog box, and the table will become a range again. Note that the table formatting remains! To turn off the filter arrows in a working table, position the cursor inside the table and click Filter on the Data tab or click Sort & Filter, Filter on the Home tab of the Ribbon. The same process can be used to turn on filtering again whenever it's needed.
When a table is turned into a range, the style formatting becomes cell formatting which may cause unexpected results if the range is later turned back into a table. If the table formatting is inconsistent, it may be repaired. Click inside the table. From the Ribbon, select Home, Format as Table. Right-click on the desired style in the gallery and choose Apply and Clear Formatting.
18Copyright © 2011. Reproduction or reuse for purposes other than a K2 Enterprises' training event is prohibited.

Working with Tables Let's review the sample table. It consists of monthly sales data for thirteen products over the past six months. First, use the check boxes in Table Style Options to explore how styles can be adjusted to meet specific needs. Figure 17 shows the results of our efforts.
Figure 17 - Using Table Style Options to Adjust Table Formatting
Altering the options in Table Style Options changes the styles presented in the Style Gallery. Formatting tables with styles may be more effective if options are set before styles are applied.
Let's continue with our example. First, name the table. Click inside the table and select Table Tools, Design. Enter Sales in the Table Name box.
Now, add some new records to the table. The easiest method is to position the cursor in the first blank row immediately below the table and to begin typing. Press TAB to advance the cursor to the next field. The table will automatically be expanded to include the new row. A new row can also be added by pressing TAB while in the last row of the most right-hand column of the table or by dragging the resize handle in the lower right-hand corner of the table to expand its size. Enter the following records in the sample table.
14 Astringent, Facial, 9 oz 15,744 17,056 15,088 15,744 19,680 23,616
15 Astringent, Facial, 16 oz 9,684 10,491 9,281 9,684 12,105 14,526
Next, let’s add a column. The column will contain a formula to total sales by product for the last six months. Position the cursor in cell I7, type in the column label Total, and press ENTER. The table immediately expands to include the new column. Now, position the cursor in cell I8. To create the formula, perform the following steps:
19Copyright © 2011. Reproduction or reuse for purposes other than a K2 Enterprises' training event is prohibited.

1. Type in =SUM( and move left one cell to cell H8. (Do not
press ENTER.)
2. Hold down the SHIFT key while using the LEFT-ARROW to expand the range to include cells H8 through H3. (Do not
press ENTER.)
3. Type in ) to complete the formula and press ENTER.
Immediately, the formula will be copied down the full length of the column. Note the contents and format of the formula.
=SUM(Sales[@,[Jan]:[Jun]])
Note that the above formula represents how Excel 2010 creates structured referencing formulas. In Excel 2007, the formula would present as shown below.
=SUM(Sales[[#ThisRow],[Jan]:[Jun]])
In Excel 2010, think of the “@” sign in the formula as “shorthand” for “#ThisRow.”
The format of this formula is known as Structured Referencing, which allows users to refer to columns, rows, or specific ranges within a table using tags. Try this: position your cursor in any cell outside
Let's add a totals row to the sample table. Position the cursor inside the table. Select the Table Tools, Design tab. Now, check Total Row in the Table Style Options group. A grand total is appended to the bottom of the table in the Total column. Click on the cell containing the total and then click the drop-down arrow to select the desired summarizing function. Let's use SUM, which is the default. Notice the formula in the Formula Bar. Excel entered the SUBTOTAL function instead of SUM, so that the total will not include hidden rows when the table is filtered. The process described is shown in
of the table and then enter the formula below.
=SUM(Sales[Apr])
The formula totals sales for April – and it doesn't matter if the table contains 100 records or 500,000! Add another record, and the total will be updated to include whatever sales amount was entered for April.
At first glance, auto-expansion of tables may appear to be just another ho-hum feature, but beneath this facade lurks great power because any formula, chart, or PivotTable that references the table will automatically incorporate any new data added to the table. Have you heard of named dynamic ranges? Tables in Excel can perform the same function but without the need for creating defined names based on complex formulas that average users have little chance of understanding or applying.
Figure 18.
20Copyright © 2011. Reproduction or reuse for purposes other than a K2 Enterprises' training event is prohibited.

Figure 18 - Adding Totals to a Table
Each column in the table can be totaled independently of every other column. In other words, one column can be summed while another can be averaged or counted. Copy the total formula to the bottom of all sales columns by grabbing the auto-fill box in the lower right-hand corner of the cell containing the grand total and dragging the fill box across the row to the January sales column.
Our sample table should now resemble the one shown in Figure 19.
Figure 19 - Sample Table with Added Rows and a Total Column
21Copyright © 2011. Reproduction or reuse for purposes other than a K2 Enterprises' training event is prohibited.

The total row can be turned on or off in Table Style Options. The row remembers its content and layout so that the next time it is turned on, it will display just as it did before it was turned off.
Quick-Add Column, Row Excel Tables will also help with the mundane work, such as, adding columns and rows, including formulas. The trick to this is inserting the column or row within the table range. If you create a formula in the new column or row, the table will automatically copy the formula to the rest of the column or row. When dealing with a substantial amount of data, this can be a huge time saver.
Figure 20 – Quick-Add
Freeze Column and Row Column and row titles will freeze in place, automatically, as long as you are working in the table. When you click off the table, the column and row headings go back to their original state.
Figure 21 – Freeze Column and Row within a Table
Filtering and Sorting The sales manager for Nature's Softness would like to have monthly sales totals for one of the product groups. Click the drop-down filter button at the top of the Description column. Clear the Select All button in the record list at the bottom of the filter dialog. Next, select all of the Cream products. Click OK to apply the filter. The table should resemble the one in Figure 22. Note that the total row calculates
22Copyright © 2011. Reproduction or reuse for purposes other than a K2 Enterprises' training event is prohibited.

the total sales for only the records displayed. Also, note the icon on the filter button of the Description column indicating that a filter is active.
Figure 22 - Table with Simple Filter Applied
Our next example uses check data exported from QuickBooks. Rod Hesson, the owner of Hesson Flooring, hired us to help him analyze his check payment history. In preparation for the engagement, he exported a list of check data for the past two years from QuickBooks. First, place the cursor in the data and convert it to a table by any means with a style of your choice. Name the table Checks. After those tasks are complete, the table should resemble the one shown in Figure 23.
Figure 23 - Table Created from QuickBooks Check Data
The table has nearly 200 records. To begin the analysis, filter the data on the Date field so that only checks for the current year are displayed. Click on the filter drop-down in the Date column. Click on Date Filters, and then on This Year, to set the filter as shown in Figure 24. Only checks dated during the current calendar year are now visible in the table.
23Copyright © 2011. Reproduction or reuse for purposes other than a K2 Enterprises' training event is prohibited.

Figure 24 - Setting a Predefined Date Filter
Our attention is focused on those checks that were written for amounts of at least $1,000. Using a similar process, set a filter on the Amount field so that only checks with amounts of $1,000 or more are displayed. Click on the filter drop-down in the Amount column. Click on Number Filters and then on Greater Than Or Equal To. In the Custom AutoFilter dialog box, enter 1000 as the amount. Click OK to set the filter as shown in Figure 25. Only checks with amounts of $1,000 or more are now visible in the table.
Now, let's sort the data. Click on the filter drop-down in the Amount field. Select Sort Largest to Smallest so that the largest check amounts are at the top of the list. Next, do another simple sort so that the name of the payee is in alphabetical order. Click on the filter drop-down in the Name field. Select Sort A to Z so that the list is in ascending order. Note that when a sort is active, the filter drop-down has a small arrow pointing up or down to indicate the direction of sort in the field.
24Copyright © 2011. Reproduction or reuse for purposes other than a K2 Enterprises' training event is prohibited.

Figure 25 - Setting a Filter on Numerical Data
The two latest versions of Excel allow sorting on up to 64 fields simultaneously – more of a theoretical limit than a practical one for most users. Click on the filter drop-down in the Name field. Select Sort by Color, Custom Sort to display the Sort dialog box shown in Figure 26.
Figure 26 - The Custom Sort Dialog Box
25Copyright © 2011. Reproduction or reuse for purposes other than a K2 Enterprises' training event is prohibited.

Click Add Level to add another sort criterion. In the Then by box, select Type. In the Sort On box, choose Values. Note that a column can be sorted on values, cell color, font color, or cell icon (from an icon set). In the Order box, select Z to A. Again, click Add Level to add yet another sort criterion. In the Then by box, select Amount. In the Sort On box, choose Values. In the Order box, select Largest to Smallest.
Hesson would like to see his data sorted first on check Type, then Name, and then Amount. Click on the row identified as Then by Type. With the row highlighted, click the small blue arrow at the top of the dialog box to move Type to the top of the sort order as shown in Figure 27.
Figure 27 - Specifying a Custom Sort Order
The results of the sorting exercise are shown in Figure 28.
Figure 28 - Table Sorted on Type, Name, and Amount
Hesson would like to re-sort the data by check Type, Amount, and then payee Name. To do so, re-visit the Sort dialog box to rearrange the sort order.
To perform a case-sensitive sort or to sort across columns, click on the Options button in the Sort dialog box. To clear all active sorts and filters, position the cursor in the table and select Home, Sort & Filter, Clear. This will reposition the data to its original order.
26Copyright © 2011. Reproduction or reuse for purposes other than a K2 Enterprises' training event is prohibited.

For the next example, clear the active sorts and filters. Position the cursor in the table and select Sort & Filter, Clear on the Home tab of the Ribbon. Re-filter the table by any means so that only checks written in 2010 and with amounts of $1,000 or more are displayed. Add a total row to the table by checking Total Row on the Table Tools, Design tab. Note that the total row is off the screen at the bottom of the table. Position the cursor inside the table. Use the scroll bar on the right to slowly
Figure 29
scroll down to see the total row. Watch as the table header row approaches the top edge of the worksheet grid and then becomes embedded in the columnar headings as shown in . In other words, the column headings A, B, C, etc., become Type, Date, Num, etc. This innovation insures that table headings never scroll off of the screen, reducing the need to use Excel’s Freeze Panes tool.
Figure 29 - Table Headings Embedded in Worksheet Columnar Headings
Structured Referencing Scrolling up to set filters and then down to see totals in a large table is not effective practice. Let's put our totals at the top of the table, so that as we set filters, the results will be plainly visible. In the process, we will investigate another innovation called structured referencing. Position the cursor in cell E4. Type in the label Total and format the label with boldface, right justification, and accounting format. Move right to cell F4 and type in the following formula:
=SUBTOTAL(109,Checks[Amount])
The formula sums all checks displayed in the Amount column of the Checks table. As the filters are reset, the total displayed will change to reflect the sum of just those records displayed. If filters are cleared, then the formula will reflect the sum of all checks written.
27Copyright © 2011. Reproduction or reuse for purposes other than a K2 Enterprises' training event is prohibited.

As a table is filtered, Excel hides from the user the rows that are not of interest. The SUBTOTAL function uses function numbers to determine whether the summary calculation includes hidden rows. Hidden rows are normally included in summary totals when using function numbers 1-11 except when the rows are hidden by active filters, in which case the hidden rows are not included in the totals. Hence, it is not necessary to use SUBTOTAL function 109 to sum filtered tables so that only displayed rows are included in the totals.
Copy cells E4 and F4 to cells E3 and F3. Change the label in cell E3 to read Mean and change the formula in cell F3 to read as shown below.
=SUBTOTAL(101,Checks[Amount])
Manipulate the filters, by any means, so that the number of displayed rows varies in length. Note that the mean and total formulas displayed at the top of the table change accordingly as shown in Figure 30.
Figure 30 - Creating Totals at the Top of a Table
Structured references are a means of working with table data, both inside the table and outside the table. Formulas built on structured referencing are self-documenting
Figure 30
because they specify data elements within a table rather than cell references. There are a number of reserved item specifiers. For example, [#Totals] refers to the total row, and @ refers to data elements in other columns but on the same row. A total row exists in the sample table shown in . To create a formula in the worksheet to refer to the total displayed at the bottom of the Amount column as its value and position changes, use this formula.
=Checks[[#Totals], [Amount]]
As the formula is entered from the keyboard, Formula AutoComplete will display the tables and fields for selection, just as with functions and range names. To learn more about this innovation, search for "structured references" in the Excel help system.
28Copyright © 2011. Reproduction or reuse for purposes other than a K2 Enterprises' training event is prohibited.

Removing Duplicate Records One of the best features of the two latest versions of Excel is their ability to easily identify or remove duplicate values in a range or table.
Using the Remove Duplicates command is destructive. The rows in a range or table identified as duplicates will be deleted from the data. Make sure that you save a copy of the workbook with a different file name before executing the command.
Continuing with our example, Rod Hesson would like to a have a sorted list of all payees who received a check in 2009 or 2010. To produce the list he needs, simply remove all duplicate records in the Name column.
First, keeping in mind that removing duplicate records is a destructive process, save the workbook with a different file name. Then, clear all of the filters and sorts in the sample table. To remove the duplicate payees, position the cursor in the table and select Data, Remove Duplicates. Uncheck all columns except Name in the Remove Duplicates dialog box as shown in Figure 31. Click OK and then OK again to confirm the removal. Sort the Name column in ascending order to complete the task.
Figure 31 - Selecting Columns from Which to Remove Duplicates
Alternatively, an advanced filter could have been applied to the Name field. Using an advanced filter is not
Selecting Table Rows or Columns
destructive, and the filtered list can be copied to another range in the worksheet as part of the filter command. Before discussing advanced filters, let's take a few minutes to discuss the process of selecting a range in a table.
A table is a single unitary object within a worksheet. Think of a table as a worksheet within a worksheet. In other words, users can insert, delete, or move rows and columns within a table without disturbing the surrounding worksheet. Moreover, users can select rows and columns in a table without selecting entire rows and columns in the surrounding worksheet. To select a row, position the cursor just inside the left-hand margin of the row. The cursor will change to a small dark arrow pointing to the right or inside of
29Copyright © 2011. Reproduction or reuse for purposes other than a K2 Enterprises' training event is prohibited.

the table. Click to select the row. Right-click and select Insert, Table Rows Above to insert a row in the table but not
Figure 32
in the surrounding worksheet. If the cursor is positioned too far to the left, in the worksheet row reference, the entire row in the worksheet will be selected. The correct and incorrect cursor positions are shown in .
Figure 32 - Positioning Cursor Properly to Insert Row in Table
Similarly, to select a column, position the cursor just at the top margin of the table above the column label. The cursor will change to a small dark arrow pointing down to the inside of the table. Click once to select the data and click twice to select the entire column, including the heading and total row. Right-click and select Insert, Table Columns to the Left to insert a column in the table but not in the surrounding worksheet. If the cursor is positioned too far to the top, in the worksheet column reference, the entire column in the worksheet will be selected. Rows and columns can be selected and deleted
The data in a table or an entire table can be selected by positioning the cursor just at the upper left-hand corner of the table. The cursor will change to a small dark arrow pointing down and to the right inside the table. Click once to select the data and twice to select the entire table, including the headings and total row. The correct cursor position for selecting an entire table is shown in
without affecting the surrounding worksheet using a similar process. Selected rows or columns can be dragged to new positions within a table.
Figure 33.
Figure 33 - Positioning Cursor to Select Entire Table
30Copyright © 2011. Reproduction or reuse for purposes other than a K2 Enterprises' training event is prohibited.

Note the similarity of working with rows and columns in Word tables. If you have ever worked with tables in Word, then you will recognize the process immediately.
Using Advanced Filters to Identify Unique Records Now, let's return to identifying or creating a list of unique records in our table. Recall that Hesson would like to have a sorted list of all payees who received a check in 2009 or 2010. Click on the heading for the Name column. Select Data and then Advanced in the Sort and Filter group.
Figure 34 - Performing an Advanced Filter to Create a Unique List of Records
In the Advanced Filter dialog box, shown in Figure 34, select Copy to another location. Click in the List range box and then select the data range for the Name column. Click the top of the column, as shown in Figure 34, until the range reference reads Checks[Name]. Click in the Copy to box and enter $H$6. Check Unique records only and click OK to create the list. Cut and paste the list to another worksheet, sort the list in ascending order, and add formatting, as required, to complete the task. Note that a list cannot
Filtering Duplicate Records
be extracted to another worksheet. Also, note that our advanced filter could have been used to filter the list in place. In other words, the table list could have been filtered to display unique records in the table. Subsequently, sorting the Name column would have produced similar results.
The last example of working with duplicate records involves using conditional formatting to highlight duplicate records and then filtering by color to find the duplicates. For example, users may want to identify checks issued with duplicate check numbers.
31Copyright © 2011. Reproduction or reuse for purposes other than a K2 Enterprises' training event is prohibited.

Using the QuickBooks check data, clear all active sorts and filters. Sort the Date column in ascending date order. Select the data in the Num column by any means. Then, select Conditional Formatting, Highlight Cells Rules, Duplicate Values from the Home tab of the Ribbon. In the Duplicate Values dialog box, select Duplicates and accept the default color scheme as shown in Figure 35. Click OK to apply the conditional formatting.
Figure 35 - Formatting Duplicate Values
Next, filter the Num column to display only the duplicate values. Click the filter drop-down arrow and select Filter by Color. Choose Filter by Font Color and select the deep red bar as shown in Figure 36.
32Copyright © 2011. Reproduction or reuse for purposes other than a K2 Enterprises' training event is prohibited.

Figure 36 - Filtering a Column by Font Color
The results are shown in Figure 37. If you have ever scrolled through a sorted list looking for duplicate check numbers, then you understand the effectiveness of the method demonstrated.
Figure 37 - Filtering by Color to Identify Duplicate Check Numbers
33Copyright © 2011. Reproduction or reuse for purposes other than a K2 Enterprises' training event is prohibited.