excel & business math video/class project #01 … · page 1 of 16 excel & business math...
TRANSCRIPT

Page 1 of 16
Excel & Business Math Video/Class Project #01
Introduction to Excel. Why We Use Excel for Math. First Formula.
Topics Covered in Video:
1) USB Drive to store files from class .................................................................................................................................. 2
2) Save As to Download Excel & pdf Files ........................................................................................................................... 2
3) Save Class Files & Create Class Folder ............................................................................................................................ 3
4) Windows Explorer to view and open files ...................................................................................................................... 4
5) Why we use Excel for Business Math .............................................................................................................................. 4
6) Conventions for Class ...................................................................................................................................................... 5
7) What does Excel do? ....................................................................................................................................................... 6
8) Excel Workbook Layout ................................................................................................................................................... 7
9) First Excel Formula: Total Sales = Price * Number Units Sold ......................................................................................... 9
10) Selecting a Range of Cells with the Selection Cursor ................................................................................................ 12
11) Number Formatting .................................................................................................................................................. 13
12) Second Excel Formula for Net Income & How To Copying Formula to the Side ...................................................... 14
13) Verify that Number Formatting is NOT displaying a misleading Number ................................................................ 15
14) PDF Notes .................................................................................................................................................................. 15
15) Practice Homework & Answers to Homework ......................................................................................................... 15

Page 2 of 16
1) USB Drive to store files from class
As is required from our syllabus, you must buy a Jump Drive to store all the Excel and PDF files for our
class. Example of USB Jump Drives:
2) Save As to Download Excel & pdf Files
At our class web site, right-click the file, and depending on your browser, point to:
1) Chrome:
2) Internet Explorer:
3) Mozilla:

Page 3 of 16
3) Save Class Files & Create Class Folder
1. When we download a file, we Navigate to our Jump Drive.
2. In the Save As dialog Box you can create a new folder using the keyboard Ctrl + Shift + N, or use the
“New Folder Button”:
3. Name our class folder “Business Math”:
4. On the Left Side of the Save As dialog box, click (not double-click) on the triangles to open your Jump
Drive.
5. Then click (not double-click) on Business Math Folder.
6. Then click Save.
1) Navigate
to your
Jump Drive 2) Create a new folder using the
keyboard Ctrl + Shift + N, or use
the “New Folder Button”
4) Click (not
double-click)
on triangle
to open
Jump Drive
5) Click (not
double-click) on
Business Math
Folder
6) Click Save

Page 4 of 16
4) Windows Explorer to view and open files
1. Windows Explorer is a program that allows use to perform File and Folder Management
2. Windows Explorer allows us to:
1) Verify files and folders are in correct location
2) Open Files
3) Move, Copy Delete files or folders
4) Backup folders and files
3. Keyboard to open Windows Explorer = + E
4. Examples of what Window Key Looks Like:
5) Why we use Excel for Business Math
1. Your Job will require it!!!!!
2. Make many calculations quickly.
Example for Video of making many “Net Pay” calculations quickly:
3. Make complicated calculations MUCH easier.
Example of FV Function (as seen in video):
4. What IF Analysis: Change Formula Input and Answer Instantly Updates.
Example of changing Year Formula Input and our answer instantly updated (as seen in video):

Page 5 of 16
6) Conventions for Class
1. Blue Worksheet Tab = You work on this sheet. You do things like make calculations / create formulas on these sheets
2. Red Worksheet Tab = Shows completed work
3. Yellow Worksheet Tab = Sheets with Notes
4. Black Worksheet Tab = Homework Problems come after the Black Sheet
5. Dark Blue Fill with White Font = Column Headers in Data Set
6. Dark Blue Fill with White Font = Variable (Formula Inputs) Names
7. Cells with no Fill Color = Item typed in cell
8. Cells with Light Green Fill Color = Calculation = Formula
9. Cells with Light Yellow Fill Color = Instructions, like for practice homework or tests.

Page 6 of 16
7) What does Excel do?
1. Store Raw Data.
Excel can store raw data, like names and numbers, but it is not as effective in storing Raw Data as a Database is at storing Raw Data.
2. Makes Calculations (Formulas)
Like calculating a Net Pay amount
3. Perform Data Analysis (Convert Raw Data into Useful Information).

Page 7 of 16
8) Excel Workbook Layout
1. Column Headers = Letters. Row Headers = Numbers.
2. Cells = Intersection of Column & Row, like cell D14
This is important because we can store raw data in cells and refer to raw data in cells in formulas
by using Cell References.
3. Worksheets = “Spreadsheet” = Sheet = All The Cells
4. Sheet Tab Names Worksheet Tab Names = Name of Sheet
5. All Sheets = Workbook = The Whole Excel File = Workbook
The Formula is in
Cell D2. The
Formula uses Cell
References that
refer to the
numbers in cells B2
and C2.
All The Cells = Worksheet (also called a “Spreadhseet”)
Sheet Tab has
“Name of
Worksheet”
All The Sheets =
Workbook = File

Page 8 of 16
6. Move Between Sheets: Right-Click Sheet Navigation Arrow
7. Ribbon Tabs = Tabs at Top of Excel Window that contain the commands that we can use.
8. Quick Access Toolbar = QAT
1) We will not use it in this class.
2) We will use these keyboards for Save, Undo and Redo:
3) Ctrl + S = Save Changes in File 4) Ctrl + Z = Undo 5) Ctrl + Y = Re-do = Undo the Undo
9. Zoom in and out = Ctrl + Roll Wheel on Mouse
1) You can zoom the view of the Excel Worksheet by
Right-Click
Sheet
Navigation
Arrow
AFTER you Right-Click Sheet
Navigation Arrow, the
“Activate” dialog box pops-up
that allows to select and then
jump to any sheet in the Excel
Workbook
Home Ribbon Tab with command
buttons is showing
Formula Ribbon Tab with command
buttons is NOT showing
Home Ribbon Tab contains “groups” of command
buttons like the Number group or the Font group
QAT

Page 9 of 16
9) First Excel Formula: Total Sales = Price * Number Units Sold
1. Formulas always start with an Equal Sign as first character in cell. When you type an Equal Sign as first
character in cell you are telling Excel that you want to create a formula.
2. We use cell references to refer to cells that have numbers that we need in our formula.
You can use the Arrow Keys on the Navigation Pad on a Standard Keyboard (Or Arrow Keys on
Laptop) to put Cell References into a Formula.
You can use the Mouse and the Selection Cursor to select Cell References for your formula. The
Selection Cursor looks like this:
3. Type a multiplication Symbol (asterisk key on Number Pad or Shift + 8)
Note: Use asterisk key on Number Pad or Shift + 8 as seen in this picture:
Arrow
Keys on
Standard
Keyboard
Arrow
Keys on
Some
Laptops
Asterisk key
on Number
Pad
Shift + 8
1) Equal Sign
Starts All
Formulas
2) Cell References
Refer to Numbers
we use in our
Formula
3) Asterisk is the
Multiplication
Symbol

Page 10 of 16
4. Enter Cell Reference for Number of Units.
5. Use Ctrl + Enter to put the formula in the cell and keep the cell selected. We can see the answer from
the formula in the Cell D2 and we can see the formula in the Formula Bar.
6. To Copy the formula down the column, you can Double-Click the “Fill Handle” with your Cross Hair or
"Angry Rabbit" Cursor:
Fill Handle looks like this:
Angry Rabbit Cursor looks like this:
Formula Shows the
Answer of 109.75
in Cell D2.
Formula Bar Shows the Formula. Name
Box
Shows
which
Cell is
Selected
Fill Handle = Small Green
Box in Lower Right
Corner of Selected Cell
Angry Rabbit Cursor
appears when you
hover cursor over Fill
Handle. It is a Black
Cross.
5) Ctrl + Enter
to put Formula
in Cell and
Keep Cell
Selected
4) Cell References
Refer to Numbers
we use in our
Formula
6) To Copy Formula
Down Column Double-
Click Fill Handle with
Angry Rabbit Black
Cross.

Page 11 of 16
DO NOT USE THE SELECTION CURSOR TO COPY FORMULA:
DO NOT USE THE MOVE CURSOR TO COPY FORMULA:
7. After you Double-Click the Fill Handle with your Cross Hair or "Angry Rabbit" Cursor the formula will
copy down the column and stop at the last row because there are no more rows of data:
7) The formula
“Total Sales = Price *
Number Units Sold”
was copied through
the Range of Cells
D2:D19.

Page 12 of 16
8. After you copy a formula through a range of cells, ALWAYS select the last cell in the range and hit the F2
Key to verify that the formula is correct. F2 puts the cell in Edit Mode so we can visually see if Cell
References are pointing to the correct Formula Inputs.
10) Selecting a Range of Cells with the Selection Cursor
1. Goal: Select all cells on range B31:I33.
2. With Selection Cursor in middle of Cell B31, click and drag to the side.
3. Drag the Selection Cursor until cell I33.
4. DO NOT USE THE MOVE CURSOR TO SELECT CELLS:
5. DO NOT USE THE “ANGRY RABBIT” CROSS HAIR CURSOR TO SELECT CELLS:
8) ALWAYS check last cell
using the keyboard F2 to
see if Cell References are
pointing to the correct
Formula Inputs
With Selection Cursor,
click in Cell B31 and
drag cursor to Cell I33
Notice that the formula
always has Cell References
that are looking two-cells-
to-the-left (Price) times
one-cell-to-the-left (Units).
These types of Cell
References are called
“Relative Cell References”
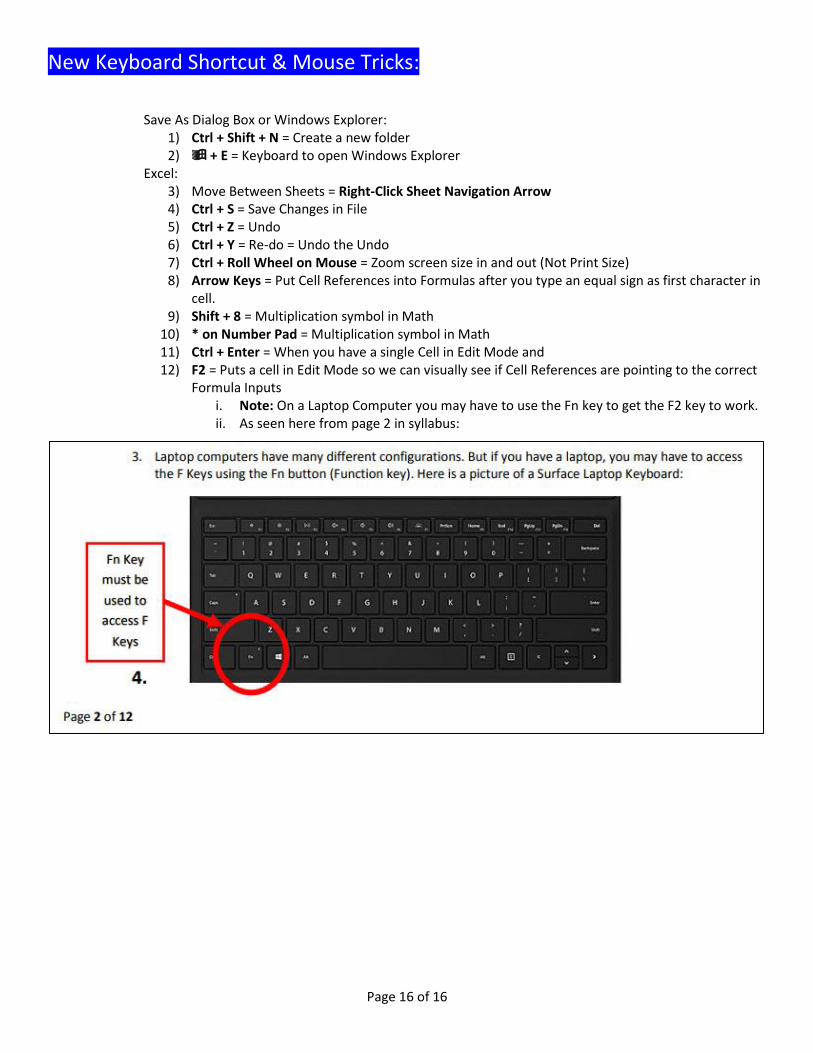
NOTE: On a Laptop Computer you may
have to use the Fn key to get the F2 key to
work. See picture at end of this pdf file.

Page 13 of 16
11) Number Formatting
1. Number Formatting = A Façade that sits on top of Number.
2. Number Formatting can be applied in the Number group in the Home Ribbon Tab.
3. The number under the Number Formatting can be different than what you "see" on the surface of the
cell.
4. Number Formatting can save us a lot of type because we don’t have to type as many characters into the
cell.
5. Be Careful!!!!!
1) Number Formatting is only a Façade.
2) Number Formatting only changes what we “see”.
3) Number Formatting does not Change the underlying Number.
4) If you decrease the decimals using the Decrease Decimal Button in the Number group in the
Home Ribbon Tab, the decimals are not removed, they are just “displayed” with fewer decimals:
With Range B31:I33
selected, Choose
Currency Number
Formatting in the
Number group in the
Home Ribbon Tab.
With Cell B31 selected, we see “$110,404.00”, 11 characters. This is the
façade, this is what you “see” on the surface of Cell B31.
With Cell B31 selected, the Formula Bar
shows what is actually in Cell B31,
underneath the Number Formatting.
There are only 6 Characters.
Decrease Decimal
Button
$76,179 is NOT the actual number in the cell.
$76,179 is only what you “see”.
Fewer Decimals
are “Displayed”
in Cell B32.
Formula Bar shows that 76178.5 is the ACTUAL number in Cell B32

Page 14 of 16
12) Second Excel Formula for Net Income & How To Copying Formula to the Side
1. With Cell B33 selected, create the formula =B31-B32. The displayed answer of $34,226 is what we “see”
in cell B33. The Formula Bar shows us the formula.
2. To copy the formula to the side, hover your cursor over Fill Handle and when you see the “Angry Rabbit”
Cursor, click and drag to the side until your cursor is over cell I33:
3. Selecting Cell I33, use the F2 Key to put the cell in Edit Mode and verify that the Relative Cell References
are pointing to the correct Formula Inputs.
Displayed answer of
$34,226 in Cell B33
Formula Bar shows us Formula.
Use the F2 Key to put the cell in Edit
Mode and verify that the Relative
Cell References are pointing to the
correct Formula Inputs

Page 15 of 16
13) Verify that Number Formatting is NOT displaying a misleading Number
1. Notice that: 110404 - 76179 = 34225 NOT: 34226
2. Number Formatting is "displaying" a misleading answer
3. To fix this, selecting the Range of Cells B31:I33 with the Selection Cursor and use the Increase Decimal
Button in the Number group in the Home Ribbon Tab.
14) PDF Notes
1. Be sure to read them because there are a written and pictorial description of what is shown in the
Video.
15) Practice Homework & Answers to Homework
1. Practice Homework & Answers to Homework are always located on the Worksheets at the end of the
Excel Workbook.
Increase Decimal
Button
Page 16 of 16
New Keyboard Shortcut & Mouse Tricks:
Save As Dialog Box or Windows Explorer:
1) Ctrl + Shift + N = Create a new folder 2) + E = Keyboard to open Windows Explorer
Excel: 3) Move Between Sheets = Right-Click Sheet Navigation Arrow 4) Ctrl + S = Save Changes in File 5) Ctrl + Z = Undo 6) Ctrl + Y = Re-do = Undo the Undo 7) Ctrl + Roll Wheel on Mouse = Zoom screen size in and out (Not Print Size) 8) Arrow Keys = Put Cell References into Formulas after you type an equal sign as first character in
cell. 9) Shift + 8 = Multiplication symbol in Math
10) * on Number Pad = Multiplication symbol in Math 11) Ctrl + Enter = When you have a single Cell in Edit Mode and 12) F2 = Puts a cell in Edit Mode so we can visually see if Cell References are pointing to the correct
Formula Inputs i. Note: On a Laptop Computer you may have to use the Fn key to get the F2 key to work. ii. As seen here from page 2 in syllabus: