exams and quizzes - information...
TRANSCRIPT
1
Exams and Quizzes
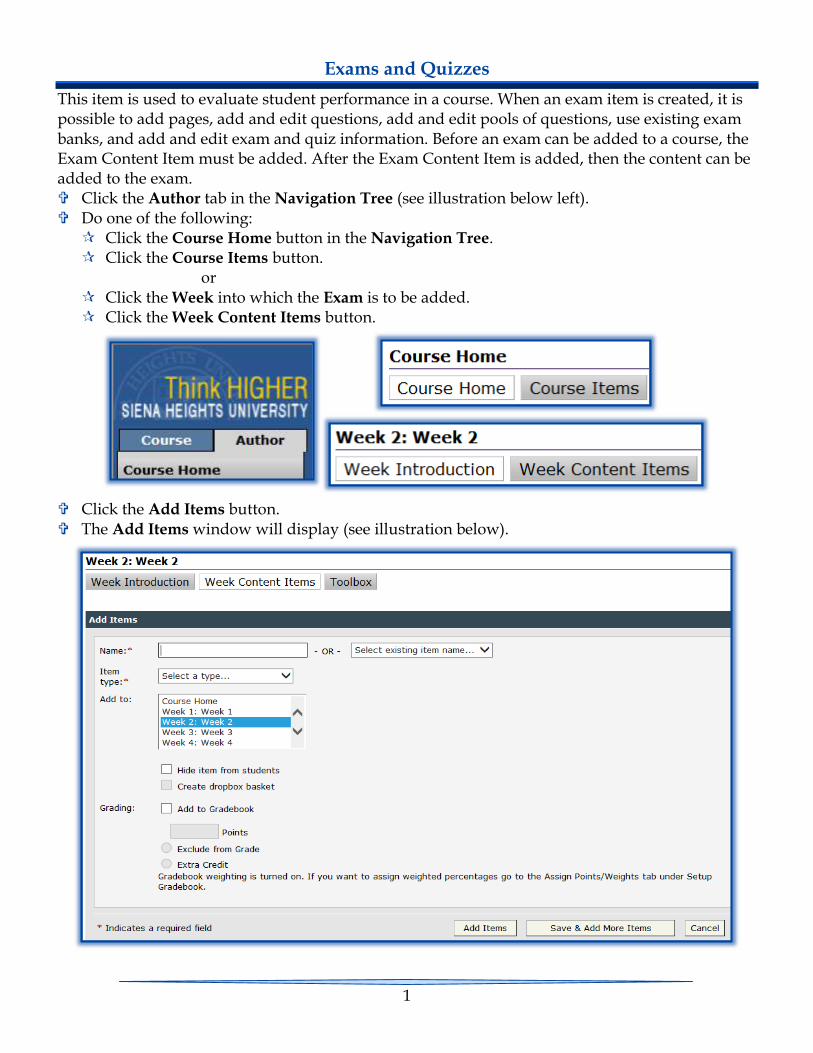
This item is used to evaluate student performance in a course. When an exam item is created, it is possible to add pages, add and edit questions, add and edit pools of questions, use existing exam banks, and add and edit exam and quiz information. Before an exam can be added to a course, the Exam Content Item must be added. After the Exam Content Item is added, then the content can be added to the exam. Click the Author tab in the Navigation Tree (see illustration below left). Do one of the following:
Click the Course Home button in the Navigation Tree. Click the Course Items button.
or Click the Week into which the Exam is to be added. Click the Week Content Items button.
Click the Add Items button. The Add Items window will display (see illustration below).

2
In the fields that are provided, enter information accordingly. The table below describes the fields that are in this window.
In this field Do this
Name Input a name for the new Content Item, such as Quiz/Test. When the new name is entered and saved, it will display in the Select existing item name list.
Select Existing Item Name Click the list arrow for this item. It is used to select an existing content item to use for the new content item.
Item Type In this list, select Exam. The other options are Text/ Multimedia, Microsoft Office Document, Discussion, and Web Content Upload. Each of these items are described in other documents on the eCollege Web Page.
Add to In this area, select either Course Home or the Week into which the Exam is to be added. To select more than one week, click the first week, hold
down the CTRL key and select the other weeks. To select all the weeks, select the first week, hold down
the SHIFT key and click on the last week. If the Week Content Items option was selected, the
selected week will already be selected.
Assign to This option is only available if groups have been setup for the course.
Hide Item from Students Click the check box if students will not be allowed to view the item at this time. The availability of an Exam can also be controlled by using the Edit Schedule option in the Exam Toolbox.
Create Dropbox Basket This item is not available for exams as exams are submitted automatically. The points for an exam are automatically added to the Gradebook.
Grading This area is used to add the Exam to the Gradebook and to assign points. It is also possible to specify other options such as: Extra Credit – This option should be specified when the
student is to receive extra credit for the exam. When this option is chosen, the total points will not be changed.
Exclude from Gradebook – This option can be used when students need to complete a process but do not receive a grade for the assignment.
Add Items Use this option when only one item is to be added to the course.
Save & Add More Items To add additional content items to the course, click this button.
Cancel Click this button to exit from this window without saving the changes.

3
Add Questions After an Exam Content Item has been added to the course, questions can then be added. In eCollege, it is possible to add Multiple Choice, Multiple Answer, True-False, Essay, Short Answer, Fill in the Blank, and Matching questions. In addition, it is possible to use the Question Pools feature to randomly extract questions from a pool of questions for use in the exam. It is also possible to store questions in the Test Bank for reuse in future courses. Click the Author tab in the Navigation Tree.
Click the Exam Content Item into which the questions are to be added. The Exam window will display (see illustration below).
In the Title & Introductory Text section, click Edit to add a title and introduction to the exam. In the Page section, select the page number to which the question is going to be added.
When a new test is being added, Page 1 is the only option. To add a new page to the exam, click Add New Page.
In the Add list, select the type of question that is to be added. In the as row, type a number to specify the order in which the question is to appear on the
page. Click Add to start creating the question.
NOTE: For information on adding an Exam Content Item, see the Add Content Item document on the
eCollege Page of the Siena Training Web Site. For information on adding the different types of questions, see the appropriate document on
the eCollege Page of the Siena Training Web Site.
Add Essay Question An Essay question cannot be auto-graded. Click the Author tab.

4
Click the Week that contains the Test/Quiz item. Click the Test or Quiz that the question is to be added to. The Test window will display (see illustration below).
In the Add list, select New Essay Question. Click the Add button on the right side of the window. The Add Essay Question window will display (see illustration below).
In the Question box, input the text for the question. Input the number of points that this question is worth in the Points box. Input a General Explanation of the question, if desired. In order for students to see the
Explanation, the test or quiz needs to be made available in the Gradebook.

5
Click the Add button to insert the question into the test or quiz. A message will appear saying the question has been added successfully. Click OK to return to the Exam Content Item window.
Add Fill the Blank Question With this type of question, it is possible to add up to 10 acceptable responses for the question. The auto-grading feature is case sensitive. Therefore, it is important to be very specific about the answer for each question. When this type of question is auto-graded, all spaces and letters (capital and lower case) are taken into consideration. For this reason, you need to make sure you input all possible correct answers. Click the Author tab. Click the Week in the Navigation Tree where the quiz or test is located. Click the Exam into which the questions are to be added. The Exam window will display (see illustration below).
6
In the Add list, select New Fill-in-the-Blank Question. Click the Add button on the right side of the window. The Add Fill-in-the-Blank Question window will display (see illustration on previous page). In the Question box, input the text for the question. Input the number of points that this question is worth in the Points box. In the Accepted Response boxes, input possible answers for the question. Scroll to the bottom of the window and input a General Explanation of the question, if desired. Click the Add button to insert the question into the test or quiz. A message will appear saying the question has been added successfully.
Click OK to return to the Exam Content Item window.
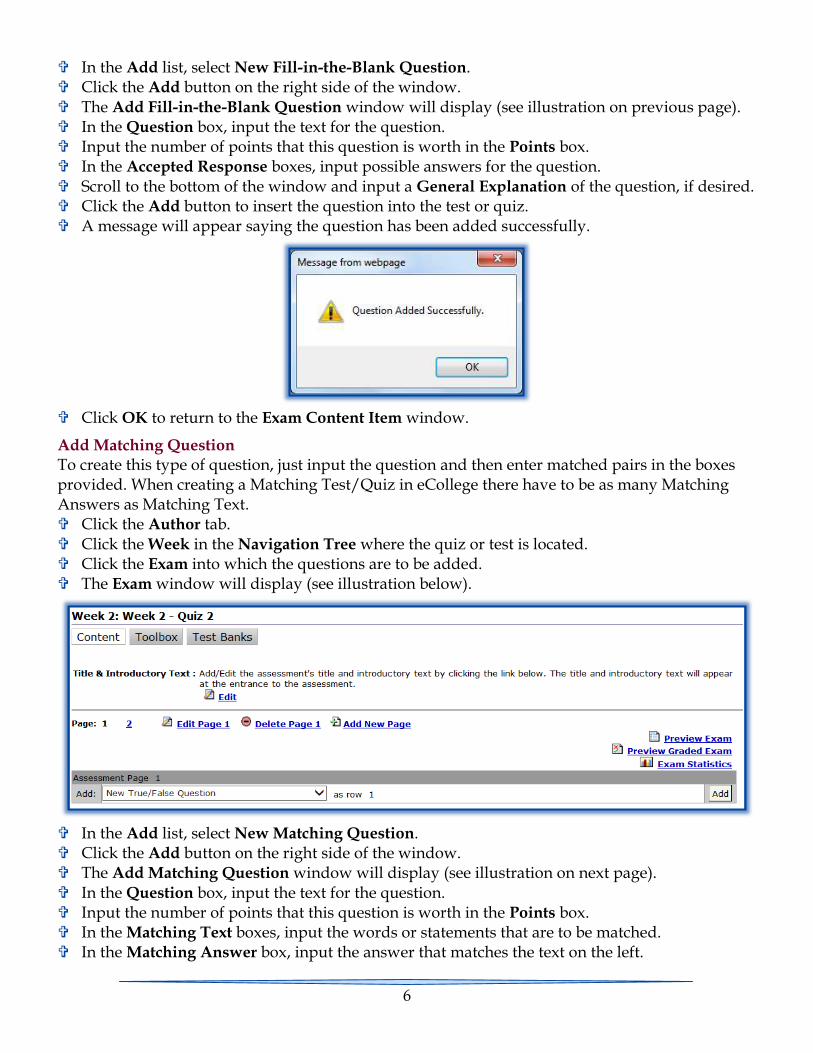
Add Matching Question To create this type of question, just input the question and then enter matched pairs in the boxes provided. When creating a Matching Test/Quiz in eCollege there have to be as many Matching Answers as Matching Text. Click the Author tab. Click the Week in the Navigation Tree where the quiz or test is located. Click the Exam into which the questions are to be added. The Exam window will display (see illustration below).
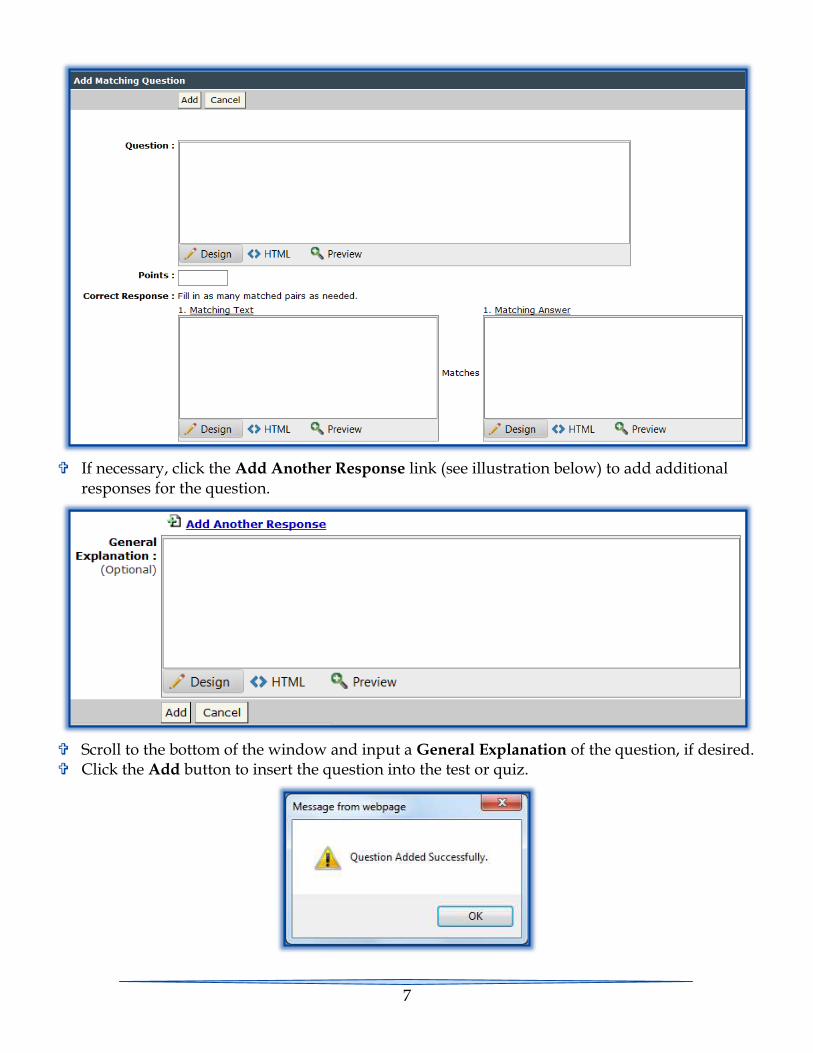
In the Add list, select New Matching Question. Click the Add button on the right side of the window. The Add Matching Question window will display (see illustration on next page). In the Question box, input the text for the question. Input the number of points that this question is worth in the Points box. In the Matching Text boxes, input the words or statements that are to be matched. In the Matching Answer box, input the answer that matches the text on the left.
7
If necessary, click the Add Another Response link (see illustration below) to add additional responses for the question.
Scroll to the bottom of the window and input a General Explanation of the question, if desired. Click the Add button to insert the question into the test or quiz.

8
A message will appear saying the question has been added successfully (see illustration on previous page).
Click OK to return to the Exam Content Item window.
Add Multiple Answer Question This type of question functions the same as a Multiple Choice question. The difference is that two or more correct answers must be selected. Click the Author tab. Click the Week in the Navigation Tree where the quiz or test is located. Click the Exam into which the questions are to be added. The Exam window will display (see illustration below).
In the Add list, select New Multiple Answer Question. Click the Add button on the right side of the window. The Add Multiple Answer Question window will display (see illustration below).
In the Question box, input the text for the question.
9
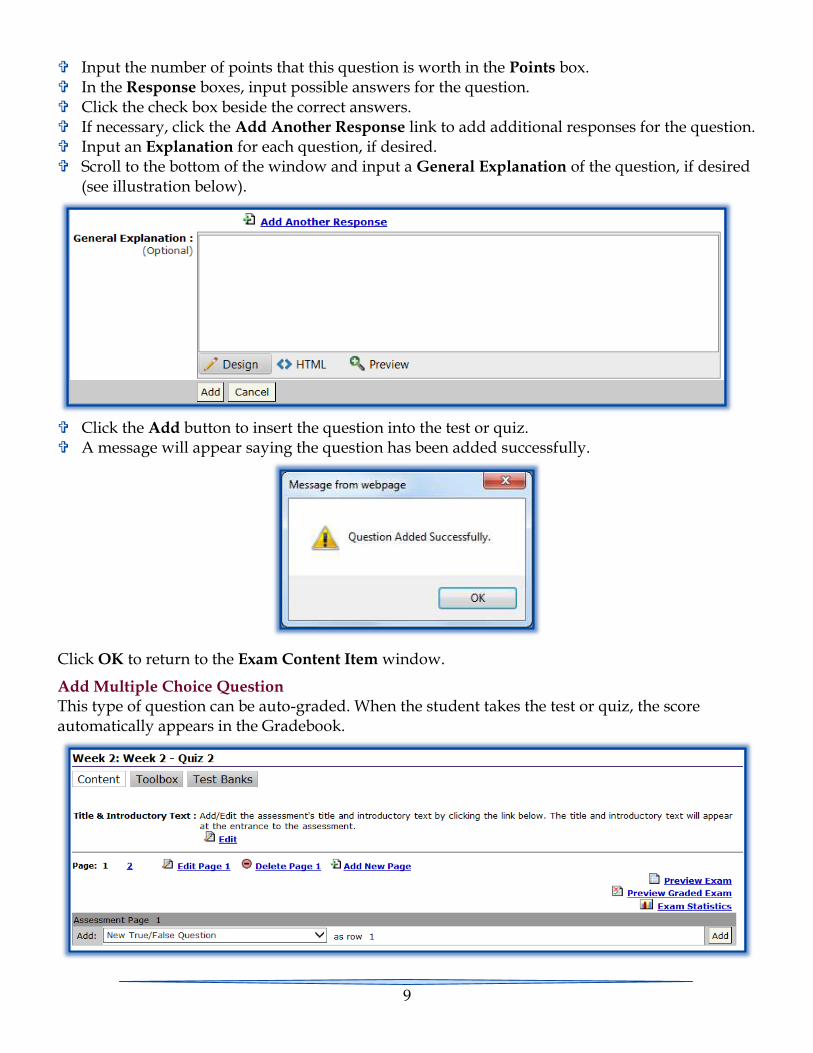
Input the number of points that this question is worth in the Points box. In the Response boxes, input possible answers for the question. Click the check box beside the correct answers. If necessary, click the Add Another Response link to add additional responses for the question. Input an Explanation for each question, if desired. Scroll to the bottom of the window and input a General Explanation of the question, if desired
(see illustration below).
Click the Add button to insert the question into the test or quiz. A message will appear saying the question has been added successfully.
Click OK to return to the Exam Content Item window.
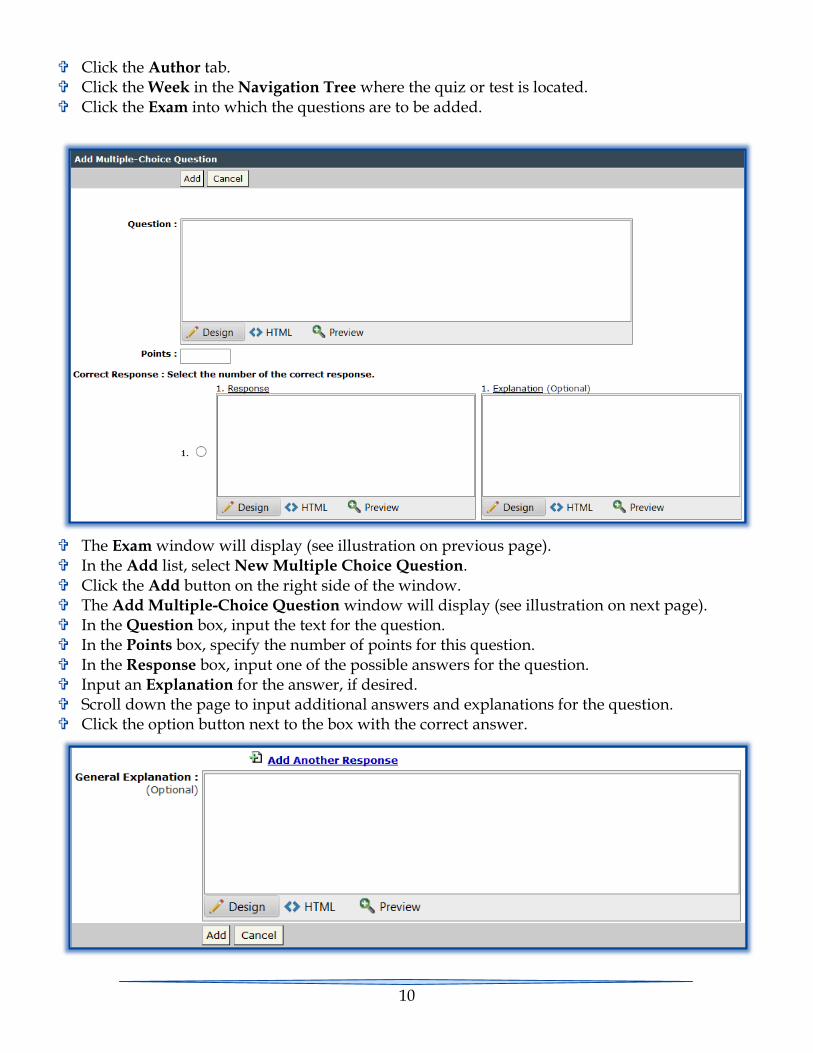
Add Multiple Choice Question This type of question can be auto-graded. When the student takes the test or quiz, the score automatically appears in the Gradebook.
10
Click the Author tab. Click the Week in the Navigation Tree where the quiz or test is located. Click the Exam into which the questions are to be added.
The Exam window will display (see illustration on previous page). In the Add list, select New Multiple Choice Question. Click the Add button on the right side of the window. The Add Multiple-Choice Question window will display (see illustration on next page). In the Question box, input the text for the question. In the Points box, specify the number of points for this question. In the Response box, input one of the possible answers for the question. Input an Explanation for the answer, if desired. Scroll down the page to input additional answers and explanations for the question. Click the option button next to the box with the correct answer.
11
Scroll down to the bottom of the window to input a General Explanation for the question (see illustration on previous page).
Once the question and answers are complete, click the Add button. This button appears at the top and the bottom of the window.
A question added successfully confirmation box will appear.
Click OK to return to the Exam Content Item window.
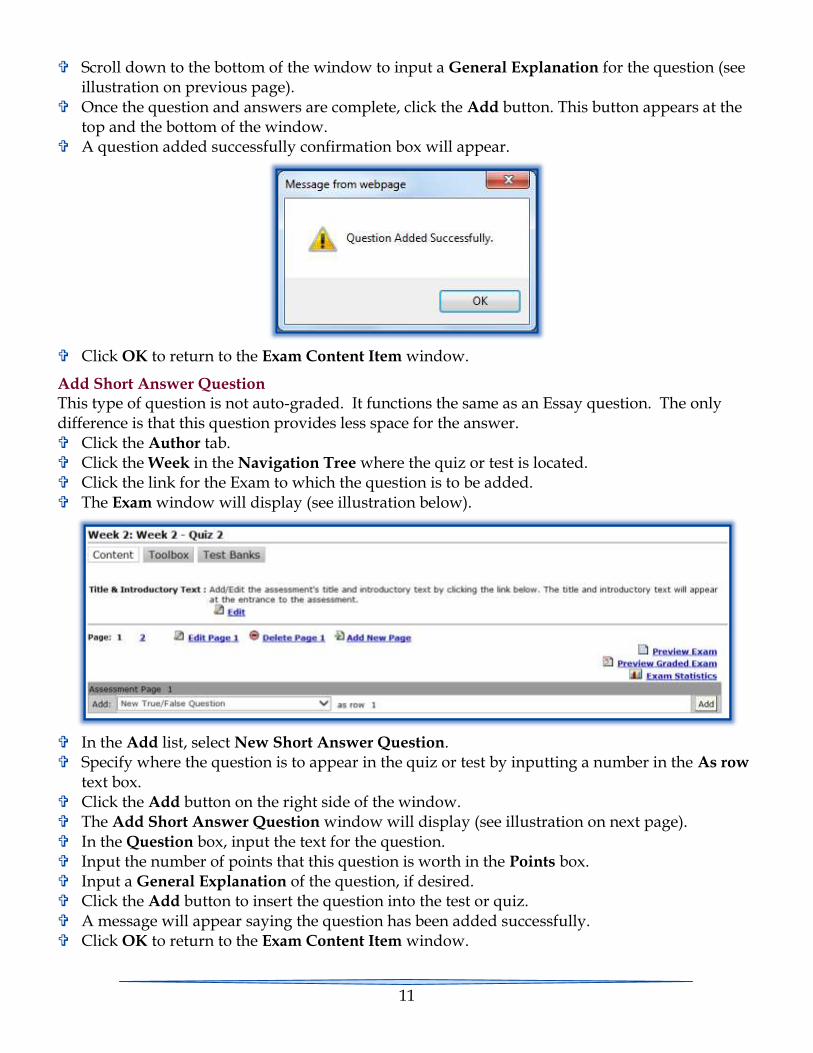
Add Short Answer Question This type of question is not auto-graded. It functions the same as an Essay question. The only difference is that this question provides less space for the answer. Click the Author tab. Click the Week in the Navigation Tree where the quiz or test is located. Click the link for the Exam to which the question is to be added. The Exam window will display (see illustration below).
In the Add list, select New Short Answer Question. Specify where the question is to appear in the quiz or test by inputting a number in the As row
text box. Click the Add button on the right side of the window. The Add Short Answer Question window will display (see illustration on next page). In the Question box, input the text for the question. Input the number of points that this question is worth in the Points box. Input a General Explanation of the question, if desired. Click the Add button to insert the question into the test or quiz. A message will appear saying the question has been added successfully. Click OK to return to the Exam Content Item window.

12
NOTE: In order for students to see the Explanation, the test or quiz needs to be made available in the Gradebook.
Add True/False Question This type of question can be auto-graded. When the student takes the test or quiz, the score will automatically appear in the Gradebook. Click the Author tab. Click the Week where the test or quiz is located. Click the Test or Quiz that is to be edited. The Exam window will display (see illustration below).
In the Add list, select New True-False Question. Specify where the question is to appear in the test or quiz in the As row box. Click the Add button on the right side of the window.

13
The Add True-False Question window will display (see illustration below).
In the Question box, input the text for the question. Input the number of points that this question is worth in the Points box. Click the option button for either True or False to specify the correct answer. Input an Explanation for each of the answers, if desired. Scroll to the bottom of the window to input a General Explanation for the question.
Click the Add button to insert the question into the test or quiz. The Question Added Successfully window will display. Click OK to return to the Exam Content Item window.
Add an Image to Exam It is very simple to generate exam questions and answers when using the Exam Builder tool. When creating an exam, there may be a time when you choose to use a graphic in a question and ask

14
students to reference the graphic. You may also wish to add a table to an exam question. Graphics and tables can be added to the exam question as well as to the answer and explanation areas of the exam.
Add an Image Select the question that the graphic is to be added to. Click the Edit link for the question (see illustration below).
Click in the Text Box to open the Visual Editor Toolbar. Click the Insert an Image button (see illustration at right). The Add a Link: Insert an Image window will display (see illustration below).
Input a Descriptive Text for the image. Click the Browse button to locate the image. The Choose File to Upload window will display. Navigate to the folder where the image is stored. Click the image. The path for the image will appear in the File to upload box. Click the Insert Image button. The image should appear in the exam question, the answer, or the explanation. Click the corner handles of the image to resize it.

15
Add a Table Select the question that the table is to be added to. Click the Edit link for the question (see illustration below).
Click in the Text Box to open the Visual Editor Toolbar. Click the Insert Table button (see illustration below left). A table grid will appear (see illustration below middle). Move the mouse pointer over the grid to select the number of columns (across) and rows
(down).
Click the left mouse button. The table will appear in the box (see illustration above right). Click in the first cell of the table to enter the text for that cell. Continue this process to fill in the rest of the cells in the table.
You must click in each cell. You cannot use the tab key to move from cell to cell. When the tab key is pressed, the whole table will be selected.
To add a row or column to the table: Right-click in the table cell; the area where the row and column intersect. Select the appropriate option from the shortcut menu.
Answers Don’t Line up Properly Most of us copy and paste our text wherever we can to save time, but doing it from a Word document into an exam or quiz question or answer might throw the formatting off, making the answers not line up with the boxes anymore.

16
Correct the Problem Click the Author tab in eCollege. Click the Exam for which the changes need to be made. Expand the question by clicking the plus (+) sign next to the question. Click the Edit link at the bottom of the question (see illustration).
Click <>HTML at the bottom of each text box and remove all of the HTML code. Make sure you remove all the code, that’s right, all of the code. You need to leave just the text of all of the questions and answers.
Click the Update button when the changes to all the text boxes have been made. Follow this procedure to change all the questions in the test. Click the Preview Exam link at the top of the Exam window to see the results of the changes.
Prevent Reoccurrence of Problem To prevent a reoccurrence of the problem the next time, you can choose to:
Just type the text in online. Only paste in plain text, from, say, a Notepad document. Right-click on the text box and select Paste from Plain Text from the drop-down menu. Click the Paste from Plain Text button on the Visual Editor Toolbar. Use Respondus to import your exams. These exams can be sent to the Technology Trainer
for formatting and uploading. When one of the above options is chosen, the HTML code will not appear. When there isn’t any HTML code, each question should appear properly in the test. Always check that your new formatting is correct by clicking Preview Exam on the Author
side. Editing the questions will only affect students who have not yet accessed the exam or quiz, or
for those that you have reset their test, the next time they enter it.
Delete Test or Quiz Click the Author tab in the Navigation Tree. Click the Week where the Test or Quiz is located. Click the Test or Quiz that is to be deleted. Click the Toolbox button. The Toolbox window will display (see illustration on next page). Click the Delete link. The Message from webpage window will display.
17
Click OK to delete the test or quiz.
Edit Test or Quiz Once a test or quiz has been created, it is possible to make additional changes. It is a good idea to use the Preview Exam feature to ensure the test or quiz is correct before it is made available to students.
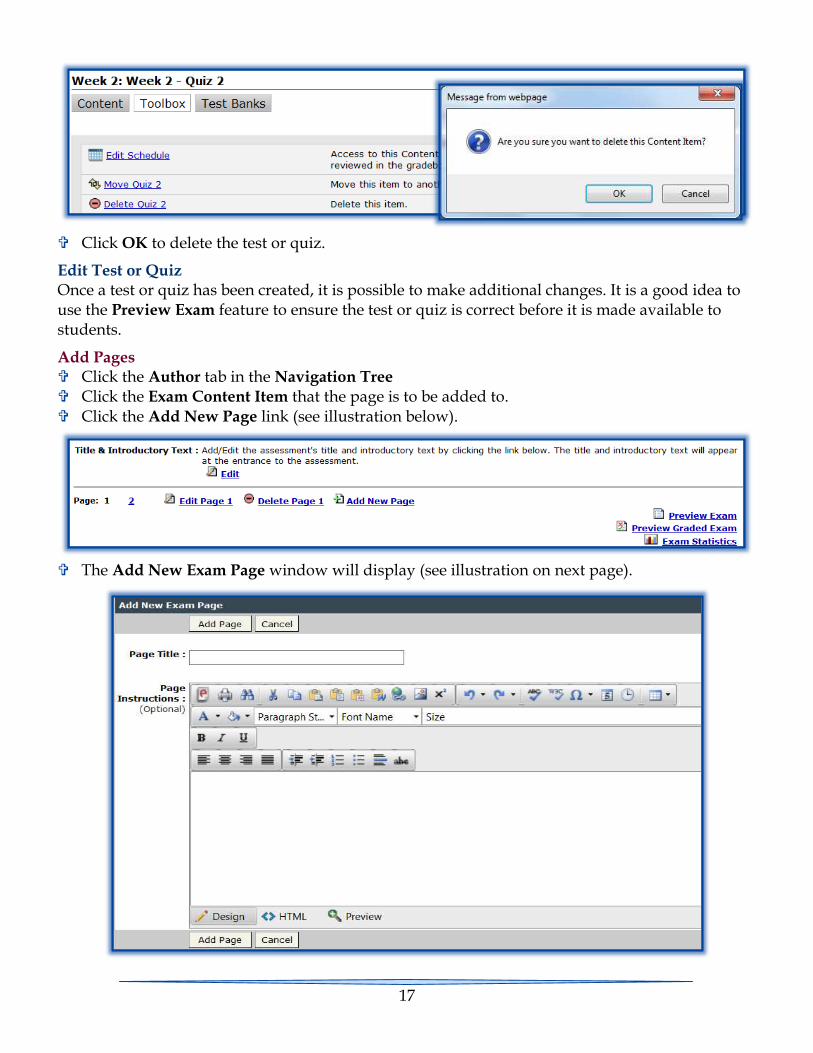
Add Pages Click the Author tab in the Navigation Tree Click the Exam Content Item that the page is to be added to. Click the Add New Page link (see illustration below).
The Add New Exam Page window will display (see illustration on next page).

18
In the Page Title box, input a title for the new page. In the Page Instructions box, input any instructions that are pertinent to the new page. Click Add Page. A confirmation message will appear stating the page has been added successfully. Click OK to return to the Exam Content Item.
Reorder Questions Click the Author tab in the Navigation Tree. Click the Exam Content Item in which the questions are to be reordered. Find the question that is to be moved to another location within the test or quiz. In the Row box, input a new row number for the question (see illustration below). This box is
not visible unless there is more than one question on a page.
Click the arrow at the end of the Row box to move the question to the specified position. A confirmation box will appear saying the question has been moved successfully. Click OK to return to the Exam Content Item.
Move Questions to Different Page Click the Author tab in the Navigation Tree. Click the Exam Content Item in which the questions are to be moved to the new page. Find the question that is to be moved to another location within the test or quiz. In the Page box, input a new page number for the question (see illustration below). This box is
not visible unless more than one page has been added to the test or quiz.
Click the arrow at the end of the Page box to move the question to the specified page. A confirmation box will appear saying the question has been moved successfully. Click OK to return to the Exam Content Item.
Edit Questions Click the Author tab in the Navigation Tree. Click the Exam Content Item that is to be edited. On the left side of the question, click the plus (+) sign (see illustration below).
The Question and Answer(s) will display.
19
Click the Edit button under the question (see illustration below).
Make the necessary changes to the question. Click the Update button. A confirmation box will appear saying the changes have been made successfully. Click OK to return to the Exam Content Item.
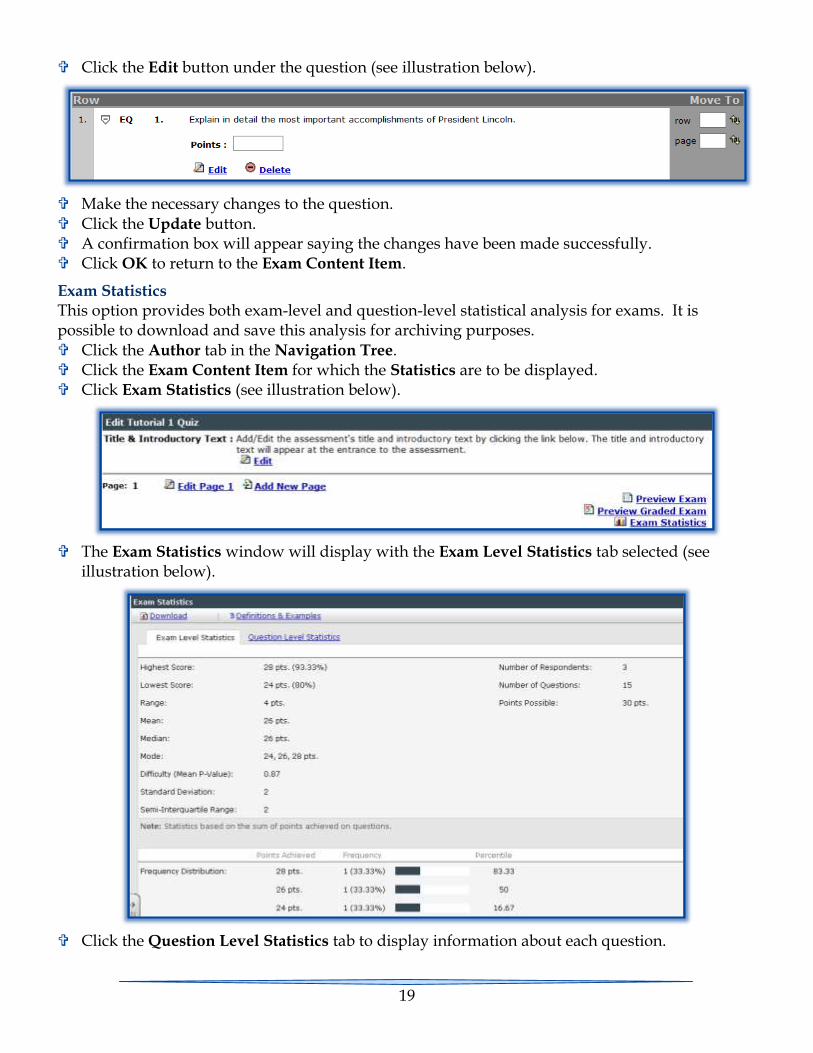
Exam Statistics This option provides both exam-level and question-level statistical analysis for exams. It is possible to download and save this analysis for archiving purposes. Click the Author tab in the Navigation Tree. Click the Exam Content Item for which the Statistics are to be displayed. Click Exam Statistics (see illustration below).
The Exam Statistics window will display with the Exam Level Statistics tab selected (see illustration below).
Click the Question Level Statistics tab to display information about each question.

20
To download and save the exam statistics report: Click the Download button. A window will display with the Exam Level Statistics information at the top and the
Question Level Statistics information at the bottom. Click Save in the upper left corner of the window. The report will be saved as an HTML document in the specified storage area.
The report is not stored in the system once the report page is closed. However, the report can always be run again.
Preview Exams As a test or quiz is being built, it is possible to see the test or quiz as the students will view it. It is also possible to take the test or quiz to see what students will experience at exam time.
Preview Exams Click the Author tab in the Navigation Tree. Click the Exam Content Item that is to be previewed. Click Preview Exam on the right side of the window (see illustration below).
The test or quiz will preview in the same view as students will see it. Click the Back button (see illustration below) at the top of the window on the left side to return
to the Exam Content Item.
Preview Graded Exams Click the Author tab in the Navigation Tree. Click the Exam Content Item that is to be previewed. Click Preview Graded Exam (see illustration below).
You may receive a message saying that you must Preview the Exam before you can Preview a Graded Exam.
If this message appears, click the Preview Exam link.
21
The test or quiz will display in the same view as students will see it. Click the Back button (see illustration below) at the top of the window on the left side to return
to the Exam Content Item.
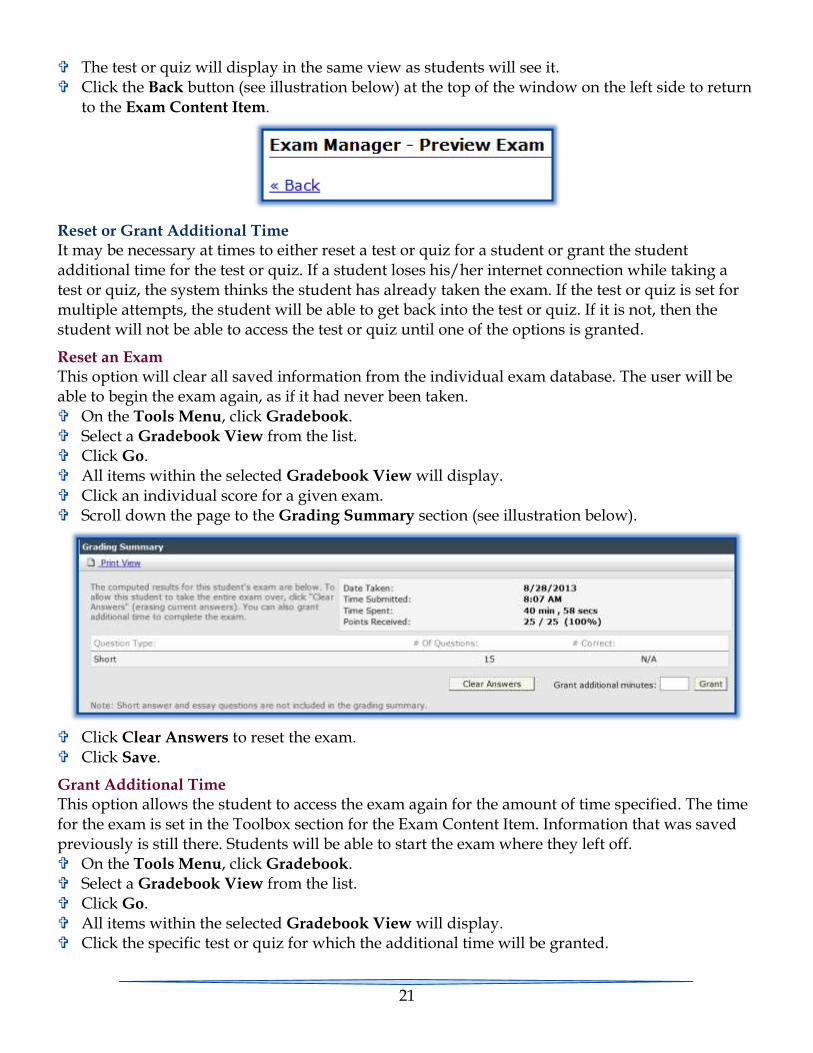
Reset or Grant Additional Time It may be necessary at times to either reset a test or quiz for a student or grant the student additional time for the test or quiz. If a student loses his/her internet connection while taking a test or quiz, the system thinks the student has already taken the exam. If the test or quiz is set for multiple attempts, the student will be able to get back into the test or quiz. If it is not, then the student will not be able to access the test or quiz until one of the options is granted.
Reset an Exam This option will clear all saved information from the individual exam database. The user will be able to begin the exam again, as if it had never been taken. On the Tools Menu, click Gradebook. Select a Gradebook View from the list. Click Go. All items within the selected Gradebook View will display. Click an individual score for a given exam. Scroll down the page to the Grading Summary section (see illustration below).
Click Clear Answers to reset the exam. Click Save.
Grant Additional Time This option allows the student to access the exam again for the amount of time specified. The time for the exam is set in the Toolbox section for the Exam Content Item. Information that was saved previously is still there. Students will be able to start the exam where they left off. On the Tools Menu, click Gradebook. Select a Gradebook View from the list. Click Go. All items within the selected Gradebook View will display. Click the specific test or quiz for which the additional time will be granted.

22
Scroll down the page to the Grading Summary section (see illustration above). In the Grant additional minutes field, enter the number of additional minutes that are being
granted. Click Grant.
Click Save.
Edit or Delete a Test Question Once a test has been created, it is possible to make changes to the questions.
Edit a Test Question Click the Author tab in the course where the test is stored. In the Navigation Tree, click the week or unit where the test is stored. Click on the test for which the changes are to be made. The test will open in the Test View window (see illustration below).
Click the Expand All button. Click the Edit button which is located directly below the question that is to be changed (see
illustration below).
If students have already taken the test or quiz, the message in the illustration on the next page will appear.
Click OK to continue to the Edit window. The Edit window will appear. Make the necessary corrections to the question. Click the Update button to accept the changes (see illustration at right). The Edit window will close.

23
The Test View window will display again.
Delete a Test Question Click the Author tab in the course where the test is stored. In the Navigation Pane, click the week or unit where the test is stored. Click on the test from which the question is to be deleted. The test will open in the Test View window (see illustration below).
Click the Expand All button. Click the Delete button which is located directly below the question that is to be deleted (see
illustration below).
A confirmation window will appear asking if you are sure you want to delete the question. If students have already taken the exam, the confirmation window illustrated on the previous
page will display. Click OK to permanently delete the question.

24
A window will display saying the question has been deleted. Click OK to exit the window.
Change Question Points in Exam Once a test has been created, it is possible to change the points for each individual question. Click the Author tab in the course where the test is stored. In the Navigation Pane, click the week or unit where the test is stored. Click on the test for which the points are to be changed. The test will open in the Test View window (see illustration below).
Click the Expand All button. The point box will display directly under the question (see illustration below).
Input the new points for the question. Scroll to the bottom of the exam. Click the Update Points button to accept the changes. The button appears at the bottom of the
exam questions. The points for the test will be changed.
The points should be changed before the test is taken. Points can be changed after the test has been taken. Once the points have been changed, the new points may be reflected in the test results. If the points are not reflected, the instructor will have to go to the test for each student and
change the points.
25
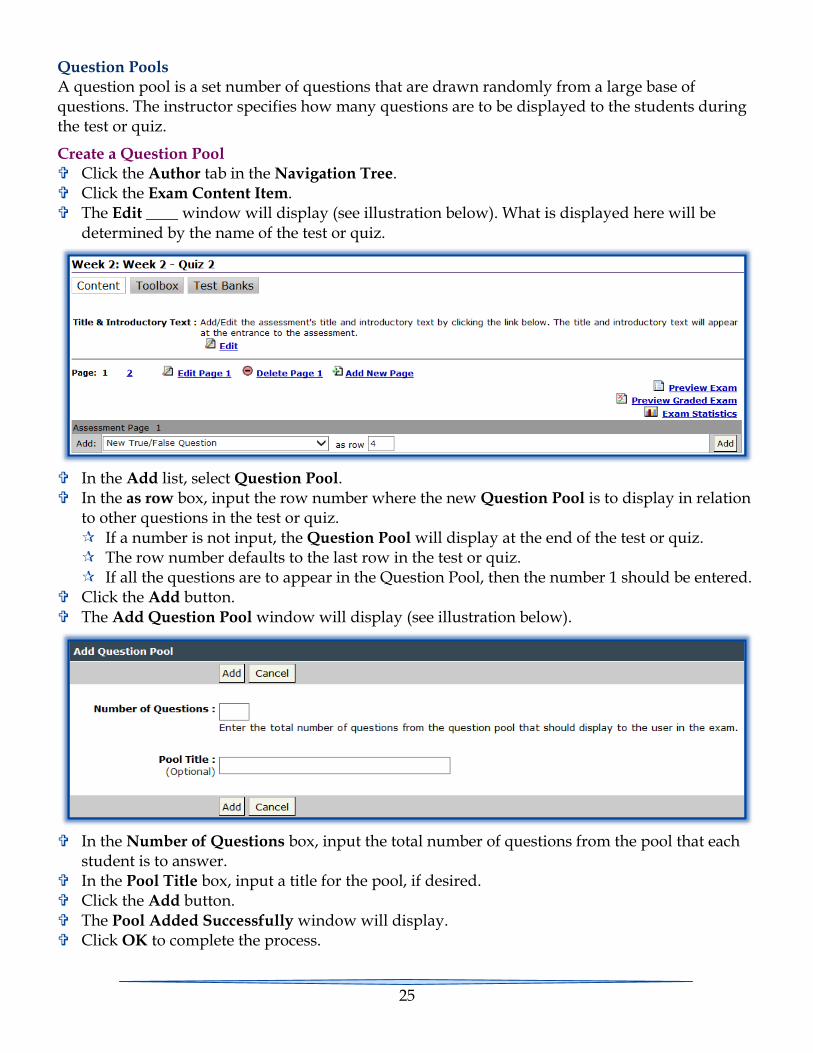
Question Pools A question pool is a set number of questions that are drawn randomly from a large base of questions. The instructor specifies how many questions are to be displayed to the students during the test or quiz.
Create a Question Pool Click the Author tab in the Navigation Tree. Click the Exam Content Item. The Edit ____ window will display (see illustration below). What is displayed here will be
determined by the name of the test or quiz.
In the Add list, select Question Pool. In the as row box, input the row number where the new Question Pool is to display in relation
to other questions in the test or quiz. If a number is not input, the Question Pool will display at the end of the test or quiz. The row number defaults to the last row in the test or quiz. If all the questions are to appear in the Question Pool, then the number 1 should be entered.
Click the Add button. The Add Question Pool window will display (see illustration below).
In the Number of Questions box, input the total number of questions from the pool that each student is to answer.
In the Pool Title box, input a title for the pool, if desired. Click the Add button. The Pool Added Successfully window will display. Click OK to complete the process.
26
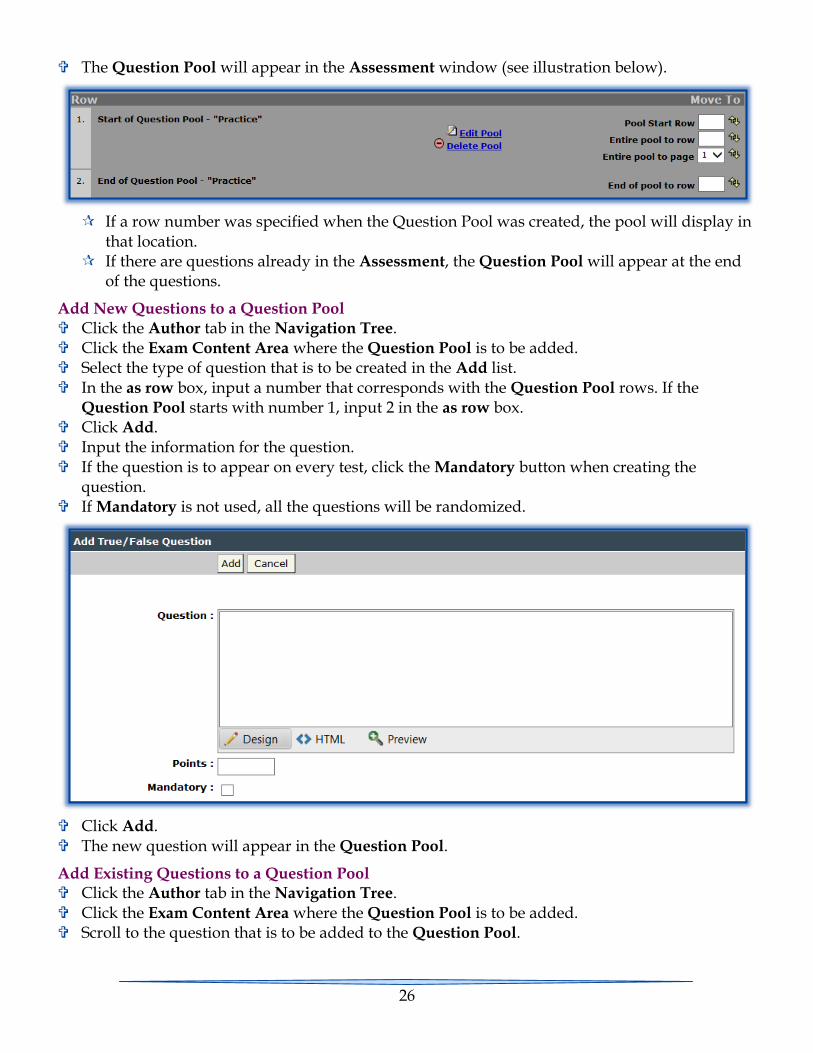
The Question Pool will appear in the Assessment window (see illustration below).
If a row number was specified when the Question Pool was created, the pool will display in that location.
If there are questions already in the Assessment, the Question Pool will appear at the end of the questions.
Add New Questions to a Question Pool Click the Author tab in the Navigation Tree. Click the Exam Content Area where the Question Pool is to be added. Select the type of question that is to be created in the Add list. In the as row box, input a number that corresponds with the Question Pool rows. If the
Question Pool starts with number 1, input 2 in the as row box. Click Add. Input the information for the question. If the question is to appear on every test, click the Mandatory button when creating the
question. If Mandatory is not used, all the questions will be randomized.
Click Add. The new question will appear in the Question Pool.
Add Existing Questions to a Question Pool Click the Author tab in the Navigation Tree. Click the Exam Content Area where the Question Pool is to be added. Scroll to the question that is to be added to the Question Pool.

27
In the Row box (see illustration below), input a number within the Question Pool. If the last row of the Question Pool is 4, then input the number 4 to add the question to the pool.
Click the arrows at the end of the row (see illustration above). A message will appear saying the question was moved successfully (see illustration below).
Click OK.
NOTE: The question pool is the gray area of the test or quiz. Questions not included in the pool will show in the white area.
Move the Start or End Row of a Question Pool Click the Author tab in the Navigation Tree. Click the Exam Content Area where the Question Pool is to be added. Follow the steps in the first section of this document to create the Question Pool.
Input a new row number in either Pool Start Row or End of Pool to Row box. These appear on the right side of the window at the top and bottom of the pool (see
illustration below).
Click the arrow keys at the end of the box to include the rows specified. The message in the illustration below left will display. Click OK.
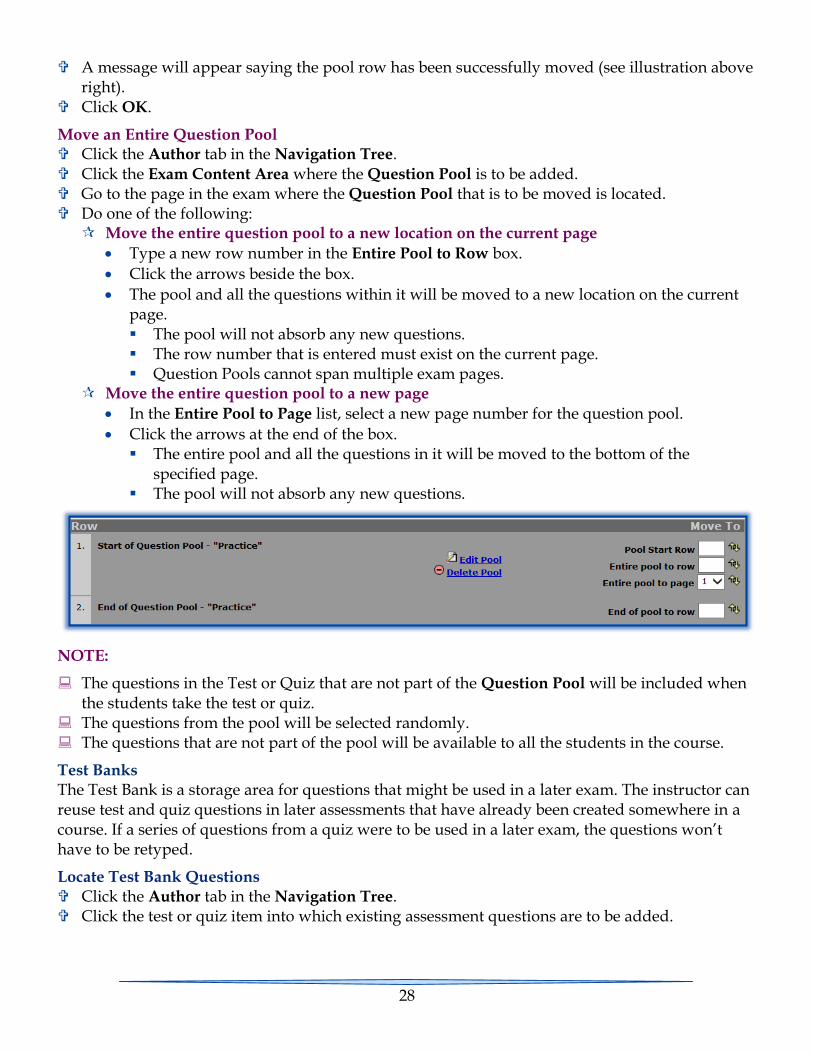
28
A message will appear saying the pool row has been successfully moved (see illustration above right).
Click OK.
Move an Entire Question Pool Click the Author tab in the Navigation Tree. Click the Exam Content Area where the Question Pool is to be added. Go to the page in the exam where the Question Pool that is to be moved is located. Do one of the following:
Move the entire question pool to a new location on the current page
Type a new row number in the Entire Pool to Row box.
Click the arrows beside the box.
The pool and all the questions within it will be moved to a new location on the current page. The pool will not absorb any new questions. The row number that is entered must exist on the current page. Question Pools cannot span multiple exam pages.
Move the entire question pool to a new page
In the Entire Pool to Page list, select a new page number for the question pool.
Click the arrows at the end of the box. The entire pool and all the questions in it will be moved to the bottom of the
specified page. The pool will not absorb any new questions.
NOTE:
The questions in the Test or Quiz that are not part of the Question Pool will be included when the students take the test or quiz.
The questions from the pool will be selected randomly. The questions that are not part of the pool will be available to all the students in the course.
Test Banks The Test Bank is a storage area for questions that might be used in a later exam. The instructor can reuse test and quiz questions in later assessments that have already been created somewhere in a course. If a series of questions from a quiz were to be used in a later exam, the questions won’t have to be retyped.
Locate Test Bank Questions Click the Author tab in the Navigation Tree. Click the test or quiz item into which existing assessment questions are to be added.
29
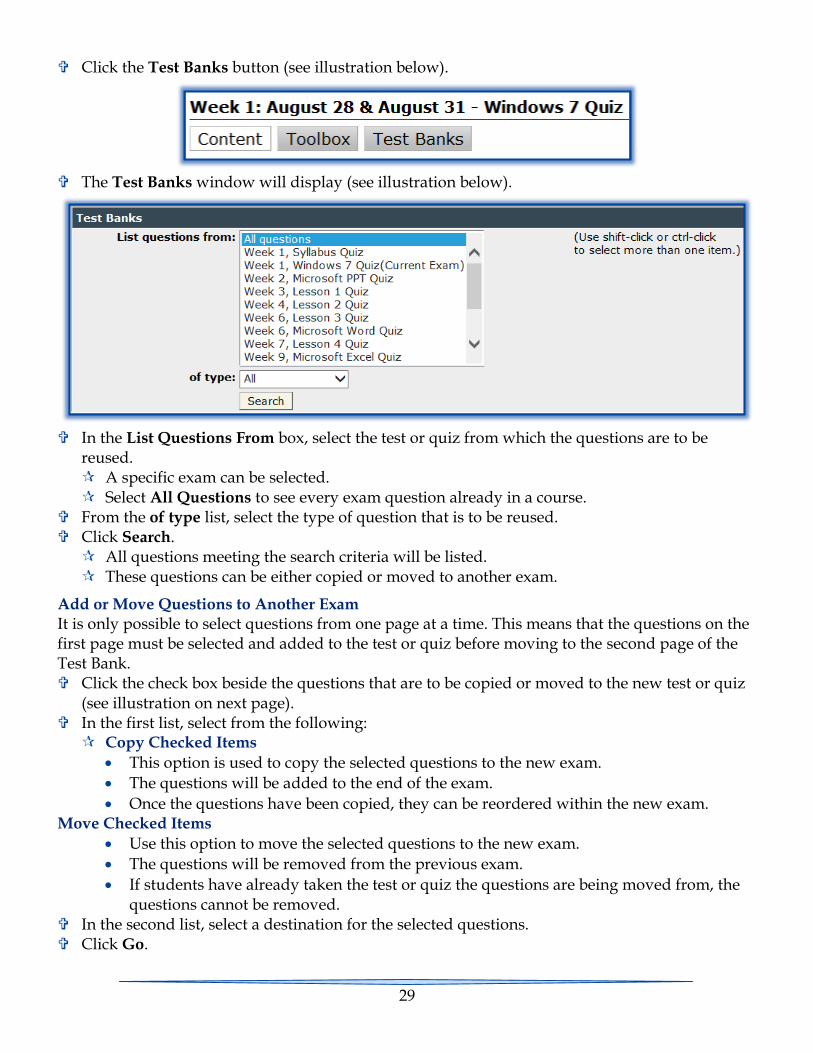
Click the Test Banks button (see illustration below).
The Test Banks window will display (see illustration below).
In the List Questions From box, select the test or quiz from which the questions are to be reused. A specific exam can be selected. Select All Questions to see every exam question already in a course.
From the of type list, select the type of question that is to be reused. Click Search.
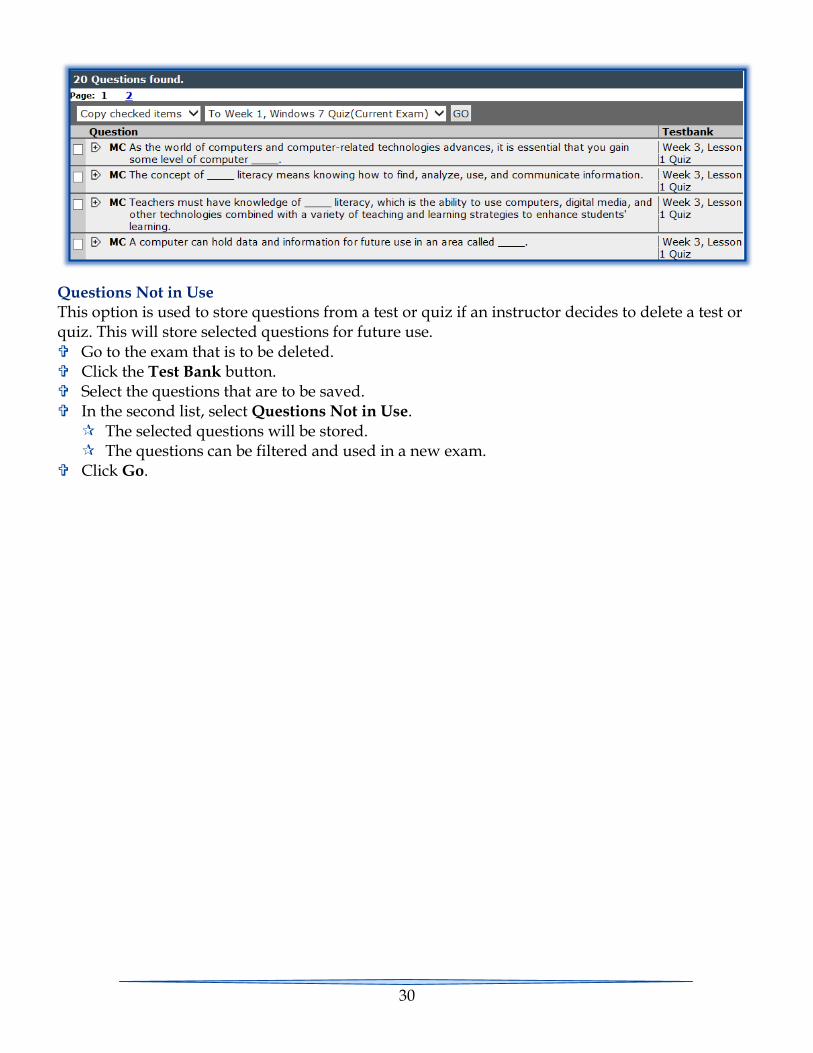
All questions meeting the search criteria will be listed. These questions can be either copied or moved to another exam.
Add or Move Questions to Another Exam It is only possible to select questions from one page at a time. This means that the questions on the first page must be selected and added to the test or quiz before moving to the second page of the Test Bank. Click the check box beside the questions that are to be copied or moved to the new test or quiz
(see illustration on next page). In the first list, select from the following:
Copy Checked Items
This option is used to copy the selected questions to the new exam.
The questions will be added to the end of the exam.
Once the questions have been copied, they can be reordered within the new exam. Move Checked Items
Use this option to move the selected questions to the new exam.
The questions will be removed from the previous exam.
If students have already taken the test or quiz the questions are being moved from, the questions cannot be removed.
In the second list, select a destination for the selected questions. Click Go.
30
Questions Not in Use This option is used to store questions from a test or quiz if an instructor decides to delete a test or quiz. This will store selected questions for future use. Go to the exam that is to be deleted. Click the Test Bank button. Select the questions that are to be saved. In the second list, select Questions Not in Use.
The selected questions will be stored. The questions can be filtered and used in a new exam.
Click Go.