examination information
TRANSCRIPT
EXAMINATION INFORMATION
This document will provide all the information you need for your examinations. We’ve got three sections here, so please take some time to read through everything. 1. Proctored Exams - Explains the process and outlines what each exam covers.
2. Equipment Standards – The technology you will need to run your exams.
3. Test-Taker Detailed Service Description - Detailed instructions on how to set up your exam account and what to expect on exam days.
The Basics
Carson Dunlop uses ProctorU for your exams. They are the largest and most recognized online proctoring service for universities and institutions offering online courses in North America. The exam-taking process is straightforward:
1. Create your Account and learn how ProctorU works: https://www.proctoru.com/portal/carsondunlopNote: You must make sure to download the appropriate ProctorU browser extension if required. Moreinformation is available from the link. 2. Schedule and confirm an exam. Then, on the day and time you scheduled your exam, log in to ProctorU.
3.
With your proctor, log in to the Online Training Portal, navigate to the Course and exam you will be taking.
4.
The proctor will enter the password on the opening page of the exam to activate it
and you can begin.
We recommend testing your computer equipment prior to taking your first exam to ensure everything is working correctly. Sign in: https://go.proctoru.com/students/system-metrics/new
ProctorU has a very good Help page that details every step of how to sign up and what to expect: https://www.proctoru.com/live-plus-resource-center
PROCTORED EXAMS
Course Breakdown Each course has three assessment components weighted in the following way: Case Studies (online): 25% Midterm (90 minutes – 70 multiple choice questions): 25% Final (120 minutes – 95 multiple choice questions): 50% Course passing grade: 70% *to pass the module you must achieve at least 70% for each component Each course has a Midterm and a Final proctored examination. These are set up online through ProctorU - http://www.proctoru.com/portal/carsondunlop/ This process allows you to take your examinations from home while you are being monitored online by a proctor. You and your computer screen will be monitored in much the same way as if you were in a classroom. You will need a laptop or desktop computer with a high-speed internet connection, a webcam and speakers. You will also need to make sure you have downloaded the ProctorU browser extension (more information at the link above). You have complete freedom to take your exams as and when you wish. The online proctors are available 24/7, 361 days a year. You must set up your exam a minimum of 72 hours prior to the time you wish to take it. You will receive an email confirmation from ProctorU. Please note – the cost to write your exams is included in your original course fee. However, if you choose to schedule your exam less than 72 hours in advance of the time you want to take it, ProctorU charges a supplementary fee which you are responsible for. When you are selecting your exam in ProctorU, please make sure you select it from the ‘Exams -training.carsondunlop.com users ONLY’ list of exams. When the time comes to take your exam, you will go to the ProctorU site, sign in and connect to your proctor. You will need to have a piece of government-issued photo ID with you to show them. You will go through a series of steps with them, and they will ask you to navigate to your exam site. That site is your Online Training Portal – http://training.carsondunlop.com You will log in with your username and password and go to the Course and then the Midterm or Final exam for that course. Click on the exam to open the page, and the proctor will input a password. IMPORTANT: You must read the Test Taker Detailed Service Description below that ProctorU has provided. It will walk you through the examination process and ensure that you have everything set up properly. Please see the next page for a breakdown of the content that each exam covers. Each references a Module Section. There is no overlap between the Midterm and the Final content.

COURSE MIDTERM FINAL
Roofing 1. Steep Roofing
1. Steep Roof Flashings 2. Flat Roofing
Structure
1. Footings & Foundations 2. Floors
1. Wall Systems 2. Roof Framing
Electrical
1. Service Drop & Service Entrance 2. Service Box Grounding & Panels
1. The Distribution System
Heating I
1. Furnace – Gas & Oil Parts 1 and 2
1. Hot Water Boilers
Heating II
1. Chimneys 2. Wood
1. Steam 2. Electric Heating 3. Wall and Floor Furnaces, etc.
Air Conditioning 1. Air Conditioning
1. Heat Pumps
Plumbing
1. Supply Plumbing 2. Water Heaters
1. Drain, Waste & Vent Plumbing 2. Fixtures & Faucets
Exterior
1. Architectural Styles 2. Exterior Cladding
1. Exterior Structures 2. Surface Water Control & Landscaping
Insulation & Interior 1. Insulation & Ventilation
1. Interior – Parts 1 & 2
Communication & Prof. Practice
1. Professional Practice
1. Communication
EQUIPMENT STANDARDS
Every student must have access to a computer – desktop or laptop. The computer should have the following specifications:
• Windows or Mac Operating System • Processor – 2.4GHz or more • RAM – 2GB or more • Browser – Chrome/Firefox/Safari • Microphone and speakers • Webcam • Internet – DSL or better • Bandwidth – 700Kbps or more • Software - Adobe PDF reader, Microsoft Word, JavaScript
If you are not sure if your computer has these specifications, we recommend discussing your needs with BestBuy or your local electronics outlet.
Please read on for ProctorU’s detailed instructions for using their site.

Page 1
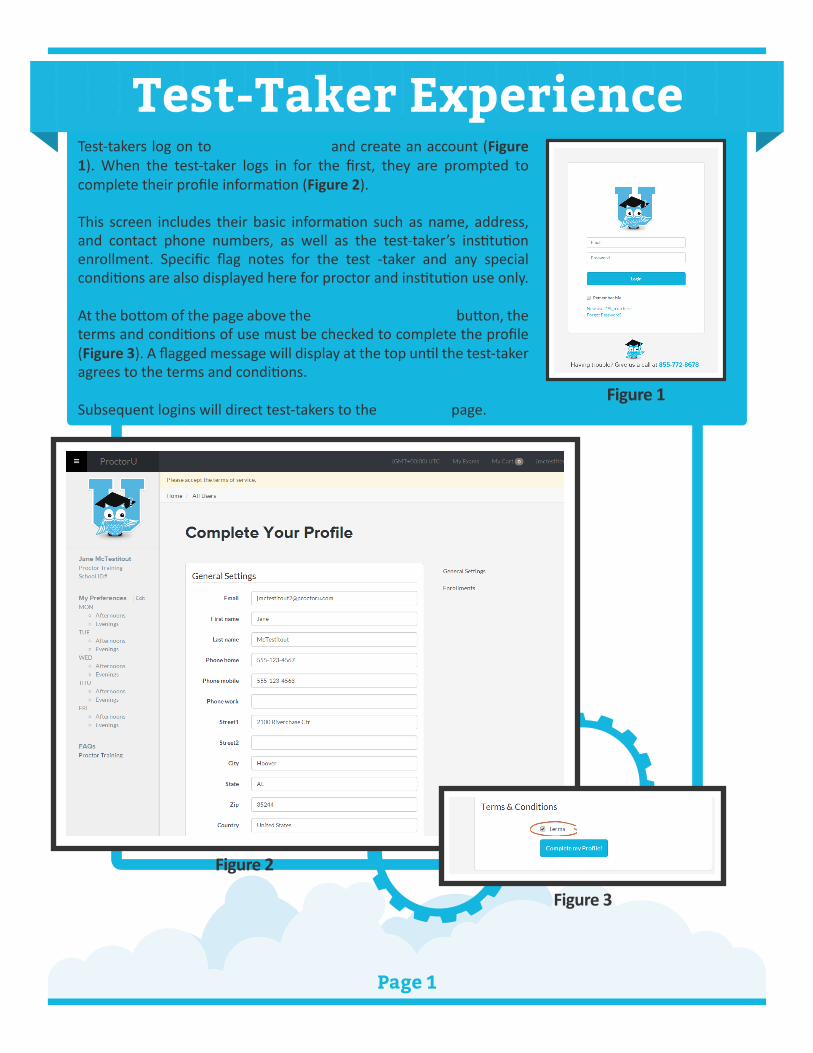
Test-Taker ExperienceTest-takers log on to go.proctoru.com and create an account (Figure 1). When the test-taker logs in for the first, they are prompted to complete their profile information (Figure 2).
This screen includes their basic information such as name, address, and contact phone numbers, as well as the test-taker’s institution enrollment. Specific flag notes for the test -taker and any special conditions are also displayed here for proctor and institution use only.
At the bottom of the page above the Complete my Profile! button, the terms and conditions of use must be checked to complete the profile (Figure 3). A flagged message will display at the top until the test-taker agrees to the terms and conditions.
Subsequent logins will direct test-takers to the My Exams page.Figure 1
Figure 2
Figure 3
Page 2
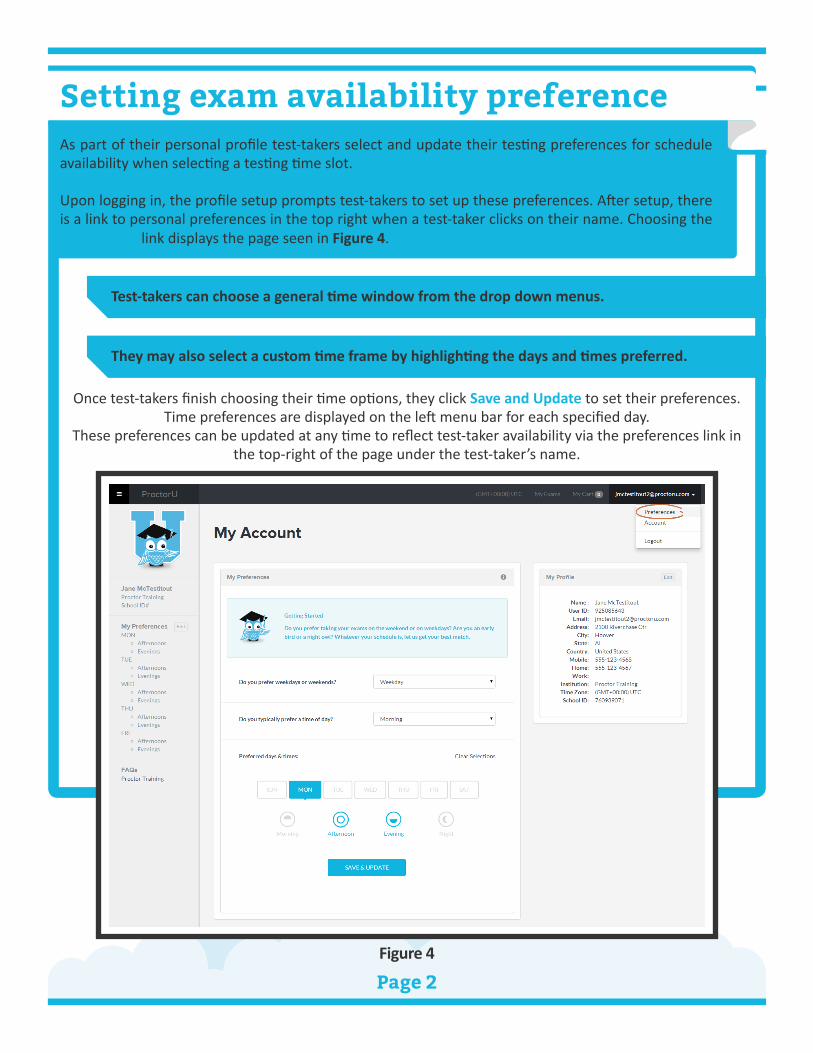
Test-takers can choose a general time window from the drop down menus.
They may also select a custom time frame by highlighting the days and times preferred.
As part of their personal profile test-takers select and update their testing preferences for schedule availability when selecting a testing time slot.
Upon logging in, the profile setup prompts test-takers to set up these preferences. After setup, there is a link to personal preferences in the top right when a test-taker clicks on their name. Choosing the Preferences link displays the page seen in Figure 4.
Once test-takers finish choosing their time options, they click Save and Update to set their preferences.Time preferences are displayed on the left menu bar for each specified day.
These preferences can be updated at any time to reflect test-taker availability via the preferences link in the top-right of the page under the test-taker’s name.
Setting exam availability preference
Figure 4

Page 3
Once a profile has been completed, or for a previous test-taker, the first login page will default to the My Exams page. If no exams are scheduled, the page will appear as in Figure 5.
A test-taker may click on the Schedule New Exam button either in the top-right or, if there are no active reservations, within the center of the page.
After clicking the Schedule New Exam button, a page with three drop-down menus appears. The test-taker will confirm the institution, select the exam term and select the specific exam they wish to take (Figure 6).
After choosing a specific test and clicking Find Reservations, the scheduling page will appear.
Scheduling Exams
Figure 5
Figure 6

Page 3Page 4
After selecting the test appointment, it is either added to the test-taker’s cart for payment and checkout (Figures 8 and 9) or the test-taker is sent back to their My Exam page. (Figure 10)
On the My Exam page, test-takers can view their recently scheduled exams and upcoming exams.
At the top of the page, the specific exam information is shown including: exam name, course ID, institution, instructor, available dates and blackout dates (if applicable). If enabled, there is also a Take It Now button option.
The test-taker can choose a time range to find an appointment for their exam by adjusting the slider bar or auto adjusting the slider using the night, morning, afternoon and evening options.
Adjusting the slider causes the available reservations list to display the available time slots for scheduling. Clicking on the Select button chooses a time slot.
1
2
3
1
2
3
Please refer to Figure 7 at top-right for the following:
Figure 8
Figure 9 Figure 10
Figure 7

Page 3Page 5
Figure 12
Figure 13
Figure 14
Figure 11
When the proctor connects in the proctoring room, the test-taker’s video is shown in the bottom right corner and the proctor’s video is on the left, as illustrated in Figure 14. This picture represents what the test-taker sees. The proctor’s view of the test-taker is much larger and there is also a zoom option.
After scheduling their exams, test-takers will see a countdown to their closest exam time at the top of their My Exams page, shown in Figure 11. At the appointment time, a test-taker will click on the Start button next to the appointment, which will take them to the proctoring room. Here, they will be prompted to download and run an applet as shown in Figure 12.
Figure 13 shows the downloaded applet, which connects the examinee’s screen to the proctor. Once the test-taker has connected their screen to the proctor, the proctor connects the two-way video and audio connection.
Connecting to a Proctor
Page 4Page 6
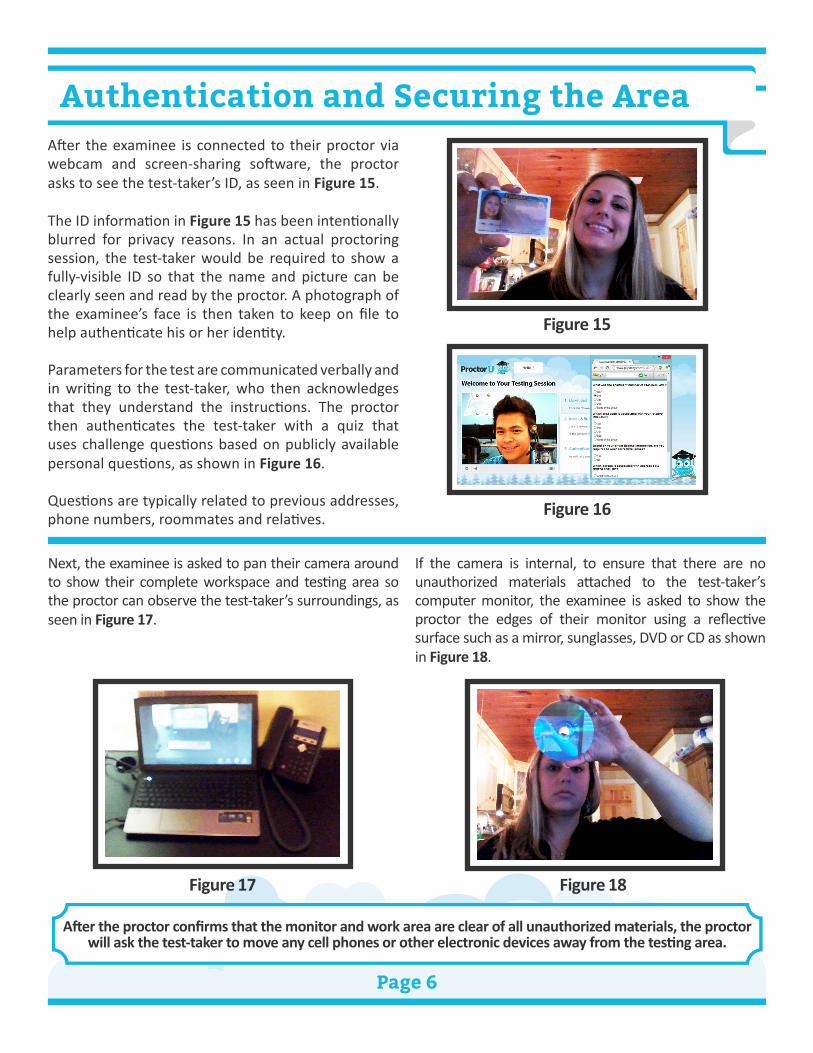
Figure 15
After the examinee is connected to their proctor via webcam and screen-sharing software, the proctor asks to see the test-taker’s ID, as seen in Figure 15.
The ID information in Figure 15 has been intentionally blurred for privacy reasons. In an actual proctoring session, the test-taker would be required to show a fully-visible ID so that the name and picture can be clearly seen and read by the proctor. A photograph of the examinee’s face is then taken to keep on file to help authenticate his or her identity.
Parameters for the test are communicated verbally and in writing to the test-taker, who then acknowledges that they understand the instructions. The proctor then authenticates the test-taker with a quiz that uses challenge questions based on publicly available personal questions, as shown in Figure 16.
Questions are typically related to previous addresses, phone numbers, roommates and relatives. Figure 16
If the camera is internal, to ensure that there are no unauthorized materials attached to the test-taker’s computer monitor, the examinee is asked to show the proctor the edges of their monitor using a reflective surface such as a mirror, sunglasses, DVD or CD as shown in Figure 18.
Figure 17 Figure 18
Next, the examinee is asked to pan their camera around to show their complete workspace and testing area so the proctor can observe the test-taker’s surroundings, as seen in Figure 17.
Authentication and Securing the Area
After the proctor confirms that the monitor and work area are clear of all unauthorized materials, the proctor will ask the test-taker to move any cell phones or other electronic devices away from the testing area.
Page 7
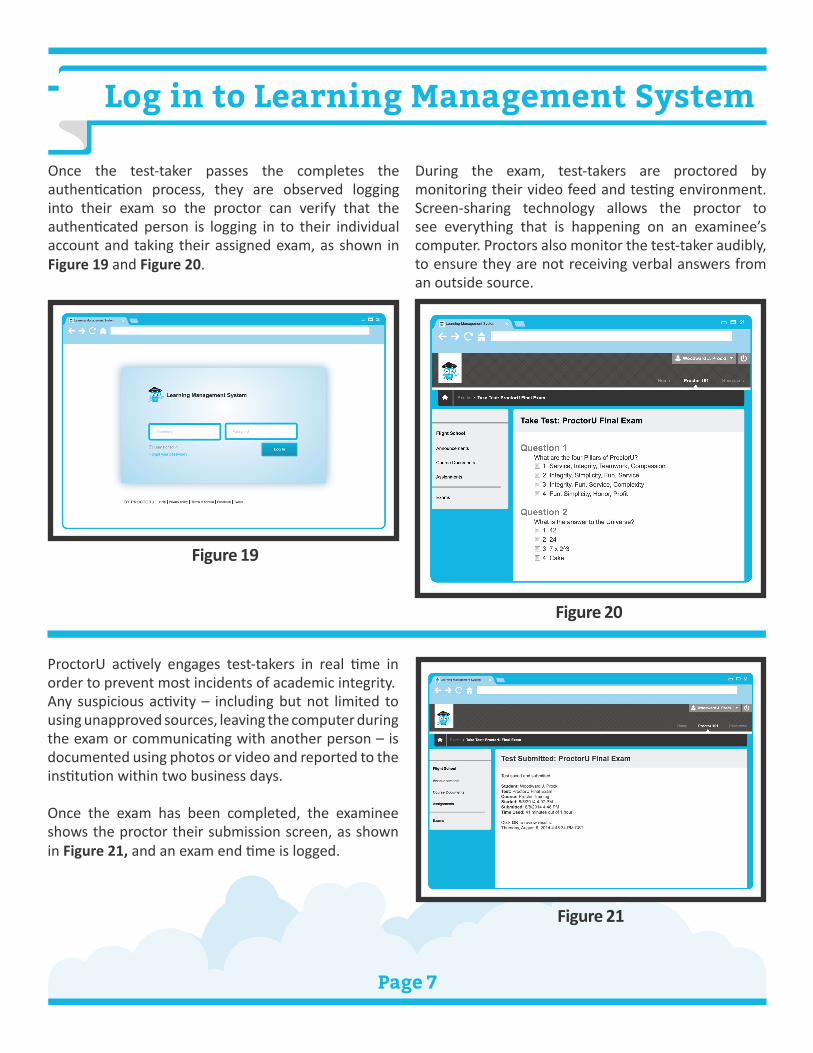
ProctorU actively engages test-takers in real time in order to prevent most incidents of academic integrity.Any suspicious activity – including but not limited to using unapproved sources, leaving the computer during the exam or communicating with another person – is documented using photos or video and reported to the institution within two business days.
Once the exam has been completed, the examinee shows the proctor their submission screen, as shown in Figure 21, and an exam end time is logged.
Once the test-taker passes the completes the authentication process, they are observed logging into their exam so the proctor can verify that the authenticated person is logging in to their individual account and taking their assigned exam, as shown in Figure 19 and Figure 20.
During the exam, test-takers are proctored by monitoring their video feed and testing environment. Screen-sharing technology allows the proctor to see everything that is happening on an examinee’s computer. Proctors also monitor the test-taker audibly, to ensure they are not receiving verbal answers from an outside source.
Figure 21
Figure 20
Figure 19
Log in to Learning Management System