ex6x study guide 1.4 - lexmarkcontentdelivery.lexmark.com/webcontent/training/ex6x/ex6x_study... ·...
TRANSCRIPT
Lexmark E260/E360/E460

Mono Product Study Guide
THIS PAGE INTENTIONALLY LEFT BLANK
Lexmark E260/E360/E460 Mono Product Study Guide Rev 1.4
For Training Purposes Only 9/17/2008
Edition: September 2008 Revision: 1.4 The following paragraph does not apply to any country where such provisions are inconsistent with local law: LEXMARK INTERNATIONAL, INC. PROVIDES THIS PUBLICATION “AS IS” WITHOUT WARRANTY OF ANY KIND, EITHER EXPRESS OR IMPLIED, INCLUDING, BUT NOT LIMITED TO, THE IMPLIED WARRANTIES OF MERCHANTABILITY OR FITNESS FOR A PARTICULAR PURPOSE. Some states do not allow disclaimer of express or implied warranties in certain transactions; therefore, this statement may not apply to you. This publication could include technical inaccuracies or typographical errors. Changes are periodically made to the information herein; these changes will be incorporated in later editions. Improvements or changes in the products or the programs described may be made at any time.
Comments may be addressed to Lexmark International, Inc., Department 352X/008-4, 740 West New Circle Road, Lexington, Kentucky 40550, U.S.A or e-mail at [email protected]. Lexmark may use or distribute any of the information you supply in any way it believes appropriate without incurring any obligation to you.
References in this publication to products, programs, or services do not imply that the manufacturer intends to make these available in all countries in which it operates. Any reference to a product, program, or service is not intended to state or imply that only that product, program, or service may be used. Any functionally equivalent product, program, or service that does not infringe any existing intellectual property right may be used instead. Evaluation and verification of operation in conjunction with other products, programs, or services, except those expressly designated by the manufacturer, are the user’s responsibility.
Lexmark and Lexmark with diamond design are trademarks of Lexmark International, Inc., registered in the United States and/or other countries.
PCL® is a registered trademark of the Hewlett-Packard Company.
All other trademarks are the property of their respective owners. © 2008 Lexmark International, Inc. All rights reserved. UNITED STATES GOVERNMENT RIGHTS This software and any accompanying documentation provided under this agreement are commercial computer software and documentation developed exclusively at private expense.

Lexmark E260/E360/E460 Mono Product Study Guide Rev 1.4
For Training Purposes Only 9/17/2008
THIS PAGE INTENTIONALLY LEFT BLANK
Lexmark E260/E360/E460 Mono Product Study Guide Rev 1.4
For Training Purposes Only 9/17/2008
Table of Contents
TECHNICAL INFORMATION ......................................................................................... 1
PRINTER SPECIFICATIONS .........................................................................................................................1 PRINT SPEEDS..........................................................................................................................................1 SUPPLIES .................................................................................................................................................2 BASIC MODEL CONFIGURATIONS...............................................................................................................3 OPTIONS AND FEATURES ..........................................................................................................................3
THEORY OF OPERATION ............................................................................................. 4
ELECTROPHOTOGRAPHIC PROCESS ..........................................................................................................4 Charge .............................................................................................................................................4 Exposure ..........................................................................................................................................4 Development ....................................................................................................................................4 Transfer ............................................................................................................................................4 Fusing...............................................................................................................................................4 Cleaning ...........................................................................................................................................4
PAPER TRANSPORT SYSTEM .....................................................................................................................6 PAPER PATH ............................................................................................................................................7 PAPER JAMS ............................................................................................................................................8
200 Paper Jam.................................................................................................................................9 201 Paper Jam...............................................................................................................................10 202 Paper Jam...............................................................................................................................11 231 Paper Jam...............................................................................................................................12 233 Paper Jam...............................................................................................................................13 234 Paper Jam...............................................................................................................................13 235 Paper Jam...............................................................................................................................14 242 Paper Jam...............................................................................................................................14 251 Paper Jam...............................................................................................................................15 Jam Codes Summary.....................................................................................................................16
E260D(N) OPERATOR PANEL.................................................................................... 17
PANEL BUTTONS ....................................................................................................................................17 LIGHT PATTERNS AND ERROR MESSAGES ...............................................................................................18 ACCESSING SERVICE MENUS ..................................................................................................................19
Lexmark E260/E360/E460 Mono Product Study Guide Rev 1.4
For Training Purposes Only 9/17/2008
E360D(N) OPERATOR PANEL.................................................................................... 20
PANEL BUTTONS ....................................................................................................................................20 ACCESSING SERVICE MENUS ..................................................................................................................22
E460D(N) OPERATOR PANEL.................................................................................... 23
PANEL BUTTONS ....................................................................................................................................23 ACCESSING SERVICE MENUS ..................................................................................................................25
CUSTOMER MENUS.................................................................................................... 26
SERVICE MENU ITEMS............................................................................................... 27
CONFIGURATION MODE MENU ITEMS .......................................................................................................27 Reset photoconductor maintenance counter (Reset PC Cnt)........................................................27 Print quality pages (Prt Quality Pgs) ..............................................................................................27 Reports...........................................................................................................................................28 Panel Menus [available on the E360d(n) & E460d(n)]...................................................................28 PPDS Emulation [on the E360d(n) & E460d(n)] ............................................................................29 PPDS Emulation [on the E260d(n)] ...............................................................................................29 Demo Mode....................................................................................................................................29 Factory Defaults [on the E360d(n) & E460d(n)].............................................................................29 Factory Defaults [on the E260d(n)] ................................................................................................29 Energy Conserve ...........................................................................................................................30 Font Sharpening [available on the E360d(n) & E460d(n)] .............................................................30 Exit Configuration Menu (Exit Config Menu) [available on the E360d(n) & E460d(n)] ..................30
DIAGNOSTIC MODE MENU ITEMS: ............................................................................................................31 E260 Registration...........................................................................................................................31 E360 Registration...........................................................................................................................32
E360 Top & Bottom Margins ...................................................................................................32 E360 Left Margin and Right Margin.........................................................................................33 E360 Quick Test page .............................................................................................................33
E460 Registration...........................................................................................................................34 E460 Top & Bottom Margins ...................................................................................................34 E460 Left Margin .....................................................................................................................34 E460 Right Margin...................................................................................................................35 E340 Quick Test page .............................................................................................................35
Print Tests E360 & E460................................................................................................................35 Print Quality Pages (Prt Quality Pgs).............................................................................................36 EP Setup ........................................................................................................................................36

Lexmark E260/E360/E460 Mono Product Study Guide Rev 1.4
For Training Purposes Only 9/17/2008
PRINT QUALITY DIAGNOSTIC TIPS .......................................................................... 38
GENERAL TERMINOLOGY ........................................................................................................................38 PRINT QUALITY RULES OF THUMB ...........................................................................................................39
Diagnostic Steps ............................................................................................................................40 Repeating defects....................................................................................................................40 Solid Black ...............................................................................................................................41 Blank print (no print) ................................................................................................................42 Spots........................................................................................................................................43 Solid black or white streaks .....................................................................................................44 Vertical Stripes (process direction)..........................................................................................45 Horizontal stripes (side to side direction) ................................................................................46 Vertical void lines and bands (process direction) ....................................................................47 Horizontal white stripes or bands (side to side direction)........................................................48 Ghost images (sometimes called after image) ........................................................................49 Print irregularities, Voids, Partial Lack.....................................................................................50 Faint print (Low contrast).........................................................................................................51 Background (fog) .....................................................................................................................52 Skew........................................................................................................................................53 Media Damage ........................................................................................................................54 No fuse (unfused toner, smearing)..........................................................................................55
PAPER TRANSPORT DIAGNOSTIC TIPS .................................................................. 56
PAPER RULES OF THUMB........................................................................................................................56
SPECIAL PROCEDURES ............................................................................................ 57
E260 PRINTHEAD ASSEMBLY MECHANICAL ADJUSTMENT........................................................................57 E360 & E460N PRINTHEAD ASSEMBLY MECHANICAL ADJUSTMENT .........................................................59 E260 PRINTHEAD ASSEMBLY ELECTRONIC ADJUSTMENT.........................................................................61 E360 & E460 PRINTHEAD ASSEMBLY ELECTRONIC ADJUSTMENT............................................................61
POTENTIAL FIELD ISSUE........................................................................................... 62
LOCATIONS AND CONNECTIONS............................................................................. 63
E260 & E360 CONTROLLER CARD CONNECTOR PIN VALUES ....................................................................64 E460D/DN CONTROLLER CARD CONNECTOR PIN VALUES..........................................................................65
LEXMARK E260/E360/E460 PRINT DRIVER – CORE SKILLS COURSE.................. 66
DIAGNOSTIC TOOLS AVAILABLE FOR TECHNICIANS ........................................... 66
SERVICE MANUALS.................................................................................................................................66 TECHNICAL SERVICE BULLETINS .............................................................................................................66

Lexmark E260/E360/E460 Mono Product Study Guide Rev 1.4
For Training Purposes Only 9/17/2008
THIS PAGE INTENTIONALLY LEFT BLANK
Lexmark E260/E360/E460 Mono Product Study Guide Rev 1.4
For Training Purposes Only 9/17/2008 1
Technical Information
Printer Specifications
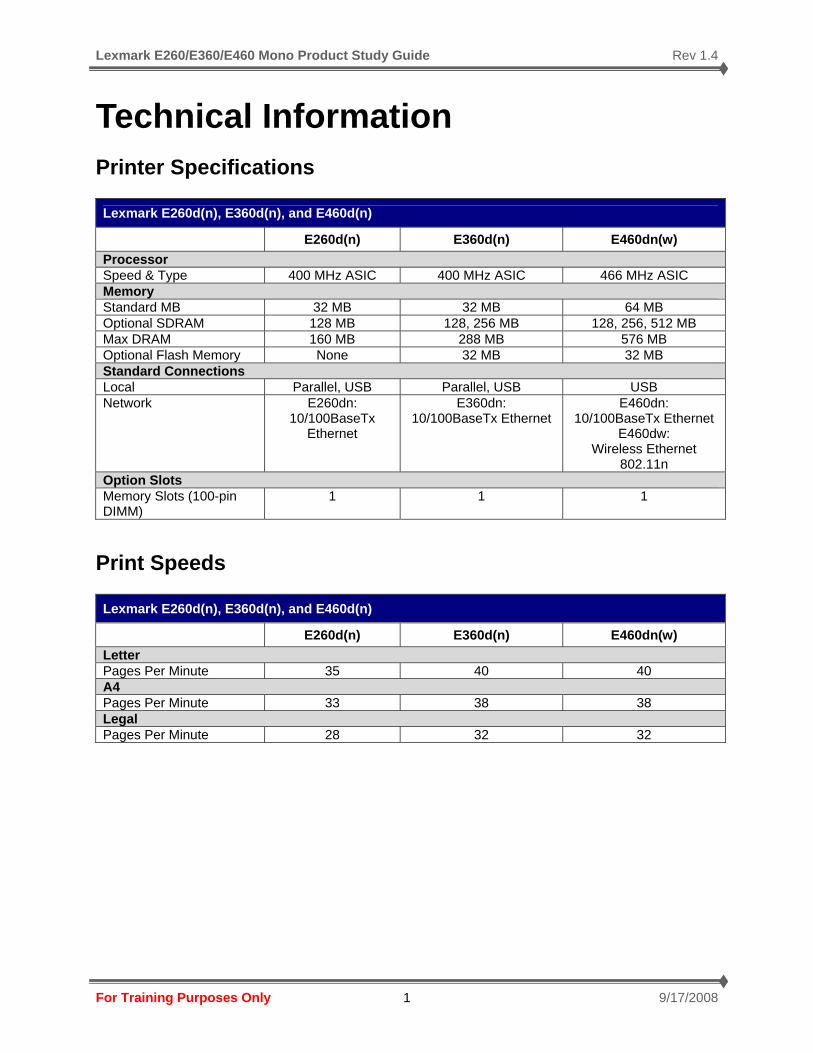
Lexmark E260d(n), E360d(n), and E460d(n) E260d(n) E360d(n) E460dn(w) Processor Speed & Type 400 MHz ASIC 400 MHz ASIC 466 MHz ASIC Memory Standard MB 32 MB 32 MB 64 MB Optional SDRAM 128 MB 128, 256 MB 128, 256, 512 MB Max DRAM 160 MB 288 MB 576 MB Optional Flash Memory None 32 MB 32 MB Standard Connections Local Parallel, USB Parallel, USB USB Network E260dn:
10/100BaseTx Ethernet
E360dn: 10/100BaseTx Ethernet
E460dn: 10/100BaseTx Ethernet
E460dw: Wireless Ethernet
802.11n Option Slots Memory Slots (100-pin DIMM)
1 1 1
Print Speeds
Lexmark E260d(n), E360d(n), and E460d(n) E260d(n) E360d(n) E460dn(w) Letter Pages Per Minute 35 40 40 A4 Pages Per Minute 33 38 38 Legal Pages Per Minute 28 32 32

Lexmark E260/E360/E460 Mono Product Study Guide Rev 1.4
For Training Purposes Only 9/17/2008 2
Supplies The two-piece photoconductor/toner cartridge is an item that confuses some customers from time to time.
• The photoconductor and toner cartridge are supply items that can be ordered separately. A two-piece photoconductor/toner SWE cartridge comes with each printer.
• The photoconductor and toner cartridge needs to have the packing material carefully removed, and the cartridge reinstalled in the printer.
• The new toner cartridge can be removed separately and should be gently shaken from side to side in order to evenly distribute the toner in the reservoir. Some unevenness may have developed during shipping.
• The surface of the Photoconductor should be protected from light and from being touched.
• A toner cartridge that has been used in the machine long enough to be nearing the end of life, may also be gently shaken from side to side in order to level out any unevenness in the toner reservoir that may have developed because of certain usage patterns or applications. This may allow the cartridge to be used a little longer.
Regionalization (toner has an internal identification mechanism that establishes the region in which that cartridge is to be used.) When servicing and testing of the printer:
• All printers/SWE toner will be shipped as “undefined”. The SWE cartridge is not capable of providing regionalization information and can be used in different machines. This is true even after an aftermarket cartridge has been installed.
• The first aftermarket cartridge that is used in the printer provides the printer’s firmware with the regionalization information which establishes the printer’s “region”.
• A servicer has the ability to use an aftermarket cartridge for test purposes, and then reinstall and use the customer’s original SWE cartridge. NOTE: If the aftermarket test cartridge will be the first aftermarket cartridge that is installed in the machine, it must be from the same region as the customer’s region.
NOTE: The Ex6x cartridge will not work in a Ex5x machine and vice versa. They are physically different sizes.

Lexmark E260/E360/E460 Mono Product Study Guide Rev 1.4
For Training Purposes Only 9/17/2008 3
Basic Model Configurations 1. Front Door Release button 2. Paper Stop 3. Standard Exit Bin 4. Printer Control Panel (each model is slightly different) 5. System Board Door 6. Standard 250-sheet tray (tray 1) 7. E260 Manual Document feed door 7. E360 or E460 Multipurpose feed door 8. Front Door
Options and Features
Lexmark E260d(n), E360d(n), and E460d(n)
Optional 250-Sheet Tray
Optional 550-Sheet Tray
Optional 550-Sheet Tray Optional 250-Sheet Tray
Lexmark E260/E360/E460 Mono Product Study Guide Rev 1.4
For Training Purposes Only 9/17/2008 4
Theory of Operation
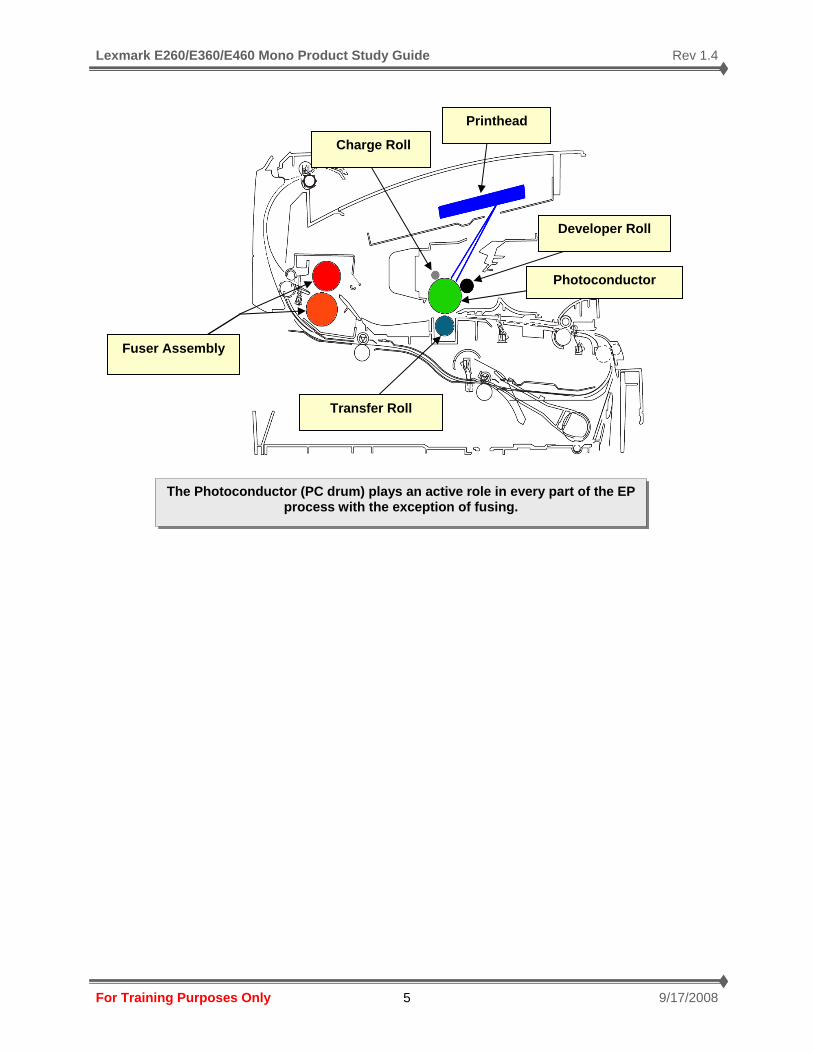
Electrophotographic Process Charge The charge roll deposits a uniform negative electrostatic charge on the light-sensitive surface of the photoconductor drum: (also called the PC, Photodeveloper, or OPC). Exposure The printhead generates Laser light that enters the cartridge and strikes the photoconductor (PC) drum in areas to be developed, forming an invisible (latent) electrostatic image of the desired print. Note: Any form of light (laser, LED's, sun light, etc.) activates the Electrophotographic (EP) properties of the drum coating. Consequently, care should be taken to cover the PC when removed from the printer to protect it from exposure to a light source. Development (Developer Roll) Toner is transferred from the reservoir in the toner cartridge to the photoconductor drum through electrostatic attraction making the image visible on the PC drum. Toner is attracted only to areas where the laser imaged the drum. Since the toner and the charge applied to the drum are both negative, the toner will be repelled from areas where the laser did not image the drum. Transfer The transfer roll rolls along the underside of the paper to be imaged, and moves the toned image from the photoconductor to the paper. The toner is negatively charged and the transfer roll bathes the paper with a positive charge; this attracts the toner to the paper. Fusing The paper – now with a “toned” image – moves through the fuser assembly. Using temperature and pressure, it marries toner to paper. Cleaning Waste toner (toner that was not transferred), paper debris and dust are removed from the photoconductor drum by the cleaning blade. See the illustration of the EP Process on the following page.
Lexmark E260/E360/E460 Mono Product Study Guide Rev 1.4
For Training Purposes Only 9/17/2008 5
.
The Photoconductor (PC drum) plays an active role in every part of the EP process with the exception of fusing.
Printhead
Charge Roll
Developer Roll
Photoconductor
Transfer Roll
Fuser Assembly
Lexmark E260/E360/E460 Mono Product Study Guide Rev 1.4
For Training Purposes Only 9/17/2008 6
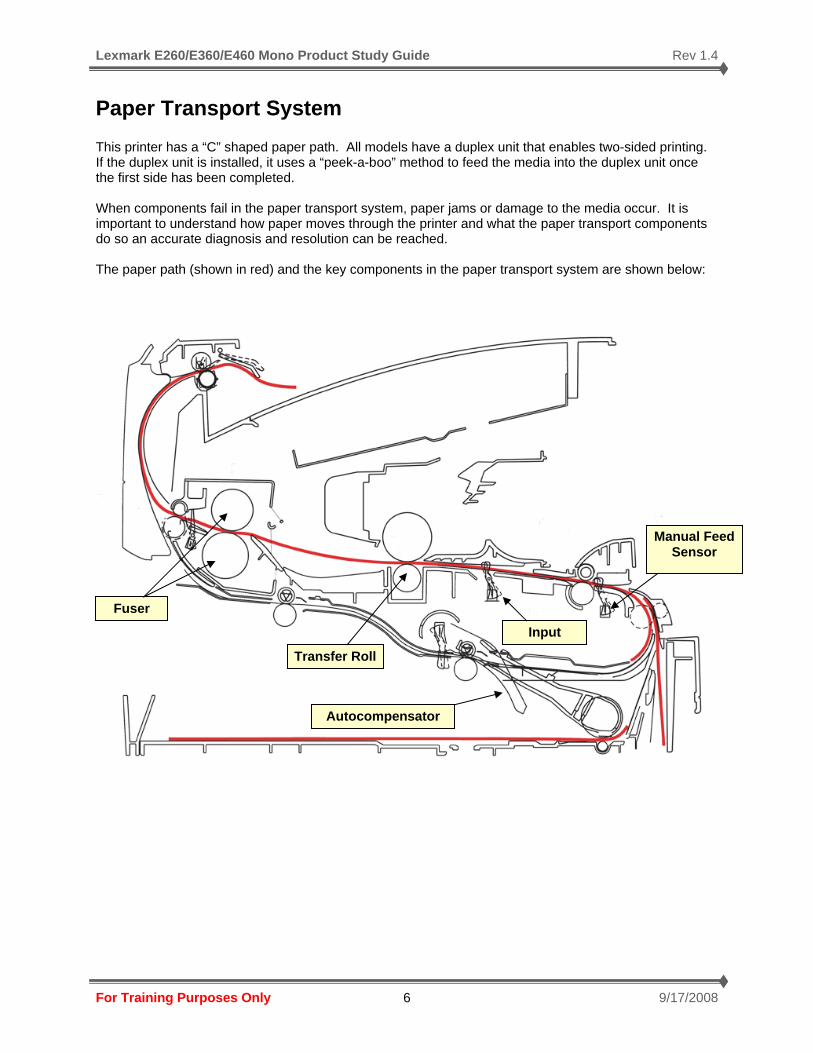
Paper Transport System This printer has a “C” shaped paper path. All models have a duplex unit that enables two-sided printing. If the duplex unit is installed, it uses a “peek-a-boo” method to feed the media into the duplex unit once the first side has been completed. When components fail in the paper transport system, paper jams or damage to the media occur. It is important to understand how paper moves through the printer and what the paper transport components do so an accurate diagnosis and resolution can be reached. The paper path (shown in red) and the key components in the paper transport system are shown below:
Manual Feed Sensor
Input
Fuser
Transfer Roll
Autocompensator
Lexmark E260/E360/E460 Mono Product Study Guide Rev 1.4
For Training Purposes Only 9/17/2008 7
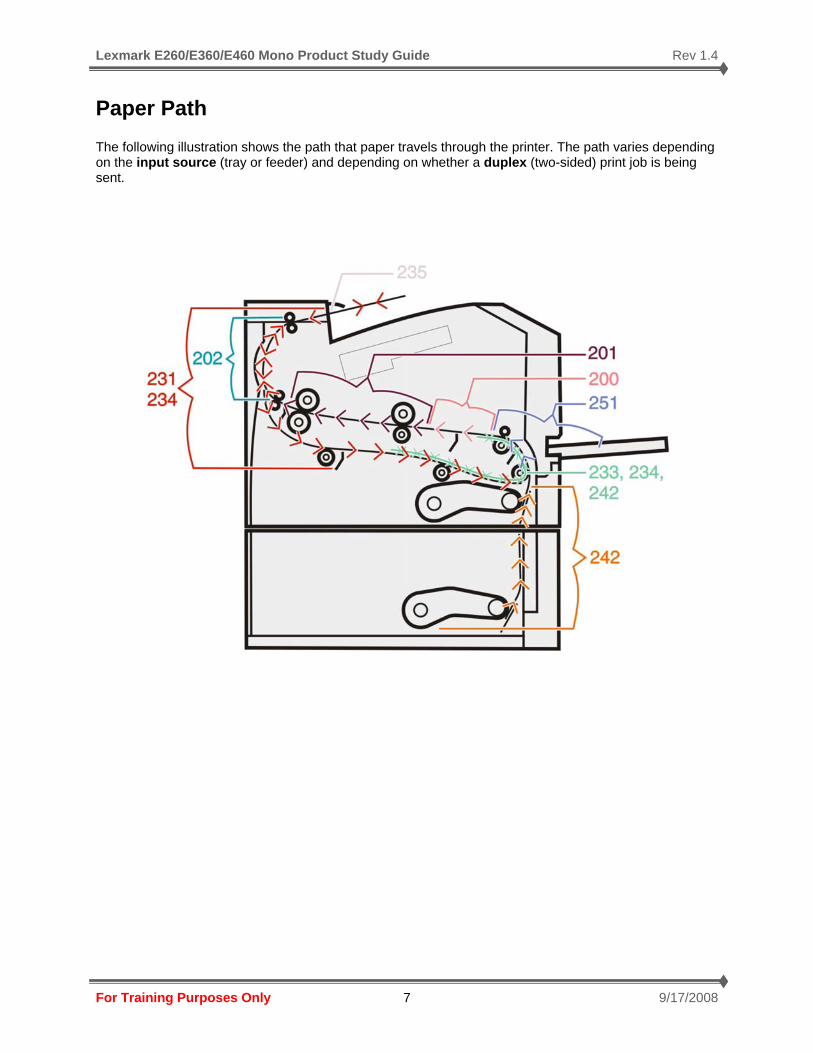
Paper Path The following illustration shows the path that paper travels through the printer. The path varies depending on the input source (tray or feeder) and depending on whether a duplex (two-sided) print job is being sent.
Lexmark E260/E360/E460 Mono Product Study Guide Rev 1.4
For Training Purposes Only 9/17/2008 8
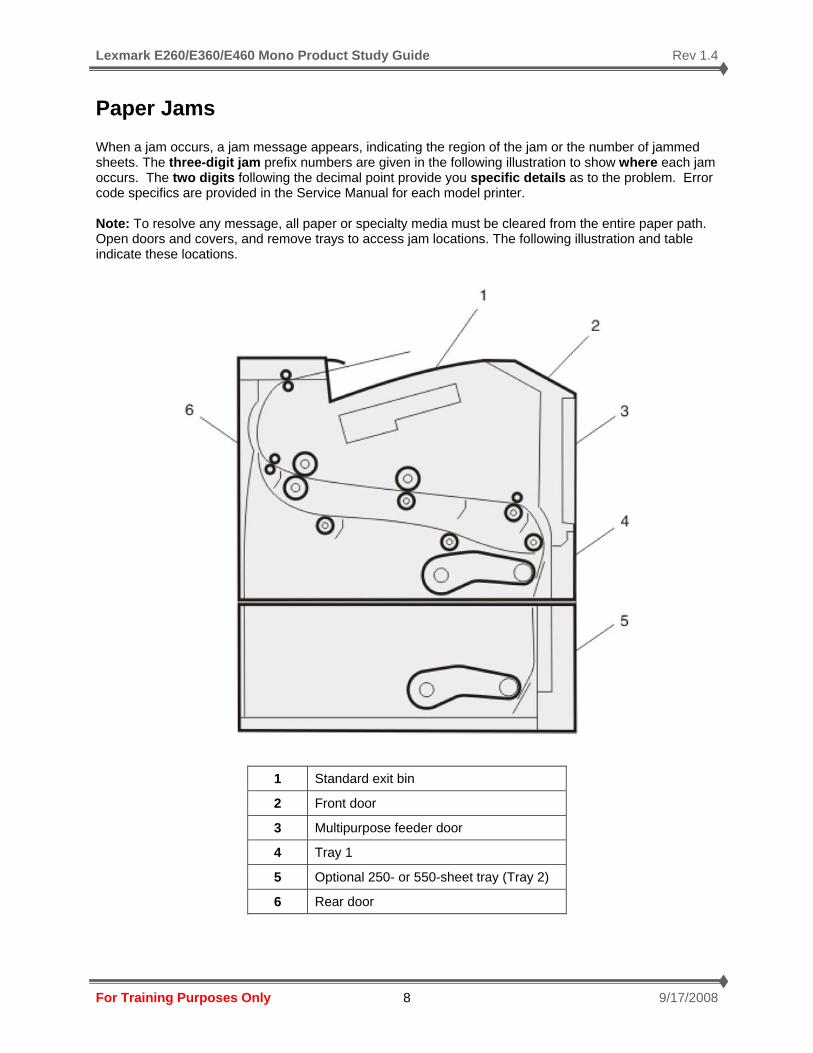
Paper Jams When a jam occurs, a jam message appears, indicating the region of the jam or the number of jammed sheets. The three-digit jam prefix numbers are given in the following illustration to show where each jam occurs. The two digits following the decimal point provide you specific details as to the problem. Error code specifics are provided in the Service Manual for each model printer. Note: To resolve any message, all paper or specialty media must be cleared from the entire paper path. Open doors and covers, and remove trays to access jam locations. The following illustration and table indicate these locations.
1 Standard exit bin
2 Front door
3 Multipurpose feeder door
4 Tray 1
5 Optional 250- or 550-sheet tray (Tray 2)
6 Rear door

Lexmark E260/E360/E460 Mono Product Study Guide Rev 1.4
For Training Purposes Only 9/17/2008 9
200 Paper Jam
1. Remove the tray from the printer.
2. Remove the jam if you see it here.
3. If you do not see it, open the front door, and then remove the photoconductor kit and toner cartridge unit.
Note: When the photoconductor kit and toner cartridge are together, they are called a unit.
4. Lift the flap in front of the printer, and remove any jammed sheets.
5. Align and insert the unit.
6. Close the front door.
7. Insert the tray.
8. Press

Lexmark E260/E360/E460 Mono Product Study Guide Rev 1.4
For Training Purposes Only 9/17/2008 10
201 Paper Jam
CAUTION—HOT SURFACE: The fuser and the inside of the printer near the fuser may be hot. To reduce the risk of injury from a hot component, allow the surface to cool before removing paper from this area.
1. Open the front door, and then remove the unit.
2. Lift the flap in front of the printer, and then remove any jammed sheets.
3. Align and insert the unit.
4. Close the front door.
5. Press

Lexmark E260/E360/E460 Mono Product Study Guide Rev 1.4
For Training Purposes Only 9/17/2008 11
202 Paper Jam
CAUTION—HOT SURFACE: The fuser and the inside of the printer near the fuser may be hot. To reduce the risk of injury from a hot component, allow the surface to cool before removing paper from this area.
1. Open the front door, and then remove the unit.
2. Lift the flap in front of the printer, and then remove any jammed sheets.
3. Open the rear door.
4. Remove the jam.
5. Close the rear door.
6. Close the front door.
7. Press

Lexmark E260/E360/E460 Mono Product Study Guide Rev 1.4
For Training Purposes Only 9/17/2008 12
231 Paper Jam
CAUTION—HOT SURFACE: The fuser and the inside of the printer near the fuser may be hot. To reduce the risk of injury from a hot component, allow the surface to cool before removing paper from this area.
1. Open the front door.
2. Open the rear door.
3. Remove the jam.
4. Close the rear door.
5. Close the front door.
6. Press
Note: If this does not clear the jam, complete the steps in “233 paper jam”

Lexmark E260/E360/E460 Mono Product Study Guide Rev 1.4
For Training Purposes Only 9/17/2008 13
233 Paper Jam
1. Remove the tray from the printer.
2. Locate the lever shown. Pull the lever down to release the jam.
3. Pull the jammed sheets from the duplex area.
4. Insert the tray.
5. Press
Note: If this does not clear the jam, complete the steps in “231 paper jam” 234 Paper Jam A single jam or multiple jams are in the duplex area of the printer when the printer is turned on. To locate and remove the jammed sheets, complete all the steps in:
• 231 paper jam
• 233 paper jam

Lexmark E260/E360/E460 Mono Product Study Guide Rev 1.4
For Training Purposes Only 9/17/2008 14
235 Paper Jam A duplex print job was sent to the printer using a size of paper not supported for duplex printing. A sheet is jammed in the standard exit bin.
1. To remove the jam, gently pull the jammed sheet out of the standard exit bin.
2. Press
242 Paper Jam
1. Remove the optional tray from the printer.
2. Remove the jam.
3. Insert the optional tray.
4. Press

Lexmark E260/E360/E460 Mono Product Study Guide Rev 1.4
For Training Purposes Only 9/17/2008 15
251 Paper Jam A sheet of paper or specialty media failed to feed completely from the multipurpose feeder. Part of it may be still visible. If it is visible, gently pull the jammed sheet from the front of the multipurpose feeder. If the sheet is not visible, complete the following steps:
1. Open the front door, and then remove the unit.
2. Lift the flap at the front of the printer, and then remove any jammed sheets of paper that are short lengths of paper.
3. Align and insert the unit.
4. Close the front door.
5. Press
Lexmark E260/E360/E460 Mono Product Study Guide Rev 1.4
For Training Purposes Only 9/17/2008 16
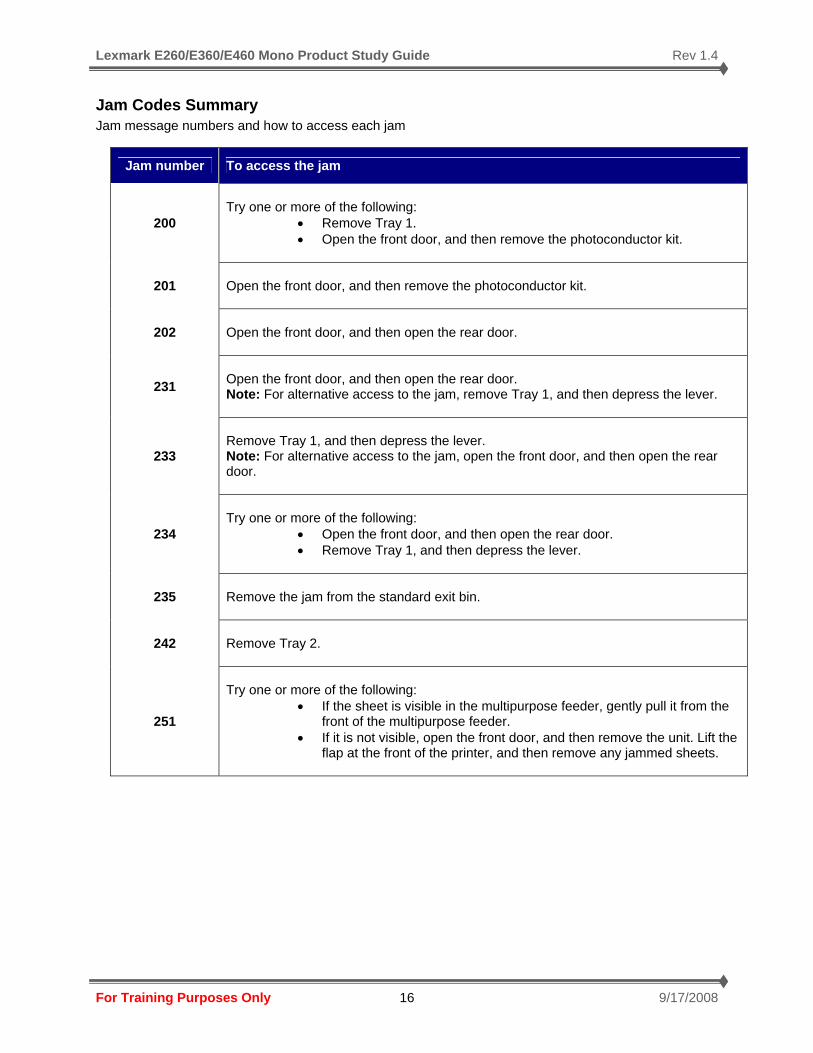
Jam Codes Summary Jam message numbers and how to access each jam
Jam number To access the jam
200
Try one or more of the following:
• Remove Tray 1. • Open the front door, and then remove the photoconductor kit.
201 Open the front door, and then remove the photoconductor kit.
202 Open the front door, and then open the rear door.
231 Open the front door, and then open the rear door. Note: For alternative access to the jam, remove Tray 1, and then depress the lever.
233
Remove Tray 1, and then depress the lever. Note: For alternative access to the jam, open the front door, and then open the rear door.
234
Try one or more of the following:
• Open the front door, and then open the rear door. • Remove Tray 1, and then depress the lever.
235 Remove the jam from the standard exit bin.
242 Remove Tray 2.
251
Try one or more of the following:
• If the sheet is visible in the multipurpose feeder, gently pull it from the front of the multipurpose feeder.
• If it is not visible, open the front door, and then remove the unit. Lift the flap at the front of the printer, and then remove any jammed sheets.

Lexmark E260/E360/E460 Mono Product Study Guide Rev 1.4
For Training Purposes Only 9/17/2008 17
E260d(n) Operator Panel
Panel Buttons The printer control panel features six lights and two buttons. The lights can be on, off, blinking, or blinking slowly.
Button or Control Panel Item Function
Continue Button
This functions as a button and as a light. • Make certain that the Ready Light is on. • Press the Continue button to print the menu settings and
network setup page(s). • Press and release the Continue button to resume
printing. Press and release the Continue button twice quickly (called “double click”) to display a secondary error code. Double-click again to see the tertiary code (if one exists, not all errors have a secondary and/or tertiary codes). Double-click a third time to return to the primary light pattern.
Stop Button
• Press and release the Stop/Cancel button to cancel the job currently printing.
• Press and hold the Stop/Cancel button until all of the lights flash to reset the printer.
Error Light
Paper Jam Light
Load Paper Light
Toner Light
Ready Light
Continue Button
Stop Button

Lexmark E260/E360/E460 Mono Product Study Guide Rev 1.4
For Training Purposes Only 9/17/2008 18
Light Patterns and Error Messages User attendance messages, paper jam errors, and service errors display a light pattern. This may be all the information that is needed. However, if the Continue button is double-clicked on the panel, a second pattern may appear with more detailed information. If the Continue button is double-clicked again, the first pattern usually returns. Not all initial level light patterns have additional patterns. In which case, when double-clicking, the pattern does not change.
Lexmark E260/E360/E460 Mono Product Study Guide Rev 1.4
For Training Purposes Only 9/17/2008 19
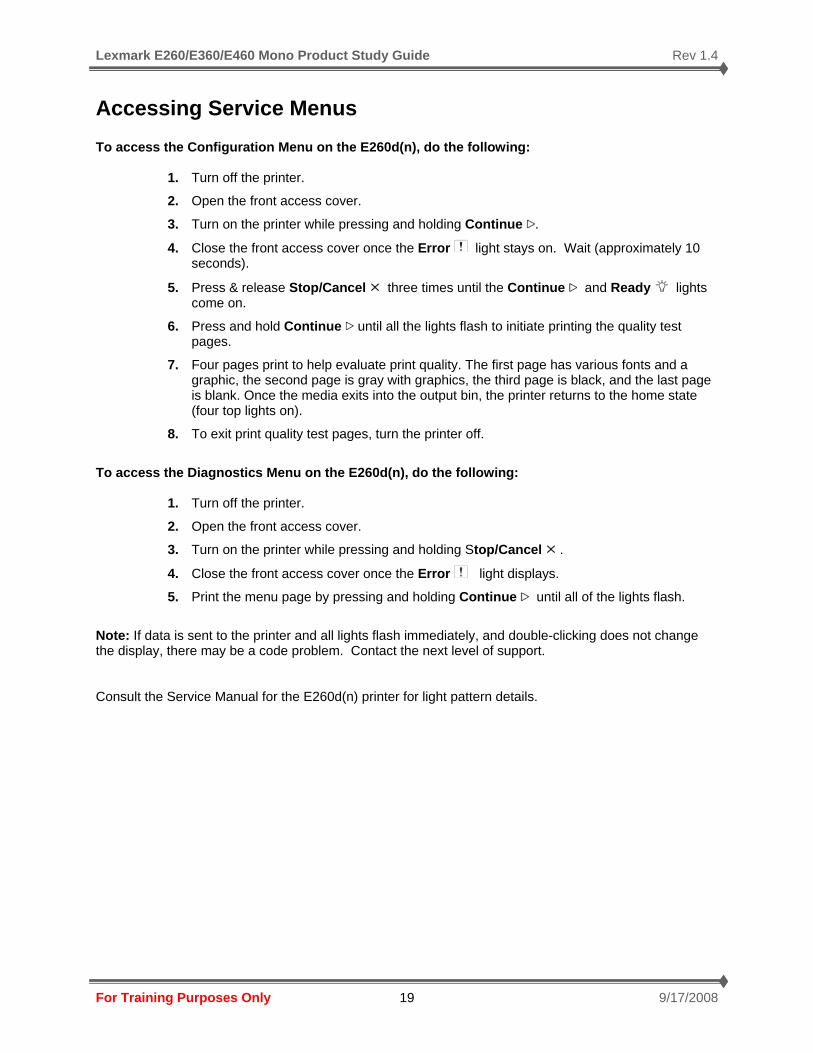
Accessing Service Menus To access the Configuration Menu on the E260d(n), do the following:
1. Turn off the printer.
2. Open the front access cover.
3. Turn on the printer while pressing and holding Continue .
4. Close the front access cover once the Error light stays on. Wait (approximately 10 seconds).
5. Press & release Stop/Cancel three times until the Continue and Ready lights come on.
6. Press and hold Continue until all the lights flash to initiate printing the quality test pages.
7. Four pages print to help evaluate print quality. The first page has various fonts and a graphic, the second page is gray with graphics, the third page is black, and the last page is blank. Once the media exits into the output bin, the printer returns to the home state (four top lights on).
8. To exit print quality test pages, turn the printer off.
To access the Diagnostics Menu on the E260d(n), do the following:
1. Turn off the printer.
2. Open the front access cover.
3. Turn on the printer while pressing and holding Stop/Cancel .
4. Close the front access cover once the Error light displays.
5. Print the menu page by pressing and holding Continue until all of the lights flash.
Note: If data is sent to the printer and all lights flash immediately, and double-clicking does not change the display, there may be a code problem. Contact the next level of support. Consult the Service Manual for the E260d(n) printer for light pattern details.

Lexmark E260/E360/E460 Mono Product Study Guide Rev 1.4
For Training Purposes Only 9/17/2008 20
E360d(n) Operator Panel
Panel Buttons The buttons of the operator panel are identified and their functions are provided in the illustration and table below.
Button or Control Panel Item Function
Menus Button
Press and release to open the menus. The menus are available only when the printer is in the Ready state.
Pressing also returns the operator panel to the top level menu screen if pressed while in a menu.
Back Button
Press and release to return to the previous screen.

Lexmark E260/E360/E460 Mono Product Study Guide Rev 1.4
For Training Purposes Only 9/17/2008 21
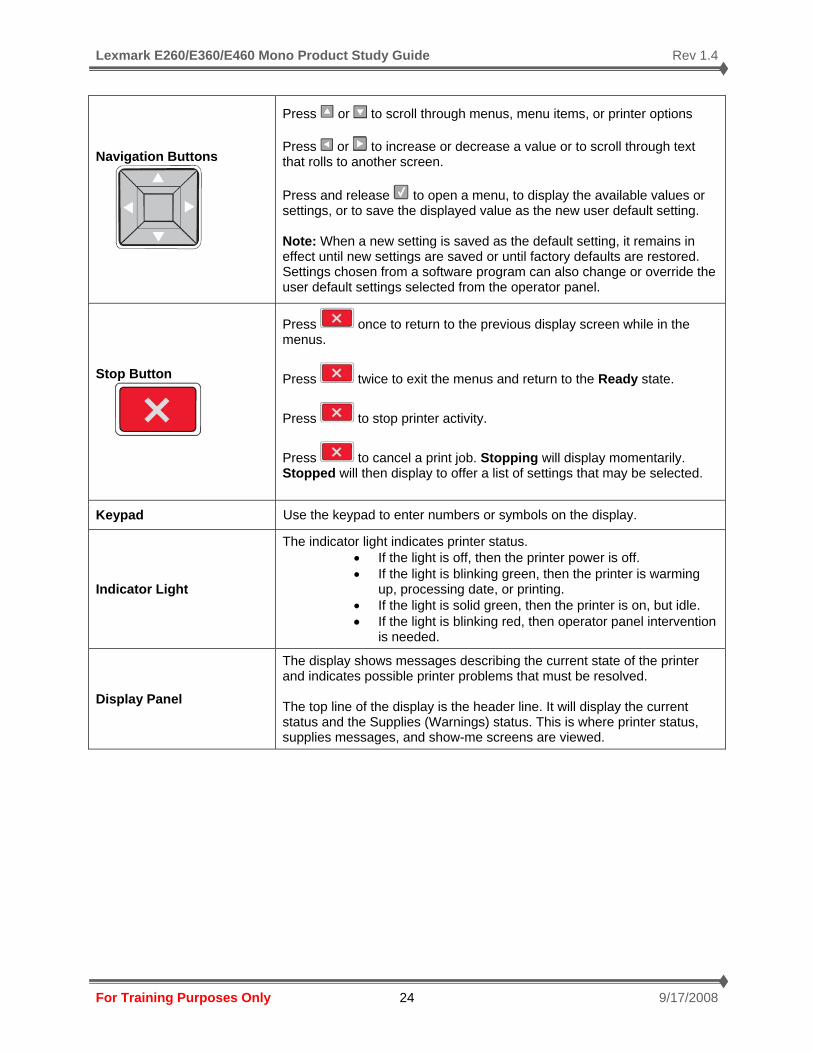
Navigation Buttons
Press and release or to scroll through menus, menu items, or printer options, or to move between screens and menu options. These buttons can also be used to automatically increase or decrease the desired number of copies. Press and release to open a menu, to display the available values or settings, or to save the displayed value as the new user default setting. Note: When a new setting is saved as the default setting, it remains in effect until new settings are saved or until factory defaults are restored. Settings chosen from a software program can also change or override the user default settings selected from the operator panel.
Stop Button
Press once to return to the previous display screen while in the menus.
Press twice to exit the menus and return to the Ready state.
Press to stop printer activity.
Press to cancel a print job. Stopping will display momentarily. Stopped will then display to offer a list of settings that may be selected.
Display
The display shows messages describing the current state of the printer and indicating possible printer problems that must be resolved. The top line of the display is the header line. It will display the current status and the Supplies (Warnings) status. This is where printer status, supplies messages, and show-me screens are viewed.
Indicator Light
The indicator light indicates printer status. • If the light is off, then the printer power is off. • If the light is blinking green, then the printer is warming
up, processing date, or printing. • If the light is solid green, then the printer is on, but idle. • If the light is blinking red, then operator panel intervention
is needed.
Lexmark E260/E360/E460 Mono Product Study Guide Rev 1.4
For Training Purposes Only 9/17/2008 22
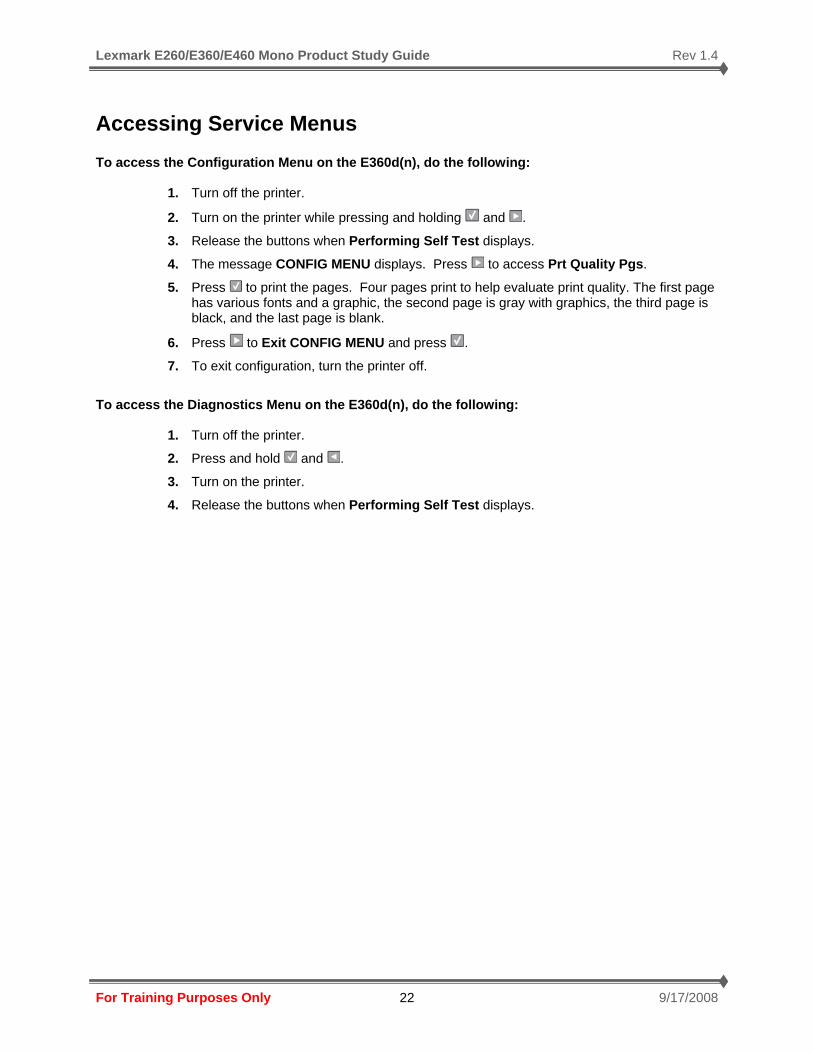
Accessing Service Menus To access the Configuration Menu on the E360d(n), do the following:
1. Turn off the printer.
2. Turn on the printer while pressing and holding and .
3. Release the buttons when Performing Self Test displays.
4. The message CONFIG MENU displays. Press to access Prt Quality Pgs.
5. Press to print the pages. Four pages print to help evaluate print quality. The first page has various fonts and a graphic, the second page is gray with graphics, the third page is black, and the last page is blank.
6. Press to Exit CONFIG MENU and press .
7. To exit configuration, turn the printer off.
To access the Diagnostics Menu on the E360d(n), do the following:
1. Turn off the printer.
2. Press and hold and .
3. Turn on the printer.
4. Release the buttons when Performing Self Test displays.

Lexmark E260/E360/E460 Mono Product Study Guide Rev 1.4
For Training Purposes Only 9/17/2008 23
E460d(n) Operator Panel
Panel Buttons The buttons of the operator panel are identified and their functions are provided in the illustration and table below.
Button or Control Panel Item Function
Menus Button
Press and release to open the menus. The menus are available only when the printer is in the Ready state.
Pressing also returns the operator panel to the top level menu screen if pressed while in a menu.
Back Button
Press and release to return to the previous screen.
Lexmark E260/E360/E460 Mono Product Study Guide Rev 1.4
For Training Purposes Only 9/17/2008 24
Navigation Buttons
Press or to scroll through menus, menu items, or printer options Press or to increase or decrease a value or to scroll through text that rolls to another screen. Press and release to open a menu, to display the available values or settings, or to save the displayed value as the new user default setting. Note: When a new setting is saved as the default setting, it remains in effect until new settings are saved or until factory defaults are restored. Settings chosen from a software program can also change or override the user default settings selected from the operator panel.
Stop Button
Press once to return to the previous display screen while in the menus.
Press twice to exit the menus and return to the Ready state.
Press to stop printer activity.
Press to cancel a print job. Stopping will display momentarily. Stopped will then display to offer a list of settings that may be selected.
Keypad Use the keypad to enter numbers or symbols on the display.
Indicator Light
The indicator light indicates printer status. • If the light is off, then the printer power is off. • If the light is blinking green, then the printer is warming
up, processing date, or printing. • If the light is solid green, then the printer is on, but idle. • If the light is blinking red, then operator panel intervention
is needed.
Display Panel
The display shows messages describing the current state of the printer and indicates possible printer problems that must be resolved. The top line of the display is the header line. It will display the current status and the Supplies (Warnings) status. This is where printer status, supplies messages, and show-me screens are viewed.
Lexmark E260/E360/E460 Mono Product Study Guide Rev 1.4
For Training Purposes Only 9/17/2008 25
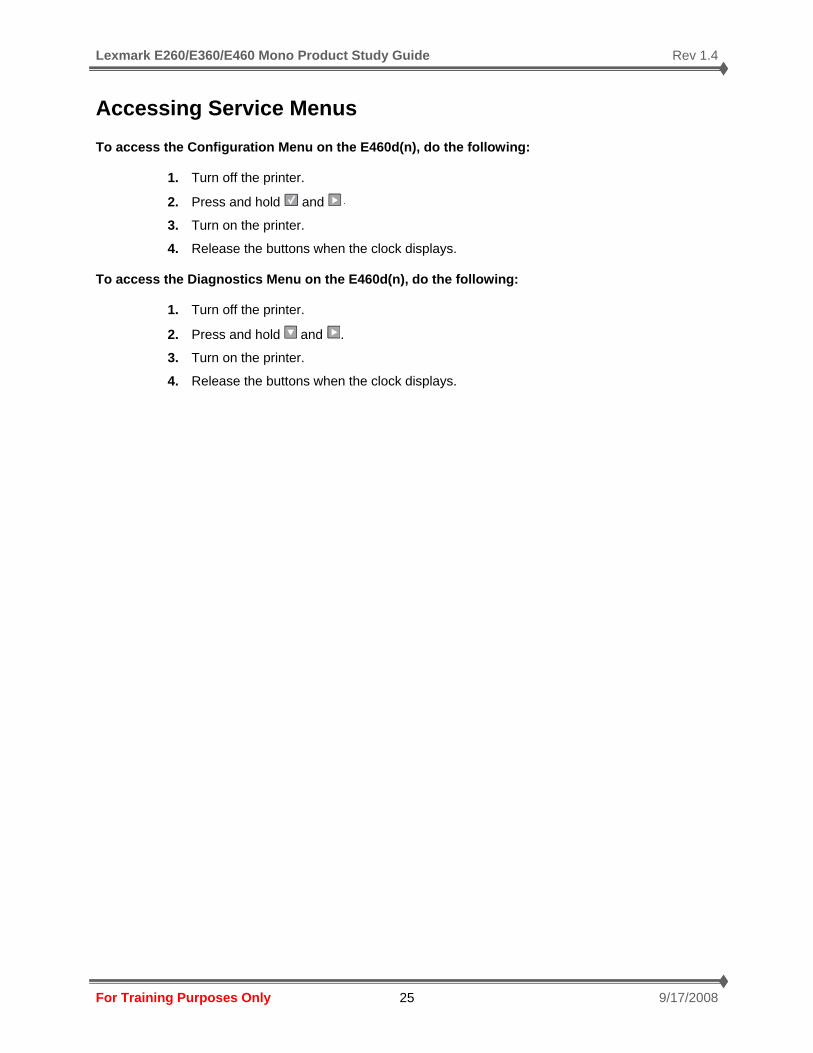
Accessing Service Menus To access the Configuration Menu on the E460d(n), do the following:
1. Turn off the printer.
2. Press and hold and
3. Turn on the printer.
4. Release the buttons when the clock displays. To access the Diagnostics Menu on the E460d(n), do the following:
1. Turn off the printer.
2. Press and hold and .
3. Turn on the printer.
4. Release the buttons when the clock displays.

Lexmark E260/E360/E460 Mono Product Study Guide Rev 1.4
For Training Purposes Only 9/17/2008 26
Customer Menus For a complete listing of the printer menu tree, consult the User’s Guide. E260/E360/E460 Customer Menu Tree

Lexmark E260/E360/E460 Mono Product Study Guide Rev 1.4
For Training Purposes Only 9/17/2008 27
Service Menu Items
Configuration Mode Menu Items All models unless otherwise specified Reset photoconductor maintenance counter (Reset PC Cnt) The reset photoconductor maintenance counter resets the photoconductor kit page counter and clears any warnings or photoconductor exhausted messages. This operation should only be performed after a new photoconductor unit has been installed. Print quality pages (Prt Quality Pgs) The print quality test pages can be printed from either the Diagnostics menu or Configuration Menu (CONFIGMENU). When printed from the Diagnostic mode, additional information is included, and the print cartridge lockout is bypassed. Additional configuration information may be included on the print quality pages which is not included on the print menu page. To print the Print Quality Test Pages, select Prt Quality Pgs from CONFIG MENU. The message Printing Quality Test Pages is displayed. The print quality test consists of four pages:
1. Page one contains device information, cartridge information, margin settings, minimum stroke width, and a mixture of graphics and text.
2. Page two is a gray page containing two graphics
3. Page three is black
4. Page four is blank. Note: If the duplex is turned on, the print quality pages are duplexed. The Print Quality Test pages are printed in English and must always be printed on letter, legal, or A4 paper.
Lexmark E260/E360/E460 Mono Product Study Guide Rev 1.4
For Training Purposes Only 9/17/2008 28
Reports The Reports menu contains two selections: 1) Menu Settings Page and 2) Event Log. Menu Settings Page The Menu Settings Page contains printer settings information.
For the E260d(n): Make certain that the Ready Light is on. Press the Continue button to print the menu settings and network setup page(s). Press and hold Cancel to reset the printer. For the E360d(n) and/or the E460d(n):
• Make sure the printer is on and Ready Light is on.
• From the printer control panel, press .
• Press the arrow buttons until Reports appears, and then press .
• Press the arrow buttons until Menu Settings Page appears, and then press .
• After the menu settings page prints, Ready appears.
Event Log [available on the E360d(n) & E460d(n)] The event log provides a history of printer errors. The event log can only be printed in the Configuration menu. Additional options are available in the Diagnostics menu. To print the event log:
1. Select Print Event Log from the Event Log menu.
2. Press to return to the Configuration menu. Note: An event log printed from the CONFIG MENU will not contain debug information or secondary codes for 900 service errors; however, the event log printed from DIAGNOSTICS mode does. Panel Menus [available on the E360d(n) & E460d(n)] The settings are On and Off. The default is ON.
Lexmark E260/E360/E460 Mono Product Study Guide Rev 1.4
For Training Purposes Only 9/17/2008 29
PPDS Emulation [on the E360d(n) & E460d(n)] This menu item activates or deactivates PPDS emulation data stream. The selections are Deactivate (default) and Activate. When PPDS emulation is activated, the following settings are also changed:
• SmartSwitch settings for each port are turned off.
• The printer language is changed to PPDS Emulation. Users can still switch languages on the operator panel and through the PJL data stream. PPDS Emulation [on the E260d(n)] PPDS emulators will use the device’s default resolution. Demo Mode This setting contains a built-in demonstration mode. The settings allow you to turn the Demo Mode Off (default) or On. While Demo Mode is set, the printer will start in Demo Mode until you change the setting. Note: While Demo Mode is set to On, only demonstration files can print. Files received across the network or from the host computer are ignored. Factory Defaults [on the E360d(n) & E460d(n)] This setting enables a user to restore all the printer settings to the original factory settings. The selections are: Do not restore (default) and Restore now. Network does not appear unless you have a network printer. The following settings are not changed:
• Display language
• Settings in the NETWORK/PORTS MENU group.
Factory Defaults [on the E260d(n)] Returns the printer settings to factory default values. Sometimes resetting the printer to the original settings solves formatting problems. All menu items are reset to the factory default values except:
• All settings in the Parallel menu, Network menu, and USB menu.
• Resources in flash memory.
Use Caution since all downloaded resources (fonts, macros, and symbol sets) in printer memory (RAM) are deleted.

Lexmark E260/E360/E460 Mono Product Study Guide Rev 1.4
For Training Purposes Only 9/17/2008 30
Energy Conserve This menu controls what values appear on the Power Saver menu. If Off is selected in the Energy Conserve menu, then the Power Saver can be turned off (in the case of the E260d(n), Power Saver will be off). If On (default) is set in Energy Conserve, the Power Saver feature cannot be turned off. Font Sharpening [available on the E360d(n) & E460d(n)] This menu allows a user to set a text point-size value below which the high frequency screens will be used when printing font data. For example, if this setting’s value is “24,” then all fonts sized 24 points or less will use the high frequency screens. To increase this setting’s value by 1, press . To decrease this setting’s value by 1, press . Exit Configuration Menu (Exit Config Menu) [available on the E360d(n) & E460d(n)] Press to exit the Configuration menu. The printer performs a POR and restarts in normal mode.
Lexmark E260/E360/E460 Mono Product Study Guide Rev 1.4
For Training Purposes Only 9/17/2008 31
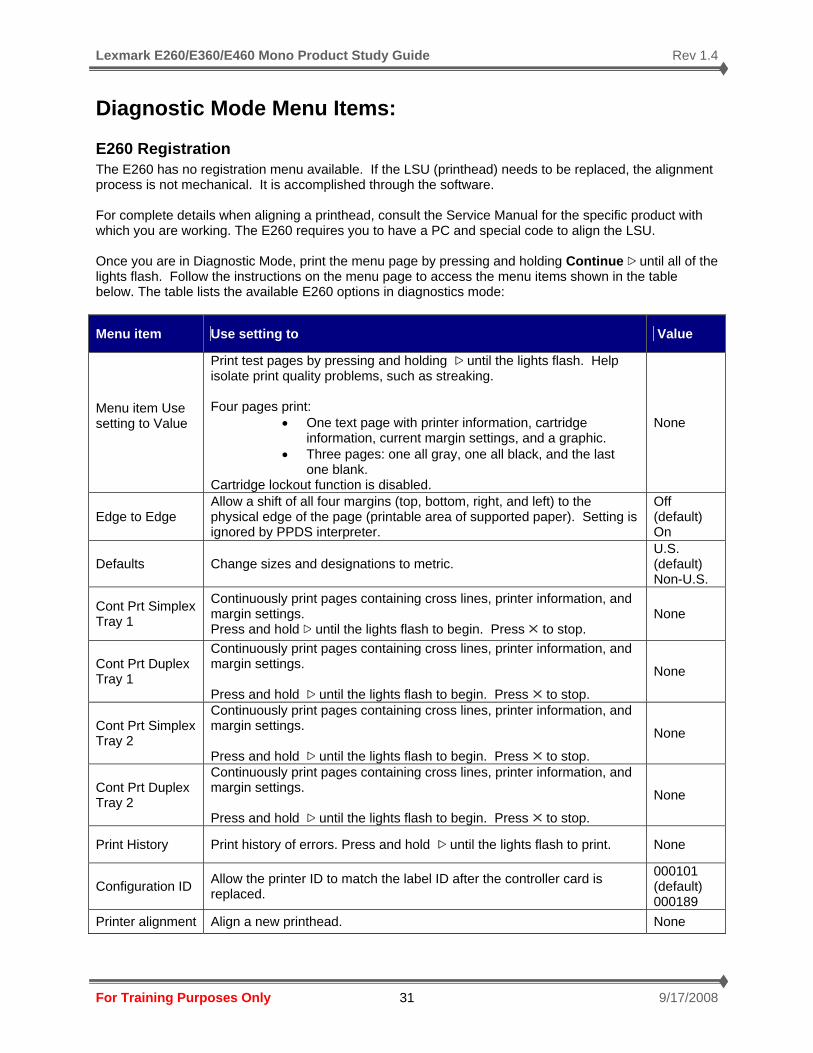
Diagnostic Mode Menu Items: E260 Registration The E260 has no registration menu available. If the LSU (printhead) needs to be replaced, the alignment process is not mechanical. It is accomplished through the software.
For complete details when aligning a printhead, consult the Service Manual for the specific product with which you are working. The E260 requires you to have a PC and special code to align the LSU.
Once you are in Diagnostic Mode, print the menu page by pressing and holding Continue until all of the lights flash. Follow the instructions on the menu page to access the menu items shown in the table below. The table lists the available E260 options in diagnostics mode:
Menu item Use setting to Value
Menu item Use setting to Value
Print test pages by pressing and holding until the lights flash. Help isolate print quality problems, such as streaking. Four pages print:
• One text page with printer information, cartridge information, current margin settings, and a graphic.
• Three pages: one all gray, one all black, and the last one blank.
Cartridge lockout function is disabled.
None
Edge to Edge Allow a shift of all four margins (top, bottom, right, and left) to the physical edge of the page (printable area of supported paper). Setting is ignored by PPDS interpreter.
Off (default) On
Defaults Change sizes and designations to metric. U.S. (default) Non-U.S.
Cont Prt Simplex Tray 1
Continuously print pages containing cross lines, printer information, and margin settings. Press and hold until the lights flash to begin. Press to stop.
None
Cont Prt Duplex Tray 1
Continuously print pages containing cross lines, printer information, and margin settings. Press and hold until the lights flash to begin. Press to stop.
None
Cont Prt Simplex Tray 2
Continuously print pages containing cross lines, printer information, and margin settings. Press and hold until the lights flash to begin. Press to stop.
None
Cont Prt Duplex Tray 2
Continuously print pages containing cross lines, printer information, and margin settings. Press and hold until the lights flash to begin. Press to stop.
None
Print History Print history of errors. Press and hold until the lights flash to print. None
Configuration ID Allow the printer ID to match the label ID after the controller card is replaced.
000101 (default) 000189
Printer alignment Align a new printhead. None
Lexmark E260/E360/E460 Mono Product Study Guide Rev 1.4
For Training Purposes Only 9/17/2008 32
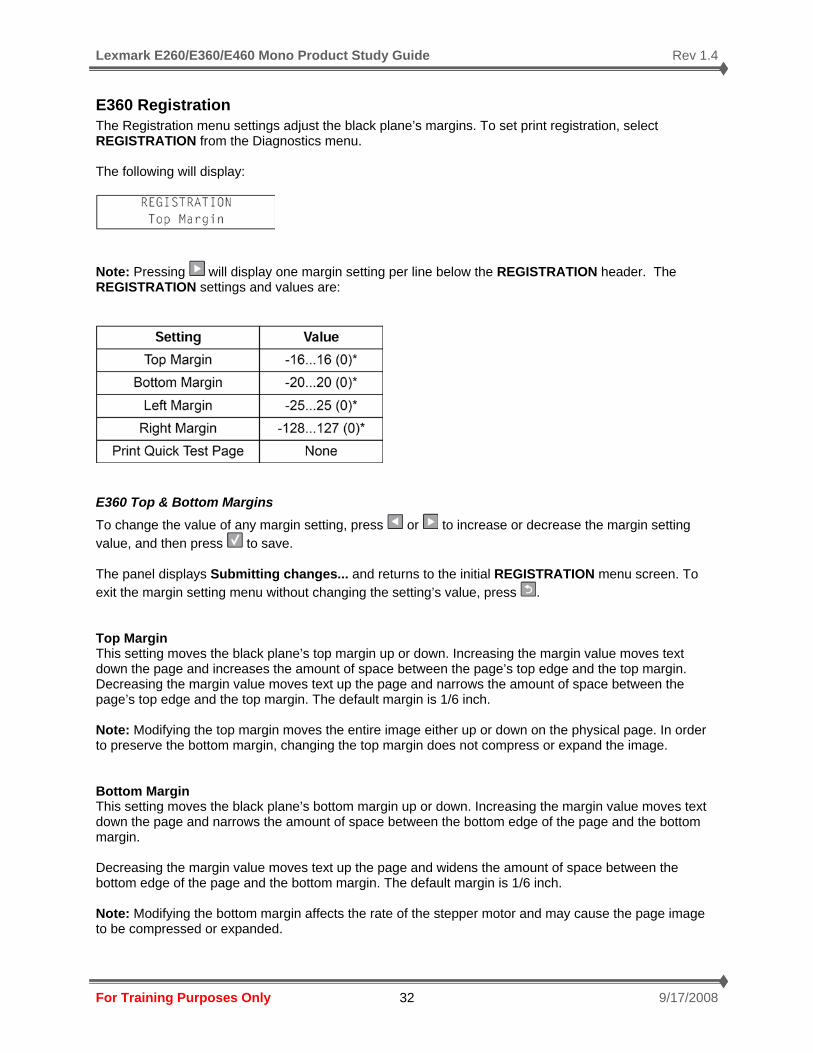
E360 Registration The Registration menu settings adjust the black plane’s margins. To set print registration, select REGISTRATION from the Diagnostics menu. The following will display:
Note: Pressing will display one margin setting per line below the REGISTRATION header. The REGISTRATION settings and values are:
E360 Top & Bottom Margins To change the value of any margin setting, press or to increase or decrease the margin setting value, and then press to save. The panel displays Submitting changes... and returns to the initial REGISTRATION menu screen. To exit the margin setting menu without changing the setting’s value, press . Top Margin This setting moves the black plane’s top margin up or down. Increasing the margin value moves text down the page and increases the amount of space between the page’s top edge and the top margin. Decreasing the margin value moves text up the page and narrows the amount of space between the page’s top edge and the top margin. The default margin is 1/6 inch. Note: Modifying the top margin moves the entire image either up or down on the physical page. In order to preserve the bottom margin, changing the top margin does not compress or expand the image. Bottom Margin This setting moves the black plane’s bottom margin up or down. Increasing the margin value moves text down the page and narrows the amount of space between the bottom edge of the page and the bottom margin. Decreasing the margin value moves text up the page and widens the amount of space between the bottom edge of the page and the bottom margin. The default margin is 1/6 inch. Note: Modifying the bottom margin affects the rate of the stepper motor and may cause the page image to be compressed or expanded.
Lexmark E260/E360/E460 Mono Product Study Guide Rev 1.4
For Training Purposes Only 9/17/2008 33
E360 Left Margin and Right Margin These settings move the position of the black plane’s margin right or left. Increasing the margin value moves the margin to the right. Decreasing the margin value moves the margin to the left. The default margin is 1/4 inch. Note: Modifying the left and right margins move the entire image left or right on the physical page. In order to preserve the right margin, changing the left margin does not compress or expand the image. E360 Quick Test page Print a Quick Test page to verify that the REGISTRATION margin values are set appropriately. The Quick Test page consists of the following:
• Alignment diamonds
• Horizontal lines used for skew adjustment
• General device information (current page count, installed memory, etc.)
• The printer’s serial number, code levels, and print registration settings
While the Quick Test page prints, Printing... will display. No buttons are active while the Quick Test page prints. When the Quick Test page is finished printing, the display returns to the initial REGISTRATION menu screen. Note: Print the Quick Test page on Letter- or A4-sized media.
Lexmark E260/E360/E460 Mono Product Study Guide Rev 1.4
For Training Purposes Only 9/17/2008 34
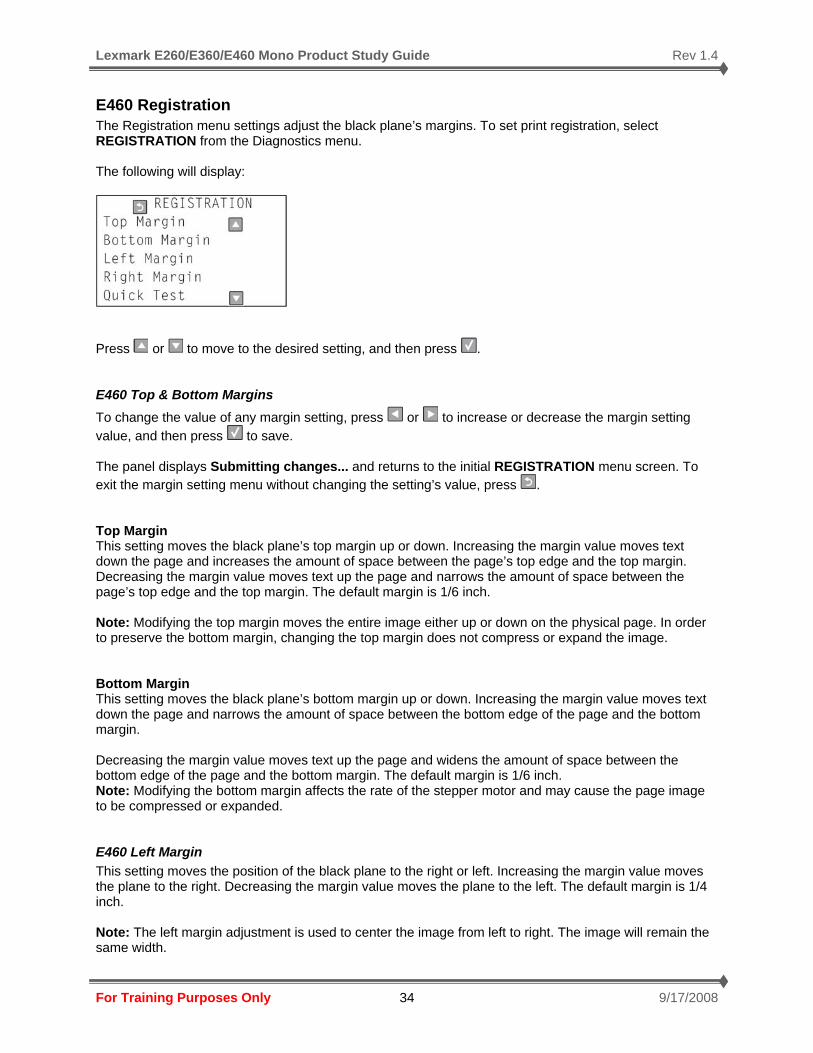
E460 Registration The Registration menu settings adjust the black plane’s margins. To set print registration, select REGISTRATION from the Diagnostics menu. The following will display:
Press or to move to the desired setting, and then press . E460 Top & Bottom Margins To change the value of any margin setting, press or to increase or decrease the margin setting value, and then press to save. The panel displays Submitting changes... and returns to the initial REGISTRATION menu screen. To exit the margin setting menu without changing the setting’s value, press . Top Margin This setting moves the black plane’s top margin up or down. Increasing the margin value moves text down the page and increases the amount of space between the page’s top edge and the top margin. Decreasing the margin value moves text up the page and narrows the amount of space between the page’s top edge and the top margin. The default margin is 1/6 inch. Note: Modifying the top margin moves the entire image either up or down on the physical page. In order to preserve the bottom margin, changing the top margin does not compress or expand the image. Bottom Margin This setting moves the black plane’s bottom margin up or down. Increasing the margin value moves text down the page and narrows the amount of space between the bottom edge of the page and the bottom margin. Decreasing the margin value moves text up the page and widens the amount of space between the bottom edge of the page and the bottom margin. The default margin is 1/6 inch. Note: Modifying the bottom margin affects the rate of the stepper motor and may cause the page image to be compressed or expanded. E460 Left Margin This setting moves the position of the black plane to the right or left. Increasing the margin value moves the plane to the right. Decreasing the margin value moves the plane to the left. The default margin is 1/4 inch. Note: The left margin adjustment is used to center the image from left to right. The image will remain the same width.

Lexmark E260/E360/E460 Mono Product Study Guide Rev 1.4
For Training Purposes Only 9/17/2008 35
E460 Right Margin This setting is used to adjust the printhead, but only after determining that it is out of adjustment by observing the Quick Test Page. Note: The right margin setting is not a margin adjustment and should not be used unless a new printhead is installed. E340 Quick Test page Print a Quick Test page to verify that the REGISTRATION margin values are set appropriately. The Quick Test page consists of the following:
• Alignment diamonds
• Horizontal lines used for skew adjustment
• General device information (current page count, installed memory, etc.)
• The printer’s serial number, code levels, and print registration settings
While the Quick Test page prints, Printing... will display. No buttons are active while the Quick Test page prints. When the Quick Test page is finished printing, the display returns to the initial REGISTRATION menu screen. Note: Print the Quick Test page on Letter- or A4-sized media. Print Tests E360 & E460 This setting tests the printer’s ability to generate printed output from each of its installed input sources and to test the printer’s current print quality. PRINT TESTS contains the following installed input sources:
• Tray1 (& Tray 2 on an E460d/E460dn)
• Manual Feeder
• MP Feeder Press or to scroll through the PRINT TESTS menu, and then press to select the desired input source. Single or Continuous is displayed on the screen.
• A Single test feeds one sheet of media from the selected input and prints a test page on it. No buttons are active during the Single test.
• The Continuous test feeds media from the selected input and prints test pages until is pressed.
The printer always generates a simplexed version of the Print Test page in its default resolution. While the Single or Continuous tests print, Printing... will display. After the Single test prints or the Continuous test is canceled, the display returns to the PRINT TESTS menu screen. Note: The type of media installed in the selected input source will affect the contents of the page.

Lexmark E260/E360/E460 Mono Product Study Guide Rev 1.4
For Training Purposes Only 9/17/2008 36
Print Quality Pages (Prt Quality Pgs) This setting reports the values of a broad range of printer settings and tests the printer’s ability to generate acceptable printed output. Press to print the report. Printing Quality Test Pages will display. Once started, the printing cannot be canceled and no buttons are active until the printing completes. The print quality pages consist of four pages.
• Page one contains a mixture of graphics and text.
• Page two is gray with two one inch black squares located on the bottom right.
• Page three is solid black page
• Page four is blank.
If the printer is capable of printing in duplex and duplex is turned on, the pages are duplexed. The Print Quality Test pages are printed in English and must always be printed on letter, legal, or A4 paper.
EP Setup EP Setup displays the following selections:
• EP Defaults
• Fuser Temperature (Fuser Temp)
• Transfer
• Print Contrast
• Charge Roll
• Gap Adjust
• Automatic Darkness Adjustment (Auto Dark Adj)
Lexmark E260/E360/E460 Mono Product Study Guide Rev 1.4
For Training Purposes Only 9/17/2008 37
EP Defaults Restores all EP settings to factory default values. Selections are Restore and Do Not Restore. Fuser Temperature (Fuser Temp) Changing this setting can reduce media curl or melting of some letterhead images. Selections are Normal (default), Lower, and Lowest. Transfer The transfer can be adjusted to Low, Medium, or High. The default setting is Medium. Print Contrast The print contrast can be adjusted to Low, Medium, or High. The default setting is Medium. Charge Roll The charge roll can be adjusted to Low, Medium, or High. The default setting is Medium. Gap Adjust Adjusts the minimum gap between sheets during printing. This setting reduces speed (pages per minute), but can be used to reduce curl of printed media and improve stacking in the output bin. The range is 0 (default) to 255. Adjusting by one results in 9 mm of increased gap. Automatic Darkness Adjustment (Auto Dark Adj) This setting attempts to optimize the amount of toner used when printing with a specific operating point. Each time this setting executes, the printer performs the following:
• Calibrates its toner density sensor
• Measures the reflectivity of its bare drum
• Prints patches on the drum and measures the drum’s reflectivity through the patches
• Cleans the transfer roll
• Calculates reflectivity ratios and operating points in order to attain each operating point’s darkness target
• Modifies the EP mechanism as necessary to adjust toner darkness.
No messages are displayed on the operator panel to give any indication that this test is running. When deactivated, the printer disables.
Lexmark E260/E360/E460 Mono Product Study Guide Rev 1.4
For Training Purposes Only 9/17/2008 38
Print Quality Diagnostic Tips
General Terminology Before diagnosing print quality problems, take a moment to understand the concepts below. This will prevent confusion when diagnosing or escalating a problem.
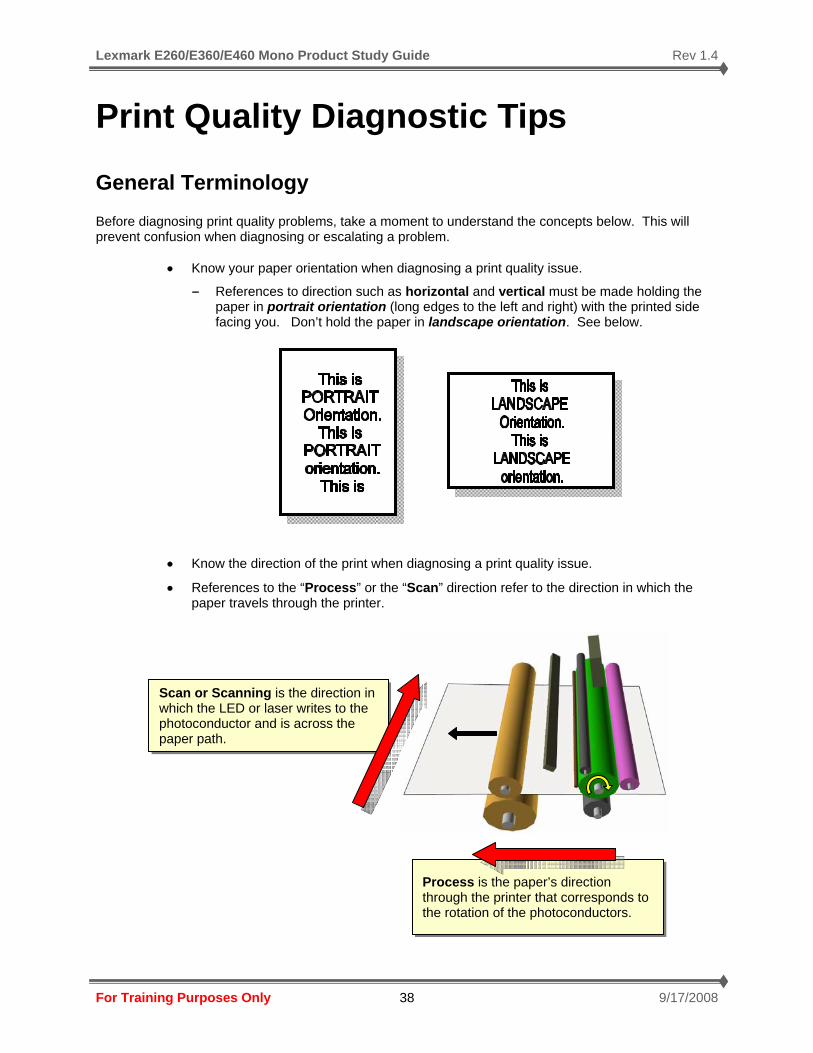
• Know your paper orientation when diagnosing a print quality issue.
- References to direction such as horizontal and vertical must be made holding the paper in portrait orientation (long edges to the left and right) with the printed side facing you. Don’t hold the paper in landscape orientation. See below.
• Know the direction of the print when diagnosing a print quality issue.
• References to the “Process” or the “Scan” direction refer to the direction in which the paper travels through the printer.
Process is the paper’s direction through the printer that corresponds to the rotation of the photoconductors.
Scan or Scanning is the direction in which the LED or laser writes to the photoconductor and is across the paper path.
Lexmark E260/E360/E460 Mono Product Study Guide Rev 1.4
For Training Purposes Only 9/17/2008 39
Print Quality Rules of Thumb If you encounter print quality problems, follow the tips below. Following these simple rules may solve the problem easily and quickly.
• Always run a new Settings/Configuration page showing the:
- Page Count – Is it time for a maintenance kit?
- Supply Life – are any of the supplies low or exhausted?
- Firmware/Code Levels – Are the code levels old/obsolete?
- Media Settings – does the printer media settings match what’s in the Trays?
• Always check the Media Type and Size used.
- Is the media used within the printer’s manufacturing specification?
- Are the printer and/or Driver set correctly for the paper type/size?
• Always print the printer’s Diagnostic Test pages.
- How does the print vary from what is expected?
• Try reseating the supplies.
- Check for damage as you reseat them.
• For tricky problems, think about the EP Process Steps. Eliminate the components/areas that couldn’t cause the problem until you are finally left with what could.
Lexmark E260/E360/E460 Mono Product Study Guide Rev 1.4
For Training Purposes Only 9/17/2008 40
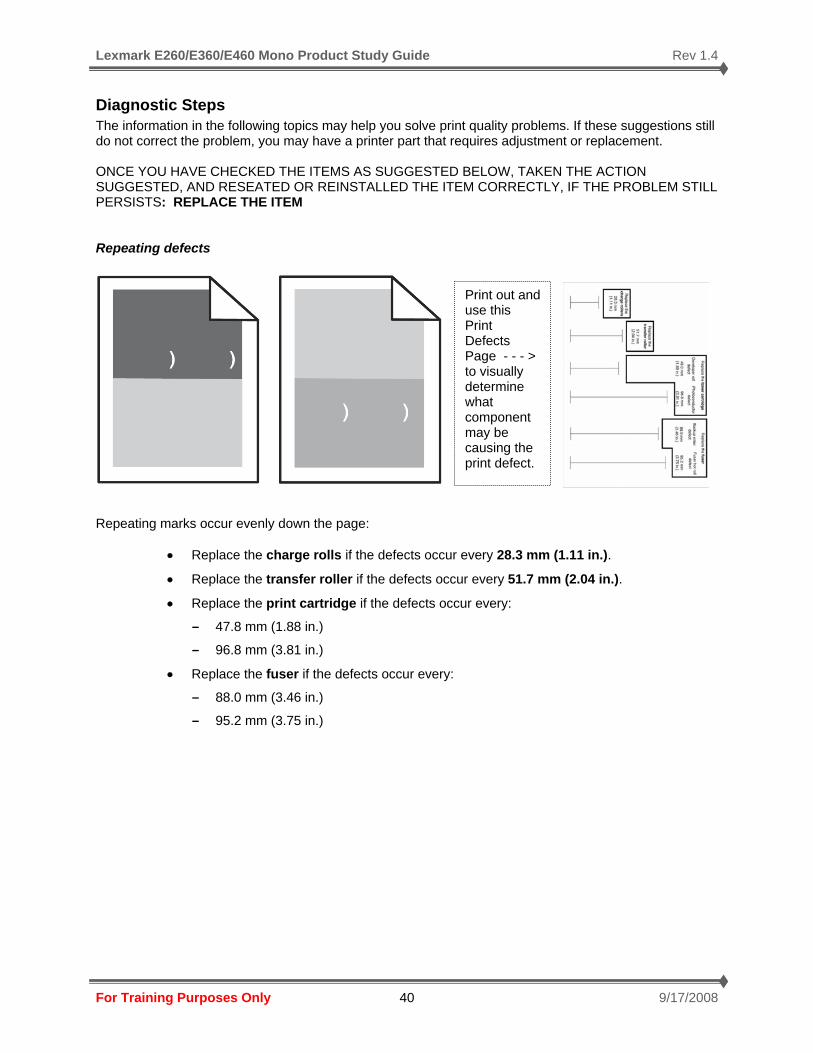
Diagnostic Steps The information in the following topics may help you solve print quality problems. If these suggestions still do not correct the problem, you may have a printer part that requires adjustment or replacement. ONCE YOU HAVE CHECKED THE ITEMS AS SUGGESTED BELOW, TAKEN THE ACTION SUGGESTED, AND RESEATED OR REINSTALLED THE ITEM CORRECTLY, IF THE PROBLEM STILL PERSISTS: REPLACE THE ITEM Repeating defects
Repeating marks occur evenly down the page:
• Replace the charge rolls if the defects occur every 28.3 mm (1.11 in.).
• Replace the transfer roller if the defects occur every 51.7 mm (2.04 in.).
• Replace the print cartridge if the defects occur every:
- 47.8 mm (1.88 in.)
- 96.8 mm (3.81 in.)
• Replace the fuser if the defects occur every:
- 88.0 mm (3.46 in.)
- 95.2 mm (3.75 in.)
Print out and use this Print Defects Page - - - > to visually determine what component may be causing the print defect.

Lexmark E260/E360/E460 Mono Product Study Guide Rev 1.4
For Training Purposes Only 9/17/2008 41
Solid Black
• Check the charge roll assembly to be certain that it is installed correctly.
- If the component seems to be installed correctly, replace the charge roll assembly.
• Check the toner cartridge to be certain that it is installed correctly.
- Inspect, clean and reinstall the print cartridge.
- If the problem persists, replace the print cartridge.
• Check the HVPS card assembly for proper connections
- Reseat the connections properly.
- If the component seems to be connected correctly, replace the HVPS card.
• Check the system card for proper connections
- Reseat the connections properly.
- If the component seems to be connected correctly, replace the system card.
Before starting, check the media route (paper path) for foreign objects, such as staples, clips, paper scraps, etc in the media path.
Lexmark E260/E360/E460 Mono Product Study Guide Rev 1.4
For Training Purposes Only 9/17/2008 42
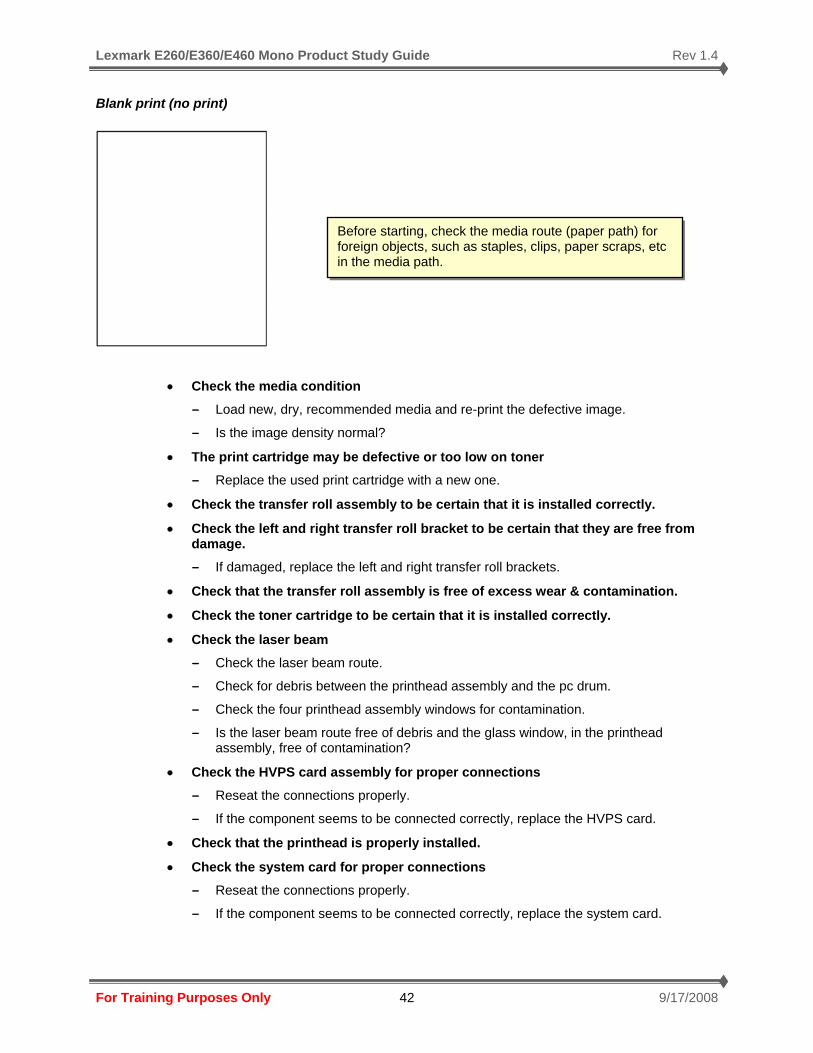
Blank print (no print)
• Check the media condition
- Load new, dry, recommended media and re-print the defective image.
- Is the image density normal?
• The print cartridge may be defective or too low on toner
- Replace the used print cartridge with a new one.
• Check the transfer roll assembly to be certain that it is installed correctly.
• Check the left and right transfer roll bracket to be certain that they are free from damage.
- If damaged, replace the left and right transfer roll brackets.
• Check that the transfer roll assembly is free of excess wear & contamination.
• Check the toner cartridge to be certain that it is installed correctly.
• Check the laser beam
- Check the laser beam route.
- Check for debris between the printhead assembly and the pc drum.
- Check the four printhead assembly windows for contamination.
- Is the laser beam route free of debris and the glass window, in the printhead assembly, free of contamination?
• Check the HVPS card assembly for proper connections
- Reseat the connections properly.
- If the component seems to be connected correctly, replace the HVPS card.
• Check that the printhead is properly installed.
• Check the system card for proper connections
- Reseat the connections properly.
- If the component seems to be connected correctly, replace the system card.
Before starting, check the media route (paper path) for foreign objects, such as staples, clips, paper scraps, etc in the media path.

Lexmark E260/E360/E460 Mono Product Study Guide Rev 1.4
For Training Purposes Only 9/17/2008 43
Spots
CAUTION: Allow the fuser unit assembly to cool down.
• Check the media condition
- Load new, dry, recommended media and re-print the defective image.
• Check the media transfer route (paper path)
- Make certain it is free of debris or contamination.
• Check the print cartridge for spots or other damage on the drum surface.
- Make certain that it is free of excess wear or contamination.
• Check that the transfer roll assembly is free of excess wear & contamination.
• Check the heat roll and pressure roll
- Remove the fuser unit assembly.
- Is there contamination or cracks on the heat roll and/or
- Pressure roll? If so, replace the fuser unit assembly.
• Check the printhead for proper installation
- Reseat the connections properly.
- If the component seems to be installed and adjusted correctly, replace the printhead assembly.
• If problem still persists; replace the system card

Lexmark E260/E360/E460 Mono Product Study Guide Rev 1.4
For Training Purposes Only 9/17/2008 44
Solid black or white streaks
• Make sure the fill pattern is correct
- If the fill pattern is incorrect, then choose a different fill pattern from your software program or application.
• Check the paper type
- Try a different type of paper.
- Use only transparencies recommended by the printer manufacturer.
- Make sure the paper type and paper texture settings match the paper loaded in the tray or feeder.
• Check the toner level. The toner may be low.
Tip: a toner cartridge that has been used in the machine long enough to be nearing the end of life, may be gently shaken from side to side in order to level out any unevenness in the toner reservoir that may have developed because of certain usage patterns or applications. As an interim measure, this may allow the cartridge to be used a little longer.
• The print cartridge may be defective or too low on toner
- Replace the used print cartridge with a new one.

Lexmark E260/E360/E460 Mono Product Study Guide Rev 1.4
For Training Purposes Only 9/17/2008 45
Vertical Stripes (process direction)
CAUTION: Allow the fuser unit assembly to cool down.
• Check the media condition
- Load new, dry, recommended media and re-print the defective image.
• Check the media transfer route (paper path)
- Make certain it is free of debris or contamination.
• Check that the transfer roll assembly is free of excess wear & contamination.
• Check the print cartridge for spots or other damage on the drum surface.
- Make certain that it is free of excess wear or contamination.
• Check the heat roll and pressure roll
- Remove the fuser unit assembly.
- Is there contamination or cracks on the heat roll and/or pressure roll? If so, replace the fuser unit assembly.
• If problem still persists; replace the system card

Lexmark E260/E360/E460 Mono Product Study Guide Rev 1.4
For Training Purposes Only 9/17/2008 46
Horizontal stripes (side to side direction)
CAUTION: Allow the fuser unit assembly to cool down.
• Check the media condition
- Load new, dry, recommended media and re-print the defective image.
• Check the media transfer route (paper path)
- Make certain it is free of debris or contamination.
• Check the print cartridge for spots or other damage on the drum surface.
- Make certain that it is free of excess wear or contamination.
• Check that the transfer roll assembly is free of excess wear & contamination.
• Check the heat roll and pressure roll
- Remove the fuser unit assembly.
- Is there contamination or cracks on the heat roll and/or pressure roll? If so, replace the fuser unit assembly.
• Check the HVPS card assembly for proper connections
- Reseat the connections properly.
- If the component seems to be connected correctly, replace the HVPS card.
• If problem still persists; replace the system card

Lexmark E260/E360/E460 Mono Product Study Guide Rev 1.4
For Training Purposes Only 9/17/2008 47
Vertical void lines and bands (process direction)
• Check the media condition
- Load new, dry, recommended media and re-print the defective image.
• Check the media transfer route (paper path)
- Make certain it is free of debris or contamination.
• Check the laser beam
- Check the laser beam route.
- Check for debris between the printhead assembly and the pc drum.
- Check the four printhead assembly windows for contamination.
- Is the laser beam route free of debris and the glass window, in the printhead assembly, free of contamination?
• Check the toner cartridge to be certain that it is installed correctly.
- Inspect, clean and reinstall or replace print cartridge.
• Check that the transfer roll assembly is free of excess wear & contamination.
• Check the printhead assembly for proper connections
- Reseat the connections properly.
- If the component seems to be connected correctly, replace the printhead assembly.
• Check the system card for proper connections
- Reseat the connections properly.
- If the component seems to be connected correctly, replace the system card.

Lexmark E260/E360/E460 Mono Product Study Guide Rev 1.4
For Training Purposes Only 9/17/2008 48
Horizontal white stripes or bands (side to side direction)
• Check the media condition
- Load new, dry, recommended media and re-print the defective image.
• Check the media transfer route (paper path)
- Make certain it is free of debris or contamination.
• Check the toner level. The toner may be low.
Tip: a toner cartridge that has been used in the machine long enough to be nearing the end of life, may be gently shaken from side to side in order to level out any unevenness in the toner reservoir that may have developed because of certain usage patterns or applications. As an interim measure, this may allow the cartridge to be used a little longer.
• Check that the transfer roll assembly is free of excess wear & contamination.
• Check the printhead assembly for proper connections
- Reseat the connections properly.
- If the component seems to be connected correctly, replace the printhead assembly.
• Check the system card for proper connections
- Reseat the connections properly.
- If the component seems to be connected correctly, replace the system card.
Lexmark E260/E360/E460 Mono Product Study Guide Rev 1.4
For Training Purposes Only 9/17/2008 49
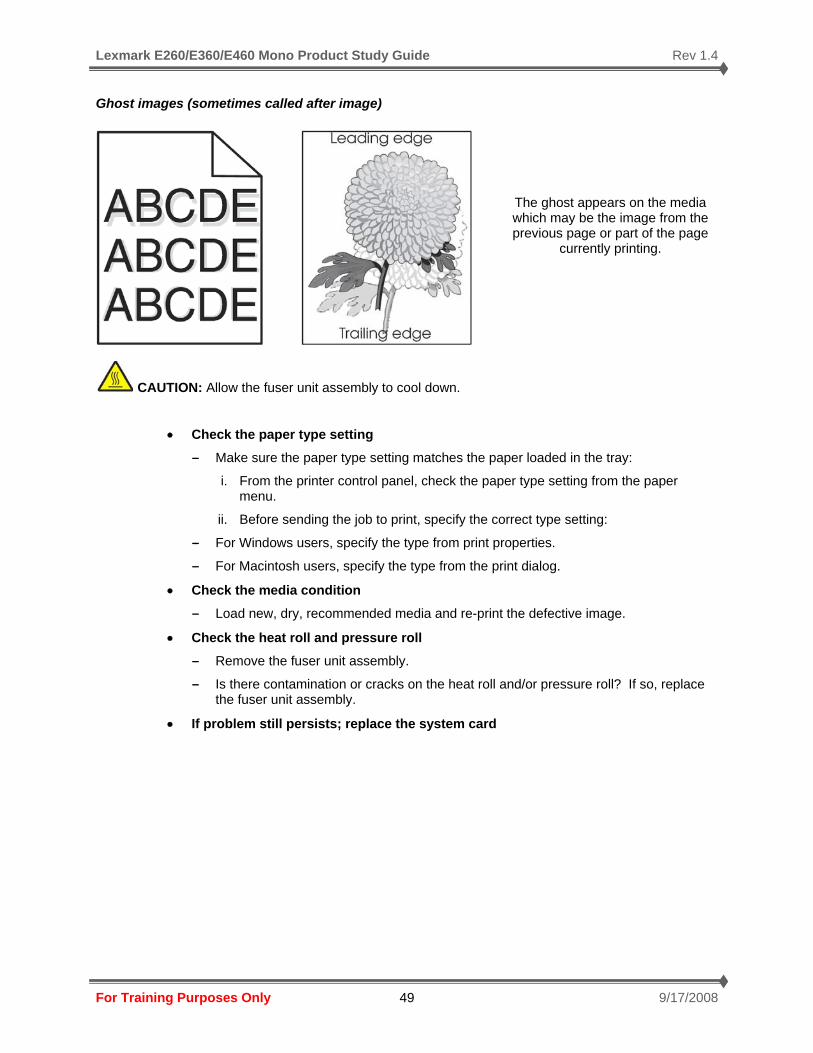
Ghost images (sometimes called after image)
CAUTION: Allow the fuser unit assembly to cool down.
• Check the paper type setting
- Make sure the paper type setting matches the paper loaded in the tray:
i. From the printer control panel, check the paper type setting from the paper menu.
ii. Before sending the job to print, specify the correct type setting:
- For Windows users, specify the type from print properties.
- For Macintosh users, specify the type from the print dialog.
• Check the media condition
- Load new, dry, recommended media and re-print the defective image.
• Check the heat roll and pressure roll
- Remove the fuser unit assembly.
- Is there contamination or cracks on the heat roll and/or pressure roll? If so, replace the fuser unit assembly.
• If problem still persists; replace the system card
The ghost appears on the media which may be the image from the previous page or part of the page
currently printing.

Lexmark E260/E360/E460 Mono Product Study Guide Rev 1.4
For Training Purposes Only 9/17/2008 50
Print irregularities, Voids, Partial Lack
These are possible solutions. Try one or more of the following:
• Check media condition; paper may have absorbed moisture due to high humidity
- Load paper from a fresh new, dry, recommended media package.
Tip: store paper in its original wrapper until you use it.
• Check the paper type setting
- Make sure the paper type setting matches the paper loaded in the tray:
i. From the printer control panel, check the paper type setting from the paper menu.
ii. Before sending the job to print, specify the correct type setting:
- For Windows users, specify the type from print properties.
- For Macintosh users, specify the type from the print dialog.
• Check the paper
- Avoid textured paper with rough finishes.
• The toner may be low
- When 88 cartridge low appears or when the print becomes faded, replace the print cartridge.
Tip: a toner cartridge that has been used in the machine long enough to be nearing the end of life, may be gently shaken from side to side in order to level out any unevenness in the toner reservoir that may have developed because of certain usage patterns or applications. As an interim measure, this may allow the cartridge to be used a little longer.
• Check the heat roll and pressure roll
CAUTION: Allow the fuser unit assembly to cool down.
- Remove the fuser unit assembly.
- Is there contamination or cracks on the heat roll and/or pressure roll? If so, replace the fuser unit assembly.
• Check the laser beam
Lexmark E260/E360/E460 Mono Product Study Guide Rev 1.4
For Training Purposes Only 9/17/2008 51
- Check the laser beam route.
- Check for debris between the printhead assembly and the pc drum.
- Check the four printhead assembly windows for contamination.
- Is the laser beam route free of debris and the glass window, in the printhead assembly, free of contamination?
• Check that the transfer roll assembly is free of excess wear & contamination
• Check that the printhead is properly installed.
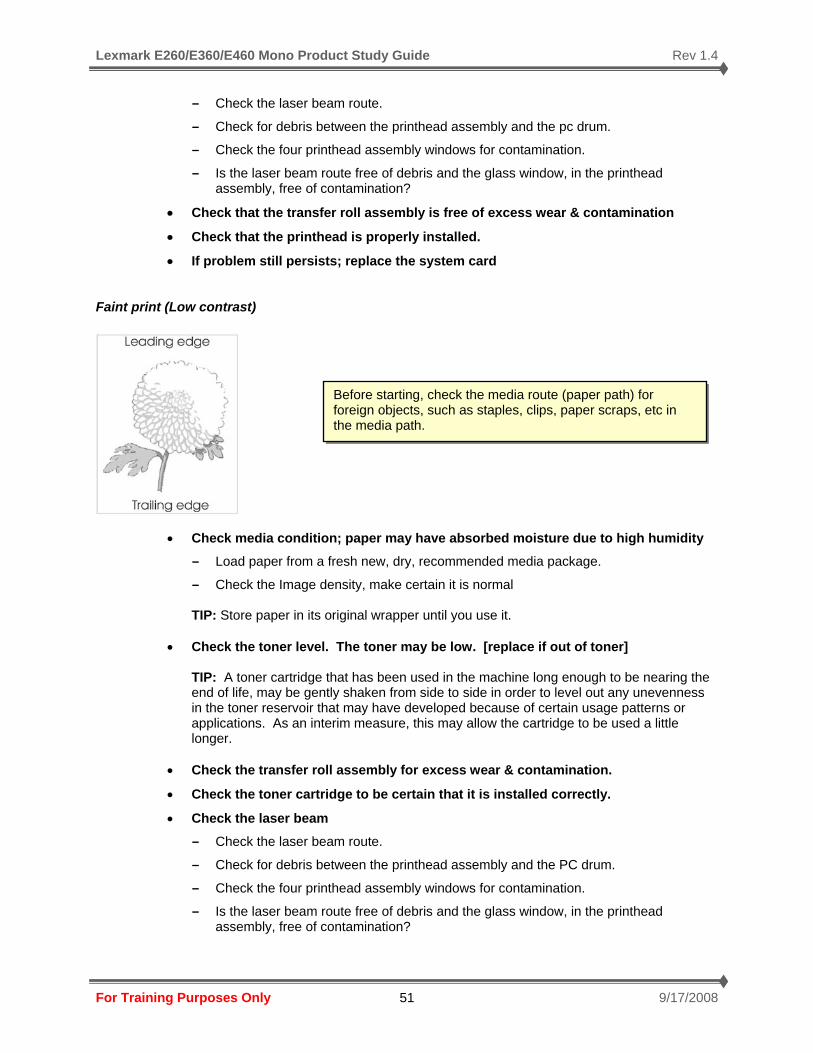
• If problem still persists; replace the system card Faint print (Low contrast)
• Check media condition; paper may have absorbed moisture due to high humidity
- Load paper from a fresh new, dry, recommended media package.
- Check the Image density, make certain it is normal TIP: Store paper in its original wrapper until you use it.
• Check the toner level. The toner may be low. [replace if out of toner]
TIP: A toner cartridge that has been used in the machine long enough to be nearing the end of life, may be gently shaken from side to side in order to level out any unevenness in the toner reservoir that may have developed because of certain usage patterns or applications. As an interim measure, this may allow the cartridge to be used a little longer.
• Check the transfer roll assembly for excess wear & contamination.
• Check the toner cartridge to be certain that it is installed correctly.
• Check the laser beam
- Check the laser beam route.
- Check for debris between the printhead assembly and the PC drum.
- Check the four printhead assembly windows for contamination.
- Is the laser beam route free of debris and the glass window, in the printhead assembly, free of contamination?
Before starting, check the media route (paper path) for foreign objects, such as staples, clips, paper scraps, etc in the media path.

Lexmark E260/E360/E460 Mono Product Study Guide Rev 1.4
For Training Purposes Only 9/17/2008 52
• Check the HVPS card assembly for proper connections
- Reseat the connections properly.
- If the component seems to be connected correctly, replace the HVPS card.
• Check the printhead assembly for proper connections
- Reseat the connections properly.
- If the component seems to be connected correctly, replace the printhead assembly.
• Check the system card for proper connections
- Reseat the connections properly.
- If the component seems to be connected correctly, replace the system card. Background (fog)
• Check the media condition
- Load new, dry, recommended media and re-print the defective image.
• Check the media transfer route (paper path)
- Make certain it is free of debris or contamination.
• Check the toner cartridge to be certain that it is installed correctly.
- Inspect, clean and reinstall or replace print cartridge.
• Check the transfer roll assembly for excess wear & contamination.
• Check the HVPS card assembly for proper connections
- Reseat the connections properly.
- If the component seems to be connected correctly, replace the HVPS card.
• Check the printhead for proper installation
- Reseat the connections properly.
- If the component seems to be installed and adjusted correctly, replace the printhead assembly.
• If problem still persists; replace the system card
Lexmark E260/E360/E460 Mono Product Study Guide Rev 1.4
For Training Purposes Only 9/17/2008 53
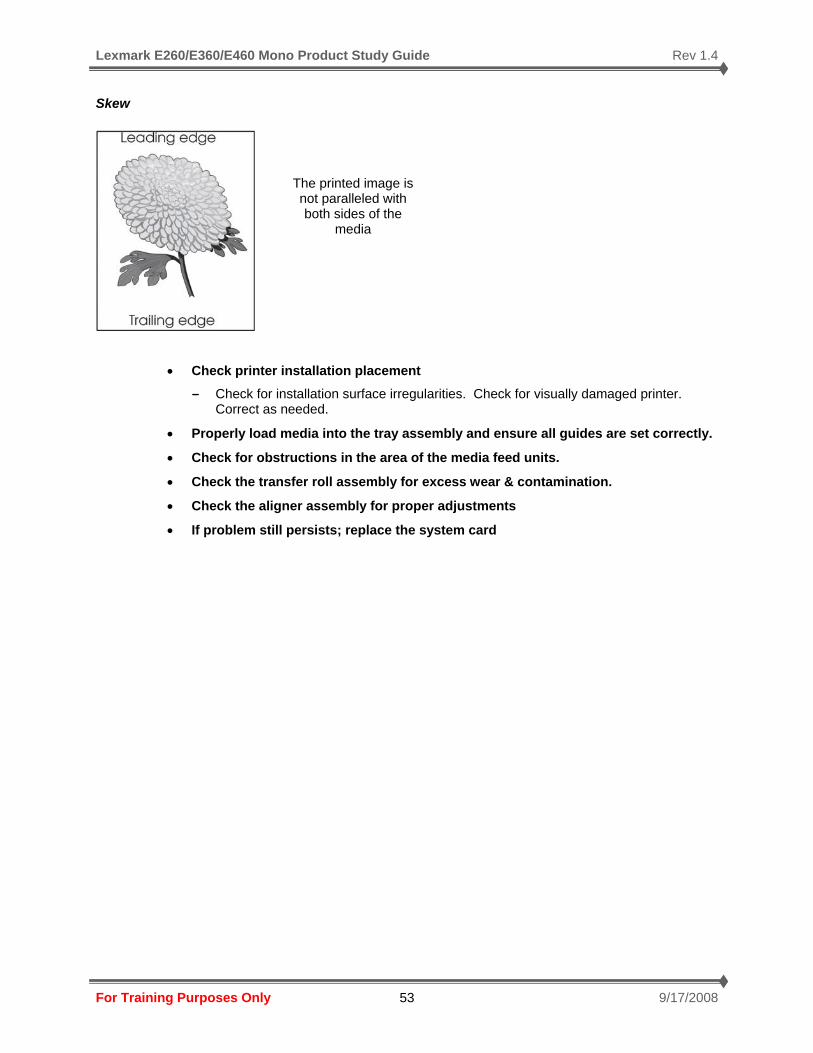
Skew
• Check printer installation placement
- Check for installation surface irregularities. Check for visually damaged printer. Correct as needed.
• Properly load media into the tray assembly and ensure all guides are set correctly.
• Check for obstructions in the area of the media feed units.
• Check the transfer roll assembly for excess wear & contamination.
• Check the aligner assembly for proper adjustments
• If problem still persists; replace the system card
The printed image is not paralleled with both sides of the
media

Lexmark E260/E360/E460 Mono Product Study Guide Rev 1.4
For Training Purposes Only 9/17/2008 54
Media Damage
CAUTION: Allow the fuser unit assembly to cool down.
• Check printer installation placement
- Check for installation surface irregularities. Check for a damaged printer caster. Correct as needed.
• Check the media feed
- Remove the media tray assembly
- Properly load media in the tray assembly
- Properly install media tray assembly in the printer.
• Check the media condition
- Load new, dry, recommended media and re-print the defective image.
• Check the transfer roll assembly for excess wear & contamination.
• Check the aligner assembly for proper adjustments
• Check the heat roll and pressure roll
- Remove the fuser unit assembly.
- Is there contamination or cracks on the heat roll and/or pressure roll? If so, replace the fuser unit assembly.

Lexmark E260/E360/E460 Mono Product Study Guide Rev 1.4
For Training Purposes Only 9/17/2008 55
No fuse (unfused toner, smearing)
CAUTION: Allow the fuser unit assembly to cool down.
• Check the fuser unit assembly installation, reinstall as needed.
• Check the media condition
- Load new, dry, recommended media and re-print the defective image.
• Check the heat roll and pressure roll
- Remove the fuser unit assembly.
- Is there contamination or cracks on the heat roll and/or pressure roll? If so, replace the fuser unit assembly.
• Check the LVPS card assembly for proper connections
- Reseat the connections properly.
- If the component seems to be connected correctly, replace the LVPS card.
• If problem still persists; replace the system card

Lexmark E260/E360/E460 Mono Product Study Guide Rev 1.4
For Training Purposes Only 9/17/2008 56
Paper Transport Diagnostic Tips
Paper Rules of Thumb Paper jams and feed problems occur for numerous reasons. Sometimes, failure of the equipment is the cause or it can be the result of other external factors. Before replacing parts for a feed problem, ask these questions:
• Is the customer using a supported media type? This is a common problem. Check the printer specifications if you are not sure.
• Is the customer using a supported media size? Check the printer specifications of you are not sure.
• Is the customer using a supported media weight? This is a common problem. Check the printer specifications of you are not sure.
• Have you tried printing with a fresh ream of paper? Paper that is left out of the package for periods of time can dry out or absorb moisture.
• Have you tried printing from a different input source? This will help narrow down the cause of some problems.
• Is too much paper loaded in the Tray? Make sure the stack height does not exceed the indicated maximum height.
• Is the paper in the Tray wrinkled, creased, damp, or curled? Paper will not feed properly if it is damaged. Try a fresh ream of paper.
• Are different media types and/or weights loaded in the Tray? This will cause misfeeds.
• Is the relative humidity too high? Too low? This can affect the media and/or printer and its ability to feed properly. Check the printer specifications to see if it is located in an ambient environment.
• Is the paper loaded properly in the Tray or option? This is a common problem. Reposition the paper in the Tray or option to make sure that is loaded properly. The paper guides should be flush against the media, but not too tight.
• Are the feed rollers worn because it is time for a maintenance kit? Check the page count of the printer to see if it is time for a maintenance kit to be installed.
• Are there any obstructions in the paper path? If paper, staples, paper clips or other items are left in the printer, they can prevent the media from feeding properly.
Save yourself time and effort and always check these external influences before spending time troubleshooting a supposed equipment failure.
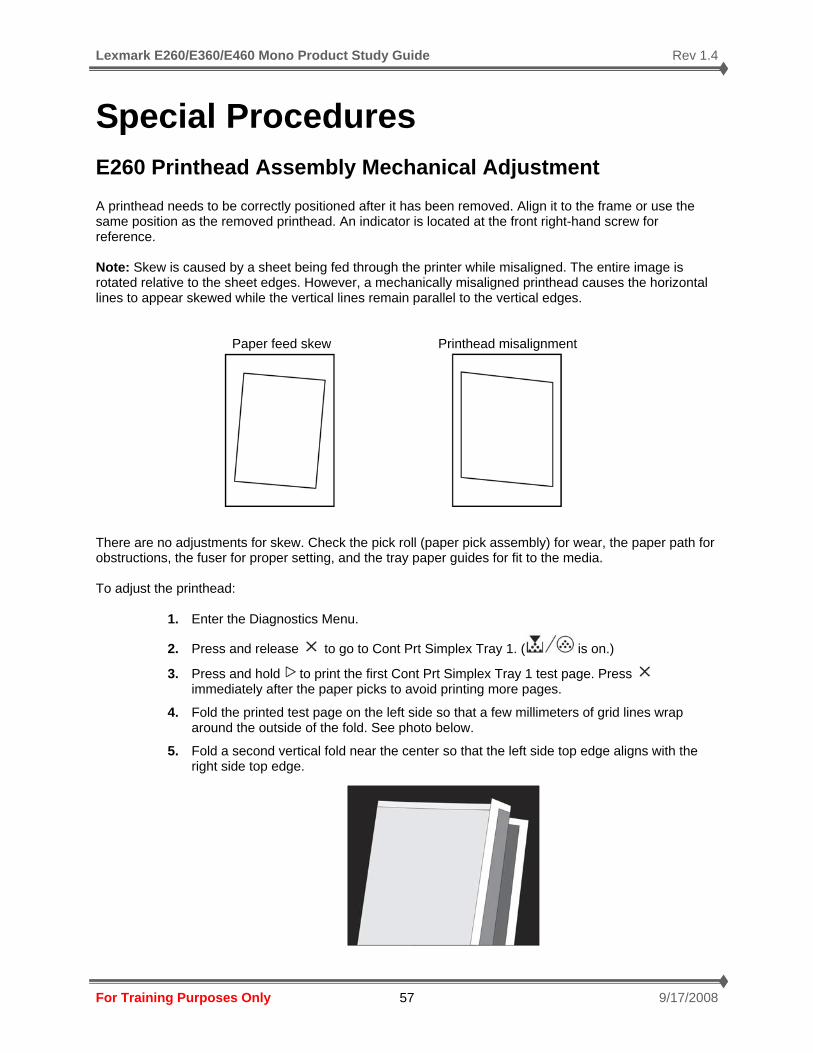
Lexmark E260/E360/E460 Mono Product Study Guide Rev 1.4
For Training Purposes Only 9/17/2008 57
Special Procedures
E260 Printhead Assembly Mechanical Adjustment A printhead needs to be correctly positioned after it has been removed. Align it to the frame or use the same position as the removed printhead. An indicator is located at the front right-hand screw for reference. Note: Skew is caused by a sheet being fed through the printer while misaligned. The entire image is rotated relative to the sheet edges. However, a mechanically misaligned printhead causes the horizontal lines to appear skewed while the vertical lines remain parallel to the vertical edges. Paper feed skew Printhead misalignment There are no adjustments for skew. Check the pick roll (paper pick assembly) for wear, the paper path for obstructions, the fuser for proper setting, and the tray paper guides for fit to the media. To adjust the printhead:
1. Enter the Diagnostics Menu.
2. Press and release to go to Cont Prt Simplex Tray 1. ( is on.)
3. Press and hold to print the first Cont Prt Simplex Tray 1 test page. Press immediately after the paper picks to avoid printing more pages.
4. Fold the printed test page on the left side so that a few millimeters of grid lines wrap around the outside of the fold. See photo below.
5. Fold a second vertical fold near the center so that the left side top edge aligns with the right side top edge.
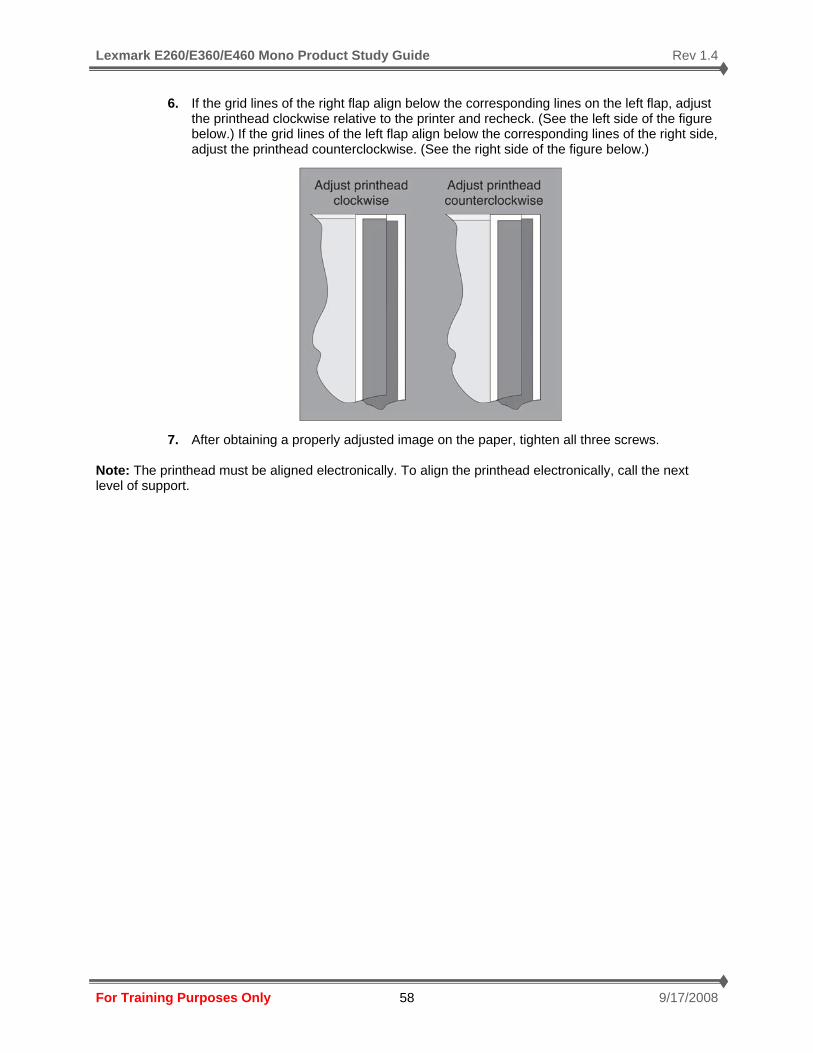
Lexmark E260/E360/E460 Mono Product Study Guide Rev 1.4
For Training Purposes Only 9/17/2008 58
6. If the grid lines of the right flap align below the corresponding lines on the left flap, adjust the printhead clockwise relative to the printer and recheck. (See the left side of the figure below.) If the grid lines of the left flap align below the corresponding lines of the right side, adjust the printhead counterclockwise. (See the right side of the figure below.)
7. After obtaining a properly adjusted image on the paper, tighten all three screws. Note: The printhead must be aligned electronically. To align the printhead electronically, call the next level of support.
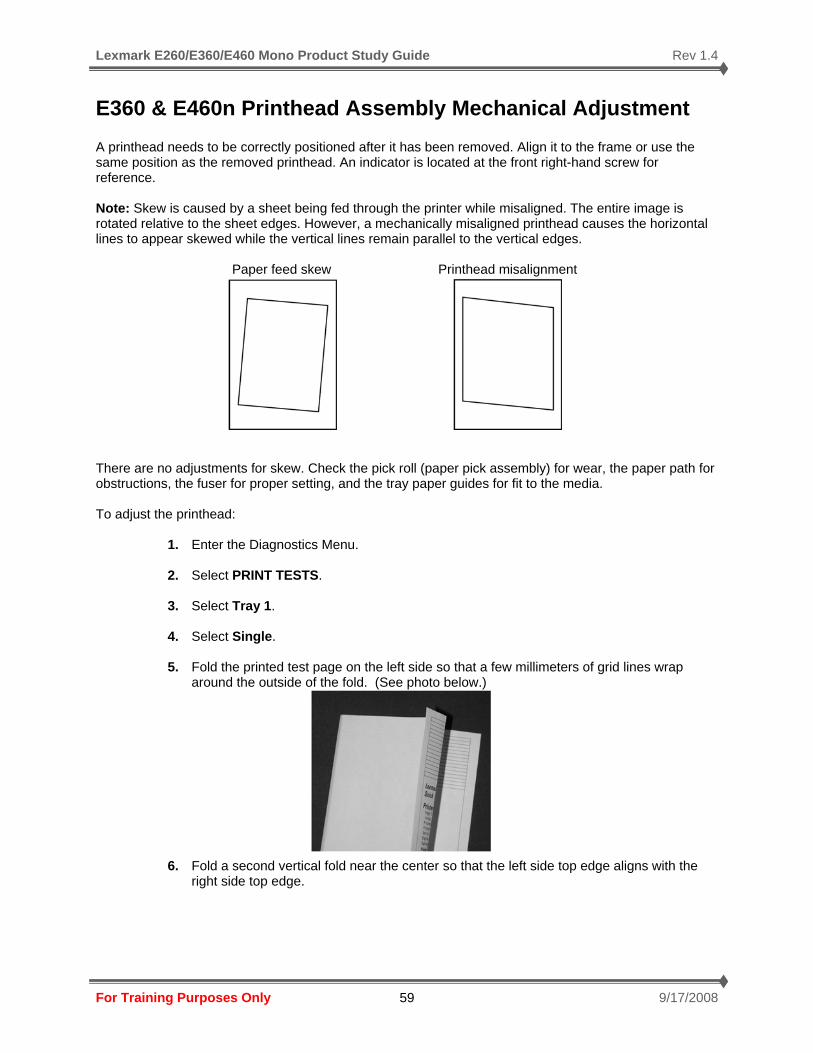
Lexmark E260/E360/E460 Mono Product Study Guide Rev 1.4
For Training Purposes Only 9/17/2008 59
E360 & E460n Printhead Assembly Mechanical Adjustment A printhead needs to be correctly positioned after it has been removed. Align it to the frame or use the same position as the removed printhead. An indicator is located at the front right-hand screw for reference. Note: Skew is caused by a sheet being fed through the printer while misaligned. The entire image is rotated relative to the sheet edges. However, a mechanically misaligned printhead causes the horizontal lines to appear skewed while the vertical lines remain parallel to the vertical edges. Paper feed skew Printhead misalignment There are no adjustments for skew. Check the pick roll (paper pick assembly) for wear, the paper path for obstructions, the fuser for proper setting, and the tray paper guides for fit to the media. To adjust the printhead:
1. Enter the Diagnostics Menu.
2. Select PRINT TESTS.
3. Select Tray 1.
4. Select Single.
5. Fold the printed test page on the left side so that a few millimeters of grid lines wrap around the outside of the fold. (See photo below.)
6. Fold a second vertical fold near the center so that the left side top edge aligns with the right side top edge.
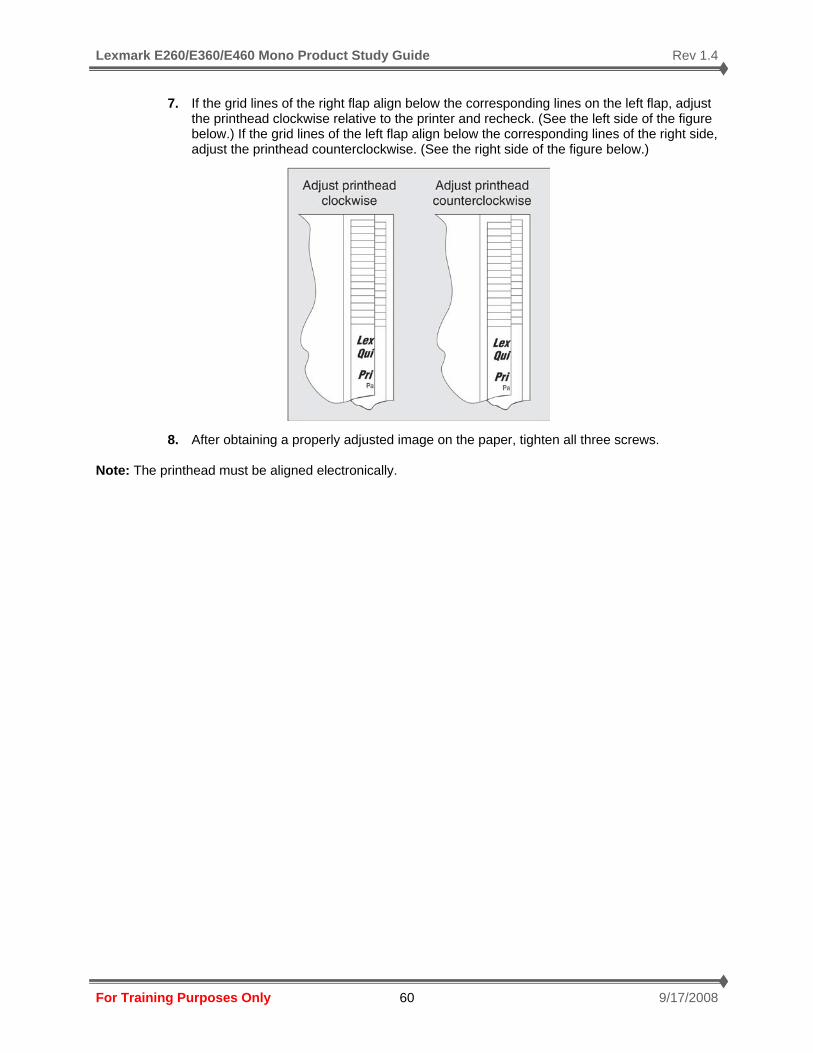
Lexmark E260/E360/E460 Mono Product Study Guide Rev 1.4
For Training Purposes Only 9/17/2008 60
7. If the grid lines of the right flap align below the corresponding lines on the left flap, adjust the printhead clockwise relative to the printer and recheck. (See the left side of the figure below.) If the grid lines of the left flap align below the corresponding lines of the right side, adjust the printhead counterclockwise. (See the right side of the figure below.)
8. After obtaining a properly adjusted image on the paper, tighten all three screws. Note: The printhead must be aligned electronically.
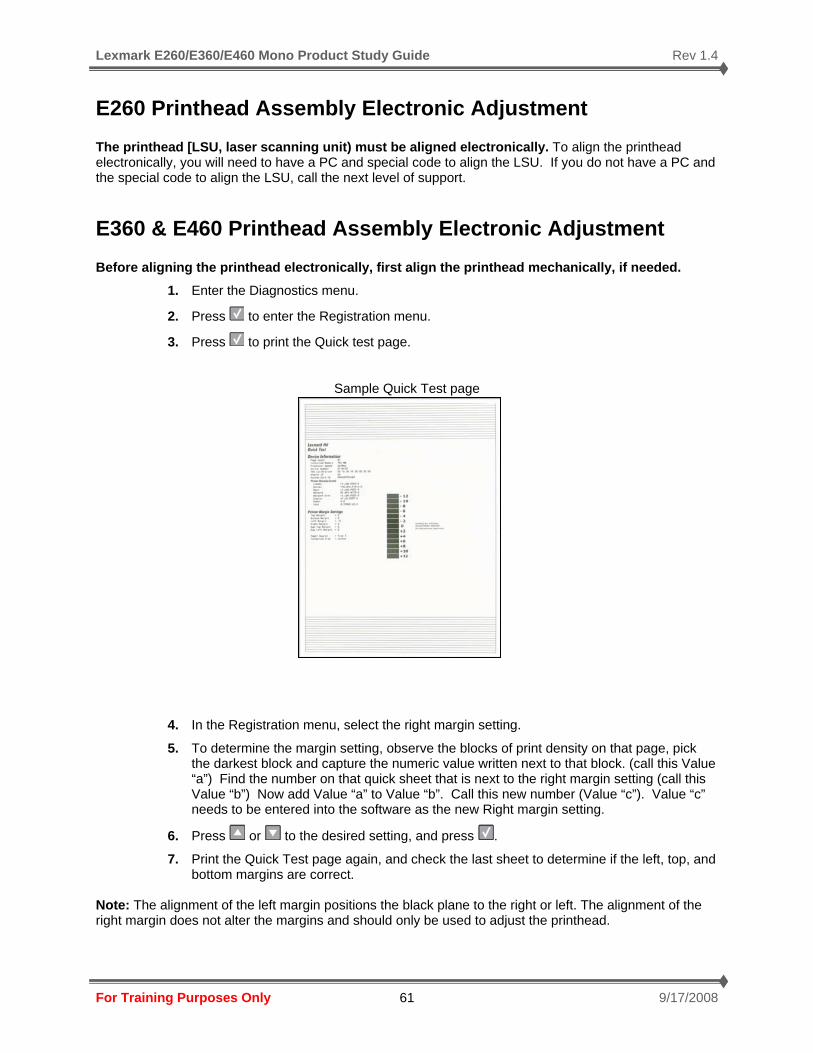
Lexmark E260/E360/E460 Mono Product Study Guide Rev 1.4
For Training Purposes Only 9/17/2008 61
E260 Printhead Assembly Electronic Adjustment The printhead [LSU, laser scanning unit) must be aligned electronically. To align the printhead electronically, you will need to have a PC and special code to align the LSU. If you do not have a PC and the special code to align the LSU, call the next level of support.
E360 & E460 Printhead Assembly Electronic Adjustment Before aligning the printhead electronically, first align the printhead mechanically, if needed.
1. Enter the Diagnostics menu.
2. Press to enter the Registration menu.
3. Press to print the Quick test page.
Sample Quick Test page
4. In the Registration menu, select the right margin setting.
5. To determine the margin setting, observe the blocks of print density on that page, pick the darkest block and capture the numeric value written next to that block. (call this Value “a”) Find the number on that quick sheet that is next to the right margin setting (call this Value “b”) Now add Value “a” to Value “b”. Call this new number (Value “c”). Value “c” needs to be entered into the software as the new Right margin setting.
6. Press or to the desired setting, and press .
7. Print the Quick Test page again, and check the last sheet to determine if the left, top, and bottom margins are correct.
Note: The alignment of the left margin positions the black plane to the right or left. The alignment of the right margin does not alter the margins and should only be used to adjust the printhead.
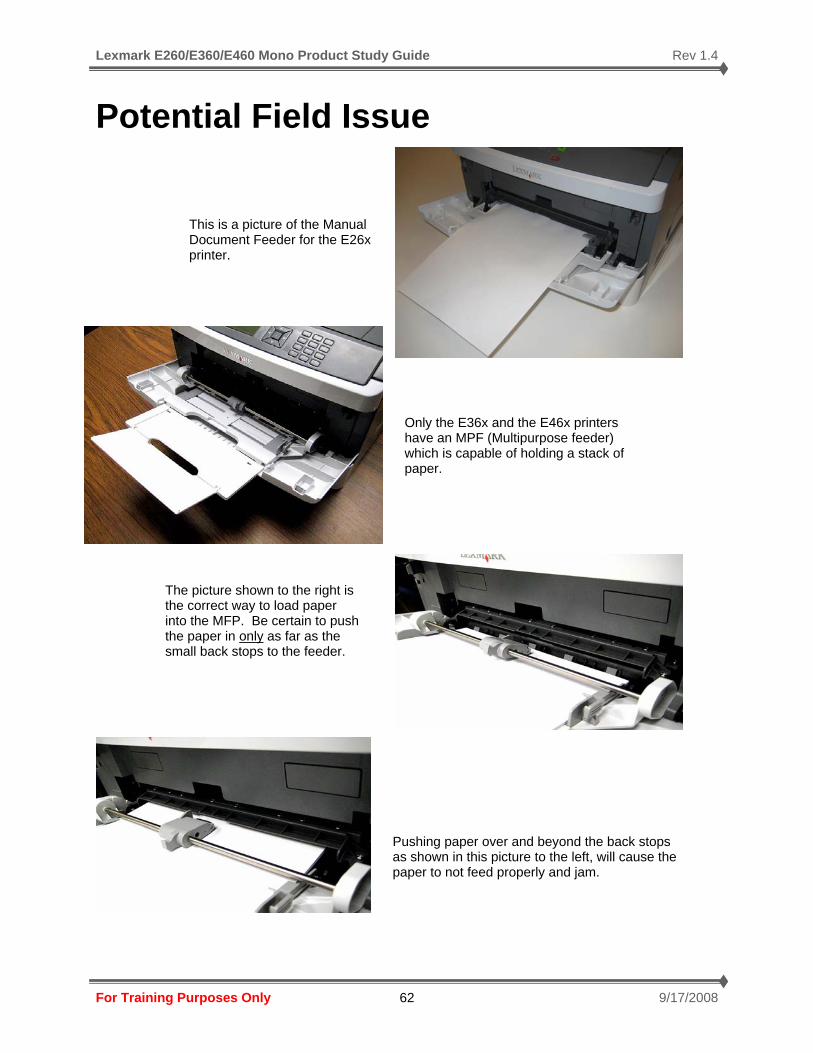
Lexmark E260/E360/E460 Mono Product Study Guide Rev 1.4
For Training Purposes Only 9/17/2008 62
Potential Field Issue
The picture shown to the right is the correct way to load paper into the MFP. Be certain to push the paper in only as far as the small back stops to the feeder.
Pushing paper over and beyond the back stops as shown in this picture to the left, will cause the paper to not feed properly and jam.
This is a picture of the Manual Document Feeder for the E26x printer.
Only the E36x and the E46x printers have an MPF (Multipurpose feeder) which is capable of holding a stack of paper.
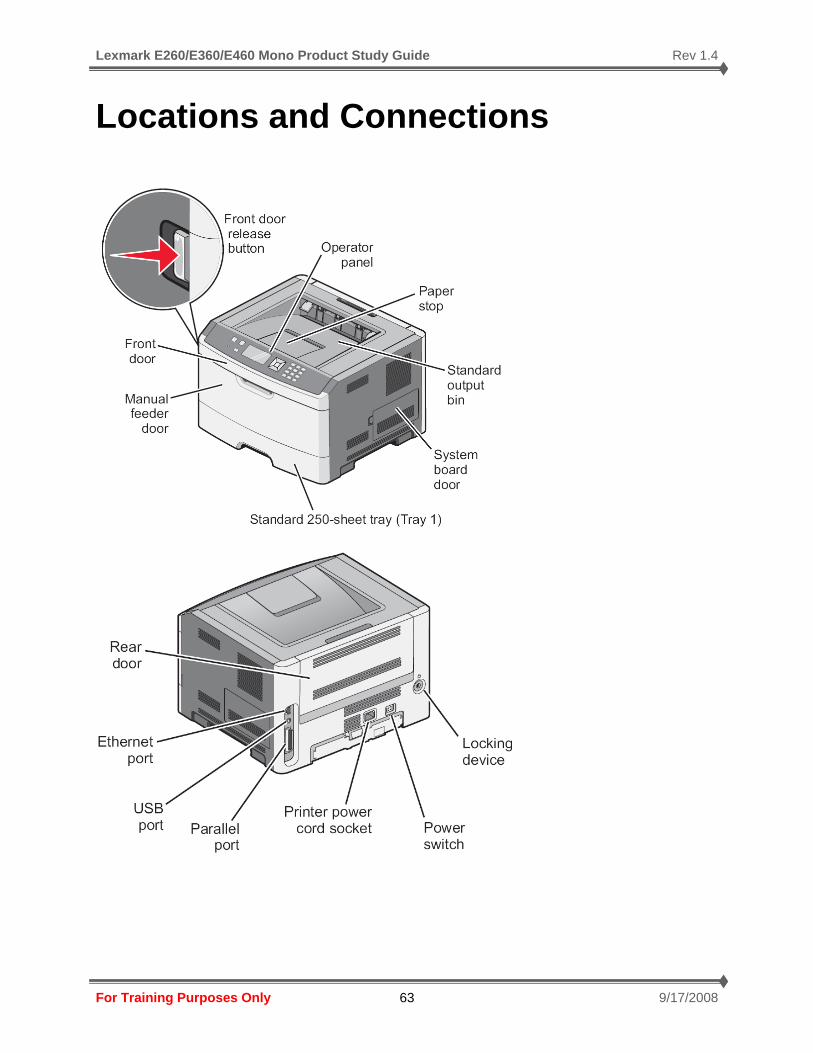
Lexmark E260/E360/E460 Mono Product Study Guide Rev 1.4
For Training Purposes Only 9/17/2008 63
Locations and Connections

Lexmark E260/E360/E460 Mono Product Study Guide Rev 1.4
For Training Purposes Only 9/17/2008 64
The next two pages are providing you with an enlarged picture of the controller boards for the three Ex6x printers. Please refer to the service manual for the specific product that you have to identify specific contact definitions.
E260 & E360 Controller card connector pin values
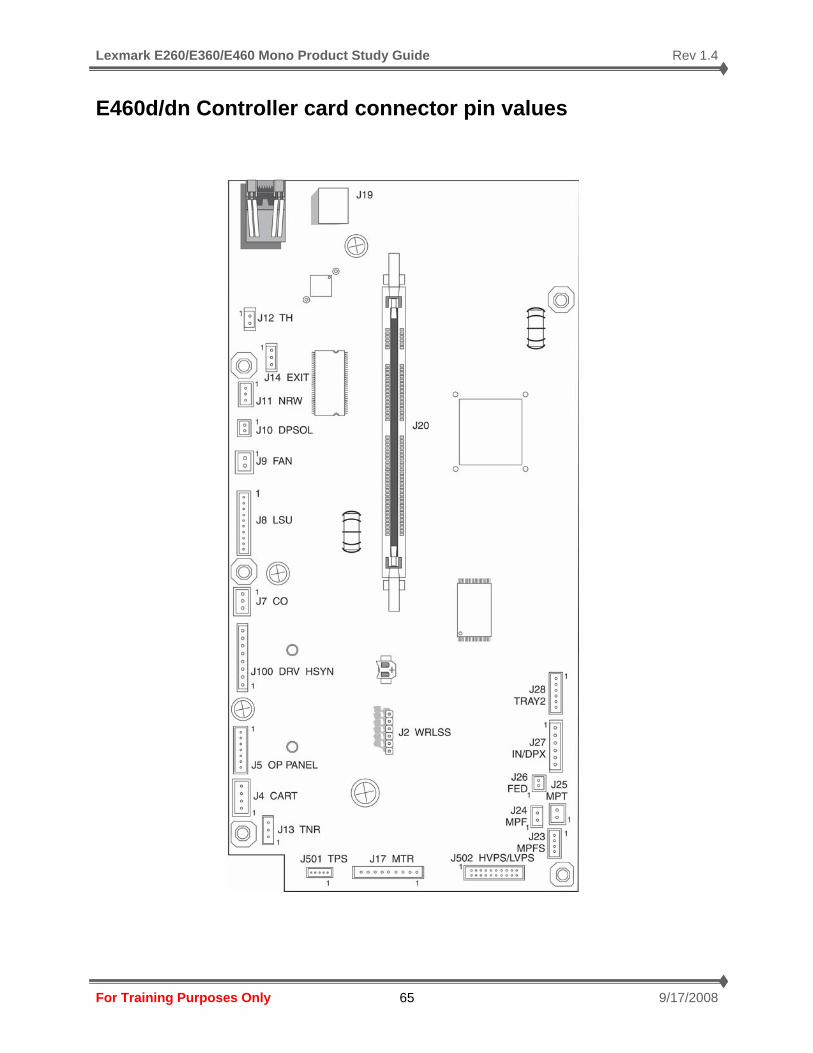
Lexmark E260/E360/E460 Mono Product Study Guide Rev 1.4
For Training Purposes Only 9/17/2008 65
E460d/dn Controller card connector pin values