evo - crusher - shearforce equipmentshearforce.ca/pdf/crusher-buckets/crusher_manual.pdf ·...
TRANSCRIPT

VER. 9V/07.01
Evo - Crusher
VOLUMETRIC REDUCTION BUCKET FOR INERT MATERIAL
Evo 24 HD Evo 28 HD
Evo 35 HD Evo 47 HD
INSTRUCTION MANUAL

Evo - Crusher
- Sheet. 2 of 31 -
INDEX
INTRODUCTION _____________________________________________________________ 3
KEY ______________________________________________________________________ 3
DESCRIPTION OF THE ATTACHMENT _____________________________________________ 3
INFORMATION ON AIR NOISE OF THE ATTACHMENT ________________________________ 3
POSITION OF STICKERS ______________________________________________________ 4
PURPOSE OF THE ATTACHMENT ________________________________________________ 5
UNAUTHORIZED USES: _______________________________________________________ 5
HOW TO PROCEED WITH THE CRUSHING _________________________________________ 7
ATTACHMENT INSTALLATION __________________________________________________ 9
ASSEMBLY AND DISASSEMBLY OF THE ATTACHMENT ________________________________ 9
HYDRAULIC SCHEMATIC _____________________________________________________ 12
DIMENSION AND CONNECTIONS SPECIFICATIONS ________________________________ 12
CASE DRAIN LINE __________________________________________________________ 14
HANDLING AND TRANSPORTATION OF THE ATTACHMENT ___________________________ 15
STORAGE OF THE EQUIPMENT _________________________________________________ 16
MAINTENANCE _____________________________________________________________ 17
JAWS WEAR _______________________________________________________________ 19
TIGHTENING TORQUE OF SCREWS AND NUTS_____________________________________ 20
ADJUSTING THE BELT TENSION _______________________________________________ 21
ADJUSTING SPRING TENSION _________________________________________________ 22
JAW OPENING SETTINGS _____________________________________________________ 23
TOP PLATE Evo 24 HD _______________________________________________________ 25
TOP PLATE Evo 28 HD _______________________________________________________ 26
TOP PLATE Evo 35 HD _______________________________________________________ 27
TOP PLATE Evo 47 HD _______________________________________________________ 28
HITCH ASSEMBLY __________________________________________________________ 29
INFORMATION REGARDING DISMANTLEMENT ____________________________________ 30
Evo - Crusher
- Sheet 3 of 31 -
INTRODUCTION This manual serves to provide the client with all the information he needs regarding the machine and
the safety regulations associated with it, as well as instructions for use and maintenance.
The manual allows the owner to make best use of the machine, and to maintain its efficiency over time.
The user manual, together with the spare parts catalogue, makes up an integral part of the machine
and should always be passed on to any new owner, up to the time that the machine is finally dismantled.
This manual should be provided for anyone who has to use the machine, or who needs to perform
maintenance operations.
ATTENTION
Incorrect use of the machine and improper maintenance operations carry risks which can cause serious
injury to people, even leading to death.
Operators and persons qualified for maintenance should study all the contents of this manual carefully
before using the machine or carrying out any maintenance operations. The procedures and precautions outlined in this manual are applicable only when the machine is used
for the purposes permitted.
KEY
ATTENTION This word is used in safety messages in the manual and helps to avoid situations
which can cause injuries. The message may also be used to warn of dangers that could cause damage to the machine.
IMPORTANT This word is used in relation to precautions which need to be taken to avoid any
operations which might shorten the life of the machine.
Evo-Crusher cannot foresee every circumstance that could cause potential danger during the use and
maintenance of the machine. For this reason, the safety messages contained in the manual might not include every possible safety precaution.
DESCRIPTION OF THE ATTACHMENT
This is a piece of equipment to be fitted on earthmoving machinery. It is made up of a metal case containing
two jaws, one fixed and the other moving. The moving jaw is hinged at the base, while at the head it is connected to a shaft and a large flywheel. The off-center position of the shaft on the flywheel causes the
movement at the head of the moving jaw, so that it closes against the fixed jaw and at the same time
generates a vertical oscillation, assisting the uniform crushing of the material
WARNING: Before carrying out any operations on the above product, read this instruction manual carefully.
INFORMATION ON AIR NOISE OF THE ATTACHMENT
The equivalent continuous sound pressure level weighted in the workplaces is less than 70 dB (A).
TERMS USED:
Attachment: Evo-Crusher attachment to which this manual refers.
Excavator: excavator on which the attachment is mounted

Evo - Crusher
- Sheet. 4 of 31 -
POSITION OF STICKERS

Evo - Crusher
- Sheet 5 of 31 -
PURPOSE OF THE ATTACHMENT The attachment is made to crush various materials.
UNAUTHORIZED USES:
DO NOT USE THE ATTACHMENT to compress the material.
DO NOT HIT OR PUSH the unfiltered material with the equipment.

Evo - Crusher
- Sheet. 6 of 31 -
Do not lean the machine on the ground and use it as a support-prop for turning the operating machine
Risk of damage to the equipment.
IMPORTANT
Lend attention to the not full of rocks material with advanced dimensions at the opening minimal of the jaw in job, this could be cause of the block of the equipment.
IMPORTANT THE work space must be properly enclosed to prevent the access to peoples or animals.
Evo - Crusher
- Sheet 7 of 31 -
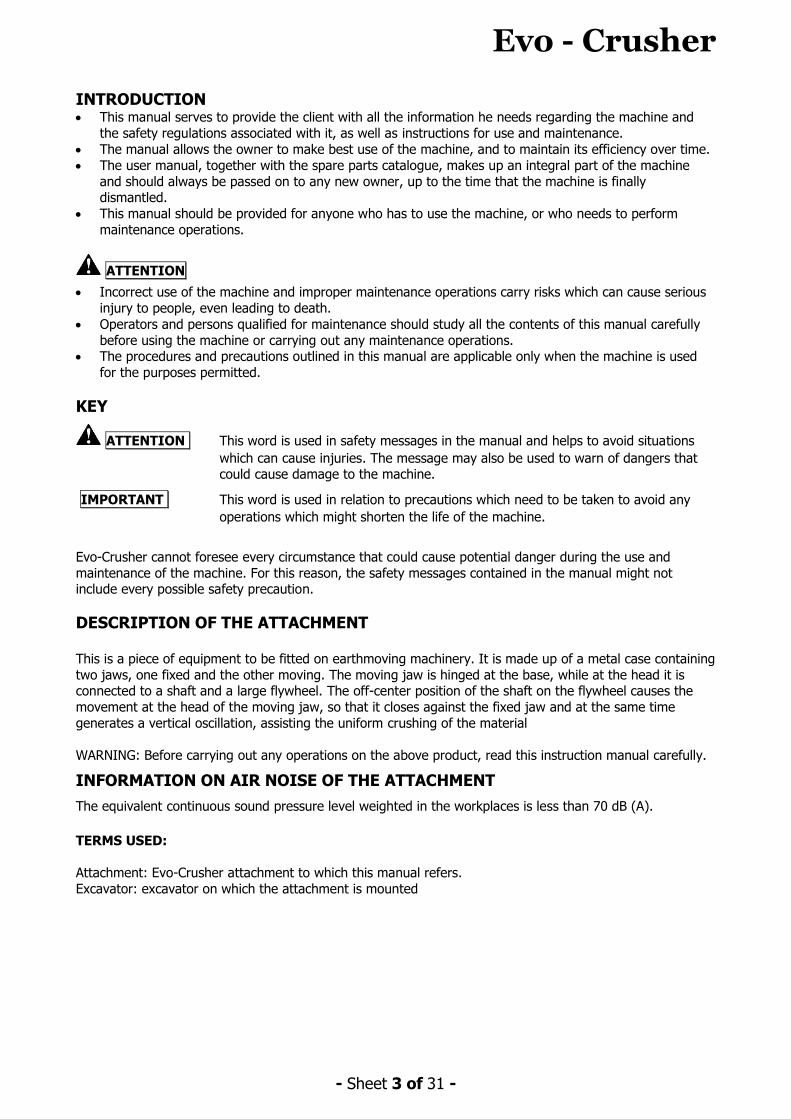
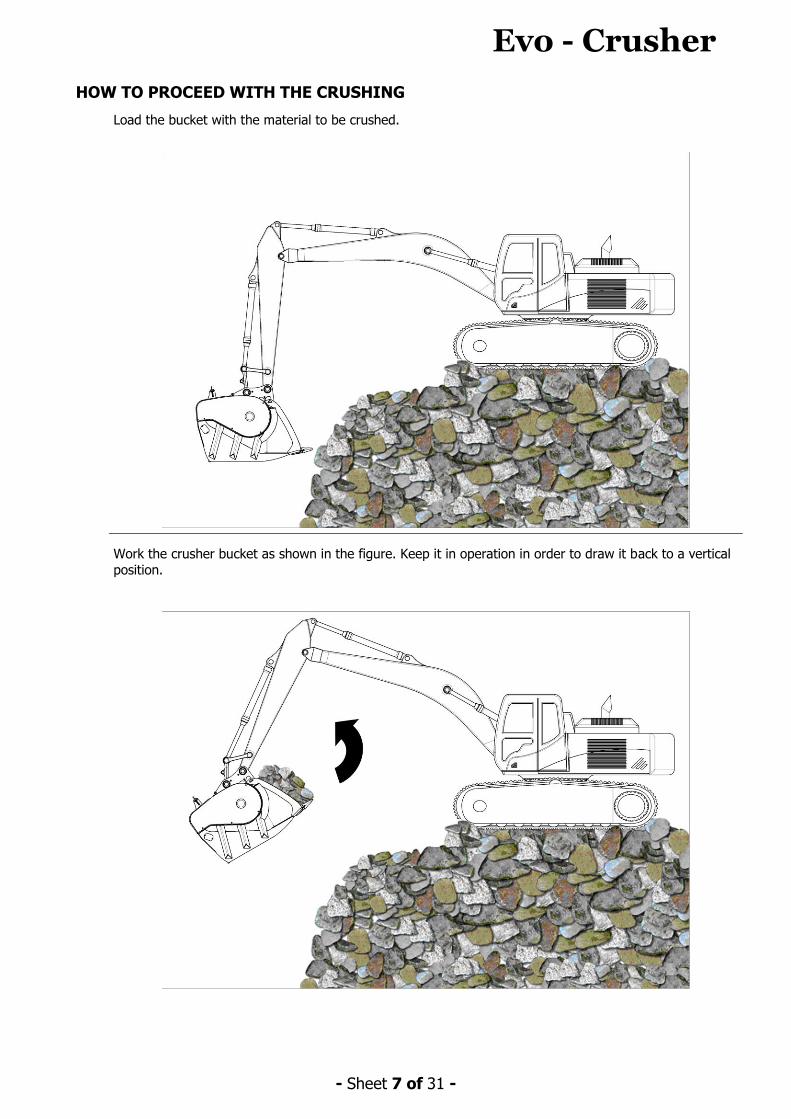
HOW TO PROCEED WITH THE CRUSHING
Load the bucket with the material to be crushed.
Work the crusher bucket as shown in the figure. Keep it in operation in order to draw it back to a vertical
position.
Evo - Crusher
- Sheet. 8 of 31 -
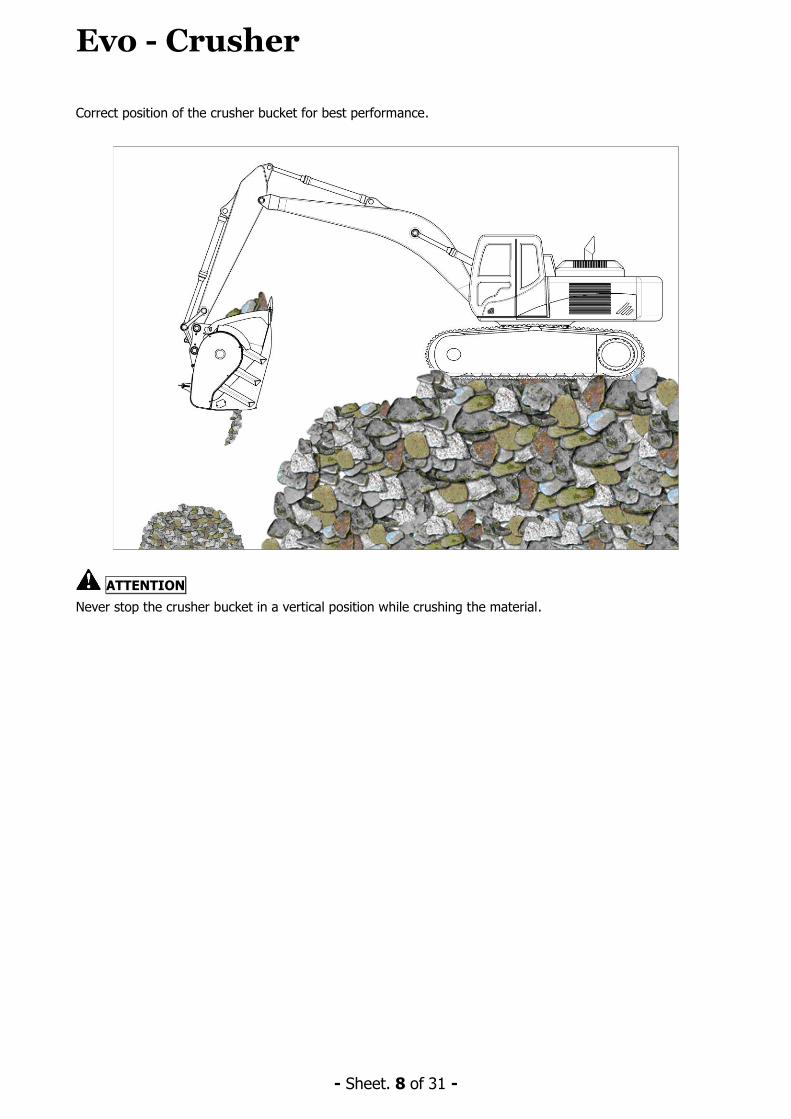
Correct position of the crusher bucket for best performance.
ATTENTION
Never stop the crusher bucket in a vertical position while crushing the material.

Evo - Crusher
- Sheet 9 of 31 -
ATTACHMENT INSTALLATION
ATTENTION
Before proceeding to install the attachment you need to be sure that the attachment is intact as it might have been damaged during transportation.
It is especially important to check that the pipes are intact and the hydraulic connections are firmly attached.
ATTENTION
The attachment must be installed in a space large enough to allow the necessary operations to be carried
out in complete safety.
IMPORTANT
The attachment is not allowed to be used at temperatures below -16 °C or above 45 °C.
IMPORTANT
If the air temperature is below –10°C, increase the temperature of the equipment in the following way:
- Carry out working cycles with the machine empty for 20 minutes - Begin with a job that is not too onerous for 10 minutes
ASSEMBLY AND DISASSEMBLY OF THE ATTACHMENT
ATTENTION
While being assembled, the attachment should be laid firmly on the ground with the excavator’s engine at a
standstill and parking brakes pulled on.
ATTENTION
If our attachment is supplied without couplings, it is up to the client to fit it with suitable couplings according to current safety standards.
The installer, operator and maintenance personnel must wear the suitable protection devices specified by
Italian decree 81/2008, or the relevant safety legislation in force in the country where the equipment is used.
Evo-Crusher declines all liability in the event of accidents if the installer, operator or maintenance personnel fail to use the suitable safety devices.
Evo - Crusher
- Sheet. 10 of 31 -
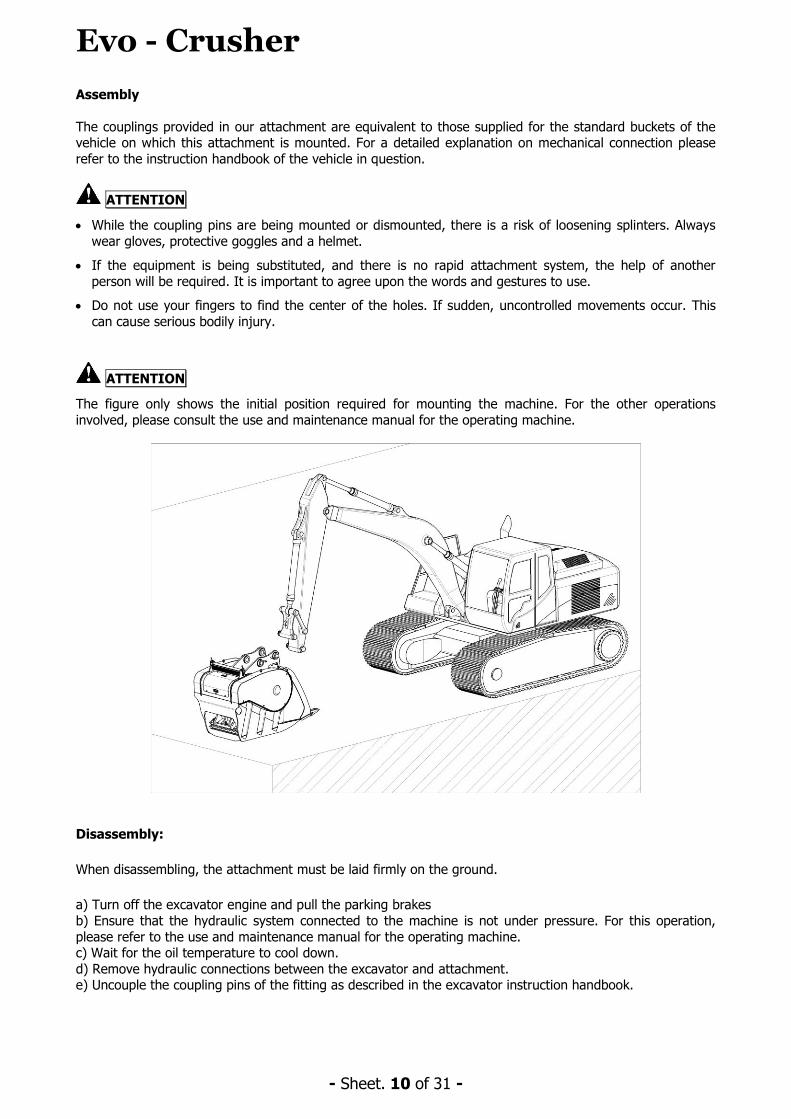
Assembly
The couplings provided in our attachment are equivalent to those supplied for the standard buckets of the vehicle on which this attachment is mounted. For a detailed explanation on mechanical connection please
refer to the instruction handbook of the vehicle in question.
ATTENTION
While the coupling pins are being mounted or dismounted, there is a risk of loosening splinters. Always
wear gloves, protective goggles and a helmet.
If the equipment is being substituted, and there is no rapid attachment system, the help of another
person will be required. It is important to agree upon the words and gestures to use.
Do not use your fingers to find the center of the holes. If sudden, uncontrolled movements occur. This
can cause serious bodily injury.
ATTENTION
The figure only shows the initial position required for mounting the machine. For the other operations
involved, please consult the use and maintenance manual for the operating machine.
Disassembly:
When disassembling, the attachment must be laid firmly on the ground.
a) Turn off the excavator engine and pull the parking brakes
b) Ensure that the hydraulic system connected to the machine is not under pressure. For this operation,
please refer to the use and maintenance manual for the operating machine. c) Wait for the oil temperature to cool down.
d) Remove hydraulic connections between the excavator and attachment. e) Uncouple the coupling pins of the fitting as described in the excavator instruction handbook.

Evo - Crusher
- Sheet 11 of 31 -
Routine of hose
ATTENTION
For the operations to be followed for connecting the hydraulic tubes to the machine, please refer to the
instructions given in the user’s manual for the operating machine. The figure indicates the way in which the connecting tubes should be arranged.
IMPORTANT
The use of rapid couplings for connecting the equipment is not advised. These cause severe overheating of the hydraulic oil and therefore shorten the life of the components.
A possible malfunctioning of the rapid couplings can cause serious damage to the machine.
ATTENTION
The outlet pressure of the excavator must always be as required for the attachment in use. See section
DIMENSION AND CONNECTIONS SPECIFICATIONS.
ATTENTION
Do not use the attachment without first checking that the delivery pressure of the attachment is as required.
Evo - Crusher
- Sheet. 12 of 31 -
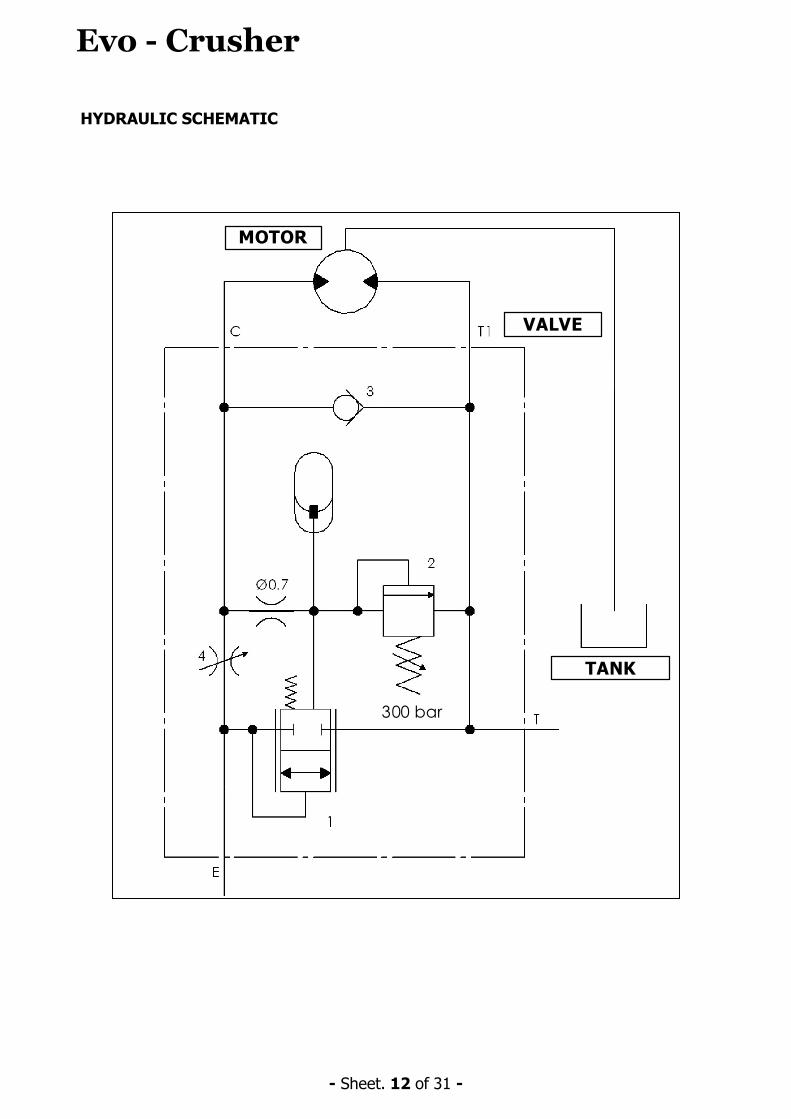
HYDRAULIC SCHEMATIC
VALVE
MOTOR
TANK
300 bar
Evo - Crusher
- Sheet 13 of 31 -
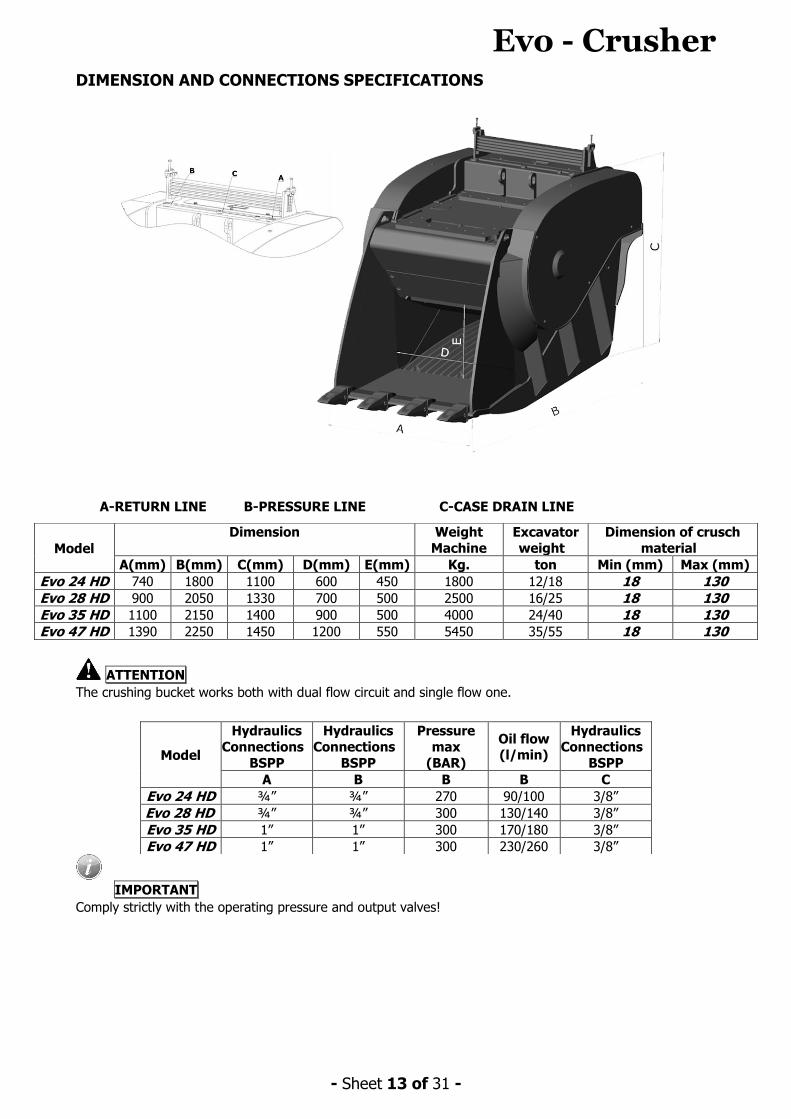
DIMENSION AND CONNECTIONS SPECIFICATIONS
A-RETURN LINE B-PRESSURE LINE C-CASE DRAIN LINE
ATTENTION The crushing bucket works both with dual flow circuit and single flow one.
IMPORTANT
Comply strictly with the operating pressure and output valves!
Model
Dimension
Weight
Machine
Excavator
weight
Dimension of crusch
material
A(mm) B(mm) C(mm) D(mm) E(mm) Kg. ton Min (mm) Max (mm)
Evo 24 HD 740 1800 1100 600 450 1800 12/18 18 130 Evo 28 HD 900 2050 1330 700 500 2500 16/25 18 130 Evo 35 HD 1100 2150 1400 900 500 4000 24/40 18 130 Evo 47 HD 1390 2250 1450 1200 550 5450 35/55 18 130
Model
Hydraulics
Connections
BSPP
Hydraulics
Connections
BSPP
Pressure
max
(BAR)
Oil flow (l/min)
Hydraulics
Connections
BSPP
A B B B C
Evo 24 HD ¾” ¾” 270 90/100 3/8”
Evo 28 HD ¾” ¾” 300 130/140 3/8”
Evo 35 HD 1” 1” 300 170/180 3/8”
Evo 47 HD 1” 1” 300 230/260 3/8”
Evo - Crusher
- Sheet. 14 of 31 -
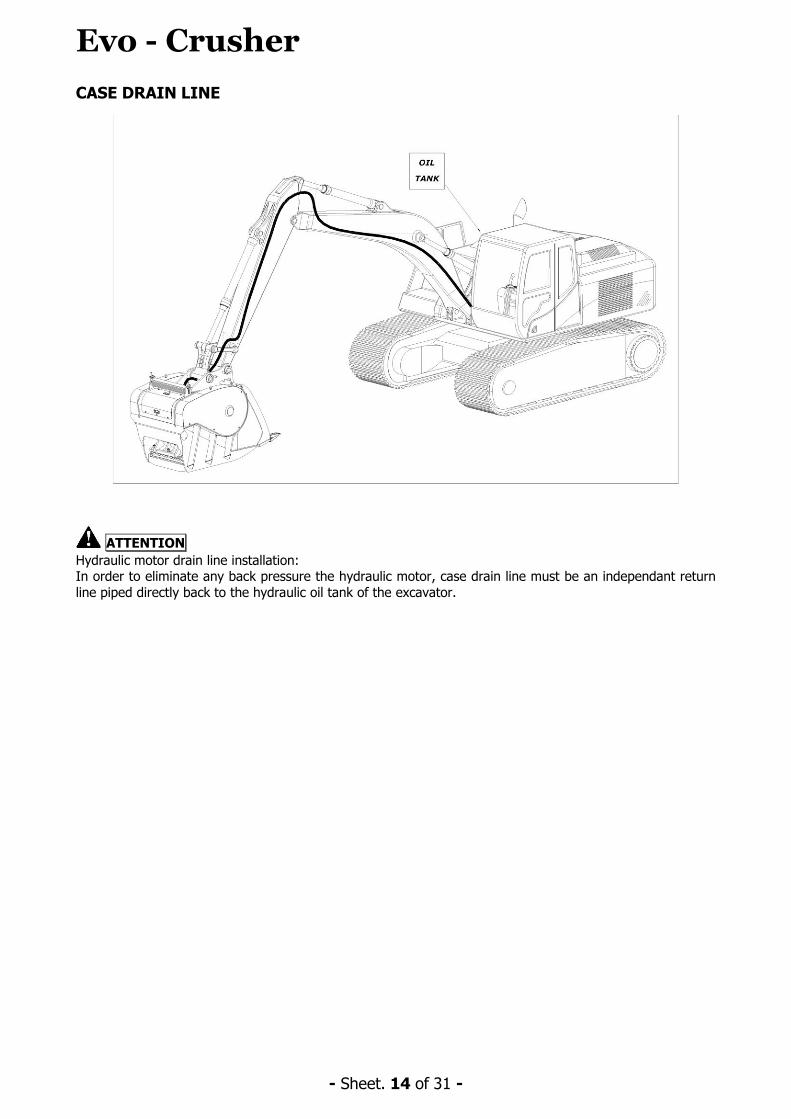
CASE DRAIN LINE
ATTENTION
Hydraulic motor drain line installation: In order to eliminate any back pressure the hydraulic motor, case drain line must be an independant return
line piped directly back to the hydraulic oil tank of the excavator.
Evo - Crusher
- Sheet 15 of 31 -
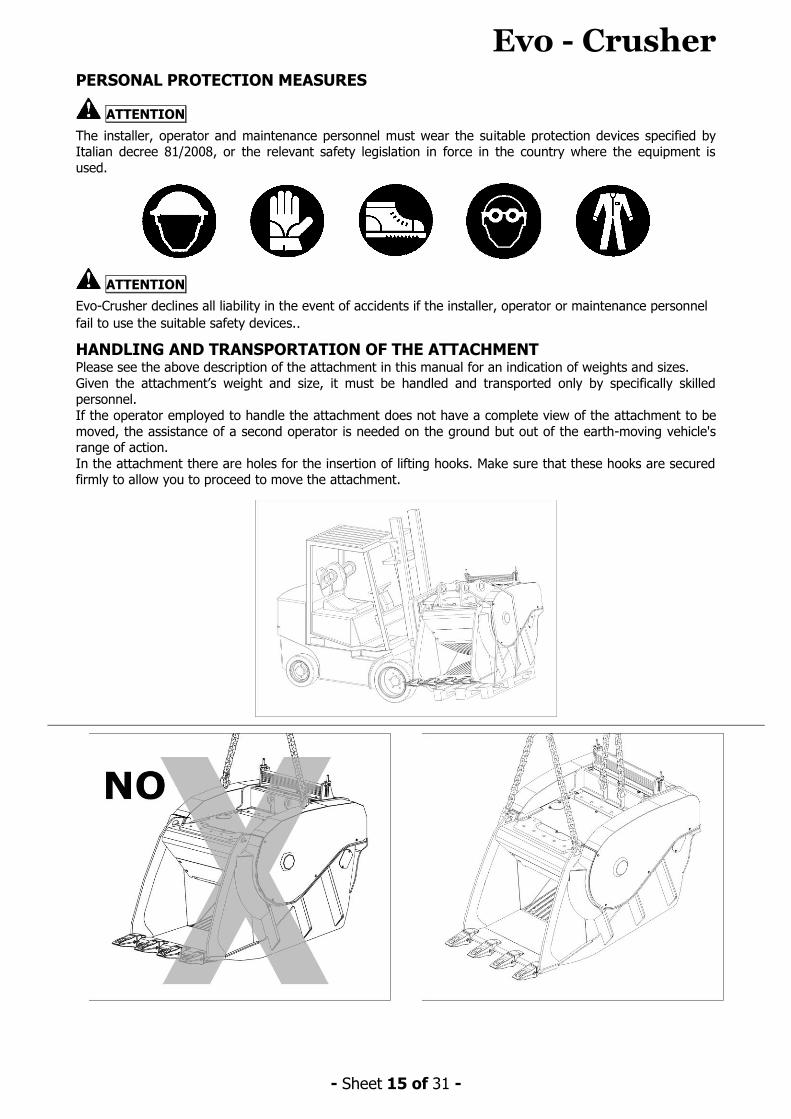
PERSONAL PROTECTION MEASURES
ATTENTION
The installer, operator and maintenance personnel must wear the suitable protection devices specified by Italian decree 81/2008, or the relevant safety legislation in force in the country where the equipment is
used.
ATTENTION
Evo-Crusher declines all liability in the event of accidents if the installer, operator or maintenance personnel
fail to use the suitable safety devices..
HANDLING AND TRANSPORTATION OF THE ATTACHMENT Please see the above description of the attachment in this manual for an indication of weights and sizes.
Given the attachment’s weight and size, it must be handled and transported only by specifically skilled personnel.
If the operator employed to handle the attachment does not have a complete view of the attachment to be
moved, the assistance of a second operator is needed on the ground but out of the earth-moving vehicle's range of action.
In the attachment there are holes for the insertion of lifting hooks. Make sure that these hooks are secured firmly to allow you to proceed to move the attachment.

Evo - Crusher
- Sheet. 16 of 31 -
STORAGE OF THE EQUIPMENT Keep the equipment away from areas of transit.
Position the equipment on a wooden bed to give it greater stability (see figure).
ATTENTION
Do not position the machine as shown in this figure. It could tip over, causing the risk of serious cuts or
crushing
If the equipment needs to be stored for more than 2 months, please follow these instructions:
Grease the various rotation points to protect them from damp.
Store the equipment in a dry place, at a temperature of between –5°C and +30°C.
Protect the equipment from dirt, dust and humidity..
Evo - Crusher
- Sheet 17 of 31 -
MAINTENANCE
ATTENTION
Maintenance and inspection of the attachment should be performed only by skilled personnel.
ATTENTION
Any operation requiring direct handling by the operator (inspection, maintenance) must be performed with
the excavator off, with its parking brakes pulled on with our fitting laid firmly on the ground. Wait for the machine oil to cool (approx. 2 hours).
ATTENTION
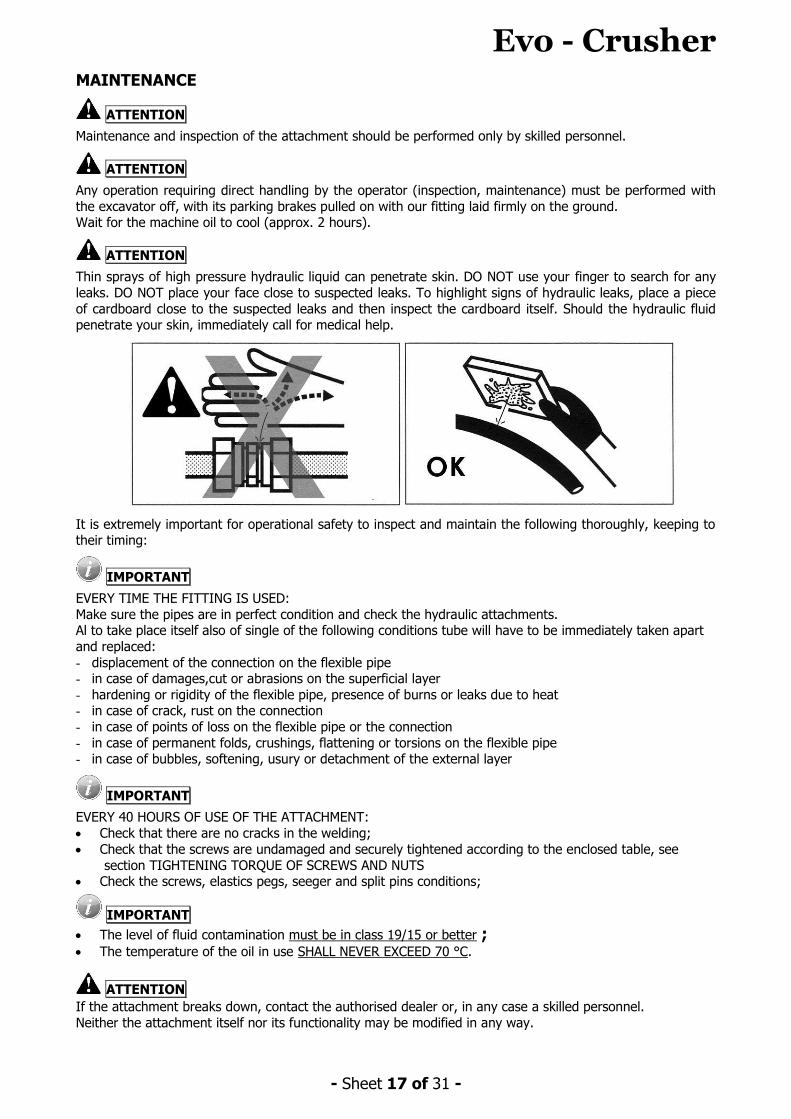
Thin sprays of high pressure hydraulic liquid can penetrate skin. DO NOT use your finger to search for any
leaks. DO NOT place your face close to suspected leaks. To highlight signs of hydraulic leaks, place a piece
of cardboard close to the suspected leaks and then inspect the cardboard itself. Should the hydraulic fluid penetrate your skin, immediately call for medical help.
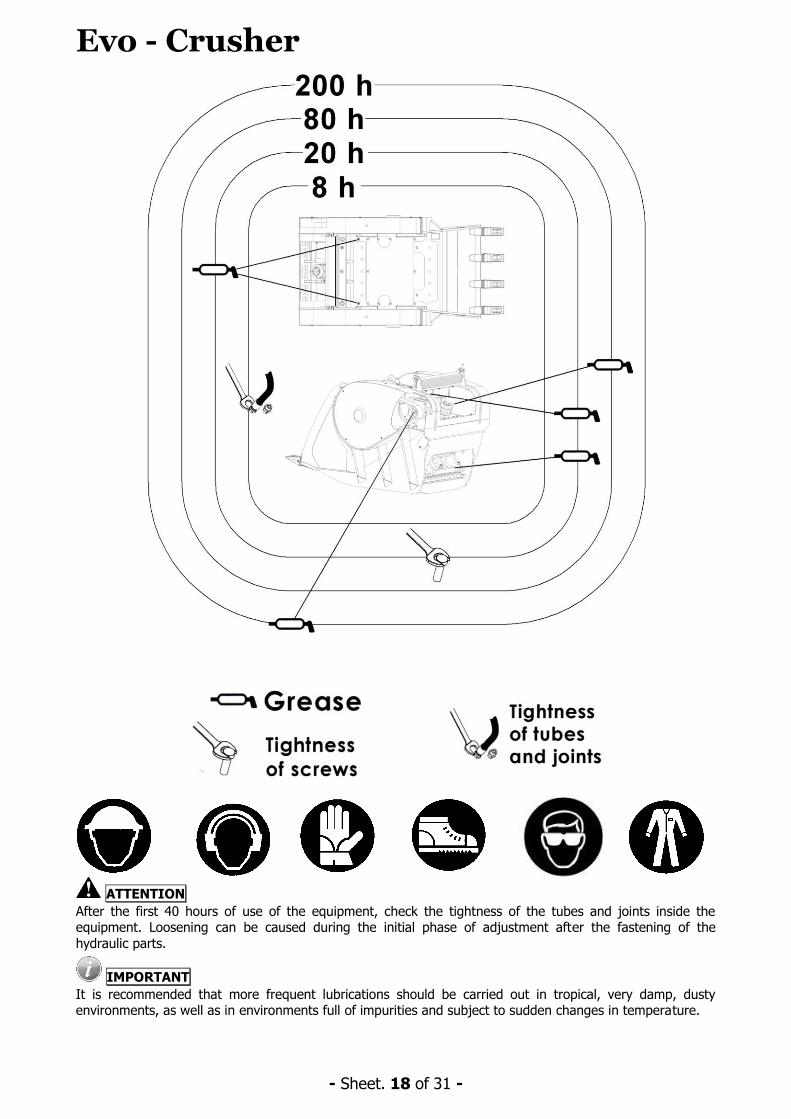
It is extremely important for operational safety to inspect and maintain the following thoroughly, keeping to their timing:
IMPORTANT
EVERY TIME THE FITTING IS USED:
Make sure the pipes are in perfect condition and check the hydraulic attachments. Al to take place itself also of single of the following conditions tube will have to be immediately taken apart
and replaced:
- displacement of the connection on the flexible pipe - in case of damages,cut or abrasions on the superficial layer
- hardening or rigidity of the flexible pipe, presence of burns or leaks due to heat - in case of crack, rust on the connection
- in case of points of loss on the flexible pipe or the connection
- in case of permanent folds, crushings, flattening or torsions on the flexible pipe - in case of bubbles, softening, usury or detachment of the external layer
IMPORTANT
EVERY 40 HOURS OF USE OF THE ATTACHMENT:
Check that there are no cracks in the welding;
Check that the screws are undamaged and securely tightened according to the enclosed table, see
section TIGHTENING TORQUE OF SCREWS AND NUTS Check the screws, elastics pegs, seeger and split pins conditions;
IMPORTANT
The level of fluid contamination must be in class 19/15 or better ; The temperature of the oil in use SHALL NEVER EXCEED 70 °C.
ATTENTION
If the attachment breaks down, contact the authorised dealer or, in any case a skilled personnel.
Neither the attachment itself nor its functionality may be modified in any way.
Evo - Crusher
- Sheet. 18 of 31 -
d
ATTENTION
After the first 40 hours of use of the equipment, check the tightness of the tubes and joints inside the equipment. Loosening can be caused during the initial phase of adjustment after the fastening of the
hydraulic parts.
IMPORTANT
It is recommended that more frequent lubrications should be carried out in tropical, very damp, dusty environments, as well as in environments full of impurities and subject to sudden changes in temperature.

Evo - Crusher
- Sheet 19 of 31 -
JAWS WEAR
JAWS:
They should be rotated by 180°. However, this operation should be done on both of the jaw grips so that
a collision does not occur between the two of them leading to a sudden blockage of the machine. Their position can be reversed, in order to ensure uniform wear.
ATTENTION
Unscrew the screws very carefully when removing the top jaw, since it may fall down and cause damage to
property or injure people or animals. It is advised to rotate or to invert the position of jaws in an equipped workshop
JAWS WEAR
L = NEW WAVE L1 = 5mm WORN WAVE

Evo - Crusher
- Sheet. 20 of 31 -
TIGHTENING TORQUE OF SCREWS AND NUTS
The tightening torque in the table is valid approximately for the following conditions:
- Hexagonal- head screws (UNI 5737 type), cylindrical-head screws (UNI 5931 and UNI 6107 type).
- The tightening torque must be applied slowly with dynamometric wrenches.
1 Nm = 0,102 kgm
The data in the table refer to Regulation DIN 267
Ø bolt hexagon
coarse fine coarse fine coarse fine coarse fine
mm mm mm Nm Nm Nm Nm Nm Nm
M8 13 1,25 1,0 25 27 35 38 42 46
M10 17 1,5 1,25 50 53 70 74 84 89
M12 19 1,75 1,5 85 89 119 125 143 150
M14 22 2,0 1,5 135 148 190 208 228 250
M16 24 2 1,5 212 226 298 318 357 382
M18 27 2,5 2,0 290 310 402 436 490 523
M20 30 2,5 2,0 413 436 580 614 697 736
M22 34 2,5 2,0 568 597 798 840 958 1.008
M24 36 3,0 2,0 714 781 1.004 1.098 1.204 1.317
M27 41 3,0 2,0 1.050 1.139 1.477 1.602 1.772 1.923
M30 46 3,5 2,0 1.429 1.590 2.009 2.236 2.411 2.648
M33 50 3,5 2,0 1.941 2.136 2.729 3.004 3.275 3.605
M36 55 4,0 3,0 2.497 2.652 3.511 3.730 4.213 4.476
NORM 8.8 10.9 12.9
Metric Thread Metric Thread Metric Thread Metric Thread
Evo - Crusher
- Sheet 21 of 31 -
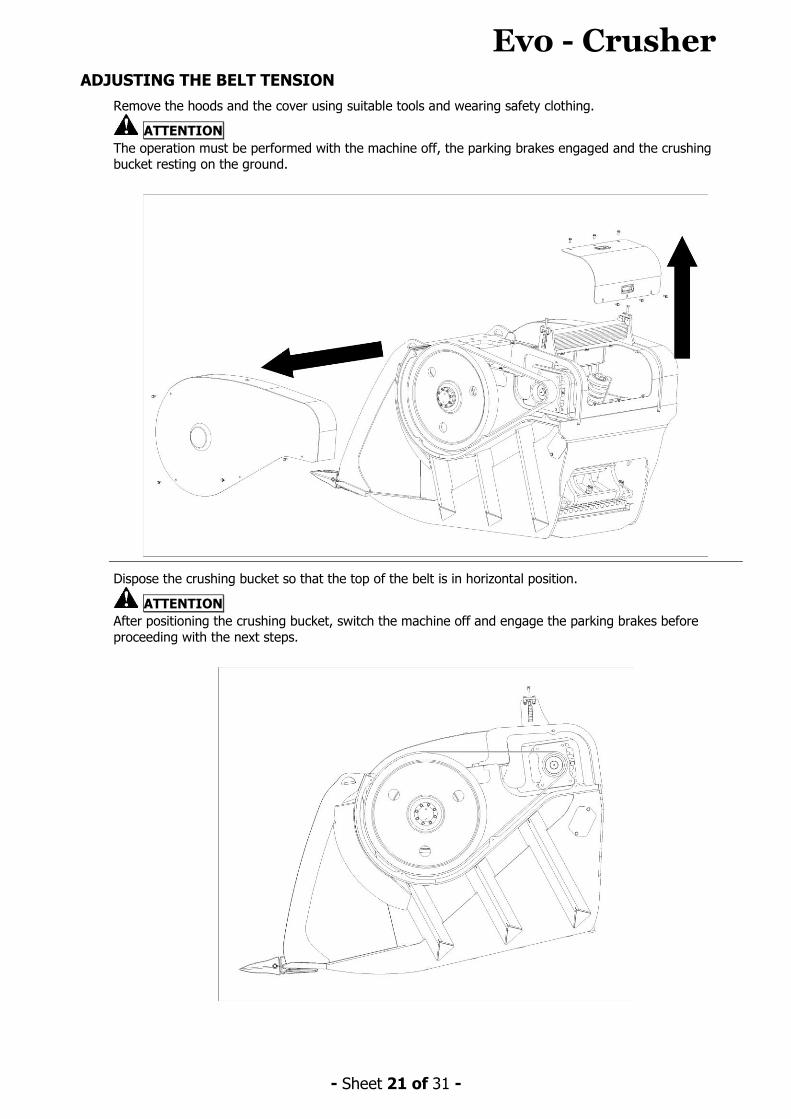
ADJUSTING THE BELT TENSION
Remove the hoods and the cover using suitable tools and wearing safety clothing.
ATTENTION
The operation must be performed with the machine off, the parking brakes engaged and the crushing bucket resting on the ground.
Dispose the crushing bucket so that the top of the belt is in horizontal position.
ATTENTION
After positioning the crushing bucket, switch the machine off and engage the parking brakes before
proceeding with the next steps.
Evo - Crusher
- Sheet. 22 of 31 -
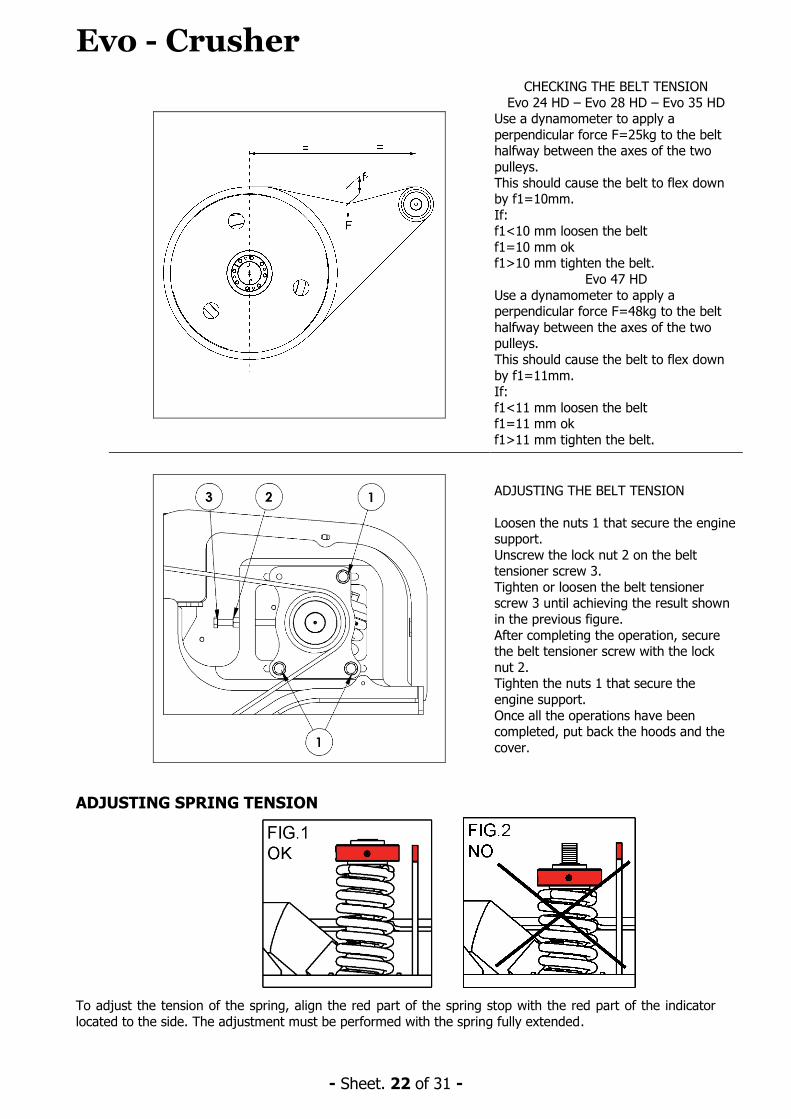
CHECKING THE BELT TENSION
Evo 24 HD – Evo 28 HD – Evo 35 HD Use a dynamometer to apply a
perpendicular force F=25kg to the belt halfway between the axes of the two
pulleys.
This should cause the belt to flex down by f1=10mm.
If: f1<10 mm loosen the belt
f1=10 mm ok f1>10 mm tighten the belt.
Evo 47 HD
Use a dynamometer to apply a perpendicular force F=48kg to the belt
halfway between the axes of the two pulleys.
This should cause the belt to flex down
by f1=11mm. If:
f1<11 mm loosen the belt f1=11 mm ok
f1>11 mm tighten the belt.
ADJUSTING THE BELT TENSION
Loosen the nuts 1 that secure the engine support.
Unscrew the lock nut 2 on the belt tensioner screw 3.
Tighten or loosen the belt tensioner screw 3 until achieving the result shown
in the previous figure.
After completing the operation, secure the belt tensioner screw with the lock
nut 2. Tighten the nuts 1 that secure the
engine support.
Once all the operations have been completed, put back the hoods and the
cover.
ADJUSTING SPRING TENSION
To adjust the tension of the spring, align the red part of the spring stop with the red part of the indicator
located to the side. The adjustment must be performed with the spring fully extended.

Evo - Crusher
- Sheet 23 of 31 -
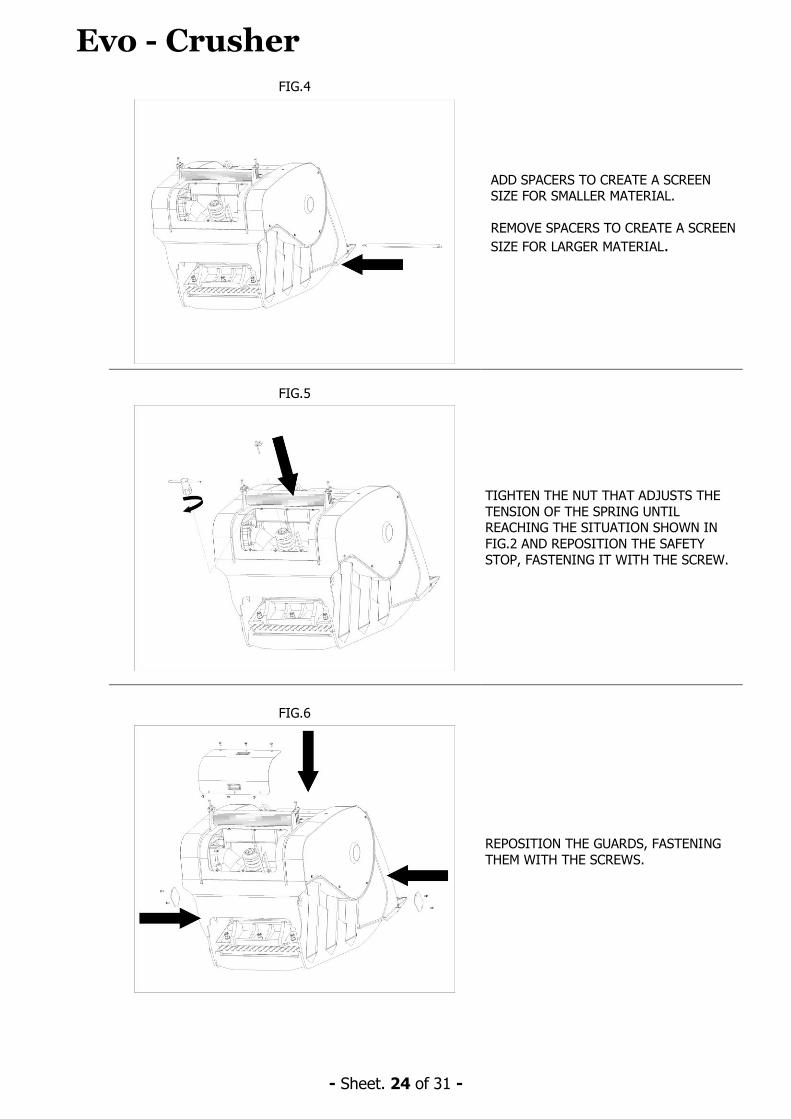
JAW OPENING SETTINGS
FIG.1
UNSCREW THE FASTENING SCREWS
ON THE GUARDS INDICATED AND REMOVE THE GUARDS.
FIG.2
CHECK THAT THE RED PART OF THE
SPRING STOP AND THE RED PART OF
THE INDICATOR LOCATED TO THE SIDE ARE ALIGNED.
FIG.3
UNSCREW THE SCREW ON THE SAFETY
STOP AND REMOVE IT. UNSCREW THE NUT THAT ADJUSTS THE TENSION OF
THE SPRING UNTIL CREATING SUFFICIENT SPACE TO ADD OR
REMOVE SPACERS. BEFORE
UNSCREWING THE NUT THAT ADJUSTS THE TENSION OF THE SPRING,
ALWAYS CHECK THAT THE SPRING IS FULLY EXTENDED (FIG.2).
Evo - Crusher
- Sheet. 24 of 31 -
FIG.4
ADD SPACERS TO CREATE A SCREEN SIZE FOR SMALLER MATERIAL.
REMOVE SPACERS TO CREATE A SCREEN
SIZE FOR LARGER MATERIAL.
FIG.5
TIGHTEN THE NUT THAT ADJUSTS THE
TENSION OF THE SPRING UNTIL REACHING THE SITUATION SHOWN IN
FIG.2 AND REPOSITION THE SAFETY
STOP, FASTENING IT WITH THE SCREW.
FIG.6
REPOSITION THE GUARDS, FASTENING
THEM WITH THE SCREWS.
Evo - Crusher
- Sheet 25 of 31 -
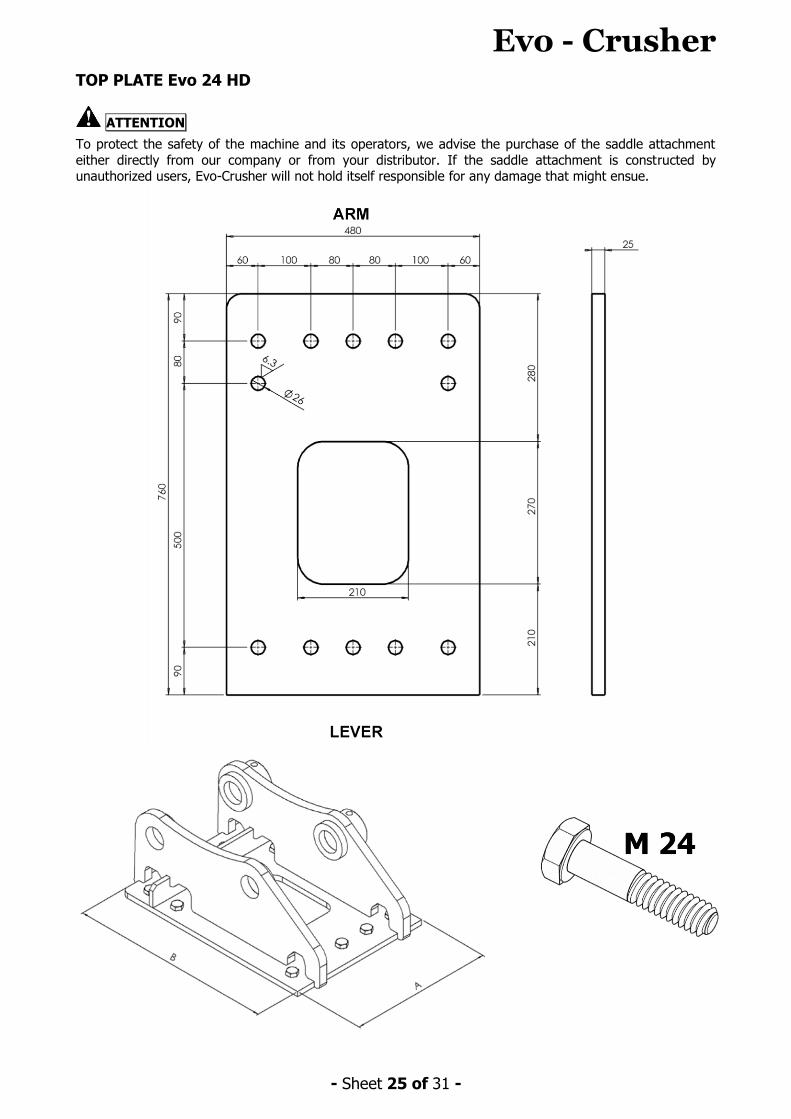
TOP PLATE Evo 24 HD
ATTENTION
To protect the safety of the machine and its operators, we advise the purchase of the saddle attachment
either directly from our company or from your distributor. If the saddle attachment is constructed by unauthorized users, Evo-Crusher will not hold itself responsible for any damage that might ensue.

Evo - Crusher
- Sheet. 26 of 31 -
TOP PLATE Evo 28 HD
ATTENTION
To protect the safety of the machine and its operators, we advise the purchase of the saddle attachment
either directly from our company or from your distributor. If the saddle attachment is constructed by
unauthorized users, Evo-Crusher will not hold itself responsible for any damage that might ensue.
Evo - Crusher
- Sheet 27 of 31 -
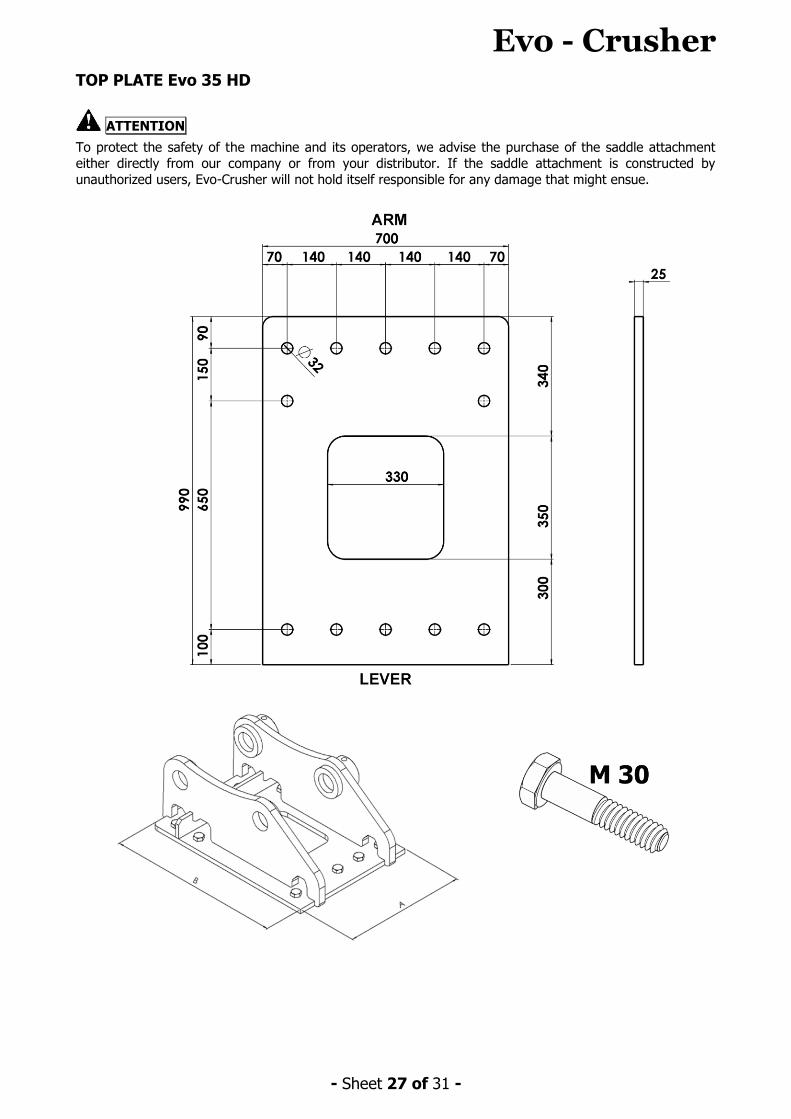
TOP PLATE Evo 35 HD
ATTENTION
To protect the safety of the machine and its operators, we advise the purchase of the saddle attachment
either directly from our company or from your distributor. If the saddle attachment is constructed by
unauthorized users, Evo-Crusher will not hold itself responsible for any damage that might ensue.

Evo - Crusher
- Sheet. 28 of 31 -
TOP PLATE Evo 47 HD
ATTENTION
To protect the safety of the machine and its operators, we advise the purchase of the saddle attachment
either directly from our company or from your distributor. If the saddle attachment is constructed by unauthorized users, Evo-Crusher will not hold itself responsible for any damage that might ensue.

Evo - Crusher
- Sheet 29 of 31 -
HITCH ASSEMBLY
Position the
equipment as shown in the figure
and, using suitable lifting gear,
approach
the holed adapter plate to the
machine
After positioning the
holed adapter plate on the attachment
plate of the machine, insert the bolts and
tighten them with a
spanner. Repeat the operation 2/3 times
to ensure they are properly tightened.

Evo - Crusher
- Sheet. 30 of 31 -
INFORMATION REGARDING DISMANTLEMENT
DEMOLITION OF THE MACHINE
ATTENTION
If you ever decide to scrap the machine, you are advised to render it inoperable by dismantling the various
components. All the dismantling process must be carried out by specialized personnel. Every time the machine is moved around on the demolition site, a suitable means of transport must be used,
with a carrying capacity greater than the weight of the machine.
ATTENTION
Empty the machine completely of all its oil content.
INFORMATION OF ENVIRONMENTAL CONCERN
ATTENTION
Disposal of the packaging materials associated with the machine, as well as substitute parts and lubricants, must be carried out with respect for the environment, avoiding pollution of soil, air and water. It is the
responsibility of the consignee to ensure that the operation is executed in full conformity with the current
regulations of the country where the machine is put to use.
ADVICE REGARDING THE PROPER TREATMENT OF WASTE MATERIAL
Ferrous material, such as aluminium and copper: to be treated as recyclable
material and taken to an official collection center. Plastic and rubber materials: these materials should be taken to the scrap-
yard or official recycling center.
Oil waste: to be taken to an official center for the collection of oil waste, to
be properly destroyed.
Never tip oil waste into drains, rivers etc.
Never discharge oil waste straight onto the ground.
Comply fully with the laws and regulations regarding the treatment of
dangerous substances such as oil, fuel, solvents used filters and batteries.
