everything you’ve always want to know about notebook/tablet programming and branding … but were...
TRANSCRIPT

EVERYTHING YOU’VE ALWAYS WANT TO KNOW ABOUT NOTEBOOK/TABLET PROGRAMMING AND BRANDING … BUT WERE AFRAID TO ASK
Presented by Lynne Fontana October 2013

2
2
ABOUT THIS TRAINING:I owe thanks to many people in supporting me in all the many elements in
developing this training for the CE population.The first of these are my East Director Carmen Lopez and Manager/Managers-
starting with Dave Davenport and now with Eric Stevenson, in understanding and believing in the importance and positive impact of CE’s having this knowledge and thus allowing me time to develop and present it to New Hires and now to our current CE population.
Secondly would be my local Orlando/Jacksonville Team- they are the ones that covered extra service cases while I took the time to gather and format and present this information. I have to also add the Ga. District Lead Jason Nicholls, South FL Lead Jose Colon who encouraged me to develop this topic during our New Hire Training
Third is Co-Chair of my TLC Programming and Branding Team-Jon Crotty who has spent countless hours writing and perfecting accurate documents so that Ces’ can understand and this topic more easily,and for listening to me for countless hours babble about this topic. I have to also add Tomietta Brown in for making each of our meetings on this topic, and other members of my Programming/Branding Team.
Last but not least, each of you who take the time to give us input and pass on information! A BIG THANKS TO EVERYONE! WE WILL MAKE HP GREAT AGAIN!

3
Module OverviewThis module will cover the following topics:• About this Training• Acronyms• Notebook/Tablet Configuration Information• Why Do We Program/Brand after system board replacement• Preparation: Creating NBDMIFIT and WNDMIFIT USB Drives• Preparation: Before you Run Programming/Branding Utilities• DMI Programming with NBDMIFIT and WNDMIFIT• Troubleshooting the DMI programming and Branding Process• What about the ElitePad 900?• Key point to remember about programming DMI• Tech Links• Q & A / Close
4
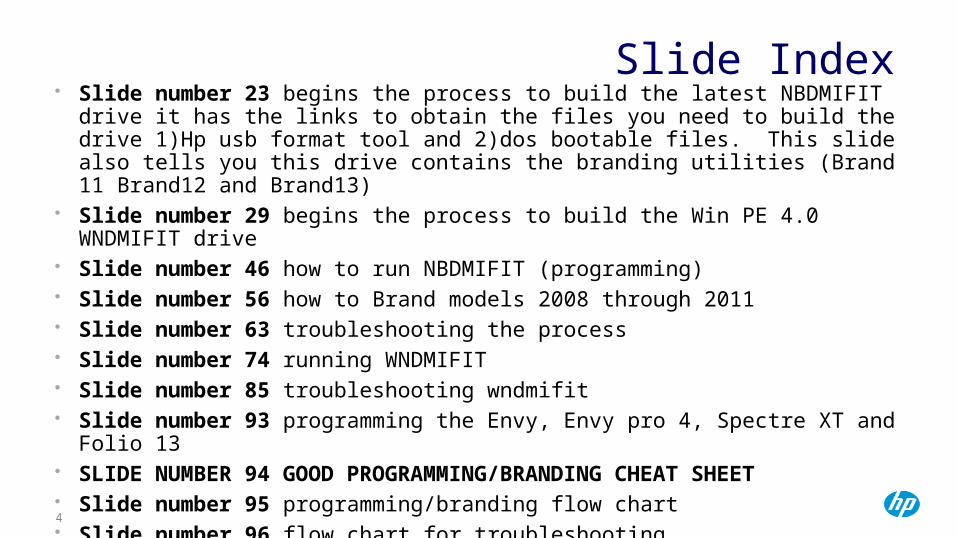
Slide Index• Slide number 23 begins the process to build the latest NBDMIFIT drive it
has the links to obtain the files you need to build the drive 1)Hp usb format tool and 2)dos bootable files. This slide also tells you this drive contains the branding utilities (Brand 11 Brand12 and Brand13)
• Slide number 29 begins the process to build the Win PE 4.0 WNDMIFIT drive
• Slide number 46 how to run NBDMIFIT (programming)• Slide number 56 how to Brand models 2008 through 2011• Slide number 63 troubleshooting the process• Slide number 74 running WNDMIFIT• Slide number 85 troubleshooting wndmifit• Slide number 93 programming the Envy, Envy pro 4, Spectre XT and Folio
13• SLIDE NUMBER 94 GOOD PROGRAMMING/BRANDING CHEAT SHEET• Slide number 95 programming/branding flow chart• Slide number 96 flow chart for troubleshooting programming/branding• Slide number 97 begins ElitePad 900 info

5
5
Acronyms • API-An application programming interface (API) is a protocol intended to be used
as an interface by software components to communicate with each other. An API is a library that may include specification for routines, data structures, object classes, and variables
• AT-Intel AT (Anti-Theft) is a hardware and software-based security solution Customer must enroll with Absolute through CompuTrace in ProtectTools
• AMT-Intel Active Management Technology (iAMT) is: a hardware- and firmware-based solution connected to the system’s auxiliary power plane.provides IT administrators with “any platform state” access
• BIOS-Basic Input Output System
• DMI-Desktop Management Interface
• FFD-Field Flash Drive
• MOST-Mobile On Site Toolset
• NBDMIFIT-Note Book Desktop Management Interface Interactive Tool (DOS Tool)
• SAW-Service Access Workbench

6
6
Acronyms continued SML-Service Media Library
TPM-TXT (Trusted Execution Technology) on the TPM (Trusted Platform Module) provides a combined software and hardware-based security foundation for enhanced information protection.
UEFI- "Unified Extensible Firmware Interface". The UEFI specification defines a new model for the interface between personal-computer operating systems and platform firmware. Will eventually replace BIOS. It was designed to overcome the weakness of bios such as speed and hardware limitations
WinPE – Windows Preinstall Environment, a limited Operating System with Limited Services designed to give the ability to boot a computer that doesn’t have functioning OS and allow support for NTFS files systems and 32 and 64 bit windows device drivers ( you can’t do this with DOS)
WNDMIFIT – Windows Desktop Management Interface Interactive Tool (either run from within windows or contained on a WinPE Bootable USB Drive)

7
7
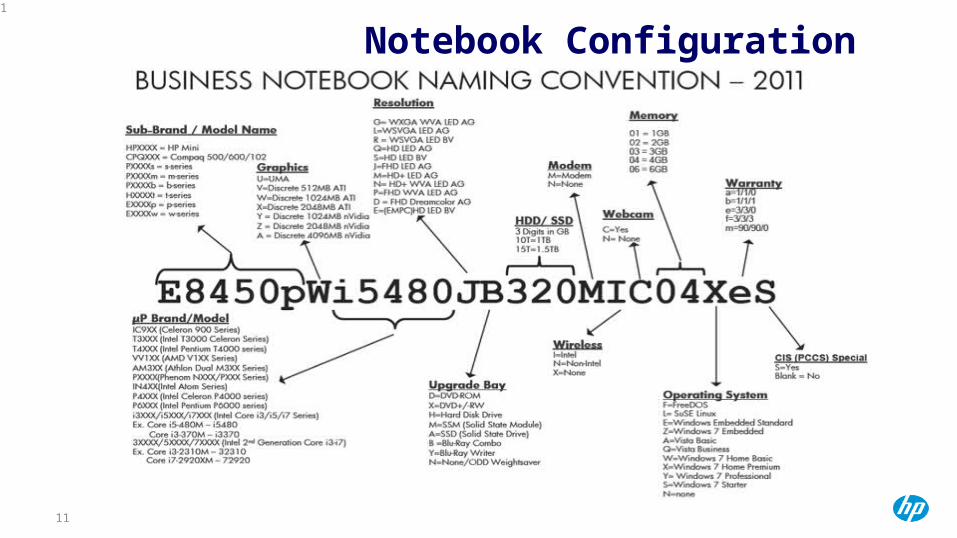
Notebook ConfigurationHP Notebook PCs - Business Notebook Naming Conventions
Failure to reference notebook naming convention can lead to improper replacement part identification. As such, this document presents both current and previous HP Business Notebook Naming Conventions.
Current Naming Convention
For the current naming convention, refer to the charts on the next pages.
You Can Find These Charts Also in SAW
http://h41302.www4.hp.com/km/saw/view.do?docId=mmr_kc-0108575&hsid=53724615&sz=4286 2013 Models
http://h41302.www4.hp.com/km/saw/view.do?docId=emr_na-c02777678&hsid=53724477&sz=3220 2008-2012 Models

8
8
Notebook Configuration

9
9
Notebook Configuration

10
10
Notebook Configuration
11
11
Notebook Configuration

12
12
Notebook Configuration

13
13
Notebook Configuration

14
14
Notebook Configuration

© Copyright 2013 Hewlett-Packard Development Company, L.P. The information contained herein is subject to change without notice. HP Restricted.
Why do we program/brand after system board replacement? What is DMI? What is Branding?

© Copyright 2013 Hewlett-Packard Development Company, L.P. The information contained herein is subject to change without notice. HP Restricted.16
What happens when the DMI is not set or incorrect?Desktop Management Interface (DMI) informationThe DMI (Desktop Management Interface) is an API to enable software to collect information about a computer environment.
After performing a system board replacement, service engineers must update the replacement system board's DMI information to match the factory settings of the original system board.
Failure to update the DMI information could result in the following:Operating system activation issues
Missing software applications
Missing CODECs
Missing serial number
Missing security features
Software image recovery problemsIMPORTANT: it is important to always update the replacement system board's DMI information.

© Copyright 2013 Hewlett-Packard Development Company, L.P. The information contained herein is subject to change without notice. HP Restricted.17
Information Location Description
Serial number Service tag or label
The customer system's serial number.
SKU number(Product Number)
The customer system's SKU (stock-keeping unit) number.
Notebook Model(Product Name)
The customer system's model name.
CTO localization (commercial only) The CTO localization defines the language and other regional features.
PCID(System Configuration ID)
PCID The Product Configuration ID (PCID) is a unique number that is used to identify the feature and software configuration for a specific notebook.
CT number on system board The CT number is used to uniquely identify a system board.
UUID Press F1 during boot, or run NBDMIFIT
The UUID (Universal Unique Identifier) is a 128-bit number automatically generated to uniquely identify the system.
DMI information Consumer and Commercial Notebooks (PROGRAMMING OR TATTOOING)

© Copyright 2013 Hewlett-Packard Development Company, L.P. The information contained herein is subject to change without notice. HP Restricted.18
Commercial Notebooks OnlyIntel technologies
Part of the DMI programming process for commercial notebooks is enabling or disabling certain Intel security features built into the system board. (Branding)
As spare parts, the features are in an "uncommitted" state and must be committed before the boards are used by customers.
Feature Description
Intel AMT Intel Active Management Technology (iAMT) is: a hardware- and firmware-based solution connected to the system’s auxiliary power plane.provides IT administrators with “any platform state” access.
Intel AT Intel AT (Anti-Theft) is a hardware and software-based security solution Customer must enroll with Absolute through CompuTrace in ProtectTools.
TPM TXT (Trusted Execution Technology) on the TPM (Trusted Platform Module) provides a combined software and hardware-based security foundation for enhanced information protection.

© Copyright 2013 Hewlett-Packard Development Company, L.P. The information contained herein is subject to change without notice. HP Restricted.
Preparation:Creating USB drives NBDMIFIT and WNDMIFIT
NBDMIFIT and WNDMIFIT

© Copyright 2013 Hewlett-Packard Development Company, L.P. The information contained herein is subject to change without notice. HP Restricted.20
Process overview Consumer and Commercial Notebooks
Confirm data and reset BIOS
• Confirm system state
• Disable EFI boot (if used)
• Reset BIOS to defaults
Enable/disable Intel features• Commercial
notebooks only
• Enable features in WNDMIFIT (2012 and later Run Brand12 or Brand13 only if necessary)
• Enable EFI boot in BIOS and reboot to indicated image (2010 and 2011 only)
Program information
• Consumer and pre-2011 commercial notebooks use NBDMIFIT
• 2012 commercial and consumer notebooks use WNDMIFIT
System assessment
• Run NBDMIFIT.BAT
• Follow instructions
• Run WNDMIFIT if ‘invalid system type’ (2012 or later)
Prepare
• Create DOS USB tool key
• Create WinPE key
• Gather/record information
• DMI
• Intel features
• Prepare BIOS
• Update
• Set clock
Programming
Branding

© Copyright 2013 Hewlett-Packard Development Company, L.P. The information contained herein is subject to change without notice. HP Restricted.21
Consumer and Commercial NotebooksHP Mobile DMIFIT tools
The HP Mobile DMIFIT employs a common tool strategy:Combines the consumer and commercial notebook DMI flashing tools. One version of the utility supports:• all consumer product families that
shipped after 2C08.
• all commercial product families that shipped after 2009 through 2012.
The utility identifies the notebook and automatically launches the appropriate tools.
This strategy:• Reduces the number of utilities required
to support the HP notebooks.
• Eliminates the need to determine whether a notebook was consumer or commercially developed.
The HP Mobile DMIFIT can be downloaded from: 3LS website
HP Channel Services Network (CSN) website
HP Partner Portal
Regional service SharePoints

© Copyright 2013 Hewlett-Packard Development Company, L.P. The information contained herein is subject to change without notice. HP Restricted.22
Consumer and Commercial NotebooksNecessary tools
The HP Mobile DOS DMI Firmware Interface Tool (DMIFIT) and the Windows WNDMIFIT are service utilities used to restore notebook-specific information.
HardwareUSB keys (4gig or less in size)
AC power adapter
SoftwareHP Mobile DMIFIT tools
NOTE: Since the tools require USB access, certain systems require a docking station, jacket, or dongle.
USB Key Description
DOS key The bootable DOS key with the NBDMIFIT tools is for 2011 and earlier systems.
WinPE key The WinPE key with the WNDMIFIT tools is used when Windows is unavailable for 2012 and future products.

© Copyright 2013 Hewlett-Packard Development Company, L.P. The information contained herein is subject to change without notice. HP Restricted.23
DOS Tools – Consumer and Commercial NotebooksUSB drive creation
Most of the mobile system's tools are run from an USB key drive.
To create the USB tools drive:
1. Format an USB key drive as DOS-bootable • 4 GB and lower recommended. Do not use more
than 4 GB.
• Although the tools are not 4 GB, you should dedicate the drive to the DMI tools.
2. Decompress the tools on the USB key, maintaining the directories.
USB drive
IMPORTANT: HP Mobile DMIFIT is internal to HP and its partners, and should not be left with or provided to the customer.

24
24
Creating The NBDMIFIT USB DriveCreating a bootable USB DOS NBDMIFIT for models (2008...2011) This drive also contains branding utilites.
PART A
You will need to download the latest verison of DMI files to obtain the latest version of NBDMIFIT tools from this site:
http://intranet.hp.com/PSG/WW/Notebook/TCE/3LSCCE/3LS/Pages/Commercial3LSTools.aspx
1. Click on DMIFIT Folder.
2. It will Download the Folder Called NBDMIFIT 1.1E (or whatever the latest file is).
3. Save to your laptop and extract using winzip to your laptop (I have a directory called utilities\ nbdmifit that I save these in so I can easily locate them)

25
25
Creating The NBDMIFIT USB Drive cont‘PART B
1. Download and save OTHER UTILITY FILE YOU WILL NEED TO MAKE THE DRIVE BOOTABLE:
Username: test1234 Password: Test1234
Go to this site ftp://ftp.usa.hp.com/
A)Download the HPUSBFW1.exe file (save to known location on your laptop
B)Download the winpebootdisk.zip file (save to known location on your laptop I created a directory called utilities/DOS Boot)
2. Extract the file win98bootdisk.zip
3. Plug the key into a USB port.

26
26
Creating The NBDMIFIT USB Drive cont‘4. Start the software "HP USB Disk Storage Format Tool".
5. Start > All Programs > Hewlett Packard Company
6. In "Device" select the USB drive.
7. In "File System" select FAT32.
8. Select the "Create a Dos startup disk".
9. Select the "Using DOS system file located at" fill in the path /point it to the location of your DOS boot files from step B2 (C: \ UsbBoot for example).
10. Click Start.
27
27
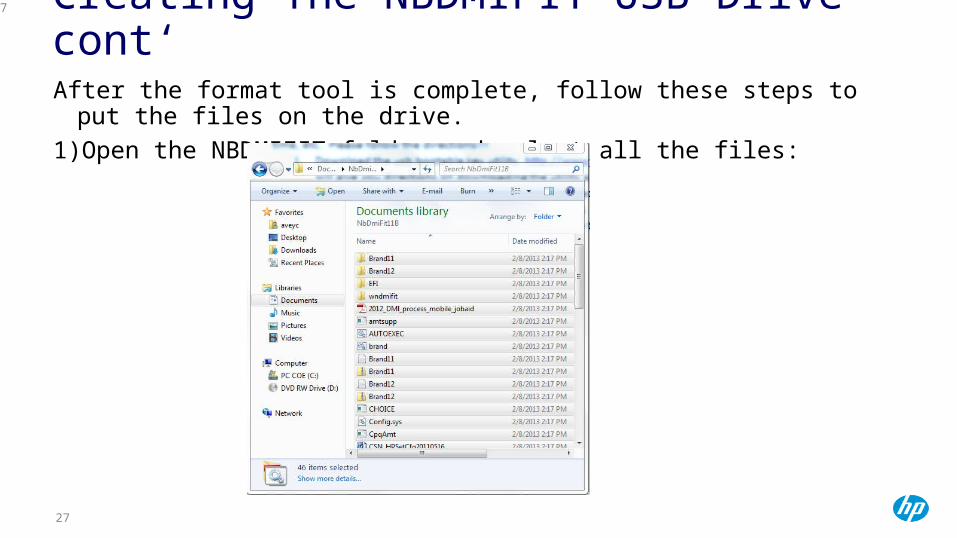
Creating The NBDMIFIT USB Drive cont‘After the format tool is complete, follow these steps to put the files on
the drive.1)Open the NBDMIFIT folder and select all the files:

28
28
Creating The NBDMIFIT USB Drive cont‘2) Right click and select send to, then whatever your usb drive is named.
3) The files will then copy over and the key is ready to go!
4) When your ready to use the key, just select F9 and then select usb hard drive.
The machine will boot into DOS prompt and you are ready to program the information onto the new system board.
THE FOLLOWING IS ONLY IF YOU ARE WORKING ON A 2012 SUCH AS A 70 SERIES MACHINE OR NEWER (8570, 8470, 8770, ETC)
If you notice the wndmifit folder listed, this is because you can double click on that folder and it will display three files. One of them labeled wndmifit, if you are willing to log into the customer’s operating system then you can run the utility from there to program the DMI information. Otherwise, you need to follow the directions for Creating bootable WNDMIFIT usb drive to program this information.

29
29
Creating a WINPE 4.0 bootable drive with WNDMIFITThis method recently changed to allow you to use this drive on both
the 2012 and greater notebooks and the ElitePad 900 tablet.
What’s Needed:
USB key drive (4 GB recommended)
Technician computer with Symantec Ghost version 11 (or greater) installed
WinPE900.GHO Ghost image file
(Perform these steps while on the TECHNICIANS LAPTOP)
1) (Note: If you already have Ghost version 11 or greater installed on your pc, skip to step 6)
Download the trial version of Ghost 11 from https://www.symantec.com/ghost-solution-suite. (Click on “trialware” in the top right corner of the page)
2) It will ask you to sign in or create a new account so you will probably have to create a new account unless you already have one.

30
30 Creating a WINPE 4.0 bootable drive with
WNDMIFIT3) Once your account is set up you will be directed to a page where you pick which language version you want to download. Select the top option “Symantec Ghost Solution Suite 2.5.1” (it does NOT say English but this is the right one)
4) When it finishes downloading it should pop up a box saying it’s complete. Choose “launch”
5) This launches the installer. Just click “next” all the way through until it says it’s finished and leave everything set to the defaults. Towards the end of the install it will ask you to visit a website to activate it, but this isn’t necessary since it is a trial version.
6) Now visit this ftp site ftp://rwinpe:[email protected] and download the
WinPE900.GHO image file to your desktop.
7) Insert the blank usb drive you plan on using (1 GB to 4 GB drive recommended.)

31
31 Creating a WINPE 4.0 bootable drive with
WNDMIFITImportant: Remember, this drive MUST be formatted as Fat32!
8) Go to Start>All Programs>Symantec Ghost>Ghost Explorer. This will open Ghost Explorer.
9) Click on the “Open” icon (first icon on the top left, looks like a folder) and this should pop up a window where you can navigate and find the WinPE900.GHO file that you saved to your desktop. Select this file and click “Open.”
10) You should then notice some files and folders added to the main pane of Ghost Explorer. Now click on the extract icon (second icon from the top left, looks like a piece of paper with an arrow through it). This pops up a window where you can tell it where to extract the files to. Navigate to the usb key you plan on using and click “OK.” This may take a few minutes. It took a minute or so before I seen it start to do anything so just be patient. You can see the progress at the bottom of the Ghost Explorer window. When it’s finished it will say Complete. To double check everything worked go to Windows explorer and open your flash drive and see if the files transferred onto it properly.

32
32
Additional notes on Ghost processSome CEs’ have reported an issue when they FAT32 format their USB drives where, the usb drive will not boot on 2012 laptops. If this happens and you have used the USB Format utility (HPUSBFW1) you may need to format using the following manual format commands at the command prompt. See next slide for these commands.

33
33
Additional notes on Ghost process1) From your laptop launch command prompt log in as admin, you do this by clicking start/select all programs/Accessories/ you will see command prompt and right click it and choose ‘run as admin’ you will then get a command prompt window everything else below will be typed in that window, type everything after the word type,you will type in only the commands in RED
2TYPE Diskpart
3)TYPE List Disk ( Make sure you notate which drive is your USB drive. See next page for example)
4)Type Select Disk 1 (make sure you are careful to select the disk number that is the USB DISK you want to format. See next page for example)
5) TYPE Clean
6) TYPE Create Partition primary
7) TYPE Select Partition 1
8)TYPE Active
9)TYPE Format FS=FAT32
10) TYPE Assign
11) TYPE Exit
After this is finished then use Symantec Ghost to extract the ghost image to your USB drive and see if you can boot the drive on your laptop (8440p and later models)

34
34
Additional notes on Ghost process

35
35
Additional notes on Ghost processRegarding this note Note: Do not extract the “Fat32 - NO NAME” folder itself, only
its content. At the end of the procedure, the following should be at the root of your USB key: folders: “Boot”, “efi”, “sources” and “wndmifit” files: “bootmgr.efi”, “bootmgr” and “Das.bat”

36
36
Additional notes on Ghost processHere’s what to extract:

37
37
Additional notes on Ghost processThese are the files that will be on your WNDMIFIT drive if made
properly. The Das.BAT is what allows you to boot it on the Elitepad 900.

38
38
Additional notes on Ghost processSAW Advisory that covers this process
http://h41302.www4.hp.com/km/saw/view.do?docId=mmr_kc-0107001&hsid=53725739&sz=9830

© Copyright 2013 Hewlett-Packard Development Company, L.P. The information contained herein is subject to change without notice. HP Restricted.
Preparation:Before you run Programming/Branding Utilities
Updating Bios, Set Date and Time, Gather Info

40
40
Before running NDMIFIT or WNDMIFIT- Assure the following: Make sure that the BIOS is up to date. Date/Time are modified/updated in bios. Failure to set date and
time can cause issues with UUID being properly created. AC adapter is connected USB disc drive formatted in FAT32 and have all files of EEPROM
utility in root. Do not store any other files on these drives. Connect the bootable USB disc drive on the 2.0 USB connector.
Never use the 3.0 USB connectors, they are blue in color. Have the last tool version. All CEs’ should periodically check the
site to see if there is an update.

© Copyright 2013 Hewlett-Packard Development Company, L.P. The information contained herein is subject to change without notice. HP Restricted.41
Consumer and Commercial NotebooksBIOS update
The replacement system board might not include the most up-to-date BIOS version. • It is important to update the BIOS version
to the latest version.
• The customer might require the BIOS to be updated to a specific version. In this case, the BIOS should be updated to the requested version.
The latest BIOS can be downloaded from the HP Support website. If the version currently installed and the version on the HP Support website are the same, no further action is required.
BIOS InstallationThe basic steps for installing a BIOS are:1. If the product is a notebook PC, make
sure that it is connected to an AC power source.
2. Locate the downloaded BIOS installation file on the computer.
3. Double-click the file to start the installation and follow the on-screen instructions.
4. Allow the installation to complete all its actions and automatically restart. If prompted, press the power button to restart the computer.

© Copyright 2013 Hewlett-Packard Development Company, L.P. The information contained herein is subject to change without notice. HP Restricted.42
Consumer and Commercial NotebooksSet system clock
The replacement system board might not have the correct time set in the system clock. The automatic UUID generation requires the system clock be set correctly.
The UUID is generated as the other DMI information is programmed.
The clock must be set at least within the time zone and close to the current time.
Setting the system clockThe basic steps for setting the clock are:1. Access the System BIOS by pressing
F10 during boot.
2. Select File - Set System Date and Time.
3. Set the date and time for the timezone you are in.
Set System clock

© Copyright 2013 Hewlett-Packard Development Company, L.P. The information contained herein is subject to change without notice. HP Restricted.43
Consumer and Commercial NotebooksService tag label
All notebooks are shipped with a Service Tag label that identifies the:• Model
• Serial number
• Configuration of the notebook
• warranty
The notebook Service Tag Label is located on the bottom of the notebook or inside the EasyAccess cover.
Example Service Tag
NOTE: The Service Tag Label is usually located under the battery.

© Copyright 2013 Hewlett-Packard Development Company, L.P. The information contained herein is subject to change without notice. HP Restricted.44
Consumer and Commercial NotebooksCT number
The Commodity Tracking (CT) Number is unique to each system board.
The fourteen digit System Board CT Number is included in error messages when other DMI information is missing.
The CT number is on a label next to the memory.
See system documentation for instructions on accessing the memory to see the label.
CT Number example

© Copyright 2013 Hewlett-Packard Development Company, L.P. The information contained herein is subject to change without notice. HP Restricted.
DMI Programming with NBDMIFIT and WNDMIFIT
Programming/Branding Units Prior to 2011

© Copyright 2013 Hewlett-Packard Development Company, L.P. The information contained herein is subject to change without notice. HP Restricted.46
Commercial Notebooks before 2011DMI update procedure
For commercial notebooks made before 2011, the DMI information must be updated using the DOS utility NBDMIFIT.
1. To launch the nbdmifit utility, type 'nbdmifit' at the command prompt and press Enter.
2. At the nbdmifit menu, press P to start updating the DMI information.
NBDMIFITNOTE: The utility displays a summary of all the DMI information you have entered. It also enables you to make any changes before finishing the process.

47
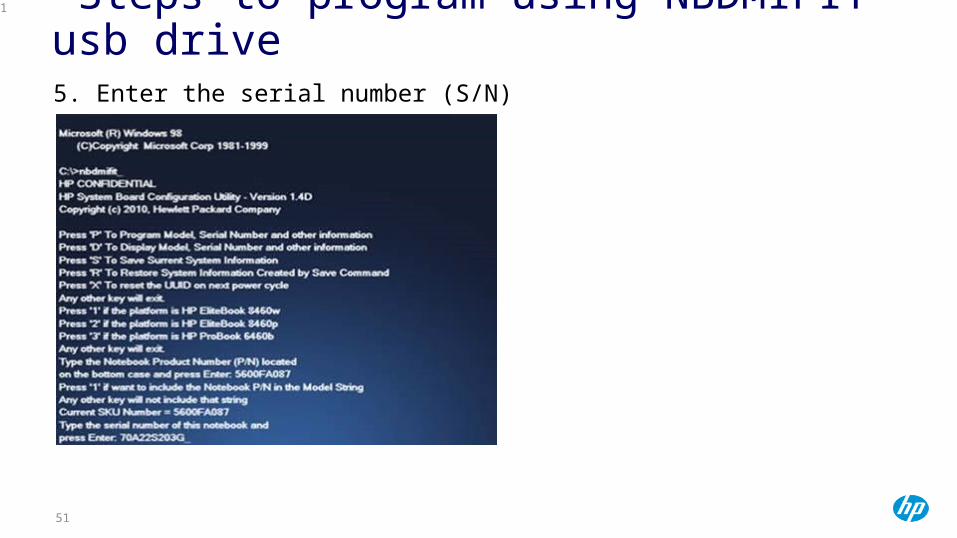
47 Steps to program using NBDMIFIT usb
drive1. Type "P" to set the motherboard

48
48 Steps to program using NBDMIFIT usb
drive2. Select the model

49
49 Steps to program using NBDMIFIT usb
drive3. Enter the product number (P/N)

50
50 Steps to program using NBDMIFIT usb
drive4. Tap any other key to not include the P/N in the "model name“
51
51 Steps to program using NBDMIFIT usb
drive5. Enter the serial number (S/N)

52
52 Steps to program using NBDMIFIT usb
drive6. Press "Y" if the "asset tag" is the same as the serial number
7. Enter the configID (8 hexadecimal characters) and press Enter if not exist
A0001C02, A0001D02: TPM ON
A0001402, A0001502: TPM OFF

53
53 Steps to program using NBDMIFIT usb
drive8. Type "Y" to enable "CompuTrace" or any other button if the computer does not support this technology.

54
54 Steps to program using NBDMIFIT usb
drive9. Enter the CT number (14 hex characters)

55
55 Steps to program using NBDMIFIT usb
drive10. Check and confirm data

56
56
Configure AMT and AT (Commit/Brand)On the older units, 2008 and 2009 and some 2010 this will run
automatically.
ON MOST 2010 UNITS:
For the Error related to Vpro/system not in committed state: Check if there is vpro written on Intel sticker or on the Top of the Unitt
While you have your NBDMIFIT boot in dos in the unit type the following commands:
If there is Vpro (to enable Vpro), use the command: cpqamt.exe write on
If there is no vpro (to disable Vpro), use : cpqamt.exe write off.

57
57
Branding/Committing 2011 Units1. Enable "UEFI Boot from file" in BIOS
2. System configuration > Boot Options > UEFI boot mode
3. Restart the laptop by connecting the USB

58
58
Branding/Committing 2011 Units4. Boot from the USB drive by pressing F9
5. Select "UEFI Boot from file"

59
59
Branding/Committing 2011 Units6. Select "Brand11“
7. Select "boot64X.efi

60
60
Branding/Committing 2011 Units8. Enable/disable Intel AT
If Intel security features is enabled, restart the laptop several times.

61
61
Branding/Committing 2011 UnitsNote:If the computer does not have the technology Vpro, HpMeBrand
tool will choose three non-directly Vpro.
9. Type 9 to restart

62
62
Branding/Committing 2011 Units10. Access the bios and set the default settings
11. Confirm with "Yes"
12. Check if "UEFI Boot from file" is disabled else disable it

63
63
Error messages during programming system board:
*** Invalid serial number ***
Issue: On startup, a warning message indicate that the system has found an invalid serial number. Product Information not valid The following product information programmed into the system board is missing or invalid. System Board (00A) - X XXXX XX XX XX XXX
Cause: The system board settings might not have been programmed correctly with a new serial number.Solution: Use the HP Mobile DMIFIT to reprogram the system board
settings.

64
64
Error messages during programming system board:
*** Machine is not in committed state ***
Problem: An error message appears after programming system board "machine is not in committed state"
Cause: Commit/Branding has not done or done correctly
Solution: First check that the system board does not have Vpro (on the CPU socket, the label on the top cover or on the system board and follow the steps in Configuring AMT and AT (Commit)

65
65
Error messages during programming system board:
*** DMIFIT Fails at System Configuration ID Input Stage ***
Problem: After replacing the system board, the process of DMIFIT can not be completed. An error message appears after entering the config ID. Without a valid ID system configuration, the tool can not move to the next step.
Cause: The PCID (config Id) and Computrace settings can be configured once the system board has turned on the MPM mode. The default configID will be displayed before giving to user the option to enter a new config. The config ID can be changed when the system board is in MPM. The NBDMIFIT utility will disable MPM once configuration is complete.
Solution: Change the config ID as follows:
A0001C02, A0001D02: TPM ON
A0001402, A0001502: TPM OFF

66
66
Error messages during programming system board
*** Manufacturing program mode set 1 of 10 ***
Disregard this if you have not yet run NBDMIFIT or WNDMIFIT
Problem: When the laptop is turned on, the following error message appears: Manufacturing Program Mode set: x of 10
Cause: This problem occurs when the laptop is badly put in "Manufacturing program before shipping." The Manufacturing Program Mode allows up to 10 attempts to use before resetting the laptop itself and resumes its expected behavior.
Solution: To remove this message, follow the instructions below: Turn on the computer and make sure it is connected to the charger as the message appears. Turn off the computer, disconnect the Ac adapter, plug it and start If the message still appears, you will see that the counter increases by 1 eg: Manufacturing Program Mode set 2 of 10 Repeat the same process until the message disappears (maximum of 10 attempts).

67
67
Error messages during programming system board
*** Me region is not unlocked ***
Problem: After replacing the system board, an error message is displayed: Me region is not unlocked
Cause: The settings of the system board are not correctly programmed
Solution: To resolve this issue, follow the steps below:
- Step 1: Turn off the computer. Remove the battery. Press and hold three keys: Windows, left arrow and right arrow. Turn on the system. Release your fingers when seeing the HP logo on the screen. Press F9 to change the boot order, then choose your USB NBDMIFIT type, and follow the classic step of system board programming.
At the next reboot, another message will be appear: « Hard GPIO-33 lock SPI Global reset disconnect AC and DC power and reboot the unit. Disconnect the AC power and un-plug the USB key and restart the unit » Turn off the laptop and unplug the power cord for a few seconds, then reconnect the adapter and turn it again.
- Step 2: If the step 1 does not resolve the problem, escalate the issue to the (2LS/3LS) team to recover the utility UNC10 to one-commit the Management Engine (ME) when the Error “Me region” has not committed. After receiving the file, follow the same instructions for SMC.bin.
68
68
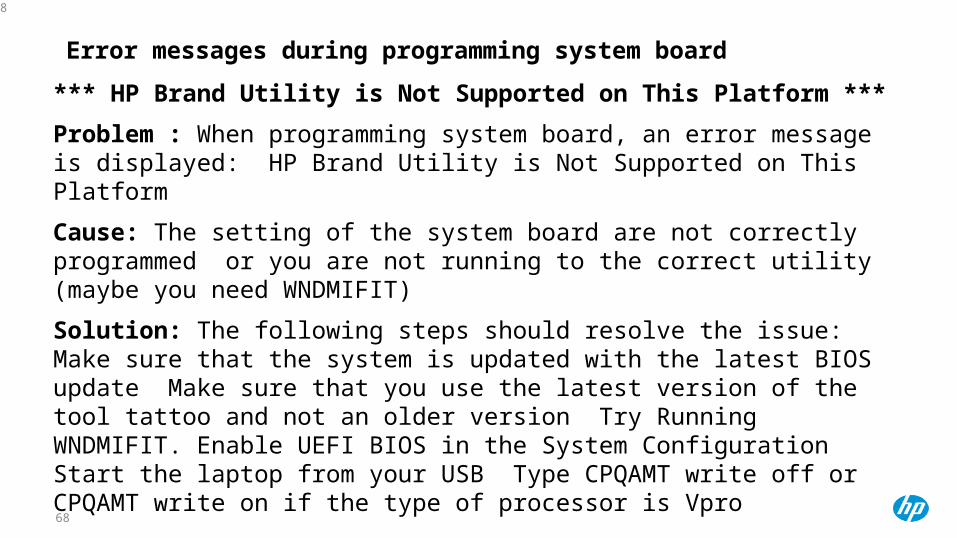
Error messages during programming system board
*** HP Brand Utility is Not Supported on This Platform ***
Problem : When programming system board, an error message is displayed: HP Brand Utility is Not Supported on This Platform
Cause: The setting of the system board are not correctly programmed or you are not running to the correct utility (maybe you need WNDMIFIT)
Solution: The following steps should resolve the issue: Make sure that the system is updated with the latest BIOS update Make sure that you use the latest version of the tool tattoo and not an older version Try Running WNDMIFIT. Enable UEFI BIOS in the System Configuration Start the laptop from your USB Type CPQAMT write off or CPQAMT write on if the type of processor is Vpro

69
69
Error messages during programming system board
*** Unable to enter DMI information ***
Issue: Unable to enter DMI information on systems made after 2011 when using wndmifit.
Cause: For systems made after 2011, the DMI information can only be set one time using the wndmifit tools. If the information is entered incorrectly, an unique key must be generated to unlock the system and restart the process.
Solution: The problem must be escalated to the next level to support which will create the one-time use key to unlock the system. The system UUID is required to create the unique key.

70
70
Error messages during programming system board
MPM NOT LOCKED AFTER RUNNING NBDMIFIT ON Folio 13, Envy Pro, Envy Pro 4 and Spectre XT
The error message "Manufacture Programming Mode Is In Unlock Mode" displays when programming the system board.
• To solve this issue, No need to elevate case to 3LS. The "mpmlock.bat" utility in the WNDMIFIT folder for version nbdmifit1.1e tool can solve the issue and reset the MPM only on the HP Spectre and models with PL:6U. To use this tool boot with Windows PE and navigate to WNDMIFIT, just run the “lockmpm.bat" and restart the laptop. If you get an error, run rMPMcnt.bat (to reset the counter) and then run lockmpm.bat

71
71
Other Info:On 2010 Units if NBDMIFIT doesn’t work, you can run this file from that drive
1. Run the File hpsetxxx.exe (hpset14b.exe or hpset14d.exe or hpset14f.exe) and then Follow the On screen instruction to change the Serial Number and product Number.
2. If you get an Error on Restart “PCID Not Valid”, re-run the same file and Enter the PCID as Zero 25 times.
On 2011 Units you can do the same thing:
1. Run the File hpsetxxx.exe (hpset14b.exe or hpset14d.exe) and then Follow the On screen instruction to change the Serial Number and product Number.
2. If you get Error Enter CT number while Configuring Serial Number, you will find 14 Digit CT Number on Battery Compartment and 8 Digit CT number in BIOS.

72
72
Other Info:In Fact NBDMIFIT is a Windows Batch file, it queries the units and then
determines which actual executable file to run. If you know the correct executable for your type system board you can run it directly. Sometimes this is a work around for issues with this utility.
HOW CAN YOU TELL WHICH SYSTEM BOARD YOU HAVE?Look up the serial number of your system in SAW and look for the
manufacturer

73
73
Other Info:Once you find that compare it to this table in the NBDMIFIT.bat
file
Set PackageVersion=1.1ESet Quanta_Uti_Name=HPBQ169.exeSet Wistron_Uti_Name=HPBW085.exeSet Compal_Uti_Name=HPBC329.exeSet Inventec_Uti_Name=HPBI180.exeSet Flextronics_Uti_Name=HPBFL237.exeSet bNB_Uti_Name=HpSet152.exeSet Foxconn_Uti_Name=HPBFO061.exeSet Pegatron_Uti_Name=HPBP121.exeFor HPBQ169, HPBQ IS THE FILE NAME AND 169 IS THE VERSION OF THE FILE

© Copyright 2013 Hewlett-Packard Development Company, L.P. The information contained herein is subject to change without notice. HP Restricted.74
2012 Commercial and Consumer NotebooksDMI update procedure
For 2012 and later consumer and commercial notebooks, the DMI information must be updated using the Windows utility WNDMIFIT. (this may be able to be run on some 2011 notebooks others will require nbdmifit)
1. To launch the wndmifit utility, run 'wndmifit' on the USB key from Windows command line. (Use WinPE if Windows with Admin is unavailable.)
2. Enter the DMI information.
3. Set the Intel security features.
4. If entered correctly, program the information:
• China ONLY - use Commit Only
• All other regions - use Commit & Lock MPM
WNDMIFITIMPORTANT: For 2012 systems, the DMI information can only be set one time using the WNDMIFIT tools.

75
75
Updating DMI Using WNDMIFITNOTE: You can also run wndmifit directly from within the customer’s copy of
windows. If you wish to do so then login into windows with your thumb drive plugged in and navigate to the wndmifit executable file and double click it. This should pop up the window to edit the fields you need to edit. Keep in mind that you can only run this utility from within windows if the user profile you are running it under has administrative rights on the machine, if not you will need to boot to the WinPE bootable WNDMIFIT drive and run it that way.
To Boot from Windows PE Bootable WNDMIFIT1) Insert USB drive into a 2.0 USB port on Laptop2) Turn unit on hit ESC key for boot options, choose option f9 you
should be presented with a list of bootable items, choose your USBSee Photo on Next Page

76
76
Updating DMI Using WNDMIFIT
NOTE: When your drive boots it will look like the next photo, not like a regular Windows OS

77
77
Updating DMI Using WNDMIFIT
When you see this Prompt above Windows PE is now booted you need to determine which drive letter is associated with your USB drive so you can navigate to the WNDMIFIT folder

78
78
Updating DMI Using WNDMIFIT1) At the command prompt
X:\Windows\system32> type “diskpart”
2) Wait for command prompt to change to: DISKPART> and then type “list volume.” Determine the drive letter assigned to your thumb drive. This can vary from system to system depending on drive configurations. The drive you want is the one that says “Removable”. For me it was the D: drive.
3) Exit diskpart by typing “exit” at the command prompt.

79
79
Updating DMI Using WNDMIFIT4) After returning to the original command prompt change drive by typing the drive letter you determined plus colon (i.e. D: or E:). Then, change directory to wndmifit by typing “cd wndmifit” at command prompt. Then execute wndmifit.exe by typing “wndmifit” at command prompt

80
80
Updating DMI Using WNDMIFIT5) This then should pull up a window where you can edit fields such as the product name (make sure to select the product name from the pull down tab. If you type it in manually it will NOT set it correctly and the unit will boot with the error “product name not set” and the user will have to hit enter to boot after every reboot), sku number (do not need to add #ABA at the end), tpm state (should be ON for laptops in the U.S.), computrace (set to ON in case the customer currently uses this feature or wants to use it in the future), system config ID (this field should be pre-populated and does NOT need to be edited. Do NOT check the checkbox “Edit PCID.” This will open up the system config id so you can edit it but you should just leave the config id the way it is.

81
81
Updating DMI Using WNDMIFITNote: Sometimes this field is populated with a zero (0) or will become blank when you edit other certain fields. If it is blank or is populated with a zero (0) then you will have to check the “Edit PCID” box which will allow you to edit the system config id field. If the machine is a vpro machine type: A0001C02 ; for non-vpro machine type: A0001402 ; remember to determine if a machine is vpro or not just check the Intel sticker located on the top cover ), serial number, asset tracking number (can usually just check the checkbox “copy serial number”), and system board CT number (this is located on a sticker on the new system board if this field is blank, however, sometimes this is already populated and does not need to be edited)
.

82
82
Updating DMI Using WNDMIFIT6) Once you populate the fields with the appropriate info click on the “Commit and Lock MPM” button. This should pop up a window that looks like this (see next page). Click OK to continue:
Note: By clicking “Commit and Lock MPM” you are actually programming and branding the board in one step. If this step runs smoothly without returning any errors afterwards, it means the board was set correctly and you DO NOT have to run Brand 11 or Brand12. On some machines you will only see a “Commit Only” button and a “Commit and Lock MPM” button isn’t present. In this case, you will program the board by hitting “Commit Only” and then you DO have to run Brand 11 or Brand12 afterwards. This will mostly be seen on 2011 units.
THE BEST PRACTICE TO DETERMINE IF THE BRANDING UTILITY WILL NEED TO BE USED, IS TO CHECK FOR THE “MACHINE IS NOT IN A COMMITED STATE” MESSAGE AFTER THE REBOOT ON STEP 9. IF THIS MESSAGE IS PRESENT, YOU WILL NEED TO RUN THE BRANDING UTILITY. IF NOT, NOTHING FURTHER NEEDS TO BE DONE!

83
83
Updating DMI Using WNDMIFITNote: Sometimes after hitting OK to continue you will see a command prompt window pop up with a blinking cursor. It may seem like it’s just sitting there doing nothing, but it is actually running a script which can sometimes take a few minutes to complete. If you see the command prompt window pop up, do NOT exit out of the window or you may receive an error and it won’t commit the settings. When the script is done running the window will automatically close itself and you can proceed to next step (6). If you accidentally exit out of the window, reboot and restart the wndmifit process and then it should work ok.

84
84
Updating DMI Using WNDMIFIT6) Another window should pop up that looks like this letting you know the Commit was successful. Click OK on this message and then reboot the machine.
7) Go into bios and check under system information that all info was updated correctly and that the UUID is set correctly and not all f’s.

85
85
Known Issues when running WNDMIFIT
MPM NOT UNLOCKED-Note: You may get a message before the wndmifit window pops up that looks like this (see above) If this happens it means the system board has already been set and “locked” by the factory or another technician and you will not be able to modify these fields.
UUID All FFFFF’s
In this case there is a generic tool that is tied to the units UUID (all F’s) that is used to unlock the board. This tool is can be use on any serial number laptop listed that contains all F’s in the UUID field. The file is called FSMC.Bin. This file unlocks the board so you can then edit the necessary fields (s/n, product name, ct#, etc.) and then commit and lock the board correctly.

86
86
Known Issues when running WNDMIFIT
Where can I obtain Generic SMC.Bin File?
If you navigate to your DOS Bootable NBDMIFIT drive Version 1.1E, go to the WNDMIFIT folder you will see a file called FSMC.BIN .
HOW TO RUN THE FSMC.BIN FILE?If you navigate to your DOS Bootable NBDMIFIT drive Version 1.1E find the file called README.TXT you can double click to open it. It has instructions for all models, all utilities contained on this drive
This is newly available as of NBDMIFIT Version 1.1E

87
87
Known Issues when running WNDMIFIT
MPM NOT UNLOCKED-Note: You may get a message before the wndmifit window pops up that looks like this (see above) If this happens it means the system board has already been set and “locked” by the factory or another technician and you will not be able to modify these fields.
UUID is populated correctly with a random set of letters and numbers but the Commit and Lock button is still grayed out.In this case you will have to create a case with tech assist who will ask you for the UUID displayed. They will then escalate it to 2nd level who will have the 2LS team email a new SMC.BIN directly to you (can take up to 48 hours or longer) that only works on the laptop that contains the UUID you provide them. This file is tied directly to the specific UUID you provided them which is why it only works on the current laptop you are working on and is NOT GENERIC. Once they provide you with the SMC.Bin file you need, just run the tool following the same directions provided in for Generic FSMC file This will change the UUID and unlock the board for you to program it correctly.

88
88
How to Run FSMC.bin or SMC.bin fileTo Run the Tool:
a. Copy the FSMC.bin file to a usb key that is formatted as a Fat32 Dos Bootable drive (as opposed to the NTFS formatting that we use on the wndmifit pe bootable drive.) You will then need to rename the file from FSMC.bin to SMC.bin
b. Press "Windows Key + Arrow UP Key + Arrow Down Key" at the same time and turn on the system
c. Release all keys. When you see the blue HP logo, press Esc. When the menu appears, you can power the notebook off.
Note: If the laptop is reading the SMC file correctly, you should see a brief message on a white screen saying "SMC command handled successfully". If you don’t see this, it means the file is not being read from the USB flash drive correctly.
Reasons it may not run correcty:
Wrong UUID is provided to create the tool
May need a different brand or smaller size USB key (recommend 2gb or smaller key)
USB key is not formatted FAT32
Make sure to use a USB 2.0 port, not a USB 3.0 port
BIOS date and time should be current and updated.
d. If it runs correctly, you should now be able to go back and program the board.

89
89
Known Issues when running WNDMIFITMachine NOT in Committed State After running WNDMIFIT and
reboot:You will need to run Brand 12. If you DO receive the message
“Machine is not in a committed state,” then follow these instructions to run Brand12 in order to commit the AMT features to the machine. After running Brand12 you should no longer see that message on boot.
HOW TO RUN BRAND12With your NBDMIFIT USB drive plugged in press f9 for the boot menu. Select
“Boot from EFI file”. Then, select “, Acpi... long file name (it should be your only option).” Then select “Brand12.” Then select “Bootx64.efi”. This then runs the utility. Follow the on screen instructions from here. It will ask you to select if you would like to commit it as a vpro or non-vpro machine by pressing “1” or “3”. Select the appropriate one (The Intel sticker on the top cover of the notebook will indicate if it is vpro or not. If the sticker doesn’t say vpro, then its not). Then it will tell you to push “9” and then “Enter” to reboot the machine. Then you need to boot back into the brand12 utility (f9>boot from efi file>,Acpi…>brand12>bootx64.efi) and it will pop up a message saying “Pass, this machine is configured!”

© Copyright 2013 Hewlett-Packard Development Company, L.P. The information contained herein is subject to change without notice. HP Restricted.90
Feature
Location
Description
Intel AMT
BIOS To check if Intel AMT is enabled:1. Access the System BIOS by pressing F10 during boot. 2. Select System Configuration - AMT Options.
Intel AT BIOS To check if Intel AT is enabled:1. Access the System BIOS by pressing F10 during boot. 2. Select Security - Anti Theft.
TPM BIOS To check if the TPM is enabled:1. Access the System BIOS by pressing F10 during boot. 2. Select Security - TPM Embedded Security.
Verify Intel security feature inclusionCommercial Notebooks Only

© Copyright 2013 Hewlett-Packard Development Company, L.P. The information contained herein is subject to change without notice. HP Restricted.91
Consumer and Commercial NotebooksRestore BIOS defaults
During the programming process, you may have set BIOS passwords or changed other settings.
To easily return the BIOS to the factory default settings, use the Restore Defaults option.
Restore BIOS defaults1. Access the System BIOS by
pressing F10 during boot.
2. Select File - Restore Defaults.
3. Click Yes.IMPORTANT: Do not return systems to the customer with altered settings.
Restore BIOS defaults

© Copyright 2013 Hewlett-Packard Development Company, L.P. The information contained herein is subject to change without notice. HP Restricted.92
2010-2012 Commercial Notebooks OnlyDisable EFI boot option
Turn off EFI from Boot-Options when finished.
To disable the EFI boot option:
1. F10 BIOS setup > System Configuration > Boot Options:
2. Under UEFI Boot mode, select Legacy box (or Disable).
3. Press F10, and save the changes.
4. Failure to disable EFI boot may cause notebook to not be able to boot from OS
UEFI Boot

93
93
Programming/Branding T/S other infoProgramming the Folio 13, Envy Pro, Envy Pro 4 and Spectre
XTRun the file NBDMIFIT (WNDMIFIT will not work on these units) and follow the
on-screen instructions to commit the boardIf the NBDMIFIT.BAT does not work, use the file hpbcxxx.exe Latest file on version 1.1D is hpbc322.exe
On 2010 Units 1. If you have issues running NBDMIFIT Run the File hpsetxxx.exe
(hpset14b.exe or hpset14d.exe or hpset14f.exe) and then Follow the On screen instruction to change the Serial Number and product Number.
2. If you get an Error on Restart “PCID Not Valid”, re-run the same file and Enter the PCID as Zero 25 times.
3. For the Error related to Vpro/system not in committed state: Check for Vpro
written on the Intel sticker. If there is Vpro, use the command: cpqamt.ext write on
If there is no Vpro, use : cpqamt.ext write off

94
94
Troubleshooting/Best PracticesDon’t panic! First run the correct tool for the year model that you are working on and document any errors/messages you receive.
2008-2010 run NBDMIFIT to program, then Branding will run auto or you will have to use command line to commit AMT
2011 NBDMIFIT to program, Enable EFI mode and run Brand 11 from NBDMIFIT
2012 and later- WNDMIFIT (either in windows or bootable Winpe), look for not committed state messages if so then enable UEFI mode in bios and Run Brand12 or Brand13 from NBDMIFIT drive
Envy Pro, Envy pro4 sleekbook, Spectre XT, Folio 13 program from NBDMIFIT if issues with it from NBDMIFIT run HPBC329.exe (This is the version on the current 1.1E nbdmifit so the file is HPBCXXX.exe the XXX will depend on what version of nbdmifit you are using), directly from the nbdmifit drive. No branding is run, if MPM not locked run LockMPM.bat from bootable Winpe drive in WNDMIFIT folder.
Elitepad 900 WNDMIFIT (either in windows or bootable Winpe)
You should always reboot after running and watch the boot process to be sure you do not receive any errors.
Check SAW for any recent advisories to our Programming/Branding tools or the unit you are working on.
Always prepare BEFORE going onsite. Have the latest version of our Tools and know which process you need to use for the Unit you are working on.

© Copyright 2013 Hewlett-Packard Development Company, L.P. The information contained herein is subject to change without notice. HP Restricted.95
Troubleshooting

© Copyright 2013 Hewlett-Packard Development Company, L.P. The information contained herein is subject to change without notice. HP Restricted.96
Troubleshooting

97
97 What about the Elitepad
900?

© Copyright 2013 Hewlett-Packard Development Company, L.P. The information contained herein is subject to change without notice. HP Restricted.98
HP ElitePad 900 – Preboot menu and USBSystem considerations
The HP ElitePad 900 is a business tablet built exclusively for Windows 8 and designed to provide seamless integration into Windows IT environments.
Access the Preboot menu by pressing the power button to turn on the HP ElitePad 900 while holding the Volume Down button.
HP ElitePad 900 Jacket
To add an USB port use:• The HP ElitePad
Expansion Jacket• The USB dongle
HP ElitePad 900 Preboot menu
HP ElitePad 900 dongle
NOTE: A microSD card can also be used as the tools drive.

© Copyright 2013 Hewlett-Packard Development Company, L.P. The information contained herein is subject to change without notice. HP Restricted.99
HP ElitePad 900 – HP BIOS SettingsSystem considerations
ElitePad 900 HP BIOS Settings do not display:
• PCID (System configuration ID)
• System BD CT#
The information is displayed with WNDMIFIT.
Restore BIOS defaultsHP ElitePad 900 BIOS

100
100
Important Facts About Working On The ElitePad 900It is very important to understand that changing the power board or sometimes called the power button board means you will need to run the WNDMIFIT tool to program/brand the unit. This board holds the configuration info rather than the system board. Those of you that remember years and years back this is how our Notebook products used to be in the old days. Because these parts contain the Digital Product Key for Windows 8 there are two different power boards depending on which version of Windows 8 the customer is running. A -501 part number board is Windows 8 Standard and a -601 part number board is Windows 8 Pro. You must install the correct part or the customer will not be able to reimage or reactivate Windows.
The system board has the embedded hard disk and contains the OS image. There are two different system boards depending on how much storage (memory/32 or 64 GB) the customer has. If you change the system board, the new board should contain an test pre- loaded copy of the Windows 8 OS you will be required to reimage the unit. Please note the time to completely reimage a unit can be as much as 2hrs and 45 min. A separate USB stick with the OS or Customer Image would be necessary to reimage. You obtain this by calling support @ this number Elite Support at 1-866-625-1175 and giving them your case number and/or serial number of the unit and they will ship this stick to you. It must be shipped to an address other than a hold for pickup, like your home address.
There is a special phone number for support of this product it is Elite Support at 1-866-625-1175
So the bottom line in this is plan ahead, read the case thoroughly as soon as you receive it so you understand how to properly plan.

101
101
Updating The DMI Info For ElitePad 900STEPS TO RUN WNDMIFIT:
1. Power off the HP ElitePad 900 G1 Tablet.
2. Dock the HP ElitePad 900 G1 Tablet to a docking station with a USB Keyboard and Mouse connected.
3. Connect the USB key.
4. Hold the Volume-Down button and press the Power button.
5. Choose "F9 Boot Option", then “USB Hard Drive” Note: In some systems, instead of “USB Hard Drive”, you may see a strange string beginning with “PciRoot(0x0)/Pci (…)”, go ahead and choose it.

102
102
Updating The DMI Info For ElitePad 9006. The X: drive WinPE command prompt will load (it may take a few seconds)
7. Change drive your USB key drive letter (typically, it should be “D:”, but this depends on the partitioning of the unit) See Next Figure

103
103
Updating The DMI Info For ElitePad 900
8. Run Das.bat (See Above Photo)
Note: It may take up to a minute or more for this to complete with the prompt accessible again

104
104
Updating The DMI Info For ElitePad 900 9. Go back to the root of “D:”, change to folder Wndmifit and run Wndmifit.exe (see photo below).
10. The “Notebook DMI Firmware Interface Tool” GUI will appear (see next Photo).

105
105
Updating The DMI Info For ElitePad 900
106
106
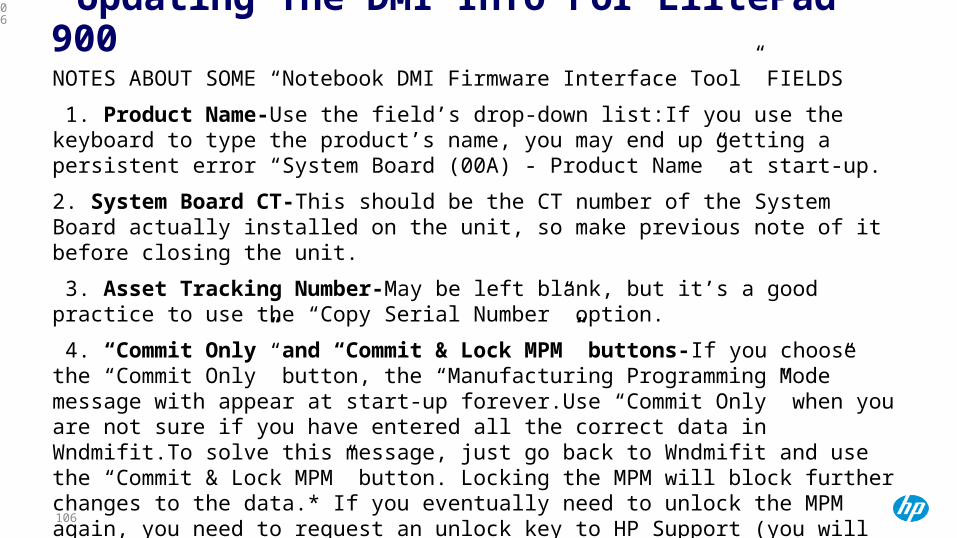
Updating The DMI Info For ElitePad 900NOTES ABOUT SOME “Notebook DMI Firmware Interface Tool” FIELDS
1. Product Name-Use the field’s drop-down list:If you use the keyboard to type the product’s name, you may end up getting a persistent error “System Board (00A) - Product Name” at start-up.
2. System Board CT-This should be the CT number of the System Board actually installed on the unit, so make previous note of it before closing the unit.
3. Asset Tracking Number-May be left blank, but it’s a good practice to use the “Copy Serial Number” option.
4. “Commit Only” and “Commit & Lock MPM” buttons-If you choose the “Commit Only” button, the “Manufacturing Programming Mode” message with appear at start-up forever.Use “Commit Only” when you are not sure if you have entered all the correct data in Wndmifit.To solve this message, just go back to Wndmifit and use the “Commit & Lock MPM” button. Locking the MPM will block further changes to the data.* If you eventually need to unlock the MPM again, you need to request an unlock key to HP Support (you will need to provide the UUID shown by the tool)

107
107
More tips for the ElitePad 900
The instructions to get to the preboot screen on the EP900 are sometimes tricky to follow.
This method listed below seems to work every time. On step 4 and 5 of the advisory hold down the volume down
button (keep holding in down), then press the power button at the same time (do not hold this button), while still continuing to hold the volume down button down button you will see the screen go black, keeping holding the button until you then see the HP logo now you can release the button. You should then see the preboot menu and can choose to boot from the USB drive that contains WNDMIFIT.
© Copyright 2013 Hewlett-Packard Development Company, L.P. The information contained herein is subject to change without notice. HP Restricted.108
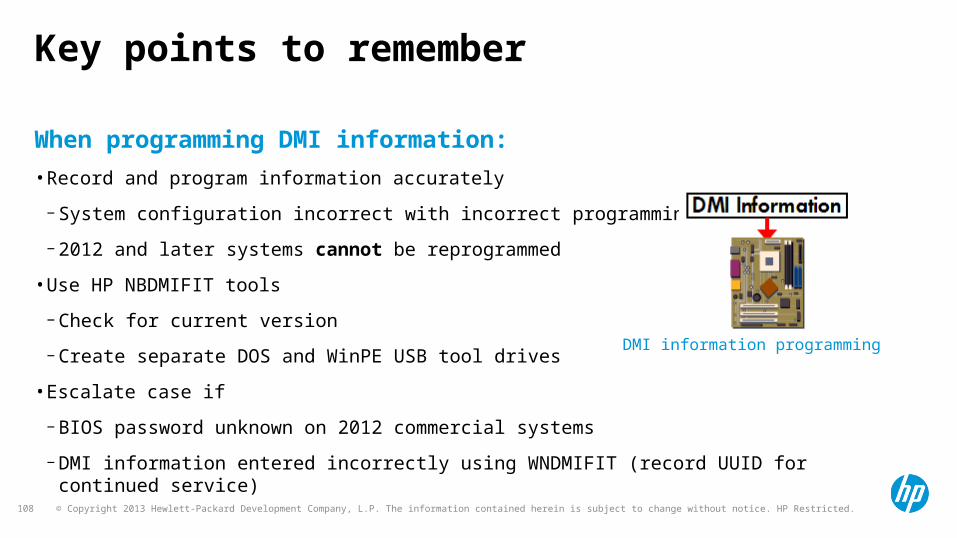
Key points to remember
When programming DMI information:
• Record and program information accurately
−System configuration incorrect with incorrect programming
−2012 and later systems cannot be reprogrammed
• Use HP NBDMIFIT tools
−Check for current version
−Create separate DOS and WinPE USB tool drives
• Escalate case if
−BIOS password unknown on 2012 commercial systems
−DMI information entered incorrectly using WNDMIFIT (record UUID for continued service)
DMI information programming

© Copyright 2013 Hewlett-Packard Development Company, L.P. The information contained herein is subject to change without notice. HP Restricted.109
More information-IMPORTANT SAW DOCUMENTS
HP Commercial Notebooks - How to Program System Board Models 2008-2011Document number mmr_kc-0105892http://h41302.www4.hp.com/km/saw/view.do?docId=mmr_kc-0105892&hsid=51691458&sz=31497HP Commercial Notebooks - How to Program the System Board 2012Document number emr_na-c03618473-2 http://h41302.www4.hp.com/km/saw/view.do?docId=emr_na-c03618473&hsid=51691443&sz=12757HP Business Notebook PCs - Replacement System Board Brand and Commit Process and TroubleshootingDocument number mmr_kc-0104544http://h41302.www4.hp.com/km/saw/view.do?docId=mmr_kc-0104544&hsid=51691636&sz=5605

© Copyright 2013 Hewlett-Packard Development Company, L.P. The information contained herein is subject to change without notice. HP Restricted.110
Courses to TakeMore information
The recording of the DMIFIT training is now available on the Learning Center. The course ID is 00755120. (go to HP university, then choose Grow@hp and then search on this course ID)

111
111
Tech Linkshttp://intranet.hp.com/PSG/WW/Notebook/TCE/3LSCCE/3LS/Pages/Mobile3LSTools.aspx
Mobile 3LS Tools
This site is the 3LS Tools web site. This site is geared to support various audiences and tools of various security levels are available from this site. The DMI tools are HP Confidential and cannot and should not be shared outside of HP.
End users who need DMI changes to their notebook should be referred to their Service Partner to address their DMI or ASSET change requirements. Service Partners and Self Maintainers can obtain these tools from CSN and should proactively program the Serial Number, Model Number and Branding information when a system board replacement is performed. We require the customer to work with their Service Partner for resolution.
These tools are posted here as a convenience for our internal support teams ONLY .

112
112
Tech Linkshttp://thesml.hp.com/default.htm
HP Services Media Library
Tear down video’s of all HP equipment, bios simulators for all Computer products
_____________________________________________________________________________
http://lego-web-pro.houston.hp.com/tracking/
Serial Number & Subassembly Tracking
This web site allows you to track the history of a unit through its serial number by searching a large number of HP's databases.
You can also search by the CT Label (or subassembly serial number) for a specific component. This allows you to determine which unit the component belongs to (down to unit serial number). You can then track the history of the unit by clicking on the unit serial number.

113
113
Tech Linkshttp://partsurfer.hp.com/search.aspx
HP PartSurfer
______________________________________________________________________
http://h10025.www1.hp.com/ewfrf/wc/document?lc=en&dlc=en&cc=us&docname=c01443317#N1094
Testing for Hardware Failures (Windows 7 and Windows Vista)
______________________________________________________________________
http://h41302.www4.hp.com/km/saw/home.do
Services Access Workbench

114
114
Thank you for attending!

115
115
Module TopicAdd data here

116
116
Module TopicAdd data here

117
117
Module TopicAdd data here

118
118
Module TopicAdd data here

119
119
Module TopicAdd data here

120
120
Module TopicAdd data here

121
121
Module TopicAdd data here

122
122
Module TopicAdd data here

123
123
Module TopicAdd data here

124
124
Module TopicAdd data here

125
125
Thank you for attending! Q & A