evaluating sourcepro - perforce
TRANSCRIPT

Evaluating SourcePro®
Rogue Wave® Software SourcePro®
Version 2021.1
EVALUATING SOURCEPRO
Copyright © 2021 Rogue Wave Software, Inc., a Perforce company (“Rogue Wave”). All Rights Reserved.
The Rogue Wave name and logo, and the SourcePro name, are registered trademarks of Rogue Wave. All other trademarks are the property of their respective owners.
Rogue Wave by Perforcehttps://www.perforce.com/products/sourceprohttps://help.perforce.com/sourcepro
This documentation, and the information contained herein (the “Documentation”), contains proprietary information of Rogue Wave. Any reproduction, disclosure, modification, creation of derivative works from, license, sale, or other transfer of the Documentation without the express written consent of Rogue Wave is strictly prohibited. The Documentation may contain technical inaccuracies or typographical errors. Use of the Documentation and implementation of any of its processes or techniques are the sole responsibility of the client, and Rogue Wave assumes no responsibility and will not be liable for any errors, omissions, damage, or loss that might result from any use or misuse of the Documentation
ROGUE WAVE MAKES NO REPRESENTATION ABOUT THE SUITABILITY OF THE DOCUMENTATION. THE DOCU-MENTATION IS PROVIDED "AS IS" WITHOUT WARRANTY OF ANY KIND. ROGUE WAVE HEREBY DISCLAIMS ALL WARRANTIES AND CONDITIONS WITH REGARD TO THE DOCUMENTATION, WHETHER EXPRESS, IMPLIED, STATUTORY, OR OTHERWISE, INCLUDING WITHOUT LIMITATION ANY IMPLIED WARRANTIES OF MERCHANT-ABILITY, FITNESS FOR A PARTICULAR PURPOSE, OR NONINFRINGEMENT. IN NO EVENT SHALL PERFORCE SOFTWARE, INC. BE LIABLE, WHETHER IN CONTRACT, TORT, OR OTHERWISE, FOR ANY SPECIAL, CONSEQUEN-TIAL, INDIRECT, PUNITIVE, OR EXEMPLARY DAMAGES IN CONNECTION WITH THE USE OF THE DOCUMENTATION.
ACKNOWLEDGMENTS
Introduction . . . . . . . . . . . . . . . . . . . . . . . . . . . . . . . . . . . . . . . . . . . . . . . . . . . . . . . . . . . . 1
Welcome . . . . . . . . . . . . . . . . . . . . . . . . . . . . . . . . . . . . . . . . . . . . . . . . . . . . . . . . . . . . 1
Product Overview . . . . . . . . . . . . . . . . . . . . . . . . . . . . . . . . . . . . . . . . . . . . . . . . . . . . 2
Software Requirements . . . . . . . . . . . . . . . . . . . . . . . . . . . . . . . . . . . . . . . . . . . . . . . 4General Software Requirements . . . . . . . . . . . . . . . . . . . . . . . . . . . . . . . . . . . 4Module Dependencies . . . . . . . . . . . . . . . . . . . . . . . . . . . . . . . . . . . . . . . . . . . 4Third-Party Libraries . . . . . . . . . . . . . . . . . . . . . . . . . . . . . . . . . . . . . . . . . . . . . 5
Documentation . . . . . . . . . . . . . . . . . . . . . . . . . . . . . . . . . . . . . . . . . . . . . . . . . . . . . . 6
Conventions . . . . . . . . . . . . . . . . . . . . . . . . . . . . . . . . . . . . . . . . . . . . . . . . . . . . . . . . . 8Pathname Conventions. . . . . . . . . . . . . . . . . . . . . . . . . . . . . . . . . . . . . . . . . . . 8Typographic Conventions . . . . . . . . . . . . . . . . . . . . . . . . . . . . . . . . . . . . . . . . . 9
Using This Manual. . . . . . . . . . . . . . . . . . . . . . . . . . . . . . . . . . . . . . . . . . . . . . . . . . . 10Organization . . . . . . . . . . . . . . . . . . . . . . . . . . . . . . . . . . . . . . . . . . . . . . . . . . . . 10
Support Services . . . . . . . . . . . . . . . . . . . . . . . . . . . . . . . . . . . . . . . . . . . . . . . . . . . . 10
Purchasing SourcePro . . . . . . . . . . . . . . . . . . . . . . . . . . . . . . . . . . . . . . . . . . . . . . . 10
Installing the Libraries . . . . . . . . . . . . . . . . . . . . . . . . . . . . . . . . . . . . . . . . . . . . . . . . . . 11
Overview . . . . . . . . . . . . . . . . . . . . . . . . . . . . . . . . . . . . . . . . . . . . . . . . . . . . . . . . . . . 11
Installing the Libraries . . . . . . . . . . . . . . . . . . . . . . . . . . . . . . . . . . . . . . . . . . . . . . . 12
Directory Structure . . . . . . . . . . . . . . . . . . . . . . . . . . . . . . . . . . . . . . . . . . . . . . . . . . 13
Environment Variables . . . . . . . . . . . . . . . . . . . . . . . . . . . . . . . . . . . . . . . . . . . . . . . 13
Evaluation Period . . . . . . . . . . . . . . . . . . . . . . . . . . . . . . . . . . . . . . . . . . . . . . . . . . . 14
Uninstalling the Libraries. . . . . . . . . . . . . . . . . . . . . . . . . . . . . . . . . . . . . . . . . . . . . 14Uninstalling on Windows . . . . . . . . . . . . . . . . . . . . . . . . . . . . . . . . . . . . . . . . . 14Uninstalling on UNIX . . . . . . . . . . . . . . . . . . . . . . . . . . . . . . . . . . . . . . . . . . . . . 14
Building and Running the Examples . . . . . . . . . . . . . . . . . . . . . . . . . . . . . . . . . . . . 15
Overview . . . . . . . . . . . . . . . . . . . . . . . . . . . . . . . . . . . . . . . . . . . . . . . . . . . . . . . . . . . 15
Building the Examples . . . . . . . . . . . . . . . . . . . . . . . . . . . . . . . . . . . . . . . . . . . . . . . 15Building the Examples from the Command Line . . . . . . . . . . . . . . . . . . . . . 15
Windows. . . . . . . . . . . . . . . . . . . . . . . . . . . . . . . . . . . . . . . . . . . . . . . . . . . . 16UNIX . . . . . . . . . . . . . . . . . . . . . . . . . . . . . . . . . . . . . . . . . . . . . . . . . . . . . . . 16
Contents
iv
Contents
Building from Microsoft Visual Studio . . . . . . . . . . . . . . . . . . . . . . . . . . . . . . 16
Running the Examples . . . . . . . . . . . . . . . . . . . . . . . . . . . . . . . . . . . . . . . . . . . . . . .18Running from the Command Line . . . . . . . . . . . . . . . . . . . . . . . . . . . . . . . . . 18Running from Microsoft Visual Studio. . . . . . . . . . . . . . . . . . . . . . . . . . . . . . 18
The SourcePro DB Examples. . . . . . . . . . . . . . . . . . . . . . . . . . . . . . . . . . . . . . . . . . . .19
Overview . . . . . . . . . . . . . . . . . . . . . . . . . . . . . . . . . . . . . . . . . . . . . . . . . . . . . . . . . . .19
Modifying Files for Database Connection . . . . . . . . . . . . . . . . . . . . . . . . . . . . . . .21
Building the DB Examples . . . . . . . . . . . . . . . . . . . . . . . . . . . . . . . . . . . . . . . . . . . 22Building from the Command Line . . . . . . . . . . . . . . . . . . . . . . . . . . . . . . . . . 22
On Windows . . . . . . . . . . . . . . . . . . . . . . . . . . . . . . . . . . . . . . . . . . . . . . . . .22On UNIX . . . . . . . . . . . . . . . . . . . . . . . . . . . . . . . . . . . . . . . . . . . . . . . . . . . .22
Running the DB Examples . . . . . . . . . . . . . . . . . . . . . . . . . . . . . . . . . . . . . . . . . . . 22Populate Your Database . . . . . . . . . . . . . . . . . . . . . . . . . . . . . . . . . . . . . . . . . 22Run the Tutorials . . . . . . . . . . . . . . . . . . . . . . . . . . . . . . . . . . . . . . . . . . . . . . . . 22Clean Up Your Database . . . . . . . . . . . . . . . . . . . . . . . . . . . . . . . . . . . . . . . . . 23
Writing Your Own Applications . . . . . . . . . . . . . . . . . . . . . . . . . . . . . . . . . . . . . . . 24
Overview . . . . . . . . . . . . . . . . . . . . . . . . . . . . . . . . . . . . . . . . . . . . . . . . . . . . . . . . . . 24
Using SourcePro Components . . . . . . . . . . . . . . . . . . . . . . . . . . . . . . . . . . . . . . . 24
Building Your Applications . . . . . . . . . . . . . . . . . . . . . . . . . . . . . . . . . . . . . . . . . . . 26Setting the Include Paths. . . . . . . . . . . . . . . . . . . . . . . . . . . . . . . . . . . . . . . . . 27Defining the _RWCONFIG Macro . . . . . . . . . . . . . . . . . . . . . . . . . . . . . . . . . . 27Specifying Compiler Flags and System Libraries . . . . . . . . . . . . . . . . . . . . . 27Linking to the Libraries. . . . . . . . . . . . . . . . . . . . . . . . . . . . . . . . . . . . . . . . . . . 28Additional Parameters . . . . . . . . . . . . . . . . . . . . . . . . . . . . . . . . . . . . . . . . . . . 29
Running Your Applications . . . . . . . . . . . . . . . . . . . . . . . . . . . . . . . . . . . . . . . . . . . 29
Index . . . . . . . . . . . . . . . . . . . . . . . . . . . . . . . . . . . . . . . . . . . . . . . . . . . . . . . . . . . . . . . . . . . . . . 30
Chapter 1, Introduction
WelcomeThank you for evaluating SourcePro® products from Perforce Software.
Each SourcePro product provides an integrated, comprehensive set of classes that addresses a specific pro-gramming area in C++. SourcePro products simplify development projects and reduce development time by providing intuitive, easy-to-use, C++ interfaces to complex constructs. Whatever your area of development, you can save both time and effort using tested, reliable SourcePro C++ components.
This free, 30-day Evaluation Edition of SourcePro contains prebuilt versions of SourcePro libraries for use on supported platforms, as described in the Supported_Platforms.pdf, in the distribution under <installdir>\. This document is also on the web at https://help.perforce.com/sourcepro/current/Supported_Platforms.pdf.
The SourcePro Evaluation also includes complete documentation for each library, and code examples illus-trating the key features of each library.
When you purchase SourcePro, full source code is included for the operating systems for which you are licensed, allowing easy integration into any supported build environment.
NOTE: This document applies only to the evaluation version of SourcePro, available upon request from the SourcePro website, perforce.com/products/sourcepro. It assumes the presence of prebuilt binaries, which is not true of the full product.
Note also that the prebuilt libraries are built in release mode. If you link them into an application being built in debug mode, the resulting application may experience runtime exceptions.
1
Introduction Product Overview
Product OverviewSourcePro products are organized into four functional areas:
SourcePro Core contains an extensive set of fundamental C++ components, including classes for multithreading, advanced streaming, and XML object serialization. SourcePro Core also provides a complete Unicode-based framework for internationalization and localization.
SourcePro DB contains database and data manipulation classes that encapsulate SQL 92 in a C++ interface that is consistent across all supported platforms and databases. The included access modules provide access support for ODBC, PostgreSQL, MySQL, DB2 CLI, Sybase, Oracle OCI, and Microsoft SQL Server.
SourcePro Analysis contains a full range of C++ classes that encapsulate essential computational and analytical tools for business and research.
SourcePro Net contains network, Internet, and secure communication classes that provide a high-level C++ API to complex services, techniques, and protocols. SourcePro Net implements the most widely used protocols for traffic on the Internet, including HTTP, HTTPS, SMTP, POP3, FTP, FTPS, and the MIME message format.
NOTE: The Web Services Module has been removed from SourcePro. Perforce offers a more com-plete SOAP solution with its HydraExpress product. For information on HydraExpress, please contact your sales representative.
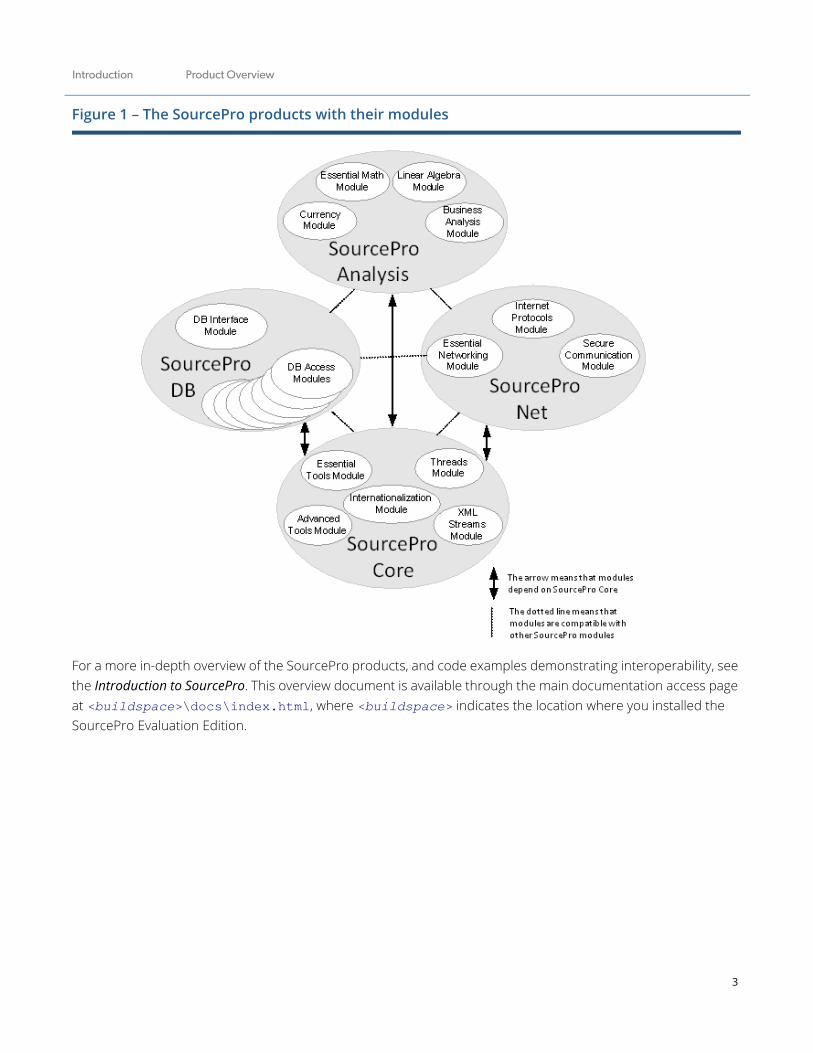
Within these areas, each SourcePro product is composed of modules; modules are composed of either packages or class groups; packages and class groups are composed of classes.
The four SourcePro products and their modules are shown in Figure 1.
2
Introduction Product Overview
Figure 1 – The SourcePro products with their modules
For a more in-depth overview of the SourcePro products, and code examples demonstrating interoperability, see the Introduction to SourcePro. This overview document is available through the main documentation access page at <buildspace>\docs\index.html, where <buildspace> indicates the location where you installed the SourcePro Evaluation Edition.
3
Introduction Software Requirements
Software RequirementsThe SourcePro Evaluation contains precompiled dynamic or shared libraries, also called “DLLs” on Windows. These dynamic libraries are built with multithreading support and using the native C++ Standard Library. The included DB Access Modules provide support for a limited set of databases, as specified in the section below.
General Software RequirementsTo use the SourcePro Evaluation Edition, you must have the following software installed:
A supported combination of operating system and compiler, as specified in the Supported_Platforms.pdf, in the distribution under <installdir>\ or on the web at https://help.perforce.com/sourcepro/current/Supported_Platforms.pdf.
The compiler is needed to build the examples.
If you intend to connect to a database and create examples using SourcePro DB components, you need to install the database client software and establish connectivity with the database server. The supported databases for each access module are also identified in the Supported_Platforms.pdf.
To view documents in the Portable Document Format (PDF), you must have Adobe Acrobat Reader.
Module DependenciesMany SourcePro modules depend on other modules. For example, all SourcePro modules depend on the Essen-tial Tools Module. In the SourcePro Evaluation, all such dependencies among SourcePro products are fully satisfied for you.
4
Introduction Software Requirements
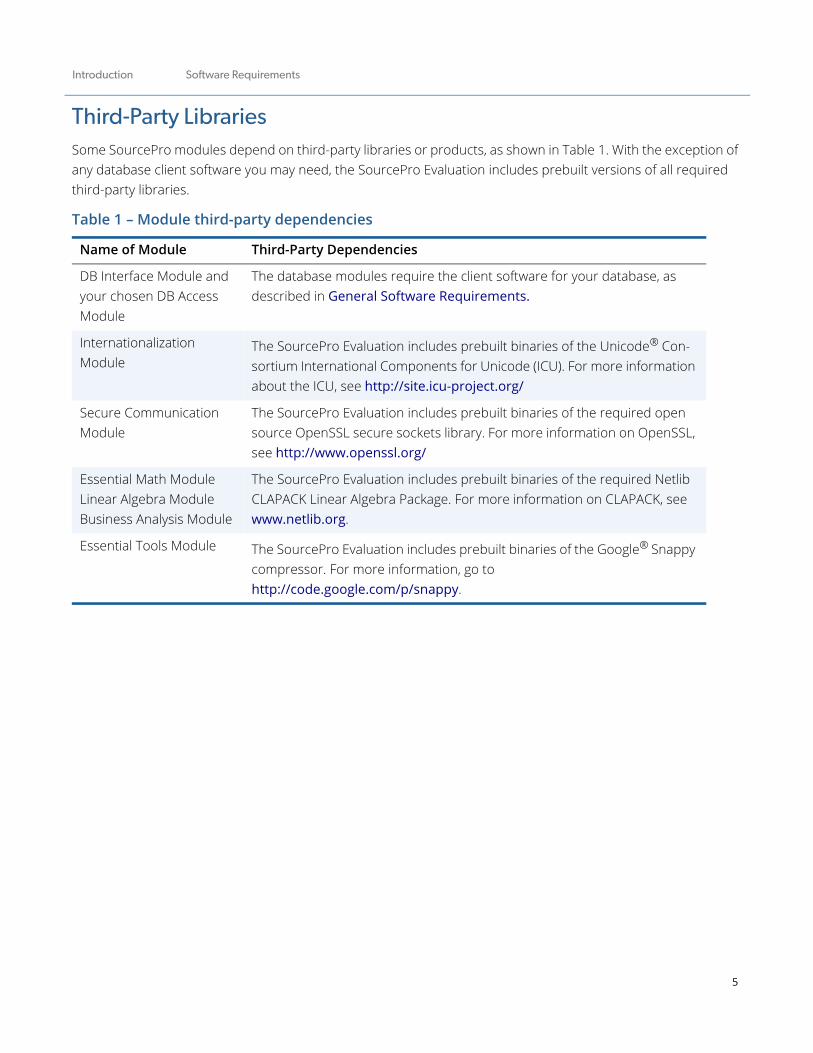
Third-Party LibrariesSome SourcePro modules depend on third-party libraries or products, as shown in Table 1. With the exception of any database client software you may need, the SourcePro Evaluation includes prebuilt versions of all required third-party libraries.
Table 1 – Module third-party dependencies
Name of Module Third-Party Dependencies
DB Interface Module and your chosen DB Access Module
The database modules require the client software for your database, as described in General Software Requirements.
Internationalization Module
The SourcePro Evaluation includes prebuilt binaries of the Unicode® Con-sortium International Components for Unicode (ICU). For more information about the ICU, see http://site.icu-project.org/
Secure Communication Module
The SourcePro Evaluation includes prebuilt binaries of the required open source OpenSSL secure sockets library. For more information on OpenSSL, see http://www.openssl.org/
Essential Math ModuleLinear Algebra ModuleBusiness Analysis Module
The SourcePro Evaluation includes prebuilt binaries of the required Netlib CLAPACK Linear Algebra Package. For more information on CLAPACK, see www.netlib.org.
Essential Tools Module The SourcePro Evaluation includes prebuilt binaries of the Google® Snappy compressor. For more information, go to http://code.google.com/p/snappy.
5
Introduction Documentation
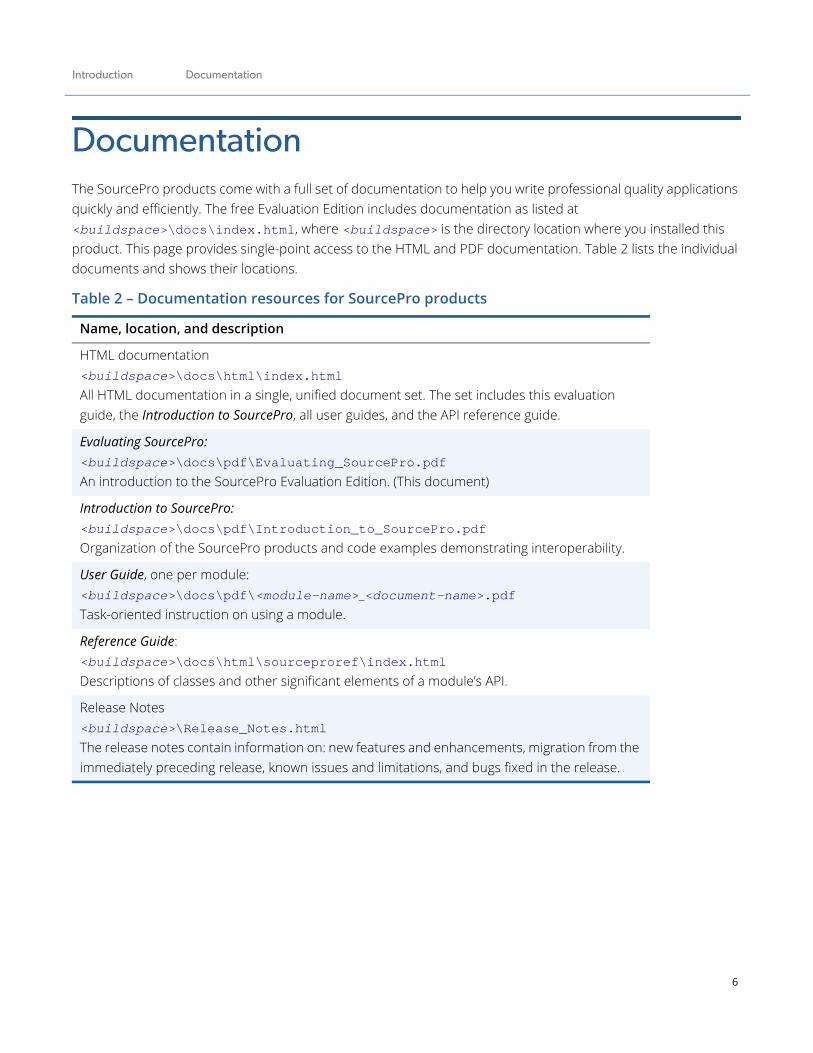
DocumentationThe SourcePro products come with a full set of documentation to help you write professional quality applications quickly and efficiently. The free Evaluation Edition includes documentation as listed at <buildspace>\docs\index.html, where <buildspace> is the directory location where you installed this product. This page provides single-point access to the HTML and PDF documentation. Table 2 lists the individual documents and shows their locations.
Table 2 – Documentation resources for SourcePro products
Name, location, and description
HTML documentation<buildspace>\docs\html\index.htmlAll HTML documentation in a single, unified document set. The set includes this evaluation guide, the Introduction to SourcePro, all user guides, and the API reference guide.
Evaluating SourcePro:<buildspace>\docs\pdf\Evaluating_SourcePro.pdfAn introduction to the SourcePro Evaluation Edition. (This document)
Introduction to SourcePro:<buildspace>\docs\pdf\Introduction_to_SourcePro.pdfOrganization of the SourcePro products and code examples demonstrating interoperability.
User Guide, one per module:<buildspace>\docs\pdf\<module-name>_<document-name>.pdfTask-oriented instruction on using a module.
Reference Guide:<buildspace>\docs\html\sourceproref\index.htmlDescriptions of classes and other significant elements of a module’s API.
Release Notes<buildspace>\Release_Notes.htmlThe release notes contain information on: new features and enhancements, migration from the immediately preceding release, known issues and limitations, and bugs fixed in the release.
6
Introduction Documentation
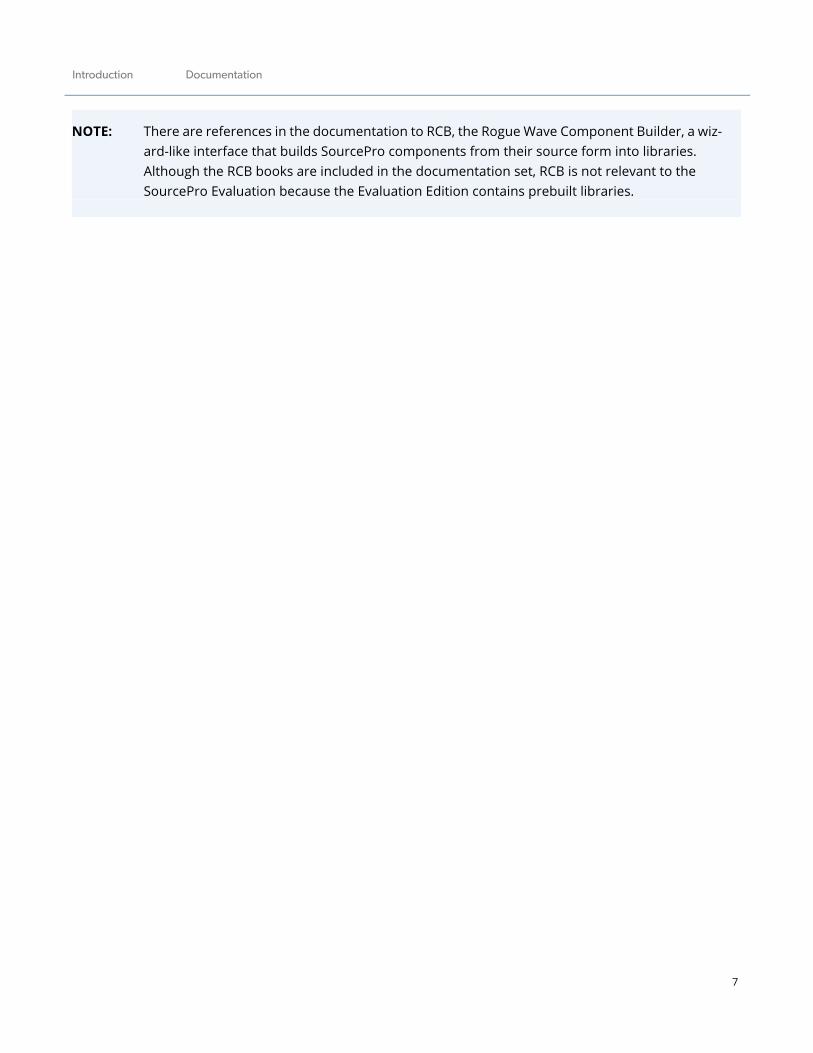
NOTE: There are references in the documentation to RCB, the Rogue Wave Component Builder, a wiz-ard-like interface that builds SourcePro components from their source form into libraries. Although the RCB books are included in the documentation set, RCB is not relevant to the SourcePro Evaluation because the Evaluation Edition contains prebuilt libraries.
7
Introduction Conventions
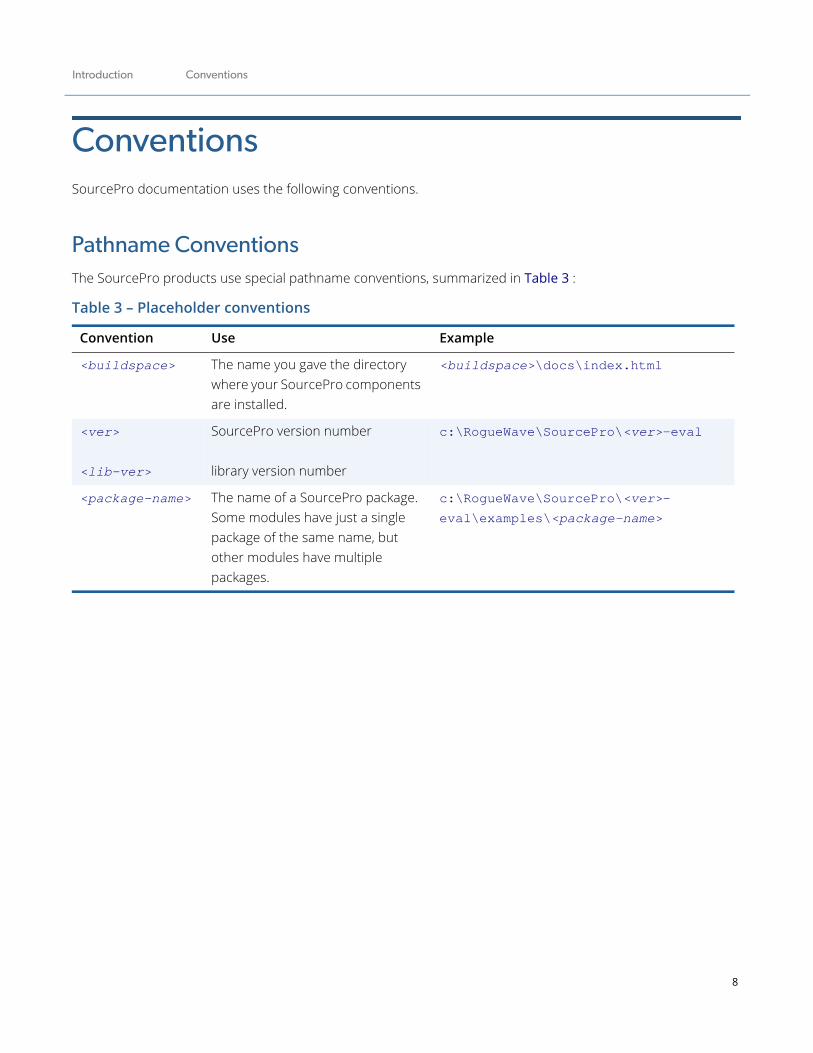
ConventionsSourcePro documentation uses the following conventions.
Pathname ConventionsThe SourcePro products use special pathname conventions, summarized in Table 3 :
Table 3 – Placeholder conventions
Convention Use Example
<buildspace> The name you gave the directory where your SourcePro components are installed.
<buildspace>\docs\index.html
<ver>
<lib-ver>
SourcePro version number
library version number
c:\RogueWave\SourcePro\<ver>-eval
<package-name> The name of a SourcePro package. Some modules have just a single package of the same name, but other modules have multiple packages.
c:\RogueWave\SourcePro\<ver>-eval\examples\<package-name>
8
Introduction Conventions
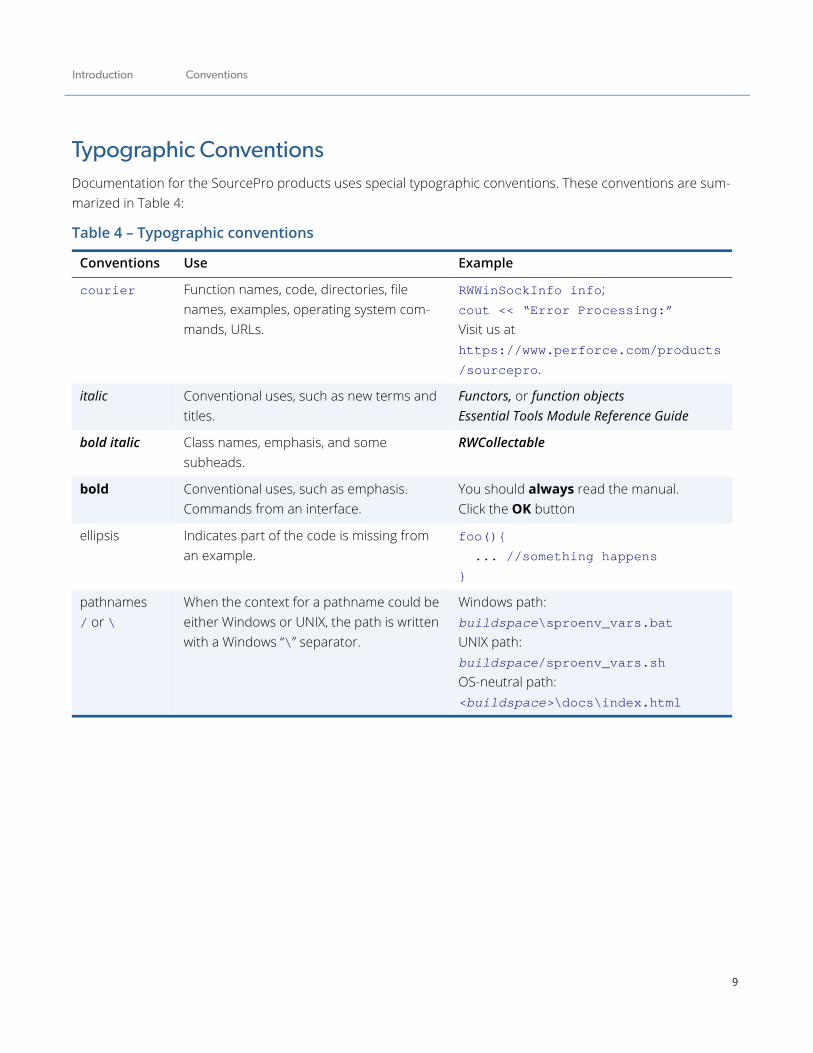
Typographic ConventionsDocumentation for the SourcePro products uses special typographic conventions. These conventions are sum-marized in Table 4:
Table 4 – Typographic conventions
Conventions Use Example
courier Function names, code, directories, file names, examples, operating system com-mands, URLs.
RWWinSockInfo info;cout << “Error Processing:”Visit us at https://www.perforce.com/products/sourcepro.
italic Conventional uses, such as new terms and titles.
Functors, or function objectsEssential Tools Module Reference Guide
bold italic Class names, emphasis, and some subheads.
RWCollectable
bold Conventional uses, such as emphasis.Commands from an interface.
You should always read the manual.Click the OK button
ellipsis Indicates part of the code is missing from an example.
foo(){ ... //something happens}
pathnames/ or \
When the context for a pathname could be either Windows or UNIX, the path is written with a Windows “\” separator.
Windows path: buildspace\sproenv_vars.batUNIX path: buildspace/sproenv_vars.sh OS-neutral path:<buildspace>\docs\index.html
9
Introduction Using This Manual
Using This ManualThis manual assumes that you are familiar with the basic features of the C++ programming language. There are many widely-available books on learning C++.
OrganizationThis manual is divided into the following chapters:
Chapter 1, Introduction, (this chapter) describes the SourcePro Evaluation.
Chapter 2, Installing the Libraries, describes how to install the SourcePro Evaluation.
Chapter 3, Building and Running the Examples, discusses how to build and run the code examples included with each SourcePro library. Studying these examples is one of the best ways to learn how to use a library effectively.
Chapter 4, The SourcePro DB Examples, describes how to build and run the examples included with SourcePro DB. These examples require some special attention due to the complexity of establishing a database connection.
Chapter 5, Writing Your Own Applications, describes how to get started building your own applications using SourcePro components.
Support ServicesEvaluation support is available to you for the entire 30-day evaluation period. Contact your sales representative for details.
Purchasing SourceProFor information on purchasing SourcePro, contact us at: https://www.perforce.com/contact-us.
10
Chapter 2, Installing the Libraries
OverviewThe SourcePro Evaluation contains prebuilt versions of all the provided SourcePro libraries. This chapter describes:
How to install the libraries
The resulting directory structure
Environment variables set by the installation program
The nature of the free evaluation period
How to uninstall the libraries
For information on how to get started using the libraries, see Chapter 3.
11

Installing the Libraries Installing the Libraries
Installing the LibrariesTo download and install the SourcePro Evaluation:
1. Request a download of the Evaluation version from https://www.perforce.com/products/source-pro/free-c-library. You will need to have an account.
2. Look for an email from Rogue Wave with instructions on downloading the SourcePro Evaluation. Save it to a known location.
3. The email will also have the license.key file. Save the file to a known location on your system. You will be asked for this location during installation.
4. Install the product:
On Windows, double-click the installer executable sourcepro_<ver>_eval*.exe.
On Linux and Solaris, invoke sourcepro_<ver>_eval*.run at the command prompt.
If you need a new license.key file, please contact [email protected].
12
Installing the Libraries Directory Structure
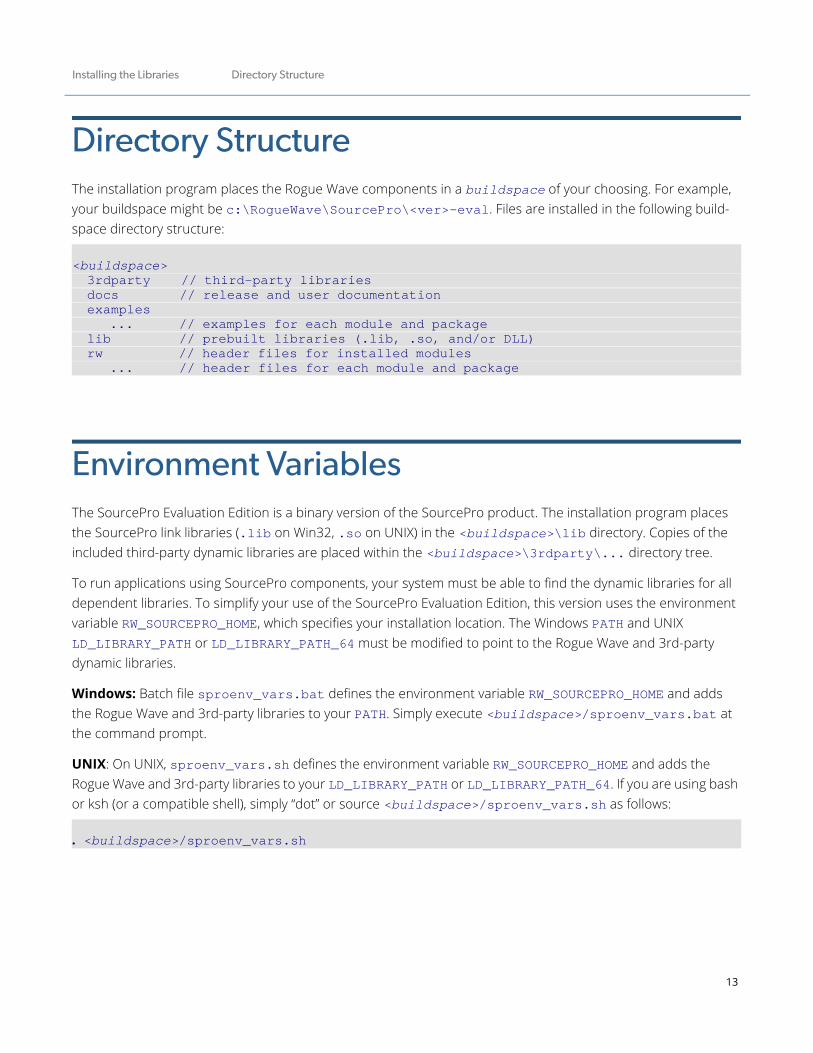
Directory StructureThe installation program places the Rogue Wave components in a buildspace of your choosing. For example, your buildspace might be c:\RogueWave\SourcePro\<ver>-eval. Files are installed in the following build-space directory structure:
<buildspace> 3rdparty // third-party libraries docs // release and user documentation examples ... // examples for each module and package lib // prebuilt libraries (.lib, .so, and/or DLL) rw // header files for installed modules ... // header files for each module and package
Environment VariablesThe SourcePro Evaluation Edition is a binary version of the SourcePro product. The installation program places the SourcePro link libraries (.lib on Win32, .so on UNIX) in the <buildspace>\lib directory. Copies of the included third-party dynamic libraries are placed within the <buildspace>\3rdparty\... directory tree.
To run applications using SourcePro components, your system must be able to find the dynamic libraries for all dependent libraries. To simplify your use of the SourcePro Evaluation Edition, this version uses the environment variable RW_SOURCEPRO_HOME, which specifies your installation location. The Windows PATH and UNIX LD_LIBRARY_PATH or LD_LIBRARY_PATH_64 must be modified to point to the Rogue Wave and 3rd-party dynamic libraries.
Windows: Batch file sproenv_vars.bat defines the environment variable RW_SOURCEPRO_HOME and adds the Rogue Wave and 3rd-party libraries to your PATH. Simply execute <buildspace>/sproenv_vars.bat at the command prompt.
UNIX: On UNIX, sproenv_vars.sh defines the environment variable RW_SOURCEPRO_HOME and adds the Rogue Wave and 3rd-party libraries to your LD_LIBRARY_PATH or LD_LIBRARY_PATH_64. If you are using bash or ksh (or a compatible shell), simply “dot” or source <buildspace>/sproenv_vars.sh as follows:
. <buildspace>/sproenv_vars.sh
13
Installing the Libraries Evaluation Period
NOTE: If you are using a shell compatible with csh, you will have to modify sproenv_vars.sh to accom-modate csh syntax.
Evaluation PeriodThe SourcePro Evaluation is provided free of charge for a 30-day evaluation period, beginning on the day that the license key is generated. Any application containing SourcePro code that is built or run after the evaluation period expires will fail.
Uninstalling the LibrariesThe installer for the evaluation includes an uninstall executable.
Uninstalling on Windows On Windows you can access the uninstaller from the Start menu. The executable can also be found in the root of the installation directory.
Uninstalling on UNIXOn UNIX you must run the uninstaller from the root of the installation directory.
If you have altered your startup scripts to set RW_SOURCEPRO_HOME or LD_LIBRARY_PATH, you may wish to undo those changes.
14
Chapter 3, Building and Running the Examples
OverviewEach SourcePro module or package includes code examples illustrating the key features of the library. Study-ing these examples is one of the best ways to learn how to use a library effectively. This chapter describes how to build and run the examples.
Building and running the examples for SourcePro DB requires that you establish database connectivity. See Chapter 4 for more information on these examples. For information on how to develop your own applica-tions using SourcePro components, see Chapter 5.
Building the ExamplesThe examples for each library are located in the <buildspace>\examples\<mnemonic> directory:
<buildspace> examples analytics // examples for analytics module currency // examples for currency module ... // examples for other modules and packages
For instance, the examples for the Threads Module are located in a subdirectory under <buildspace>\examples\thread.
Building the Examples from the Command LineThe installation program places makefiles in the <buildspace>\examples\<module>\12d directory within the examples directory for each library.
15
Building and Running the Examples Building the Examples
The provided makefiles contain the necessary include paths, link libraries, and compiler flags for each example.
Windows
1. Open a command prompt window.
2. Ensure that the environment variables lib and include are set for the Microsoft Visual C++ compiler. If not, run vcvarsall.bat, located in the VC subdirectory of your compiler installation. You must pass the argument amd64:
<MS-visual-studio-installdir>\VC\vcvarsall.bat amd64
For more information, see the MSVC documentation.
3. Change to the 12d subdirectory below the examples you want to build.
4. Type nmake. The program looks in the current directory and executes the commands found in the makefile.
For instance, to build the examples for the Essential Tools Module on Windows, type nmake in the <buildspace>\examples\tools\12d directory.
UNIX
1. Verify that the supported compiler for your platform is working as your compiler. If not, set your environ-ment for the supported compiler.
2. Within your SourcePro Evaluation installation, change to the 12d directory below the examples you want to build.
3. Type make. The program looks in the current directory and executes the commands found in the makefile.
For instance, to build the examples for the Essential Tools Module on UNIX, type make in the <buildspace>/examples/tools/12d directory.
Building from Microsoft Visual StudioBelow are instructions for setting up a project in Microsoft Visual Studio to build and run the examples. You can also use this for guidance in setting up a project for your own application that depends on SourcePro libraries.
16
Building and Running the Examples Building the Examples
1. Open Visual Studio and select File | New | Project.
2. Select Win32 Console Application, give the project a name, and click OK.
The Win32 Application Wizard appears.
3. Click Next.
4. In Application Settings, select the Empty Project option and click Finish.
5. In the Solution Explorer, right-click on Source and select Add | Existing Item.
6. Navigate to and add the source code for the examples you are interested in.
7. Again, in the Solution Explorer, right click on Source and select Add | Existing Item.
8. Navigate to and add the library files the examples depend on.
If you are uncertain what these are, look in the makefiles for the examples you want to build. For example, to build the Essential Tools Module tutorial examples, look in <installdir>\examples\tools\tutorial\12d\makefile. The REQLIBS entry specifies all required libraries.
9. In the Solution Explorer, right click on the project and choose Properties.
10. Under VC++ Directories, edit the Executable Directories to contain the path to the DLL files.
If the buildspace is located at c:\RogueWave\SourcePro\<ver>-eval, the additional executable path needed is c:\RogueWave\SourcePro\<ver>-eval\lib.
11. Edit the Include Directories to contain the path to the rw directory.
If the buildspace is located at c:\RogueWave\SourcePro\<ver>-eval, the additional include path needed is c:\RogueWave\SourcePro\<ver>-eval.
12. Expand the C/C++ section.
13. Select Preprocessor and edit the Preprocessor Definitions to add _RWCONFIG=12d.
14. Select Precompiled Headers | Precompiled Header and from the dropdown list for this item, select Not Using Precompiled Headers.
15. Click OK.
Your project is now set up to compile and run the examples you have selected.
17
Building and Running the Examples Running the Examples
Running the ExamplesTo run the examples in the SourcePro Evaluation Edition, your system must be able to find the dynamic libraries (.dll on Win32, .so on UNIX). Windows users can execute the batch file <buildspace>\sproenv_vars.bat to set the PATH, while UNIX users can execute the shell script <buildspace>/sproenv_vars.sh to set the LD_LIBRARY_PATH or LD_LIBRARY_PATH_64, as described in Environment Variables.
Running from the Command LineTo run an example from the command line, run the executable in the 12d subdirectory below the example source file. For instance, to run the timedate example for the Essential Tools Module from a command prompt, type .\timedate in the buildspace\examples\tools\tutorial\12d directory. This directory also con-tains any input files required by the example; any generated output files are sent to the same directory.
Running from Microsoft Visual StudioIf you have set up a Microsoft Visual Studio solution for the example you want to run, you can do the following:
1. Open the appropriate solution in Visual Studio. (See Building from Microsoft Visual Studio.)
2. Right-click the example project file in the solution explorer and select Set as Startup Project.
3. Select Debug | Start Without Debugging from the main menu bar.
Input files required by the example and any generated output files are located in the Other Files folder.
18
Chapter 4, The SourcePro DB Examples
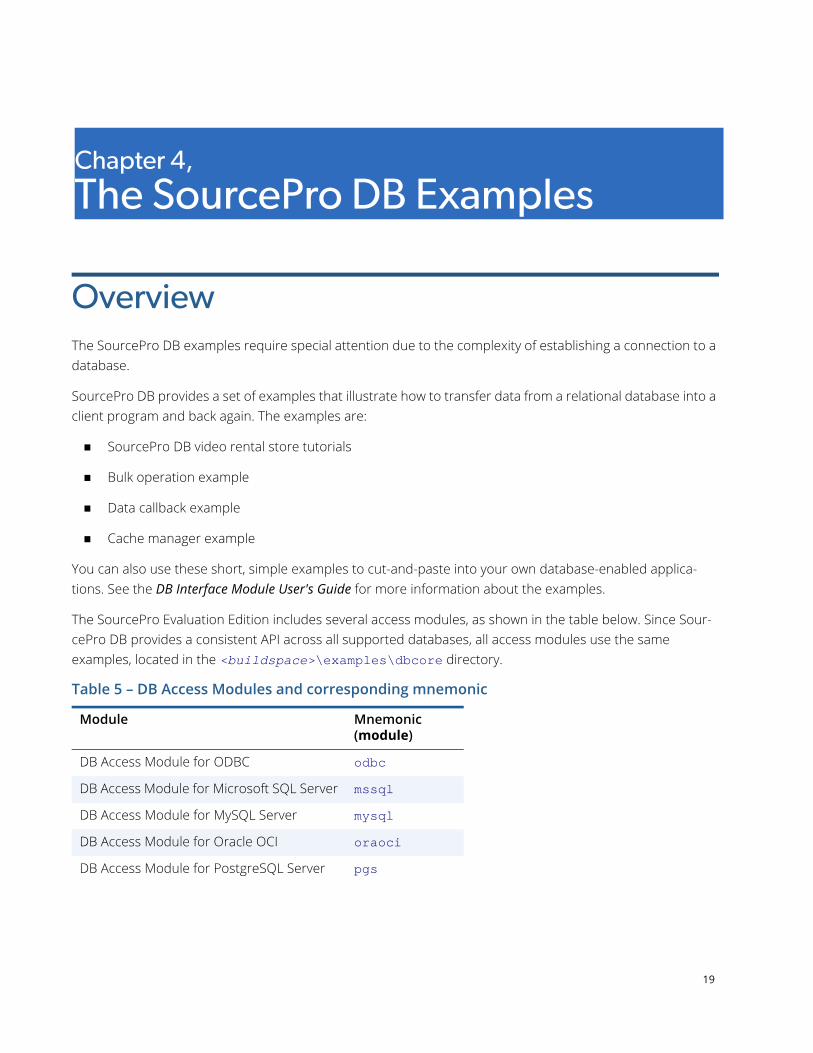
OverviewThe SourcePro DB examples require special attention due to the complexity of establishing a connection to a database.
SourcePro DB provides a set of examples that illustrate how to transfer data from a relational database into a client program and back again. The examples are:
SourcePro DB video rental store tutorials
Bulk operation example
Data callback example
Cache manager example
You can also use these short, simple examples to cut-and-paste into your own database-enabled applica-tions. See the DB Interface Module User's Guide for more information about the examples.
The SourcePro Evaluation Edition includes several access modules, as shown in the table below. Since Sour-cePro DB provides a consistent API across all supported databases, all access modules use the same examples, located in the <buildspace>\examples\dbcore directory.
Table 5 – DB Access Modules and corresponding mnemonic
Module Mnemonic (module)
DB Access Module for ODBC odbcDB Access Module for Microsoft SQL Server mssqlDB Access Module for MySQL Server mysqlDB Access Module for Oracle OCI oraociDB Access Module for PostgreSQL Server pgs
19
The SourcePro DB Examples Overview
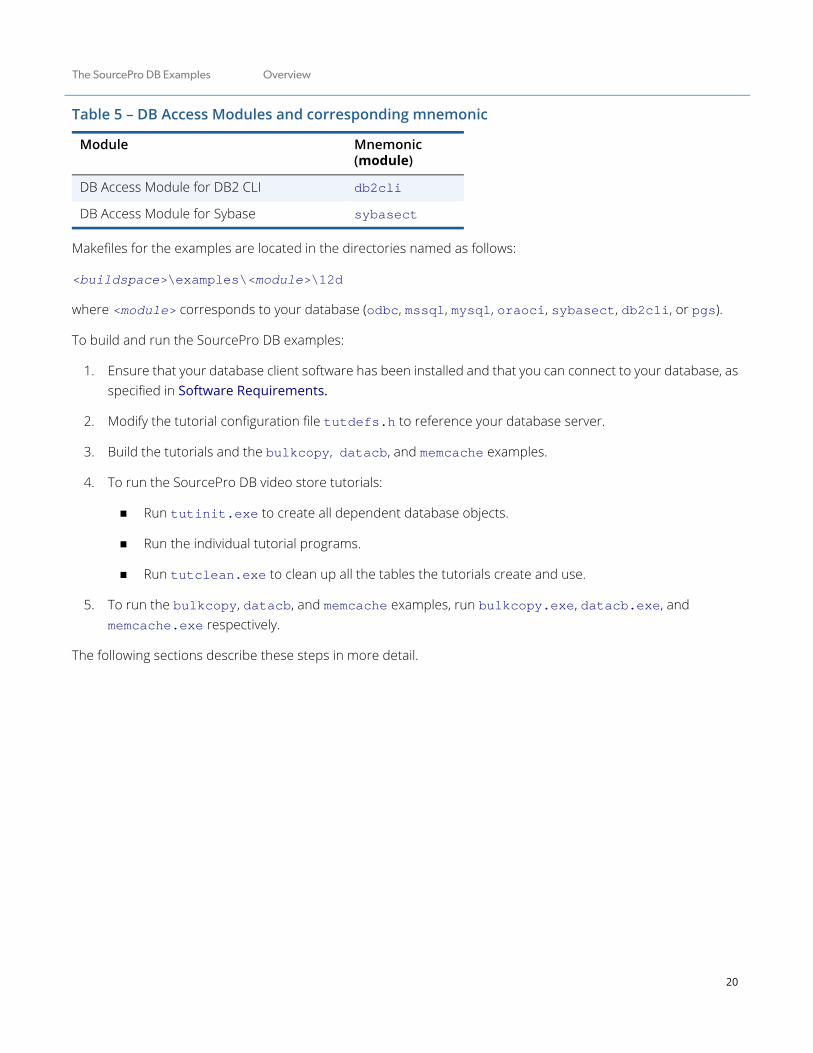
Makefiles for the examples are located in the directories named as follows:
<buildspace>\examples\<module>\12d
where <module> corresponds to your database (odbc, mssql, mysql, oraoci, sybasect, db2cli, or pgs).
To build and run the SourcePro DB examples:
1. Ensure that your database client software has been installed and that you can connect to your database, as specified in Software Requirements.
2. Modify the tutorial configuration file tutdefs.h to reference your database server.
3. Build the tutorials and the bulkcopy, datacb, and memcache examples.
4. To run the SourcePro DB video store tutorials:
Run tutinit.exe to create all dependent database objects.
Run the individual tutorial programs.
Run tutclean.exe to clean up all the tables the tutorials create and use.
5. To run the bulkcopy, datacb, and memcache examples, run bulkcopy.exe, datacb.exe, and memcache.exe respectively.
The following sections describe these steps in more detail.
DB Access Module for DB2 CLI db2cliDB Access Module for Sybase sybasect
Table 5 – DB Access Modules and corresponding mnemonic
Module Mnemonic (module)
20
The SourcePro DB Examples Modifying Files for Database Connection
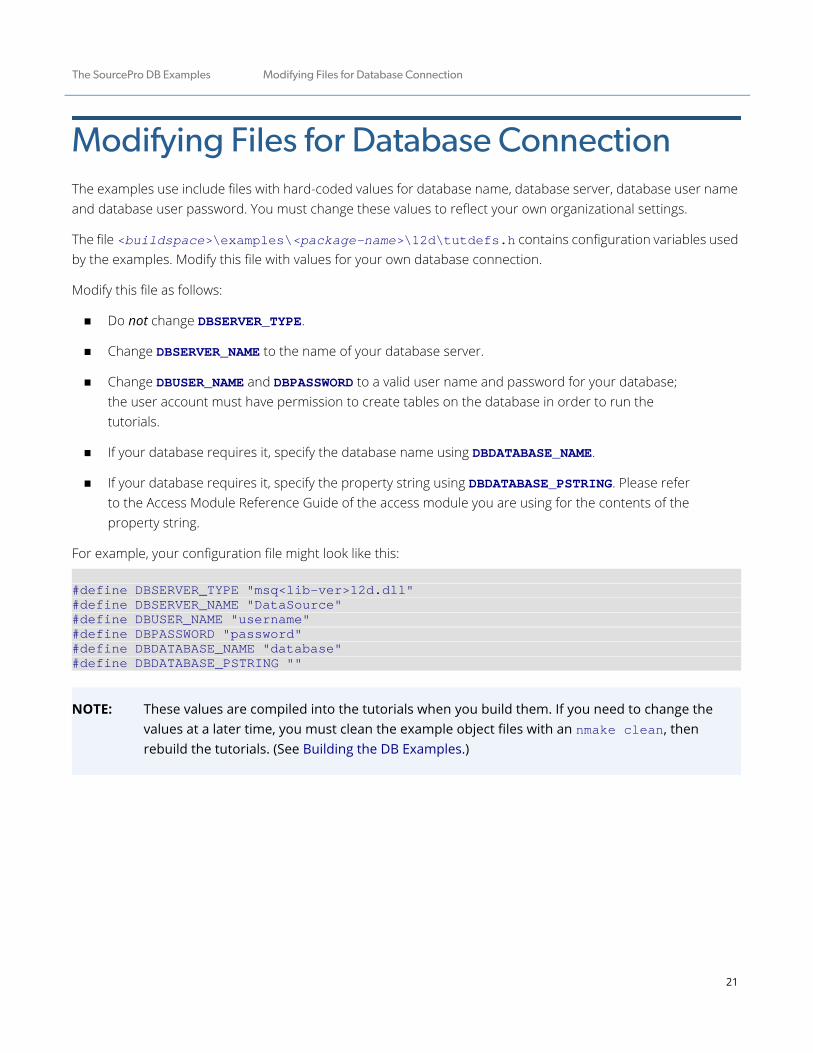
Modifying Files for Database ConnectionThe examples use include files with hard-coded values for database name, database server, database user name and database user password. You must change these values to reflect your own organizational settings.
The file <buildspace>\examples\<package-name>\12d\tutdefs.h contains configuration variables used by the examples. Modify this file with values for your own database connection.
Modify this file as follows:
Do not change DBSERVER_TYPE.
Change DBSERVER_NAME to the name of your database server.
Change DBUSER_NAME and DBPASSWORD to a valid user name and password for your database; the user account must have permission to create tables on the database in order to run the tutorials.
If your database requires it, specify the database name using DBDATABASE_NAME.
If your database requires it, specify the property string using DBDATABASE_PSTRING. Please refer to the Access Module Reference Guide of the access module you are using for the contents of the property string.
For example, your configuration file might look like this:
#define DBSERVER_TYPE "msq<lib-ver>12d.dll" #define DBSERVER_NAME "DataSource" #define DBUSER_NAME "username" #define DBPASSWORD "password" #define DBDATABASE_NAME "database"#define DBDATABASE_PSTRING ""
NOTE: These values are compiled into the tutorials when you build them. If you need to change the values at a later time, you must clean the example object files with an nmake clean, then rebuild the tutorials. (See Building the DB Examples.)
21

The SourcePro DB Examples Building the DB Examples
Building the DB Examples
Building from the Command Line
On Windows
To build the examples for a given module <module-name>, open a command prompt window set with the Visual Studio environment, as described in Building the Examples from the Command Line, and type nmake in the <buildspace>\examples\<package-name>\12d directory.
On UNIX
To build the examples for a given module <module-name>, type make in the <buildspace>/examples/<package-name>/12d directory.
Running the DB ExamplesThis section describes running the video store tutorials in detail, including the purpose of each tutorial, its inputs and outputs. For the bulkcopy and datacb examples, simply follow the instructions in Running the Examples.
Populate Your DatabaseFrom the command line, run tutinit.exe to create all dependent database objects for the tutorials. File setuperr.txt reports any errors that occur during setup.
Run the TutorialsTo run the tutorials, enter the executable name in a command prompt window.
Table 6 contains a list of the video store tutorials, their related files, and a description of their content. Filenames containing the word out give the output of the tutorial program. Filenames containing the word err contain error messages.
22
The SourcePro DB Examples Running the DB Examples
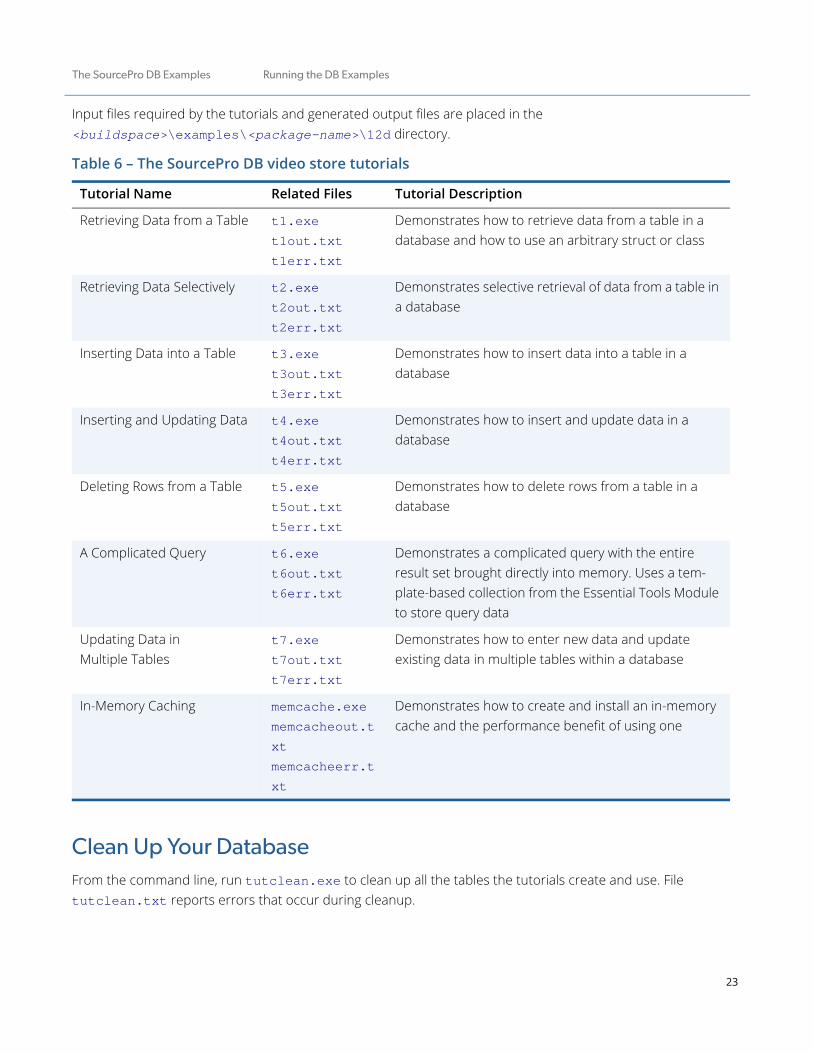
Input files required by the tutorials and generated output files are placed in the <buildspace>\examples\<package-name>\12d directory.
Clean Up Your DatabaseFrom the command line, run tutclean.exe to clean up all the tables the tutorials create and use. File tutclean.txt reports errors that occur during cleanup.
Table 6 – The SourcePro DB video store tutorials
Tutorial Name Related Files Tutorial Description
Retrieving Data from a Table t1.exet1out.txtt1err.txt
Demonstrates how to retrieve data from a table in a database and how to use an arbitrary struct or class
Retrieving Data Selectively t2.exet2out.txtt2err.txt
Demonstrates selective retrieval of data from a table in a database
Inserting Data into a Table t3.exet3out.txtt3err.txt
Demonstrates how to insert data into a table in a database
Inserting and Updating Data t4.exet4out.txtt4err.txt
Demonstrates how to insert and update data in a database
Deleting Rows from a Table t5.exet5out.txtt5err.txt
Demonstrates how to delete rows from a table in a database
A Complicated Query t6.exet6out.txtt6err.txt
Demonstrates a complicated query with the entire result set brought directly into memory. Uses a tem-plate-based collection from the Essential Tools Module to store query data
Updating Data in Multiple Tables
t7.exet7out.txtt7err.txt
Demonstrates how to enter new data and update existing data in multiple tables within a database
In-Memory Caching memcache.exememcacheout.txtmemcacheerr.txt
Demonstrates how to create and install an in-memory cache and the performance benefit of using one
23
Chapter 5, Writing Your Own Applications
OverviewOnce you have succeeded in building and running the examples, you can start developing your own applica-tions with SourcePro components. This chapter describes:
How to use SourcePro components in your applications by including the appropriate header files
How to build your applications, including how to specify proper include paths, linked libraries, and compiler flags
How to run your applications
Using SourcePro ComponentsTo use a Rogue Wave class, simply include its header file in your application. SourcePro header files are orga-nized in the buildspace as shown below:
buildspace ... rw // Essential Tools Module, Essential Math Module, // and Linear Algebra Module header files analytics // Business Analysis Module header files currency // Currency Module header files ... // header files for other modules or packagesThe #include directives for all SourcePro components must contain the path to each header file from the rw directory. For example:#include <rw/cstring.h>#include <rw/http/RWHttpClient.h>#include <rw/https/RWHttpsSecureSocketClient.h>
24
Writing Your Own Applications Using SourcePro Components
#include <rw/secsock/RWSecureSocketContext.h>#include <rw/network/RWWinSockInfo.h>
25
Writing Your Own Applications Building Your Applications
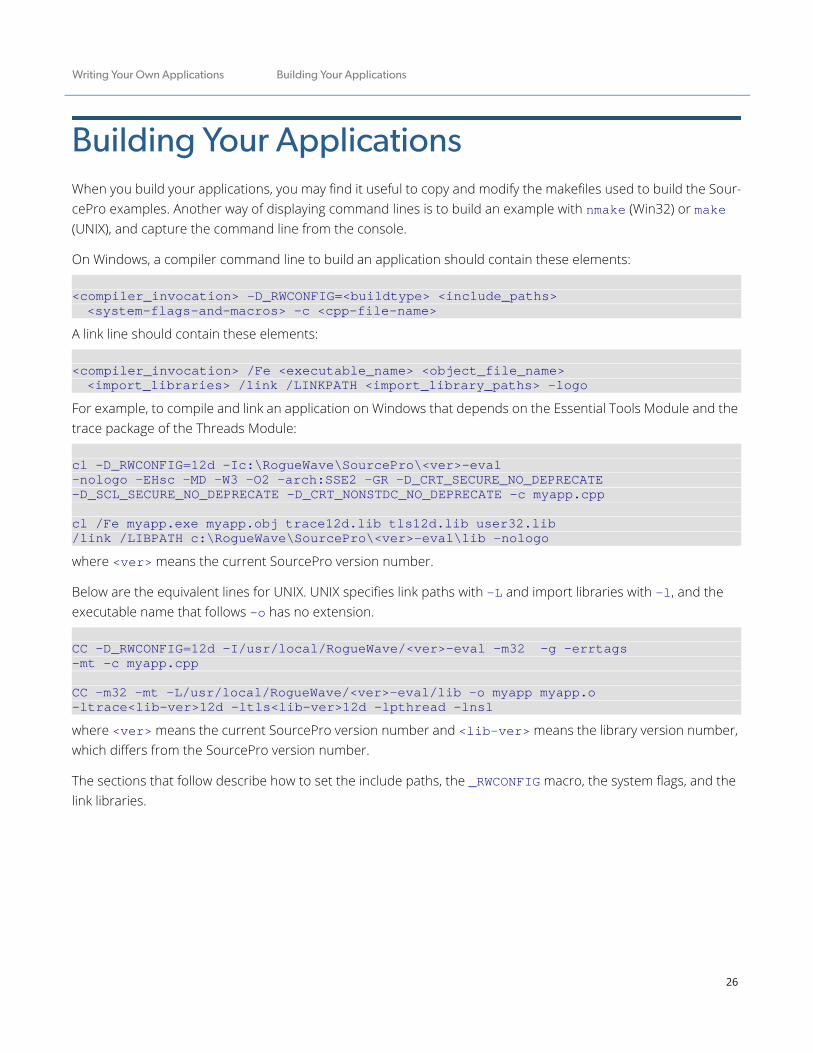
Building Your ApplicationsWhen you build your applications, you may find it useful to copy and modify the makefiles used to build the Sour-cePro examples. Another way of displaying command lines is to build an example with nmake (Win32) or make (UNIX), and capture the command line from the console.
On Windows, a compiler command line to build an application should contain these elements:
<compiler_invocation> -D_RWCONFIG=<buildtype> <include_paths> <system-flags-and-macros> -c <cpp-file-name>A link line should contain these elements:
<compiler_invocation> /Fe <executable_name> <object_file_name> <import_libraries> /link /LINKPATH <import_library_paths> -logo For example, to compile and link an application on Windows that depends on the Essential Tools Module and the trace package of the Threads Module:
cl -D_RWCONFIG=12d -Ic:\RogueWave\SourcePro\<ver>-eval-nologo -EHsc -MD -W3 -O2 -arch:SSE2 -GR -D_CRT_SECURE_NO_DEPRECATE -D_SCL_SECURE_NO_DEPRECATE -D_CRT_NONSTDC_NO_DEPRECATE -c myapp.cpp
cl /Fe myapp.exe myapp.obj trace12d.lib tls12d.lib user32.lib/link /LIBPATH c:\RogueWave\SourcePro\<ver>-eval\lib -nologowhere <ver> means the current SourcePro version number.
Below are the equivalent lines for UNIX. UNIX specifies link paths with -L and import libraries with -l, and the executable name that follows -o has no extension.
CC -D_RWCONFIG=12d -I/usr/local/RogueWave/<ver>-eval -m32 -g -errtags-mt -c myapp.cpp
CC -m32 -mt -L/usr/local/RogueWave/<ver>-eval/lib -o myapp myapp.o-ltrace<lib-ver>12d -ltls<lib-ver>12d -lpthread -lnslwhere <ver> means the current SourcePro version number and <lib-ver> means the library version number, which differs from the SourcePro version number.
The sections that follow describe how to set the include paths, the _RWCONFIG macro, the system flags, and the link libraries.
26
Writing Your Own Applications Building Your Applications
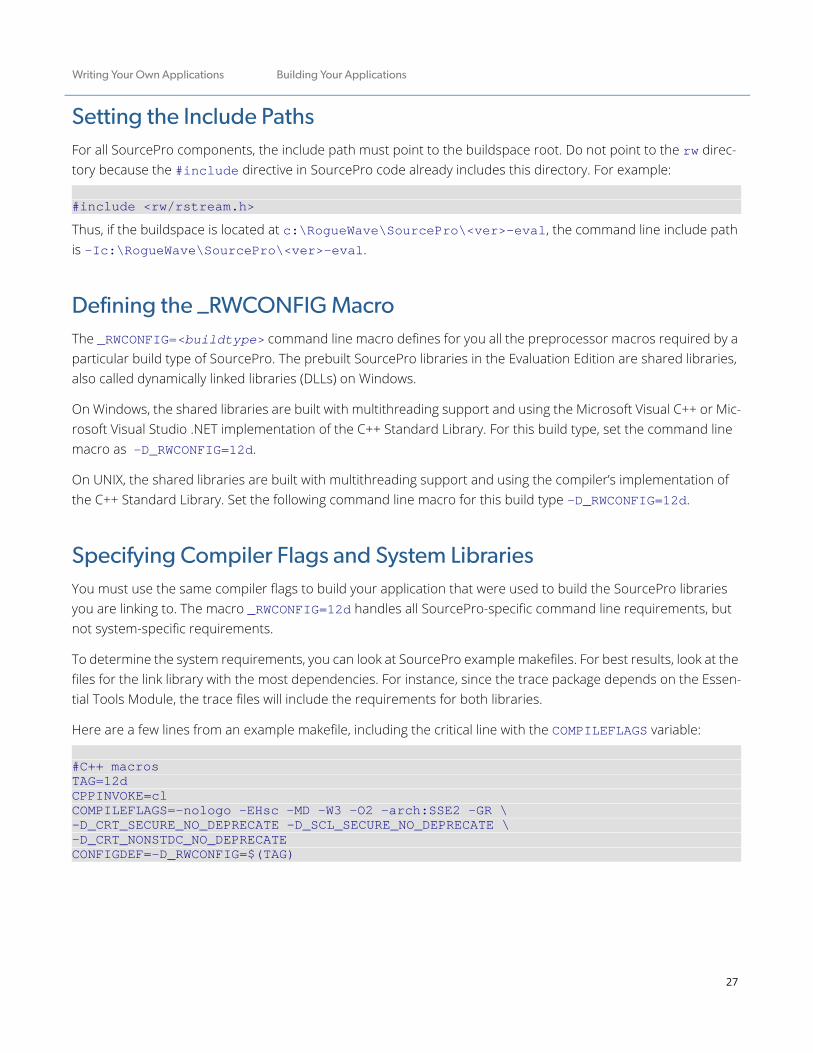
Setting the Include PathsFor all SourcePro components, the include path must point to the buildspace root. Do not point to the rw direc-tory because the #include directive in SourcePro code already includes this directory. For example:
#include <rw/rstream.h>Thus, if the buildspace is located at c:\RogueWave\SourcePro\<ver>-eval, the command line include path is -Ic:\RogueWave\SourcePro\<ver>-eval.
Defining the _RWCONFIG MacroThe _RWCONFIG=<buildtype> command line macro defines for you all the preprocessor macros required by a particular build type of SourcePro. The prebuilt SourcePro libraries in the Evaluation Edition are shared libraries, also called dynamically linked libraries (DLLs) on Windows.
On Windows, the shared libraries are built with multithreading support and using the Microsoft Visual C++ or Mic-rosoft Visual Studio .NET implementation of the C++ Standard Library. For this build type, set the command line macro as -D_RWCONFIG=12d.
On UNIX, the shared libraries are built with multithreading support and using the compiler’s implementation of the C++ Standard Library. Set the following command line macro for this build type -D_RWCONFIG=12d.
Specifying Compiler Flags and System LibrariesYou must use the same compiler flags to build your application that were used to build the SourcePro libraries you are linking to. The macro _RWCONFIG=12d handles all SourcePro-specific command line requirements, but not system-specific requirements.
To determine the system requirements, you can look at SourcePro example makefiles. For best results, look at the files for the link library with the most dependencies. For instance, since the trace package depends on the Essen-tial Tools Module, the trace files will include the requirements for both libraries.
Here are a few lines from an example makefile, including the critical line with the COMPILEFLAGS variable:
#C++ macrosTAG=12dCPPINVOKE=clCOMPILEFLAGS=-nologo -EHsc -MD -W3 -O2 -arch:SSE2 -GR \-D_CRT_SECURE_NO_DEPRECATE -D_SCL_SECURE_NO_DEPRECATE \-D_CRT_NONSTDC_NO_DEPRECATECONFIGDEF=-D_RWCONFIG=$(TAG)
27
Writing Your Own Applications Building Your Applications
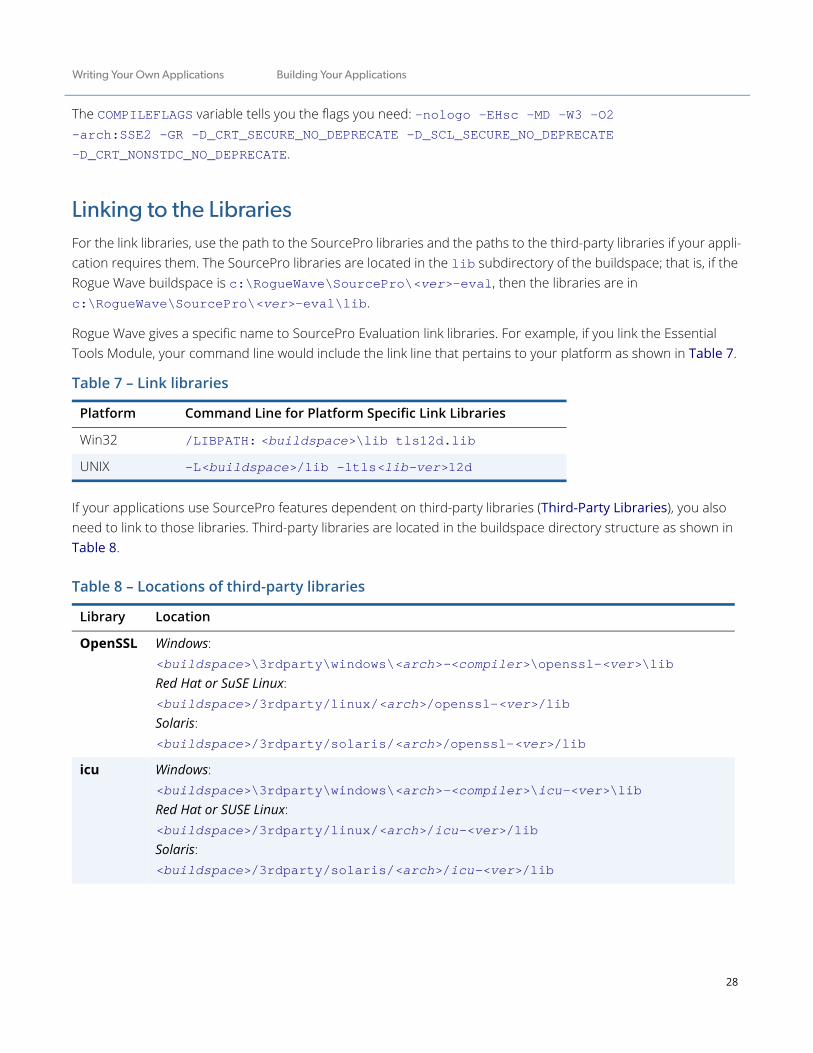
The COMPILEFLAGS variable tells you the flags you need: -nologo -EHsc -MD -W3 -O2 -arch:SSE2 -GR -D_CRT_SECURE_NO_DEPRECATE -D_SCL_SECURE_NO_DEPRECATE -D_CRT_NONSTDC_NO_DEPRECATE.
Linking to the LibrariesFor the link libraries, use the path to the SourcePro libraries and the paths to the third-party libraries if your appli-cation requires them. The SourcePro libraries are located in the lib subdirectory of the buildspace; that is, if the Rogue Wave buildspace is c:\RogueWave\SourcePro\<ver>-eval, then the libraries are in c:\RogueWave\SourcePro\<ver>-eval\lib.
Rogue Wave gives a specific name to SourcePro Evaluation link libraries. For example, if you link the Essential Tools Module, your command line would include the link line that pertains to your platform as shown in Table 7.
If your applications use SourcePro features dependent on third-party libraries (Third-Party Libraries), you also need to link to those libraries. Third-party libraries are located in the buildspace directory structure as shown in Table 8.
Table 7 – Link libraries
Platform Command Line for Platform Specific Link Libraries
Win32 /LIBPATH: <buildspace>\lib tls12d.lib
UNIX -L<buildspace>/lib -ltls<lib-ver>12d
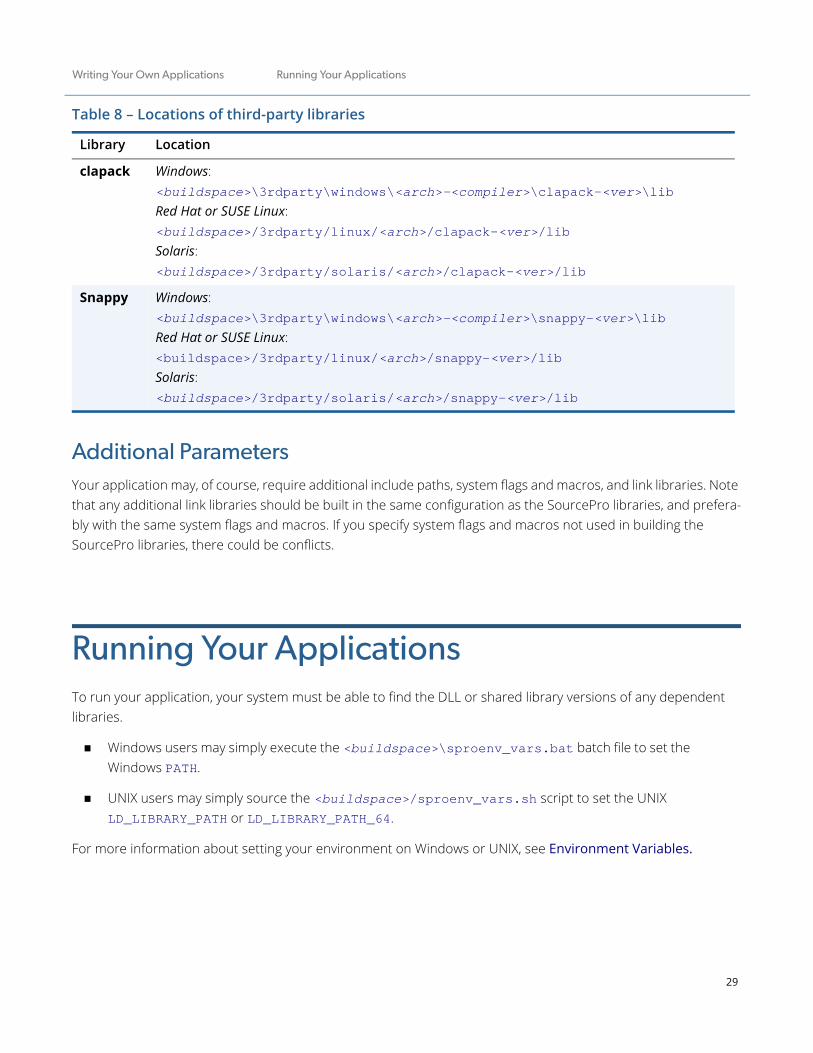
Table 8 – Locations of third-party libraries
Library Location
OpenSSL Windows: <buildspace>\3rdparty\windows\<arch>-<compiler>\openssl-<ver>\libRed Hat or SuSE Linux: <buildspace>/3rdparty/linux/<arch>/openssl-<ver>/libSolaris: <buildspace>/3rdparty/solaris/<arch>/openssl-<ver>/lib
icu Windows:<buildspace>\3rdparty\windows\<arch>-<compiler>\icu-<ver>\libRed Hat or SUSE Linux: <buildspace>/3rdparty/linux/<arch>/icu-<ver>/libSolaris: <buildspace>/3rdparty/solaris/<arch>/icu-<ver>/lib
28
Writing Your Own Applications Running Your Applications
Additional ParametersYour application may, of course, require additional include paths, system flags and macros, and link libraries. Note that any additional link libraries should be built in the same configuration as the SourcePro libraries, and prefera-bly with the same system flags and macros. If you specify system flags and macros not used in building the SourcePro libraries, there could be conflicts.
Running Your ApplicationsTo run your application, your system must be able to find the DLL or shared library versions of any dependent libraries.
Windows users may simply execute the <buildspace>\sproenv_vars.bat batch file to set the Windows PATH.
UNIX users may simply source the <buildspace>/sproenv_vars.sh script to set the UNIX LD_LIBRARY_PATH or LD_LIBRARY_PATH_64.
For more information about setting your environment on Windows or UNIX, see Environment Variables.
clapack Windows: <buildspace>\3rdparty\windows\<arch>-<compiler>\clapack-<ver>\libRed Hat or SUSE Linux: <buildspace>/3rdparty/linux/<arch>/clapack-<ver>/libSolaris: <buildspace>/3rdparty/solaris/<arch>/clapack-<ver>/lib
Snappy Windows:<buildspace>\3rdparty\windows\<arch>-<compiler>\snappy-<ver>\libRed Hat or SUSE Linux: <buildspace>/3rdparty/linux/<arch>/snappy-<ver>/libSolaris: <buildspace>/3rdparty/solaris/<arch>/snappy-<ver>/lib
Table 8 – Locations of third-party libraries
Library Location
29
30
Symbols_RWCONFIG macro 27
#include directives 24
Numerics12d_eval_gcc_rhas4 buildtype 27
12d_eval_vc6_win32 buildtype 27
3rdparty. See third-party libraries.
Aapplications
compiling 26running 29writing your own 24
Bbuilding applications 26
building the examples 15, 22
buildspace 8, 13
Ccoding your own applications 24
command line compiling 26
compiler flags 27
compilers 4invoking from command
line 26
compiling applications 26
connecting to a database 21
conventionspathname 8typographic 9
Ddatabase
populating for SourcePro DB tutorials 22
database connection 21
database examples 19
DB Access Modules 5
DB Interface Module 5
DBDATABASE_NAME 21
DBPASSWORD 21
DBSERVER_NAME 21
DBSERVER_TYPE 21
DBUSER_NAME 21
dependenciesICU 5module 4OpenSSL secure sockets
library 5third-party 5
directory structureheader files 24
directory structure of buildspace 13
DLLs 13, 29
document organization 10
documentation 6locations 6
Eenvironment variables 13
evaluation period 14
examples 13building 15, 22building in MSVC 16running 13, 18, 22running from MSVC 18SourcePro DB 19
Hheader files, including 24
IICU 5, 28
include paths 27
includes 24
including header files 24
installation 12
installing the libraries 12
internationalization 2
Internationalization Module 5
Llibraries
linking 28third-party 28
link libraries 28
Mmakefiles 15
Microsoft Visual Studio 16
module organization 2
MSVC project files 16
MSVC workspaces 13
MSVC workspaces and solutions 16
OOpenSSL secure sockets library 5,
28
operating systems 4
Ppackages 2
PATH environment variable 13
platforms 4
populating your database 22
productsdocumentation 6Internationalization Module 5module organization 2purchasing 10SourcePro Analysis 2SourcePro Core 2SourcePro DB 2SourcePro Net 2
project files 16
purchasing products 10
RRCB 7
requirements, system 27
Index
31
INDEX
Rogue Wave Component Builder. See RCB.
running applications 29
running the examples 13, 18, 22
RW_SOURCEPRO_HOME environ-ment variable 13
SSecure Communications Module 5
setup 12
software requirements 4
solutions (MSVC) 16
SourcePro Analysis 2
SourcePro Core 2
SourcePro DB 2
SourcePro DB examples 19building 22running 22tutorial names, filenames, and
descriptions 23
SourcePro DB examples configuration 21
SourcePro Net 2
sproenv_vars.sh environment variable 13
support 10operating systems and
compilers 4
system libraries 27
system requirements 27
Tthird-party libraries 5, 13, 28
ICU 28OpenSSL secure sockets
library 28
timebomb 14
tutdefs.h file 21
UUnicode 2
using SourcePro components 24
Wworkspaces 13, 16
writing your own applications 24