esx vc oracle - vmware.com 1. tasks to clone and stanrt an oracle rac using esx server and...
TRANSCRIPT

��������������������������������������������������������
��������������������������������������������������������������������������������������������������������������
� � � � � � � � � � �

VMWARE WHITE PAPER
1
Table of ContentsIntroduction . . . . . . . . . . . . . . . . . . . . . . . . . . . . . . . . . . . . . . . . . . . . . . . . . . . . . . . . . . . . . . . . . . . . . . . . . . . . . . . . . . . . . 3
Scope . . . . . . . . . . . . . . . . . . . . . . . . . . . . . . . . . . . . . . . . . . . . . . . . . . . . . . . . . . . . . . . . . . . . . . . . . . . . . . . . . . . . . . . . . 3
Assumption . . . . . . . . . . . . . . . . . . . . . . . . . . . . . . . . . . . . . . . . . . . . . . . . . . . . . . . . . . . . . . . . . . . . . . . . . . . . . . . . . . . . . 3
Background . . . . . . . . . . . . . . . . . . . . . . . . . . . . . . . . . . . . . . . . . . . . . . . . . . . . . . . . . . . . . . . . . . . . . . . . . . . . . . . . . . . . . 3
ESX Server . . . . . . . . . . . . . . . . . . . . . . . . . . . . . . . . . . . . . . . . . . . . . . . . . . . . . . . . . . . . . . . . . . . . . . . . . . . . . . . . . . . . . 4
VirtualCenter . . . . . . . . . . . . . . . . . . . . . . . . . . . . . . . . . . . . . . . . . . . . . . . . . . . . . . . . . . . . . . . . . . . . . . . . . . . . . . . . . . . 4
Process Overview . . . . . . . . . . . . . . . . . . . . . . . . . . . . . . . . . . . . . . . . . . . . . . . . . . . . . . . . . . . . . . . . . . . . . . . . . . . . . . . . . 5
Real Application Node Scaling and Replication . . . . . . . . . . . . . . . . . . . . . . . . . . . . . . . . . . . . . . . . . . . . . . . . . . . . . . . . . . 6
Cloning RAC Clusters . . . . . . . . . . . . . . . . . . . . . . . . . . . . . . . . . . . . . . . . . . . . . . . . . . . . . . . . . . . . . . . . . . . . . . . . . . . . . . 7
Removing the Shared Disk . . . . . . . . . . . . . . . . . . . . . . . . . . . . . . . . . . . . . . . . . . . . . . . . . . . . . . . . . . . . . . . . . . . . . . . . 7
Creating a Virtual Machine Group and Copying Virtual Disks . . . . . . . . . . . . . . . . . . . . . . . . . . . . . . . . . . . . . . . . . . . . . . 8
Cloning Nodes . . . . . . . . . . . . . . . . . . . . . . . . . . . . . . . . . . . . . . . . . . . . . . . . . . . . . . . . . . . . . . . . . . . . . . . . . . . . . . . . 11
Guest Operating System Customization . . . . . . . . . . . . . . . . . . . . . . . . . . . . . . . . . . . . . . . . . . . . . . . . . . . . . . . . . . . . . 14
Adding the Clustered Virtual Disk . . . . . . . . . . . . . . . . . . . . . . . . . . . . . . . . . . . . . . . . . . . . . . . . . . . . . . . . . . . . . . . . . . 19
Change SCSI Controller Attributes. . . . . . . . . . . . . . . . . . . . . . . . . . . . . . . . . . . . . . . . . . . . . . . . . . . . . . . . . . . . . . . . . . 22
Modify Parameters . . . . . . . . . . . . . . . . . . . . . . . . . . . . . . . . . . . . . . . . . . . . . . . . . . . . . . . . . . . . . . . . . . . . . . . . . . . . . . . 23
Linux Operating-System Parameters . . . . . . . . . . . . . . . . . . . . . . . . . . . . . . . . . . . . . . . . . . . . . . . . . . . . . . . . . . . . . . . . 23
hosts File . . . . . . . . . . . . . . . . . . . . . . . . . . . . . . . . . . . . . . . . . . . . . . . . . . . . . . . . . . . . . . . . . . . . . . . . . . . . . . . . . . . . . 23
hosts.equiv File . . . . . . . . . . . . . . . . . . . . . . . . . . . . . . . . . . . . . . . . . . . . . . . . . . . . . . . . . . . . . . . . . . . . . . . . . . . . . . . . 23
Oracle Cluster Manager . . . . . . . . . . . . . . . . . . . . . . . . . . . . . . . . . . . . . . . . . . . . . . . . . . . . . . . . . . . . . . . . . . . . . . . . . . 24
Oracle Cluster File System . . . . . . . . . . . . . . . . . . . . . . . . . . . . . . . . . . . . . . . . . . . . . . . . . . . . . . . . . . . . . . . . . . . . . . . . 24
Starting OCFS . . . . . . . . . . . . . . . . . . . . . . . . . . . . . . . . . . . . . . . . . . . . . . . . . . . . . . . . . . . . . . . . . . . . . . . . . . . . . . . . . 24
Starting the Cluster Manager . . . . . . . . . . . . . . . . . . . . . . . . . . . . . . . . . . . . . . . . . . . . . . . . . . . . . . . . . . . . . . . . . . . . . 25
Database Configuration Assistant (dbca) . . . . . . . . . . . . . . . . . . . . . . . . . . . . . . . . . . . . . . . . . . . . . . . . . . . . . . . . . . . . . . 25
Conclusions . . . . . . . . . . . . . . . . . . . . . . . . . . . . . . . . . . . . . . . . . . . . . . . . . . . . . . . . . . . . . . . . . . . . . . . . . . . . . . . . . . . . 26
Appendix A: Creating Additional OCFS File Systems . . . . . . . . . . . . . . . . . . . . . . . . . . . . . . . . . . . . . . . . . . . . . . . . . . . . . 27

VMWARE WHITE PAPER
Using ESX Server and VirtualCenter to Reduce Oracle Real Application Clusters Deployment Costs and Cycle TimesESX Server Version 2.1/VirtualCenter 1.0.1/Oracle 9i RAC
IntroductionWith the rapid success and market penetration of Oracle’s Real Application Clusters (RAC), it has become increasingly critical to deploy these solutions quickly, consistently, and in a uniform manner. The successful deployment of RAC solutions requires careful infrastructure and hardware planning. At a minimum IT organization must secure the hardware and technical resources necessary to deploy multiple servers, configure public and private networks, provision storage, and create the Oracle environment itself. IT organizations must also factor in the need to replicate the RAC infrastructure for development and QA environments, as well as production.
These tasks and hardware costs can be greatly minimized with the use of VMware’s product offerings. ESX Server can be used to create a virtual RAC infrastructure. ESX Server accomplishes this by transforming a physical system into a pool of logical computing resources. Each RAC node’s operating system and Oracle software are encapsulated into isolated virtual machines. These virtual machines, in turn, can reside on a single server.
In addition, VirtualCenter will be used to manage, monitor, and provision resources within the virtual RAC infrastructure. VirtualCenter can clone the virtual RAC nodes, thereby scaling the existing cluster or replicating the cluster for development or test purposes.
By using VMware’s virtualization technology and the techniques described in this paper, RAC deployments can be reduced to basic Database and System Administration tasks. This greatly reduces the complexity and costs associated with a traditional RAC infrastructure. Oracle administrators no longer must set up individual nodes of a cluster, but can instead clone a master to create new nodes. Moreover, the use of VMware ESX Server allows multiple virtual machines to coexist on a single piece of hardware, thus massively reducing hardware costs for deploy-ment. Using the described methodology, operational Real Application Clusters can be created in the time it takes to clone nodes and edit a few files entries (approximately 30 minutes per node).
The architecture and design outlined in this white paper was created as a proof of concept to demonstrate the capabilities of VMware technologies with Oracle Real Application Cluster. When implementing and planning production environments please refer to the appropriate vendor support matrix for official support statements on product integration.
3
ScopeThis paper describes the steps necessary to clone Real Application Cluster nodes with ESX Server and VirtualCenter. Using this technique, a functionally independent RAC cluster can be created for a multitude of purposes. This technique can also be used to scale a virtual cluster by adding additional RAC nodes. This procedure requires the modification of a few node-specific parameters described later in this paper.
AssumptionIt is assumed that readers have a basic understanding of Oracle database software, the Linux operating system, VirtualCenter, ESX Server, and basic networking. As such, readers already should be familiar with the installation and administration of Linux and the Oracle databases.
It is also assumed ESX Sever and VirtualCenter have been successfully installed. The installation of ESX Server and VirtualCenter are beyond the scope of this paper.
BackgroundOracle Real Application Clusters may be configured on one or more ESX Servers. A golden master1 virtual RAC cluster is used to clone functionally independent clusters or scale existing virtual clusters. Conventional Oracle Real Application Clusters are configured on multiple hardware nodes with an attached shared file system. A virtual Oracle Real Application Cluster consists of a public Virtual Machine File System (VMFS) and a private VMFS. Each virtual Real Application Cluster must contain its own private VMFS.
The sole purpose of the golden master is to produce consis-tent clones throughout an infrastructure. It is not meant to be started. For this reason, the golden master’s shared file system may reside on a public VMFS partition. The properties of the golden master’s shared file system are altered, and then succes-sively copied to the new clones’ shared file system. This process is described in detail later in this paper.
VMWARE WHITE PAPER
4
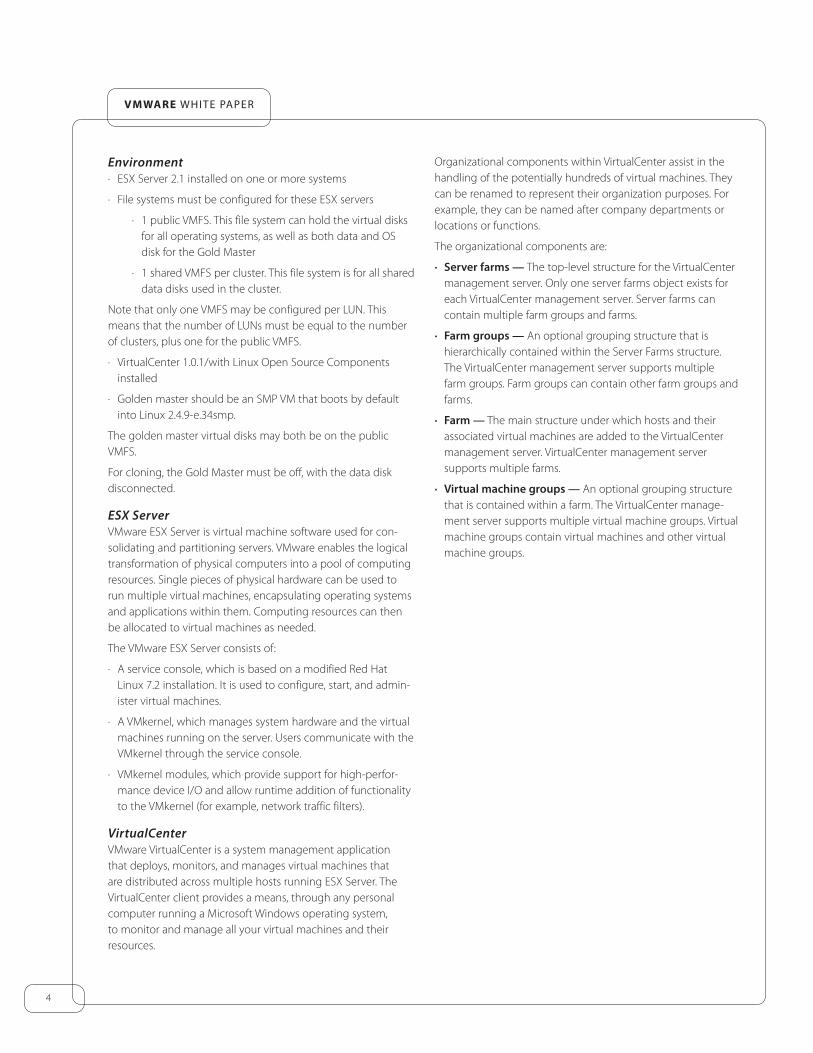
Environment· ESX Server 2.1 installed on one or more systems
· File systems must be configured for these ESX servers
· 1 public VMFS. This file system can hold the virtual disks for all operating systems, as well as both data and OS disk for the Gold Master
· 1 shared VMFS per cluster. This file system is for all shared data disks used in the cluster.
Note that only one VMFS may be configured per LUN. This means that the number of LUNs must be equal to the number of clusters, plus one for the public VMFS.
· VirtualCenter 1.0.1/with Linux Open Source Components installed
· Golden master should be an SMP VM that boots by default into Linux 2.4.9-e.34smp.
The golden master virtual disks may both be on the public VMFS.
For cloning, the Gold Master must be off, with the data disk disconnected.
ESX ServerVMware ESX Server is virtual machine software used for con-solidating and partitioning servers. VMware enables the logical transformation of physical computers into a pool of computing resources. Single pieces of physical hardware can be used to run multiple virtual machines, encapsulating operating systems and applications within them. Computing resources can then be allocated to virtual machines as needed.
The VMware ESX Server consists of:
· A service console, which is based on a modified Red Hat Linux 7.2 installation. It is used to configure, start, and admin-ister virtual machines.
· A VMkernel, which manages system hardware and the virtual machines running on the server. Users communicate with the VMkernel through the service console.
· VMkernel modules, which provide support for high-perfor-mance device I/O and allow runtime addition of functionality to the VMkernel (for example, network traffic filters).
VirtualCenterVMware VirtualCenter is a system management application that deploys, monitors, and manages virtual machines that are distributed across multiple hosts running ESX Server. The VirtualCenter client provides a means, through any personal computer running a Microsoft Windows operating system, to monitor and manage all your virtual machines and their resources.
Organizational components within VirtualCenter assist in the handling of the potentially hundreds of virtual machines. They can be renamed to represent their organization purposes. For example, they can be named after company departments or locations or functions.
The organizational components are:
· Server farms — The top-level structure for the VirtualCenter management server. Only one server farms object exists for each VirtualCenter management server. Server farms can contain multiple farm groups and farms.
· Farm groups — An optional grouping structure that is hierarchically contained within the Server Farms structure. The VirtualCenter management server supports multiple farm groups. Farm groups can contain other farm groups and farms.
· Farm — The main structure under which hosts and their associated virtual machines are added to the VirtualCenter management server. VirtualCenter management server supports multiple farms.
· Virtual machine groups — An optional grouping structure that is contained within a farm. The VirtualCenter manage-ment server supports multiple virtual machine groups. Virtual machine groups contain virtual machines and other virtual machine groups.
5
VMWARE WHITE PAPER
5
Process StepSource
VirtualCenter Instance
Destination VirtualCenter
InstanceOracle Linux VM
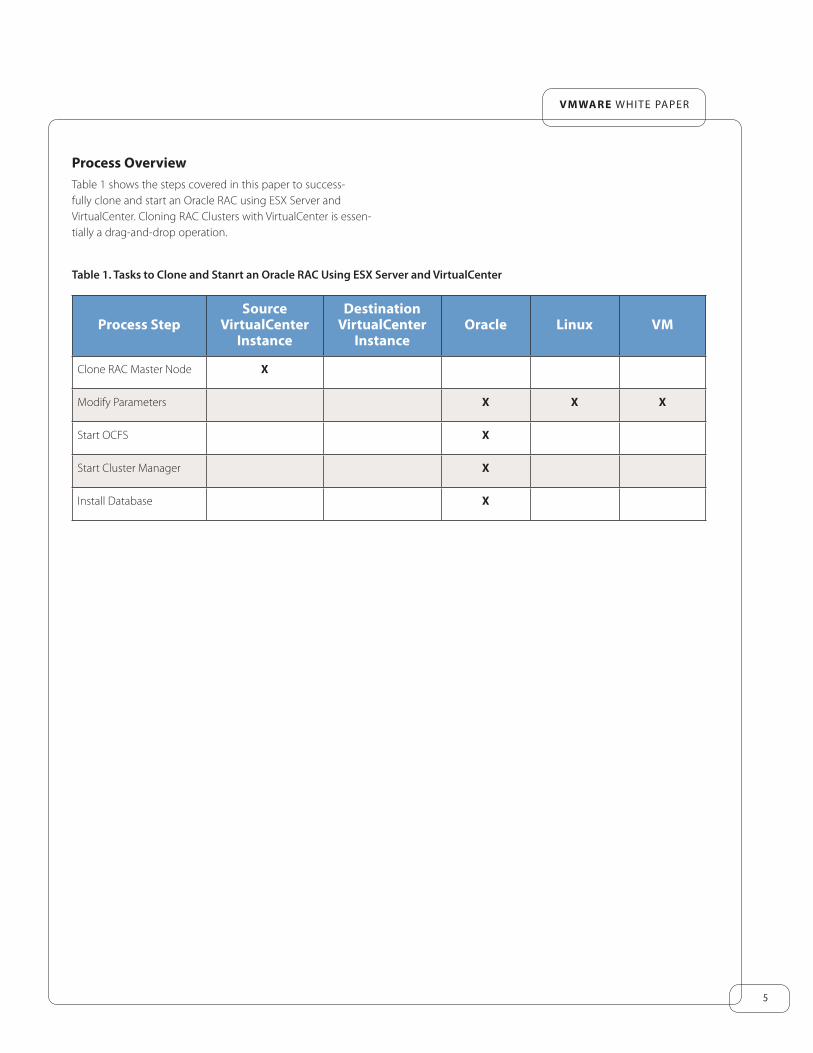
Clone RAC Master Node X
Modify Parameters X X X
Start OCFS X
Start Cluster Manager X
Install Database X
Table 1. Tasks to Clone and Stanrt an Oracle RAC Using ESX Server and VirtualCenter
Process OverviewTable 1 shows the steps covered in this paper to success-fully clone and start an Oracle RAC using ESX Server and VirtualCenter. Cloning RAC Clusters with VirtualCenter is essen-tially a drag-and-drop operation.

VMWARE WHITE PAPER
6
Real Application Node Scaling and ReplicationReal Application Cluster node may reside on a single ESX Server or may be distributed over several ESX Servers. Multiple ESX Servers can be used for failover testing, performance testing, or scaling beyond the servers available resources. Figure 1 shows both scenarios.
Cluster scaling is only limited by the available resources and the cluster manager’s maximum node count. In addition to scaling Real Application Clusters, a new functionally independent RAC cluster can be created. These cloned RAC cluster may be created for operationally independent purposes as well, such as test, development, or QA.
Figure 1.
VMWARE WHITE PAPER
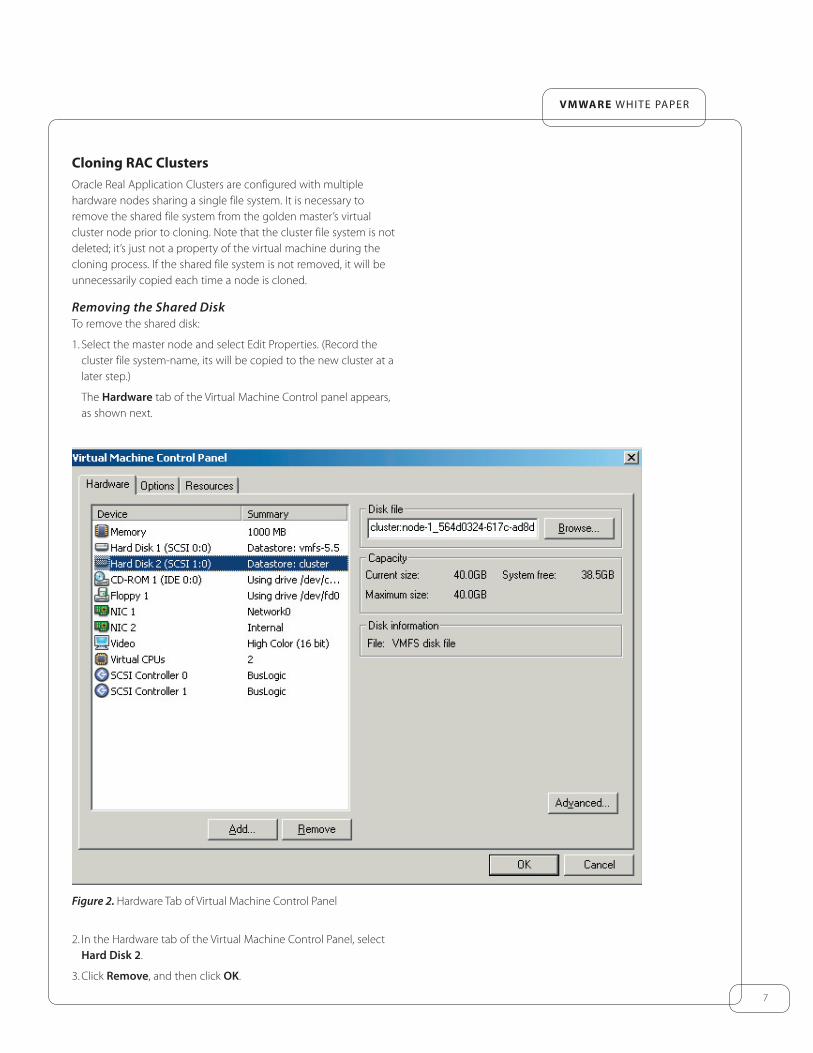
Cloning RAC ClustersOracle Real Application Clusters are configured with multiple hardware nodes sharing a single file system. It is necessary to remove the shared file system from the golden master’s virtual cluster node prior to cloning. Note that the cluster file system is not deleted; it’s just not a property of the virtual machine during the cloning process. If the shared file system is not removed, it will be unnecessarily copied each time a node is cloned.
Removing the Shared DiskTo remove the shared disk:
1. Select the master node and select Edit Properties. (Record the cluster file system-name, its will be copied to the new cluster at a later step.)
The Hardware tab of the Virtual Machine Control panel appears, as shown next.
2. In the Hardware tab of the Virtual Machine Control Panel, select Hard Disk 2.
3. Click Remove, and then click OK.
7
Figure 2. Hardware Tab of Virtual Machine Control Panel

VMWARE WHITE PAPER
Creating a Virtual Machine Group and Copying Virtual Disks1. Create a new Virtual Machine Group:
2. To make a copy of the cluster virtual disk:
a. Log in to the Web console of the ESX Server as root.
8
Figure 3. Main Pane
Figure 4. ESX Server Log On Screen
VMWARE WHITE PAPER
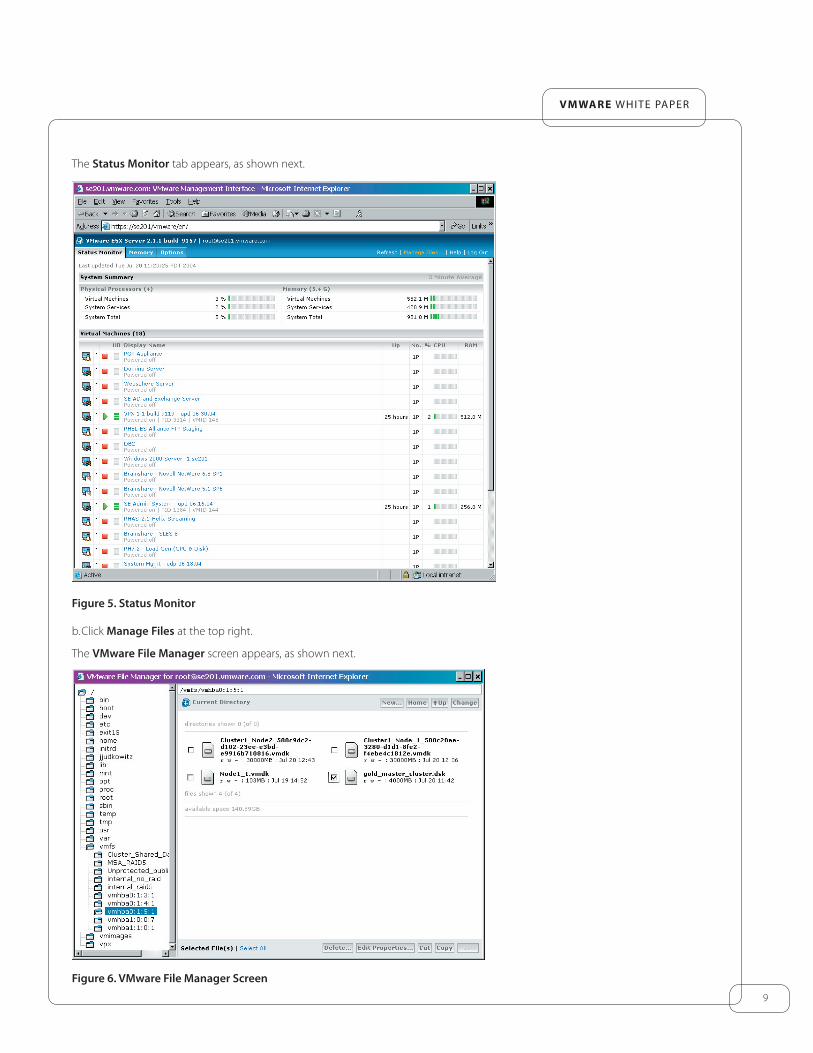
The Status Monitor tab appears, as shown next.
b. Click Manage Files at the top right.
The VMware File Manager screen appears, as shown next.
9
Figure 5. Status Monitor
Figure 6. VMware File Manager Screen
VMWARE WHITE PAPER
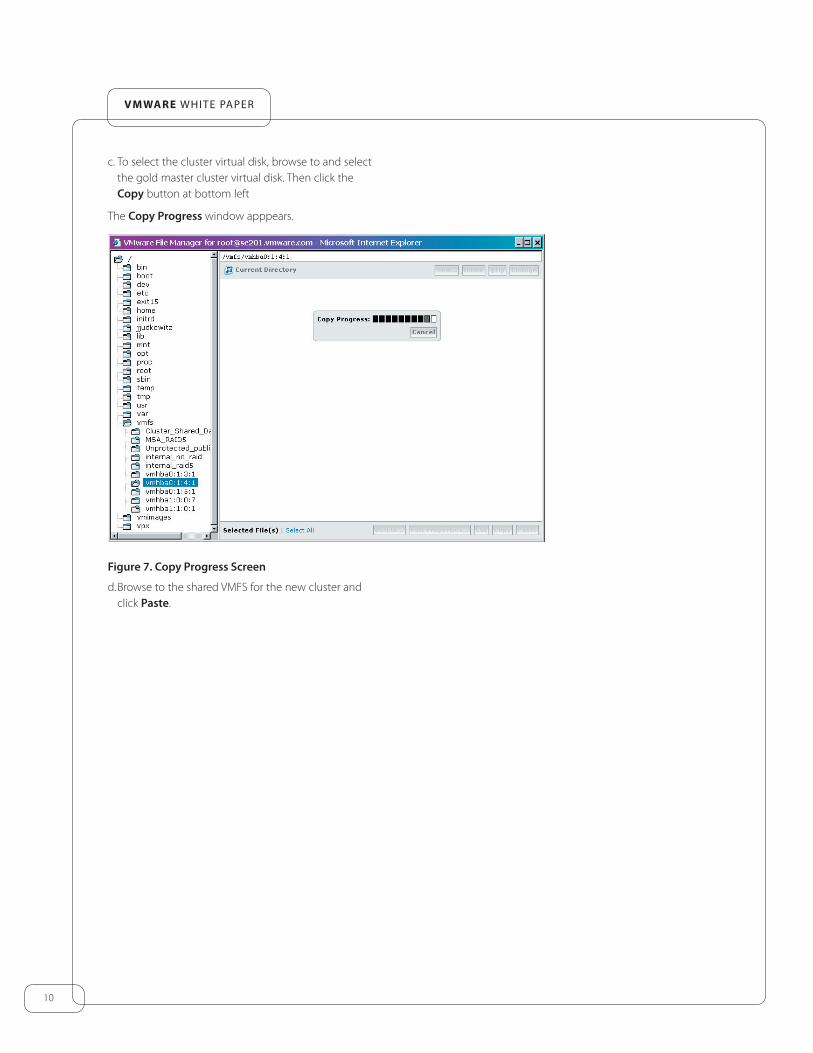
c. To select the cluster virtual disk, browse to and select the gold master cluster virtual disk. Then click the Copy button at bottom left
The Copy Progress window apppears.
d. Browse to the shared VMFS for the new cluster and click Paste.
10
Figure 7. Copy Progress Screen

VMWARE WHITE PAPER
Cloning Nodes1. Right-click on the gold master and select Clone to
bring up the VirtualCenter Clone Wizard.
2. Click Next to continue.
The Select a Host screen appears.
11
Figure 8. VirtualCenter Clone Wizard
Figure 9. Select a Host Screen

VMWARE WHITE PAPER
3. Select a host for the destination virtual machine. Then click Next.
The Destination Virtual Machine Group screen appears.
4. Select the destination virtual machine group you created. Then click Next.
The Name the Virtual Machine screen appears.
5. Enter a descriptive virtual machine name for the new node. Then click Next.
12
Figure 10. Distination Virtual Machine Group Screen
Figure 11. Name the Virtual Machine Screen

VMWARE WHITE PAPER
The Specify the Virtual Machine’s Location screen appears.
6. Specify the virtual machine’s location for the operating-system virtual disk and clear Automatically Power On. Then click Next.
The NIC Configuration screen appears.
13
Figure 12. Specify the Virtual Machine’s Location Screen
Figure 13. NIC Configuration Screen

VMWARE WHITE PAPER
7. Assign a NIC to the public and private network. If the nodes will be distributed across several ESX Servers, then both NICs should be externally routable.
· NIC 1 represents the Public Network
· NIC 2 represents the Private Network
Once you assign the NICs, click Next. The Assign Resources screen appears.
8. Assign the necessary resources to the virtual machine. Then click Next.
Guest Operating System CustomizationThe Linux Open Source Components must be downloaded and installed prior to using the Customization Wizard.
Linux Open Source Components can be downloaded at http://www.vmware.com/download
Installation instructions can be found at: http://www.vmware.com/support/vc11/doc/c12prepcustomize.html#1030370)
14
Figure 14. Assign Resources Screen.

VMWARE WHITE PAPER
1. Select Start the guest customization wizard,and then click Next.
The Computer Name screen appears.
2. Enter the computer and domain name supplied by your network administrator. Then click Next.
The Network Interface Settings screen appears.
15
Figure 15. Computer Name Screen

16
VMWARE WHITE PAPER
3. Select Custom settings, and then click Next.
The DNS screen appears.
4. Enter the DNS and domain information supplied by your network administrator. Then click Next.
The Network Interface Customizations screen appears, as shown next.
Figure 16. Network Interface Settings
Figure 17. DNS Screen

17
VMWARE WHITE PAPER
5. Select a network interface to customize; performing the following steps on both the public and private NICs.
6. Enter the network properties, and then click OK.
Figure 18. Network Interface Customizations Screen
Figure 19. Network Properties General Tab

18
VMWARE WHITE PAPER
7. Click Finish to create the clone.
8. You can monitor progress in the Scheduled Tasks window, shown next.
Figure 20. Completing the VMware VirtualCenter Clone Wizard
Figure 21. Scheduled Tasks Window

19
VMWARE WHITE PAPER
Adding the Clustered Virtual DiskAfter you have created the clone, you can add the virtual disk using the following procedure:
1. Right-click the cloned virtual machine and select Properties to open the properties dialog box, as shown next.
2. Select Hard Disk 1, and then click OK. The Hardware Type screen appears.
3. Select Hard Disk, and then click Next.
The Select a Disk screen appears.
Figure 22. Hardware Tab of Virtual Machine Control Panel
Figure 23. Hardware Type Screen
20
VMWARE WHITE PAPER
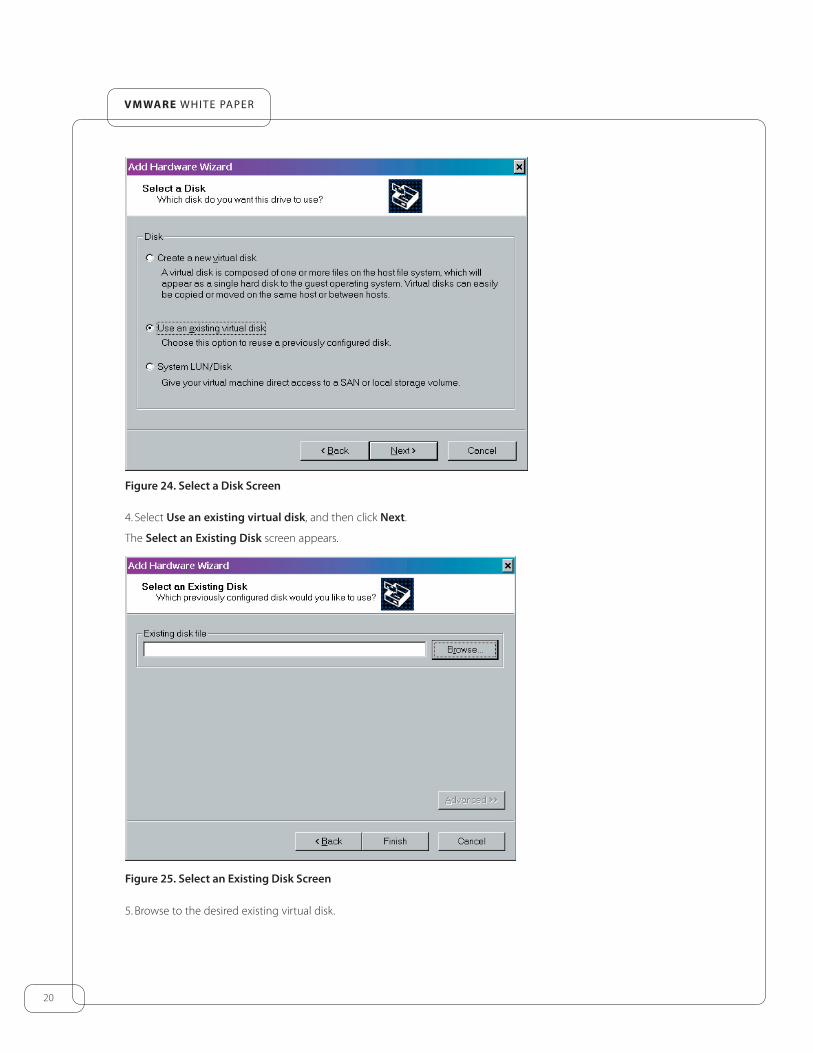
4. Select Use an existing virtual disk, and then click Next.
The Select an Existing Disk screen appears.
5. Browse to the desired existing virtual disk.
Figure 24. Select a Disk Screen
Figure 25. Select an Existing Disk Screen

21
VMWARE WHITE PAPER
6. Select the shared VMFS for this cluster with the newly copied cluster virtual disk. Then click OK.
The Datastore screen lets you select the clustered virtual disk, as shown next.
7. Select the clustered virtual disk. Then click OK.
The Specify Advanced Options screen appears.
Figure 26. Datastore Screen
Figure 27. Selecting a Clustered Virtual Disk

22
VMWARE WHITE PAPER
8. Select SCSI 1:0 and Persistent; then click Finish.
Change SCSI Controller AttributesOpen the properties dialog box for the VM again (Figure 29) and click SCSI Controller 1. Then set Bus Sharing to Physical. Then click OK.
Figure 28. Specify Advanced Options Screen
Figure 29. Virtual Machine Properties

23
VMWARE WHITE PAPER
Modify ParametersTo modify the Linux operating system and Oracle parameters, the virtual machines must be started. To start the virtual machines, right-click the node and select Start2.
Linux Operating-System ParametersThe parameters you must modify are network-related and are contained in the hosts, hosts.equiv, and network files. You must obtain the following information from either the System Administrator or Network Administrator:
Static IP Addresses
Gateway
Network Mask
Hostname
hosts FileThe /etc/hosts file contains the static IP addresses and the hostnames of both the private and public LAN connections for the RAC cluster. The hosts file entries are as follows:
The hosts file for each node must be modified to reflect the new static IP addresses and hostnames. You can make the modifications to the hosts file on one node, and then copy the file to successive nodes. If you copy the hosts file across several nodes, you must modify the loopback address to reflect the hostname of the local node.
hosts.equiv FileWhen Oracle Installer is run on a RAC node, it uses the rsh, rcp, and rlogin features for copying Oracle software to each RAC node. Therefore, the oracle account must be trusted by all other RAC nodes. The /etc/hosts.equiv file will need to be modified as follows:The hosts.equiv file may be modified on a single node and copied to successive nodes without any modifications necessary.
127.0.0.1 node-1 Change node-1 to hostname
192.168.1.1 rac-01 Change IP/name to private LAN of local host
192.168.1.2 rac-02 Change IP/name to private LAN of remote host
137.69.8.185 node-1 Change IP/name to public LAN of local host
137.69.8.183 node-2 Change IP/name to public LAN of remote host
rac-01 oracle Change rac-01 to private hostname
rac-02 oracle Change rac-02 to private hostname
node-1 oracle Change node-1 to public hostname
node-2 oracle Change node-2 to public hostname

24
VMWARE WHITE PAPER
Oracle Cluster ManagerYou must modify the node-specific parameters of the Oracle Cluster Manager file. Change the $ORACLE_HOME/
oracm/admin/cmcfg.ora file as follows:
All other cmcfg.ora parameters remain the same. You can modify this file on a single node, and then copy the file to successive nodes; however, the HostName parameter must be modified to reflect the private local hostname.
Oracle Cluster File SystemThe virtual machines are configured to use the Oracle Cluster File System (OCFS). Using OCFS generates a configuration file that contains the private IP address and private hostname for each node. These parameters in the /etc/ocfs.conf file must be modified on each node as follows:
Starting OCFS On each of the nodes, you must reload the OCFS module to reflect the new IP addresses.1. When cloning virtual machines, the VMware uuid may be
changed. If this happens OCFS will fail to load since the MAC address stored in the ocfs.conf will not match the current MAC address. Regenerating the OCFS guid will fix this issue.
a. As root, unload the OCFS module:
# rmod ocfs
b. To regenerate the guid, issue the following com-mand as root:
# ocfs_uid_gen –c –f
Note: If altered, the following message is displayed:
ocfs_uid_gen: the new GUID is xxxxxxx
If not altered, the following message is displayed:
ocfs_uid_gen: The GUID is already correct. No action taken
2. As root, load the OCFS module:
# load_ocfs
3. As root, mount the OCFS file system:
# mount –t ocfs /dev/sdb2 /var/opt/oracle/oradata/u01
PrivateNodeNames=rac-01 rac-02 Change to private cluster node names
PublicNodesName=node-1 node-2 Change to public cluster node names
HostName=rac-01 Change to private node name of local host
node_name = rac-02 Change to private node name of local host
ip_address = 192.168.1.2 Change to private IP address of local host
Note: If the OCFS file system will not mount, it may be neces-sary to reboot the virtual machine node.
25
VMWARE WHITE PAPER
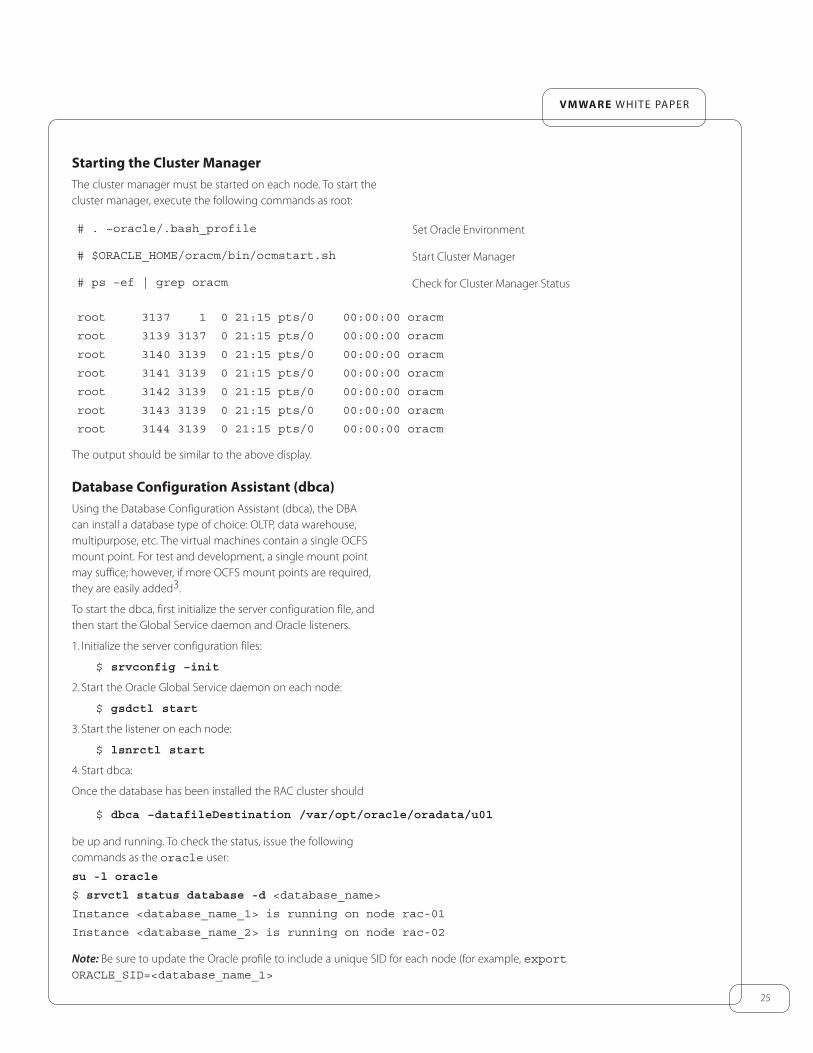
Starting the Cluster ManagerThe cluster manager must be started on each node. To start the cluster manager, execute the following commands as root:
The output should be similar to the above display.
Database Configuration Assistant (dbca)Using the Database Configuration Assistant (dbca), the DBA can install a database type of choice: OLTP, data warehouse, multipurpose, etc. The virtual machines contain a single OCFS mount point. For test and development, a single mount point may suffice; however, if more OCFS mount points are required, they are easily added3.
To start the dbca, first initialize the server configuration file, and then start the Global Service daemon and Oracle listeners.
1. Initialize the server configuration files:
$ srvconfig –init
2. Start the Oracle Global Service daemon on each node:
$ gsdctl start
3. Start the listener on each node:
$ lsnrctl start
4. Start dbca:
Once the database has been installed the RAC cluster should
be up and running. To check the status, issue the following commands as the oracle user:
# . ~oracle/.bash_profile Set Oracle Environment
# $ORACLE_HOME/oracm/bin/ocmstart.sh Start Cluster Manager
# ps –ef | grep oracm Check for Cluster Manager Status
root 3137 1 0 21:15 pts/0 00:00:00 oracm
root 3139 3137 0 21:15 pts/0 00:00:00 oracm
root 3140 3139 0 21:15 pts/0 00:00:00 oracm
root 3141 3139 0 21:15 pts/0 00:00:00 oracm
root 3142 3139 0 21:15 pts/0 00:00:00 oracm
root 3143 3139 0 21:15 pts/0 00:00:00 oracm
root 3144 3139 0 21:15 pts/0 00:00:00 oracm
su -l oracle
$ srvctl status database -d <database_name>
Instance <database_name_1> is running on node rac-01
Instance <database_name_2> is running on node rac-02
$ dbca –datafileDestination /var/opt/oracle/oradata/u01
Note: Be sure to update the Oracle profile to include a unique SID for each node (for example, export ORACLE_SID=<database_name_1>

26
VMWARE WHITE PAPER
ConclusionsUsing VMware technologies and the techniques described in this paper to clone Real Application Cluster nodes significantly reduces the time, resources, and costs associated with deploy-ing traditional RAC cluster. The virtual cluster is functionally equivalent to a nonvirtual cluster and totally transparent to the user. Cloning RAC nodes eliminates System Administrative, DBA, and operational tasks such as loading the operating system and rpms, updating the kernel parameters, installing public and private networking components, creating the necessary user accounts, loading and configuring Oracle Cluster File System, installing and configuring the Oracle Cluster Manager, and hang check timer, to mention a few.
Deploying Real Application Clusters on a single server signifi-cantly reduces the total cost of ownership, while delivering equivalent functionality.
27
VMWARE WHITE PAPER
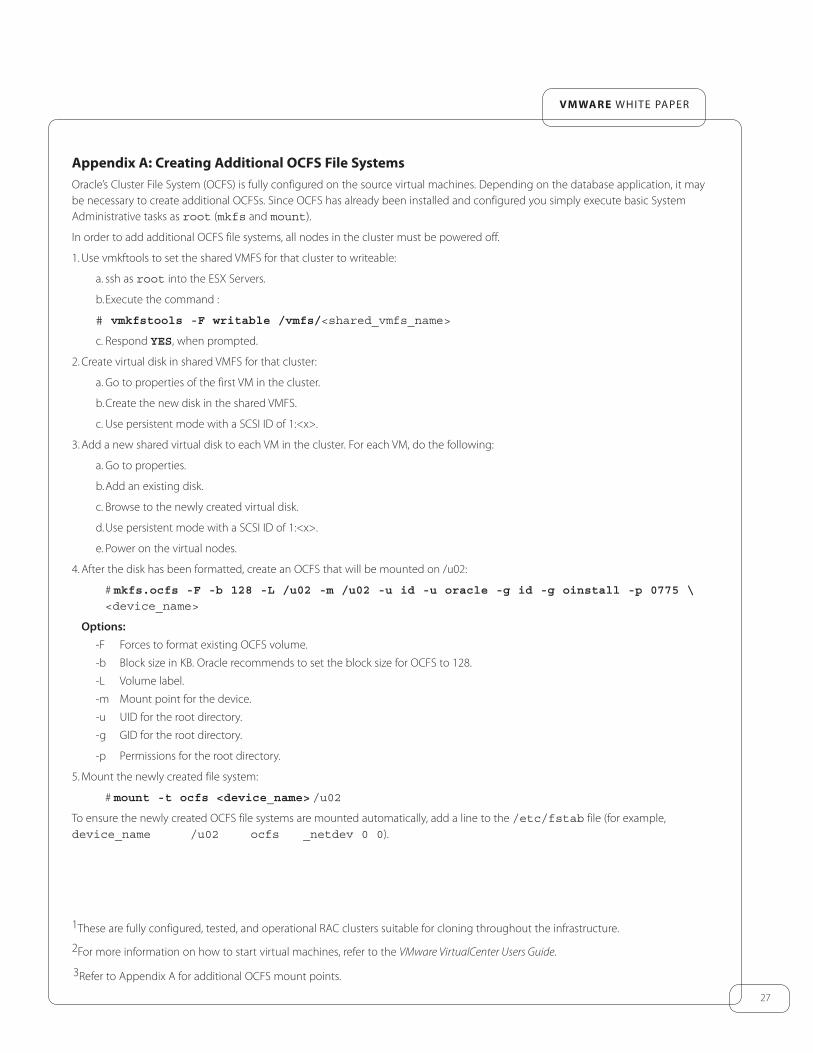
Appendix A: Creating Additional OCFS File SystemsOracle’s Cluster File System (OCFS) is fully configured on the source virtual machines. Depending on the database application, it may be necessary to create additional OCFSs. Since OCFS has already been installed and configured you simply execute basic System Administrative tasks as root (mkfs and mount).
In order to add additional OCFS file systems, all nodes in the cluster must be powered off.
1. Use vmkftools to set the shared VMFS for that cluster to writeable:
a. ssh as root into the ESX Servers.
b. Execute the command :
# vmkfstools -F writable /vmfs/<shared_vmfs_name>
c. Respond YES, when prompted.
2. Create virtual disk in shared VMFS for that cluster:
a. Go to properties of the first VM in the cluster.
b. Create the new disk in the shared VMFS.
c. Use persistent mode with a SCSI ID of 1:<x>.
3. Add a new shared virtual disk to each VM in the cluster. For each VM, do the following:
a. Go to properties.
b. Add an existing disk.
c. Browse to the newly created virtual disk.
d. Use persistent mode with a SCSI ID of 1:<x>.
e. Power on the virtual nodes.
4. After the disk has been formatted, create an OCFS that will be mounted on /u02:
# mkfs.ocfs -F -b 128 -L /u02 -m /u02 -u id -u oracle -g id -g oinstall -p 0775 \ <device_name>
Options:
-F Forces to format existing OCFS volume.
-b Block size in KB. Oracle recommends to set the block size for OCFS to 128.
-L Volume label.
-m Mount point for the device.
-u UID for the root directory.
-g GID for the root directory.
-p Permissions for the root directory.
5. Mount the newly created file system:
# mount -t ocfs <device_name> /u02
To ensure the newly created OCFS file systems are mounted automatically, add a line to the /etc/fstab file (for example, device_name /u02 ocfs _netdev 0 0).
2For more information on how to start virtual machines, refer to the VMware VirtualCenter Users Guide.
3Refer to Appendix A for additional OCFS mount points.
1These are fully configured, tested, and operational RAC clusters suitable for cloning throughout the infrastructure.

VMware, Inc. 3145 Porter Drive Palo Alto CA 94304 USA Tel 650-475-5000 Fax 650-475-5001 www.vmware.comCopyright © 2004 VMware, Inc. All rights reserved. Protected by one or more of U.S. Patent Nos. 6,397,242 and 6,496,847;patents pending. VMware, the VMware "boxes" logo, GSX Server and ESX Server are trademarks of VMware, Inc. Microsoft,Windows and Windows NT are registered trademarks of Microsoft Corporation. Linux is a registered trademark of LinusTorvalds. All other marks and names mentioned herein may be trademarks of their respective companies.
V00014-20001205