est2 installation and service manual - bass united fire & … · circuit compatibility listings...
TRANSCRIPT
EST2Installation and Service Manual
P/N 270186 • Rev 5.0 • 16AUG00
Contents
DEVELOPED BY Edwards Systems Technology6411 Parkland DriveSarasota, FL 34243(941) 739-4300
COPYRIGHT NOTICE Copyright © 2000 Edwards Systems Technology, Inc.
Edwards Systems Technology, Inc. (EST) owns the copyrightsto this manual and the products it describes. You may notreproduce, translate, transcribe, or transmit any part of thismanual without express, written permission from EST.
This manual contains proprietary information intended fordistribution to authorized persons or companies for the solepurpose of conducting business with EST. If you distribute anyinformation contained in this manual to unauthorized persons,you have violated all distributor agreements and we may takelegal action.
TRADEMARKS IBM is a registered trademark of International BusinessMachines Corporation.
Microsoft and MS-DOS are registered trademarks, andMicrosoft Mouse and Windows are trademarks of MicrosoftCorporation.
Sound Blaster is a trademark of Creative Technology Ltd.
Scan-One is a trademark of Zebra Technologies VTI, Inc.
CREDITS This manual was designed and written by the EST TechnicalServices - Documentation Department, Sarasota.
DOCUMENT HISTORY
Date Revision Reason for change
31 May 1995 1.0 Initial Release.
01 August 1995 2.0 Revised: Figure 3.5; IOP-3 info; 2-MCM circuit resistancespecs.; misc. editorial corrections.
Added: Download ground fault note. DL2 Dialer
October 1995 2.5 Revised specification tables and LED/Switch Modulenumber switch settings.
December 1995 3.0 Added CMDN, SAN, and APSB Power Supplyinformation. Changed DL2 Information.
March 1997 3.5 Added information about CDR-3, 2-SMK, 2-CTM, and 2-PPS/6A.
DOCUMENT HISTORY
Date Revision Reason for change
September 1997 4.0 Added: 2-WB3(R); 2-WB&(R); SIGA-APS; SIGA-AA30;SIGA-AA50; 2-AAC; 2-MIC; 2-TEL; Audio NACcalculation information; Initial & re-acceptance testprocedure; Personality code 18; compatible telephones
Revised: PL Wiring Information; DL2 Specifications;Display DIP Switch settings
December 1997 4.1 Added: 2-LSRA
Revised: RACCR installation; Chapter 4 layout
16 August 2000 5.0 Included service information and updated content toreflect programming changes.

Contents
EST2 Installation and Service Manual i
Contents
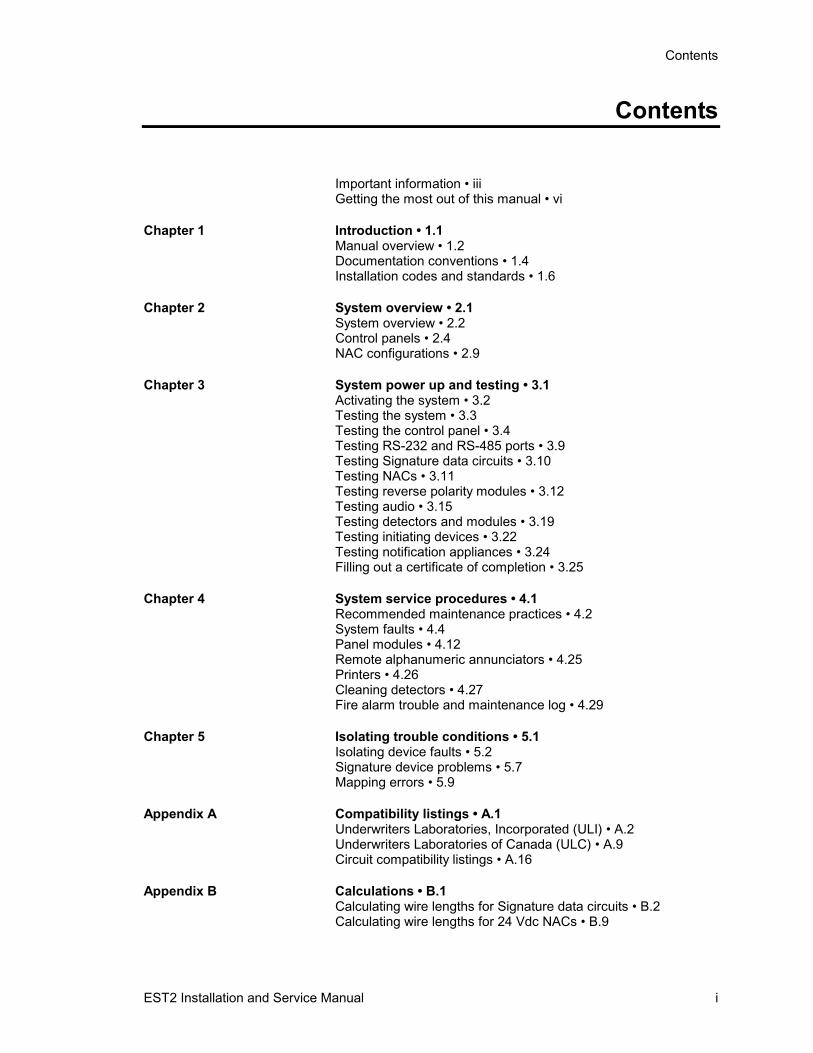
Important information • iiiGetting the most out of this manual • vi
Chapter 1 Introduction • 1.1Manual overview • 1.2Documentation conventions • 1.4Installation codes and standards • 1.6
Chapter 2 System overview • 2.1System overview • 2.2Control panels • 2.4NAC configurations • 2.9
Chapter 3 System power up and testing • 3.1Activating the system • 3.2Testing the system • 3.3Testing the control panel • 3.4Testing RS-232 and RS-485 ports • 3.9Testing Signature data circuits • 3.10Testing NACs • 3.11Testing reverse polarity modules • 3.12Testing audio • 3.15Testing detectors and modules • 3.19Testing initiating devices • 3.22Testing notification appliances • 3.24Filling out a certificate of completion • 3.25
Chapter 4 System service procedures • 4.1Recommended maintenance practices • 4.2System faults • 4.4Panel modules • 4.12Remote alphanumeric annunciators • 4.25Printers • 4.26Cleaning detectors • 4.27Fire alarm trouble and maintenance log • 4.29
Chapter 5 Isolating trouble conditions • 5.1Isolating device faults • 5.2Signature device problems • 5.7Mapping errors • 5.9
Appendix A Compatibility listings • A.1Underwriters Laboratories, Incorporated (ULI) • A.2Underwriters Laboratories of Canada (ULC) • A.9Circuit compatibility listings • A.16
Appendix B Calculations • B.1Calculating wire lengths for Signature data circuits • B.2Calculating wire lengths for 24 Vdc NACs • B.9

Contents
ii EST2 Installation and Service Manual
Calculating wire lengths for 25 or 70 Vrms NACs • B.11Calculating wire lengths for addressable analog circuits • B.13Calculating ampere-hour battery requirements • B.14
Appendix C Special applications • C.1Ditek surge protector module • C.2Wiring the CDR-3 Bell Coder • C.4
Index • Z.1
Contents
EST2 Installation and Service Manual iii
Important information
Limitation of liabilityThe content of this manual is proprietary in nature and isintended solely for distribution to authorized persons,companies, distributors and/or others for the sole purpose ofconducting business associated with Edwards SystemsTechnology, Inc. The distribution of information containedwithin this manual to unauthorized persons shall constitute aviolation of any distributor agreements and may result inimplementation of legal proceedings.
This product has been designed to meet the requirements ofNFPA Standard 72, 1996 Edition; Underwriters Laboratories,Inc., Standard 864, 7th Edition; and Underwriters Laboratoriesof Canada, Inc., Standard ULC S527. Installation in accordancewith this manual, applicable codes, and the instructions of theAuthority Having Jurisdiction is mandatory. EST, Inc. shall notunder any circumstances be liable for any incidental orconsequential damages arising from loss of property or otherdamages or losses owing to the failure of EST, Inc. productsbeyond the cost of repair or replacement of any defectiveproducts. EST, Inc. reserves the right to make productimprovements and change product specifications at any time.
While every precaution has been taken during the preparation ofthis manual to ensure the accuracy of its contents, EST assumesno responsibility for errors or omissions.
FCC warningThis equipment can generate and radiate radio frequency energy.If this equipment is not installed in accordance with this manual,it may cause interference to radio communications. Thisequipment has been tested and found to comply within the limitsfor Class A computing devices pursuant to Subpart B of Part 15of the FCC Rules. These rules are designed to providereasonable protection against such interference when thisequipment is operated in a commercial environment. Operationof this equipment is likely to cause interference, in which casethe user at his own expense, is required to take whatevermeasures may be required to correct the interference.
FCC information1. The dialer complies with Part 68 of the FCC rules. The
Dialer’ FCC registration number and the Ringer EquivalenceNumber (REN) are on the back of the dialer. This

Contents
iv EST2 Installation and Service Manual
information must be provided to the telephone company, ifrequested.
2. An FCC compliant telephone cord and modular plug cord issupplied with the dialer. The dialer is designed to beconnected to the telephone network using the supplied cordand an RJ31X or RJ38X jack, which must also comply withFCC Part 68 rules.
3. The REN is used to determine the quantity of devices whichmay be connected to the telephone line. Excessive RENs onthe telephone line may result in the devices not ringing inresponse to an incoming call. In most, but not all areas, thesum of RENs should not exceed five (5). To be certain thenumber of devices that may be connected to a line, asdetermined by the total RENs, contact the local telephonecompany.
4. If the dialer causes harm to the telephone network, thetelephone company will notify you in advance thattemporary discontinuance of service may be required. Ifadvance notice isn’t practical, the telephone company willnotify you as soon as possible. You will also be advised ofyour right to file a complaint with the FCC, if you believe itis necessary.
5. The telephone company may make changes in it’s facilities,equipment, operations, or procedures that could affect theoperation of the dialer. If this happens, the telephonecompany will provide advance notice in order for you tomake necessary modifications to maintain uninterruptedservice.
6. If trouble is experienced with the dialer, for repair orwarranty information, contact Edwards SystemsTechnology, 6411 Parkland Drive, Sarasota, Florida, USA34243 Telephone: 1-800-655-4497. If the dialer is causingharm to the telephone network, the telephone company mayrequest you disconnect the dialer until the problem isresolved.
7. No repairs may be performed on the dialer by the user.
8. The dialer cannot be used on public coin phone or party lineservice provided by the telephone company.
Canada DOC informationNote: The Industry Canada label identifies certified equipment.This certification means that the equipment meets certaintelecommunications network protective, operational, and safetyrequirements. The Department does not guarantee the equipmentwill operate to the user’s satisfaction.
Contents
EST2 Installation and Service Manual v
Before installing this equipment, users should ensure that it ispermissible to be connected to the facilities of the localtelecommunications company. The equipment must also beinstalled using an acceptable method of connection. Thecustomer should be aware that compliance with the aboveconditions may not prevent degradation of service in somesituations.
Repairs to certified equipment should be made by an authorizedCanadian maintenance facility designated by the supplier. Anyrepairs or alterations made by the user to this equipment, orequipment malfunctions, may give the telecommunicationscompany cause to request the user disconnect the equipment.
Users should ensure for their own protection that the electricalground connections of the power utility, telephone lines, andinternal metallic water pipe system, if present, are connectedtogether. This precaution may be particularly important in ruralareas.
Caution: Users should not attempt to make such connectionsthemselves, but should contact the appropriate electricinspection authority, or electrician, as appropriate
Note: The Load Number (LN) assigned to each terminal devicedenotes the percentage of the total load to be connected to atelephone loop which is used by the device, to preventoverloading. The termination on a loop may consist of anycombination of devices subject only to the requirements that thesum of the Load Numbers of all the devices does not exceed100.

Contents
vi EST2 Installation and Service Manual
Getting the most out of this manual
Finding EST2 documentationA library of related documents supports the EST2 product line.Here is a complete list of the EST2 library:
• EST2 Installation and Service Manual (P/N 270186)• EST2 Network Site Manual (P/N 270895)• EST2 Network Supplement Manual (P/N 270894)• EST2 System Operations Manual (P/N 270188)• EST2 System Programming Manual (P/N 270187)• EST2 Installation Sheets (P/N 3100060)• 2-SDU Help (P/N180902)
Our technical writers constantly update the information in thismanual. Your comments during our training classes, technicalsupport phone calls, and field trips improve this document.
Finding related documentationThe Signature Series Intelligent Smoke and Heat DetectorsApplications Bulletin (P/N 270145) provides instructions andillustrations for various arrays of smoke and heat detectors.
The Signature Series Component Installation Manual (P/N270497) supports the installation of the Signature Seriesdetectors and modules.
The Serial Number Log Book (P/N 270267) provides aconvenient means for recording the serial number of eachSignature device installed in the fire alarm system.
The SAN Annunciator Installation Guide (P/N 250084) supportsthe SAN annunciators mentioned in this manual.
The EST Speaker Application Guide (P/N 85000-0033) providesinformation about the placement and layout of speakers for firealarm signaling and emergency voice communications.
The EST Strobe Applications Guide (P/N 85000-0049) providesinformation for the placement and layout of strobes for firealarm signaling.
The Microline 182 Turbo Printer Handbook, by Okidataprovides all the necessary information for the maintenance andconfiguration of the PT1-S Form Printer. The Okidata handbookcomes with the Form Printer.
EST2 Installation and Service Manual 1.1
Chapter 1 Introduction
Summary
Chapter 1 describes the contents of the manual and lists relevantcodes and standards, which govern the installation of fire alarmequipment.
ContentManual overview • 1.2
System overview • 1.2Testing procedures • 1.2Servicing instructions • 1.2Compatibility lists • 1.2Calculations • 1.2Special applications • 1.3
Documentation conventions • 1.4Important notices • 1.4System parameters • 1.4
Installation codes and standards • 1.6National Fire Protection Association • 1.6Underwriters Laboratories, Inc. • 1.6Underwriters Laboratories of Canada • 1.7Other requirements • 1.7

Introduction
1.2 EST2 Installation and Service Manual
Manual overviewThe EST2 Installation and Service Manual provides an overviewof the EST2 fire alarm system and instructions for itsinstallation, testing, and servicing. This manual also containscompatible device listings and calculations for batteries andwiring.
System overviewThe system overview presents the fire alarm system in severalvariations. The size of the equipment enclosure, the wiring class,and the components installed make up the configuration of thesystem.
Testing proceduresThe testing procedures will guide you through the activation andtesting of your system in the following progression:
1. Simulate off-normal conditions at the panel.2. Simulate off-normal conditions at the devices.
The testing procedures conclude with instructions forcompleting and posting a master copy of the Certificate ofCompletion.
Servicing instructionsThe servicing of the system entails everything from preventivemaintenance practices to troubleshooting difficult problems.Preventive maintenance practices include the proper installationand care of fire alarm components. For example, detectorsrequire periodic cleaning to avoid nuisance alarms.Troubleshooting problems on the system requires anunderstanding of the system fault messages, which appear on thefront panel display.
Compatibility listsThe compatibility lists include UL-approved initiating devicesthat work with the fire alarm system. Initiating devices includebells, horns, and strobes.
CalculationsThe system wiring requires a calculation to prevent overextension. Worksheets, along with instructions, provide a meansfor determining the maximum wire length for your fire alarmsystem. The batteries that power the fire alarm system in theevent of a power failure or brownout also require a special set of
Introduction
EST2 Installation and Service Manual 1.3
calculations. A set of procedures explains the steps forcalculating the ampere-hour requirement for the batteries.
Special applicationsThe system requires surge protection from one building toanother. The Ditek Surge Protection Module provides therequired surge protection.
Some applications require coded signals. The CDR-3 providesmarch time and unique coded outputs for separate zones.

Introduction
1.4 EST2 Installation and Service Manual
Documentation conventions
Important noticesNotices throughout this manual inform the reader of practicesand conditions, which will affect physical safety, occupantsafety, equipment performance, and time consumption. Noticesappear as warnings, cautions, and notes.
Warnings
Warnings appear throughout the manual where injury or loss oflife may occur through the neglect of safe practices andconditions. Warnings appear in the following format:
WARNING: Testing the system disables the alarm contact. Thesystem will not notify the fire department in the event of a firealarm condition during a test. See the system administrator fordetailed information.
Cautions
Cautions are posted in the manual to prevent damage to theequipment. A typical caution concerns the prevention ofelectrostatic discharge (ESD). Cautions appear in the followingformat:
Caution: Observe static-sensitive handling practices.
Notes
Notes instruct the reader to avoid practices or conditions, whichmay result in wasted time and effort. For example, a downloadwill not work unless the programmer disconnects the printerfrom the RS-232 port on the 2-MCM. Notes appear in thefollowing format:
Note: Disconnect the printer when downloading to the 2-MCM.
System parameters2-LCD keypad entries and fault messages require knowledge ofthe system parameters.
Keypad entry parameters
To understand the parameters for 2-LCD keypad entries, seeMaking keypad entries in the EST2 System Operations Manual.

Introduction
EST2 Installation and Service Manual 1.5
Fault message parameters
To understand the parameters for reading fault messages, seeSystem service procedures in the Installation and ServiceManual.
Introduction
1.6 EST2 Installation and Service Manual
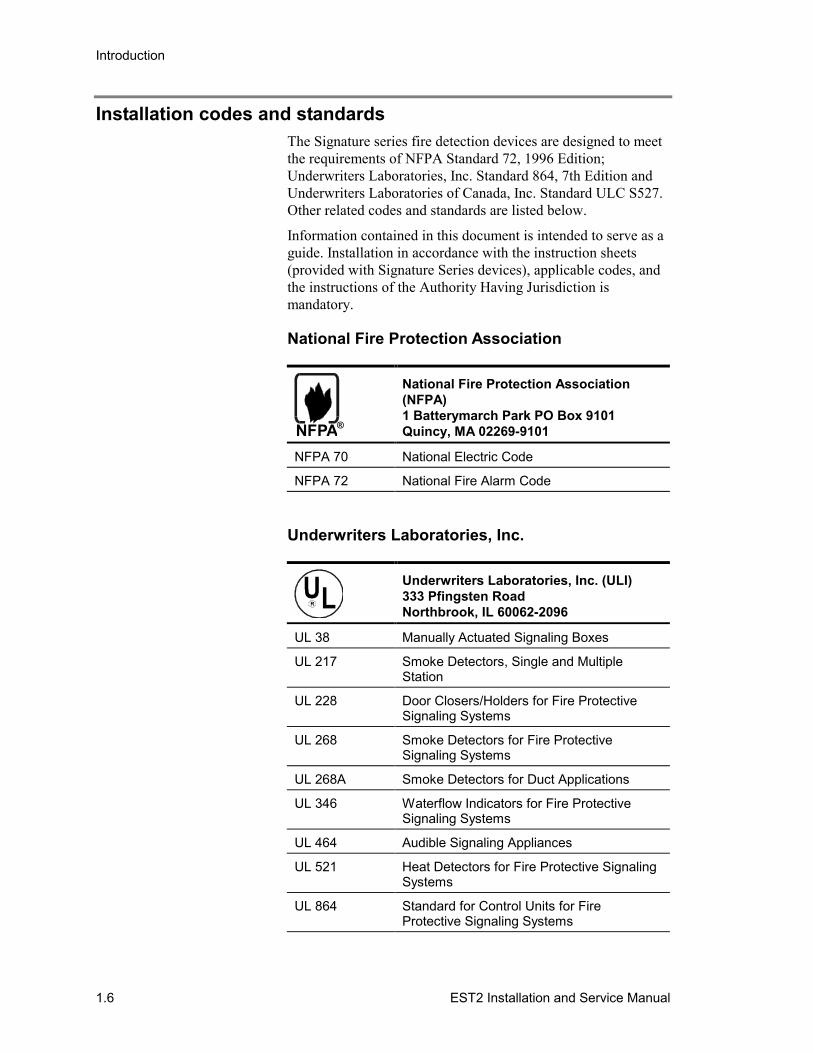
Installation codes and standardsThe Signature series fire detection devices are designed to meetthe requirements of NFPA Standard 72, 1996 Edition;Underwriters Laboratories, Inc. Standard 864, 7th Edition andUnderwriters Laboratories of Canada, Inc. Standard ULC S527.Other related codes and standards are listed below.
Information contained in this document is intended to serve as aguide. Installation in accordance with the instruction sheets(provided with Signature Series devices), applicable codes, andthe instructions of the Authority Having Jurisdiction ismandatory.
National Fire Protection Association
NFPA®
National Fire Protection Association(NFPA)1 Batterymarch Park PO Box 9101Quincy, MA 02269-9101
NFPA 70 National Electric Code
NFPA 72 National Fire Alarm Code
Underwriters Laboratories, Inc.
R
Underwriters Laboratories, Inc. (ULI)333 Pfingsten RoadNorthbrook, IL 60062-2096
UL 38 Manually Actuated Signaling Boxes
UL 217 Smoke Detectors, Single and MultipleStation
UL 228 Door Closers/Holders for Fire ProtectiveSignaling Systems
UL 268 Smoke Detectors for Fire ProtectiveSignaling Systems
UL 268A Smoke Detectors for Duct Applications
UL 346 Waterflow Indicators for Fire ProtectiveSignaling Systems
UL 464 Audible Signaling Appliances
UL 521 Heat Detectors for Fire Protective SignalingSystems
UL 864 Standard for Control Units for FireProtective Signaling Systems

Introduction
EST2 Installation and Service Manual 1.7
R
Underwriters Laboratories, Inc. (ULI)333 Pfingsten RoadNorthbrook, IL 60062-2096
UL 1481 Power Supplies for Fire Protective SignalingSystems
UL 1638 Visual Signaling Appliances
UL 1971 Visual Signaling Appliances
Underwriters Laboratories of Canada
R
Underwriters Laboratories of Canada(ULC)7 Crouse RoadScarborough, Ontario M1R 3A9
ULC S527 Standard for Control Units for Fire AlarmSystems
ULC S524 Standard for the Installation of Fire AlarmSystems
ULC S536 Standard for the Inspection and Testing ofFire Alarm Systems
ULC S537 Standard for the Verification of Fire AlarmSystems
Other requirementsOther requirements that affect the installation of this systeminclude:
• State and local building codes• Authority having jurisdiction (AHJ)

Introduction
1.8 EST2 Installation and Service Manual

EST2 Installation and Service Manual 2.1
Chapter 2 System overview
Summary
Chapter 2 provides a look at the layout of the fire alarm systemand its configuration.
ContentSystem overview • 2.2
Design • 2.2Features • 2.2
Control panels • 2.4Standard control panels • 2.4Control panels with audio • 2.5Option modules • 2.7
NAC configurations • 2.9

System overview
2.2 EST2 Installation and Service Manual
System overview
DesignThe control panel consists of a multiplexed fire alarm system,which supports up to 96 Signature series detectors and 94Signature series modules on an addressable Signature DataCircuit (SDC). Two hard-wired Notification Appliance Circuits(NACs) are provided for audible and visual devices. AnExpander Loop Module may be added to the panel, providingtwo more NACs and a second SDC, which supports anadditional 96 Signature detectors and 94 Signature modules.
The audio sub-system consists of a two-channel audio controlcenter, which provides a microphone, 15 available signal tones,and firefighter paging capability. Audio amplifiers complementthe audio system.
Features• Autoprogramming• Advanced power management• Custom programmable• Transient-protected field wiring• User-friendly front panel• Emergency audio control center• Firefighter telephone system• 30 and 50 Watt audio amplifiers• Optional dead-front construction• Class A (Style D) Initiating Device Circuits (IDC)• Class B (Style B) Initiating Device Circuits (IDC)• Ground fault detection LED• Monitor mode• Local and remote power supplies• Class A (Style Z) Notification Appliance Circuits (NACs)• Class B (Style Y) Notification Appliance Circuits (NACs)• Optional supplementary front panel led/switch modules• Optional expander loop module• March time module• Class A RS-485 external annunciator port• Class B RS-485 external annunciator port• Off-premises: Reverse Polarity Module or Dialer• RS-232 external peripheral device port• Form C alarm and trouble contacts• Form A supervisory contacts
System overview
EST2 Installation and Service Manual 2.3
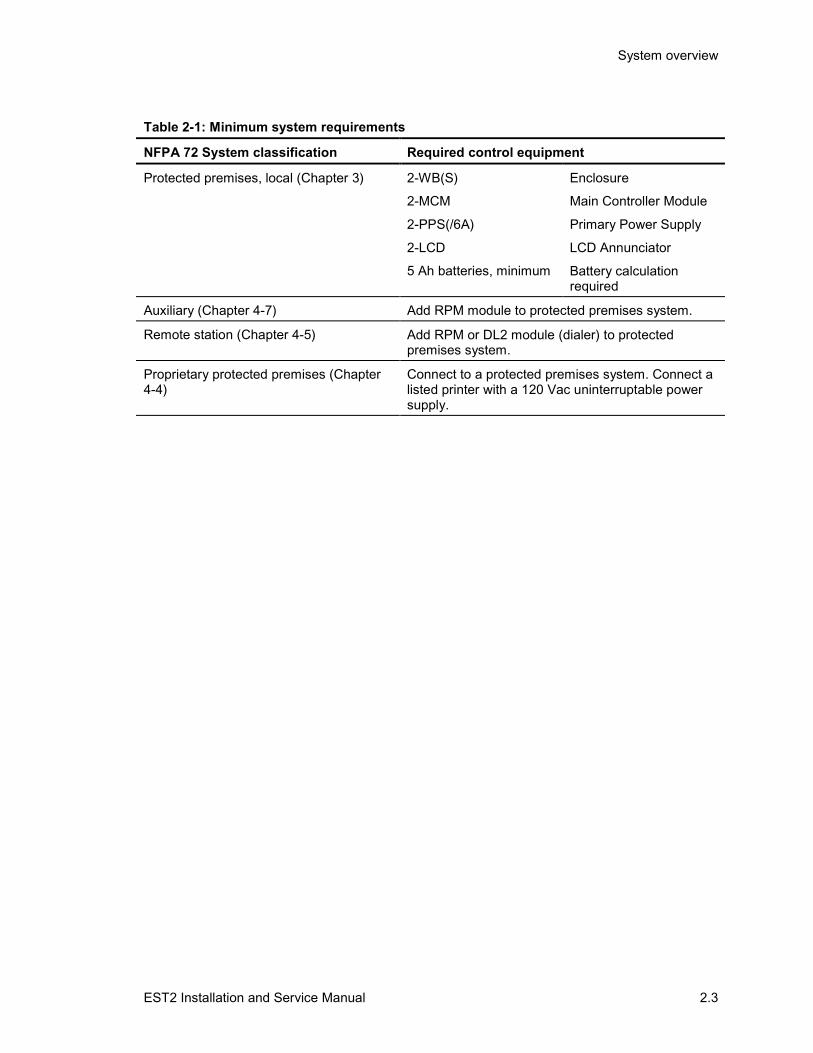
Table 2-1: Minimum system requirements
NFPA 72 System classification Required control equipment
Protected premises, local (Chapter 3) 2-WB(S) Enclosure
2-MCM Main Controller Module
2-PPS(/6A) Primary Power Supply
2-LCD LCD Annunciator
5 Ah batteries, minimum Battery calculationrequired
Auxiliary (Chapter 4-7) Add RPM module to protected premises system.
Remote station (Chapter 4-5) Add RPM or DL2 module (dialer) to protectedpremises system.
Proprietary protected premises (Chapter4-4)
Connect to a protected premises system. Connect alisted printer with a 120 Vac uninterruptable powersupply.

System overview
2.4 EST2 Installation and Service Manual
Control panels
Standard control panelsA standard control panel (Figure 2-1) includes the following:
• 2-WBS surface mount or 2-WB semi-flush Wallbox• 2-PPS/6A Primary Power Supply (6A)• 2-MCM Main Controller Module• 2-LCX Expander Loop Module• Backup batteries (24 Vdc @10 Ah)
SDCs
RS-485NACs
INST073.CDRIBM compatible PC
Form printer
RS-232
RS-232
Download
[1] [6]
[2]
[5]
[3] [4]
Notes[1] The RS-485 lines support SAN annunciators,
2-LSRA(-C)s, 2-CMDN(-C)s, and 2-SMDN(-C)s.
[2] The 2-MCM and the 2-LCX have two NACs each for a totalof four NACs.
[3] The 2-MCM and the 2-LCX have two SDCs each for a totalof four SDCs.
[4] See the Signature Series Component Installation Manualfor information on specific detectors and modules.
[5] Locate the form printer in the same room, within 50 feet ofthe Main Controller Module.
[6] Any wiring that exits one building and enters anotherrequires a Ditek Surge Protector Module at each end. SeeSpecial Applications, in the Appendix, for more information.
Figure 2-1: 2-WBS(R) and 2-WB(R) wallboxes

System overview
EST2 Installation and Service Manual 2.5
Control panels with audioA control panel with emergency audio includes the following:
• 2-WB3 (Figure 2-2) or 2-WB7 (Figure 2-3)• 2-PPS/6A Primary Power Supply• SIGA-APS Auxiliary power supply• 2-MCM Main Controller Module• 2-LCX Expander Loop Module• 2-AAC Audio Control Module• SIGA-AAXX Amplifiers• Backup batteries (24 Vdc @10 Ah)
SDCs
Speaker risers
RS-485NACs
INST074.CDRIBM compatible PC
Form printer
RS-232
RS-232
Download
[1] [7]
[2]
[6]
[5]
[3] [4]
Notes[1] The RS-485 lines support SAN annunciators,
2-LSRA(-C)s, 2-CMDN(-C)s, and 2-SMDN(-C)s.
[2] The 2-MCM and the 2-LCX have two NACs each for a totalof four NACs.
[3] The 2-MCM and the 2-LCX have two SDCs each for a totalof four SDCs.
[4] See the Signature Series Component Installation Manualfor information on specific detectors and modules.
[5] 2-AAC Audio Control Module and SIGA-AAXX amplifiers
[6] Locate the form printer in the same room, within 50 feet ofthe Main Controller Module.
[7] Any wiring that exits one building and enters anotherrequires a Ditek Surge Protector Module at each end. SeeSpecial Applications, in the Appendix, for more information.
Figure 2-2: 2-WB3(R) Wallbox

System overview
2.6 EST2 Installation and Service Manual
SDCs
Speaker risers
RS-485NACs
INST075.CDR
IBM compatible PC
Form printer
RS-232
RS-232
Download
[1] [7]
[2]
[5]
[6]
[3] [4]
Notes[1] The RS-485 lines support SAN annunciators,
2-LSRA(-C)s, 2-CMDN(-C)s, and 2-SMDN(-C)s.
[2] The 2-MCM and the 2-LCX have two NACs each for a totalof four NACs.
[3] The 2-MCM and the 2-LCX have two SDCs each for a totalof four SDCs.
[4] See the Signature Series Component Installation Manualfor information on specific detectors and modules.
[5] Locate the form printer in the same room, within 50 feet ofthe Main Controller Module.
[6] This control panel can support a fifth SIGA-AAXX insteadof an extra MCM. The amplifier must have a dedicatedoutput on the auxiliary power supply or power from anothercabinet.
[7] Any wiring that exits one building and enters anotherrequires a Ditek Surge Protector Module at each end. SeeSpecial Applications, in the Appendix, for more information.
Figure 2-3: 2-WB7(R) Wallbox

System overview
EST2 Installation and Service Manual 2.7
Option modulesEach control panel may house the following option modules:
• CDR-3 Coder• DL2 Dialer• IOP-3A Isolation Module• MTM March Time Module• 2-CTM City Tie Module• 2-SMK Smoke Power Module• SIGA-MDM Digital Voice Message Module• SIGA-UIO2R Universal Input/Output Motherboard• SIGA-UIO6(R) Universal Input/Output Motherboard
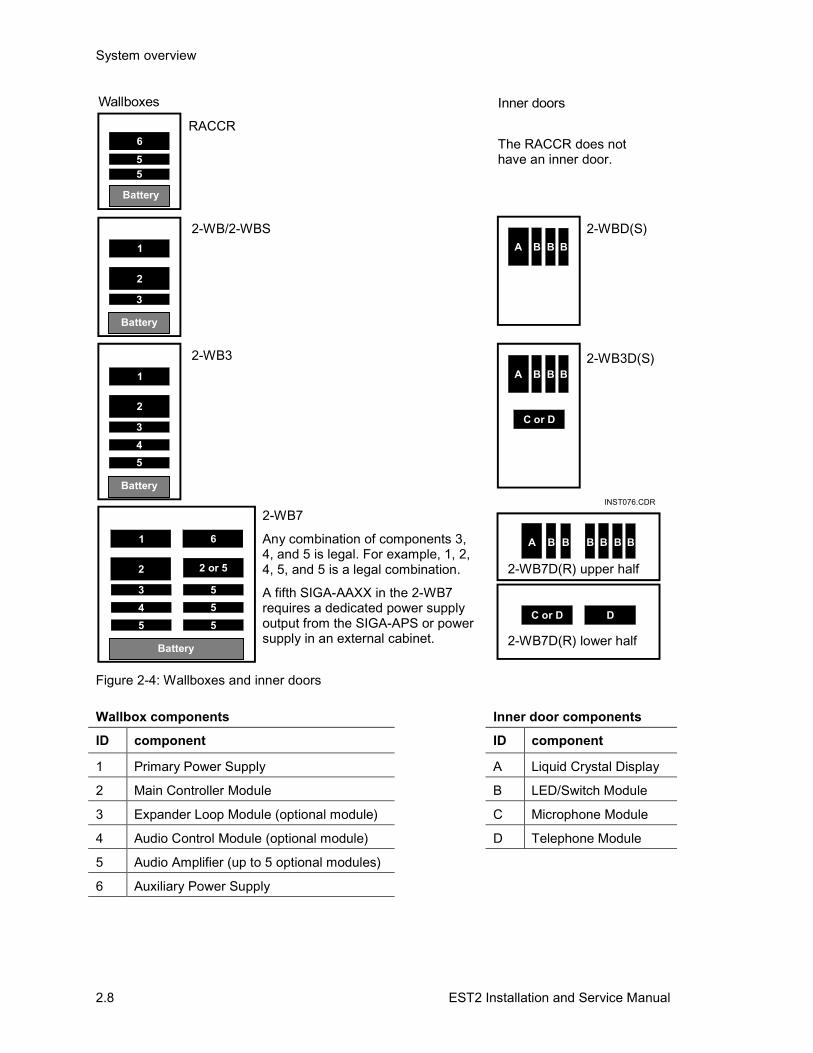
Figure 2-4 shows the different locations and combinations ofsystem modules in the wallboxes and inner doors.
System overview
2.8 EST2 Installation and Service Manual
345
2
1
Battery
C or D
3
2
1
Battery
B B BA
B B BA
55
6
Battery
345
5
2 or 5
6
55
2
1
Battery
C or D D
B B BA B B B
Wallboxes Inner doors
INST076.CDR
Figure 2-4: Wallboxes and inner doors
Wallbox components Inner door components
ID component ID component
1 Primary Power Supply A Liquid Crystal Display
2 Main Controller Module B LED/Switch Module
3 Expander Loop Module (optional module) C Microphone Module
4 Audio Control Module (optional module) D Telephone Module
5 Audio Amplifier (up to 5 optional modules)
6 Auxiliary Power Supply
RACCR
2-WB/2-WBS
2-WB3
The RACCR does nothave an inner door.
2-WB7
Any combination of components 3,4, and 5 is legal. For example, 1, 2,4, 5, and 5 is a legal combination.
A fifth SIGA-AAXX in the 2-WB7requires a dedicated power supplyoutput from the SIGA-APS or powersupply in an external cabinet.
2-WBD(S)
2-WB7D(R) upper half
2-WB7D(R) lower half
2-WB3D(S)

System overview
EST2 Installation and Service Manual 2.9
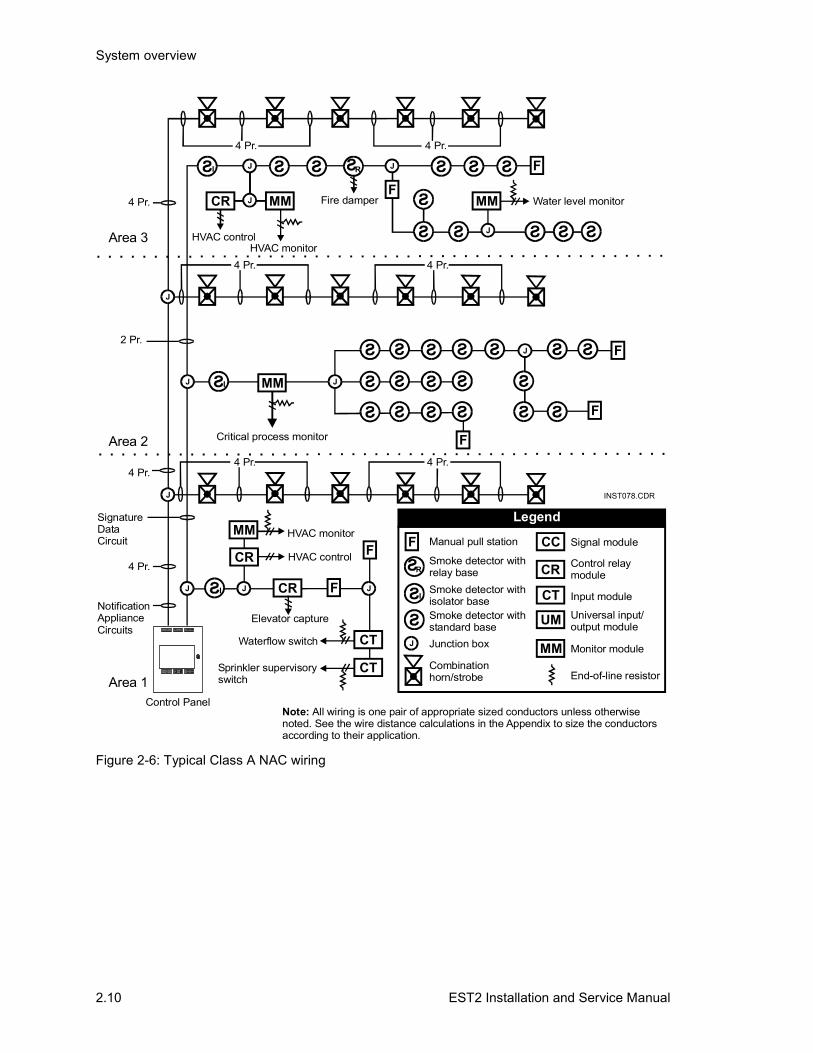
NAC configurationsThe system supports the following NAC circuits:
• Class B (Figure 2-5)• Class A (Figure 2-6)• Class A multiplexed-switched (Figure 2-7)
INST077.CDR
F
F
CT
UM
CC
CR
CR
CR
MM
MM
MM
J J J
J
NotificationApplianceCircuits
2 Pr.
2 Pr.
4 Pr.
4 Pr.
4 Pr.
4 Pr.
2 Pr.
2 Pr.
1 Pr.
2 Pr.
SignatureDataCircuit
Waterflow switch
Elevator capture
HVAC control
HVAC control
HVAC monitor
HVAC monitor
Fire damper Water level monitor
Critical process monitor
Sprinkler supervisoryswitch
Control Panel
Signal moduleManual pull station
Smoke detector withrelay baseSmoke detector withisolator baseSmoke detector withstandard base
Control relaymodule
Input module
Universal input/output module
Monitor module
End-of-line resistorCombinationhorn/strobe
Junction box
Legend
Note: All wiring is one pair of appropriate sized conductors unless otherwise noted. See the wire distance calculations in the Appendix to size the conductors according to their application.
I
I I
I R
R
J
J
J
J
J J
J
J
J
F
F
F
F
F
F
CT
CT
CR
MM
MM
Area 3
Area 2
Area 1
Figure 2-5: Typical Class B NAC wiring
System overview
2.10 EST2 Installation and Service Manual
INST078.CDR
F
F
CT
UM
CC
CR
CR
CR
MM
MM
MM
J J J
J
NotificationApplianceCircuits
4 Pr.
4 Pr.
4 Pr.
4 Pr.
4 Pr.
4 Pr. 4 Pr.
4 Pr.
4 Pr.
2 Pr.
SignatureDataCircuit
Waterflow switch
Elevator capture
HVAC control
HVAC control
HVAC monitor
HVAC monitor
Fire damper Water level monitor
Critical process monitor
Sprinkler supervisoryswitch
Control Panel
Signal moduleManual pull station
Smoke detector withrelay baseSmoke detector withisolator baseSmoke detector withstandard base
Control relaymodule
Input module
Universal input/output module
Monitor module
End-of-line resistorCombinationhorn/strobe
Junction box
Legend
I
I I
I R
R
J
J
J
J
J J
J
J
J
F
F
F
F
F
F
CT
CT
CR
MM
MM
Area 3
Area 2
Area 1
Note: All wiring is one pair of appropriate sized conductors unless otherwise noted. See the wire distance calculations in the Appendix to size the conductors according to their application.
Figure 2-6: Typical Class A NAC wiring

System overview
EST2 Installation and Service Manual 2.11
NAC usedas 24 Vdcriser
2 Pr.
2 Pr.
2 Pr. 2 Pr.
2 Pr.
2 Pr.
Horn supervisionand control
Horn supervisionand control
Horn supervision and control
Strobe supervisionand control
Strobe supervisionand control
Strobe supervision and control
Riser EOL
2 Pr.
2 Pr.
SignatureDataCircuit
Control Panel
Critical process monitor
Fire damper
Waterflow switch
Elevator Capture
Sprinkler supervisoryswitch
INST079.CDR
CT
CT
CT UM
CC
CC2
CC2
CC2
CC2
CC2
CC2
CRCR
MM
MM
Signal moduleManual pull station
Smoke detector withrelay baseSmoke detector withisolator baseSmoke detector withstandard base
Control relaymodule
Input module
Universal input/output module
Monitor module
End-of-line resistorCombinationhorn/strobe
Junction box
Legend
I
I
I
I R
R
J
J
J
J J
J J J
J
J
J J
F
F
F
F
F
F
F
Area 3
Area 2
Area 1
Note: All wiring is one pair of appropriate sized conductors unless otherwise noted. See the wire distance calculations in the Appendix to size the conductors according to their application.
Figure 2-7: Typical multiplexed switched NAC wiring

System overview
2.12 EST2 Installation and Service Manual

EST2 Installation and Service Manual 3.1
Chapter 3 System power up and testing
Summary
Chapter 3 discusses the procedures for a thorough test of the firealarm system and filling out a Certificate of Completion.
ContentActivating the system • 3.2Testing the system • 3.3
Initial acceptance test • 3.3Re-acceptance test • 3.3Test tools • 3.3
Testing the control panel • 3.4Testing power supplies • 3.4Testing the control functions • 3.5
Testing RS-232 and RS-485 ports • 3.9Testing the RS-232 port • 3.9Testing RS-485 ports • 3.9
Testing Signature data circuits • 3.10Testing NACs • 3.11Testing reverse polarity modules • 3.12
Testing city-tie configuration • 3.12Testing single circuit (old style) configuration • 3.13Testing three circuit configuration • 3.14
Testing audio • 3.15Microphone paging test • 3.15Firefighter telephone tests • 3.15Amplifier test • 3.17
Testing detectors and modules • 3.19Detectors • 3.19Modules • 3.20
Testing initiating devices • 3.22Testing notification appliances • 3.24Filling out a certificate of completion • 3.25

System power up and testing
3.2 EST2 Installation and Service Manual
Activating the systemTo activate the system:
1. Connect batteries to the power supply terminals.
2. Energize ac power at the primary and auxiliary powersupplies.
The 2-LCD and the system annunciators will indicate all off-normal conditions. See the System Operations Manual fordescriptions of the indicators and messages on the 2-LCD. TheInstallation and Service Manual explains the faults messagesthat appear on the 2-LCD in greater detail. Instructions forfinding and correcting power supply and battery problems alsoappear in the Installation and Service Manual.

System power up and testing
EST2 Installation and Service Manual 3.3
Testing the systemTest all of the components as a system once it has been:
• Wired• Programmed• Cleared of circuit faults
WARNING: Before you test the system, notify all areas thatreceive alarm signals that testing is in progress. Inform any off-premises locations that receive alarm and trouble transmissionsof the test.
All of the procedures in this chapter apply to initial and re-acceptance testing.
Initial acceptance testThe initial system check verifies that every component of thesystem is installed and operating according to design.Verification of the system design and installation requires thetesting of every aspect of the system. Test results that differfrom expected outcomes require corrective action.
Note: Records of all testing and maintenance shall be kept onthe protected premises for a period of at least five (5) years.
Re-acceptance testA complete check of installed field wiring and devices should bemade at regular intervals, in accordance with NFPA 72 and ULC524 requirements.
Test toolsAny test of the system requires the following tools:
• Slotted screwdriver, insulated• Digital multi-meter• 12-inch (30.5 cm) jumper lead with alligator clips• Panel door key

System power up and testing
3.4 EST2 Installation and Service Manual
Testing the control panelPerform the test procedures listed on the equipment installed ineach cabinet connected to the system. These procedures will testthe installation of the hardware.
Note: Download the system configuration information into thepanel, using the 2-SDU, before you begin testing the system.
Before you test any power supply, verify that your systemconforms to:
• Accepted installation practices• Job specifications• The battery capacity requirements for the application• Safe routing practices for power-limited and nonpower-
limited wires
Testing power supplies
Primary power supply
To test the primary power supplies:
1. Disconnect the batteries.
2. Connect the positive battery terminal to the positiveauxiliary output of the power supply to verify that it cansustain its full alarm load without batteries.
3. Disconnect the positive battery terminal from the positiveauxiliary output of the power supply.
4. Reconnect the batteries.
5. Disconnect ac power to verify that the 2-LCD annunciates apower supply trouble. The batteries should also sustain thesupply’s full alarm load.
6. Verify that the battery charger properly charges the batteriesconnected to 80% capacity within 24 hours.
Auxiliary power supplies
To test the auxiliary supplies:
1. Disconnect the batteries to verify that the power supply cansustain its full alarm load without the batteries connected.
2. Reconnect the batteries.
3. Disconnect ac power to verify that the 2-LCD annunciates apower supply trouble. The batteries should also sustain thesupply’s full alarm load.

System power up and testing
EST2 Installation and Service Manual 3.5
4. Verify that the battery charger properly charges the batteriesconnected to 80% capacity within 24 hours.
Testing the control functions
Testing the 2-LCD
To test the 2-LCD:
1. Verify that the 2-LCD is properly mounted and secured.
2. Verify the proper seating of the ribbon cable between the 2-LCD and the Main Controller Module.
3. Verify that the 2-LCD displays the correct date and time andthat its Power LED is on.
4. Press the Trouble Silence and Alarm Silence switchessimultaneously to perform the lamp test function.
5. Verify that each function switch performs according tospecification.
Note: See the System Operations Manual for 2-LCD switchfunctions.
Verifying the installation of panel components
To verify the proper installation of panel components:
1. Make sure that all ribbon cables are firmly seated in theirconnectors and that all wiring is secure.
2. Verify that all components are installed according to thespecifications of the job.
Verifying 2-LCD message queues
During this phase of the system test, you will need to initiateseveral off-normal conditions. The off-normal conditions willtest the 2-LCD’s handling of messages in its queue. The messagequeue test requires:
• 4 Alarm tests• 1 Monitor condition test• 2 Supervisory condition tests• 2 Trouble condition tests

System power up and testing
3.6 EST2 Installation and Service Manual
To run the first fire alarm test:
1. Initiate a fire alarm.
2. Check the 2-LCD to see if the internal buzzer sounds and theAlarm LED flashes.
3. Verify that the 2-LCD message for the alarm matches theprogrammed message in the 2-SDU.
4. Press the Local Silence switch to verify that it silences thebuzzer, stops the Alarm LED from flashing (but keeps it lit),and turns on the Local Silence LED.
5. Press the Alarm Review switch to verify that you can scrollthrough all the messages in the alarm queue.
6. Press the Alarm Silence switch to verify that it silences theactive notification appliances.
7. Print a history report to verify that all of the informationappears on the printer.
To run the second fire alarm test:
1. Initiate a second fire alarm.
2. Check the 2-LCD to see if the internal buzzer sounds and theAlarm LED turns on.
3. Verify that the 2-LCD message for the alarm matches theprogrammed message in the 2-SDU.
4. Press the Local Silence switch to verify that it silences thebuzzer, stops the Alarm LED from flashing (but keeps it lit),and turns on the Local Silence LED.
5. Press the Alarm Review switch to verify that you can scrollthrough all the messages in the alarm queue.
To run the third fire alarm test:
1. Initiate a third fire alarm.
2. Check the 2-LCD to see if the internal buzzer sounds and theAlarm LED turns on.
3. Verify that the 2-LCD message for the alarm matches theprogrammed message in the 2-SDU.
4. Press the Local Silence switch to verify that it silences thebuzzer, stops the Alarm LED from flashing (but keeps it lit),and turns on the Local Silence LED.
5. Press the Alarm Review switch to verify that you can scrollthrough all the messages in the alarm queue.
System power up and testing
EST2 Installation and Service Manual 3.7
6. Press the Reset switch.
7. Verify that all initiating devices reset and all panelindicators clear except the green Power LED.
To run a monitor condition test:
1. Initiate a monitor condition.
2. Verify that the 2-LCD Monitor LED turns on.
3. Verify that the internal buzzer does not sound.
4. Restore the monitor point.
To run a trouble test:
1. Initiate an active trouble condition.
2. Check the 2-LCD to see if the internal buzzer sounds and theTrouble LED flashes.
3. Verify that the 2-LCD message for the trouble conditionmatches the programmed message in the 2-SDU.
4. Press the Local Silence switch to verify that it silences thebuzzer, stops the Trouble LED from flashing (but keeps itlit), and turns on the Local Silence LED.
5. Press the Trouble Review switch to verify that you canscroll through all the messages in the trouble queue.
6. Restore the trouble condition.
7. Press the Reset switch at the 2-LCD.
To complete the trouble test:
1. Initiate a second active trouble condition.
2. Verify that the second trouble message appears in thedisplay.
3. Restore the trouble point.
4. Press the Reset switch at the 2-LCD.
To run a supervisory test:
1 Initiate an active supervisory condition.
2. Check the 2-LCD to see if the internal buzzer sounds and theSupervisory LED flashes.
3. Verify that the 2-LCD message for the supervisory conditionmatches the programmed message in the 2-SDU.
System power up and testing
3.8 EST2 Installation and Service Manual
4. Press the Local Silence switch to verify that it silences thebuzzer, stops the Supervisory LED from flashing (but keepsit lit), and turns on the Local Silence LED.
5. Press the Supervisory Review switch to verify that you canscroll through all the messages in the supervisory queue.
6. Restore the supervisory condition.
7. Press the Reset switch at the 2-LCD.
To complete the supervisory test:
1. Initiate a second active supervisory condition.
2. Verify that the second supervisory message appears in thedisplay.
3. Restore the supervisory point.
4. Press the Reset switch at the 2-LCD.
To run the fourth fire alarm test:
1. Initiate a fourth fire alarm.
2. Check the 2-LCD to see if the internal buzzer sounds and theAlarm LED turns on.
3. Verify that the 2-LCD message for the alarm matches theprogrammed message in the 2-SDU.
4. Press the Local Silence switch to verify that it silences thebuzzer, stops the Alarm LED from flashing (but keeps it lit),and turns on the Local Silence LED.
5. Press the Alarm Review switch to verify that you can scrollthrough all the messages in the alarm queue.
6. Press the Reset switch.
7. Verify that all initiating devices reset and all panelindicators clear except the green Power LED.
System power up and testing
EST2 Installation and Service Manual 3.9
Testing RS-232 and RS-485 ports
Testing the RS-232 portThis test will verify the operation of peripheral devicesconnected to the Main Controller Module's RS-232 port.
To test the RS-232 Port:
1. Verify that the baud rate of the peripheral device matchesthe setting in the 2-SDU.
2. Check the printer operation by generating a system report atthe 2-LCD keypad.
3. Check the laptop function by uploading data in the 2-SDUCommunication menu.
Testing RS-485 portsTwo RS-485 lines (Ch 0 and Ch 1) support the system in a ClassB (Style 4) or a Class A (Style 7) configuration. The RS-485lines support annunciators like 2-LSRA(-C)s, 2-SMDN(-C)s,and SAN annunciators.
To test the Class B (Style 4) RS-485 ports:
1. Verify that the 2-LCD indicates normal operations.
2. Use the System Status switch to verify that all connecteddevices are communicating over the system.
3. Disconnect the RS-485 wiring from the Main ControllerModule (MCM).
4. Verify that all the other devices connected to the systemappear in the Trouble queue.
To test the Class A (Style 7) RS-485 ports:
1. Verify that the 2-LCD indicates normal operations.
2. Use the System Status switch to verify that all connecteddevices are communicating over the system.
3. Disconnect the RS-485 wiring from the MCM, Ch 0.
4. Verify that the 2-LCD annunciates a Class Acommunications fault.
5. Repeat step 2 to verify that all connected devices stillcommunicate over the RS-485 lines.
System power up and testing
3.10 EST2 Installation and Service Manual
Testing Signature data circuitsThe signature data circuit (SDC) consists of Signature seriesdevices connected to the MCM on a data circuit. A complete testof the SDC looks at:
• Wiring on the circuit• Mapping in the 2-SDU• Messages on the 2-LCD
To verify the proper SDC mapping:
1. Visually inspect the wiring on the SDC to ensure properwiring practices.
2. In the 2-SDU, map the SDC by uploading device data fromthe MCM.
3. Commit devices on the SDC as required.
4. Download the new data back to the MCM and upload itagain back into the 2-SDU.
5. In the 2-SDU, open the Signature data map to verify thatactual data matches the expected data.
To test the SDC:
1. With no map errors displayed, put an input device on theSDC into the active mode.
2. Verify that the 2-LCD displays the appropriate message.
3. Put the input device into the Trouble mode.
4. Verify that the 2-LCD displays the appropriate Troublemessage.

System power up and testing
EST2 Installation and Service Manual 3.11
Testing NACsTo test NACs at the 2-LCD:
1. Verify that all components are installed according to thespecifications of the job.
2. Activate an output on the 2-LCD.
3. Verify that the devices activate properly.
4. Restore the circuit.
5. Disconnect the circuit or EOL resistor.
6. Verify that the appropriate trouble message appears on the2-LCD.
To test NACs on site:
1. Verify that all components are installed according to thespecifications of the job.
2. Inspect each notification appliance to verify properoperation.
3. Remove one leg of the notification appliance wiring.
4. Verify that the 2-LCD displays the appropriate troublemessage.

System power up and testing
3.12 EST2 Installation and Service Manual
Testing reverse polarity modules
TB1
RPM REVERSE POLARITYTRANSMITTERS
CITYBOX ALARM TROUBLE SUPV
SUPVTRBLALRM
TRBL INCOM
JP1
+241 2 3 4 5 6 7 8
INST103.CDR
Figure 3-1: Reverse Polarity Module
Note: See the MCM installation sheet for more details on theRPM.
The Reverse Polarity Module (RPM) may support any one ofthree different configurations:
• City-tie configuration• Single circuit (old style) configuration• Three circuit configuration
Each of the configurations requires a different approach totesting the RPM. Before you test the RPM in any configuration,however, you have to ensure that the proper test conditions exist.
To ensure the proper test conditions:
1. Verify the proper wiring of the RPM.
2. If the RPM is connected to a municipal box or centralmonitoring station, advise the appropriate parties of theupcoming test.
Testing city-tie configurationNote: You can temporarily substitute a 15 Ω, 2 W resistor forthe municipal box. If you activate the municipal box, it willindicate Trouble until it is rewound.
To test for trouble conditions:
1. With the municipal box connected to TB1-1 and TB1-2,open the circuit.
2. Verify that the open circuit activates the appropriate Troublemessage in the 2-LCD message queue.
3. Reconnect the circuit at the conclusion of the test.
System power up and testing
EST2 Installation and Service Manual 3.13
To test for fire alarms:
1. Initiate a fire alarm.
2. With a voltmeter, verify that 20 to 25 Vdc sits across TB1-1(+) and TB1-2 (-) in the correct polarity.
3. Press the Reset switch and wait for the system to reset.
4. Verify the receipt of the alarm at the municipal receivingstation.
Testing single circuit (old style) configuration
To test for trouble conditions:
1. Make sure that JP1 is not installed.
2. With a voltmeter, verify that 20 to 25 Vdc sits across TB1-3(+) and TB1-4 (-).
3. Create a Trouble condition on the panel.
4. With a voltmeter, verify that 0 Vdc sits across TB1-3 (+)and TB1-4 (-).
5. Verify that the:
• Panel’s trouble relay activates• 2-LCD message queue displays the correct message• Municipal receiving station receives a trouble indication
6. Open the circuit wired between TB1-3 and TB1-4.
7. Verify that municipal receiving station receives a troubleindication.
To test for fire alarms:
1. Initiate an active fire alarm.
2. With a voltmeter, verify that 20 to 25 Vdc sits across TB1-5(+) and TB1-6 (-) and look for any polarity change.
3. Verify the receipt of the alarm at the municipal receivingstation.

System power up and testing
3.14 EST2 Installation and Service Manual
Testing three circuit configuration
To test for trouble conditions:
1. Make sure that JP1 is installed.
2. With a voltmeter, confirm that 20 to 25 Vdc (in the correctpolarity) sits across the following terminals:
• TB1-3 (+) and TB1-4 (-)• TB1-5 (+) and TB1-6 (-)• TB1-7 (+) and TB1-8 (-)
3. Create a Trouble condition on the panel.
4. With a voltmeter, confirm that 20 to 25 Vdc sits across TB1-5 (+) and TB1-6 (-).
5. Verify that the:
• Panel’s trouble relay activates• 2-LCD message queue displays the correct message• Receiving station receives a trouble indication
6. See if the municipal receiving station receives a circuit faultindication when you open the circuit wired between:
• TB1-3 (+) and TB1-4 (-)• TB1-5 (+) and TB1-6 (-)• TB1-7 (+) and TB1-8 (-)
To test for fire alarms:
1. Initiate an active fire alarm.
2. With a voltmeter, verify that 20 to 25 Vdc sits across TB1-3(+) and TB1-4 (-) and look for any polarity change.
3. Verify the receipt of the alarm at the municipal receivingstation.
To test for supervisory conditions:
1. Initiate a supervisory condition.
2. With a voltmeter, verify that 20 to 25 Vdc sits across TB1-7(+) and TB1-8 (-) and look for any polarity change.
3. Verify the receipt of a supervisory condition at themunicipal receiving station.
System power up and testing
EST2 Installation and Service Manual 3.15
Testing audioThe audio system includes the following components:
• 2-AAC Audio Controller Module• SIGA-AAXX Audio Amplifier• 2-MIC Microphone Module• 2-TEL Firefighter Telephone
Note: Before any test, check all of the audio components againstthe job specifications and the installation sheets. Ensure theproper installation and wiring of each component.
WARNING: Inform building occupants of any fire alarm testbefore you perform it.
Microphone paging test
To test the 2-AAC and the 2-MIC:
1. Disconnect the 2-MIC from the 2-AAC and make sure thatthe 2-LCD displays the appropriate message.
2. Reconnect the 2-MIC to the 2-AAC.
3. Remove each audio riser from the 2-AAC and make surethat the 2-LCD trouble queue displays the correct message.
4. Reconnect the audio risers.
5. At the 2-MIC, press the Page-to-Alarm switch.
6. At the front panel LED/Switch module, select all floors andissue a page to verify that all locations receive the page.
Firefighter telephone testsThe firefighter telephone test consists of several phases becausetelephone jacks are distributed throughout the building. Inaddition, the 2-TEL comes with a 2-TEL option board, whichneeds its own test.
Note: The CC1 wired to the 2-TEL should be programmed witha personality code 6.
To test the first firefighter telephone circuit:
1. Take a firefighter telephone off the hook.
2. Plug a firefighter telephone into a firefighter telephone jack.

System power up and testing
3.16 EST2 Installation and Service Manual
3. Verify that an incoming call buzzer sounds, and that theappropriate LED lights on the front panel LED/Switchmodule.
4. Press the Call-in Silence switch and verify that the buzzersilences.
5. Press the appropriate switch on the front panel LED/Switchmodule to connect the incoming call.
6. Talk over the firefighter telephone connection to verifyclear, noise-free communications.
To test the second firefighter telephone circuit:
1. Take a second firefighter telephone, on a different branchcircuit, off the hook.
2. Verify that the incoming call buzzer re-sounds, and that theappropriate LED lights on the front panel LED/Switchmodule.
3. Press the Call-in Silence switch and verify that the buzzersilences.
4. Press the appropriate switch on the front panel LED/Switchmodule to connect the incoming call.
5. Talk over the firefighter telephone connection to verifyclear, noise-free communications.
To test multiple telephone jacks:
1. Connect five firefighter telephones at the same time.
2. Verify that the incoming call buzzer re-sounds, and that theappropriate LEDs light on the front panel LED/Switchmodule.
3. Press the Call-in Silence switch and verify that the buzzersilences.
4. Press the appropriate switch on the front panel LED/Switchmodule to connect each incoming call.
5. Talk over the firefighter telephone connection to verifyclear, noise-free communications.
6. Disconnect all but one firefighter telephone.
To test the Page by Phone switch:
1. Press the Page by Phone switch on the 2-MIC.
2. At the front panel LED/Switch module, select a pagedestination.

System power up and testing
EST2 Installation and Service Manual 3.17
3. Speak into the telephone still connected to the circuit fromthe last test.
4. Verify the distribution of the telephone’s audio throughoutthe facility.
To test the telephone option board:
1. Disconnect each of the telephone risers from the 2-TELoption board.
2. Verify that the 2-LCD displays the appropriate troublemessage.
3. Restore the connections.
To test the firefighter telephone jacks:
1. Disconnect each firefighter telephone jack/station.
2. Verify that the 2-LCD trouble queue displays the correctmessage.
3. Restore the connections.
Amplifier testThe amplifier test will measure the responsiveness of the SIGA-AA30 and SIGA-AA50 amplifiers.
To test the audio amplifiers:
1. Ensure that the wattage of any backup amplifier equals orexceeds the wattage of any primary amplifier it will replace.
2. Create an alarm condition to verify that EVAC signal showsup at the alarm output.
3. Create an amplifier fault to see if the backup amplifier takesover.
To test Class B output configurations:
1. Disconnect the amplifier’s audio output wiring.
2. Verify that the 2-LCD trouble queue displays the correctmessage.
3. Restore the connections.
To test Class A output configurations:
1. Disconnect the amplifier’s primary audio output wiring.
2. Verify that the 2-LCD trouble queue displays the correctmessage.

System power up and testing
3.18 EST2 Installation and Service Manual
3. Verify that the amplifier output is available on Class Awiring.
4. Restore the connections.
System power up and testing
EST2 Installation and Service Manual 3.19
Testing detectors and modulesThese procedures are designed to test the application andprogramming of detectors, input modules, and output modulesfor initial approval and re-acceptance.
Note: Download the Signature data circuit (SDC) configurationto the panel from the 2-SDU before you start testing.
Detectors
Signature detectors
Signature Series detectors and bases reside on an SDC, which iscontrolled by a Main Controller Module (MCM) or an ExpanderLoop Module (LCX).
To test Signature detectors:
1. Ensure that all the detectors are located and mountedaccording to accepted installation practices and thespecifications of the job.
2. Activate each detector individually.
3. Verify that the device initiates the appropriate systemresponses.
4. Check the 2-LCD for the appropriate circuit type and devicelocation message.
5. Remove the detector from its base.
6. Verify that the 2-LCD displays the appropriate troublemessage and location.
7. After you replace the detector, press the Reports switch onthe 2-LCD to run a sensitivity report.
If the detector is installed in a relay base, verify that the base’srelay function operates according to design. If the detector isinstalled in an isolator base, verify that the base isolates therequired circuit segments.
Conventional detectors
Conventional detectors and bases work in conjunction withSignature series universal modules (UMs).
Note: Before you test conventional detectors, verify thefollowing:
• A 2-SMK module is installed between the panel powersupply and the UM, terminal 9 (smoke power)
• JP1, on each UM, jumps pins 1 and 2
System power up and testing
3.20 EST2 Installation and Service Manual
To test conventional detectors:
1. Ensure that all the detectors are located and mountedaccording to accepted installation practices and thespecifications of the job.
2. Activate each detector individually.
3. Verify that the UM initiates the appropriate systemresponses.
4. Check the 2-LCD for the appropriate circuit type and devicelocation message.
5. Remove the detector from its base.
6. Verify that the 2-LCD displays the appropriate troublemessage and location.
If the detector is installed in a relay base, verify that the base’srelay function operates according to design. If the detector isinstalled in an isolator base, verify that the base isolates therequired circuit segments.
Duct detectors
Test duct detectors to verify that they meet the minimum andmaximum airflow requirements.
See the following documents for detailed specifications andinstructions on Signature Series detectors:
• Signature Series Technical Reference (P/N 270144)• Signature Series Component Installation Manual (P/N
270497)• Intelligent Smoke and Heat Detectors Applications Bulletin
(P/N 270145)
Modules
Input modules
To test input modules
1. Ensure that all the modules are located and mountedaccording to accepted installation practices and thespecifications of the job.
2. Activate each module individually.
3. Verify that the device initiates the appropriate systemresponses.
4. Check the 2-LCD for the appropriate circuit type and devicelocation message.

System power up and testing
EST2 Installation and Service Manual 3.21
5. Open the circuit.
6. Verify that the 2-LCD displays the appropriate troublemessage and location.
Output modules
To test output modules:
1. Ensure that all the modules are located and mountedaccording to accepted installation practices and thespecifications of the job.
2. At the 2-LCD, activate each module individually with theActivate Output command.
3. Verify that the device initiates the appropriate systemresponses.
4. Check the 2-LCD for the appropriate circuit type and devicelocation message.
5 Open the circuit (for supervised output circuits).
6. Verify that the 2-LCD displays the appropriate troublemessage and location.
If the output is activated by one or more system inputs, activatethese inputs and verify that the output function operatesappropriately.
System power up and testing
3.22 EST2 Installation and Service Manual
Testing initiating devicesThe procedures for testing initiating devices are the same forinitial and re-acceptance testing. These procedures test theinitiating devices and their programming. Initiating devicesinclude:
• Manual pull stations• Non-restorable heat detectors• Restorable heat detectors• Waterflow switches
Caution: Do not test a nonrestorable heat detector.Nonrestorable heat detectors activate only one time, and requirereplacement afterwards.
Perform the tests along with the procedures for testing Signaturedetectors and input modules.
To test manual pull stations:
1. Inspect the initiating device for visual indications of non-conformance.
2. Pull the lever to activate the pull station.
3. Verify that the device initiates the appropriate systemresponses.
4. Check the 2-LCD for the appropriate circuit type and devicelocation message.
5. Open the circuit.
6. Verify that the 2-LCD displays the appropriate troublemessage and location.
To test restorable heat detectors:
1. Inspect the initiating device for visual indications of non-conformance.
2. Activate the detector.
3. Verify that the device initiates the appropriate systemresponses.
4. Check the 2-LCD message for the appropriate circuit typeand device location.
5. Open the circuit.
6. Verify that the 2-LCD displays the appropriate troublemessage and location.

System power up and testing
EST2 Installation and Service Manual 3.23
To test waterflow switches:
1. Inspect the initiating device for visual indications of non-conformance.
2. Activate the sprinkler test valve.
3. Verify that the device initiates the appropriate systemresponses.
4. Check the 2-LCD message for the appropriate circuit typeand device location.
5. Open the circuit.
6. Verify that the 2-LCD displays the appropriate troublemessage and location.
System power up and testing
3.24 EST2 Installation and Service Manual
Testing notification appliancesThe procedures for testing notification appliances are the samefor initial and re-acceptance testing.
These procedures test the notification appliances and theirprogramming. Notification appliances include:
• Visual devices• Speakers• Bells• Horns
The procedures for testing notification appliances are the samefor visual and audible devices. Perform the tests along with theprocedures for testing Signature detectors and output modules.
To test notification appliances:
1. Inspect the notification appliance for visual indications ofnon-conformance.
2. Activate the circuit.
3. Verify that all indicating appliances operate according tospecification.
4. Open the circuit.
5. Verify that the 2-LCD displays the appropriate troublemessage and location.
System power up and testing
EST2 Installation and Service Manual 3.25
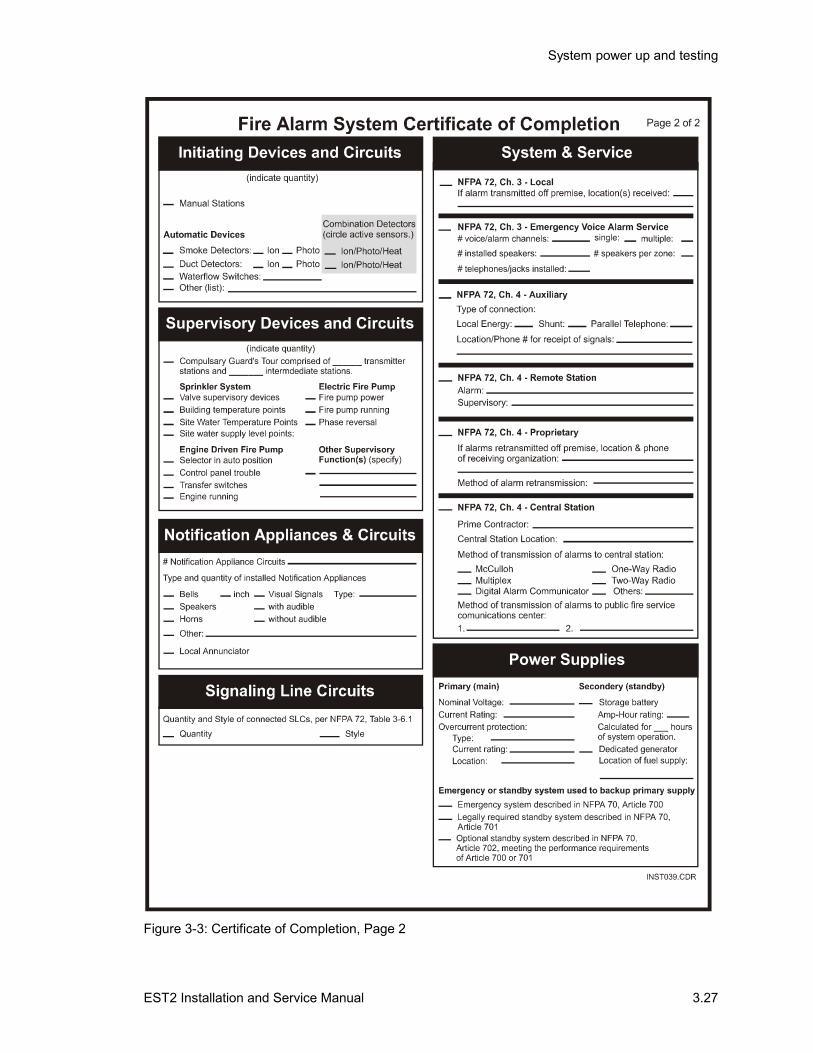
Filling out a certificate of completionWhen you have tested the system and found it to operatesatisfactorily, it is time to submit a Certificate of Completion.
Note: Do not use the master copy to report your work.
To fill out a certificate of completion:
1. Reproduce the master copies of the Certificate ofCompletion on the following pages (Figure 3-2 and Figure3-3).
2. Supply the information requested on the Certificate ofCompletion.
3. Give the Certificate of Completion to the buildingrepresentative.
System power up and testing
3.26 EST2 Installation and Service Manual
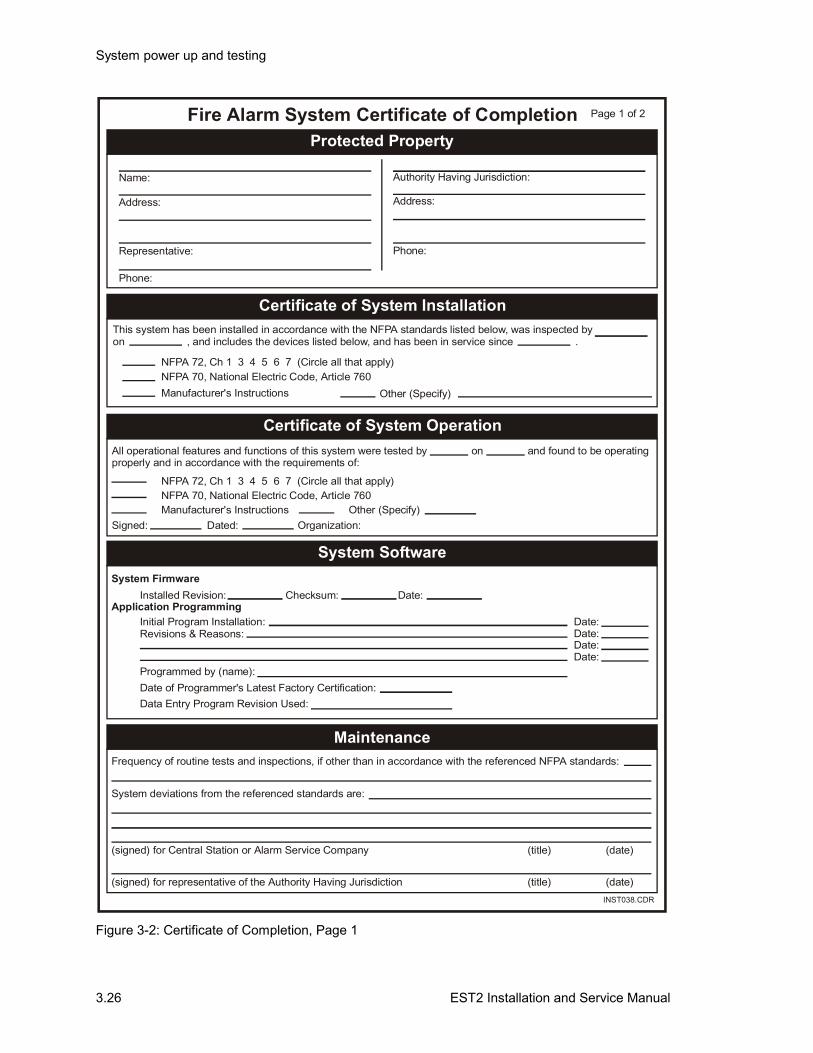
Fire Alarm System Certificate of Completion Page 1 of 2
Protected Property
Name: Authority Having Jurisdiction:
Address:
Phone:
Address:
Representative:
Phone:
Certificate of System InstallationThis system has been installed in accordance with the NFPA standards listed below, was inspected by on , and includes the devices listed below, and has been in service since .
NFPA 72, Ch 1 3 4 5 6 7 (Circle all that apply)NFPA 70, National Electric Code, Article 760Manufacturer's Instructions Other (Specify)
Certificate of System Operation
NFPA 72, Ch 1 3 4 5 6 7 (Circle all that apply)NFPA 70, National Electric Code, Article 760Manufacturer's Instructions Other (Specify)
All operational features and functions of this system were tested by on and found to be operatingproperly and in accordance with the requirements of:
Signed: Dated: Organization:
System SoftwareSystem Firmware
Installed Revision: Checksum: Date:
Programmed by (name):
Application ProgrammingInitial Program Installation:Revisions & Reasons:
Date:Date:Date:Date:
Date of Programmer's Latest Factory Certification:Data Entry Program Revision Used:
MaintenanceFrequency of routine tests and inspections, if other than in accordance with the referenced NFPA standards:
System deviations from the referenced standards are:
(signed) for Central Station or Alarm Service Company
(signed) for representative of the Authority Having Jurisdiction
(title)
(title)
(date)
(date)INST038.CDR
Figure 3-2: Certificate of Completion, Page 1
System power up and testing
EST2 Installation and Service Manual 3.27
Figure 3-3: Certificate of Completion, Page 2

System power up and testing
3.28 EST2 Installation and Service Manual

EST2 Installation and Service Manual 4.1
Chapter 4 System service procedures
Summary
Chapter 4 provides detailed instructions for identifying systemfaults on the 2-LCD and the system components.
ContentRecommended maintenance practices • 4.2
Electrical safeguards • 4.2Preventive maintenance • 4.2Documenting system service • 4.2
System faults • 4.4Reading 2-LCD messages • 4.4Checking LEDs on the 2-LCD • 4.9Checking system status • 4.9
Panel modules • 4.122-PPS Primary Power Supply • 4.122-PPS/6A 6 Amp Primary Power Supply • 4.12SIGA-APS Auxiliary Power Supply • 4.142-MCM Main Controller Module • 4.152-LCX Expander Loop Module • 4.162-LCD Display Module • 4.18LED/Switch Modules • 4.19DL2 Dialer • 4.19CDR-3 Coder • 4.202-AAC Audio Controller Module • 4.212-MIC Microphone • 4.222-TEL Firefighter Telephone • 4.22SIGA-AAXX amplifiers • 4.23
Remote alphanumeric annunciators • 4.25Printers • 4.26
PT-1S(-220) form printer • 4.26RSAN-PRT strip printer • 4.26
Cleaning detectors • 4.27Fire alarm trouble and maintenance log • 4.29
System service procedures
4.2 EST2 Installation and Service Manual
Recommended maintenance practices
Electrical safeguards
Personal safety
WARNING: Disconnect ac power to the control panel beforeinstalling or removing any components. Failure to remove acpower may result in serious injury or loss of life.
Follow the recommendations for the routing of power-limitedand nonpower-limited wiring to avoid dangerous confusion ofwire types. See the wallbox installation sheets for the details.
Electro-static precautions
The components of the fire alarm control panel are extremelysensitive to small amounts of static electricity. Make sure youare properly grounded before you handle any module. Provide astatic-free storage environment for any module you remove fromthe control panel.
Wire stripping
Strip 1/4 inch (6.4 mm) from the ends of all wires that connect tothe terminal blocks of the module. Exposing more than 1/4 inchof wire may cause a ground fault. Exposing less than 1/4 inch ofwire may result in a faulty connection. Observe the wirestripping whenever you perform maintenance on the system ortroubleshoot a problem.
Preventive maintenanceThere are two standards you need to follow for preventivemaintenance. NFPA 72 (1996 edition) provides guidance forinspection, testing, and maintenance in Chapter 7. The otherstandard to follow is the authority having jurisdiction for yourmunicipality.
Documenting system serviceDocument your maintenance activities and any problems thatarise on the system. The more documentation you have, theeasier it is to track problems on the system. See, Documentingsystem service, at the end of this chapter for a samplemaintenance log. Photocopy the sample and use it for systemmaintenance activities.
Use the Reports menu in the 2-SDU to generate and print reportson the configuration of the system for any changes. When

System service procedures
EST2 Installation and Service Manual 4.3
problems arise on the system, you will have a reliable record forcomparison.

System service procedures
4.4 EST2 Installation and Service Manual
System faults
Reading 2-LCD messagesThe standalone system provides valuable data to help thetechnician find and correct problems. Whenever a problemarises, the 2-LCD indicates both audibly and visually thatsomething is wrong. See the System Operations Manual fordetailed information on the LED indications of the 2-LCD.
The 2-LCD also displays fault messages to locate and identifythe problem. Each fault message consists of a 4-digit address.The first two digits represent the panel address. If the paneladdress is 00, the last two digits will be pseudo-point IDs (01through 99). If the panel address is 01 through 63, the last twodigits will represent the device address (01 through 96). Table4-1 lists the system addresses. All devices and accessoriesconnected to the RS-485 circuit have four-digit addressesbetween 10xx and 63xx.
Table 4-1: System addressing
Panel address Function Device addresses References
00 Primary Power Supply andsystem faults
Table 4-6 (2-PPS)
Table 4-7 (2-PPS/6A)
0001 to 0014 System faults
0015 to 0019 2-MCM faults
0020 to 0024 2-LCX faults
0025 to 0029 DL2 faults
Table 4-2
01 and 02 Main Controller Module
See Signature deviceproblems.
0101 to 0196 Signature detectors
0201 Dedicated NAC (default)
0202 Dedicated NAC (default)
0203 to 0296 Signature modules
03 and 04 Expander Loop Module
See Signature deviceproblems.
0301 to 0396 Signature detectors
0401 Dedicated NAC (default)
0402 Dedicated NAC (default)
0403 to 0496 Signature Modules
05 LED/switch modules LEDs Switches Table 4-16
1st module 0501 to 0516 (0501 to 0508)
2nd module 0517 to 0532 (0509 to 0516)
3rd module 0533 to 0548 (0517 to 0524)
4th module 0549 to 0564 (0525 to 0532)
5th module 0565 to 0580 (0533 to 0540)
6th module 0581 to 0596 (0541 to 0548)
System service procedures
EST2 Installation and Service Manual 4.5
Table 4-1: System addressing
Panel address Function Device addresses References
User-defined switch 0096
06, 07, 08, 09 Future use
41, 2-AAC Audio ControlModule
4110 to 4115, and 4197 Table 4-19
Table 4-20
Table 4-21
Table 4-22
42, 43 Not available
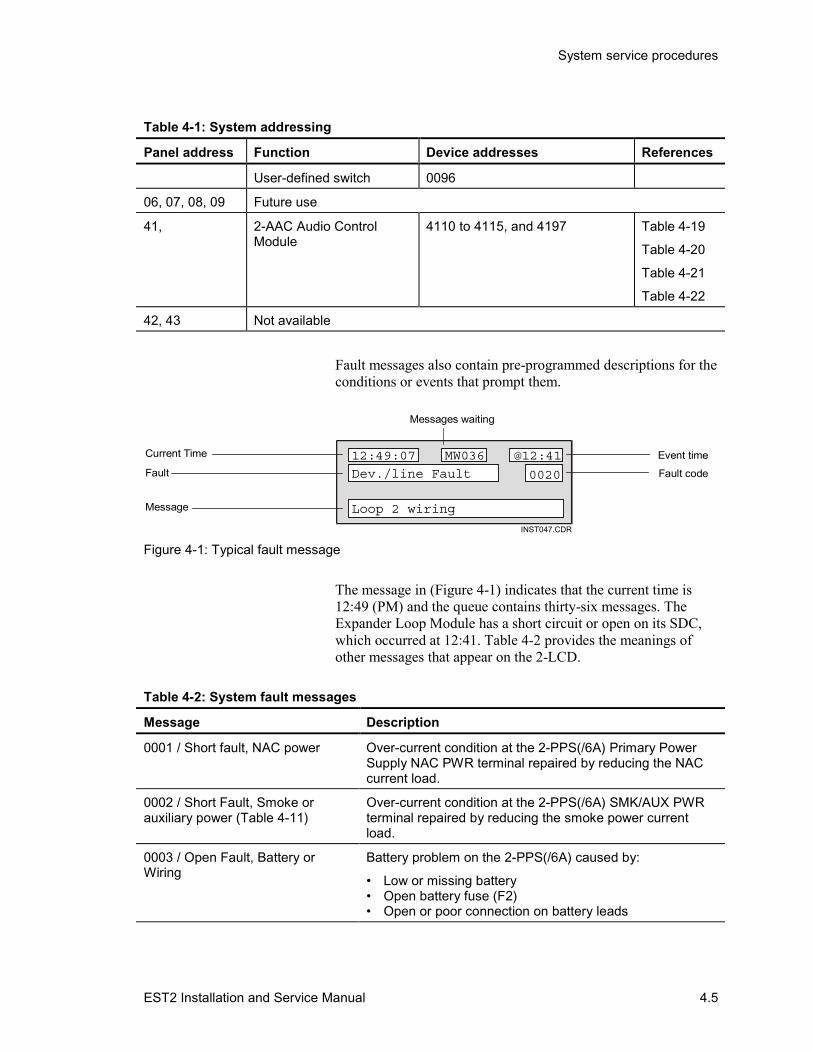
Fault messages also contain pre-programmed descriptions for theconditions or events that prompt them.
Current Time
Messages waiting
Event time
Fault codeFault
Message
12:49:07 MW036 @12:41
Dev./line Fault
Loop 2 wiring
INST047.CDR
0020
Figure 4-1: Typical fault message
The message in (Figure 4-1) indicates that the current time is12:49 (PM) and the queue contains thirty-six messages. TheExpander Loop Module has a short circuit or open on its SDC,which occurred at 12:41. Table 4-2 provides the meanings ofother messages that appear on the 2-LCD.
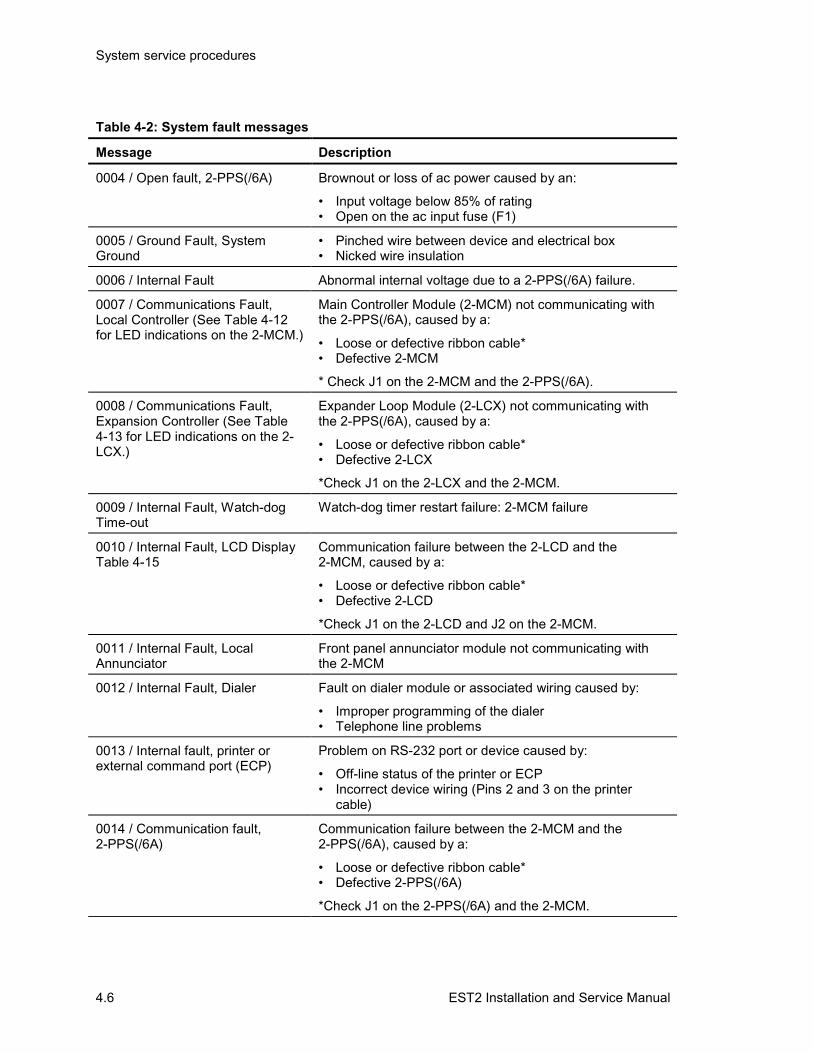
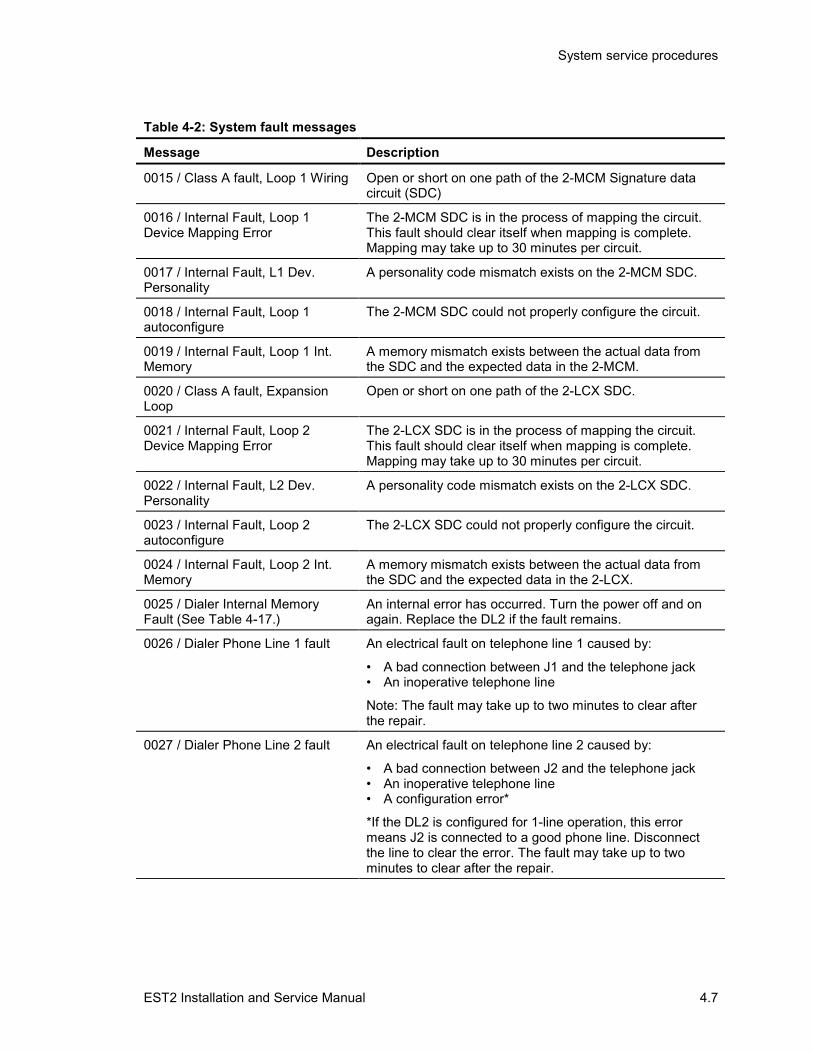
Table 4-2: System fault messages
Message Description
0001 / Short fault, NAC power Over-current condition at the 2-PPS(/6A) Primary PowerSupply NAC PWR terminal repaired by reducing the NACcurrent load.
0002 / Short Fault, Smoke orauxiliary power (Table 4-11)
Over-current condition at the 2-PPS(/6A) SMK/AUX PWRterminal repaired by reducing the smoke power currentload.
0003 / Open Fault, Battery orWiring
Battery problem on the 2-PPS(/6A) caused by:
• Low or missing battery• Open battery fuse (F2)• Open or poor connection on battery leads
System service procedures
4.6 EST2 Installation and Service Manual
Table 4-2: System fault messages
Message Description
0004 / Open fault, 2-PPS(/6A) Brownout or loss of ac power caused by an:
• Input voltage below 85% of rating• Open on the ac input fuse (F1)
0005 / Ground Fault, SystemGround
• Pinched wire between device and electrical box• Nicked wire insulation
0006 / Internal Fault Abnormal internal voltage due to a 2-PPS(/6A) failure.
0007 / Communications Fault,Local Controller (See Table 4-12for LED indications on the 2-MCM.)
Main Controller Module (2-MCM) not communicating withthe 2-PPS(/6A), caused by a:
• Loose or defective ribbon cable*• Defective 2-MCM
* Check J1 on the 2-MCM and the 2-PPS(/6A).
0008 / Communications Fault,Expansion Controller (See Table4-13 for LED indications on the 2-LCX.)
Expander Loop Module (2-LCX) not communicating withthe 2-PPS(/6A), caused by a:
• Loose or defective ribbon cable*• Defective 2-LCX
*Check J1 on the 2-LCX and the 2-MCM.
0009 / Internal Fault, Watch-dogTime-out
Watch-dog timer restart failure: 2-MCM failure
0010 / Internal Fault, LCD DisplayTable 4-15
Communication failure between the 2-LCD and the2-MCM, caused by a:
• Loose or defective ribbon cable*• Defective 2-LCD
*Check J1 on the 2-LCD and J2 on the 2-MCM.
0011 / Internal Fault, LocalAnnunciator
Front panel annunciator module not communicating withthe 2-MCM
0012 / Internal Fault, Dialer Fault on dialer module or associated wiring caused by:
• Improper programming of the dialer• Telephone line problems
0013 / Internal fault, printer orexternal command port (ECP)
Problem on RS-232 port or device caused by:
• Off-line status of the printer or ECP• Incorrect device wiring (Pins 2 and 3 on the printer
cable)
0014 / Communication fault,2-PPS(/6A)
Communication failure between the 2-MCM and the2-PPS(/6A), caused by a:
• Loose or defective ribbon cable*• Defective 2-PPS(/6A)
*Check J1 on the 2-PPS(/6A) and the 2-MCM.
System service procedures
EST2 Installation and Service Manual 4.7
Table 4-2: System fault messages
Message Description
0015 / Class A fault, Loop 1 Wiring Open or short on one path of the 2-MCM Signature datacircuit (SDC)
0016 / Internal Fault, Loop 1Device Mapping Error
The 2-MCM SDC is in the process of mapping the circuit.This fault should clear itself when mapping is complete.Mapping may take up to 30 minutes per circuit.
0017 / Internal Fault, L1 Dev.Personality
A personality code mismatch exists on the 2-MCM SDC.
0018 / Internal Fault, Loop 1autoconfigure
The 2-MCM SDC could not properly configure the circuit.
0019 / Internal Fault, Loop 1 Int.Memory
A memory mismatch exists between the actual data fromthe SDC and the expected data in the 2-MCM.
0020 / Class A fault, ExpansionLoop
Open or short on one path of the 2-LCX SDC.
0021 / Internal Fault, Loop 2Device Mapping Error
The 2-LCX SDC is in the process of mapping the circuit.This fault should clear itself when mapping is complete.Mapping may take up to 30 minutes per circuit.
0022 / Internal Fault, L2 Dev.Personality
A personality code mismatch exists on the 2-LCX SDC.
0023 / Internal Fault, Loop 2autoconfigure
The 2-LCX SDC could not properly configure the circuit.
0024 / Internal Fault, Loop 2 Int.Memory
A memory mismatch exists between the actual data fromthe SDC and the expected data in the 2-LCX.
0025 / Dialer Internal MemoryFault (See Table 4-17.)
An internal error has occurred. Turn the power off and onagain. Replace the DL2 if the fault remains.
0026 / Dialer Phone Line 1 fault An electrical fault on telephone line 1 caused by:
• A bad connection between J1 and the telephone jack• An inoperative telephone line
Note: The fault may take up to two minutes to clear afterthe repair.
0027 / Dialer Phone Line 2 fault An electrical fault on telephone line 2 caused by:
• A bad connection between J2 and the telephone jack• An inoperative telephone line• A configuration error*
*If the DL2 is configured for 1-line operation, this errormeans J2 is connected to a good phone line. Disconnectthe line to clear the error. The fault may take up to twominutes to clear after the repair.
System service procedures
4.8 EST2 Installation and Service Manual
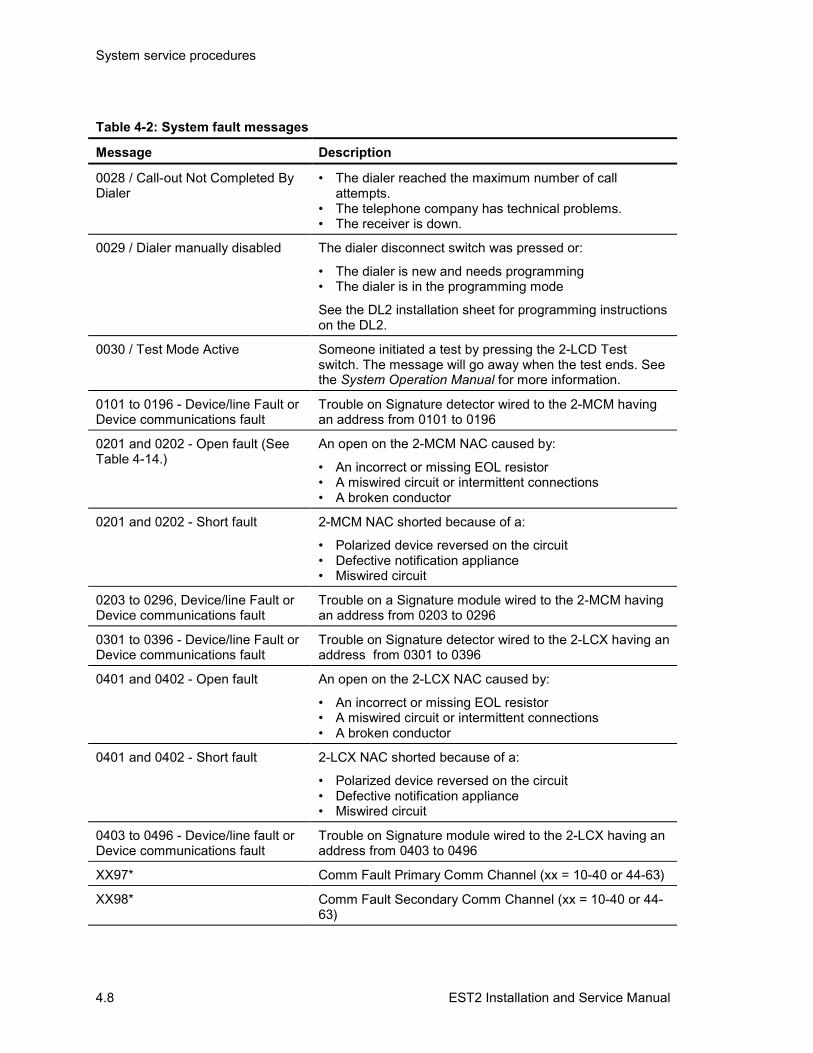
Table 4-2: System fault messages
Message Description
0028 / Call-out Not Completed ByDialer
• The dialer reached the maximum number of call attempts.
• The telephone company has technical problems.• The receiver is down.
0029 / Dialer manually disabled The dialer disconnect switch was pressed or:
• The dialer is new and needs programming• The dialer is in the programming mode
See the DL2 installation sheet for programming instructionson the DL2.
0030 / Test Mode Active Someone initiated a test by pressing the 2-LCD Testswitch. The message will go away when the test ends. Seethe System Operation Manual for more information.
0101 to 0196 - Device/line Fault orDevice communications fault
Trouble on Signature detector wired to the 2-MCM havingan address from 0101 to 0196
0201 and 0202 - Open fault (SeeTable 4-14.)
An open on the 2-MCM NAC caused by:
• An incorrect or missing EOL resistor• A miswired circuit or intermittent connections• A broken conductor
0201 and 0202 - Short fault 2-MCM NAC shorted because of a:
• Polarized device reversed on the circuit• Defective notification appliance• Miswired circuit
0203 to 0296, Device/line Fault orDevice communications fault
Trouble on a Signature module wired to the 2-MCM havingan address from 0203 to 0296
0301 to 0396 - Device/line Fault orDevice communications fault
Trouble on Signature detector wired to the 2-LCX having anaddress from 0301 to 0396
0401 and 0402 - Open fault An open on the 2-LCX NAC caused by:
• An incorrect or missing EOL resistor• A miswired circuit or intermittent connections• A broken conductor
0401 and 0402 - Short fault 2-LCX NAC shorted because of a:
• Polarized device reversed on the circuit• Defective notification appliance• Miswired circuit
0403 to 0496 - Device/line fault orDevice communications fault
Trouble on Signature module wired to the 2-LCX having anaddress from 0403 to 0496
XX97* Comm Fault Primary Comm Channel (xx = 10-40 or 44-63)
XX98* Comm Fault Secondary Comm Channel (xx = 10-40 or 44-63)

System service procedures
EST2 Installation and Service Manual 4.9
Table 4-2: System fault messages
Message Description
XX99* Internal Fault Card/Supervision (xx = 10-40 or 44-63)
41XX 2-AAC Audio Controllerfaults
See Table 4-19
Checking LEDs on the 2-LCDThe 2-LCD also indicates problems with LEDs and an internalbuzzer. The internal buzzer provides an audible indication thatthe system has a problem. Table 4-3 lists the LEDs to look forwhen the internal buzzer sounds.
Table 4-3: System fault messages
Fault Possible Causes
AC Power LED off The ac power is off or below 85% of the rated voltage.
TROUBLE LED on The system has detected a problem with the wiring or a device on theloop. Check the display for more details and look for other lit LEDs.
CPU FAIL LED on • 2-MCM CPU watch-dog time-out• LED/Switch module CPU watch-dog time-out
All LEDs off The system has had an ac power failure and the batteries belowminimum allowable voltage
Another way of finding problems is to look for improper deviceresponses. For example, the disable function fails to disable thedesired Signature device or disables another one. An improperdevice response may result from any of the following conditions:
• Conflicting device types• Conflicting serial numbers• An incorrect personality code loaded into a module• Incorrect country code• An incorrect jumper setting on a Signature series universal
module (SIGA-UM)
Check the devices by looking at their LEDs and comparing theirserial numbers with the ones configured in the 2-SDU.
Checking system statusA level 1, 2, or 3 password is required to use the 2-LCD statusfunction. Press the STATUS switch to access the first statusscreen, and follow its instructions (Figure 4-2).

System service procedures
4.10 EST2 Installation and Service Manual
INST048.CDR
Status Report.[ent] key scrolls[del] key terminates
Figure 4-2: First status screen
Press the ENTER switch a second time to advance the LCDdisplay to the general status screen (Figure 4-3).
INST043.CDRStatus Legend
Battery
AC PowerGround Fault
Remote Annunciator
485 Comm. StatusSmoke PowerDialer
NAC Power
Printer/External Command Port
Status: (1=Fault)
ACp0 Bat0 MPw0 SPw0Gnd1 Ann0 Prn0 Dia0
Figure 4-3: General status screen
The general status screen in Figure 4-3 indicates a ground faultin the system. Table 4-4 lists the indications that appear on thegeneral status screen and the events they represent.
Table 4-4: General status legend
Indication Event
ACp Ac power
Gnd Ground fault
Bat Battery
Ann Remote annunciator
MPw NAC power
Prn Printer
Spw Smoke power
Dia Dialer
Press the ENTER switch again to reveal the loop status screens.

System service procedures
EST2 Installation and Service Manual 4.11
INST041.CDRCircuit ID
CommunicationsProgramming
Circuit ResetCircuit Ground Fault
Status LegendMapping in ProgressMap Fault
Balanced MapClass A Line Fault
Loop 1 status:1= flt/act, 0=ok/inact.Com0 Res0 Bal0 Mpg0Prg0 Gnd0 Lin0 Map1
Figure 4-4: Loop Status Screen
The loop status screen in (Figure 4-4) shows a map fault on theSDC connected to the Main Controller Module (loop 1). Thenext loop status screen displays the status of the SDC on theLoop Expander Module. Table 4-5 lists the indications thatappear on the loop status screen the events they represent.
Table 4-5: Loop status legend
Legend Cause
Com Communications fault between loop electronicsand Main Controller Module
Res SDC is resetting
BAL SDC is balanced
Mpg SDC is actively mapping
Prg Writing to Signature memory
Gnd Ground Fault on SDC
Lin Class A fault on SDC
Map Map fault on SDC
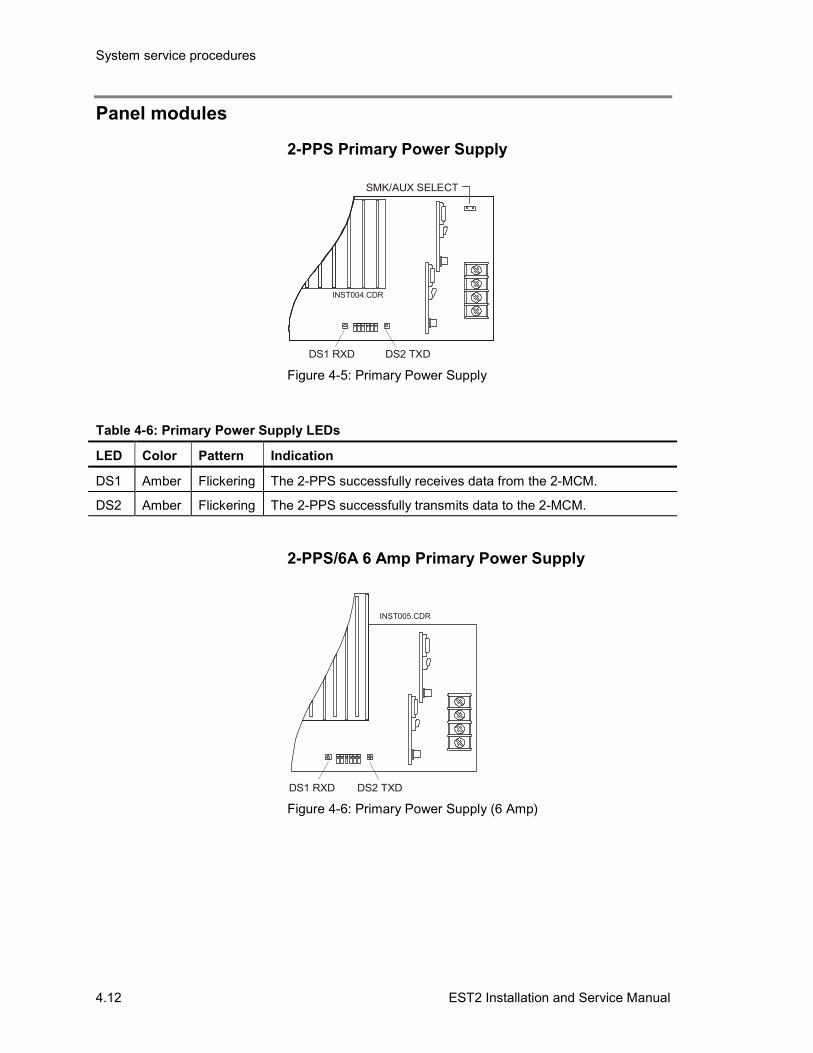
System service procedures
4.12 EST2 Installation and Service Manual
Panel modules
2-PPS Primary Power Supply
INST004.CDR
DS1 RXD DS2 TXD
SMK/AUX SELECT
Figure 4-5: Primary Power Supply
Table 4-6: Primary Power Supply LEDs
LED Color Pattern Indication
DS1 Amber Flickering The 2-PPS successfully receives data from the 2-MCM.
DS2 Amber Flickering The 2-PPS successfully transmits data to the 2-MCM.
2-PPS/6A 6 Amp Primary Power Supply
INST005.CDR
DS1 RXD DS2 TXD
Figure 4-6: Primary Power Supply (6 Amp)

System service procedures
EST2 Installation and Service Manual 4.13
Table 4-7: 6 Amp Primary Power Supply LEDs
LED Color Pattern Indication
DS1 Amber Flickering The 2-PPS/6A successfully receives data from the 2-MCM.
DS2 Amber Flickering The 2-PPS/6A successfully transmits data to the 2-MCM.
Table 4-8 lists the most common symptoms and causes ofprimary power supply problems.
Table 4-8: Primary power supply problems
Problem Cause(s)
RXD LED (DS1) off (Figure 4-5and Figure 4-6)
A communication failure from the 2-MCM, caused by a:
• Loose or defective ribbon cable*• Defective 2-MCM
*Check J1 on the 2-PPS(/6A) and the 2-MCM
TXD LED (DS2) off (Figure 4-5and Figure 4-6)
A communication failure from the 2-MCM, caused by a:
• Loose or defective ribbon cable*• Defective 2-PPS(/6A)
*Check J1 on the 2-PPS(/6A) and the 2-MCM
Voltage low at NAC PWR An excessive load is causing the 2-PPS(/6A) to fold back(3.6 A max).
Voltage low at SMK/AUX PWR An excessive load is causing the 2-PPS(/6A) to fold back(1 A max).
4-Wire smoke detectors will notreset
The SMK/AUX SELECT jumper is installed.
Batteries will not charge • The system is in the alarm mode.• The 7 Amp battery fuse (F2) is open.
System will not operate onbatteries
• The batteries are low.• The 7 Amp battery fuse (F2) is open.
Note: The system automatically turns off when batteries aretoo low to operate system.
System ground fault • Internal or field wiring is in contact with earth ground• The download computer is feeding ground to the panel.

System service procedures
4.14 EST2 Installation and Service Manual
SIGA-APS Auxiliary Power Supply
INST006.CDR
DS2 TXDDS1 RXD
Figure 4-7: Auxiliary Power Supply
Table 4-9: Auxiliary Power Supply LEDs
LED Color Pattern Indication
DS1 Amber Flickering The SIGA-APS Auxiliary Power Supply successfully receives datafrom the 2-AAC.
DS2 Amber Flickering The SIGA-APS successfully transmits data to the 2-AAC.
Table 4-10: Auxiliary power supply trouble conditions
Address Status Description
Low (1st zone) Open AC failure or battery loss
High (2nd zone) Open • NAC short• Internal fault• Ground fault
Table 4-11: Auxiliary power supply problems
Problem Cause(s)
DS1 and DS2 do not flash andthe SDC does not communicate.(See Figure 4-7 and Table 4-9.)
• Defective or poor connection on the SDC• The SIGA-APS does not appear as a supervisory
SIGA-CT2 in the database
No ac power to the APS
(See Table 4-10)
• The ac power is turned off.• The SIGA-APS is unplugged.• The ac power cord is not connected.
Voltage low at NAC1 or NAC2 An excessive load is causing the 2-PPS(/6A) to fold back(3.2 A max).
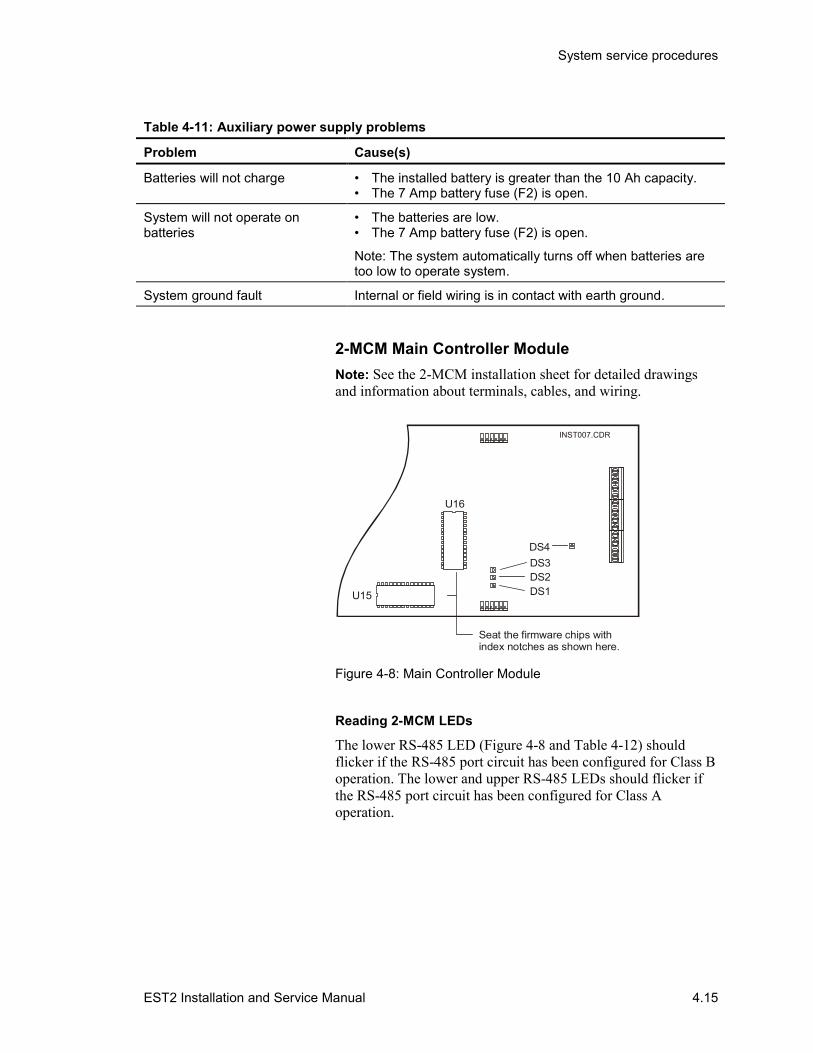
System service procedures
EST2 Installation and Service Manual 4.15
Table 4-11: Auxiliary power supply problems
Problem Cause(s)
Batteries will not charge • The installed battery is greater than the 10 Ah capacity.• The 7 Amp battery fuse (F2) is open.
System will not operate onbatteries
• The batteries are low.• The 7 Amp battery fuse (F2) is open.
Note: The system automatically turns off when batteries aretoo low to operate system.
System ground fault Internal or field wiring is in contact with earth ground.
2-MCM Main Controller ModuleNote: See the 2-MCM installation sheet for detailed drawingsand information about terminals, cables, and wiring.
Seat the firmware chips with index notches as shown here.
INST007.CDR
DS1DS2DS3DS4
U15
U16
Figure 4-8: Main Controller Module
Reading 2-MCM LEDs
The lower RS-485 LED (Figure 4-8 and Table 4-12) shouldflicker if the RS-485 port circuit has been configured for Class Boperation. The lower and upper RS-485 LEDs should flicker ifthe RS-485 port circuit has been configured for Class Aoperation.

System service procedures
4.16 EST2 Installation and Service Manual
Table 4-12: Main Controller Module LEDs
LED Color Pattern Indication
DS1 Green Flickering Internal communications normal
DS2 Green Flickering RS-485 TX1 active
DS3 Green Flickering RS-485 TX0 active
DS4 Green Flickering Signature data circuit (SDC) active
Replacing 2-MCM firmware chips
Caution: Remove ac and battery power before installing thechip. When handling the chips, observe all anti-staticprecautions.
The EPROM firmware chips (U15 and U16) may be replacedwith upgrade firmware revisions.
To replace U15 and U16:
1. Remove ac and battery power to the Main ControllerModule.
2. Ground yourself to prevent electrostatic discharge.
3. Note the position of the index notches on U15 and U16.
4. Remove the old firmware chips.
5. Take the upgrade chips out of the static-protective bag.
6. Seat the upgrade chips with index notches in the sameposition as the replaced firmware chips.
Substituting Main Controller Modules
You can substitute a dependable 2-MCM for a suspect 2-MCM,but the substitute 2-MCM requires a download from the 2-SDU.The substitute 2-MCM does not contain the original mapinformation, which it requires to watch the integrity of thesystem loop(s). See the 2-SDU Help for complete instructions onuploading and downloading to the 2-MCM.
2-LCX Expander Loop ModuleNote: See the 2-LCX installation sheet for detailed drawings andinformation about terminals, cables, and wiring.
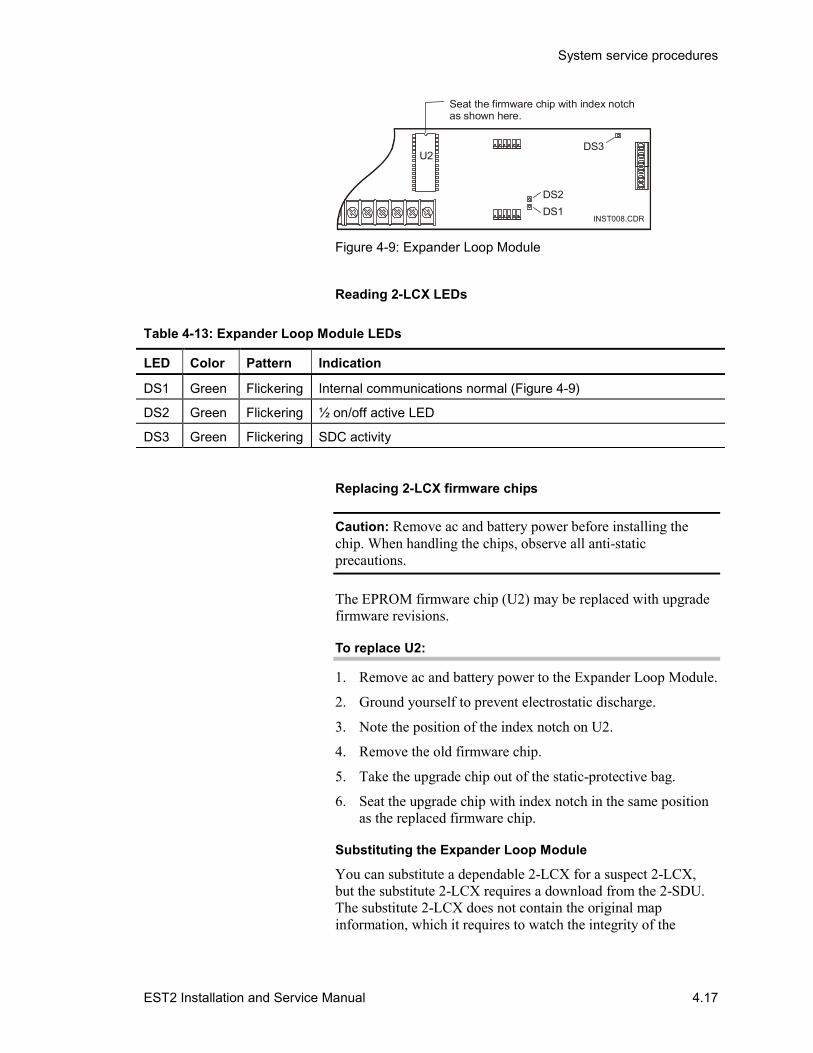
System service procedures
EST2 Installation and Service Manual 4.17
U2
DS1DS2
DS3
INST008.CDR
Seat the firmware chip with index notch as shown here.
Figure 4-9: Expander Loop Module
Reading 2-LCX LEDs
Table 4-13: Expander Loop Module LEDs
LED Color Pattern Indication
DS1 Green Flickering Internal communications normal (Figure 4-9)
DS2 Green Flickering ½ on/off active LED
DS3 Green Flickering SDC activity
Replacing 2-LCX firmware chips
Caution: Remove ac and battery power before installing thechip. When handling the chips, observe all anti-staticprecautions.
The EPROM firmware chip (U2) may be replaced with upgradefirmware revisions.
To replace U2:
1. Remove ac and battery power to the Expander Loop Module.
2. Ground yourself to prevent electrostatic discharge.
3. Note the position of the index notch on U2.
4. Remove the old firmware chip.
5. Take the upgrade chip out of the static-protective bag.
6. Seat the upgrade chip with index notch in the same positionas the replaced firmware chip.
Substituting the Expander Loop Module
You can substitute a dependable 2-LCX for a suspect 2-LCX,but the substitute 2-LCX requires a download from the 2-SDU.The substitute 2-LCX does not contain the original mapinformation, which it requires to watch the integrity of the

System service procedures
4.18 EST2 Installation and Service Manual
system loop(s). See the 2-SDU Help for complete instructions onuploading and downloading to the 2-LCX.
Table 4-14: 2-MCM/2-LCX problems
Problem Cause(s)
NAC open • Incorrect or missing EOL resistor• Miswired circuit or intermittent connections• Broken conductor
NAC shorted • A polarized device reversed on the circuit• A defective notification appliance• A miswired circuit
NAC ground fault • A pinched wire between device and electrical box• Nicked wire insulation
SDC open • Miswired circuit• Defective base• Broken conductor• Device not installed on the circuit• Class A configuration: circuit open
SDC shorted and the protection relaykeeps on cycling
• Miswired circuit• Defective base• Nicked insulation• Class A or B: circuit shorted
SDC ground fault • Pinched wire• Nicked insulation• Class A: one or both of the two circuits has a fault
RS-232 port inoperative (2-MCM only) • TXD and RXD wires reversed• Improper baud rate on the peripheral device• Off-line or improperly configured peripheral device
RS-485 port inoperative (2-MCM only) • Positive and negative wires reversed• Improper circuit termination• Crossed channel 0 and Channel 1 circuits• Improper wire type
2-LCD Display ModuleNote: See the 2-LCD installation sheet for detailed drawings andinformation about terminals, cables, and wiring.
System service procedures
EST2 Installation and Service Manual 4.19
Table 4-15: 2-LCD problems
Problem Cause(s)
The Power LED is off,no characters appearon the display, and theswitches do not work.
• No power to the panel• Loose or defective ribbon cable between the 2-MCM and the
2-PPS(/6A)• Loose or defective ribbon cable between the 2-LCD and the
2-MCM• Defective 2-LCD• Defective 2-MCM
LED/Switch ModulesNote: See the LED/Switch module installation sheet for detaileddrawings and information about terminals, cables, and wiring.
Table 4-16: LED/switch module problems
Problem Possible Cause(s)
The module LEDs, themodule switches, andthe 2-LCD areinoperative.
• No power to the panel• Loose or defective ribbon cable between the 2-MCM and the
2-PPS(/6A)• Loose or defective ribbon cable between the 2-LCD and the 2-MCM• Loose or defective ribbon cable between the 2-LCD and the
LED/Switch modules• Defective 2-LCD• Defective 2-MCM
The 2-LCD works, butthe LED/Switchmodules do not work.
• Loose or defective ribbon cable between the 2-LCD and the LED/Switch modules
• Incorrect setting of the module address switch• LED/switch module(s) not defined in the 2-SDU• Defective LED/switch module
Module 1 acts likemodule 2 and module2 acts like module 1.
Module 1's address switches were set to the module 2's address.Module 2's address switches were set to the module 1's address.
DL2 DialerNote: See the DL2 installation sheet for detailed drawings andinformation about terminals, cables, and wiring.
Verify the following for the DL2:
• Incoming receiver phone numbers for the CMS• Site ID (account) codes• Proper entry of all information into the dialer
Central Monitoring Station(CMS)
System service procedures
4.20 EST2 Installation and Service Manual
To verify information:
1. Press the “*” key and enter the respective programming itemnumber into the dialer using the programming phone.
2. Press the “#” key.
The phone will sound out the programming item’s contents. Seethe DL2 installation sheet for more information (P/N387132).
Table 4-17: DL2 Dialer trouble conditions
Problem Possible Cause
Status LED: single amber flash • Phone Line problems: jack miswired• Cable between dialer and wall jack open or shorted• Telco line problems
Status LED: double amber flash • Disconnect switch activated• Module not completely programmed• Awaiting entry of 24-hour test offset in programming
mode
Dialer not communicating with theCMS
• Incorrect phone numbers entered in the dialer• Incorrect site ID (account) numbers entered in the dialer• 2-MCM not configured for dialer• Long distance prefix (1) not entered in phone number*• Incompatible receiver
*The long distance prefix is not always required.
Garbage signal received at theCMS
• Incorrect protocol selected at receiver• Defective dialer module
Telephone line problems • Loop start line not furnished• Line wired through PBX board• Line voltage less than 10 Vdc• T-tap on phone line before RJ31X jack• Dialer not wired to seize line upon operation
CDR-3 CoderNote: See the CDR-3 installation sheet for detailed drawings andinformation about terminals, cables, and wiring.
The Coder trouble contacts close approximately 3 minutes after aCPU failure or a loss of RS-232 communications. The temporaloutput on TB1-1 and 2 delivers a continuous tone. Table 4-18 liststhe CDR-3 LEDs and the their indications.

System service procedures
EST2 Installation and Service Manual 4.21
Table 4-18: CDR-3 LED Indications
LED Color Description
D1 Red Bell code relay active
D2 Red Temporal relay active
D3 Red Duration relay active
D5 Yellow Module trouble
D8 Green Power on
2-AAC Audio Controller ModuleNote: See the 2-AAC installation sheet for detailed drawings andinformation about terminals, cables, and wiring.
Table 4-19 lists the 2-AAC fault messages that may appear onthe 2-LCD.
Table 4-19: 2-AAC troubles
Problem Link Possible Cause
4110: 2-AAC pre-amp Ch 1 output • Pre-amp output wiring open, shorted, or incorrect• Incorrect or missing EOL resistor
4111: 2-AAC pre-amp Ch 2 output • Pre-amp output wiring open, shorted, or incorrect• Incorrect or missing EOL resistor
4114: Channel 1 is not functioningproperly.
• Incorrect output wiring• Incorrect or missing EOL resistor• Incorrect setting of dip switches S1 or S2• Incorrect programming of Ch 1
4115: Channel 2 is not functioningproperly.
• Incorrect output wiring• Incorrect or missing EOL resistor• Incorrect setting of dip switches S3 or S4• Incorrect programming of Ch 2
4197: The 2-AAC is unresponsive. DS1is not flashing
• Incorrect RS-485 wiring at TB1• Incorrect database definition for the 2-AAC*• Power/data cable on J2 loose
*Program the 2-AAC as an audio panel at address 41.
Auxiliary 1 input not functioning properly • Incorrect programming for output 4119• Auxiliary source level too low (below 1 Vrms)• Incorrect wiring at the auxiliary input (TB4)
Auxiliary 2 input not functioning properly • Incorrect programming of output 4121• Auxiliary source level too low (below 1 Vrms)• Incorrect wiring at the auxiliary input (TB4)
Incorrect EVAC and Alert tones • Incorrect setting of switches S1 or S3• EVAC and Alert input or output wiring switched

System service procedures
4.22 EST2 Installation and Service Manual
Table 4-19: 2-AAC troubles
Problem Link Possible Cause
No pre-announce tone Dip switches S2 and/or S4 not set to mode 4
The supervisory tone pulses when thesystem is inactive, and does not detectmissing EOL resistors.
Dip switches S2 and/or S4 set to mode 5
Low output level • Driving in excess of 15 amplifiers per channel• Short on riser wiring or incorrect EOL value
2-MIC MicrophoneNote: See the 2-MIC installation sheet for detailed drawings andinformation about terminals, cables, and wiring.
The 2-MIC requires the 2-AAC for operation. Table 4-20 liststhe possible causes of a 4112 error on the 2-LCD.
Table 4-20: 2-MIC troubles
Problem Cause(s)
4112: 2-MIC trouble • Loose or defective ribbon cable*• Loose or open microphone connection to J2• Defective 2-MIC• Paging switch pressed in standby condition• Incorrect setting of mode 6 on the 2-AAC
*Check J1 on the 2-MIC and J1 on the 2-AAC.
2-TEL Firefighter TelephoneNote: See the 2-TEL installation sheet for detailed drawings andinformation about terminals, cables, and wiring.
Table 4-21: 2-TEL problems
Problem Cause(s)
4113: 2-TEL trouble • Improper seating of the 2-TEL option board on the 2-AAC• Loose or defective modular cable*• Defective 2-TEL• Defective 2-TEL option board• Open telephone riser wiring• Missing or wrong value EOL resistor on telephone riser• Incorrect setting of phone supervision jumper
*Check the RJ45 connector on the 2-TEL and J2 on the 2-TELoption board.

System service procedures
EST2 Installation and Service Manual 4.23
SIGA-AAXX amplifiersNote: See the SIGA-AAXX installation sheet for detaileddrawings and information about terminals, cables, and wiring.
INST012.CDR
DS5DS4
R116 (Amplifier gain adjustment) DS3
DS1
DS2
TB6JP225 V
70 V
Figure 4-10: SIGA-AA30 or SIGA-AA50 Audio Amplifier
Reading LEDs
Table 4-22: SIGA-AAXX LEDs
LED Color Pattern Indication
DS1 Green Steady Power amp disabled (Figure 4-10)
DS2 Yellow Steady Backup mode)
DS3 Green Steady Amplifier active
DS4 Green Flashing Normal communications (daughterboard)
DS5 Red Flashing Active condition (daughterboard)
Adjusting amplifier gain
To adjust the amplifier gain:
1. Connect the amplifier to the speaker load.
2. Connect 1 Vrms, 1 kHz tone to the amplifier input.
3. Set JP2 for 25 Vrms or 70 Vrms.
4. Adjust R116 to 25 Vrms or 70 Vrms (Figure 4-10).
If you use an oscilloscope to adjust levels, set it to the followingpeak-to-peak voltage levels:
• 25 Vrms: 71 Vpp• 70 Vrms: 200 Vpp
Note: The amplifier must be connected to a load to adjust it forthe proper gain. If the actual speaker circuit cannot be used, useTable 4-23 to construct a dummy load. The wattage rating of the

System service procedures
4.24 EST2 Installation and Service Manual
dummy load must exceed the output power rating of theamplifier.
Caution: Do not operate the amplifier with the speaker circuitand the dummy load connected at the same time.
Table 4-23: Amplifier Dummy Load Values
Output Power 25 Vrms Output 70 Vrms Output
30 Watts 20.8 Ω @ 30W 163.3 Ω @ 30 W
50 Watts 12.5 Ω @ 50W 98.0 Ω @ 50 W
To keep the amplifier out of trouble during the gainadjustment:
1. Connect a 47 kΩ EOL resistor across the NAC B output.
2. Connect the dummy load to the NAC A output.
Troubleshooting the amplifiers
Table 4-24 lists some common problems on the SIGA-AAXXamplifiers and provides some of the causes.
Table 4-24: Audio amplifier troubleshooting
Problem Cause(s)
No output • 24 Vdc power or input signal missing• Incorrect wiring of output circuits• Improper seating of Daughterboard• Incorrect database definition for the amplifier• In backup mode with backup amplifier/wiring problem• Incorrectly programming of branch circuits• Inoperative branch circuit control modules
Backup 1 kHz tone sounding Incorrect or missing input wiring
Low output • 70 Vrms speakers with 25 Vrms jumper setting• Overloaded circuit*• Gain setting on R116 too low
*Too many SIGA-CC1s and SIGA-CC2s will cause theamplifier to shut down.

System service procedures
EST2 Installation and Service Manual 4.25
Remote alphanumeric annunciatorsNote: See the applicable installation sheets of the remotealphanumeric annunciators for detailed drawings andinformation about terminals, cables, and wiring.
The remote alphanumeric annunciators include the followingmodels:
• 2-CMDN(-C)• 2-SMDN(-C)• 2-LSRA(-C)
Troubleshooting remote alphanumeric annunciators
Table 4-25 lists problems common to all of the remotealphanumeric annunciators. The table also lists problems uniqueto each class of annunciator.
Table 4-25: Remote alphanumeric annunciator problems
Common problems Possible cause(s)
Point is displayed without a message • No message for the point in the database• Routing set to all messages
No message when change of stateinitiated
Incorrect setting of the display filter
Incorrect header type but correctmessage
Wrong type selected for message
LCD display’s internal databasecorrupted
Download process interrupted
2-CMDN(-C) and 2-SMDN(-C) Possible cause(s)
Display indicates a fault at the controlpanel
• Mismatched baud rate• Faulty connection• Improper wiring
Front panel switches inoperative • Key switch in disable position• Improper programming of the key switch filter
2-LSRA(-C) Possible cause(s)
Garbled characters on the display Mismatched baud rate
Front panel switches inoperative • Key switch in disable position• Improper programming of the key switch filter• Password not entered

System service procedures
4.26 EST2 Installation and Service Manual
Printers
PT-1S(-220) form printerNote: See the Microline 182 Turbo Printer Handbook, byOkidata, for detailed technical information about the PT-1S(-220). The handbook comes with the printer. See the 2-MCMinstallation sheet for wiring the form printer to the MainController Module.
RSAN-PRT strip printerNote: See the RSAN-PRT (Strip Printer) installation sheet fordetailed drawings and information about terminals, cables,FCOM cards, jumper settings, and wiring.
Table 4-26: Strip printer problems
Problem Possible cause
Gibberish from printer • Printer baud rate does not match the source’s baud rate• Printer not defined as a strip printer in the 2-SDU• Paper jammed in the printer
Printer not working at all • Printer out of paper• 24 Vdc off• FCOM card incorrectly installed/wired• FCOM jumpers incorrectly set
Paper Out LED on • Out of paper• Paper Out sensor out of adjustment
Trouble LED on • Internal printer trouble• Trouble on a printer downline• Trouble on a communications circuit
Light printing Old ribbon
Paper take-up reel inoperative Take-up reel On/Off switch (top of take-up reel frame) in theoff position

System service procedures
EST2 Installation and Service Manual 4.27
Cleaning detectorsSignature series detectors require periodic cleaning to ensurereliable performance. The Detector Cleaning Tool, with aconventional vacuum cleaner, provides the means for cleaningthe detectors. The tool creates a high velocity vortex scrubbingaction around the detector to remove loose dust and debris.
Caution: Disable the detector before you clean it to avoid falsealarms.
To clean a Signature series detector:
1. At the 2-LCD, disable the detector to prevent false alarms.
2. Vacuum cobwebs and other loose objects from theimmediate area of the detector.
3. Install the Detector Cleaning Tool on the vacuum hose(Figure 4-11).
4. Place the Detector Cleaning Tool over the detector head forapproximately 1 minute.
5. When the detector is clean, restore it to proper operation.
6. At the 2-LCD, check the detector’s sensitivity to verify thatit is clean.
Note: See the System Operations Manual for instructions onchecking detectors sensitivity level.
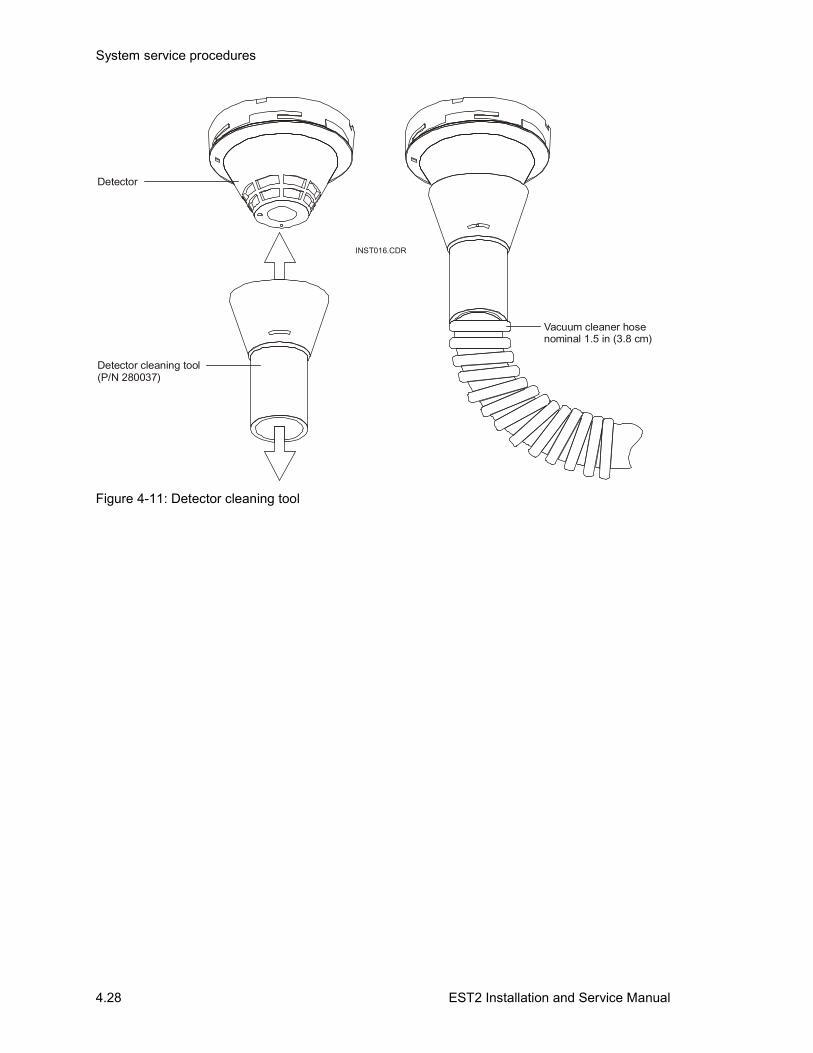
System service procedures
4.28 EST2 Installation and Service Manual
Detector
Detector cleaning tool(P/N 280037)
Vacuum cleaner hosenominal 1.5 in (3.8 cm)
INST016.CDR
Figure 4-11: Detector cleaning tool

System service procedures
EST2 Installation and Service Manual 4.29
Fire alarm trouble and maintenance log
Date Time Event Initials

System service procedures
4.30 EST2 Installation and Service Manual
EST2 Installation and Service Manual 5.1
Chapter 5 Isolating trouble conditions
Summary
Chapter 5 discusses the procedures for isolating several troubleconditions.
ContentIsolating device faults • 5.2
Isolating open circuits • 5.2Isolating short circuits • 5.4Isolating ground faults • 5.5
Signature device problems • 5.7Signature device LEDs • 5.7Detectors • 5.7Modules • 5.8
Mapping errors • 5.9

Isolating trouble conditions
5.2 EST2 Installation and Service Manual
Isolating device faultsMethods for isolating Signature device faults differ according tothe problem. Still, some tools may prove helpful in manysituations. An accurate and complete wiring diagram of theSignature data circuit (SDC) will prove useful in allcircumstances. The 2-SDU features a mapping tool, whichprovides valuable information about the condition of each circuitand its devices. You can read about the mapping tool in the2-SDU help. Your own documentation is another useful tool.Document your maintenance activities and make the recordsavailable. If you know the last thing that happened to a device orthe system, you may not have to spend a lot of time isolating aproblem.
Isolating open circuitsThe most common electrical problems with fire alarm systemsare open circuits, short circuits, and ground faults (Figure 5-2).An open circuit disrupts communications on the SDC.Consequently, the 2-LCD will report an open circuit as acommunications fault (Figure 5-1).
Current Time
Messages waiting
Event time
Device addressFaultMessage
02:49:07 MW020 @02:41Comm. Fault
SMK_FLR_4,
RM_423North Corridor
INST046.CDR
0116
Figure 5-1: 2-LCD message for an open condition
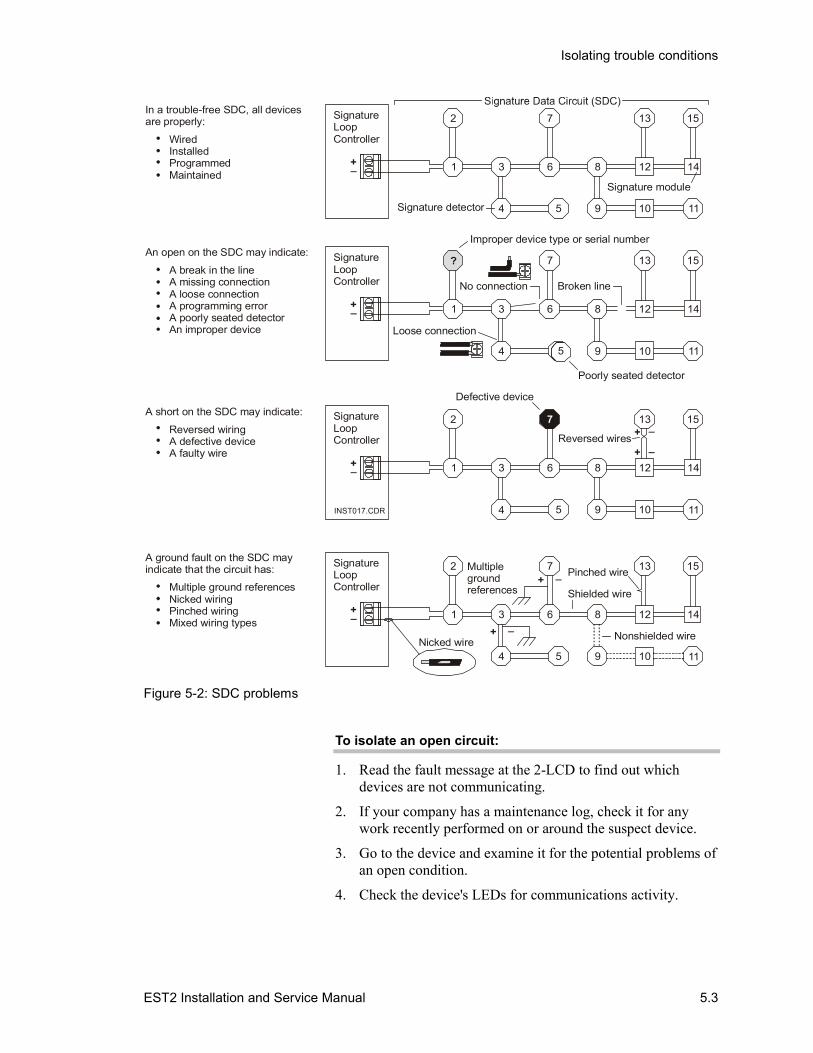
Isolating trouble conditions
EST2 Installation and Service Manual 5.3
1
1
1
1
6
6
6
6
11
11
11
11
2
2
2
?
7
7
7
7
12
12
12
12
3
3
3
3
8
8
8
8
13
13
13
13
4
4
4
4
9
9
9
9
14
14
14
14
5
5
10
10
10
10
15
15
15
15
+
++
+
+
+
+
+
_
_
_
_
_
_
_
_
Signature detector
SignatureLoopController
SignatureLoopController
SignatureLoopController
SignatureLoopController
Signature module
No connection
Improper device type or serial number
Loose connection
Poorly seated detector
Broken line
Nonshielded wire
Shielded wire
Pinched wire
Defective device
Reversed wires
Nicked wire
Multiplegroundreferences
In a trouble-free SDC, all devices are properly:
WiredInstalledProgrammedMaintained
An open on the SDC may indicate:A break in the lineA missing connectionA loose connectionA programming errorA poorly seated detectorAn improper device
A short on the SDC may indicate:Reversed wiringA defective deviceA faulty wire
A ground fault on the SDC may indicate that the circuit has:
Multiple ground referencesNicked wiringPinched wiringMixed wiring types
5
5
INST017.CDR
Figure 5-2: SDC problems
To isolate an open circuit:
1. Read the fault message at the 2-LCD to find out whichdevices are not communicating.
2. If your company has a maintenance log, check it for anywork recently performed on or around the suspect device.
3. Go to the device and examine it for the potential problems ofan open condition.
4. Check the device's LEDs for communications activity.

Isolating trouble conditions
5.4 EST2 Installation and Service Manual
5. Check the serial number of the device against the serialnumber entered in the Serial Number Log Book.
6. Check the 2-SDU for other programming information aboutthe device to see if it matches the one in trouble.
Isolating short circuitsThe 2-LCD reports a short circuit as a device/line fault because itmay arise from a problem with the line or the device (Figure5-3).
Current Time
Messages waiting
Event time
Fault codeFault
Message
12:49:07 MW036 @12:41
Dev./line Fault
Loop 2 wiring
INST047.CDR
0020
Figure 5-3: 2-LCD message for a short circuit
The 2-LCD also reports communications faults for every deviceon the SDC. Listen for the constant clicking of a relay on theprimary power supply, which frequently accompanies a shortcircuit.
Isolating a short circuit requires more patience than isolating anopen circuit. The 2-LCD provides indications of a short circuit,but you may have to isolate portions of the circuit to find thecause.
To isolate a short circuit:
1. Look for a device/line fault and several communicationfaults on the 2-LCD.
2. Listen for a clicking relay at the Primary Power Supply.
3. If your company has a maintenance log, check it for anywork recently performed on or around the suspect device.
4. Isolate portions of the SDC to locate the cause (Figure 5-4).
5. Investigate the problem area for potential wiring or devicefaults.

Isolating trouble conditions
EST2 Installation and Service Manual 5.5
1
1
1
6
6
6
11
11
11
2
2
2
7
7
7
12
12
12
3
3
3
8
8
8
13
13
13
4
4
4
9
9
9
14
14
14
5
5
5
10
10
10
15
15
15
+
+
+
_
_
_
SignatureLoopController
SignatureLoopController
SignatureLoopController
Isolate a portion of the Signature Data Circuit (SDC).
Isolate devices electrically further if the isolation restored communications to the SDC.
Isolate electrically closer devices if communications were not restored to the first half of the SDC.
INST018.CDR
Figure 5-4: Typical isolation procedure
Isolating ground faultsA ground fault occurs when a device or a line has more than oneground reference. The 2-LCD indicates a ground fault conditionfor the system and communication faults for every device on theaffected SDC (Figure 5-5).
Current Time
Messages waiting
Event time
Fault codeFault
Message
22:16:07 MW036 @22:13
Ground Fault
System Ground
INST049.CDR
0005
Figure 5-5: 2-LCD message for a ground fault
As with short circuits, the cause of a ground fault may proveelusive. The isolation procedure for short circuits also applies toground faults.
Isolating trouble conditions
5.6 EST2 Installation and Service Manual
To isolate a ground fault:
1. Look for a ground fault and several communication faults onthe 2-LCD.
3. If your company has a maintenance log, check it for anywork recently performed on or around the suspect device.
4. Isolate portions of the SDC to locate the cause (Figure 5-4).
5. Investigate the problem area for potential wiring or devicefaults.

Isolating trouble conditions
EST2 Installation and Service Manual 5.7
Signature device problems
Signature device LEDsSignature series detectors and modules feature LEDs thatindicate the status of the device. Table 5-1 provides a descriptionfor each LED color and pattern.
Table 5-1: Signature device LEDs
LED Device status
Green flashing Normal communications
No flashing No communications
Red flashing Alarm/Active(either input of dual input modules)
Red and green steady Standalone Alarm/Active (either input of dual input modules)
Detectors
Incorrect response
A detector may exhibit an incorrect response for the followingreasons:
• Incorrect detector address• Detector not in database• Incorrect programming of device responses
Trouble condition
A detector may cause a trouble condition for the followingreasons:
• Missing or incorrectly wired• Not in the database• Ground fault• Internal fault
Nuisance alarms
A detector may cause nuisance alarms or active conditions underthe following conditions:
• Extremely high airflow*• High ambient smoke• Defective detector
*High airflow affects ionization detectors.

Isolating trouble conditions
5.8 EST2 Installation and Service Manual
Modules
Incorrect response
A module may exhibit an incorrect response for the followingreasons:
• Wrong location• Incorrect address• Missing from the database• Wrong personality code• Ground fault on the SDC or negative side of the input/output
Incorrect module responses may also originate from issuesspecific to personality codes. For example, modules with:
• Personality codes 1, 2, 3, 4, 8, 13, 14, 16, and 18 will notaccept a personality code other than zero (0) for an unusedmodule address.
• Personality code 8 will cause problems for the wrong settingof setting of the jumper on dual channel modules.
• Personality codes 13, 14, 18, 20, and 21 will have problemsif 24 Vdc for smoke power low or missing.
• Personality codes 1, 2, 3, and 4 will have problems if inputs1 and 2 are swapped.
• Personality code 7 will fail if signal sources 1 and 2 areswapped.
Trouble condition
A module may cause a trouble condition on the host controllerunder the following circumstances
• Wrong location• Incorrect address• Missing from the database• Ground fault on the SDC or negative side of the input/output• Output circuit open, short, or incorrectly wired• Polarized device installed in reverse
Note: An incorrect or missing EOL will also cause modules withpersonality codes 1, 2, 3, 4, 7, 13, 14, 16, 18, 20, and 21 toindicate a trouble condition to the host controller.
Nuisance alarm
A module may cause nuisance alarms or active conditions if the:
• Initiating device has a short circuit• Initiating device was installed wrong• EOL resistor value is too low
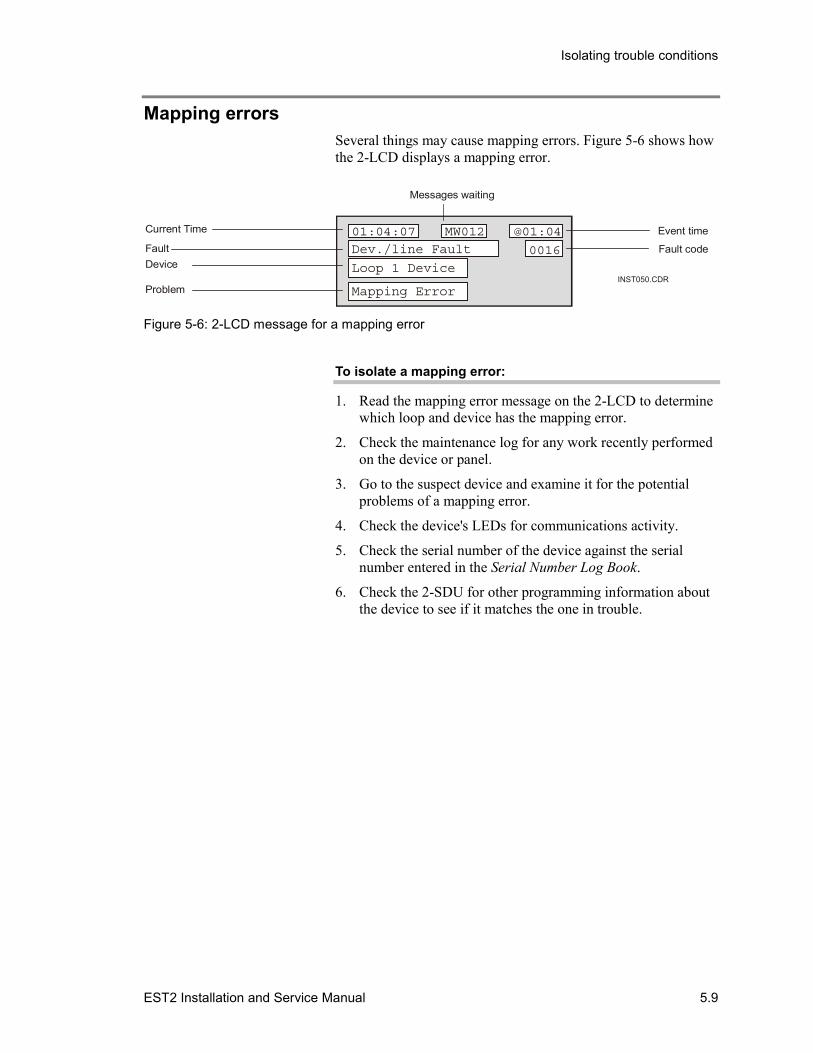
Isolating trouble conditions
EST2 Installation and Service Manual 5.9
Mapping errorsSeveral things may cause mapping errors. Figure 5-6 shows howthe 2-LCD displays a mapping error.
Current Time
Messages waiting
Event time
Fault codeFault
Problem
Device
01:04:07 MW012 @01:04
Dev./line Fault
Mapping Error
Loop 1 DeviceINST050.CDR
0016
Figure 5-6: 2-LCD message for a mapping error
To isolate a mapping error:
1. Read the mapping error message on the 2-LCD to determinewhich loop and device has the mapping error.
2. Check the maintenance log for any work recently performedon the device or panel.
3. Go to the suspect device and examine it for the potentialproblems of a mapping error.
4. Check the device's LEDs for communications activity.
5. Check the serial number of the device against the serialnumber entered in the Serial Number Log Book.
6. Check the 2-SDU for other programming information aboutthe device to see if it matches the one in trouble.

Isolating trouble conditions
5.10 EST2 Installation and Service Manual
Table 5-2: Mapping errors
Problem Cause(s)
Mapping error • Conflicts between actual and expected data*• Loose or defective ribbon cable**• Device ID entered incorrectly into database• More than 63 T-taps on an SDC• Excessive circuit resistance• Excessive circuit capacitance
*The 2-MCM's internal map does not reflect the devices actuallyinstalled on the SDC (serial number, personality code, or devicetype).
**Check J5 on the 2-MCM and J3 on the 2-LCX.
System continues to re-mapdata circuit
• An intermittent connection*• A defective device or detector base
*The intermittent connection will cause one or more devices toloose then re-establish communication with the 2-LCX.
Device type error A discrepancy between the device type recorded on the2-MCM or 2-LCX internal map and the device installed on theSDC
EST2 Installation and Service Manual A.1
Appendix A Compatibility listings
Summary
Appendix B presents compatibility lists for the EST2 system.
ContentUnderwriters Laboratories, Incorporated (ULI) • A.2
Controllers and initiating devices • A.2Notification appliances • A.3System accessories • A.7
Underwriters Laboratories of Canada (ULC) • A.9Controllers and initiating devices • A.9Notification appliances • A.10System accessories • A.15
Circuit compatibility listings • A.16Circuit compatibility matrix • A.16Circuit specifications • A.17Recommended cable manufacturers • A.18

Compatibility listings
A.2 EST2 Installation and Service Manual
Underwriters Laboratories, Incorporated (ULI)
Controllers and initiating devicesLoop controllers include the 2-MCM and the 2-LCX.
Table A-1: ULI panel compatibility for loop controllers and Signature Series devices
Model Description Devices (1)
SIGA-IS (2) Ionization smoke detector 96
SIGA-PS (2) Photoelectric smoke detector 96
SIGA-PHS (2) Combination photoelectric smoke and fixed temperaturedetector
96
SIGA-IPHS (2) Combination ionization, photoelectric smoke, and fixedtemperature detector
96
SIGA-HFS (2) Fixed temperature detector 96
SIGA-HFS (2) Combination fixed temperature and rate-of-rise heat detector 96
SIGA-IM Isolator module 96
SIGA-AA30 Audio amplifier, 30 Watt 47
SIGA-AA50 Audio amplifier, 50 Watt 47
SIGA-APS Auxiliary power supply 47
SIGA-CC1 Single input signal module 94
SIGA-CC2 Dual input signal module 47
SIGA-CT1 Single input module 94
SIGA-CT2 Dual input module 47
SIGA-CR Control relay module 94
SIGA-CRR Control reversing relay module 94
SIGA-MM1 Monitor module 94
SIGA-WTM Waterflow/tamper module 47
SIGA-UM Universal module 47
SIGA-MDM Signature digital message module 47
Notes(1) Maximum number of devices per Signature data circuit (SDC)
(2) Includes SB(4), RB(4), IB(4), and AB(4) detector bases

Compatibility listings
EST2 Installation and Service Manual A.3
Notification appliances
Table A-2: ULI compatible notification appliances
Model Description
202-3A-T Strobe, self-synchronized
202-3A-TW Strobe, self-synchronized
202-5A-T Strobe, self-synchronized
202-5A-TW Strobe, self-synchronized
202-6A-T Strobe, self-synchronized
202-6A-TW Strobe, self-synchronized
202-7A-T Strobe, self-synchronized
202-7A-TW Strobe, self-synchronized
202-8A-T Strobe, self-synchronized
202-8A-TW Strobe, self-synchronized
323D-10AW AdaptaBel, single-stroke
323D-10AW-R AdaptaBel, single-stroke
329D-AW Chime with diode
403-3A-R Bell/strobe Plate
403-5A-R Bell/strobe Plate
403-7A-R Bell/strobe Plate
403-8A-R Bell/strobe Plate
405-3A-R Strobe, self-synchronized
405-5A-R Strobe, self-synchronized
405-7A-R Strobe, self-synchronized
405-8A-R Strobe, self-synchronized
405-6A-T Strobe, self-synchronized
405-6A-TW Strobe, self-synchronized
405-7A-T Strobe, self-synchronized
405-7A-TW Strobe, self-synchronized
405-8A-T Strobe, self-synchronized
405-8A-TW Strobe, self-synchronized
439D-6AW Bell, vibrating
439D-6AW-R Bell, vibrating
439D-10AW Bell, vibrating
439D-10AW-R Bell, vibrating

Compatibility listings
A.4 EST2 Installation and Service Manual
Table A-2: ULI compatible notification appliances
Model Description
439DEX-6AW Bell, explosion-proof
439DEX-8AW Bell, explosion-proof
439DEX-10AW Bell, explosion-proof
5520D-AW Horn/siren, duotronic, diode-polarized
5522D-AW Horn, explosion-proof duotronic
5523D-AW Siren, explosion-proof duotronic
5524D-AW Horn, explosion-proof duotronic
5525D-AW Siren, explosion-proof duotronic
5530BD-AW Signal, electronic, multi-tone
5533BD-AW Signal, electronic, multi-tone, explosion-proof
5534BD-AW Signal, electronic, multi-tone, explosion-proof
682-1A-HR Mini-horn
682-1A-HW Mini-horn
692-5A-HSR Mini-horn/strobe
692-5A-HSW Mini-horn/strobe
692-7A-HSR Mini-horn/strobe
692-7A-HSW Mini-horn/strobe
692-8A-HSR Mini-horn/strobe
692-8A-HSW Mini-horn/strobe
757-1A-C Chime
757-1A-CW Chime, white
757-1A-R25 Speaker, re-entrant type
757-1A-R25W Speaker, re-entrant type
757-1A-R70 Speaker, re-entrant type
757-1A-R70W Speaker, re-entrant type
757-1A-S25 Speaker, cone-type
757-1A-S25W Speaker, cone-type
757-1A-S70 Speaker, cone-type
757-1A-S70W Speaker, cone-type
757-1A-T Horn, temporal, self-synchronized
757-1A-TW Horn, temporal, self-synchronized
757-3A-CS Chime/strobe
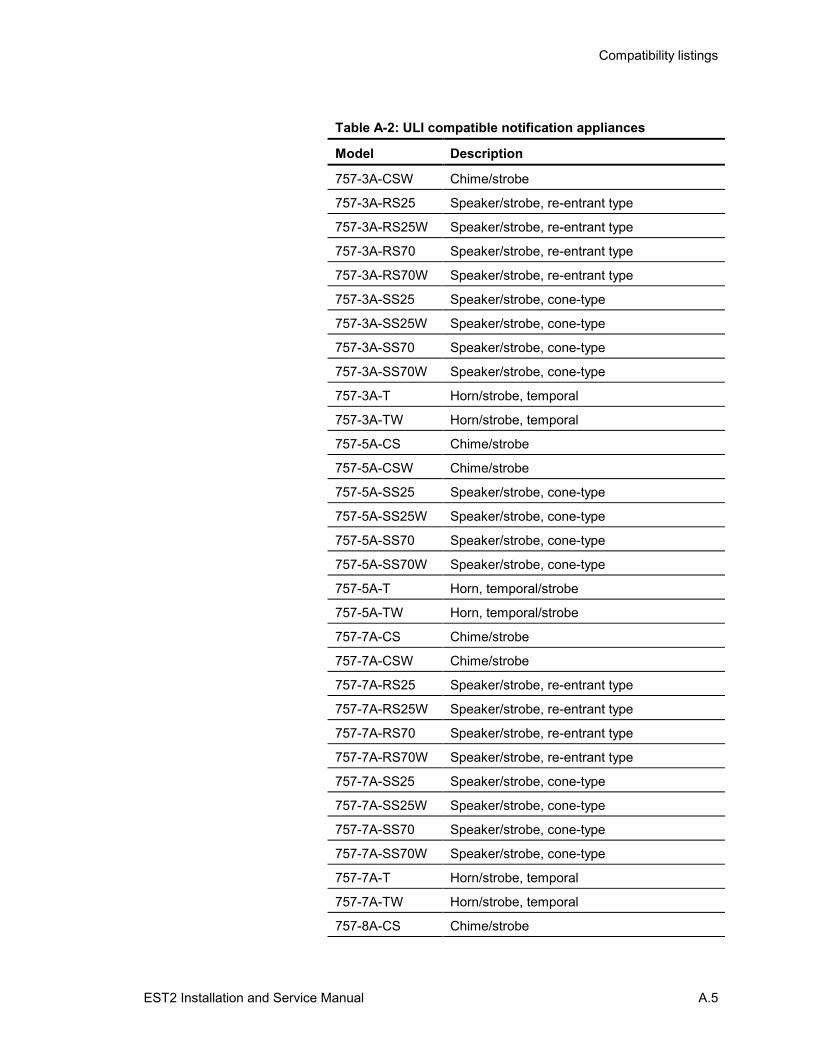
Compatibility listings
EST2 Installation and Service Manual A.5
Table A-2: ULI compatible notification appliances
Model Description
757-3A-CSW Chime/strobe
757-3A-RS25 Speaker/strobe, re-entrant type
757-3A-RS25W Speaker/strobe, re-entrant type
757-3A-RS70 Speaker/strobe, re-entrant type
757-3A-RS70W Speaker/strobe, re-entrant type
757-3A-SS25 Speaker/strobe, cone-type
757-3A-SS25W Speaker/strobe, cone-type
757-3A-SS70 Speaker/strobe, cone-type
757-3A-SS70W Speaker/strobe, cone-type
757-3A-T Horn/strobe, temporal
757-3A-TW Horn/strobe, temporal
757-5A-CS Chime/strobe
757-5A-CSW Chime/strobe
757-5A-SS25 Speaker/strobe, cone-type
757-5A-SS25W Speaker/strobe, cone-type
757-5A-SS70 Speaker/strobe, cone-type
757-5A-SS70W Speaker/strobe, cone-type
757-5A-T Horn, temporal/strobe
757-5A-TW Horn, temporal/strobe
757-7A-CS Chime/strobe
757-7A-CSW Chime/strobe
757-7A-RS25 Speaker/strobe, re-entrant type
757-7A-RS25W Speaker/strobe, re-entrant type
757-7A-RS70 Speaker/strobe, re-entrant type
757-7A-RS70W Speaker/strobe, re-entrant type
757-7A-SS25 Speaker/strobe, cone-type
757-7A-SS25W Speaker/strobe, cone-type
757-7A-SS70 Speaker/strobe, cone-type
757-7A-SS70W Speaker/strobe, cone-type
757-7A-T Horn/strobe, temporal
757-7A-TW Horn/strobe, temporal
757-8A-CS Chime/strobe

Compatibility listings
A.6 EST2 Installation and Service Manual
Table A-2: ULI compatible notification appliances
Model Description
757-8A-CSW Chime/strobe
757-8A-RS25 Speaker/strobe, re-entrant type
757-8A-RS25W Speaker/strobe, re-entrant type
757-8A-RS70 Speaker/strobe, re-entrant type
757-8A-RS70W Speaker/strobe, re-entrant type
757-8A-SS25 Speaker/strobe, cone-type
757-8A-SS25W Speaker/strobe, cone-type
757-8A-SS70 Speaker/strobe, cone-type
757-8A-SS70W Speaker/strobe, cone-type
757-8A-T Horn/strobe, temporal
757-8A-TW Horn/strobe, temporal
889D-AW Horn, explosion-proof, diode-polarized
890RDA Lamp station, supervised
890RDB-G5 Lamp station, supervised
890WDA-G5 Lamp station, supervised
890WDB-G5 Lamp station, supervised
964-1A-4RR Cone speaker
964-1A-4RW Cone speaker
964-1A-8RW Cone speaker
964-1A-8SW Cone speaker
964-5A-4RR Cone speaker
964-5A-4RW Cone speaker
964-5A-8RW Cone speaker
964-5A-8SW Cone speaker
964-7A-4RR Cone speaker
964-7A-4RW Cone speaker
964-7A-8RW Cone speaker
964-7A-8SW Cone speaker
964-8A-4RR Cone speaker
964-8A-4RW Cone speaker
964-8A-8RW Cone speaker
964-8A-8SW Cone speaker

Compatibility listings
EST2 Installation and Service Manual A.7
Table A-2: ULI compatible notification appliances
Model Description
965-1A-4RR Speaker/strobe
965-1A-4RW Speaker/strobe
965-1A-8RW Speaker/strobe
965-1A-8SW Speaker/strobe
965-5A-4RR Speaker/strobe
965-5A-4RW Speaker/strobe
965-5A-8RW Speaker/strobe
965-5A-8SW Speaker/strobe
965-7A-4RR Speaker/strobe
965-7A-4RW Speaker/strobe
965-7A-8RW Speaker/strobe
965-7A-8SW Speaker/strobe
965-8A-4RR Speaker/strobe
965-8A-4RW Speaker/strobe
965-8A-8RW Speaker/strobe
965-8A-8SW Speaker/strobe
97DEXC-GW Strobe, explosion-proof
System accessories
Table A-3: ULI compatible accessories
Model Description
MR-101/C 1-SPDT relay with LED in metal enclosure
MR-101/T 1-SPDT relay with LED in track mounting
MR-104/C 4-SPDT relay with LEDs in metal enclosure
MR-104/T 4-SPDT relay with LEDs in track mounting
MR-201/C 1-DPDT relay with LED in metal enclosure
MR-201/T 1-DPDT relay with LED in track mounting
MR-204/C 4-DPDT relay with LED in metal enclosure
MR-204/T 4-DPDT relay with LED in track mounting
PAM-1 1-SPDT relay with LED in adhesive tape mounting
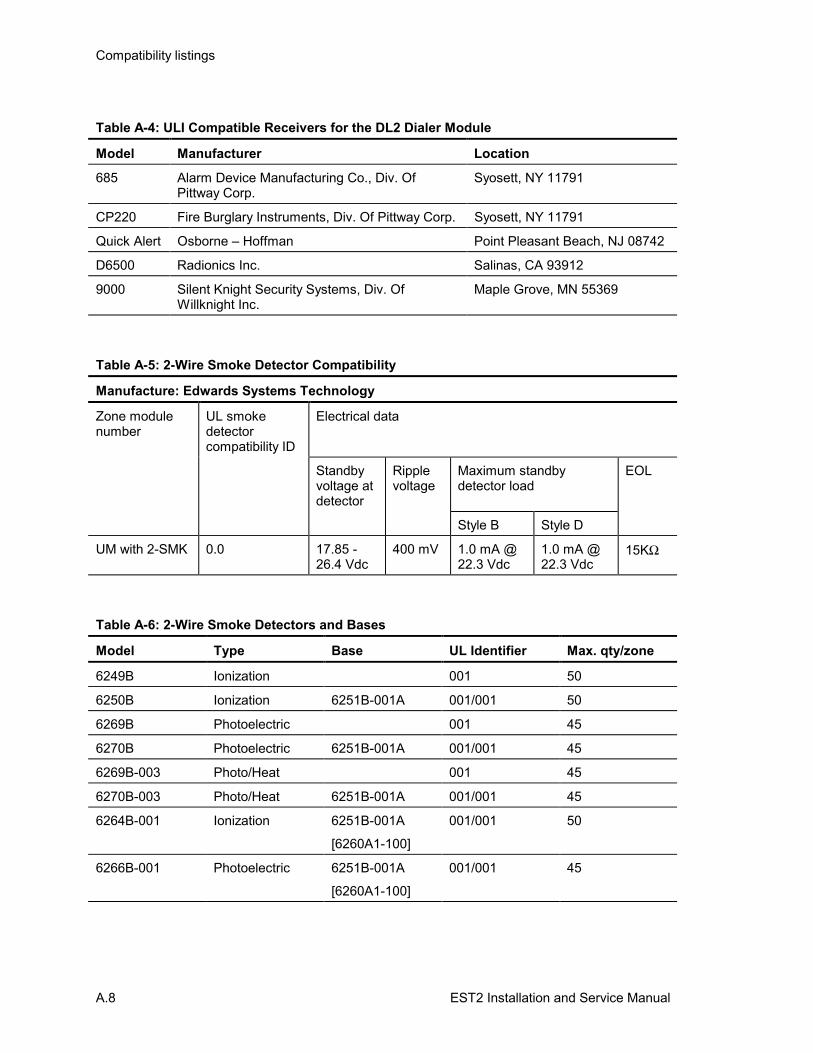
Compatibility listings
A.8 EST2 Installation and Service Manual
Table A-4: ULI Compatible Receivers for the DL2 Dialer Module
Model Manufacturer Location
685 Alarm Device Manufacturing Co., Div. OfPittway Corp.
Syosett, NY 11791
CP220 Fire Burglary Instruments, Div. Of Pittway Corp. Syosett, NY 11791
Quick Alert Osborne – Hoffman Point Pleasant Beach, NJ 08742
D6500 Radionics Inc. Salinas, CA 93912
9000 Silent Knight Security Systems, Div. OfWillknight Inc.
Maple Grove, MN 55369
Table A-5: 2-Wire Smoke Detector Compatibility
Manufacture: Edwards Systems Technology
Zone modulenumber
UL smokedetectorcompatibility ID
Electrical data
Standbyvoltage atdetector
Ripplevoltage
Maximum standbydetector load
EOL
Style B Style D
UM with 2-SMK 0.0 17.85 -26.4 Vdc
400 mV 1.0 mA @22.3 Vdc
1.0 mA @22.3 Vdc
15KΩ
Table A-6: 2-Wire Smoke Detectors and Bases
Model Type Base UL Identifier Max. qty/zone
6249B Ionization 001 50
6250B Ionization 6251B-001A 001/001 50
6269B Photoelectric 001 45
6270B Photoelectric 6251B-001A 001/001 45
6269B-003 Photo/Heat 001 45
6270B-003 Photo/Heat 6251B-001A 001/001 45
6264B-001 Ionization 6251B-001A
[6260A1-100]
001/001 50
6266B-001 Photoelectric 6251B-001A
[6260A1-100]
001/001 45
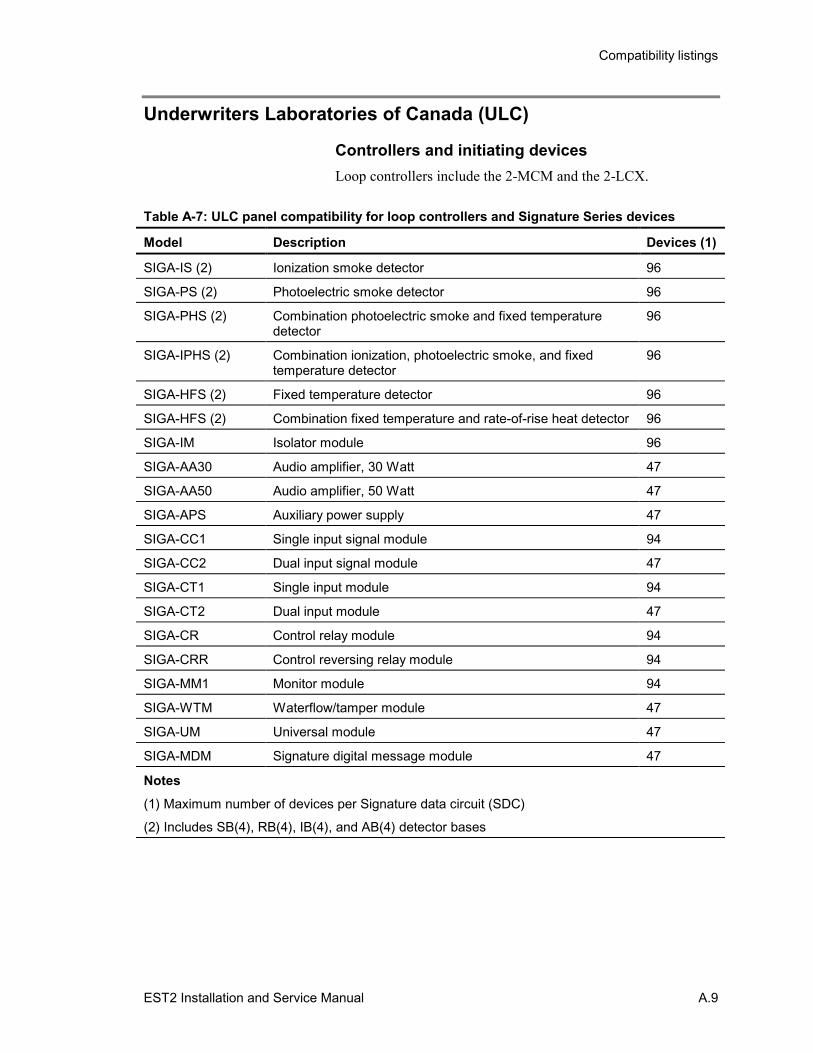
Compatibility listings
EST2 Installation and Service Manual A.9
Underwriters Laboratories of Canada (ULC)
Controllers and initiating devicesLoop controllers include the 2-MCM and the 2-LCX.
Table A-7: ULC panel compatibility for loop controllers and Signature Series devices
Model Description Devices (1)
SIGA-IS (2) Ionization smoke detector 96
SIGA-PS (2) Photoelectric smoke detector 96
SIGA-PHS (2) Combination photoelectric smoke and fixed temperaturedetector
96
SIGA-IPHS (2) Combination ionization, photoelectric smoke, and fixedtemperature detector
96
SIGA-HFS (2) Fixed temperature detector 96
SIGA-HFS (2) Combination fixed temperature and rate-of-rise heat detector 96
SIGA-IM Isolator module 96
SIGA-AA30 Audio amplifier, 30 Watt 47
SIGA-AA50 Audio amplifier, 50 Watt 47
SIGA-APS Auxiliary power supply 47
SIGA-CC1 Single input signal module 94
SIGA-CC2 Dual input signal module 47
SIGA-CT1 Single input module 94
SIGA-CT2 Dual input module 47
SIGA-CR Control relay module 94
SIGA-CRR Control reversing relay module 94
SIGA-MM1 Monitor module 94
SIGA-WTM Waterflow/tamper module 47
SIGA-UM Universal module 47
SIGA-MDM Signature digital message module 47
Notes(1) Maximum number of devices per Signature data circuit (SDC)
(2) Includes SB(4), RB(4), IB(4), and AB(4) detector bases
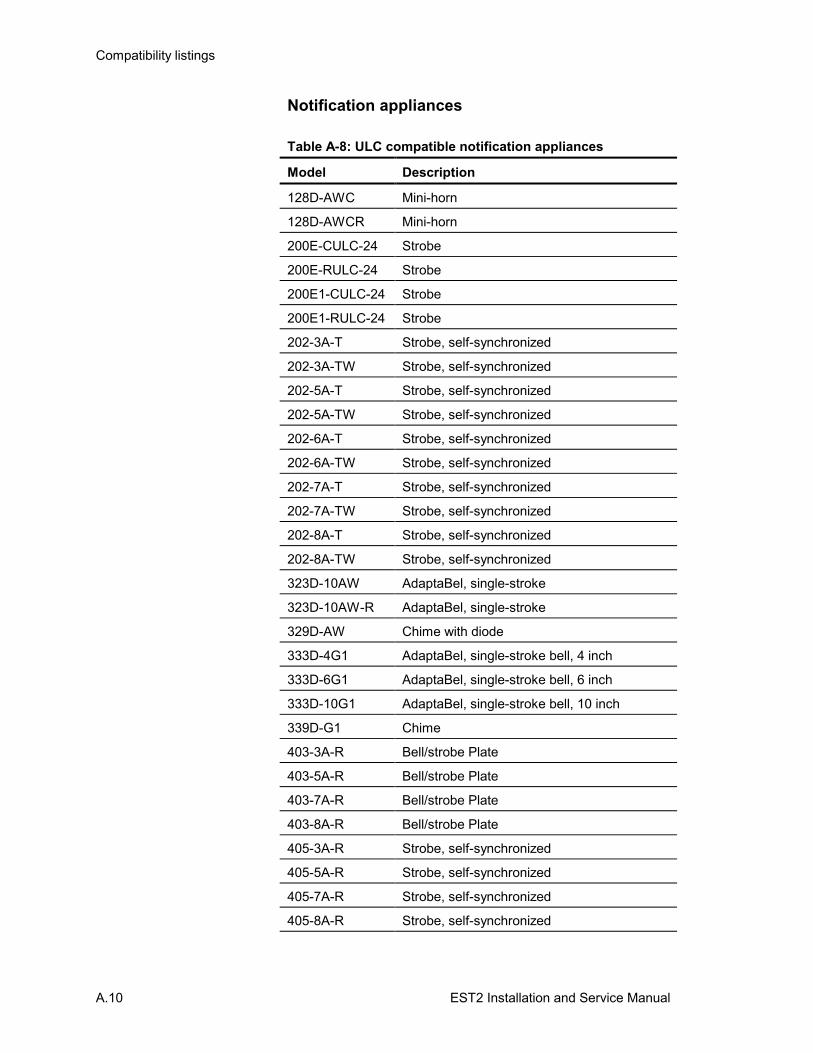
Compatibility listings
A.10 EST2 Installation and Service Manual
Notification appliances
Table A-8: ULC compatible notification appliances
Model Description
128D-AWC Mini-horn
128D-AWCR Mini-horn
200E-CULC-24 Strobe
200E-RULC-24 Strobe
200E1-CULC-24 Strobe
200E1-RULC-24 Strobe
202-3A-T Strobe, self-synchronized
202-3A-TW Strobe, self-synchronized
202-5A-T Strobe, self-synchronized
202-5A-TW Strobe, self-synchronized
202-6A-T Strobe, self-synchronized
202-6A-TW Strobe, self-synchronized
202-7A-T Strobe, self-synchronized
202-7A-TW Strobe, self-synchronized
202-8A-T Strobe, self-synchronized
202-8A-TW Strobe, self-synchronized
323D-10AW AdaptaBel, single-stroke
323D-10AW-R AdaptaBel, single-stroke
329D-AW Chime with diode
333D-4G1 AdaptaBel, single-stroke bell, 4 inch
333D-6G1 AdaptaBel, single-stroke bell, 6 inch
333D-10G1 AdaptaBel, single-stroke bell, 10 inch
339D-G1 Chime
403-3A-R Bell/strobe Plate
403-5A-R Bell/strobe Plate
403-7A-R Bell/strobe Plate
403-8A-R Bell/strobe Plate
405-3A-R Strobe, self-synchronized
405-5A-R Strobe, self-synchronized
405-7A-R Strobe, self-synchronized
405-8A-R Strobe, self-synchronized
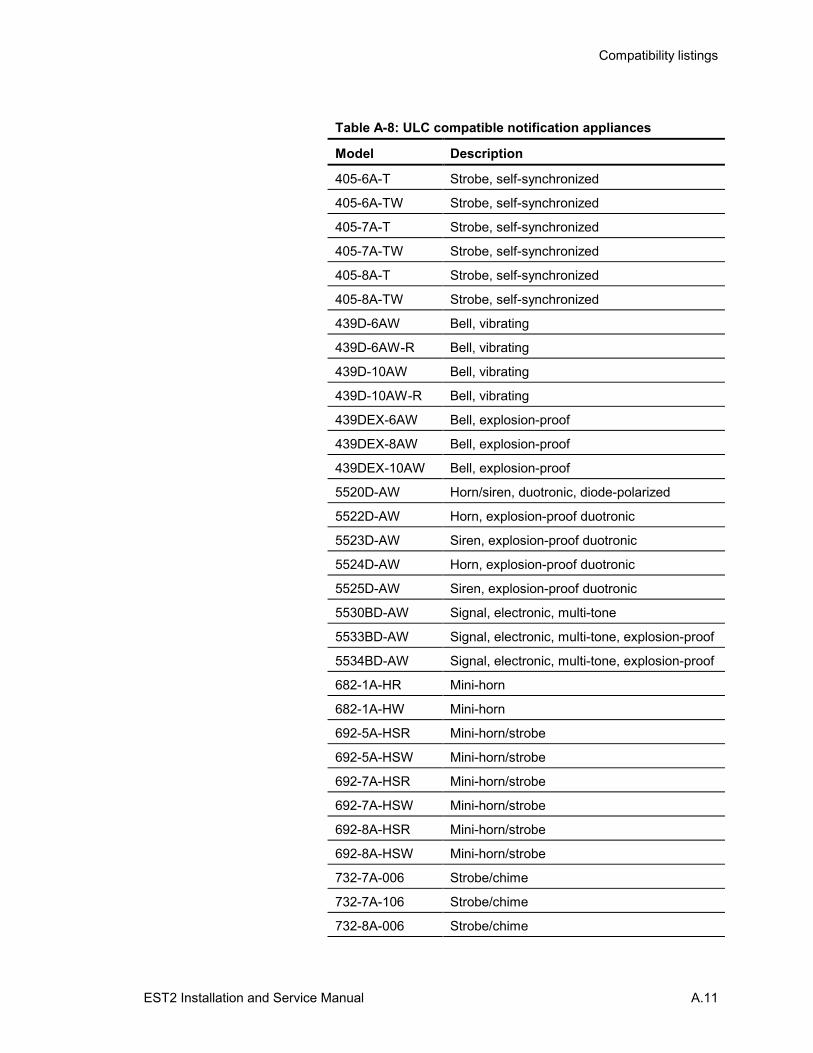
Compatibility listings
EST2 Installation and Service Manual A.11
Table A-8: ULC compatible notification appliances
Model Description
405-6A-T Strobe, self-synchronized
405-6A-TW Strobe, self-synchronized
405-7A-T Strobe, self-synchronized
405-7A-TW Strobe, self-synchronized
405-8A-T Strobe, self-synchronized
405-8A-TW Strobe, self-synchronized
439D-6AW Bell, vibrating
439D-6AW-R Bell, vibrating
439D-10AW Bell, vibrating
439D-10AW-R Bell, vibrating
439DEX-6AW Bell, explosion-proof
439DEX-8AW Bell, explosion-proof
439DEX-10AW Bell, explosion-proof
5520D-AW Horn/siren, duotronic, diode-polarized
5522D-AW Horn, explosion-proof duotronic
5523D-AW Siren, explosion-proof duotronic
5524D-AW Horn, explosion-proof duotronic
5525D-AW Siren, explosion-proof duotronic
5530BD-AW Signal, electronic, multi-tone
5533BD-AW Signal, electronic, multi-tone, explosion-proof
5534BD-AW Signal, electronic, multi-tone, explosion-proof
682-1A-HR Mini-horn
682-1A-HW Mini-horn
692-5A-HSR Mini-horn/strobe
692-5A-HSW Mini-horn/strobe
692-7A-HSR Mini-horn/strobe
692-7A-HSW Mini-horn/strobe
692-8A-HSR Mini-horn/strobe
692-8A-HSW Mini-horn/strobe
732-7A-006 Strobe/chime
732-7A-106 Strobe/chime
732-8A-006 Strobe/chime
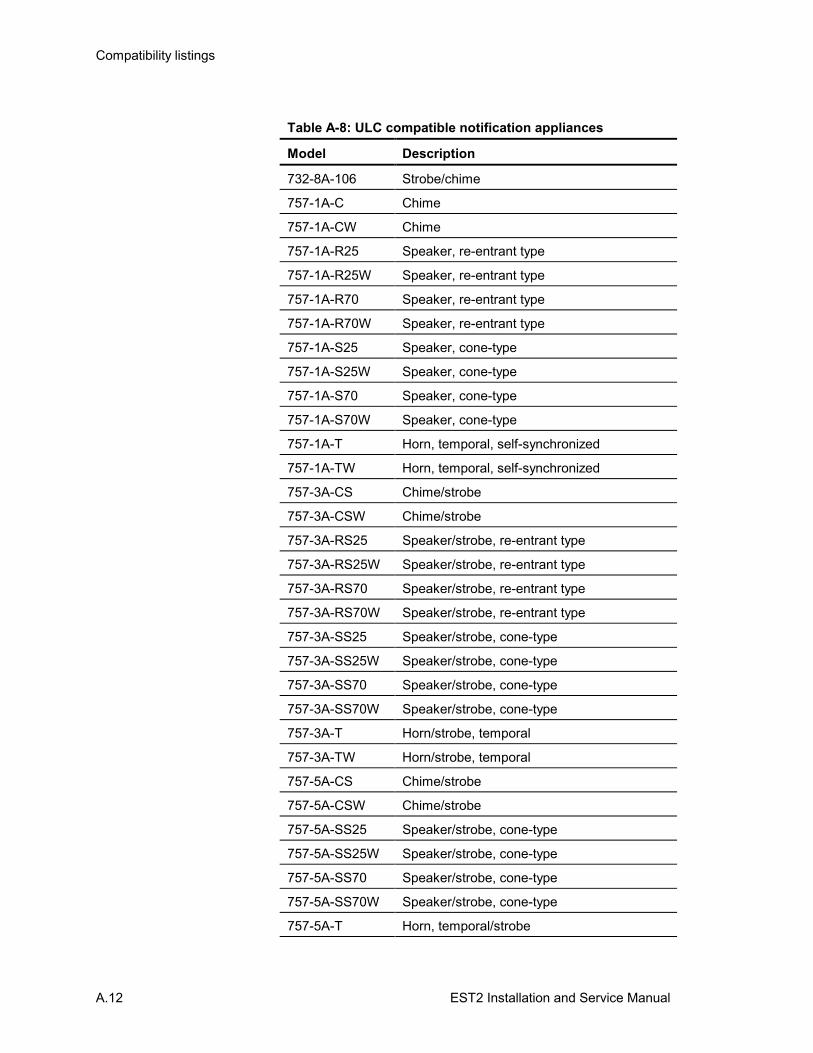
Compatibility listings
A.12 EST2 Installation and Service Manual
Table A-8: ULC compatible notification appliances
Model Description
732-8A-106 Strobe/chime
757-1A-C Chime
757-1A-CW Chime
757-1A-R25 Speaker, re-entrant type
757-1A-R25W Speaker, re-entrant type
757-1A-R70 Speaker, re-entrant type
757-1A-R70W Speaker, re-entrant type
757-1A-S25 Speaker, cone-type
757-1A-S25W Speaker, cone-type
757-1A-S70 Speaker, cone-type
757-1A-S70W Speaker, cone-type
757-1A-T Horn, temporal, self-synchronized
757-1A-TW Horn, temporal, self-synchronized
757-3A-CS Chime/strobe
757-3A-CSW Chime/strobe
757-3A-RS25 Speaker/strobe, re-entrant type
757-3A-RS25W Speaker/strobe, re-entrant type
757-3A-RS70 Speaker/strobe, re-entrant type
757-3A-RS70W Speaker/strobe, re-entrant type
757-3A-SS25 Speaker/strobe, cone-type
757-3A-SS25W Speaker/strobe, cone-type
757-3A-SS70 Speaker/strobe, cone-type
757-3A-SS70W Speaker/strobe, cone-type
757-3A-T Horn/strobe, temporal
757-3A-TW Horn/strobe, temporal
757-5A-CS Chime/strobe
757-5A-CSW Chime/strobe
757-5A-SS25 Speaker/strobe, cone-type
757-5A-SS25W Speaker/strobe, cone-type
757-5A-SS70 Speaker/strobe, cone-type
757-5A-SS70W Speaker/strobe, cone-type
757-5A-T Horn, temporal/strobe
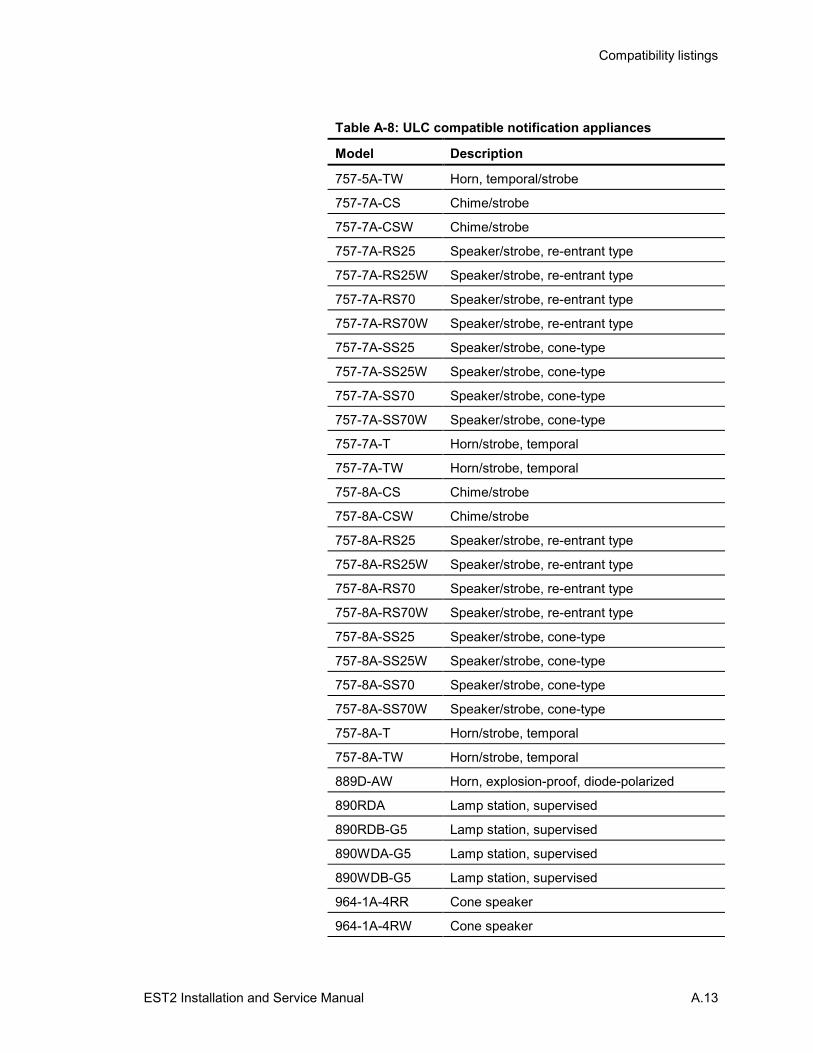
Compatibility listings
EST2 Installation and Service Manual A.13
Table A-8: ULC compatible notification appliances
Model Description
757-5A-TW Horn, temporal/strobe
757-7A-CS Chime/strobe
757-7A-CSW Chime/strobe
757-7A-RS25 Speaker/strobe, re-entrant type
757-7A-RS25W Speaker/strobe, re-entrant type
757-7A-RS70 Speaker/strobe, re-entrant type
757-7A-RS70W Speaker/strobe, re-entrant type
757-7A-SS25 Speaker/strobe, cone-type
757-7A-SS25W Speaker/strobe, cone-type
757-7A-SS70 Speaker/strobe, cone-type
757-7A-SS70W Speaker/strobe, cone-type
757-7A-T Horn/strobe, temporal
757-7A-TW Horn/strobe, temporal
757-8A-CS Chime/strobe
757-8A-CSW Chime/strobe
757-8A-RS25 Speaker/strobe, re-entrant type
757-8A-RS25W Speaker/strobe, re-entrant type
757-8A-RS70 Speaker/strobe, re-entrant type
757-8A-RS70W Speaker/strobe, re-entrant type
757-8A-SS25 Speaker/strobe, cone-type
757-8A-SS25W Speaker/strobe, cone-type
757-8A-SS70 Speaker/strobe, cone-type
757-8A-SS70W Speaker/strobe, cone-type
757-8A-T Horn/strobe, temporal
757-8A-TW Horn/strobe, temporal
889D-AW Horn, explosion-proof, diode-polarized
890RDA Lamp station, supervised
890RDB-G5 Lamp station, supervised
890WDA-G5 Lamp station, supervised
890WDB-G5 Lamp station, supervised
964-1A-4RR Cone speaker
964-1A-4RW Cone speaker

Compatibility listings
A.14 EST2 Installation and Service Manual
Table A-8: ULC compatible notification appliances
Model Description
964-1A-8RW Cone speaker
964-1A-8SW Cone speaker
964-5A-4RR Cone speaker
964-5A-4RW Cone speaker
964-5A-8RW Cone speaker
964-5A-8SW Cone speaker
964-7A-4RR Cone speaker
964-7A-4RW Cone speaker
964-7A-8RW Cone speaker
964-7A-8SW Cone speaker
964-8A-4RR Cone speaker
964-8A-4RW Cone speaker
964-8A-8RW Cone speaker
964-8A-8SW Cone speaker
965-1A-4RR Speaker/strobe
965-1A-4RW Speaker/strobe
965-1A-8RW Speaker/strobe
965-1A-8SW Speaker/strobe
965-5A-4RR Speaker/strobe
965-5A-4RW Speaker/strobe
965-5A-8RW Speaker/strobe
965-5A-8SW Speaker/strobe
965-7A-4RR Speaker/strobe
965-7A-4RW Speaker/strobe
965-7A-8RW Speaker/strobe
965-7A-8SW Speaker/strobe
965-8A-4RR Speaker/strobe
965-8A-4RW Speaker/strobe
965-8A-8RW Speaker/strobe
965-8A-8SW Speaker/strobe
97DEXC-GW Strobe, explosion-proof
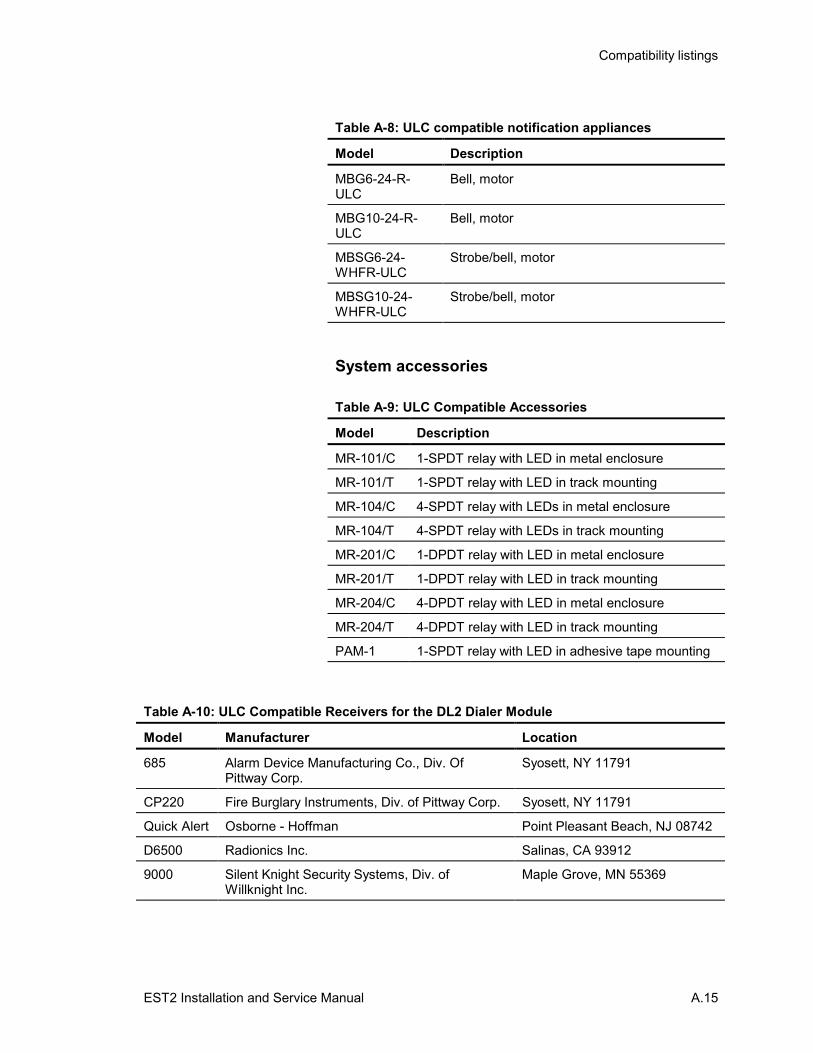
Compatibility listings
EST2 Installation and Service Manual A.15
Table A-8: ULC compatible notification appliances
Model Description
MBG6-24-R-ULC
Bell, motor
MBG10-24-R-ULC
Bell, motor
MBSG6-24-WHFR-ULC
Strobe/bell, motor
MBSG10-24-WHFR-ULC
Strobe/bell, motor
System accessories
Table A-9: ULC Compatible Accessories
Model Description
MR-101/C 1-SPDT relay with LED in metal enclosure
MR-101/T 1-SPDT relay with LED in track mounting
MR-104/C 4-SPDT relay with LEDs in metal enclosure
MR-104/T 4-SPDT relay with LEDs in track mounting
MR-201/C 1-DPDT relay with LED in metal enclosure
MR-201/T 1-DPDT relay with LED in track mounting
MR-204/C 4-DPDT relay with LED in metal enclosure
MR-204/T 4-DPDT relay with LED in track mounting
PAM-1 1-SPDT relay with LED in adhesive tape mounting
Table A-10: ULC Compatible Receivers for the DL2 Dialer Module
Model Manufacturer Location
685 Alarm Device Manufacturing Co., Div. OfPittway Corp.
Syosett, NY 11791
CP220 Fire Burglary Instruments, Div. of Pittway Corp. Syosett, NY 11791
Quick Alert Osborne - Hoffman Point Pleasant Beach, NJ 08742
D6500 Radionics Inc. Salinas, CA 93912
9000 Silent Knight Security Systems, Div. ofWillknight Inc.
Maple Grove, MN 55369
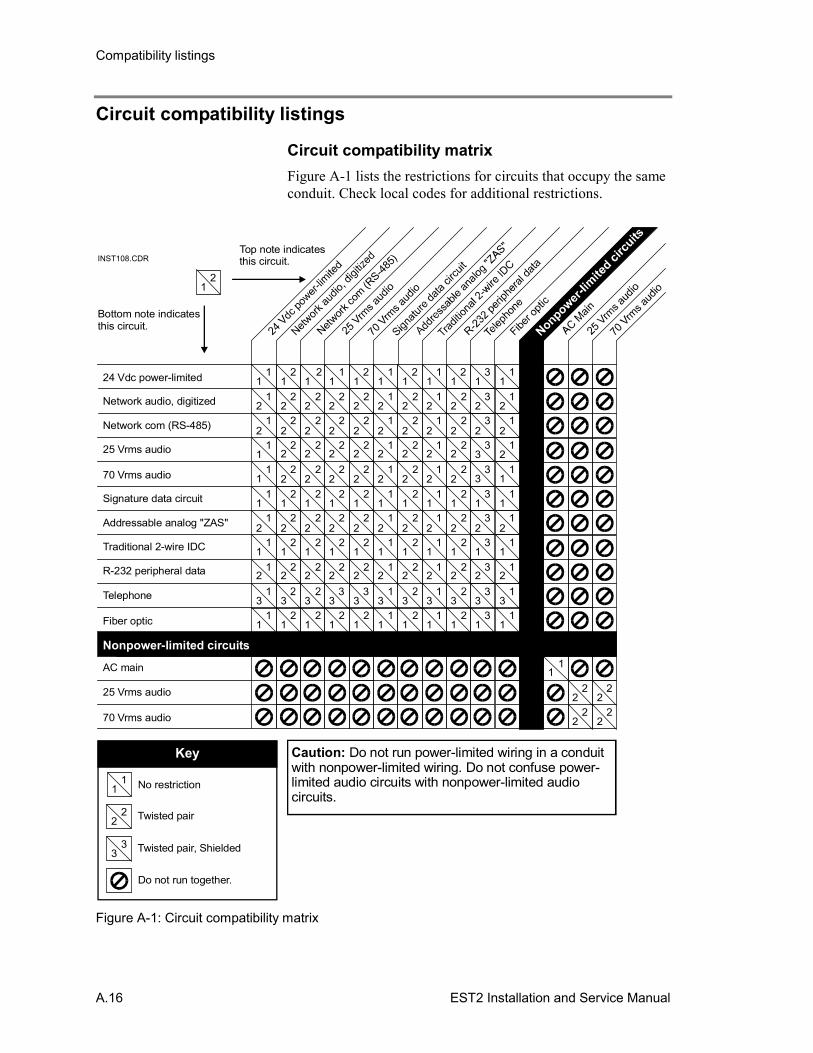
Compatibility listings
A.16 EST2 Installation and Service Manual
Circuit compatibility listings
Circuit compatibility matrixFigure A-1 lists the restrictions for circuits that occupy the sameconduit. Check local codes for additional restrictions.
24 Vdc power-limited
Network audio, digitized
Network com (RS-485)
Network
com (R
S-485)
25 Vrms audio
25 Vrms audio
70 Vrms audio
70 Vrms audio
Signature data circuit
Addressable analog "ZAS"
Traditional 2-wire IDC
R-232 peripheral data
Telephone
Fiber optic
AC main
1
1
1
1
1
1
1
1
1
1
1
21 3
3
3
3
3
3
2
3
3
3
2
3
3
2 2
2 2 22 2 2
2 2 22 2 2
1
2 2 22 2 2
2 2 22 2 2
2 2 22 2 2
2 2 22 2 2
2 2 22 2 2
2 2 22 2 2
2 2 22 2 2
1
1
1
1
1
1
1
1
1
1
1
2
33
1
1
1
1
1
1
2
1
1
1
2
1
1
21
1
1
1
1
1
1
1
1
1
1
1
1
1
2
2
2
2
1
3
1
1
1
1
2
2
2
2
2
2
1
3
1
1
1
2
2
2
2
2
2
1
3
1
1
3
1
2
2
2
2
2
1
3
2
3
1
1
1
2
2
2
2
2
2
1
3
1
1
1
2
2
2
2
2
2
1
3
1
1
1
2
2
2
2
2
2
1
3
1
1
1
1
2
2
2
2
2
1
3
2
2
1
1
1
2
2
2
2
2
2
1
3
1
1
1
2
2
2
2
1
2
2
1
3
1
1
1
2
2
2
2
2
2
1
3
1
21
Bottom note indicatesthis circuit.
Top note indicatesthis circuit.
11 No restriction
22 Twisted pair
33 Twisted pair, Shielded
Key
INST108.CDR
Do not run together.
Nonpower-limited circuits
Caution: Do not run power-limited wiring in a conduit with nonpower-limited wiring. Do not confuse power-limited audio circuits with nonpower-limited audio circuits.
Figure A-1: Circuit compatibility matrix
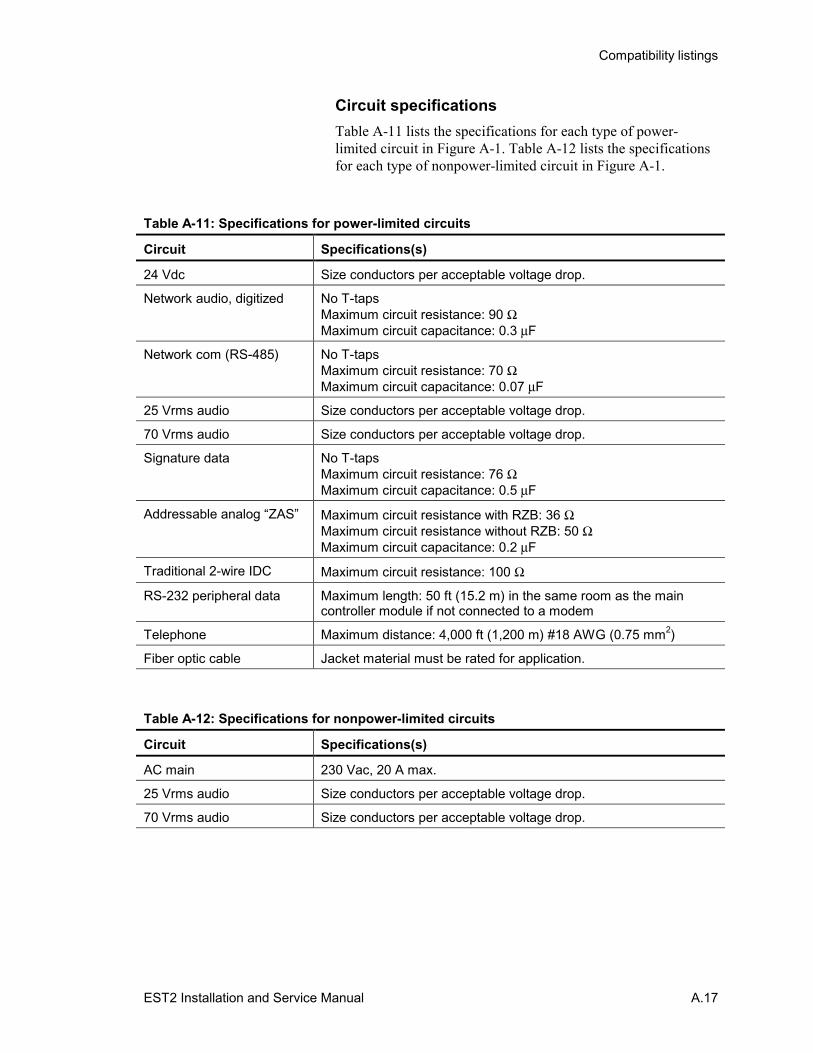
Compatibility listings
EST2 Installation and Service Manual A.17
Circuit specificationsTable A-11 lists the specifications for each type of power-limited circuit in Figure A-1. Table A-12 lists the specificationsfor each type of nonpower-limited circuit in Figure A-1.
Table A-11: Specifications for power-limited circuits
Circuit Specifications(s)
24 Vdc Size conductors per acceptable voltage drop.
Network audio, digitized No T-tapsMaximum circuit resistance: 90 ΩMaximum circuit capacitance: 0.3 µF
Network com (RS-485) No T-tapsMaximum circuit resistance: 70 ΩMaximum circuit capacitance: 0.07 µF
25 Vrms audio Size conductors per acceptable voltage drop.
70 Vrms audio Size conductors per acceptable voltage drop.
Signature data No T-tapsMaximum circuit resistance: 76 ΩMaximum circuit capacitance: 0.5 µF
Addressable analog “ZAS” Maximum circuit resistance with RZB: 36 ΩMaximum circuit resistance without RZB: 50 ΩMaximum circuit capacitance: 0.2 µF
Traditional 2-wire IDC Maximum circuit resistance: 100 Ω
RS-232 peripheral data Maximum length: 50 ft (15.2 m) in the same room as the maincontroller module if not connected to a modem
Telephone Maximum distance: 4,000 ft (1,200 m) #18 AWG (0.75 mm2)
Fiber optic cable Jacket material must be rated for application.
Table A-12: Specifications for nonpower-limited circuits
Circuit Specifications(s)
AC main 230 Vac, 20 A max.
25 Vrms audio Size conductors per acceptable voltage drop.
70 Vrms audio Size conductors per acceptable voltage drop.

Compatibility listings
A.18 EST2 Installation and Service Manual
Recommended cable manufacturersUse the cable manufacturers listed in Table A-13.
Table A-13: Recommended cable manufacturers
Manufacturer Address Telephone/Fax
Atlas Wire & Cable Corp. 133 S. Van Norman RoadMontebello, CA 90640
(213) 723-2401
West Penn Wire Corp. 2833 West Chestnut StreetP.O. Box 762Washington, PA 15301
(412) 222-7060
Belden Wire & Cable Corp. P.O. Box 1980Richmond, IN 47375
(317) 983-5200
BSCC 233 Florence StreetLeominster, MA 01453
(508) 537-9138(508) 537-8392
Remee Product, Inc. 186 North Main StreetFlorida, NY 10921
Not listed

EST2 Installation and Service Manual B.1
Appendix B Calculations
Summary
Appendix B provides worksheets for calculating systemparameters, such as wire distance, and battery capacity.
ContentCalculating wire lengths for Signature data circuits • B.2
Determining the maximum allowable branch length • B.2Determining the total loop length • B.8
Calculating wire lengths for 24 Vdc NACs • B.10Calculating wire lengths for 25 or 70 Vrms NACs • B.12Calculating wire lengths for addressable analog circuits • B.14Calculating ampere-hour battery requirements • B.15
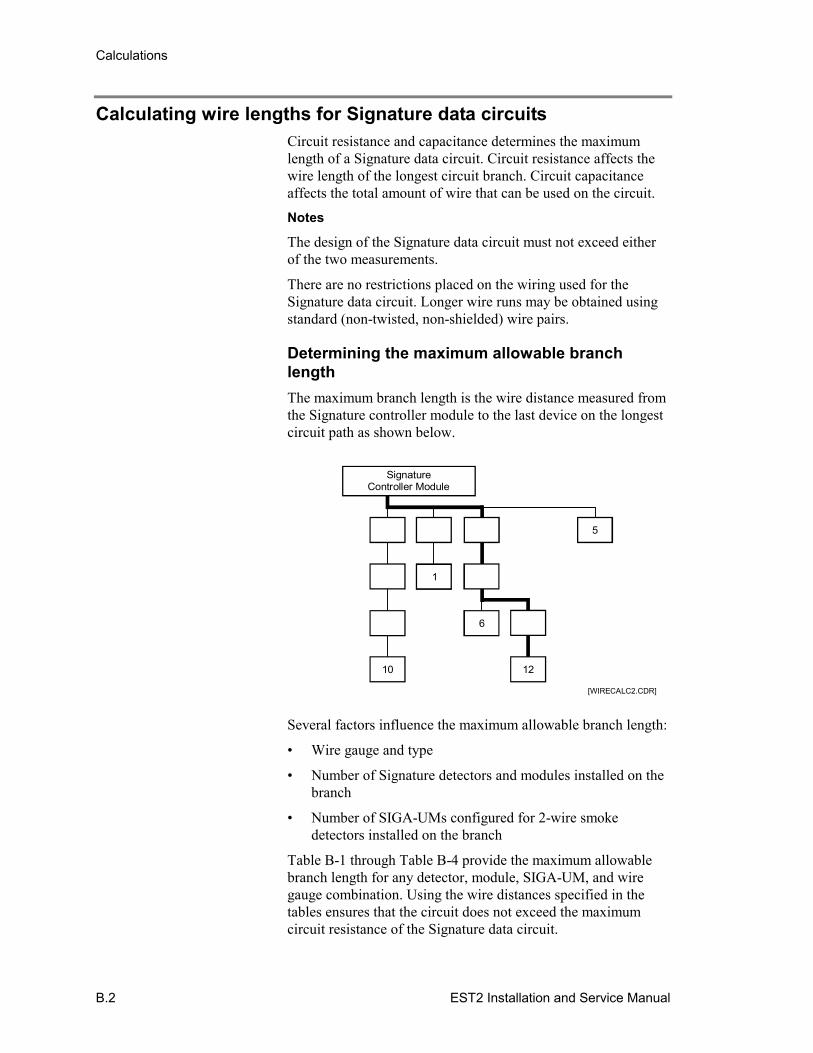
Calculations
B.2 EST2 Installation and Service Manual
Calculating wire lengths for Signature data circuitsCircuit resistance and capacitance determines the maximumlength of a Signature data circuit. Circuit resistance affects thewire length of the longest circuit branch. Circuit capacitanceaffects the total amount of wire that can be used on the circuit.
Notes
The design of the Signature data circuit must not exceed eitherof the two measurements.
There are no restrictions placed on the wiring used for theSignature data circuit. Longer wire runs may be obtained usingstandard (non-twisted, non-shielded) wire pairs.
Determining the maximum allowable branchlengthThe maximum branch length is the wire distance measured fromthe Signature controller module to the last device on the longestcircuit path as shown below.
SignatureController Module
10 12
5
1
6
[WIRECALC2.CDR]
Several factors influence the maximum allowable branch length:
• Wire gauge and type
• Number of Signature detectors and modules installed on thebranch
• Number of SIGA-UMs configured for 2-wire smokedetectors installed on the branch
Table B-1 through Table B-4 provide the maximum allowablebranch length for any detector, module, SIGA-UM, and wiregauge combination. Using the wire distances specified in thetables ensures that the circuit does not exceed the maximumcircuit resistance of the Signature data circuit.
Calculations
EST2 Installation and Service Manual B.3
Note: To calculate the wire distance with respect to circuitresistance, the tables assume that the circuit is end-loaded (alldevices are clustered more towards the end of the circuit) andthe circuit uses standard, non-shielded wire.
To determine the maximum allowable length of a Signaturedata circuit branch:
1. Identify the device located farthest from the Signaturecontroller.
2. Determine the number of Signature detectors, modules, andSIGA-UMs configured for 2-wire smokes that lie on thesame conductive path between the device identified in step 1and the Signature controller.
3. Calculate the number of detector and module addresses.Some Signature modules require two addresses.
4. Determine the size of the wire used to construct the circuit.
5. Find the maximum allowable wire distance for the longestbranch in the lookup tables as follows:
If no SIGA-UMs are installed, use Table B-1.
If 1–5 SIGA-UMs are installed, use Table B-2.
If 6–10 SIGA-UMs are installed, use Table B-3.
If 11–15 SIGA-UMs are installed, use Table B-4.
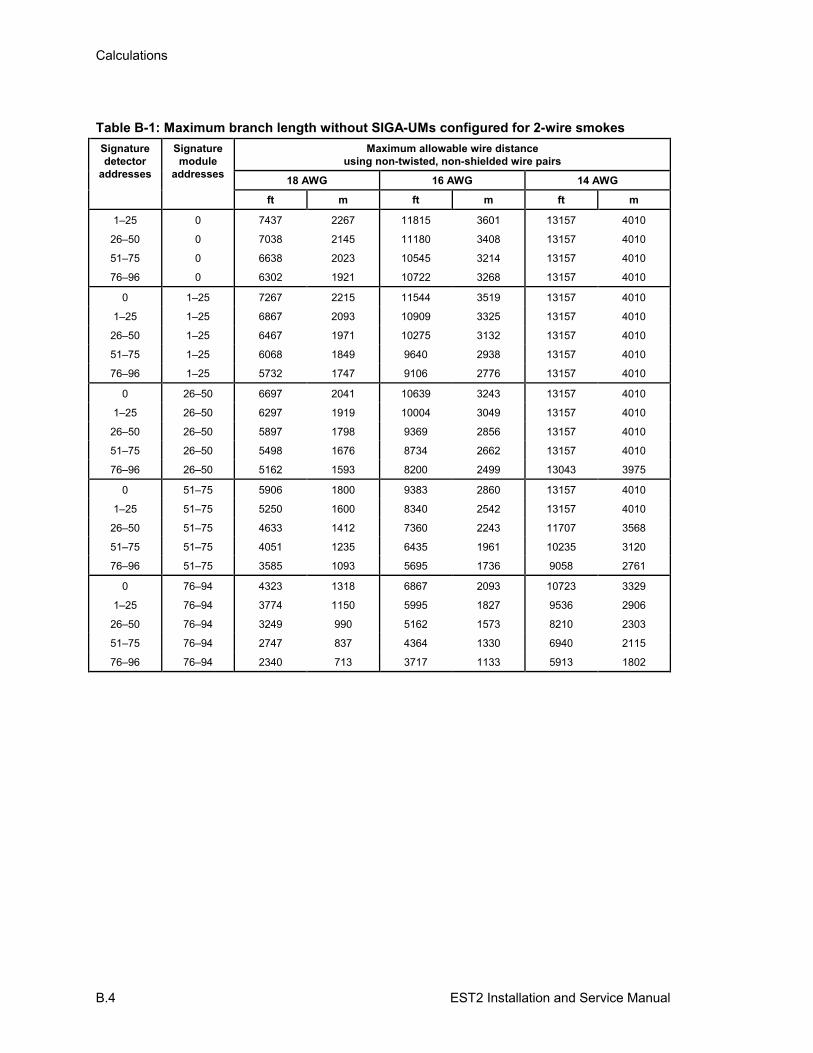
Calculations
B.4 EST2 Installation and Service Manual
Table B-1: Maximum branch length without SIGA-UMs configured for 2-wire smokesMaximum allowable wire distance
using non-twisted, non-shielded wire pairsSignaturedetector
addresses
Signaturemodule
addresses 18 AWG 16 AWG 14 AWG
ft m ft m ft m
1–25 0 7437 2267 11815 3601 13157 4010
26–50 0 7038 2145 11180 3408 13157 4010
51–75 0 6638 2023 10545 3214 13157 4010
76–96 0 6302 1921 10722 3268 13157 4010
0 1–25 7267 2215 11544 3519 13157 4010
1–25 1–25 6867 2093 10909 3325 13157 4010
26–50 1–25 6467 1971 10275 3132 13157 4010
51–75 1–25 6068 1849 9640 2938 13157 4010
76–96 1–25 5732 1747 9106 2776 13157 4010
0 26–50 6697 2041 10639 3243 13157 4010
1–25 26–50 6297 1919 10004 3049 13157 4010
26–50 26–50 5897 1798 9369 2856 13157 4010
51–75 26–50 5498 1676 8734 2662 13157 4010
76–96 26–50 5162 1593 8200 2499 13043 3975
0 51–75 5906 1800 9383 2860 13157 4010
1–25 51–75 5250 1600 8340 2542 13157 4010
26–50 51–75 4633 1412 7360 2243 11707 3568
51–75 51–75 4051 1235 6435 1961 10235 3120
76–96 51–75 3585 1093 5695 1736 9058 2761
0 76–94 4323 1318 6867 2093 10723 3329
1–25 76–94 3774 1150 5995 1827 9536 2906
26–50 76–94 3249 990 5162 1573 8210 2303
51–75 76–94 2747 837 4364 1330 6940 2115
76–96 76–94 2340 713 3717 1133 5913 1802
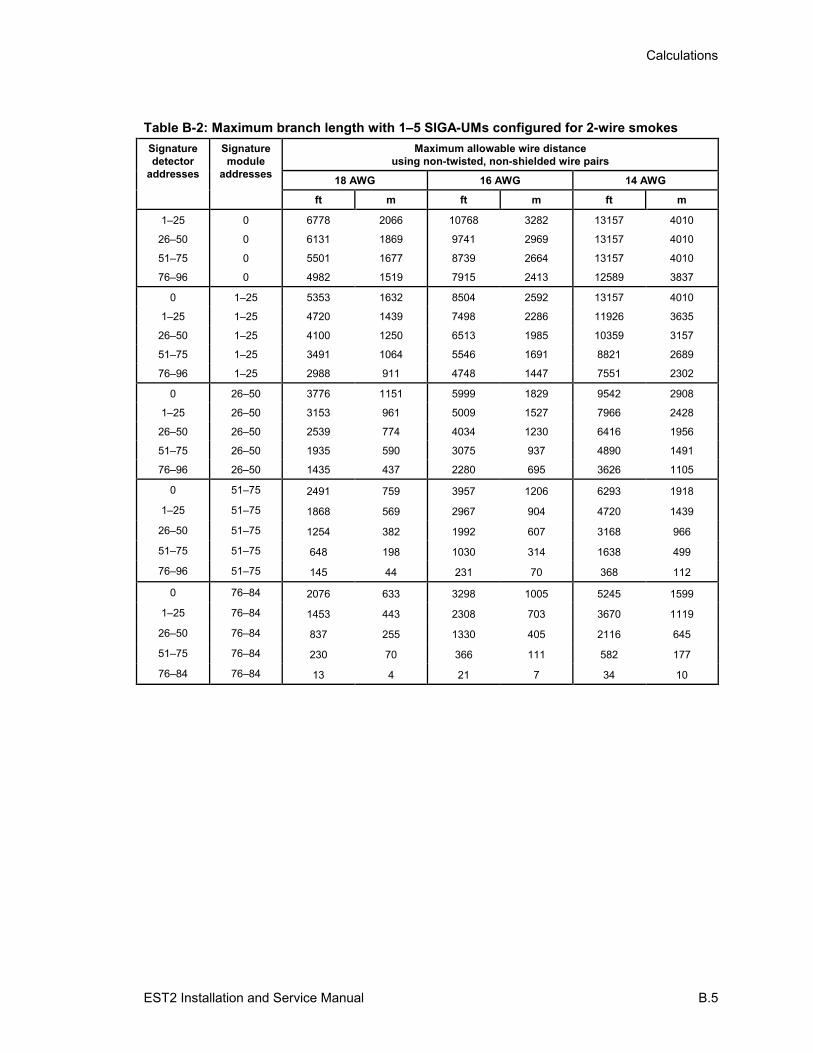
Calculations
EST2 Installation and Service Manual B.5
Table B-2: Maximum branch length with 1–5 SIGA-UMs configured for 2-wire smokesMaximum allowable wire distance
using non-twisted, non-shielded wire pairsSignaturedetector
addresses
Signaturemodule
addresses 18 AWG 16 AWG 14 AWG
ft m ft m ft m
1–25 0 6778 2066 10768 3282 13157 4010
26–50 0 6131 1869 9741 2969 13157 4010
51–75 0 5501 1677 8739 2664 13157 4010
76–96 0 4982 1519 7915 2413 12589 3837
0 1–25 5353 1632 8504 2592 13157 4010
1–25 1–25 4720 1439 7498 2286 11926 3635
26–50 1–25 4100 1250 6513 1985 10359 3157
51–75 1–25 3491 1064 5546 1691 8821 2689
76–96 1–25 2988 911 4748 1447 7551 2302
0 26–50 3776 1151 5999 1829 9542 2908
1–25 26–50 3153 961 5009 1527 7966 2428
26–50 26–50 2539 774 4034 1230 6416 1956
51–75 26–50 1935 590 3075 937 4890 1491
76–96 26–50 1435 437 2280 695 3626 1105
0 51–75 2491 759 3957 1206 6293 1918
1–25 51–75 1868 569 2967 904 4720 1439
26–50 51–75 1254 382 1992 607 3168 966
51–75 51–75 648 198 1030 314 1638 499
76–96 51–75 145 44 231 70 368 112
0 76–84 2076 633 3298 1005 5245 1599
1–25 76–84 1453 443 2308 703 3670 1119
26–50 76–84 837 255 1330 405 2116 645
51–75 76–84 230 70 366 111 582 177
76–84 76–84 13 4 21 7 34 10

Calculations
B.6 EST2 Installation and Service Manual
Table B-3: Maximum branch length with 6–10 SIGA-UMs configured for 2-wire smokesMaximum allowable wire distance
using non-twisted, non-shielded wire pairsSignaturedetector
addresses
Signaturemodule
addresses 18 AWG 16 AWG 14 AWG
ft m ft m ft m
1–25 0 5045 1538 8015 2443 12748 3886
26–50 0 4494 1370 7139 2176 11355 3461
51–75 0 3950 1204 6275 1913 9981 3042
76–96 0 3499 1066 5559 1694 8841 2695
0 1–25 4106 1252 6523 1988 10375 3162
1–25 1–25 3542 1080 5627 1715 8950 2728
26–50 1–25 2985 910 4742 1445 7542 2299
51–75 1–25 2435 742 3868 1179 6152 1875
76–96 1–25 1978 603 3142 958 4997 1523
0 26–50 2869 874 4557 1389 7248 2209
1–25 26–50 2296 700 3648 1112 5802 1768
26–50 26–50 1730 527 2749 838 4372 1332
51–75 26–50 1170 357 1859 567 2957 901
76–96 26–50 705 215 1120 341 1781 543
0 51–74 1836 560 2914 2917 4639 1414
1–25 51–74 1255 382 1993 608 3171 966
26–50 51–74 680 207 1080 329 1717 323
51–75 51–74 110 34 175 53 279 85
76–79 51–74 20 6 31 10 50 15
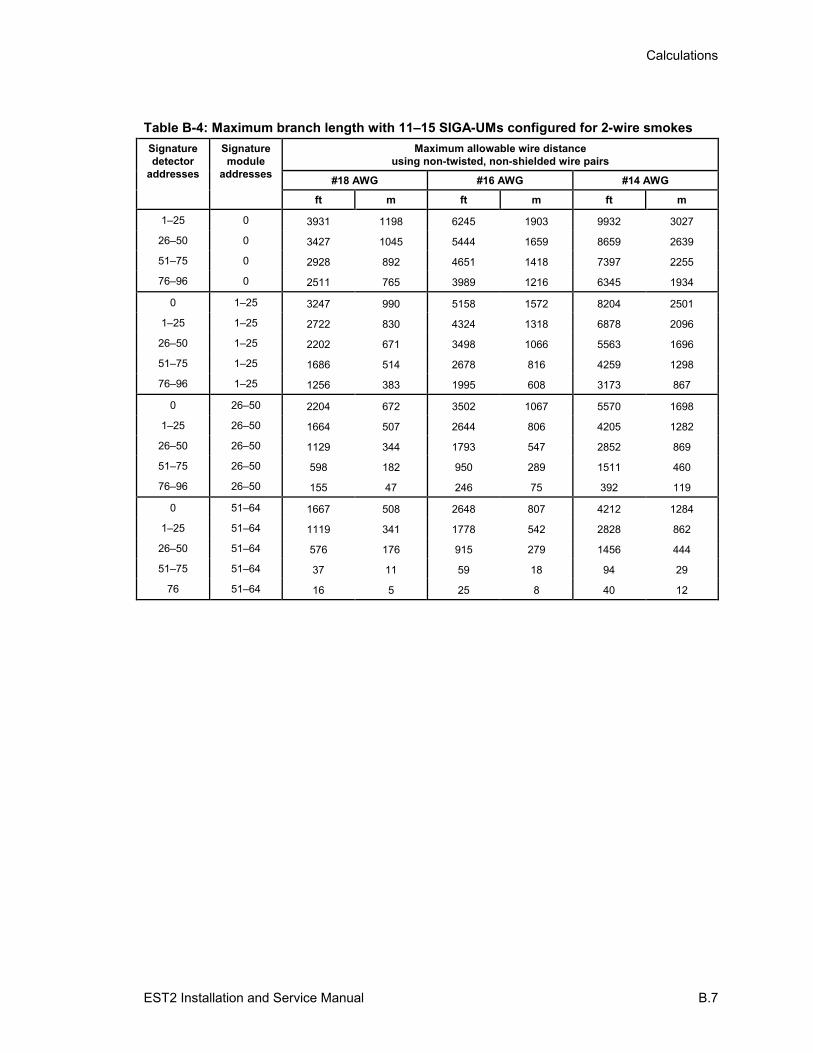
Calculations
EST2 Installation and Service Manual B.7
Table B-4: Maximum branch length with 11–15 SIGA-UMs configured for 2-wire smokesMaximum allowable wire distance
using non-twisted, non-shielded wire pairsSignaturedetector
addresses
Signaturemodule
addresses #18 AWG #16 AWG #14 AWG
ft m ft m ft m
1–25 0 3931 1198 6245 1903 9932 3027
26–50 0 3427 1045 5444 1659 8659 2639
51–75 0 2928 892 4651 1418 7397 2255
76–96 0 2511 765 3989 1216 6345 1934
0 1–25 3247 990 5158 1572 8204 2501
1–25 1–25 2722 830 4324 1318 6878 2096
26–50 1–25 2202 671 3498 1066 5563 1696
51–75 1–25 1686 514 2678 816 4259 1298
76–96 1–25 1256 383 1995 608 3173 867
0 26–50 2204 672 3502 1067 5570 1698
1–25 26–50 1664 507 2644 806 4205 1282
26–50 26–50 1129 344 1793 547 2852 869
51–75 26–50 598 182 950 289 1511 460
76–96 26–50 155 47 246 75 392 119
0 51–64 1667 508 2648 807 4212 1284
1–25 51–64 1119 341 1778 542 2828 862
26–50 51–64 576 176 915 279 1456 444
51–75 51–64 37 11 59 18 94 29
76 51–64 16 5 25 8 40 12
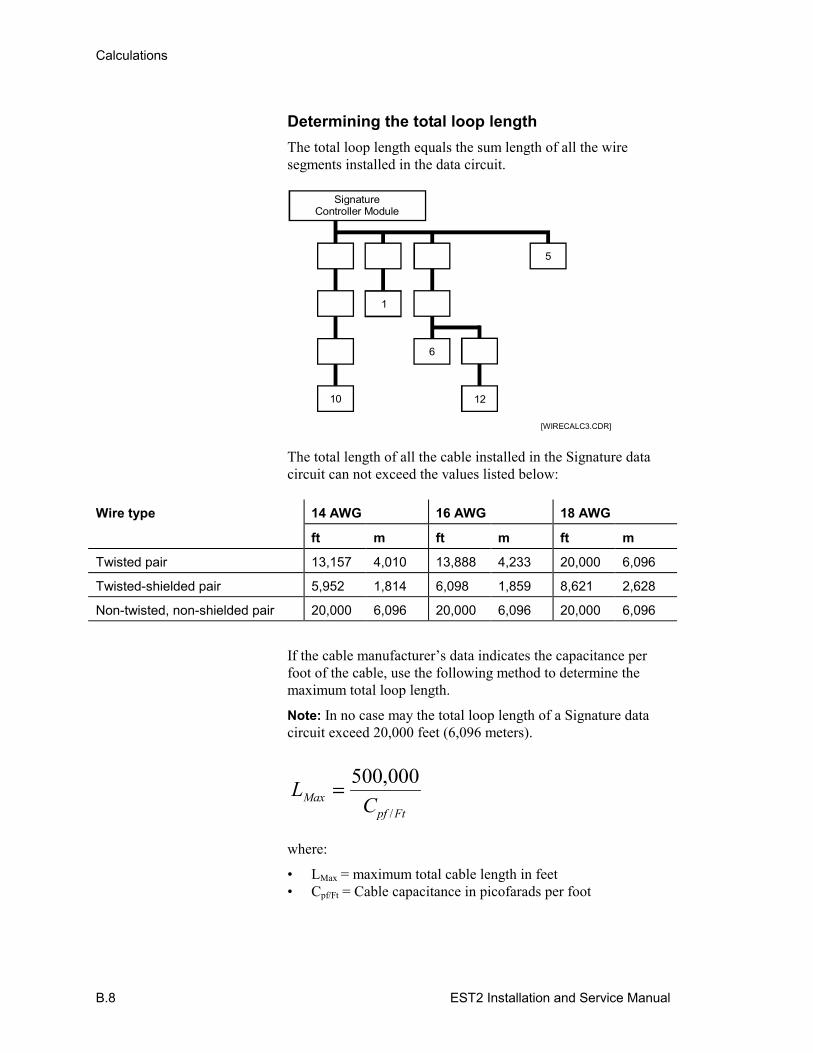
Calculations
B.8 EST2 Installation and Service Manual
Determining the total loop lengthThe total loop length equals the sum length of all the wiresegments installed in the data circuit.
SignatureController Module
10
6
12
5
1
[WIRECALC3.CDR]
The total length of all the cable installed in the Signature datacircuit can not exceed the values listed below:
14 AWG 16 AWG 18 AWGWire type
ft m ft m ft m
Twisted pair 13,157 4,010 13,888 4,233 20,000 6,096
Twisted-shielded pair 5,952 1,814 6,098 1,859 8,621 2,628
Non-twisted, non-shielded pair 20,000 6,096 20,000 6,096 20,000 6,096
If the cable manufacturer’s data indicates the capacitance perfoot of the cable, use the following method to determine themaximum total loop length.
Note: In no case may the total loop length of a Signature datacircuit exceed 20,000 feet (6,096 meters).
LCMaxpf Ft
= 500 000,
/
where:
• LMax = maximum total cable length in feet• Cpf/Ft = Cable capacitance in picofarads per foot

Calculations
EST2 Installation and Service Manual B.9
Note: Install SIGA-IM Isolator modules at strategic points in theSignature data circuit to limit the effect of an electrical short.

Calculations
B.10 EST2 Installation and Service Manual
Calculating wire lengths for 24 Vdc NACsThe 24 Vdc notification appliance circuits (NACs) must be aminimum of 18 AWG (0.75 mm2) pair. The maximum allowablecircuit resistance and cable manufacturer’s specificationsdetermine the limits for circuit length.
Table B-5: Wire resistance ratings
Wire size Resistance per 1000 ft pair
18 AWG (0.75 mm2) 13.0 Ω
16 AWG (1.0 mm2) 8.0 Ω
14 AWG (1.50 mm2) 5.2 Ω
12 AWG (2.5 mm2) 3.2 Ω
The following restrictions apply to the calculation of wire sizesfor 24 Vdc NACs:
• Minimum supply voltage available is 20.4 Vdc• Minimum required circuit voltage at any notification
appliance is 17.0 Vdc
According to Ohm’s Law, the maximum allowable NACresistance equals the voltage drop divided by the NAC current.
RVIMaxdrop
Max
=
where:
• RMax = Maximum allowable NAC resistance
• Vdrop = Maximum allowable voltage drop of 3.4 volts frompower supply to the last notification appliance (20.4 - 17)
• IMax = Maximum NAC requirement (Total current of allinstalled notification appliances. See Table B-6.)
The maximum permissible circuit resistance for a fully loaded(3.5 A) NAC using 14 AWG wire is 0.97 Ω.
0 97 33 5
. .4.
Ω = VA
Use Table B-5 to determine the maximum allowable distance(D) of any listed wire gauge pair.
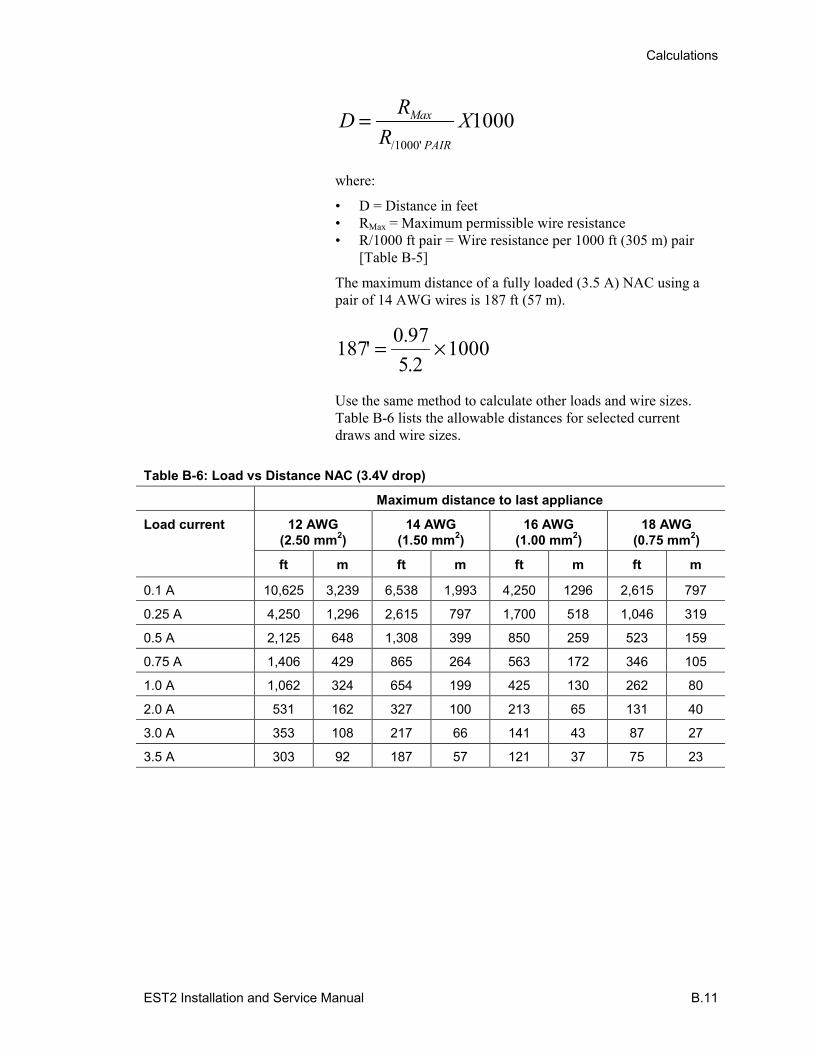
Calculations
EST2 Installation and Service Manual B.11
D RR
XMax
PAIR
=/1000'
1000
where:
• D = Distance in feet• RMax = Maximum permissible wire resistance• R/1000 ft pair = Wire resistance per 1000 ft (305 m) pair
[Table B-5]
The maximum distance of a fully loaded (3.5 A) NAC using apair of 14 AWG wires is 187 ft (57 m).
187 0 975 2
1000' ..
= ×
Use the same method to calculate other loads and wire sizes.Table B-6 lists the allowable distances for selected currentdraws and wire sizes.
Table B-6: Load vs Distance NAC (3.4V drop)
Maximum distance to last appliance
12 AWG(2.50 mm2)
14 AWG(1.50 mm2)
16 AWG(1.00 mm2)
18 AWG(0.75 mm2)
Load current
ft m ft m ft m ft m
0.1 A 10,625 3,239 6,538 1,993 4,250 1296 2,615 797
0.25 A 4,250 1,296 2,615 797 1,700 518 1,046 319
0.5 A 2,125 648 1,308 399 850 259 523 159
0.75 A 1,406 429 865 264 563 172 346 105
1.0 A 1,062 324 654 199 425 130 262 80
2.0 A 531 162 327 100 213 65 131 40
3.0 A 353 108 217 66 141 43 87 27
3.5 A 303 92 187 57 121 37 75 23
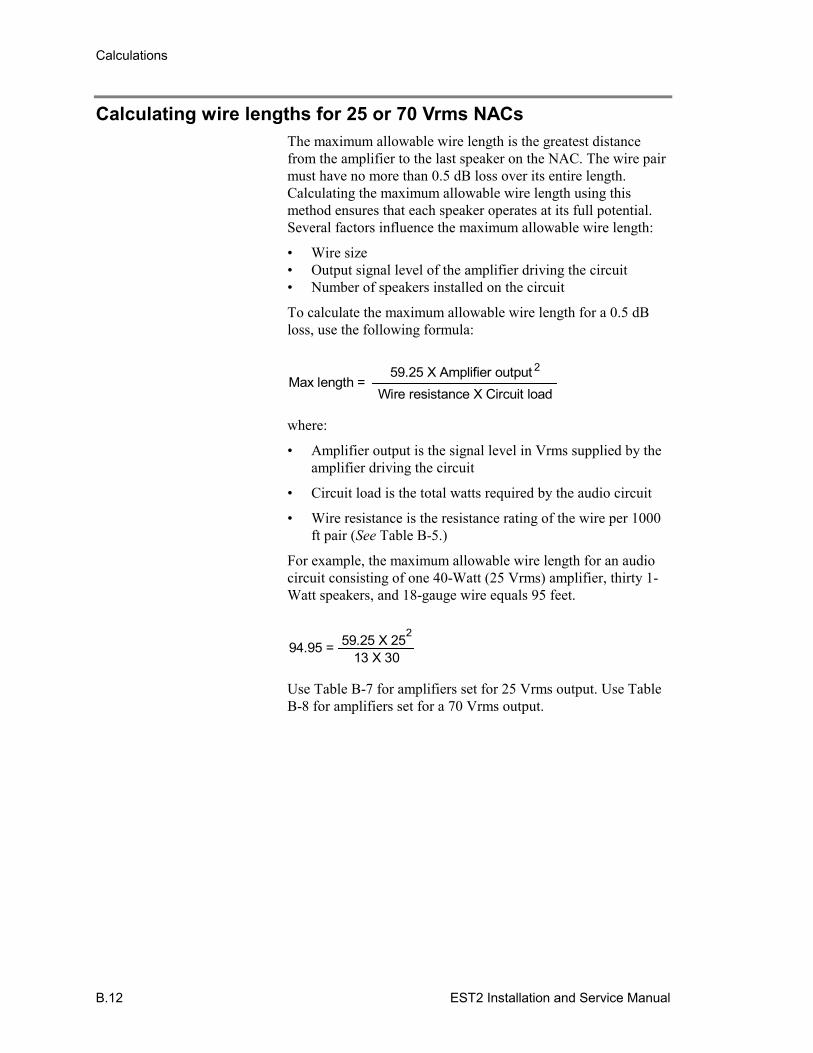
Calculations
B.12 EST2 Installation and Service Manual
Calculating wire lengths for 25 or 70 Vrms NACsThe maximum allowable wire length is the greatest distancefrom the amplifier to the last speaker on the NAC. The wire pairmust have no more than 0.5 dB loss over its entire length.Calculating the maximum allowable wire length using thismethod ensures that each speaker operates at its full potential.Several factors influence the maximum allowable wire length:
• Wire size• Output signal level of the amplifier driving the circuit• Number of speakers installed on the circuit
To calculate the maximum allowable wire length for a 0.5 dBloss, use the following formula:
Max length =Wire resistance X Circuit load
59.25 X Amplifier output 2
where:
• Amplifier output is the signal level in Vrms supplied by theamplifier driving the circuit
• Circuit load is the total watts required by the audio circuit
• Wire resistance is the resistance rating of the wire per 1000ft pair (See Table B-5.)
For example, the maximum allowable wire length for an audiocircuit consisting of one 40-Watt (25 Vrms) amplifier, thirty 1-Watt speakers, and 18-gauge wire equals 95 feet.
94.95 =13 X 30
59.25 X 252
Use Table B-7 for amplifiers set for 25 Vrms output. Use TableB-8 for amplifiers set for a 70 Vrms output.

Calculations
EST2 Installation and Service Manual B.13
Table B-7: Maximum allowable length at 25 Vrms, 0.5 dB lossCircuit load requirement
15 W 20 W 30 W 40 W 90 W 120 WWire Size
ft m ft m ft m ft m ft m ft m
18 AWG(0.75 mm2)
190 58 142 43 95 29 71 22 Over maxcurrent limit
Over maxcurrent limit
16 AWG(1.0 mm2)
309 94 231 70 154 47 116 35 51 16 39 12
14 AWG(1.5 mm2)
475 145 356 109 237 72 178 54 79 24 59 18
12 AWG(2.5 mm2)
772 235 579 176 386 118 289 88 129 39 96 29
Table B-8: Maximum allowable length at 70 Vrms, 0.5 dB lossCircuit load requirement
15 W 20 W 30 W 40 W 90 W 120 WWire Size
ft m ft m ft m ft m ft m ft m
18 AWG(0.75 mm2)
1489 454 1117 340 744 227 558 170 248 76 186 57
16 AWG(1.0 mm2)
2420 738 1815 553 1210 369 907 276 403 123 302 92
14 AWG(1.5 mm2)
3722 1134 2792 851 1861 567 1396 426 620 189 465 142
12 AWG(2.5 mm2)
6049 1844 4537 1383 3024 922 2268 691 1008 307 756 230

Calculations
B.14 EST2 Installation and Service Manual
Calculating wire lengths for addressable analog circuitsTable B-9 lists the maximum wire distances allowed forAddressable Analog circuits.
Notes
• Maximum wire resistance can not exceed 50 Ω.• Maximum wire capacitance can not exceed 0.05 µF.
Table B-9: Maximum allowable wire distance for addressable analog circuits
Twisted,non-shielded
Twisted,shielded
Non-twisted,non-shielded
Wiregauge
Max loopcapacitance
ft m ft m ft m
0.01 µF 4000 1219 1724 525 5000 15240.02 µF 8000 2438 3448 1051 10000 3048
18 0.03 µF 12000 3658 5172 1576 15000 45720.04 µF 16000 4877 6896 2102 20000 60960.05 µF 20000 6096 8620 2627 25000 7620
0.01 µF 2777 846 1219 372 5000 15240.02 µF 5555 1693 2439 743 10000 3048
16 0.03 µF 8333 2540 3658 1115 15000 45720.04 µF 11111 3387 4878 1487 20000 60960.05 µF 13888 4233 6097 1858 25000 7620
0.01 µF 2631 802 1190 363 5000 15240.02 µF 5263 1604 2380 725 10000 3048
14 0.03 µF 7894 2406 3571 1088 15000 45720.04 µF 10526 3208 4761 1451 20000 60960.05 µF 13157 4010 5952 1814 25000 7620

Calculations
EST2 Installation and Service Manual B.15
Calculating ampere-hour battery requirementsUse the following method to calculate the minimum ampere-hour capacity of a battery required for the operation of a panel inthe absence of ac power. Perform battery calculations separatelyfor each cabinet in the system.
To calculate the ampere-hour capacity:
1. Determine the total amount of current in milliamps requiredby all of the components that derive power from the batterywhile the panel is in standby mode.
2. Multiply the total amount of standby current by the numberof hours that the panel is required to operate in standbymode while on battery power.
3. Determine the total amount of current in milliamps requiredby all of the components that derive power from the batterywhile the panel is in alarm mode.
4. Multiply the total amount of alarm current by the number ofminutes that the panel is required to operate in alarm modewhile on battery power.
5. Divide the result by 60 to convert minutes to hours.
6. Add the total amount of standby current and the totalamount of alarm current then divide the result by 1000 toconvert to ampere-hours.
7. Multiply this number by 1.2 to add a 20% safety factor tothe calculations.

Calculations
B.16 EST2 Installation and Service Manual
EST2 Installation and Service Manual C.1
Appendix C Special applications
Summary
Chapter 6 illustrates the wiring of the Ditek Surge ProtectorModule and the CDR-3 Bell Coder.
ContentDitek surge protector module • C.2
Description • C.2Wiring the surge protector module • C.2
Wiring the CDR-3 Bell Coder • C.4

Special applications
C.2 EST2 Installation and Service Manual
Ditek surge protector module
DescriptionAny time a wire exits a building and enters another, it must havesurge and amperage protection at each end. The Ditek surgeprotector module (Figure C-1) provides protection to circuits,fuses, and wiring. The surge protector is mounted in a standardgrounded metal electrical box and comes in a 2, 4, 6, or 8-wireversion. The following are part numbers for the Ditek surgeprotectors:
• 2 Wire Protector: (P/N - DTK-1LVLPSCP)• 4 Wire Protector: (P/N - DTK-2LVLPSCP)• 6 Wire Protector: (P/N - DTK-3LVLPSCP)• 8 Wire Protector: (P/N - DTK-4LVLPSCP)
These surge protectors can be ordered from Ditek at 12345-AStarkey Road, Largo, Florida 34643. Ditek also has a toll-freenumber (1-800-753-2345).
24 VSURGE PROTECTOR
INST064.CDR
Figure C-1: Ditek Surge Protector Module
Wiring the surge protector moduleFigure C-2 illustrates the typical application for surge protectormodules. Wiring must include a surge protector when it exits onebuilding and another surge protector when it enters the nextbuilding.
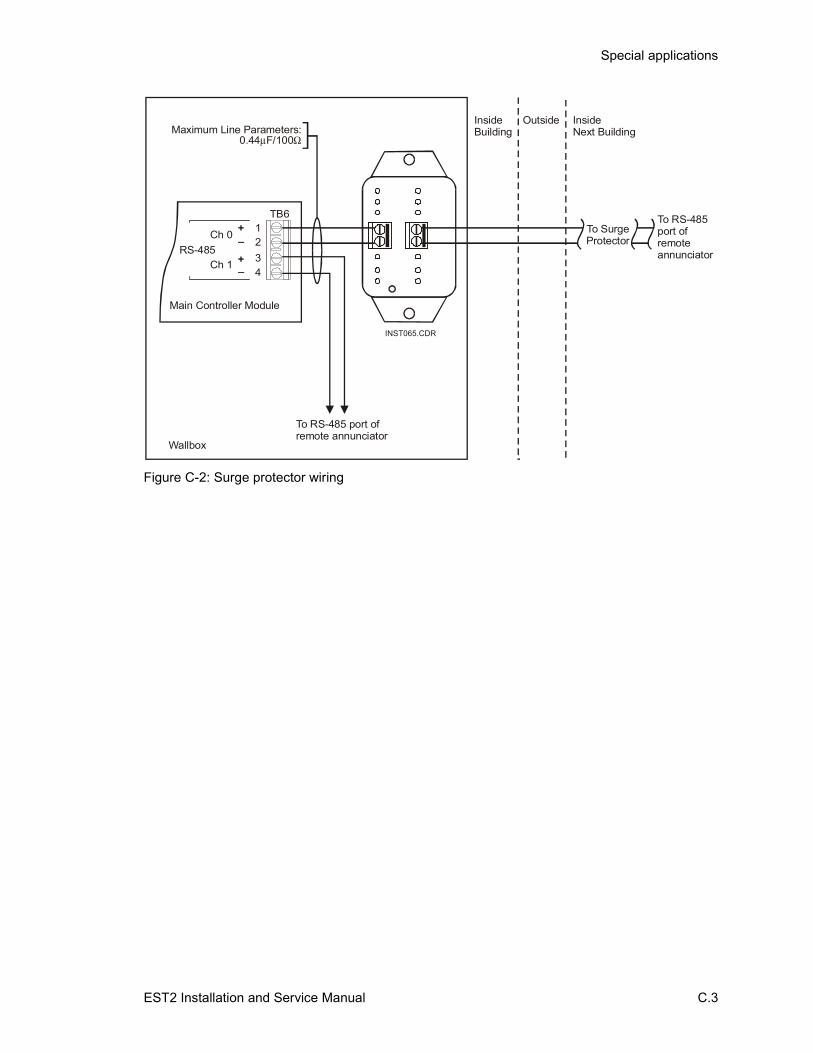
Special applications
EST2 Installation and Service Manual C.3
InsideBuilding
InsideNext Building
Outside
Wallbox
To SurgeProtector
INST065.CDR
To RS-485 port ofremote annunciator
To RS-485port ofremoteannunciator
Maximum Line Parameters:0.44 F/100µ Ω
Main Controller Module
Ch 0RS-485
Ch 1 +
+
_
_
TB61234
Figure C-2: Surge protector wiring

Special applications
C.4 EST2 Installation and Service Manual
Wiring the CDR-3 Bell CoderSome applications require coded fire alarm signals. The CDR-3Bell Coder provides march time or unique coded outputs forseparate zones. Figure C-3 illustrates the wiring for a typicalcoded signal. Figure C-4 shows how to wire a CDR-3 to anaudio circuit. Figure C-5 pictures the wiring of a CDR-3 toNACs on the Main Controller Module.
Note: See the CDR-3 installation sheet (P/N 3100023) for moredetails about the installation and wiring of the bell coder.
CC2
14 13 12 11 10 9
8 7 6 5 4 3 2 1RS-232
TXDRXDRTSCOM
MainControllerModule
+_
PrimaryPowerSupply TB3
NACPWR
CT2
4 3 2 1
8 7 6 5
INST105.CDR
N/O in normal condition
1 2 3 4 5 6 7 8 9 10 11 12
UL/ULC listed 10 k EOL (1/4W)Ω
Bell orhorncircuit
UL/ULClisted47 k EOLΩ
UL/ULC listed47 k EOLΩ
Main boardDaugter board
CDR-3CDR-3
1 2 3 4 5 6 7
TB1TB1
Note: All components except for the bell or horn circuit must be in the same enclosure.
Figure C-3: Coded signal wiring

Special applications
EST2 Installation and Service Manual C.5
Daughter board Main board
1 2 3 4 5 6 71 2 3 4 5 6 7 8 910 11 12
TB3
TB4
AUX. input 1 AUX. input 2
2-AAC
CDR-3
TB1TB1
24 Vdc To RS-232 port on Main Controller Module
INST104.CDR
To Monitor Module
+-
TXDCOM
Note: All components must be in the same enclosure.
Figure C-4: 2-AAC with coded tone auxiliary output

Special applications
C.6 EST2 Installation and Service Manual
Bell or horn circuit
UL/ULC Listed 15 k EOL resistorΩ
UL/ULC Listed 15k EOL resistorΩ
UL/ULCListed47 kEOLresistor
Ω
UL/ULCListed47 kEOLresistor
Ω
Main Controller Module
SOURCE SOURCENAC1/B NAC1/BNAC1/A NAC1/A+ ++ ++ +_ __ __ _
TB1 TB2
+
+
+
_
_
_
PrimaryPowerSupply
UL/ULC listedpower supply
UL/ULC listedpower supply
TB3
NACPWR
24 Vdc
24 Vdc
CDR-3 main board
1 2 3 4 5 6 7TB1
12
12
16
16
11
11
15
15
10
10
14
14
9
9
13
13
8
8
4
4
7
7
3
3
6
6
2
2
5
5
1
1
UM
UM
Bell or Horn Circuit
Bell or Horn Circuit
EXR or ARA-1polarized relay
EXR or ARA-1polarized relay
1
1
2
2
2
2
33
3
Typical Area 1
Typical Area 2
Typical Area 3
Wiring connections provide march time code after completion of PSN1 code.
NotesThe CDR-3 must be in the same enclosure as the audible circuit.
The circuit must be activated on all system alarms.
Riser out to next device or to UL/ULC listed EOL resistor
3-2-1
3-2-1
Figure C-5: Coded NAC risers

EST2 Installation and Service Manual Z.1
Z Index
22-AAC • 4.21–4.222-CMDN(-C) • 4.252-LCD
LEDs • 4.9messages on • 4.4–4.9problems with • 4.18–4.19testing of • 3.5–3.8
2-LCX • 4.16–4.182-LSRA(-C) • 4.252-MCM • 4.15–4.16, 4.182-MIC • 4.222-PPS(-220) • 4.12, 4.132-PPS/6A(-220) • 4.12–4.132-SMDN(-C) • 4.252-TEL • 4.222-WB(R) • 2.4, 2.82-WB3(R) • 2.5, 2.82-WB7(R) • 2.6, 2.82-WBS(R) • 2.4, 2.8
Aactivating the system • 3.2addresses, system • 4.4–4.5adjustments, amplifier gain • 4.23–4.24amplifiers, audio. See SIGA-AAXXannunciators, remote alphnumeric. See 2-
CMDN(-C); 2-SMDN(-C)appliances, notification
testing of • 3.24ULC compatibility listings • A.10–A.15ULI compatibility listings • A.3–A.7
audio control module. See 2-AACauxiliary power supplies. See SIGA-APS(-
220)
Bbell coder. See CDR-3
Ccabinets, system. See 2-WB(R); 2-WB3(R);
2-WB7(R); 2-WBS(R)cable manufacturers • A.18
calculations24 Vdc NACs • B.9–B.1025 or 70 Vrms NACs • B.11–B.12addressable analog data circuits • B.13battery • B.14Signature branch length • B.2–B.7total loop length • B.8
CDR-3LEDs • 4.21wiring • C.4–C.6
certificate of completion • 3.25–3.27circuit compatibility matrix • A.16cleaning tool, detector • 4.27–4.28coder, bell. See CDR-3compatibility listings
circuit • A.16–A.17ULC • A.9–A.15ULI • A.2–A.8
configurationscontrol panel • 2.4–2.8NAC • 2.9–2.11
controllers, loop. See 2-LCX; 2-MCM
Ddetector cleaning tool • 4.27–4.28detectors, conventional • 3.19–3.20detectors, duct • 3.20detectors, restorable heat • 3.22detectors, Signature series
cleaning of • 4.27problems with • 5.7testing of • 3.19
devices, initiating • 3.22–3.23dialer. See DL2display, liquid crystal. See 2-LCDDitek surge protector module • C.2–C.3DL2 • 4.19–4.20documenting system service • 4.2–4.3. See
also Fire alarm trouble and maintenancelog
dummy load values • 4.24
Eenclosures. See 2-WB(R); 2-WB3(R); 2-
WB7(R); 2-WBS(R)expander loop module. See 2-LCX

Index
Z.2 EST2 Installation and Service Manual
Ffault messages • 4.5–4.9fire alarm tests • 3.6–3.7, 3.8Fire alarm trouble and maintenance log •
4.29firmware chip replacement
2-LCX • 4.172-MCM • 4.16
form printer. See PT-1S
Ggain adjustment, SIGA-AAXX • 4.23–4.24general status screen • 4.10ground faults • 5.5–5.6
Hhandling static-sensitive devices • 4.2
Iindicators. See LEDsinitial acceptance test • 3.3isolation procedures
for ground faults • 5.5for mapping errors • 5.9for open circuits • 5.3for short circuits • 5.4
LLED/switch modules • 4.19LEDs (light emitting diodes)
on Signature devices • 5.7on the 2-LCD • 4.9on the 2-LCX • 4.17on the 2-MCM • 4.15–4.16on the 2-PPS(-220) • 4.12on the 2-PPS/6A(-220) • 4.13on the CDR-3 • 4.21on the SIGA-AAXX • 4.23on the SIGA-APS(-220) • 4.14
life safety remote annunciator. See 2-LSRA(-C)
log, Fire alarm trouble and maintenance •4.29
loop controllers. See 2-LCX; 2-MCMloop status screen • 4.11
Mmain controller module. See 2-MCMmaintenance, preventive • 4.2mapping errors • 5.9
matrix, circuit compatibility • A.16messages, system fault • 4.5–4.9microphone. See 2-MICmodule
audio control. See 2-AACDitek surge protector • C.2–C.3expander loop. See 2-LCXfront panel LED/switch. See 2-LCDmain controller. See 2-MCM
modules, Signature seriesproblems with • 5.8testing of • 3.20–3.21
NNACs (notification appliance circuits)
Class A wiring • 2.10Class B wiring • 2.9multiplexed switched wiring • 2.11testing of • 3.11
nonpower-limited circuits • A.16–A.17
Oopen circuits • 5.2–5.4
Ppanel, control
configurations • 2.4–2.8testing of • 3.4–3.8
phone, firefighter. See 2-TELpoints, supervisory • 3.7–3.8ports, RS-232 and RS-485
inoperative • 4.18testing of • 3.9
power suppliesauxiliary. See SIGA-APS(-220)primary. See 2-PPS(-220); 2-PPS/6A(-
220)power-limited circuits • A.16–A.17precautions, electro-static • 4.2preventive maintenance • 4.2primary power supplies. See 2-PPS(-220);
2-PPS/6A(-220)printers. See PT-1S; RSAN-PRTproblems
2-AAC • 4.212-CMDN(-C) • 4.252-LCD • 4.192-LCX • 4.182-LSRA(-C) • 4.252-MCM • 4.182-MIC • 4.222-PPS(-220) • 4.13

Index
EST2 Installation and Service Manual Z.3
problems (continued)2-PPS/6A(-220) • 4.132-SMDN(-C) • 4.252-TEL • 4.22DL2 • 4.20ground faults • 5.5–5.6LED/switch modules • 4.19mapping errors • 5.9–5.10open circuits • 5.2–5.4PT-1S • 4.26RS-232 • 4.18RS-485 • 4.18RSAN-PRT • 4.26short circuits • 5.4–5.5SIGA-AAXX • 4.24SIGA-APS(-220) • 4.14–4.15Signature data circuit • 4.18Signature series detectors • 5.7Signature series modules • 5.8
procedures, isolationfor ground faults • 5.5–5.6for mapping errors • 5.9for open circuits • 5.3for short circuits • 5.4
PT-1S • 4.26pull stations, manual • 3.22
Rre-acceptance test • 3.3remote alphnumeric annunciators. See 2-
CMDN(-C); 2-SMDN(-C)replacing firmware chips
on the 2-LCX • 4.17on the 2-MCM • 4.16
requirements, system • 2.3restorable heat detectors • 3.22RS-232
problems with • 4.18testing of • 3.9
RS-485problems with • 4.18testing of • 3.9
RSAN-PRT • 4.26
Ssafety, personal • 4.2screens, 2-LCD
general status • 4.10ground faults • 5.5loop status • 4.11mapping errors • 5.9open circuits • 5.2short circuits • 5.4
screens, 2-LCD (continued)system status • 4.10
SDC (Signature data circuit)calculating branch length for • B.2–B.7calculating total length for • B.8problems with • 4.18testing of • 3.10
short circuits • 5.4–5.5SIGA-AAXX
dummy load values • 4.24gain adjustment • 4.23–4.24LEDs • 4.23problems with • 4.24
SIGA-APS(-220) • 4.14–4.15Signature series detectors
problems with • 5.7testing of • 3.19
Signature series modulesproblems with • 5.8testing of • 3.20–3.21
specifications, circuit • A.17strip printer. See RSAN-PRTsubstitutes
2-LCX • 4.17–4.182-MCM • 4.16
supervisory points • 3.7–3.8Surge Protector Module, Ditek • C.2–C.3switches, waterflow • 3.23system
activation of • 3.2addresses • 4.4–4.5fault messages • 4.5–4.9requirements • 2.3testing of • 3.3
system status screen • 4.9
Ttelephone, firefighter. See 2-TELtests
2-LCD • 3.5–3.8control panel • 3.4–3.8conventional detectors • 3.19–3.20duct detectors • 3.20fire alarms • 3.6–3.7, 3.8initial acceptance • 3.3initiating devices • 3.22–3.23manual pull stations • 3.22notification appliance circuits • 3.11notification appliances • 3.24power supplies • 3.4–3.5re-acceptance • 3.3restorable heat detectors • 3.22RS-232 ports • 3.9RS-485 ports • 3.9
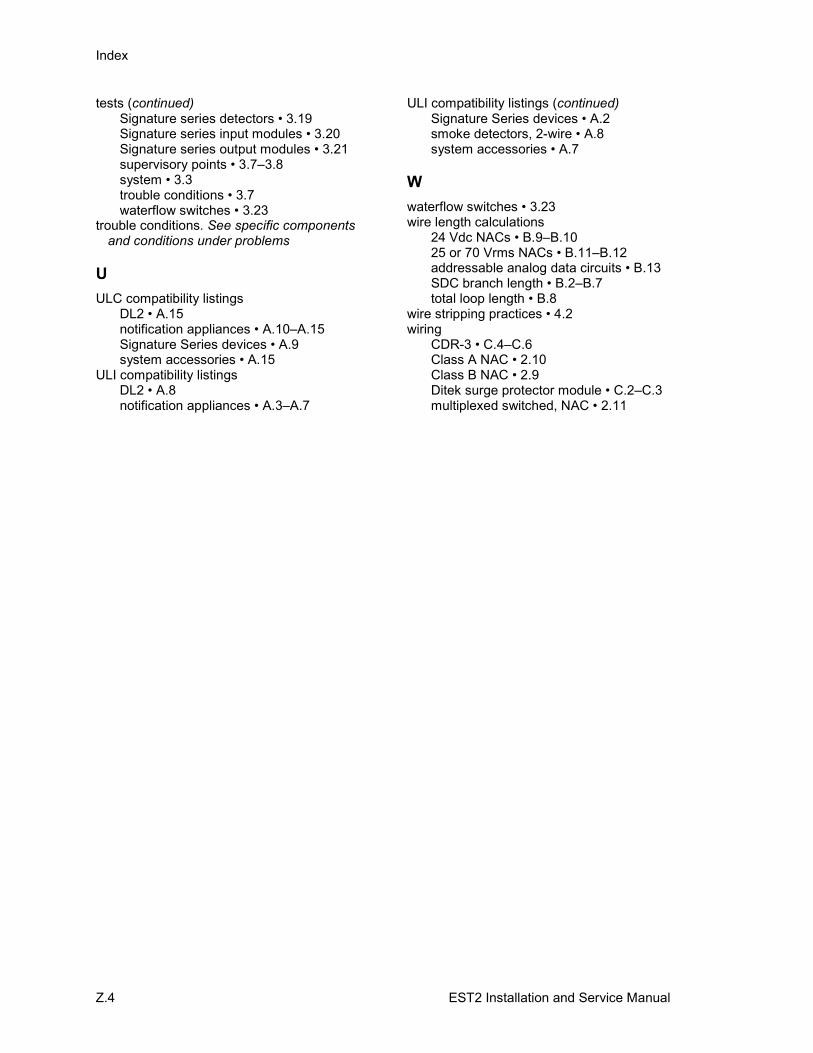
Index
Z.4 EST2 Installation and Service Manual
tests (continued)Signature series detectors • 3.19Signature series input modules • 3.20Signature series output modules • 3.21supervisory points • 3.7–3.8system • 3.3trouble conditions • 3.7waterflow switches • 3.23
trouble conditions. See specific componentsand conditions under problems
UULC compatibility listings
DL2 • A.15notification appliances • A.10–A.15Signature Series devices • A.9system accessories • A.15
ULI compatibility listingsDL2 • A.8notification appliances • A.3–A.7
ULI compatibility listings (continued)Signature Series devices • A.2smoke detectors, 2-wire • A.8system accessories • A.7
Wwaterflow switches • 3.23wire length calculations
24 Vdc NACs • B.9–B.1025 or 70 Vrms NACs • B.11–B.12addressable analog data circuits • B.13SDC branch length • B.2–B.7total loop length • B.8
wire stripping practices • 4.2wiring
CDR-3 • C.4–C.6Class A NAC • 2.10Class B NAC • 2.9Ditek surge protector module • C.2–C.3multiplexed switched, NAC • 2.11