esp8266 - nico-maas.de · nodemcu 10.06.2015 nico maas / / [email protected] 9 • opensource...
TRANSCRIPT
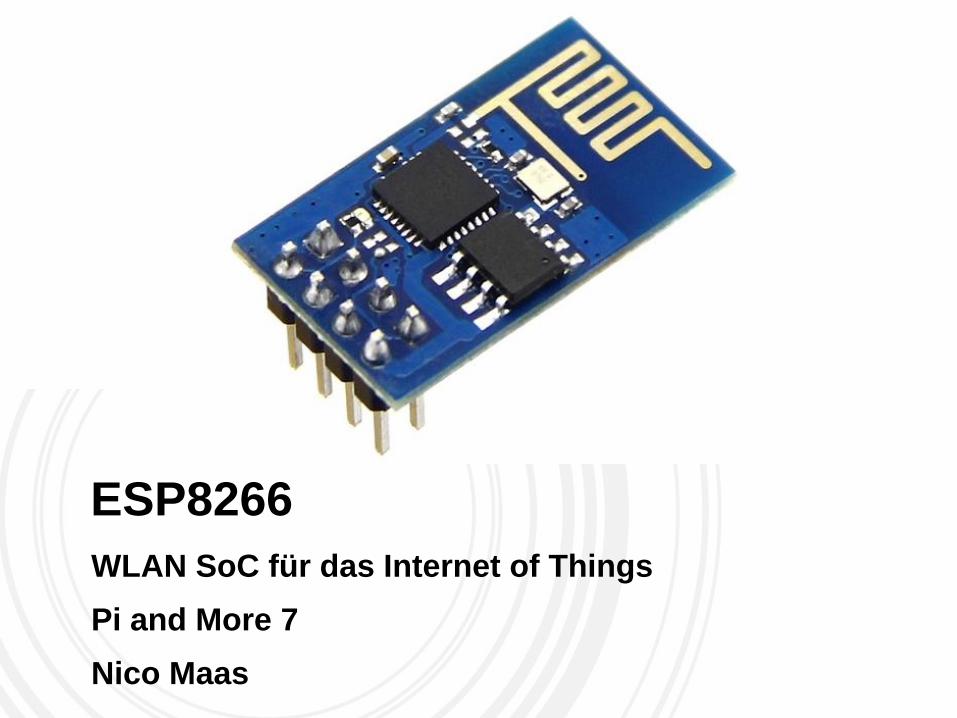
ESP8266
WLAN SoC für das Internet of Things
Pi and More 7
Nico Maas
Zur Person
Nico Maas
IT Systemelektroniker
Bachelor of Science
www.nico-maas.de
@nmaas87
10.06.2015 Nico Maas / www.nico-maas.de / [email protected] 2
Agenda
10.06.2015 Nico Maas / www.nico-maas.de / [email protected] 3
- I. Einführung
- ESP8266
- Modelle
- NodeMCU
- II. Projekt
- Hardware
- Software Option 1
- Software Option 2
- Live Demo
- III. Abschluss
- Fragen
- Quellenangaben
ESP8266
10.06.2015 Nico Maas / www.nico-maas.de / [email protected] 4
• Espressif Systems ESP8266EX
• 802.11 b / g / n • Wi-Fi Direct
• Soft AP
• 802.11b mode + 19.5dBm output power
• Support antenna diversity
• Integrated WEP, TKIP, AES, and WAPI engines
• Built-in
• TCP / IP protocol stack
• TR switch, balun, LNA, power amplifier & matching network
• PLL, voltage regulators, DCXO and power management
• temperature sensor
• Power down leakage current of <10uA
• Integrated low power 32-bit CPU
• SDIO 1.1/2.0, SPI, UART
• STBC, 1×1 MIMO, 2×1 MIMO
• A-MPDU & A-MSDU aggregation & 0.4ms guard interval
• Wake up and transmit packets in < 2ms
• Standby power consumption of < 1.0mW (DTIM3)
Einführung
- ESP8266
- Modelle
- NodeMCU
Projekt
Abschluss
ESP8266
10.06.2015 Nico Maas / www.nico-maas.de / [email protected] 5
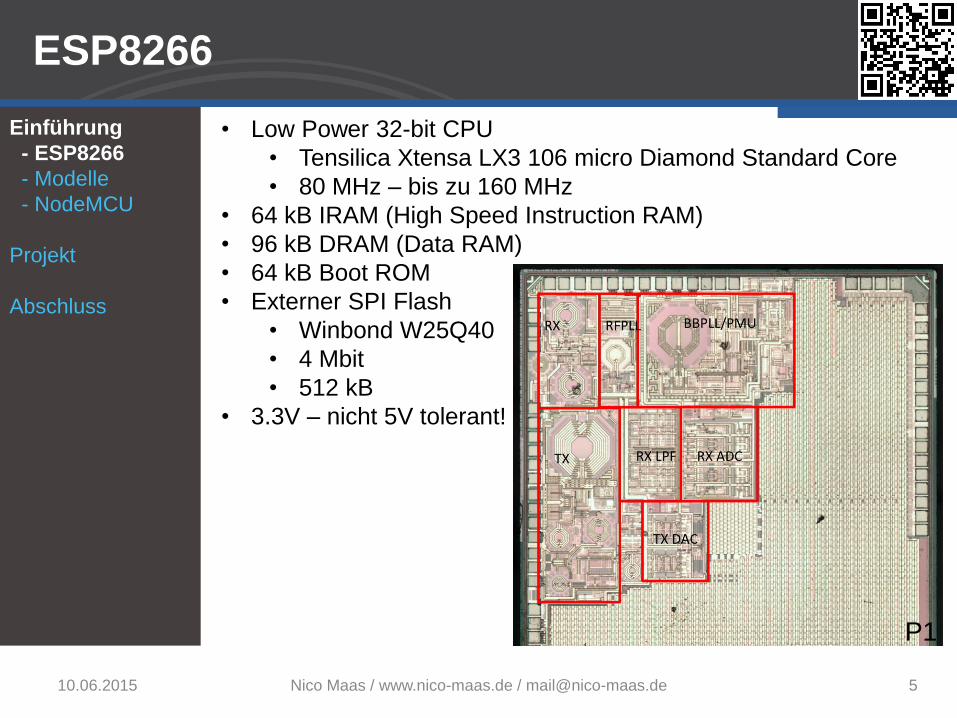
• Low Power 32-bit CPU
• Tensilica Xtensa LX3 106 micro Diamond Standard Core
• 80 MHz – bis zu 160 MHz
• 64 kB IRAM (High Speed Instruction RAM)
• 96 kB DRAM (Data RAM)
• 64 kB Boot ROM
• Externer SPI Flash
• Winbond W25Q40
• 4 Mbit
• 512 kB
• 3.3V – nicht 5V tolerant!
Einführung
- ESP8266
- Modelle
- NodeMCU
Projekt
Abschluss
P1
Modelle
10.06.2015 Nico Maas / www.nico-maas.de / [email protected] 6
Einführung
- ESP8266
- Modelle
- NodeMCU
Projekt
Abschluss
P2
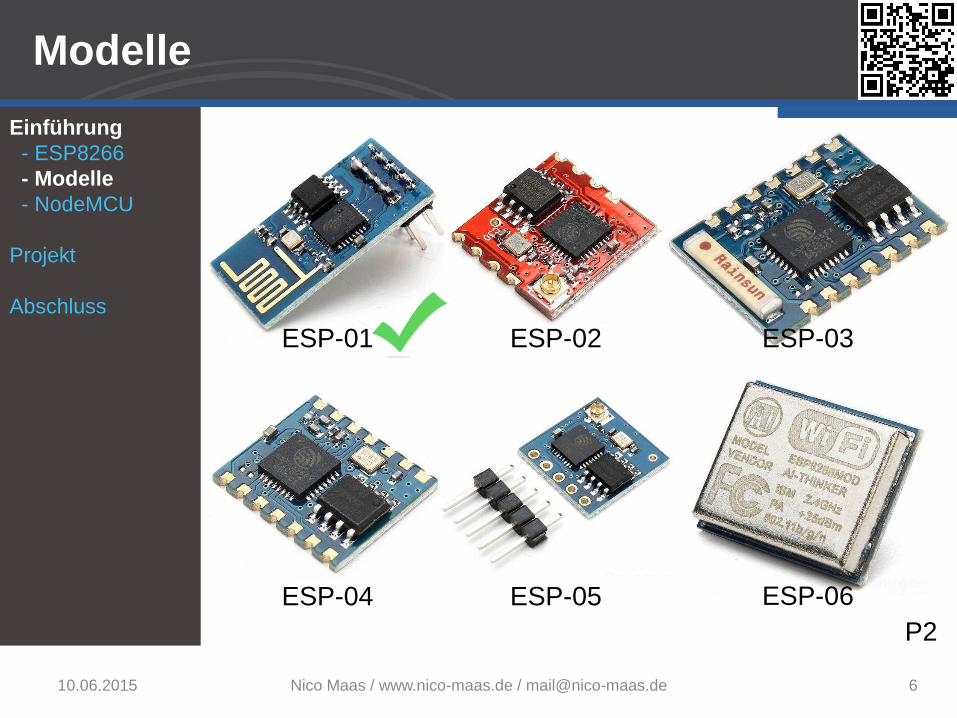
ESP-01 ESP-02 ESP-03
ESP-04 ESP-05 ESP-06
Modelle
10.06.2015 Nico Maas / www.nico-maas.de / [email protected] 7
Einführung
- ESP8266
- Modelle
- NodeMCU
Projekt
Abschluss
P2
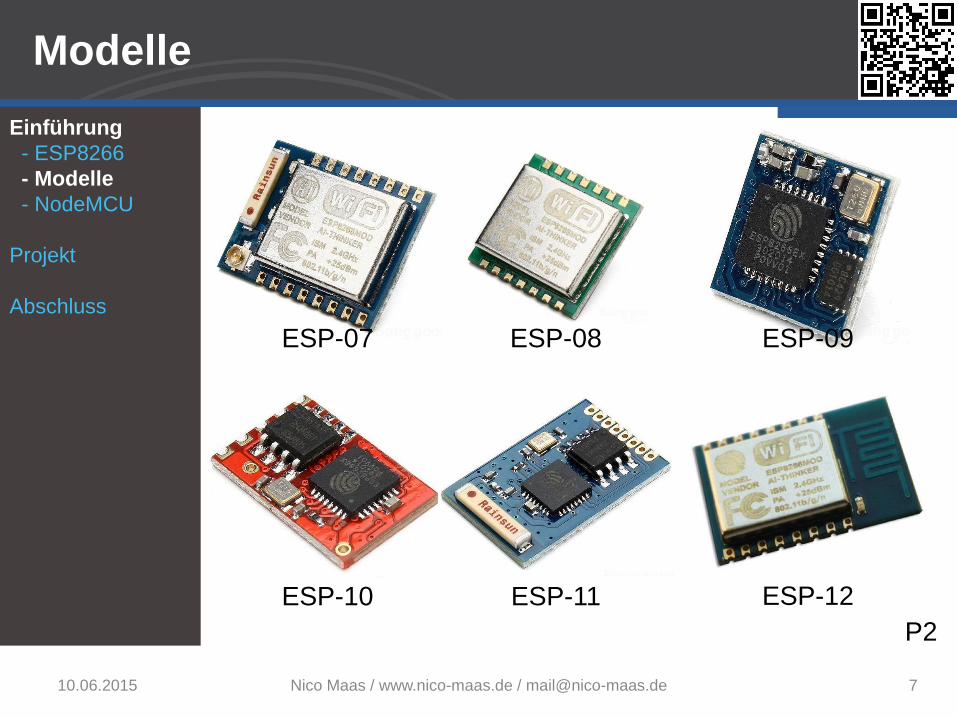
ESP-07 ESP-08 ESP-09
ESP-10 ESP-11 ESP-12
Modelle
10.06.2015 Nico Maas / www.nico-maas.de / [email protected] 8
Einführung
- ESP8266
- Modelle
- NodeMCU
Projekt
Abschluss
P2
P3
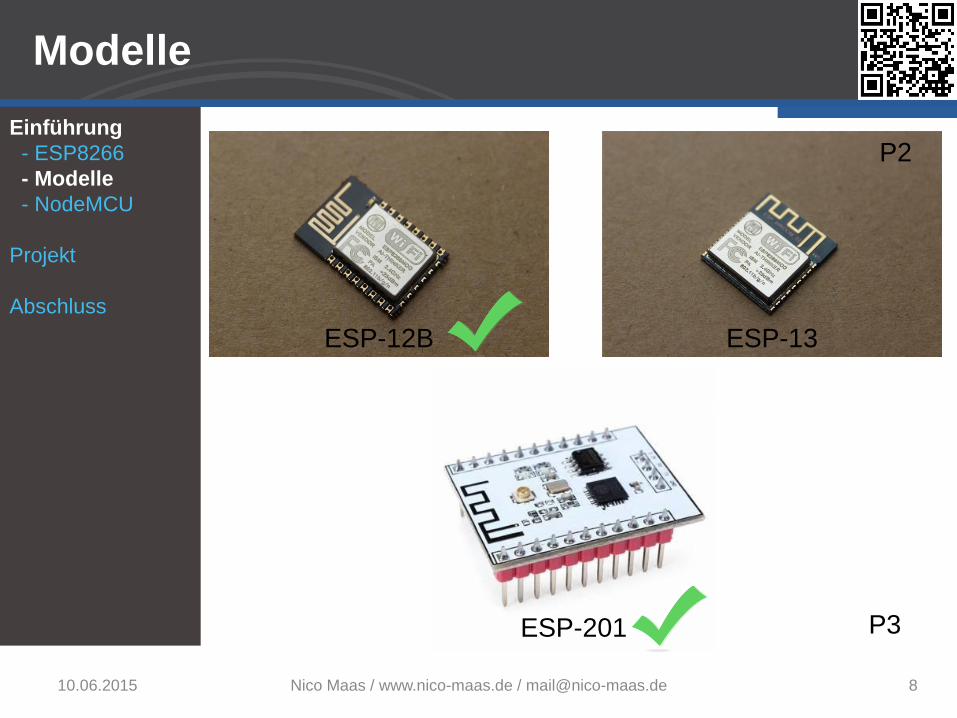
ESP-12B ESP-13
ESP-201
NodeMCU
10.06.2015 Nico Maas / www.nico-maas.de / [email protected] 9
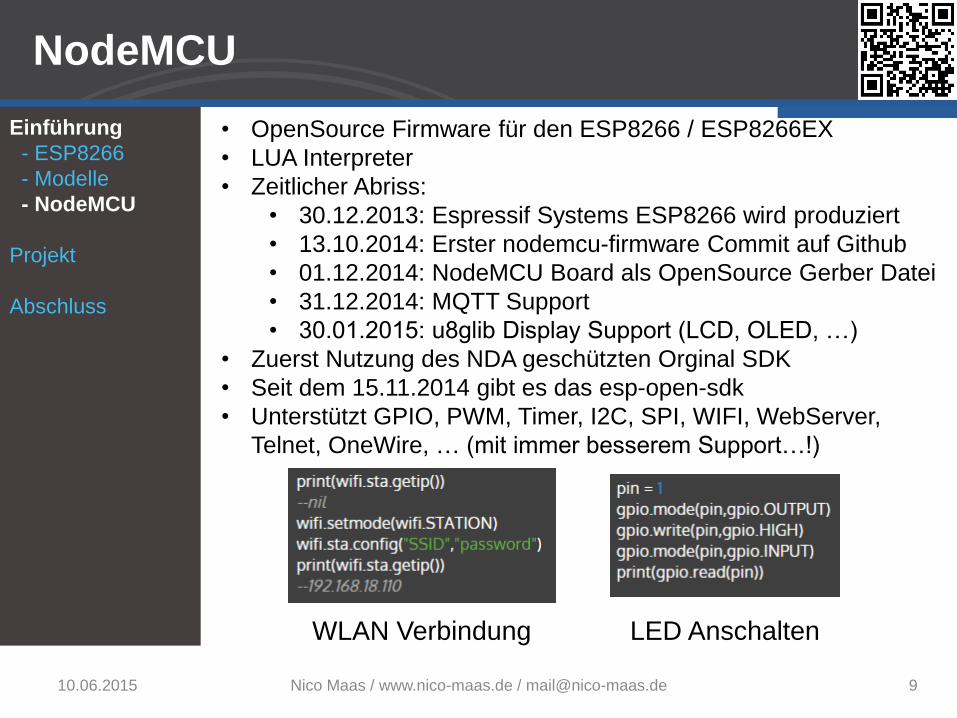
• OpenSource Firmware für den ESP8266 / ESP8266EX
• LUA Interpreter
• Zeitlicher Abriss:
• 30.12.2013: Espressif Systems ESP8266 wird produziert
• 13.10.2014: Erster nodemcu-firmware Commit auf Github
• 01.12.2014: NodeMCU Board als OpenSource Gerber Datei
• 31.12.2014: MQTT Support
• 30.01.2015: u8glib Display Support (LCD, OLED, …)
• Zuerst Nutzung des NDA geschützten Orginal SDK
• Seit dem 15.11.2014 gibt es das esp-open-sdk
• Unterstützt GPIO, PWM, Timer, I2C, SPI, WIFI, WebServer,
Telnet, OneWire, … (mit immer besserem Support…!)
Einführung
- ESP8266
- Modelle
- NodeMCU
Projekt
Abschluss
WLAN Verbindung LED Anschalten
Hardware
10.06.2015 10
Einführung
Projekt
- Hardware
- SW Option 1
- SW Option 2
- Live Demo
Abschluss
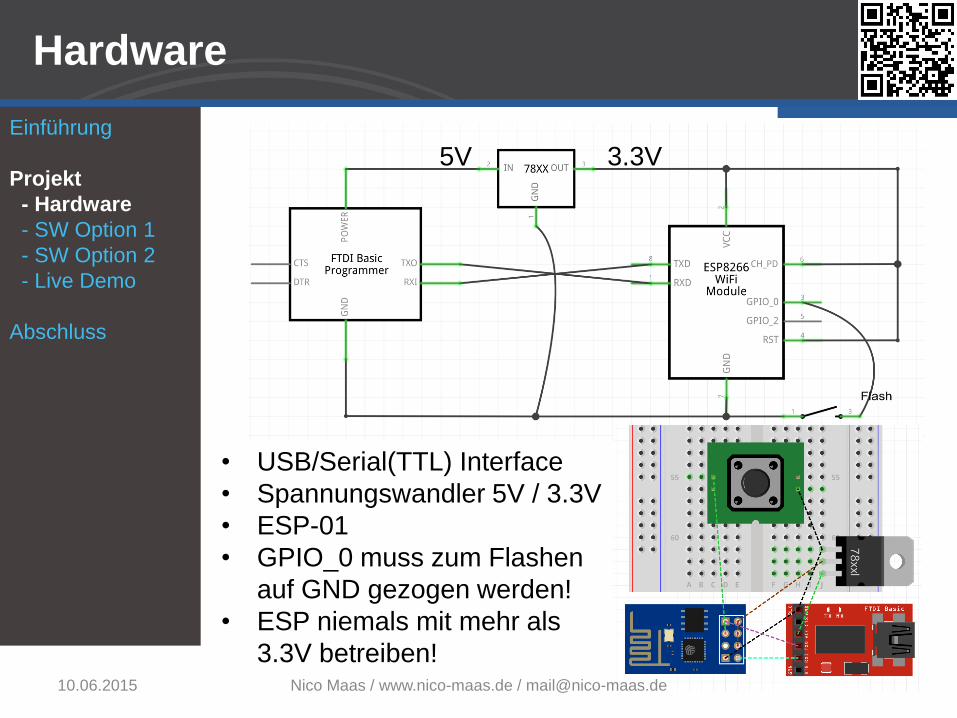
5V 3.3V
Nico Maas / www.nico-maas.de / [email protected]
• USB/Serial(TTL) Interface
• Spannungswandler 5V / 3.3V
• ESP-01
• GPIO_0 muss zum Flashen
auf GND gezogen werden!
• ESP niemals mit mehr als
3.3V betreiben!
Hardware
10.06.2015 11
Einführung
Projekt
- Hardware
- SW Option 1
- SW Option 2
- Live Demo
Abschluss
Nico Maas / www.nico-maas.de / [email protected]
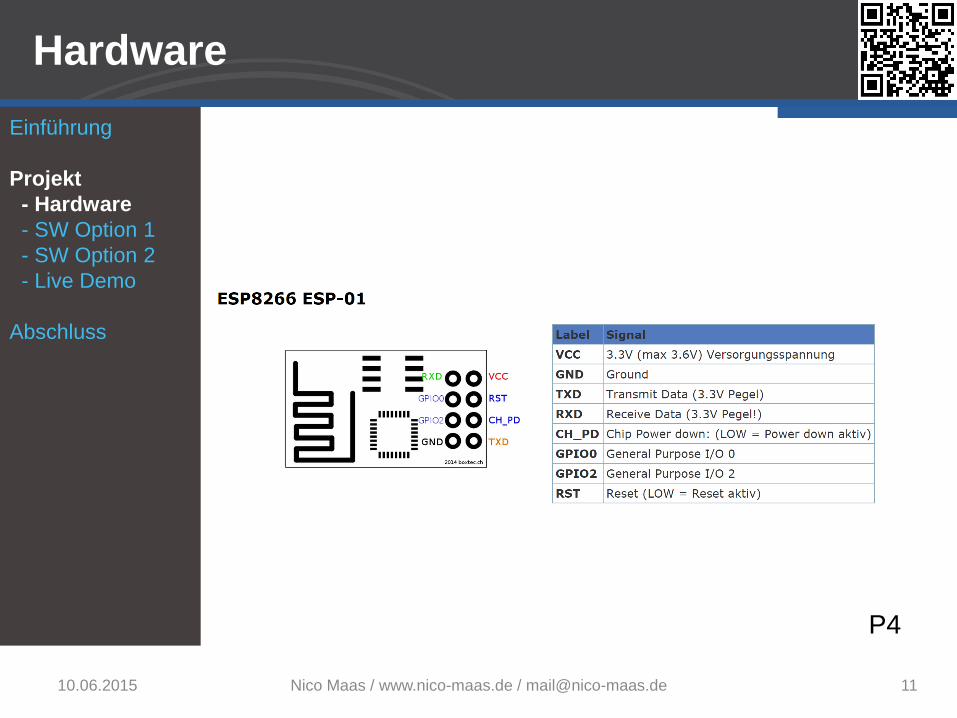
P4
SW Manuell (1/3): ESP Open SDK
10.06.2015 Nico Maas / www.nico-maas.de / [email protected] 12
• Ubuntu 14.04 LTS, x64 BIT
• ESP OPEN SDK installieren:
• sudo apt-get install make unrar autoconf automake libtool
gcc g++ gperf flex bison texinfo gawk ncurses-dev libexpat-
dev python sed git
• cd ~
• mkdir esp
• cd esp
• git clone https://github.com/pfalcon/esp-open-sdk.git
• cd esp-open-sdk
• make STANDALONE=y
• PATH Variable in .profile oder .bashrc eintragen
• export PATH=/home/pi/esp/esp-open-sdk/xtensa-lx106-
elf/bin:$PATH
• ESP OPEN SDK Update (für die Zukunft):
• cd ~/esp/esp-open-sdk
• make clean
• git pull
• git submodule update
• make STANDALONE=y
Einführung
Projekt
- Hardware
- SW Option 1
- SW Option 2
- Live Demo
Abschluss
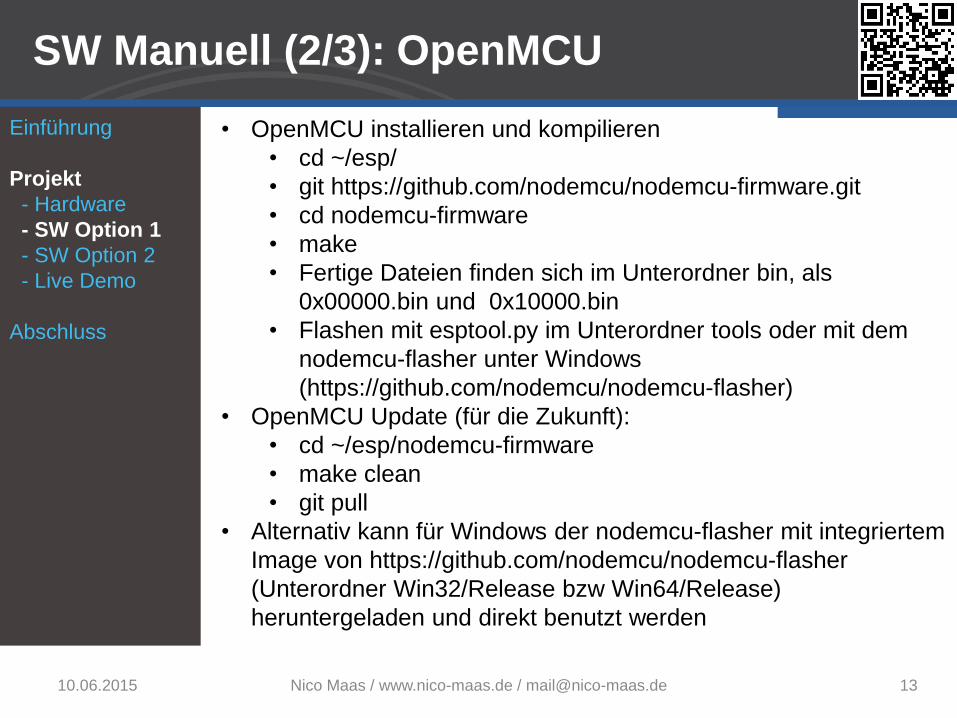
SW Manuell (2/3): OpenMCU
10.06.2015 Nico Maas / www.nico-maas.de / [email protected] 13
• OpenMCU installieren und kompilieren
• cd ~/esp/
• git https://github.com/nodemcu/nodemcu-firmware.git
• cd nodemcu-firmware
• make
• Fertige Dateien finden sich im Unterordner bin, als
0x00000.bin und 0x10000.bin
• Flashen mit esptool.py im Unterordner tools oder mit dem
nodemcu-flasher unter Windows
(https://github.com/nodemcu/nodemcu-flasher)
• OpenMCU Update (für die Zukunft):
• cd ~/esp/nodemcu-firmware
• make clean
• git pull
• Alternativ kann für Windows der nodemcu-flasher mit integriertem
Image von https://github.com/nodemcu/nodemcu-flasher
(Unterordner Win32/Release bzw Win64/Release)
heruntergeladen und direkt benutzt werden
Einführung
Projekt
- Hardware
- SW Option 1
- SW Option 2
- Live Demo
Abschluss
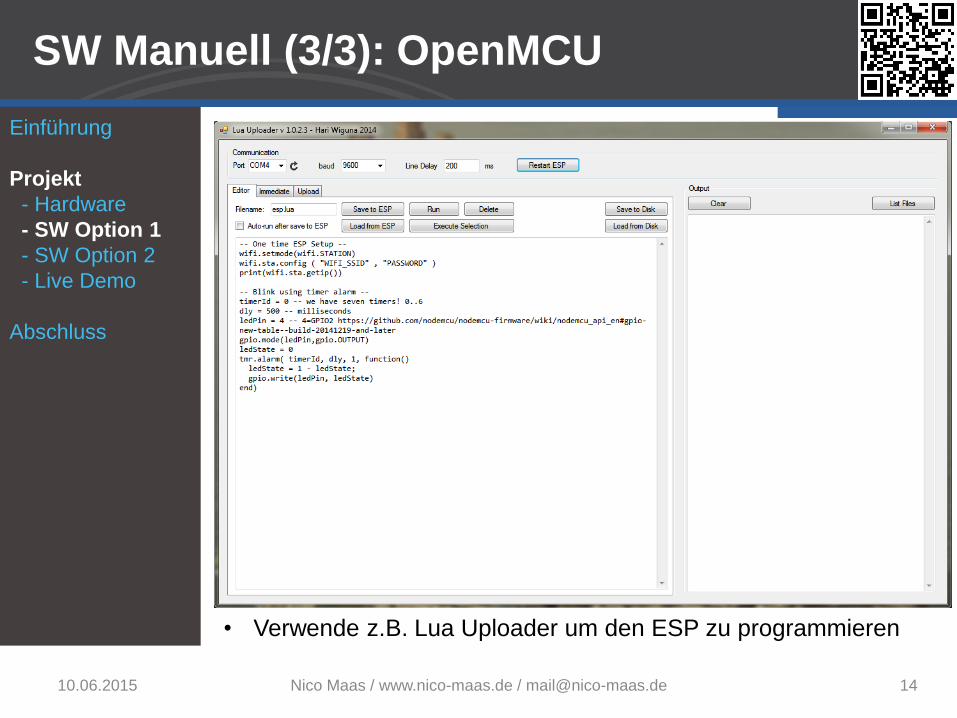
SW Manuell (3/3): OpenMCU
10.06.2015 Nico Maas / www.nico-maas.de / [email protected] 14
Einführung
Projekt
- Hardware
- SW Option 1
- SW Option 2
- Live Demo
Abschluss
• Verwende z.B. Lua Uploader um den ESP zu programmieren
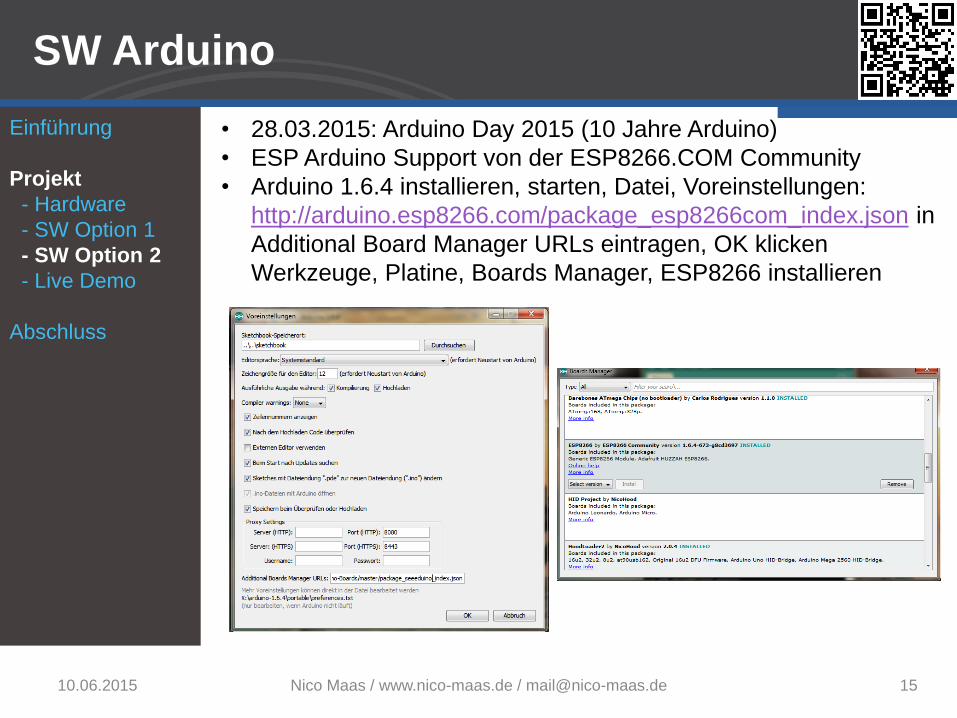
SW Arduino
10.06.2015 Nico Maas / www.nico-maas.de / [email protected] 15
• 28.03.2015: Arduino Day 2015 (10 Jahre Arduino)
• ESP Arduino Support von der ESP8266.COM Community
• Arduino 1.6.4 installieren, starten, Datei, Voreinstellungen:
http://arduino.esp8266.com/package_esp8266com_index.json in
Additional Board Manager URLs eintragen, OK klicken
Werkzeuge, Platine, Boards Manager, ESP8266 installieren
Einführung
Projekt
- Hardware
- SW Option 1
- SW Option 2
- Live Demo
Abschluss
SW Arduino
10.06.2015 Nico Maas / www.nico-maas.de / [email protected] 16
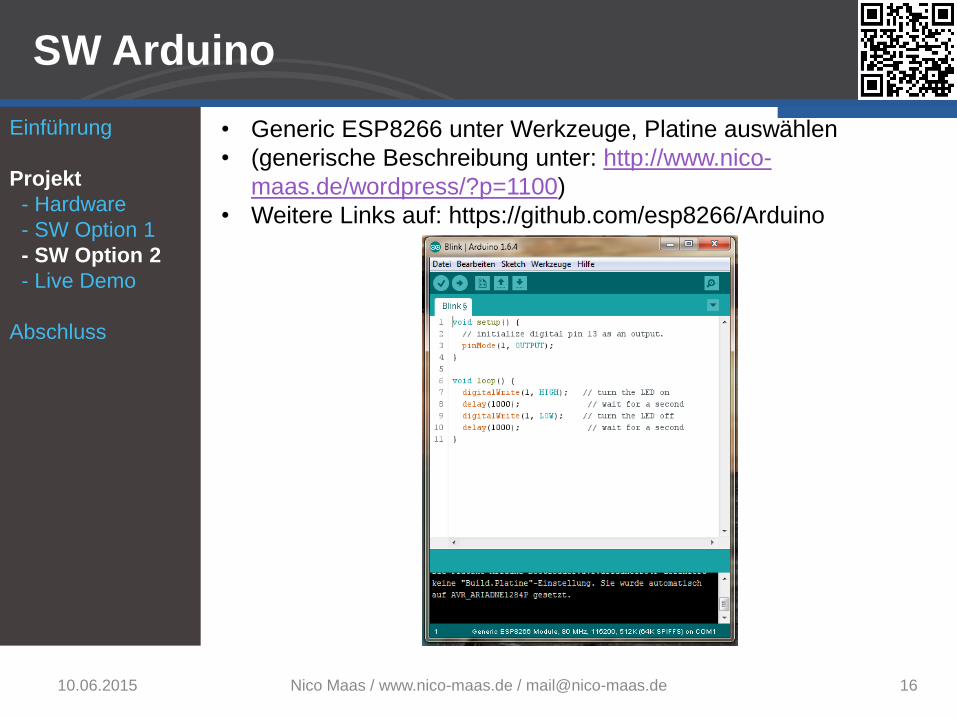
• Generic ESP8266 unter Werkzeuge, Platine auswählen
• (generische Beschreibung unter: http://www.nico-
maas.de/wordpress/?p=1100)
• Weitere Links auf: https://github.com/esp8266/Arduino
Einführung
Projekt
- Hardware
- SW Option 1
- SW Option 2
- Live Demo
Abschluss
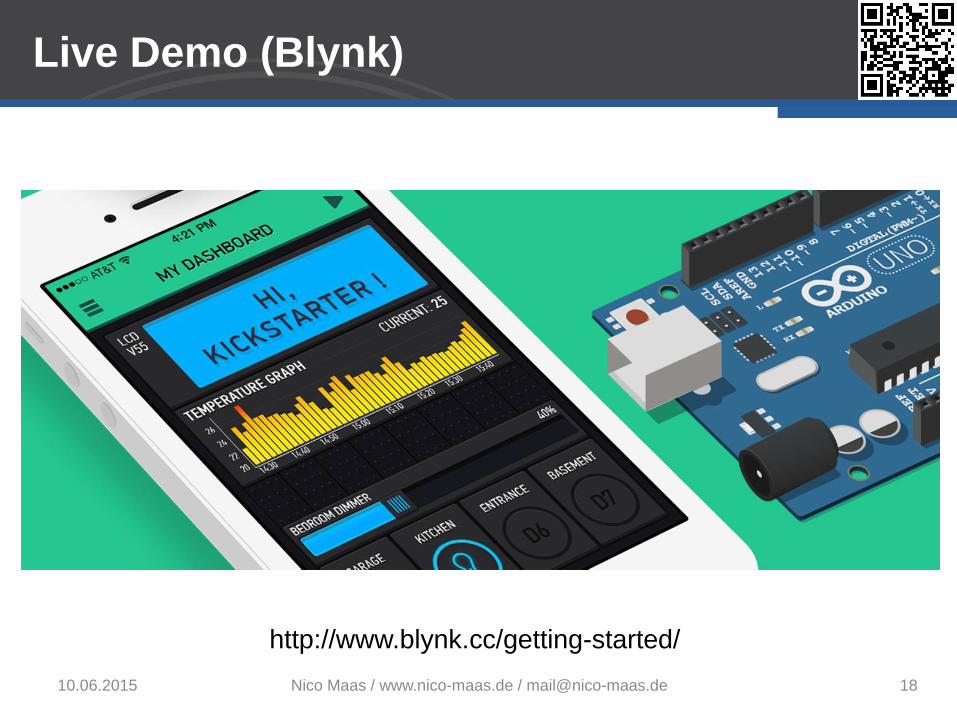
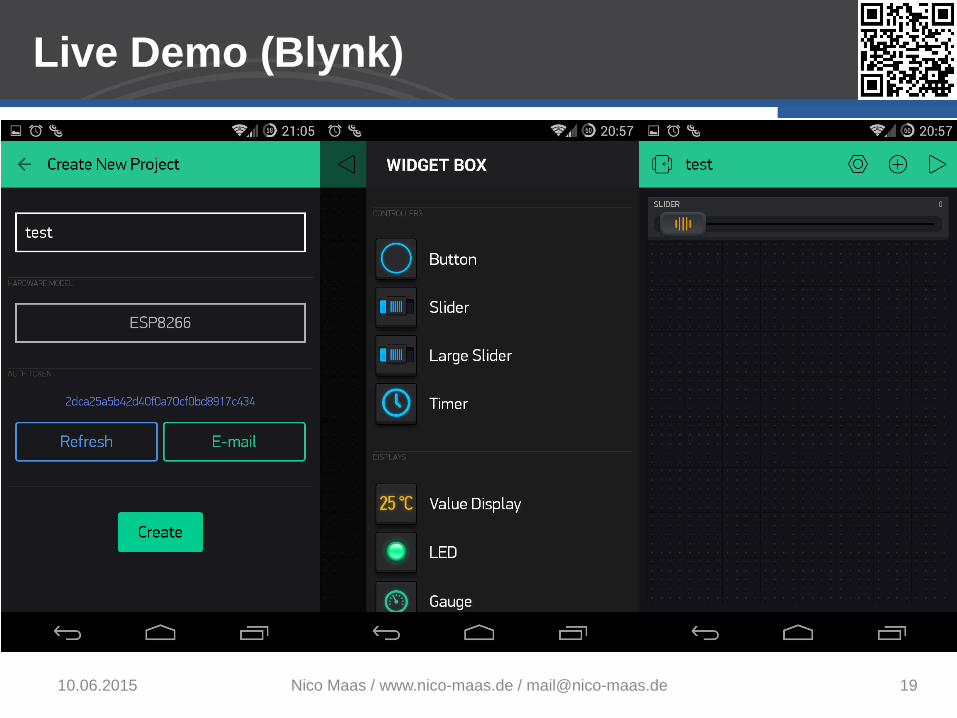
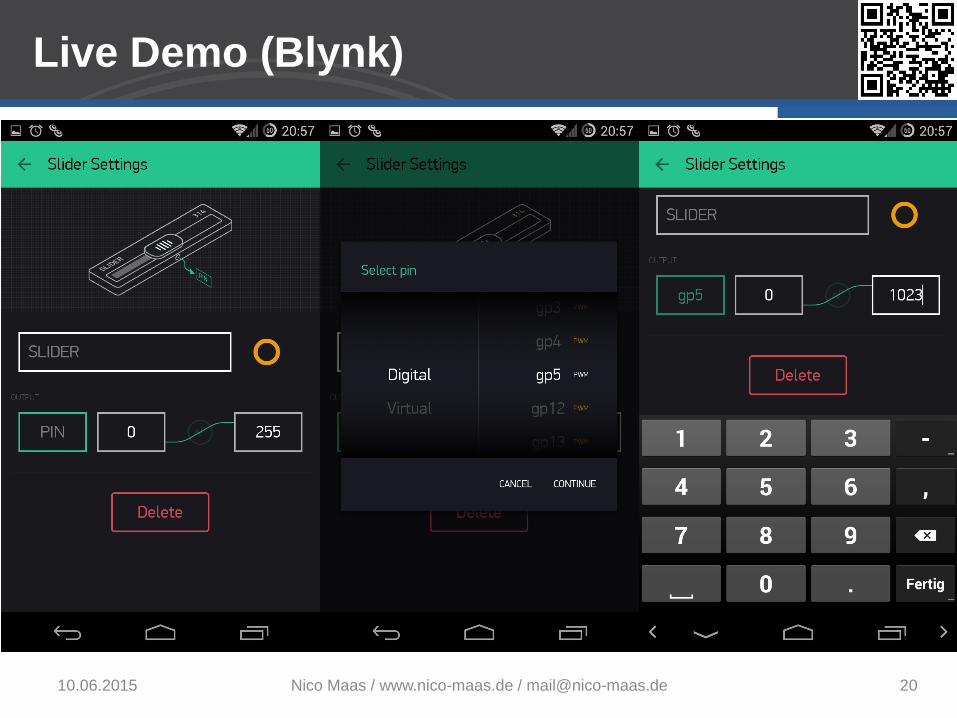
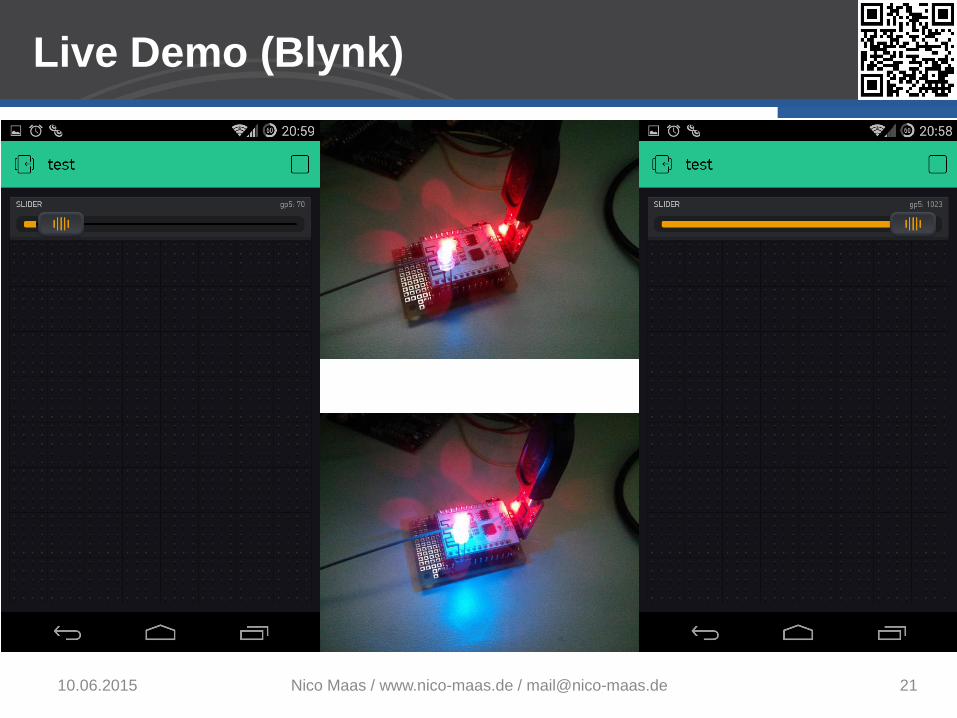
Live Demo (Blynk)
10.06.2015 Nico Maas / www.nico-maas.de / [email protected] 18
http://www.blynk.cc/getting-started/
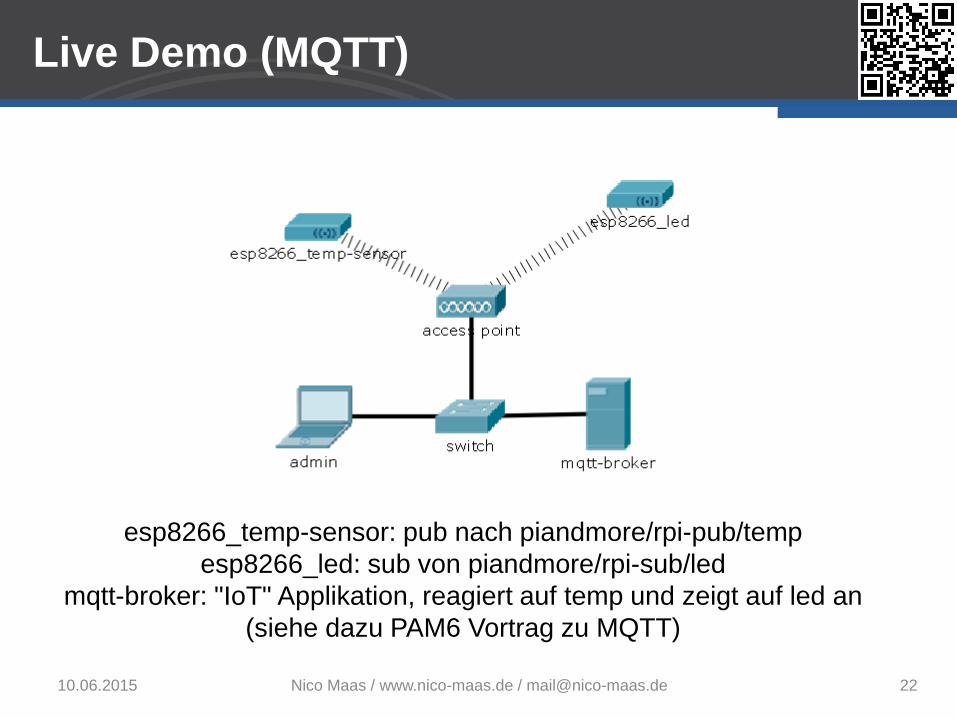
Live Demo (MQTT)
10.06.2015 Nico Maas / www.nico-maas.de / [email protected] 22
esp8266_temp-sensor: pub nach piandmore/rpi-pub/temp
esp8266_led: sub von piandmore/rpi-sub/led
mqtt-broker: "IoT" Applikation, reagiert auf temp und zeigt auf led an
(siehe dazu PAM6 Vortrag zu MQTT)
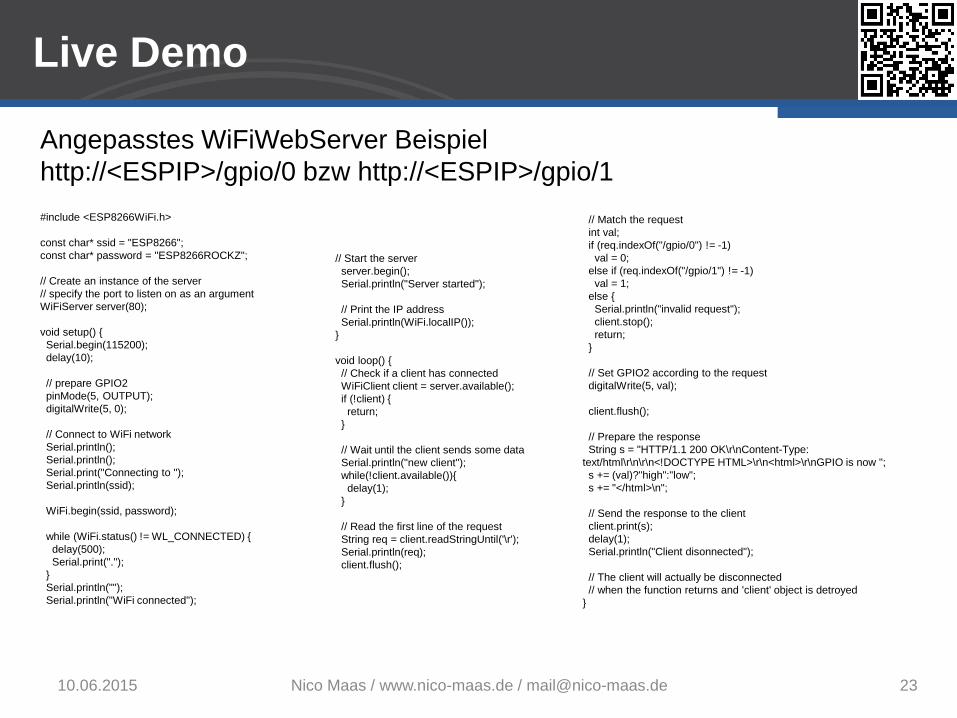
Live Demo
10.06.2015 Nico Maas / www.nico-maas.de / [email protected] 23
Angepasstes WiFiWebServer Beispiel
http://<ESPIP>/gpio/0 bzw http://<ESPIP>/gpio/1
#include <ESP8266WiFi.h>
const char* ssid = "ESP8266";
const char* password = "ESP8266ROCKZ";
// Create an instance of the server
// specify the port to listen on as an argument
WiFiServer server(80);
void setup() {
Serial.begin(115200);
delay(10);
// prepare GPIO2
pinMode(5, OUTPUT);
digitalWrite(5, 0);
// Connect to WiFi network
Serial.println();
Serial.println();
Serial.print("Connecting to ");
Serial.println(ssid);
WiFi.begin(ssid, password);
while (WiFi.status() != WL_CONNECTED) {
delay(500);
Serial.print(".");
}
Serial.println("");
Serial.println("WiFi connected");
// Start the server
server.begin();
Serial.println("Server started");
// Print the IP address
Serial.println(WiFi.localIP());
}
void loop() {
// Check if a client has connected
WiFiClient client = server.available();
if (!client) {
return;
}
// Wait until the client sends some data
Serial.println("new client");
while(!client.available()){
delay(1);
}
// Read the first line of the request
String req = client.readStringUntil('\r');
Serial.println(req);
client.flush();
// Match the request
int val;
if (req.indexOf("/gpio/0") != -1)
val = 0;
else if (req.indexOf("/gpio/1") != -1)
val = 1;
else {
Serial.println("invalid request");
client.stop();
return;
}
// Set GPIO2 according to the request
digitalWrite(5, val);
client.flush();
// Prepare the response
String s = "HTTP/1.1 200 OK\r\nContent-Type:
text/html\r\n\r\n<!DOCTYPE HTML>\r\n<html>\r\nGPIO is now ";
s += (val)?"high":"low";
s += "</html>\n";
// Send the response to the client
client.print(s);
delay(1);
Serial.println("Client disonnected");
// The client will actually be disconnected
// when the function returns and 'client' object is detroyed
}
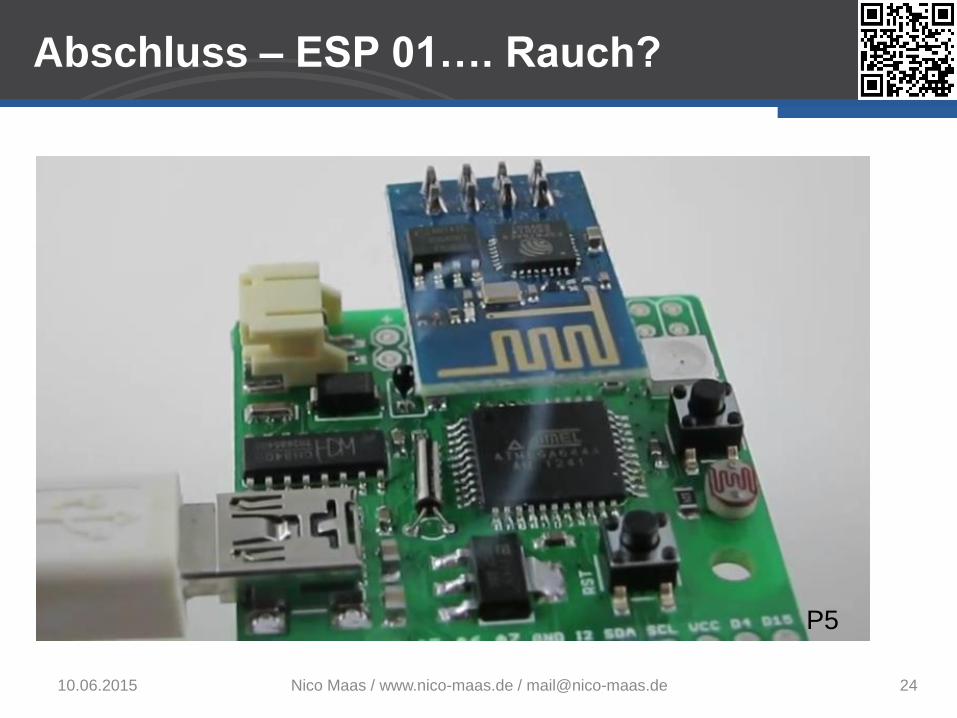
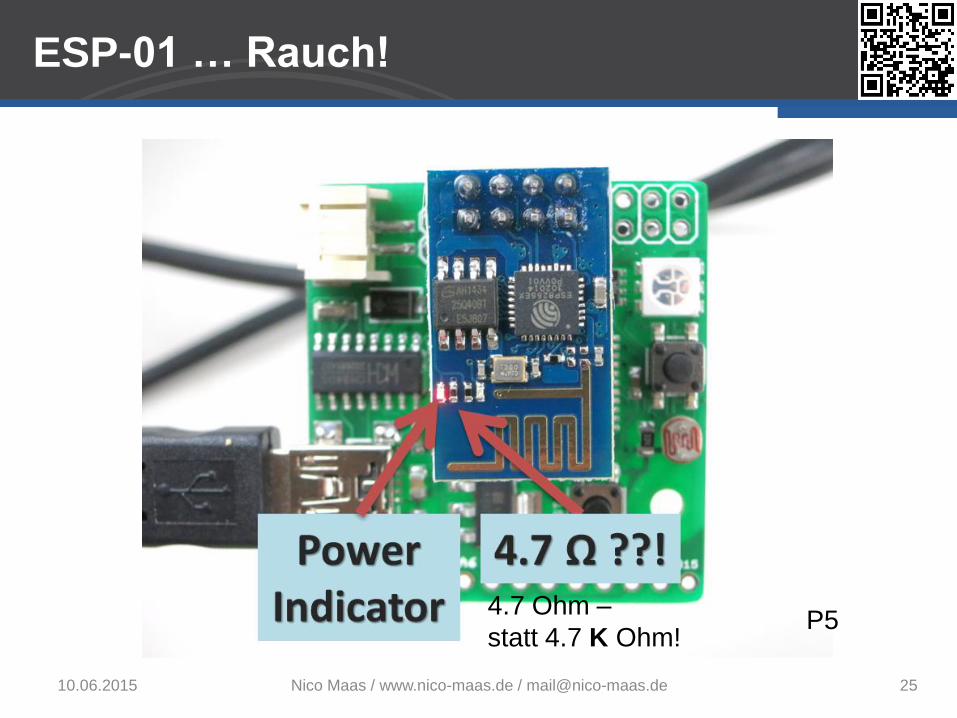
ESP-01 … Rauch!
10.06.2015 Nico Maas / www.nico-maas.de / [email protected] 25
4.7 Ohm –
statt 4.7 K Ohm! P5

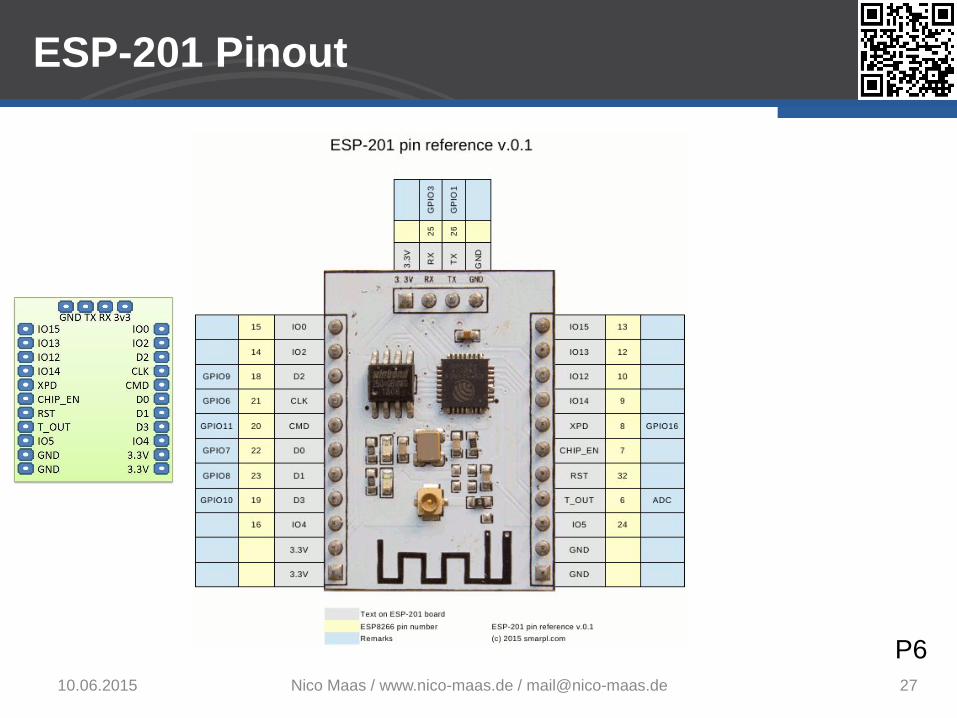
ESP-201 Tipps und Tricks
10.06.2015 Nico Maas / www.nico-maas.de / [email protected] 26
Externe Antenne
Onboard Antenne
Länge der Antenne kontrollieren / korrigieren
Antennenwahl Empfangsschwierigekeiten bei externen Antenne?
Eventuellen Kurzschluss bei ext. Ant. testen /
korrigieren P6
Fragen?
10.06.2015 Nico Maas / www.nico-maas.de / [email protected] 28
Vielen Dank für Ihre Aufmerksamkeit!
Besonderen Dank an Espressif Systems für die
Unterstützung dieses Vortrages !
Quellenangaben
10.06.2015 Nico Maas / www.nico-maas.de / [email protected] 29
• Foto der Frontfolie, P0: http://www.seeedstudio.com/depot/WiFi-Serial-Transceiver-
Module-w-ESP8266-p-1994.html
• P1: http://hackaday.com/2015/03/18/how-to-directly-program-an-inexpensive-
esp8266-wifi-module/
• P2: http://www.esp8266.com/wiki/doku.php?id=esp8266-module-family
• P3: http://www.iotextreme.com/purchase-wifi-module-esp8266-esp8266-201-esp-201-
serial-wifi-wireless-transceiver-module-send-receiver-lwip-ap-sta-for-arduino-r-27.html
• P4: http://playground.boxtec.ch/doku.php/wireless/esp8266
• P5: http://hackaday.com/2015/01/08/faulty-esp8266s-release-smoke-then-keep-
working/
• P6: http://smarpl.com/content/esp8266-esp-201-module-antenna-troubleshooting
Quellenangaben
10.06.2015 Nico Maas / www.nico-maas.de / [email protected] 30
• http://espressif.com/en/products/esp8266/
• https://github.com/esp8266/esp8266-wiki/wiki
• http://www.esp8266.com/wiki/doku.php
• http://en.wikipedia.org/wiki/NodeMCU
• http://www.mikrocontroller.net/articles/ESP8266
• https://nurdspace.nl/ESP8266
• http://tech.scargill.net/page/2/?s=esp8266
• http://www.nodemcu.com/index_en.html
• https://github.com/pfalcon/esp-open-sdk
• https://hackaday.io/project/3465-playing-with-esp8266
• http://smarpl.com/content/esp8266-esp-201-module-freeing-gpio9-and-gpio10
• http://tim.jagenberg.info/2015/01/18/low-power-esp8266/
• http://www.whatimade.today/esp8266-and-the-water-heater/
• http://tomeko.net/other/ESP8266/
• http://www.esp8266.com/viewtopic.php?f=31&t=2150
• http://arduino-hannover.de/2015/04/08/arduino-ide-mit-dem-esp8266/