erriiss emergency response information system
TRANSCRIPT

EERRIISS
Emergency Response Information System
User’s Guide
Iowa Department of Transportation, Office of Traffic and Safety 800 Lincoln Way Ames, IA, 50010 Phone: (515) 239-1169
Center for Transportation Research and Education
2901 South Loop Drive, Suite 3100
Ames, Iowa, 50010-8632

The Emergency Response Information System pilot project has been funded by the Iowa Highway Safety Management System Coordination Committee (Iowa SMS). ERIS Data Manager and ERIS ArcExplorer projects were created by the Center for Transportation Research and Engineering (CTRE). ArcExplorer v.3.1® is a free browser provided by Environmental Systems Research Institute, Inc. (ESRI)™. Data for this system has been provided by the following: Ø Iowa Department of Public Safety Fire Service Training Bureau (formerly ISU
Extension) Ø Governor’s Traffic Safety Bureau Ø Iowa Department of Public Health, Bureau of Emergency Medical Services Ø Iowa Department of Transportation
Copyright 2002. All rights reserved. The Iowa SMS Coordination Committee gives permission to reproduce sections of this manual as necessary for instruction and training. For software copies or data questions, please contact CTRE.

ERIS User’s Guide
Master Table of Contents
07/31/2002 TOC-1
Overview
Introduction This manual supports the Emergency Response Information System (ERIS)
software. The manual includes installation instructions, instructions on accessing Iowa county and city data, and a brief description of the database.
Table of Contents
The following subjects are discussed in this manual:
Chapter See Page
Chapter 1: Overview of ERIS Introduction 1-1 What’s on the CD 1-2 What ERIS Can and Can’t Do 1-3 Contacts 1-5
Chapter 2: Installation of ERIS Overview 2-1 The Installation Process 2-2 Troubleshooting 2-5
Chapter 3: Using the ERIS Data Manager Overview 3-1 The Map and the Data 3-2 Drop Down Boxes 3-5 The Select Menu 3-6 The Tool Menu 3-8 The Other Menus 3-10
Chapter 4: Using ERIS in ArcExplorer v3.1 Overview 4-1 ERIS Projects 4-2 ERIS Project Maps 4-5 ERIS Project Legends and Layers 4-7 ERIS ArcExplorer Menu Options 4-9 ERIS ArcExplorer Buttons 4-11 Performing Some Standard Tasks in ArcExplorer 4-12
Appendix A: Metadata Overview A-1
Appendix B: Acknowledgements Overview B-1
* * *

ERIS User’s Guide
Chapter 1: Overview of ERIS
07/31/2002 1-1
Introduction
ERIS The Emergency Response Information System (ERIS) provides a means of
accessing emergency information for Iowa counties and cities. ERIS is a pilot project whose goal is to provide an effective emergency planning tool for counties and cities. NOTE: ERIS is not designed to be used during emergency situations! It
is to be used to plan responses to future emergency situations.
Two Primary Software Systems
ERIS is composed of two software packages, described in the table below: • ERIS Data Manager; and • ArcExplorer v3.1.
Package Function
ERIS Data Manager
This software package is used to enter and view a wide range of data related to actual emergency services that are provided by cities and counties within Iowa. The software puts a lot of organized and categorized information at your fingertips, but does not have the capability to search the raw data. As some examples, you could use this package to:
• Update emergency contact information; • Find out the level of hazardous material spill
response for each service in your county; or • Determine the nearest trauma center to your town.
ArcExplorer v3.1
This software package is used to build maps with a range of highway, road, crash data, and waterway information. Information from a number of agencies is accessible with this software package. You may build specialized maps or search the associated data files for bits of information. As some examples, you could use this package to:
• Make a map to see how roads, crashes, and railroad intersections interact; or
• Find out how many certified emergency medical technicians or firefighters are available in a county or across the state of Iowa.

ERIS User’s Guide
Chapter 1: Overview of ERIS
07/31/2002 1-2
What’s on the CD
Software There are three software programs on the ERIS CD. They are:
• Java Runtime 1.3.0_2 • ERIS Data Manager • ArcExplorer v3.1
Data The majority of the CD is filled with raw data and a variety of project files
created from that data. This information is vital for the ERIS Data Manager and ArcExplorer programs. You must copy and/or access the data correctly in order for the programs to run properly. Refer to chapter 2 for installation instructions. NOTE: All of the data included in ERIS has been self- reported by a number
of different agencies. A lot of effort has been put into confirming and validating the data offered voluntarily by these agencies, but neither CTRE nor the Iowa Highway SMS can guarantee the accuracy of the data.
ERIS Data vs. ArcExplorer Data
Both programs use much of the same data. However, the data has had to be compiled and organized in different ways so that the two software packages can make sense of the information.
Metadata Documentation
Some consolidated metadata is included on the CD. For a brief description of this metadata, refer to Appendix A. This documentation is primarily for high-end users.
ERIS User’s Guide
The Microsoft Word™ files for this manual are included in a folder on the CD called /UserGuide.
Vendor Documentation
ArcExplorer is a free browser from by Environmental Systems Research Institute, Inc. (ESRI)™. An Adobe Acrobat file is located in the /AE31JavaSetup/ directory on the CD. The file is named using-ae31.pdf. High-end users might find the vendor manual useful for supplementary information on building queries and extensively modifying how the layers (defined and described later) appear.

ERIS User’s Guide
Chapter 1: Overview of ERIS
07/31/2002 1-3
What ERIS Can and Can’t Do
The Scope of ERIS
ERIS was originally created in order to improve Iowa’s ability to plan for responses related to highway crashes and highway crash victims on state and local levels. The system has been expanded to include more transportation, emergency, and environmental information. However, as a pilot project it:
• Does not contain data for every county within Iowa; and • Is only as up-to-date as the information provided by participating
counties and state agencies. ERIS has the capacity to continue to expand its scope. It could include more map and location-based information relevant to city and county planners.
Who Uses ERIS ERIS is intended for two primary audiences:
Audience Description Providers These are the people providing the actual services,
ranging from fire chiefs to EMS directors.
State and local agencies and officials
These are agencies who may be responsible for providing services or data. Some, like the Iowa DOT, maintain crash data, while others maintain other records.
Benefits of ERIS
ERIS can be used for a wide range of planning tasks, including determining: • Emergency route evaluation; • Responders to highway crashes, hazardous spills, fires, and medical
emergencies; • Service sharing options; • Highway safety evaluation; • Information dissemination for highway construction projects, rural
water locations, and hazardous material incidents; and • Assessment of emergency response needs.

ERIS User’s Guide
Chapter 1: Overview of ERIS
07/31/2002 1-4
Available Data The system includes a range of information, including:
• Contact names, addresses, and phone numbers; • Descriptions of available emergency services; • Number of personnel for emergency services; • Available means of emergency communication; and • Emergency equipment available to a city or county.
Refer to Appendix A for more details about the data and metadata.
Emergency Services Descriptions
The system currently provides descriptions of the following emergency services:
• Fire; • Rescue; • First responder; • EMS; • Hazardous materials; and • Emergency management.
Counties Included
The following counties have provided partial-to-complete information for use in this pilot project:
County County # County County #
Calhoun 13 Lyon 60 Carroll 14 O’Brien 71 Clay 21 Osceola 72 Dubuque 31 Plymouth 75 Floyd 34 Pocahontas 76 Guthrie 39 Polk 77 Harrison 43 Sioux 84 Henry 44 Story 85 Ida 47 Van Buren 89 Lee 56 Washington 92

ERIS User’s Guide
Chapter 1: Overview of ERIS
07/31/2002 1-5
Contacts
Who to Contact For help with the software or the data, contact:
Center for Transportation Research and Education
http://www.ctre.iastate.edu/research/eris/
2901 South Loop Drive, Suite 3100
Ames, Iowa, 50010-8632
Phone: (515) 294-8103
Fax: (515) 294-0467 In the future, support for ERIS software, data, and web resources could be provided by other agencies.
* * *

ERIS User’s Guide
Chapter 2: Installation of ERIS
07/31/2002 2-1
Overview
Introduction The ERIS software is currently provided to users through a CD-ROM.
Depending upon user responses and other factors, ERIS software, data, and/or documentation may also be available from the web in the future.
System Requirements
You must have the following minimum system requirements in order to install the programs on an IBM-compatible PC:
Part Description
Processor Pentium 100 MHz or better RAM 32 MB minimum, 64 MB or better strongly
recommended Hard Drive Space 100 MB minimum, 340 MB to copy all data for all
included counties. Supporting Software
Internet Explorer 5.0 or higher
Operating System
The ERIS programs are 32-bit applications and can only be installed on PCs that are running one of the following operating systems: Windows 95, 98, 2000, ME, XP, NT 4.0 or higher. NOTE: If you are installing the system on a Windows
NT 4.0 machine, you must already have Service Pack 6 installed.
Display Settings SVGA 640x480, SVGA 800x600 or greater recommended.
Color Settings 256 colors minimum, 65536 or greater recommended. CD-ROM 1X CD-ROM or faster
ERIS User’s Guide
Chapter 2: Installation of ERIS
07/31/2002 2-2
The Installation Process
Introduction There is an installation process you must go through in order to install all of
the required software for the ERIS system. You must complete each stage in order to successfully use ERIS. Refer to the following description of the whole process:
Stage Description
1 Perform initial checks.
2 Copy data. You should copy data from the CD to your hard drive.
3 Install Java RunTime. This is version 1.3.0_02, and is a program required by ERIS ArcExplorer 3.1.
4 Install ArcExplorer. This system uses version 3.1.
5 Install ERIS Data Manager.
Stage 1: Perform Initial Checks
There are a few things you should do before you begin installing the software associated with ERIS. Refer to the following table:
Step Action
1 Make sure your computer meets or surpasses the system requirements discussed at the beginning of this chapter. If your computer doesn’t meet the minimum requirements, the system may not run or may run poorly on your computer.
2 Make a back-up of ERIS_STATEWIDE.mdb if you have one. The installation process will overwrite any and all files with the same name. This step should only apply if you are upgrading from a previous version.
3 Close down any programs you have running on your PC.
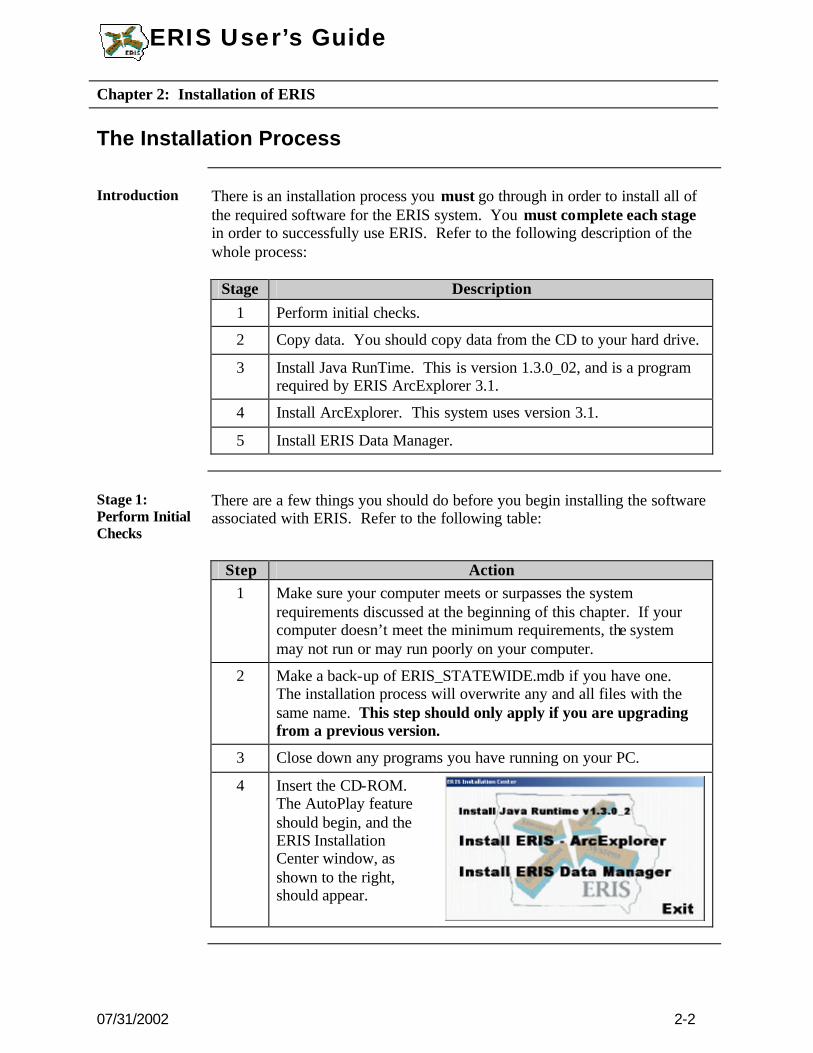
4 Insert the CD-ROM. The AutoPlay feature should begin, and the ERIS Installation Center window, as shown to the right, should appear.

ERIS User’s Guide
Chapter 2: Installation of ERIS
07/31/2002 2-3
Stage 2: Copy Data
You should copy data and project files from the CD to your hard drive in order to maximize the speed with which the system runs. You can run ArcExplorer if you leave the data on the CD, but we advise against this.
Step Action
1 Open Windows Explorer (this should be accessible from Start/Programs or Start/Programs/Accessories if it is not located on your desktop).
2 Double-click on the My Computer entry.
3 Go to the drive location associated with your CD-ROM. On many computers this is either the D:, E:, or F: drive.
4 Double-click that drive. You will see the CD contents, which include the ERIS_Data folder. There are file folders for every Iowa county located within the ERIS_Data folder.
5 Decide which county data you wish to copy to your computer. The following instructions assume that your C: drive is your computer’s hard drive. If you wish to copy…: v …data for all of the counties, then:
1. Confirm that you have space for all of this data. 2. Select the ERIS_Data folder on the CD-ROM. 3. Drag or copy it to the C: drive.
v …data for one or more counties but all of them, then you must
create an identical directory structure on your hard drive for the data to be placed into. In this case:
1. Create an ERIS_Data folder on your C: drive. 2. Copy the st_layers folder from the CD-ROM to the
ERIS_Data folder on your C: drive. 3. Create an _counties folder within ERIS_Data on your
C: drive. 4. Copy the desired county folders from the _counties
folder on the CD-ROM to your _counties folder on your C: drive.
5. Copy all of the “loose” files located in the _counties folder on the CD-ROM to the _counties folder on your C: drive.

ERIS User’s Guide
Chapter 2: Installation of ERIS
07/31/2002 2-4
Stage 3: Install Java Runtime
You must install, or already have installed, Java RunTime v1.3.0_02 in order to allow ERIS ArcExplorer 3.1 to install. Refer to the following table:
Step Action
1 Click on Install Java Runtime v1.3.0_2 from the ERIS Installation Center window. The Software License Agreement window appears.
2 Press Yes. The Choose Destination Location window appears. It is recommended you use the default option.
3 Press Next>. The program installs.
Stage 4: Install ArcExplorer
You must install, or already have installed, ArcExplorer v3.1 in order to use the ERIS system. Refer to the following table for installation instructions:
Step Action
Click on Install ERIS-ArcExplorer from the ERIS Installation Center window. The ArcExplorer v3.1 Installation “Welcome to ArcExplorer Installation” window appears.
1
NOTE: If you already have ArcExplorer v3.1 on your PC, the installation program can not overwrite it.
2 Ignore the View Readme option.
3 Press Next>. The License Agreement window appears.
4 Press I Accept to agree to the licensing agreement. The ArcExplorer Installation Directory window appears.
5 Press Next>. The Summary of Installation Information window appears.
6 Press Next>. The program installs and the Installation Successful window appears.
7 Press Finish.
ERIS User’s Guide
Chapter 2: Installation of ERIS
07/31/2002 2-5
Stage 5: Install ERIS Data Manager
Complete the following steps to install the ERIS Data Manager software package:
Step Action
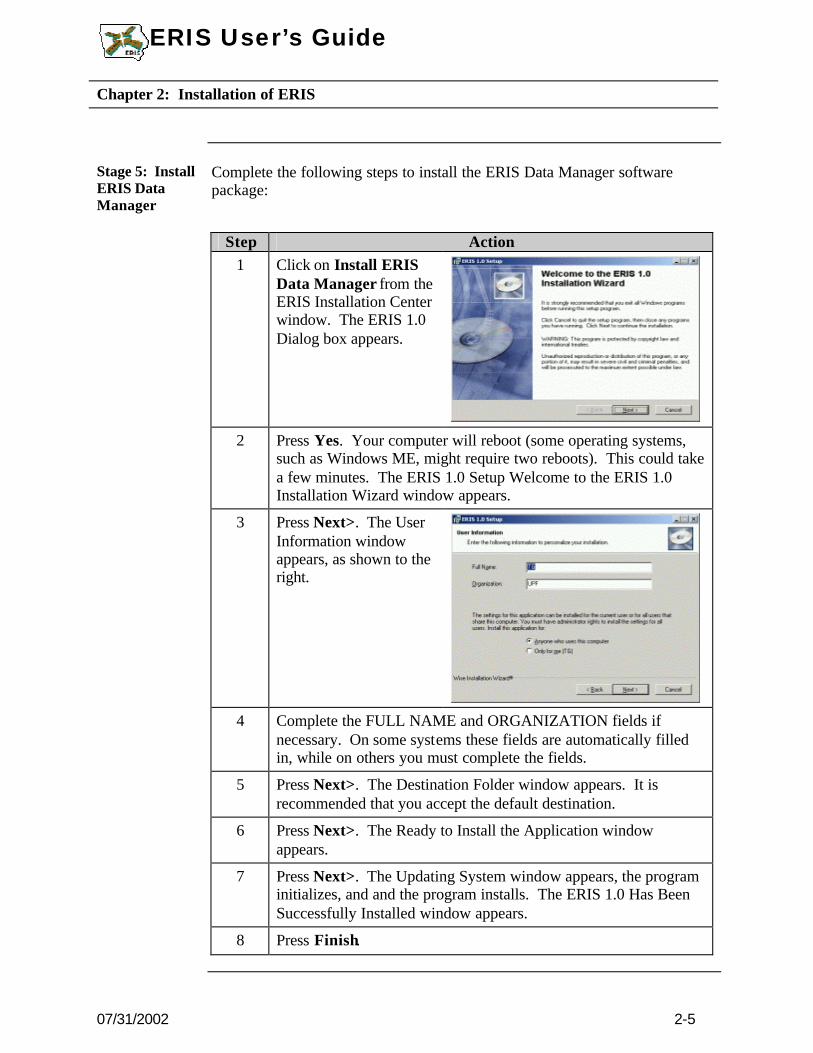
1 Click on Install ERIS Data Manager from the ERIS Installation Center window. The ERIS 1.0 Dialog box appears.
2 Press Yes. Your computer will reboot (some operating systems,
such as Windows ME, might require two reboots). This could take a few minutes. The ERIS 1.0 Setup Welcome to the ERIS 1.0 Installation Wizard window appears.
3 Press Next>. The User Information window appears, as shown to the right.
4 Complete the FULL NAME and ORGANIZATION fields if
necessary. On some systems these fields are automatically filled in, while on others you must complete the fields.
5 Press Next>. The Destination Folder window appears. It is recommended that you accept the default destination.
6 Press Next>. The Ready to Install the Application window appears.
7 Press Next>. The Updating System window appears, the program initializes, and and the program installs. The ERIS 1.0 Has Been Successfully Installed window appears.
8 Press Finish.

ERIS User’s Guide
Chapter 2: Installation of ERIS
07/31/2002 2-6
Troubleshooting
Further Assistance
If you need further assistance in order to install ERIS on your computer, please contact: Center for Transportation Research and Education
http://www.ctre.iastate.edu/research/eris/
2901 South Loop Drive, Suite 3100
Ames, Iowa, 50010-8632
Phone: (515) 294-8103
Fax: (515) 294-0467
* * *

ERIS User’s Guide
Chapter 3: Using the ERIS Data Manager
07/31/2002 3-1
Overview
Introduction This section describes the basics of using the ERIS Data Manager.
Primary Goal The primary goal of the ERIS Data Manager is to be a user- friendly interface.
This software package is used to enter and view a wide range of data related to emergency services that are provided by cities and counties within Iowa. The software puts a lot of organized and categorized information at your fingertips, but does not have the capability to search the raw data.
The Data The attempt has been made to confirm the accuracy of the data supplied by
counties and state agencies. NOTE: The data that makes up the back-end of the ERIS Data Manager
application is composed primarily of self-reported information that will change over time.
Updating the Data
If you are responsible for managing data in your county or state agency and wish to make your updates available to other users of ERIS, please contact CTRE: Center for Transportation Research and Education
http://www.ctre.ia state.edu/research/eris/
2901 South Loop Drive, Suite 3100
Ames, Iowa, 50010-8632
Phone: (515) 294-8103
Fax: (515) 294-0467

ERIS User’s Guide
Chapter 3: Using the ERIS Data Manager
07/31/2002 3-2
The Map and the Data
The Map The ERIS Data Manager map is illustrated below. You may change the font
and font size of the county labels within the ERIS Data Manager application. However, you can’t save these changes from session to session.
The Address Bar
The address bar, located at the bottom of the ERIS map window, shows which selection and tool choices are currently active. These selection and tool choices are discussed later in this chapter.

ERIS User’s Guide
Chapter 3: Using the ERIS Data Manager
07/31/2002 3-3
Brief Map Instructions
The data you retrieve in the ERIS Data Manager depends upon which menu options you select. General instructions describing how to use the map—assuming you have already selected your desired menu option—are shown below:
Step Action
1 Move the cursor to a selected county. The county’s name and number will appear in a small pop-up box.
2 Click on the selected county. A dialog window will appear, based on your choice of selection.
3 Click the Cancel or Close button to close the dialog window when you are finished.
Changing the Data
The ERIS Data Manager is a tool you can use to update, change, or delete emergency services data. NOTE: If you modify the data, you are only doing so on your computer. If
you wish to update your data and make it available to others, please contact CTRE, as described at the beginning of this chapter.

ERIS User’s Guide
Chapter 3: Using the ERIS Data Manager
07/31/2002 3-4
Printing Reports
The ERIS Data Manager includes options to create reports of the data. You can export these reports to another software system (such as Microsoft Word) or print them. A sample procedure to print a report for the Ames Fire Department in Story county is shown below:
Step Action
1 Open the ERIS Data Manager.
2 Select ERIS Reports from the Tools menu option.
3 Double-click on Story County. The Services Listing for Story County window, as shown to the right, appears.
4 Highlight Ames Fire Department. 5 Press Select. In
this example, three new windows appear: Vehicle Information, Equipment Information, and Emergency Service Information.
6 Click on the Equipment Information window, assuming we want to print this report.
7 Press . The Print window appears. 8 Press Print. The equipment report is printed.

ERIS User’s Guide
Chapter 3: Using the ERIS Data Manager
07/31/2002 3-5
Drop Down Boxes
The Drop-Down Boxes
You may use the drop-down boxes, located at the bottom left of the ERIS screen, to select either a city or county of choice. The two lists work independently of one another. Thus, for example, there is no need to (nor can you) select “Ames” and then “Story” county.
Select City This drop-down box contains the names of
all the cities in Iowa. The drop-down box is shown to the right. Using this option causes the Services Listing for the City of… window to appear, displaying the services available in the city you selected.
Select County This drop-down box contains the names of
all of the counties in Iowa. The drop-down box is shown to the right. Using this option causes the Services Listing for … County window to appear, displaying all of the services available in the county you selected.

ERIS User’s Guide
Chapter 3: Using the ERIS Data Manager
07/31/2002 3-6
The Select Menu
The Select Menu
The Select menu options allow you to determine what kind of emergency service data you will access. The Select options are shown to the right The checkmark indicates which option is selected.
Emergency Response (County)
This option lists each service in a county when you double click on a county on the map, as described at the beginning of this chapter. Each separate service in the county appears in the Services Listing dialog box, as shown in the Story county example to the right. This option is the default Select setting for ERIS.
Emergency Response (County and City)
This option groups the data by city. When you double click on a county on the map, it causes cities that have services for that county to appear in the City Listing dialog box, as shown in the Story county example to the right.
Hazardous Material Contacts (Region)
This option causes the map to be redrawn and deactivates the Tools menu. Hazmat regions are color coded in order to separate different responsibility zones. Double-clicking anywhere within a color-coded region causes the Hazardous Materials Contact dialog box with contact information to appear. NOTE: Dark gray indicates a region with no Hazmat spill response
coverage.

ERIS User’s Guide
Chapter 3: Using the ERIS Data Manager
07/31/2002 3-7
Trauma Care Facilities (County)
This option causes the map to be redrawn and deactivates the Tools menu. The map shows the location of trauma care facilities, represented by colored dots defined on the map. Moving the cursor over a county causes the county name to appear (as shown below).
Double-clicking anywhere within a county causes the Trauma Care Facilities dialog box, as shown in the Pottawattamie county example to the right, to appear. Note that in this example, there are two records (hence, two facilities—Alegent Mercy and Jennie Edmundson) in Council Bluffs, but the map’s resolution allows it to show only one dot.
Emergency Management Agencies (County)
This option deactivates the Tools menu options and allows you to access contact information that appears in the Emergency Management Agency dialog box for the county you have selected from the map.

ERIS User’s Guide
Chapter 3: Using the ERIS Data Manager
07/31/2002 3-8
The Tools Menu
The Tools Menu
The Tools menu allows you to collect the data in either a screen-only format or a printable format. The Tools Menu is shown to the right.
ERIS Data Entry/View
This option causes the Emergency Response Information window to be accessed when you select a service from within a county. This window is used to both read and enter data for the county you selected.
ERIS Reports This option causes windows to appear when you select a service within a
county. The reports found within these windows are printer- friendly. They are meant to be used to print off reports listing the emergency response information available for the county you selected. An explanation of this is shown earlier in this chapter.

ERIS User’s Guide
Chapter 3: Using the ERIS Data Manager
07/31/2002 3-9
Census Data This option causes a screen to appear
detailing census information for the county you selected. This screen is printer-friendly. The sample to the right shows Story county census data.

ERIS User’s Guide
Chapter 3: Using the ERIS Data Manager
07/31/2002 3-10
The Other Menus
The File Menu The File menu gives you options to add or expand the data field. Most users
will not need to be concerned with these options. The File menu options are described below:
Option Description
New Record This allows you to add a service. New Zip Code This allows you to add a zip code, if one is missing. Exit This option ends the program.
View Menu The View menu option allows you to change the font, font style, and font size
on the ERIS Data Manager map. You can not save these changes from session to session.
Help Menu The Help menu allows you to access author and contact information for the
ERIS project.
* * *

ERIS User’s Guide
Chapter 4: Using ERIS in ArcExplorer v3.1
07/31/2002 4-1
Overview
Introduction This chapter describes how to use the ArcExplorer software with ERIS-
specific data and maps (called projects). ArcExplorer is actually a free viewer distributed by ESRI™, a company that creates geography/mapping software.
Primary Purpose
The primary purpose of ERIS ArcExplorer is to provide a tool that creates a wide range of maps based on user decisions. It also has the capability to search the included data files for specific pieces of information.
The Data The data included within the projects has been created from a number of
sources. You may refer to Appendix A, “Metadata”, for brief explanations of the data labels. Any changes you make to the data reside only on your computer. If you wish to make your updates available to others, please contact CTRE: Center for Transportation Research and Education
http://www.ctre.iastate.edu/research/eris/
2901 South Loop Drive, Suite 3100
Ames, Iowa, 50010-8632
Phone: (515) 294-8103
Fax: (515) 294-0467
More Data, More Complicated
This is a much more involved piece of software than the ERIS Data Manager. While more data is available (such as crash data, rivers and roads, and so on), it will take more time to master—particularly in conducting queries. It will also take more time for your computer to run and load this software than it does with ERIS Data Manager.
This Chapter’s Instructions
This chapter will discuss the features of ArcExplorer that users of ERIS will often use. It is not a comprehensive manual on how to use ArcExplorer; rather, it offers ERIS-specific instructions.
ArcView ArcView® is software sold by ESRI for high-end geographic information
system users, and some ERIS users own this software. The ERIS projects and data created for use in ArcExplorer may also be used in ArcView.

ERIS User’s Guide
Chapter 4: Using ERIS in ArcExplorer v3.1
07/31/2002 4-2

ERIS User’s Guide
Chapter 4: Using ERIS in ArcExplorer v3.1
07/31/2002 4-3
ERIS Projects
Introduction Basic ERIS projects (defined below) have been already created for your use.
These projects exist for counties in Iowa who participated in the ERIS pilot by supplying emergency services data. These projects are large, containing lots of data and elements. Thus, they may run slowly on your computer.
Definition: Project
Projects are the package in which a user saves his or her choices, data, maps, and so on. Thus, they are similar to Word documents or Excel spreadsheets. Whenever the word “project” is used in this chapter, we are referring to one of these files.
The County Project Files
Four projects were created and shipped with the CD for each county. This was done because a project pulls data from a specific, defined drive on the computer. Because a computer’s hard drive might be either the C: or the D: drive and a CD-ROM may be found on either the D:, E:, or F: drives, we created four project files associated with those four drives. The letters “C”, “D”, “E”, and “F” on the .axl filenames represent the drive location for the project to find its data. Thus, if you copied the data to your D: drive and you wanted to open the Story county project, then you should select Story_D.axl (instructions on opening projects are shown later in this chapter). If you are running the data off of the CD and the CD-ROM is attached to your E:/ drive, then you should select Story_E.axl.
The Statewide Project Files
Four projects were created in the same manner for statewide EMS, fire and first responder data. Users can add other layers as desired.

ERIS User’s Guide
Chapter 4: Using ERIS in ArcExplorer v3.1
07/31/2002 4-4
Starting ERIS Refer to the following table:
Step Action 1 Open ArcExplorer v3.1. If ArcExplorer did not appear as an icon
on your desktop during installation, then you can open it by using the following path: Start / Programs / ESRI / ArcExplorer 3.1. The generic ArcExplorer Untitled window appears, as shown below:
2 Maximize the window. This is simply for convenience.

ERIS User’s Guide
Chapter 4: Using ERIS in ArcExplorer v3.1
07/31/2002 4-5
Opening an ERIS Project
This procedure is described simplest by using an example. As an example, let’s choose to examine Story county. Refer to the table below for instructions on opening the ERIS Story county project. ASSUMPTION: This example assumes you copied the project data from the
CD to your C: drive as discussed in chapter 2.
Step Action 1 Click the File menu option.
2 Select Open. The Open window appears, as shown in the example below:
3 Double-click ERIS_Data.
4 Double-click _counties.
5 Double-click _Story.
6 Double-click the Story_C.axl file.
7 Press Open. The Story county project opens and a map of Story county and its adjacent counties appears. This could take a minute or more, particularly if you have a slow computer or you are running the project off of your CD-ROM drive. NOTE: You may receive a Javaw.exe Error dialog box. If so,
press the either the Cancel or the Continue button on that dialog box. It is a harmless error.

ERIS User’s Guide
Chapter 4: Using ERIS in ArcExplorer v3.1
07/31/2002 4-6
ERIS Project Maps
The Map The ERIS project map has many layers (defined later in this chapter)
available, but initially only has some of them active. This includes roadways, riverways, railways, and county boundaries. The window below shows the default Story county map. Story county is centered in the map window, with neighboring counties drawn in as well.
Lines, Lines, Everywhere
Project maps can become quite overwhelming if you have activated too many layers. The default Story county map above may appear “busy”, but keep in mind that every road, river, and railway is being shown. Thus, it is generally wise to only open the layers you need to view. Activating layers is described later in this chapter.

ERIS User’s Guide
Chapter 4: Using ERIS in ArcExplorer v3.1
07/31/2002 4-7
Viewing the Map
There are a number of options available for changing the size of the map, zooming in or out, and so on. These are discussed later in this chapter.
Adjacent Counties
Projects have been created for every county in Iowa. These projects include road, crash, river, and other statewide data layers. The project files for counties that participated in the ERIS pilot by providing emergency service data have a range of emergency services layers as well. Thus, you may be able to view your neighboring counties, but if they haven’t supplied any emergency services data, you will only be able to see the basic map information.

ERIS User’s Guide
Chapter 4: Using ERIS in ArcExplorer v3.1
07/31/2002 4-8
ERIS Project Legends and Layers
The Legend The legend appears on the left side of your screen
when you open an ERIS project. The legend shows what colors and what symbology are used on the map to denote the different map items. Each item listed in the legend represents a layer, defined below. The upper part of an ERIS project legend is shown to the right.
Definition: Layer
A layer represents the graphical definition of a set of data. ArcExp lorer is mapping software. It builds maps based off of the data it is given. It builds these maps one “layer” at a time. Thus, roads represent a layer, rivers have a layer; crash data on roads for 1999 has a layer; and so on. Each layer is independent of every other layer.
Legend Naming Convention
The naming convention generally follows the database naming convention. If you are uncertain of what a label means, consult the metadata information found in Appendix A. For example, “zs_county_85_1999” represents crash data in Story county in 1999.
Activating a Layer
Each item listed in the legend is a layer. If a layer is selected (this is shown by the check in the box in front of each item), then the information that item represents is drawn on the map. The “road85” layer shown to the right is active, but the “trauma_care_fac” layer is not.

ERIS User’s Guide
Chapter 4: Using ERIS in ArcExplorer v3.1
07/31/2002 4-9
The Order of the Layers
There is a precedence in terms of what layer is “on top” on the map. The layers that have been activated appear in the order they are listed in the legend. As an analogy, imagine the ArcExplorer map as an onion. Thus, if “ema”, “hazmat_districts”, “road85”, and “rail85y1998” are the active layers, then “ema” is the outermost layer, followed by the rest in order. This is important because one active layer can hide a layer below it.
Hiding or Modifying the Legend
The legend acts as a normal window. Thus, you can widen it or narrow it by clicking and dragging the window pane.
You can also hide/unhide the legend window by pressing the buttons, located near the upper right hand corner of the legend window.

ERIS User’s Guide
Chapter 4: Using ERIS in ArcExplorer v3.1
07/31/2002 4-10
ERIS ArcExplorer Menu Options
Introduction There are five primary menus available from ArcExplorer.
NOTE: Keep in mind that this chapter will not describe every option.
Instead, it will discuss the ones most likely to be used by ERIS users.
File The File menu allows you to open, save, and print projects. Some of the File
menu options are described below:
Option Description Open Project… This option allows you to open projects. Remember
where you saved your ERIS data!
Save Project You can save any changes to the projects that you desire (if, for example, you choose to activate certain layers or change a layer’s colors).
Close Project This option closes a project.
Print… This option prints the visible map, and the visible part of the legend.
Edit The Edit menu allows you to copy a map image to another file.
View The View menu allows you to hide/unhide the legend and scale information.
Some of the View menu options are described below:
Option Description Overview Map There are no viewable ERIS overview maps.
Legend This option hides/unhides the legend.
Scale Bar This option hides/unhides the scale bar.
Scale Bar Properties
This option allows you to change the settings on the scale bar. This includes English to metric, as well as screen vs. map units.
Layer The Layer menu is unlikely to be used by most ERIS users.

ERIS User’s Guide
Chapter 4: Using ERIS in ArcExplorer v3.1
07/31/2002 4-11
Tools The Tools menu offers a number of options for zooming in or out on the map,
as well as moving around on the map and finding data. Some of the Tools options are described below:
Option Description
Zoom to Full Extent
This option zooms out as much as the software allows.
Zoom In This option zooms in, based on the point you select.
Zoom Out This option zooms out, based on the point you select.
Pan This option allows you to move the map around on the screen
Identify The identify tool allows you to select a point of interest on the map (a road, river, crash point, or any other feature) and retrieve information about that point of interest.
Measure The measure tool allows you to measure the distance between two spots.
Find The find feature searches the database information. This is an option for experienced users.
Query Builder The Query Builder feature allows the user to build involved queries to search through the database information. This is an option for experienced users.
Help The Help menu offers attached help files that you could use to explain
features of ArcExplorer.

ERIS User’s Guide
Chapter 4: Using ERIS in ArcExplorer v3.1
07/31/2002 4-12
ERIS ArcExplorer Buttons
Introduction The button bar provides quick access to many ArcExplorer features. Most of
those features can be found in the menu options. As for the menu options, several buttons that are of immediate relevance or use to most ERIS users are described below.
The Buttons The following table states what some of the most commonly used buttons do.
Consult the previous descriptions of the options for more details.
Button Description
This activates the Find option.
This activates the Identify option.
This allows you to open a project.
This activates the Pan option.
This allows you to print an open project.
This activates the Query Builder option.
This allows you to save a project.
This activates the zoom-in option.
This activates the zoom-out option.
This activates the Zoom to Active layer option. This option “zooms” to a layer that you have selected (by clicking once) in the legend—effectively making it the “top” layer.
This activates the measure option.
This activates the Clear All Selection option. This option allows you to “deactivate” any active layer by clicking on it in the legend.
This activates the map tips feature. This feature allows you to select data in one field per layer. This data will appear as a pop-up window on the map when your cursor rests on that layer on the map.

ERIS User’s Guide
Chapter 4: Using ERIS in ArcExplorer v3.1
07/31/2002 4-13
Performing Some Standard Tasks in ArcExplorer
Introduction You will find step-by-step instructions on how to perform some of the
common tasks one might do with ERIS projects in ArcExplorer. These include:
• Activating a Layer • Building a Query • Changing a Layer’s Appearance • Creating a Map Tip • Identifying a Feature • Measuring • Panning • Zooming In
Activating a Layer
This task represents one of two things. The first would be to activate (and therefore draw on the map) one of the layers in the legend. Simply click in the checkbox to the left of the layer title to do this. Some options require you to indicate which layer you want to work (such as the Zoom to Active Layer button). To activate a layer for these options, simply single click somewhere on the layer entry in the legend.
Building a Query
This is a complex operation requiring and understanding of the database tables, field names, and search operators. Refer to the following table:
Step Action
1 Activate the layer containing data upon which you want to search.
2 Select this option from either the menu or the button. The Query Builder window appears.
3 Select fields, operators, and values as desired.
4 Press Execute to conduct the query. The results appear in the bottom half of the Query Builder window.
5 Press Clear and repeat steps 2-4 if desired; otherwise, close the window.
ERIS User’s Guide
Chapter 4: Using ERIS in ArcExplorer v3.1
07/31/2002 4-14
Changing an Layer’s Appearance
Every layer has been created with a pre-selected symbol and color. However, you can change these if you desire. In order to do so, complete the following steps:
Step Action
1 Double-click on a layer entry in the Legend. A Properties window specific to that layer appears.
2 Change any of the fields you desire.
3 Press either OK, Cancel, or Apply, as desired.
Creating a Map Tip
This option requires some familiarity with the metadata (refer to Appendix A). Refer to the following table:
Step Action
1 Click the button. The Map Tips dialog box appears.
2 Select the layer for which you wish to create a map tip.
3 Select the field.
4 Press OK.
Identifying a Feature
Refer to the following table:
Step Action
1 Activate the layer containing features of interest.
2 Select this option from either the menu or the button. The cursor changes into the identify symbol.
3 Click on a map feature for which you want information. An Identify Features window appears with data about that feature.
4 Close the Identify Features window when you are done.

ERIS User’s Guide
Chapter 4: Using ERIS in ArcExplorer v3.1
07/31/2002 4-15
Measuring Refer to the following table:
Step Action 1 Select this option from either the menu or the button.
2 Click on one spot on the map.
3 Hold the mouse button while you drag the cursor to another spot, creating a line.
4 Release the mouse button. A gray box with the distance appears in the upper left-hand corner of the map.
Panning Refer to the following table:
Step Action 1 Select either the Pan menu option or the button.
2 Place your cursor on a spot on the map.
3 Click and hold the right mouse button.
4 Drag the map into the desired position.
Zooming In Refer to the following table:
Step Action 1 Select either the Zoom In menu option or the button. The
cursor becomes a magnifying glass icon.
2 You may either: • Click on the map with the cursor. This centers the zoom in
on that spot. • Click-and-drag a box around the area you want to zoom-in
on.
3 Continue to zoom in until you have reached the desired view.
* * *

ERIS User’s Guide
Appendix A: Metadata
07/31/2002 A-1
Overview
Introduction This section briefly describes the data and the metadata associated with ERIS.
Definitions Refer to the following table for some definitions:
Word Definition Data Data is the actual information itself. This includes each
piece of information tied to a crash; the location of road intersections; how many EMS technicians are available in a county; and so on.
Metadata Metadata describes the data itself and how the data fits together. This includes how the data is labeled, organized, and retrieved to draw a map; how the data is searched when a query is run; and so on.
Metadata Documentation
The metadata documents have been placed on the ERIS CD. The documents are found in two Excel spreadsheets, named ERIS_DATA.xls and COUNTY_DATA.xls as well as two webpages, named ERIS.DATA.xls and COUNTY_DATA.xls. These pages identify:
• What the data labels mean; and • What data values within a label mean.
Questions About the Data
If you have questions about the data, please contact CTRE. Center for Transportation Research and Education
2901 South Loop Drive, Suite 3100
Ames, Iowa, 50010-8632
Phone: (515) 294-8103
Fax: (515) 294-0467
* * *

ERIS User’s Guide
Appendix B: Acknowledgements
07/31/2002 B-1
Overview
Introduction ERIS is the product of a project primarily funded by Iowa SMS but also
through various other project funds supplied by the Iowa Traffic Safety Improvement Program, Iowa Department of Public Health, and Iowa Department of Economic Development. Special thanks for the support of Tom Welch and the members of Iowa SMS.
Overall Project Leaders
The following people acted in overall project leadership roles: Jacqueline Comito (Project Coordinator) Joyce Emery (Project Manager) George Oster (Iowa SMS and ISU Extension to Communities
Contract Manager)
CTRE The following members of CTRE contributed to the project:
Reginald R. Souleyrette (CTRE Contract Manager/Faculty Advisor) CTRE GIS Development Team:
• Nick Burdine • Brad Estochen • Zachary Hans • Brett Lewis • Jerry Roche • Kevin Triggs
Key Advisory Committee Members
The following members contributed to the project: Dick Harmon (IDPH) Bob Thompson (Governor's Traffic Safety Bureau) Randy Novak (Fire Service Training Bureau) Michael Pawlovich (Iowa DOT) Ray Jones (IDPH) Anita Bailey (IDPH)

ERIS User’s Guide
Appendix B: Acknowledgements
07/31/2002 B-2
Research Assistants
The following people contributed to the project: Jason Carter Jeanne Frerichs Jon Wolseth Samantha Solimeo
Manual The following person contributed to the project:
Ryan Wilson
Testing, Review, Content
The following people contributed to the project: Jacqueline Comito Dena Huisman George Oster Michael Pawlovich
Community Emergency Response Services
Special thanks to the community emergency response services of the 20 participating pilot counties. The success of this project rests with their interest, dedication, and contributions.
* * *