erasmus+ project: yestermorrow year 1 maths: pythagorean
TRANSCRIPT

Erasmus+ Project: Yestermorrow Year 1 Maths: Pythagorean Theorem
Workshop (Coding Android Mobile Apps):
“Collision Detection and the Pythagorean Theorem” (Based on the code.org worksheet)
WORKSHOP OVERVIEW Determining when objects on the screen touch is an important aspect of most games. In this workshop we'll look at how the Pythagorean Theorem and the Distance Formula can be used to measure the distance between two points on the plane, and then decide whether those two points (or game characters) are touching. Once this mathematical basics are understood, we will use them to develop an easy game in which a blue ball has to be flung towards a yellow one as many time as possible in 30 seconds. The blue ball will bounce on screen borders and the yellow one will reappear in a random place every time it is crashed by the blue. Coding is Fun!!! Enjoy coding!!!
Miguel Señor Alonso IT Dpt. IES Abyla School Ceuta (SPAIN) 1

WORKSHOP OBJECTIVES Students will:
● Demonstrate that circles will overlap if the distance between their centers is less than the sum of their radii.
● Show that the distance of two points graphed in 2 dimensions can be represented as the hypotenuse of a right triangle.
● Understand that the Pythagorean Theorem allows you to calculate the hypotenuse of a right triangle using the length of the two legs.
● Apply the Pythagorean Theorem to calculate the distance between the centers of two objects.
● Learn objectoriented and eventoriented programming basics through the App Inventor platform.
● Develop a game for Android devices, designing its interface and coding its algorithms through blocks.
MATERIALS, RESOURCES, AND PREP
● GMAIL account: Each student must own one, in order to log into the App Inventor platform.
● Android Mobile device: Not a must, but important to test the app on a real device. At least one android device for every two students.
● MIT AI2 Companion: Download and install this app from Google Play to your android device.
This app lets you synchronize your device with the development environment and see/test the app while you are designing it.
● QR Code Reader: Download and install this app from Google Play to your android device. Lets you download your just developed app once it is finished, in order to install it on your device.
Miguel Señor Alonso IT Dpt. IES Abyla School Ceuta (SPAIN) 2

GETTING STARTED 1) Vocabulary This activity has a couple of key words: Hypotenuse The side opposite the 90degree angle in a right triangle. Interface In computing, an interface is a shared boundary across which two separate components of a computer system exchange information. Actually, in our app it will be the mobile screen with all the objects that we will place on it, which will allow the user to interact. 2) Are they Touching? Suppose two objects are moving through plane space, each one having its own (x,y) coordinates. When do their edges start to overlap? They certainly overlap if their coordinates are identical (x1 = x2, y1 = y2), but what if their coordinates are separated by a small distance? Just how small does that distance need to be before their edges touch?
In one dimension, it’s easy to calculate when two objects overlap. In this example, the red circle has a radius of 1, and the blue circle has a radius of 1.5. The circles will overlap if the distance between their centers is less than the sum of their radii (1 + 1.5 = 2.5). How is the distance between their centers calculated? In this example, their centers are 3 units apart, because 4 − 1 = 3. So we can say that they don’t overlap.
How would the distance be calculated between objects moving in 2dimensions (like your game elements)? If we use the same method for one dimension, we can calculate the vertical and horizontal lines in the graphic shown here, using the distance between the xcoordinates and the distance between the ycoordinates. Unfortunately, it doesn’t tell us how far apart the two centers are.
Miguel Señor Alonso IT Dpt. IES Abyla School Ceuta (SPAIN) 3

Drawing a line from the center of one object to the other, creates a righttriangle with sides A, B and C. A and B are the vertical and horizontal distances, with C being the distance between the two coordinates. Now we can calculate A and B using the onedimension method but how can we calculate C? In a right triangle, the side opposite the 90degree angle is called the hypotenuse. Thinking back to our collision detection, we know that the objects will collide if the hypotenuse is less or equal than the sum of their radii. Knowing the length of the hypotenuse will be essential to determine when a collision occurs.
Miguel Señor Alonso IT Dpt. IES Abyla School Ceuta (SPAIN) 4
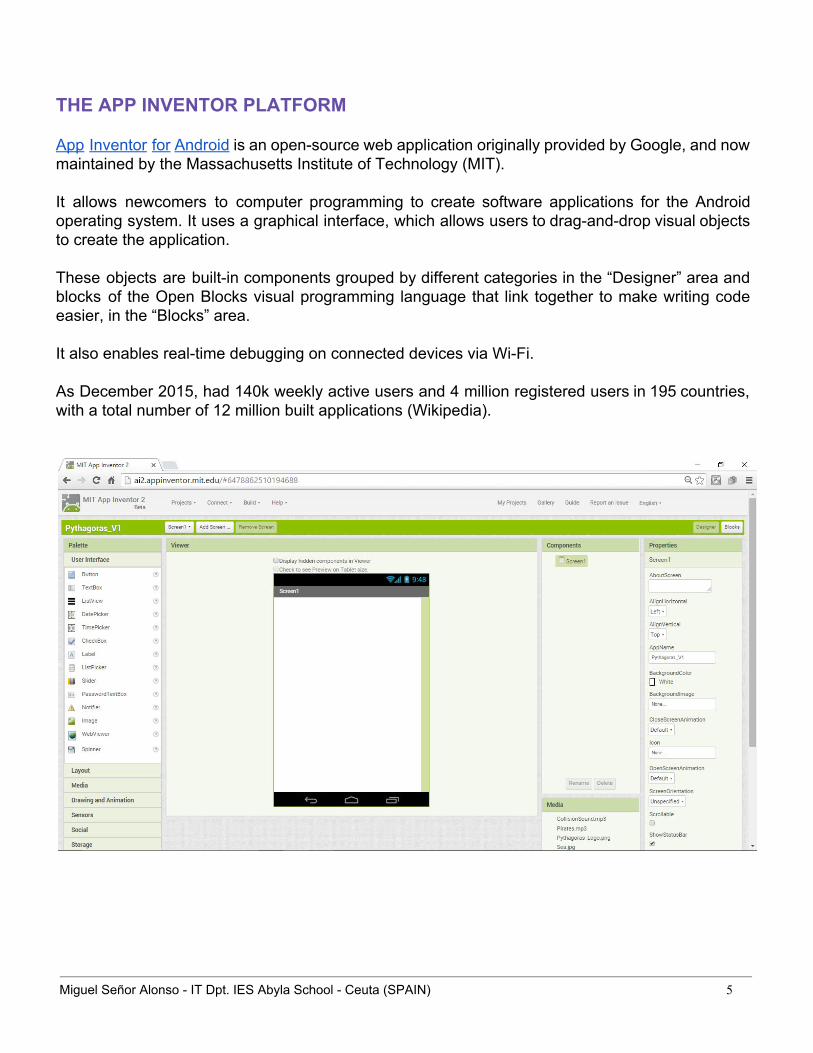
THE APP INVENTOR PLATFORM App Inventor for Android is an opensource web application originally provided byGoogle, and now maintained by the Massachusetts Institute of Technology (MIT). It allows newcomers to computer programming to create software applications for the Android operating system. It uses a graphical interface, which allows users todraganddrop visual objects to create the application. These objects are builtin components grouped by different categories in the “Designer” area and blocks of the Open Blocks visual programming language that link together to make writing code easier, in the “Blocks” area. It also enables realtime debugging on connected devices via WiFi. As December 2015, had 140k weekly active users and 4 million registered users in 195 countries, with a total number of 12 million built applications (Wikipedia).
Miguel Señor Alonso IT Dpt. IES Abyla School Ceuta (SPAIN) 5

DESIGNING THE APP INTERFACE (Version 1) Start a new app inventor project* and design its interface dragging the objects needed as follows: From the palette “User Interface”
● Label, just a component to place some text or numbers on screen. Later we will use other ones to place the score and time left to game over. Now we will show here the distance between the two balls. Rename it as “Distance” and set its property “FontSize” to “18”, “TextColor” to “White” and delete the content of the property “Text”.
From the palette “Drawing and Animation”
● Canvas, a twodimensional touchsensitive rectangular panel on which drawing can be done and sprites (images or animations) can be moved. Set “Height” and “Width” properties to “Fill parent” in order to fill the screen device. Set “BackgroundImage” to “Sea.jpg”
● Ball (2), a round sprite that can be placed on a Canvas, where it can react to touches and drags, interact with other sprites and the edge of the Canvas, and move according to its property values. Drag them to different places in the Canvas and set its properties “Radius” to “15” and “PaintColor” to “Blue” and “Yellow” respectively. Rename these components as “BlueBall” and “YellowBall”. Set “BlueBall” property “Interval” to “10” instead of “100”.
From the palette “Sensors”
● Clock, Nonvisible component that provides the instant in time using the internal clock on the phone. We will use it to fire a timer at regularly set intervals for instant distance measurement. Set its property “TimerInterval” to “10” (milliseconds).
Finally, let’s set up some details for the app, in the “Screen1” component. Set the property “BackgroundColor” to “Black”, “Icon” to “Pythagoras_Logo.png” and uncheck “TitleVisible”.
Miguel Señor Alonso IT Dpt. IES Abyla School Ceuta (SPAIN) 6

*This time we will import this project, which although it’s also a new project, it has some files uploaded already (sounds and images that we will use in the interface). This way, we will save some time as we won’t need to search for those files and upload them to the project.
Miguel Señor Alonso IT Dpt. IES Abyla School Ceuta (SPAIN) 7
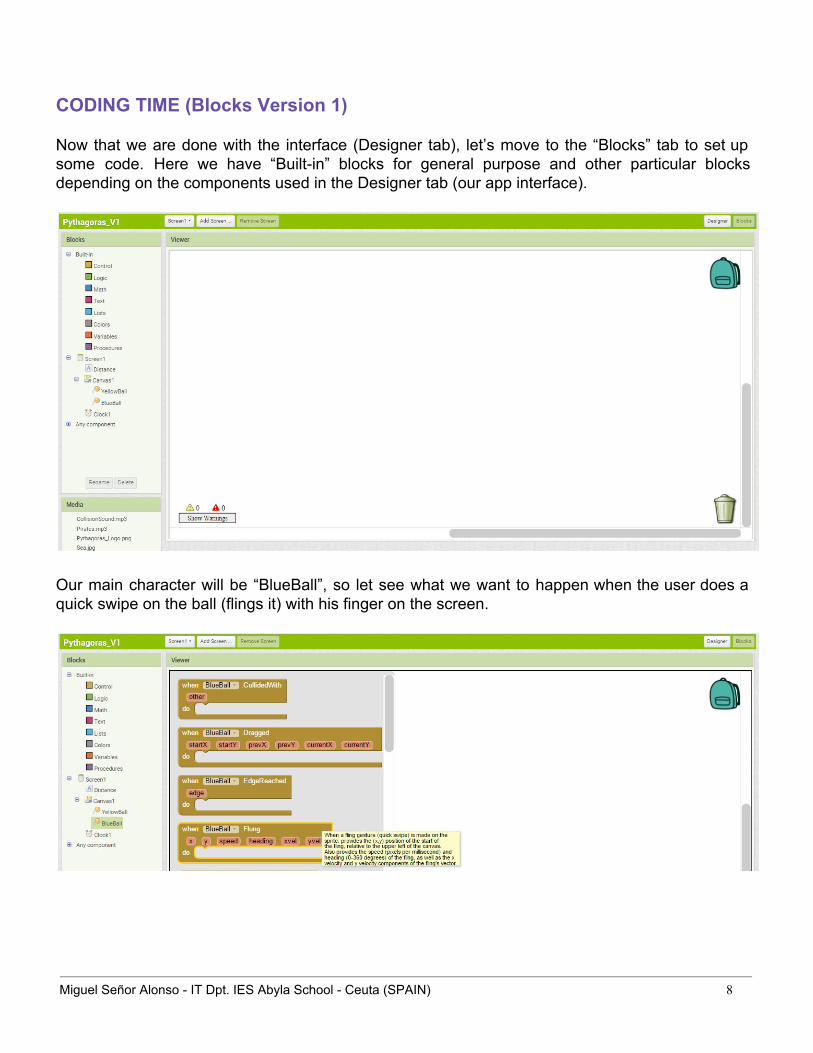
CODING TIME (Blocks Version 1) Now that we are done with the interface (Designer tab), let’s move to the “Blocks” tab to set up some code. Here we have “Builtin” blocks for general purpose and other particular blocks depending on the components used in the Designer tab (our app interface).
Our main character will be “BlueBall”, so let see what we want to happen when the user does a quick swipe on the ball (flings it) with his finger on the screen.
Miguel Señor Alonso IT Dpt. IES Abyla School Ceuta (SPAIN) 8

Drag this block to the workspace and use inside the property values it returns, to set up the “Speed” and “Heading” of the ball.
Notice that “set” green blocks have been dragged from the component “BlueBall”.
Now we will make our “BlueBall” bounce onto the edges of the screen.
Connect your device to the App Inventor platform with the MIT AI2 Companion and test your app.
Miguel Señor Alonso IT Dpt. IES Abyla School Ceuta (SPAIN) 9

Let’s calculate the distance between the two balls. We know now that means to calculate the hypotenuse (C) of the right triangle which legs are the distance between the xcoordinates (B) and the distance between the ycoordinates (A). So first step must be to calculate xdistance (B) and ydistance (A) and then apply the Pythagorean Theorem.
We will do all this calculations inside a custom procedure block which we will call “Distance_Calculation” and will be used later each time the timer fires (clock component) to show the realtime distance between the two balls (in label “Distance”).
To reduce the number of blocks linked together and make the code clearer, we are going to define side A, B and the hypotenuse C as global variables. And here we find a little problem: the x and y position of the sprites (balls included) that App Inventor blocks return, are not the coordinates of its centre but the coordinates of the upper left corner of the sprite as if it was squared. So we need to make a correction to get “our” centre coordinates. This correction consists on adding the radius of the ball to both x and y coordinates.
Miguel Señor Alonso IT Dpt. IES Abyla School Ceuta (SPAIN) 10

Then C will be the square root of A2 + B2.
So finally our procedure block which calculates the global distance is as follows:
Now we will show calculated distance in the label “Distance” over the canvas each time out timer fires. Here you are a couple of screen captures of our Pythagoras_V1 app, with the distance in pixels between the centres of the two balls. In next version of the app, we will make it playable, adding score, timer out and friction to the movement of BlueBall, so it stops moving after a while rolling. In addition, we will make YellowBall disappear and reappear in a random position every time is collided by BlueBall.
Miguel Señor Alonso IT Dpt. IES Abyla School Ceuta (SPAIN) 11

Finally, our Pythagoras_V1 app code is as follows:
Miguel Señor Alonso IT Dpt. IES Abyla School Ceuta (SPAIN) 12

IMPROVING THE APP INTERFACE (Version 2) This time we will add to the app interface the following components: From the palette “Layout”
● HorizontalArrangement, a formatting element in which to place components that should be displayed from left to right. Set its property “AlignVertical” to “Center”.
From the palette “User Interface”
● Label (5), which we will drag inside the previous HorizontalArrangement. Then we will drag our former label (Distance) inside the HorizontalArrangement too, being the last in the line. From left to right, we will rename the second label as “Score” and the fourth as “TimerOut”. We will also set for all of them, the property “FontSize” to “18” and, “TextColor” to “White”. The content of the property “Text” will be “Score” for the first one, “0” for the second, “TimeOut” for the third, “30” for the fourth and “Distance” for the fifth. Also set the property “Width” of labels “Score” and “TimeOut” to “40 pixels”.
From the palette “Sensor”
● Clock, renamed to “TimerOut”. Rename the former clock component to “Friction” as we will take advantage of it to slow down BlueBall, simulating friction every 10 milliseconds.
With former settings, the upper side of our app interface shows as we can see here:
Miguel Señor Alonso IT Dpt. IES Abyla School Ceuta (SPAIN) 13

CODING TIME (Blocks Version 2) We are going to start with something easy. Did you notice that in last image “Distance” is shown without decimals? We can truncate “Distance” adding a block from “Math” category. But also, we can show the distance from balls’ surfaces, not their centres subtracting the sum of their radii to the calculated distance. Thus, blocks change as shown:
Now let’s simulate friction on BlueBall. Each time clock “Friction” fires (every 10 milliseconds), we will slow down BlueBall in 0.005. We have to be aware of negative values, because they would make BlueBall to move backwards. That’s why we will check if actual speed is greater than 0.005 before the subtraction, and if it isn’t, we will set it to 0.
We also can slow down BlueBall when it bounces against the screen borders. This time we will decrease its speed in 1 for each bouncing. We use the same block “if then else” to avoid negative speed.
Miguel Señor Alonso IT Dpt. IES Abyla School Ceuta (SPAIN) 14

Next step for our game will be to move YellowBall to a random place on screen every time that BlueBall collides with it. So back to workshop fundamentals we have to remind that two balls collide when the distance between them is less or equal than the sum of their radii. Moving YellowBall to a random place, means setting its coordinates x and y to a random number between 0 and the limits of the screen minus its diameter. That is because for App Inventor the coordinates x and y of a sprite are those of its upper left corner and also the upper left corner of the screen is coordinate (0,0).
And we will check that, every time that clock “Friction” fires (remember that it’s also used to calculate the distance, every 10 milliseconds).
We can take advantage of last “if then” to update score + 1 for every collision.
Miguel Señor Alonso IT Dpt. IES Abyla School Ceuta (SPAIN) 15

It would be funny making BlueBall grow each time it collides with YellowBall, increasing its radius in one pixel. Now it’s time to set up code for “TimeOut”. We initialized “TimeOut” label text to “30” and we pretend that to be a countdown to 0. We will use the clock “TimerOut” which fires every second (1000 milliseconds in its property “TimerInterval”).
If “TimeOut” label reaches 0, it stops the count down in order not to go negative. But the game continue and it should stop, so let’s add some blocks for “BlueBall” to stop.
Our game is almost ready, it only needs to have some details as background music, sound effects (when balls collide) and a start button. We will do that in Version 3.
Miguel Señor Alonso IT Dpt. IES Abyla School Ceuta (SPAIN) 16

FINISHING THE APP INTERFACE (Version 3) This time we will add to the app interface the following components: From the palette “Media”
● Player, a Multimedia component that plays audio. Set its property “Source” to “Pirates.mp3”.
● Sound, a multimedia component that plays sound files and optionally makes the device vibrate. Set its property “Source” to “CollisionSound.mp3”.
From the palette “Drawing and Animation”
● ImageSprite, a sprite that can be placed on a Canvas, where it can react to touches. Rename it to “START_Button”. Set its property “Picture” to “StartButton.png”, “Height” to “100 pixels”, “Width” to “200 pixels”, “X” to “60” and “Y” to “120”. That will place it approximately in the centre of the screen, as shown:
Miguel Señor Alonso IT Dpt. IES Abyla School Ceuta (SPAIN) 17

CODING TIME (Blocks Version 3) Now that we have a “START” button, our app shouldn’t start automatically as before. Instead, it has to wait the user to click on “START”. Only then, “START” button should disappear, background music plays, timers fire and BlueBall responds to the user. So let’s disable clocks and BlueBall when the app opens (the screen initializes):
Now let’s hide the START button when the user touches it, and enable BlueBall, clocks and make the music play as well.
Miguel Señor Alonso IT Dpt. IES Abyla School Ceuta (SPAIN) 18

Do you remember the “Sound” component that we add to our app with its source property set to “CollisionSound.mp3”? Let’s play it every time BlueBall collides with YellowBall adding a “call Sound1.Start” block to the “When Friction.Timer” one, as shown:
When the game is over (“TimerOut” countdown reaches 0), apart from disabling BlueBall (which we have already done), we have to stop the music, disable clocks and make “START” button visible just in case the user wants to play again.
Miguel Señor Alonso IT Dpt. IES Abyla School Ceuta (SPAIN) 19

Finally, waiting for that option, we should add some instructions to reset “Score” and “TimerOut” to their initial values of “0” and “30” respectively and BlueBall to its original radius, speed and heading, inside the block “when START_Button.TouchDown”.
Miguel Señor Alonso IT Dpt. IES Abyla School Ceuta (SPAIN) 20

Our game is ready.
Miguel Señor Alonso IT Dpt. IES Abyla School Ceuta (SPAIN) 21