epiccare link quick reference - unsupported web …€¦ · epiccare link – quick reference ......
TRANSCRIPT

EpicCare Link – Quick Reference EpicCare Link provides a realtime view of the patient chart in Epic, in a Web-based, read-only format.
Log In
In a contemporary Web browser, go to the YNHHS Link site: https://eclink.ynhhs.org
At the login screen, enter your ID and password. Click Log In.
Internet Explorer 9 is the browser supported institutionally by YNHHS. Link is built for wide compatibility but connection via other
browsers is not tested or guaranteed.
Logging Out
Press Log Out in the toolbar at any time. Link will also log out after a period of inactivity.
Find a Patient and Add to a List
Click Select a Patient on the Home screen, or at any time click Pt Lists or Clinicals in the toolbar.
If a patient is currently on the list you may select their chart and proceed.
To find and add a new patient, click and fill in the required fields. Press Search. Be sure to use the
format Lastname,Firstname (full names, no space between)—Link will not completion-match this search.
Verify the search has returned the desired patient. (If not, press Cancel.) Be sure the radio button beside the name is
checked and press Select. The patient is now added to your Pt Lists for a prescribed period of time. Patients can be
added back later if that period expires.
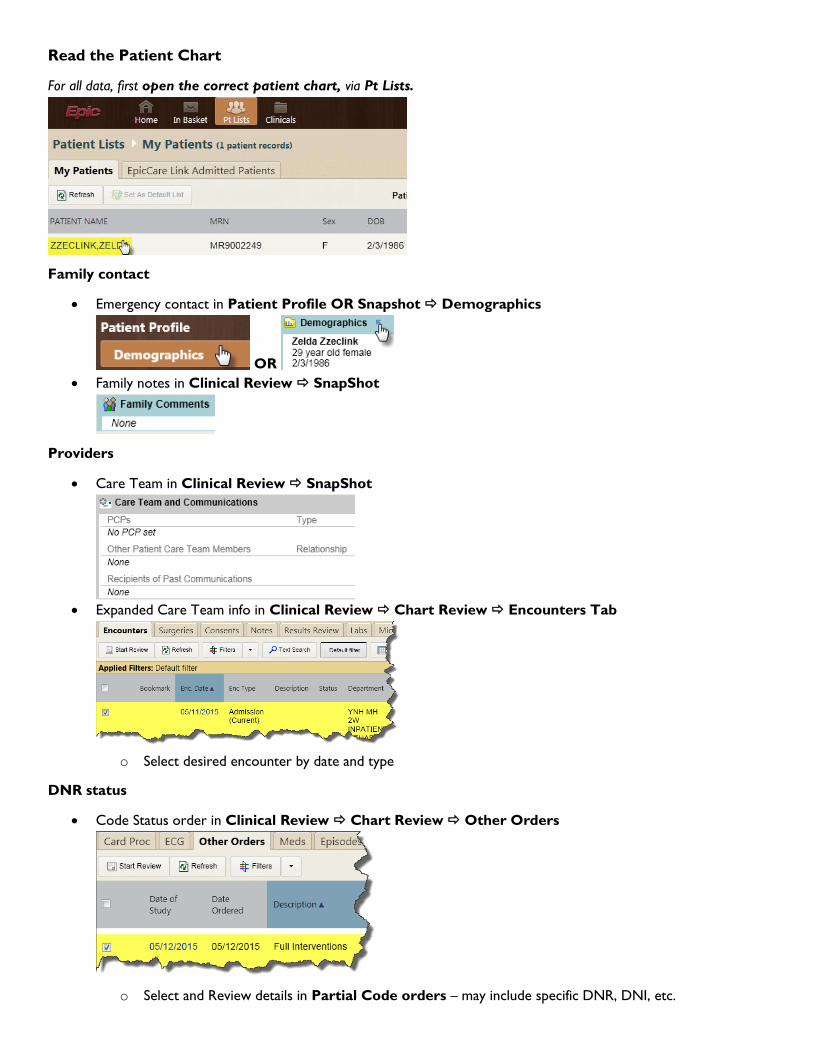
Read the Patient Chart
For all data, first open the correct patient chart, via Pt Lists.
Family contact
Emergency contact in Patient Profile OR Snapshot Demographics
OR
Family notes in Clinical Review SnapShot
Providers
Care Team in Clinical Review SnapShot
Expanded Care Team info in Clinical Review Chart Review Encounters Tab
o Select desired encounter by date and type
DNR status
Code Status order in Clinical Review Chart Review Other Orders
o Select and Review details in Partial Code orders – may include specific DNR, DNI, etc.

Allergies
Overview of allergies in Clinical Review SnapShot
Detailed allergies in Clinical Review or SnapShot Allergies
Vital Signs
Clinical Review Chart Review Encounter
o Select correct encounter
o Scroll down encounter report to All Flowsheet Templates: Vital Signs, click link
o Select correct interval and click.
I&O
Clinical Review Chart Review Encounter
o Select correct inpatient encounter
o Scroll down encounter report to All Flowsheet Templates: Intake/Output, click link

o Select correct interval and click.
Medications
All Medications in Clinical Review Chart Review Meds Tab,
o Click column header to sort IP/AMB (inpatient/home medications)
Labs, Microbiology, Pathology: Detailed Orders/Results
Clinical Review Chart Review Labs, Micro, or Path Tabs
o Status column indicates if collected, in process, resulted etc.
o Click column headers to sort by date, description, etc.
o Click checkbox beside order and click Start Review to read report.
Labs: Trended Results Over Time
Clinical Review Results Review (also reachable through Chart Review)
o Specify time range of data when opening Results Review and press Accept.

o Use View, Select a Component, and Options to tailor data view.
o Press Legend to see what text and icon markers mean.
Radiology & Other Imaging
Detailed Imaging Orders/Results in Clinical Review Chart Review Imaging Tab
o Click column headers to sort by date, description, etc.
o Click checkbox beside order and click Start Review to read report.
Notes
All Notes in Clinical Review Chart Review Notes Tab
o Click column headers to sort by date, description, etc.
o Inpatient nursing, ancillary clinical (PT/RT/etc.) and non-clinical consult (Religious Ministries etc.) are
Plan of Care notes using CPM templates
o If a note you were expecting is not present, be sure the Exclude button is not active. (Click to
deactivate if so.)
Scanned Media (including paper consents)

Scans in Clinical Review Chart Review Media Tab
o Media that corresponds to a chart review item should also appear in that tab
(e.g. a scanned H&P in Notes tab)
Support Notes
This document takes screenshots from a user with broad access to Link. Other types of Link accounts may
display fewer options on some screens.
Timed features (auto log-off, duration patients remain on lists, etc.) also may vay by account type.
Link presents live chart PHI and Best Practices for safety and HIPAA should be followed. Chart access is
auditable/discoverable. This is especially important for groups that share a common patient list—verify you are
accessing the right patient and the minimum necessary data for continuity of care.
Access problems (no account, forgotten password, etc.) should be referred to the YNHHS Help Desk at 203-
688-HELP.
EpicCare Link – Appendix A – In Basket EpicCare Link supports messages sent to and from the Epic In Basket
Access EpicCare Link In Basket
Log into EpicCare Link and click the In Basket button in the top toolbar.
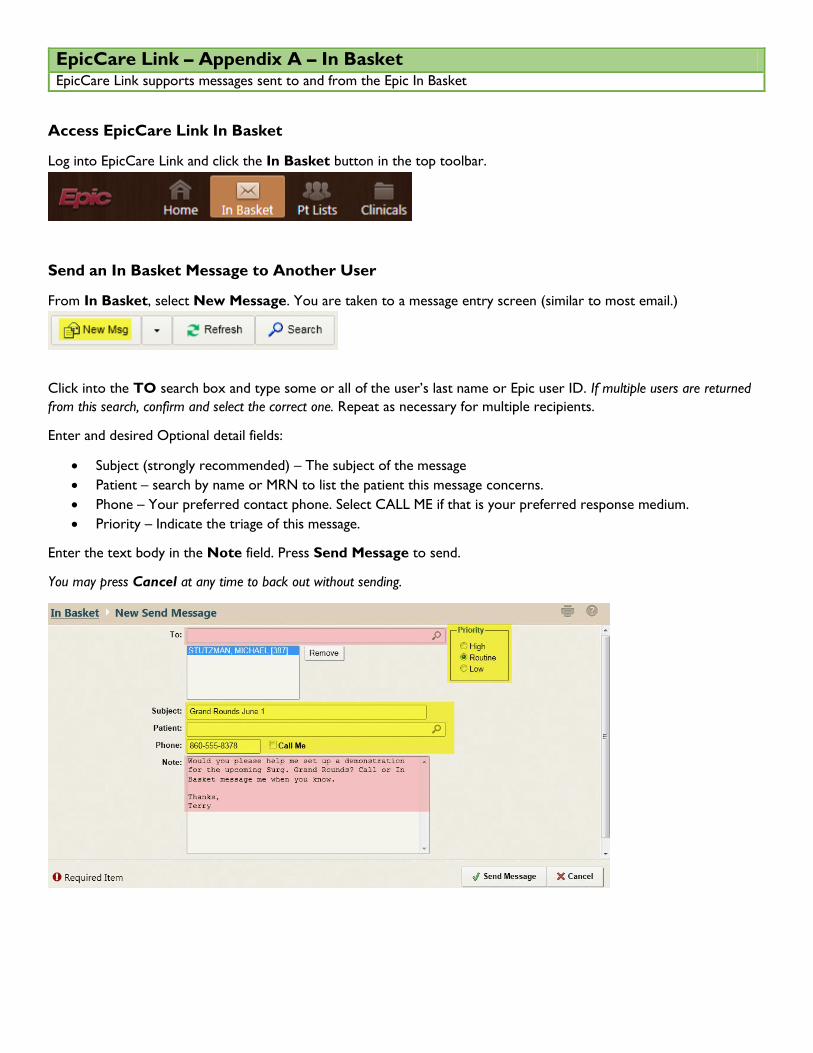
Send an In Basket Message to Another User
From In Basket, select New Message. You are taken to a message entry screen (similar to most email.)
Click into the TO search box and type some or all of the user’s last name or Epic user ID. If multiple users are returned
from this search, confirm and select the correct one. Repeat as necessary for multiple recipients.
Enter and desired Optional detail fields:
Subject (strongly recommended) – The subject of the message
Patient – search by name or MRN to list the patient this message concerns.
Phone – Your preferred contact phone. Select CALL ME if that is your preferred response medium.
Priority – Indicate the triage of this message.
Enter the text body in the Note field. Press Send Message to send.
You may press Cancel at any time to back out without sending.

The message will be received by the user as a Community Message item.
Read an In Basket message and take response action
From In Basket, select the folder containing the new message. At time of documentation, only Staff Message and
Community Message folders may appear.
Click the unread (bolded) message in the list. Its content appears below.
Press the Reply or Forward buttons to send a new related message to the sender or other users, respectively.
These messages can be completed in the same manner as a new message (directions above.)

EpicCare Link – Appendix B – Palcement Request Workflow EpicCare Link allows you to process and correspond regarding aftercare (SNF etc.) through In Basket actions
Access Referrals in EpicCare Link In Basket
Log into EpicCare Link and click the In Basket button in the top toolbar.
Select the Placement Requests folder from the sidebar.
Some versions of Link may label this folder as Discharge Placement Requests.
Select a Request message by selecting the checkbox beside it. The message displays in the lower pane.
Accept a Placement
Having selected and reviewed a placement, select Accept from the toolbar.
This sends your acceptance to the requesting Care Coordinator(s).

If your aftercare service is ultimately chosen, you’ll receive a confirmation message in your In Basket, and the patient will
be added to your Pt Lists automatically.
If your service is not chosen, you’ll receive a decline message.
Acceptance Message Decline Message
Decline a Placement
Having selected and reviewed a placement, select Decline from the toolbar.
Your response is sent to the requesting Care Coordinator(s), and the message falls off the queue with a status of Done.
Change the In Basket Status of a Placement
Having selected a placement, select menu arrow beside Done from the toolbar.
Messages may be marked with an appropriate stage of progress.
Messages marked Done will fall off the queue unless you have selected
Correspond with the Requesting Party
Having selected a placement, select Reply from the toolbar.
Complete an In Basket Message (see Appendix A for full details) and Send.
Responses will return to your In Basket.

Search for Done Messages
To see what messages have been marked as ‘Done’ and when, go to the InBasket, select the Placement Request
folder and click on Search.
Under the Statuses section, select the status of Done to Search on and then click Search at the bottom.
That search will return all messages marked as ‘Done’

You can then mark any message and change the staus back to ‘Read’ or ‘Pend’ and it will be placed back into your
InBasket folder.
To get back into the InBasket, click on My InBasket.
View More Information about the Patient

More information about patients is available through Pt Lists Chart Review.
Patients are automatically added your Pt Lists when a request is mutually accepted.
Manually adding a patient and chart review features are detailed in the Quick Reference playbook.