epermit - user guide for st agent v2.0 · suruhanjaya tenaga (st) is the regulator for the...
TRANSCRIPT

Suruhanjaya Tenaga Agent Module V2.0
User Guide
Dagang Net Technologies Sdn. Bhd.
Tower 3, Avenue 5, The Horizon, Bangsar South, No. 8, Jalan Kerinchi, 59200 Kuala Lumpur
Tel: 603‐2730 0200 Fax: 603‐2713 2121

2
Table of Contents
Introduction ............................................................................................................................................ 3
Conventions ............................................................................................................................................ 4
1 Getting Started With ePermit ........................................................................................................... 5
1.1 Logging In ................................................................................................................................ 5
1.2 Logging Out ............................................................................................................................. 7
1.3 Agent Profile ........................................................................................................................... 8
2 Using ePermit ................................................................................................................................... 9
2.1 Applying Certificate of Approval ‐ Import .............................................................................. 9
2.2 Applying Certificate of Approval ‐ Manufacture .................................................................. 28
2.3 Applying Release Letter ........................................................................................................ 38
2.4 Renewing Certificate of Approval ......................................................................................... 65
2.5 Editing Application ................................................................................................................ 79
2.6 Copying Application .............................................................................................................. 81
2.7 Deleting Application ............................................................................................................. 83
2.8 Submitting Application ......................................................................................................... 84
2.9 Viewing Application Status ................................................................................................... 86

3
Introduction
ePermit is a web‐based value‐added service provided by Dagang Net Technologies Sdn Bhd (DNT). It
is designed to facilitate online applications and approval of permits. You can apply permits from
multiple Other Government Agencies (OGA) or Permit Issuing Agencies (PIA). It is one of the core
services available under the National Single Window initiative accessible via
www.mytradelink.gov.my.
Approved permits will be routed to Sistem Maklumat Kastam (where applicable) for validation and
cross‐reference purposes against Customs declaration.
Suruhanjaya Tenaga (ST) is the regulator for the electricity and gas supply industry. Through ePermit,
you can apply to ST for the issuance of Certificate of Approval (COA) to manufacture, import, display,
sell or advertise electrical equipment and for Release Letter from Customs Detention.
In this guide, you will have a deeper understanding of ePermit system with step by step help. By the
end of this guide, you will benefit from the system as it reduces turnaround time, easy to use,
convenient and offers multi‐tasking.

4
Conventions
Icon Description Function
Edit Profile To edit profile
Help To view quick guide
Search To search for a particular list
Show To show filtered search result
Add To add item or species
Attachments To attach document with PDF format
Renew To renew Certificate of Approval upon expiry
Copy To copy application
Delete To delete application or item
Reset To reset page
Cancel To cancel application
Close To close pop‐up window
Save To save application or add item
Back To return to previous page
Checkbox To select application
Previous To go to previous page of a list
Next To go to next page of a list
Calendar To view calendar
Radio Button To select item

5
1 Getting Started With ePermit
1.1 Logging In
Before logging in, you must ensure that you have the correct username and password.
You may login via www.mytradelink.gov.my or epermit.dagangnet.com.
To login, please follow the steps below:
Step 1
Launch Internet Explorer Browser
In your PC desktop, double click the Internet Explorer (IE) to launch it.
Step 2
Enter URL (Uniform Resource Locator) At Address Bar
In Internet Explorer, go to address bar. Enter: http://epermit.dagangnet.com
Step 3
Disabling Pop‐up Blocker
From the toolbar, select Tools > Pop‐up Blocker > Turn Off Pop‐up Blocker to
disable the Pop‐up Blocker.
Internet Explorer
Enter Address
Turn-off Pop-up Blocker

6
Step 4
Enter Username And Password
1 Enter Username and Password.
2 Click on the checkbox Remember Password to disable automatic logout if
there were no activity above 30 minutes.
3 Click on the button to access the system.
4 The system will display the main screen.
Enter Username
Enter Password
Login Button

7
1.2 Logging Out
Once done with application process, you are advised to logout from ePermit.
To logout, please follow the steps below:
Step 1
Logging Out
Click the button to logout from ePermit.
Logout Button

8
1.3 Agent Profile
You can edit your profile by going to the Edit Profile screen.
To edit profile, please follow the steps below:
Step 1
Edit Profile
1 To edit your profile, click on the button.
2 Enter the necessary information into the field.
NOTE: Item labeled with * is compulsory.
3 To change your password, enter new password in the Password field.
4 Enter the new password again in the Confirm Password field to confirm your
password.
5 Click on the button to submit the profile once done.

9
1 Using ePermit
The system allows you to apply, edit, copy, delete and submit:
• Certificate of Approval for Import
• Certificate of Approval for Manufacture
• Release Letter
It also allows you to:
• Renew Certificate of Approval
• View Application Status
2.1 Applying Certificate of Approval ‐ Import
To apply Certificate of Approval (Import), please follow the steps below:
Step 1
View Certificate of Approval Screen
1 Click on Suruhanjaya Tenaga menu as shown.
2 View Certificate of Approval screen appears.
3 Click button.
Suruhanjaya Tenaga Menu
Apply Button

10
Step 2
Select Application Type
1 Click to select Trader.
2 Click to select OGA Name.
3 Click to select Branch.
4 Tick on the radio button to select Application Type; e.g. Certificate of
Approval ‐ Import.
5 Click button.
6 “Are you sure?’’ screen appears to confirm Application Type selected.
7 Click button to proceed or button to abort.
Select Application Type

11
Step 3
Apply Certificate of Approval (Import) Screen
This is a standard Certificate of Approval (Import) Application screen.
Step 4
Consignor Details Section
1 Fill in your exporter details or click next to ROC/ROB field to retrieve
the data updated in Admin Module previously.
2 Pop‐up window will display the list of Consignor.
3 Click Consignor Name as shown.

12
4 All fields in Consignor Details section will be filled automatically.
Step 5
Consignee Details Section
Fill in Consignee Details is the details for the trader that you have selected.
Step 6
Agent Details Section
Fill in Agent Details is your company details.
Step 7
Applicant Details Section
1 Fill in your applicant details or click next to Applicant Name field to
retrieve data updated in the Admin Module previously.

13
2 Applicant pop‐up window appears as shown below.
3 Click Applicant Name as shown.
4 All fields in Applicant Details such as Applicant Name, Designation,
IC/Passport No., Phone No., Fax No. and Email will be filled automatically.
Step 8
Mode of Transport
1 Mode of Transport refers to how the goods are being imported to Malaysia.
2 There are various types of Mode of Transport (Maritime, Rail, Road, Air,
Post).
3 Click to select Mode of Transport; e.g. Maritime.
NOTE: Mode of transport is not been validated by SMK. This field is optional and
user can leave this field blank.
Step 9
Purpose of Import
1 Click to select the Purpose of this COA application.
2 There are various type of Purpose for COA application (Private, Business,

14
Research, Exhibition, Others).
NOTE: This section is required by SMK and defaulted to Others. Applicant may change if
necessary.
Step 10
Country of Origin
1 Click to search for Country of Origin.
2 Country Codes pop‐up window appears as shown below.
3 Select a Country Code.
4 Country of Origin field will be filled automatically.
Step 11
Place of Origin
1 Click button to search for Place of Origin.
2 Port Codes pop‐up window appears as shown below.
NOTE: Place of Origin reflects the Country of Origin.
3 Select a Port Code.
4 Place of Origin field will be filled automatically.

15
Step 12
Consigned From Field
1 Click button to search for the Consigned From.
2 Country Codes pop‐up window appears as shown below.
3 Select a Country Code.
4 Consigned From field will be filled automatically.
Step 13
Port/Place of Import
1 Click to select Port/Place of Import.
2 Place of Import refers to the place of Entry Point for Import.
NOTE : Place of Import should tally with the mode of transport.
e.g. If you choose ‘Maritime’ as the mode of transport, place of import
should be a sea port.
NOTE: Port/Place of Import is not been validated by SMK. This field is optional and
user can leave this field blank.
Step 14
Location Field
Click to select the Location.
NOTE : Location is not been validated by SMK. This field is optional and user can
leave this field blank.

16
Step 15
Customs Station Field
All COA applications will be registered at Sistem Maklumat Kastam.
NOTE: Please do not change to other Customs Station; This is an auto default
station.
Step 16
No Kerja and Remarks Field
1 Enter No Kerja
NOTE: No Kerja refers to your COA reference number to represent this COA
application.
2 Enter Trader Remarks.
NOTE: Trader Remarks refers to free remark by you.
Step 17
Additional Details Section
1 Additional Details section is a Suruhanjaya Tenaga requirement. This
section is mandatory.
2 There are TWO (2) types of COA, namely;
a) Import, Display, Sell, Advertise of Electrical Equipment.
b) Import Regulated Electrical Equipment for Exhibition Only.

17
Step 17
(a)
COA: Import, Display, Sell, Advertise of Electrical Equipment
1 Enter company contact details.
2 Click to select COA Type;
e.g: Import, Display, Sell, Advertise of Electrical Equipment
3 The system displays all the related fields as shown below.
4 Click to select Country of Manufacturer; e.g: Korea, Republic of.
5 Enter Name of Manufacturer.
6 Enter Address of Manufacturer.
7 Click to select Category. Category Codes pop‐up window appears as
shown below.

18
8 Select a Category Code; e.g: K for Mixer.
9 Enter Brand name.
10 Complete Additional Details section.
<< Step 17 | Step 18 >>
Step 17
(b)
COA: Import Regulated Electrical Equipment For Exhibition Only
1 Enter company contact details.
2 Click to select COA Type;
e.g: Import Regulated Electrical Equipment for Exhibition Only
3 The system displays all the related fields as shown below.

19
4 Click to select Country of Manufacturer; e.g: Korea, Republic of
5 Enter Name of Manufacturer.
6 Enter Address of Manufacturer.
7 Click to select Category. Category Codes pop‐up window appears as
shown below.
8 Select a Category Code; e.g: K for Mixer.
9 Enter Brand.
10 Enter Name of Exhibition.
11 Enter Address of Exhibition. Click to select State.
12 Tick on the checkbox if Exhibition Address same as Consignee Adress.

20
13 Click to select Date of Exhibition and Date Of Re‐export To Origin
Country.
NOTE: Date of re‐export to origin country cannot be earlier than the last date of
exhibition duration.
14 Enter Invoice Number.
15 Click to select Date of Invoice.
16 Enter AWB / BL / Conveyance Number.
17 Click to select Date of AWB / BL / Conveyance.
18 Complete Additional Details section.
<< Step 17 | Step 18 >>

21
Step 18
Saving Application And Proceed
1 Click to proceed.
or
Click to save the aplication.
or
Click to abort the application.
2 Application Saved message window appears.
3 Click button to proceed to Add Import Item screen.
Step 19
Add Import Item
1 Click button to add Import Item.
2 Add Import Item pop‐up window appears.
Add Button

22
3 Click the button to search for Tariff Code.
4 Alert screen appear
5 Click button to proceed.
Step 20
Search Tariff Code
1 Select Tariff or SJT tab to search Code. System will display the type of tab
according to your consignment’s origin.
Tariff Code – Origin from Non‐ASEAN countries
SJT – Origin from ASEAN countries
2 Search Code/Description and click button.
3 Select a Code.
Select Tariff/Product Profile Tab
Select Product Code
Search Button

23
Step 21
Tariff Field
1 Tariff Code & Tariff Description will be filled automatically. You may edit it.
2 Tariff UOM will be filled automatically and cannot be edited.
3 Enter Tariff Quantity.
NOTE: Tariff Quantity is defaulted at the maximum of 9999999. For application type
Import, Display, Sell, Advertise of Electrical Equipment, do not change the
quantity. For Import Regulated Electrical Equipment For Exhibition, key in the
actual quantity of import.
4 Enter Unit Cost C.I.F, Total, Name of Electrical Equipment and Model
details.
NOTE: Model entered can’t be duplicated for each item entered.
5 Click button to proceed.
or
Click to reset entry.
or
Click to close the pop‐up window.
6 Import Item Added message window appears.
7 Click button to return to Edit Certificate of Approval (Import)
screen.

24
Step 22
Attachment of Technical Documents
1 Click button to attach supporting documents.
2 Attachments screen appears as shown.
3 Click button to select the suppporting documents file from your
PC for attachment.
4 Select the file to be attached.
Attachment Button
Browse Button

25
5 Click button to complete the attachment process.
6 Attachment screen to attach file(s) appears as shown.
7 If a message screen appears as below, the file you have attached is not in
the listed format.
8 Your file(s) must be in the listed format before you can proceed any further.
9 Attach the correct format file to proceed.
10 Message screen appears notifying the docoument(s) has been attached
successfully.
11 Click to return to Edit Certificate of Approval (Import) screen.
Attach Files Button

26
Step 23
Submission To Suruhanjaya Tenaga
1 Tick on the checkbox to agree to the condition required.
2 Click button to submit application.
3 Message screen appears notifying you to pay processing fee to Suruhanjaya
Tenaga.
4 Click button to proceed.
5 Application Submitted message screen appears.
6 Click button to proceed.
Submit To OGA

27
Step 24
Check Application Status After Submission
You can check the COA Application Status and ID in the Suruhanjaya Tenaga
menu.
The new Application ID is displayed with status “Awaiting OGA Approval”.
Awaiting OGA Approval

28
2.2 Applying Certificate of Approval ‐ Manufacture
To apply for Certificate of Approval (Manufacture), please follow the steps below:
Step 1
View Certificate of Approval Screen
1 Click on Suruhanjaya Tenaga menu as shown.
2 View Certificate of Approval screen appears.
3 Click button.
Step 2
Select Application Type
1 Click to select Trader.
2 Click to select OGA Name.
3 Click to select Branch.
4 Tick on the radio button to select Application Type; e.g. Certificate of
Suruhanjaya Tenaga Menu
Apply Button

29
Approval ‐ Manufacture.
5 Click button.
8 “Are you sure? screen appears to confirm Application Type selected.
9 Click button to proceed or button to abort.
Step 3
Apply Certificate of Approval (Manufacture) Screen
This is a standard Certificate of Approval (Manufacture) Application screen.
Select Application Type

30
Step 4 Applicant Details Section
1 Fill in your applicant details or click next to Applicant Name field to
retrieve the data updated in Admin Module previously.
2 Applicant pop‐up window appears as shown below.
3 Click Applicant Name as shown.
4 All fields in Applicant Details such as Applicant Name, Designation and
IC/Passport No., Phone No., Fax No. and Email will be filled automatically.
Step 5
No Kerja and Remarks Field
1 Enter No Kerja
NOTE: No Kerja refers to your COA reference number to represent this COA
application

31
2 Enter Trader Remarks.
NOTE: Trader Remarks refers to free remark by you.
Step 6
Additional Details Section
1 Additional Details section is a Suruhanjaya Tenaga requirement.
NOTE: This section is required by Suruhanjaya Tenaga and field in * remark is
mandatory.
2 Enter Company Phone No., Company Fax No., Company Email Address and
Handphone No.
3 Click to select Country of Manufacturer.

32
4 Enter Name of Manufacturer.
5 Enter Address of Manufacturer.
6 Enter ROC/ROB Number.
7 Click to search for Category. Category Codes pop‐up window appears
as shown below.
8 Select a Category Code; e.g: K04 for Lampholders.
9 Enter Brand Name.
10 Enter Name of Electrical Equipment & Model.
NOTE: Model entered can’t be duplicated for each electrical equipment name.
11 Click button to insert another equipment.
12 To delete equipment off the list, tick on the checkbox and click
button to delete the selected equipment.

33
13 Complete Additional Details.
14 Click button to proceed.
or
Click button to save application.
or
Click button to abort application.
15 Application Saved message window appears.
16 Click button to proceed.

34
Step 7
Attachment of Technical Documents
1 Click button to attach supporting documents.
2 Attachments screen appears as shown.
3 Click button to select the suppporting documents file from your
PC for attachment.
4 Select the file to be attached
Attachment Button
Browse Button

35
5 Click button to complete the attachment process.
6 Attachment screen to attach file(s) appears as shown.
7 If a message screen appears as below, the file you have attached is not in
the listed format.
8 Your file(s) must be in the listed format before you can proceed any further.
9 Attach the correct format file to proceed.
10 Message screen appears notifying the docoument(s) has been attached
successfully.
11 Click to return to Edit Certificate of Approval (Manufacture).
Attach Files Button

36
Step 8
Submission To Suruhanjaya Tenaga
1 Tick on the checkbox to agree to the condition required.
2 Click button to submit application.
3 Message screen appears notifying you to pay processing fee to Suruhanjaya
Tenaga.
4 Click button to proceed.
5 Application Submitted message screen appears.
6 Click button to proceed.
Submit To OGA Button

37
Step 9
Check Application Status After Submission
The new Application ID is displayed with status = “Awaiting OGA Approval”.
Awaiting OGA Approval

38
2.3 Applying Release Letter
To apply for Release Letter, please follow the steps below:
Step 1
View Certificate of Approval Screen
1 Click on Suruhanjaya Tenaga menu as shown.
2 View Certificate of Approval screen appears.
3 Click button.
Step 2
Select Application Type
1 Click to select Trader.
2 Click to select OGA Name.
3 Click to select Branch.
Suruhanjaya Tenaga Menu
Apply Button
39
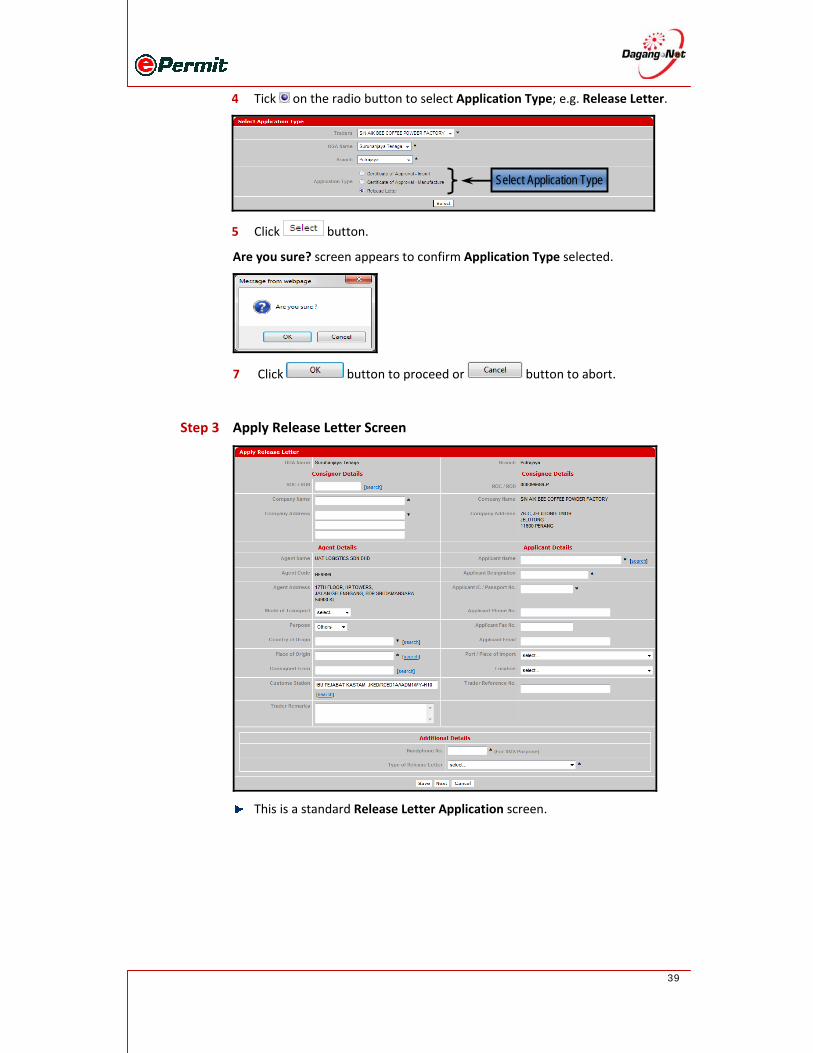
4 Tick on the radio button to select Application Type; e.g. Release Letter.
5 Click button.
Are you sure? screen appears to confirm Application Type selected.
7 Click button to proceed or button to abort.
Step 3
Apply Release Letter Screen
This is a standard Release Letter Application screen.
Select Application Type

40
Step 4
Consignor Details Section
1 Fill in your exporter details or click next to ROC/ROB field to
retrieve the data updated in Admin Module previously.
2 Pop‐up window will display the list of Consignor.
3 Click Consignor Name as shown.
4 All fields in Consignor Details section will be filled automatically.
Step 5
Agent Details Section
Agent Details is your company’s details.

41
Step 6
Consignee Details Section
Consignee Details are the details for the trader that you have choosed.
Step 7
Applicant Details Section
1 Fill in your exporter details or click next to Applicant Name field to
retrieve the data updated in Admin Module previously.
2 Click next to Applicant Name field.
3 Applicant pop‐up window appears as shown below.
4 Click Applicant Name as shown.
5 All fields in Applicant Details such as Applicant Name, Designation and
IC/Passport No., Phone No., Fax No. and Email will be filled automatically.
Step 8
Mode of Transport
1 Mode of Transport refers to how the goods are being imported to Malaysia.
2 There are various types of Mode of Transport (Maritime, Rail, Road, Air,
Post).

42
3 Click to select Mode of Transport; e.g. Maritime
NOTE: Mode of transport is not been validated by SMK. This field is optional and
user can leave this field blank
Step 9
Purpose
1 Click to select the Purpose.
2 There are various type of Purpose (Private, Business, Research, Exhibition,
Others).
NOTE: This section is required by SMK and defaulted to Others. Applicant may
change if necessary
Step 10
Country of Origin
1 Click to search for Country of Origin.
2 Country Codes pop‐up window appears as shown below.
3 Select a Country Code.
Country of Origin field will be filled automatically.
Step 11
Place of Origin

43
1 Click button to search for Place of Origin.
2 Port Codes pop‐up window appears as shown below.
NOTE: Place of Origin reflects the Country of Origin.
3 Select a Port Code.
4 Place of Origin field will be filled automatically.
Step 12
Consigned From Field
1 Click button to search for the Consigned From.
2 Country Codes pop‐up window appears as shown below.
3 Select a Country Code.
4 Consigned From field will be filled automatically.
Step 13
Port/Place of Import

44
1 Click to select Port/Place of Import.
2 Place of Import refers to the place of Entry Point for Import.
NOTE : Place of Import should tally with the mode of transport. e.g. If you choose ‘Maritime’ as the mode of transport, place of import should be a sea port.
NOTE: Port/Place of Import is not been validated by SMK. This field is optional and user can leave this field blank
Step 14
Location Field
Click to select the Location.
NOTE : For Location field, please refer to your office or warehouse.
NOTE: Location is not been validated by SMK. This field is optional and user can leave
this field blank
Step 15
Customs Station Field
All COA applications will be registered at Sistem Maklumat Kastam.
NOTE: Please do not change to other Customs Station; This is an auto default station.
Step 16
No Kerja and Remarks Field
1 Enter No Kerja.
NOTE: No Kerja refers to your COA reference number to represent this COA
application
2 Enter Trader Remarks.
NOTE: Trader Remarks refers to free remark by you.

45
Step 17
Additional Details Section
1 Additional Details section is a Suruhanjaya Tenaga requirement. This
section is mandatory.
2 Enter Handphone No. for SMS purpose.
3 Click to select Type of Release Letter.
4 There are various types of Release Letter, click on the link to view each
Release Letter;
a) Import for Manufacturing Component (100% for Export)
b) Import for Manufacturing Component (Local Market)
c) Import for Keeping In Bonded Warehouse
d) Import for Research (Factory)
e) Import for Research (Market/Quality)
f) Import for Re‐work and Re‐export
g) Import for Non‐Regulated Items
h) Import for Specific Purpose
i) Import for Concert
j) Import for Transit
Step 17
(a)
Release Letter: Import For Manufacturing Component (100% for Export)
1 Click to select Type of Release Letter.
2 Enter End Product.
3 Click to search for Category. Category Codes pop‐up window appears

46
as shown.
4 Select a Category Code; e.g: K for Mixer.
5 Enter Brand name.
6 Select Country of Manufacturer
7 Complete Additional Details for Import For Manufacturing Component
(100% for Export).
<<Step 17 | Step 18>>
Step 17
(b)
Release Letter: Import For Manufacturing Component (Local Market)
1 Click to select Type of Release Letter.
2 Click to search for Approved COA Number. Approved COA Number
pop‐up window appears as shown.

47
3 Select Approved COA No.; e.g: 81115
4 Enter End Product.
5 Click to search for Category. Category Codes pop‐up window appears
as shown.
6 Select a Category Code; e.g: K for Mixer.
7 Enter Brand name.
8 Select Country of Manufacturer
9 Enter Name of Electrical Equipment & Model.
NOTE: Model inserted can’t be duplicated for each electrical equipment name.
10 Complete Additional Details section for Import For Manufacturing
Component (Local Market).
<<Step 17 | Step 18>>

48
Step 17
(c)
Release Letter: Import For Keeping In Bonded Warehouse
1 Click to select Type of Release Letter.
2 Enter Name of Bonded Warehouse.
3 Enter Address of Bonded Warehouse.
4 Click to search for Category. Category Codes pop‐up window appears
as shown.
5 Select a Category Code; e.g: K for Mixer.
6 Enter Brand name.

49
7 Enter Invoice Details. Click button to select Date of Invoice.
8 Enter AWB / BL / Conveyance Number. Click button to select Date of
AWB / BL / Conveyance.
9 Complete Additional Details section for Import For Keeping In Bonded
Warehouse.
<<Step 17 | Step 18>>
Step 17
(d)
Release Letter: Import for Research (Factory)
1 Click to select Type of Release Letter.
2 Click to search for Category. Category Codes pop‐up window appears
as shown.
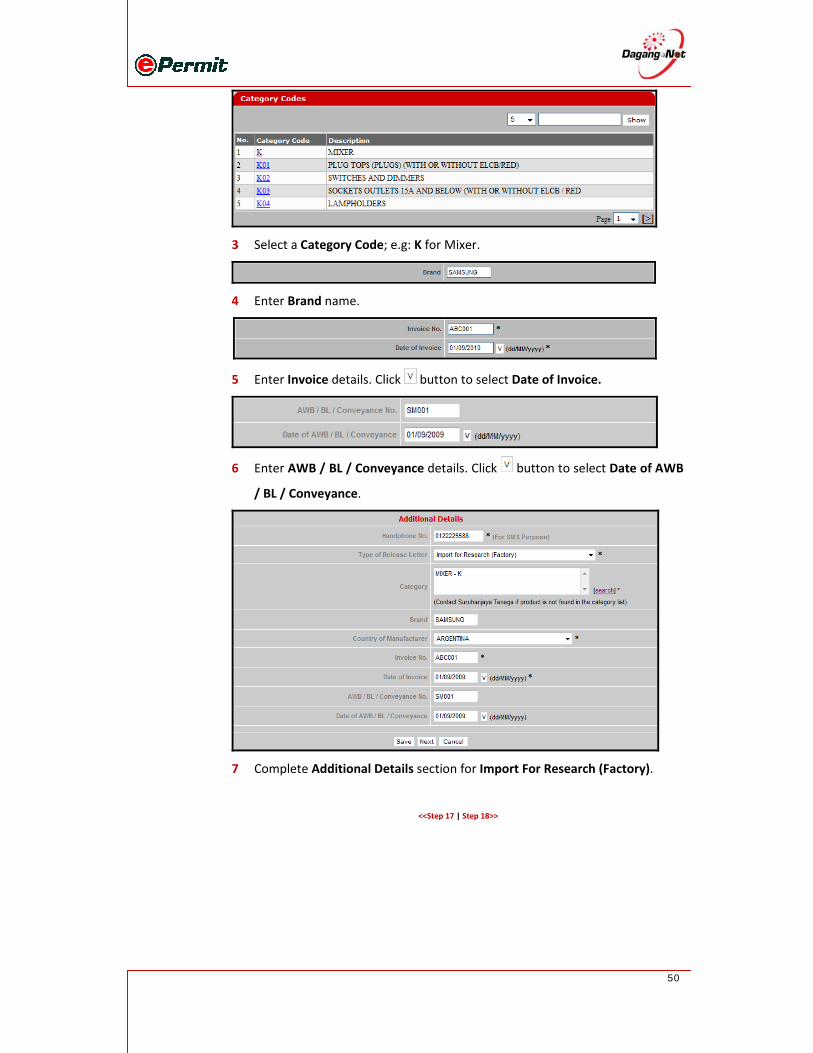
50
3 Select a Category Code; e.g: K for Mixer.
4 Enter Brand name.
5 Enter Invoice details. Click button to select Date of Invoice.
6 Enter AWB / BL / Conveyance details. Click button to select Date of AWB
/ BL / Conveyance.
7 Complete Additional Details section for Import For Research (Factory).
<<Step 17 | Step 18>>

51
Step 17
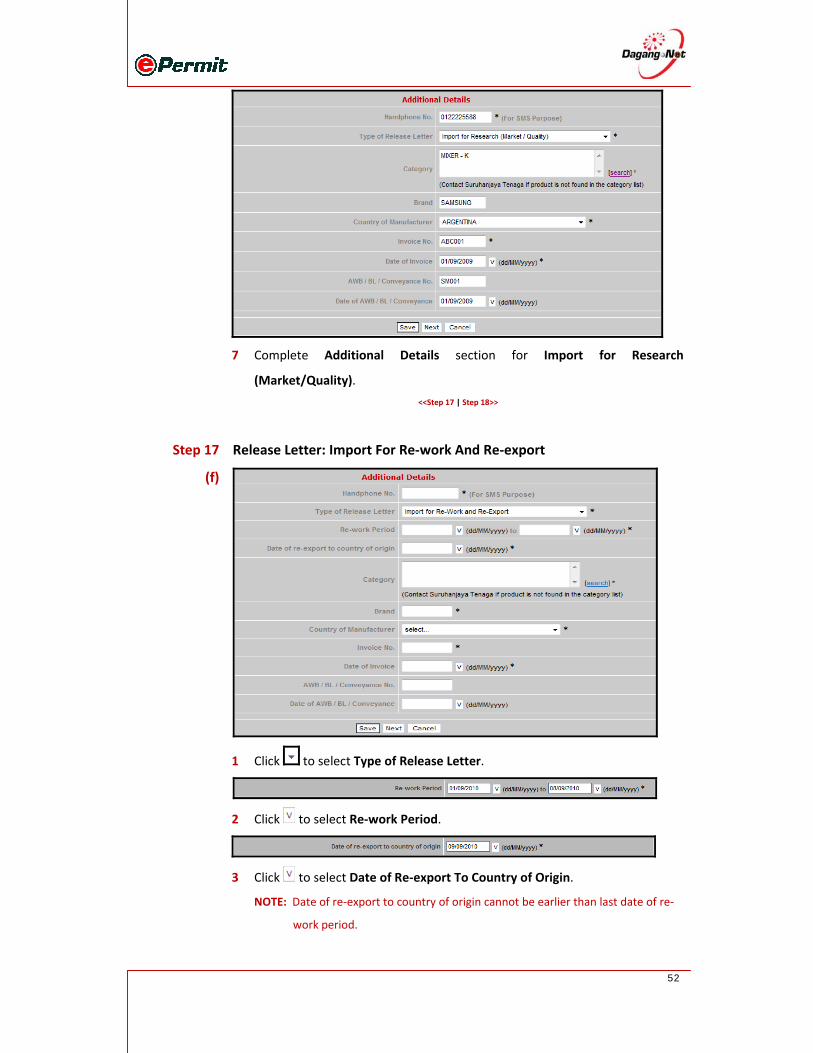
(e)
Release Letter: Import for Research (Market/Quality)
1 Click to select Type of Release Letter.
2 Click to search for Category. Category Codes pop‐up window appears
as shown.
3 Select a Category Code; e.g: K for Mixer.
4 Enter Brand name.
5 Enter Invoice details. Click button to select Date of Invoice.
6 Enter AWB / BL / Conveyance details. Click button to select Date of AWB
/ BL / Conveyance.
52
7 Complete Additional Details section for Import for Research
(Market/Quality).
<<Step 17 | Step 18>>
Step 17
(f)
Release Letter: Import For Re‐work And Re‐export
1 Click to select Type of Release Letter.
2 Click to select Re‐work Period.
3 Click to select Date of Re‐export To Country of Origin.
NOTE: Date of re‐export to country of origin cannot be earlier than last date of re‐
work period.

53
4 Click to search for Category. Category Codes pop‐up window appears
as shown.
5 Select a Category Code; e.g: K for Mixer.
6 Enter Brand name.
7 Enter Invoice details. Click button to select Date of Invoice.
8 Enter AWB / BL / Conveyance details. Click button to select Date of AWB
/ BL / Conveyance.
9 Complete Additional Details section for Import for Re‐work and Re‐export.
<<Step 17 | Step 18>>

54
Step 17
(g)
Release Letter: Import for Non‐Regulated Items
1 Click to select Type of Release Letter.
2 Click to search for Category. Category Codes pop‐up window appears
as shown.
3 Select a Category Code; e.g: K for Mixer.
4 Enter Brand name.
5 Complete Additional Details section for Import for Non‐Regulated Items.
<<Step 17 | Step 18>>

55
Step 17
(h)
Release Letter: Import for Specific Purpose
1 Click to select Type of Release Letter.
2 Enter Name of Company/User.
3 Enter Address To Be Used.
4 Click to search for Category. Category Codes pop‐up window appears
as shown.
5 Select a Category Code; e.g: K for Mixer.
6 Enter Brand name.

56
7 Enter Invoice details. Click button to select Date of Invoice.
8 Enter AWB / BL / Conveyance details. Click button to select Date of AWB
/ BL / Conveyance.
9 Complete Additional Details section for Import for Specific Purpose.
<<Step 17 | Step 18>>
Step 17
(i)
Release Letter: Import for Concert

57
1 Click to select Type of Release Letter.
2 Enter Name of Concert.
3 Enter Address of Concert.
4 Click to select Concert Period.
5 Click to select Date of Re‐export To Country of Origin.
NOTE: Date of re‐export to country of origin must not be earlier than the last date
of concert period.
6 Click to search for Category. Category Codes pop‐up window appears
as shown.
7 Select a Category Code; e.g: K for Mixer.
8 Enter Brand name.
9 Enter Invoice details. Click button to select Date of Invoice.
10 Enter AWB / BL / Conveyance details. Click button to select Date of AWB
/ BL / Conveyance.

58
11 Complete Additional Details section for Import for Concert.
<<Step 17 | Step 18>>
Step 17
(j)
Release Letter: Import for Transit
1 Click to select Type of Release Letter.
2 Click to search for Category. Category Codes pop‐up window appears
as shown.

59
3 Select a Category Code; e.g: K for Mixer.
4 Enter Brand name.
5 Enter Invoice details. Click button to select Date of Invoice.
6 Enter AWB / BL / Conveyance details. Click button to select Date of AWB
/ BL / Conveyance.
7 Complete Additional Details section for Import for Transit.
<<Step 17 | Step 18>>

60
Step 18
Add Import Item
1 Click button to add Import Item.
2 Add Import Item pop‐up window appears.
3 Click the button to search for Tariff Code.
NOTE: Items labeled * is complusory.
4 Message alert screen appear.
5 Click button to proceed application.
Add Button
Search Button

61
4 Select Tariff or SJT tab to search Code. System will display the type of tab
according to your consignment’s origin.
Tariff Code – Origin from Non‐ASEAN countries
SJT – Origin from ASEAN countries
5 Search Code/Description and click button.
6 Select a Code.
7 Tariff Code & Tariff Description will be filled automatically. You may edit it.
8 Tariff UOM will be filled automatically and cannot be edited.
9 Enter Tariff Quantity.
NOTE: Tariff Quantity is defaulted at the maximum of 9999999. For application type
Import, Display, Sell, Advertise of Electrical Equipment, do not change the
quantity. For Import Regulated Electrical Equipment For Exhibition, key in the
actual quantity of import.
10 Enter Unit Cost C.I.F, Total, Name of Electrical Equipment and Model
Select Tariff/Product Profile Tab
Select Product Code

62
details.
NOTE: Model entered can’t be duplicated for each item entered.
11 Click button to proceed.
or
Click to reset entry.
or
Click to close the pop‐up window.
12 Import Item Added message window appears.
13 Click button to return to Edit Release Letter screen.
14 Click button to return to Edit Release Letter screen.
Step 19
Attachment of Technical Documents
1 Click button to attach supporting documents.
2 Attachments screen appears as shown.
3 Click button to select the suppporting documents file from your
PC for attachment.
Attachment Button
Browse Button

63
4 Select the file to be attached.
5 Click button to complete the attachment process.
6 Attachment screen to attach file(s) appears as shown.
7 If a message screen appears as below, the file you have attached is not in
the listed format.
8 Your file(s) must be in the listed format before you can proceed any further.
9 Attach the correct format file to proceed.
10 Message screen appears notifying the docoument(s) has been attached
successfully.
11 Click to return to Edit Release Letter.
Attach Files Button

64
Step 20
Submission To Suruhanjaya Tenaga
1 Tick on the checkbox to agree to the condition required.
2 Click button to submit application.
3 Application Submitted message screen appears.
4 Click button to proceed.
Step 21
Check Application Status After Submission
The new Application ID is displayed with status “Awaiting OGA Approval”.
Submit To OGA Button
Awaiting OGA Button

65
2.4 Renewing Certificate of Approval
Renew option is for approved COA and only for applications with status Acknowledged by
Customs and within the expiry date limitation (within 60 and 14) days before the expiry date.
It is only applicable for:
• COA ‐ Import, Display, Sell, Advertise of Electrical Equipment
• COA ‐ Manufacture
COA ‐ Import, Display, Sell, Advertise of Electrical Equipment
Step 1 Check Expiry Date
1 Select Application ID, SJT1612010000243.
NOTE: Only for applications with status Acknowledged by Customs and within the
expiry date limitation (within 60 and 14 ) days before the expiry date
2 View Certificate of Approval (Import) appears.
3 Refer to OGA Response section to check Expiry Date as shown.
The expired date

66
Step 2
Select Application
1 Select application to be renewed.
2 Tick on the checkbox and click button.
3 COA Renewal ‐ Import Display Sell Advertise of Electrical Equipment
screen appears.

67
4 During Renewal process, only fields that are related to Customs, Applicant
Details, Consignor Details and Additional Details are allowed to be
changed.
5 Click button to save application.
6 Application Saved message appears.
7 Click button to proceed.
8 Edit COA Renew (Import) screen appears. Take note for the new
Application ID, SJT1612010000214 at the top of the screen as shown.
9 Click button to proceed on adding Technical Documents.
New Application ID
Original Application ID

68
10 Application Saved message appears.
11 Click button to proceed.
12 Edit COA Renewal (Import) screen appears.
13 You can remove import item during renewal however you must specify the
reason for item removal.
NOTE: Only for second time users are allowed to remove existing items. At least 1
item must exist in COA renewal.
14 Click Name of Equipment hyperlink to enter tariff.
15 Edit Import Item pop‐up window appears.
16 Click the button to search for Tariff Code.
NOTE: Items labeled * is complusory.
17 Alert screen appear
Search Button

69
18 Click button to proceed.
19 Select Tariff or SJT tab to search Code. System will display the type of tab
according to your consignment’s origin.
Tariff Code – Origin from Non‐ASEAN countries
SJT – Origin from ASEAN countries
20 Search Code/Description and click button.
21 Select a Code.
22 Tariff Code & Tariff Description will be filled automatically. You may edit it.
23 Tariff UOM will be filled automatically and cannot be edited.
Select Tariff/Product Profile Tab
Select Product Code

70
24 Enter Tariff Quantity.
NOTE: Tariff Quantity is defaulted at the maximum of 9999999. For application type
Import, Display, Sell, Advertise of Electrical Equipment, do not change the
quantity. For Import Regulated Electrical Equipment For Exhibition, key in
the actual quantity of import.
25 Enter Unit Cost C.I.F and Total details.
26 Click button to proceed or click to reset entry or click
to close the pop‐up window.
27 Import Item Updated message window appears.
28 Click button to return to Edit COA Renewal (Import) screen.
Step 3
Attachment of Technical Documents
1 Click button to attach supporting documents.
2 Attachments screen appears as shown.
3 Click button to select the suppporting documents file from your
PC for attachment.
Attachment Button
Browse Button

71
4 Select the file to be attached.
5 Click button to complete the attachment process.
6 Attachment screen to attach file(s) appears as shown.
7 If a message screen appears as below, the file you have attached is not in
the listed format.
8 Your file(s) must be in the listed format before you can proceed any further.
9 Attach the correct format file to proceed.
10 Message screen appears, notifying the docoument(s) has been attached
successfully.
11 Click to return to Edit Certificate of Approval Renew (Import).
Attach Files Button

72
Step 4
Submission To Suruhanjaya Tenaga
1 Tick on the checkbox to agree to the condition required.
2 Click button to submit application.
3 Application Submitted message screen appears.
4 Click button to proceed.
Step 5
Check Application Status After Submission
The Process Type for the old application now is Renewed.
The Process Type for the new application now is changed to Renewal with
Status of “Awaiting OGA Approval”.
Submit To OGA Button
New Application
Old Application

73
COA ‐ Manufacture
Step 1
Check Expiry Date
1 Select Application ID, SJT1212010000150. NOTE: Only for approved COA with Status Approved by OGA and within the expiry
date limitation.
2 View Certificate of Approval (Manufacture) appears.
3 Refer to OGA Response section to check Expiry Date as shown below.
74
Step 2
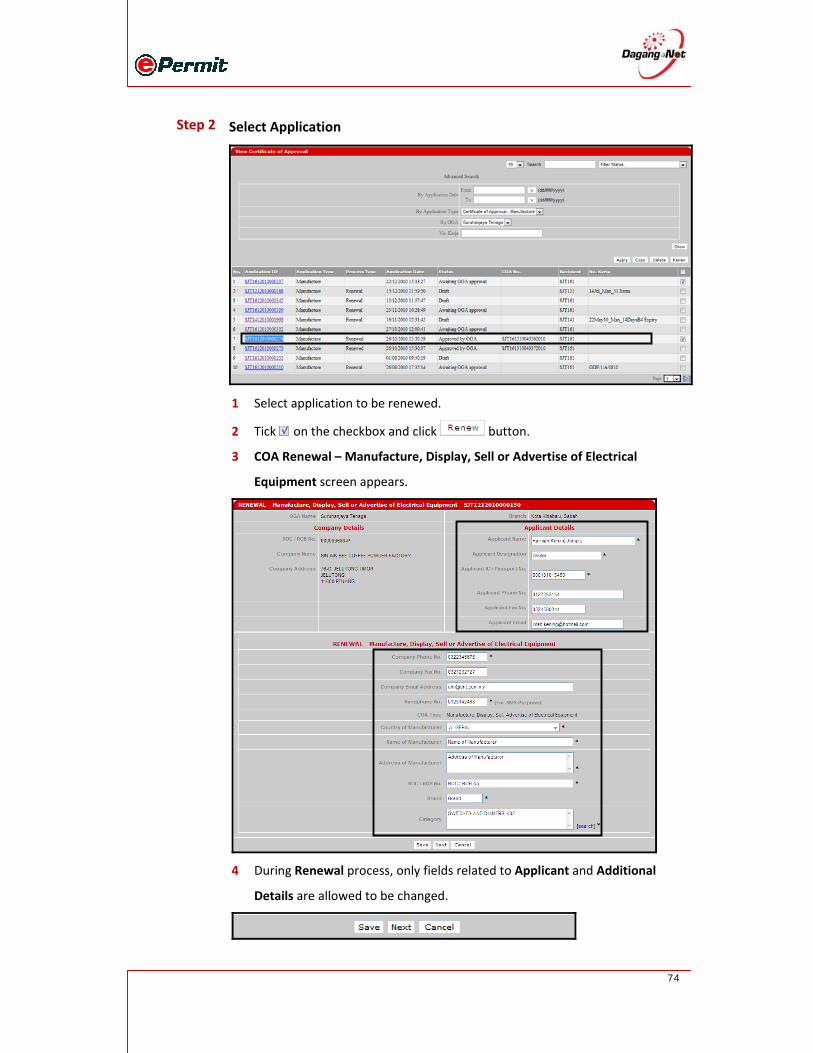
Select Application
1 Select application to be renewed.
2 Tick on the checkbox and click button.
3 COA Renewal – Manufacture, Display, Sell or Advertise of Electrical
Equipment screen appears.
4 During Renewal process, only fields related to Applicant and Additional
Details are allowed to be changed.

75
5 Click on button save aplication.
6 Application Saved message appears.
7 Click button to proceed.
8 Edit COA Renewal (Manufacture) screen appears.
9 Take note for the new Application ID, SJT1212010000161 at the top of the
screen as shown.
10 Click button to proceed on adding Technical Documents.
11 Application Saved message appears.
12 Click button to proceed.
13 Edit COA Removal (Manufacture) screen appears.
New Application ID
Original Application ID

76
29 You can remove import item during renewal however you must specify the
reason for item removal.
NOTE: At least 1 item must exist in the COA application.
Step 3
Attachment of Technical Documents
1 Click button to attach supporting documents.
2 Attachments screen appears as shown.
3 Click button to select the suppporting documents file from your
PC for attachment.
Attachment Button
Browse Button

77
4 Select the file to be attached.
5 Click button to complete the attachment process.
6 Attachment screen to attach file(s) appears as shown.
7 If a message screen appears as below, the file you have attached is not in the
listed format.
8 Your file(s) must be in the listed format before you can proceed any further.
9 Attach the correct format file to proceed.
10 Message screen appears, notifying the docoument(s) has been attached
successfully.
11 Click to return to Edit Certificate of Approval (Manufacture).
Attach Files Button

78
Step 4
Submission To Suruhanjaya Tenaga
1 Tick on the checkbox to agree to the condition required.
2 Click button to submit application.
3 Application Submitted message screen appears.
4 Click button to proceed.
Step 5
Check Application Status After Submission
The Process Type for the old application now is Renewed.
The Process Type for the new application now is changed to Renewal with
Status of “Awaiting OGA Approval”.
Old Application
New Application
Submit To OGA Button

79
2.5 Editing Application
If there is a correction, you can edit the COA or Release Letter application by selecting the
Application ID.
To edit a COA or Release Letter application, please follow the steps below:
Step 1
Search Application
1 Search for COA or Release Letter By Application ID & Status, By Application
Date, By OGA or By Application Type.
NOTE: Only application with draft status can be edited.
2 Click button.
Step 2
Select Application
1 Click the required Application ID.
2 Edit COA/Release Letter screen appears.
Select Application
Filter By Application Date
Filter By Application ID & Status
Show Button Filter By Application Type
Filter By OGA
No Kerja

80
Step 3
Edit COA/Release Letter Screen
1 Once you are done with the changes, click the button.
2 Changes will be saved.
NOTE: Please refer to Applying Certificate of Approval (Import/Manufacture) or
Applying Release Letter for details.

81
2.6 Copying Application
For your convenience, you can use information from previous application to apply for another
application by selecting from a list of previous application. To copy an application, please
follow the steps below:
Step 1
Search Application
1 Search for COA or Release Letter By Status, By Application Date, By OGA or
By Application Type.
2 Click button.
Step 2
Select Application
1 Select an application and tick on the checkbox.
2 Click button to proceed.
Checkbox
Filter By Application Date
Filter By Application ID & Status
Show Button Filter By Application Type
Filter By OGA
Click Copy
No Kerja

82
Step 3
Copy Certificate of Approval / Release Letter
1 Copy Certificate of Approval / Release Letter screen appears as shown
above.
2 Repeat all the steps in Applying Certificate of Approval / Release Letter.
NOTE: Please refer to Applying COA / Release Letter.

83
2.7 Deleting Application
To reduce the number of applications listed on View COA or Release Letter screen, you can
only delete applications with ‘Draft’ status with normal type. You cannot delete COA
application in draft status with Renewal type.
NOTE: “RENEWAL DO NOT ALLOW DELETE FOR DRAFT STATUS”, system may shows the pop up
message for information to users 'COA in draft mode for Renewal or Resubmission cannot be
deleted'
To delete an application, please follow the steps below:
Step 1
Delete COA/Release Letter
1 Select a COA or Release Letter application and tick on the checkbox
provided.
2 Click button to proceed.
3 Click to proceed or click to abort.
Checkbox
Click Delete

84
2.8 Submitting Application
Please refer to section 2.1, 2.2 and 2.3 on applying Certificate of Approval
(Import/Manufacture) and Release Letter. Follow the steps provided in the two sections
before submitting the COA or Release Letter application to Suruhanjaya Tenaga.
Step 1
Submission To Suruhanjaya Tenaga
1 Tick on the checkbox to agree to the condition required.
2 Click button to submit application.
3 Message screen appears notifying you to pay processing fee to Suruhanjaya
Tenaga.
4 Click button to proceed.
5 Application Submitted message screen appears.
6 Click button to proceed.
Submit To OGA Button
85
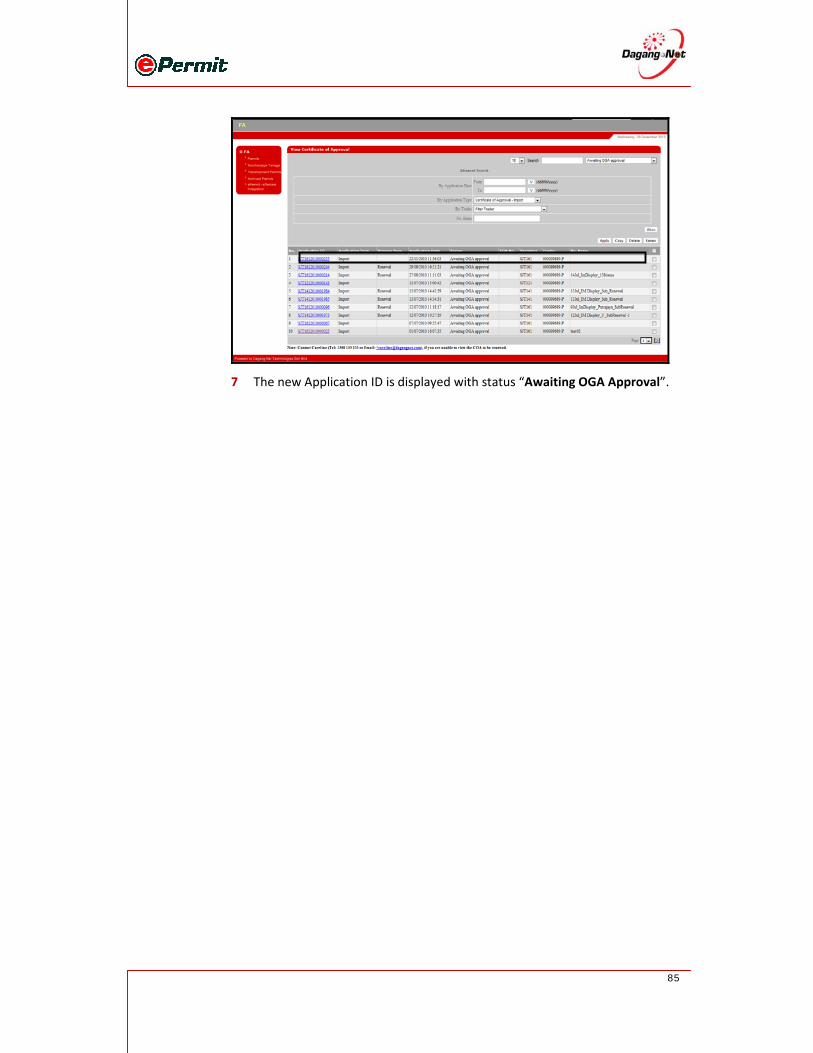
7 The new Application ID is displayed with status “Awaiting OGA Approval”.

86
2.9 Viewing Application Status
Step 1
COA/Release Letter Menu
Click Suruhanjaya Tenaga menu.
Step 3
View COA/Release Letter Application
1 Click on the Application ID of the archived permit that you want to view.
2 View COA/Release Letter screen appears.
Select Permit Application
Suruhanjaya Tenaga Menu

87
3 Go to Transaction section at the bottom of the page to view Application
Status.
4 Current Application Status for this permit is “Awaiting OGA Approval”.
5 Click button to exit the page.

88
COA/Release Letter ‐ Application Status
Status Description
Draft COA/Release Letter application has not been submitted
and can be edited.
Awaiting OGA Approval COA/Release Letter application has been submitted and is
awaiting for approval from OGA
Approved By OGA Permit application has been approved by OGA
Rejected By OGA COA/Release Letter application has been rejected by OGA
Verified By OGA COA/Release Letter application has been verified by OGA
Awaiting Customs Acknowledgement COA application is awaiting for Customs
acknowledgement
Acknowledged By Customs COA application has been acknowledged by Customs
Rejected By Customs COA application has been rejected by Customs
Permit Cancelled COA/Release Letter has been cancelled
Cancellation Acknowledged By
Customs
COA cancellation has been acknowledged by Customs