enterprise javabeans developer's guide - index [metu
TRANSCRIPT

Enterprise JavaBeans Developer’s Guide
V E R S I O N 5
Borland Software Corporation100 Enterprise Way, Scotts Valley, CA 95066-3249www.borland.com
Borland®
JBuilder™

Refer to the file DEPLOY.TXT located in the redist directory of your JBuilder product for a complete list of files that you can distribute in accordance with the JBuilder License Statement and Limited Warranty.
Borland Software Corporation may have patents and/or pending patent applications covering subject matter in this document. The furnishing of this document does not give you any license to these patents.
COPYRIGHT © 1997, 2001 Borland Software Corporation. All rights reserved. All Borland brand and product names are trademarks or registered trademarks of Borland Software Corporation in the United States and other countries. Other product names are trademarks or registered trademarks of their respective holders.
For third-party conditions and disclaimers, see the Release Notes on your JBuilder product CD.
Printed in the U.S.A.
JBE0050WW21002entjb 2E1R04010102030405-9 8 7 6 5 4 3 2 1PDF

i
Chapter 1An introduction to EJB development 1-1Why we need Enterprise JavaBeans . . . . . . . 1-1Roles in the development of an EJB
application . . . . . . . . . . . . . . . . . . . . 1-2Application roles . . . . . . . . . . . . . . . . 1-3Infrastructure roles . . . . . . . . . . . . . . . 1-3Deployment and operation roles . . . . . . . 1-4
EJB architecture . . . . . . . . . . . . . . . . . . 1-4The EJB server . . . . . . . . . . . . . . . . . 1-5The EJB container. . . . . . . . . . . . . . . . 1-5How an enterprise bean works . . . . . . . . 1-6
Types of enterprise beans . . . . . . . . . . . . . 1-7Session beans . . . . . . . . . . . . . . . . . . 1-7Entity beans . . . . . . . . . . . . . . . . . . . 1-7
Developing enterprise beans . . . . . . . . . . . 1-7Contacting Borland developer support . . . . . 1-8
Online resources . . . . . . . . . . . . . . . . 1-9World Wide Web . . . . . . . . . . . . . . 1-9Borland newsgroups . . . . . . . . . . . . 1-9Usenet newsgroups. . . . . . . . . . . . . 1-9Reporting bugs . . . . . . . . . . . . . . . 1-10
Documentation conventions . . . . . . . . . . . 1-10
Chapter 2Setting up the target applicationserver 2-1
Adding application server files to your project . . . . . . . . . . . . . . . . . . . . 2-3
Making the ORB available to JBuilder . . . . . . 2-3Selecting an application server . . . . . . . . . . 2-4
Chapter 3Creating enterprise beans with JBuilder 3-1
Creating an EJB group. . . . . . . . . . . . . . . 3-2Creating an empty EJB group . . . . . . . . . 3-2Creating an EJB group from existing
enterprise beans. . . . . . . . . . . . . . . . 3-3Creating an enterprise bean. . . . . . . . . . . . 3-4
Creating a session bean . . . . . . . . . . . . 3-6Creating an entity bean . . . . . . . . . . . . 3-6Adding the business logic to your bean . . . 3-8Exposing business methods through
the remote interface . . . . . . . . . . . . . 3-10
Generating the bean class from a remote interface . . . . . . . . . . . . . . . . . 3-11
Creating the home and remote interfaces for an existing bean . . . . . . . . . . . . . . . 3-13
Compiling the bean . . . . . . . . . . . . . . . . 3-16Editing deployment descriptors. . . . . . . . . 3-18
Chapter 4Creating entity beans from an existing database table 4-1
Creating entity beans with the EJB Entity Bean Modeler . . . . . . . . . . . . . . . 4-1
Chapter 5Testing an enterprise bean 5-1Creating a test client . . . . . . . . . . . . . . . . 5-1Using the test client application . . . . . . . . . . 5-3Testing your enterprise bean. . . . . . . . . . . . 5-5
Chapter 6Deploying enterprise beans 6-1Creating a deployment descriptor file . . . . . . 6-2The role of the deployment descriptor . . . . . . 6-2
The types of information in the deployment descriptor . . . . . . . . . . . . 6-3
Structural information. . . . . . . . . . . . 6-3Application assembly information. . . . . 6-4Security . . . . . . . . . . . . . . . . . . . . 6-4Security roles . . . . . . . . . . . . . . . . . 6-4Method permissions . . . . . . . . . . . . . 6-5Linking of security role references . . . . . 6-5
Deploying to an application server . . . . . . . . 6-5Deploying one or more JAR files . . . . . . . 6-5Deploying to WebLogic or WebSphere
servers . . . . . . . . . . . . . . . . . . . . . 6-8Setting deployment options with
the Properties dialog box . . . . . . . . . . . 6-9Hot deploying to an application server . . . . 6-9
Chapter 7Using the Deployment Descriptor editor 7-1
Displaying the Deployment Descriptor editor . . . . . . . . . . . . . . . . . . . . . . . . 7-2
Viewing the deployment descriptor of an enterprise bean. . . . . . . . . . . . . . . . . 7-2
Contents

ii
Adding information for a new enterprise bean . . . . . . . . . . . . . . . . . . 7-4
Changing bean information . . . . . . . . . . . 7-4Enterprise bean information . . . . . . . . . . . 7-4
Main panel . . . . . . . . . . . . . . . . . . . 7-4Environment panel . . . . . . . . . . . . . . . 7-6EJB references panel . . . . . . . . . . . . . . 7-8Security role references panel . . . . . . . . . 7-9Resource references panel . . . . . . . . . . . 7-10Persistence panel . . . . . . . . . . . . . . . . 7-11Finders panel . . . . . . . . . . . . . . . . . . 7-13Properties panel . . . . . . . . . . . . . . . . 7-14
Container transactions . . . . . . . . . . . . . . 7-19Adding a container-managed
transaction. . . . . . . . . . . . . . . . . . . 7-19Working with data sources . . . . . . . . . . . . 7-20
Setting isolation levels . . . . . . . . . . . . . 7-22Setting data source properties . . . . . . . . 7-22
Adding security roles and method permissions . . . . . . . . . . . . . . . . . . . . 7-24
Creating a security role . . . . . . . . . . . . 7-24Assigning method permissions . . . . . . . . 7-25
Viewing and editing WebLogic and WebSphere properties . . . . . . . . . . . 7-26
Verifying descriptor information. . . . . . . . . 7-27
Chapter 8Using the DataExpress for EJB components 8-1
The DataExpress EJB components . . . . . . . . 8-2Components for the server . . . . . . . . . . 8-2Components for the client . . . . . . . . . . . 8-2
Creating the entity beans . . . . . . . . . . . . . 8-2Creating the server-side session bean . . . . . . 8-2
Adding provider and resolver components to the session bean. . . . . . . 8-3
Writing the setSessionContext() method. . . 8-4Adding an EJB reference to
the deployment descriptor . . . . . . . . 8-4Adding the providing and resolving
methods . . . . . . . . . . . . . . . . . . . . 8-5Calling the finder method . . . . . . . . . . . 8-6
Building the client side . . . . . . . . . . . . . . 8-7Handling relationships . . . . . . . . . . . . . . 8-9The sample project . . . . . . . . . . . . . . . . . 8-9
Chapter 9Developing session beans 9-1Types of session beans . . . . . . . . . . . . . . . 9-1
Stateful session beans . . . . . . . . . . . . . . 9-1Stateless session bean . . . . . . . . . . . . . . 9-2
Writing the session bean class . . . . . . . . . . . 9-2Implementing the SessionBean
interface. . . . . . . . . . . . . . . . . . . . . 9-2Writing the business methods . . . . . . . . . 9-3Adding one or more ejbCreate()
methods. . . . . . . . . . . . . . . . . . . . . 9-3How JBuilder can help you create a
session bean . . . . . . . . . . . . . . . . . . 9-4The life of a session bean . . . . . . . . . . . . . . 9-5
Stateless beans . . . . . . . . . . . . . . . . . . 9-5Stateful beans . . . . . . . . . . . . . . . . . . 9-6
The method-ready in transaction state . . . . . . . . . . . . . . . . . . . . . 9-7
A shopping cart session bean . . . . . . . . . . . 9-9Examining the files of the cart example. . . . 9-9The Cart session bean . . . . . . . . . . . . . 9-10
Adding the required methods . . . . . . 9-11Adding the business methods . . . . . . 9-12
Item class . . . . . . . . . . . . . . . . . . . . 9-14Exceptions . . . . . . . . . . . . . . . . . . . 9-14Required interfaces . . . . . . . . . . . . . . 9-15
The home interface . . . . . . . . . . . . 9-15The remote interface . . . . . . . . . . . . 9-16The Cart deployment descriptor . . . . . 9-17
Chapter 10Developing entity beans 10-1Persistence and entity beans . . . . . . . . . . . 10-1
Bean-managed persistence . . . . . . . . . . 10-2Container-managed persistence . . . . . . . 10-2
Primary keys in entity beans. . . . . . . . . . . 10-3Writing the entity bean class . . . . . . . . . . . 10-3
Implementing the EntityBean interface . . . 10-4Declaring and implementing the
entity bean methods. . . . . . . . . . . . . 10-5Creating create methods . . . . . . . . . 10-5Creating finder methods . . . . . . . . . 10-6Writing the business methods . . . . . . 10-7
Using JBuilder wizards to create an entity bean . . . . . . . . . . . . . . . . . . 10-7

iii
The life of an entity bean . . . . . . . . . . . . . 10-8The nonexistent state. . . . . . . . . . . . . . 10-8The pooled state . . . . . . . . . . . . . . . . 10-9The ready state . . . . . . . . . . . . . . . . . 10-9Returning to the pooled state . . . . . . . . . 10-9
A bank entity bean example . . . . . . . . . . 10-10The entity bean home interface . . . . . . . 10-10The entity bean remote interface . . . . . . 10-11An entity bean with container-managed
persistence. . . . . . . . . . . . . . . . . . 10-12An entity bean with bean-managed
persistence. . . . . . . . . . . . . . . . . . 10-13The primary key class . . . . . . . . . . . . 10-18The deployment descriptor . . . . . . . . . 10-18
Deployment descriptor for an entity bean with bean-managed persistence . . . . . . . . . . . . . . . . 10-20
Deployment descriptor for an entity bean with container-managed persistence . . . . . . . . . . . . . . . . 10-20
Chapter 11Creating the home and remote interfaces 11-1
Creating the home interface . . . . . . . . . . . 11-1The EJBHome base class . . . . . . . . . . . . 11-2Creating a home interface for a
session bean . . . . . . . . . . . . . . . . . . 11-2create() methods in session beans . . . . . 11-3
Creating a home interface for an entity bean. . . . . . . . . . . . . . . . . . . 11-4
create() methods for entity beans . . . . . 11-4Finder methods for entity beans . . . . . 11-5
Creating the remote interface . . . . . . . . . . . 11-6The EJBObject interface . . . . . . . . . . . . 11-7
Chapter 12Developing enterprise bean clients 12-1Locating the home interface . . . . . . . . . . . 12-2Getting the remote interface . . . . . . . . . . . 12-2
Session beans . . . . . . . . . . . . . . . . . 12-2Entity beans . . . . . . . . . . . . . . . . . . 12-3
Finder methods and the primary key class . . . . . . . . . . . . . . . . . . 12-4
Create and remove methods . . . . . . . 12-4Calling methods. . . . . . . . . . . . . . . . . . 12-4Removing bean instances . . . . . . . . . . . . 12-5Referencing a bean with its handle . . . . . . . 12-6Managing transactions . . . . . . . . . . . . . . 12-7Discovering bean information . . . . . . . . . . 12-8Creating a client with JBuilder . . . . . . . . . 12-9
Chapter 13Managing transactions 13-1Characteristics of transactions . . . . . . . . . . 13-1Transaction support in the container . . . . . . 13-2Enterprise beans and transactions . . . . . . . 13-3
Bean- versus container-managed transactions. . . . . . . . . . . . . . . . . . 13-3
Transaction attributes . . . . . . . . . . . . . 13-4Local and global transactions . . . . . . . . 13-5
Using the transaction API . . . . . . . . . . . . 13-6Handling transaction exceptions . . . . . . . . 13-7
System-level exceptions . . . . . . . . . . . 13-8Application-level exceptions . . . . . . . . . 13-8Handling application exceptions . . . . . . 13-8
Transaction rollback . . . . . . . . . . . . 13-9Options for continuing a transaction . . 13-9
Index I-1

iv
C h a p t e r
1Chapter1An introduction to EJB
developmentThe “Enterprise JavaBeans (EJB) specification” (http://java.sun.com/products/ejb/docs.html) formally defines a Java server-side component model and a programming interface for application servers. Developers build the components, called enterprise beans, to contain the business logic of the enterprise. Enterprise beans run on an EJB server that provides services such as transaction management and security to the beans. Developers don’t have to worry about programming these low-level and complex services, but can focus on encapsulating the business rules of an organization or system within the beans, knowing that the services are available to the beans when they are needed.
While the Enterprise JavaBeans specification is the ultimate authority on the EJB framework, it’s primarily useful to vendors such as Borland who build the EJB servers and containers the beans run in. This book will help you, the JBuilder developer, learn what you want to know about developing enterprise beans and creating applications that use them.
If you are already familiar with EJB development and want to get started creating enterprise beans with JBuilder, start with Chapter 3, “Developing enterprise beans.”
Why we need Enterprise JavaBeansThe client-server model of application development has enjoyed considerable popularity. The client application resides on a local machine and accesses the data in a data store such as a relational database management system (RDMS). This model works well as long as the system has only a few users. As more and more users need access to the

1-2 E n t e r p r i s e J a v a B e a n s D e v e l o p e r ’ s G u i d e
R o l e s i n t h e d e v e l o p m e n t o f a n E J B a p p l i c a t i o n
data, these applications don’t scale well to meet the demands. Because the client contains the logic, it must be installed on each machine. Management becomes increasingly difficult.
Gradually the benefits of dividing applications into more than the two tiers of the client-server model becomes apparent. In a multi-tier application, only the user interface stays on local machines while the logic of the application runs in the middle tier on a server. The final tier is still the stored data. When the logic of an application needs updating, changes are made to the software of the middle tier on the server, greatly simplifying the management of updates.
But creating reliable, secure, and easily managed distributed applications is notoriously difficult. For example, managing transactions over a distributed system is a major task. Fortunately, using components that follow the EJB specification to build distributed systems relieves much of the burden by:
• Dividing the development of a distributed system into specific tasks that are assigned to specialists.
For example, if the application is an accounting system, the enterprise bean developer would need to understand accounting. The system administrator must know about monitoring a deployed and running application. Each specialist assumes a particular role.
• Making EJB server and container services available to the enterprise bean and application developers.
The EJB server provider and EJB container provider (who are often the same vendor) handle many of the more difficult tasks so the developers don’t have to. For example, the container an enterprise bean runs in can provide transaction and security services to the bean automatically.
• Making enterprise beans portable.
Once a bean is written, it can be deployed on any EJB server that adheres to the Enterprise JavaBeans standard. Each bean is likely to include vendor-specific elements, however.
Roles in the development of an EJB applicationThe work of developing an EJB distributed application is divided into six distinct roles. Each role is assumed by an expert in their domain. By dividing the work this way, the task of creating and managing a distributed system becomes much easier.

A n i n t r o d u c t i o n t o E J B d e v e l o p m e n t 1-3
R o l e s i n t h e d e v e l o p m e n t o f a n E J B a p p l i c a t i o n
Application roles
Those who assume the application roles write the code for the enterprise beans and the applications that use them. Both roles require an understanding of how the business runs, although at different levels. These are the two application roles:
• Bean provider
Bean providers (also called bean developers) create the enterprise beans and write the logic of the business methods within them. They also define the remote and home interfaces for the beans and they create the beans’ deployment descriptors. Bean providers don’t necessarily need to know how their beans will be assembled and deployed.
• Application assembler
Application assemblers write the applications that use the enterprise beans. These applications usually include other components, such as GUI clients, applets, JavaServer Pages pages (JSP), and servlets. These components are assembled into a distributed application. Assemblers add assembly instructions to the bean deployment descriptors. Although application assemblers must be familiar with the methods contained within the enterprise beans so they can call them, they don’t need to know how those methods are implemented.
JBuilder users who are interested in Enterprise JavaBeans are usually bean providers and application assemblers. Therefore, this book is written primarily for them. JBuilder has wizards, designers, and other tools that simplify the development of enterprise beans and the applications that use them.
Infrastructure roles
Without a supporting infrastructure, the enterprise beans and the applications that use them cannot run. Although the two infrastructure roles are distinct, they are almost always assumed by the same vendor. Together they provide system-level services to the enterprise beans and provide an environment in which to run. These are the two infrastructure roles:
• EJB server provider
EJB server providers are specialists in distributed transaction management, distributed objects, and other low-level services. They provide an application framework in which to run EJB containers. EJB service providers must provide, at a minimum, a naming service and a transaction service to the beans.

1-4 E n t e r p r i s e J a v a B e a n s D e v e l o p e r ’ s G u i d e
E J B a r c h i t e c t u r e
• EJB container provider
EJB container providers provide the deployment tools required to deploy enterprise beans and the runtime support for the beans. A container provides management services to one or more beans. They communicate for the beans with the EJB server to access the services the bean needs.
In almost all cases, the EJB server provider and the EJB container provider are the same vendor. The Borland AppServer provides both the server and the container.
Deployment and operation roles
The final steps in the development of an EJB distributed application are to deploy the application and to monitor the enterprise computing and network infrastructure as it runs. These are the deployment and operation roles:
• Deployer
Deployers understand the operation environment for distributed applications. They adapt the EJB application to the target operation environment by modifying the properties of the enterprise beans using the tools provided by the container provider. For example, deployers set transaction and security policies by setting appropriate properties in the deployment descriptor. They also integrate the application with existing enterprise management software.
• System administrator
Once an application is deployed, the system administrator monitors it as it runs, and takes appropriate actions if the application behaves abnormally. System administrators are responsible for configuring and administrating the enterprise’s computing and networking infrastructure that includes the EJB server and EJB container.
EJB architectureMulti-tier distributed applications often consist of a client that runs on a local machine, a middle-tier that runs on a server that contains the business logic, and a backend-tier consisting of an enterprise information system (EIS). An EIS can be a relational database system, an ERP system, a legacy application, or any data store that holds the data that needs to be accessed. This figure shows a typical EJB multi-tier distributed system with three tiers: the client; the server, the container, and the beans deployed on them; and the enterprise information system.

A n i n t r o d u c t i o n t o E J B d e v e l o p m e n t 1-5
E J B a r c h i t e c t u r e
Figure 1.1 EJB architecture diagram
Because our interest is how to develop enterprise beans, our focus is the middle tier.
The EJB server
The EJB server provides system services to enterprise beans and manages the containers in which the beans run. It must make available a JNDI-accessible naming service and a transaction service. Frequently an EJB server provides additional features that distinguish it from its competitors. The Borland AppServer is an example of an EJB server.
The EJB container
A container is a runtime system for one or more enterprise beans. It provides the communication between the beans and the EJB server. It provides transaction, security, and network distribution management. A container is both code and a tool that generates code specific for a particular enterprise bean. A container also provides tools for the deployment of an enterprise bean, and a means for the container to monitor and manage the application.

1-6 E n t e r p r i s e J a v a B e a n s D e v e l o p e r ’ s G u i d e
E J B a r c h i t e c t u r e
The EJB server and EJB container together provide the environment for the bean to run in. The container provides management services to one or more beans. The server provides services to the bean, but the container interacts on behalf of the beans to obtain those services.
Although it is a vital part of the Enterprise JavaBeans architecture, enterprise bean developers and application assemblers don’t have to think about the container. It remains a behind-the-scenes player in an EJB distributed system. Therefore, this book goes no further explaining what a container is and how it works. For more information about containers, refer to the “Enterprise JavaBeans 1.1 Specification” itself (http://java.sun.com/products/ejb/docs.html). For specific information about the Borland EJB container, see the Borland AppServer’s Enterprise JavaBeans Programmer’s Guide.
How an enterprise bean works
The bean developer must create these interfaces and classes:
• The home interface for the bean
The home interface defines the methods a client uses to create, locate, and destroy instances of an enterprise bean.
• The remote interface for the bean
The remote interface defines the business methods implemented in the bean. A client accesses these methods through the remote interface.
• The enterprise bean class
The enterprise bean class implements the business logic for the bean. The client accesses these methods through the bean’s remote interface.
Once the bean is deployed in the EJB container, the client calls the create() method defined in the home interface to instantiate the bean. The home interface isn’t implemented in the bean itself, but by the container. Other methods declared in the home interface permit the client to locate an instance of a bean and to remove a bean instance when it is no longer needed.
When the enterprise bean is instantiated, the client can call the business methods within the bean. The client never calls a method in the bean instance directly, however. The methods available to the client are defined in the remote interface of the bean, and the remote interface is implemented by the container. When the client calls a method, the container receives the request and delegates it to the bean instance.

A n i n t r o d u c t i o n t o E J B d e v e l o p m e n t 1-7
T y p e s o f e n t e r p r i s e b e a n s
Types of enterprise beansAn enterprise bean can be a session bean or an entity bean.
Session beans
An enterprise session bean executes on behalf of a single client. In a sense, the session bean represents the client in the EJB server.
Session beans can maintain the client’s state, which means they can retain information for the client. The classic example where a session bean might be used is a shopping cart for an individual shopping at an online store on the web. As the shopper selects items to put in the “cart,” the session bean retains a list of the selected items.
Session beans can be short-lived. Usually when the client ends the session, the bean is removed by the client.
Session beans can be either stateful or stateless. Stateless beans don’t maintain state for a particular client. Because they don’t maintain conversational state, stateless beans can be used to support multiple clients.
Entity beans
An entity bean provides an object view of data in a database. Usually the bean represents a row in a set of relational database tables. An entity bean usually serves more than one client.
Unlike session beans, entity beans are considered to be long-lived. They maintain a persistent state, living as long as the data remains in the database, rather than as long as a particular client needs it.
The container can manage the bean’s persistence, or the bean can manage it itself. If the persistence is bean-managed, the bean developer must write code that includes calls to the database.
Developing enterprise beansThe next few chapters explain how to use the JBuilder wizards, designers, and tools that make it easier and quicker to create your enterprise beans. It assumes that you understand what Enterprise JavaBeans are, how they work, and what their requirements are.
If your EJB knowledge is sketchy or you want more information about EJB development before you begin using JBuilder’s EJB wizards and tools,

1-8 E n t e r p r i s e J a v a B e a n s D e v e l o p e r ’ s G u i d e
C o n t a c t i n g B o r l a n d d e v e l o p e r s u p p o r t
start reading Chapter 9, “Developing session beans” and the chapters that follow it before beginning this chapter.
Developing Enterprise JavaBeans with JBuilder has several steps:
1 Setting up the target application server (see Chapter 2)
2 Creating an EJB group (see page 3-2)
3 Creating an enterprise bean and its home and remote interfaces (see page 3-4)
4 Compiling the bean (see page 3-16)
5 Editing the deployment descriptor (see page 3-18)
6 Creating a test client application (see page 5-1)
7 Testing your enterprise bean (see page 5-5)
8 Deploying to an application server (see page 6-5)
You can also use JBuilder to create entity enterprise beans based on existing tables in any database accessible through JDBC. See “Creating entity beans with the EJB Entity Bean Modeler” on page 4-1.
If you prefer to create the remote interface for an enterprise bean first, you can then use the EJB Bean Generator to create a skeleton bean class and home interface based on that remote interface. For more information, see “Generating the bean class from a remote interface” on page 3-11.
Contacting Borland developer supportBorland offers a variety of support options. These include free services on the Internet, where you can search our extensive information base and connect with other users of Borland products. In addition, you can choose from several categories of support, ranging from support on installation of the Borland product to fee-based consultant-level support and extensive assistance.
For more information about Borland’s developer support services, see our web site at http://www.borland.com/devsupport/, call Borland Assist at (800) 523-7070, or contact our Sales Department at (831) 431-1064.
When contacting support, be prepared to provide complete information about your environment, the version of the product you are using, and a detailed description of the problem.
For support on third-party tools or documentation, contact the vendor of the tool.

A n i n t r o d u c t i o n t o E J B d e v e l o p m e n t 1-9
C o n t a c t i n g B o r l a n d d e v e l o p e r s u p p o r t
Online resourcesYou can get information from any of these online sources:
World Wide WebCheck www.borland.com regularly. The JBuilder Product Team will post white papers, competitive analyses, answers to frequently asked questions, sample applications, updated software, updated documentation, and information about new and existing products.
You may want to check these URLs in particular:
• http://www.borland.com/jbuilder/ (updated software and other files)
• http://www.borland.com/techpubs/jbuilder/ (updated documentation and other files)
• http://community.borland.com/ (contains our web-based news magazine for developers)
Borland newsgroupsYou can register JBuilder and participate in many threaded discussion groups devoted to JBuilder.
You can find user-supported newsgroups for JBuilder and other Borland products at http://www.borland.com/newsgroups/
Usenet newsgroupsThe following Usenet groups are devoted to Java and related programming issues:
• news:comp.lang.java.advocacy• news:comp.lang.java.announce• news:comp.lang.java.beans• news:comp.lang.java.databases• news:comp.lang.java.gui• news:comp.lang.java.help• news:comp.lang.java.machine• news:comp.lang.java.programmer• news:comp.lang.java.security• news:comp.lang.java.softwaretools
Note These newsgroups are maintained by users and are not official Borland sites.
World Wide Web http://www.borland.com/
FTP ftp.borland.com Technical documents available by anonymous ftp.
Listserv To subscribe to electronic newsletters, use the online form at: http://www.borland.com/contact/listserv.html
or, for Borland’s international listserver, http://www.borland.com/contact/intlist.html

1-10 E n t e r p r i s e J a v a B e a n s D e v e l o p e r ’ s G u i d e
D o c u m e n t a t i o n c o n v e n t i o n s
Reporting bugsIf you find what you think may be a bug in the software, please report it in the JBuilder Developer Support page at http://www.borland.com/devsupport/jbuilder/. From this site, you can also submit a feature request or view a list of bugs that have already been reported.
When you report a bug, please include all the steps needed to reproduce the bug, including any special environmental settings you used and other programs you were using with JBuilder. Please be specific about the expected behavior versus what actually happened.
If you have comments (compliments, suggestions, or issues) with the JBuilder documentation, you may email [email protected]. This is for documentation issues only. Please note that you must address support issues to developer support.
JBuilder is made by developers for developers. We really value your input, because it helps us to improve our product.
Documentation conventionsThe Borland documentation for JBuilder uses the typefaces and symbols described in the table below to indicate special text.
Table 1.1 Typeface and symbol conventions
Typeface Meaning
Monospace type Monospaced type represents the following:• text as it appears onscreen• anything you must type, such as “Enter Hello World in the Title
field of the Application wizard.”• file names• path names• directory and folder names• commands, such as SET PATH, CLASSPATH• Java code• Java data types, such as boolean, int, and long.• Java identifiers, such as names of variables, classes, interfaces,
components, properties, methods, and events• package names• argument names• field names• Java keywords, such as void and static
Bold Bold is used for java tools, bmj (Borland Make for Java), bcj (Borland Compiler for Java), and compiler options. For example: javac, bmj, -classpath.

A n i n t r o d u c t i o n t o E J B d e v e l o p m e n t 1-11
D o c u m e n t a t i o n c o n v e n t i o n s
JBuilder is available on multiple platforms. See the table below for a description of platforms and directory conventions used in the documentation.
Italics Italicized words are used for new terms being defined, for book titles, and occasionally for emphasis.
Keycaps This typeface indicates a key on your keyboard. For example, “Press Esc to exit a menu.”
[ ] Square brackets in text or syntax listings enclose optional items. Do not type the brackets.
< > Angle brackets in text or syntax listings indicate a variable string; type in a string appropriate for your code. Do not type the angle brackets. Angle brackets are also used for HTML tags.
... In code examples, an ellipsis indicates code that is missing from the example. On a button, an ellipsis indicates that the button links to a selection dialog.
Table 1.2 Platform conventions and directories
Item Meaning
Paths All paths in the documentation are indicated with a forward slash (/). For the Windows platform, use a backslash (\).
Home directory The location of the home directory varies by platform.• For UNIX and Linux, the home directory can vary. For
example, it could be /user/[username] or /home/[username]• For Windows 95/98, the home directory is C:\Windows• For Windows NT, the home directory is C:\Winnt\Profiles\
[username]
• For Windows 2000, the home directory is C:\Documents and Settings\[username]
.jbuilder4 directory The .jbuilder4 directory, where JBuilder settings are stored, is located in the home directory.
jbproject directory The jbproject directory, which contains project, class, and source files, is located in the home directory. JBuilder saves files to this default path.
Screen shots Screen shots reflect JBuilder’s Metal Look & Feel on various platforms.
Table 1.1 Typeface and symbol conventions (continued)
Typeface Meaning

1-12 E n t e r p r i s e J a v a B e a n s D e v e l o p e r ’ s G u i d e

S e t t i n g u p t h e t a r g e t a p p l i c a t i o n s e r v e r 2-1
C h a p t e r
2Chapter2Setting up the target
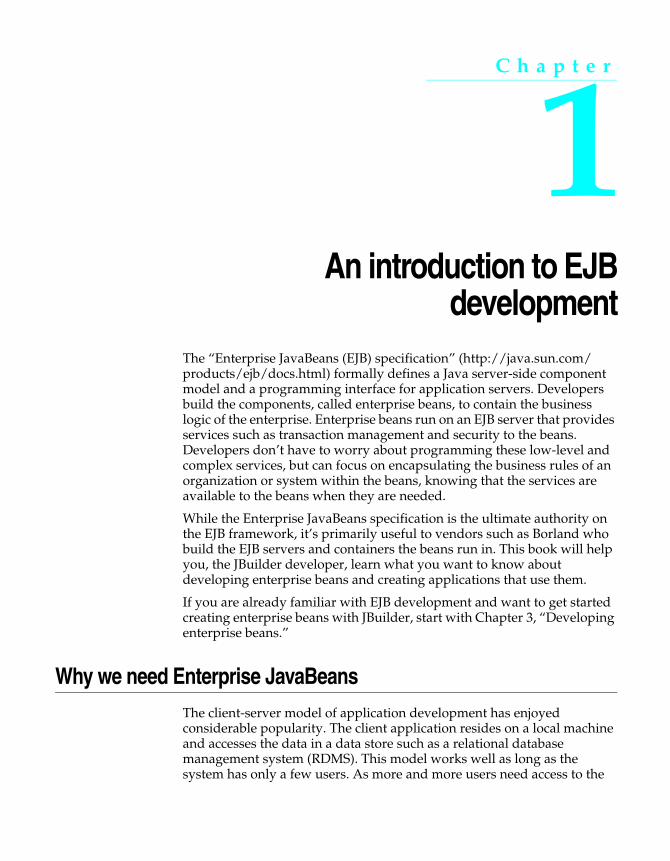
application serverBefore you begin creating Enterprise JavaBeans, you must set up the application server to which you are going to deploy your enterprise beans.
Note In all cases, the Borland AppServer (BAS) or Inprise Application Server 4.1 (IAS) must be already installed on your computer.
To set up JBuilder to target one or more application servers,
1 Choose Tools|Enterprise Setup.
2 Select the Application Server page.
Note You must perform the next step regardless of which application server you are developing enterprise beans for. If you don’t, the EJB wizards in the object gallery will be disabled.
3 Select the BAS 4.5 page or IAS 4.1 page and specify the directory where the Borland AppServer 4.5 or the Inprise Application Server 4.1 is installed. This is usually /Borland/AppServer for BAS 4.5. Setting up one
2-2 E n t e r p r i s e J a v a B e a n s D e v e l o p e r ’ s G u i d e
S e t t i n g u p t h e t a r g e t a p p l i c a t i o n s e r v e r
of the Borland application server pages prevents you from setting up the other.
4 If you want to target a WebLogic or WebSphere server, select the WebLogic or WebSphere page for the version you are targeting and specify the directory where you have the WebLogic or WebSphere application server installed. For WebSphere, you must also specify where the IBM JDK that ships with WebSphere is installed. For WebLogic 6.0, the BEA home directory is required.
5 If you want to use the application server you are setting up as the target application server for your current project, check the Apply Settings For Selected Modified Application Server To Current Project check box.
6 Choose OK.
When you close the dialog box, a BAS 4.5 library is created for you automatically that contains all the BAS files you will need for EJB development. (If you are targeting the Inprise Application Server, the name of the library will be IAS 4.1.)
You must close and then restart JBuilder to enable the EJB wizards. If you want to make the VisiBroker ORB available to JBuilder, you can wait until you complete that step before shutting down and restarting JBuilder.

S e t t i n g u p t h e t a r g e t a p p l i c a t i o n s e r v e r 2-3
A d d i n g a p p l i c a t i o n s e r v e r f i l e s t o y o u r p r o j e c t
Adding application server files to your projectNext you must add a library that contains your application server files to your project. Every time you begin a new project, you must take this step. If you checked the Apply Settings For Selected Modified Application Server To Current Project check box in the Enterprise Setup dialog box, you can skip this step for now because JBuilder already added the correct library to your current project. The next time you start a new project, however, you must take these steps to add a library to your current project:
1 Choose Project|Project Properties and make sure the Paths tab is selected.
2 Click the Required Libraries tab.
3 Click the Add button to display the Select One or More Libraries dialog box. Which libraries are available depends on which application servers you have installed and you set up using Tools|Enterprise Setup.
4 Select the appropriate library. For example, if your target is the Borland AppServer, select the BAS 4.5 library and click OK twice to close the dialog boxes.
Making the ORB available to JBuilderWhen you use Tools|Enterprise Setup to set up the Borland AppServer or Inprise Application Server, your CORBA settings are automatically set up for you at the same time. You can see your current settings on the CORBA page of the Enterprise Setup dialog box. You might want to use this page to set the VisiBroker SmartAgent port to a unique number. Also, to add a
2-4 E n t e r p r i s e J a v a B e a n s D e v e l o p e r ’ s G u i d e
S e l e c t i n g a n a p p l i c a t i o n s e r v e r
command to start the SmartAgent to the Tools menu, check the Add The VisiBroker SmartAgent Item To The Tools Menu option.
You must still perform one step: starting the VisiBroker SmartAgent. This handles the initial bootstrap issues such as how the client locates the naming service and so on.
To start the SmartAgent, choose Tools|VisiBroker SmartAgent.
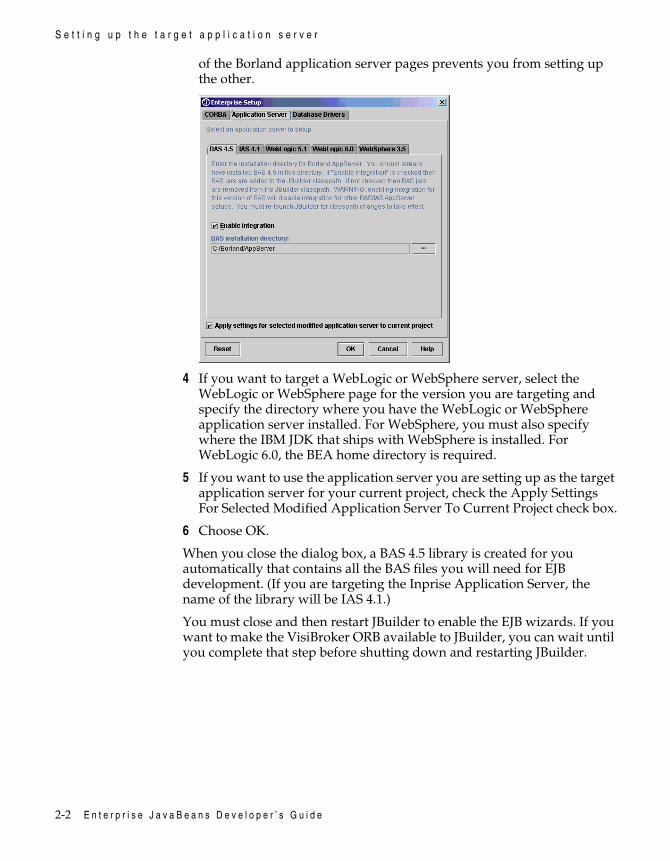
Selecting an application serverJBuilder can target one of multiple application servers. After selecting a target application server, finish setting up JBuilder by modifying the properties for your project:
1 Choose Project|Project Properties.
2 Click the Servers tab.
3 Click the ... button and a Select Application Server dialog box appears. Which application servers are available in the dialog box depends on which application servers are supported by JBuilder, have been added using JBuilder’s OpenTools API, or have been added using the Add button in this dialog box.
4 Select the application server you are building your beans to run on. The Borland AppServer 4.5 is the default server.
The EJB 1.1 choice is a generic option. Select it if the application server you use is not currently supported by JBuilder. You will probably want to edit the resulting deployment descriptor with tools supplied with that application server to get the exact settings you want. You could also choose this option if the you aren’t targeting a specific application server.
5 Choose OK to close the dialog box.

C r e a t i n g e n t e r p r i s e b e a n s w i t h J B u i l d e r 3-1
C h a p t e r
3Chapter3Creating enterprise beans
with JBuilderEach enterprise bean you create must belong to a JBuilder EJB group. An EJB group is a logical grouping of one or more beans that will be deployed in a single JAR file. It contains the information that is used to produce the deployment descriptor(s) for that JAR file. You can edit the content of an EJB group using the Deployment Descriptor editor.
Once you have an EJB group and have edited it to your liking with the Deployment Descriptor editor, you can Make or Build an EJB group to produce the JAR. JBuilder uses the deployment descriptor to help identify the class files to be packaged.
An EJB group can be one of two types, depending on the file extension:
You can have more than one EJB group in a project. All the EJB groups in a single project use the same project classpath and JDK, and they are configured for the same target application server.
If you haven’t done so already, follow the instructions in Chapter 2, “Setting up the target application server.” You must follow the steps to add a library containing your application server files to each EJB project you undertake.
.ejbgrp A binary file.
.ejbgrpx An XML file. The information remains the same as in an .ejbgrp file, but because it is a text file, it’s easier to work with if you are using a version control system.

3-2 E n t e r p r i s e J a v a B e a n s D e v e l o p e r ’ s G u i d e
C r e a t i n g a n E J B g r o u p
Creating an EJB groupThere are two ways to create an EJB group:
• Use the Empty EJB Group wizard to create an empty EJB group when you haven’t created your enterprise beans yet.
• Use the EJB Group From Descriptors wizard to create an EJB from the deployment descriptors of existing enterprise beans you have.
If you don’t have an open project before you begin an EJB group wizard, JBuilder displays the Project wizard first. After you create a new project, the EJB wizard you selected then appears.
Creating an empty EJB groupIf you haven’t created your enterprise beans yet, begin by creating an empty EJB group. To create an empty EJB group,
1 Choose File|New and click the Enterprise tab.Note If the EJB wizards on the Enterprise page are disabled, you have not set
up your application server yet. See Chapter 2, “Setting up the target application server” for information on how to do this.
2 Double-click the Empty EJB Group wizard icon and the wizard appears:
3 Specify the name of the EJB group.
4 Specify the type of the new group.
Your choices are ejbgrp, which internally stores the deployment descriptors in .zip format and was used before JBuilder 5, or ejbgrpx, which stores the deployment descriptors in XML format. XML format allows users to merge changes if they are checking them into a source control system. Using ejbgrpx is recommended unless you are sharing the file with an older version of JBuilder.

C r e a t i n g e n t e r p r i s e b e a n s w i t h J B u i l d e r 3-3
C r e a t i n g a n E J B g r o u p
5 Specify the name of the JAR file your enterprise bean(s) will be in.
JBuilder entered a default name that is the same as the name of your EJB group. You can simply accept that name or specify another. JBuilder also entered a path based on your project path. You can change it to your liking or accept the default path.
6 Click OK to create the EJB group.
Creating an EJB group from existing enterprise beans
If you already have existing BAS enterprise beans, add them to an EJB group by following these steps:
1 Choose File|New and click the Enterprise tab.
2 Double-click the EJB Group From Descriptors wizard icon and the wizard appears.
3 Specify the name of your new EJB group.
4 Specify the type of the new group.
Your choices are ejbgrp, which internally stores the deployment descriptors in .zip format and was used before JBuilder 5, or ejbgrpx, which stores the deployment descriptors in XML format. XML format allows users to merge changes if they are checking them into a source control system. Using ejbgrpx is recommended unless you are sharing the file with an older version of JBuilder.
5 Specify the name and path of the JAR file your enterprise bean will be in.
JBuilder entered a default name that is the same as the name of your EJB group. You can simply accept that name or specify another.

3-4 E n t e r p r i s e J a v a B e a n s D e v e l o p e r ’ s G u i d e
C r e a t i n g a n e n t e r p r i s e b e a n
6 Click Next and specify the directory that contains the existing deployment descriptor(s) you want to make up the group. When you do, the wizard lists the deployment descriptors in the specified directory in the Usable Descriptors Found field.
7 Click Finish to create the EJB group that contains the deployment descriptors for the existing bean(s).
Creating an enterprise beanThe JBuilder object gallery contains two wizards to create enterprise beans: the Enterprise JavaBean wizard and the EJB Entity Bean Modeler. The Wizards menu contains another: the EJB Bean Generator. This section discusses creating an enterprise bean with the Enterprise JavaBean wizard.
The Enterprise JavaBean wizard and the EJB Entity Bean Modeler use the model in which your enterprise bean class and the home and remote interfaces are created at the same time. If you prefer to begin your enterprise bean development by creating your remote interface first, see “Generating the bean class from a remote interface” on page 3-11 for information about using the EJB Bean Generator to generate your bean class from a remote interface you have created.
To begin creating an enterprise bean with the Enterprise JavaBean wizard,
1 Choose File|New and click the Enterprise tab.
2 Double-click the Enterprise JavaBean wizard icon.

C r e a t i n g e n t e r p r i s e b e a n s w i t h J B u i l d e r 3-5
C r e a t i n g a n e n t e r p r i s e b e a n
The wizard appears.
3 In the drop-down list, select the EJB group you want your enterprise bean to belong to. Choose Next to display page 2 of the wizard.
If you don’t have an EJB group defined before you start the Enterprise JavaBeans wizard or you want to create another, click the New button to start the Empty EJB Group wizard. You must have at least one EJB group defined in your project before you can create an enterprise bean. Once you’ve created an EJB group with the Empty EJB Group wizard, select the new group and choose Next to continue with the Enterprise JavaBean wizard.
4 Specify the class name of your bean class, the package it will be in, and the bean’s base class.
Next you must decide whether you are creating a session bean or an entity bean.

3-6 E n t e r p r i s e J a v a B e a n s D e v e l o p e r ’ s G u i d e
C r e a t i n g a n e n t e r p r i s e b e a n
Creating a session bean
If you are creating a session bean,
1 Click either the Stateless Session Bean or Stateful Session Bean.
For more information about session bean types, see “Types of session beans” on page 9-1.
2 If you select a Stateful Session Bean, you can also choose to implement the SessionSynchronization interface by checking the Session Synchronization check box.
For information about the SessionSynchronization interface, see “The SessionSynchronization interface” on page 9-7.
3 Click Next to go Step 3.
4 Specify names for the Home Interface Class, the Remote Interface Class, and the Bean Home Name; JBuilder suggests default names based on the name of your bean class.
5 Click Finish.
Creating an entity bean
If you are creating an entity bean,
1 Select either the Bean Managed Persistence Entity Bean option or the Container Managed Persistence 1.1 Entity Bean option. (If WebSphere 3.5 is your target application server, the second option is Container Managed Persistence 1.0 Entity Bean.)
For information about bean-managed and container-managed persistence, see “Persistence and entity beans” on page 10-1.

C r e a t i n g e n t e r p r i s e b e a n s w i t h J B u i l d e r 3-7
C r e a t i n g a n e n t e r p r i s e b e a n
2 Specify a Primary Key Class.
3 Click Next to go Step 3.
4 Specify names for the Home Interface Class, the Remote Interface Class, and the Bean Home Name; JBuilder suggests default names based on the name of your bean class.
5 Click Finish.
After you click the Finish button, JBuilder creates the bean class and its home and remote interfaces. You’ll see them appear in the project pane. Examine the source code of the bean class and you’ll see that the class implements the SessionBean interface if it’s a session bean, and it implements the EntityBean interface if it’s an entity bean. JBuilder has added methods with empty bodies for the methods all enterprise beans must implement. You can add code to these method bodies to supply the logic your bean requires when these methods are called.
The home interface extends the EJBHome interface and contains a create() method needed to create the bean. The remote interface extends EJBObject but is empty otherwise because you have yet to declare any business logic methods for your bean.
Although you can begin your entity beans using the Enterprise JavaBeans wizard, the preferred way to create entity beans is to use the EJB Entity Bean Modeler. Entity beans you create with the Enterprise JavaBean wizard aren’t likely to pass verification with the Deployment Descriptor editor until you complete the bean more fully.

3-8 E n t e r p r i s e J a v a B e a n s D e v e l o p e r ’ s G u i d e
C r e a t i n g a n e n t e r p r i s e b e a n
Adding the business logic to your bean
In the source code of your bean class, define and write the methods that implement the logic your enterprise bean needs.
If you need to add properties to the bean, you can either add them directly in the source code, or you can use the Properties page of the Bean designer.
To use the Bean designer to work with properties,
1 Double-click the bean class in the project pane.2 Click the Bean tab to display the Bean designer.3 Click the Properties tab to display the Properties page.
To add a new property,
1 Click the Add Property button to display the New Property dialog box.

C r e a t i n g e n t e r p r i s e b e a n s w i t h J B u i l d e r 3-9
C r e a t i n g a n e n t e r p r i s e b e a n
2 Specify the Property Name and its Type.
3 Specify your access methods by setting the Getter and Setter options.
If you decide your property needs a getter access method, you can also decide if it appears in the bean class and/or in the remote interface. If you decide your property needs a setter access method, you can also decide if it appears in the bean class and/or in the remote interface.
4 Choose Apply to immediately add the new property definition to the source code of your bean. The access methods you specified are added to bean class and/or the remote interface, depending on the options you selected.
5 You can continue adding new properties in the dialog box. When you are finished, choose OK.
If you use the Enterprise JavaBean wizard to begin an entity bean with container-managed persistence, you will be adding properties to your bean. Keep in mind that one of properties must be the primary key and that you must specify which field or fields makes up the primary key on the Persistence panel of the Deployment Descriptor editor. If you fail to do so, the Deployment Descriptor editor won’t be able to verify the deployment descriptor as valid.
You can also use the Properties page to modify a property. For example, if you didn’t specify a setter for your property when you were declaring it and you decide your bean needs one, you can simply check the Setter box for that property on the Properties page and JBuilder adds the setter method to your source code. Or you can remove a getter or setter by unchecking the appropriate check box.
To remove a property from your bean using the Properties page,
1 Select the property listed in the table of properties.
2 Click the Remove button.
JBuilder asks if you want to remove the property and its associated code.
3 Choose Yes.
You can also use the Properties page to change the name of the property and its type. The Bean designer is a two-way tool, so changes you make on the Properties page are reflected in your code and changes you make in your code are reflected on the Properties page.

3-10 E n t e r p r i s e J a v a B e a n s D e v e l o p e r ’ s G u i d e
C r e a t i n g a n e n t e r p r i s e b e a n
Exposing business methods through the remote interface
Once you’ve declared your business logic methods in the source code of your bean, you must specify which methods you want to add to the remote interface. The client can call only those methods exposed through the remote interface of the bean.
To add methods to the remote interface,
1 Double-click the enterprise bean in the project pane.
2 Click the Bean tab to display the Bean designer.
3 Click the Methods tab.
4 In the Methods box, check the check box next to the methods you want to expose in the remote interface.
As you check methods in the Methods box, the methods are added to the remote interface.
To remove a method from the remote interface, uncheck the check box next to the method in the Methods box.
To edit one of the methods, right-click it to display a context menu and choose Edit Selected. The file opens in the code editor and your cursor is positioned on that method, ready for you to edit it.
The context menu has other commands you’ll find useful. You can choose Remove Selected to remove a method from the bean class. Choosing Check All checks all the methods so that they are all added to the remote interface; choosing Uncheck All unchecks all the methods so that no methods are added to the remote interface.

C r e a t i n g e n t e r p r i s e b e a n s w i t h J B u i l d e r 3-11
G e n e r a t i n g t h e b e a n c l a s s f r o m a r e m o t e i n t e r f a c e
You can use the Methods page to verify that the methods declared in your bean class have the same method signature as they do in the home and remote interface. For example, suppose you add a parameter to the ejbCreate() method in your bean class, but neglect to add it to the create() method in the home interface. The Methods box will show both the ejbCreate() method and create() method in red text. If you then click a method displayed in red text, the Problem Description box explains what the problem is. You could then add the additional parameter to the create() method to make the method signatures match and fix the problem. Or, if you remove methods from your bean class but forget to do so in the remote interface, the Methods box will display those methods in red text to remind you to remove them from the remote interface.
Generating the bean class from a remote interfaceSome developers prefer to start their development of an enterprise bean by designing the remote interface first. If you favor this approach, you can then use the EJB Bean Generator to generate a skeleton bean class from your existing remote interface.
To generate a bean class from a remote interface,
1 Display the remote interface in the editor.
2 Choose Wizards|EJB|EJB Bean Generator to display the EJB Bean Generator wizard.

3-12 E n t e r p r i s e J a v a B e a n s D e v e l o p e r ’ s G u i d e
G e n e r a t i n g t h e b e a n c l a s s f r o m a r e m o t e i n t e r f a c e
3 Select the EJB group the bean belongs to and click Next.
4 Select the type of EJB you want generated and click Next.
If you selected one of the session bean options, this page appears:
• Specify the EJB Bean options: the Bean Class, the Bean Name, the Home Interface, and the JNDI Name.

C r e a t i n g e n t e r p r i s e b e a n s w i t h J B u i l d e r 3-13
C r e a t i n g t h e h o m e a n d r e m o t e i n t e r f a c e s f o r a n e x i s t i n g b e a n
If you selected one of the CMP entity bean options, this screen appears:
• Specify the EJB Bean options: the Bean Class, the Bean Name, the Home Interface, the JNDI Name, the Primary Key Class, and which fields you want to be persistent.
5 Choose Finish.
The EJB Bean Generator creates the skeleton bean class you specified that includes the methods found in the remote interface. In the generated bean class, these methods include a comment reminding you to fill in their implementations. You must add your code to the methods to implement them as you wish.
The EJB Bean Generator also creates a home interface if one did not previously exist. If a home interface did exist, the EJB Bean Generator asks you if you want to overwrite the home interface and responds according to your answer.
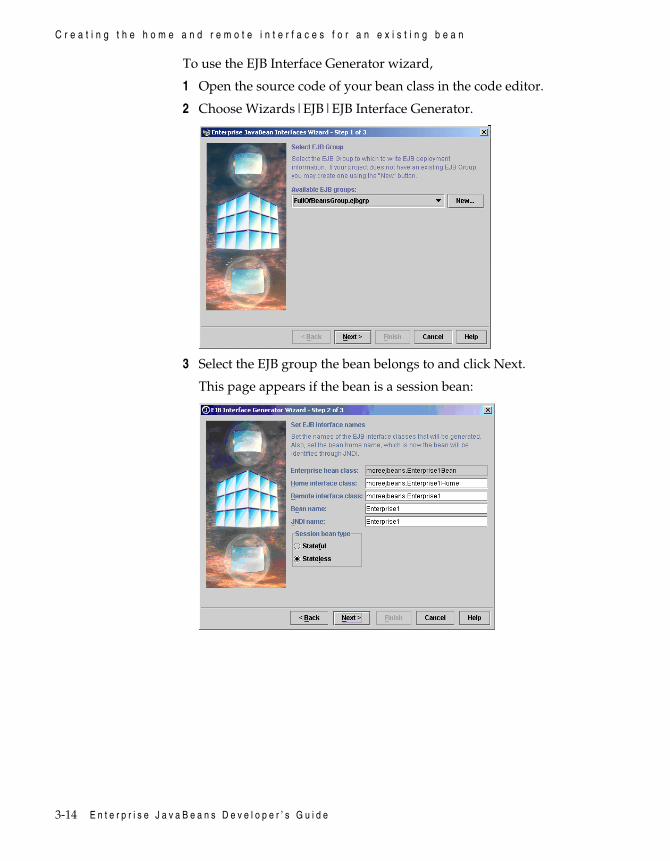
Creating the home and remote interfaces for an existing beanIf you already have a bean class, but don’t have the required home and remote interfaces, you can use the EJB Interface Generator wizard to create them. You can also use the wizard if you’ve made significant changes to the source code of your bean and you want the changes reflected in the interfaces. By using the EJB Interface Generator, you regenerate new interfaces based on the revised bean class source code.
3-14 E n t e r p r i s e J a v a B e a n s D e v e l o p e r ’ s G u i d e
C r e a t i n g t h e h o m e a n d r e m o t e i n t e r f a c e s f o r a n e x i s t i n g b e a n
To use the EJB Interface Generator wizard,
1 Open the source code of your bean class in the code editor.
2 Choose Wizards|EJB|EJB Interface Generator.
3 Select the EJB group the bean belongs to and click Next.
This page appears if the bean is a session bean:

C r e a t i n g e n t e r p r i s e b e a n s w i t h J B u i l d e r 3-15
C r e a t i n g t h e h o m e a n d r e m o t e i n t e r f a c e s f o r a n e x i s t i n g b e a n
If the bean is an entity bean, this page appears:
4 Accept the default names or enter new ones.
5 If the enterprise bean is a session bean, select either the Stateless or Stateful option. If the enterprise bean is an entity bean, select either Bean Managed Persistence or Container Managed Persistence.
6 Click Next to display Step 3, which displays the bean methods:
7 Leave those methods that you want exposed in the remote interface checked and uncheck those you don’t want to appear in the remote interface.
8 Choose Finish.

3-16 E n t e r p r i s e J a v a B e a n s D e v e l o p e r ’ s G u i d e
C o m p i l i n g t h e b e a n
Compiling the beanWhen you’ve written and saved your enterprise bean, its interfaces, and any supporting classes, you’re almost ready to compile. Before you do and only if you’re targeting the Borland AppServer or Inprise Application Server 4.1 and you’re going to test your bean locally, generate and add the client stubs to your classpath. You do this by changing the build properties of the home interface and then compiling.
To change the build properties for an EJB group to generate and add client stubs to your classpath for each bean in the group (this step is optional),
1 Right-click the EJB group in the project pane and choose Properties.
2 Select the Build tab.
3 Select the EJB tab.
4 Edit the build properties as you wish.
You can change the name of the output JAR file and where it is generated.
If you don’t want to use JBuilder’s Deployment Descriptor editor to edit the deployment descriptors, but want to use another tool instead, edit the deployment descriptors with your tool of choice.

C r e a t i n g e n t e r p r i s e b e a n s w i t h J B u i l d e r 3-17
C o m p i l i n g t h e b e a n
You can also insert deployment descriptors into an EJB group and copy deployment descriptors to elsewhere. You can also delete a deployment descriptor.
If you want to specify that additional files should be added to the JAR file, click the Add Button and specify the location of the files. You’ll need to do this if you’ve added a new class to your project, for example, and you want it to become part of the JAR file. Or if you have deployment descriptors you have edited outside of JBuilder, you can add them here and uncheck the Include Deployment Descriptors In Output JAR File. The deployment descriptors shown in the Deployment Descriptors In Group list won’t be added to the JAR, but those you specified in the Additional Files For META-INF In JAR list will be.
If you might target different application servers, you can use the Remove Stubs Files On Application Server Change option to remove client stubs used by the old application server when you select a new application server.
The Always Create JAR When Building option is on by default. By unchecking this option, you can defer building the JAR file until you are ready to begin testing.
5 Click OK the tab of the application server you are targeting. For example, this image shows the BAS 4.5 tab selected:
6 Specify the build options you want. If you need more information about the available options, click the Help button.

3-18 E n t e r p r i s e J a v a B e a n s D e v e l o p e r ’ s G u i d e
E d i t i n g d e p l o y m e n t d e s c r i p t o r s
You can also modify the build properties for each bean instead of for the whole EJB group:
1 Right-click the home interface of the bean and choose Properties.
2 Click the Build tab.
3 Click the VisiBroker tab.
4 Check the Generate IIOP check box and select any other Java2IIOP options you want.
5 Click OK.
To compile all the classes in the project, right-click the project file (<project>.jpx) and choose Make, or simply choose Project|Make Project.
During the compiling process, JBuilder might detect that a problem exists in a deployment descriptor that makes it invalid. If this happens, you’ll see a message appear in the message pane that tells you to verify the bean in the Deployment Descriptor editor. For more information about verifying a deployment descriptor, see “Verifying descriptor information” on page 7-27.
Note for WebLogic users. If you are targeting the WebLogic Server, you’ll receive an error during the build process if the temporary directory or the classpath contains embedded spaces, such as C:/Documents and Settings/jbprojects.
If you’ve chosen to generate the clients stubs, you’ll see that the home interface node in the project pane now has several files listed below it if you click its icon to expand it. These generated files are the required client stubs and helper classes that make EJB work.
Editing deployment descriptorsEach enterprise bean that adheres to the EJB 1.1 specification requires a deployment descriptor entry in XML format. As you used the JBuilder wizards to create one or more enterprise beans, you also created one or more deployment descriptors.
When you compile your project, JBuilder creates a JAR file based on the configured name and displays it as a node under the group in the project pane.
You can also create the JAR file without compiling your entire project. Right-click the EJB group node in the project pane and choose Make to compile the EJB group node. If you want to modify the build properties before choosing Make, select the Properties menu item on the same popup menu and make any modifications you want in the Build Properties dialog box before choosing Make to generate the JAR file.
The JAR file contains all the deployment descriptors. Each deployment descriptor is an XML file, except for WebSphere, which uses a .ser file for each bean. Each JAR file can contain one or more deployment descriptors.

C r e a t i n g e n t e r p r i s e b e a n s w i t h J B u i l d e r 3-19
E d i t i n g d e p l o y m e n t d e s c r i p t o r s
JBuilder will target one of multiple application servers. The application server you are targeting determines the number of deployment descriptors that are in the generated JAR file. Every JAR file will have an ejb-jar.xml (except for those that target WebSphere 3.5), which describes the deployment attributes for the beans in the group that are common among all application servers. ejb-jar.xml is the EJB 1.1-compliant deployment descriptor. If you have selected EJB 1.1 as your target application server, that is the only deployment descriptor that JAR file will contain.
All vendor-specific information is kept in the ejb-inprise.xml file, even when the vendor is some other than Borland. When you compile, vendor-specific XML files are generated from this information. They are also generated when you click the Deployment Descriptor editor Source tab.
If the Borland AppServer is your target, there will be just one additional application server-specific XML file, ejb-inprise.xml. If the WebLogic Server is your target, the generated JAR file includes a weblogic-ejb-jar.xml file, and one additional XML file for each entity bean with container-managed persistence. If WebSphere is your target, the generated JAR file will contain a .ser file for each bean.
JBuilder’s Deployment Descriptor editor provides a way to modify the existing deployment descriptors.
To display the Deployment Descriptor editor, double-click the EJB group in the project pane. The Deployment Descriptor editor appears. Note that a tree of the EJB group appears in the structure pane.

3-20 E n t e r p r i s e J a v a B e a n s D e v e l o p e r ’ s G u i d e
E d i t i n g d e p l o y m e n t d e s c r i p t o r s
To view information about an enterprise bean in the Deployment Descriptor editor, click the bean in the structure pane. Or if you select the EJB Deployment Descriptor node in the structure pane, you can click the Contents tab to display the contents of the EJB group and then double-click the icon of bean you want to view. When a bean is selected in the editor, several tabs appear in the Deployment Descriptor editor. You use these tabs to go to panels where you edit deployment descriptor information.
Note that the EJB Properties tab does not appear if your target application server is the Borland AppServer or the Inprise Application Server. The EJB Properties page allows you to change values for WebLogic or WebSphere application servers.
For detailed information about using the Deployment Descriptor editor, see Chapter 7, “Using the Deployment Descriptor editor.”
After you’ve finished editing the descriptor, you can verify the file to make sure the descriptor information correct, the required bean class files are present, and so on.
To verify descriptor information, click the Verify button on the Deployment Descriptor editor’s tool bar.
Verify does the following:
• Ensures that the descriptor conforms to the EJB 1.1 specification.
• Ensures that the classes referenced by the deployment descriptors conform to the EJB 1.1 specification.
If the verification fails, one or more messages appear in a Log panel describing the failures.

C r e a t i n g e n t i t y b e a n s f r o m a n e x i s t i n g d a t a b a s e t a b l e 4-1
C h a p t e r
4Chapter4Creating entity beans from an
existing database tableOften the data you want to model with an entity bean already exists in a database. You can use JBuilder’s Entity Modeler to create such entity beans.
Creating entity beans with the EJB Entity Bean ModelerThe EJB Entity Modeler wizard creates entity beans based on existing tables in any database accessible through JDBC. You can use the wizard to create several entity beans at once and you can specify any relationships between those beans.
Once you’ve used the EJB Entity Bean Modeler to generate the code that makes up the entity beans, their primary keys, their home and remote interfaces, and the appropriate entries in the deployment descriptor, you can then modify the results using other JBuilder tools, such as the Bean designer, the Deployment Descriptor editor, and the JBuilder code editor.

4-2 E n t e r p r i s e J a v a B e a n s D e v e l o p e r ’ s G u i d e
C r e a t i n g e n t i t y b e a n s w i t h t h e E J B E n t i t y B e a n M o d e l e r
To display the EJB Entity Modeler, choose File|New, click the Enterprise tab, and choose EJB Entity Bean Modeler. If you have at least one EJB group defined in your project, the Entity Bean Modeler appears.
All enterprise beans developed with JBuilder must belong to an EJB group. If you don’t have at least one EJB group in your current project, click the New button to start the Empty EJB Group wizard. Once you’ve created an EJB Group with the Empty EJB Group wizard, the Entity Bean Modeler then appears.
To create one or more beans from existing database tables, follow these steps:
1 Select an EJB group to put your bean in and choose Next to go to Step 2.
The EJB group you select is used to determine where the deployment information is written.

C r e a t i n g e n t i t y b e a n s f r o m a n e x i s t i n g d a t a b a s e t a b l e 4-3
C r e a t i n g e n t i t y b e a n s w i t h t h e E J B E n t i t y B e a n M o d e l e r
2 Specify a JDBC data source.
Enter the information that’s needed to connect to a JDBC data source.
To use an existing connection, click the Choose Existing Connection button and select a connection. Other required information for this page is then filled in automatically except the password, which you must enter yourself if your connection requires one.
If you don’t have an existing connection or want to create another, select a driver from the Driver drop-down list and specify an URL.
Specify the Username for the data source, and if a password is required, type in the password. Select any extended properties you need. Finally, specify a JNDI name for the data source.
3 Specify which Schemas And Table Types options you want.
If you check the All Schemas option, the EJB Entity Bean Modeler will load all schemas the user has rights to for the connection. If you leave All Schemas unchecked, just the schemas with the same name as the username, potentially reducing the time required to make the connection and load the data.
Check the Views option if you want to have views loaded into the EJB Entity Bean Modeler. If you don’t want to load views, leave the Views option unchecked.
The EJB Entity Bean Modeler attempts to connect to the specified data source. Only if the connection is successful does the next page appear.

4-4 E n t e r p r i s e J a v a B e a n s D e v e l o p e r ’ s G u i d e
C r e a t i n g e n t i t y b e a n s w i t h t h e E J B E n t i t y B e a n M o d e l e r
4 Select the tables you want to map to entity beans.
For each table you select, one entity bean will be created. From the Available list select the tables you want and move them to the Select list by using the > and >> buttons. When you’ve selected all your tables, choose Next.
5 Select the columns from each table to map to entity bean fields and specify any relationships you want to establish between the tables.
In the Tables and Links section, you’ll see all the tables you selected in the previous step. Select each table in turn by clicking on it and then use the Selected Table’s Columns section to move any columns of the table between the Available and Selected lists. By default, all columns in every table are selected.
You can also specify relationships between the tables by dragging the mouse pointer between the tables in the Tables and Links box on the left. Or you can use the Add Link button to do the same thing. When you use either method, a dialog box appears that proposes a relationship based on foreign keys, primary keys, unique indexes, and field names and types in the two tables. You can accept the suggested relationship or modify it to create the relationship you want. To remove a link between tables, choose Remove Link.

C r e a t i n g e n t i t y b e a n s f r o m a n e x i s t i n g d a t a b a s e t a b l e 4-5
C r e a t i n g e n t i t y b e a n s w i t h t h e E J B E n t i t y B e a n M o d e l e r
Here’s an example of three tables linked together:
When you’ve selected all columns in each table that you want mapped to fields in entity beans you’re creating, choose Next.
6 Specify the names and data types for the entity bean fields to map to your table’s columns.
Click the appropriate tab to select the table you want to begin the mapping process on. For each column in the table a suggested Field Name and Field Type appears. You can simply accept the suggested name or edit the suggested names and types as you want them to be in your bean.
To change the data type of multiple fields at one type, select the fields you want to change and choose Update Field Type. A dialog box
4-6 E n t e r p r i s e J a v a B e a n s D e v e l o p e r ’ s G u i d e
C r e a t i n g e n t i t y b e a n s w i t h t h e E J B E n t i t y B e a n M o d e l e r
appears in which you can type the new field type. When you choose Apply or OK, the field type for each selected field changes.
If the table already has a primary key, that field or set of fields is selected when the Map Columns page first appears. If no primary key exists, you must select one or more fields to make up primary key by checking the check box for those fields in the Primary Key column. When you finish mapping all the selected columns to the field names and types you want in your entity bean for each table, choose Next.
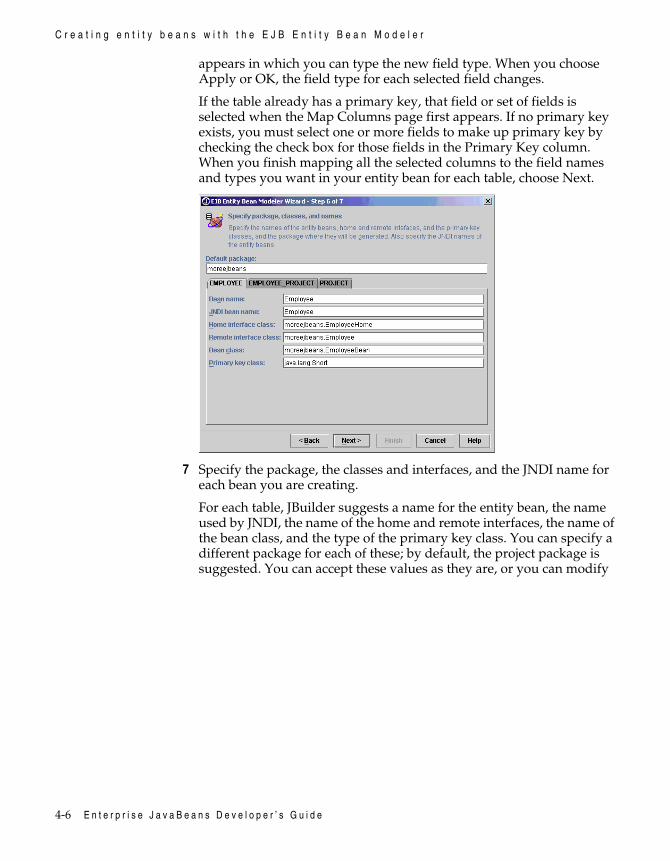
7 Specify the package, the classes and interfaces, and the JNDI name for each bean you are creating.
For each table, JBuilder suggests a name for the entity bean, the name used by JNDI, the name of the home and remote interfaces, the name of the bean class, and the type of the primary key class. You can specify a different package for each of these; by default, the project package is suggested. You can accept these values as they are, or you can modify
C r e a t i n g e n t i t y b e a n s f r o m a n e x i s t i n g d a t a b a s e t a b l e 4-7
C r e a t i n g e n t i t y b e a n s w i t h t h e E J B E n t i t y B e a n M o d e l e r
them as you wish. When you have finished specifying the information for each table, choose Next.
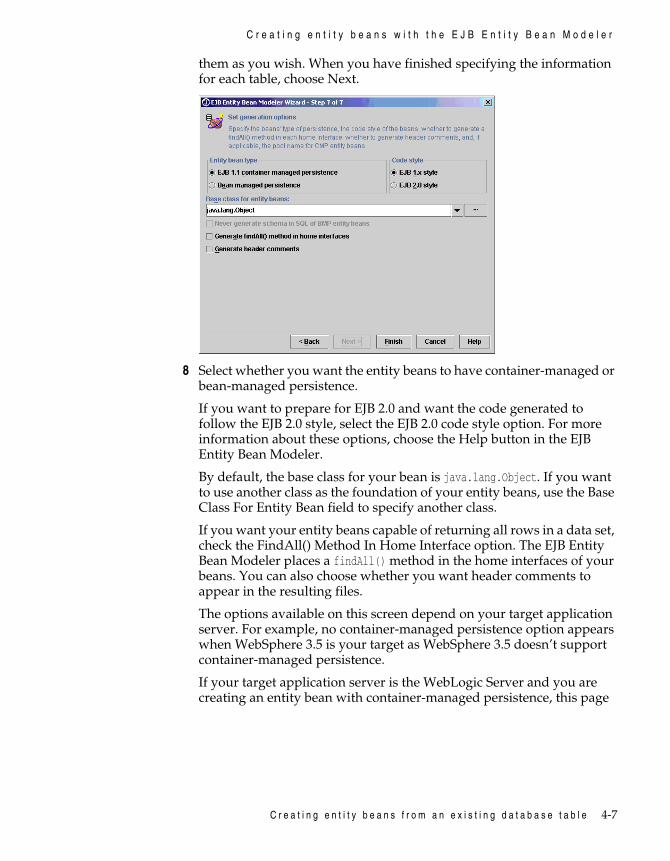
8 Select whether you want the entity beans to have container-managed or bean-managed persistence.
If you want to prepare for EJB 2.0 and want the code generated to follow the EJB 2.0 style, select the EJB 2.0 code style option. For more information about these options, choose the Help button in the EJB Entity Bean Modeler.
By default, the base class for your bean is java.lang.Object. If you want to use another class as the foundation of your entity beans, use the Base Class For Entity Bean field to specify another class.
If you want your entity beans capable of returning all rows in a data set, check the FindAll() Method In Home Interface option. The EJB Entity Bean Modeler places a findAll() method in the home interfaces of your beans. You can also choose whether you want header comments to appear in the resulting files.
The options available on this screen depend on your target application server. For example, no container-managed persistence option appears when WebSphere 3.5 is your target as WebSphere 3.5 doesn’t support container-managed persistence.
If your target application server is the WebLogic Server and you are creating an entity bean with container-managed persistence, this page

4-8 E n t e r p r i s e J a v a B e a n s D e v e l o p e r ’ s G u i d e
C r e a t i n g e n t i t y b e a n s w i t h t h e E J B E n t i t y B e a n M o d e l e r
also includes a Pool Name field in which you should enter the name of the pool for your CMP WebLogic beans:
9 Choose Finish.
JBuilder creates an entity bean for each table and all the supporting classes interfaces. You can now add the business logic you want to the beans, define the methods you want the client to be able to call in the remote interface, compile the beans, and edit the deployment descriptors for the beans.

T e s t i n g a n e n t e r p r i s e b e a n 5-1
C h a p t e r
5Chapter5Testing an enterprise bean
Once you’ve finished creating an enterprise bean, you can use JBuilder to help you create a client application that tests the function of your bean.
Creating a test clientTo create a test client application,
1 Open the project that contains the EJB group for your enterprise bean.
2 Choose File|New, click the Enterprise tab and double-click the EJB Test Client.

5-2 E n t e r p r i s e J a v a B e a n s D e v e l o p e r ’ s G u i d e
C r e a t i n g a t e s t c l i e n t
3 Select the bean you want to create a client for using one of the Select EJB options and specifying the bean:
• Select From Project if your bean is in the current project and specify which bean by selecting it from the drop-down list.
• Select From JAR Or Directory if your bean is not in the current project, but exists elsewhere in a JAR file or a directory. Use the ... button to navigate to where the JAR is located and select the JAR, then use the drop-down list to select the bean you want.
4 Select the package name from the list of packages. The current package is the default value.
5 Enter a name for the test client class or accept the default name.
6 Select the options you want:
• Generate Method For Testing Remote Interface Calls With Default Arguments
Adds a testRemoteCallsWithDefaultArguments() method that tests the remote interface calls with default argument values. For example, the default argument for a String is “”, the default argument for an int is 0, and so on.
• Generate Logging Messages
Adds code that displays messages reporting on the bean’s status as the client runs. For example, a message is displayed when bean initialization is begun and another when it completes. This option also generates wrappers for all the methods declared in the home and remote interfaces and initialization functions. Finally, the messages report how long each method call takes to complete.
• Generate Main Function
Adds the main function to the client.
• Generate Header Comments
Adds JavaDoc header comments to the client you can use to fill in information such as title, author, and so on.
7 Choose OK.
The EJB Test Client wizard generates a test client that creates a reference to the enterprise bean.

T e s t i n g a n e n t e r p r i s e b e a n 5-3
U s i n g t h e t e s t c l i e n t a p p l i c a t i o n
If the Generate Logging Messages option is selected, for each method declared in the bean’s remote interface, the wizard also declares and implements a method that calls the remote method. Each of these methods reports its success in invoking the remote method and how long the remote method took to execute.
There are multiple ways to use the generated test client application. If you added a main() function to the test client application, you can write the code that invokes the calls to the enterprise bean’s methods in the main() function. You do this by first calling either a create or find method, and, if a remote reference is returned, by using that remote reference to call the bean’s business methods. Or, because the wizard has declared a client object in the main() function, you can use that client object to simply call the methods declared in the test client application that call the bean’s remote methods.
If you selected the Generate Method For Testing Remote Interface Calls With Default Arguments option, your client class now contains a testRemoteCallsWithDefaultArguments() method. If you selected the logging option, this method calls the remote method wrappers that were generated from the logging option. To test each remote method, you can then simply call testRemoteCallsWithDefaultArguments() after you create a remote interface reference in either the client class’s create() method or in one of its findByXXX() methods.
If you did not select the logging option, the testRemoteCallsWithDeafultArguments() method requires a remote interface passed as a parameter. You must then create a remote interface reference in either the home reference’s create() method or in one of its findByXXX() methods. Then add the code to the client class to call the testRemoteCallsWithDefaultArguments() method, passing it the remote reference as a argument.
If you prefer to write the logic that calls each of the business methods from another class, you can choose to create and use an instance of the test client application. See “Using the test client application” on page 5-3.
Compile your test client application.
Using the test client applicationYou can quickly add a declaration of a test client class to any class.
1 Display the class in which you want the declaration to appear in the editor.

5-4 E n t e r p r i s e J a v a B e a n s D e v e l o p e r ’ s G u i d e
U s i n g t h e t e s t c l i e n t a p p l i c a t i o n
2 Choose Wizards|EJB|Use EJB Test Client.
3 If the test client already exists, check the EJB Test Client Class Already Exists option.
If this option isn’t checked, when you click Next, the EJB Test Client wizard starts. When you are through using it, the Use EJB Test Client wizard resumes.
4 Click Next to go to Step 2.
5 For the Class field, navigate to the test client class you want to use.
6 In the Field field, specify a name for the variable that will hold an instance of the test client class, or accept the default value the wizard suggests.
7 Choose Finish.
The wizard adds a declaration of the test client application you specified to the class like this, for example:
EmployeeTestClient1 employeeTestClient1 = new EmployeeTestClient1();
Now you’re ready to call the methods declared in the test client application.
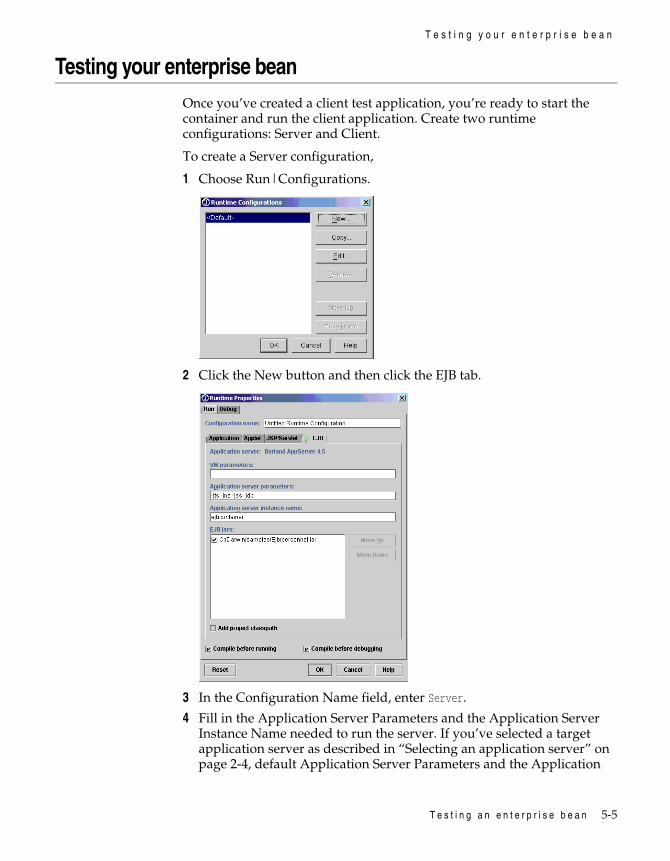
T e s t i n g a n e n t e r p r i s e b e a n 5-5
T e s t i n g y o u r e n t e r p r i s e b e a n
Testing your enterprise beanOnce you’ve created a client test application, you’re ready to start the container and run the client application. Create two runtime configurations: Server and Client.
To create a Server configuration,
1 Choose Run|Configurations.
2 Click the New button and then click the EJB tab.
3 In the Configuration Name field, enter Server.
4 Fill in the Application Server Parameters and the Application Server Instance Name needed to run the server. If you’ve selected a target application server as described in “Selecting an application server” on page 2-4, default Application Server Parameters and the Application

5-6 E n t e r p r i s e J a v a B e a n s D e v e l o p e r ’ s G u i d e
T e s t i n g y o u r e n t e r p r i s e b e a n
Instance Name are already in place. If you haven’t selected a target application server, BAS 4.5 will be the selected application server by default.
5 Select the JAR file containing the beans you want to test in the list of EJB JAR(s). If there is only one, it will be already selected. The listed JAR files are retrieved from the EJB groups in the project.
The list of EJB JAR(s) is disabled for WebSphere 3.5 because that application server doesn’t support deployment to a running server.
For WebLogic Server 6.0, the JAR(s) are copied to the <WLServer6.0 home>\config\<domain name>\applications directory.
6 Click OK.
To create a Client configuration,
1 Choose Run|Configurations.
2 Click the New button and then click the Application tab.
3 In the Configuration Name filed, enter Client.
4 Click the ... button next the Main Class field and navigate to the test client application you created, or to the application containing the main() function that calls the methods of the test client.
5 Click OK two times.
Now you’re ready to start the container. Select the Server run configuration from the drop-down list next to the Run button on the JBuilder toolbar:

T e s t i n g a n e n t e r p r i s e b e a n 5-7
T e s t i n g y o u r e n t e r p r i s e b e a n
The container starts up. Be patient as the start-up process takes a while. You can view the progress of the start-up process in the message window. Any errors that occur will also appear there.
Next select the Client run configuration to run your client application. The messages that appear in the message pane report the success or failure of the client application’s execution.
Another way to test your bean is to simply right-click its EJB group in the project pane and choose Run.
You can debug your enterprise beans or the client just as you would any other Java code with JBuilder. For information about debugging, see “Debugging Java programs” in Building Applications with JBuilder.

5-8 E n t e r p r i s e J a v a B e a n s D e v e l o p e r ’ s G u i d e

D e p l o y i n g e n t e r p r i s e b e a n s 6-1
C h a p t e r
6Chapter6Deploying enterprise beans
Deploying an enterprise bean to an application server usually involves the following steps:
1 Creating a deployment descriptor XML-based file compliant with Sun’s EJB 1.1 specification. (WebSphere 3.5 is the exception to this. It is compliant with the EJB 1.0 specification and does not use XML-based deployment descriptors
When you use JBuilder’s EJB wizards to create your beans, the deployment descriptors are being created at the same time for you.
2 Edit the deployment descriptors, if necessary.
You can edit the deployment descriptors JBuilder creates using JBuilder’s Deployment Descriptor editor.
3 Creating an EJB JAR file containing the deployment descriptor and all of the classes required to operate the EJB (bean class, remote interface, home interface, stubs and skeletons, primary key class if the EJB is an entity bean, and any other associated classes).
When you compile your EJB group using the JBuilder development environment, the proper JAR file is created for you.
4 Deploying your EJB to an EJB container.
JBuilder has an EJB Deployment wizard that simplifies the deployment process for Borland enterprise beans. If WebLogic or WebSphere is your target application server, choosing Tools|EJB Deployment displays a Deploy Settings dialog box that is specific to your server. Once you fill in those settings to suit your needs and choose OK to close the dialog box, the EJB is deployed as you specified.

6-2 E n t e r p r i s e J a v a B e a n s D e v e l o p e r ’ s G u i d e
C r e a t i n g a d e p l o y m e n t d e s c r i p t o r f i l e
Creating a deployment descriptor fileAs you create your enterprise beans using JBuilder’s EJB tools, JBuilder is creating deployment descriptors at the same time. You can then use the Deployment Descriptor editor to add additional information and modify attributes in the deployment descriptors.
Each deployment descriptors that conforms to the EJB 1.1 specification (this excludes those used by WebSphere 3.5):
• Must be XML based and conform to the rules of XML.
• Must be valid with respect to the DTD in the EJB 1.1 specification.
• Conforms to the semantics rules specified in the DTD.
• Refers to the DTD using the following statement:
<DOCTYPE ejb-jar PUBLIC "-//Sun Microsystems Inc.//DTD EnterpriseJavaBeans 1.1//EN" "http://java.sun.com/j2ee/dts/ejb-jar_1_1.dtd">
When you use JBuilder’s EJB tools to create and edit your deployment descriptors, you don’t have to worry about learning XML or conforming to the semantics rules specified in Sun’s DTD. The Deployment Descriptor editor imposes these rules on the data you enter and edit. As you fill in information using the Deployment Descriptor editor, it lets you know what data are required. JBuilder’s tools automatically set up the Borland-specific extensions in an ejb-inprise.xml file. For more information about the Deployment Descriptor editor, see Chapter 7, “Using the Deployment Descriptor editor.”
The role of the deployment descriptorThe role of the deployment descriptor is to provide information about each EJB that is to be bundled and deployed in a particular JAR file. It’s intended to be used by the consumer of the EJB JAR file. As the bean developer, it’s your responsibility to create the deployment descriptor. You can also modify the deployment descriptor once the enterprise bean is deployed.
The information in the deployment descriptor is used in setting enterprise bean attributes. These attributes define how the enterprise bean operates within a particular environment. For example, when you set the bean’s transactional attributes, they define how the bean behaves with respect to transactions. The deployment descriptor keeps the following information:
• Type information, which defines the types, or names, of the classes for the home and remote interfaces and the bean class.
• JNDI names, which set the name under which the home interface of the enterprise bean is registered.

D e p l o y i n g e n t e r p r i s e b e a n s 6-3
T h e r o l e o f t h e d e p l o y m e n t d e s c r i p t o r
• Fields to enable container-managed persistence.
• Transactional policies that govern the transactional behavior of a bean.
• Security attributes that govern access to an enterprise bean.
• Borland-specific information, such as data source information used for connections to a database.
The types of information in the deployment descriptor
The information in the deployment descriptor can be divided into two basic kinds:
• Enterprise beans’ structural information.
Structural information describes the structure of an enterprise bean and declares an enterprise bean’s external dependencies. This information is required. The structural information usually can’t be changed because doing so could break the bean’s function.
• Application assembly information.
Application assembly information describes how the enterprise bean(s) included in the ejb-jar.xml file are composed into a larger application deployment unit. This information is optional. Assembly level information can be changed without breaking the bean’s function, although doing so might alter the behavior of an assembled application.
Structural informationThe bean developer must provide the following structural information for each bean in the EJB jar:
All enterprise beans• Enterprise bean’s name, a mnemonic used to refer to the bean in the
deployment descriptor.
• Enterprise bean’s class
• Enterprise bean’s home interface
• Enterprise bean’s remote interface
• Enterprise bean’s type, either session bean or entity bean
• Environment entries, if the bean has configuration parameters
• Resource factory references
• EJB references, if an enterprise bean references another enterprise bean
• Security role references, if an enterprise bean needs to access specific roles

6-4 E n t e r p r i s e J a v a B e a n s D e v e l o p e r ’ s G u i d e
T h e r o l e o f t h e d e p l o y m e n t d e s c r i p t o r
Session beans• Session bean state management type, either stateful or stateless
• Session bean transaction demarcation type for stateful beans that have synchronization callbacks
Entity beans• Entity bean’s persistence management type
• Entity bean’s primary key class
• Container-managed fields for container-managed beans
Application assembly informationYou can specify any of the following application assembly information. During application assembly, this information is optional. This same information is not optional for the role of the deployer.
• Binding of enterprise bean references• Security roles• Method permissions• Linking of security role references• Transaction attributes
During the process of application assembly or deployment, you can modify the following structural information:
• The values of environment entries. The application assembler can change existing properties and/or define the values of environment properties.
• Description fields. The application assembler can change existing descriptions or create new description elements.
You can’t modify any other types of structural information. You can modify any application assembly information at deployment time, however.
SecurityThe application assembler usually specifies the following information in the deployment descriptor:
• Security roles• Method permissions• Links between security role references and security roles
Security rolesUsing the security role elements in the deployment descriptor, the developer can define one or more security roles. These define the required security roles for the clients of the enterprise beans.

D e p l o y i n g e n t e r p r i s e b e a n s 6-5
D e p l o y i n g t o a n a p p l i c a t i o n s e r v e r
Method permissionsUsing the method-permission elements in the deployment descriptor, the developer can define method permissions. Method permissions are paired relations between the security roles and the methods of the enterprise bean’s remote and home interfaces.
Linking of security role referencesIf security roles are defined, the developer must link them with security role references using the role-link element in the deployment descriptor.
If your target application server is the Borland AppServer, you’ll have an additional deployment descriptor for you enterprise bean, ejb-inprise.xml. To read more about Borland-specific information in deployment descriptors, see the “Deploying Enterprise JavaBeans” chapter of the Borland AppServer’s Enterprise JavaBeans Programmer’s Guide.
Deploying to an application serverWhen your bean is working to your satisfaction and if you selected the Borland AppServer as your application server for your current project, you can deploy your bean to the Borland AppServer using JBuilder’s EJB Deployment wizard. If your target application server is the WebLogic Server or WebSphere Application Server, choosing Tools|EJB Deployment wizard displays a Deploy Settings dialog box you can use to deploy to those servers.
The steps described here assume you are deploying to the Borland container. Start the application server, then use the EJB Deployment wizard.
Deploying one or more JAR filesTo deploy one or more JAR files to the Borland Application Server,1 Choose Tools|EJB Deployment to display the EJB Deployment wizard.
The JAR files in your current project appear.

6-6 E n t e r p r i s e J a v a B e a n s D e v e l o p e r ’ s G u i d e
D e p l o y i n g t o a n a p p l i c a t i o n s e r v e r
2 Specify the JAR file(s) that contain the beans you want to deploy.
If you want to deploy additional JARs, click the Add button and specify the JARs you want added. To remove a JAR from the list, select and click Remove. You also have access to the BAS 4.5 Archive Tool and the Deployment Descriptor editor in this step.
3 Click Next to go to the next step.
4 Specify the classpath of any libraries you’re enterprise beans are dependent upon, the stub generation options you want, and set the verifier options. Click Next.
The wizard analyzes the JAR(s) and reports the results.

D e p l o y i n g e n t e r p r i s e b e a n s 13-7
D e p l o y i n g t o a n a p p l i c a t i o n s e r v e r
5 Click Next if there are no errors reported, otherwise fix any errors and begin again.
6 Use this page to select the container you want to deploy your EJB.
In this example, the user clicked the Add EJB Container button to select a container:

13-8 E n t e r p r i s e A p p l i c a t i o n D e v e l o p e r ’ s G u i d e
D e p l o y i n g t o a n a p p l i c a t i o n s e r v e r
Click Next when you have specified a container.
The wizard attempts to deploy the EJB and reports the results.
7 Click Finish to close the wizard.
Deploying to WebLogic or WebSphere servers
WebLogic and WebSphere developers can also deploy their EJBs using the Tools|EJB Deployment command. When WebLogic or WebSphere is the selected application server for the current project, this command displays a Deploy Settings dialog box specific to the server. For example, here is the WebSphere Deploy Settings dialog box:
Fill in the fields you need and choose OK. For more information, click the Help button in the Deploy Settings dialog box.

D e p l o y i n g e n t e r p r i s e b e a n s 6-9
D e p l o y i n g t o a n a p p l i c a t i o n s e r v e r
Setting deployment options with the Properties dialog box
While you can use Tools|EJB Deployment to set options for deployment to the current application server for the project, you can also use the Properties dialog box. These properties are saved for the specific node on which they are set.
To set deployment options using the Properties dialog box,
1 Right-click the EJB group node or a child JAR of this node to display the pop-up menu.
2 Choose Properties to display the Properties dialog box. If you right-clicked the EJB group node, you must now click the Deployment tab of the Properties dialog box and then the page specific to your application server (such as BAS 4.5).
3 Set your options. For BAS 4.5, you will just be setting VM parameters. For IAS 4.1, you can set a host name and VM parameters. WebLogic users can set a unit name, deploy options, a password, and VM parameters. WebSphere users can set the primary node name, the application server name, the container name, VM parameters, and an option to generate XML. If multiple nodes are selected that have different deploy options, default values are used.
4 If your target application server is WebSphere and you want an XML file to be generated as input to the WebSphere XMLConfig utility, check the Generate XML check box. If this option isn’t checked, the file won’t be created. If you make your own modifications to the generated XML file (named deploy_<selectednode>.xml and appearing under the project node), uncheck this option to be sure you don’t lose your changes.
Hot deploying to an application server
During your development cycle, you are likely to want to quickly deploy, redeploy, and undeploy your enterprise beans to an already running container. Right-click the EJB group node or its child nodes in the project pane to see this list of deployment commands:
• Deploy - Deploys a JAR to the currently running container of the project application server.
• Redeploy - Deploys a JAR again to the currently running container.
• Undeploy - Undeploys an already deployed JAR in the running container.

6-10 E n t e r p r i s e J a v a B e a n s D e v e l o p e r ’ s G u i d e
D e p l o y i n g t o a n a p p l i c a t i o n s e r v e r
• List Deployments - Lists all JARs deployed in the running container.
• Stop Container - Stops the container. This option appears for WebSphere only. When a deployed EJB changes, the container must be stopped and then restarted for the changes to register.
• Start Container - Starts the container. This option appears for WebSphere only.
U s i n g t h e D e p l o y m e n t D e s c r i p t o r e d i t o r 7-1
C h a p t e r
7Chapter7Using the Deployment
Descriptor editorJBuilder includes a Deployment Descriptor editor you can use to change Borland deployment information (such as transaction policies and security roles in an EJB deployment descriptor file). You can also alter the method of persisting an enterprise bean.
JBuilder’s Deployment Descriptor editor provides a way to modify the existing Borland deployment descriptors. For general information about deployment descriptors, see Chapter 6, “Deploying enterprise beans.”
You can also view and edit some of the properties specific to WebLogic and WebSphere servers. For information, see “Viewing and editing WebLogic and WebSphere properties” on page 7-26.

7-2 E n t e r p r i s e J a v a B e a n s D e v e l o p e r ’ s G u i d e
D i s p l a y i n g t h e D e p l o y m e n t D e s c r i p t o r e d i t o r
Displaying the Deployment Descriptor editorTo display the Deployment Descriptor editor, double-click the EJB group in the project pane. The Deployment Descriptor editor appears.
Note that a tree of the EJB group appears in the structure pane.
Viewing the deployment descriptor of an enterprise beanTo view information about an enterprise bean in the Deployment Descriptor editor, click the bean in the structure pane. Or click the Contents tab to display the contents of the EJB group and then double-click the icon of bean you want to view. When you do, several more tabs appear in the in the Deployment Descriptor editor:

U s i n g t h e D e p l o y m e n t D e s c r i p t o r e d i t o r 7-3
V i e w i n g t h e d e p l o y m e n t d e s c r i p t o r o f a n e n t e r p r i s e b e a n
You can click any of these tabs at the bottom of the Deployment Descriptor editor to view other pages. Use the editor to make any changes you want to the deployment information for the bean.
You can view additional information about a deployment descriptor by using the structure pane:
Expand the node of the enterprise bean you’re interested in in the structure pane. You’ll see some or all of these additional nodes: Home Interface, Remote Interface, Method Permissions, and Container Transactions. Selecting any of these nodes displays additional information about the bean. For example, selecting Home Interface displays in the contents pane icons with the names of the methods in the home interface, and selecting Remote Interface displays the icons with names of the methods in the remote interface. You can also use the Security Roles and Data Sources nodes in the structure pane to display information on and edit security roles and data sources.
To view the source code of each descriptor, click the EJB DD Source tab. For each deployment descriptor in the EJB group, a tab appears with the name of the file on the tab. Select the tab of the file you want to view. While viewing the source code of a deployment descriptor, you can click on elements in the structure pane to move a highlight bar to the corresponding element in the source code. You can edit the source code directly.

7-4 E n t e r p r i s e J a v a B e a n s D e v e l o p e r ’ s G u i d e
A d d i n g i n f o r m a t i o n f o r a n e w e n t e r p r i s e b e a n
Adding information for a new enterprise beanTo add an enterprise bean to the deployment descriptor using the Deployment Descriptor editor,
1 Select the EJB Deployment Descriptor node in the structure pane.
2 Select the type of bean you wish to add.
• To add a session bean, click the icon on the Deployment Descriptor editor toolbar.
• To add an entity bean, click the icon on the Deployment Descriptor editor toolbar.
A name dialog box appears.
3 In the dialog box, enter the name of the enterprise bean you want to add and choose OK.
The new bean appears in the structure pane.
4 Select the bean in the structure pane.
A series of panels for the enterprise bean appears in the content pane. Use the tabs at the bottom to display the panel you want to use to enter information about the new bean.
Changing bean informationTo change bean information, select the bean in the structure pane. A series of panels for the enterprise bean appears in the content pane. Use the tabs at the bottom to display the panel you want to use to modify the existing information about the new bean.
If you’re comfortable working in XML and with deployment descriptor source code, you can select the EJB DD Source tab and make your changes directly in the source code.
Enterprise bean informationThis section describes the type of information you can create and store for enterprise beans in the deployment descriptor.
Main panel
Use the Main panel to enter or change general information about the enterprise bean.

U s i n g t h e D e p l o y m e n t D e s c r i p t o r e d i t o r 7-5
E n t e r p r i s e b e a n i n f o r m a t i o n
This is the Main panel for a session bean:
This is the Main panel for an entity bean:
The Main panel includes this information:
• Description: A summary of the bean’s purpose and function. This information is optional.
• Bean Name: A logical name assigned to the enterprise bean by the bean provider. Each enterprise bean has a logical name. There is no structured relationship between the bean’s logical name and the JNDI name assigned to the bean. The bean deployer may change the bean’s logical name.

7-6 E n t e r p r i s e J a v a B e a n s D e v e l o p e r ’ s G u i d e
E n t e r p r i s e b e a n i n f o r m a t i o n
• Home Interface: The fully-qualified name of the enterprise bean’s home interface. This information must be specified.
• Remote Interface: The fully-qualified name of the enterprise bean’s remote interface. This information must be specified.
• Bean Class: The fully-qualified name of the Java class that implements the bean’s business methods. This information must be specified.
• JNDI Name: The JNDI name of the enterprise bean’s home interface.
• Small icon: The name of a 16 X 16 pixel icon file used to represent the bean.
• Large icon: The name of a 32 X 32 pixel icon file used to represent the bean.
For Session beans, the Main panel also includes the following:
• Session Type: Specifies whether the enterprise bean is Stateless or Stateful.
• Transaction Type: Specifies whether Transaction Policies are set by the bean or the Container.
For Entity beans, the Main panel also includes the following:
• Primary Key Class: The fully-qualified name of the Entity bean’s primary key class. The primary key class must be specified.
• Reentrant: Indicates the bean is reentrant. Borland recommends you avoid making a bean reentrant.
Environment panel
The Environment panel lists all the enterprise bean’s environment entries. Environment entries allow you to customize the bean’s business logic when the bean is assembled or deployed. The environment allows you to customize the bean without accessing or changing the bean’s source code.
Each enterprise bean defines its own set of environment entries. All instances of an enterprise bean share the same environment entries. Enterprise bean instances aren’t allowed to modify the bean’s environment at runtime.

U s i n g t h e D e p l o y m e n t D e s c r i p t o r e d i t o r 7-7
E n t e r p r i s e b e a n i n f o r m a t i o n
To add an environment entry,
1 Click Add to create a new entry.
A new, blank row appears.
2 Enter a property in the Property column and a property value in the Value column.
3 Choose a property type from the Type drop-down list.
4 Continue to add environment entries as you desire.
To remove a row,
1 Select the row.2 Click the Remove button.
These are some things to keep in mind about the environment entries:
• The bean provider must declare all the environment entries accessed from the enterprise bean’s code.
• If the bean provider includes a value for the environment entry, the value can be later changed during the assembly or deployment.
• The assembler can modify the values of the environment entries set by the bean provider.
• The deployer must ensure that the values of all environment entries are set to meaningful values.

7-8 E n t e r p r i s e J a v a B e a n s D e v e l o p e r ’ s G u i d e
E n t e r p r i s e b e a n i n f o r m a t i o n
EJB references panel
The EJB References panel lists all the enterprise bean references to the homes of other enterprise beans the bean requires.
Each EJB reference describes the interface requirements that the referencing enterprise bean has for the referenced bean. You can define references between beans within the same JAR file or from an external enterprise bean (one that is outside the JAR file), such as a session bean to an entity bean. Each reference contains these fields:
• Description: A brief description of the bean that is referenced. This information is optional.
• Name: The name of the referenced bean.
• IsLink: When IsLink is checked, the reference is to a bean within the JAR, so the JNDI Name value isn’t relevant. If IsLink isn’t checked, the JNDI name is used to find the bean. When you check this option, you then select the bean that is referenced from the Link drop-down list.
• Link: Links the EJB reference to the target enterprise bean. The Link value is the name of the target bean. This information is optional.
• Type: The expected type of the referenced bean.
• Home: The expected Java type of the referenced bean’s home interface.
• Remote: The expected Java type of the referenced bean’s remote interface.
• JNDI Name: The JNDI name of the referenced bean.
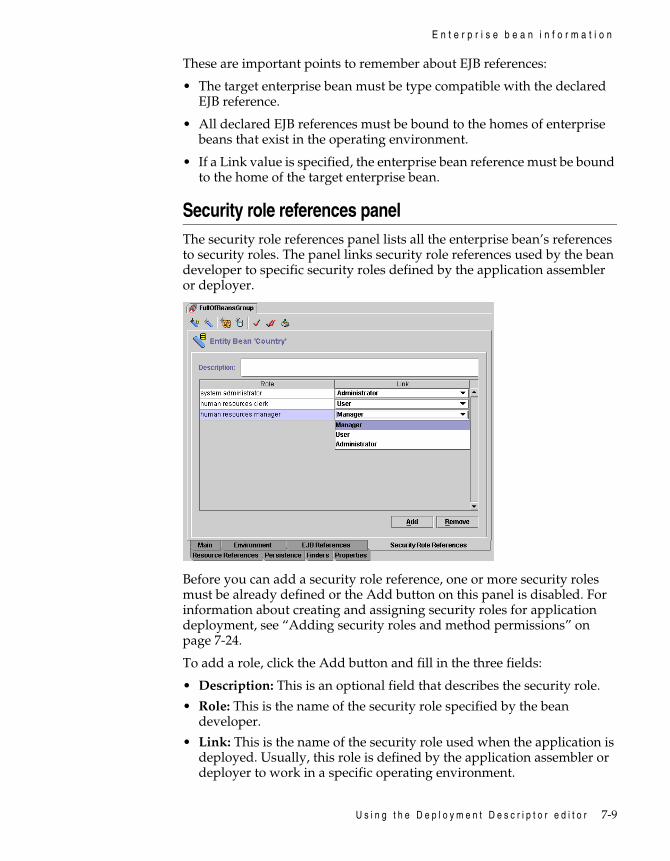
U s i n g t h e D e p l o y m e n t D e s c r i p t o r e d i t o r 7-9
E n t e r p r i s e b e a n i n f o r m a t i o n
These are important points to remember about EJB references:
• The target enterprise bean must be type compatible with the declared EJB reference.
• All declared EJB references must be bound to the homes of enterprise beans that exist in the operating environment.
• If a Link value is specified, the enterprise bean reference must be bound to the home of the target enterprise bean.
Security role references panelThe security role references panel lists all the enterprise bean’s references to security roles. The panel links security role references used by the bean developer to specific security roles defined by the application assembler or deployer.
Before you can add a security role reference, one or more security roles must be already defined or the Add button on this panel is disabled. For information about creating and assigning security roles for application deployment, see “Adding security roles and method permissions” on page 7-24.
To add a role, click the Add button and fill in the three fields:
• Description: This is an optional field that describes the security role.
• Role: This is the name of the security role specified by the bean developer.
• Link: This is the name of the security role used when the application is deployed. Usually, this role is defined by the application assembler or deployer to work in a specific operating environment.

7-10 E n t e r p r i s e J a v a B e a n s D e v e l o p e r ’ s G u i d e
E n t e r p r i s e b e a n i n f o r m a t i o n
Resource references panel
The resource references panel lists all the enterprise bean’s resource factory references. This enables the application assembler and/or the bean deployer to locate all references used by the enterprise bean. Each entity bean with container-managed persistence must have a resource reference.
To add a resource reference, click the Add button and fill in the following fields:
• Description: A description of the resource reference. This information is optional.
• Name: The name of the environment entry used in the enterprise bean’s code.
• Type: The Java type of the resource factory expected by the enterprise bean’s code. (This is the Java type of the resource factory, not the Java type of the resource.)
• Authentication: An Application authentication indicates that the enterprise bean performs the resource sign-on programmatically. A Container authentication indicates that the container signs on to the resource based on the principal mapping information supplied by the deployer.
• JNDI Name: JNDI name for the resource reference.
• CMP (container-managed persistence): If you’re using container-managed persistence for the bean, you must have one (and only one) resource reference with the CMP field checked.

U s i n g t h e D e p l o y m e n t D e s c r i p t o r e d i t o r 7-11
E n t e r p r i s e b e a n i n f o r m a t i o n
Persistence panel
The Persistence panel appears only for entity beans. It specifies how persistence is managed for the enterprise bean. Information displayed on the panel varies depending on whether persistence is bean-managed or container-managed.
The persistence panel includes these fields:
• Persistence Type: Indicates whether persistence is managed by the bean itself or the container.
• Primary Key Class: The fully-qualified name of the entity bean’s primary key class. The primary key must be specified.
• Get Meta Data button:
Clicking this button retrieves the metadata for the table and populates a drop-down list for each Column Name(s) cell. Each element of the drop-down list is a column name/column type pair. Selecting from the drop-down list fills in both the column name and the column type cells. The drop-down list includes only the column names that have not already been used in the panel.

7-12 E n t e r p r i s e J a v a B e a n s D e v e l o p e r ’ s G u i d e
E n t e r p r i s e b e a n i n f o r m a t i o n
For beans with container-managed persistence, the following additional information is included to enable you to map fields in the bean to columns in a database table:
• Table(s): The name of the database table(s) referenced by the bean.
• CMP: A check mark indicates the field is container-managed.
• isPK: A check mark indicates the field is the primary key.
• Field Type: The data type of the field.
• Field Name: The name of the field. The Field Name column lists all fields in an entity bean.
• Column Name: You can map compound fields in the bean (for example, location.street) to columns in the database table. You can map either the root field (for example, location) or the subfields (for example, location.street), but not both.
• Column Type: The data type of the field.
• EJB Reference: If the field type is an EJB class, a menu appears with a list of EJB references to select. These references are set in the EJB references panel.
To set up the entity bean for container-managed persistence, select Container as the Persistence Type. If you use the EJB Entity Modeler to generate the bean, Container will be already selected. The panel displays the primary key class name, which you can’t change. In the CMP Description field, you can enter optional text describing the bean.
Each field in your entity bean that will be container-managed has the CMP field checked. For each field, you enter the name of the column to which it maps. If you used the EJB Entity Modeler, JBuilder has already mapped these columns for you. You can edit the Column Name and Column Type if you choose. You can enter text describing each field in the Description field, but it’s not required.
The Deployment Descriptor editor uses JDBC to obtain metadata on existing tables. You can conveniently hook up existing entity beans to existing tables. For example, you might purchase a third-party enterprise bean and want to use it with a table in your database. To populate both the Column Name and Column Type fields, click the Get Meta Data button and the metadata is retrieved and displayed.

U s i n g t h e D e p l o y m e n t D e s c r i p t o r e d i t o r 7-13
E n t e r p r i s e b e a n i n f o r m a t i o n
Finders panel
The Finders panel specifies the “where” clauses used by the container-managed bean to execute finder methods defined by the bean.
You’ll find this information on the finders panel:
• Method: The finder method name and a list of all parameters.
• Where Clause: Specifies an SQL “where” clause used by the container to retrieve records from the database. Note that not all SQL statements can be converted to WebLogic query logic.
• Load State: When selected, this attribute enables the container to preload all container-managed fields whenever a find operation occurs.
To specify a finder method,
1 Click the Add button.
A Finder dialog box appears.
2 Select the method signature for the finder method you want from the drop-down list.
3 Modify the argument names, if you wish, and specify the proper Where clause for the find operation.

7-14 E n t e r p r i s e J a v a B e a n s D e v e l o p e r ’ s G u i d e
E n t e r p r i s e b e a n i n f o r m a t i o n
Here’s an example:
Properties panel
The Properties panel contains varying information depending upon the context. When you select an enterprise bean in the structure pane, the following Properties pane appears:
To add a property to an enterprise bean selected in the structure pane,
1 Click the Add button to add a row to the panel.
2 From the Name drop-down list, select the property you want to add.

U s i n g t h e D e p l o y m e n t D e s c r i p t o r e d i t o r 7-15
E n t e r p r i s e b e a n i n f o r m a t i o n
3 Specify a value in the Value field.
You specify some values by selecting a value from a drop-down list, others require you to enter an appropriate value such as a string or integer value, and one presents a check box for boolean values—checking the check box indicates the value is true. Here is the list of possible values and their descriptions:
ejb.cmp.primaryKeyGeneratorSpecifies a class, written by the user, that implements the com.inprise.ejb.cmp.PrimaryKeyGenerator interface and generates primary keys. For more information about primary key generation, see the /Borland/AppServer/examples/ejb/pkgen example.
ejb.cmp.getPrimaryKeyBeforeInsertSqlSpecifies the SQL the CMP engine executes to generate a primary key when the next INSERT occurs. The CMP engine updates the entity bean with this primary key value. This property is usually used in conjunction with Oracle Sequences. For more information about primary key generation, see the /Borland/AppServer/examples/ejb/pkgen example.
ejb.cmp.getPrimaryKeyAfterInsertSqlSpecifies the SQL the CMP engine executes to generate a primary key after the next INSERT. The CMP engine updates the entity bean with this primary key value. When specifying this property, you must also specify the ejb.cmp.ignoreColumnsOnInsert property. For more information about primary key generation, see the /Borland/AppServer/examples/ejb/pkgen example.
ejb.cmp.ignoreColumnsOnInsertSpecifies the name of the column the CMP must not set during the INSERT. This property is used in conjunction with the ejb.cmp.getPrimaryKeyAfterInsertSql property. For more information about primary key generation, see the /Borland/AppServer/examples/ejb/pkgen example.
ejb.cmp.checkExistenceBeforeCreateSuppresses the existence check that occurs before creating a new entity bean. The EJB 1.1 specification requires that the container first check for the existence of an entity bean (that is, check for the existence of a row in the table) and throw a javax.ejb.DuplicateKeyException if such an entity is found. For performance reasons, you might want to eliminate this extra access to the database and rely on the fact that the database will prevent duplicate values from being inserted.

7-16 E n t e r p r i s e J a v a B e a n s D e v e l o p e r ’ s G u i d e
E n t e r p r i s e b e a n i n f o r m a t i o n
ejb.cmp.jdbcAccesserFactorySpecifies a factory for a user-implemented instance of the com.inprise.ejb.cmp.JdbcAccessor interface. This interface gives you a way to write specific code to get a value from a java.sqlResultSet or to set a value to a java.sql.PreparedStatement. The default value is none.
ejb.cmp.managerSpecifies the name of a class implementing the interface com.inprise.ejb.cmp.Manager. An instance of this class is used to perform container-managed persistence (CMP).
ejb.maxBeansInPoolSpecifies the maximum number of beans in the ready pool. If the ready pool exceeds this limit, entities will be removed from the container by calling unsetEntityContext(). The default setting is 1000.
ejb.maxBeansInCacheSpecifies the maximum number of beans in the Option A cache (see ejb.transactionCommitMode which follows). If the cache exceeds this limit, entities will be moved to the ready pool by calling ejbPassivate(). The default setting is 1000.
ejb.transactionCommitModeIndicates the disposition of an entity bean with respect to a transaction. The values are:
• A or Exclusive—This entity has exclusive access to the particular table in the database. Thus, the state of the bean at the end of the last committed transaction can be assumed to be the state of the bean at the beginning of the next transaction. The beans are cached across transactions.
• B or Shared—This entity shares access to the particular table in the database. However, for performance reasons, a particular bean remains associated with a particular primary key between transactions to avoid extraneous calls to ejbActivate() and ejbPassivate() between transactions. The bean stays in the active pool. This setting is the default.
• C or None—This entity shares access to the particular table in the database. A particular bean does not remain associated with a particular primary key between transactions, but goes back to the ready pool after every transaction. This is generally not a useful setting.

U s i n g t h e D e p l o y m e n t D e s c r i p t o r e d i t o r 7-17
E n t e r p r i s e b e a n i n f o r m a t i o n
ejb.cmp.optimisticConcurrencyBehaviorYou can specify one of the following:
• UpdateAllFields• UpdateModifiedFields• VerifyModifiedFields• VerifyAllFields
• UpdateAllFields - Issues an update on all fields, regardless of whether they were modified. Given a CMP bean with three fields: “key”, “value1” and “value2”, stored in a table called “MyTable”, the following update will be issued at the end of every transaction, regardless of whether the bean was modified:
UPDATE MyTable SET (value1 = <value1>, value2 = <value2>) WHERE key = <key>
• UpdateModifiedFields -This is the default setting. Issues an update only on the fields that were modified, or suppresses the update altogether if the bean was not modified. With the above bean, if only “value1” was modified, the following update is issued:
UPDATE MyTable SET (value1 = <value1>) WHERE key = <key>
This can give a significant performance boost for following reasons:
1 Very often your data access is read-only. In such cases, not sending an update to the database is desirable. Borland have seen great performance boosts from this single optimization.
2 Many databases write logs depending on which columns were modified. For example, SQL Server will log the update if a TEXT or IMAGE field is updated, regardless of whether the column’s value actually changed. Note that the database often does not (or cannot) distinguish between updating a column to hold the same value it used to hold (which is what occurs with “UpdateAllFields”), and actually modifying the column’s value. Suppressing the update for the case where the value did not actually change can have a very significant performance impact when using such DBMSs.
3 There is less JDBC-based network traffic going to the database and less work going on in the JDBC driver. The network issue is, generally, not significant, but the JDBC driver issue is significant. Our performance measurements indicate that as many as 70% of the CPU’s time is spent in the JDBC driver in large-scale EJB applications. Often, this is due to the fact that many commercial JDBC drivers have not been sufficiently performance tuned. Even for well-tuned drivers, the less work they have to do, the better.

7-18 E n t e r p r i s e J a v a B e a n s D e v e l o p e r ’ s G u i d e
E n t e r p r i s e b e a n i n f o r m a t i o n
• VerifyModifiedFields - In this mode, the CMP engine issues a tuned update while verifying that the fields it is updating are consistent with the values that were previously read in. So, for the previous example, where only “value1” was modified, the following update is issued:
UPDATE MyTable SET (value1 = <value1>) WHERE key = <key> AND value1 = <old-value1>
• VerifyAllFields - This mode is similar to VerifyModifiedFields, except that all fields are verified. So the update would be:
UPDATE MyTable SET (value1 = <value1>) WHERE key = <key> AND value1 = <old-value1> AND value2 = <old-value2>
These two verify settings can be used to replicate the SERIALIZABLE isolation level in the Container. Often your application requires serializable isolation semantics. However, asking the database to implement this for you can have a significant performance impact. Our tests show using SERIALIZABLE with Oracle instead of a less restricted isolation level, can slow down an application over 50%. The main reason for this slowdown is that Oracle provides optimistic concurrency using a row-level locking model. With the above two settings, you are basically asking the CMP engine to implement optimistic concurrency using field-level locking. And with any concurrent system, the smaller the granularity of the locking, the better the concurrency.
ejb.findByPrimaryKeyBehaviorIndicates the desired behavior of the findByPrimaryKey() method. The values are:
• Verify - The standard behavior for findByPrimaryKey() is to verify that the specified primary key exists in the database.
• Load - This behavior causes the bean’s state to be loaded into the container when findByPrimaryKey() is invoked, if the finder call is running in an active transaction. The assumption is that found objects will typically be used, and it is optimal to load the object’s state at find time. This setting is the default.
• None - This behavior indicates that findByPrimaryKey() should be a no-op. Basically, this causes the verification of the bean to be deferred until the object is actually used. Since it is always the case that an object could be removed between calling find and actually using the object, for most programs this optimization will not cause a change in client logic.

U s i n g t h e D e p l o y m e n t D e s c r i p t o r e d i t o r 7-19
C o n t a i n e r t r a n s a c t i o n s
For information about the Properties panel in other contexts, see “Setting data source properties” on page 7-22 and “Assigning method permissions” on page 7-25.
Container transactionsEnterprise beans that use container-managed transactions must have the transaction policies set by the container. The Deployment Descriptor editor enables you to set container-managed transaction policies and then associate these policies with methods in the enterprise bean’s home and remote interfaces.
Adding a container-managed transaction
To add a container transaction,
1 Double-click the enterprise bean in the structure pane to expand the bean’s tree.
2 Click Container Transactions in the structure pane.
3 Click the Add button to add a row to the grid.
4 In the row, select the Interface that exposes the method: either the home or remote interface, or select * to indicate both the home and remote interface.

7-20 E n t e r p r i s e J a v a B e a n s D e v e l o p e r ’ s G u i d e
W o r k i n g w i t h d a t a s o u r c e s
5 From the drop-down list of Methods available, select the method, or select * to select all the methods this transaction pertains to.
6 From the drop-down list of Transaction Attributes, select the attribute you want the transaction to have.
For a description of the transaction attributes available, see “Transaction attributes” on page 13-4.
7 Enter a description in the Description field to describe the transaction. This information is optional.
Working with data sourcesTo view information on a data source in your deployment descriptor, expand the Data Sources node in the structure pane and select one of the data sources. The Deployment Descriptor editor displays this Data Source panel. You can use the panel to modify the information on the selected data source. Only entity beans have a data source.
The Deployment Descriptor editor enables you to specify a new data source for entity beans and to set the isolation level for the data transactions.

U s i n g t h e D e p l o y m e n t D e s c r i p t o r e d i t o r 7-21
W o r k i n g w i t h d a t a s o u r c e s
To add a new data source to the deployment descriptor,
1 Click the icon on the Deployment Descriptor toolbar.
A New DataSource dialog box appears.
2 Enter the name of new data source and choose OK.
The new data source is added to the tree in the structure pane.
3 Select the data source in the tree.
4 Enter the information for the new data source.
The data source is defined by a data source name, the URL location of the data source, and (if required) a user name and password to access the source. The panel also includes the class name of the JDBC driver and JDBC properties.
5 When you’ve specified the data source connection, you can choose the Test Connection button.
The Deployment Descriptor editor attempts to make the connection with the specified data source. The results are posted in the message log.

7-22 E n t e r p r i s e J a v a B e a n s D e v e l o p e r ’ s G u i d e
W o r k i n g w i t h d a t a s o u r c e s
Setting isolation levels
The term isolation level refers to the degree to which multiple, interleaved transactions are prevented from interfering with each other in a multi-user database. These are possible transaction violations:
• Dirty read: Transaction t1 modifies a row; Transaction t2 then reads the row. Now t1 performs a rollback and t2 has seen a row that never really existed.
• Non-repeatable read: Transaction t1 retrieves a row. Then transaction t2 updates this row and t1 retrieves the same row again. Transaction t1 has now retrieved the same row twice and seen two different values for it.
• Phantoms: Transaction t1 reads a set of rows that satisfy certain search conditions. Then transaction t2 inserts one or more rows that satisfy the same search condition. If transaction t1 repeats the read, it will see rows that did not exist previously. These rows are called phantoms.
To set or change the transaction isolation level for a data source, choose one of these isolation levels from the Isolation Level drop-down list:
Setting data source properties
When a data source is selected in the Deployment Descriptor editor, a Properties tab appears as well as the Data Source tab. The Properties panel allows you to set properties that affect the Borland container-managed persistence (CMP) engine.
Attribute Syntax Description
Uncommitted TRANSACTION_READ_UNCOMMITTED Allows all three violations
Committed TRANSACTION_READ_COMMITTED Allows non-repeatable reads and phantoms, but doesn’t allow a dirty read.
Repeatable TRANSACTION_REPEATABLE_READ Allows phantoms, but not the other two violations.
Serializable TRANSACTION_SERIALIZABLE Doesn’t allow any of the three violations.

U s i n g t h e D e p l o y m e n t D e s c r i p t o r e d i t o r 7-23
W o r k i n g w i t h d a t a s o u r c e s
To modify the properties of a data source,
1 Select the data source in the structure pane.
2 Click the Properties tab.
3 On the Properties panel, select a property to set from the Name drop-down list.
The Type value is set automatically, depending on your selection from the Name list.
4 Select a value in the Value column for your property.
5 Add additional properties by clicking the Add button to add a new row, and then select the Name and Value entries for that new property.
These are the possible properties:
Property Description
uniqueSequence Determines whether the CMP engine should declare a unique sequence for the primary key columns. Usually this is achieved by declaring the appropriate columns to be primary keys (see primaryKeyDeclaration).
batchUpdates Indicates whether the CMP engine should batch updates to the database. This can have a significant performance benefit for transactions that update a number of entities that update a number of entities, and should be used if the driver supports it. Unfortunately, most don’t support batch updates yet. The default value is false.

7-24 E n t e r p r i s e J a v a B e a n s D e v e l o p e r ’ s G u i d e
A d d i n g s e c u r i t y r o l e s a n d m e t h o d p e r m i s s i o n s
Adding security roles and method permissionsThe Deployment Descriptor editor enables you to create or edit security roles in the deployment descriptor. After you create security roles, you can then associate methods in the enterprise bean’s home and remote interfaces with these roles, thereby defining the security view of the application.
This section describes how to use the Deployment Description editor to create the security roles and assign enterprise bean methods to the roles. The section “Security role references panel” on page 7-9 describes how to use the Roles panel to assign user groups and/or user accounts to the roles.
Defining security roles in the deployment descriptor is optional.
Creating a security role
To create a security role in the deployment descriptor,
1 Click the icon on the Deployment Descriptor toolbar.
2 In the dialog box that appears, enter the name of the new security role and choose OK.
reuseStatements Determines whether the CMP engine should reuse prepared statements across transactions. Reusing prepared statements has a significant performance impact, and they should be used unless the JDBC driver exhibits are reused. The default value is true.
notNullDeclaration Determines whether the Java fields that can’t be null (such as int or float) should map to non-null columns. The default value is true.
dialect Determines the type of the data source, such as whether its a JDataStore, Oracle, Informix, or other data source. Select the dialect value from the Value drop-down list. If you don’t set this field, the CMP engine creates tables for JDataStore only. The default value is none.
primaryKeyDeclaration Determines whether the CMP engine declares the primary key columns in the table to be primary keys. Some databases don’t support primary key declarations. The default value is true.
Property Description

U s i n g t h e D e p l o y m e n t D e s c r i p t o r e d i t o r 7-25
A d d i n g s e c u r i t y r o l e s a n d m e t h o d p e r m i s s i o n s
The new role appears under the Security Roles node in the structure pane. If you don’t see it, be sure to expand the Security Roles node. Also, a Properties panel for the role appears:
You can enter a description for the new role on the Properties panel. The description is optional.
Assigning method permissions
Once you’ve defined a security role, you can specify which methods in the home and remote interfaces of an enterprise bean the security role is allowed to invoke.
You aren’t required to associate a security role with methods in a bean’s home or remote interface. In these cases, none of the security roles defined in the deployment descriptor are allowed to invoke these methods.
To assign method permissions,
1 Expand the bean’s node in the structure pane to reveal its Method Permissions subnode.

7-26 E n t e r p r i s e J a v a B e a n s D e v e l o p e r ’ s G u i d e
V i e w i n g a n d e d i t i n g W e b L o g i c a n d W e b S p h e r e p r o p e r t i e s
2 Select the Method Permission node to display a Properties panel.
Each defined security role appears as a column heading.
3 Click the Add button to add a row to the panel.
4 In the new row, choose either Home or Remote or * to indicate both from the drop-down list in the Interface field.
5 From the Method drop-down list, select the method you are granting permission to call, or select *, which indicates permission to call all the methods.
6 Check the check box for each security role you want to give permission to call the specified methods.
7 As a final step, you can enter an optional description in the Description field to describe the permission the row defines.
Viewing and editing WebLogic and WebSphere propertiesYou can use the Deployment Descriptor editor to view and edit some of the vendor-specific elements that are unique to WebLogic and WebSphere. If one of the WebLogic or WebSphere servers is your target application server, the Deployment Descriptor editor displays an EJB Properties tab at the bottom of the content pane.

U s i n g t h e D e p l o y m e n t D e s c r i p t o r e d i t o r 7-27
V e r i f y i n g d e s c r i p t o r i n f o r m a t i o n
To view WebLogic- or WebSphere-specific properties,
1 Double-click the EJB group node in the project pane.
2 Click the enterprise bean you are working with in the structure pane.
3 Click the EJB Properties tab.
The EJB Properties panel displays a table of properties specific to either the WebLogic or WebSphere server. For example, this is how the EJB Properties panel appears when the WebLogic Server 6.0 is the selected application server:
You can use this table to view the property values or to edit them. Use the left column to enter values for properties you want to modify. The property values are stored in the application server-specific deployment descriptors.
Verifying descriptor informationAfter you’ve finished editing the descriptor file, you can verify that the descriptor information is in the correct format, the required bean class files are present, and so on.
To verify descriptor information, click the Verify icon ( ) on the Deployment Descriptor editor toolbar. Before choosing Verify, you can set Verify options by clicking the icon.

7-28 E n t e r p r i s e J a v a B e a n s D e v e l o p e r ’ s G u i d e
V e r i f y i n g d e s c r i p t o r i n f o r m a t i o n
Verify does the following:
• Ensures that the descriptor conforms to the EJB 1.1 specification.
• Ensures that the classes referenced by the deployment descriptors conform to the EJB 1.1 specification.
The Set Class Path is used for byte-code reflection, not for source code reflection. To enable byte-code reflection, add this statement to the Preferences section of the Borland/AppServer/console/plugins/iaspt.ini file:
UseSourceReflection=false
To set the class path, click the icon and use the dialog box that appears to set the new class path.

U s i n g t h e D a t a E x p r e s s f o r E J B c o m p o n e n t s 8-1
C h a p t e r
8Chapter8Using the DataExpress for
EJB componentsJBuilder has several components that allow you to retrieve data from entity beans into DataExpress DataSets (providing), and to save data from DataExpress DataSets back to entity beans (resolving). These DataExpress for EJB components make it easy to implement a Session Bean wrap Entity Bean design pattern. Using this design pattern, clients usually don’t access entity beans directly, but instead they access them using session beans. The session beans, which are co-located with the entity beans, make all the calls to the entity beans within a single transaction and then return all the data at once. DataSets provide a way of transporting the data from the session bean to the client and back. Because data is sent over the wire just once to provide the data to the client, and then just once again to resolve changes to the entity beans on the server, performance improves.
These components also make it easier for you to build client applications using DataExpress-aware visual components such as dbSwing or InternetBeans Express. For a full description of DataExpress, see “Understanding JBuilder database applications” in the Database Application Developer’s Guide.
This chapter explains how to use these components to transfer data from entity beans deployed on a server to your client application and back again. The code used in the chapter comes from the /JBuilder5/samples/Ejb/ejb.jpx sample project. The data the sample accesses is stored in an Employee data store. The sample creates an entity bean to hold Employee data. It also creates a Personnel session bean that retrieves data from Employee and then sends it to the client. The client sends the data back to the Personnel, which resolves the data to the Employee entity bean instances.

8-2 E n t e r p r i s e J a v a B e a n s D e v e l o p e r ’ s G u i d e
T h e D a t a E x p r e s s E J B c o m p o n e n t s
The DataExpress EJB componentsFour of the DataExpress EJB components are on the EJB page of the component palette. You can work with these components in the UI designer, setting properties and events using the Inspector. There are additional classes that your code can call that you don’t work with visually. For information about all of the classes, see the API reference.
Components for the server
The two components on the EJB page of the component palette that are used by the session bean deployed on the server are the EntityBeanProvider and EntityBeanResolver components. EntityBeanProvider provides data from the entity beans deployed on the server, and EntityBeanResolver resolves data to those entity beans. You add these components to the session bean you create to make the session bean capable of providing from and resolving to the entity beans.
Components for the client
Two of the components on the EJB page are used in the client side: EjbClientDataSet and SessionBeanConnection. The EjbClientDataSet provides data from and resolves changes to the session bean referenced in the SessionBeanConnection. A SessionBeanConnection holds the reference to a session bean on the server, and it contains the method names to provide datasets from and resolve datasets to that session bean.
Creating the entity beansBegin by using the EJB Entity Modeler to create the entity beans that access the data you are interested in. The sample project creates Employee and Department entity beans, although this chapter refers only to Employee.
Creating the server-side session beanCreate the session bean that will live on the server. Consider using the Enterprise JavaBean wizard to create a stateless session bean. Later in the next section you’ll be adding EntityBeanProvider and EntityBeanResolver classes to this bean. Because these classes aren’t serializable, it’s easier to place them in a stateless session bean, which, for the Borland Application Server, is never passivated. If you require a stateful session bean for your application, you should either have the stateful session bean refer to a

U s i n g t h e D a t a E x p r e s s f o r E J B c o m p o n e n t s 8-3
C r e a t i n g t h e s e r v e r - s i d e s e s s i o n b e a n
stateless session bean, or you must reinstantiate the EntityBeanProvider and EntityBeanResolver when the stateful session bean is activated.
Here is what a resulting bean class named PersonnelBean would look like:public class PersonnelBean implements SessionBean { private SessionContext sessionContext; public void ejbCreate() { } public void ejbRemove() throws RemoteException { } public void ejbActivate() throws RemoteException { } public void ejbPassivate() throws RemoteException { } public void setSessionContext(SessionContext sessionContext) throws RemoteException { this.sessionContext = sessionContext; }}
Click the Design tab to display the UI Designer.
Adding provider and resolver components to the session bean
From the EJB page of the component palette, add an EntityBeanProvider and an EntityBeanResolver to the session bean. You must also add a dataset component to hold the data gathered from the entity beans before it is sent to the client and the data that the client sends back. From the DataExpress page of the component palette, add a TableDataSet component and rename TableDataSet to some appropriate name.
This is how the top of PersonnelBean would look; the TableDataSet has been renamed to employeeDataSet:
public class PersonnelBean implements SessionBean { private SessionContext sessionContext; EntityBeanProvider entityBeanProvider = new EntityBeanProvider(); EntityBeanResolver entityBeanResolver = new EntityBeanResolver(); TableDataSet employeeDataSet = new TableDataSet(); ...
Using the Inspector, set the provider and resolver properties of the TableDataSet to the newly added EntityBeanProvider and EntityBeanResolver components, respectively. The result is two new methods in the jbInit() method:
employeeDataSet.setProvider(entityBeanProvider);employeeDataSet.setResolver(entityBeanResolver);
The sample project shows these methods in the setSessionContext() method instead. You can add the method calls yourself to setSessionContext() if you prefer to imitate the sample project exactly. Either approach is fine.
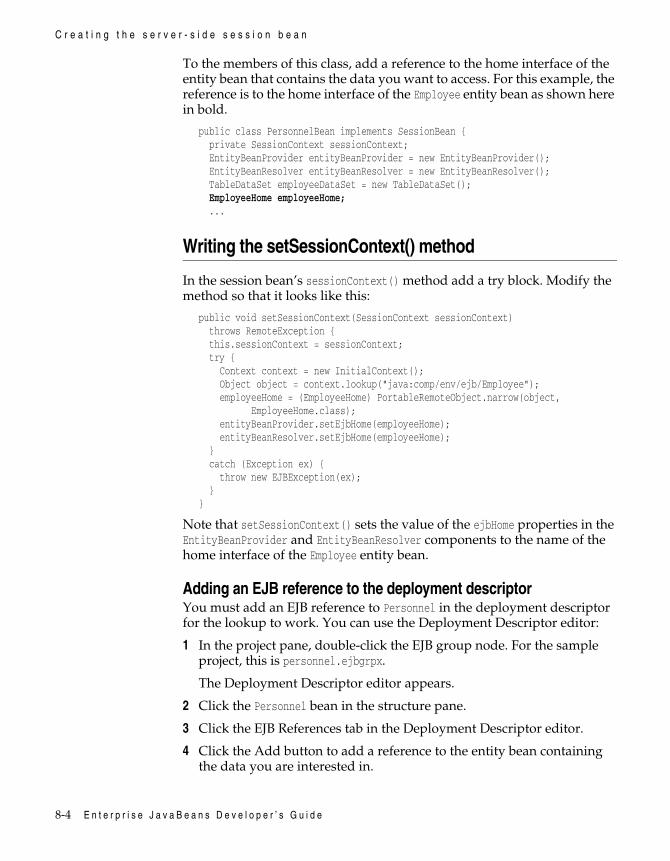
8-4 E n t e r p r i s e J a v a B e a n s D e v e l o p e r ’ s G u i d e
C r e a t i n g t h e s e r v e r - s i d e s e s s i o n b e a n
To the members of this class, add a reference to the home interface of the entity bean that contains the data you want to access. For this example, the reference is to the home interface of the Employee entity bean as shown here in bold.
public class PersonnelBean implements SessionBean { private SessionContext sessionContext; EntityBeanProvider entityBeanProvider = new EntityBeanProvider(); EntityBeanResolver entityBeanResolver = new EntityBeanResolver(); TableDataSet employeeDataSet = new TableDataSet(); EmployeeHome employeeHome; ...
Writing the setSessionContext() method
In the session bean’s sessionContext() method add a try block. Modify the method so that it looks like this:
public void setSessionContext(SessionContext sessionContext) throws RemoteException { this.sessionContext = sessionContext; try { Context context = new InitialContext(); Object object = context.lookup("java:comp/env/ejb/Employee"); employeeHome = (EmployeeHome) PortableRemoteObject.narrow(object, EmployeeHome.class); entityBeanProvider.setEjbHome(employeeHome); entityBeanResolver.setEjbHome(employeeHome); } catch (Exception ex) { throw new EJBException(ex); }}
Note that setSessionContext() sets the value of the ejbHome properties in the EntityBeanProvider and EntityBeanResolver components to the name of the home interface of the Employee entity bean.
Adding an EJB reference to the deployment descriptorYou must add an EJB reference to Personnel in the deployment descriptor for the lookup to work. You can use the Deployment Descriptor editor:
1 In the project pane, double-click the EJB group node. For the sample project, this is personnel.ejbgrpx.
The Deployment Descriptor editor appears.
2 Click the Personnel bean in the structure pane.
3 Click the EJB References tab in the Deployment Descriptor editor.
4 Click the Add button to add a reference to the entity bean containing the data you are interested in.

U s i n g t h e D a t a E x p r e s s f o r E J B c o m p o n e n t s 8-5
C r e a t i n g t h e s e r v e r - s i d e s e s s i o n b e a n
5 Enter a reference name. For the sample project, the name is ejb/Employee.
6 Check the IsLink check box.
7 Specify the entity bean from the Link drop-down list.
The rest of the data should fill in for you automatically.
Adding the providing and resolving methods
You must add two methods to the session bean, a provider and a resolver. The names of these methods use the value you specified as the methodName property value in the EjbClientDataSet component. So the provider for PersonnelBean becomes provideEmployee() and the resolver becomes resolveEmployee().
The provider must call the method of an EntityBeanConnection class that provides the data from an entity bean to a dataset that can be sent over the wire. This is what the provideEmployee() method must look like:
public DataSetData [] provideEmployee(RowData [] parameterArray, RowData [] masterArray) { return EntityBeanConnection.provideDataSets(new StorageDataSet [] {employeeDataSet}, parameterArray, masterArray);}
The resolver must call the method of an EntityBeanConnection class that resolves any updates to the entity beans. This is how resolveEmployee() should appear:
public DataSetData [] resolveEmployee(DataSetData[] dataSetDataArray) { return EntityBeanConnection.saveChanges(dataSetDataArray, new DataSet [] {employeeDataSet});}
Next add these methods to the remote interface. The simplest way to do this is to use BeansExpress. With the bean source file open in the editor, click the Bean tab, click the Methods tab, and check the check boxes next names of the two methods you just added. You can now check the your session bean’s remote interface to verify that the two methods are now defined:
public interface Personnel extends EJBObject { public com.borland.dx.dataset.DataSetData[] providePersonnel(com.borland.dx.ejb.RowData[] parameterArray, com.borland.dx.ejb.RowData[] masterArray) throws RemoteException; public com.borland.dx.dataset.DataSetData[] resolvePersonnel(com.borland.dx.dataset.DataSetData[] dataSetDataArray) throws RemoteException;}

8-6 E n t e r p r i s e J a v a B e a n s D e v e l o p e r ’ s G u i d e
C r e a t i n g t h e s e r v e r - s i d e s e s s i o n b e a n
Calling the finder method
You must tell the EntityBeanProvider which entity beans to provide. To do this, add an event to the EntityBeanProvider:
1 While in the UI Designer, select the EntityBeanProvider in the structure pane.
2 Click the Events tab of the Inspector and double-click the blank column next the findEntityBeans event. A new event is added.
Here is the resulting event code as it appears in the ejb.jpx project:
entityBeanProvider1.addEntityBeanFindListener(new com.borland.dx.ejb.EntityBeanFindListener() { public void findEntityBeans(EntityBeanFindEvent e) { entityBeanProvider1_findEntityBeans(e); } }); ... void entityBeanProvider_findEntityBeans(EntityBeanFindEvent e) { }
3 To the new event handler, add a finder method to return the entity beans you want. Here the added code appears in bold:
void entityBeanProvider_findEntityBeans(EntityBeanFindEvent e) { try { e.setEntityBeanCollection(employeeHome.findAll()); } catch (Exception ex) { throw new EJBException(ex); }}
In this example, the event handler calls a findAll() method to return all the entity beans. You can call any finder you want. You could use the EntityBeanProvider’s parameterRow property to dynamically determine which finder to call and/or which parameters to pass.
For resolving, the EntityBeanResolver can by default determine how to apply updates and deletes. But it can’t automatically determine how to create new entity beans because there is no way it can determine which create() method to call and which parameters to pass to it. So, if you want to add a row to the data source, you must add the create event yourself and supply the necessary logic. You can use the Inspector to add the

U s i n g t h e D a t a E x p r e s s f o r E J B c o m p o n e n t s 8-7
B u i l d i n g t h e c l i e n t s i d e
skeleton create event code to your session bean. You can see an example of a create event in the ejb.jpx sample project. You can also use the other events available in EntityBeanResolver to override the default behavior, if you choose.
Deploy the session and entity beans to the application server. For more information about deploying your beans, see “Deploying to an application server” on page 6-5.
Building the client sideNow that you’ve created the entity beans and the session bean that accesses them and deployed them to your target application server, you’re ready to begin building the client.
Follow these steps:
1 Create a data module. Choose File|New|Data Module.
2 From the component palette, select the EjbClientDataSet and add it to the data module.
3 From the component palette, select the SessionConnectionBean and add it to the data module.
4 In the Inspector, set the sessionBeanConnection property of the EjbClientDataSet to the name of the SessionBeanConnection component.
5 In the Inspector, specify a name for the methodName property of the EjbClientDataSet component.
The methodName property determines how the methods that provide and resolve data are named. For example, if you specify a value of Employee for methodName, the session bean methods to provide and resolve data become provideEmployee() and resolveEmployee(). Later you will need to add these methods to the session bean you create.
6 In the Inspector or directly in the source code, set the jndiName property of the SessionBeanConnection component. Or you can specify the name of the remote interface of the session bean you will create instead as the value of the sessionBeanRemote property.
You can also use the Inspector to add a creating event to your SessionBeanConnection. Code you add to the event handler can control the creation of the session bean after the JNDI lookup occurs. Usually you must add a creating event if you want to invoke a create() method on the home interface that requires parameters.

8-8 E n t e r p r i s e J a v a B e a n s D e v e l o p e r ’ s G u i d e
B u i l d i n g t h e c l i e n t s i d e
Here is the resulting source code as found in the /JBuilder5/samples/Ejb/ejb.jpx sample project.
import com.borland.dx.dataset.*;import com.borland.dx.ejb.*;
public class PersonnelDataModule implements DataModule { private static PersonnelDataModule myDM; SessionBeanConnection sessionBeanConnection = new SessionBeanConnection(); EjbClientDataSet personnelDataSet = new EjbClientDataSet();
public PersonnelDataModule() { try { jbInit(); } catch(Exception e) { e.printStackTrace(); } } private void jbInit() throws Exception { try { sessionBeanConnection.setJndiName("Personnel"); sessionBeanConnection.addCreateSessionBeanListener(new com.borland.dx.ejb.CreateSessionBeanListener() { public void creating(CreateSessionBeanEvent e) { sessionBeanConnection_creating(e); } }); personnelDataSet.setSessionBeanConnection(sessionBeanConnection); personnelDataSet.setMethodName("Personnel"); } catch (Exception ex) {
} } public static PersonnelDataModule getDataModule() { if (myDM == null) { myDM = new PersonnelDataModule(); } return myDM; } public com.borland.dx.ejb.SessionBeanConnection getSessionBeanConnection() { return sessionBeanConnection; } public com.borland.dx.ejb.EjbClientDataSet getPersonnelDataSet() { return personnelDataSet; }
void sessionBeanConnection_creating(CreateSessionBeanEvent e) {
}}

U s i n g t h e D a t a E x p r e s s f o r E J B c o m p o n e n t s 8-9
H a n d l i n g r e l a t i o n s h i p s
Handling relationshipsThe EntityBeanProvider automatically flattens relationships. For example, if you have any Employee entity bean that has a getDept() method that returns a Dept, where Dept is an entity bean remote, a DataSet is created that has all the fields in the Employee entity bean plus all the fields in the Dept entity bean (including any hidden columns containing the primary keys of each of the entity beans). Except for Dept.ejbPrimaryKey, the other Dept fields will be read-only.
To resolve changes when a one-to-one relationship is involved, you must add an event listener to the EntityBeanProvider because it can’t dynamically determine the home of the related entity bean. The sample ejb.jpx project does not demonstrate handling relationships.
The sample projectSo far you’ve seen how to efficiently transfer data back and forth between the client and the server. The sample /JBuilder5/samples/Ejb/ejb.jpx project shows you how to use the described techniques with a Java client that uses dbSwing controls and with a Web client that uses JSP technology combined with InternetBeansExpress. You will be able to work with live data. Check the project’s Ejb.html page to find complete instructions for running the sample project.

8-10 E n t e r p r i s e J a v a B e a n s D e v e l o p e r ’ s G u i d e

D e v e l o p i n g s e s s i o n b e a n s 9-1
C h a p t e r
9Chapter9Developing session beans
JBuilder’s EJB tools can greatly simplify the creation of enterprise beans and their supporting interfaces. You should understand what the requirements are for these classes and interfaces, however, so you can modify the files JBuilder produces and so you understand what JBuilder is doing for you. The next few chapters can help you gain that understanding.
A session bean usually exists for the lifetime of a single client session. The methods of a session bean perform a set of tasks or processes for the client that uses the bean. Session beans persist only for the life of the connection with the client. In a sense, the session bean represents the client in the EJB server. It usually provides a service to the client. Unless you need to work with persistent data that exists in a data store, you are usually working with session beans.
Types of session beansThere are two types of session beans: those that can maintain state information between method calls, which are called stateful beans, and those that can’t, which are called stateless beans.
Stateful session beans
Stateful session beans are objects used by a single client and they maintain state on behalf of that client. For example, consider a shopping cart session bean. As the shopper in an online store selects items to purchase, the items are added to the “shopping cart” by storing the selected items in a list within the shopping cart session bean object. When the shopper is ready to purchase the items, the list is used to calculate the total cost.

9-2 E n t e r p r i s e J a v a B e a n s D e v e l o p e r ’ s G u i d e
W r i t i n g t h e s e s s i o n b e a n c l a s s
Stateless session bean
Stateless session beans don’t maintain state for any specific client. Therefore, they can be used by many clients. For example, consider a sort session bean that contains a sortList() business method. The client would invoke sortList(), passing it an unsorted list of items. sortList() would then pass back to the client a sorted list.
Writing the session bean classTo create a session bean class,
• Create a class that implements the javax.ejb.SessionBean interface.
• Implement one or more ejbCreate() methods. If you are creating a stateless session bean, the class implement just one parameterless ejbCreate() method. If you’ve already created the home interface for the bean, the bean must have an ejbCreate() method with the same signature for each create() method in the home interface.
• Define and implement the business methods you want your bean to have. If you’ve already created the remote interface for the bean, the methods must be defined exactly as they are in the remote interface.
JBuilder’s Enterprise JavaBean wizard can start these tasks for you, including creating the home and remote interfaces. It creates a class that extends the SessionBean interface and writes empty implementations of the SessionBean methods. You fill in the implementations if your bean requires them. The next section explains what these methods are and how they are used.
Implementing the SessionBean interface
The SessionBean interface defines the methods all session beans must implement. It extends the EnterpriseBean interface.
package javax.ejb;public interface SessionBean extends EnterpriseBean { void setSessionContext(SessionContext sessionContext) throws EJBException, RemoteException; void ejbRemove() throws EJBException, RemoteException; void ejbActivate() throws EJBException, RemoteException; void ejbPassivate() throws EJBException, RemoteException;}
D e v e l o p i n g s e s s i o n b e a n s 9-3
W r i t i n g t h e s e s s i o n b e a n c l a s s
The methods of the SessionBean interface are closely associated with the life cycle of a session bean. This table explains their purpose:
The ejbActivate() and ejbPassivate() methods allow a stateful session bean to manage resources. For more information, see “Stateful beans” on page 9-6.
Writing the business methodsWithin your enterprise bean class, write full implementations of the business methods your bean needs using JBuilder’s code editor. To make these methods available to a client, you must also declare them in the bean’s remote interface exactly as they are declared in the bean class. You can use JBuilder’s Bean designer to perform that task for you. See the “Exposing business methods through the remote interface” on page 3-10.
Adding one or more ejbCreate() methodsIf you use the Enterprise JavaBean wizard to begin your enterprise bean, you’ll see that the wizard adds an ejbCreate() method to the bean class that takes no parameters. You can add additional ejbCreate() methods that do include parameters. While stateless session beans never need more than a parameterless ejbCreate() method because they don’t retain any state, stateful session beans often need one or more ejbCreate() methods that have parameters. As you write additional ejbCreate() methods with parameters, keep these rules in mind:
• Each ejbCreate() must be declared as public.
• Each must return void.
• The parameters of an ejbCreate() method must be of the same number and type as those in the corresponding create() method in the bean’s remote interface. For stateless session beans, there can be only one parameterless ejbCreate().
Method Description
setSessionContext() Sets a session context. The bean’s container calls this method to associate a session bean instance with its context. The session context interface provides methods to access the runtime properties of the context in which a session runs. Usually a session bean retains its context in a data field.
ejbRemove() Notifies a session object that it is about to be removed. The container calls this method whenever it removes a stateful session bean as a result of the client calling a remove() method of the remote or home interface.
ejbActivate() Notifies a stateful session object that is has been activated.
ejbPassivate() Notifies a stateful session object that it is about to be deactivated by the container.

9-4 E n t e r p r i s e J a v a B e a n s D e v e l o p e r ’ s G u i d e
W r i t i n g t h e s e s s i o n b e a n c l a s s
This is the signature for all ejbCreate() methods of a session bean:
public void ejbCreate( <zero or more parameters> ) { // implementation}
The ejbCreate() method need not throw an exception, although it can throw application-specific exceptions and other exceptions, such javax.ejb.CreateException. The Enterprise JavaBean wizard generates an ejbCreate() method that throws javax.ejb.CreateException.
How JBuilder can help you create a session bean
Using JBuilder’s Enterprise JavaBean wizard, you can begin creating a session bean by selecting either the Stateless Session Bean or Stateful Session Bean option on the wizard’s second page:
Not only does the Enterprise JavaBean wizard create your enterprise bean class, it also creates the bean’s home and remote interfaces as it creates the bean class. This way, you are assured the create() method of the home interface returns the remote interface while the ejbCreate() method always returns void.
After you write the business methods in your bean class, you can use the Bean designer to specify which of those you want defined in the bean’s remote interface. A client application can access only those methods defined in the remote interface. Once you specify which methods you want a client to be able to call, the Bean designer defines the methods in the remote interface for you.
If you already have a complete enterprise bean class, but don’t have home and remote interfaces for it, you can use JBuilder’s EJB Interfaces wizard to create them. The method signatures will comply with EJB 1.1

D e v e l o p i n g s e s s i o n b e a n s 9-5
T h e l i f e o f a s e s s i o n b e a n
specifications in the home and remote interfaces without you having to worry about making them correct.
For information about using JBuilder’s EJB tools to create session beans, see Chapter 3, “Developing enterprise beans.”
The life of a session beanStateful and stateless session beans have different life cycles. You should understand what happens during the life cycle of each.
Stateless beans
The life of a stateless session bean begins when the client calls the create() method of the session bean’s home interface. The container creates a new instance of the session bean and returns an object reference to the client.
During the creation process, the container invokes the setSessionContext() method of the SessionBean interface and calls the ejbCreate() method of the session bean implementation. The new bean object joins a pool of stateless bean objects that are ready for use by clients. Because stateless session objects don’t maintain client-specific state, the container can assign any bean object to handle an incoming method call. When the container removes an object from the session bean object pool, it calls the ejbRemove() method of the bean object.
Note that calling the create() or remove() methods of the home/remote interfaces doesn’t add or remove a stateless session bean object to or from the stateless session bean pool. The container controls the life cycle of stateless beans.

9-6 E n t e r p r i s e J a v a B e a n s D e v e l o p e r ’ s G u i d e
T h e l i f e o f a s e s s i o n b e a n
Stateful beans
The life of a stateful session bean begins when the client calls the create() method of the session bean’s home interface. The container creates a new instance of the session bean, initializes it, and returns an object reference to the client.
During the creation process, the container invokes the setSessionContext() method of the SessionBean interface and calls the ejbCreate() method of the session bean implementation. As a bean provider, you can use these methods to initialize the session bean.
The state of the session bean is now method ready, which means it can perform nontransaction operations or be included in a transaction for transaction operations. The bean remains in the method-ready state until one of three things happens:
• The bean enters a transaction.
• The bean is removed.
• The bean is passivated.
When a client calls the remove() method of the remote or home interface, the container invokes the corresponding ejbRemove() method on the session bean object. As a bean provider, you put any application-specific cleanup code in this method. After ejbRemove() completes, the bean object is no longer usable. If the client attempts to call a method in the bean object, the container throws the java.rmi.NoSuchObjectException.

D e v e l o p i n g s e s s i o n b e a n s 9-7
T h e l i f e o f a s e s s i o n b e a n
The container can deactivate the session bean instance. Usually this occurs for resource management reasons such as when a session object is idle for a while or if the container requires more memory. The container deactivates the bean by calling the bean’s ejbPassivate() method. When a bean instance is deactivated, which is called passivation, the container stores reference information and the state of the session object on disk and frees the memory allocated to the bean. You can add code to ejbPassivate() if you have some task you want to execute just before passivation occurs.
The container activates the bean object again by calling the ejbActivate() method. This occurs when the client calls a method on the session bean that is passivated. During activation, the container recreates the session object in memory and restores its state. If you want something to happen immediately after the bean becomes active again, add your code to the ejbActivate() method.
The method-ready in transaction stateWhen a client calls a method on a session bean object in a transactional context, the container starts a new transaction or includes the bean object in an existing one. The bean enters the method-ready in transaction state. There are points in a transaction’s life cycle, called transaction synchronization points, where a session bean object can be notified of upcoming transaction events and the object can take some action beforehand if necessary.
The SessionSynchronization interfaceA session bean can implement the SessionSynchronization interface if it wants to be notified about the state of any transaction in which it is involved. Only stateful session beans using container-managed transactions can implement SessionSynchronization; its use is optional. The methods of SessionSynchronization are callbacks made by the container into the bean, and they mark points within the transaction. Here is the SessionSynchronization interface:
public interface javax.ejb.SessionSynchronization{ public abstract void afterBegin() throws RemoteException; public abstract void beforeCompletion() throws RemoteException; public abstract void afterCompletion(boolean completionStatus) throws RemoteException;}
The Enterprise JavaBean wizard can add these methods to your bean class. Using the wizard, check the Session Synchronization check box, and

9-8 E n t e r p r i s e J a v a B e a n s D e v e l o p e r ’ s G u i d e
T h e l i f e o f a s e s s i o n b e a n
the wizard declares the three methods with empty bodies in your bean class:
The following table briefly describes each method:
This is how the SessionSynchronization methods are used: The client calls a transactional business method defined in the remote interface, which puts the bean object in the transaction-ready state. The container calls the afterBegin() method in the bean object. Later, if the transaction is committed, the container calls beforeCompletion(), and then, if the commit was successful, the afterCompletion(true) method. If the transaction was rolled back or otherwise failed to commit, the container calls afterCompletion(false). The session bean object is now in method-ready state again.
For more information about using session beans in transactions, see Chapter 13, “Managing transactions.”
Method Description
afterBegin() Notifies the bean instance that it is about to be used in a transaction. Any code you write within afterBegin() occurs within the scope of the transaction.
beforeCompletion() Notifies the bean instance that the transaction is about to commit. If the bean has any cached values, use beforeCompletion() to write them to the database. If necessary, a session bean could use the beforeCompletion() method to force the transaction to roll back by calling the setRollbackOnly() method of the SessionContext interface.
afterCompletion() Notifies the bean instance that the transaction has completed. If the transaction was committed, the parameter completionStatus is set to true. If the transaction was rolled back, the parameter is set to false.

D e v e l o p i n g s e s s i o n b e a n s 9-9
A s h o p p i n g c a r t s e s s i o n b e a n
A shopping cart session beanThis example demonstrates the use of a stateful session enterprise bean, Cart, that becomes a virtual shopping cart for an online store. Shoppers select items and put them in their virtual shopping carts. They can leave the site briefly, return, and add more things to their carts. Whenever they want, shoppers can view the items in their cart. When they are ready, they buy the items in the cart.
You can find complete code for the cart example in the /Borland/AppServer/examples/ejb/cart directory.
Examining the files of the cart example
The cart example consists of a number of different files. This section focuses on those files that you might write yourself, or that illustrate interesting things about session beans. Some of the files in the cart directory are generated files (stubs, skeletons, and other CORBA code) that are not discussed here.
These are the key files:
• CartHome.java, the file that defines the home interface for the Cart session bean.
• Cart.java, the file that defines the remote interface for the Cart session bean.
• CartBean.java, the session bean class.
• Item.java, an item file used by CartBean. It provides methods for getting the price and title of the items that are placed in the virtual cart.
• Cart.xml, the deployment descriptor file. For EJB 1.1, an XML file contains the deployment descriptor of an enterprise bean.
• Exception files. These files define the application -specific exceptions thrown by CartBean. There are three exceptions and each is defined in its own file:
• ItemNotFoundException • PurchaseProblemException • CardExpiredException
• CartClient.java, the client application.

9-10 E n t e r p r i s e J a v a B e a n s D e v e l o p e r ’ s G u i d e
A s h o p p i n g c a r t s e s s i o n b e a n
The Cart session bean
This section provides the details for how you might implement a Cart session bean. You would begin by using the Enterprise JavaBean wizard. On the second page of the wizard, type in the name of the class as CartBean and select the Stateful Session Bean option and click Next. Accept the suggested home interface name, the remote interface name, and the bean home name, and choose Finish. The wizard creates a skeleton bean class for you:
package shoppingcart;import java.rmi.*;import javax.ejb.*;
public class CartBean implements SessionBean {
private SessionContext sessionContext; public void ejbCreate() throws CreateException { } public void ejbRemove() throws RemoteException { } public void ejbActivate() throws RemoteException { } public void ejbPassivate() throws RemoteException { } public void setSessionContext(SessionContext context) throws RemoteException { sessionContext = context; }}
A session bean class must be defined as public. It cannot be defined as final or abstract. The bean class must implement the SessionBean interface.
Session beans are Java objects, so they can have instance variables. CartBean has four instance variables you add to the class. The four variables are declared as private:
private Vector _items = new Vector();private String _cardHolderName;private String _creditCardNumber;private Date _expirationDate;
Place these declarations after the sessionContext variable the Enterprise JavaBean wizard added to the class.
The _items variable holds the items owned by the cart object. It is a vector, a collection of items. The remaining three instance variables store the credit card information of the online shopper.

D e v e l o p i n g s e s s i o n b e a n s 9-11
A s h o p p i n g c a r t s e s s i o n b e a n
Adding the required methodsA session bean must implement the four methods that are defined by the SessionBean interface. The EJB container invokes these methods on the bean instance at specific points in a session bean’s life cycle. At a minimum, the bean provider must implement these methods with empty bodies. The bean provider can add additional code to these methods if it is needed. This CartBean session bean adds no code to these methods. These are the four methods:
public void ejbRemove() {}public void ejbActivate() {}public void ejbPassivate() {}public void setSessionContext(SessionContext context) {}
The Enterprise JavaBean wizard adds all four of these methods. In the setSessionContext() method, the wizard assigns the value of the context parameter to the sessionContext instance variable.
The container calls the setSessionContext() method to associate the bean instance with its session context. The bean can choose to retain this session context reference as part of its conversational state, but it’s not required to do so. If you used the Enterprise JavaBean wizard, the session context reference is held. The session bean can use the session context to get information about itself, such as environment variables or its home interface.
The container calls the ejbPassivate() method on the bean instance when it needs to place the bean instance into a passive state. The container writes the bean’s current state to secondary storage when it passivates the bean. It restores this state when it later activates the bean. Because the container calls the ejbPassivate() method just before it actual passivates the bean instance, you, as the bean provider, can add code to this method to do any special variable caching you want. Similarly, the container calls the ejbActivate() method on the bean instance just prior to returning the bean instance to an active state from a passive state. When it activates the bean, it restores all persisted state values. You can choose to add code to the ejbActivate() method. CartBean leaves these implementations empty.
While a session bean isn’t required to implement a constructor, it must implement at least one ejbCreate() method. This method serves as a constructor to create a new bean instance. A stateful session can implement more than one ejbCreate() method. Each ejbCreate() method would differ only in their parameters.
The CartBean example declares one ejbCreate() method that takes three parameters:
public void ejbCreate(String cardHolderName, String creditCardNumber, Date expirationDate) throws CreateException { _cardHolderName = cardHolderName; _creditCardNumber = creditCardNumber;}

9-12 E n t e r p r i s e J a v a B e a n s D e v e l o p e r ’ s G u i d e
A s h o p p i n g c a r t s e s s i o n b e a n
The container calls the ejbRemove() method just prior to removing the bean instance. You can add some application-specific code that would execute before the bean is removed, but it isn’t required. The CartBean example leaves the body of the ejbRemove() method empty.
Adding the business methodsThere are a few rules that your business methods must follow:
• None of the method names can start with the prefix ejb to avoid conflict with names reserved by the EJB architecture.
• Each method must be declared as public.• No method can be declared as final or static.• The parameters and return types must be legal RMI-IIOP types.• The throws clause may include the javax.ejb.EJBException exception,
and it may define arbitrary application-specific exceptions.
In the Cart example, five business methods are implemented. The signatures (method name, number of parameters, parameter types, and return type) of the session bean class methods must match those of the remote interface. To ensure that happens, you can use the Bean designer to move the business methods you add to the bean class to the bean’s remote interface.
To help you follow the flow of the program, each business method includes a line of code that displays the method name and what it is doing.
The addItem() method adds an item to the vector that holds the list of items in the cart:
public void addItem(Item item) { System.out.println("\taddItem(" + item.getTitle() + "): " + this); _items.addElement(item);}
The removeItem() method is more complicated. The method loops through the elements in the item list and checks if the class and the title of the item to be removed match the class and title of one in the list. This method verifies that you are removing the item you really want removed. If no matching item is found, the method throws an ItemNotFoundException.
public void removeItem(Item item) throws ItemNotFoundException { System.out.println("\tremoveItem(" + item.getTitle() + "): " + this); Enumeration elements = _items.elements(); while(elements.hasMoreElements()) { Item current = (Item) elements.nextElement(); // items are equal if they have the same class and title if(item.getClass().equals(current.getClass()) && item.getTitle().equals(current.getTitle())) { _items.removeElement(current); return; }}

D e v e l o p i n g s e s s i o n b e a n s 9-13
A s h o p p i n g c a r t s e s s i o n b e a n
The getTotalPrice() method initializes the total price to zero, then loops through the item list, adding the price of each element to the total price. It returns the total price rounded to the nearest penny.
public float getTotalPrice() { System.out.println("\tgetTotalPrice(): " + this); float totalPrice = 0f; Enumeration elements = _items.elements(); while(elements.hasMoreElements()) { Item current = (Item) elements.nextElement(); totalPrice += current.getPrice(); } // round to the nearest lower penny return (long) (totalPrice * 100) / 100f;}
All data types passed between a client and a server must be serializable. That is, they must implement the java.io.Serializable interface. In the Cart example, the bean returns a list of items to the client. If there were no serializable restrictions, you could use _items.elements() to return the contents of the item vector. But _items.elements() returns a Java Enumeration object, which is not serializable. To avoid this problem, the program implements a class called com.inprise.ejb.util.VectorEnumeration(_items). This class takes a vector and returns an actual enumeration, which is serializable, for the contents of that vector. The CartBean object passes this serializable vector to the client, and receives a serializable vector passed from the client side. The getContents() method does the conversion between a Java Enumeration and a serializable VectorEnumeration.
public java.util.Enumeration getContents() { System.out.println("\tgetContents(): " + this); return new com.inprise.ejb.util.VectorEnumeration(_items);}
The purchase() method should do the following:
1 Get the current time.
2 Compare the expiration date of the credit card with the current time. If the expiration date is prior to the current time, the method throws the CardExpiredException application exception.
3 Complete the purchasing process, including updating inventory, posting the charge to the credit card company, and initiating shipment of the item. (None of this has actually been implemented in the Cart example.) If an error occurs at any point, the purchase process does not complete and the method throws a PurchaseProblemException exception.public void purchase() throws PurchaseProblemException { System.out.println("\tpurchase(): " + this); // make sure the credit card has not expired Date today = Calendar.getInstance().getTime(); if(_expirationDate.before(today)) { throw new CardExpiredException("Expiration date: " + _expirationDate); } // complete purchasing process // throw PurchaseProblemException if an error occurs}

9-14 E n t e r p r i s e J a v a B e a n s D e v e l o p e r ’ s G u i d e
A s h o p p i n g c a r t s e s s i o n b e a n
CartBean includes a toString() method to print out the CartBean and the name of the card holder.
// method to print out CartBean and the name of card holderpublic String toString() { return "CartBean[name=" + _cardHolderName + "]";}
Item class
The CartBean example uses an Item class. Item is public and it extends java.io.Serializable; serialized data can be passed on the wire:
package shoppingcart;public class Item implements java.io.Serializable { private String _title; private float _price; public Item(String title, float price) { _title = title; _price = price; } public String getTitle() { return _title; } public float getPrice() { return _price; }}
Exceptions
There are three exception classes in the Cart example. All are extensions of the Java class Exception:
public class ItemNotFoundException extends Exception { public ItemNotFoundException(String message) { super(message); }}public class PurchaseProblemException extends Exception { public PurchaseProblemException(String message) { super(message); }}public class CardExpiredException extends Exception { public CardExpiredException(String message) { super(message); }}

D e v e l o p i n g s e s s i o n b e a n s 9-15
A s h o p p i n g c a r t s e s s i o n b e a n
Required interfaces
Enterprise beans always have two interfaces: a home and a remote interface. In this example the Cart session bean has a public EJB remote interface called Cart, and a home interface called CartHome.
When you use the Enterprise JavaBean wizard, the home and remote interfaces are created at the same time the bean class is. If you already have a session bean, but not the interfaces, use the EJB Interfaces wizard. To use the wizard, display the source code of the your enterprise bean in the code editor and choose Wizards|EJB Interfaces. Respond to the wizard’s prompts and when you are done, the wizard creates a home and a remote interface for your enterprise bean.
For more information about using the Enterprise JavaBean wizard and the EJB Interfaces wizard, see Chapter 3, “Developing enterprise beans.”
The home interfaceLike all other home interfaces, CartHome extends the EJBHome interface. While the home interface can potentially perform two actions, creating bean instances and finding bean instances, session beans need only to create a bean instance. Session beans always cease to exist when a client’s session ends. Therefore, there would be no need to find a CartBean instance when a shopper enters an online store, for example, because a CartBean instance doesn’t exist. Only home interfaces for entity beans include find operations, because entity beans are used by multiple clients and persist as long as the data entities exists. Here is the CartHome interface:
// CartHome.javapublic interface CartHome extends javax.ejb.EJBHome { Cart create(String cardHolderName, String creditCardNumber, java.util.Date expirationDate) throws java.rmi.RemoteException,javax.ejb.CreateException;}
The CartHome interface is very simple, defining a solitary create() method. Because this is a stateful session bean, there can be more than one create() method. In this example, create() method in the CartHome interface takes three parameters: cardHolderName, creditCardNumber, and expirationDate.
The client invokes the create() method to request a shopping cart and the container creates one specifically for that user. The client can use the shopping cart intermittently, but the session bean remains active for that one client until the user exits and the session bean instance is removed.
A stateful session bean maintains state across method calls, regardless of whether those methods are within the context of a transaction. The state is the data carried by an bean object. The data remains associated with the bean object for the lifetime of the object. When the session is over, the container flushes the state of session bean from memory.

9-16 E n t e r p r i s e J a v a B e a n s D e v e l o p e r ’ s G u i d e
A s h o p p i n g c a r t s e s s i o n b e a n
The create() method follows the rules defined in the EJB specification: it throws an RMI remote exception, java.rmi.RemoteException, and it throws an EJB create exception, javax.ejb.CreateException. The signature of the create() method matches that of the ejbCreate() method in the session bean class it terms of the number and type of parameters. The return value of create() is a Cart remote interface. This is because the CartHome interface functions as a factory for CartBean. (The return value for the matching ejbCreate() method in the CartBean class is void.)
The remote interfaceThe Cart session bean has a remote interface Cart that extends the EJBObject interface. EJBObject is a base interface for all remote interfaces. It defines the methods that enable you to
• Get information about the session bean.
You can test if the bean object is identical to another enterprise bean object. (You can also get the primary key for an entity bean, but that doesn’t apply to session beans.)
• Obtain a reference or a handle to the session bean.
You can obtain a reference to the bean’s home interface of a serialization handle to the bean instance. You can store the handle and retrieve it at a later time and then use it to regain your reference to the bean instance.
• Remove the bean instance.
The EJBObject interface defines the remove() method for removing the bean instance.
The Cart remote interface defines five business methods in addition to the methods it inherits from EJBObject. These business methods are the methods implemented in the CartBean session bean class. The Cart remote interface merely exposes these methods to clients. A client can call only the methods of an enterprise bean that the remote interface exposes. These are the exposed business methods:
• addItem(), which adds an item to the shopping cart.
• removeItem(), which removes an item from the shopping cart.
• getTotalPrice(), which adds the prices on all the items and returns the total price.
• getContents(), which gathers all the items in the shopping cart and returns them in a lists that can be viewed or printed.
• purchaseItems(), which attempts to purchase the items.

D e v e l o p i n g s e s s i o n b e a n s 9-17
A s h o p p i n g c a r t s e s s i o n b e a n
The Cart deployment descriptorAccording to the EJB 1.1 specification, the deployment descriptor must be an XML file. The XML file follows the Document Type Definition (DTD) approved by Sun Microsystems. A deployment descriptor contains a set of properties that describe how the container will deploy the enterprise bean or application.
As you use JBuilder’s Enterprise JavaBean wizard to create a session bean, JBuilder also creates a deployment descriptor for you. You can then use the Deployment Descriptor editor to customize it to your needs.
The deployment descriptor includes a set of tags and attributes whose values indicate the properties of the bean. For example, some of the tags for the Cart example are as follows:
• The <session> tag specifies that the enterprise bean is a session bean. With the <session> tag, other tags exist:• <ejb-class> - The name of the session bean class that implements the
bean.• <home> - The home interface name.• <remote> - The remote interface name.• <session-type> - Whether the session bean is stateful or stateless.• <transaction-type> - Whether persistence is container-managed or
bean-managed.
• <trans attribute> - The transaction attribute for each method.• <timeout> - The time out value for the session bean.
Here is the deployment descriptor file for the cart session bean:
<ejb-jar> <enterprise-beans> <session> <description> XML deployment descriptor cart session bean <description> <ejb-name>cart</ejb-name> <home>CartHome</home> <remote>Cart</remote> <ejb-class>CartBean</ejb-class> <session-type>Stateful</session-type> <transaction-type>Container</transaction-type> <session> <enterprise-beans> <assembly-descriptor> <container-transaction> <method> <ejb-name>cart</ejb-name> <method-name>*</method-name> </method> <trans-attribute>NotSupported</trans-attribute> </container-transaction>

9-18 E n t e r p r i s e J a v a B e a n s D e v e l o p e r ’ s G u i d e
A s h o p p i n g c a r t s e s s i o n b e a n
<container-transaction> <method> <ejb-name>cart</ejb-name> <method-name>purchase</method-name> </method> <trans-attribute>Required</trans-attribute> </container-transaction> </assembly-descriptor></ejb-jar>
The CartClient program is the client application that uses the Cart enterprise bean. Its main() routine includes elements that all enterprise bean client application must implement. It demonstrates how to
• Use JNDI to locate the bean’s home interface.
• Use the home interface’s create() method to create a new remote Cart object.
• Invoke method declared in the Cart object.public static void main(String] args) throws Exception {// get a JNDI context using the Naming servicejavax.naming.Context context = new javax.naming.InitialContext();
Object objref = context.lookup("cart");CartHome home = (CartHome)javax.rmi.PortableRemoteObject.narrow(objref, CartHome.class);Cart cart;{ String cardHolderName = "Jack B. Quick"; String creditCardNumber = "1234-5678-9012-3456"; Date expirationDate = new GregorianCalendar(2001, Calendar.JULY,1).getTime(); cart = home home.create(cardHolderName, creditCardNumber, expirationDate);}Book knuthBook = new Book("The Art of Computer Programming", 49.95f);cart.addItem(knuthBook); ... // create compact disc and add it to cart, then list cart contentssummarize(cart)cart.removeItem(knuthBook); ... // add a different book and summarize cart contentstry { cart.purchase(); } catch(PurchaseProblemException e) { System.out.println("Could not purchase the items:\n\t" + e); }cart.remove();}
The main() routine begins by a JNDI context to look up objects. It constructs an initial context (a Java naming context). This is standard JNDI code.
main() looks up the CartHome object called cart. Looking up a name with JNDI invoking a call from the client to the CosNaming service to look up the name in CosNaming. The CosNaming service returns an object reference to the client. In this example, it returns a CORBA object reference. The program must perform a PortableRemoteObject.narrow() operation on the object reference and cast the returned object to the type CartHome, and assign it to the variable home. This call is typical for

D e v e l o p i n g s e s s i o n b e a n s 9-19
A s h o p p i n g c a r t s e s s i o n b e a n
distributed applications. The call uses CORBA and IIOP to do the following:
• Talk to a server.• Perform a CosNaming lookup.• Obtain a CORBA object reference.• Return the object reference to the client.
The program declares a reference to the remote cart object, initializes three create() parameter variables, and creates a new cart remote object.
The program creates two shopping cart items, a book and a compact disc, and adds these items to the shopping cart using the cart’s addItem() method.
The routine then lists the items current in the cart by calling the summarize() function. summarize() retrieves the elements or items in the cart using the cart’s getContents() method, which returns a Java Enumeration. It then uses the Java Enumeration interface methods to read each element in the Enumeration, extracting the title and price for each one. Here is the summarize() function code:
static void summarize(Cart cart) throws Exception { System.out.println("======== Cart Summary =========")' Enumeration elements = cart.getContents(); while(elements.hasMoreElements()) { Item current = (Item) elements.nextElement(): System.out.println("Price: $" + current.getPrice() + "\t" + current.getClass().getName() + " title: " + current.getTitle()); } System.out.println("Total: $" + cart.getTotalPrice()); System.out.println("===============================");}
The program then calls cart’s removeItem() method to remove an item from the cart. It adds a different item and summarizes the cart contents again.
Finally, the program attempts to purchase the items. The purchase operation fails because it is not implemented on the server, and a PurchaseProblemException is thrown.
Because the user is finished with the shopping session, the program removes the cart. It’s not necessary to remove the cart, although it is good programming practice to do so. A session bean exists for the client that created it. When the client ends the session, the container automatically removes the session bean object. The container also removes the session bean object when it times out, although this doesn’t happen immediately.
CartClient also includes code that extends the generic Item class with two types of items: a book and a compact disc. Book and CompactDisc are the classes used in the example.

9-20 E n t e r p r i s e J a v a B e a n s D e v e l o p e r ’ s G u i d e
D e v e l o p i n g e n t i t y b e a n s 10-1
C h a p t e r
10Chapter10Developing entity beans
An entity bean directly represents data stored in persistent storage, such as a database. It maps to a row or rows within a table in a relational database, or to an entity object in an object-oriented database. It can also map to one or more rows across multiple tables. In a database, a primary key uniquely identifies a row in a table. Similarly, a primary key identifies a specific entity bean instance. Each column in the relational database table maps to an instance variable in the entity bean.
Because an entity bean usually represents data stored in a database, it lives as long as the data. Regardless of how long an entity bean remains inactive, the container doesn’t remove it from persistent storage.
The only way to remove an entity bean is to explicitly do so. An entity bean is removed by calling its remove() method, which removes the underlying data from the database. Or an existing enterprise application can remove data from the database.
Persistence and entity beansAll entity enterprise beans are persistent; that is, their state is stored between sessions and clients. As a bean provider, you can choose how your entity bean’s persistence is implemented.
You can implement the bean’s persistence directly in the entity bean class, making the bean itself responsible for maintaining its persistence. This is called bean-managed persistence.
Or you can delegate the handling of the entity bean’s persistence to the EJB container. This is called container-managed persistence.

10-2 E n t e r p r i s e J a v a B e a n s D e v e l o p e r ’ s G u i d e
P e r s i s t e n c e a n d e n t i t y b e a n s
Bean-managed persistence
An entity bean with bean-managed persistence contains the code to access and update a database. That is, you, as the bean provider, write database access calls directly in the entity bean or its associated classes. Usually you write these calls using JDBC.
The database access calls can appear in the entity bean’s business methods, or in one of the entity bean interface methods. (You’ll read more about the entity bean interface soon.)
Usually a bean with bean-managed persistence is more difficult to write because you must write the additional data-access code. And, because you might choose to embed the data-access code in the bean’s methods, it can also be more difficult to adapt the entity bean to different databases or to a different schema.
Container-managed persistence
You don’t have to write code that accesses and updates databases for entity beans with container-managed persistence. Instead, the bean relies on the container to access and update the database.
Container-managed persistence has many advantages compared to bean-managed persistence:
• Such beans are easier to code.
• Persistence details can be changed without modifying and recompiling the entity bean. Instead the deployer or application assembler can modify the deployment descriptor.
• The complexity of the code is reduced, as is the possibility of errors.
• You, as the bean provider, can focus on the business logic of the bean and not on the underlying system issues.
Container-managed persistence has some limitations, however. For example, the container might load the entire state of the entity object into the bean instance’s fields before it calls the ejbLoad() method. This could lead to performance problems if the bean has many fields.

D e v e l o p i n g e n t i t y b e a n s 10-3
P r i m a r y k e y s i n e n t i t y b e a n s
Primary keys in entity beansEach entity bean instance must have a primary key. A primary key is a value (or combination of values) that uniquely identifies the instance. For example, a database table that contains employee records might use the employee’s social security number for its primary key. The entity bean modeling this employee table would also use the social security number for its primary key.
For enterprise beans, the primary key is represented by a String or Integer type or a Java class containing the unique data. This primary key class can be any class as long as that class is a legal value type in RMI_IIOP. This means the class must extend the java.io.Serializable interface, and it must implement the Object.equals(Other other) and Object.hashCode() methods, which all Java classes inherit.
The primary key class can be specific to a particular entity bean class. That is, each entity bean can define its own primary key class. Or multiple entity beans can share the same primary key class.
Writing the entity bean classTo create an entity bean class,
• Create a class that implements the javax.ejb.EntityBean interface.
• Implement one or more ejbCreate() methods. If you’ve already created the home interface for the bean, the bean must have an ejbCreate() method with the same signature for each create() method in the home interface.
• Define and implement the business methods you want your bean to have. If you’ve already created the remote interface for the bean, the methods must be defined exactly as they are in the remote interface.
• For entity beans with bean-managed persistence, implement finder methods.
JBuilder’s Enterprise JavaBean wizard can start these tasks for you. It creates a class that extends the EntityBean interface and writes empty implementations of the EntityBean methods. You fill in the implementations if your bean requires it. The next section explains what these methods are and how they are used.
If you’d like to build entity beans using existing database tables, use JBuilder’s EJB Entity Modeler. For information, see “Creating entity beans with the EJB Entity Bean Modeler” on page 4-1.

10-4 E n t e r p r i s e J a v a B e a n s D e v e l o p e r ’ s G u i d e
W r i t i n g t h e e n t i t y b e a n c l a s s
Implementing the EntityBean interfaceThe EntityBean interface defines the methods all entity beans must implement. It extends the EnterpriseBean interface.
public void EntityBean extends EnterpriseBean { public void setEntityContext(EntityContext ctx) throws EJBException, RemoteException; public void unsetEntitycontext() throws EJBException, RemoteException; void ejbRemove() throws RemoveException, EJBException, RemoteException; void ejbActivate() throws EJBException, RemoteException; void ejbPassivate() throws EJBException, RemoteException; void ejbLoad() throws EJBException, RemoteException; public void ejbStore() throws EJBException, RemoteException;}
The methods of the EntityBean interface are closely associated with the life cycle of an entity bean. This table explains their purpose:
Method Description
setEntityContext() Sets an entity context. The container uses this method to pass a reference to the EntityContext interface to the bean instance. The EntityContext interface provides methods to access properties of the runtime context for the entity bean. An entity bean instance that uses this context must store it in an instance variable.
unsetEntityContext() Frees the resources that were allocated during the setEntityContext() method call. The container calls this method before it terminates the life of the current instance of the entity bean.
ejbRemove() Removes the database entry or entries associated with this particular entity bean. The container calls this method when a client invokes a remove() method.
ejbActivate Notifies an entity bean that it has been activated. The container invokes this method on the instance selected from the pool of available instances and assigned to a specific entity object identity. When the bean instance is activated, it has the opportunity to acquire additional resources that it might need.
ejbPassivate() Notifies an entity bean that it is about to be deactivate—that is, the instance’s association with an entity object identity is about to be broken and the instance returned to the pool of available instances. The instance can then release any resources allocated with the ejbActivate() method that it might not want to hold while in the pool.
ejbLoad() Refreshes the data the entity object represents from the database. The container calls this method on the entity bean instance so that the instance synchronizes the entity state cached in its instance variables to the entity state in the database.
ejbStore() Stores the data the entity object represents in the database. The container calls this method on the entity bean instance so that the instance synchronizes the database state to the entity state cached in its instance variables.
D e v e l o p i n g e n t i t y b e a n s 10-5
W r i t i n g t h e e n t i t y b e a n c l a s s
Declaring and implementing the entity bean methods
Entity beans can have three types of methods:
• Create methods• Finder methods• Business methods
Creating create methodsIf you use the Enterprise JavaBean wizard to begin your enterprise bean, you’ll see that the wizard adds an ejbCreate() method and an ejbPostCreate() method to the bean class that takes no parameters. You can write additional create methods if your bean requires them.
Keep in mind that entity beans are not required to have create methods. Calling a create method of an entity bean inserts new data in the database. You can have entity beans without create methods if new instances of entity objects should be added to the database only through DBMS updates or through a legacy application.
ejbCreate() methodIf you choose to add additional ejbCreate() methods that include parameters, remember these rules:
• Each ejbCreate() must be declared as public.
• For container-managed entity beans, an ejbCreate() method must return null.
The container has complete responsibility for creating container-managed entity beans.
• For bean-managed entity beans, an ejbCreate() method must return an instance of the primary key class for the new entity object.
The container uses this primary key to create the actual entity reference.
• The parameters of an ejbCreate() method must be of the same number and type as those in the corresponding create() method in the bean’s remote interface.
• Each ejbCreate() method must have a corresponding ejbPostCreate() method that matches the ejbCreate() in the same number of parameters.
The signature for an ejbCreate() method is the same, regardless whether the bean uses container-managed or bean-managed persistence. This is the signature for all ejbCreate() methods of an entity bean:
public <PrimaryKeyClass> ejbCreate( <zero or more parameters> )// implementation}

10-6 E n t e r p r i s e J a v a B e a n s D e v e l o p e r ’ s G u i d e
W r i t i n g t h e e n t i t y b e a n c l a s s
When the client calls the create() method, the container in response executes the ejbCreate() method and inserts a record representing the entity object into the database. The ejbCreate() methods usually initialize some entity state. Therefore, they often have one or more parameters and their implementations include code that sets the entity state to the parameter values. For example, the bank example discussed later in this chapter has a checking account entity bean whose ejbCreate() method takes two parameters, a string and a float value. The method initializes the name of the account to the string value and the account balance to the float value:
public AccountPK ejbCreate(String name, float balance) { this.name = name; this.balance = balance; return null;}
ejbPostCreate() methodWhen an ejbCreate() method finishes executing, the container then calls a matching ejbPostCreate() method to allow the instance to complete its initialization. The ejbPostCreate() matches the ejbCreate() method in its parameters, but it returns void:
public void ejbPostCreate( <zero or more parameters> ) // implementation}
Follow these rules when defining an ejbPostCreate():
• It must be declared as public.
• It can’t be declared as final or static.
• Its return type must be void.
• Its parameter list must match that of the corresponding ejbCreate() method.
Use ejbPostCreate() to perform any special processing your bean needs to do before it becomes available to the client. If your bean doesn’t need to do any special processing, leave the method body empty, but remember to include one ejbPostCreate() for every ejbCreate() for an entity bean with bean-managed persistence.
Creating finder methodsEvery entity bean must have one or more finder methods. Finder methods are used by clients to locate entity beans. Each bean-managed entity bean must have an ejbFindByPrimaryKey() method that has a corresponding
D e v e l o p i n g e n t i t y b e a n s 10-7
W r i t i n g t h e e n t i t y b e a n c l a s s
findByPrimaryKey() in the bean’s home interface. This is the ejbFindByPrimaryKey() method’s signature:
public <PrimaryKeyClass> ejbFindByPrimaryKey(<PrimaryKeyClass primaryKey>) { // implementation}
You can define additional finder methods for your bean. For example, you might have an ejbFindByLastName() method. Each finder method must follow these rules:
• It must be declared as public.
• Its name must start with the prefix ejbFind.
• It can’t be declared as static or final.
• It must return either a primary key or a collection of primary keys or an Enumeration of primary keys.
• The parameters and return type of the method must be valid Java RMI types.
For entity beans with bean-managed persistence, each finder method declared in the bean class must have a corresponding finder method in the bean’s home interface that has the same parameters, but returns the entity bean’s remote interface. The client locates the entity bean it wants by calling the finder method of the home interface and the container then invokes the corresponding finder method in the bean class. See “Finder methods for entity beans” on page 11-5.
Writing the business methodsWithin your enterprise bean class, write full implementations of the business methods your bean needs. To make these methods available to a client, you must also declare them in the bean’s remote interface using the exact same signature.
Using JBuilder wizards to create an entity bean
You can use the JBuilder’s Enterprise JavaBeans wizard to quickly start the creation of an entity bean. If you have existing database tables you want to use to create enterprise beans from, start with JBuilder’s EJB Entity Modeler. And if you have an existing entity bean, but don’t have its home and remote interfaces, use the EJB Interfaces wizard to create them. You can then modify the code in JBuilder using the code editor and the Bean designer. Edit deployment descriptors with JBuilder’s Deployment Descriptor editor. Create a test client application with the EJB Test Client Application wizard to test your new enterprise beans. Finally, use the EJB Deployment wizard to simplify the process of deploying your enterprise beans.

10-8 E n t e r p r i s e J a v a B e a n s D e v e l o p e r ’ s G u i d e
T h e l i f e o f a n e n t i t y b e a n
For more information about using JBuilder’s EJB development tools to create entity beans, see Chapter 3, “Developing enterprise beans,” Chapter 7, “Using the Deployment Descriptor editor,” and Chapter 6, “Deploying enterprise beans.”
The life of an entity beanThere are three distinct states in the life cycle of an entity enterprise bean:
• Nonexistent• Pooled• Ready
The following diagram depicts the life cycle of an entity bean instance:
The nonexistent state
At first the entity bean instance doesn’t exist. The EJB container creates an instance of an entity bean and then it calls the setEntityContext() method on the entity bean to pass the instance a reference to its context; that is, a reference to the EntityContext interface. The EntityContext interface gives the instance access to container-provided services and allows it to obtain information about its clients. The entity bean is now in the pooled state.

D e v e l o p i n g e n t i t y b e a n s 10-9
T h e l i f e o f a n e n t i t y b e a n
The pooled state
Each type of entity bean has its own pool. None of the instances in the pool are associated with data. Because none of their instance variables have been set, the instances have no identity and they are all equivalent. The container is free to assign any instance to a client that requests such an entity bean.
When a client application calls one of the entity bean’s finder methods, the container executes the corresponding ejbFind() method on an arbitrary instance in the pool. The instance remains in the pooled state during the execution of a finder method.
When the container selects an instance to service a client’s requests to an entity object, that instance moves from the pooled to the ready state. There are two ways that an entity instance moves from the pooled state to the ready state:
• Through the ejbCreate() and ejbPostCreate() methods.• Through the ejbActivate() method.
The container selects the instance to handle a client’s create() request on the bean’s home interface. In response to the create() call, the container creates an entity object and calls the ejbCreate() and ejbPostCreate() methods when the instance is assigned to the entity object.
The container calls the ejbActivate() method to activate an instance so that it can respond to an invocation on an existing entity object. Usually the container calls ejbActivate() when there is no suitable instance in the ready state to handle the client’s calls.
The ready state
When the instance is in the ready state, it is associated with a specific primary key. Clients can call the application-specific methods on the entity bean. The container calls the ejbLoad() and ejbStore() methods to tell the bean to load and store its data. They also enable the bean instance to synchronize its state with that of the underlying data entity.
Returning to the pooled state
When an entity bean instance moves back to the pooled state, the instance is decoupled from the data represented by the entity. The container can now assign the instance of any entity object within the same entity bean

10-10 E n t e r p r i s e J a v a B e a n s D e v e l o p e r ’ s G u i d e
A b a n k e n t i t y b e a n e x a m p l e
home. There are two ways an entity bean instance moves from the ready state back to the pooled state:
• The container calls the ejbPassivate() method to disassociate the instance from its primary key without removing the underlying entity object.
• The container calls the ejbRemove() method to remove the entity object. It calls ejbRemove() when the client application calls the bean’s home or remote remove() method.
To remove an unassociated instance from the pool, the container calls the instance’s unsetEntityContext() method.
A bank entity bean exampleThe bank example shows you how to use entity beans. It includes two implementations of the same Account remote interface. One implementation uses bean-managed persistence, and the other uses container-managed persistence.
The SavingsAccount entity bean, which uses bean-managed persistence, models savings accounts. As you examine the entity bean code, you’ll see that it includes direct JDBC calls.
The CheckingAccount entity bean, which uses container-managed persistence, models checking accounts. It relies on the container to implement persistence, not you, the bean developer.
A third enterprise bean called Teller transfers funds from one account to the other. It’s a stateless session bean that shows you how calls to multiple entity beans can be grouped within a single container-managed transaction. Even it the credit occurs before the debit in the transfer operation, the container rolls back the transaction if the debit fails, and neither the debit nor the credit occurs.
You can find complete code for the bank example in the /Borland/AppServer/examples/ejb/bank directory.
The entity bean home interface
Multiple entity beans can share the same home and remote interfaces, even if one entity bean uses container-managed persistence and the other uses bean-managed persistence. Both SavingsAccount and CheckingAccount entity beans use the same home interface, AccountHome. They also use the same Account remote interface.
The home interface for an entity bean is very much like the home interface for a session bean. They extend the same javax.ejb.EJBHome interface. The

D e v e l o p i n g e n t i t y b e a n s 10-11
A b a n k e n t i t y b e a n e x a m p l e
home interface for entity beans must include at least one finder method. A create() method is optional.
Here is the code for the AccountHome interface:
public interface AccountHome extends javax.ejb.EJBHome { Account create(String name, float balance) throws java.rmi.RemoteException, javax.ejb.CreateException; Account findByPrimaryKey(AccountPK primaryKey) throws java.rmi.RemoteException, javax.ejb.FinderException; java.util.Enumeration findAccountsLargerThan(float balance) throws java.rmi.RemoteException, javax.ejb.FinderException:}
The AccountHome home interface implements three methods. While the create() method is not required for entity beans, the bank example does implement one. The create() method inserts a new entity bean object into the underlying database. You could choose to defer the creation of new entity objects to the DBMS or to another application, in which case you would not define a create() method.
The create() method requires two parameters, an account name string and a balance amount. The implementation of this method in the entity bean class uses these two parameter values to initialize the entity object state—the account name and the starting balance—when it creates a new object. The throws clause of a create() method must include the java.rmi.RemoteException and the java.ejb.CreateException. It can also include additional application-specific exceptions.
Entity beans must have the findByPrimaryKey() method, so the AccountHome interface declares this method. It takes one parameter, the AccountPK primary key class, and returns a reference to the Account remote interface. This method finds one particular account entity and returns a reference to it.
Although it’s not required, the home interface also declares a second finder method, findAccountsLargerThan(). This method returns a Java Enumeration containing all the accounts whose balance is greater than some amount.
The entity bean remote interface
More than one entity bean can use the same remote interface, even when the beans use different persistence management strategies. The bank example’s two entity beans both use the same Account remote interface.
The remote interface extends the javax.ejb.EJBObject interface and exposes the business methods that are available to clients. Here is the code:
public interface Account extends javax.ejb.EJBObject { public float getBalance() throws java.rmi.RemoteException; public void credit(float amount) throws java.rmi.RemoteException; public void debit(float amount) throws java.rmi.RemoteException;}

10-12 E n t e r p r i s e J a v a B e a n s D e v e l o p e r ’ s G u i d e
A b a n k e n t i t y b e a n e x a m p l e
An entity bean with container-managed persistence
The bank example implements a CheckingAccount entity bean that illustrates the basics for using container-managed persistence. In many ways, this implementation is like a session bean implementation. There are some key things to note in the implementation of an entity bean that uses container-managed persistence, however:
• The entity bean has no implementations for finder methods. The EJB container provides the finder method implementations for entity beans with container-managed persistence. Rather than providing the implementation for the finder methods in the bean’s class, the deployment descriptor contains information that enables the container to implement these finder methods.
• The entity bean declares all fields public that are managed by the container for the bean. The CheckingAccount bean declares name and balance to be public fields.
• The entity bean class implements the several; methods declared in the EntityBean interface: ejbActivate(), ejbPassivate(), ejbLoad(), ejbStore(), ejbRemove(), setEntityContext(), and unsetEntityContext(). The entity bean is required to provide skeletal implementations of these methods only, however, although it is free to add application-specific code where it is appropriate. The CheckingAccount bean saves the context returned by setEntityContext() and releases the reference in unsetEntityContext(). Otherwise, it adds no additional code to the EntityBean interface methods.
• CheckingAccount includes an implementation of the ejbCreate() method because this enterprise bean allows callers to create new checking accounts. The implementation also initializes the instance’s two variables, name and balance, to the parameter values. ejbCreate() returns a null value because, with container-managed persistence, the container creates the appropriate reference to return to the client.
• CheckingAccount provides the minimal implementation of the ejbPostCreate() method, although this method could have performed further initialization work if it was needed. For beans with container-managed persistence, you need just a minimal implementation of ejbPostCreate() because it serves as a notification callback.
import javax.ejb.*import java.rmi.RemoteException;
public class CheckingAccount implements EntityBean { private javax.ejb.EntityContext _context; public String name; public float balance;

D e v e l o p i n g e n t i t y b e a n s 10-13
A b a n k e n t i t y b e a n e x a m p l e
public float getBalance() { return balance; }
public void debit(float amount) { if(amount > balance) { // mark the current transaction for rollback ... _context.setRollbackOnly(); } else { balance = balance - amount; } }
public void credit(float amount) { balance = balance + amount; }
public AccountPK ejbCreate(String name, float balance) { this.name = name; this.balance = balance; return null; }
public void ejbPostCreate(String name, float balance) {} public void ejbRemove() {} public void setEntityContext(EntityContext context) { _context = context; }
public void unsetEntityContext() { context = null; }
public void ejbActivate() {} public void ejbPassivate() {} public void ejbLoad() {} public void ejbStore() {} public String toString() { return"CheckingAccount[name=" + name + ",balance=" + balance +"]"; }}
An entity bean with bean-managed persistence
The bank example also implements a SavingsAccount bean, an entity bean with bean-managed persistence. The SavingsAccount bean accesses a different account table than the CheckingAccount bean. Although these two entity beans use different persistence-management approaches, they can both use the same home and remote interfaces. There are differences between the two implementations, however.

10-14 E n t e r p r i s e J a v a B e a n s D e v e l o p e r ’ s G u i d e
A b a n k e n t i t y b e a n e x a m p l e
An entity bean implementation with bean-managed persistence does the following:
• It can declare its instance variables to be private rather than public.
The bean includes code to access these variables, to load the database values into these instance variables, and to store their changes to the database. As such, the bean can limit access to these variables as it sees fit. This differs from a bean using container-managed persistence, which must declare all container-managed variables to be public so that the container can access them.
• The ejbCreate() method returns the primary key class.
In the SavingsAccount bean the class is AccountPK. The container takes the returned primary key class and uses it to construct a remote reference to the entity bean instance.
• Just like beans with container-managed persistence, a bean with bean-managed persistence may optionally provide more than an empty implementation of the ejbCreate() method.
The SavingsAccount bean doesn’t need to include additional initialization code in this method.
• It has implementations for the ejbLoad() and ejbStore() methods.
A bean using container-managed persistence usually provides just an empty implementation of these methods because the container handles persistence. An entity bean with bean-managed persistence must provide its own code to read the database values into its instance variables in the ejbLoad() method, and to write to the database with changed values in the ejbStore() method.
• It has implementations for all finder methods.
The SavingsAccount entity bean implements two finder methods, the required ejbFindByPrimaryKey() method, and the optional ejbFindAccountsLargerThan() method.
• An entity bean with bean-managed persistence must implement the ejbRemove() method.
Because the bean is managing the underlying database entity object, it must implement this method so that it can remove the entity object from the database. A bean with container-managed persistence will omit the implementation of this method because the container is responsible for the database management.
• Each method that accesses the underlying database object must include the correct database access code.
These methods are ejbCreate(), ejbRemove(), ejbLoad(), ejbStore, ejbFindByPrimaryKey(), all other finder methods, and the business

D e v e l o p i n g e n t i t y b e a n s 10-15
A b a n k e n t i t y b e a n e x a m p l e
methods. Each method contains code to connect to the database, followed by code to build and then execute SQL statements that accomplish the functionality encompassed by the method. When the SQL statements complete, the method closes the statements and the database connection before returning.
The following code sample shows the interesting code portions from the SavingsAccount implementation class. The example removes the code that is merely the empty implementations of the EntityBean interfaces methods, such as ejbActivate(), ejbPassivate(), and so on.
First look at the ejbLoad() method, which accesses the database entity object, to see how a bean with bean-managed persistence implements database access. Note that all of the methods implemented in the SavingsAccount class follow the same approach as ejbLoad() uses. The ejbLoad() method begins by establishing a connection to the database. It calls the internal getConnection() method, which uses a DataSource to obtain a JDBC connection to the database from a JDBC connection pool. Once the connection is established, ejbLoad() creates a PreparedStatement object and builds its SQL database access statement. Because ejbLoad() reads the entity object values into the entity bean’s instance variables, it builds an SQL SELECT statement for a query that selects the balance value for the savings account whose name matches a pattern. The method then executes the query. If the query returns a result, it extracts the balance amount. The ejbLoad() method finished by closing the PreparedStatement objects and then closing the database connection. Note that the ejbLoad() method doesn’t actually close the connection. Instead, it simply returns the connection to the connection pool.
import.java.sql.*;import javax.ejb.*;import java.util.*;import java.rmi.RemoteException;
public class SavingsAccount implements EntityBean { private entitycontext _constext; private String _name; private float _balance;
public float getBalance() { return _balance; }
public void debit(float amount) { if(amount > balance) { // mark the current transaction for rollback... _context.setRollbackOnly(); } else { _balance = _balance - amount; } } public void credit(float amount) { _balance = _balance + amount; }

10-16 E n t e r p r i s e J a v a B e a n s D e v e l o p e r ’ s G u i d e
A b a n k e n t i t y b e a n e x a m p l e
// setEntitycontext(), unsetEntityContext(), ejbActivate(), ejbPassivate(), // ejbPostCreate() skeleton implementations are not shown here ... public AccountPK ejbCreate(String name, float balance) throws RemoteException, CreateException { _name = name; _balance = balance; try { Connection connection = getConnection(); PreparedStatement statement = connection.prepareStatement ("INSERT INTO Savings_Accounts (name, balance) VALUES (?,?)*); statement.setString(1, _name); statement.setFloat(2, _balance); if(statement.executeUpdate() != 1) { throw new CreateException("Could not create: " + name); } statement.close(); connection.close(); return new AccountPK(name); } catch(SQLException e) { throw new RemoteException("Could not create: " + name, 3); } } ... public void ejbRemote() throws RemoteException, RemoveException { try { Connection connection = getConnection(); PreparedStatement statement = connection.prepareStatement ("DELETE FROM Savings Account WHERE name = ?"); statement.setString(1, _name); if(statement.executeUpdate() != 1) { throw new RemoteException("Could not remove: " + _name, e); } statement.close(); connection.close(); } catch(SQLException e) { throw new RemoteException("Could not remove: " + _name, e); } } public AccountPK ejbFindByPrimaryKey(AccountPK key) throws RemoteException, FinderException { try { Connection connection = getConnection(); PreparedStatement statement = connection.prepareStatement ("SELECT name FROM Savings_Accounts WHERE name = ?"); statement.setString(1, key.name); ResultSet resultSet = statement.executeQuery(); if(!resultSet.next()) { throw new FinderException("Could not find: " + key statement.close(); connection.close(); return key; } catch(SQLException e) { throw new RemoteException("Could not find: " + key, e); } }

D e v e l o p i n g e n t i t y b e a n s 10-17
A b a n k e n t i t y b e a n e x a m p l e
public java.util.Enumeration ejbFindAccountsLargerThan(float balance) throws RemoteException, FinderException { try { Connection connection = getConnection(); PreparedStatement statement = connection.prepareStatement ("SELECT name FROM Savings_Account WHERE balance > ?"); statement.setFloat(1, balance); ResultSet resultSet = statement.executeQuery(); Vector keys = new Vector(); while(resultSet.next()) { String name = resultSet.getString(1); keys.addElement(new AccountPK(name)); } statement.close(); connection.close(); return keys.elements(); } catch(SQLException 3) { throw new RemoteException("Could not findAccountsLargerThan: " + balance, e); } }
public void ejbLoad() throws RemoteException { // get the name from the primary key _name = (AccountPK) _context.getPrimaryKey()).name; try { Connection connection = getConnection(); PreparedStatement statement = connection.prepareStatement ("SELECT balance FROM Savings_Account WHERE name = ?"); statement.setString(1, _name); ResultSet resultSet = statement.executeQuery(); if(!resultSet.next()) { throw new RemoteException("Account not found: " + _name); } _balance = resultSet.getFloat(1); statement.close(); connection.close(); } catch(SQLException e) { throw new RemoteException("Could not load: " + _name, e): } }
public void ejbStore() throw RemoteException { try { Connection connection = getConnection(); PreparedStatement statement = connection.prepareStatement ("UPDATE Savings_Accounts SET balance = ? WHERE name = ?"); statement.setFloat(1, _balance); statement.setString(2, _name); statement.executeUpdate(); statement.close(); connection.close(); } catch(SQLException e) { throw new RemoteException("Could not store: " + _name, e); } }

10-18 E n t e r p r i s e J a v a B e a n s D e v e l o p e r ’ s G u i d e
A b a n k e n t i t y b e a n e x a m p l e
private connection getconnection() throws SQLException { Properties properties = _context.getEnvironment(); String url = properties.getProperty("db.url"); String username = properties.getProperty("db.username"); String password = properties.getProperty("db.password"); if(username != null) { return DriverManager.getConnection(url, username, password); } else { return DriverManager.getConnection(url); } }
public String toString() { return "SavingsAccount[name=" + _name + ",balance=" + _balance +"]"; }}
The primary key class
Both CheckingAccount and SavingsAccount use the same field to uniquely identify a particular account record. In this case, they both use the same primary key class, AccountPK, to represent the unique identifier for either type of account:
public class AccountPK implements java.io.Serializable { public String name; public AccountPK() {} public AccountPK(String name) { this.name = name; }}
The deployment descriptor
The deployment descriptor for the bank example deploys three kinds of beans: the Teller session bean, the CheckingAccount entity bean with container-managed persistence, and the SavingsAccount entity bean with bean-managed persistence.
You use properties in the deployment descriptor to specify information about the entity bean’s interfaces, transaction attributes, and so on, just as you do for session beans. But you also add additional information that is unique to entity beans.
The bean-managed XML code sample shows typical deployment descriptor property tags for an entity bean with bean-managed persistence. This container-managed XML code sample illustrates the typical deployment descriptor tags for an entity bean that uses container-

D e v e l o p i n g e n t i t y b e a n s 10-19
A b a n k e n t i t y b e a n e x a m p l e
managed persistence. When you compare the descriptor tags for the two types of entity beans, you’ll notice that the deployment descriptor for an entity bean with container-managed persistence is more complex.
The bean’s deployment descriptor type is set to <entity>. Notice that the first tags within the <enterprise-beans> section in both code samples specify that the bean is an entity bean.
An entity bean deployment descriptor specifies the following type of information:
• The names of the related interfaces (home and remote) and the bean implementation class.
Each enterprise bean specifies its home interface using the <home> tag, its remote interface using the <remote> tag, and its implementation class name using the <ejb-class> tag.
• The JNDI names under which the entity bean is registered and by which clients locate the bean.
• The bean’s transaction attributes and its transaction isolation level.
This usually appears in the <assembly-descriptor> section of the deployment descriptor.
• The name of the entity bean’s primary key class.
In this example, the primary key class is AccountPK and it appears within the <prim-key-class> tag.
• The persistence used by the bean.
The CheckingAccount bean uses container-managed persistence, so the deployment descriptor sets the <persistence-type> tag to Container.
• Whether the bean class is reentrant.
Neither the SavingsAccount nor the CheckingAccount bean is reentrant, so the <reentrant> tag to set to False for both.
• The fields that the container manages, if the bean uses container-managed persistence.
A bean that uses bean-managed persistence doesn’t specify any container-managed fields. Therefore, the deployment descriptor for the SavingsAccount bean doesn’t specify any container-managed fields. An entity bean using container-managed persistence must specify the names of its fields or instance variables that the container must manage. Use a combination of the <cmp field> and <field name> tags for this.
10-20 E n t e r p r i s e J a v a B e a n s D e v e l o p e r ’ s G u i d e
A b a n k e n t i t y b e a n e x a m p l e
The first tag, <cmp field>, indicates that the field is container-managed. Within this tag, the <fields name> tag specifies the name of the field itself. For example, the CheckingAccount bean deployment descriptor indicates that the balance field is container-managed as follows:
<cmp field><field name>balance</field name></cmp field>
Information about the container-managed fields for container-managed beans. The container uses this information to generate the finder methods for these fields.
Deployment descriptor for an entity bean with bean-managed persistenceThe following code sample shows the key parts of the deployment descriptor for an entity bean using bean-managed persistence. Because the bean, not the container, handles its own fetches from the database entity values and updates to these values, the descriptor doesn’t specify fields for the container to manage. Nor does it tell the container how to implement its finder methods, because the bean’s implementation provides those.
<enterprise-beans><entity> <description>This entity bean is an example of bean-managed persistence</description> <ejb-name>savings</ejb-name> <home>AccountHome</home> <remote>Account</remote> <ejb-class>SavingsAccount</ejb-class> <persistence-type>Bean</persistence-type> <prim-key-class>AccountPK</prim-key-class> <reentrant>False</reentrant></entity> ...</enterprise-beans><assembly-descriptor> <container-transaction> <method> <ejb-name>savings</ejb-name> <method-name>*</method-name> </method> <trans-attribute>Required</trans-attribute> </container-transaction></assembly-descriptor>
Deployment descriptor for an entity bean with container-managed persistenceThe next code sample shows the key parts of the deployment descriptor for an entity bean using container-managed persistence. Because the bean lets the container handle loading database entity values and updating

D e v e l o p i n g e n t i t y b e a n s 10-21
A b a n k e n t i t y b e a n e x a m p l e
these values, the descriptor specifies the fields that the container will manage.
<enterprise-beans><entity> <description>This entity bean is an example of container-managed persistence </description>
<ejb-name>checking</ejb-name> <home>AccountHome></home> <remote>Account</remote> <ejb-class>chkingAccount</ejb-class> <persistence-type>Container</persistence-type> <prim-key-class>AccountPK>/prim-key-class> <reentrant>False</reentrant> <cmp-field> <field-name>name</field-name> <cmp-field></entity></enterprise-beans><assembly-descriptor> <container-transaction> <method> <ejb-name>chekcing</ejb-name> <method-name>*</method-name> </method> <trans-attribute-transaction> </container-transaction></assembly-descriptor>

10-22 E n t e r p r i s e J a v a B e a n s D e v e l o p e r ’ s G u i d e

C r e a t i n g t h e h o m e a n d r e m o t e i n t e r f a c e s 11-1
C h a p t e r
11Chapter11Creating the home and remote
interfacesAs an enterprise bean provider, you must create two interfaces for each bean: a home interface and a remote interface. The home interface defines the methods a client application uses to create, locate, and destroy instances of an enterprise bean. The remote interface defines the business methods implemented in the bean. A client accesses these methods through the remote interface.
Creating the home interfaceThe home interface of an enterprise bean controls the bean’s life cycle. It contains the definition of the methods to create, find, and remove an instance of an enterprise bean.
As a bean provider, you must define the home interface, but you don’t implement it. The EJB container does that, generating a home object that returns a reference to the bean.
It’s customary to give the home interface the same name as the bean class with the suffix Home. For example, if the enterprise bean is named Account, the home interface for Account should be AccountHome. By default, a home interface generated by JBuilder’s EJB wizards follows this convention, although you have the opportunity to modify the name of the interface while using the wizard if you choose.

11-2 E n t e r p r i s e J a v a B e a n s D e v e l o p e r ’ s G u i d e
C r e a t i n g t h e h o m e i n t e r f a c e
The EJBHome base class
Each home interface extends the javax.ejb.EJBHome interface. Here is the complete definition of EJBHome:
package javax.ejbpublic interface EJBHome extends java.rmi.Remote { void remove(Handle handle) throws java.rmi.RemoteException, RemoveException; void remove(Object primaryKey) throws java.rmi.RemoteException, RemoveException; EJBMetaData getEJBMetaData() throws RemoteException; HomeHandle getHomeHandle() throws RemoteException;}
EJBHome has two remove() methods to remove enterprise bean instances. The first remove() method identifies the instance by a handle; the second by a primary key.
A handle, a serializable bean object identifier, has the same lifetime as the enterprise bean object it’s referencing. For a session bean, the handle exists only as long as the session does. For an entity bean, the handle can persist and a client can use a serialized handle to reestablish a reference to the entity object it identifies.
A client would use the second remove() method to remove an entity bean instance using its primary key.
The getEJBMetaData() returns the EJBMetaData interface of the enterprise bean object. This interface allows the client to obtain metadata information about the bean. Its purpose is to be used by development tools that build applications that use deployed enterprise beans.
Note that the EJBHome interface doesn’t have any methods for creating or locating instances of an enterprise bean. Instead, you must add these methods to the home interfaces you develop for your beans. Because session beans and entity beans have different life cycles, the methods defined in their home interfaces differ.
Creating a home interface for a session bean
A session bean almost always has a single client (except occasionally for stateless session beans). When a client creates a session bean, that session bean instance exists for the use of that client only.
To create a home interface for a session bean,
• Declare a home interface that extends javax.ejb.EJBHome.
• Add a create() method signature for each ejbCreate() method in the bean, matching the number and type of arguments exactly.

C r e a t i n g t h e h o m e a n d r e m o t e i n t e r f a c e s 11-3
C r e a t i n g t h e h o m e i n t e r f a c e
When you use JBuilder’s Enterprise JavaBean wizard, JBuilder creates a home interface with one defined create() method at the same time it creates the enterprise bean class. You can then add additional create() methods to the home interface if you add additional ejbCreate() methods to your bean. Or if you have an existing enterprise bean class, use JBuilder’s EJB Interfaces wizard to create a home and remote interface with signatures that match appropriately those in your bean class. For more information, see Chapter 3, “Creating enterprise beans with JBuilder.”
If you choose to begin your EJB development by creating a remote interface first, you can use the EJB Bean Generator to create a skeleton bean class and the home interface. For more information about using the EJB Bean Generator, see “Generating the bean class from a remote interface” on page 3-11.
create() methods in session beansA session home interface functions as a session bean factory, because it must define one or more create() methods. When the client calls create(), a new bean instance is created. According to the EJB specification, each create() method defined in the home interface must
• Return the remote interface type of the session bean.
• Be named create().
• Match a ejbCreate() method in the session bean class. The number and types of arguments for each create() method must match its corresponding ejbCreate() method in the session bean class.
• Throw the exception java.rmi.RemoteException.
• Throw the exception javax.ejb.CreateException.
• Use its parameters, if there are any, to initialize the new session bean object.
You can use the EJB wizards to ensure that these rules are followed.
The following code sample shows two possible create() methods of a session home interface. The parts shown in bold are required:
public interface AtmHome extends javax.ejb.EJBHome { Atm create() throws java.rmi.RemoteException, javax.ejb.CreateException; Atm create(Profile preferredProfile) throws java.rmi.RemoteException, javax.ejb.CreateException;}

11-4 E n t e r p r i s e J a v a B e a n s D e v e l o p e r ’ s G u i d e
C r e a t i n g t h e h o m e i n t e r f a c e
Creating a home interface for an entity bean
An entity bean is designed to serve multiple clients. When a client creates an entity bean instance, any other client can use it also.
To create a home interface for an entity bean,
• Declare an interface that extends javax.ejb.EJBHome.
• Add a create() method signature for each ejbCreate() method in the bean, matching the signatures exactly.
• Add a finder method signature for each finder method in the bean, matching the signatures exactly.
When you use JBuilder’s Enterprise JavaBean wizard or EJB Entity Modeler, JBuilder creates a home interface with one defined create() method at the same time it creates the enterprise bean class. You can then add additional create() methods to the home interface if you add additional ejbCreate() methods to your bean. Or if you have an existing enterprise bean class, use JBuilder’s EJB Interfaces wizard to create a home and remote interface with signatures that match appropriately those in your bean class. For more information, see Chapter 3, “Creating enterprise beans with JBuilder.”
If you choose to begin your EJB development by creating a remote interface first, you can use the EJB Bean Generator to create a skeleton bean class and the home interface. For more information about using the EJB Bean Generator, see “Generating the bean class from a remote interface” on page 3-11.
create() methods for entity beansLike a home interface for a session bean, a home interface for an entity bean must define one or more create() methods. According to the EJB specification, each create() method you define must
• Throw the exception java.rmi.RemoteException.
• Throw the exception javax.ejb.CreateException.
• Return the remote interface type of the entity bean.
• Be named create().
• Match a ejbCreate() method in the session bean class. The number and types of arguments for each create() method must match its corresponding ejbCreate() method in the session bean class.
• Must include in the exceptions in the throws clause all the exceptions thrown by the corresponding ejbCreate() and ejbPostCreate() methods in the entity bean class. In other words, the set of exceptions for the create() method must be a superset of the union of exceptions for both

C r e a t i n g t h e h o m e a n d r e m o t e i n t e r f a c e s 11-5
C r e a t i n g t h e h o m e i n t e r f a c e
the ejbCreate() and ejbPostCreate() methods. The return type of the ejbCreate() method is the primary key class.
• Use its parameters, if there are any, to initialize the new entity bean object.
Finder methods for entity beansBecause entity beans usually have long lives and can be used by multiple clients, an entity bean instance probably already exists when a client application needs it. In this case, the client doesn’t need to create an entity bean instance, but it does need to locate the appropriate existing one. That’s why the home interface of an entity bean defines one or more finder methods.
Session beans don’t need finder methods because they serve one client, the application that created the bean. The client has no need to find the session bean instance—it already knows where the instance is.
Each entity bean home interface must define the default finder method, findByPrimaryKey(). It allows a client to locate an entity object using a primary key:
<entity bean's remote interface> findByPrimaryKey(<primary key type> key) throws java.rmi.RemoteException, FinderException;
findByPrimaryKey() has a single argument, the primary key. Its return type is the entity bean’s remote interface. In the bean’s deployment descriptor, you tell the container the type of the primary key. findByPrimaryKey() always returns a single entity object.
You can define additional finder methods in the home interface. Each finder method must have a corresponding implementation in the entity bean class for bean-managed persistence. For container-managed persistence, the container implements the finder methods. Each finder method must follow these conventions:
• The return type is the remote interface type, or for finder methods that return more than one entity object, a collection type that has the remote interface type as the content type. Valid Java collection types are java.util.Enumeration and java.util.Collection.
• The finder method always starts with the prefix find. The corresponding finder method in the entity bean class begins with the prefix ejbFind.
• The method must throw the exception java.rmi.RemoteException.
• The method must throw the exception javax.ejb.FinderException.
• The throws clause of the finder method in the home interface must match the throws clause of the corresponding ejbFind<xxx> method in the entity bean class.

11-6 E n t e r p r i s e J a v a B e a n s D e v e l o p e r ’ s G u i d e
C r e a t i n g t h e r e m o t e i n t e r f a c e
The following sample home interface contains two create() methods and two finder methods. The parts shown in bold are required:
public interface AccountHome extends javax.ejb.EJBHome {
Account create(String accountID) throws java.rmi.RemoteException, javax.ejb.CreateException;
Account create(String accountID, float initialBalance) throws java.rmi.RemoteException, javax.ejb.CreateException;
Account findByPrimaryKey(String key) throws java.rmi.RemoteException, javax.ejb.FinderException;
Account findBySocialSecurity(String socialSecurityNumber) throws java.rmi.RemoteException, javax.ejb.FinderException;}
Creating the remote interfaceThe remote interface you create for your enterprise bean describes the business methods a client application can call. While you define the methods in the remote interface, you implement these same methods in the enterprise bean class. The clients of an enterprise bean never access the bean directly. They access its methods through its remote interface.
To create a remote interface,
• Declare an interface that extends javax.ejb.EJBObject.
• Declare in the remote interface every business method you want a client application to be able to call in the enterprise bean, matching the signatures exactly with those in the bean class.
When you use JBuilder’s EJB wizards, JBuilder creates a remote interface that extends EJBObject for you. You can then use the Bean designer to specify which business methods in your bean you want to appear in the remote interface.
Each method defined in the remote interface must follow these rules, which are the same for both session and entity beans:
• It must be public.
• It must throw the exception java.rmi.RemoteException.
• Its return value and all of its arguments must be of valid types for RMI-IIOP.
• A method must exist in the remote interface for each method in the enterprise bean’s class you want a client to be able to call. The methods in the remote interface and in the bean itself must have the same name, the same number and types of arguments, the same return type, and

C r e a t i n g t h e h o m e a n d r e m o t e i n t e r f a c e s 11-7
C r e a t i n g t h e r e m o t e i n t e r f a c e
they must throw the same exceptions, or a subset of the remote interface method’s exceptions.
The following code sample shows the code for a sample remote interface called Atm for an ATM session bean. The Atm remote interface defines a business method called transfer(). The parts shown in bold are required:
public interface Atm extends javax.ejb.EJBObject{
public void transfer(String source, String target, float amount) throws java.rmi.RemoteException, InsufficientFundsException;}
The transfer() method declared in the Atm interface throws two exceptions: the required java.rmi.RemoteException and InsufficientFundsException, which is an exception specific to an application.
The EJBObject interface
The remote interface extends the javax.ejb.EJBObject interface. Here is the source code for EJBObject:
package javax.ejb;public interface EJBObject extends java.rmi.Remote ( public EJBHome getEJBHome() throws java.rmi.RemoteException; public Object getPrimaryKey() throws java.rmi.RemoteException; public void remove() throws java.rmi.RemoteException, java.rmi.RemoveException; public Handle getHandle() throws java.rmi.RemoteException; boolean isIdentical (EJBObject other) throws java.rmi.RemoteException;}
The getEJBHome() method allows an application to obtain the bean’s home interface. If the bean is an entity bean, the getPrimaryKey() method returns the primary key for the bean. The remove() method deletes the enterprise bean. getHandle() returns a persistent handle to the bean instance. Use isIdentical() to compare two enterprise beans.
The EJB container creates an EJBObject for the enterprise bean. Because the remote interface extends the EJBObject interface, the EJBObject the container creates includes implementations for all the methods the EJBObject interface as well as all the business methods you define in the remote interface. The instantiated EJBObject is visible over the network and it acts as a proxy for the bean. It has a stub and a skeleton. The bean itself is not visible over the network.

11-8 E n t e r p r i s e J a v a B e a n s D e v e l o p e r ’ s G u i d e
D e v e l o p i n g e n t e r p r i s e b e a n c l i e n t s 12-1
C h a p t e r
12Chapter12Developing enterprise bean
clientsA client of an enterprise bean is an application—stand-alone application, servlet, or applet—another enterprise bean. In all cases, the client must do the following things to use an enterprise bean:
• Locate the bean’s home interface. The EJB specification states that the client should use the JNDI (Java Naming and Directory Interface) API to locate home interfaces.
• Get a reference to an enterprise bean object’s remote interface. This involves using methods defined on the bean’s home interface. You can either create a session bean, or you can create or find an entity bean.
• Call one or more methods defined by the enterprise bean. A client doesn’t directly call the methods defined by the enterprise bean. Instead, the client calls the methods of the enterprise bean object’s remote interface. The methods defined in the remote interface are the methods that the enterprise bean has exposed to clients.
The following sections describe the client application SortClient.java, that calls the sample SortBean session bean. SortBean is a stateless session bean that implements a merge/sort algorithm. Here is the code of SortClient:
// SortClient.java...
public class SortClient { ... public static void main(String[] args) throws Exception { javax.naming.Context context; { // get a JNDI context using the Naming service context = new javax.naming.InitialContext(); }

12-2 E n t e r p r i s e J a v a B e a n s D e v e l o p e r ’ s G u i d e
L o c a t i n g t h e h o m e i n t e r f a c e
Object objref = context.lookup("sort"); SortHome home = (SortHome) javax.rmi.PortableRemoteObject.narrow(objref, SortHome.class); Sort sort = home.create(); ... //do the sort and merge work sort.remove(); }}
Locating the home interfaceSortClient imports the required JNDI classes and the SortBean home and remote interfaces. The client uses the JNDI API to locate an enterprise bean’s home interface. First the client must obtain a JNDI initial naming context. The code for SortClient instantiates a new javax.naming.Context object, which is called InitialContext. The client then uses the context lookup() method to resolve the name to a home interface.
The context’s lookup() method returns an object of type java.lang.Object. Your code must cast this returned object to the expected type. The SortClient code shows a portion of the client code for the sort example. The main() routine begins by using the JNDI naming service and its context lookup() method to locate the home interface. You pass the name of the remote interface, which in this case is sort, to the context.lookup() method. Note that the program eventually casts the results of the context.lookup() method to SortHome, the type of the home interface.
Getting the remote interfaceOnce you have the home interface of an enterprise bean, you need a reference to the bean’s remote interface. To do this, use the home interface’s create or finder methods. Which method to use depends on the type of the enterprise bean and the methods the bean provider has defined in the home interface.
Session beans
If the enterprise bean is a session bean, the client uses a create method to return the remote interface. Session beans don’t have finder methods. If the session bean is stateless, it will have just one create() method, so that is the one the client must call to obtain the remote interface. The default

D e v e l o p i n g e n t e r p r i s e b e a n c l i e n t s 12-3
G e t t i n g t h e r e m o t e i n t e r f a c e
create() method has no parameters. So for the SortClient code sample, the call to the get the remote interface looks like this:
Sort sort = home.create();
The cart example discussed in Chapter 9, “Developing session beans,” on the other hand, uses a stateful session bean, and its home interface, CartHome, implements more than one create() method. One of its create() methods takes three parameters, which together identify the purchaser of the cart contents, and returns a reference to the Cart remote interface. The CartClient sets values for the three parameters—cardHolderName, creditCardNumber, and expirationDate—then calls the create() method. Here’s the code:
Cart cart;{ String cardHolderName = "Jack B. Quick"; String creditCardNumber = "1234-5678-9012-3456"; Date expirationDate = new GregorianCalendar(2001, Calendar.JULY, 1).getTime(); cart = home.create(cardHolderName, creditCardNumber, expirationDate);}
Entity beans
If it’s an entity bean, use either a create or a finder method to obtain the remote interface. Because an entity object represents some underlying data stored in a database, and that data is persistent, entity beans usually exist for a long time. Therefore, the client most often needs to simply find the entity bean that represents that data rather than create a new entity object, which would create and store new data in the underlying database.
A client uses a find operation to locate an existing entity object, such as a specific row within a relational database table. That is, find operations locate data entities that have previously been inserted into data storage. The data might have been added to the data store by an entity bean, or it might have been added outside of the EJB context, such as directly from within the database management system (DBMS). Or, in the case of legacy systems, the data might have existed prior to the installation of the EJB container.
A client uses an entity bean object’s create() method to create a new data entity that will be stored in the underlying database. An entity bean’s create() method inserts the entity state into the database, initializing the entity’s variables according to the values in the create() method’s parameters.
Each entity bean instance must have a primary key that uniquely identifies it. An entity bean instance can also have secondary keys that can be used to locate a particular entity object.

12-4 E n t e r p r i s e J a v a B e a n s D e v e l o p e r ’ s G u i d e
C a l l i n g m e t h o d s
Finder methods and the primary key classThe default finder method for an entity bean is findByPrimaryKey(), which locates the entity object using its primary key value. This is its signature:
<remote interface> findByPrimaryKey(<key type> primaryKey)
Each entity bean must implement a findByPrimaryKey() method. The primaryKey parameter is a separate primary key class that is defined in the deployment descriptor. The key type is the type for the primary key, and it must be a legal value type in RMI-IIOP. The primary key class can be any class, such as a Java class or a class you’ve written yourself.
For example, suppose you have an Account entity bean for which you’ve defined the primary key class AccountPK. AccountPK, a String type, holds the identifier for the Account bean. To obtain a reference to a specific Account entity bean instance, set the AccountPK to the account identifier and call the findByPrimaryKey() method as shown here:
AccountPK accountPK = new AccountPK("1234-56-789");Account source = accountHome.findByPrimaryKey(accountPK);
Bean providers can define additional finder methods that a client can use.
Create and remove methodsA client can also create entity beans using create methods defined in the home interface. When a client invokes a create method for an entity bean, the new instance of the entity object is saved in the data store. The new entity object always has a primary key value that is its identifier. Its state can be initialized to values passed as parameters to the create method.
Keep in mind that an entity bean exists for as long as data is present in the database. The life of the entity bean isn’t bound by the client’s session. The entity bean can be removed by calling one of the bean’s remove methods. These methods remove the bean and the underlying representation of the entity data from the database. It’s also possible to directly delete an entity object, such as by deleting a database record using the DBMS or with a legacy application.
Calling methodsOnce the client has a reference to the bean’s remote interface, it can invoke the methods defined in the remote interface for the bean. The client is most interested in the methods that embody the bean’s business logic.
For example, the following is some code from a client that accesses the cart session bean. The code shown here begins from the point where it has created

D e v e l o p i n g e n t e r p r i s e b e a n c l i e n t s 12-5
R e m o v i n g b e a n i n s t a n c e s
a new session bean instance for a card holder and retried a Cart reference to the remote interface. The client is ready to invoke the bean methods:
...Cart cart;{ ... // obtain a reference to the bean's remote interface cart = home.create(cardHolderName, creditCardNumber, expirationDate);}
// create a new book objectBook knuthBook = new Book("The Art of Computer Programming", 49.95f);
// add the new book item to the cartcart.addItem(knuthBook);...
// list the items currently in the cartsummarize(cart);cart.removeItem(knuthBook);...
First the client creates a new book object, setting its title and price parameters. Next it invokes the enterprise bean business method addItem() to add the book object to a shopping cart. The Cart session bean defines the addItem() method, and the the Cart remote interface makes it public. The client adds other items (these aren’t shown here), then calls its own summarize() method to list the items in the shopping cart. This is followed by the remove() method to remove the bean instance. Note that a client calls the enterprise bean methods in the same way that it invokes any method, such as its own summarize() method.
Removing bean instancesThe remove() method operates differently for session beans than it does for entity beans. Because a session object exists for one client and isn’t persistent, a client of a session bean should call the remove() method when it’s finished with a session object. Two remove() methods are available to the client: the client can remove the session object with the javax.ejb.EJBObject.remove() method, or the client can remove the session handle with the javax.ejb.EJBHome.remove(Handle handle) method. For more information on bean handles, see “Referencing a bean with its handle” on page 12-6.
While it isn’t required that a client remove a session object, it’s good programming practice. If a client doesn’t remove a stateful session bean object, the container will eventually remove the object after a certain time, specified by a timeout value. The timeout value is a deployment property.

12-6 E n t e r p r i s e J a v a B e a n s D e v e l o p e r ’ s G u i d e
R e f e r e n c i n g a b e a n w i t h i t s h a n d l e
A client can also keep a handle to the session for future reference, however.
Clients of entity beans don’t have this problem as entity beans are associated with a client only for the duration of a transaction and the container is in charge of their life cycles, including their activation and passivation. A client of an entity bean calls the bean’s remove() method only when the entity object is to be deleted from the underlying database.
Referencing a bean with its handleA handle is an another way to reference an enterprise bean. A handle is a serializable reference to a bean. You can obtain a handle from the bean’s remote interface. Once you have the handle, you can write it to a file (or other persistent storage). Later, you can retrieve the handle from storage and use it to reestablish a reference to the enterprise bean.
You can use the remote interface handle to recreate only the reference to the bean, however. You can’t use it to recreate the bean itself. If another process has removed the bean, or the system removed the bean instance, then an exception is thrown when the client tries to use the handle to reestablish its reference to the bean.
When you aren’t sure that the bean instance will still be in existence, rather than using a handle to the remote interface, you can store the bean’s home handle and recreate the bean object later by invoking the bean’s create or finder method.
After the client creates a bean instance, it can use the getHandle() method to obtain a handle to this instance. Once it has the handle, it can write it to a serialized file. Later, the client program can read the serialized file, casting the object that it reads in to a Handle type. Then, it calls the getEJBObject() method on the handle to obtain the bean reference, narrowing the results of getEJBObject() to the correct type for the bean.
For example, the CartClient program might do the following to use a handle to the Cart session bean:
import java.io;import javax.ejb.Handle;...Cart cart;...cart = home.create(cardHolderName, creditCardNumber, expirationDate);
// call getHandle() on the cart object to get its handlecartHandle = cart.getHandle();

D e v e l o p i n g e n t e r p r i s e b e a n c l i e n t s 12-7
M a n a g i n g t r a n s a c t i o n s
// write the handle to serialized fileFileOutputStream f = new FileOutputStream ("carthandle.ser");ObjectOutputStream o = new ObjectOutputStream(f);o.writeObject(myHandle);o.flush();o.close();...
// read handle from file at later timeFileInputStream fi = new FileInputStream ("carthandle.ser");ObjectInputStream oi = new ObjectInputStream(fi);
//read the object from the file and cast it to a HandlecartHandle = (Handle)oi.readObject();oi.close();...
// Use the handle to reference the bean instanceCart cart = (Cart) javax.rmi.PortableRemoteObject.narrow(cartHandle.getEJBObject(), Cart class);...
When it’s finished with the session bean handle, the client can remove it by calling the javax.ejb.EJBHome.remove(Handle handle) method.
Managing transactionsA client program can manage its own transactions rather than letting the enterprise bean (or container) manage the transactions. A client that manages its own transactions does so in exactly the same manner as a session bean that manages its own transactions.
When a client manages its own transactions, it’s responsible for delimiting the transaction boundaries. That is, it must explicitly start the transaction and end (commit or roll back) the transaction.
A client uses the javax.transaction.UserTransaction interface to manage its own transactions. It must first obtain a reference to the UserTransaction interface, using JNDI to do so. Once it has the UserTransaction context, the client uses the UserTransaction.begin() method to start the transaction, followed later by the UserTransaction.commit() method to commit and end the transaction (or UserTransaction.rollback() to rollback and end the transaction). In between, the client accesses EJB objects and so on.

12-8 E n t e r p r i s e J a v a B e a n s D e v e l o p e r ’ s G u i d e
D i s c o v e r i n g b e a n i n f o r m a t i o n
The code shown here demonstrates how a client would manage its own transactions; the code that pertains specifically to client-managed transactions are highlighted in bold:
...import javax.naming.InitialContext;import javax.transaction.UserTransaction;...public class clientTransaction { public static void main (String[] argv) { InitialContext initContext = new InitialContext(); UserTransaction ut = null; ut = (UserTransaction)initContext.lookup("java:comp/UserTransaction"); // start a transaction ut.begin(); // do some transaction work ... // commit or rollback the transaction ut.commit(); // or ut.rollback(); ... }}
For more information about transactions, see Chapter 13, “Managing transactions.”
Discovering bean informationInformation about an enterprise bean is referred to as metadata. A client can obtain metadata about a bean using the enterprise bean’s home interface getMetaData() method.
The getMetaData() method is most often used by development environments and tool builders that need to discover information about an enterprise bean, such as for linking together beans that have already been installed. Scripting clients might also want to obtain metadata on the bean.
Once the client retrieves the home interface reference, it can call its getEJBMetaData() method. Then, the client can call the EJBMetaData interface methods to extract such information as this:
• The bean’s EJBHome home interface, using the EJBMetaData.getEJBHome() method.
• The bean’s home interface class object, including its interfaces, classes, fields, and methods, using the EJBMetaData.getHomeInterfaceClass() method.

D e v e l o p i n g e n t e r p r i s e b e a n c l i e n t s 12-9
C r e a t i n g a c l i e n t w i t h J B u i l d e r
• The bean’s remote interface class object, including all class information, using the EJBMetaData.getRemoteInterfaceClass() method.
• The bean’s primary key class object, using the EJBMetaData.getPrimaryKeyClass() method.
• Whether the bean is a session bean or an entity bean, using the EJBMetaData.isSession() method. The method returns true if this is a session bean.
• Whether a session bean is stateless or stateful, using the EJBMetaData.isStatelessSession() method. The method returns true if the session bean is stateless.
Here’s the EJBMetaData interface in its entirety:
package javax.ejb;
public interface EJBMetaData { EJBHome getEJBHome(); Class getHome InterfaceClass(); Class getRemoteInterfaceClass(); Class getPrimaryKeyClass(); boolean isSession(); boolean isStatelessSession();}
Creating a client with JBuilderYou can use JBuilder to give you a head start on creating your client. JBuilder has a EJB Test Client wizard that is intended to create a simple client application to test your enterprise bean. You can also use it to get started building your actual client application. Inform the wizard of the name of one of enterprise beans the client will access, and the wizard writes the code that gets a naming context, locates the bean’s home interface and secures a reference to its remote interface.
Your client is likely to call multiple beans, however, so you’ll have to perform these steps in your client code for other beans it accesses. And you’ll add the calls that access the business logic of the enterprise beans to your client code yourself.
For more information on using the EJB Test Client wizard, see “Creating a test client” on page 5-1.

12-10 E n t e r p r i s e J a v a B e a n s D e v e l o p e r ’ s G u i d e

M a n a g i n g t r a n s a c t i o n s 13-1
C h a p t e r
13Chapter13Managing transactions
You can benefit from developing applications on platforms such as Java 2 Enterprise Edition (J2EE) that support transactions. A transaction-based system simplifies application development because it frees you, the developer, from the complex issues of failure recovery and multi-user programming. Transactions aren’t limited to single databases or single sites. Distributed transactions can simultaneously update multiple databases across multiple sites.
A developer usually divides the total work of an application into a series of units. Each unit of work is a separate transaction. As the application progresses, the underlying system ensures that each unit of work, each transaction, fully completes without interference from other processes. If it doesn’t, the system rolls back the transaction and completely reverses the work the transaction had performed so that the application is back to the same state before the transaction began.
Characteristics of transactionsUsually transactions refer to operations that access a database. All access to the database occurs in the context of a transaction. All transactions share these characteristics, denoted by the acronym ACID:
• Atomicity
Usually a transaction consists of more than a single operation. Atomicity requires that all of the operations of a transaction are performed successfully for the transaction to be considered complete. If all of a transaction’s operations can’t be performed, that none of them are allowed to be performed.

13-2 E n t e r p r i s e J a v a B e a n s D e v e l o p e r ’ s G u i d e
T r a n s a c t i o n s u p p o r t i n t h e c o n t a i n e r
• Consistency
Consistency refers to database consistency. A transaction must move the database from one consistent state to another, and it must preserve the database’s semantic and physical integrity.
• Isolation
Isolation requires that each transaction appear to be the only transaction currently manipulating the data in the database. Although other transactions can run concurrently, a transaction shouldn’t see these manipulations until and unless they complete successfully and commit their work. Because of interdependencies among updates, a transaction might get an inconsistent view of the data were it to see just a subset of another transaction’s updates. Isolation protects a transaction from this sort of data inconsistency.
Isolation is related to transaction concurrency. There are levels of isolation. Higher degrees of isolation limit the extent of concurrency. The highest level of isolation occurs when all transactions can be serialized. That is, the database contents appear as if each transaction ran by itself to completion before the next transaction began. Some applications, however, might be able to tolerate a reduced level of isolation for a higher degree of concurrency. Usually these applications run a greater number of concurrent transactions, even it transactions are reading data that might be partially updated and possibly inconsistent.
• Durability
Durability means that updates made by committed transactions persist in the database regardless of failure conditions. Durability guarantees that committed updates remain in the database despite failures that occur after the commit operation, and that the databases can be recovered after a system or media failure.
Transaction support in the containerAn EJB container supports flat transactions, but not nested ones. It also propagates transactions implicitly. This means that you don’t have to explicitly pass the transaction context as a parameter, because the container handles this task for the client transparently.
You should keep in mind that JSPs and servlets, while they can act as clients, aren’t designed to be transactional components. Use enterprise beans to perform transactional work. When you invoke an enterprise bean to perform the transactional work, the bean and container set up the transaction properly.

M a n a g i n g t r a n s a c t i o n s 13-3
E n t e r p r i s e b e a n s a n d t r a n s a c t i o n s
Enterprise beans and transactionsEnterprise beans and the EJB container greatly simplify transaction management. Enterprise beans make it possible for an application to update data in multiple databases in a single transaction, and these databases can reside on multiple EJB servers.
Traditionally, an application responsible for managing transactions had to perform these tasks:
• Creating the transaction object• Explicitly starting the transaction• Keeping track of the transaction context• Committing the transaction when all updates completed
Such an application demanded a very skilled developer and it was easy for errors to creep in.
Using enterprise beans, the container manages most if not all aspects of the transaction for you. It starts and ends the transaction and maintains its context throughout the life of the transaction object. Your responsibilities are greatly reduced, especially for transactions in distributed environments.
An enterprise bean’s transaction attributes are declared at deployment time. These transaction attributes indicate whether the container manages the bean’s transactions, or whether the bean manages its own transactions and to what extent.
Bean- versus container-managed transactions
When an enterprise bean programmatically performs its own transaction demarcation as part of its business methods, that bean is considered to be using bean-managed transaction. (To demarcate a transaction means to indicate where a transaction begins and where it ends.) When a bean defers all transaction demarcation to its EJB container, the container performs the transaction demarcation based on the application assembler’s deployment instructions. This is called using container-managed transaction.
Both stateful and stateless session beans can use either type of transaction. A bean can’t use both types of transaction management at the same time, however. The bean provider decides which type the session bean will use. Entity beans can use container-managed transactions only.
You might want a bean to manage its own transaction if you want to start a transaction as part of one operation, and then finish the transaction as part of another operation. You might encounter problems, however, if one

13-4 E n t e r p r i s e J a v a B e a n s D e v e l o p e r ’ s G u i d e
E n t e r p r i s e b e a n s a n d t r a n s a c t i o n s
operation calls the transaction starting method, but no operation calls the transaction ending method.
Whenever possible, you should write enterprise beans that use container-managed transactions. They require less work on your part and are less prone to errors. Also, it’s easier to customize a bean with a container-managed transaction and to use it to compose other beans.
Transaction attributes
Enterprise beans that use container-managed transaction have transaction attributes associated with each method of the bean or with the bean as a whole. The attribute value tells the container how it must manage the transactions that involve the bean. There are six different transaction attributes that the application assembler or deployer can associate with each method of a bean:
• Required
Guarantees that the work performed by the associated method is within a global transaction context. If the caller already has a transaction context, the container uses the same context. If the caller doesn’t have a transaction context, the container begins a new transaction automatically. Using this attribute makes it easy to compose multiple beans and coordinate the work of all the beans using the same global transaction.
• RequiresNew
Used when you don’t want the method associated with an existing transaction. It ensures that the container always begins a new transaction.
• Supports
Permits the method to avoid using a global transaction. Use this attribute only when a bean’s method accesses just one transaction resource or no transaction resources, and the method doesn’t invoke another enterprise bean. Because this attribute avoids the cost associated with global transactions, using it optimizes your bean. If this attribute is set and a global transaction already exists, the container invokes the method and it joins the existing global transaction. If there is no global transaction, the container starts a local transaction for the method and the transaction completes at the end of the method.
• NotSupported
Also permits the bean to avoid using a global transaction. If a client calls the method with a transaction context, the container suspends it. At the end of the method, the global transaction resumes.
M a n a g i n g t r a n s a c t i o n s 13-5
E n t e r p r i s e b e a n s a n d t r a n s a c t i o n s
• Mandatory
The client that calls a method with this transaction attribute must already have an associated transaction. If it doesn’t, the container throws a javax.transaction.TransactionRequiredException. Using this attribute makes the bean less flexible for composition because it makes assumptions about the caller’s transaction.
• Never
The client that calls a method with this transaction attribute must not have a transaction context. If it does, the container throws an exception.
Local and global transactions
When a single connection to a database exists, the enterprise bean can directly control the transaction by calling commit() or rollback() on the connection. This type of transaction is a local transaction. Using global transactions, all database connections are registered with the global transaction service, which handles the transaction. For a global transaction, the enterprise bean never makes calls directly on a database connection itself.
A bean that uses bean-managed transaction demarcation uses the javax.transaction.UserTransaction interface to identify the boundaries of a global transaction. When a bean uses container-managed demarcation, the container interrupts each client call to control the transaction demarcation, using the transaction attribute set in the bean’s deployment descriptor by the application assembler. The transaction attribute also determines whether the transaction is local or global.
For container-managed transactions, the container follows certain rules to determine when it should do a local versus a global transaction. Usually a container calls the method within a local transaction after verifying that no global transaction already exists. It also verifies that it isn’t expected to start a new global transaction and that the transaction attributes are set for container-managed transactions. The container automatically wraps a method call within a local transaction if one of the follow conditions is true:
• The transaction attribute is set to NotSupported and the container detects that the database resources were accessed.
• The transaction attribute is set to Supports and the container detects that the method wasn’t invoked from within a global transaction.
• The transaction attribute is set to Never and the container detects that database resources are accessed.

13-6 E n t e r p r i s e J a v a B e a n s D e v e l o p e r ’ s G u i d e
U s i n g t h e t r a n s a c t i o n A P I
Using the transaction APIAll transactions use the Java Transaction API (JTA). When transactions are container managed, the platform handles the demarcation of transaction boundaries and the container uses the JTA API. You never need to use this API in your bean code.
If your bean manages its own transactions, it must use the JTA javax.transaction.UserTransaction interface. This interface allows a client or component to demarcate transaction boundaries. Enterprise beans that use bean-managed transactions use the EJBContext.getUserTransaction() method.
Also, all transactional clients use JNDI to look up the UserTransaction interface. Do this by constructing a JNDI InitialContext using the JNDI naming service, such as shown here:
javax.naming.Context context = new javax.naming.InitialContext();
Once the bean has the InitialContext, it can then use the JNDI lookup() operation to obtain the UserTransaction interface:
javax.transaction.UserTransaction utx = (javax.transaction.UserTransaction) context.lookup("java:comp/UserTransaction")
Note than an enterprise bean can obtain a reference to the UserTransaction interface from the EJBContext object. The bean can simply use the EJBContext.getUserTransaction() method rather than having to obtain an InitialContext object and then using the JNDI lookup() method. A transactional client that isn’t an enterprise bean, however, must use the JNDI lookup approach.
When the bean or client has the reference to the UserTransaction interface, it can then initiate its own transactions and manage them. That is, you can use the UserTransaction interface methods to begin and commit (or rollback) transactions. You use the begin() method to start the transaction, then the commit() method to commit the changes to the database. Or, you use the rollback() method to abort all changes made within the transaction and restore the database to the state it was in prior to the start of the transaction. Between the begin() and commit() methods, you include the code to carry out the business of the transaction. Here’s an example:
public class NewSessionBean implements SessionBean { EJBContext ejbContext; public void doSomething(...) { javax.transaction.UserTransaction utx; javax.sql.DataSource dataSource1; javax.sql.DataSource dataSource2; java.sql.Connection firstConnection; java.sql.Connection secondConnection; java.sql.Statement firstStatement; java.sql Statement secondStatement;

M a n a g i n g t r a n s a c t i o n s 13-7
H a n d l i n g t r a n s a c t i o n e x c e p t i o n s
java.naming.Context context = new javax.naming.InitialContext(); dataSource1 = (javax.sql.DataSource) context.lookup("java:comp/env/jdbcDatabase1"); firstConnection = dataSource1.getConnection(); firstStatement = firstConnection.createStatement(); dataSource2 = (javax.sql.DataSource) context.lookup("java:comp/env/jdbcDatabase2"); secondConnection = dataSource2.getConnection(); secondStatement = secondConnection.createStatement(); utx = ejbContext.getUserTransaction(); utx.begin(); firstStatement.executeQuery(...); firstStatement.executeUpdate(...); secondStatement.executeQuery(...); secondStatement.executeUpdate(...); utx.commit(); firstStatement.close; secondStatement.close firstConnection.close(); secondConnection.close(); } ...
Handling transaction exceptionsEnterprise beans can throw application and/or system-level exceptions if they encounter errors while handling transactions. Application-level exceptions arise from errors in the business logic. The calling application must handle them. System-level exceptions, such as runtime errors, transcend the application itself and can be handled by the application, the enterprise bean, or the bean container.
The enterprise bean declares application-level exceptions and system-level exceptions in the throws clauses of its Home and Remote interfaces. You must check for checked exceptions in your client application’s try/catch block when calling bean methods.

13-8 E n t e r p r i s e J a v a B e a n s D e v e l o p e r ’ s G u i d e
H a n d l i n g t r a n s a c t i o n e x c e p t i o n s
System-level exceptions
An enterprise bean throws a system-level exception (usually a java.ejb.EJBException, but possibly a java.rmi.RemoteException) to indicate an unexpected system-level failure. For example, it throws an exception if it can’t open a database connection. The java.ejb.EJBException is a runtime exception and it isn’t required to be listed in the throws clause of the bean’s business methods.
System-level exceptions usually require the transaction to be rolled back. Often the container managing the bean does the rollback. Sometimes the client must roll back the transaction, though, especially if transactions are bean-managed.
Application-level exceptions
The bean throws an application-level exception to indicate application-specific error conditions. These are business logic errors, not system problems. Application-level exceptions are exceptions other than java.ejb.EJBException. Application-level exceptions are checked exceptions, which means you must check for them when you call a method that potentially can throw this exception.
The bean’s business methods use application exceptions to report abnormal application conditions, such as unacceptable input values or amounts beyond acceptable limits. For example, a bean method that debits an account balance might throw an application exception to report that the account balance isn’t sufficient to permit a particular debit operation. A client can often recover from these application-level errors without having to roll back the entire transaction.
The application or calling program gets back the same exception that was thrown, allowing the calling program to know the precise nature of the problem. When an application-level exception occurs, the enterprise bean instance doesn’t automatically roll back the client’s transaction. The client now has the knowledge and the opportunity to evaluate the error message, take the necessary steps to correct the situation, and recover the transaction. Or the client can abort the transaction.
Handling application exceptions
Because the application-level exceptions report business logic errors, your client must handle these exceptions. While these exceptions might require transaction rollback, they don’t automatically mark the transaction for rollback. The client can retry the transaction, although often it must abort and roll back the transaction.
M a n a g i n g t r a n s a c t i o n s 13-9
H a n d l i n g t r a n s a c t i o n e x c e p t i o n s
You, as the bean provider, must ensure that the state of the bean is such that if the client continues with the transaction, there is no loss of data integrity. If you can’t ensure this, you must mark the transaction for rollback.
Transaction rollbackWhen your client gets an application exception, first check if the current transaction has been marked for rollback only. For example, a client might receive a javax.transaction.TransactionRolledbackException. This exception indicates that the helper enterprise bean failed and the transaction has been aborted or marked “rollback only”. Usually the client doesn’t know the transaction context within which the enterprise bean operated. The bean might have operated in its own transaction context separate from the calling program’s transaction context, or it might have operated in the calling program’s context.
If the enterprise bean operated in the same transaction context as the calling program, then the bean itself (or its container) has already marked the transaction for rollback. When an EJB container marks a transaction for rollback, the client should stop all work on the transaction. Usually a client using declarative transactions gets an appropriate exception, such as javax.transaction.TransactionRolledbackException. Note that declarative transactions are those transactions where the container manages the transaction details.
A client that is itself an enterprise bean should call the javax.ejbEJBContext.getRollbackOnly() method to determine if its own transaction has been marked for rollback.
For bean-managed transactions—those transactions managed explicitly by the client—the client should roll back the transaction by calling the rollback() method from the java.transaction.userTransaction interface.
Options for continuing a transactionWhen a transaction isn’t marked for rollback, the client has these options:
• Roll back the transaction.
When a client receives a checked exception for a transaction not marked for rollback, its safest course is to roll back the transaction. The client does this by either marking the transaction as rollback only or, if the client has actually started the transaction, calling the rollback() method to actually roll back the transaction.
• Pass the responsibility by throwing a checked exception or re-throwing the original exception.
The client can also throw its own checked exception or re-throw the original exception. By throwing an exception, the client lets other programs further up the transaction chain decide whether to abort the

13-10 E n t e r p r i s e J a v a B e a n s D e v e l o p e r ’ s G u i d e
H a n d l i n g t r a n s a c t i o n e x c e p t i o n s
transaction. Usually, however, it’s preferable for the code or program closest to the occurrence of the problem to make the decision about continuing the transaction or not.
• Retry and continue the transaction. This might entail retrying portions of the transaction.
The client can continue with the transaction. The client can evaluate the exception message and decide if calling the method again with difference parameters is likely to succeed. You must remember, however, that retrying a transaction is potentially dangerous. Your code doesn’t know if the enterprise bean properly cleaned up its state.
Clients that are calling stateless session beans, however, can retry the transaction if they can determine the problem from the thrown exception. Because the called bean is stateless, there is no improper state to worry about.
If you are using the Borland AppServer, see the “Transaction Management” chapter in the Borland AppServer’s Enterprise JavaBeans Programmer’s Guide for additional information about transactions and the Borland container.

I n d e x I-1
Aactivating
entity beans 10-4session beans 9-7
adding business methods to EJB 3-8adding properties to EJB 3-8afterBegin() 9-8afterCompletion() 9-8Always Create JAR When Building option 3-16application assembler
EJB role 1-3application EJB roles 1-3application server
Borland target 2-1EJB 1.1 2-4selecting 2-4setting up target 2-1WebLogic target 2-1WebSphere target 2-1
application server filesadding to a project 2-3
architectureEnterprise JavaBeans 1-4
attributestransaction 13-3, 13-4
BBean designer
Methods page 3-10Properties page 3-8
bean developerEJB role 1-3tasks 1-6
bean providerEJB role 1-3tasks 1-6
bean-managed persistence 7-11, 10-1, 10-2, 10-20disadvantages 10-2finder methods 10-3
bean-managed transactions 13-3, 13-6BeansExpress
exposing EJB methods 3-10beforeCompletion() 9-8Borland
contacting 1-8target application server 2-1
Borland Online 1-9build properties
EJB groups 3-16Build Properties dialog box 3-18
business methods 10-7adding to enterprise bean 3-8entity beans 10-5exposing EJB 3-10invoked by client 12-1, 12-4remote interface 3-10, 11-6writing 9-3
CCart sample bean 9-10checkExistenceBeforeCreate property 7-14client stubs
generating 3-16clients
creating with JBuilder 12-9enterprise bean 12-1invoking business methods 12-4locating home interface 12-2managing transactions 12-7obtain remote interface 12-2removing bean instances 12-5
contacting Borland 1-8newsgroups 1-9World Wide Web 1-9
container providerEJB role 1-3
container-managed persistence 7-11, 10-1, 10-2, 10-20
advantages 10-2limitations 10-2no primary key class 10-5
container-managed transactions 13-3adding 7-19
containers, EJB 1-5See also EJB container
create methodsentity bean 10-5, 12-3session bean 12-2
create()entity beans 11-4exceptions 11-3, 11-4session beans 11-3
CreateException exception 11-3, 11-4
Ddata sources
EJB 7-20properties 7-22transaction isolation levels 7-22
DataExpress for EJB components 8-1
Index

I-2 E n t e r p r i s e J a v a B e a n s D e v e l o p e r ’ s G u i d e
deactivatingsession bean instances 9-7
deletingEJB instances 11-2enterprise beans 11-7
Deploy Settings dialog box 6-1deployed EJB JARS
listing 6-9deployer
EJB role 1-4deploying
EJB JAR to running container 6-9EJB JARs 6-5enterprise beans 6-1, 6-5enterprise beans to WebLogic 6-1, 6-8enterprise beans to WebSphere 6-1, 6-8
Deployment Descriptor editor 7-1Data Source panel 7-20data source properties 7-22displaying 7-2EJB References panel 7-8Environment panel 7-6Finders panel 7-13Main panel 7-4method permissions 7-25Persistence panel 7-11Properties panel 7-14Resource References panel 7-10Security Role References panel 7-9security roles 7-24transaction isolation levels 7-22verifying descriptors 7-27
deployment descriptorsadding information for new bean 7-4application assembly information 6-4changing bean information 7-4creating 6-2, 7-1data source properties 7-22data sources 7-20editing 3-18, 7-1EJB references 7-8entity bean sample 10-20environment properties 7-6finder methods 7-13information in 6-3inserting into EJB group 3-16method permissions 7-25persistence 7-11properties 7-14purpose 6-2resource references 7-10security roles 7-9, 7-24session bean 9-17structural information 6-3transaction isolation levels 7-22
transaction policies 7-19verifying 7-27viewing 7-2XML file 3-18
deployment EJB role 1-4deployment options
EJB 6-9design patterns
Session Bean wrap Entity Bean 8-1developer support 1-8distributed applications
EJB 1-1documentation conventions 1-10
platform conventions 1-11
Eediting deployment descriptors 7-1EJB 1-1
See also Enterprise JavaBeansEJB 1.1 application server 2-4EJB Bean Generator wizard 3-11EJB client components 8-2EJB components 8-1EJB container
activating session beans 9-7container-managed persistence 10-2creates EJBObject 11-7deactivating session beans 9-7defined 1-5implements home interface 11-1life cycle of entity bean 10-8life cycle of stateful beans 9-6life cycle of stateless beans 9-5provider 1-3transaction support 13-2
EJB deployment optionssetting 6-9
EJB Deployment wizard 6-5EJB Entity Bean Modeler wizard 4-1EJB Group From Descriptors wizard 3-3EJB groups
build properties 3-16copy deployment descriptors from 3-16creating 3-2defined 3-1, 3-2empty 3-2file extensions 3-1from deployment descriptors 3-3inserting deployment descriptors into 3-16types 3-1
EJB Interface Generator wizard 3-13EJB roles 1-2EJB server
defined 1-5provider 1-3

I n d e x I-3
EJB server components 8-2EJB Test Client wizard 5-1EJB wizards
EJB Bean Generator 3-11EJB Group From Descriptors 3-3EJB Interface Generator 3-13Empty EJB Group 3-2enabling 2-1Enterprise JavaBean 3-4Entity Bean Modeler 4-1Test Client 5-1Use Test Client 5-3
ejbActivate() 9-3, 10-4ejbCreate() 10-5
called by container 10-5requirements 9-3, 10-5sample 10-6
ejbFindByPrimaryKey() 10-6EJBHome base class
extended by home interface 11-2ejb-jar.xml 3-18ejbLoad() 10-4EJBMetaData interface 12-8EJBObject interface 11-7
extended by remote interface 11-6ejbPassivate() 9-3, 10-4ejbPostCreate() 10-6ejbRemove() 9-3, 10-4ejbStore() 10-4Empty EJB Group wizard 3-2Enable Integration option 2-1enabling
EJB wizards 2-1enterprise beans 1-1
build properties 3-16business methods 10-7comparing two 11-7compiling 3-16creating with wizards 3-4deploying 6-1, 6-5deploying to WebLogic servers 6-8deploying to WebSphere servers 6-8deployment options 6-9developing with JBuilder 1-7entity 1-7generating from remote interface 3-11getting information 12-8hot deploying 6-9how they work 1-6managing resources 9-3removing instances 11-7running 5-5session 1-7
test client 5-1testing 5-5testing remote methods 5-1transactions 13-3types 1-7
Enterprise JavaBean wizard 3-4Enterprise JavaBeans 1-1
1.1 specification 1-1architecture 1-4developing 1-1enabling wizards 2-1roles 1-2types 1-7why needed 1-1
Enterprise Setup menu command 2-1EnterpriseBean interface
extended by EntityBean 10-4extended by SessionBean 9-2
entity bean classesrequirements 10-3writing 10-3
entity beans 1-7create() 11-4, 12-3data sources 7-20defined 10-1finder methods 7-13, 11-5, 12-3home interface 10-10, 11-4methods 10-5nonexistent state 10-8persistence 10-1pooled state 10-9primary keys 10-3, 12-3providing 8-1ready state 10-9referencing 12-3remote interface 10-11removing 10-1resolving data to 8-1sample 10-10, 10-12, 10-13sharing home and remote interfaces 10-10states 10-8writing 10-3
EntityBean interfaceentity bean implements 10-3implementing 10-4methods 10-4
environment propertiesEJB 7-6
exceptionsapplication transaction 13-8application-level 13-8system-level transaction 13-8transaction 13-7

I-4 E n t e r p r i s e J a v a B e a n s D e v e l o p e r ’ s G u i d e
FfindByPrimaryKey() 11-5, 12-4finder methods 7-13, 10-5, 11-5, 12-2, 12-3
creating 10-6default 12-4entity beans 10-3prefix 11-5requirements 10-7
FinderException exception 11-5finding entity objects
primary key 11-7fonts
JBuilder documentation conventions 1-10
GGenerate IIOP option 3-16getEJBHome()
EJBObject 11-7getEJBMetaData() 11-2
EJBHome 11-2getHandle()
EJBObject 11-7getHomeHandle()
EJBHome 11-2getMetaData()
enterprise bean 12-8getPrimaryKey()
EJBObject 11-7getPrimaryKeyAfterInsertSql property 7-14getPrimaryKeyBeforeInsertSql property 7-14getRollbackOnly() 13-9
Hhandles
EJB 11-2getting enterprise 11-7
home and remote interfacesentity beans sharing 10-10
home interfaceclient locates 12-1, 12-2create methods 12-2, 12-4creating 11-1, 11-2creating for existing enterprise bean 3-13defined 11-1entity bean requirements 11-4entity bean sample 11-6entity beans 10-10, 11-4extends EJBHome 11-2finder methods 11-5, 12-2naming 11-1remove methods 12-4session bean requirements 11-3
session bean sample 11-3session beans 11-2
hot deployingenterprise beans 6-9
Iiaspt.ini file 7-28ignoreColumnsOnInsert property 7-14infrastructure EJB roles 1-3initial naming context
obtaining 12-2InitialContext 13-6interfaces
home 11-1remote 11-6
isIdentical()EJBObject 11-7
isolation levels 7-22
JJava Transaction API (JTA) 13-6jdbcAccesserFactory property 7-14JNDI
API 12-2naming service 12-2, 13-6
Llibraries
application server files 2-3listing deployed JARS 6-9locating
enterprise beans with primary key 11-7lookup() 12-2
MMandatory transaction attribute 13-4metadata
defined 12-8method permissions 6-5, 7-25method-ready state
defined 9-6in transaction 9-7
multi-tier applicationsfor distributed systems 1-1
Nnaming context
obtaining 12-2Never transaction attribute 13-4newsgroups 1-9
Borland 1-9
I n d e x I-5
nonexistent stateentity beans 10-8
NotSupported transaction attribute 13-4
Oonline resources 1-9operation EJB role 1-4
Ppassivation 9-7, 10-4persistence 1-7
bean-managed 7-11, 10-1, 10-2bean-managed disadvantages 10-2container-managed 7-11, 10-1, 10-2container-managed advantages 10-2container-managed disadvantages 10-2container-managed versus bean-managed 10-2entity beans 7-11, 10-1
persistingentity beans 7-11
polled stateentity beans return to 10-9
pooled stateentity beans 10-9
portsVisiBroker SmartAgent 2-3
primary keyentity bean 12-3locating entity objects 11-5obtaining 11-7
primary key class 10-3, 12-4entity bean requirements 10-3
primaryKeyGenerator property 7-14properties
data source 7-22deployment descriptor 7-14EJB 7-14
providing datafrom entity beans 8-1
Rready state
entity beans 10-9redeploying
EJB JAR 6-9references
EJB 7-8referencing enterprise beans
create methods 12-2, 12-3finder methods 12-2, 12-4using handles 12-6
reflectionbyte-code 7-28
remote and home interfacesentity beans sharing 10-10
remote interface 11-6business methods 3-10client obtains reference 12-1creating for existing bean 3-13creation 11-6defined 11-1entity beans 10-11extends EJBObject 11-7generating EJB from 3-11reference 12-2reference to entity bean 12-3reference to session bean 12-2requirements 11-6session bean sample 11-7
remote methodstesting 5-1
RemoteException exception 11-3, 11-4, 11-5, 11-6Remove Stub Files On Application Server Change
option 3-16remove()
EJBHome 11-2EJBObject 11-7
removingdeployed EJB JAR 6-9EJB instances 11-2enterprise bean instances 11-7entity bean instances 10-1, 12-4session bean instances 12-5
Required transaction attributes 13-4RequiresNew transaction attribute 13-4resolving data
to entity beans 8-1resource references
EJB 7-10roles
application EJB 1-3deployment 1-4EJB 1-2infrastructure EJB 1-3operation 1-4
rollback() 13-9rolling back transactions 13-9runtime configurations
Client and Server 5-5
Ssample EJB client applications
SortClient 12-1sample entity bean
CheckAccount 10-12SavingsAccount 10-13
sample session beanCartBean 9-9

I-6 E n t e r p r i s e J a v a B e a n s D e v e l o p e r ’ s G u i d e
security role references 6-5security roles 6-4
creating 7-24EJB 7-9, 7-24
server providerEJB 1-3EJB role 1-3
serversEJB 1-5running EJB 5-5
session bean classesrequirements 9-2
Session Bean wrap Entity Bean design pattern 8-1session beans 1-7, 9-1
Cart sample 9-10create methods 12-2create() 11-3creating with JBuilder 9-4home interface 11-2implementing required methods 9-11life cycle 9-5method-ready state 9-6referencing 12-2remove() 12-5sample 9-9SessionSyncronization interface 9-7stateful 9-1, 12-2stateless 9-2, 12-2stateless pool 9-5types 9-1writing 9-2
SessionBean interfaceextending 9-2methods 9-2
SessionContext interface 9-8SessionSynchronization interface
methods 9-8stateful session beans 9-7
setEntityContext() 10-4setRollbackOnly() 9-8setSessionContext() 9-3sharing home and remote interfaces 10-10shopping cart
session bean sample 9-9SmartAgent 2-3stateful beans
life cycle 9-6stateless beans
life cycle 9-5stubs
generating client 3-16Supports transaction attribute 13-4system administrator
EJB role 1-4
Ttarget application server 2-1technical support 1-8test clients
creating EJB 5-1declaring instance of 5-3running EJB 5-5using EJB 5-3
testing enterprise bean methods 5-1testing enterprise beans 5-5transaction
attributes 13-4boundaries 12-7, 13-6demarcation 13-3policies 7-19
transaction-ready state 9-8transactions
and enterprise beans 13-3atomicity characteristic 13-1attributes 13-3bean-managed 13-3characteristics 13-1concurrency characteristic 13-1consistency 13-1container-managed 7-19, 13-3, 13-5demarcation 13-6durability characteristic 13-1exceptions 13-7global 13-5isolation characteristic 13-1isolation levels 7-22local 13-5managed by client 12-7rolling back 13-9
Uundeploying an EJB JAR 6-9unsetEntityContext() 10-4Use EJB Test Client wizard 5-3Usenet newsgroups 1-9UserTransaction interface 12-7, 13-5, 13-6
Vverifying
deployment descriptors 7-27VisiBroker
ORB, making available to JBuilder 2-3SmartAgent 2-3

I n d e x I-7
WWebLogic
Deploy Settings dialog box 6-5deployment descriptors 3-18target application server 2-1
WebLogic EJB propertiesviewing and editing 7-26
WebLogic serversdeploying to 6-8
weblogic-ejb-jar.xml 3-18WebSphere
Deploy Settings dialog box 6-5target application server 2-1
WebSphere EJB propertiesviewing and editing 7-26
WebSphere serversdeploying to 6-8
wizardsEJB Bean Generator 3-11EJB Deployment 6-5EJB Entity Bean Modeler 4-1EJB Group From Descriptors 3-3EJB Interface Generator 3-13EJB Test Client 5-1Empty EJB Group 3-2enabling EJB 2-1Enterprise JavaBean 3-4Use Test Client 5-3