enter the number of lines to print : 10 -...
TRANSCRIPT

COMPUTER PRACTICE LABORATORY-I
1
WORD PROCESSING

COMPUTER PRACTICE LABORATORY-I
2
Ex. No. 1
Date : DOCUMENT CREATION
AIM
To create a document and Manipulate Text with Scientific notations.
PROCEDURE
I. Open a new document using File -> New option and type the text. II. Bold, Italic, Underline, Spell check
1. Select the word.
2. Press CTRL+B or button on the formatting toolbar.
3. Press CTRL+I or button on the formatting toolbar.
4. Press CTRL+U or button on the formatting toolbar. 5. Right click on the word, Click Spelling and Grammar on tools or button on the standard tool bar.
III. Saving the document 1. Press CTRL+S or button on the standard tool bar or 2. Select the Save option from the File menu. It shows the Save As dialog box. Choose a suitable file name in File name text box. Then click save button on Save As dialog box.
IV. Alignment
1. Select the text for alignment.
2. Left alignment: Press CTRL+L or button on the formatting toolbar.
3. Right alignment: Press CTRL+R or button on the formatting toolbar.
4. Center alignment: Press CTRL+E or button on the formatting toolbar.
5. Justification: Press CTRL+J or button on the formatting toolbar.
V. Bullets and Numbering 1. Select the text.
2. Click Bullets button on the formatting tool bar or choose Bullets and Numbering option from the Format menu. The following dialog box appears. 3. Choose required Bullet from the Bullet tab for Bullets. 4. Choose Numbering button on the formatting tool bar or choose required number series from the Numbered tab in the Bullets and Numbering dialog box.
VI. Line Spacing 1. Select the paragraphs of the document or choose Select All option from the Edit menu or by pressing CTRL + A. 2. Choose paragraph option from the Format menu. A paragraph dialog box appears. 3. Select the line spacing that is required then click ok.

COMPUTER PRACTICE LABORATORY-I
3
VII. Font Type and Size
1. Select the required text. 2. Choose Font option from the Format menu. The Font dialog box appear as shown below. 3. Choose the required font type from the Font drop down list box and the required size from the Size list box on the Font Dialog box. Then click OK.
VIII. Inserting Symbols 1. Type the text, then put the cursor where the symbol is to be inserted. 2. Choose Symbols option from the Insert menu. 3. It shows the Symbol dialog box. Then choose the appropriate Font type. 4. Then choose the required symbol from the Symbols dialog box. Then click OK.
IX. Adding Animation to the text 1. Type and select the required text. 2. Choose Format -> Font option. 3. Font dialog box is displayed, choose Text Effects tab. 4. Choose the required animation and click OK.
X. Highlighting the Words in a Document 1. Select the Text Highlight Color option from Font tool Bar. 2. Select the word/ Text which you want to change the color.

COMPUTER PRACTICE LABORATORY-I
4
OUTPUT
Characteristics of computers
• Speed Computers process data at extremely fast rate, at millions of instructions per second. A computer can perform a huge task that a normal human being may take days or even years to complete. The speed of a computer is calculated in MHz (MegaHertz) ie. One Million instructions per second.
• 2. Accuracy Computers are very accurate. The level of accuracy depends on the instructions and type of
machine being used. Faulty instructions for data processing lead to faulty results. This is called
GIGO (Garbage In Garbage Out).Computer’s physical circuits rarely make errors, if the data and
instruction are correctly fed. Most of the errors occurring in computers are either hardware errors
or human errors.
Scientific Notation
1. C2H6 + 3.5 O2 à 2 CO2 + 3 H2O
2. (X + Y)2 = X2 + Y2 + 2XY
RESULT
Thus the document has been created as per the format given.

COMPUTER PRACTICE LABORATORY-I
5
Ex. No. 2
Date : TABLE CREATION AND MANIPULATION
AIM To Create the Table, formatting the table and Table Conversion using Ms – Word. PROCEDURE I. Table Insertion
1. Choose Insert ->Table->Insert table option. 2. Choose the required number of rows and columns and then click OK.
II. Split and merge cells 1. Select the cell to be splitted. 2. Select Split cell option from the Layout menu, the split cells dialog box appears. 3. Enter the choice to split cells and click OK. 4. Select the cells in the table for merging. 5. Select the Merge cell option from the Layout menu.
III. Sorting the table contents 1. Select the table to be sorted and choose Sort option from the Layout menu in Table tools. 2. The sort dialog box is displayed. 3. Choose the required column for sorting in the Sort list box and click OK.
IV. Splitting the table 1. Select the row from which the table is to be divided. 2. Choose Split table option from the Layout menu in Table tools.
V. Calculations using formula 1. Insert the table & type the required information. 2. Place the cursor in the cell at which calculation result is to be displayed. For example, finding the maximum in a column. 3. Choose Formula option from the Layout menu in Table tools, Formula dialog box is displayed.
VI. Auto formatting the table 1. Select the table. 2. Choose Table AutoFormat option in the Design menu which shows the Table Auto format dialog box. 3. Choose the required format from the Formats list box and click OK.
VII. Converting the table to text 1. Select the table. 2. Choose the Convert Table to Text options from the Layout menu in Table tools. 3. Now it shows the Convert table to text dialog box. 4. Choose the separator of the text and click OK.

COMPUTER PRACTICE LABORATORY-I
6
VIII. Converting the text to table
1. Select the text to be converted to table. 2. Select the Table option from the Insert menu and choose Convert text to table option. 3. Now it shows the Convert text to table dialog box. 4. Choose the table size and separator text option and click OK.

COMPUTER PRACTICE LABORATORY-I
7
OUTPUT (I) Table Insertion (II) Split Cell and Merge Cell
(III) Sorting the Table Content SLNO NAME MARK1 MARK2 MARK3 TOTAL 08CS05 Arunkumar 58 89 78 225 08CS26 Prasath 45 90 75 210 08CS43 Sivakumar 50 95 96 241 08CS58 Abdul 52 87 98 237 (IV) Split the Table (V) Calculation Using Formula SLNO NAME MARK1 MARK2 MARK3 TOTAL 08CS05 Arunkumar 58 89 78 225 08CS26 Prasath 45 90 75 210 08CS43 Sivakumar 50 95 96 241 08CS58 Abdul 52 87 98 237 (VI) Auto formatting the Table SLNO NAME MARK1 MARK2 MARK3 TOTAL 08CS05 Arunkumar 58 89 78 225 08CS26 Prasath 45 90 75 210 08CS43 Sivakumar 50 95 96 241 08CS58 Abdul 52 87 98 237

COMPUTER PRACTICE LABORATORY-I
8
(VII) Convert the Table to Text SLNO, NAME, MARK1, MARK2, MARK3, TOTAL 08CS05, Arunkumar, 58, 89, 78, 225 08CS26, Prasath, 45, 90, 75, 210 08CS43, Sivakumar, 50, 95, 96, 241 08CS58, Abdul, 52, 87, 98, 237 (VIII) Convert the Text to Table SLNO NAME MARK1 MARK2 MARK3 TOTAL 08CS05 Arunkumar 58 89 78 225 08CS26 Prasath 45 90 75 210 08CS43 Sivakumar 50 95 96 241 08CS58 Abdul 52 87 98 237
RESULT
Thus the table has been created, formatted and converted.

COMPUTER PRACTICE LABORATORY-I
9
Ex. No. 3
Date : MAIL MERGE AND LETTER PREPARATION
AIM
To do mail merge and prepare letters using MS-Word.
PROCEDURE I. Mail Merge
A. Creating the main document 1. on the menu bar, click on Tools-> Letters & Mailings-> Mail Merge. 2. A task pane will appear on the right of the word document. 3. Under Select document type, choose Letters 4. Click on Next: Starting document at the bottom of the task pane B. Selecting the starting document 1. Under Select starting document, select Use the current document will allow you to start from the current document shown on the screen. 2. Click on Next: Select recipients at the bottom of the task pane. C. Selecting recipients 1. Under Select recipients, click Type a new list. 2. Click Create..., the following window will appear. 3. In the New Address List window, type the data you want to Include under Enter Address information; for example, title, names, and address information. 4. To make another entry, click New Entry. 5. Repeat steps 3 and 4 until you've added all the entries you want, and then click Close. 6. In the Save Address List window, type a name for the data list in the File name field, and select a folder to save the list. 7. Click Save. 8. Click on Next: Write your letter.
D. Formatting letter 1. Type the text that you want to appear in every form letter. 2. Insert merge fields where you want to merge names, addresses, and other data from the data source (i.e. recipient list) by clicking anywhere you want in the main document to insert the field. 3. Then click on More Items and insert individual field. 4. Click Next: Preview your letters. E. Preview letters 1. To preview the items in order, click the arrows under the Preview your letters heading. 2. To locate a specific item, click Find a recipient..., and then enter the criteria in the Find field. 3. To change the list of recipients, click Edit recipient list..., and make your changes in the Mail Merge Recipients window. 4. Click on Next: Complete the Merge at the bottom of the task pane.

COMPUTER PRACTICE LABORATORY-I
10
F. Complete the merge 1. Click Edit individual letters 2. In the Merge to New Document window, select the records you want to merge. 3. Click OK.
II. Printing Labels
1. Choose Tools->Envelopes and Labels option. 2. It displays Envelopes and Labels dialog box. 3. Type the Label Address in the Address box. 4. Click on Full page of same label option. 5. Click on New document.

COMPUTER PRACTICE LABORATORY-I
11
OUTPUT
(I) Mail Merge Mail merged document 1 (Main document merged with the data source)
From: The Manager, Madhu Systems, No. 21 – 30, Third Floor, Mirinda Towers, Adyar, Chennai – 600 020. To: S. Ajith, No 25, Second Cross Street, Radha Nagar, Anna Nagar, Chennai – 600 040 Dear Sir / Madam, Sub: Interview call letter, requested regarding. You are requested to attend the interview, for the post of Project Trainee, in our concern on the 21st of may at 10.00 A.M. Please bring all your original certificates for the interview along with 2 copies of your updated resume. Thanking You, Your sincerely, (For Madhu Systems)

COMPUTER PRACTICE LABORATORY-I
12
Mail merged document 2 (Main document merged with the data source) From: The Manager, Madhu Systems, No. 21 – 30, Third Floor, Mirinda Towers, Adyar, Chennai – 600 020. To: A. Vijay, No 32 / A, Third Main Road, Krishna Nagar, Egmore, Chennai – 600 08 Dear Sir / Madam, Sub: Interview call letter, requested regarding. You are requested to attend the interview, for the post of Project Trainee, in our concern on the 21st of may at 10.00 A.M. Please bring all your original certificates for the interview along with 2 copies of your updated resume. Thanking You, Your sincerely, (For Madhu Systems)

COMPUTER PRACTICE LABORATORY-I
13
(II) Printing Labels
RESULT
Thus the letter has been created for multiple recipients using mail merge.

COMPUTER PRACTICE LABORATORY-I
14
Ex. No. 4
Date : DRAW - FLOWCHART
AIM
To draw a flowchart for addition of two numbers in MS word.
PROCEDURE
1. Choose Flowchart option in the Auto shapes menu of the Drawing toolbar in Insert menu. 2. Choose the appropriate flowchart symbol. Then drag the Symbol in the document. 3. Type the text in the symbol by Right-click then choose Add Text. 4. Using the Arrow button Line style button Arrow style in the Drawing toolbar. Draw the lines connecting to the different flowchart symbols. 5. Select all the flowchart symbols and lines in the document using the select object button, then Right-click to choose Grouping->Group.

COMPUTER PRACTICE LABORATORY-I
15
OUTPUT
(I) Addition of Two Numbers
RESULT
Thus the flowchart has been drawn using Auto shape tools.
START
READ A, B
C = A + B
PRINT C
STOP

COMPUTER PRACTICE LABORATORY-I
16
Microsoft Word shortcut keys Below is a listing of all the major shortcut keys in Microsoft Word. See our main shortcut page if you're looking for other shortcut keys used in other programs.
Shortcut Keys Description
Ctrl + A Select all contents of the page.
Ctrl + B Bold highlighted selection.
Ctrl + C Copy selected text.
Ctrl + E Aligns the line or selected text to the center of the screen.
Ctrl + F Open find box.
Ctrl + I Italic highlighted selection.
Ctrl + J Aligns the selected text or line to justify the screen.
Ctrl + K Insert link.
Ctrl + L Aligns the line or selected text to the left of the screen.
Ctrl + M Indent the paragraph.
Ctrl + P Open the print window.
Ctrl + R Aligns the line or selected text to the right of the screen.
Ctrl + T Create a hanging indent.
Ctrl + U Underline highlighted selection.
Ctrl + V Paste.
Ctrl + X Cut selected text.
Ctrl + Y Redo the last action performed.
Ctrl + Z Undo last action.
Ctrl + Shift + F Change the font.
Ctrl + Shift + > Increase selected font +1pts up to 12pt and then increases font +2pts.
Ctrl + ] Increase selected font +1pts.
Ctrl + Shift + < Decrease selected font -1pts if 12pt or lower, if above 12 decreases font by +2pt.
Ctrl + [ Decrease selected font -1pts.
Ctrl + Shift + * View or hide non printing characters.
Ctrl + <left arrow> Moves one word to the left.

COMPUTER PRACTICE LABORATORY-I
17
Ctrl + <right arrow> Moves one word to the right.
Ctrl + <up arrow> Moves to the beginning of the line or paragraph.
Ctrl + <down arrow> Moves to the end of the paragraph.
Ctrl + Del Deletes word to right of cursor.
Ctrl + Backspace Deletes word to left of cursor.
Ctrl + End Moves the cursor to the end of the document.
Ctrl + Home Moves the cursor to the beginning of the document.
Ctrl + Spacebar Reset highlighted text to the default font.
Ctrl + 1 Single-space lines.
Ctrl + 2 Double-space lines.
Ctrl + 5 1.5-line spacing.
Ctrl + Alt + 1 Changes text to heading 1.
Ctrl + Alt + 2 Changes text to heading 2.
Ctrl + Alt + 3 Changes text to heading 3.
Ctrl + F1 Open the Task Pane.
F1 Open Help.
Alt + Ctrl + F2 Open new document.
Ctrl + F2 Display the print preview.
Shift + F3 Change the text in Microsoft Word from upper to lower case or a capital letter at the beginning of every word.
Shift + Insert Paste.
F4 Repeat the last action performed (Word 2000+)
F5 Open the find, replace, and go to window in Microsoft Word.
Ctrl + Shift + F6 Opens to another open Microsoft Word document.
F7 Spell and grammar check selected text and/or document.
Shift + F7 Runs a Thesaurus check on the word highlighted.
F12 Save as.
Shift + F12 Save.
Ctrl + Shift + F12 Prints the document.
Alt + Shift + D Insert the current date.
Alt + Shift + T Insert the current time.

COMPUTER PRACTICE LABORATORY-I
18
Ctrl + Shift + = For Supercript
Ctrl + = For Subscript
In addition to the above shortcut keys users can also use their mouse as a method of quickly do something commonly performed. Below some are examples of mouse shortcuts.
Mouse shortcuts Description
Click, hold, and drag
Selects text from where you click and hold to the point you drag and let go.
Double-click If double-click a word, selects the complete word.
Double-click Double-clicking on the left, center, or right of a blank line will make the alignment of the text left, center, or right aligned.
Double-click Double-clicking anywhere after text on a line will set a tab stop.
Triple-click Selects the line or paragraph of the text the mouse triple-clicked.
Ctrl + Mouse wheel Zooms in and out of document.

COMPUTER PRACTICE LABORATORY-I
19
SPREAD SHEET

COMPUTER PRACTICE LABORATORY-I
20
Ex. No. 5
Date : SPREAD SHEET - CHART- LINE, XY, BAR & PIE
AIM
To draw Line, XY, Bar and Pie charts using MS- Excel. PROCEDURE
I. Line Chart 1. Enter the data in the spreadsheet. 2. Select the data and choose the insert tab. 3. Click the Line option in the charts group. A list of Line chart sub- types appear.
4. Choose a sub-type. Excel creates a line chart and the chart tools context tabs appear. 5. Choose the Design tab. Click on the chart layout and chart style. 6. Excel applies the layout and style to the chart. 7. Select Switch Row/Column to switch the row and column of the chart. 8. Click the Move Chart button. The Move Chart dialog box appears. Click the New sheet radio button and type the name of the new chart sheet. Excel creates a new chart sheet and places the chart on it. 9. Choose the Layout tab. Click on the Chart title option to type the title of the chart. 10. Similarly click on the Axis title option to type the title horizontally and vertically. 11. Click anywhere on the chart to end your entry.
II. Column Chart 1. Enter the data in the spreadsheet. 2. Select the data and choose the insert tab. 3. Click the Column option in the charts group. A list of Column chart sub-types appear.
4. Choose a sub-type. Excel creates a Column chart and the chart tools context tabs appear. 5. Choose the Design tab. Click on the chart layout and chart style. 6. Excel applies the layout and style to the chart. 7. Select Switch Row/Column to switch the row and column of the chart. 8. Click the Move Chart button. The Move Chart dialog box appears. Click the New sheet radio button and type the name of the new chart sheet. Excel creates a new chart sheet and places the chart on it. 9. Choose the Layout tab. Click on the Chart title option to type the title of the chart. 10. Similarly click on the Axis title option to type the title horizontally and vertically. 11. Click anywhere on the chart to end your entry.
III. Bar Chart 1. Enter the data in the spreadsheet. 2. Select the data and choose the insert tab. 3. Click the Bar option in the charts group. A list of Bar chart sub-types appears.
4. Choose a sub-type. Excel creates a bar chart and the chart tools context tabs appear. 5. Choose the Design tab. Click on the chart layout and chart style. 6. Excel applies the layout and style to the chart. 7. Select Switch Row/Column to switch the row and column of the chart.

COMPUTER PRACTICE LABORATORY-I
21
8. Click the Move Chart button. The Move Chart dialog box appears. Click the New sheet radio button and type the name of the new chart sheet. Excel creates a new chart sheet and places the chart on it. 9. Choose the Layout tab. Click on the Chart title option to type the title of the chart. 10. Similarly click on the Axis title option to type the title horizontally and vertically. 11. Click anywhere on the chart to end your entry.
IV. Pie Chart
1. Enter the data in the spreadsheet. 2. Select the data and choose the insert tab. 3. Click the Pie option in the charts group. A list of Pie chart sub-types appear.
4. Choose a sub-type. Excel creates a pie chart and the chart tools context tabs appear. 5. Choose the Design tab. Click on the chart layout and chart style. 6. Excel applies the layout and style to the chart. 7. Select Switch Row/Column to switch the row and column of the chart. 8. Click the Move Chart button. The Move Chart dialog box appears. Click the New sheet radio button and type the name of the new chart sheet. Excel creates a new chart sheet and places the chart on it. 9. Choose the Layout tab. Click on the Chart title option to type the title of the chart. 10. Click anywhere on the chart to end your entry.

COMPUTER PRACTICE LABORATORY-I
22
OUTPUT
(I) Enter the data in the Spread Sheet
Line Chart Column Chart
Bar Chart Pie Chart
RESULT Thus the procedure for payroll preparation in MS Excel are studied and understood.

COMPUTER PRACTICE LABORATORY-I
23
Ex. No. 6
Date : FORMULA USING IN SPREAD SHEET
AIM To do calculations using formula by formula editor in MS- Excel.
PROCEDURE I. Calculation - Formula:
1. Enter the data in the worksheet as follows 2. Place the cursor in Calculate Cell, type (Ex: =SUM (B4:F4).) 3. Copy the formulae for the remaining cells by dragging it.
II. Calculation – Formula Editor
1. Click the Formulas Menu. A formula editor dialog box will appear. 2. Select the Category of the function. Ex. Most Recently used 3. Select a SUM and AVERAGE function. 4. Type the data range. 5. Calculate the Sum and Average.

COMPUTER PRACTICE LABORATORY-I
24
OUTPUT: Calculation Using Formula

COMPUTER PRACTICE LABORATORY-I
25
Calculation Using Formula Editor
RESULT
Thus the total and average were calculated using Formulas.

COMPUTER PRACTICE LABORATORY-I
26
Ex. No. 7
Date : INCLUSION OF OBJECT, PICTURE IN EXCEL SHEET &
PROTECT A EXCEL WORK SHEET
AIM To include the object, picture, graphics and protect the document and also the sheet. PROCEDURE I. Inserting the objects in the worksheet:
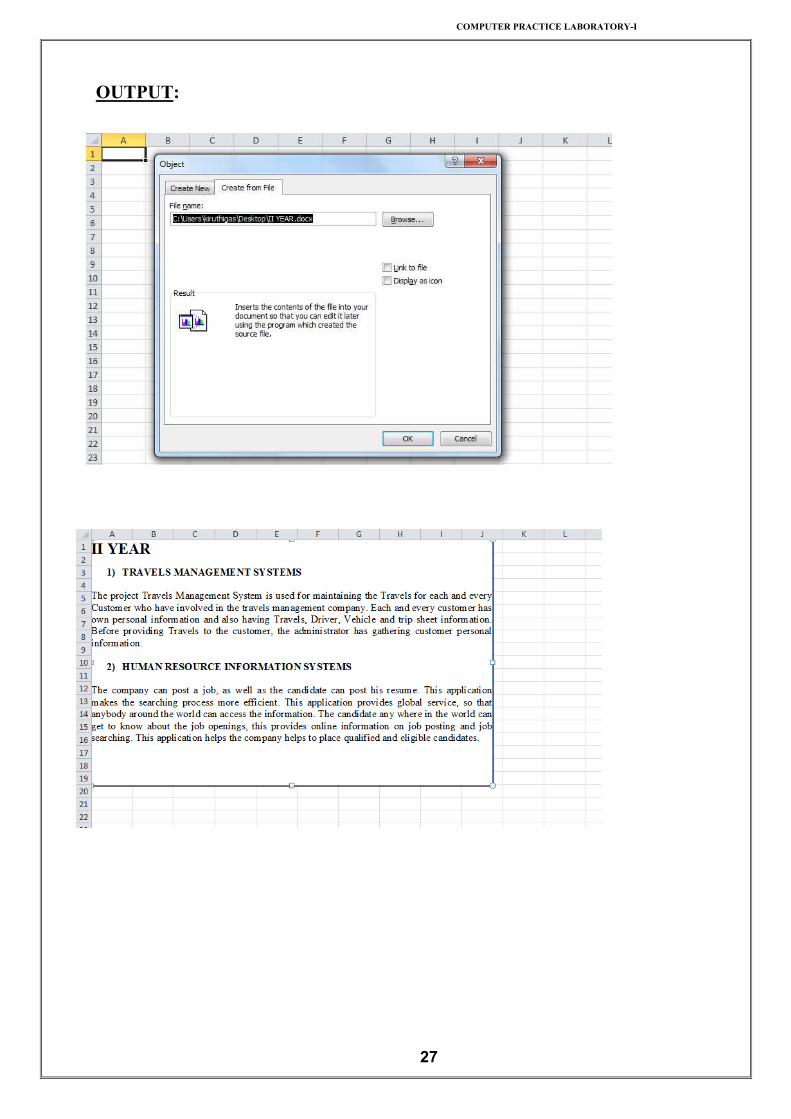
1. Choose object option in the Insert menu. 2. An Object dialog box will appear. 3. Choose Create New option for inserting a new object. Select the object type and click ok. 4. Choose Create from File option for inserting an object that already exist. Browse the file name and click ok.
II. Inserting a picture. 1. Choose picture option in the Insert menu. 2. Insert Picture dialog box appears. 3. Choose the picture to insert into the worksheet and click on insert button. 4. Now the selected picture is inserted into the worksheet.
III. Show the worksheet in 3D effect. 1. Open the worksheet, using File -> open option. 2. Now it opens the selected worksheet. 3. Select the data range in the worksheet. 4. Choose Format As Table option from Home menu. 5. It shows the AutoFormat dialog box. 6. Click on 3D Effects auto format. 7. Now the worksheet is shown in 3D format style.
IV. Protect a sheet in MS-Excel. 1. Click on cell, which you want to protect. 2. Choose Protect sheet option from Review tab. 3. It shows the protect sheet dialog box asking the password to protect sheet. 4. Type the password click and ok. Then it asks for confirmation Password box. Type the same password again and then click ok. 5. Now the sheet is under protection. 6. If you click on any cell to type, then the following message box appears by specifying the sheet under protection. 7. To remove protection, choose Unprotect Sheet from Review tab and then type the password to unprotect. 8. Now the sheet is unprotected.
COMPUTER PRACTICE LABORATORY-I
27
OUTPUT:

COMPUTER PRACTICE LABORATORY-I
28
(II) Inserting the Picture from File (III) Worksheet in 3D Effect
(IV) Protect a Sheet
RESULT
Thus the procedure for inclusion of object, picture & protection of particular worksheet are
studied and understood.

COMPUTER PRACTICE LABORATORY-I
29
Ex. No. 8
Date :
SORTING & IMPORT FEATURES IN EXCEL WORK
SHEET
AIM
To sort the data, import external data from access database and to export the data using MS-Excel. PROCEDURE I. Sorting
1. Enter the required data and select the data to be sorted. 2. Choose Sort option from the Data menu. 3. It displays sort dialog box. 4. Then choose the column name in sort by combo box and also choose whether ascending or descending. 5. Then click OK.
II. Importing External data
1. Create a database in MS-Access. 2. Choose Data-> From Access 3. It displays the Select Data Source dialog box. 4. Select the required data source and click open.
III. Save the File
1. Open the workbook. 2. On the File menu, click Save As. 3. Now the Save As dialog box appears. 4. In the File name box type a new name for the workbook. 5. In the Save As type list, click a file format. 6. Click on save button.

COMPUTER PRACTICE LABORATORY-I
30
OUTPUT: (I) Sorting the Data in Worksheet (Ascending in Name)
(II) Creating Database in MS – ACCESS
(III) Importing External Data from MS - ACCESS
RESULT
Thus the procedure for sorting of given set of data in excel are studied and understood.

COMPUTER PRACTICE LABORATORY-I
31
Microsoft Excel shortcut keys Below is a listing of all the major shortcut keys in Microsoft Excel. See our main shortcut page if you're looking for other shortcut keys used in other programs.
Shortcut Keys Description
F2 Edit the selected cell.
F5 Go to a specific cell. For example, C6.
F7 Spell check selected text and/or document.
F11 Create chart.
Ctrl + Shift + ; Enter the current time.
Ctrl + ; Enter the current date.
Alt + Shift + F1 Insert New Worksheet.
Shift + F3 Open the Excel formula window.
Shift + F5 Bring up search box.
Ctrl + A Select all contents of the worksheet.
Ctrl + B Bold highlighted selection.
Ctrl + I Italic highlighted selection.
Ctrl + K Insert link.
Ctrl + U Underline highlighted selection.
Ctrl + 5 Strikethrough highlighted selection.
Ctrl + P Bring up the print dialog box to begin printing.
Ctrl + Z Undo last action.
Ctrl + F9 Minimize current window.
Ctrl + F10 Maximize currently selected window.
Ctrl + F6 Switch between open workbooks / windows.
Ctrl + Page up Move between Excel work sheets in the same Excel document.
Ctrl + Page down Move between Excel work sheets in the same Excel document.
Ctrl + Tab Move between Two or more open Excel files.
Alt + = Create a formula to sum all of the above cells
Ctrl + ' Insert the value of the above cell into cell currently selected.
Ctrl + Shift + ! Format number in comma format.

COMPUTER PRACTICE LABORATORY-I
32
Ctrl + Shift + $ Format number in currency format.
Ctrl + Shift + # Format number in date format.
Ctrl + Shift + % Format number in percentage format.
Ctrl + Shift + ^ Format number in scientific format.
Ctrl + Shift + @ Format number in time format.
Ctrl + Arrow key Move to next section of text.
Ctrl + Space Select entire column.
Shift + Space Select entire row.

COMPUTER PRACTICE LABORATORY-I
33
PROGRAMS USING C

COMPUTER PRACTICE LABORATORY-I
34
Ex. No. 1
Date : FIND THE SIZE OF THE DATA
AIM
To write a program for finding the size of the data using C. ALGORITHM Step 1: Start the program. Step2: Initialize the datatype. Step3: Print the size of the data types using the statement sizeof() Step4: Stop the program. PROGRAM #include<stdio.h> #include<conio.h> main() { int i=10; float a,f=25.005; char name[]="welcome"; clrscr(); printf("\nThe size of integer %d\n",sizeof(i)); printf("\nThe size of float %d\n",sizeof(f)); printf("\nThe size of name %d\n",sizeof(name)); getch(); }

COMPUTER PRACTICE LABORATORY-I
35
OUTPUT
The size of integer is...2 The size of float is... 4 The size of character is...8
RESULT
Thus the program for finding the size of the data has been implemented successfully.

COMPUTER PRACTICE LABORATORY-I
36
Ex. No. 2
Date : AREA AND CIRCUMFERENCE OF THE CIRCLE
AIM
To write a program to find the area and circumference of the circle using C. ALGORITHM Step1: Start the program. Step2: Input the radius of the circle. Step3: Find the area and circumstance of the circle using the formula Area=3.14*r*r Circumference=2*3.14*r Step4: Print the area and the circumference of the circle. Step5: Stop the program.
PROGRAM
#include<stdio.h> main() { float rad,area,circum; clrscr(); printf("\nEnter the radius of the circle:"); scanf("%f",&rad); area=3.14*rad*rad; circum=2*3.14*rad; printf("\nArea=%f",area); printf("\nCircumference=%f",circum); getch(); }

COMPUTER PRACTICE LABORATORY-I
37
OUTPUT
Enter the radius of the circle 5 Area=78.500000 Circumference=31.400000
RESULT
Thus the program for finding the area and circumference of the circle has been
implemented successfully.

COMPUTER PRACTICE LABORATORY-I
38
Ex. No. 3
Date : FACTORIAL OF THE GIVEN NUMBER
AIM
To write a program to find the factorial of the given number using C.
ALGORITHM
Step1: start the program.
Step2: enter a number.
Step3: set a loop to find the factorial of the given number using formula
fact=fact*i
Step4: print the factorial of the given number.
Step5: stop the program.
PROGRAM
#include<stdio.h> main() { int fact=1,i,num; clrscr(); printf("Enter the number:"); scanf("%d",&num); for(i=1;i<=num;i++) { fact=fact*i; } printf("The factorial of %d is %d",num,fact); getch(); }

COMPUTER PRACTICE LABORATORY-I
39
OUTPUT
Enter the number 5 The factorial of 5 is 120.
RESULT
Thus the program to find the factorial of the given number has been executed successfully.

COMPUTER PRACTICE LABORATORY-I
40
Ex. No. 4
Date : FIND THE LARGEST OF THE THREE NUMBERS
AIM
To write a program to find the largest of the three numbers using C.
ALGORITHM
Step1: Start the program.
Step2: Read the three numbers a, b, c.
Step3: Assign the first number to the variable big.
Step4: Check whether the b is greater than big then assign b to
big.
Step5: Check whether the c is greater than big then assign c to
big.
Step6: Print the variable big.
Step7: Stop the program.
PROGRAM
#include<stdio.h> main() { int a,b,c,big; clrscr(); printf("Enter the three numbers:"); scanf("%d %d %d",&a,&b,&c); big=a; if(big<b) big=b; if(big<c) big=c; printf("The biggest of three number is %d",big); getch(); }

COMPUTER PRACTICE LABORATORY-I
41
OUTPUT
Enter the three numbers 93 43 23 The biggest of three numbers is 93
RESULT
Thus the program to find the largest of three numbers has been executed successfully.

COMPUTER PRACTICE LABORATORY-I
42
Ex. No. 5
Date :
FIND THE SUM AND REVERSE OF THE GIVEN
NUMBER
AIM
To write a C program to find the sum and reverse of the given number. ALGORITHM
Step1: Start the program. Step2: Initialize the variable as zero. Step3: If the number is not equal to zero then the corresponding operation will be performed. Step4: Print the sum of the digits, reverse of the number. Step5; check whether the number is palindrome or not. Step6: stop the program.
PROGRAM
#include<stdio.h> main() { unsigned long int a,num,sum=0,rnum=0,rem; clrscr(); printf("\nEnter the number..."); scanf("%ld",&num); a=num; while(num!=0) { rem=num%10; sum=sum+rem; rnum=rnum*10+rem; num=num/10; } printf("\nThe sum of the digits of %ld is %ld\n",a,sum); printf("\nThe reverse number of the %ld is %ld",a,rnum); if(a==rnum) printf("\nThe given number is a palindrome"); else printf("\nThe given number is not a palindrome"); getch(); }

COMPUTER PRACTICE LABORATORY-I
43
OUTPUT
Enter the number...12321 The sum of the digits of 12321 is 9 The reverse number of the 12321 is 12321 The given number is a palindrome
RESULT
Thus the program to find the sum and reverse of the given number has been executed
successfully.

COMPUTER PRACTICE LABORATORY-I
44
Ex. No. 6
Date :
ASCENDING AND DESCENDING ORDER OF THE GIVEN
NUMBERS
AIM
To write a Program to find the ascending and descending order of the given numbers using
C.
ALGORITHM
Step1: Start the program.
Step2: Enter the size of the array.
Step3: Enter the elements of the array.
Step4: Set a loop up to the array size minus one.
Step5: Set a inner loop up to the array size.
Step6: Check whether the next array elements are greater than or not.
Step7: If greater than exchange this position.
Step8: If not greater than go to the loop.
Step9: After the execution of the inner loop, the outer loop is executed.
Step10: Print the ascend order of the given array.
Step11: Print the descending.
Step12: Stop the program.
PROGRAM
#include<stdio.h> main() { int num[100],no,i,j,a; clrscr(); printf("Enter Upper Limit..."); scanf("%d",&no); printf("Enter the numbers"); for(i=0;i<no;i++) scanf("%d",&num[i]); for(i=0;i<no-1;i++) { for(j=i+1;j<no;j++) { if(num[i]<num[j]) { a=num[i]; num[i]=num[j];

COMPUTER PRACTICE LABORATORY-I
45
num[j]=a; } } } printf("\nThe ascending order of the given numbers"); for(i=0;i<no;i++) printf("\n%d",num[i]); printf("\n The descending number of the given numbers"); for(j=no-1;j>=0;j--) printf("\n%d",num[j]); getch(); }

COMPUTER PRACTICE LABORATORY-I
46
OUTPUT
Enter the number how many number you want to sort 5 Enter the numbers 10 30 50 60 20 The ascending order of the given numbers 10 20 30 50 60 The descending number of the given numbers 60 50 30 20 10
RESULT
Thus the program to find the ascending and descending of the given number has been
executed successfully.
COMPUTER PRACTICE LABORATORY-I
47
Ex. No. 7
Date : MULTPLICATION OF TWO MATRIX
AIM
To write a C program to implement the multiplication of two matrixes.
ALGORITHM
Step1: Start the program.
Step2: Enter the row & column of the matrix.
Step3: Enter the elements of the A matrix.
Step4: Enter the elements of the B matrix.
Step5: print the A matrix in the matrix form.
Step6: print the B matrix in the matrix form.
Step7: Set a loop up to the row.
Step8: Set a inner loop up to the column.
Step9: Multiply the elements of A and B in column wise.
Step10: After the execution of the two loops, print the value of c matrix.
Step11: Stop the program.
PROGRAM #include<stdio.h> main() { int a[25][25],b[25][25],c[25][25],i,j,k,r,s; int m,n; clrscr(); printf("\nEnter the Rows and Columns of A matrix..."); scanf("%d %d",&m,&n); printf("\nEnter the Rows and Columns of B matrix..."); scanf("%d %d",&r,&s); if(m!=r) printf("\nThe matrix cannot multiplied"); else { printf("\nEnter the elements of A matrix"); for(i=0;i<m;i++) { for(j=0;j<n;j++) scanf("\t%d",&a[i][j]); } printf("\nEnter the elements of B matrix");

COMPUTER PRACTICE LABORATORY-I
48
for(i=0;i<m;i++) { for(j=0;j<n;j++) scanf("\t%d",&b[i][j]); } printf("\nThe elements of A matrix"); for(i=0;i<m;i++) { printf("\n"); for(j=0;j<n;j++) printf("\t%d",a[i][j]); } printf("\n The elements of B matrix"); for(i=0;i<m;i++) { printf("\n"); for(j=0;j<n;j++) printf("\t%d",b[i][j]); } for(i=0;i<m;i++) { printf("\n"); for(j=0;j<n;j++) { c[i][j]=0; for(k=0;k<m;k++) c[i][j]=c[i][j]+a[i][k]*b[k][j]; } } } printf("The multiplication of two matrixes"); for(i=0;i<m;i++) { printf("\n"); for(j=0;j<n;j++) printf("\t%d",c[i][j]); } getch(); }

COMPUTER PRACTICE LABORATORY-I
49
OUTPUT
Enter the Rows and Columns of A matrix... 3 3 Enter the Rows and Columns of B matrix... 3 3 Enter the elements of A matrix 1 2 3 4 5 6 7 8 9 Enter the elements of B matrix 1 2 3 4 5 6 7 8 9 The elements of A matrix 1 2 3 4 5 6 7 8 9 The elements of B matrix 1 2 3 4 5 6 7 8 9 The multiplication of two matrixes 30 36 42 66 81 96 102 126 150
RESULT
Thus the program for multiplication of two matrixes was written and executed successfully.

COMPUTER PRACTICE LABORATORY-I
50
Ex. No. 8
Date : MENU DRIVEN PROGRAM
AIM
To write a C program to perform menu driven program.
ALGORITHM
Step1: Start the program.
Step2: Read the values of num
Step3: Assign the value of 1 to Factorial similarly 2 to prime no, 3 to odd or
even and 4 to Exit.
Step4: Read the value of choice.
Step5: If choice is 1 then factorial of the given number is executed by the
formula fact=fact*i
Step6: If choice is 2 then it executes the given number is prime or not.
Step7: If choice is 3 then it executes the given number is odd or even.
Step8: If the choice is 4 then it exit from the program.
Step9: Stop the program.
PROGRAM
#include<stdio.h> #include<conio.h> main() { int num,o,i; long int fact; clrscr(); while(1) { printf("\nEnter the number "); scanf("%d",&num); printf("\nchoose one of the options given below"); printf("\n 1.Factorial of the given number \n 2.Prime number or not\n
3. Odd or Even \n 4. Exit"); scanf("%d",&o); switch(o) { case 1: fact=1;

COMPUTER PRACTICE LABORATORY-I
51
for(i=1;i<=num;i++) fact=fact*i; printf("The factorial of %d is %ld",num,fact); break; case 3: if(num%2==0) printf("The given number is Even number"); else printf("The given number is Odd number"); break; case 2: i=2; while(i<=num-1) { if(num%i==0) { printf("The given number is not a prime number"); break; } i++; } if(i==num) printf("The given number is a prime"); break; default: exit(0); } } getch(); }

COMPUTER PRACTICE LABORATORY-I
52
OUTPUT
Enter the number.. 5 Choose one of the options given below 1. Factorial of the given number 2. Prime number or not 3. Odd or Even 4. Exit 1 The factorial of 5 is 120 Enter the number..5 Choose one of the options given below 1.Factorial of the given number 2.Prime number or not 3.Odd or Even 4.Exit 2 The given number is a prime Enter the number...5 Choose one of the options given below 1.Factorial of the given number 2.Prime number or not 3.Odd or Even 4.Exit 4
RESULT
Thus the program to perform the menu driven concept has been executed successfully.

COMPUTER PRACTICE LABORATORY-I
53
Ex. No. 9
Date : STUDENT RECORD USING POINTERS AND STRUCTURE
AIM
To write a C Program to perform the student record using pointer and structure.
ALGORITHM
Step1: Start the program.
Step2: Initialize the structure variable.
Step3: Enter the number of student.
Step4: Set a loop up to the number of student.
Step5: Enter the student name, roll no, average and marks.
Step6: Find their grades.
Step7: Print the student name, roll no, average and their grade.
Step8: Stop the program.
PROGRAM
#include<stdio.h> #include<conio.h> main() { struct student { char name[25]; char regno[25]; int avg; char grade; } stud[50],*pt; int i,no; clrscr(); printf("Enter the number of the students..."); scanf("%d",&no); for(i=0;i<no;i++) { printf("\n student[%d] information:\n",i+1); printf("Enter the name"); scanf("%s",stud[i].name); printf("\nEnter the roll no of the student"); scanf("%s",stud[i].regno); printf("\nEnter the average value of the student");

COMPUTER PRACTICE LABORATORY-I
54
scanf("%d",&stud[i].avg); } pt=stud; for(pt=stud;pt<stud+no;pt++) { if(pt->avg<30) pt->grade='D'; else if(pt->avg<50) pt->grade='C'; else if(pt->avg<70) pt->grade='B'; else pt->grade='A'; } printf("\n"); printf("NAME REGISTER-NO AVERAGE GRADE\n"); for(pt=stud;pt<stud+no;pt++) { printf("%-20s%-10s",pt->name,pt->regno); printf("%10d \t %c\n",pt->avg,pt->grade); } getch(); }

COMPUTER PRACTICE LABORATORY-I
55
OUTPUT
Enter the number of the students 3 student[1] information: Enter the name MUNI Enter the roll no of the student 100 Enter the average value of the student 95 student[2] information: Enter the name LAK Enter the roll no of the student 200 Enter the average value of the student 55 student[3] information: Enter the name RAJA Enter the roll no of the student 300 Enter the average value of the student 25 NAME REGISTER-NO AVERAGE GRADE MUNI 100 95 A LKA 200 55 B RAJA 300 25 D
RESULT
Thus the program for creation of student record using structure and pointer has been executed
successfully.

COMPUTER PRACTICE LABORATORY-I
56
Ex. No. 1O
Date : EMPLOYEE DETAILS USING UNION
AIM
To write a C program to print the mark sheet of N students using structures.
ALGORITHM
Step1: Start the program.
Step2: Declare the union variables.
Step3: Enter the employee name, number and salary.
Step4: Call the union function using union variables.
Step5: Print the details of the employees.
Step6: Stop the program.
PROGRAM
#include<stdio.h> #include<conio.h> union uemf { char name[10]; int number; float sal; }; main() { union uemf u1; clrscr(); printf("Enter the employee name..."); scanf("%s",u1.name); printf("%s",u1.name); printf("\nEnter the employee number..."); scanf("%d",&u1.number); printf("%d",u1.number); printf("\nEnter the salary..."); scanf("%f",&u1.sal); printf("\%f",u1.sal); getch(); }

COMPUTER PRACTICE LABORATORY-I
57
OUTPUT
Enter the Employee name: Manish Manish Enter the Employee number: 1111 1111 Enter the Salary: 34555 34555
RESULT
Thus the program for printing employee details using union was written and executed
successfully.

COMPUTER PRACTICE LABORATORY-I
58
Ex. No. 11
Date : ADDITION OF GIVEN TWO NUMBERS USING FUNCTION
AIM
To Write a Program for Addition of given two numbers using function
ALGORITHM
Step1: Start the program.
Step2: Read the input from the user.
Step3: Transfer the control to the called function.
Step4: Perform the addition operation & return value to the calling function.
Step5: Print the result.
Step6: Stop the program.
PROGRAM
#include <stdio.h> #include <conio.h> int main () { int add(int,int); int a,b,c; printf("Enter Any Two Numbers"); scanf("%d%d",&a,&b); c=add(a,b); printf("The addition of given Two Number is %d",c); } int add(int x, int y) { int z; z=x+y; return(z); }

COMPUTER PRACTICE LABORATORY-I
59
OUTPUT
Enter Any Two Numbers 5 5
The addition of given Two Number is 10
RESULT
Thus the program for printing addition of two numbers using function was written and
executed successfully.