enrollment reporting system campus user · pdf fileupdated ers user guide to reflect the new...
TRANSCRIPT

Enrollment Reporting System Campus User Guide
Last Revised: 02/15/2013

ERS User Guide
Last Revised: 02/15/2013 Page ii
REVISION CONTROL
Document Title: ERS User Guide Author: CO Applications (Enterprise Systems) File Reference: ERS User Guide 2012.docx
Revision History
Revision Date Revised By Summary of Revisions Section(s) Revised 06/20/2012 Y. Hepperle Updated ERS User guide to reflect the new Oracle
Forms technology All
02/15/2013 Y. Hepperle Updated section 14.1 to add the Browse feature for the File Location field
14.1
Review / Approval History
Review Date Reviewed By Action (Reviewed, Recommended or Approved) Click here to enter Review Date
Click here to enter Review Date
Click here to enter Review Date
ERS User Guide
Last Revised: 02/15/2013 Page iii
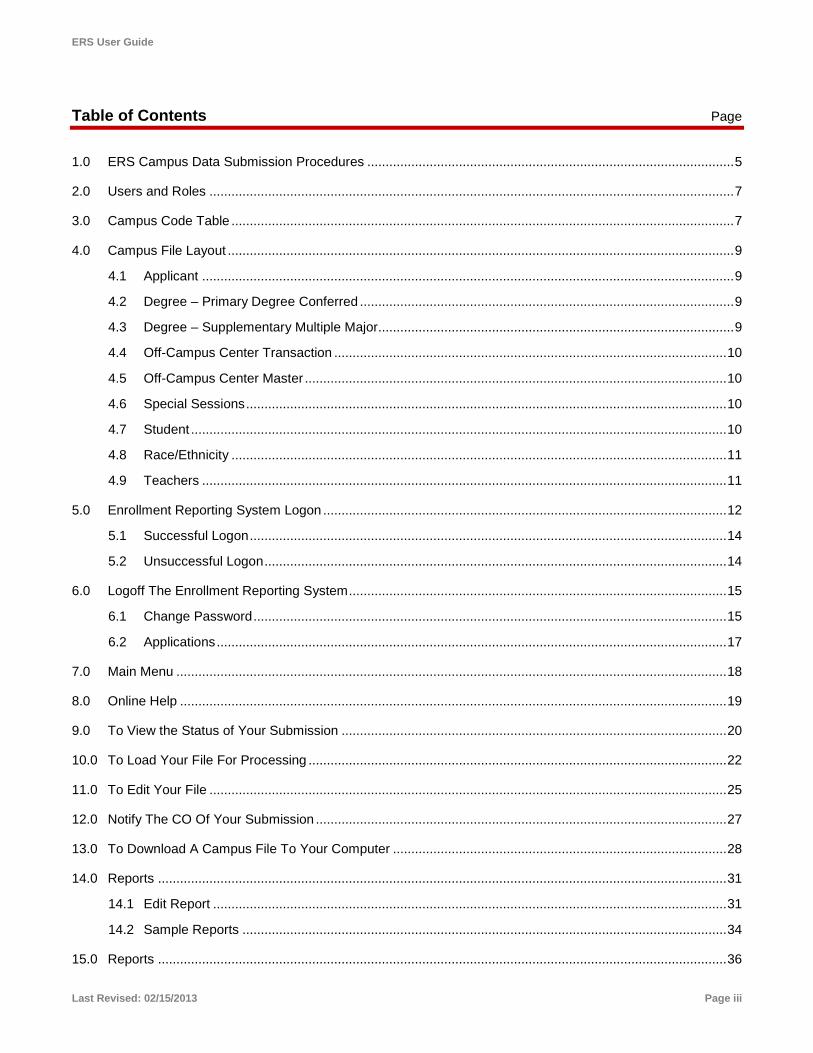
Table of Contents Page
1.0 ERS Campus Data Submission Procedures .................................................................................................... 5
2.0 Users and Roles ............................................................................................................................................... 7
3.0 Campus Code Table ......................................................................................................................................... 7
4.0 Campus File Layout .......................................................................................................................................... 9
4.1 Applicant ................................................................................................................................................. 9
4.2 Degree – Primary Degree Conferred ...................................................................................................... 9
4.3 Degree – Supplementary Multiple Major ................................................................................................. 9
4.4 Off-Campus Center Transaction ........................................................................................................... 10
4.5 Off-Campus Center Master ................................................................................................................... 10
4.6 Special Sessions ................................................................................................................................... 10
4.7 Student .................................................................................................................................................. 10
4.8 Race/Ethnicity ....................................................................................................................................... 11
4.9 Teachers ............................................................................................................................................... 11
5.0 Enrollment Reporting System Logon .............................................................................................................. 12
5.1 Successful Logon .................................................................................................................................. 14
5.2 Unsuccessful Logon .............................................................................................................................. 14
6.0 Logoff The Enrollment Reporting System ....................................................................................................... 15
6.1 Change Password ................................................................................................................................. 15
6.2 Applications ........................................................................................................................................... 17
7.0 Main Menu ...................................................................................................................................................... 18
8.0 Online Help ..................................................................................................................................................... 19
9.0 To View the Status of Your Submission ......................................................................................................... 20
10.0 To Load Your File For Processing .................................................................................................................. 22
11.0 To Edit Your File ............................................................................................................................................. 25
12.0 Notify The CO Of Your Submission ................................................................................................................ 27
13.0 To Download A Campus File To Your Computer ........................................................................................... 28
14.0 Reports ........................................................................................................................................................... 31
14.1 Edit Report ............................................................................................................................................ 31
14.2 Sample Reports .................................................................................................................................... 34
15.0 Reports ........................................................................................................................................................... 36

ERS User Guide
Last Revised: 02/15/2013 Page iv
15.1 Campus Edited Data ............................................................................................................................. 36
15.1.1 Campus Edited Data ................................................................................................................ 38
15.1.1.1 Plain Text Format ................................................................................................................. 38
15.2 SW/Campus Review Data..................................................................................................................... 38
15.2.1.1 Sample Report ..................................................................................................................... 40
15.3 S/W Campus Final Data........................................................................................................................ 41
15.3.1 Sample Report ......................................................................................................................... 43
15.4 View /Download College Year Final Data ............................................................................................. 44
15.4.1 45
15.5 Screen Field Definitions ........................................................................................................................ 45
15.6 Edit ........................................................................................................................................................ 47
16.0 Screen Field Definitions ................................................................................... Error! Bookmark not defined.
16.1 View/Download ..................................................................................................................................... 48
16.1.1 Unedited Data .......................................................................................................................... 48

ERS User Guide
Last Revised: 00/00/00 Page 5 of 49
1.0 ERS Campus Data Submission Procedures
The step-by-step procedure for submitting ERS data using the web-accessible system is as follows:
1) Open Internet Explorer (version 5.0 or higher is required)
Go the URL: http://www.calstate.edu/as/intranet/applications/aa/ers/
Click on link for Application Logon Screen. Logon using your ERS user ID and password.
2) Load your campus file to the Chancellor’s Office server (coweusftp101.calstate.edu). To load your campus file, click on Upload/Edit from the Main Menu. Select the file to be loaded > File Upload. A message will display when the file is loaded.
Status Monitor Updated To: File Uploaded
3) Edit your campus file. Click on the Upload/Edit > Perform Edits button. A message will display when the edit has completed. Click on the Display Summary link to display a total count of the records as well the counts for both catastrophic and warning errors.
4) If the summary indicates there were catastrophic errors, click on Edit Report from the Main Menu to download a copy of the edit report (list all records that failed the edit). All catastrophic errors must be corrected. Repeat Steps 1 through 3 until all errors are corrected and eliminated.
Status Monitor Updated To: Edits Performed
5) If the summary indicates there were no catastrophic errors, return to the Main Menu screen and click on Notify CO button. An email will be sent to the Chancellor’s Office.
Status Monitor Updated To: Campus Completed
6) To check the status of your file submission, click on View from the Main Menu screen.
7) The Chancellor’s Office will move the file to the ‘Review Area’ for review upon the email notification.
Status Monitor Updated To: CO Review
If the file is accepted by the Chancellor’s Office, an email will be sent to the campus to indicate the accept status.
Status Monitor Updated To: CO Completed
If the file is rejected by the Chancellor’s Office, an email will be sent to the campus to indicate the reject status
Status Monitor Updated To: The record on the status monitor will be red-flagged.
8) A file accepted by the Chancellor’s Office is moved to the Final Table.

ERS User Guide
Last Revised: 00/00/00 Page 6 of 49
ERS Campus Data Submission Procedures (continued)
This diagram depicts the overall process for the Enrollment Reporting System users.
Load Campus File______________________________Click on Upload/Edit from the Main
MenuClick on the File Upload Button
Edit Campus File______________________________Click on Upload/Edit from the Main
MenuClick on the Perform Edits Button
Catastrophic Errors
?
Notify the Chancellor’s Office_______________________________
Click on Notify CO from the Main Menu
Check the Status of Your File_______________________________
Click on View from the Main Menu
Email sent to the Chancellor’s Office
Chancellor’s Office
Review
Campus notified via email that the
file is rejected
Chancellor’s Office move the campus file to the Final Table
Status monitor updated to ‘CO
Completed’
Data Rejected
Campus
yes
no
Review Edit Reports_________________________________________
Click on Edit Report from the Main MenuCorrect Errors
Data Accepted
Open Internet ExplorerLogon to ERS
Step 1
Step 2
Step 3
Step 5
Step 4
Step 6
Step 7
Step 8

ERS User Guide
Last Revised: 00/00/00 Page 7 of 49
2.0 Users and Roles
The functions of the system have various levels of sensitivity and are not appropriate for access by all users. All users of the system are assigned specific roles and privileges. Roles describe a user’s work responsibility and privileges determine the access to functions of the system. Privileges are assigned to each role and roles are then assigned to each user. The table below describes the user role in the use of the Enrollment Reporting System.
Screen Access (Yes/No) Staff Role (Campus) Status Monitor View Yes Restricted by Campus Reset No Perform Edits Edit Yes Restricted by Campus Notify CO Yes Restricted by Campus Accept/Reject Data-(CO only) Campus Work Data No SW/Campus Review Data No View/Download Unedited Data Yes Restricted by Campus Edit Report Yes Restricted by Campus Campus Edited Report Yes Restricted by Campus SW/Campus Review Data Yes Restricted by Campus SW/Campus Final Data Yes Restricted by Campus SW/Campus CY Final Data Yes Restricted by Campus Miscellaneous-(CO only) ERSA Abstract Report No
3.0 Campus Code Table
The Campus Code Table lists the valid two digit numeric code for the CSU campuses.
Campus Code Campus Name
35 Bakersfield
73 Channel Islands
20 Chico
55 Dominguez Hills
05 East Bay
25 Fresno
50 Fullerton
30 Humboldt

ERS User Guide
Last Revised: 00/00/00 Page 8 of 49
40 Long Beach
45 Los Angeles
07 Maritime Academy
06 Monterey Bay
70 Northridge
10 Pomona
60 Sacramento
63 San Bernardino
65 San Diego
75 San Francisco
80 San Jose
15 San Luis Obispo
68 San Marcos
85 Sonoma
90 Stanislaus

ERS User Guide
Last Revised: 00/00/00 Page 9 of 49
4.0 Campus File Layout
Campus files must be properly named and formatted for the edit processes to execute. For a complete list of valid values, please refer to the Enrollment Reporting System Operations Manual located at this URL: http://www.asd.calstate.edu/opsman/index.shtml
4.1 Applicant
File Format: Fixed Block
File Length: 350
File Name: ERA.PROD.Tyyyytcc
where: yyyy = four digit ending portion of the full college year (e.g., for CY2012-2013 the yyyy portion is 2013)
t = term
cc = numeric campus code (for a list of valid values, see section titled Campus Code Table
4.2 Degree – Primary Degree Conferred
File Format: Fixed Block
File Length: 100
File Name: ERD.PROD.Tyyyytcc
where: yyyy = four digit ending portion of the full college year (e.g., for CY2005-2006 the yyyy portion is 2006)
t = term
cc = numeric campus code (for a list of valid values, see section titled Campus Code Table
4.3 Degree – Supplementary Multiple Major
File Format: Fixed Block
File Length: 100
File Name: ERD.PROD.TyyyytccMULTIMAJ
where: yyyy = four digit ending portion of the full college year (e.g., for CY2005-2006 the yyyy portion is 2006)
t = term
cc = numeric campus code (for a list of valid values, see section titled Campus Code Table
ERS User Guide
Last Revised: 00/00/00 Page 10 of 49
*Primary Degree Conferred file will contain the degree code for degree conferred. Major Degree Code 1 through Major Degree Code 9 is to be used if the student receives a degree with multiple major degree programs.
4.4 Off-Campus Center Transaction
File Format: Fixed Block
File Length: 80
File Name: ERO.PROD.Tyyyytcc
where: yyyy = four digit starting college year (e.g., for CY2006 the yyyy portion is 2006)
t = term
cc = numeric campus code (for a list of valid values, see section titled Campus Code Table
4.5 Off-Campus Center Master
File Format: Fixed Block
File Length: 122
This record design is created by matching the campus ERSO file with the campus ERSS file for the same term.
4.6 Special Sessions
File Format: Fixed Block
File Length: 250
File Name: SER.PROD.Tyyyytcc
where: yyyy = four digit ending portion of the full college year (e.g., for CY2005-2006 the yyyy portion is 2006)
t = term
cc = numeric campus code (for a list of valid values, see section titled Campus Code Table
4.7 Student
File Format: Fixed Block
ERS User Guide
Last Revised: 00/00/00 Page 11 of 49
File Length: 250
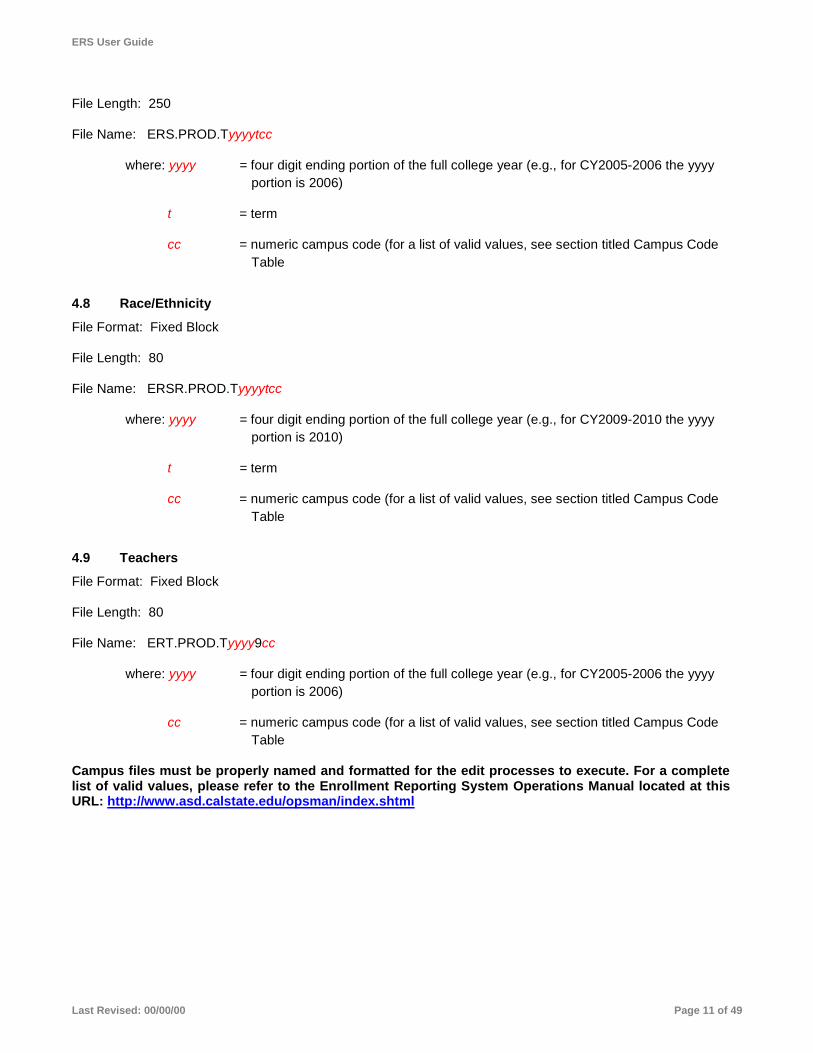
File Name: ERS.PROD.Tyyyytcc
where: yyyy = four digit ending portion of the full college year (e.g., for CY2005-2006 the yyyy portion is 2006)
t = term
cc = numeric campus code (for a list of valid values, see section titled Campus Code Table
4.8 Race/Ethnicity
File Format: Fixed Block
File Length: 80
File Name: ERSR.PROD.Tyyyytcc
where: yyyy = four digit ending portion of the full college year (e.g., for CY2009-2010 the yyyy portion is 2010)
t = term
cc = numeric campus code (for a list of valid values, see section titled Campus Code Table
4.9 Teachers
File Format: Fixed Block
File Length: 80
File Name: ERT.PROD.Tyyyy9cc
where: yyyy = four digit ending portion of the full college year (e.g., for CY2005-2006 the yyyy portion is 2006)
cc = numeric campus code (for a list of valid values, see section titled Campus Code Table
Campus files must be properly named and formatted for the edit processes to execute. For a complete list of valid values, please refer to the Enrollment Reporting System Operations Manual located at this URL: http://www.asd.calstate.edu/opsman/index.shtml

ERS User Guide
Last Revised: 00/00/00 Page 12 of 49
5.0 Enrollment Reporting System Logon
Click on the Enrollment Reporting Systems link.
To eliminate typing this URL repeatedly, use the Add to Favorites feature under the Favorites menu in Internet Explorer.
ERS User Guide
Last Revised: 00/00/00 Page 13 of 49
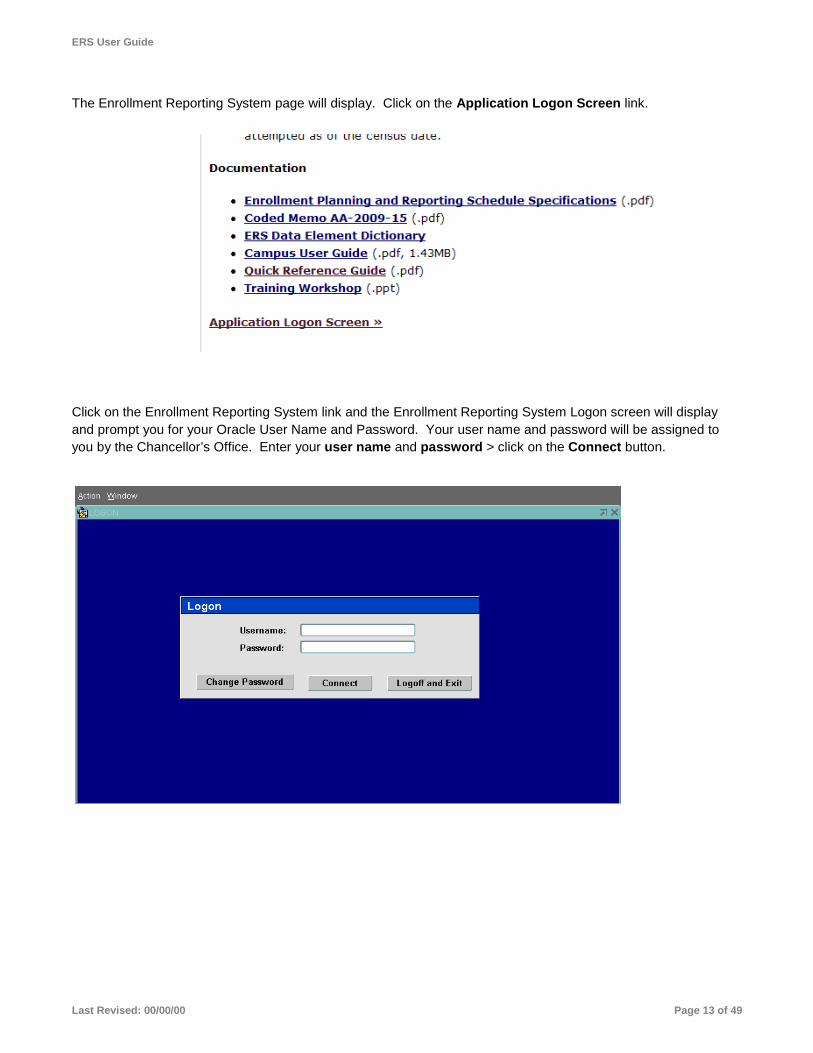
The Enrollment Reporting System page will display. Click on the Application Logon Screen link.
Click on the Enrollment Reporting System link and the Enrollment Reporting System Logon screen will display and prompt you for your Oracle User Name and Password. Your user name and password will be assigned to you by the Chancellor’s Office. Enter your user name and password > click on the Connect button.

ERS User Guide
Last Revised: 00/00/00 Page 14 of 49
Logon To The Enrollment Reporting System (continued)
5.1 Successful Logon
The main menu screen for the Enrollment Reporting System will display when a valid user name and password have been entered.
5.2 Unsuccessful Logon
A message will display when an invalid user name and/or password have been entered. Re-enter your user name and password > click on the Connect button. Should you need assistance, please open a Service Now help desk ticket at https://portal.calstate.edu/DesktopDefault.aspx?tabindex=0&tabid=1 or email the IT Service Center at [email protected] or call them at (562) 951-8500 and they will open a ticket for you.

ERS User Guide
Last Revised: 00/00/00 Page 15 of 49
6.0 Logoff The Enrollment Reporting System
To log off the system, select or click the in the upper right-hand corner of the screen. After selecting a drop-down menu will present itself. Select Exit and that you will be logged out.
6.1 Change Password
It is good practice to periodically change the password on the ERS account. This should be done upon receipt of a new password or a password reset. Note: The password must adhere to the following requirements:
• Must be different from the old password by at least 3 characters • Must contain at least three (3) out of the four (4) following character types: − At least one uppercase alphabetic character (A-Z) − At least one lowercase alphabetic character (a-z) − At least one special character. The special character should be an underscore ‘_’ − At least one number (0-9)
ERS User Guide
Last Revised: 00/00/00 Page 16 of 49
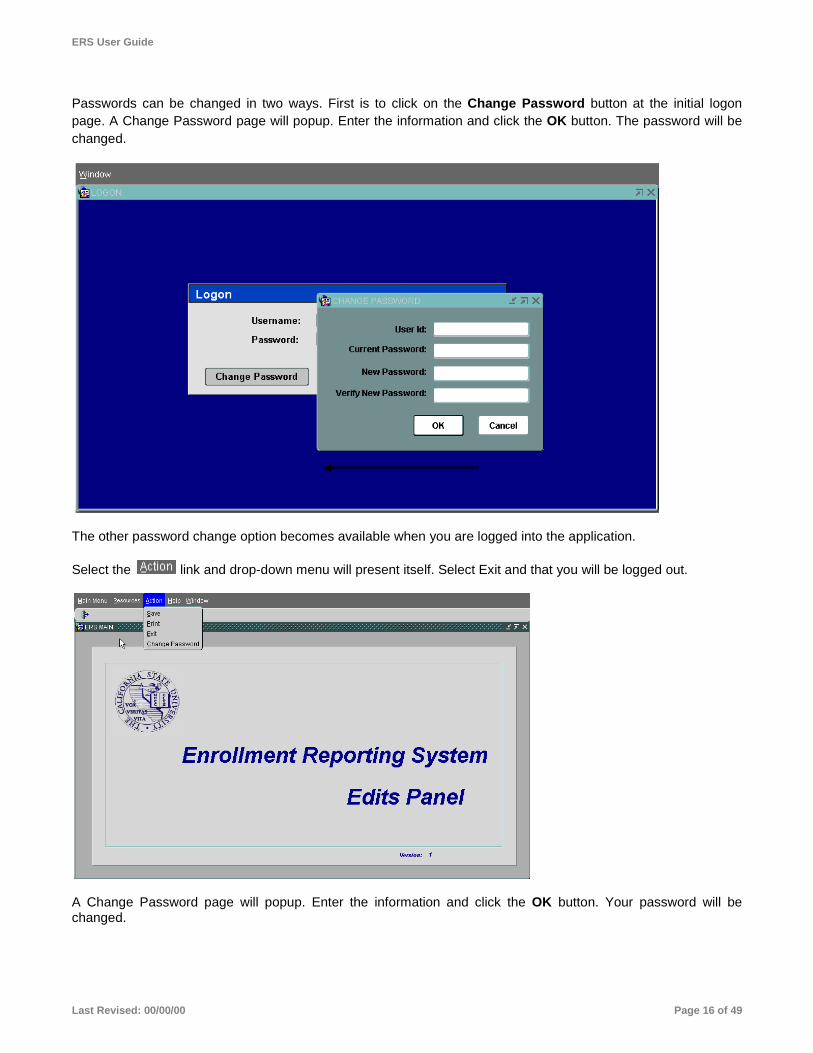
Passwords can be changed in two ways. First is to click on the Change Password button at the initial logon page. A Change Password page will popup. Enter the information and click the OK button. The password will be changed.
The other password change option becomes available when you are logged into the application.
Select the link and drop-down menu will present itself. Select Exit and that you will be logged out.
A Change Password page will popup. Enter the information and click the OK button. Your password will be changed.

ERS User Guide
Last Revised: 00/00/00 Page 17 of 49
6.2 Applications
This screen lists all system applications associated with your account. Select
And the ERS main menu will appear.
ERS User Guide
Last Revised: 00/00/00 Page 18 of 49
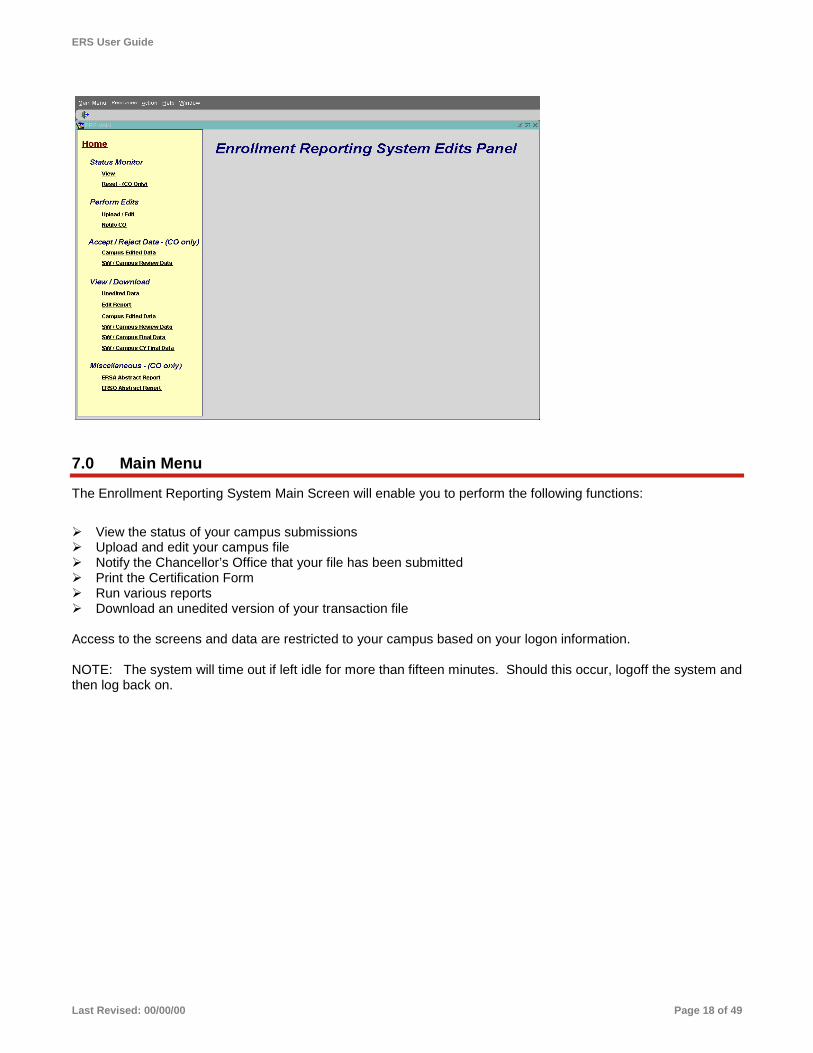
7.0 Main Menu
The Enrollment Reporting System Main Screen will enable you to perform the following functions:
View the status of your campus submissions Upload and edit your campus file Notify the Chancellor’s Office that your file has been submitted Print the Certification Form Run various reports Download an unedited version of your transaction file Access to the screens and data are restricted to your campus based on your logon information. NOTE: The system will time out if left idle for more than fifteen minutes. Should this occur, logoff the system and then log back on.

ERS User Guide
Last Revised: 00/00/00 Page 19 of 49
8.0 Online Help
To obtain online help, click Resources and then ERS Quick Reference Guide. Selecting the ERS Quick Reference Guide will select the document.

ERS User Guide
Last Revised: 00/00/00 Page 20 of 49
9.0 To View the Status of Your Submission
The View Screen will enable you to verify the status of your campus file submissions based on your search criteria. For example: after you have notified the Chancellor’s Office that your file is ready for review, you can check to see if your file has been reviewed by the Chancellor’s Office. Click the View link on the menu
And the following menu will pop up.
1. The ERS Status Monitor Report window will display.
2. Select a value from the dropdown list for each screen field. Select the Module, Term, Year, and Campus, in that sequence, for the appropriate task. Please refer to the section titled ‘Screen Field Definitions’ for a definition of the fields.
ERS User Guide
Last Revised: 00/00/00 Page 21 of 49
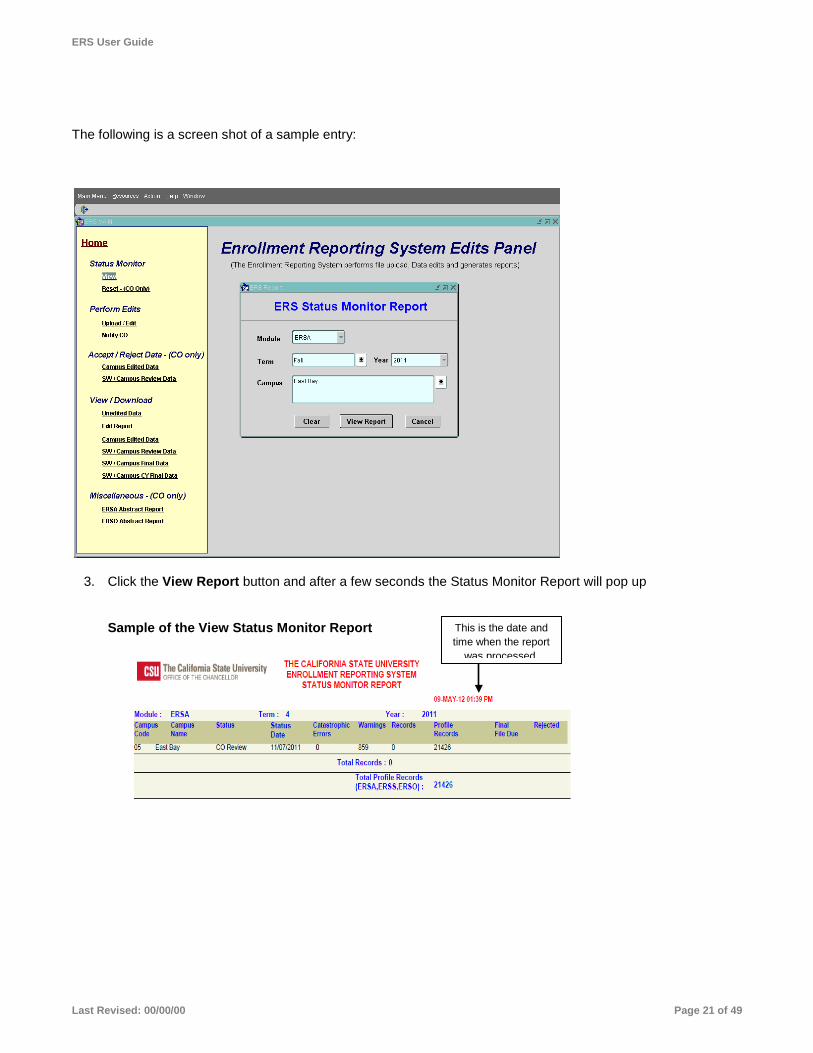
The following is a screen shot of a sample entry:
3. Click the View Report button and after a few seconds the Status Monitor Report will pop up
Sample of the View Status Monitor Report
This is the date and time when the report
was processed.

ERS User Guide
Last Revised: 00/00/00 Page 22 of 49
10.0 To Load Your File For Processing
The Edit screen will enable you to load your campus file to the Chancellor’s Office application server and run the edit program against your respective file.
To upload the file double-click the Upload/ Edit link.
The ERS File Upload and Edit window will display as follows

ERS User Guide
Last Revised: 00/00/00 Page 23 of 49
Select a value from the dropdown list for each screen field. The values selected must correspond to the name of the input file. Please refer to the section titled ‘Screen Field Definitions’ for a definition of the fields.
Click on the Browse button and select the appropriate file for the upload.
Click Open and the File Location and Name field will be populated.
The campus file must be properly named and formatted for the load and edit process to execute. Please refer to the section titled ‘Campus Record Layout’ for specifics

ERS User Guide
Last Revised: 00/00/00 Page 24 of 49
If the file name will be validated against the selected module, term, and year. If the file is not valid the following error will display:
Correct the error and submit the file by double-clicking the Upload button
A message will display while the file is loading.

ERS User Guide
Last Revised: 00/00/00 Page 25 of 49
Once the file load has completed the following status will pop up indicating a completed load and the record count.
Click the OK button and a success or failure message will display.
Click the Ok button and the file can now be edited without navigating to another screen.
11.0 To Edit Your File

ERS User Guide
Last Revised: 00/00/00 Page 26 of 49
You are ready to edit your file after you receive the message that your file has been loaded. To edit your file, click on the Perform Edits button.
A message will display when the edit has completed.
The counts are displayed. All catastrophic errors must be corrected before notifying the Chancellor’s Office of your submission.

ERS User Guide
Last Revised: 00/00/00 Page 27 of 49
12.0 Notify The CO Of Your Submission
The Notify CO screen will enable you to send an email notification to Chancellor’s Office staff for the module, term
and year of your ERS submission. You are ready to notify the Chancellor’s Office when your campus file is free
of any catastrophic errors. Once the Chancellor’s Office is notified, the status monitor on the View screen will be
updated to ‘Campus Completed’ and the file will be locked. The Chancellor’s Office will review the file and send
an email notification to the contact person on your campus should your file be rejected.
Click on Notify CO from the Main Menu screen.
The ERS Notify CO screen will display. Select a value from the dropdown list for each screen field. The values selected must correspond to the name of your input file. Please refer to the section titled ‘Screen Field Definitions’ for a definition of the fields.
The information entered in the comments area will be sent to the CO staff.
Click on the Notify CO button.
A dialog box will display for you to confirm the notification. Click on the OK button.
The status of the email notification will display.
NOTE: The Certification Report is no longer required.
ERS User Guide
Last Revised: 00/00/00 Page 28 of 49
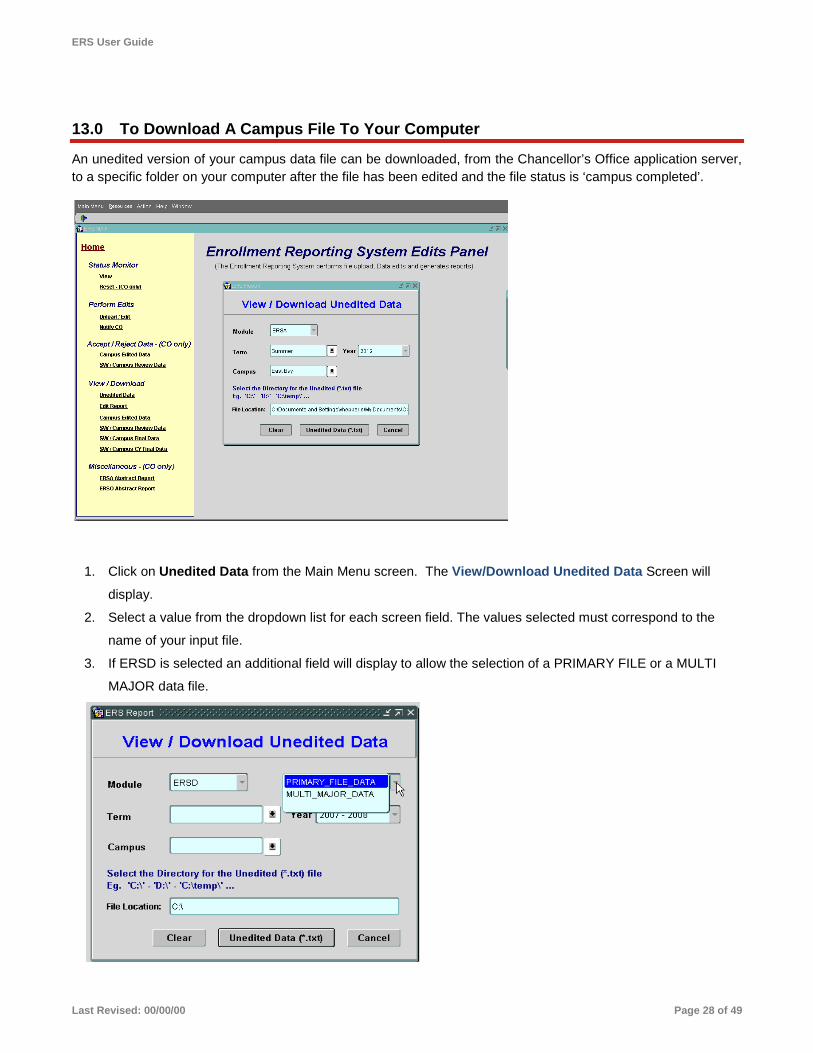
13.0 To Download A Campus File To Your Computer
An unedited version of your campus data file can be downloaded, from the Chancellor’s Office application server, to a specific folder on your computer after the file has been edited and the file status is ‘campus completed’.
1. Click on Unedited Data from the Main Menu screen. The View/Download Unedited Data Screen will
display.
2. Select a value from the dropdown list for each screen field. The values selected must correspond to the
name of your input file.
3. If ERSD is selected an additional field will display to allow the selection of a PRIMARY FILE or a MULTI
MAJOR data file.
ERS User Guide
Last Revised: 00/00/00 Page 29 of 49
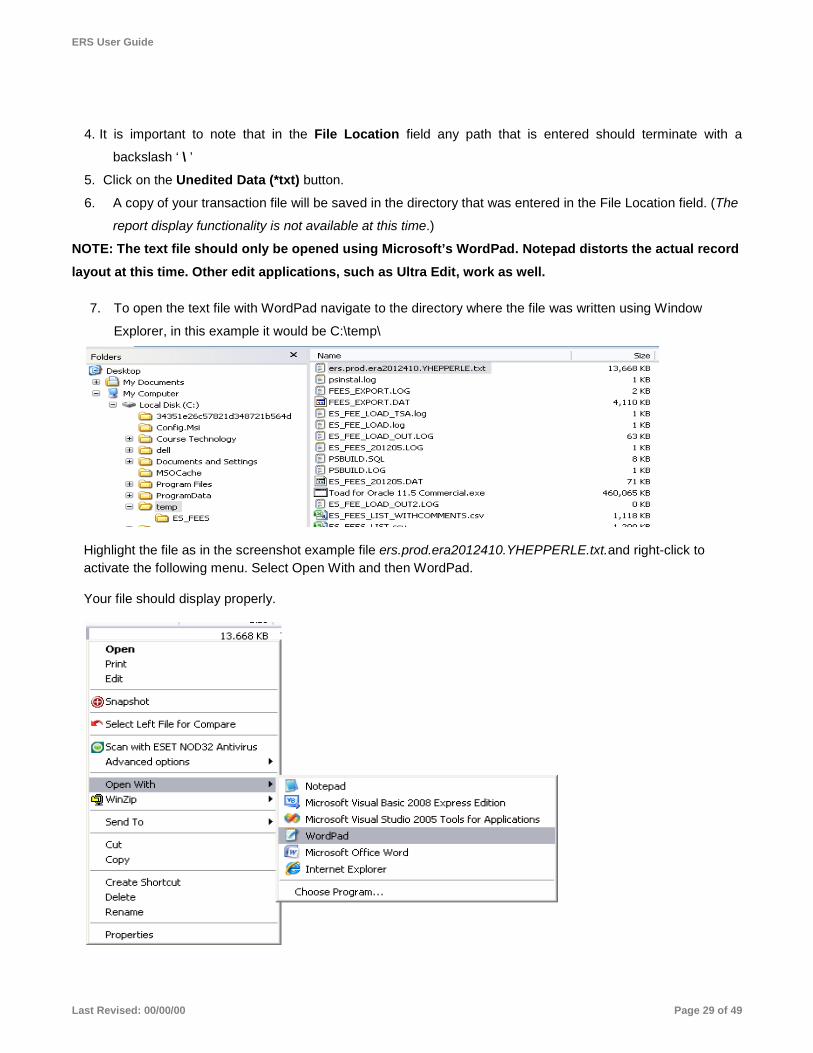
4. It is important to note that in the File Location field any path that is entered should terminate with a
backslash ‘ \ ’ 5. Click on the Unedited Data (*txt) button.
6. A copy of your transaction file will be saved in the directory that was entered in the File Location field. (The
report display functionality is not available at this time.)
NOTE: The text file should only be opened using Microsoft’s WordPad. Notepad distorts the actual record
layout at this time. Other edit applications, such as Ultra Edit, work as well.
7. To open the text file with WordPad navigate to the directory where the file was written using Window
Explorer, in this example it would be C:\temp\
Highlight the file as in the screenshot example file ers.prod.era2012410.YHEPPERLE.txt.and right-click to activate the following menu. Select Open With and then WordPad.
Your file should display properly.

ERS User Guide
Last Revised: 00/00/00 Page 30 of 49
Another option is once the file is open in WordPad save it as a text file and it will then be accessible to Notepad. To do this perform a Save As once the file is open in WordPad:
The following pop-up will display:
Select Yes and the file will be saved as a text file that can be re-opened with Notepad.

ERS User Guide
Last Revised: 00/00/00 Page 31 of 49
14.0 Reports
14.1 Edit Report
The Edit Report lists all records in the campus file that failed the edit criteria and is only created when there are errors (catastrophic and/or warning). All catastrophic errors must be corrected before notifying the Chancellor’s Office. Warning messages must be reviewed to determine if corrections are necessary. Once the data is accepted by the Chancellor’s Office, this report will no longer be available for viewing.
NOTE: Before opening the edit reports section, the following procedure is recommended. This procedure only needs to be performed once. Open Adobe Reader > select Preferences (from the Edit selection) > select Internet > uncheck the ‘Display PDF in browser’ option > click on the OK button.
1. Click on Edit Report from the Main Menu screen.
2. The View/Download Edit Report screen will display.
2. Select a value from the dropdown list for each screen field. The values selected for the screen fields are
validated against the input file name.
3. The File Location now has a Browse feature. Prior to this a campus was required to type in the path to
where the file should be created. The Browse button now lets a campus browse to their preferred location.
Click the Browse button and the following dialogue box will display.

ERS User Guide
Last Revised: 00/00/00 Page 32 of 49
Navigate to the preferred location and click Save.

ERS User Guide
Last Revised: 00/00/00 Page 33 of 49
The File Location field will be populated with path that was selected with the Browse button. This feature
only works with the Detailed Report (*.txt) feature. The other reports display on the monitor and can be placed
in a directory of choice with the Save As functionality.
4. Click on one of the following buttons:
• Detail Report (*.pdf) lists all records that failed the edit criteria in PDF format. You do not
need a File Location for this report. Any path entered will be ignored.
• Summary Report (*.pdf) summary of all catastrophic errors grouped by error codes. You do not
need a File Location for this report. Any path entered will be ignored.
• Detailed Report (*.txt) lists all records that failed the edit criteria in txt format. This file is used
for the CMS Enhanced Edit. Use this format for CMS campuses.
• Alternate Report (*.xls) lists all records that failed the edit criteria in Excel format.

ERS User Guide
Last Revised: 00/00/00 Page 34 of 49
14.2 Sample Reports Detail Report - PDF Format
Summary Report
ERS User Guide
Last Revised: 00/00/00 Page 35 of 49
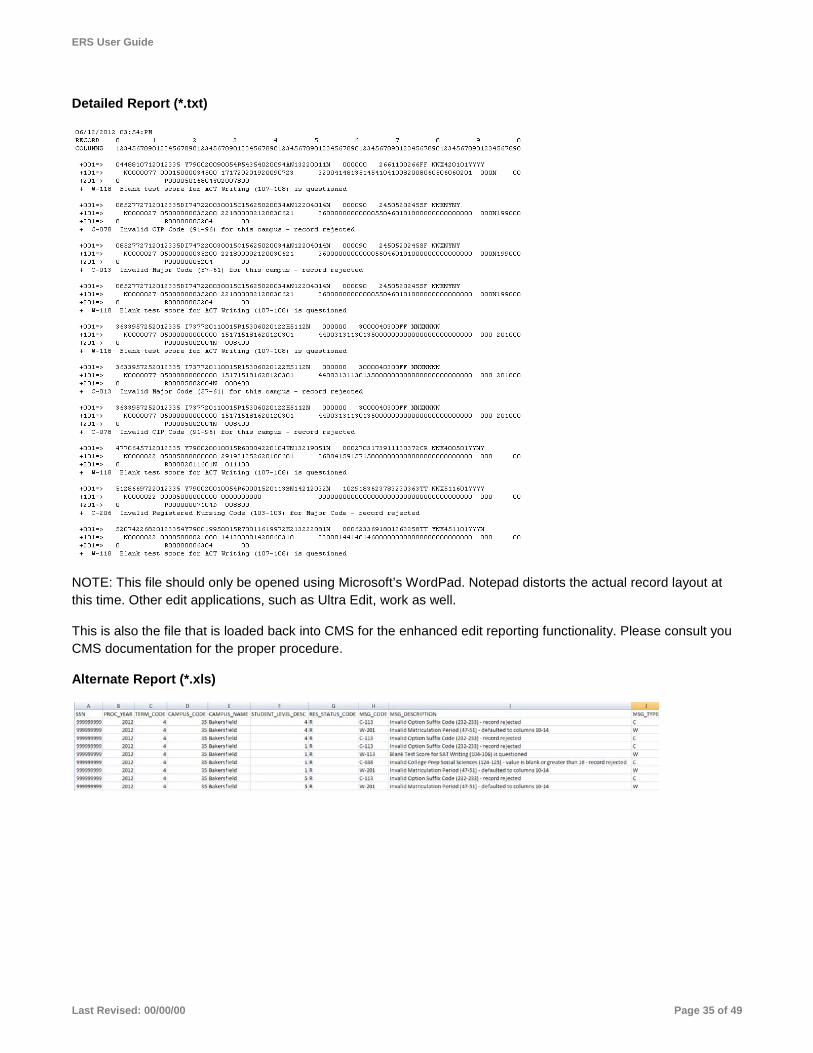
Detailed Report (*.txt)
NOTE: This file should only be opened using Microsoft’s WordPad. Notepad distorts the actual record layout at this time. Other edit applications, such as Ultra Edit, work as well.
This is also the file that is loaded back into CMS for the enhanced edit reporting functionality. Please consult you CMS documentation for the proper procedure.
Alternate Report (*.xls)

ERS User Guide
Last Revised: 00/00/00 Page 36 of 49
15.0 Reports
15.1 Campus Edited Data The Campus Edited Data Report is a snapshot of all records in the campus file after the file has been edited.
1. Click on Campus Edited Data from the Main Menu screen.
2. The View/Download Edited Data screen will display.
3 Select a value from the dropdown list for each screen field. The values selected for the screen fields are validated against the input file name. Please refer to the section titled ‘Screen Field Definitions’ for a definition of the fields.
4 Click on the radio button to identify the format of the file you want to download.
5 The Excel (*.xls) format does not require a path as it will display on the screen. The Excel file can be saved in a directory of choosing with the File>Save As functionality.
6 The File Location has a Browse feature. The Browse button lets a campus browse to their preferred location for the text file. Click the Browse button and the following dialogue box will display.

ERS User Guide
Last Revised: 00/00/00 Page 37 of 49
Navigate to the preferred location and click Save.

ERS User Guide
Last Revised: 00/00/00 Page 38 of 49
7 The File Location field will be populated with the path that was selected with the Browse button.
8 Click on the Edited Data button.
15.1.1 Campus Edited Data
15.1.1.1 Plain Text Format
15.2 SW/Campus Review Data The Campus Review Report is a snapshot of all records in the campus file that passed the edit (no catastrophic errors). This report is available after the Chancellor’s Office has moved the campus file to the review area.
1 Click on Campus Edited Data from the Main Menu screen.
2 The View/Download Edited Data screen will display.

ERS User Guide
Last Revised: 00/00/00 Page 39 of 49
3 Select a value from the dropdown list for each screen field. The values selected for the screen fields are validated against the input file name. Please refer to the section titled ‘Screen Field Definitions’ for a definition of the fields.
4 Click on the radio button to identify the format of the file you want to download.
5 The Excel (*.xls) format does not require a path as it will display on the screen. The Excel file can be saved in a directory of choosing with the File>Save As functionality.
6 The File Location has a Browse feature. The Browse button lets a campus browse to their preferred location for the text file. Click the Browse button and the following dialogue box will display.
7 Navigate to the preferred location and click Save.

ERS User Guide
Last Revised: 00/00/00 Page 40 of 49
8 The File Location field will be populated with the path that was selected with the Browse button.
9 Click on the radio button to identify the format of the file you want to download and click on the Profile
Review Data button.
15.2.1.1 Sample Report Excel Format

ERS User Guide
Last Revised: 00/00/00 Page 41 of 49
Text/Plain
15.3 S/W Campus Final Data The System-wide Campus Final Report lists all records in the campus file that was accepted by the Chancellor’s Office and moved to the Corporate Table.
1 Click on SW/Campus Final Data from the Main Menu screen. 2 The View/Download Final Data screen will display.

ERS User Guide
Last Revised: 00/00/00 Page 42 of 49
3 Select a value from the dropdown list for each screen field. The values selected for the screen fields are validated against the input file name. Please refer to the section titled ‘Screen Field Definitions’ for a definition of the fields.
4 Click on the radio button to identify the format of the file you want to download. 5 The Excel (*.xls) format does not require a path as it will display on the screen. The Excel file can be saved
in a directory of choosing with the File>Save As functionality. 6 The File Location has a Browse feature. The Browse button lets a campus browse to their preferred
location for the text file. Click the Browse button and the following dialogue box will display.
7 Navigate to the preferred location and click Save. 8 The File Location field will be populated with the path that was selected with the Browse button.
ERS User Guide
Last Revised: 00/00/00 Page 43 of 49
S/W Campus Final Report (continued)
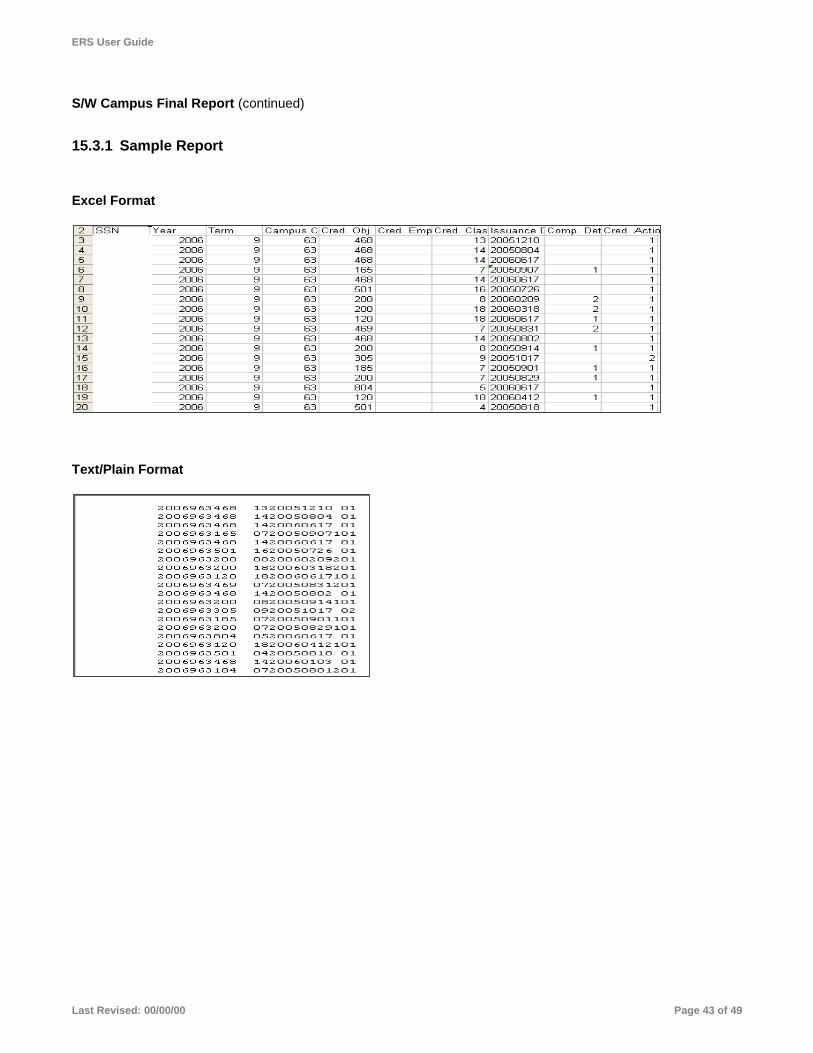
15.3.1 Sample Report
Excel Format
Text/Plain Format
ERS User Guide
Last Revised: 00/00/00 Page 44 of 49
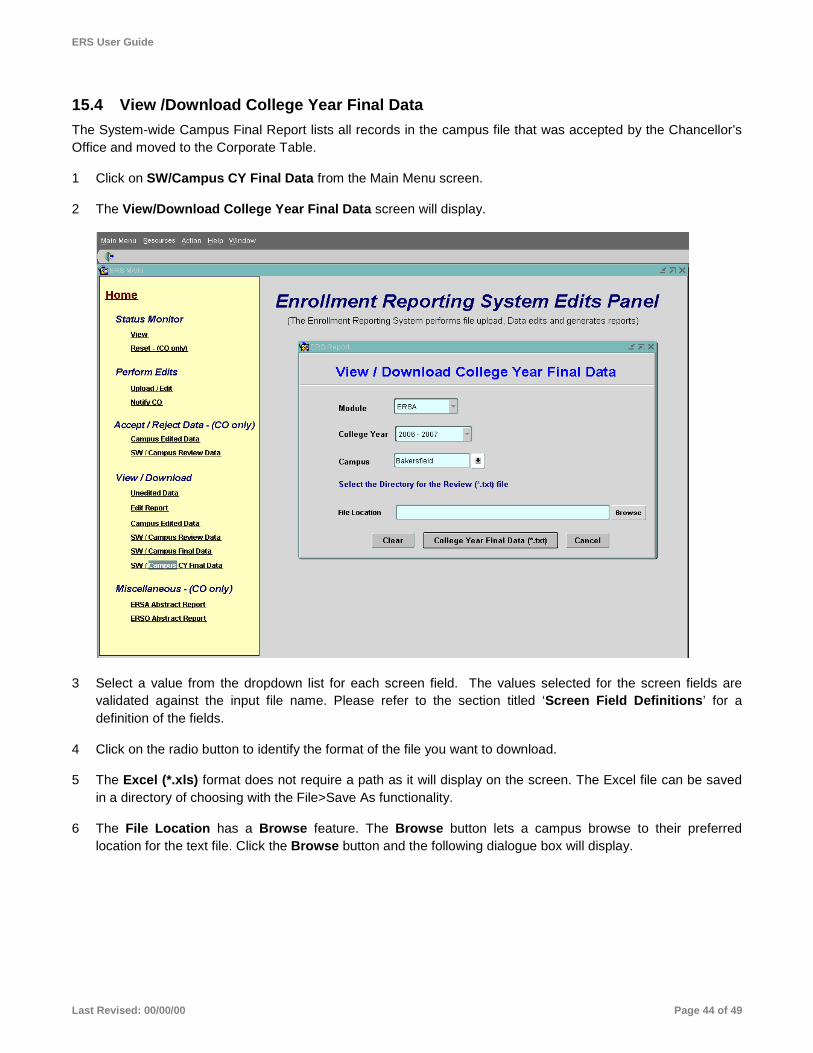
15.4 View /Download College Year Final Data The System-wide Campus Final Report lists all records in the campus file that was accepted by the Chancellor’s Office and moved to the Corporate Table.
1 Click on SW/Campus CY Final Data from the Main Menu screen.
2 The View/Download College Year Final Data screen will display.
3 Select a value from the dropdown list for each screen field. The values selected for the screen fields are validated against the input file name. Please refer to the section titled ‘Screen Field Definitions’ for a definition of the fields.
4 Click on the radio button to identify the format of the file you want to download.
5 The Excel (*.xls) format does not require a path as it will display on the screen. The Excel file can be saved in a directory of choosing with the File>Save As functionality.
6 The File Location has a Browse feature. The Browse button lets a campus browse to their preferred location for the text file. Click the Browse button and the following dialogue box will display.
ERS User Guide
Last Revised: 00/00/00 Page 45 of 49
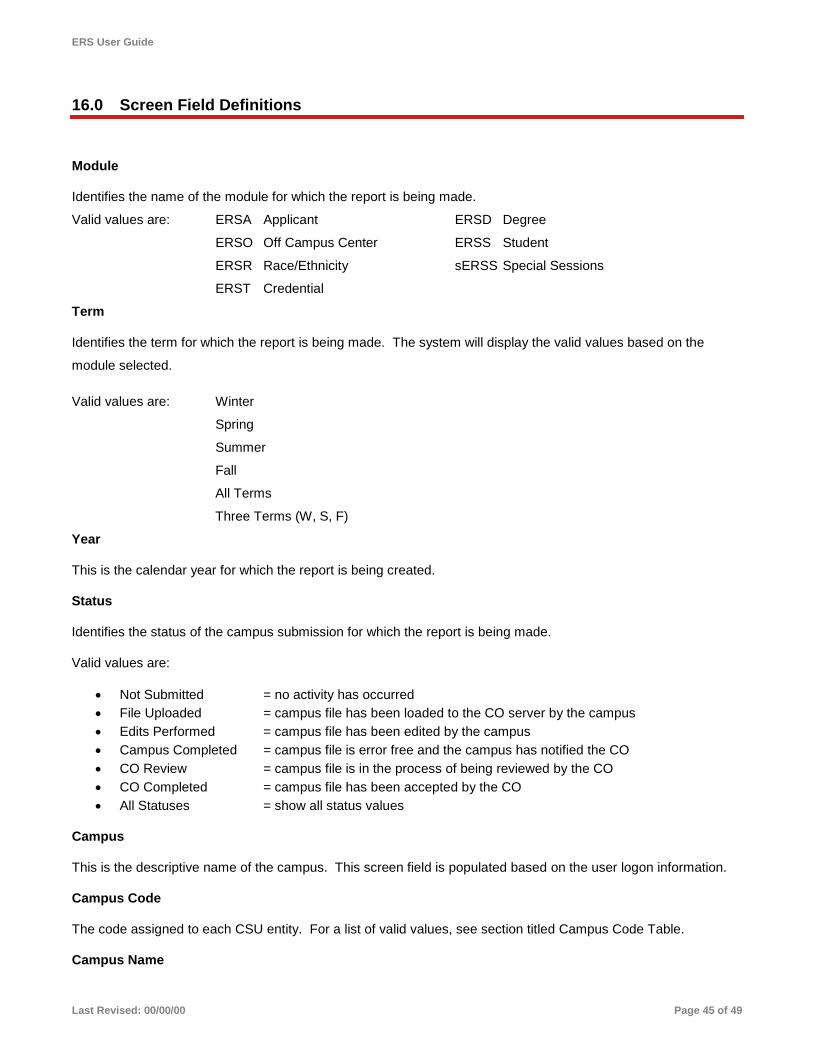
16.0 Screen Field Definitions
Module
Identifies the name of the module for which the report is being made.
Valid values are: ERSA Applicant ERSD Degree
ERSO Off Campus Center ERSS Student
ERSR Race/Ethnicity sERSS Special Sessions
ERST Credential
Term
Identifies the term for which the report is being made. The system will display the valid values based on the
module selected.
Valid values are: Winter
Spring
Summer
Fall
All Terms
Three Terms (W, S, F)
Year
This is the calendar year for which the report is being created.
Status
Identifies the status of the campus submission for which the report is being made.
Valid values are:
• Not Submitted = no activity has occurred • File Uploaded = campus file has been loaded to the CO server by the campus • Edits Performed = campus file has been edited by the campus • Campus Completed = campus file is error free and the campus has notified the CO • CO Review = campus file is in the process of being reviewed by the CO • CO Completed = campus file has been accepted by the CO • All Statuses = show all status values
Campus
This is the descriptive name of the campus. This screen field is populated based on the user logon information.
Campus Code
The code assigned to each CSU entity. For a list of valid values, see section titled Campus Code Table.
Campus Name
ERS User Guide
Last Revised: 00/00/00 Page 46 of 49
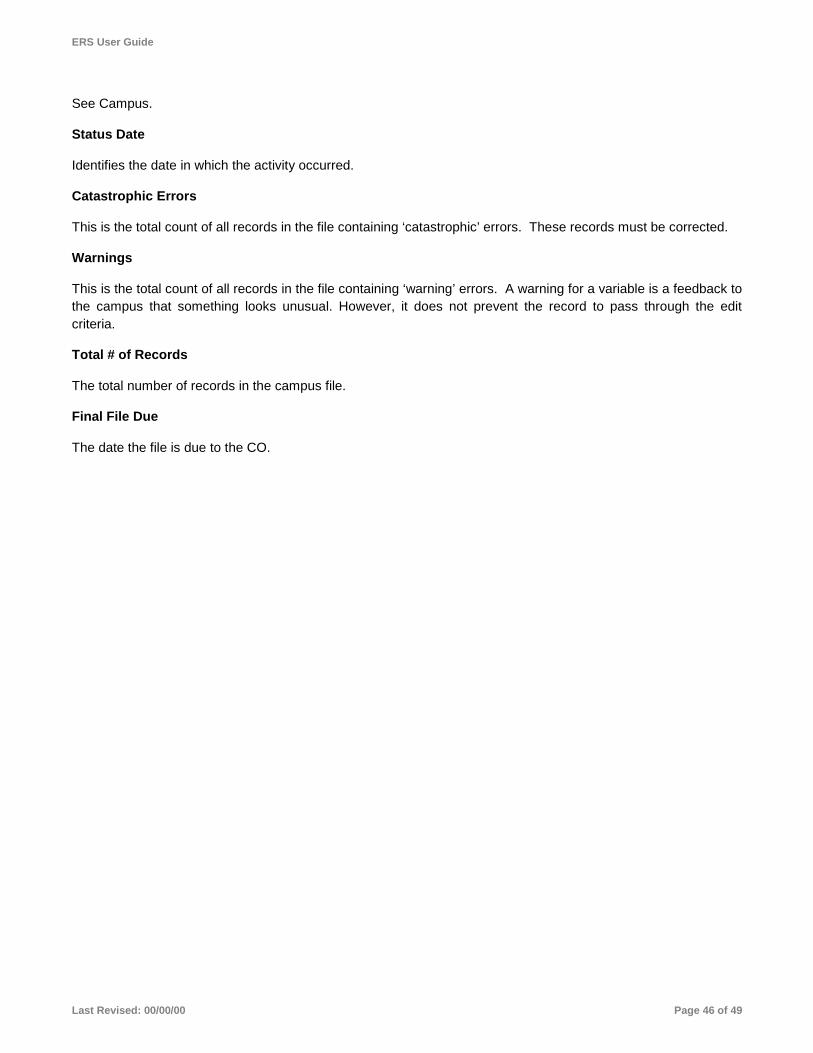
See Campus.
Status Date
Identifies the date in which the activity occurred.
Catastrophic Errors
This is the total count of all records in the file containing ‘catastrophic’ errors. These records must be corrected.
Warnings
This is the total count of all records in the file containing ‘warning’ errors. A warning for a variable is a feedback to the campus that something looks unusual. However, it does not prevent the record to pass through the edit criteria.
Total # of Records
The total number of records in the campus file.
Final File Due
The date the file is due to the CO.

ERS User Guide
Last Revised: 00/00/00 Page 47 of 49
16.1 ERS File Upload and Edit
Module
Identifies the module for which an edit is to be performed.
Valid values are: ERSA Applicant ERSD Degree
ERSO Off Campus Center ERSR Race/Ethnicity
ERSS Student sERSS Special Sessions
ERST Credential
Term
The system will display the valid values based on the module selected.
Valid values are: Winter
Spring
Summer
Fall
All Terms
Three Terms (W,S,F)
Year
This is the calendar year of the file.

ERS User Guide
Last Revised: 00/00/00 Page 48 of 49
Campus
This is the descriptive name of the campus. This screen field is populated based on the user logon information.
File Location and Name
The name and location of the campus file to be loaded and edited.
NOTE: The file name must match the values selected for the edit process. Please refer to the section titled ‘Campus File Layout’ for the proper naming convention.
16.2 View/Download Unedited Data
Module
Identifies the module for which for which the report is made.
Valid values are: ERSA Applicant ERSD Degree
ERSO Off Campus Center ERSR Race/Ethnicity
ERSS Student sERSS Special Sessions
ERST Credential

ERS User Guide
Last Revised: 00/00/00 Page 49 of 49
Term
The system will display the valid values based on the module selected.
Valid values are: Winter
Spring
Summer
Fall
All Terms
Three Terms (W,S,F)
Year
This is the calendar year of the file for which the report is made.
Campus
This is the descriptive name of the campus. This screen field is populated based on the user logon information.
File Location
The File Location has a Browse feature. The Browse button lets a campus browse to their preferred location for the text file. Click the Browse button and the following dialogue box will display