enginno usergd.r2a.qxd 5/17/06 6:32 pm page 1 · – plus a wide range of...
TRANSCRIPT
enginno_usergd.r2a.qxd 5/17/06 6:32 PM Page 1
Quick Start2
Quick Start Contents
Contents 3
Introduction ...................................... 4Features .................................................... 4Safety Instructions .................................... 7What’s in the Box .................................... 10Charging the Battery .............................. 12inno Controls .......................................... 13Using this Guide ...................................... 15inno Display ............................................ 16Remote .................................................... 17Subscribing to XM........................ 18Using Your inno Alone .............. 20Setup ...................................................... 20Live XM .................................................. 26TuneSelect™ .......................................... 29Info Extras .............................................. 31Recording XM.......................................... 33Listening to Recorded XM Content (My Music) .............................................. 37Organizing Your Music ............................ 38Using inno with a PC .................. 48System Requirements .............................. 48Setup ...................................................... 49Registering with XM+Napster ................ 51What Can You Do with XM+Napster? .... 54Exploring ................................................ 54Purchasing Music .................................... 55
Organizing Your Music ............................ 56Disconnecting Your inno From the PC...... 60Listening to XM Radio Online (XMRO) .... 61Using Your CDs or MP3/WMA Files ........ 62Updating inno Firmware .......... 64Using XM+Napster .................................. 64Using the Update Tool ............................ 65Using the Web ........................................ 65Settings .............................................. 66FM Modulator ........................................ 66Aiming the Antenna ................................ 69Audio ...................................................... 70Display .................................................... 71Channel Access........................................ 73Clock and Sleep Timer ............................ 75Vehicle Mode .......................................... 76Memory Partition .................................... 77Restoring Factory Defaults ...................... 78Customer Support ........................ 80Troubleshooting ...................................... 80Specifications .......................................... 83Patent Information .................................. 85FCC Statement ........................................ 86Warranty.................................................. 88
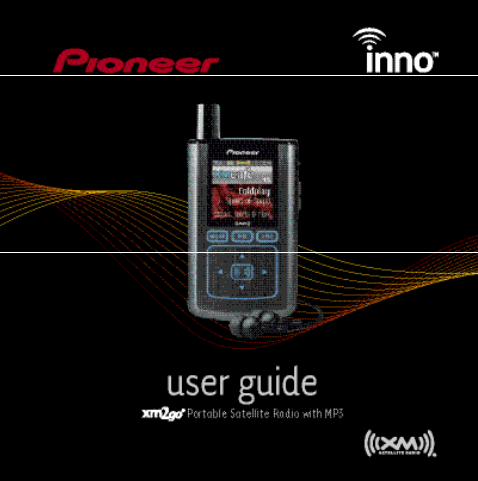
1. Charge battery for at least 8 hours (page 12).
2. Set up your inno™ (page 20).
3. Activate your XM subscription (page 18).
4. Listen to and record live XM* (pages 26 and 33).
5. Listen to recorded content (page 37).
6. Buy songs from XM+Napster (page 55).
7. Manage your songs and playlists from your computer (page 56).
*Hardware and required monthly subscription sold separately. Recorded music not for use in commercial establishments.Installation cost and other fees and taxes, including a one-time activation fee may apply. Subscription fee is consumeronly. XM products, programming, services, and fees are subject to change, at any time, without notice. Channels with frequent explicit language are indicated with an XL. Channel blocking is available for XM radio receivers by calling 1-800-XM-RADIO. Subscriptions subject to Customer Agreement available at xmradio.com. XM service only available inthe 48 contiguous United States. ©2006 XM Satellite Radio Inc. All rights reserved.
enginno_usergd.r2a.qxd 5/17/06 6:32 PM Page 2
Introduction4
Introduction Introduction
Introduction 5
FeaturesCongratulations on your purchase of the Pioneer inno™. It’s the next-generation XM2go®
radio, with an XM receiver, built-in antenna, and storage for XM, MP3, or WMA music files in one portable device.
Enjoy XM’s 170 channels from coast to coast, with over 80,000 hours of entertainment eachmonth. XM offers musical choice, variety, and discovery – worlds beyond your own collection– plus a wide range of news, sports, talk, comedy, kids, and entertainment channels. Hear XMlive, or save XM programming on your inno to listen at your leisure.
We’ve also teamed up with Napster, a leading provider of online music. Imagine discoveringa new artist on XM and then, with just a few clicks of a mouse, buying high-fidelity tracksand albums by that artist and similar artists. It’s that simple.
Manage all your music – XM tracks, songs you purchase from Napster, and MP3/WMA filesyou rip from your CDs – with the easy-to-use XM+Napster program on your Microsoft®
Windows® PC.
One device, all the music you could ever hope for, and the easiest way to find the music youwant – now that’s a music experience!
We recommend that you read the entire manual before using your inno.
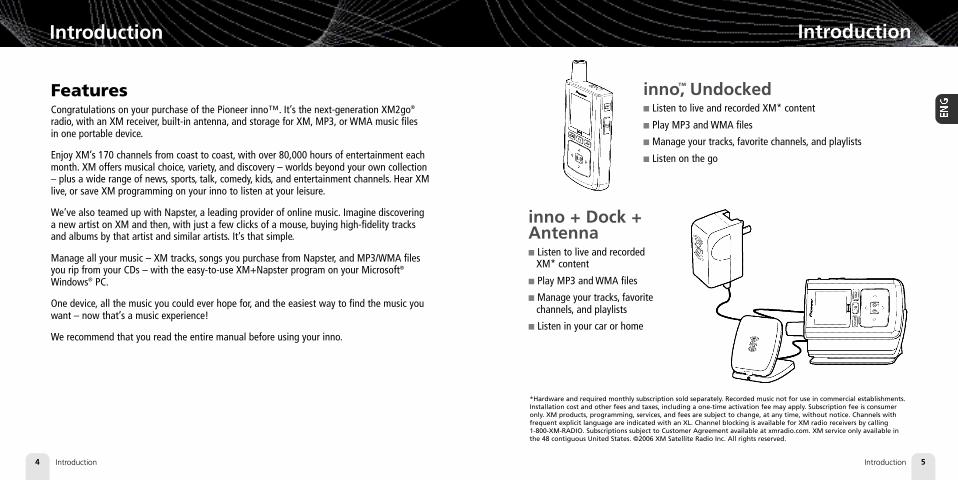
inno™, Undocked■ Listen to live and recorded XM* content
■ Play MP3 and WMA files
■ Manage your tracks, favorite channels, and playlists
■ Listen on the go
inno + Dock +Antenna ■ Listen to live and recorded
XM* content
■ Play MP3 and WMA files
■ Manage your tracks, favoritechannels, and playlists
■ Listen in your car or home
*Hardware and required monthly subscription sold separately. Recorded music not for use in commercial establishments.Installation cost and other fees and taxes, including a one-time activation fee may apply. Subscription fee is consumeronly. XM products, programming, services, and fees are subject to change, at any time, without notice. Channels with frequent explicit language are indicated with an XL. Channel blocking is available for XM radio receivers by calling 1-800-XM-RADIO. Subscriptions subject to Customer Agreement available at xmradio.com. XM service only available inthe 48 contiguous United States. ©2006 XM Satellite Radio Inc. All rights reserved.
enginno_usergd.r2a.qxd 5/17/06 6:32 PM Page 4

Introduction6
Introduction
Introduction 7
Introduction
Safety InstructionsPlease read and understand all the instructions to avoid injury to yourselfand/or damage to your inno. Please be aware that Pioneer claims noresponsibility for damage from data loss due to breakdown, repair, or other causes.
inno Digital Audio Player■ Do not expose to extreme temperatures (above 140°F or below -4°F, or above 60°C or
below -20°C).
■ Do not expose to moisture. Do not use inno near or in water.
■ Do not let any foreign matter spill into inno.
■ Do not expose to chemicals such as benzene and thinners. Do not use liquid or aerosol cleaners. Clean with a soft damp cloth only.
■ Do not expose to direct sunlight, fire, flame or other heat sources for a prolonged period.
■ Do not try to disassemble and/or repair inno yourself.
■ Do not drop your inno or subject it to severe impact.
■ Do not place heavy objects on inno.
■ Do not subject inno to excessive pressure.
■ Do not touch the inno with wet hands.
■ Do not store in dusty areas.
inno + Dock + Antenna + PC■ Manage content using inno or your PC
■ Listen to XM Radio Online
■ Purchase music from XM+Napster and upload it to your inno
WA R N I N G : Handling the cord on this product or cords associated with accessories soldwith the product will expose you to lead, a chemical known to the State of California and othergovernmental entities to cause cancer and birth defects or other reproductive harm.Wash hands after handling.
enginno_usergd.r2a.qxd 5/17/06 6:32 PM Page 6
Introduction8
Protect Your Ears
Sound can be deceiving. Over time your hearing “comfort level” adapts to higher volumes ofsound. So what sounds “normal” can actually be loud and harmful to your hearing. Set yourequipment at a safe level BEFORE your hearing adapts.To establish a safer level: Start your volume control at a low setting; Slowly increase thesound until you can hear it comfortably and clearly, without distortion.Once you have established a comfortable sound level: Set the dial and leave itthere; taking a minute to do this now will help to preserve hearing.
Pioneer and the Consumer Electronics Association recommend you avoid prolonged exposureto excessive noise. Under constant exposure such as sustained listening, sound levels above85 decibels can be dangerous without hearing protection. (For reference, a garbage disposalor loud shouting at 3 feet away are around 80 decibels; a food blender or gas lawn mower at 3 feet away are around 90 decibels.) The longer your exposure and/or higher the soundlevel, the greater the danger of permanent hearing damage. Pioneer disclaims all liability forhearing loss, bodily injury or property damage as a result of use or misuse of this product.
Introduction
Introduction 9
Introduction
Battery Charger SafetyCaution: Opening the case may result in electric shock.Caution: The uninsulated parts inside the power adapter and dock may cause electric shockor fire. For your safety, please do not open these components. Do not let metallic objects,such as necklaces or coins, come into contact with the power adapter plugs or battery terminal.Caution: To avoid electric shock, use the power adapter only with an outlet that matchesthe shape of the adapter’s plug.Caution: Make sure that you insert the adapter’s plug all the way into the outlet.Caution: Do not plug several devices into the same electrical outlet.Important: Always read and understand the user guide to prevent problems.Warning: Use the power adapter and dock away from water sources to avoid fire or electric shock.
Environmental Information■ Follow local guidelines for waste disposal when discarding packaging, batteries, and
electronic appliances.
■ Your player is packaged with cardboard, polyethylene, etc., and does not contain anyunnecessary materials.
Earbuds and Headphones■ Follow traffic safety instructions.
■ Do not use earbuds or headphones while operating a bicycle, automobile, or motorcycle.Not only is it dangerous, it may be prohibited by law in some areas.
■ For your safety, make sure the earbud or headphone cable does not get in the way of your arm or other surrounding objects while you’re walking or exercising.
■ Maintain a moderate volume when walking or exercising, so that you can be awareof what is happening around you.
■ Using earbuds or headphones for an extended time can cause serious damage to your hearing.
■ We strongly advise you to set the volume level to medium, which is usually less than 2/3 of the maximum.
■ If you hear ringing in your ear(s), lower the volume or stop using the earbuds or headphones.
WA R N I N G : inno should be placed in your vehicle where it will not interfere with the func-tion of safety features, e. g . , deployment of airbags. Failure to correctly place inno may result ininjury to you or others if the unit becomes detached during an accident and/or obstructs thedeployment of an airbag.
enginno_usergd.r2a.qxd 5/17/06 6:32 PM Page 8

Introduction10
Introduction
Introduction 11
Introduction
What’s in the Box
inno (GEX-INNO1)
Battery
Home dock
Earbuds
Remote
What’s in the Box
Home XM antenna
RCA audio cable
Also included:
User guide
XM+Napster install CDUSB cable
AC poweradapter
Carryingcase/holster
Travel powercable
enginno_usergd.r2a.qxd 5/17/06 6:32 PM Page 10

3. Plug adapter into dock andwall socket. When you insertinno into a dock, wait for thebeep before powering on.
Introduction12
Introduction
Introduction 13
Introduction
Charging the BatteryCharge the battery for at least 8 hours before using inno for the first time,or if you have not used it for several months. Be sure to charge the batteryin a place where the temperature is between 32°F and 113°F (0°C to 45°C).
1. Open battery compartment.2. Insert battery into player.
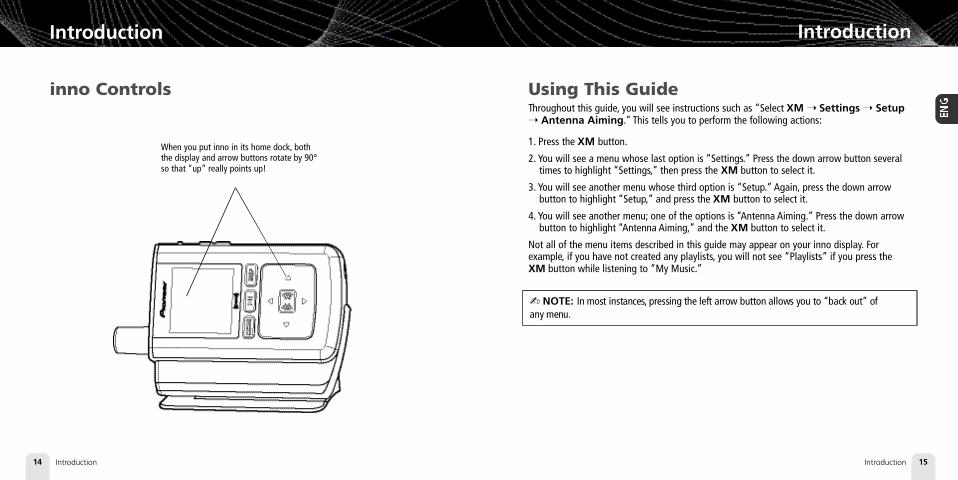
inno Controls
Power button – Slidedown to turn power on or off. Slide up to “hold”controls, preventing youfrom accidentally pressinga button.
Display button –Change what’s showingon the display.
XM button – Starthere; press to accesschannels, playlists,menus, and confirmselections.
Mode – Switchbetween “Live XM”or “My Music”(recorded content).
Arrow buttons –Select menu entries,change channels.
Display
Volume
Earbud jack
USB jack
Play/Pause
Left arrow button –Pressing the left arrowbutton allows you to“back out” of or exitmost menus.
enginno_usergd.r2a.qxd 5/17/06 6:32 PM Page 12
Introduction14
Using This GuideThroughout this guide, you will see instructions such as “Select XM ➝ Settings ➝ Setup➝ Antenna Aiming.” This tells you to perform the following actions:
1. Press the XM button.
2. You will see a menu whose last option is “Settings.” Press the down arrow button severaltimes to highlight “Settings,” then press the XM button to select it.
3. You will see another menu whose third option is “Setup.” Again, press the down arrow button to highlight “Setup,” and press the XM button to select it.
4. You will see another menu; one of the options is “Antenna Aiming.” Press the down arrowbutton to highlight “Antenna Aiming,” and the XM button to select it.
Not all of the menu items described in this guide may appear on your inno display. For example, if you have not created any playlists, you will not see “Playlists” if you press theXM button while listening to “My Music.”
Introduction
Introduction 15
Introduction
inno Controls
When you put inno in its home dock, boththe display and arrow buttons rotate by 90°so that “up” really points up!
✍ NOTE: In most instances, pressing the left arrow button allows you to “back out” of any menu.
enginno_usergd.r2a.qxd 5/17/06 6:32 PM Page 14

Available memory or signal strength –Green portion indicates amount of storage taken upby locked XM songs (page 40). In “Live XM” mode,you will see a signal strength indicator instead.
Indicates XM channel,playlist, or MP3 genre.
Introduction16
Introduction
Introduction 17
Introduction
inno Display
play
reverse or fast-forward through track
pause
skip to previous or next track
PC track (MP3 or WMA file)
track assigned to a playlist
PC track assigned to a playlist
XM track is locked
repeat track
play tracks randomly
Additional symbols:PostScript Picture
play small icon.eps
PostScript Picturefast forward small icon.eps
PostScript Picturepaused small icon.eps
PostScript Pictureprevious small icon.eps
PostScript PicturePC song small icon.eps
PostScript Pictureplaylisted song small icon.eps
PostScript Pictureplaylisted PC song icon.eps
PostScript PictureLocked song small icon.eps
Battery charge
Mode – (((XM))) showsyou’re listening to live XM.(((My Music))) showsyou’re listening to storedXM content or MP3/WMAtracks.
H – ”H” indicates that thepower switch is set in the“hold” position.
Clock
Channel number
Artist name
Song title
RemotePower button
Left arrow button –Pressing the left arrow buttonallows you to “back out” of orexit most menus.
Volume
Record – Record a song or channel.
Bookmark – Tag interestingsongs or tracks.
Numeric keypad – SelectXM channels by channel number.
Mode – “Live XM” or“My Music” (recordedcontent).
XM button – Accessmenus and confirm selections.
Arrow buttons –Select menu entries,change channels.
Pause/Mute – Pause playback or mute live XM.
Favorites – Go tofavorite channels.
Jump – Switch to previouschannel you listened to.
Display – Change what’sshowing on the display.
Progress bar – Showstotal track length and cur-rent location within a trackwhile playing songs in“My Music.”
enginno_usergd.r2a.qxd 5/17/06 6:32 PM Page 16

Subscribing to XM18 19
Subscribing to XM
Before you can listen to or record XM content, you must activate your inno.
1. Set up your inno, dock station, power adapter, and antenna (page 20 or page 22). Makesure inno can receive the XM signal.
2. Place inno in the “Live XM” mode (page 26).
3. Find the 8-character XM Radio ID, which is printed on the package or in the battery com-partment underneath the battery. Or select XM channel 0 to view the Radio ID. Record theRadio ID here for reference:
■■■■■■■■ The XM Radio ID does not use the letters I, O, S, or F.
4. Activate your XM Satellite Radio service online at http://activate.xmradio.com or by calling 1-800-XM-RADIO (1-800-967-2346). You will need a major credit card.
XM will send a signal from the satellites to activate the full channel lineup. A c t i vation normallytakes 10 to 15 minutes, but during peak busy periods you may need to keep your player onfor up to an hour. When you can access the full channel lineup on your inno, you’re finished!
Product registrationVisit us at the following site:
1. Register your product. We will keep the details of your purchase on file to help you refer to this information in the event of an insurance claim such as loss or theft.
2. Receive updates on the latest products and technologies.
3. Download owner’s manuals, order product catalogues, research new products, and muchmore.
I M P O RTANT (Serial Number) The serial number of this device is located on the backof this unit. For your own security and convenience, be sure to record this number on theenclosed warranty card.
enginno_usergd.r2a.qxd 5/17/06 6:32 PM Page 18

Using Your inno Alone
Using Your inno Alone 21Using Your inno Alone20
Using Your inno Alone
SetupAt Home1. Insert inno into home
dock.
2. Connect inno to youraudio system as shown.Connect power adapterand home antenna. Pointantenna toward the south-ern sky through a window.
3. To optimize signal recep-tion, you may mount thehome antenna outdoors,facing south. Make surethe antenna is not blockedby buildings or trees.
To AC power adapter
To your audio system’sline input or AUX input
To home antenna
While TravelingIf you’re traveling, you can connect the power adapter directly to innousing the travel power cable.
enginno_usergd.r2a.qxd 5/17/06 6:32 PM Page 20

Using Your inno Alone22
SetupIn a Vehicle (requires Car Accessory Kit CD-INCAR1, sold separately)Every vehicle is different; for your safety, follow all instructions carefully.Consult a professional installer if you have questions.
You can listen to your inno through your car stereo by using inno’s built-in FM transmitter.Simply find an unused FM frequency on the stereo and set inno to transmit on that same frequency.
1. Mount antenna to the roof or trunk of the vehicle. During installation, make sure you areoutdoors and the antenna is not obstructed by tall buildings.
Using Your inno Alone
Using Your inno Alone 23
Using Your inno Alone
2. Insert inno into car dock.
3. Connect car dock to antenna cable and power adapter.
enginno_usergd.r2a.qxd 5/17/06 6:32 PM Page 22

4. To install the swivel mount, first find a suitable location. The swivel mount’s adhesive isvery strong and may be difficult to remove. Do not install this mount on leather surfacesand make sure the air temperature is at least 60°F (15°C).
Clean the mounting surfaces with the surface preparation kit. Peel away the adhesive linerand firmly press the swivel mount to the surface for 30 seconds. Allow 24 hours beforeusing the mount.
If you need to remove the mount, carefully lift the adhesive pad with your fingers or aspoon. Warming with a hair dryer for several minutes will help soften the adhesive.
Using Your inno Alone
Using Your inno Alone 25Using Your inno Alone24
Using Your inno Alone
5. To install the vent mount, find a horizontal vent that is strong enough to hold your innoand dock. To remove the vent mount, push it into the vent and lift upwards slightly torelease the mount’s hooks from the vent vane.
6. Find an unused FM frequency on your car stereo.
7. Set your inno to the same FM frequency. (Refer to the section marked “Settings,” “FMFrequency.”)
8. Tune inno to XM channel 1. You should be able to hear XM through your car stereo.
You can adjust the tension ofthe mount with a screwdriver.
enginno_usergd.r2a.qxd 5/17/06 6:32 PM Page 24
Using Your inno Alone26
Using Your inno Alone Using Your inno Alone
Using Your inno Alone 27
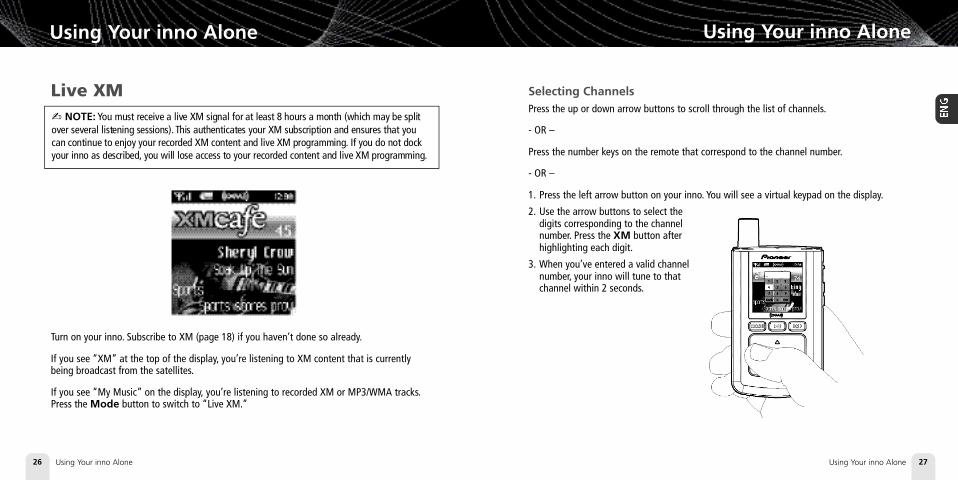
Live XM
Turn on your inno. Subscribe to XM (page 18) if you haven’t done so already.
If you see “XM” at the top of the display, you’re listening to XM content that is currentlybeing broadcast from the satellites.
If you see “My Music” on the display, you’re listening to recorded XM or MP3/WMA tracks.Press the Mode button to switch to “Live XM.”
Selecting ChannelsPress the up or down arrow buttons to scroll through the list of channels.
- OR –
Press the number keys on the remote that correspond to the channel number.
- OR –
1. Press the left arrow button on your inno. You will see a virtual keypad on the display.
2. Use the arrow buttons to select thedigits corresponding to the channelnumber. Press the XM button afterhighlighting each digit.
3. When you’ve entered a valid channelnumber, your inno will tune to thatchannel within 2 seconds.
✍ NOTE: You must receive a live XM signal for at least 8 hours a month (which may be splitover several listening sessions). This authenticates your XM subscription and ensures that youcan continue to enjoy your recorded XM content and live XM programming. If you do not dockyour inno as described, you will lose access to your recorded content and live XM programming.
enginno_usergd.r2a.qxd 5/17/06 6:32 PM Page 26
Using Your inno Alone28
Using Your inno Alone
Using Your inno Alone 29
Using Your inno Alone
Favorite ChannelsYou can save your favorite channels in an easily accessible list.
1. While you’re tuned to a channel, press the XM button.
2. Select Favorites ➝ Add Channel.
3. Once you’ve saved your favorites, you can quickly access the list. From the “Live XM”screen, simply press the right arrow button to see your “Favorites” list. Press the up anddown arrow buttons, then the XM button to select the desired channel.
4. To remove a channel from the “Favorites” list, select XM ➝ Favorites ➝ EditChannels ➝ (channel name) ➝ Remove Channel.
CategoriesXM channels are organized into categories, or genres, such as “Rock,” “Jazz,” or “News.”
To find a channel by category:
1. Press the right arrow button one or more times. The category name appears in the display. “Favorites” is your first category if you have designated any channel as a “favorite channel.”
2. When you’ve found the category you want, press the up or down arrow buttons to select a channel.
3. Press the XM button to tune to that channel.
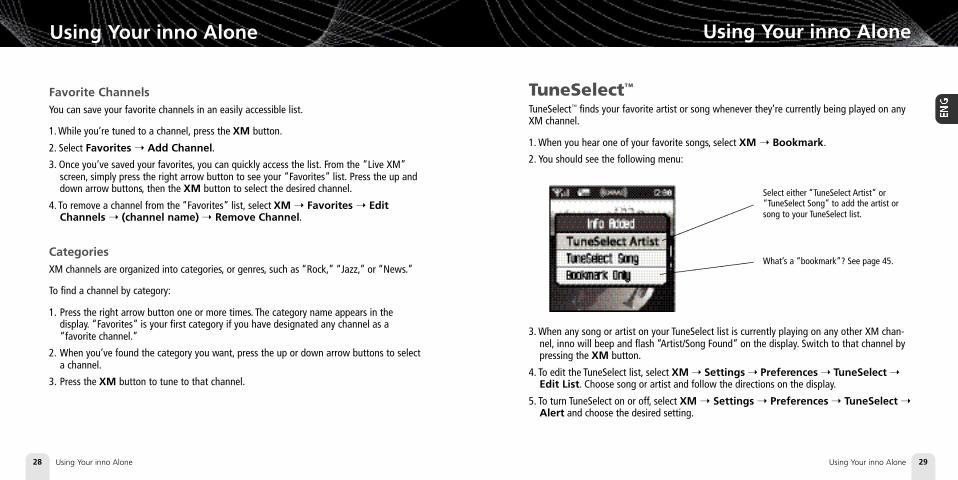
TuneSelect™
TuneSelect™ finds your favorite artist or song whenever they’re currently being played on anyXM channel.
1. When you hear one of your favorite songs, select XM ➝ Bookmark.
2. You should see the following menu:
3. When any song or artist on your TuneSelect list is currently playing on any other XM chan-nel, inno will beep and flash “Artist/Song Found” on the display. Switch to that channel bypressing the XM button.
4. To edit the TuneSelect list, select XM ➝ Settings ➝ Preferences ➝ TuneSelect ➝Edit List. Choose song or artist and follow the directions on the display.
5. To turn TuneSelect on or off, select XM ➝ Settings ➝ Preferences ➝ TuneSelect ➝Alert and choose the desired setting.
Select either “TuneSelect Artist” or“TuneSelect Song” to add the artist orsong to your TuneSelect list.
What’s a “bookmark”? See page 45.
enginno_usergd.r2a.qxd 5/17/06 6:32 PM Page 28

Using Your inno Alone
Using Your inno Alone 31Using Your inno Alone30
Using Your inno AloneUsing Your inno Alone
TuneSelect also allows you to type an artist name or song title even if the song isn’t currentlyplaying on your inno.
1.Select XM ➝ Settings ➝ Preferences ➝ TuneSelect ➝ Edit List ➝ AddTuneSelect.
2. Press the up or down arrow buttons to choose the artist or song title field.
3. Press the XM button. You will see a virtual keyboard. Type in the artist name or song title.
4. Select “Enter” when you’re finished, or select “Exit” to cancel.
5. Select “Accept” to add that name or title to your TuneSelect list. You can also select “Change” or “Cancel.”
✍ NOTE: The artist name and song title fields are case-sensitive.
Info ExtrasXM Satellite Radio broadcasts information such as sports scores, stocks, and other featuresfrom time to time.
To Choose Sports or Teams:
1. Select XM ➝ Settings ➝ Preferences ➝ Info Extras ➝ Sports.
2. Use the arrow buttons to highlight (in yellow) a sport or team.
3. Press the XM button to select that sport or team. The name of the sport or team will turngreen.
4. You may select more than one sport or team to display. Your chosen selections are shownin blue. To remove a selection, go to that entry and press the XM button; the entry willchange color from blue to gray.
5. When you’re finished, press the left arrow button repeatedly until you return to the normaldisplay. Or just wait several seconds for inno to return to its home screen automatically.
To Select Stocks*:
1. Press XM ➝ Settings ➝ Preferences ➝ Info Extras ➝ Stock Ticker ➝ AddStocks.
2. You should see a virtual keyboard that will allow you to enter astock symbol.
3. Use the arrow buttons to highlight the first letter in the stocksymbol. Choose that letter by pressing the XM button.
*Quotes are provided by ComStock, Inc. and cover most stocks listed on the NYSE,AMEX, or NASDAQ. Market information is delayed by approximately 25 minutes.
enginno_usergd.r2a.qxd 5/17/06 6:32 PM Page 30

Using Your inno Alone32
Using Your inno Alone
Using Your inno Alone 33
Using Your inno Alone
4. Continue selecting letters by using the arrow and XM buttons.
5. Select “Enter” when you’ve entered the entire stock symbol. Your inno is smart enough toautomatically complete some stock symbols.
6. You can track up to 20 stock symbols. When you’ve entered all your desired stock symbols,select “Exit.”
7. Press the left arrow button repeatedly (or simply wait a few seconds) until your innoreturns to normal operation.
To display Info Extras, press the Display button several times until you see sports scores ora stock ticker at the bottom of the display.
Recording XMYour inno enables you to record XM content for personal, non-commercial use. You mayrecord XM content while listening to live XM or by scheduling a recording session. You canthen listen to recorded XM content on the go. You can also personalize your XM content bycreating playlists for every mood and occasion.*
Recording a Single Song1. While you’re listening to live XM, select XM ➝ Record ➝ Record Song. Don’t worry
if you miss the beginning of the song; your inno captures the entire song even if you startup to 10 minutes after the song begins, as long as you’re already tuned to that channel.
By selecting “Record Song,” you instruct your inno to stop recording at the end of thesong.
2. You can continue recording the channel you’re listening to by selecting XM ➝ Record ➝Rec Channel.
3. To stop recording at any time, select XM ➝ Record ➝ Stop Recording. If you change channels, inno automatically stops recording.
S H O RT C U T:To immediately start recording at any time, press and hold the XM button until you see the “Recording …” message appear on the display.
*XM content cannot be exported from the inno digital audio player. If you wish to own a complete, high-fidelity version of digital content on demand, you should purchase content from XM+Napster. This may allow you to store the content on multiple devices depending upon the digital rights management of such content.
enginno_usergd.r2a.qxd 5/17/06 6:32 PM Page 32
Using Your inno Alone34
Using Your inno Alone
Using Your inno Alone 35
Using Your inno Alone
Recording a Channel1. While you’re listening to live XM, select XM ➝ Record ➝ Rec Channel. You will record
the channel you’re currently listening to.
2. To stop recording at any time, select XM ➝ Record ➝ Stop Recording. If you changechannels, inno automatically stops recording.
3. You can choose to stop recording at the end of the song you’re currently listening to byselecting XM ➝ Record ➝ Record Song.
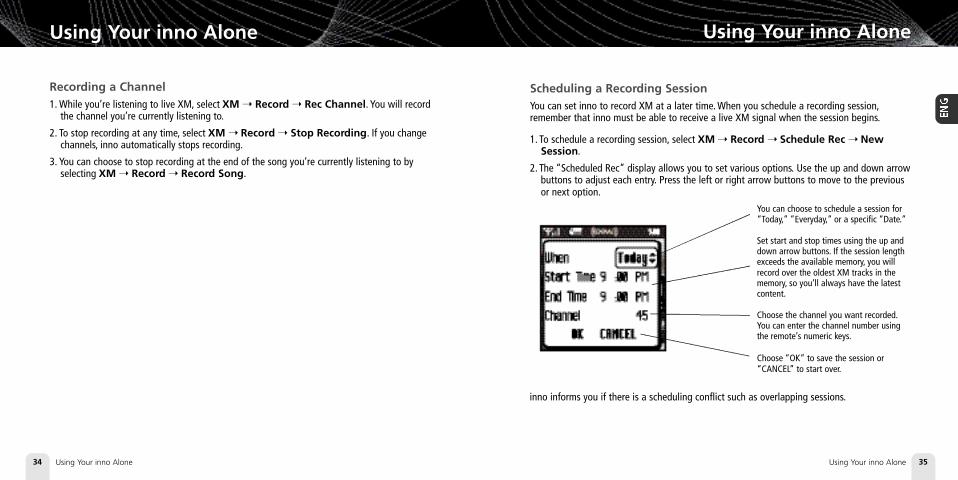
Scheduling a Recording SessionYou can set inno to record XM at a later time. When you schedule a recording session,remember that inno must be able to receive a live XM signal when the session begins.
1. To schedule a recording session, select XM ➝ Record ➝ Schedule Rec ➝ NewSession.
2. The “Scheduled Rec” display allows you to set various options. Use the up and down arrowbuttons to adjust each entry. Press the left or right arrow buttons to move to the previousor next option.
You can choose to schedule a session for“Today,” ”Everyday,” or a specific “Date.”
Set start and stop times using the up anddown arrow buttons. If the session lengthexceeds the available memory, you willrecord over the oldest XM tracks in thememory, so you’ll always have the latestcontent.
Choose the channel you want recorded.You can enter the channel number usingthe remote’s numeric keys.
Choose “OK” to save the session or“CANCEL” to start over.
inno informs you if there is a scheduling conflict such as overlapping sessions.
enginno_usergd.r2a.qxd 5/17/06 6:32 PM Page 34

Using Your inno Alone36
Using Your inno Alone
Using Your inno Alone 37
Using Your inno Alone
3. To edit an existing session, select XM ➝ Record ➝ Schedule Recording. You will seea list of sessions. Highlight the session you wish to edit.
You may not see all the sessions that you scheduled in the past. Sessions that have expiredare automatically removed from the list.
4. Choose Edit Session to change the session’s options.
5. To delete a session, choose Cancel Session.
At the scheduled time, your recording session will begin and change channels if needed.Remember that when you schedule a recording session, you are instructing inno to switch tothe desired channel.
✍NOTE: Scheduled recording sessions will begin only if inno is put in a home dock or in aboombox with AC power. Your inno can be powered off or on. M a ke sure your inno can receive astrong XM signal!
Listening to Recorded XM Content (My Music)When you see “My Music” at the top of the display, you’re listening to XM content that youhave recorded and any MP3/WMA files you have transferred to your inno.
1. To switch to “My Music” from “Live XM,” press the Mode button.
2 . Press the up and down arrow buttons to view a list of songs that you have stored on inno.Highlight the song you want to listen to, then press XM ➝ Play to start playing fromthat song.
3. You can press the right arrow button to skip to the next song. Press the left arrow buttonto skip to the previous song.
4. While you’re listening to a song, you can also press and hold the right arrow button to fast-forward through that song. Press and hold the left arrow button to reverse through the song.
✍ NOTE: In order to access your XM content you have recorded on inno, you must (1) maintain an active XM Satellite Radio subscription, and (2) receive the live XM signal at least 8 hours a month.
enginno_usergd.r2a.qxd 5/17/06 6:32 PM Page 36
Using Your inno Alone38
Using Your inno Alone
Using Your inno Alone 39
Using Your inno Alone
Organizing Your MusicFinding Your MusicAll songs and tracks that are stored in your inno are normally played in the order that theywere recorded or transferred into your inno. You can also sort the selections by artist,category, or channel.
1. While listening to recorded tracks in “My Music,” select XM ➝ Find.
2. Choose how to view your stored music. For example, to sort your stored music by artist,select Artists.
3. Press the up or down arrow buttons to scroll through the list of artists. Press the XMbutton to select an artist.
View all songs on your inno.
You can also sort songs by artists, by categories,by channels, or by recording sessions.
4. Once you’ve selected an artist, you will see a list of songs by that artist that you haverecorded.
5. Select the song you want to hear using the arrow and XM buttons. Select XM ➝ Play tobegin playing that song.
6. To return to the list of artists, press XM ➝ Find ➝ Artists and select another artist as insteps 3 and 4.
7. You can also sort your tracks by categories or by channels. WMA and MP3 songs show thecategory or genre that they are assigned to using their ID3 tags, which may or may not bethe same as the XM category. WMA and MP3 songs are also assigned to a channel named“MP3/WMA.”
8. To view all the songs stored in your inno, press XM ➝ Find ➝ All Songs.
S H O RT C U T:As soon as you’ve highlighted a song, simply press the right arrow button to startp l a y b a c k .
Shows the artist’s songs in the order theywere recorded.
Opens the Edit window, allowing you to add anartist to a playlist, lock or unlock all the artist’ssongs, or delete all the artist’s songs.
enginno_usergd.r2a.qxd 5/17/06 6:32 PM Page 38

Playlists – Adding SongsYou can create one or more custom lists, called playlists. Each playlist is an index of songsthat play in a certain order. You can create a “morning drive” playlist, a “workout” playlist, a“best of” playlist, and more.
1. To add a song to a playlist, first select a song using the up or down arrow buttons. The songmay be a recorded XM track, an MP3 track, or a WMA track, including songs purchasedthrough XM+Napster.
2. Select XM ➝ Edit Song ➝ Add to Playlist.
3. You can choose to add the song to an existing playlist or to create a new playlist. To choosean existing playlist, simply highlight and select the playlist name. To create a new playlist,choose New Playlist and use the virtual keyboard to name that playlist.
4. The display confirms by showing “(playlist name) (song title) Added.”
5. Adding a song to a playlist automatically locks that song.
You can add a song to more than one playlist or a song to the same playlist more than once.
You can also add all songs by an artist to a playlist: select XM ➝ Organize ➝ Artists ➝(artist name) ➝ Add to Playlist. You can also add all songs in a particular XM channelor category to a playlist.
Using Your inno Alone40
Using Your inno Alone
Using Your inno Alone 41
Using Your inno Alone
Locking and Unlocking XM ContentWhen you record XM, your inno records over the oldest XM tracks first. This ensures that youalways hear the latest XM content. You can “lock” a song or track to prevent inno fromrecording over it. Locked songs occupy memory on your inno and reduce your availablerecording time. Remember that you can buy high-fidelity songs or albums from XM+Napsterthat can be stored either on your inno or on your PC.
1. While you’re listening to a song in “My Music,” press the up or down arrow buttons toview the list of songs.
2. Highlight the song you want to lock.
3. Select XM ➝ Edit Song ➝ Lock Song.
4. The locked song is indicated with a padlock symbol to the left of the song title.
5. To unlock a song, highlight the song in the list and select XM ➝ Edit Song ➝ UnlockSong.
You can also lock all songs by an artist, in a category, or in a channel. To lock all songs by anartist:
1. Select XM ➝ Organize ➝ Artists ➝ (artist name) ➝ Lock Artist.
2. All songs by this artist are displayed with a padlock symbol to the left of the song title.
If you add a song to a playlist, that song is automatically locked.
S H O RT C U T: To lock the song you’re currently listening to, press and hold the XM b u t t o n ,then select Lock Song.
S H O RT C U T: When you’re in “My Music,” you can add the recorded XM song that you’re currently hearing to a playlist by pressing and holding the XM b u t t o n , then selecting Add toPlaylist.
enginno_usergd.r2a.qxd 5/17/06 6:32 PM Page 40
Using Your inno Alone42
Using Your inno Alone
Using Your inno Alone 43
Using Your inno Alone
Playlists – Removing EntriesYou can remove entries from a playlist. Remember that removing a song from one playlistdoes not remove it from any other playlist, and does not delete that song from inno.
To remove one or more songs from a playlist:
1. Select XM ➝ Playlists ➝ (playlist name) ➝ Edit Playlist ➝ Remove Songs.
2. Use the up and down arrow buttons to highlight a song.
3. Press XM ➝ Select. The song’s name will change to green.
4. Use the up and down arrow buttons to highlight another song, and press the XM buttonto select that song. Do this for all the songs you want to remove; these songs are displayed in blue.
5. Select XM ➝ Remove Song(s) ➝ Yes.
6. inno confirms by displaying “Songs Removed.”
S H O RT C U T: Instead of steps 3 and 4, press the right arrow button to select the song you wa n tto remove.
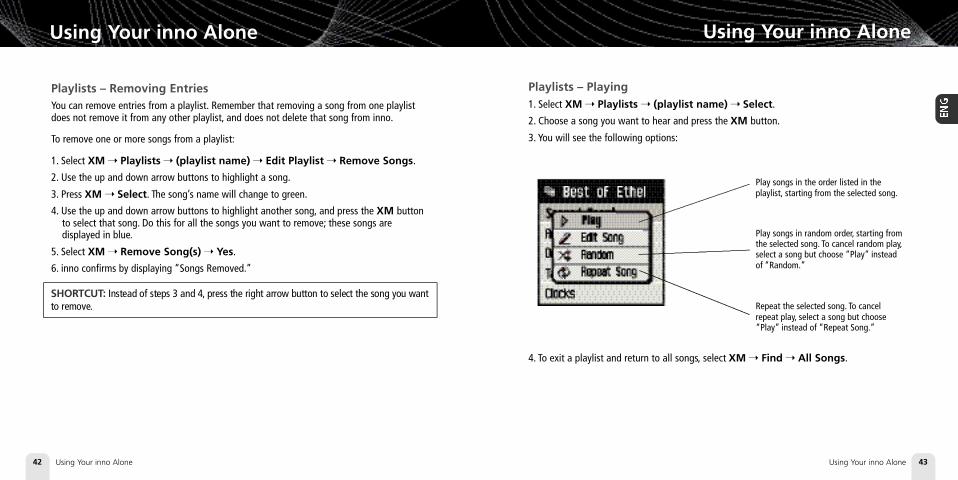
Playlists – Playing1. Select XM ➝ Playlists ➝ (playlist name) ➝ Select.
2. Choose a song you want to hear and press the XM button.
3. You will see the following options:
4. To exit a playlist and return to all songs, select XM ➝ Find ➝ All Songs.
Play songs in the order listed in theplaylist, starting from the selected song.
Play songs in random order, starting fromthe selected song. To cancel random play,select a song but choose “Play” insteadof “Random.”
Repeat the selected song. To cancelrepeat play, select a song but choose“Play” instead of “Repeat Song.”
enginno_usergd.r2a.qxd 5/17/06 6:32 PM Page 42

Using Your inno Alone44
Using Your inno Alone
Using Your inno Alone 45
Using Your inno Alone
Playlists – Other OptionsNormally, the songs in a playlist appear in the order that they were added.
To rearrange the songs in a playlist:
1. Select XM ➝ Playlists ➝ (playlist name) ➝ Edit Playlist ➝ Arrange Songs.
2. Use the up and down arrow buttons to highlight a song.
3. “Pick up” that song by pressing the XM button. The song title changes to green.
4. Move the song using the up and down arrow buttons.
5. “Put down” the song by pressing the XM button. The song title changes back to yellow.
6. Repeat steps 2-5 for any song you want to move. When you’re finished, press the leftarrow button repeatedly until you return to normal operation.
To rename a playlist:
1. Select XM ➝ Playlists ➝ (playlist name) ➝ Edit Playlist ➝ Rename Playlist.
2. Use the virtual keyboard to change the name of the playlist.
3. Select “Enter” when you’re finished, or “Exit” if you don’t want to save your changes.
✍N O T E : You can also manage the playlists on your inno by using the XM+Napster applicationon your PC.
Bookmarking Songs“Bookmarks” are a great way to remember interesting songs. You can view all your book-marks through the XM+Napster application, look up information about the artist or album, orpurchase a complete, high-fidelity version of the song that you may play on multiple devicesthrough XM+Napster. You may also purchase songs by the same artist (or similar artists)through XM+Napster.
To bookmark a song in “My Music”:
1. Press the up or down arrow buttons until you highlight the song you want to bookmark.
2. Press XM ➝ Edit Song ➝ Bookmark Song.
3. inno confirms by displaying “Info Added.”
To bookmark a song in “Live XM”:
1. Select XM ➝ Bookmark ➝ Bookmark Only.
2. inno confirms by displaying “Info Added.”
S H O RT C U T: To bookmark the song that you’re currently listening to in “My Music,” p r e s sand hold the XM button, then select Bookmark Song. You can only bookmark live orrecorded XM tracks, not MP3 or WMA tracks.
enginno_usergd.r2a.qxd 5/17/06 6:32 PM Page 44
Using Your inno Alone46
Using Your inno Alone
Using Your inno Alone 47
Using Your inno Alone
Deleting SongsWhen you’re no longer interested in a song or track, you can delete it from your inno.“Deleting” a song permanently erases it from memory, and is different from “removing” asong from a playlist.
To delete one song from “My Music”:
1. Press the up or down arrow buttons until you highlight the song you want to delete.
2. Select XM ➝ Edit Song ➝ Delete ➝ Yes.
3. inno confirms the song is erased by displaying “Song Deleted.”
S H O RT C U T: To delete the song that you’re currently listening to, press and hold the XM b u t t o n , then select Delete.
To delete multiple songs from “My Music”:
1. Select XM ➝ Organize ➝ Songs.
2. Use the up and down arrow buttons to highlight a song.
3. Select XM ➝ Select Song. The song’s name will be displayed in green.
4. Use the up and down arrow buttons to highlight another song, and press the XM buttonto select that song. Do this for all the songs you want to remove.
5. Select XM ➝ Delete ➝ Yes.
6. inno confirms that the songs are erased by displaying “Songs Deleted.”
S H O RT C U T: Instead of steps 3 and 4, press the right arrow button to select the song youwant to delete.
enginno_usergd.r2a.qxd 5/17/06 6:32 PM Page 46
Using inno with a PC48
Using inno with a PC
Using inno with a PC 49
Using inno with a PC
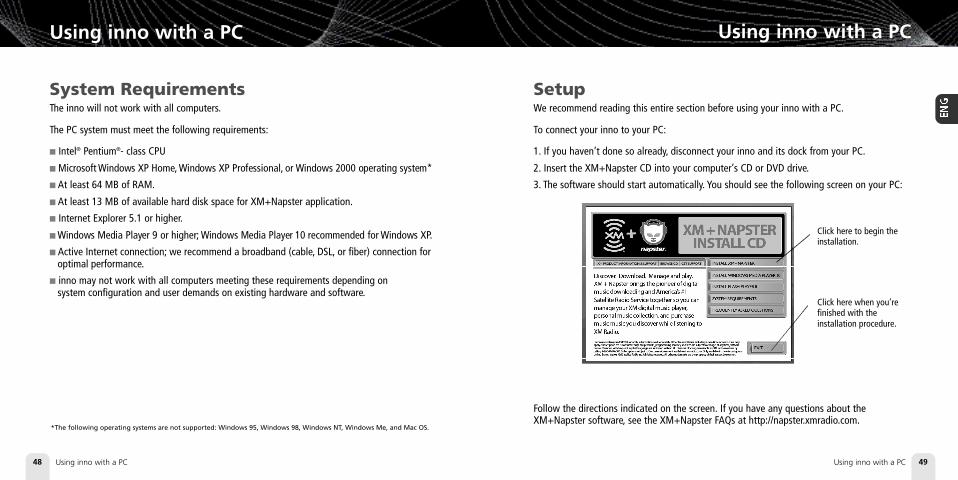
Click here to begin the installation.
Click here when you’refinished with the installation procedure.
Follow the directions indicated on the screen. If you have any questions about theXM+Napster software, see the XM+Napster FAQs at http://napster.xmradio.com.
System RequirementsThe inno will not work with all computers.
The PC system must meet the following requirements:
■ Intel® Pentium®- class CPU
■ Microsoft Windows XP Home, Windows XP Professional, or Windows 2000 operating system*
■ At least 64 MB of RAM.
■ At least 13 MB of available hard disk space for XM+Napster application.
■ Internet Explorer 5.1 or higher.
■ Windows Media Player 9 or higher; Windows Media Player 10 recommended for Windows XP.
■ Active Internet connection; we recommend a broadband (cable, DSL, or fiber) connection foroptimal performance.
■ inno may not work with all computers meeting these requirements depending on system configuration and user demands on existing hardware and software.
*The following operating systems are not supported: Windows 95, Windows 98, Windows NT, Windows Me, and Mac OS.
SetupWe recommend reading this entire section before using your inno with a PC.
To connect your inno to your PC:
1. If you haven’t done so already, disconnect your inno and its dock from your PC.
2. Insert the XM+Napster CD into your computer’s CD or DVD drive.
3. The software should start automatically. You should see the following screen on your PC:
enginno_usergd.r2a.qxd 5/17/06 6:32 PM Page 48

Using inno with a PC50
Using inno with a PC
Using inno with a PC 51
Using inno with a PC
Registering with XM+NapsterChoose either the XM+Napster Light service or the XM+Napster service. XM+Napster Lightallows you to buy individual songs or albums whenever you want. XM+Napster lets youstream music to your PC for an additional monthly subscription.
XM+Napster XM+Napster Light
Manage XM content and MP3/WMA files on your inno
Transfer MP3/WMA files from your PC to your inno
Buy individual songs or albums to keep forever, burn to CD, and transfer onto your inno
Additional monthly subscription with XM+Napster required
Download and listen to all the Napster music you want on your PC
Listen to 75+ XM channels on your PC from XM Radio Online
Community and music discovery tools
✔
✔
✔
✔
✔
✔
✔
✔
✔
✔
✔
4. Reboot your PC if necessary, then launch the XM+Napster program from the shortcut onyour desktop.
5. Set up inno as shown and plug the USB cable into the PC. You can also connect the USBcable directly between your PC and inno without using the home dock, home antenna,and AC power adapter.
6. Your PC should recognize inno. Close any file folders that appear on your screen. You canmanage the contents of inno entirely by using the XM+Napster program.
7. When taking your inno with you, you must disconnect inno from the PC by following theprocedure described in “Disconnecting Your inno from the PC” (page 60).
WA R N I N G : Only use the USB cable supplied in the package. Other USB cables may not allowyour inno to charge its battery or communicate with your PC.
enginno_usergd.r2a.qxd 5/17/06 6:32 PM Page 50
Using inno with a PC52
Using inno with a PC
Using inno with a PC 53
Using inno with a PC
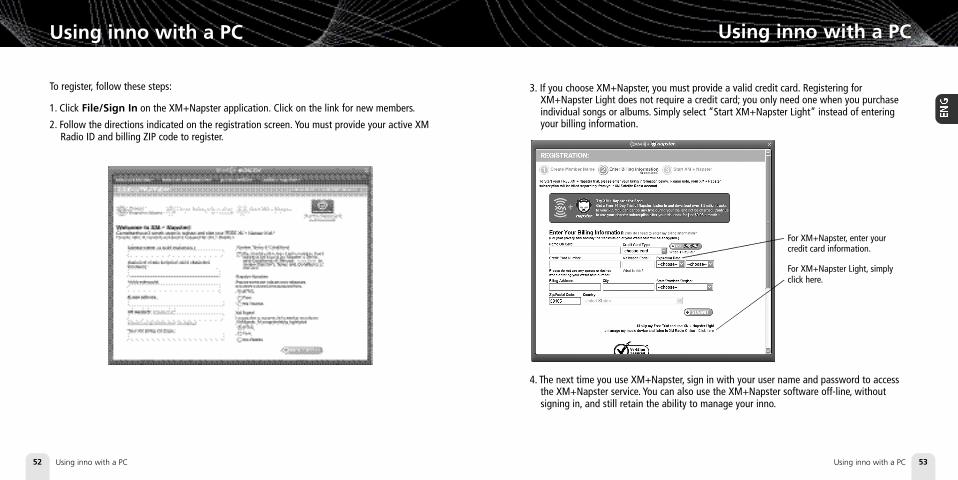
3. If you choose XM+Napster, you must provide a valid credit card. Registering forXM+Napster Light does not require a credit card; you only need one when you purchaseindividual songs or albums. Simply select “Start XM+Napster Light” instead of enteringyour billing information.
For XM+Napster, enter yourcredit card information.
For XM+Napster Light, simplyclick here.
4. The next time you use XM+Napster, sign in with your user name and password to accessthe XM+Napster service. You can also use the XM+Napster software off-line, without signing in, and still retain the ability to manage your inno.
To register, follow these steps:
1. Click File/Sign In on the XM+Napster application. Click on the link for new members.
2. Follow the directions indicated on the registration screen. You must provide your active XMRadio ID and billing ZIP code to register.
enginno_usergd.r2a.qxd 5/17/06 6:32 PM Page 52
Using inno with a PC54
Using inno with a PC
Using inno with a PC 55
Using inno with a PC
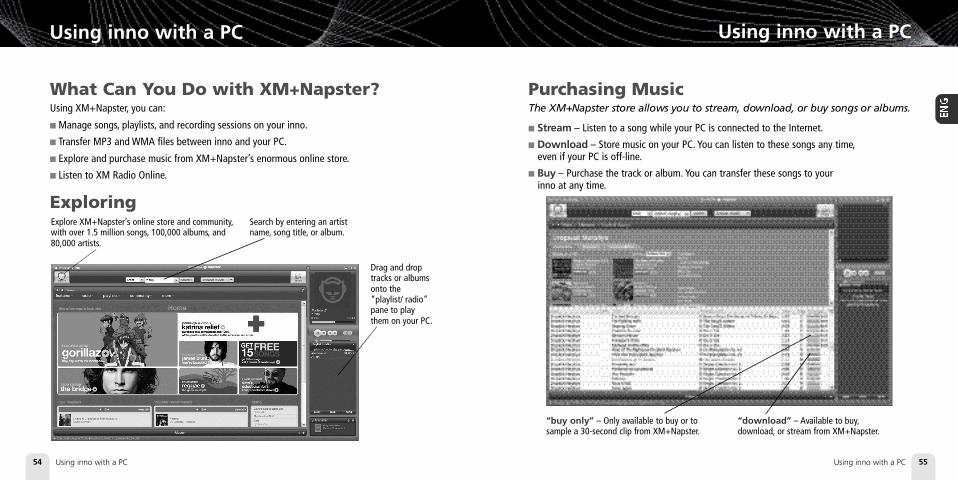
Purchasing MusicThe XM+Napster store allows you to stream, download, or buy songs or albums.
■ S t re a m – Listen to a song while your PC is connected to the Internet.
■ D o w n l o a d – Store music on your PC. You can listen to these songs any time,even if your PC is off-line.
■ B u y – Purchase the track or album. You can transfer these songs to your inno at any time.
“download” – Available to buy,download, or stream from XM+Napster.
“buy only” – Only available to buy or to sample a 30-second clip from XM+Napster.
What Can You Do with XM+Napster?Using XM+Napster, you can:
■ Manage songs, playlists, and recording sessions on your inno.
■ Transfer MP3 and WMA files between inno and your PC.
■ Explore and purchase music from XM+Napster’s enormous online store.
■ Listen to XM Radio Online.
ExploringExplore XM+Napster’s online store and community,with over 1.5 million songs, 100,000 albums, and80,000 artists.
Search by entering an artistname, song title, or album.
Drag and droptracks or albumsonto the“playlist/ radio”pane to playthem on your PC.
enginno_usergd.r2a.qxd 5/17/06 6:32 PM Page 54
Using inno with a PC56
Using inno with a PC
Using inno with a PC 57
Using inno with a PC
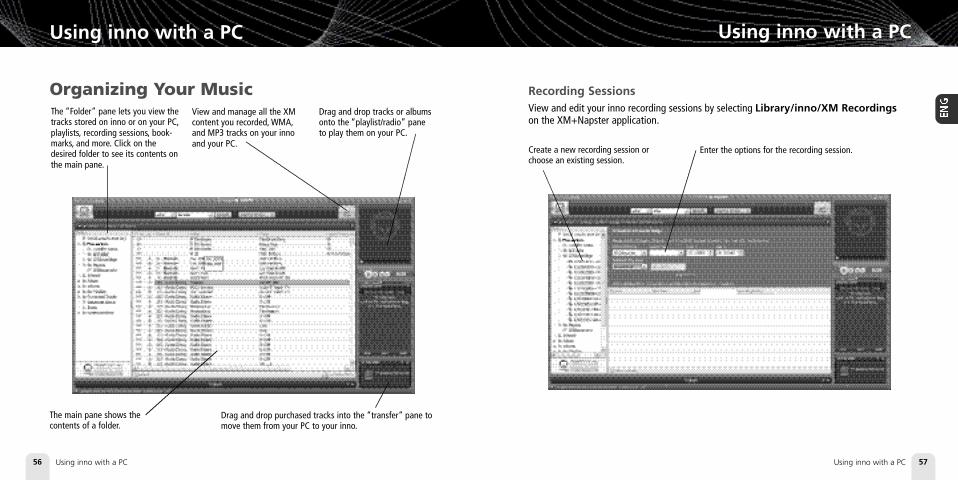
Recording SessionsView and edit your inno recording sessions by selecting Library/inno/XM Recordingson the XM+Napster application.
Enter the options for the recording session.Create a new recording session orchoose an existing session.
Organizing Your MusicThe “Folder” pane lets you view thetracks stored on inno or on your PC,playlists, recording sessions, book-marks, and more. Click on thedesired folder to see its contents onthe main pane.
Drag and drop purchased tracks into the “transfer” pane tomove them from your PC to your inno.
The main pane shows thecontents of a folder.
View and manage all the XMcontent you recorded, WMA,and MP3 tracks on your innoand your PC.
Drag and drop tracks or albumsonto the “playlist/radio” paneto play them on your PC.
enginno_usergd.r2a.qxd 5/17/06 6:32 PM Page 56
Using inno with a PC58
Using inno with a PC
Using inno with a PC 59
Using inno with a PC
Transferring Between PC and innoTo transfer a track or playlist from your PC to your inno, drag and drop the track or playlistinto the “transfer” pane on the lower right-hand side of the XM+Napster application.
You can only transfer songs that you have purchased from XM+Napster or songs that youhave ripped from your audio CDs. inno only recognizes file names that use single-byte charac-ters; double-byte and multi-byte character sets (Asian languages such as Chinese, Korean, orJapanese) are not supported.
WA R N I N G : Though you can transfer non-MP3/WMA files to your inno using W i n d o w s, t h o s efiles cannot be played as audio files. F u r t h e r m o r e, do not attempt to format the inno storage;doing so may cause damage to the device.
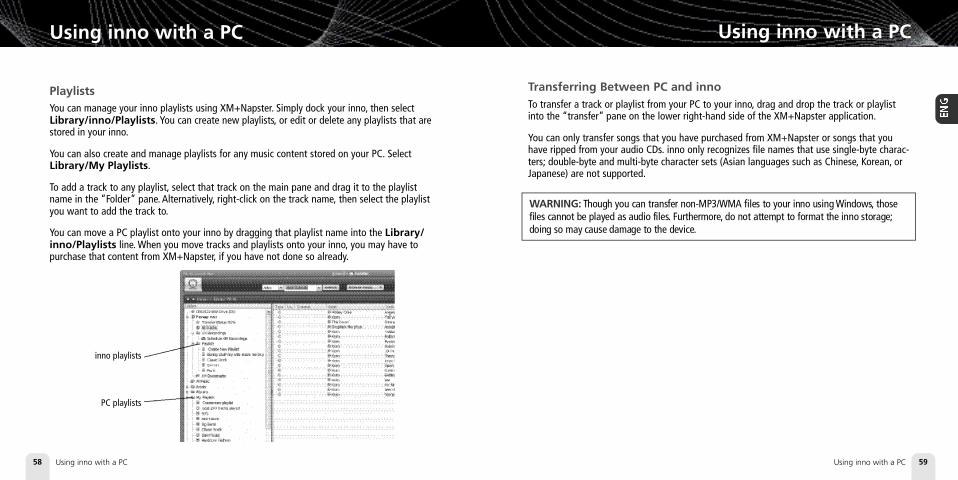
PlaylistsYou can manage your inno playlists using XM+Napster. Simply dock your inno, then selectLibrary/inno/Playlists. You can create new playlists, or edit or delete any playlists that arestored in your inno.
You can also create and manage playlists for any music content stored on your PC. SelectLibrary/My Playlists.
To add a track to any playlist, select that track on the main pane and drag it to the playlistname in the “Folder” pane. Alternatively, right-click on the track name, then select the playlistyou want to add the track to.
You can move a PC playlist onto your inno by dragging that playlist name into the Library/inno/Playlists line. When you move tracks and playlists onto your inno, you may have topurchase that content from XM+Napster, if you have not done so already.
inno playlists
PC playlists
enginno_usergd.r2a.qxd 5/17/06 6:32 PM Page 58

Using inno with a PC60
Using inno with a PC
Using inno with a PC 61
Using inno with a PC
Listening to XM Radio Online (XMRO)XM Radio Online gives you access to over 75 channels of the same amazing programmingyou hear on XM Satellite Radio, plus 10 select AOL Radio channels for even more choice.
To access XM Radio Online, click on Home/Radio/XM Radio Online. Then simply chooseyour desired channel from the channel list.
Save favorite channels in the preset buttons (at the top of the screen) by dragging a channelonto the desired button. Note that these presets are not the same as the “Favorite Channels”on your inno.
You can enjoy XM Radio Online anywhere you have a PC and a high-speed connection.Remember that you cannot save or transfer XMRO programming onto your inno.
Disconnecting Your inno From the PCBefore you remove your inno from its dock or unplug the USB cable from the dock or the PC,you must disconnect using one of the following methods:
■ In Windows: right-click on the Safely Remove Hardware icon , which is on theright side of the Windows taskbar. Select “USB Mass Storage Device,” and click on Stop.
■ On XM+Napster: click on the Disconnect Device icon or select File/Disconnect portable device.
If you want to connect inno to your PC again, re-insert inno into its dock.
enginno_usergd.r2a.qxd 5/17/06 6:32 PM Page 60
Using inno with a PC62 Using inno with a PC 63
Using inno with a PC
Burning CDsTransfer MP3 and WMA files onto a recordable CD or DVD. Please note that the contentrecorded from XM cannot be burned onto a CD or DVD or otherwise transferred off yourinno.
1. Insert a recordable CD or DVD into your PC’s CD/DVD drive.
2. Click Library.
3. Pull up the Burn screen at the bottom of the main pane.
4. Drag and drop tracks into the “Burn” pane.
5. When you’ve finished selecting tracks, click Burn Disc.
Using inno with a PC
Using Your CDs or MP3/WMA FilesRipping Your CDsUse the XM+Napster application to rip tracks from a CD into your Napster library.
1. Insert an audio CD into your PC’s CD drive.
2. Click on Library, then click on the CD icon in the “Folders” pane. You will see a listing ofthe CD tracks in the main pane.
3. Click the Rip icon on the bottom of the main pane. By default, the tracks will beencoded into the WMA format at 128 kbps. You can change this setting by clicking File/Options/CD Options.
Importing Tracks Into XM+NapsterIf you have already created MP3 or WMA files in your computer, you can import them intoyour Napster library.
1. Click File/Import Tracks to My Library …
2. Follow the directions on the screen.
For more information, please see the XM+Napster FAQs at http://napster.xmradio.com.
enginno_usergd.r2a.qxd 5/17/06 6:32 PM Page 62

Updating inno Firmware
Updating inno Firmware 65Updating inno Firmware64
Updating inno Firmware
Occasionally we make improvements to the inno firmware, which is the software that makesyour inno work. Updating the firmware is a quick and easy process.
Remember that:
■ Your inno must be docked with a power adapter and must be connected to your PC. Youcannot update the firmware if inno is not docked and powered.
■ Your PC must be connected to the Internet
Using XM+NapsterIf you have installed and use XM+Napster, it automatically checks the firmware when youconnect inno to your PC. XM+Napster notifies you when it’s necessary to update thefirmware. Simply follow the instructions.
Don’t worry if you miss a firmware update. XM+Napster will always check whether your innoneeds an update or not.
Using the UpdateToolIf you don’t use XM+Napster, you canupdate the inno firmware manually.
1. Insert the XM+Napster CD in your PC’sCD-ROM or DVD drive. The XM+Napstersoftware should start automatically.
2. Click on Browse CD.
3. Click on Utils, then click onXMFirmwareUpdateClient.
4. Follow the instructions on the PCscreen.
You can run this firmware update tool atany time. If the firmware needs to beupdated, the tool will install it automati-cally. If the firmware is already up-to-date,nothing happens.
Using the WebPoint your Web browser to http://fwupdt.xmradio.com and follow directions.
enginno_usergd.r2a.qxd 5/17/06 6:32 PM Page 64

Settings
Settings 67Settings66
Settings
FM Modulator (for optional Car Kit use only)
Set the FM frequency that innotransmits on.
Adjust the volume level of theFM transmission.
FM Frequency (for optional Car Kit use only)
Your inno contains a built-in FM modulator (or FM transmitter) that allows you to listen towhatever your inno is playing using a car FM radio. All you have to do is set your inno andthe FM radio in your car to the same frequency.
1. Place inno in the car dock.
2. Find an unused FM frequency on your FM radio. Note that FM frequency.
3. Select XM ➝ Settings ➝ FM Modulator ➝ FM Frequency.
4. Use the up and down arrow buttons to choose the same FM frequency as in step 2. Youshould hear XM programming over your FM radio when your inno and radio frequenciesmatch.
5. Press the XM button to confirm your selection.
enginno_usergd.r2a.qxd 5/17/06 6:32 PM Page 66

Settings
Settings 69Settings68
Settings
Aiming the AntennaFor optimal reception of XM’s live satellite signal, your inno antenna should have an unobstructed view of the XM satellites in the southern sky. In large cities, XM also has a network of ground repeaters to help increase the signal coverage.
Your inno can help you aim the home antenna to pull in the strongest possible signal.
1. Select XM ➝ Settings ➝ Setup ➝ Antenna Aiming.
2. Slowly turn and tilt the antenna. The signal bars on the display will change.
3. The antenna aiming screen remains as long as it’s needed to help you position the antenna.When you’ve found the best position, press the left arrow button repeatedly to exit theSettings menu.
4. Select XM channel 1. You should be able to listen to the XM Preview Channel.
FM Level
When listening to your inno using the FM modulator, you can adjust its volume level tomatch other audio sources (your CD player, other FM stations, or MP3 player).
1. Select XM ➝ Settings ➝ FM Modulator ➝ FM Level.
2. Press the left arrow button to decrease the volume level or the right arrow button toincrease the volume level.
3. Press the XM button to confirm your selection.
Move the antenna around untileither “Satellite” or “Terrestrial” isat least half strength.
enginno_usergd.r2a.qxd 5/17/06 6:32 PM Page 68
Settings70
Settings
Settings 71
Settings
AudioToneYou can adjust the audio tone quality to suit the kind of music you’re listening to.
1. Select XM ➝ Settings ➝ Preferences ➝ Set Tone.
2. Press the up or down arrow buttons to select either “Bass” or “Treble.” Adjust the tonesettings by pressing the left or right arrows.
3. Press the XM button to save your setting and exit the tone control menu. Then press theleft arrow button repeatedly until you return to normal operation.
Line Out LevelIf you connect inno to another stereo system, you can adjust inno’s audio level to matchother audio sources. This is not a volume control; use the volume control on your stereoinstead.
1. Select XM ➝ Settings ➝ Setup ➝ Line Out Level.
2. Use the left or right arrow buttons to decrease or increase the audio level.
3. Press the XM button to confirm your selection. Then press the left arrow button repeatedlyuntil you return to normal operation.
DisplayBrightness and ContrastTo change the screen’s brightness and contrast:
1. Select XM ➝ Settings ➝ Preferences ➝ Change Display ➝ Brightness.
2. Press the left or right arrow buttons to adjust brightness.
3. Press the XM button to confirm your selection. Then press the left arrow button repeatedlyuntil you return to normal operation.
Backlight TimerYour inno screen remains lit for a short time after you press a button. To adjust this time period:
1. Select XM ➝ Settings ➝ Preferences ➝ Change Display ➝ Backlight Timer.
2. Press the up and down arrow buttons to select the desired time period.
3. Press the XM button to confirm your selection.
enginno_usergd.r2a.qxd 5/17/06 6:32 PM Page 70
Settings72
Settings
Settings 73
Settings
Stock TickerIf you created a stock ticker, you will see stock symbols and their prices displayed at the bottom of inno’s display. You can control the way the ticker is displayed.
1. Select XM ➝ Settings ➝ Preferences ➝ Change Display ➝ DisplayAppearance ➝ Stock Ticker.
2. Select Scrolling to see the ticker move across the screen from right to left. Select ByPages to view the ticker as if you’re flipping pages of a book.
3. Press the XM button to confirm your selection.
Info ExtrasIf you choose sports or other Info Extras features, you will see sports scores and other infor-mation displayed at the bottom of inno’s display. You can control the way this information isdisplayed.
1. Select XM ➝ Settings ➝ Preferences ➝ Change Display ➝ DisplayAppearance ➝ Info Extras.
2. Select Scrolling to see the ticker move across the screen from right to left. Select ByPages to view the ticker as if you’re flipping pages of a book.
3. Press the XM button to confirm your selection.
Channel AccessDirect TuneNormally, as you scroll through live XM channels using the up and down arrow buttons, youcan preview the channel list before selecting one channel. inno does not switch to that channel until you push the XM button. You can change this so that inno automatically tunes to the channel that you’re previewing.
1. Select XM ➝ Settings ➝ Preferences ➝ Channel Access ➝ Direct Tune.
2. Select Direct Tune On.
3. Press the XM button to confirm your selection. Then press the left arrow button repeatedlyuntil you return to normal operation.
To return inno to its default behavior, select Direct Tune Off.
enginno_usergd.r2a.qxd 5/17/06 6:32 PM Page 72

Settings74
Clock and Sleep TimerTime1. The time is automatically set using the XM signal. Select XM ➝ Settings ➝ Setup ➝
Set Time ➝ Set Clock ➝ Select Time Zone to set the correct time zone for yourlocation.
2. Your inno automatically adjusts for Daylight Savings Time. To turn this feature off,select XM ➝ Settings ➝ Setup ➝ Set Time ➝ Set Clock ➝ Daylight SavingsTime ➝ No.
3. To display time in 12- or 24-hour format, select the desired format through XM ➝Settings ➝ Setup ➝ Set Time ➝ Set Clock ➝ 12/24 Hour Mode.
Sleep TimerYour inno has a sleep timer that can automatically shut off the unit after a period of time.
1. Select XM ➝ Settings ➝ Setup ➝ Set Time ➝ Sleep Timer.
2. Select the desired time period.
3. Press the XM button to confirm the selection. Your inno will remember this setting the nexttime you turn it on.
The sleep timer resets to “Off” every time you turn inno off.
Settings
Settings 75
Settings
Channel Skip/AddYou can simplify the list of channels that you see when you press the up and down arrowbuttons. To skip a channel:
1. Select XM ➝ Settings ➝ Preferences ➝ Channel Access ➝ ChannelSkip/Add.
2. You will see a list of channels. Press the XM button to skip a channel. You’ll see theChannel Skip icon displayed beside the channel name. You can choose to skip morethan one channel.
3. To add a channel that has been skipped, highlight that channel then press the XM button.
4. Press the left arrow button when you’re finished.
5. inno confirms by displaying “Channel List Updated.”
You can still tune to a channel directly by using the virtual keypad to enter its channel number.
Channel Skip/Add should not be used as a form of parental control. To completely blockaccess to an XM channel, contact XM Listener Care at 1-800-XM-RADIO (1-800-967-2346).
enginno_usergd.r2a.qxd 5/17/06 6:32 PM Page 74

Settings
Settings 77Settings76
Settings
Vehicle ModeIf you listen to your inno in a vehicle, you’ve probably plugged the power adapter into thecigarette lighter socket. In some vehicles, the cigarette lighter is turned on or off with theignition key; in other vehicles, the cigarette lighter is powered all the time. To prevent yourbattery from being drained, choose one of the following settings:
1. Select XM ➝ Settings ➝ Setup ➝ Set Time ➝ Vehicle Mode.
2. Choose one of the following settings:
3. The setting is saved even if you turn inno off. The vehicle mode setting is only active whenyou use the car dock.
OFF Choose this option if the cigarette lighter is always powered. You must turn innoon or off using its own power switch.
ON Choose this option if the ignition key switches the cigarette lighter on and off.
OFF or Another option if the cigarette lighter is60-180 minutes always powered: inno automatically turns
off 60 to 180 minutes after you turn it on.
Auto ON/OFF
Delayed Power Off
Memory PartitionThe internal storage in inno can store recorded XM content and MP3/WMA files. By default,the storage is divided 50/50, but you can select different memory partitions:
To change the memory partition:
1. Place your inno into the home dock and connect the AC power adapter.
2. Select XM ➝ Settings ➝ Setup ➝ Memory Partition.
3. Highlight the desired setting and press the XM button.
4. Confirm by selecting Yes, or cancel by selecting No.
typical storage for content typical storage for PCrecorded from XM (MP3 and WMA) tracks
50/50 XM/PC files 25 hours 8 hours
100% XM 50 hours 0 hours
CAUTION: When you change the memory partition, you will erase all your stored XM contentand MP3/WMA tracks from your inno.
setting
enginno_usergd.r2a.qxd 5/17/06 6:32 PM Page 76

79Settings78
Settings
Restoring Factory DefaultsTo restore all inno settings and preferences to a “factory fresh” state:
1. Select XM ➝ Settings ➝ Setup ➝ Factory Defaults.
2. You should see this display:
3. Confirm by selecting Yes, or cancel by selecting No.
Restore just the settings to factory defaults.
Restore settings to factorydefaults and erase all music.
enginno_usergd.r2a.qxd 5/17/06 6:32 PM Page 78

TroubleshootingIf this happens: You should:There is no power or your inno shuts Your inno battery may be low. Charge the battery by putting youroff quickly. inno in the dock station and plugging in the AC adapter.
inno shuts off unexpectedly. Check whether you set the sleep timer, and set it to “Off” if desired.Check whether “Vehicle Mode/Delayed Power Off” is set, and set it to “Off” if desired. inno remembers the “Vehicle Mode” setting even when you turn the device off.
You do not receive all the XM channels you Check that you have not skipped any channels (page 74). If you still do have subscribed to. not receive all channels, your inno may not be activated. Contact XM
Satellite Radio.
No audio. Check all connections between your inno and your stereo system.
No song title or artist name is displayed. Nothing is wrong with your inno. That information may be in the process of being updated. Some channels, such as news and sports,may not have such information.
No audio when listening to inno through Check that your inno and your radio are tuned to the same FMan FM radio. frequency.
Audio fades or has static when listening You might be hearing interference from another FM station. Set yourthrough an FM radio. inno and your radio to a different FM frequency.
Audio sounds too soft or is distorted when Raise or lower the FM audio level until the sound quality improves.listening to an FM radio.
XM Instant Traffic and Weather channels Nothing is wrong with your inno. These channels use a differentsound different from other channels. audio technology than the other XM channels.
Controls do not respond. Check whether the power switch is in the "hold" position.If so, slide it to the center position to unlock the controls.
The controls still refuse to respond, the display Reset your inno by removing and re-inserting the battery.does not change, or the backlight does not turn on or off.
Battery level meter does not match the Fully charge the battery, then use your inno until the battery isexpected charge or playback time. exhausted. This calibrates the battery level meter.
Customer Support
Customer Support 81Customer Support80
Customer Support
TroubleshootingIf your inno does not work the way you expect, first consult this troubleshooting guide. Toreset your inno, remove the battery then re-insert it.
If you see this on the display: You should:No Signal Something is blocking the XM signal. Move your inno away
from the obstructed area (e.g., an underground garage).
Antenna Plug the antenna into the home or car dock.Make sure the antenna wire is not bent or broken.
Off Air The channel you’ve selected is not currently broadcasting.Tune to another channel.
Loading Your inno is acquiring audio or program information from the XM signal. This message should disappear in a few seconds in good signal conditions.
Updating XM is updating your inno with the latest encryption code. Simply wait a few seconds until the update is done. – OR – You may be attempting to tune to a channel that is blocked or that you cannot receive with your subscription package. To receive that channel, contact XM SatelliteRadio at 1-800-967-2346.
--- (no artist or title) No program information, such as artist name or song title, e x i s t s.
Channel You are attempting to tune to a channel that is not available.
All Recording Features Not Available Activate your XM subscription to enable you to store XM programming on your inno.
This Channel Not Available for Recording Some programming cannot be recorded due to restrictions placed by the content owners.
This Program Not Available for Recording Some programming cannot be recorded due to restrictions placed by the content owners.
Connect to XM Antenna Within 30 Days You must receive a live XM signal for at least 8 hours a m o n t h . This to Avoid Interruption in Listening to authenticates your XM subscription and ensures that you canXM Recordings continue to enjoy your recorded XM content and live XM programming.
Please Connect to XM Antenna to Select “Live XM” and make sure you get a strong signal.Confirm Valid Subscription
Activation Required for Playback Activate your XM subscription.
enginno_usergd.r2a.qxd 5/17/06 6:32 PM Page 80

TroubleshootingIf this happens: You should:inno does not communicate with your PC. Check the power and USB connections between the dock and your PC.
Be sure to use the supplied USB cable; any others may prevent your inno from charging or communicating properly with your PC. Remove your inno from its dock station, then re-insert.
Artist and song title information does not inno may not correctly show the artist and song information display correctly. (ID3 tags) of certain foreign songs.
You cannot transfer songs that you inno is not compatible with Napster To Go’s monthly subscriptiondownloaded with Napster To Go™ into inno. service. To transfer songs from your PC to your inno, you must
purchase individual songs or albums from XM+Napster Light or XM+Napster.
Customer Support
Customer Support 83Customer Support82
Customer Support
Specificationsinno Player
Dimensions 56 mm (W) x 94 mm (H) x 16 mm (D)2.2 in (W) x 3.7 in (H) x 0.6 in (D)
Weight 128 g4.5 oz
Storage capacity 1 GB (The capacity of the built-in memory may be less than indicated; a portion of the memory is used by the inno firmware.)
Music file formats MP3 and WMA fixed bitrates:32, 48, 64, 96, 128, 160, 192, 256, 320 kbps
MP3 and WMA variable bitrates:64-128, 128-256, 160-320 kbps
Audio output 3.5 mm mini-stereo jack
Antenna connector (home and car dock) RF SMB
Battery Type: lithium ionVoltage: 3.7 VCapacity: 1750 mAh
External power Voltage: 5 V DCCurrent: 2000 mAPolarity: PostScript Picture
(polarity.eps)
enginno_usergd.r2a.qxd 5/17/06 6:32 PM Page 82

Customer Support
85Customer Support84
Customer Support
SpecificationsRemote
Dimensions 39 mm (W) x 95 mm (H) x 12 mm (D)1.5 in (W) x 3.7 in (H) x 0.47 in (D)
Weight 40 g1.4 oz
Battery Type: CR2032Voltage: 3 V
Model Numbers
inno player GEX-INNO1
Home kit CD-INHOME1
Car accessory kit CD-INCAR1
Patent InformationTechnology. It is prohibited to copy, decompile, disassemble, reverse engineer, hack,manipulate, or otherwise make available any technology incorporated in receivers compatiblewith the XM Satellite Radio System or that support the XM website, the Online Service or anyof its content. Furthermore, the AMBE® voice compression software included in this product isprotected by intellectual property rights including patent rights, copyrights, and trade secretsof Digital Voice Systems, Inc. You also agree not to upload, post, transmit or otherwise makeavailable any material that contains software viruses or any other computer code, files, or pro-grams designed to interrupt, disable, or limit the functionality of the XM website or the OnlineService. Furthermore, the music, talk, news, entertainment, data, and other content on theServices are protected by copyright and other intellectual property laws and all ownershiprights remain with the respective content and data service providers. You are prohibited fromany export of the data (or derivative thereof) except in compliance with applicable exportlaws, rules, and regulations. The user of this or any other software contained in an XM Radioor the XM website and all software used in connection with either is explicitly prohibited fromattempting to copy, decompile, reverse engineer, or disassemble the object code, or in anyother way convert the object code into human-readable form. The software is licensed solelyfor use within this product.
The product unit accompanying this user guide is licensed under certain intellectual propertyrights of certain third parties. In particular, this product is licensed under the following U.S.patents: 5,991,715, 5,740,317, 4,972,484, 5,214,678, 5,323,396, 5,539,829, 5,606,618,5,530,655, 5,777,992, 6,289,308, 5,610,985, 5,481,643, 5,544,247, 5,960,037, 6,023,490,5,878,080, and under U.S. Published Patent Application No. 2001-44713-A1.
This license is limited to private non-commercial use by end-user consumers for licensed con-tents. No rights are granted for commercial use. The license does not cover any product unitother than this product unit and the license does not extend to any unlicensed product unit orprocess conforming to ISO/IEC 11172-3 or ISO/IEC 13818-3 used or sold in combination withthis product unit. The license only covers the use of this product unit to encode and/or decodeaudio files conforming to the ISO/IEC 11172-3 or ISO/IEC 13818-3. No rights are granted underthis license for product features or functions that do not conform to the ISO/IEC 11172-3 orISO/IEC 13818-3.
Customer Support
enginno_usergd.r2a.qxd 5/17/06 6:32 PM Page 84
LIMITED WARRANTY
WARRANTY VALID ONLY IN COUNTRY OFPRODUCT PURCHASE
WARRANTYPioneer Electronics (USA) Inc. (PUSA), and Pioneer Electronics of Canada, Inc. (POC), warrantsthat products distributed by PUSA in the U.S.A., and by POC in Canada that fail to functionproperly under normal use due to a manufacturing defect when installed and operatedaccording to the owner’s manual enclosed with the unit will be repaired or replaced with aunit of comparable value, at the option of PUSA or POC, without charge to you for parts oractual repair work. Parts supplied under this warranty may be new or rebuilt at the option ofPUSA or POC.
THIS LIMITED WARRANTY APPLIES TO THE ORIGINAL OR ANY SUBSEQUENT OWNER OF THISPIONEER PRODUCT DURING THE WARRANTY PERIOD PROVIDED THE PRODUCT WAS PUR-CHASED FROM AN AUTHORIZED PIONEER DISTRIBUTOR/DEALER IN THE U.S.A. OR CANADA.YOU WILL BE REQUIRED TO PROVIDE A SALES RECEIPT OR OTHER VALID PROOF OF PUR-CHASE SHOWING THE DATE OF ORIGINAL PURCHASE OR, IF RENTED, YOUR RENTAL CON-TRACT SHOWING THE PLACE AND DATE OF FIRST RENTAL. IN THE EVENT SERVICE ISREQUIRED, THE PRODUCT MUST BE DELIVERED WITHIN THE WARRANTY PERIOD, TRANS-PORTATION PREPAID, ONLY FROM WITHIN THE COUNTRY OF PURCHASE AS EXPLAINED INTHIS DOCUMENT. YOU WILL BE RESPONSIBLE FOR REMOVAL AND INSTALLATION OF THEPRODUCT. PUSA OR POC, AS APPROPRIATE, WILL PAY TO RETURN THE REPAIRED ORREPLACEMENT PRODUCT TO YOU WITHIN THE COUNTRY OF PURCHASE.
(warranty continues next page)
Customer Support
Customer Support 87Customer Support86
Customer Support
FCC StatementThis device complies with part 15 of the FCC Rules. Operation is subject tothe following two conditions:
1. This device may not cause harmful interference, and
2. This device must accept any interference received, including interference that may cause undesired operation.
C A U T I O N : Any changes or modifications in construction of this device which are not expresslyapproved by the party responsible for compliance could void the user’s authority to operate thee q u i p m e n t .
N O T E : This equipment has been tested and found to comply with the limits for a Class B digital device, pursuant to part 15 of the FCC Rules. These limits are designed to provide reasonable protection against harmful interference in a residential installation. This equipmentg e n e r a t e s, u s e s, and can radiate radio frequency energy and, if not installed and used in accor-dance with the instructions, may cause harmful interference to radio communications. H o w e v e r,there is no guarantee that interference will not occur in a particular installation.
If this equipment does cause harmful interference to radio or television reception, which can bedetermined by turning the equipment off and on, the user is encouraged to try to correct theinterference by one or more of the following measures:
■ Reorient or relocate the receiving antenna.
■ Increase the separation between the equipment and receiver.
■ Connect the equipment to an outlet on a circuit different from that to which the receiver is connected.
■ Consult the dealer or an experienced radio/TV technician for help.
enginno_usergd.r2a.qxd 5/17/06 6:32 PM Page 86

Customer Support
Customer Support 89Customer Support88
Customer Support
NO OTHER WARRANTIESIN THE U.S.A. - PIONEER LIMITS ITS OBLIGATIONS UNDER ANY IMPLIED WARRANTIESINCLUDING, BUT NOT LIMITED TO, THE IMPLIED WARRANTIES OF MERCHANTABILITY ANDFITNESS FOR A PARTICULAR PURPOSE, TO A PERIOD NOT TO EXCEED THE WARRANTY PERI-OD. NO WARRANTIES SHALL APPLY AFTER THE WARRANTY PERIOD. SOME STATES DO NOTALLOW LIMITATIONS ON HOW LONG AN IMPLIED WARRANTY LASTS AND SOME STATES DONOT ALLOW THE EXCLUSIONS OR LIMITATIONS OF INCIDENTAL OR CONSEQUENTIAL DAM-AGES, SO THE ABOVE LIMITATIONS OR EXCLUSIONS MAY NOT APPLY TO YOU. THIS WARRAN-TY GIVES YOU SPECIFIC LEGAL RIGHTS AND YOU MAY HAVE OTHER RIGHTS WHICH MAYVARY FROM STATE TO STATE.
IN CANADA – EXCEPT AS EXPRESSLY PROVIDED HEREIN, THERE ARE NO REPRESENTATIONS,WARRANTIES, OBLIGATIONS OR CONDITIONS, IMPLIED, STATUTORY OR OTHERWISE, APPLIC-ABLE TO THIS PRODUCT.
TO OBTAIN SERVICEPUSA has appointed a number of Authorized Service Companies throughout the U.S.A. shouldyour product require service. To receive warranty service you need to present your sales receiptshowing place and date of original owner’s transaction. If shipping the unit you will need topackage it carefully and send it, transportation prepaid by a traceable, insured method, to anAuthorized Service Company. Package the product using adequate padding material to pre-vent damage in transit. Include your name, address and telephone number where you can bereached during business hours.
PRODUCT WARRANTY PERIODPortable Satellite Radio……………………………...… 1 Year Parts & LaborPortable Satellite Radio Battery……………………… 90 Days Parts & Labor
The warranty period for retail customers who rent the product commences upon the dateproduct is first put into use (a) during the rental period or (b) retail sale, whichever occursfirst.
WHAT IS NOT COVEREDIF THIS PRODUCT WAS PURCHASED FROM AN UNAUTHORIZED DISTRIBUTOR, THERE ARE NO WARRANTIES, EXPRESS OR IMPLIED, INCLUDING THE IMPLIED WARRANTY OF MER-CHANTABILITY AND THE IMPLIED WARRANTY OF FITNESS FOR A PARTICULAR PURPOSE ANDTHIS PRODUCT IS SOLD STRICTLY “AS IS” AND “WITH ALL FAULTS”. PIONEER SHALL NOT BELIABLE FOR ANY CONSEQUENTIAL AND/OR INCIDENTAL DAMAGES. PIONEER DOES NOTWARRANT ANY PRODUCT LISTED ABOVE WHEN IT IS USED IN A TRADE OR BUSINESS OR INANY INDUSTRIAL OR COMMERCIAL APPLICATION. THIS WARRANTY DOES NOT APPLY IF THEPRODUCT HAS BEEN SUBJECTED TO POWER IN EXCESS OF ITS PUBLISHED POWER RATING.THIS WARRANTY DOES NOT COVER THE CABINET OR ANY APPEARANCE ITEM, USERATTACHED ANTENNA, ANY DAMAGE TO THE PRODUCT RESULTING FROM ALTERATIONS,MODIFICATIONS NOT AUTHORIZED IN WRITING BY PIONEER, ACCIDENT, MISUSE OR ABUSE,DAMAGE DUE TO LIGHTNING OR TO POWER SURGES, SUBSEQUENT DAMAGE FROM LEAK-ING, DAMAGE FROM INOPERATIVE BATTERIES, OR THE USE OF BATTERIES NOT CONFORM-ING TO THOSE SPECIFIED IN THE OWNER’S MANUAL. THIS WARRANTY DOES NOT COVER THECOST OF PARTS OR LABOR WHICH WOULD BE OTHERWISE PROVIDED WITHOUT CHARGEUNDER THIS WARRANTY OBTAINED FROM ANY SOURCE OTHER THAN A PIONEER AUTHO-RIZED SERVICE COMPANY OR OTHER DESIGNATED LOCATION. THIS WARRANTY DOES NOTCOVER DEFECTS OR DAMAGE CAUSED BY THE USE OF UNAUTHORIZED PARTS OR LABORFROM IMPROPER MAINTENANCE. ALTERED, DEFACED, OR REMOVED SERIAL NUMBERS VOIDTHIS ENTIRE WARRANTY.
(warranty continues next page)
enginno_usergd.r2a.qxd 5/17/06 6:32 PM Page 88
Customer Support
Customer Support 91Customer Support90
Customer Support
On all complaints and concerns call Customer Support at 1-800-421-1404
DISPUTE RESOLUTIONFollowing our response to any initial request to Customer Support, should a dispute arisebetween you and Pioneer, Pioneer makes available to you, without charge, it’s ComplaintResolution Program. You are required to use the Complaint Resolution Program before youexercise any rights under, or seek any remedies, created by Title I of the Magnuson-MossWarranty-Federal Trade Commission Improvement Act, 15 U.S.C. 2301 et seq.
To use the Complaint Resolution Program call 1-800-421-1404 and explain to the customerservice representative the problem you are experiencing, steps you have taken to have theproduct repaired during the warranty period and the name of the authorized Distributor /Dealer from whom the Pioneer product was purchased. After the complaint has beenexplained to the representative, a resolution number will be issued. Within 40 days of receiv-ing your complaint, Pioneer will investigate the dispute and will either: (1) respond to yourcomplaint in writing informing you what action Pioneer will take, and in what time period, toresolve the dispute; or (2) respond to your complaint in writing informing you why it will nottake any action.
For hook-up and operation of your unit or to locate an Authorized Service Company, pleasecall or write:
PIONEER ELECTRONICS SERVICE, INC.P.O. BOX 1760 LONG BEACH, CALIFORNIA 908101-800-421-1404http://www.pioneerelectronics.com
enginno_usergd.r2a.qxd 5/17/06 6:32 PM Page 90

PIONEER ELECTRONICS SERVICE, INC.P.O. BOX 1760 LONG BEACH, CALIFORNIA 908101-800-421-1404http://www.pioneerelectronics.com
XM respects copyrights. This device is for personal use only. XMProgramming stored on the device cannot be transferred off the unit. Download legally. Buy digital music from XM+Napster.
The XM name, related logo, and TuneSelect are trademarks of XMSatellite Radio Inc. All rights reserved.
inno is a registered trademark of Pioneer Electronics (U.S.A.) inc.©2006
enginno_usergd.r2a.qxd 5/17/06 6:32 PM Page 92