endorelease - orthopedie.solutions cubital... · while reducing the risk of damaging the ulnar...
TRANSCRIPT

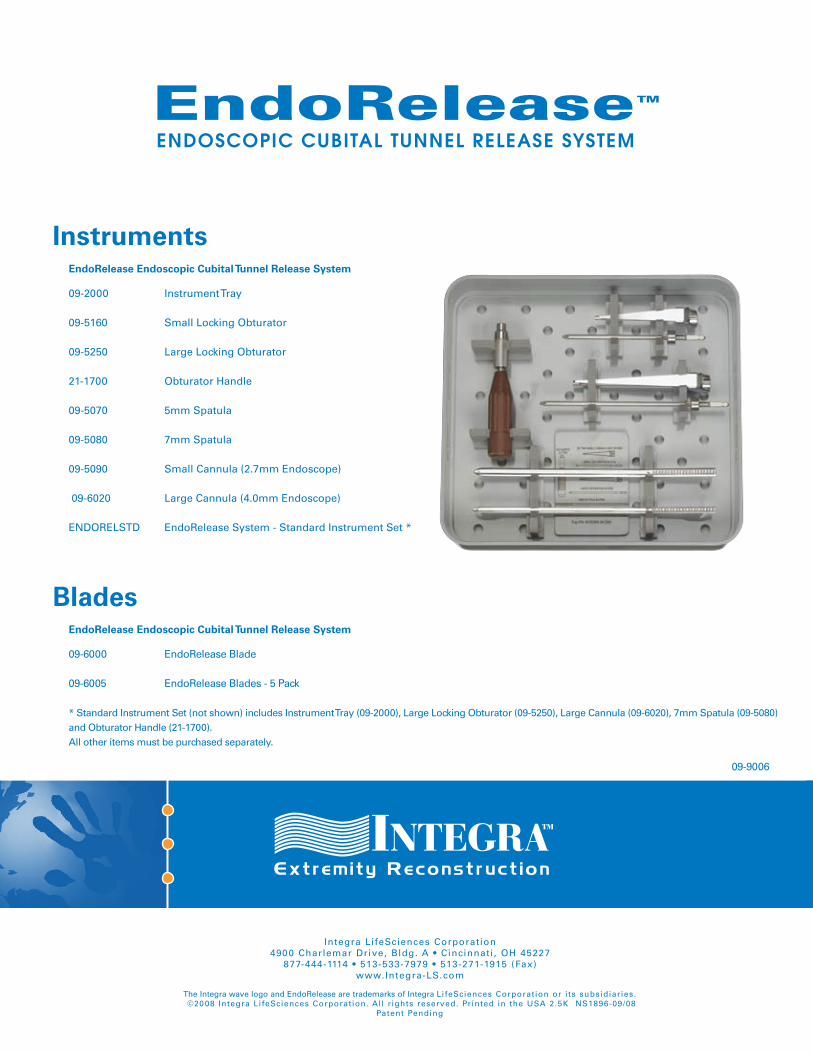
09-6000 EndoRelease Blade 09-6005 EndoRelease Blades - 5 Pack * Standard Instrument Set (not shown) includes Instrument Tray (09-2000), Large Locking Obturator (09-5250), Large Cannula (09-6020), 7mm Spatula (09-5080) and Obturator Handle (21-1700). All other items must be purchased separately.
EndoRelease™EndoRelease™
ENDOSCOPIC CUBITAL TUNNEL RELEASE SYSTEM
Upper
extremity
SolUtionS
SURGICAL TECHNIQUE

Description:
The EndoRelease™ Endoscopic Cubital Tunnel Release System provides specialized instrumentation for
performing minimally invasive decompression of the ulnar nerve. The system consists of a disposable
Blade, a double slotted Cannula, Obturator, and Spatula and is designed to aid in precision cutting
while reducing the risk of damaging the ulnar nerve and surrounding soft tissue.
System Features:
• Double slotted Cannula with flat undersurface to ensure constant visibility
• of ulnar nerve during the decompression
• Retractor built into Cannula to hold superficial nerves out of harms way
• Disposable precision Blade slides through Cannula slot while dividing fascia surrounding nerve
• Additional instruments included to ensure efficient and reliable procedure
System Benefits:
• Safe and Reliable Technique1 – an endoscopic procedure with a specialized Cannula design allowing
for constant visualization and protection of the ulnar nerve during decompression
• Rapid Patient Recovery2 – minimally invasive system results in less patient scarring and postoperative pain
• Safe and Fast – efficient surgical technique through system designed specifically for cubital
• tunnel release
1. Tsai TM, Chen IC, Majd ME, Lim BH. : Cubital tunnel release with endoscopic assistance: results of a new technique. J Hand Surg [Am]. 1999 Jan;24(1):21-9.
2. Cobb TK, Lemke J, Tyler J, Sterbank, P: Complications and Failures in Endoscopic Cubital Tunnel Release: AAOS 2008 San Francisco, CA.
ENDOSCOPIC CUBITAL TUNNEL RELEASE SYSTEM
Surgical Technique
As the manufacturer of this device, Integra does not practice medicine and does not recommend this or any other surgical technique for use on a specific patient. The surgeon who performs any procedure is responsible for determining and using the appropriate techniques in each patient.
THIS TECHNIQUE HAS BEEN DEVELOPED BY TYSON COBB, M.D.
Indications:
Contraindications:
See Package Insert for full prescribing information
Caution: Federal law restricts this device to sale by or on the order of a physician or practitioner.
The EndoRelease™ Endoscopic Cubital Tunnel Release System is intended for use in the endoscopic
surgical treatment of cubital tunnel syndrome by releasing the fascia around the ulnar nerve.
• Repeat cubital tunnel release
• Distortion of anatomy
• Previous soft tissue injury at the surgical site
2
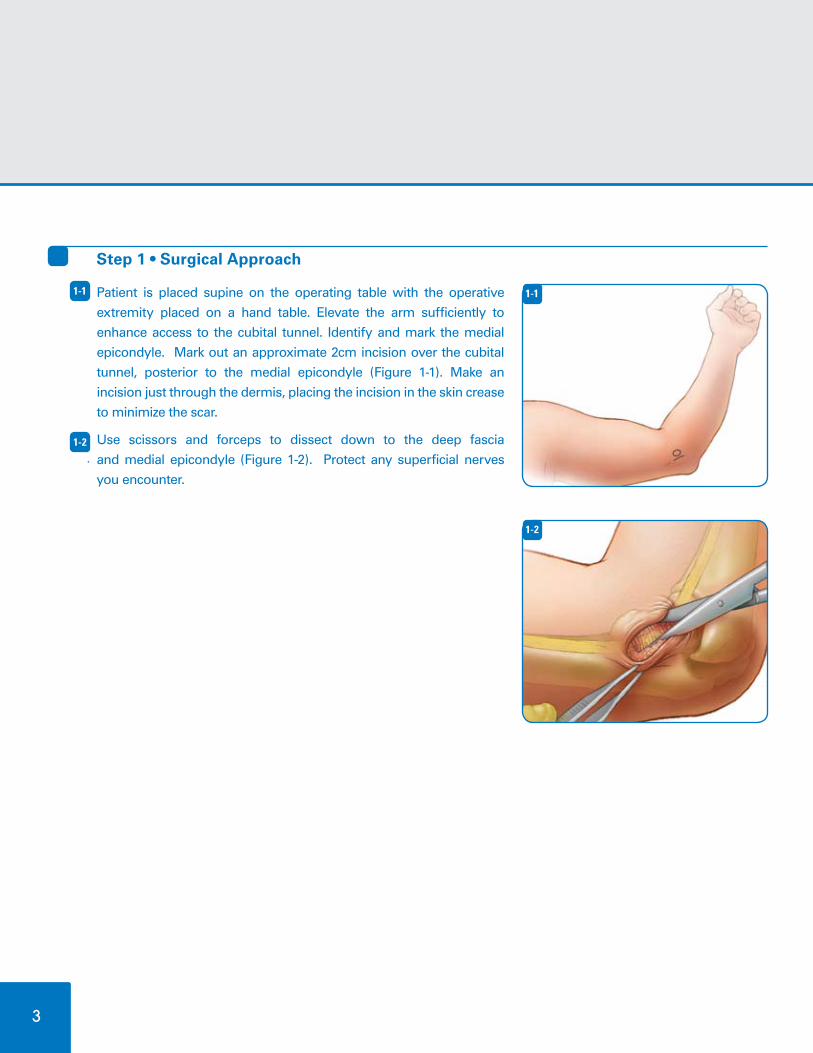
Step 1 • Surgical Approach
Patient is placed supine on the operating table with the operative
extremity placed on a hand table. Elevate the arm sufficiently to
enhance access to the cubital tunnel. Identify and mark the medial
epicondyle. Mark out an approximate 2cm incision over the cubital
tunnel, posterior to the medial epicondyle (Figure 1-1). Make an
incision just through the dermis, placing the incision in the skin crease
to minimize the scar.
Use scissors and forceps to dissect down to the deep fascia
and medial epicondyle (Figure 1-2). Protect any superficial nerves
you encounter.
1-1
1-2
1-1
1-1
1-1
1-2
3

4
Step 2 • Expose Cubital Tunnel
Use scissors to elevate the subcutaneous tissue and create space
between the deep fascia and the subcutaneous tissue/nerves
proximally and distally. Retract the skin using standard retractors
(Figure 2-1).
Use the medial epicondyle for orientation and palpate the cubital
tunnel and ulnar nerve. Lift the roof of the cubital tunnel with
forceps and open the tunnel with a 15-blade. Identify and protect
the ulnar nerve (Figure 2-2).
Use scissors to open the cubital tunnel several centimeters.
The Spatula may be used to facilitate access to the cubital tunnel
and assist separating the ulnar nerve from the roof of the cubital
tunnel (Figure 2-3). Care should be taken to stay superficial to the
nerve. The cubital tunnel must be opened sufficiently to allow
atraumatic placement of the Cannula along the course of the ulnar
nerve.
2-1
2-2
2-3
1-1
1-1
2-1
1-12-2
1-12-3

Step 3 • Proximal Cannula Insertion
Connect the Obturator to the Obturator Handle (Figure 3-1) and
insert into the Cannula, engaging the flange on the Obturator into
the Cannula slot.
Lift the skin and subcutaneous tissue and insert the Obturator
and Cannula into the cubital tunnel and advance it proximally
between the ulnar nerve and the roof of the cubital tunnel.
(Figure 3-2). Do not force the Cannula into the cubital tunnel.
Simultaneously, as the Cannula is placed in the cubital
tunnel, the retractor is advanced superficial to the deep
fascia and deep to the subcutaneous nerves/tissues.
Remove the Obturator with Handle.
3-1
3-2
1-1
1-1
3-1
3-2
5

Step 4 • Endoscopic Visualization - Proximally
Insert the endoscope between the Cannula and retractor
(Figure 4-1).
Use the endoscope to confirm that no superficial nerves are in
harms way (Figure 4-2).
Insert the endoscope into the Cannula (Figure 4-3a).
Look through the series of slots at the inferior surface of
the Cannula to confirm that the ulnar nerve is located
directly beneath the Cannula (Figure 4-3b). The Cannula may
need to be rotated slightly to capture the nerve beneath the flat
surface of the Cannula. Use the endoscope to visualize the fascia
stretched above the Cannula.
If the nerve is not clearly identified, pull the endoscope back to
the open portion of the exposure and identify the nerve with a
probe visually through the open incision and then through the
endoscope. Then, trace the nerve proximally with the endoscope.
Make sure the nerve is under the Cannula throughout the entire
length of the Cannula.
4-1
4-2
4-3
1-1
1-1
4-1
4-2
4-3b4-3a
6
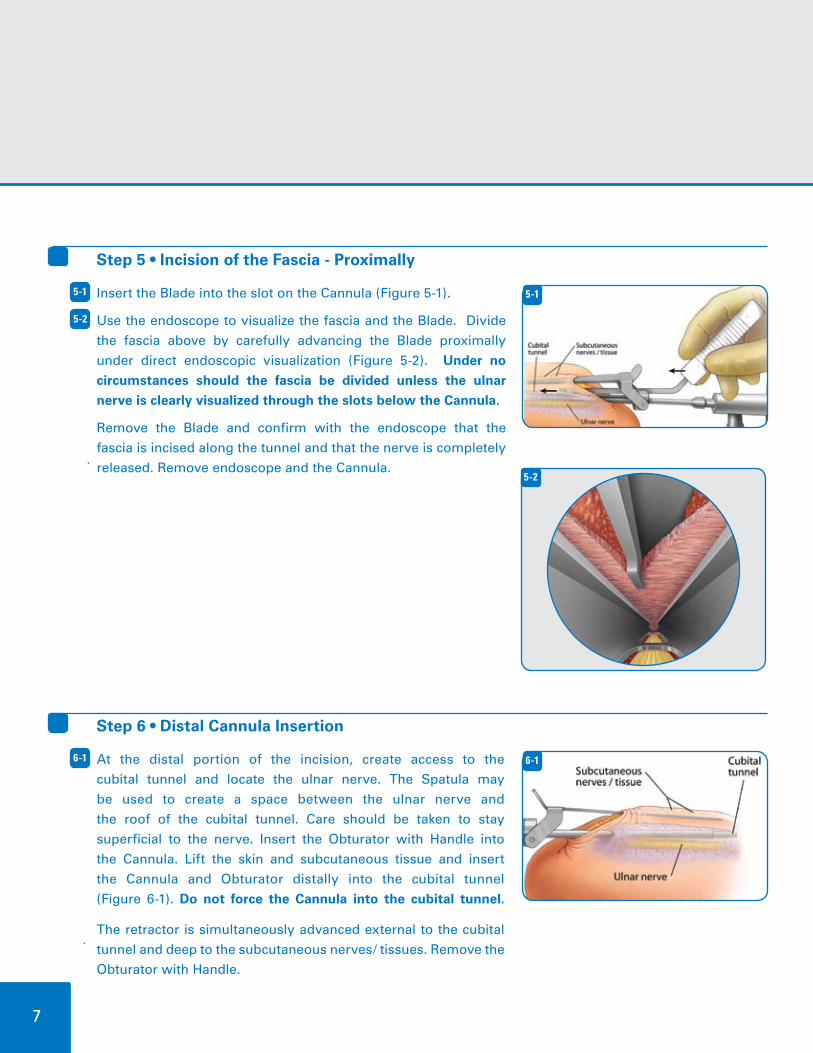
Step 5 • Incision of the Fascia - Proximally
Insert the Blade into the slot on the Cannula (Figure 5-1).
Use the endoscope to visualize the fascia and the Blade. Divide
the fascia above by carefully advancing the Blade proximally
under direct endoscopic visualization (Figure 5-2). Under no
circumstances should the fascia be divided unless the ulnar
nerve is clearly visualized through the slots below the Cannula.
Remove the Blade and confirm with the endoscope that the
fascia is incised along the tunnel and that the nerve is completely
released. Remove endoscope and the Cannula.
5-1
5-2
1-15-1
Step 6 • Distal Cannula Insertion
At the distal portion of the incision, create access to the
cubital tunnel and locate the ulnar nerve. The Spatula may
be used to create a space between the ulnar nerve and
the roof of the cubital tunnel. Care should be taken to stay
superficial to the nerve. Insert the Obturator with Handle into
the Cannula. Lift the skin and subcutaneous tissue and insert
the Cannula and Obturator distally into the cubital tunnel
(Figure 6-1). Do not force the Cannula into the cubital tunnel.
The retractor is simultaneously advanced external to the cubital
tunnel and deep to the subcutaneous nerves/ tissues. Remove the
Obturator with Handle.
6-1 1-16-1
1-15-2
7

Step 7 • Endoscopic Visualization - Distally
Insert the endoscope between the Cannula and Retractor to
confirm that no superficial nerves are in harms way (Figure 7-1).
Insert the endoscope into the Cannula. Look through the series
of slots at the inferior surface of the Cannula to confirm that
the ulnar nerve is located directly beneath the Cannula (Figure 7-2).
The Cannula may need to be rotated slightly to capture the nerve
beneath the flat surface of the Cannula. Confirm that the ulnar
nerve is under the Cannula throughout the entire length of the
Cannula. Use the endoscope to visualize the fascia stretched
above the Cannula.
7-1
7-2
1-1
1-1
7-1
7-2
8

Step 8 • Incision of the Fascia - Distally
Insert the Blade into the slot on the Cannula (Figure 8-1).
Use the endoscope to visualize the fascia and the Blade. Divide the
fascia above by carefully advancing the Blade distally under direct
endoscopic visualization (Figure 8-2). Under no circumstances
should the fascia be divided unless the ulnar nerve is clearly
visualized through the slots below the Cannula.
Remove the Blade and confirm with the endoscope that the
fascia is incised along the tunnel and that the nerve is completely
released. Remove endoscope and the Cannula.
8-1
8-2
1-11-18-1
Step 9 • Surgical Closure
The tourniquet is dropped and hemostasis is accomplished through a short period of compression. If
bipolar cautery is necessary, this can be performed with retraction of the skin and subcutaneous tissue
and visualization with the endoscope. After obtaining hemostasis, elevate the skin and insert a 20-gauge
Angiocath through the skin and into the wound under direct visualization, taking care not to injure the ulnar
nerve. Withdraw the needle from the Angiocath (leaving the Angiocath) and tightly close the skin with
absorbable subcuticular sutures, followed by Steri-Strips. Tight closure is mandatory due to considerable
stress placed on the incision during postoperative range of motion exercises. Following closure, infiltrate
(if no contraindications) with 15-20 cc of 0.25% Marcaine with Epinephrine through the Angiocath, which is
then removed. Standard soft postoperative dressing is applied with compressive Ace.
9-1
9
1-18-2

Step 10 • Postoperative Care
The patient is instructed prior to surgery for active and passive range of motion of the elbow with the
expectation of having full range of motion on the first postoperative visit in 7-10 days. The patient is instructed
to de-bulk the dressing as necessary to allow for full range of motion. Patients are allowed to return to full
activity as tolerated, with many patients obtaining full or near full activity by the end of the first week.
10-1
10
1 5
6
7
4
3
2
EndoRelease System - Full Instrument Tray
1. Obturator Handle
2. Small Cannula (2.7mm Endoscope)
3. Small Locking Obturator
4. Large Cannula (4.0mm Endoscope)
5. Large Locking Obturator
6. 7mm Spatula
7. 5mm Spatula
Integra LifeSciences Corporation 4900 Charlemar Drive, Bldg. A • Cincinnati, OH 45227
877-444-1114 • 513-533-7979 • 513-271-1915 (Fax) www.Integra-LS.com
The Integra wave logo and EndoRelease are trademarks of Integra LifeSciences Corporation or its subsidiaries. ©2008 Integra LifeSciences Corporation. All r ights reserved. Printed in the USA 2.5K NS1896-09/08
Patent Pending
09-2000 Instrument Tray
09-5160 Small Locking Obturator 09-5250 Large Locking Obturator 21-1700 Obturator Handle 09-5070 5mm Spatula 09-5080 7mm Spatula 09-5090 Small Cannula (2.7mm Endoscope) 09-6020 Large Cannula (4.0mm Endoscope)
ENDORELSTD EndoRelease System - Standard Instrument Set *
09-6000 EndoRelease Blade 09-6005 EndoRelease Blades - 5 Pack * Standard Instrument Set (not shown) includes Instrument Tray (09-2000), Large Locking Obturator (09-5250), Large Cannula (09-6020), 7mm Spatula (09-5080) and Obturator Handle (21-1700). All other items must be purchased separately.
EndoRelease Endoscopic Cubital Tunnel Release System
EndoRelease Endoscopic Cubital Tunnel Release System
Instruments
Blades
EndoRelease™
ENDOSCOPIC CUBITAL TUNNEL RELEASE SYSTEMENDOSCOPIC CUBITAL TUNNEL RELEASE SYSTEM
09-9006