enabled by synapse
TRANSCRIPT

DEMO CASE SETUP
enabled by Synapse®

TM
simple to specify | simple to install | simple to use
enabled by Synapse®

Dear Sales Representative,
Congratulations! You’ve just received your new LSI fixture demo case. This new case includes AirLink enabled by Synapse controls inside. In order to most effectively utilize this new case, there are a few quick steps that you will need to perform:
INITIAL SETUP OF CASE (Note: Must be done PRIOR to any attempted sale call)
Locate all necessary parts of the demo/system
• Fixture with the AirLink integrated controller and sensor
• Fixture stand
— Shipped separately —
• AirLink Site Manager Controller
• Two antennas
• Power supply cable
2
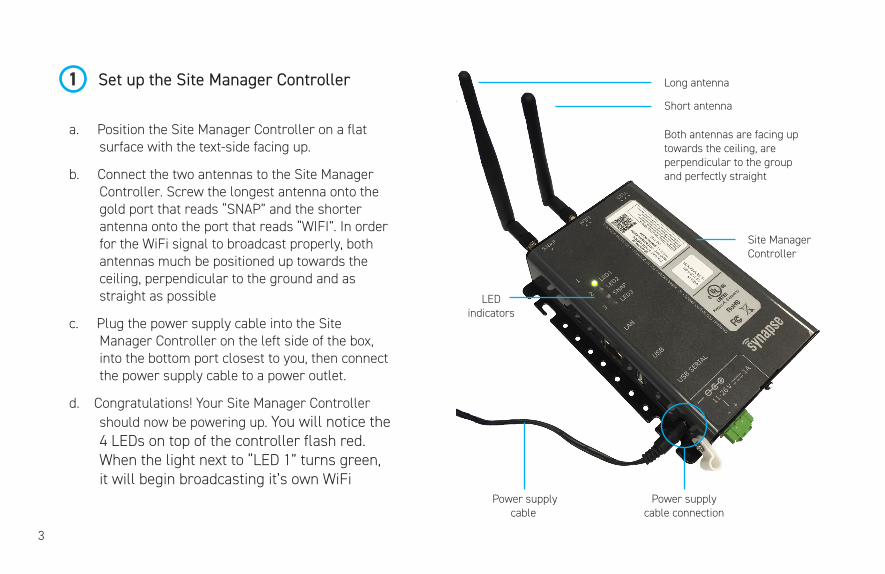
a. Position the Site Manager Controller on a flat surface with the text-side facing up.
b. Connect the two antennas to the Site Manager Controller. Screw the longest antenna onto the gold port that reads “SNAP” and the shorter antenna onto the port that reads “WIFI”. In order for the WiFi signal to broadcast properly, both antennas much be positioned up towards the ceiling, perpendicular to the ground and as straight as possible
c. Plug the power supply cable into the Site Manager Controller on the left side of the box, into the bottom port closest to you, then connect the power supply cable to a power outlet.
d. Congratulations! Your Site Manager Controller should now be powering up. You will notice the 4 LEDs on top of the controller flash red. When the light next to “LED 1” turns green, it will begin broadcasting it’s own WiFi
Power supplycable connection
Power supplycable
LEDindicators
1 Long antenna
Site ManagerController
Short antenna
Both antennas are facing uptowards the ceiling, areperpendicular to the groupand perfectly straight
3
Set up the Site Manager Controller

a. To connect to the Site Manager Controller WiFi, you will need to use a WiFi-enabled device, such as a laptop, tablet, or smartphone (suggestion: connect the device which you will use for your demonstration to customers). The WiFi name will appear as something like “simplySnap_” followed by 6 letters and/or numbers. If you’re not sure, the 6-digits are printed on a label on the top of the Site Manager Controller and will be the last 6 numbers of the Ethernet MAC address
b. The password to connect to the WiFi hotspot is on the sticker attached to the right side of the Site Manager Controller. You will also reference the User Password on the sticker to sign into the webapp later in step 3c.
c. Congratulations! You have connected your device to the Site Manager WiFi, now you may start using the AirLink Site Manager webapp
Example of WiFi name in device connection menu
Internet Access
Wireless Network Connection
simplySnap_63b9dc
Open Network and Sharing Center
WiFi Password:DefaultPasswordHere123
User Password:DefaultPasswordHere123
Site ManagerController
Default WiFi password location
a
b
2 Connect to the AirLink Site Manager WiFi
4

a. Open the internet browser on the device connected to the Site Manager WiFi—Google Chrome is recommended—Internet Explorer is not supported. In the address bar type in “192.168.55.1”
b. You may be directed to a page with a warning message about the connection not being private. If so, click the “Advanced” link, then click “Proceed to 192.168.55.1 (unsafe)” to continue to the AirLink Site Manager webapp
c. You should now land on the login screen of the webapp. In the username field enter “snap” and in the password field, enter the User Password found on the label of the Site Manager Controller where you retrieved the default WiFi password in step 2b—username and password are both case-sensitive
d. Congratulations! You should now be logged into the AirLink Site Manager webapp
WiFi Password:DefaultPasswordHere123
User Password:DefaultPasswordHere123
Site ManagerController
Default webapp password location
3 Log in to the AirLink Site Manager webapp b
c
5

a. Click on the “Config” link on the left side “of the screen. This section of the webapp contains the advanced settings for the AirLink Site Manager system
b. Click on the “WiFi Settings” link in the top navigation under the red Config bar—if you have a small screen, you may need to scroll down to “WiFi Settings”
c. In the editable fields, change the “SSID” (the WiFi name) and “Key” (WiFi password) to whatever you want (case-sensitive). We recommend something easy for you to remember. You can record your WiFi name and password choices on the back of this document for safe keeping. Click the “Save Changes” button
d. A pop-up confirmation window will appear, click “Configure WiFi Settings” to proceed
4 Change the WiFi name and password
a
b
c d
e. Another pop-up window will appear entitled “WiFi Configuration is in Progress” with a blue loading/progress bar. Once the system updates the credentials, you will be disconnected from the Site Manager WiFi
f. A “Connection Lost” error pop-up will appear—you do not have to close out of the browser window. At this time, you’ll need to reconnect to the Site Manager WiFi through your device’s settings. From now on, when you connect a device (smartphone, laptop, etc) to the system WiFi, the WiFi name and password will be whatever you chose in step 4c.
g. Return to the browser window, the “Connection Lost” pop-up window should automatically disappear when the system has established the WiFi connection—if not, click “Retry Again”. Congratulations! You have updated the Site Manager WiFi name and password
6

a. Click on the “Config” link on the left side “of the screen. This section of the webapp contains the advanced settings for the AirLink Site Manager system
b. Click on the “WiFi Settings” link in the top navigation under the red Config bar—if you have a small screen, you may need to scroll down to “WiFi Settings”
c. In the editable fields, change the “SSID” (the WiFi name) and “Key” (WiFi password) to whatever you want (case-sensitive). We recommend something easy for you to remember. You can record your WiFi name and password choices on the back of this document for safe keeping. Click the “Save Changes” button
d. A pop-up confirmation window will appear, click “Configure WiFi Settings” to proceed
e. Another pop-up window will appear entitled “WiFi Configuration is in Progress” with a blue loading/progress bar. Once the system updates the credentials, you will be disconnected from the Site Manager WiFi
f. A “Connection Lost” error pop-up will appear—you do not have to close out of the browser window. At this time, you’ll need to reconnect to the Site Manager WiFi through your device’s settings. From now on, when you connect a device (smartphone, laptop, etc) to the system WiFi, the WiFi name and password will be whatever you chose in step 4c.
g. Return to the browser window, the “Connection Lost” pop-up window should automatically disappear when the system has established the WiFi connection—if not, click “Retry Again”. Congratulations! You have updated the Site Manager WiFi name and password
e
f
fInternet Access
Wireless Network Connection
YourNewWifiName
Open Network and Sharing Center
7

a. Click on the “Admin” drop-down in the top left-hand corner of the window and select “Account Management”
b. Click on the “Edit User” link next to the red gear icon
c. In the editable fields, change the username and password to something simple and easy to remember (case-sensitive). You can record your webapp username and password choices on the back of this document for safe keeping
d. Congratulations! You’ve updated your account username and password. These are the credentials that you will use to log in to the Site Manager webapp from now on
5 Change the webapp name and password a
c
b
8

b
c
e
d
a. Plug the fixture into a power outlet, (and if you’re not already) connect to the Site Manager WiFi and log into the Site Manager webapp
b. To the left-hand side of the window, find the “Devices” link. Click on the third option down called “Census”
c. A red pop-up will appear, click “Start Census”
d. Another pop-up will appear, click “Confirm”
e. The system will detect compatible devicesand populate them on screen. Check boxes to the left of the device name(s) you would like to add, then click the red “Add Selected Devices” button on the upper right of the window
f. When your device has been added, click the “Lights and Sensors” link under “Devices” inthe navigation on the left side of the window
6 Add a fixture to the system g. Click the horizontal “All” bar, to see the list of devices currently connected to the system.
h. Locate the recently added fixture in the “Lights” column and click “Edit” on the right-hand side
i. In the editable field, change the name of the fixture to whatever you’d like. You can also see the “SNAP Address” associated with the controller inside of the fixture. This ID is native in each controller and is used for commissioning and troubleshooting by the LSI Controls team. These IDs are also labeled on each controller—if you open up the connected fixture, you would notice that the ID on the sticker matches the SNAP Address here
j. When finished, scroll to the bottom of the form and click “Save Changes.” You should then be redirected back to the “Lights and Sensors” page where you can control your light by clicking “On” and “Off” or dim it using the slider. Congratulations! You’re ready to demo!
9

a. Plug the fixture into a power outlet, (and if you’re not already) connect to the Site Manager WiFi and log into the Site Manager webapp
b. To the left-hand side of the window, find the “Devices” link. Click on the third option down called “Census”
c. A red pop-up will appear, click “Start Census”
d. Another pop-up will appear, click “Confirm”
e. The system will detect compatible devicesand populate them on screen. Check boxes to the left of the device name(s) you would like to add, then click the red “Add Selected Devices” button on the upper right of the window
f. When your device has been added, click the “Lights and Sensors” link under “Devices” inthe navigation on the left side of the window
g & h
i j
g. Click the horizontal “All” bar, to see the list of devices currently connected to the system.
h. Locate the recently added fixture in the “Lights” column and click “Edit” on the right-hand side
i. In the editable field, change the name of the fixture to whatever you’d like. You can also see the “SNAP Address” associated with the controller inside of the fixture. This ID is native in each controller and is used for commissioning and troubleshooting by the LSI Controls team. These IDs are also labeled on each controller—if you open up the connected fixture, you would notice that the ID on the sticker matches the SNAP Address here
j. When finished, scroll to the bottom of the form and click “Save Changes.” You should then be redirected back to the “Lights and Sensors” page where you can control your light by clicking “On” and “Off” or dim it using the slider. Congratulations! You’re ready to demo!
10

Site Manager WiFi name
NOTE: Usernames and passwords are case-sensitive
If you experience any problems or have any questions about the demo case or the AirLink system, call the LSI Controls team at 1-800-436-7800 (option 8).
DEMO CASE CREDENTIALS
Once you follow all of the steps in this document, you may write down your usernames and passwords here so you don’t forget them. If you do, store this document in a safe and secure location.
Site Manager WiFi password
Site Manager webapp username
Site Manager webapp password
enabled by Synapse®
part #: 679967