enable wmi after applying sp2 for xp - emco software wmi after applying... · enable wmi after...
TRANSCRIPT

© Copyright 2001-2012 EMCO Software
Enable WMI after applying SP2 forXP
Troubleshooting Guide
Company web site: emcosoftware.com
Support email: [email protected]
Support telephone: +44 20 3287-7651
+1 646 233-1163

© Copyright 2001-2012 EMCO Softwareemcosoftware.com
Enable WMI after applying SP2 for XP
Troubleshooting Guide
2
Enable WMI after applying SP2 for XP
This tutorial will guide you on enabling WMI after applying Service Pack 2 for windows XP. For this you will haveto configure Firewall on a machine on which you want to use WMI. Windows XP service Pack 2 comes up with abuilt in firewall that is enabled by default to minimize the chance of attacks on your machine.
The Windows Firewall that comes up with SP2 for Windows XP and DCOM (Distributed Component ObjectModel) can cause access denied errors when remote computers and accounts used for remote connections are notproperly configured.
When obtaining data from a remote machine, WMI must establish a DCOM connection from local Computer toremote Computer. To establish this connection, both Windows Firewall and DCOM on Computer B must beconfigured correctly, to avoid access denial errors. The configuration must be done locally on remote machine bychanging Group Policy settings, by executing NETSH commands, or by executing a script. Windows Firewall doesnot support any remote configuration.
The Windows Firewall service is dependent on WMI Winmgmt service. If WMI is stopped and restarted then youmust restart Windows Firewall service. For example, you may need to stop WMI to rebuild a corrupted repository.
To successfully connect from local machine to a remote machine when the Windows Firewall is enabled on remotemachine, some configuration of DCOM security settings is necessary on both machines.
To enable WMI after installing SP2 on Windows XP
1. Ensure that the user account is a local administrator on remote machine.
2. Enable "Allow Remote Administration" for the user account. See the next section for more details on enabling"Allow Remote Administration".
3. If the user is not an administrator but has Remote Enable permission on remote machine, then the user also mustbe given DCOM Remote Launch privilege on remote machine by running Dcomcnfg.exe at command line.The 0x80070005 error occurs when this privilege is not set.
4. Enable Windows Firewall remote administration. See the last section at the end of this document for moredetails.
Enabling "Allow Remote Administration"
There are two different ways to enable "Allow Remote Administration". We will discuss both methods one byone.
Way I
1. Click the Run menu item shown under Start menu on your desktop.
2. A Run dialog box will appear on the screen

© Copyright 2001-2012 EMCO Softwareemcosoftware.com
Enable WMI after applying SP2 for XP
Troubleshooting Guide
3
3. Type cmd in the Open textbox.
4. Now click OK button.
5. Command Prompt will appear on the screen
6. Type in netsh firewall set service RemoteAdmin in command line.
Way II
Follow the steps use the Group Policy editor (Gpedit.msc) to enable "Allow Remote Administration".
1. Click the Run menu item shown under Start menu on your desktop.
2. A Run dialog box will appear on the screen

© Copyright 2001-2012 EMCO Softwareemcosoftware.com
Enable WMI after applying SP2 for XP
Troubleshooting Guide
4
3. Type Gpedit.msc in the Open textbox to launch Group Policy Editor.
4. Now click OK button.
5. Group Policy Editor Dialog box will appear on the screen.
6. Under the Local Computer Policy heading, open the Computer Configuration folder.
7. Open the Administrative Templates folder.
8. Open the Network folder.
9. Open the Network Connections folder.

© Copyright 2001-2012 EMCO Softwareemcosoftware.com
Enable WMI after applying SP2 for XP
Troubleshooting Guide
5
10. Open the Windows Firewall folder.
11. If the computer is in the domain, then open the Domain Profile folder, otherwise open the Standard Profilefolder.
12. Click on the Windows Firewall: Allow remote administration exception item.
13. Click on the Action menu and select Properties.
14. Select Enable radio button.
15. Click the OK button.

© Copyright 2001-2012 EMCO Softwareemcosoftware.com
Enable WMI after applying SP2 for XP
Troubleshooting Guide
6
Enabling Windows Firewall remote administration
To enable Windows Firewall remote administration, perform the following steps.
1. Move to Control Panel.
2. Double click the Windows Firewall icon located in the Control Panel to launch the Windows Firewallapplet.

© Copyright 2001-2012 EMCO Softwareemcosoftware.com
Enable WMI after applying SP2 for XP
Troubleshooting Guide
7
3. Windows Firewall dialog box will appear on the screen.
4. Switch to the General Tab.
5. If Firewall is turned on; make sure Don't allow exceptions check box is unchecked.
© Copyright 2001-2012 EMCO Softwareemcosoftware.com
Enable WMI after applying SP2 for XP
Troubleshooting Guide
8
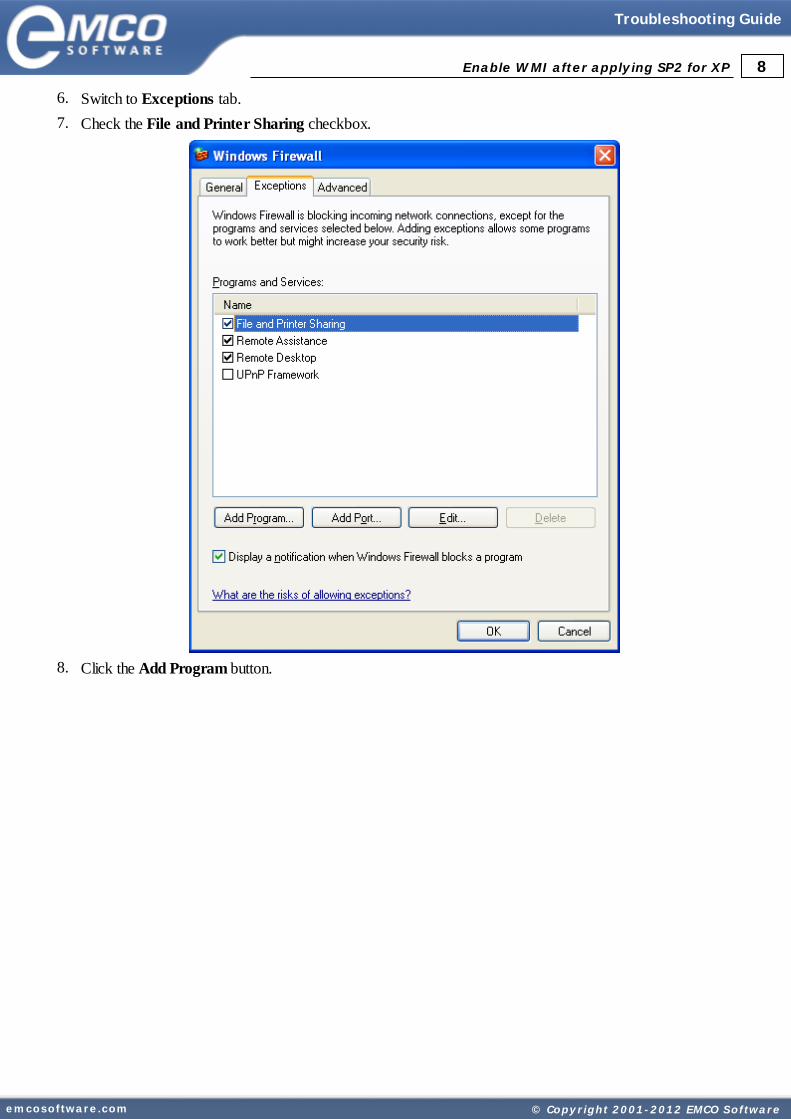
6. Switch to Exceptions tab.
7. Check the File and Printer Sharing checkbox.
8. Click the Add Program button.

© Copyright 2001-2012 EMCO Softwareemcosoftware.com
Enable WMI after applying SP2 for XP
Troubleshooting Guide
9
9. Add Program dialog box will appear on the screen.
10. Click the Browse button.
11. File open dialog box will appear on the screen.
12. Locate unsecapp.exe in %windir%\system32\wbem and click Open button.

© Copyright 2001-2012 EMCO Softwareemcosoftware.com
Enable WMI after applying SP2 for XP
Troubleshooting Guide
10
13. Click Change Scope button.
14. Change Scope dialog box will appear on the screen.
15. Click the My network (subnet) only radio button.
16. Click OK button.
17. Click OK again in Add a Program dialog box.
© Copyright 2001-2012 EMCO Softwareemcosoftware.com
Enable WMI after applying SP2 for XP
Troubleshooting Guide
11
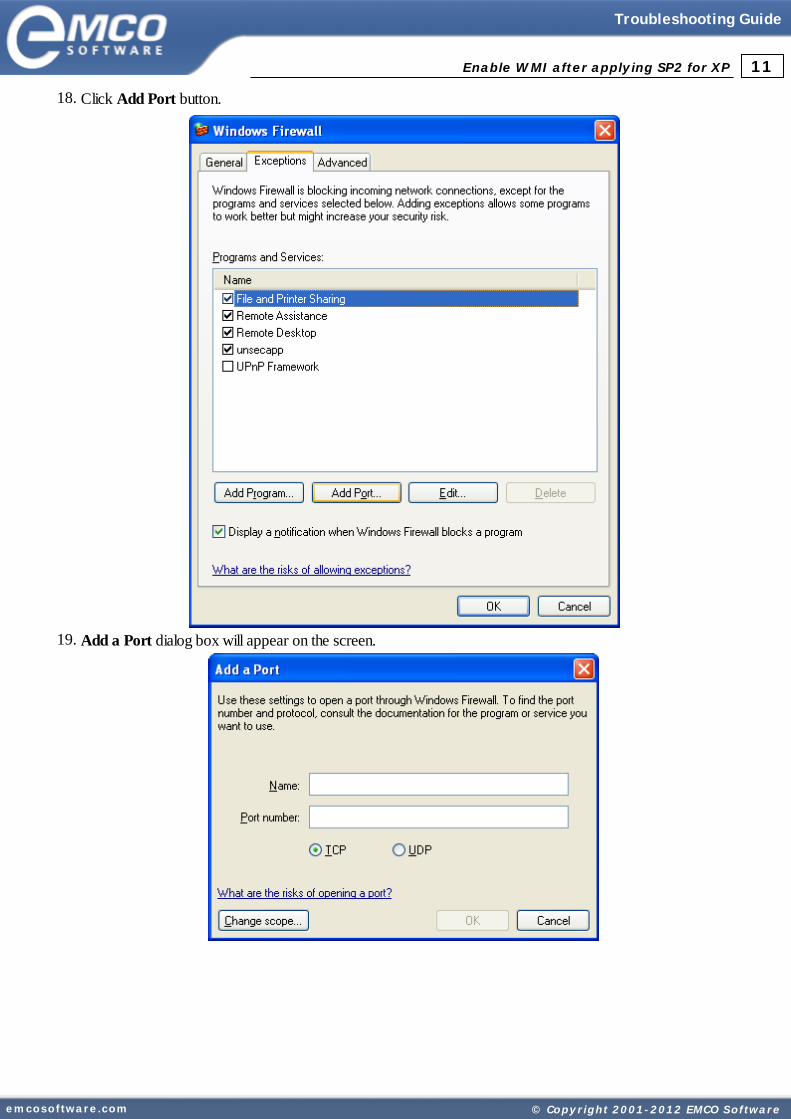
18. Click Add Port button.
19. Add a Port dialog box will appear on the screen.

© Copyright 2001-2012 EMCO Softwareemcosoftware.com
Enable WMI after applying SP2 for XP
Troubleshooting Guide
12
20. Type RPC\DCOM in the Port Name textbox.
21. Type 135 in the Port Number textbox.
22. Click TCP radio button to select it.
23. Click Change Scope button to set the scope of this port.
24. Change Scope dialog box will appear on the screen.
25. Click the My network (subnet) only radio button.
26. Click OK button.
You are now done and you have successfully completed all configurations.