enable ssh access on the tenable virtual appliance€¦ · title: enable ssh access on the tenable...
TRANSCRIPT
Enable SSH Access on the TenableVirtual Appliance (4.4.x-4.7.x)
Last Revised: February 27, 2018
Table of Contents
Introduction 3
Requirements 4
Terminology 5
Generate the Key File 6
Generate a Key for Windows Operating System 7
Copy Public Key 14
Generate a Key for Mac OS X Operating System 16
Copy Public Key 17
Enable SSH Access on the Tenable Virtual Appliance 19
Establish an SSH Connection 23
Connect to the Appliance from the Windows Operating System 24
Connect to the Appliance from the Mac OS X Operating System 29
Disable SSH Access on the Tenable Virtual Appliance 31
Copyright © 2018. Tenable Network Security, Inc. All rights reserved. Tenable Network Security, Nessus, SecurityCenter Continuous View, Passive Vulnerability Scanner, and Log Correlation Engine areregistered trademarks of Tenable Network Security, Inc. All other products or services are trademarks of their respective owners.
Introduction
You may be asked by Tenable Support personnel to collect information from your Tenable VirtualAppliance. You need to collect this information via an SSH connection. By default, SSH access to theTenable Virtual Appliance is disabled. This document describes how to enable remote SSH access onthe Tenable Virtual Appliance, and how to connect using PuTTY on a Windows system or a terminal onMac OS X.
The time required for the below tasks should not exceed 15 minutes. Minimal IT related experienceand Tenable product knowledge is required.
Tenable recommends that you only enable SSH access when requested during a Support engagement.Please disable SSH access when your engagement is complete.
Copyright © 2018. Tenable Network Security, Inc. All rights reserved. Tenable Network Security, Nessus, SecurityCenter Continuous View, Passive Vulnerability Scanner, and Log Correlation Engine areregistered trademarks of Tenable Network Security, Inc. All other products or services are trademarks of their respective owners.
Requirements
In order to complete the instructions below, you need:
l Network access to the Tenable Virtual Appliance web UI on port 8000.
l User credentials required to log into the Tenable Virtual Appliance web UI.
l puttygen.exe and putty.exe for Windows systems.
Copyright © 2018. Tenable Network Security, Inc. All rights reserved. Tenable Network Security, Nessus, SecurityCenter Continuous View, Passive Vulnerability Scanner, and Log Correlation Engine areregistered trademarks of Tenable Network Security, Inc. All other products or services are trademarks of their respective owners.
Terminology
Tenable Virtual Appliance – A proprietary operating system image provided by Tenable for use withenterprise server deployments.
SSH – Secure Shell (SSH) is a cryptographic network protocol used to communicate securely betweentwo computers.
SSH Key File – A unique computer file used in place of a password.
Key Passphrase – A password that can be used along with your SSH Key File for additional security.
PuTTY (putty.exe) – A computer application used to initiate SSH connectivity.
Puttygen (puttygen.exe) – A computer application used to generate a password key file.
Copyright © 2018. Tenable Network Security, Inc. All rights reserved. Tenable Network Security, Nessus, SecurityCenter Continuous View, Passive Vulnerability Scanner, and Log Correlation Engine areregistered trademarks of Tenable Network Security, Inc. All other products or services are trademarks of their respective owners.
Generate the Key File
You must generate an SSH key file in order to connect to the Tenable Virtual Appliance using SSH.
Generate a Key for Windows Operating System
Generate a Key for Mac OS X Operating System
Copyright © 2018. Tenable Network Security, Inc. All rights reserved. Tenable Network Security, Nessus, SecurityCenter Continuous View, Passive Vulnerability Scanner, and Log Correlation Engine areregistered trademarks of Tenable Network Security, Inc. All other products or services are trademarks of their respective owners.
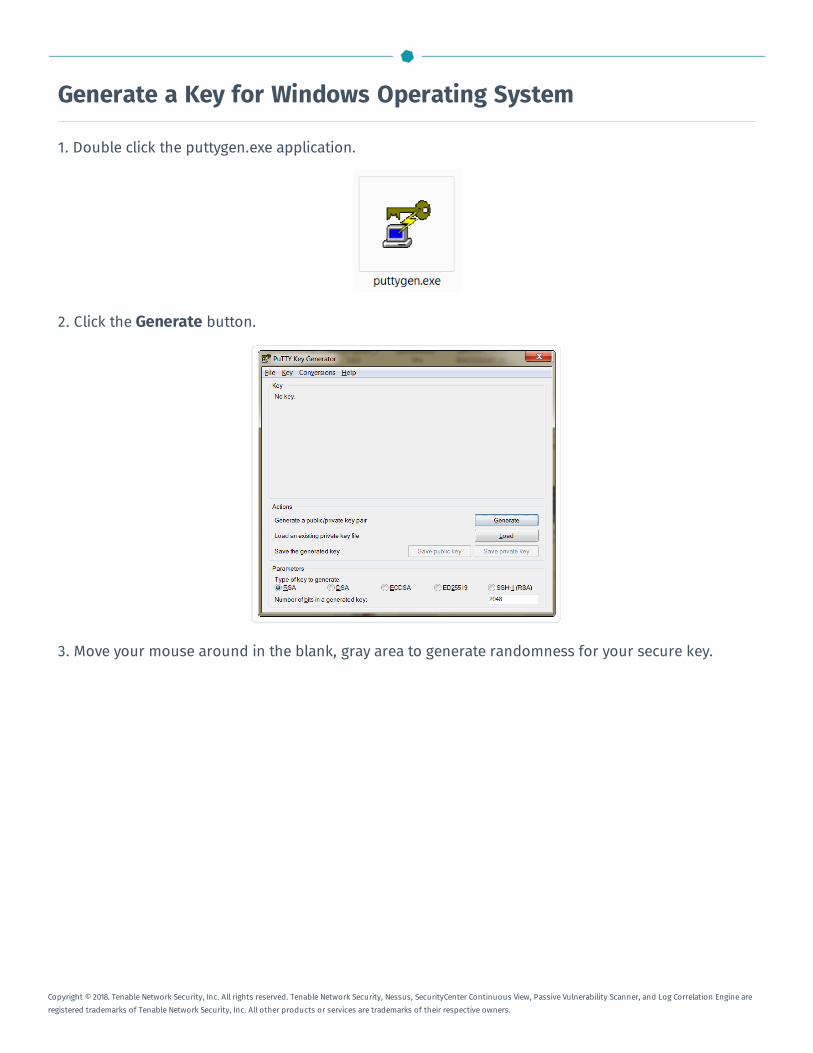
Generate a Key for Windows Operating System
1. Double click the puttygen.exe application.
2. Click the Generate button.
3. Move your mouse around in the blank, gray area to generate randomness for your secure key.
Copyright © 2018. Tenable Network Security, Inc. All rights reserved. Tenable Network Security, Nessus, SecurityCenter Continuous View, Passive Vulnerability Scanner, and Log Correlation Engine areregistered trademarks of Tenable Network Security, Inc. All other products or services are trademarks of their respective owners.
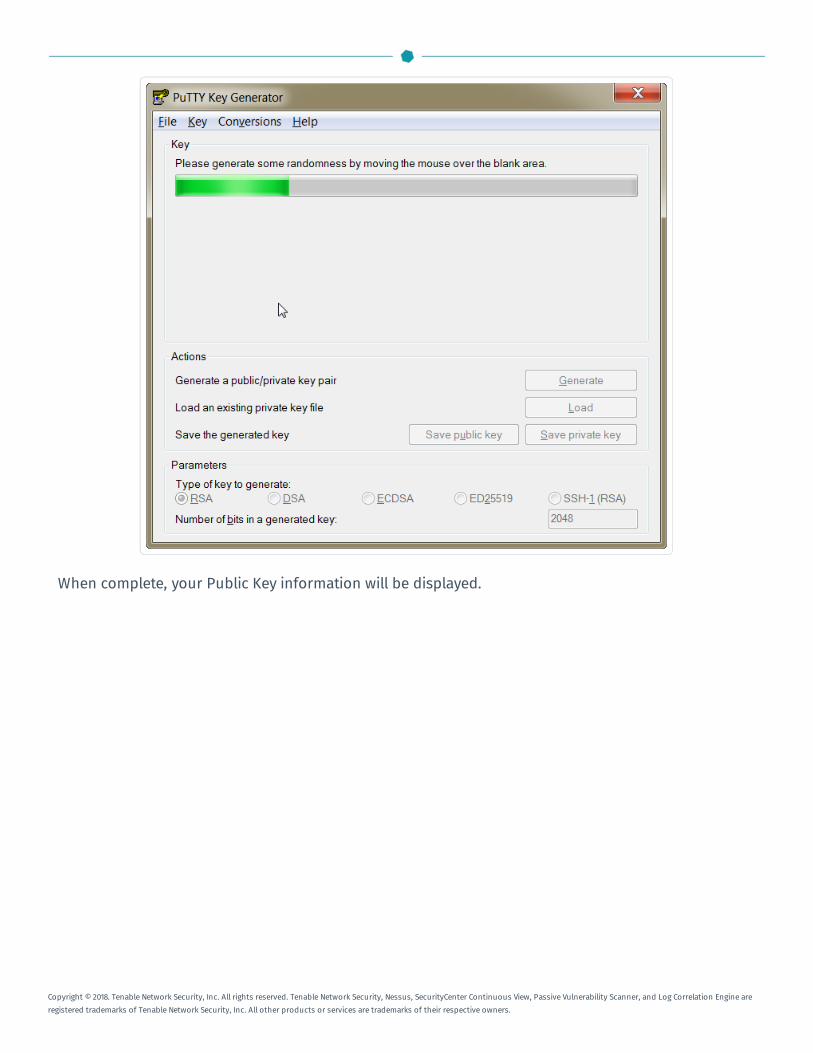
When complete, your Public Key information will be displayed.
Copyright © 2018. Tenable Network Security, Inc. All rights reserved. Tenable Network Security, Nessus, SecurityCenter Continuous View, Passive Vulnerability Scanner, and Log Correlation Engine areregistered trademarks of Tenable Network Security, Inc. All other products or services are trademarks of their respective owners.
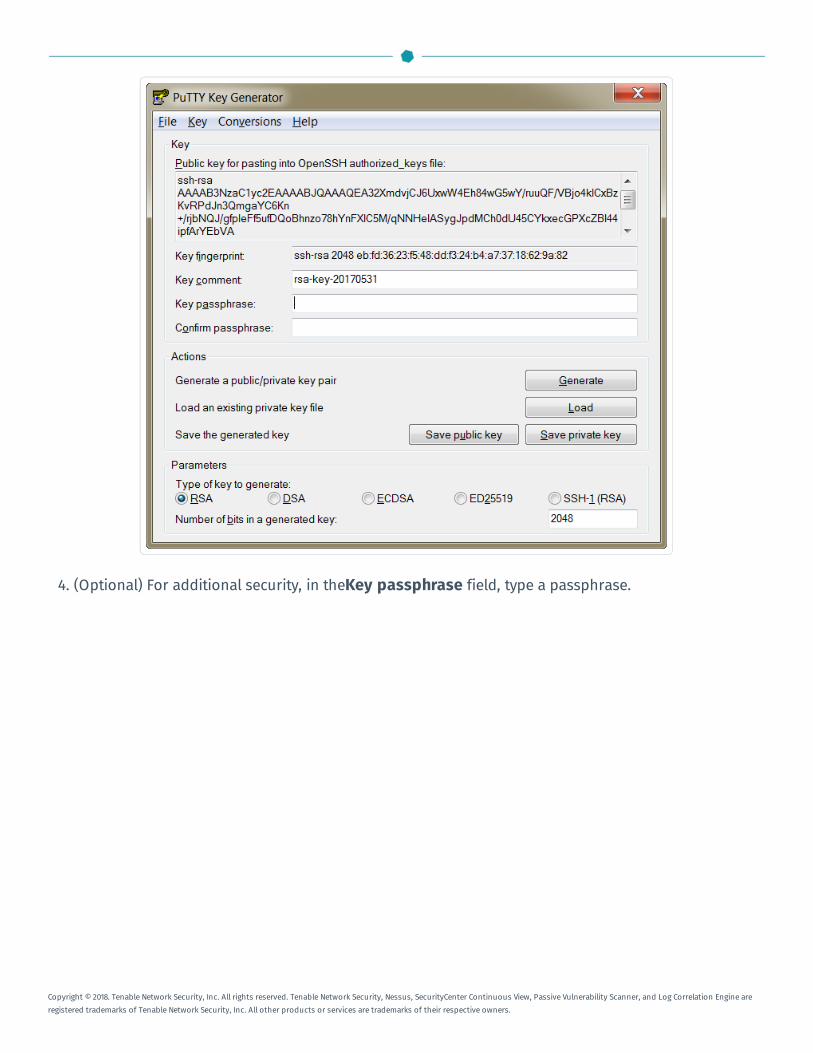
4. (Optional) For additional security, in theKey passphrase field, type a passphrase.
Copyright © 2018. Tenable Network Security, Inc. All rights reserved. Tenable Network Security, Nessus, SecurityCenter Continuous View, Passive Vulnerability Scanner, and Log Correlation Engine areregistered trademarks of Tenable Network Security, Inc. All other products or services are trademarks of their respective owners.
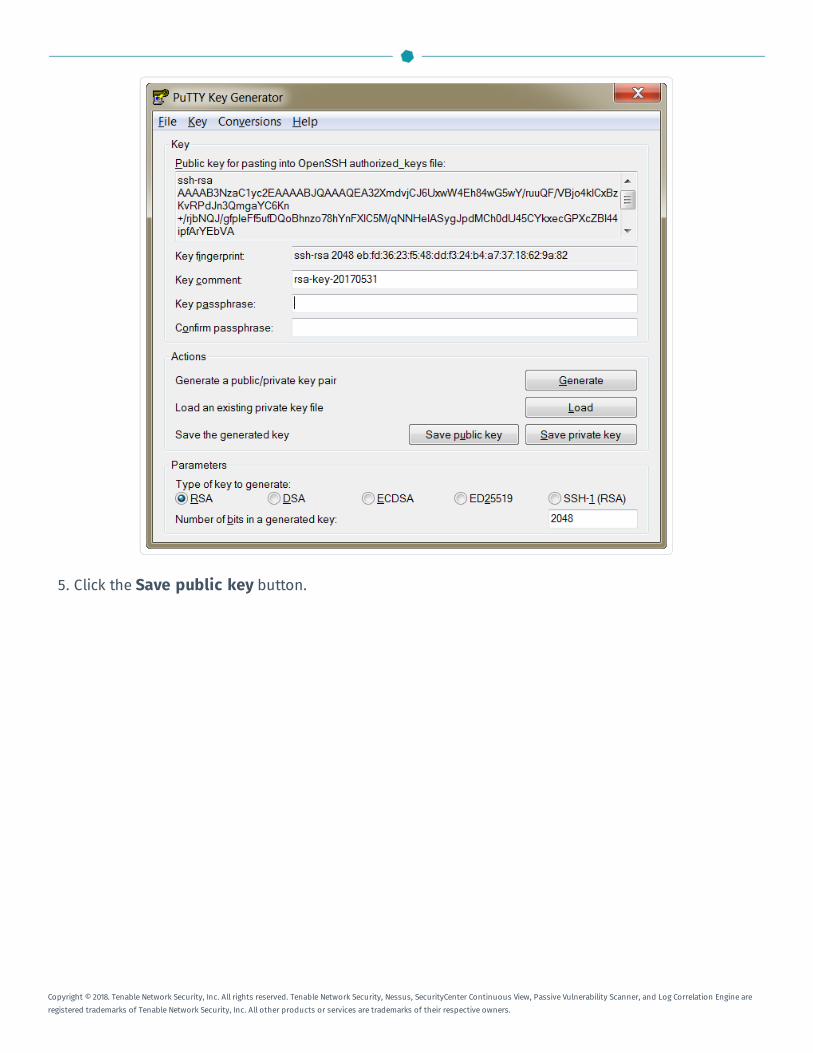
5. Click the Save public key button.
Copyright © 2018. Tenable Network Security, Inc. All rights reserved. Tenable Network Security, Nessus, SecurityCenter Continuous View, Passive Vulnerability Scanner, and Log Correlation Engine areregistered trademarks of Tenable Network Security, Inc. All other products or services are trademarks of their respective owners.
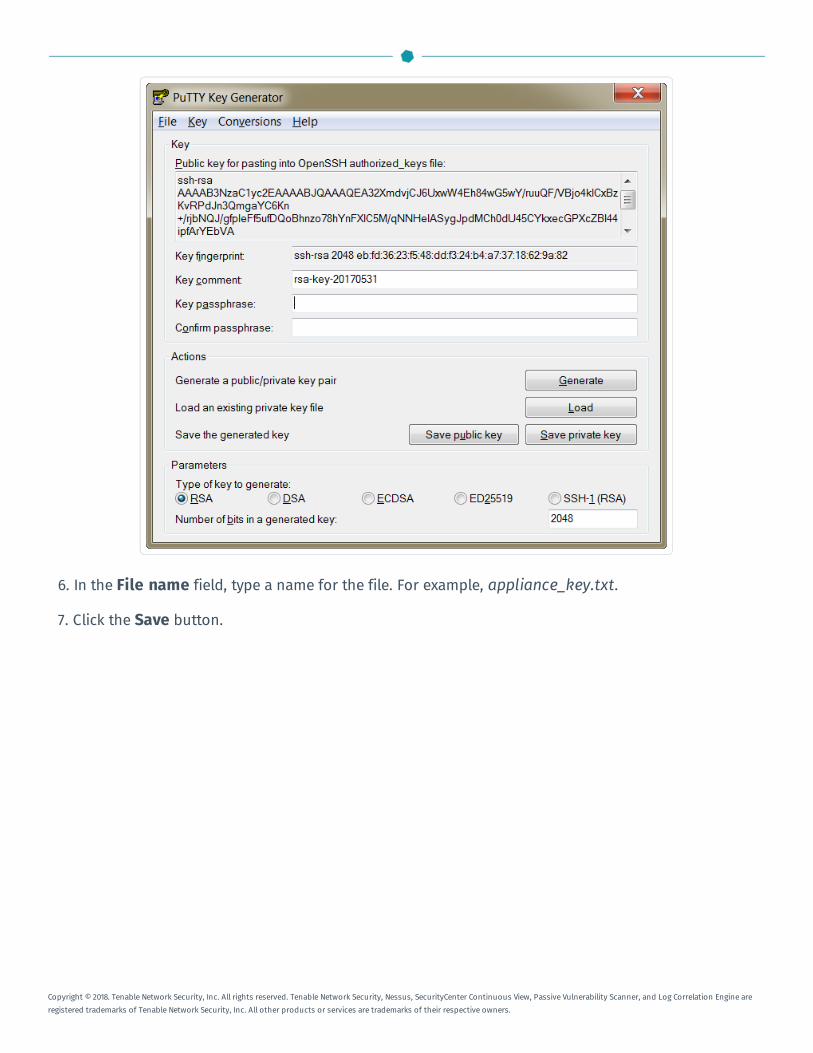
6. In the File name field, type a name for the file. For example, appliance_key.txt.
7. Click the Save button.
Copyright © 2018. Tenable Network Security, Inc. All rights reserved. Tenable Network Security, Nessus, SecurityCenter Continuous View, Passive Vulnerability Scanner, and Log Correlation Engine areregistered trademarks of Tenable Network Security, Inc. All other products or services are trademarks of their respective owners.
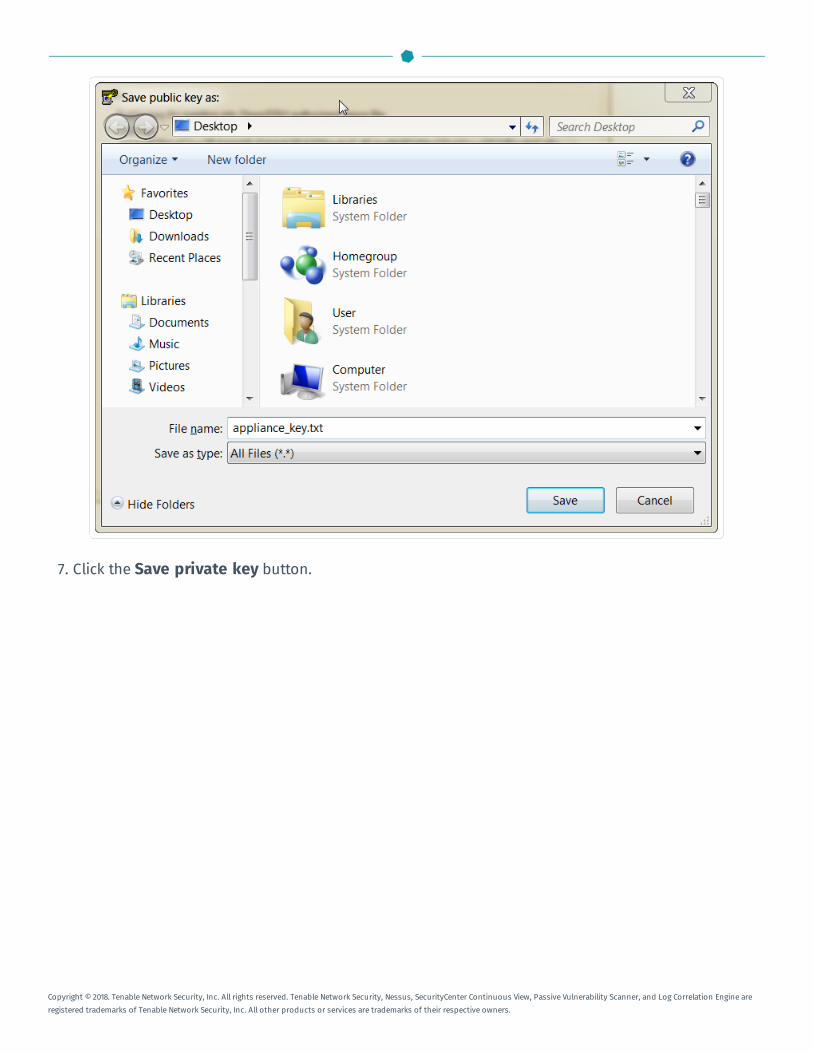
7. Click the Save private key button.
Copyright © 2018. Tenable Network Security, Inc. All rights reserved. Tenable Network Security, Nessus, SecurityCenter Continuous View, Passive Vulnerability Scanner, and Log Correlation Engine areregistered trademarks of Tenable Network Security, Inc. All other products or services are trademarks of their respective owners.
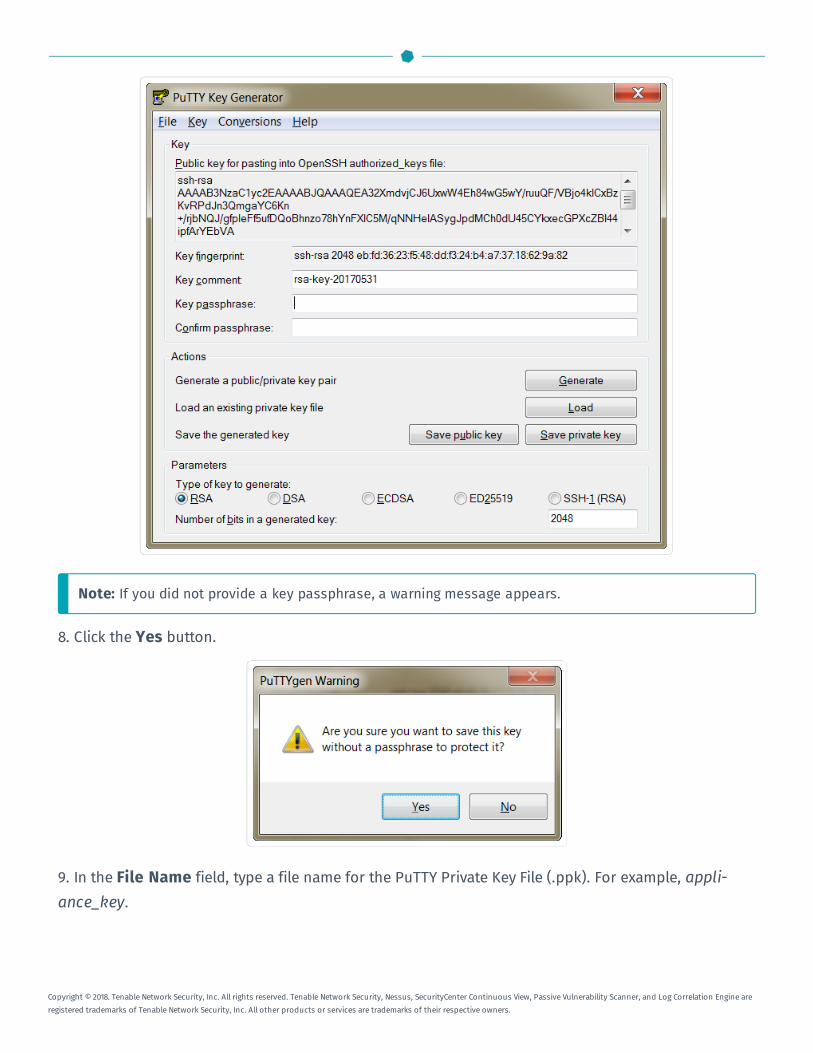
Note: If you did not provide a key passphrase, a warning message appears.
8. Click the Yes button.
9. In the File Name field, type a file name for the PuTTY Private Key File (.ppk). For example, appli-ance_key.
Copyright © 2018. Tenable Network Security, Inc. All rights reserved. Tenable Network Security, Nessus, SecurityCenter Continuous View, Passive Vulnerability Scanner, and Log Correlation Engine areregistered trademarks of Tenable Network Security, Inc. All other products or services are trademarks of their respective owners.
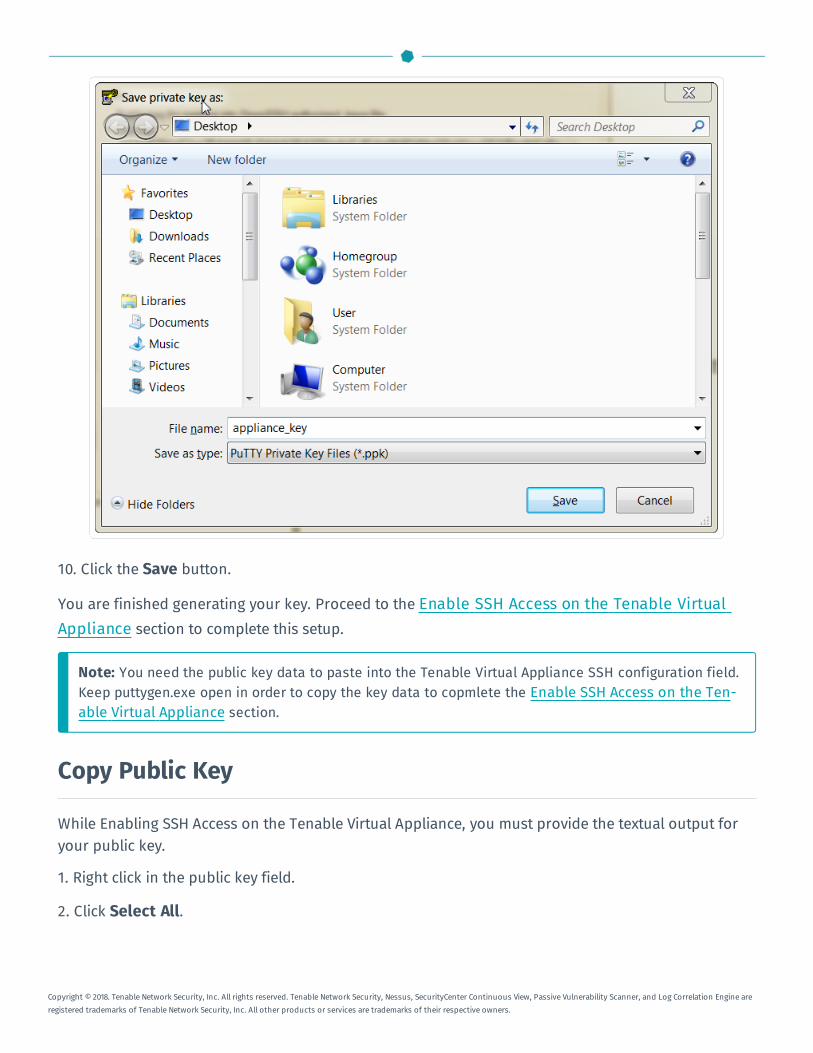
10. Click the Save button.
You are finished generating your key. Proceed to the Enable SSH Access on the Tenable VirtualAppliance section to complete this setup.
Note: You need the public key data to paste into the Tenable Virtual Appliance SSH configuration field.Keep puttygen.exe open in order to copy the key data to copmlete the Enable SSH Access on the Ten-able Virtual Appliance section.
Copy Public Key
While Enabling SSH Access on the Tenable Virtual Appliance, you must provide the textual output foryour public key.
1. Right click in the public key field.
2. Click Select All.
Copyright © 2018. Tenable Network Security, Inc. All rights reserved. Tenable Network Security, Nessus, SecurityCenter Continuous View, Passive Vulnerability Scanner, and Log Correlation Engine areregistered trademarks of Tenable Network Security, Inc. All other products or services are trademarks of their respective owners.
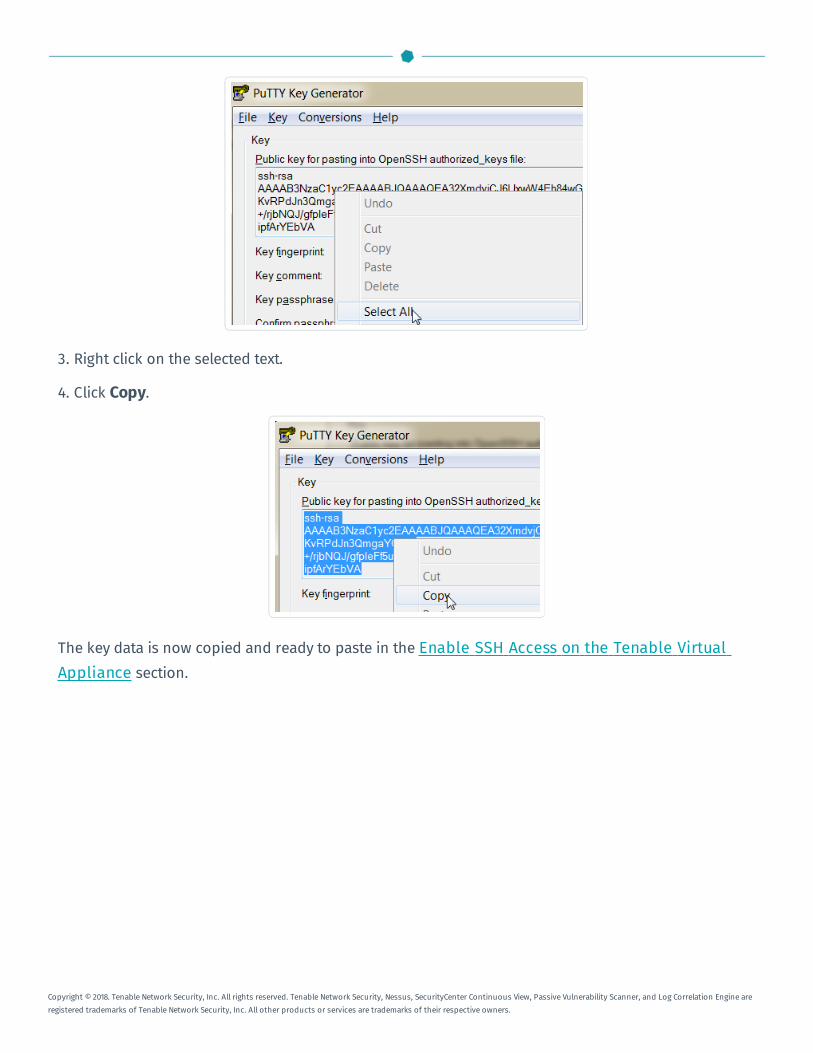
3. Right click on the selected text.
4. Click Copy.
The key data is now copied and ready to paste in the Enable SSH Access on the Tenable VirtualAppliance section.
Copyright © 2018. Tenable Network Security, Inc. All rights reserved. Tenable Network Security, Nessus, SecurityCenter Continuous View, Passive Vulnerability Scanner, and Log Correlation Engine areregistered trademarks of Tenable Network Security, Inc. All other products or services are trademarks of their respective owners.
Generate a Key for Mac OS X Operating System
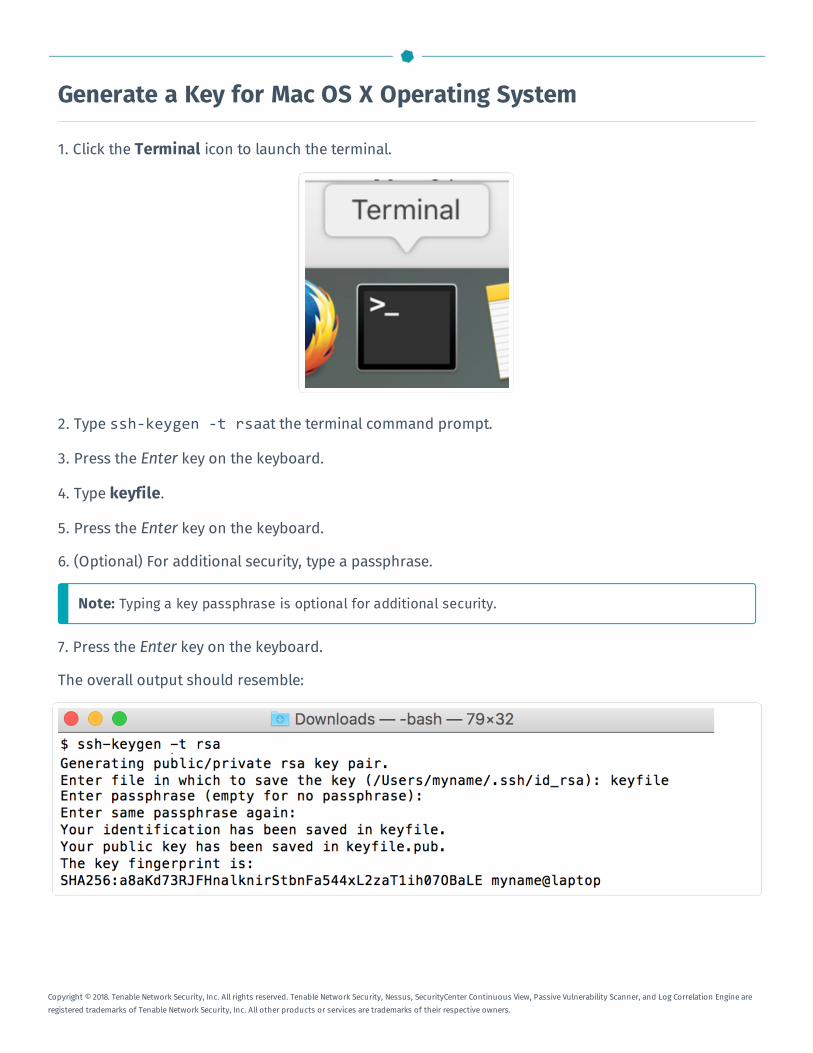
1. Click the Terminal icon to launch the terminal.
2. Type ssh-keygen -t rsaat the terminal command prompt.
3. Press the Enter key on the keyboard.
4. Type keyfile.
5. Press the Enter key on the keyboard.
6. (Optional) For additional security, type a passphrase.
Note: Typing a key passphrase is optional for additional security.
7. Press the Enter key on the keyboard.
The overall output should resemble:
Copyright © 2018. Tenable Network Security, Inc. All rights reserved. Tenable Network Security, Nessus, SecurityCenter Continuous View, Passive Vulnerability Scanner, and Log Correlation Engine areregistered trademarks of Tenable Network Security, Inc. All other products or services are trademarks of their respective owners.
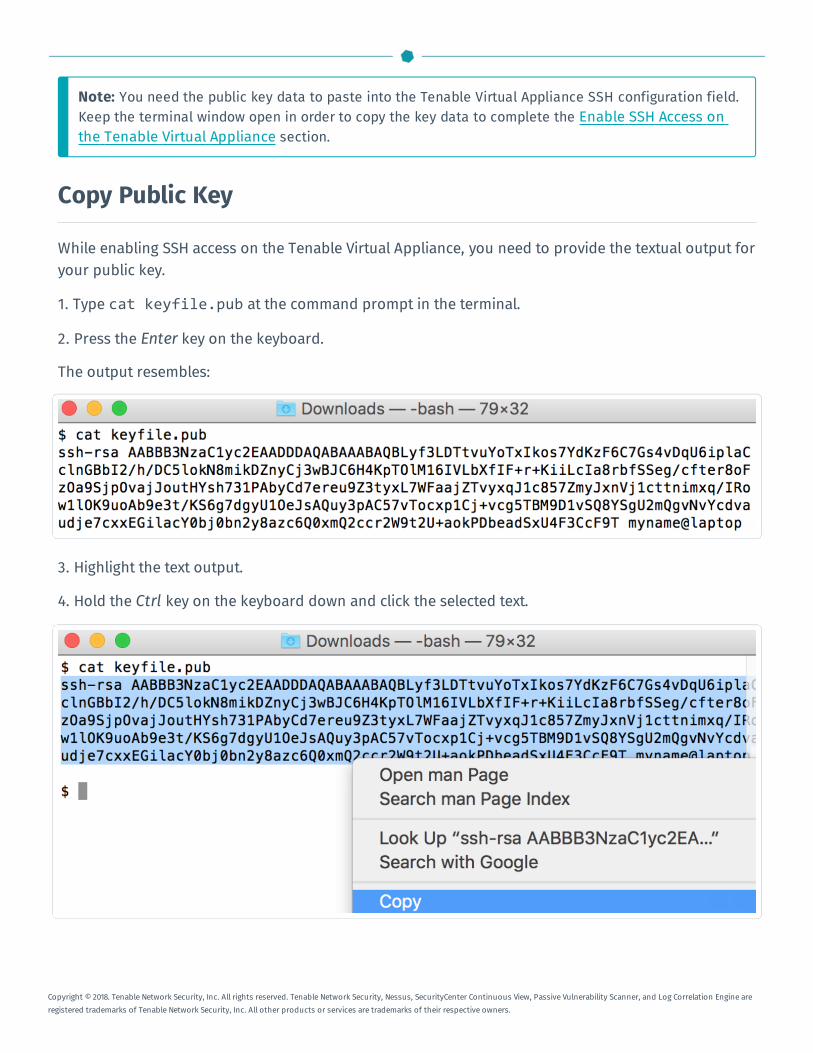
Note: You need the public key data to paste into the Tenable Virtual Appliance SSH configuration field.Keep the terminal window open in order to copy the key data to complete the Enable SSH Access onthe Tenable Virtual Appliance section.
Copy Public Key
While enabling SSH access on the Tenable Virtual Appliance, you need to provide the textual output foryour public key.
1. Type cat keyfile.pub at the command prompt in the terminal.
2. Press the Enter key on the keyboard.
The output resembles:
3. Highlight the text output.
4. Hold the Ctrl key on the keyboard down and click the selected text.
Copyright © 2018. Tenable Network Security, Inc. All rights reserved. Tenable Network Security, Nessus, SecurityCenter Continuous View, Passive Vulnerability Scanner, and Log Correlation Engine areregistered trademarks of Tenable Network Security, Inc. All other products or services are trademarks of their respective owners.
5. Click Copy.
The key data is now copied and is ready to paste in the Enable SSH Access on the Tenable VirtualAppliance section.
Copyright © 2018. Tenable Network Security, Inc. All rights reserved. Tenable Network Security, Nessus, SecurityCenter Continuous View, Passive Vulnerability Scanner, and Log Correlation Engine areregistered trademarks of Tenable Network Security, Inc. All other products or services are trademarks of their respective owners.
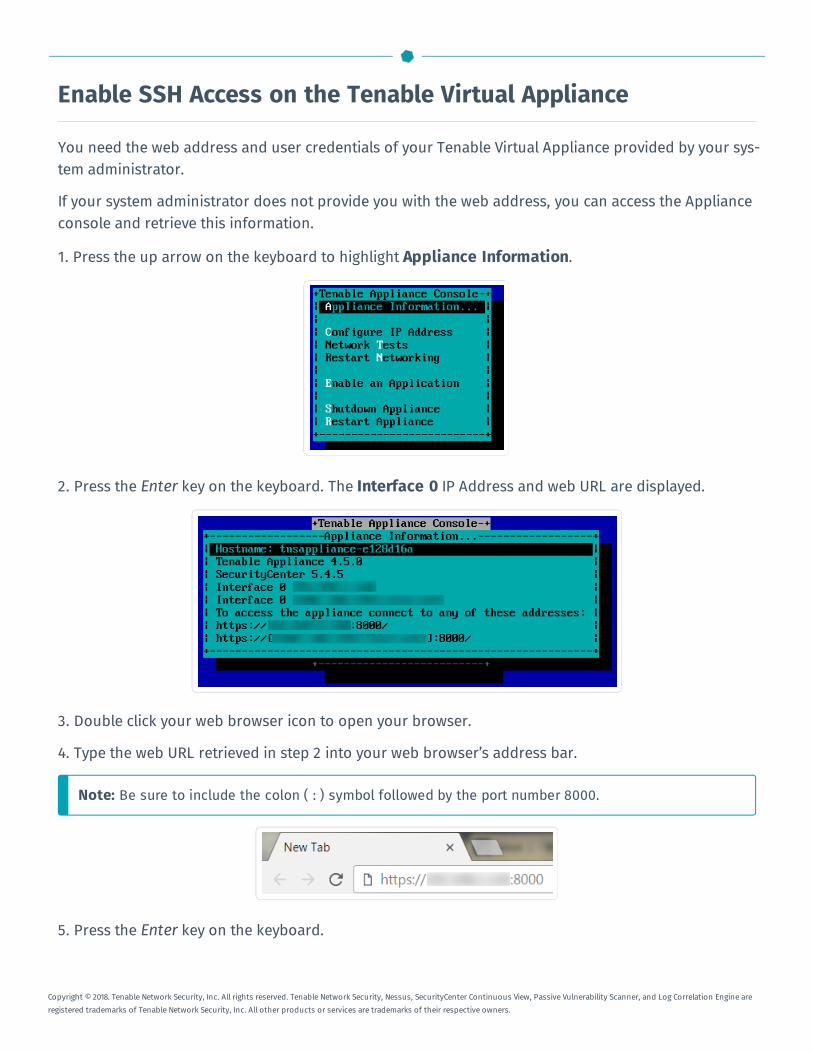
Enable SSH Access on the Tenable Virtual Appliance
You need the web address and user credentials of your Tenable Virtual Appliance provided by your sys-tem administrator.
If your system administrator does not provide you with the web address, you can access the Applianceconsole and retrieve this information.
1. Press the up arrow on the keyboard to highlight Appliance Information.
2. Press the Enter key on the keyboard. The Interface 0 IP Address and web URL are displayed.
3. Double click your web browser icon to open your browser.
4. Type the web URL retrieved in step 2 into your web browser’s address bar.
Note: Be sure to include the colon ( : ) symbol followed by the port number 8000.
5. Press the Enter key on the keyboard.
Copyright © 2018. Tenable Network Security, Inc. All rights reserved. Tenable Network Security, Nessus, SecurityCenter Continuous View, Passive Vulnerability Scanner, and Log Correlation Engine areregistered trademarks of Tenable Network Security, Inc. All other products or services are trademarks of their respective owners.
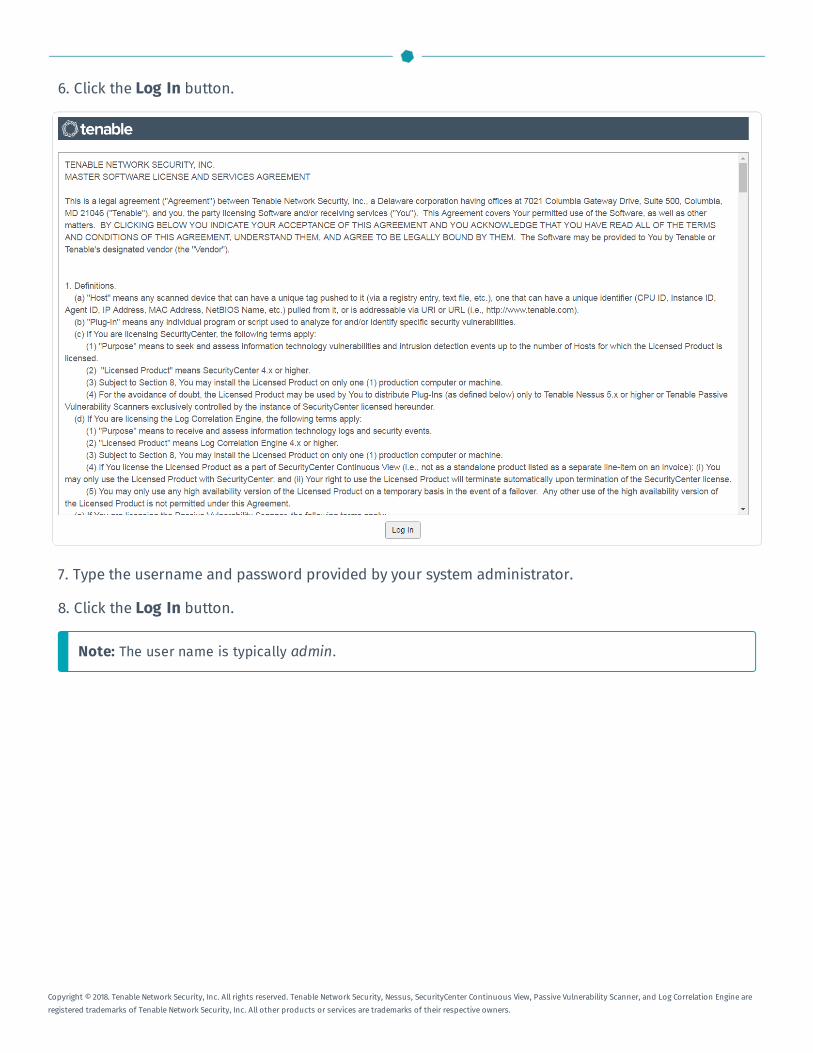
6. Click the Log In button.
7. Type the username and password provided by your system administrator.
8. Click the Log In button.
Note: The user name is typically admin.
Copyright © 2018. Tenable Network Security, Inc. All rights reserved. Tenable Network Security, Nessus, SecurityCenter Continuous View, Passive Vulnerability Scanner, and Log Correlation Engine areregistered trademarks of Tenable Network Security, Inc. All other products or services are trademarks of their respective owners.

9. Click Applications > SecurityCenter in the top navigation bar.
10. Scroll to the bottom of the page to the SSH User Access section.
11. From the Enable SSH access for the tns user drop-down menu, select True.
12. Right click in the Authorized Public Keys text box.
13. Click Paste. Your previously copied public key pastes into the field.
Copyright © 2018. Tenable Network Security, Inc. All rights reserved. Tenable Network Security, Nessus, SecurityCenter Continuous View, Passive Vulnerability Scanner, and Log Correlation Engine areregistered trademarks of Tenable Network Security, Inc. All other products or services are trademarks of their respective owners.
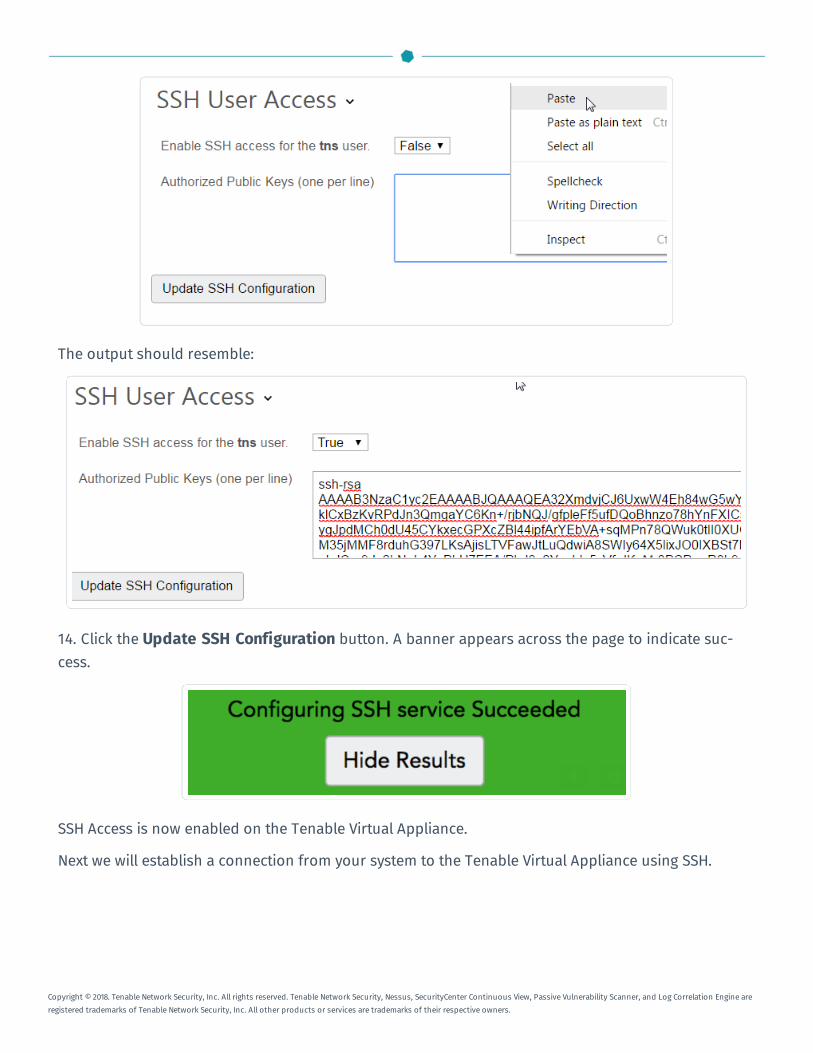
The output should resemble:
14. Click the Update SSH Configuration button. A banner appears across the page to indicate suc-cess.
SSH Access is now enabled on the Tenable Virtual Appliance.
Next we will establish a connection from your system to the Tenable Virtual Appliance using SSH.
Copyright © 2018. Tenable Network Security, Inc. All rights reserved. Tenable Network Security, Nessus, SecurityCenter Continuous View, Passive Vulnerability Scanner, and Log Correlation Engine areregistered trademarks of Tenable Network Security, Inc. All other products or services are trademarks of their respective owners.
Establish an SSH Connection
Connecting to the Appliance from the Windows Operating System
Connecting to the Appliance from the Mac OS X Operating System
Copyright © 2018. Tenable Network Security, Inc. All rights reserved. Tenable Network Security, Nessus, SecurityCenter Continuous View, Passive Vulnerability Scanner, and Log Correlation Engine areregistered trademarks of Tenable Network Security, Inc. All other products or services are trademarks of their respective owners.
Connect to the Appliance from the Windows Operating System
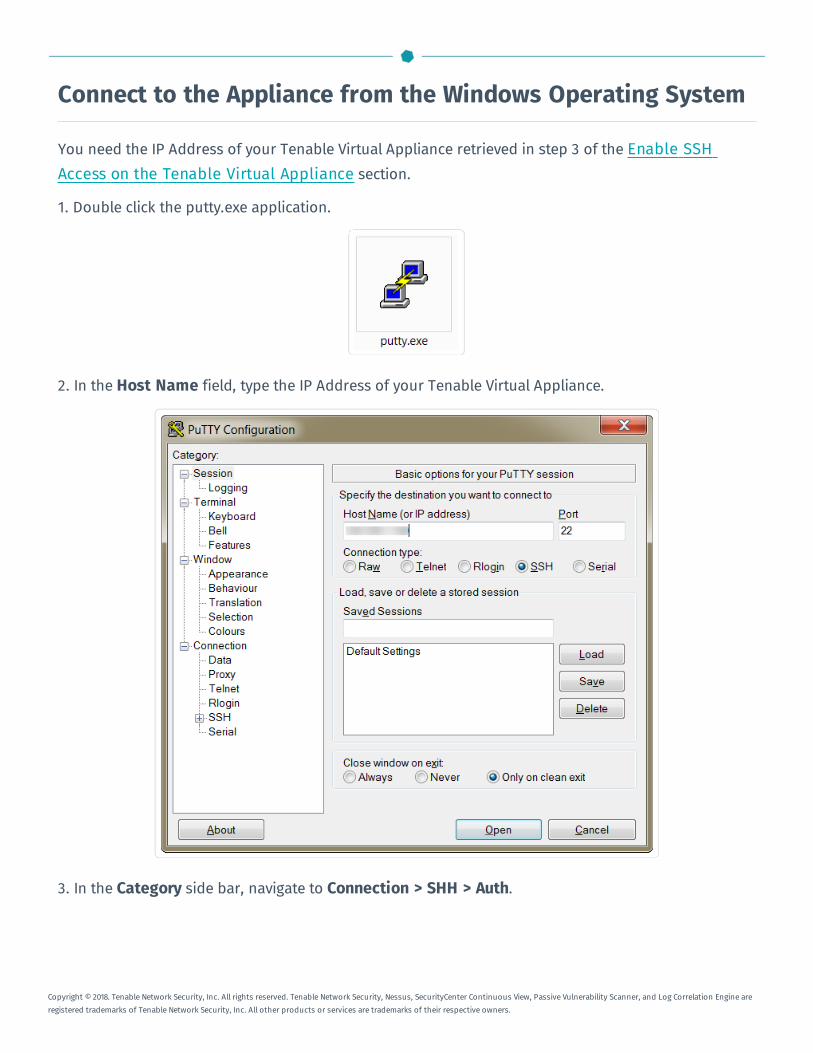
You need the IP Address of your Tenable Virtual Appliance retrieved in step 3 of the Enable SSHAccess on the Tenable Virtual Appliance section.
1. Double click the putty.exe application.
2. In the Host Name field, type the IP Address of your Tenable Virtual Appliance.
3. In the Category side bar, navigate to Connection > SHH > Auth.
Copyright © 2018. Tenable Network Security, Inc. All rights reserved. Tenable Network Security, Nessus, SecurityCenter Continuous View, Passive Vulnerability Scanner, and Log Correlation Engine areregistered trademarks of Tenable Network Security, Inc. All other products or services are trademarks of their respective owners.
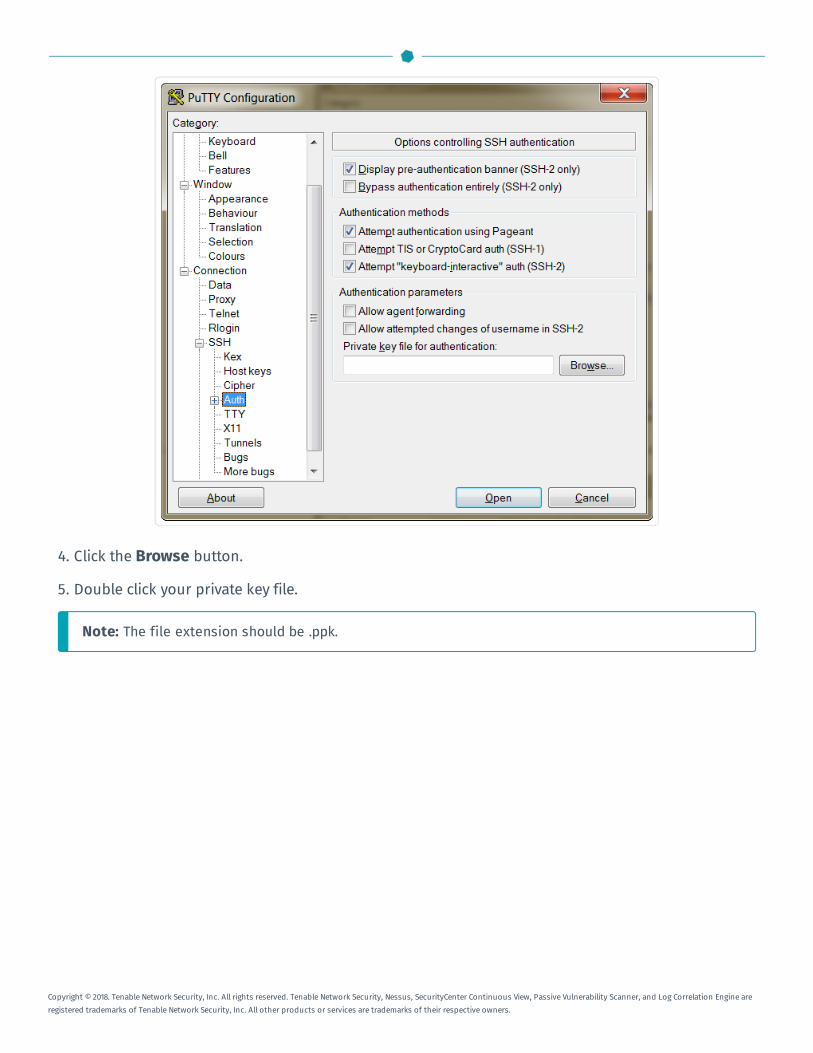
4. Click the Browse button.
5. Double click your private key file.
Note: The file extension should be .ppk.
Copyright © 2018. Tenable Network Security, Inc. All rights reserved. Tenable Network Security, Nessus, SecurityCenter Continuous View, Passive Vulnerability Scanner, and Log Correlation Engine areregistered trademarks of Tenable Network Security, Inc. All other products or services are trademarks of their respective owners.
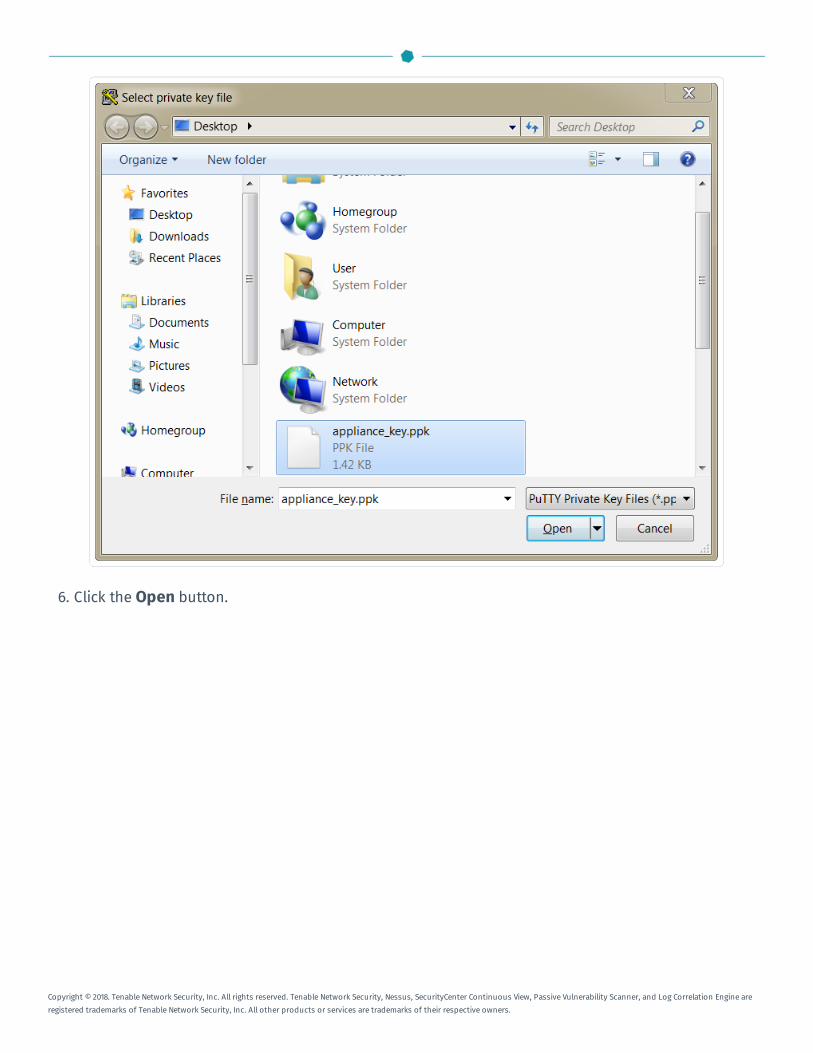
6. Click the Open button.
Copyright © 2018. Tenable Network Security, Inc. All rights reserved. Tenable Network Security, Nessus, SecurityCenter Continuous View, Passive Vulnerability Scanner, and Log Correlation Engine areregistered trademarks of Tenable Network Security, Inc. All other products or services are trademarks of their respective owners.
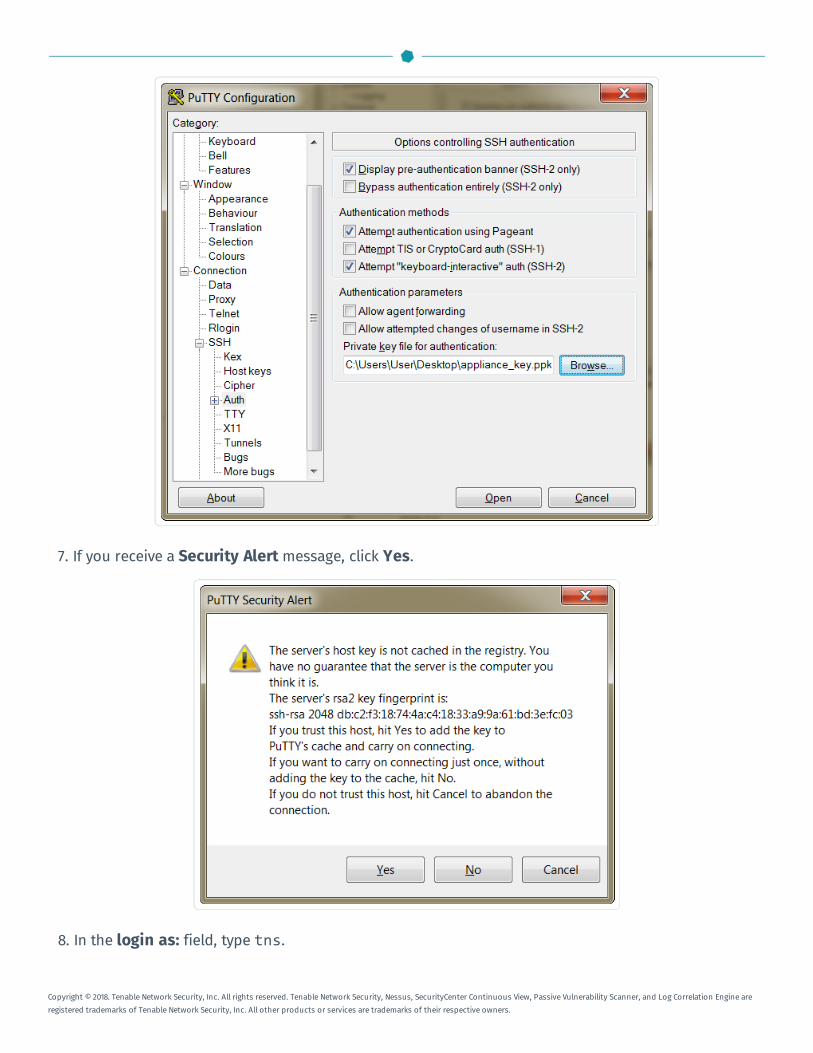
7. If you receive a Security Alert message, click Yes.
8. In the login as: field, type tns.
Copyright © 2018. Tenable Network Security, Inc. All rights reserved. Tenable Network Security, Nessus, SecurityCenter Continuous View, Passive Vulnerability Scanner, and Log Correlation Engine areregistered trademarks of Tenable Network Security, Inc. All other products or services are trademarks of their respective owners.
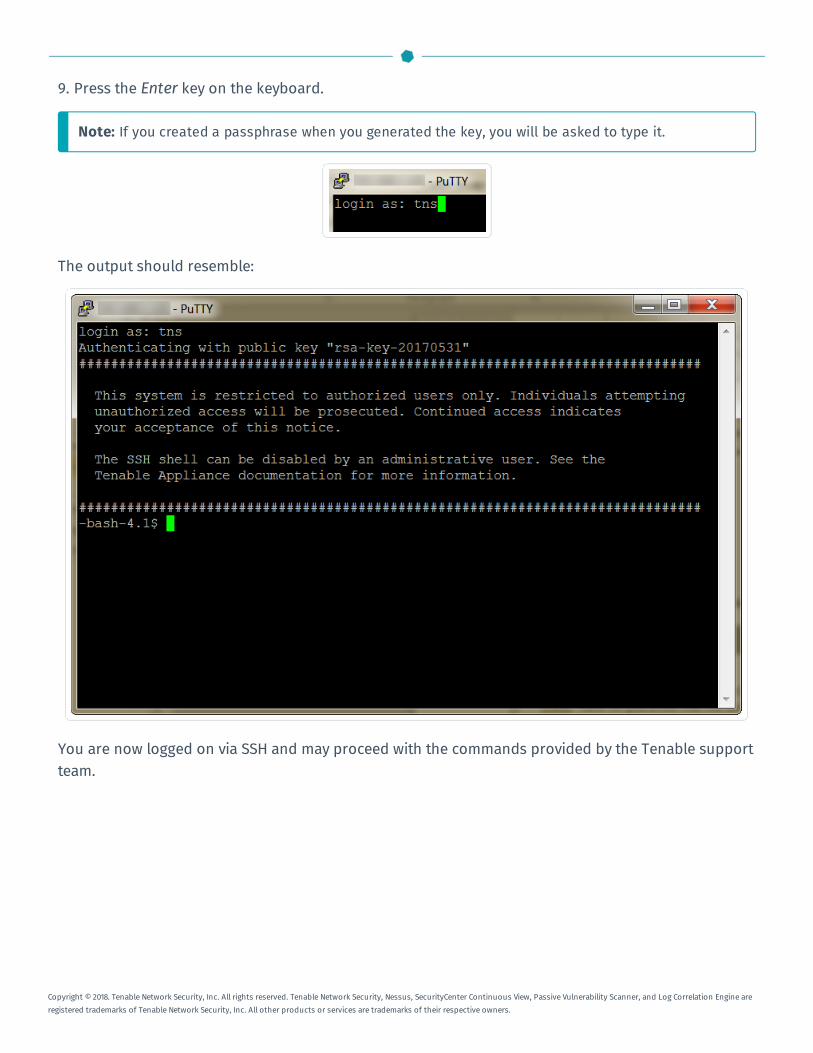
9. Press the Enter key on the keyboard.
Note: If you created a passphrase when you generated the key, you will be asked to type it.
The output should resemble:
You are now logged on via SSH and may proceed with the commands provided by the Tenable supportteam.
Copyright © 2018. Tenable Network Security, Inc. All rights reserved. Tenable Network Security, Nessus, SecurityCenter Continuous View, Passive Vulnerability Scanner, and Log Correlation Engine areregistered trademarks of Tenable Network Security, Inc. All other products or services are trademarks of their respective owners.
Connect to the Appliance from the Mac OS X Operating System
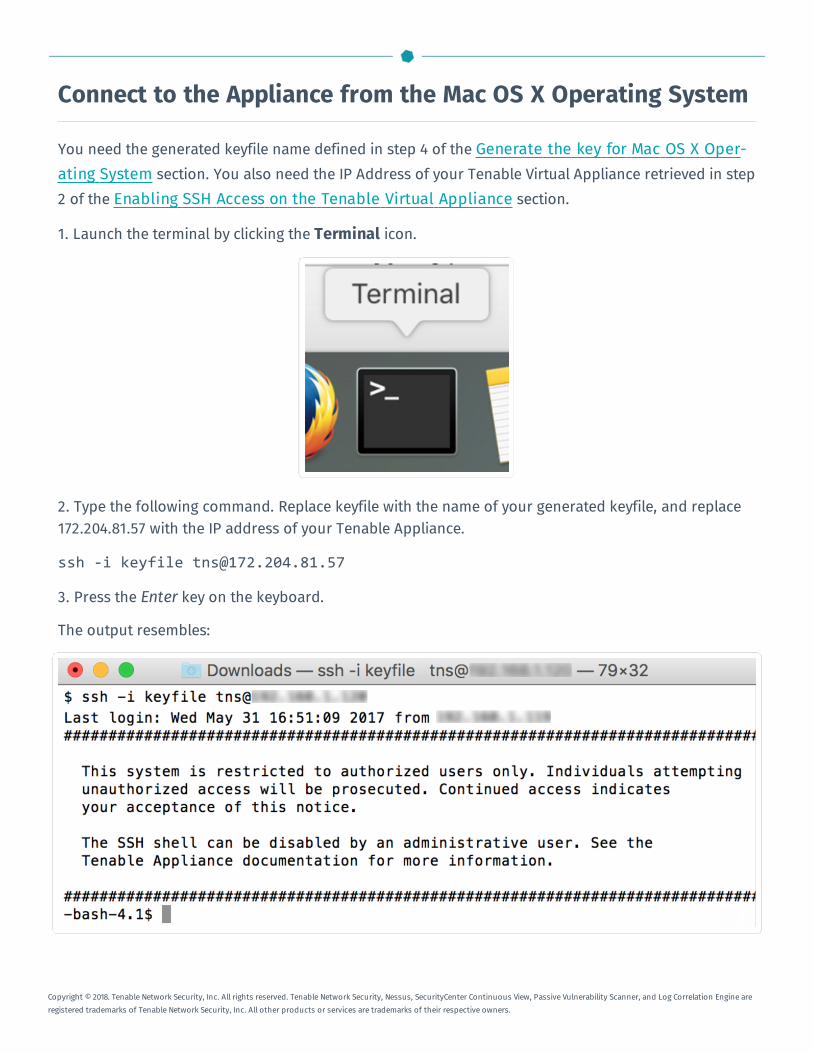
You need the generated keyfile name defined in step 4 of the Generate the key for Mac OS X Oper-ating System section. You also need the IP Address of your Tenable Virtual Appliance retrieved in step2 of the Enabling SSH Access on the Tenable Virtual Appliance section.
1. Launch the terminal by clicking the Terminal icon.
2. Type the following command. Replace keyfile with the name of your generated keyfile, and replace172.204.81.57 with the IP address of your Tenable Appliance.
ssh -i keyfile [email protected]
3. Press the Enter key on the keyboard.
The output resembles:
Copyright © 2018. Tenable Network Security, Inc. All rights reserved. Tenable Network Security, Nessus, SecurityCenter Continuous View, Passive Vulnerability Scanner, and Log Correlation Engine areregistered trademarks of Tenable Network Security, Inc. All other products or services are trademarks of their respective owners.
You are now logged on via SSH and may proceed with the commands provided by the Tenable supportteam.
Copyright © 2018. Tenable Network Security, Inc. All rights reserved. Tenable Network Security, Nessus, SecurityCenter Continuous View, Passive Vulnerability Scanner, and Log Correlation Engine areregistered trademarks of Tenable Network Security, Inc. All other products or services are trademarks of their respective owners.
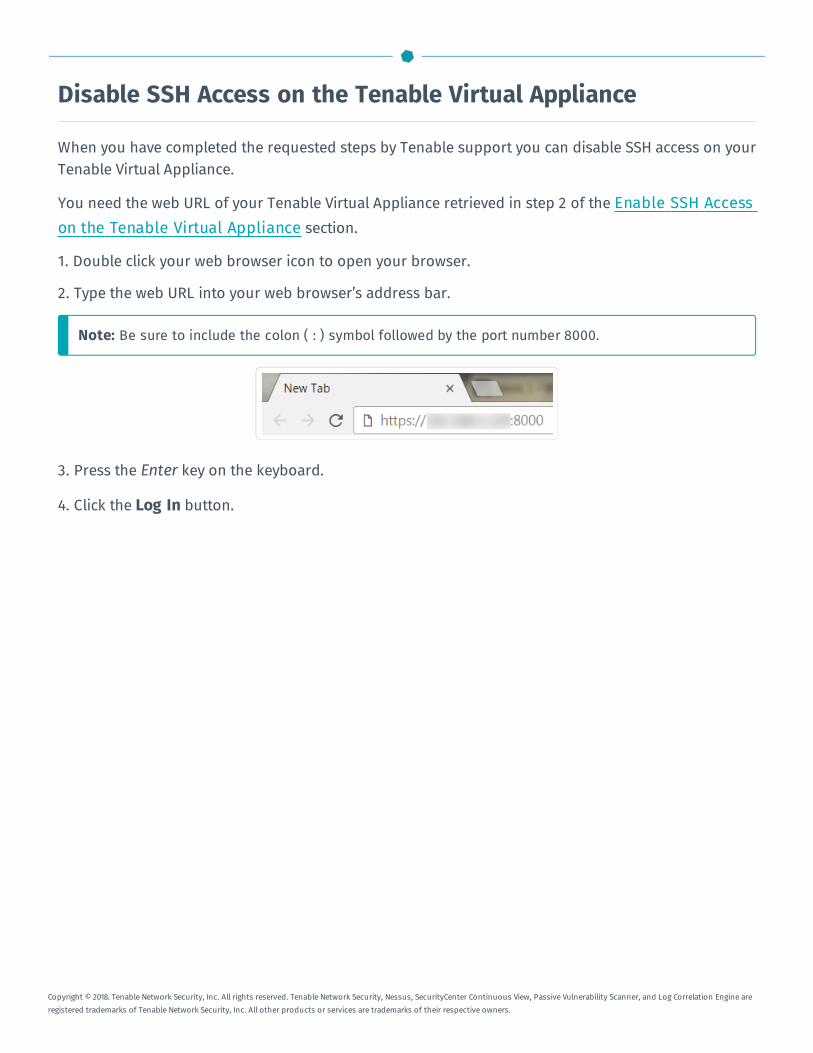
Disable SSH Access on the Tenable Virtual Appliance
When you have completed the requested steps by Tenable support you can disable SSH access on yourTenable Virtual Appliance.
You need the web URL of your Tenable Virtual Appliance retrieved in step 2 of the Enable SSH Accesson the Tenable Virtual Appliance section.
1. Double click your web browser icon to open your browser.
2. Type the web URL into your web browser’s address bar.
Note: Be sure to include the colon ( : ) symbol followed by the port number 8000.
3. Press the Enter key on the keyboard.
4. Click the Log In button.
Copyright © 2018. Tenable Network Security, Inc. All rights reserved. Tenable Network Security, Nessus, SecurityCenter Continuous View, Passive Vulnerability Scanner, and Log Correlation Engine areregistered trademarks of Tenable Network Security, Inc. All other products or services are trademarks of their respective owners.
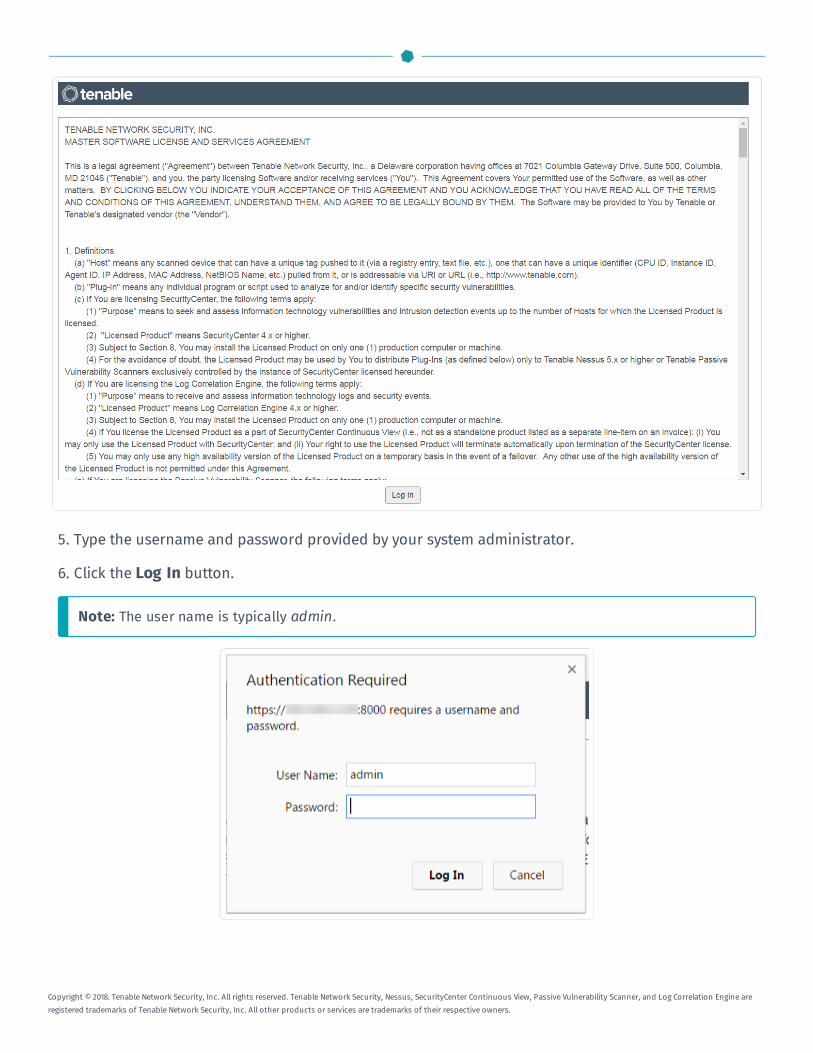
5. Type the username and password provided by your system administrator.
6. Click the Log In button.
Note: The user name is typically admin.
Copyright © 2018. Tenable Network Security, Inc. All rights reserved. Tenable Network Security, Nessus, SecurityCenter Continuous View, Passive Vulnerability Scanner, and Log Correlation Engine areregistered trademarks of Tenable Network Security, Inc. All other products or services are trademarks of their respective owners.
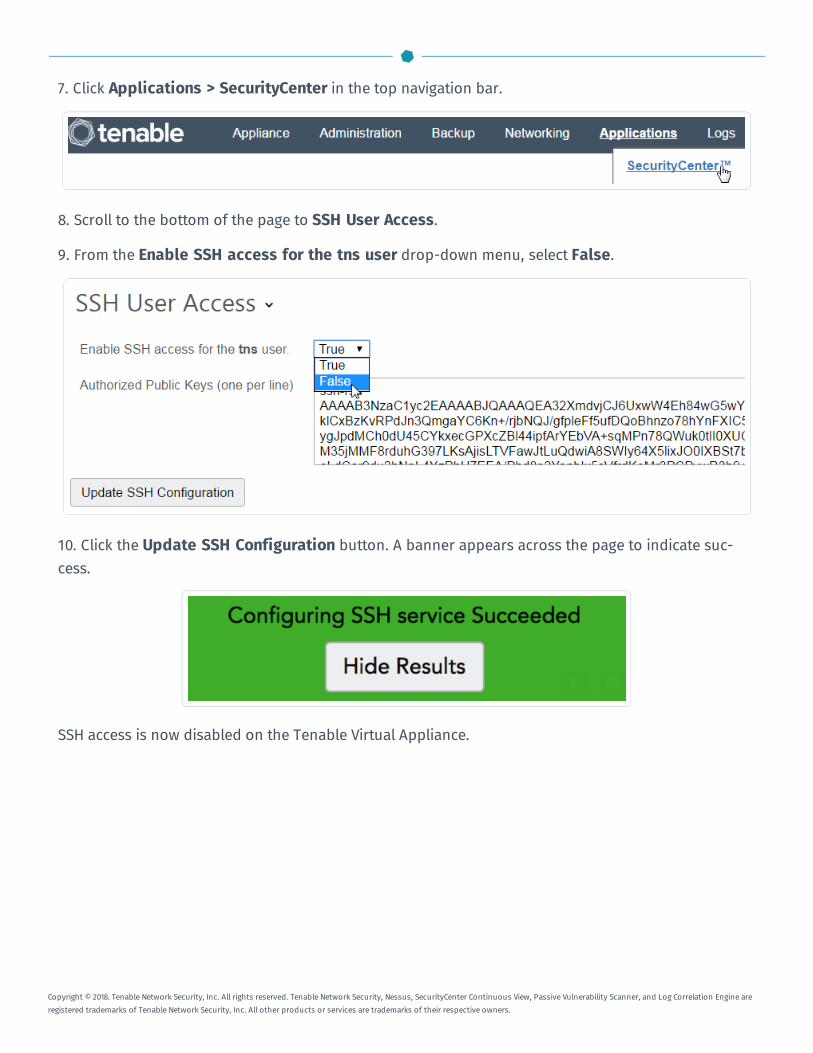
7. Click Applications > SecurityCenter in the top navigation bar.
8. Scroll to the bottom of the page to SSH User Access.
9. From the Enable SSH access for the tns user drop-down menu, select False.
10. Click the Update SSH Configuration button. A banner appears across the page to indicate suc-cess.
SSH access is now disabled on the Tenable Virtual Appliance.
Copyright © 2018. Tenable Network Security, Inc. All rights reserved. Tenable Network Security, Nessus, SecurityCenter Continuous View, Passive Vulnerability Scanner, and Log Correlation Engine areregistered trademarks of Tenable Network Security, Inc. All other products or services are trademarks of their respective owners.