emc centera centera seek · emc corporation corporate headquarters: hopkinton, ma 01748-9103...
TRANSCRIPT

EMC CenteraCentera Seek
Version 2.1
USERS GUIDEP/N 300-003-639
REV A02
EMC CorporationCorporate Headquarters:
Hopkinton, MA 01748-9103
1-508-435-1000www.EMC.com

ii
Copyright © 2006 EMC Corporation. All rights reserved.Published June, 2006
EMC believes the information in this publication is accurate as of its publication date. The information is subject to change without notice.
THE INFORMATION IN THIS PUBLICATION IS PROVIDED “AS IS.” EMC CORPORATION MAKES NO REPRESENTATIONS OR WARRANTIES OF ANY KIND WITH RESPECT TO THE INFORMATION IN THIS PUBLICATION, AND SPECIFICALLY DISCLAIMS IMPLIED WARRANTIES OF MERCHANTABILITY OR FITNESS FOR A PARTICULAR PURPOSE.
Use, copying, and distribution of any EMC software described in this publication requires an applicable software license.
For the most up-to-date listing of EMC product names, see EMC Corporation Trademarks on EMC.com.
All other trademarks used herein are the property of their respective owners.
Centera Seek Users Guide
Contents
Preface............................................................................................................................ iii
Chapter 1 Understanding Centera SeekAbout Centera Seek ......................................................................... 1-2
Centera Seek Glossary.............................................................. 1-2Centera Seek Components.............................................................. 1-3
The Query Service .................................................................... 1-4The Bundler Service ................................................................. 1-6FAST InStream........................................................................... 1-7
Chapter 2 Upgrading Seek v2.0 to v2.1Requirements.................................................................................... 2-2Verifying Service Pack 1.................................................................. 2-3Performing the Upgrade................................................................. 2-4Verifying the Upgrade..................................................................... 2-5
Chapter 3 Backing Up Centera SeekOverview........................................................................................... 3-2Backup Procedure v. 2.1 .................................................................. 3-3
General Backup Information................................................... 3-3Backup Directory ...................................................................... 3-3Automatic Configuration Backup ......................................... 3-4
Remote Backup Using NFS ............................................................ 3-6To Grant Mounting Access to Remote Machines ................. 3-6
Centera Seek Users Guide i

Contents
Chapter 4 Centera Seek ToolsQuery Browser ................................................................................. 4-2
Creating an Access Profile for the Query Browser .............. 4-2Profile Driven Metadata Tools ....................................................... 4-6
Chapter 5 Centera Seek CLIStarting the Centera Seek CLI ........................................................ 5-2Command Overview....................................................................... 5-3Configuration Settings .................................................................... 5-5
Available Configuration Settings ........................................... 5-5Schedule Settings ............................................................................. 5-8
Available Services for Scheduling .......................................... 5-8Email Settings................................................................................. 5-10
Available Email Settings ........................................................ 5-10Centera Settings ............................................................................. 5-12
Available Centera Settings .................................................... 5-12Logging Settings ............................................................................ 5-13
Available Logging Settings.................................................... 5-13Version Information ............................................................... 5-13
Status Information ......................................................................... 5-15
Centera Seek Users Guideii

Preface
As part of an effort to improve and enhance the performance and capabilities of its product line, EMC from time to time releases revisions of its hardware and software. Therefore, some functions described in this document may not be supported by all revisions of the software or hardware currently in use. For the most up-to-date information on product features, refer to your product release notes.
If a product does not function properly or does not function as described in this document, please contact your EMC representative.
Audience This guide is part of the Centera Seek documentation set, and is intended for use by Centera Seek administrators.
Readers of this guide are expected to be familiar with the following topics:
◆ EMC Centera◆ EMC Centera Seek and its operation
Organization Here is a list of where information is located in this guide.
Chapter 1, “Understanding Centera Seek” provides a brief overview of Centera Seek components and architecture.
Chapter 2, “Upgrading Seek v2.0 to v2.1” explains how to upgrade your v2.0 Seek Appliance to v2.1.
Chapter 3, “Backing Up Centera Seek” provides instructions for backing up Centera Seek and Centera Chargeback Reporter.
Chapter 4, “Centera Seek Tools” describes the Centera Seek Query Browser and Profile Drive Metadata Tools.
Centera Seek Users Guide iii

iv
Preface
Chapter 5, “Centera Seek CLI” provides the CLI commands that can be used with Centera Seek.
RelatedDocumentation
Related documents include:
◆ Centera Seek Query Integration Guide (P/N: 300-002-184)
◆ Centera Seek Query Language and Parameters Guide (P/N: 300-002-166)
◆ Centera Seek System Administrator’s Operations Guide (P/N: 300-002-165)
◆ Centera Seek Release Notes (P/N: 300-002-164)
Conventions Used inThis Guide
EMC uses the following conventions for notes, cautions, warnings, and danger notices.
Note: A note presents information that is important, but not hazard-related.
CAUTION!A caution contains information essential to avoid data loss or damage to the system or equipment. The caution may apply to hardware or software.
Typographical conventionsEMC uses the following type style conventions in this guide:
bold • User actions (what the user clicks, presses, or selects)• Interface elements (button names, dialog box names)• Names of keys, commands, programs, scripts, applications,
utilities, processes, notifications, system calls, services, applications, and utilities in text
italic • Book titles• New terms in text• Emphasis in text
Courier • Prompts • System output • Filenames • Pathnames• URLs • Syntax when shown in command line or other examples
Courier, bold • User entry• Options in command-line syntax
Centera Seek Users Guide
Preface
Where to Get Help EMC support, product, and licensing information can be obtained as follows.
Product information — For documentation, release notes, software updates, or for information about EMC products, licensing, and service, go to the EMC Powerlink website (registration required) at:
http://Powerlink.EMC.com
Technical support — For technical support, go to EMC WebSupport on Powerlink. To open a case on EMC WebSupport, you must be a WebSupport customer. Information about your site configuration and the circumstances under which the problem occurred is required.
Your Comments Your suggestions will help us continue to improve the accuracy, organization, and overall quality of the user publications. Please send your opinion of this guide to:
Courier italic • Arguments in examples of command-line syntax• Variables in examples of screen or file output• Variables in pathnames
<> Angle brackets for parameter values (variables) supplied by user.
[] Square brackets for optional values.
| Vertical bar symbol for alternate selections. The bar means or.
... Ellipsis for nonessential information omitted from the example.
Centera Seek Users Guide v
vi
Preface
Centera Seek Users Guide

1Invisible Body Tag
This chapter provides a brief architectural overview of Centera Seek and contains the following sections:
◆ About Centera Seek ...........................................................................1-2◆ Centera Seek Components................................................................1-3
UnderstandingCentera Seek
Understanding Centera Seek 1-1

1-2
Understanding Centera Seek
About Centera SeekCentera provides a flexible mechanism for associating metadata with content; however, the Centera SDK does not provide a way to query this metadata.
Centera Seek, a customizable index and search engine of metadata, was designed to query the metadata stored on Centera by storing the metadata into Fast Search and Transfer ASA (FAST)'s indexing software called InStream™.
Centera Seek Glossary
Metadata — Data that describes the content, quality, condition, and other characteristics of data.
C-Clip — A package containing the user data (BLOBs) and associated metadata (CDF).
Content Address (CA) — An identifier that uniquely address the content of a file.
C-Clip Descriptor File (CDF) — The additional XML file that the Centera creates when making a C-Clip. This file includes the CAs for all referenced BLOBs and associated metadata.
Centera Seek Users Guide

Understanding Centera Seek
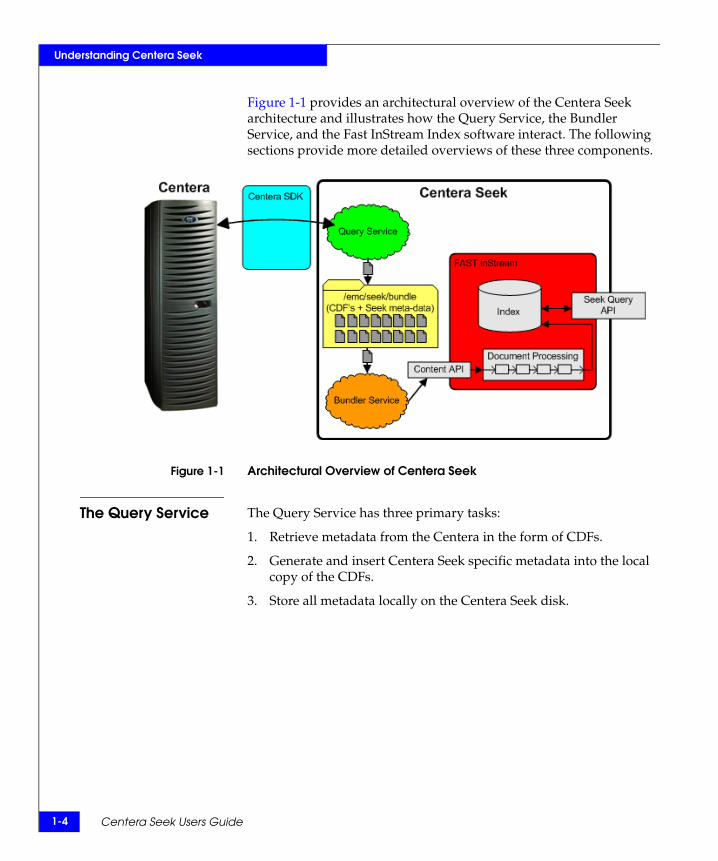
Centera Seek ComponentsCentera Seek has components that reside on an external standalone server (Centera Seek Appliance).
Centera Seek contains the following main components:
◆ Query Service — The Query Service is responsible for collecting and processing Centera metadata. It uses the Centera SDK to build lists of CDFs and retrieve CDF metadata. It also transforms the metadata and saves the bundled data to the /emc/seek/bundles directory.
◆ Bundler Service — The Bundler Service inserts the metadata into FAST InStream. Once the metadata is in the index, the user can query this information using tools and APIs developed by FAST. The Bundler Service can be configured to routinely check the /emc/seek/bundles directory for new CDF bundles. When new CDF bundles are detected, the Bundler Service takes the CDFs and writes them to the FAST index and search engine. Also after the bundles are indexed by FAST, the Bundler Service moves the bundles from /emc/seek/bundles to /emc/seek/cache.
◆ FAST InStream indexing software indexes the metadata from the Bundler Service and provides a query interface to Centera Seek.
Centera Seek Components 1-3
1-4
Understanding Centera Seek
Figure 1-1 provides an architectural overview of the Centera Seek architecture and illustrates how the Query Service, the Bundler Service, and the Fast InStream Index software interact. The following sections provide more detailed overviews of these three components.
Figure 1-1 Architectural Overview of Centera Seek
The Query Service The Query Service has three primary tasks:
1. Retrieve metadata from the Centera in the form of CDFs.
2. Generate and insert Centera Seek specific metadata into the local copy of the CDFs.
3. Store all metadata locally on the Centera Seek disk.
Centera Seek Users Guide

Understanding Centera Seek
Figure 1-2 provides an overview of the Query Service architecture.
Figure 1-2 Architectural Overview of the Query Service
Retrieving Metadatafrom Centera
To complete this task, Centera Seek uses the Centera SDK to retrieve CDFs containing metadata from Centera. This phase consists of two main parts:
1. Centera Seek starts a thread to query Centera for all new Content Addresses (CAs) that have been written since the last time Centera Seek queried Centera and places these CAs in a queue.
2. Centera Seek then starts ClipWorker threads that take the CAs from the queue and uses them to retrieve the CDFs that were written since the last time Centera was queried by Seek.
Centera Seek Components 1-5
1-6
Understanding Centera Seek
Inserting CenteraSeek Specific
Metadata
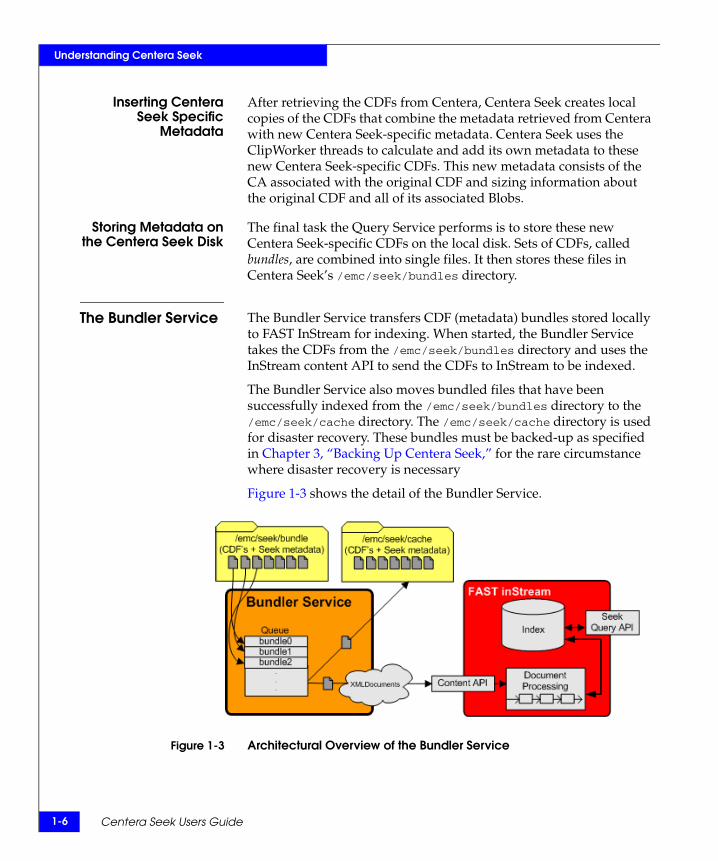
After retrieving the CDFs from Centera, Centera Seek creates local copies of the CDFs that combine the metadata retrieved from Centera with new Centera Seek-specific metadata. Centera Seek uses the ClipWorker threads to calculate and add its own metadata to these new Centera Seek-specific CDFs. This new metadata consists of the CA associated with the original CDF and sizing information about the original CDF and all of its associated Blobs.
Storing Metadata onthe Centera Seek Disk
The final task the Query Service performs is to store these new Centera Seek-specific CDFs on the local disk. Sets of CDFs, called bundles, are combined into single files. It then stores these files in Centera Seek’s /emc/seek/bundles directory.
The Bundler Service The Bundler Service transfers CDF (metadata) bundles stored locally to FAST InStream for indexing. When started, the Bundler Service takes the CDFs from the /emc/seek/bundles directory and uses the InStream content API to send the CDFs to InStream to be indexed.
The Bundler Service also moves bundled files that have been successfully indexed from the /emc/seek/bundles directory to the /emc/seek/cache directory. The /emc/seek/cache directory is used for disaster recovery. These bundles must be backed-up as specified in Chapter 3, “Backing Up Centera Seek,” for the rare circumstance where disaster recovery is necessary
Figure 1-3 shows the detail of the Bundler Service.
Figure 1-3 Architectural Overview of the Bundler Service
Centera Seek Users Guide

Understanding Centera Seek
FAST InStream FAST InStream provides the index and query interface to Centera Seek. The Bundler Service takes the bundles stored on Centera Seek and then passes them to InStream through FAST’s Content API.
InStream transforms the bundles into InStream's internal format and indexes the metadata. Once the metadata has been indexed, it can be searched. The Centera Seek Query API can be used to issue queries against the FAST InStream index of Centera metadata. This API is used by Centera Chargeback Reporter, and the Centera Seek Query Browser and is available for customers to use in building customer Centera management and data access applications. For more information about the Seek Query API, refer to the Centera Seek Query Integration Guide.
Centera Seek Components 1-7

1-8
Understanding Centera Seek
Centera Seek Users Guide

2Invisible Body Tag
This chapter describes how to upgrade Centera Seek v2.0 SP 1 to v2.1 using the upgrade script, seek_v2.1_upgrade.sh.
Note: If you attempt to run seek_v2.1_upgrade.sh on a Seek v1.1 or a Seek v2.0 Appliance without SP1, you will receive an error message telling you to upgrade to v2.0 SP1. If you receive this error, contact EMC to have an EMC Service personnel upgrade your Seek Appliance to v2.1.
◆ Requirements......................................................................................2-2◆ Verifying Service Pack 1 ....................................................................2-3◆ Performing the Upgrade ...................................................................2-4◆ Verifying the Upgrade.......................................................................2-5
Upgrading Seek v2.0to v2.1
Upgrading Seek v2.0 to v2.1 2-1

2-2
Upgrading Seek v2.0 to v2.1
RequirementsTo perform the upgrade you need the following components:
◆ Centera Seek Appliance v2.0. The Seek Appliance must be patched to at least v2.0 Service Pack 1.
◆ A workstation, with network access to the Centera. You use this machine to upload the upgrade file to the Centera Seek Appliance.
◆ A secure file transfer application such as pscp.exe (PSCP is a secure copy utility that runs on Windows). You use the file transfer application to securely copy the upgrade file from the Windows PC to both the Centera and Centera Seek Appliance.
◆ The CD with the Centera Seek software upgrade file, seek_v2.1_upgrade.sh.
Centera Seek Users Guide

Upgrading Seek v2.0 to v2.1
Verifying Service Pack 1In order to upgrade Centera Seek to v2.1 using the CD in your kit, your Centera Seek Appliance must be running v2.0_SP1. To check if you are running this version:
1. Log into the Centera Seek Appliance through the seekuser account.
username: seekuser
password: seekuser
2. Issue the following command:
rpm –qa | grep “instream\|seek\|chargeback”
The version numbers for Centera Seek, FAST InStream, and Chargeback Reporter will be the output of this command. You should see the following out put for the command. If you see any other results, contact your EMC support representative to install v2.1 on your system.
Version Outputs
If SP 1 was installed against a Centera Seek v2.0 appliance, you would see:
The output will be one of the following:instream-4.2.1.10-1-patch2-1-1 instream-4.2.1.10-1instream-4.2.1.11-1-patch1-1-1centeraseek-2.0.3.1-1chargeback-2.0.1.1-1
or
instream-4.2.1.11-1instream-4.2.1.11-1-patch1-1-1centeraseek-2.0.3.1-1chargeback-2.0.1.1-1
If the Centera Seek v2.0 SP1 image was pre-installed on the Seek Appliance when it came from EMC, you would see:
instream-4.2.1.12-1centeraseek-2.0.3.1-1chargeback-2.0.1.1-1
Verifying Service Pack 1 2-3
2-4
Upgrading Seek v2.0 to v2.1
Performing the Upgrade1. Place the CD with the upgrade file, seek_v2.1_upgrade.sh, in
the CD-ROM drive on your Windows PC.
2. Open a command prompt and copy the file to the /emc/tmp directory of the Centera Seek Appliance with this command:
pscp -pw seekuser c:\seek_v2.1_upgrade.sh seekuser@appliance_ip_address:/emc/tmp
3. Log into the CenteraSeek Appliance through the seekuser account.
username: seekuser
password: seekuser
4. Change directory to the /emc/tmp directory with this command:
cd /emc/tmp
5. Change the permissions on the upgrade script with this command:
chmod +x seek_v2.1_upgrade.sh
6. Run the upgrade script with this command:
./seek_v2.1_upgrade.sh
If the Query and Bundler services are running, the upgrade script attempts to automatically stop these services before performing the upgrade. If the script cannot stop these services after a minute, you will see the following prompt:
The Bundler/Query Service did not stop in its allocated time. What would you like to do?
[1] Wait another minute for the Bundler/Query Service to stop.
[2] Try to kill the Bundler Service.
[3] Exit the upgrade.
Option 2 uses the Linux kill command to force the service to stop and option 3 exits the upgrade. First try Option 1, if that does not work, try Option 2.
Centera Seek Users Guide

Upgrading Seek v2.0 to v2.1
Verifying the UpgradeTo verify the upgrade, you can run this command:
rpm -qa | grep centeraseek
You should see the following output:
centeraseek-2.1.0.x-1
Verifying the Upgrade 2-5

2-6
Upgrading Seek v2.0 to v2.1
Centera Seek Users Guide

3Invisible Body Tag
This section contains instructions on backing up a Centera Seek Appliance.
◆ Overview.............................................................................................3-2◆ Backup Procedure v. 2.1 ....................................................................3-3◆ Remote Backup Using NFS...............................................................3-6
Backing Up CenteraSeek
Backing Up Centera Seek 3-1

3-2
Backing Up Centera Seek
OverviewCentera Seek (CS) and Chargeback Reporter (CBR) both reside on the Seek Appliance and require some sort of backup. Centera Seek has configuration files and CDF bundle files which need to be backed up. Chargeback Reporter has configuration files, report definitions, and a database to backup.
You must manually back up important Seek and CBR files off of the Seek Appliance onto a secure server within your network. Some of this process is automated but some steps must be performed manually.
Centera Seek Users Guide

Backing Up Centera Seek
Backup Procedure v. 2.1This section contains instructions on backing up a Seek Appliance.
Note: In the case that disaster recovery is required, the EMC Service personnel will use your backup files to restore your Seek Appliance.
General Backup Information
Backing up a Seek Appliance involves copying certain Centera Seek, FAST, and Chargeback files off of the Centera Seek Appliance onto a remote machine for future use in a restore. Table 3-1 lists the items which need to be backed up and the sections that contain the specific backup directions.
Backup Directory All of the files that need to be backed up are accessible in a single directory structure—this makes it easy to identify which files need to be backed up and copied to a remote machine. This directory structure starts at /emc/seek and the seekuser account has access to this directory. The files in this directory structure should be copied periodically to a remote server to retain a backup state of the Centera
Table 3-1 Backup Items
Item Backup Instructions
Configuration files:• Seek configuration files• FAST configuration files• Chargeback configuration files
Refer to “Automatic Configuration Backup ” on page 3-4
Seek CDF bundle files Refer to “Backing up Seek Bundle Files (CDFs)” on page 3-5
Backup Procedure v. 2.1 3-3

3-4
Backing Up Centera Seek
Seek Appliance. Table 3-2 provides a brief description of the subdirectories and what is contained within them:
Note: For remote access to these directories through NFS, refer to “Remote Backup Using NFS” on page 3-6.
Automatic Configuration Backup
Centera Seek v2.1 has a backup script which assists in collecting important configuration files. This script automatically runs daily and places a file called backup_v2.1.tar in the /emc/seek/backup directory.
Here is a list of configuration data which is collected:
◆ Seek Configuration Files (e.g. centeraseek.pea, seek_index.conf)
◆ FAST Configuration Files (e.g. index profile, license file)
◆ Chargeback data:
• Tags, categories and report definitions created in the CBR UI (database)
• Output results from running reports (xml and csv files)
◆ A snapshot of the Chargeback Reporter database.
You should periodically backup the backup_v2.1.tar file to a remote server in case a restore is needed in the future. Refer to “Remote Backup Using NFS” on page 3-6 for details about gaining remote access to the /emc/seek drive via NFS.
Table 3-2 Subdirectories of /emc/seek
Directory Contents
backup An archive of Seek, FAST, and Chargeback Reporter configuration files.
bundles Seek CDF bundles which have yet to be processed by the Bundler Service.
cache Seek CDF bundles which have been processed by the Bundler Service and have been indexed.
logs Query and Bundler Service log files.
Centera Seek Users Guide

Backing Up Centera Seek
Manually Running theBackup Script
The backup script automatically runs every day but can also be run manually by logging in as seekuser and issuing the following command:
/usr/local/emc/seek/bin/backup_seek
Backing up SeekBundle Files (CDFs)
Centera Seek stores all of the CDF metadata retrieved from Centera in bundle files. Once the bundle files have been processed and indexed by the Bundler Service, the bundle files are moved to the Seek cache directory.
The bundles located in the /emc/seek/cache and /emc/seek/bundle directories are not automatically archived. To avoid re-querying all CDFs upon restoration of the Centera Seek Appliance, you should copy the files in the /emc/seek/cache and /emc/seek/bundle directories to a remote server.
You have access to the cached bundle files via the /emc/seek/cache directory. Refer to “Remote Backup Using NFS” on page 3-6 for details about gaining remote access to the /emc/seek drive via NFS.
Backup Procedure v. 2.1 3-5

3-6
Backing Up Centera Seek
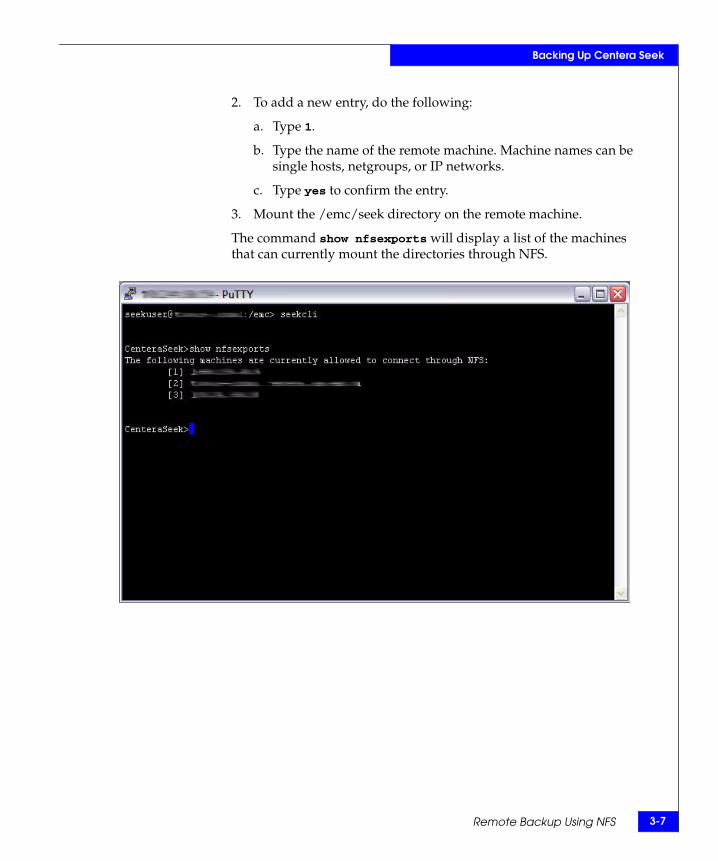
Remote Backup Using NFSRemote access through NFS to the directories /emc/seek and /emc/chargeback/reports is configurable through the seekcli on a per machine basis. Once in the seekcli, the command nfsexports will start a wizard that allows the user to configure the machines that can mount the local directories. New machines can be granted access or existing machines can have their access rights taken away.
To Grant Mounting Access to Remote Machines
To allow remote machines to mount the /emc/seek directory, use the following procedure:
1. In the Centera Seek CLI, enter this command:
set nfsexports
A menu appears.
Centera Seek Users Guide
Backing Up Centera Seek
2. To add a new entry, do the following:
a. Type 1.
b. Type the name of the remote machine. Machine names can be single hosts, netgroups, or IP networks.
c. Type yes to confirm the entry.
3. Mount the /emc/seek directory on the remote machine.
The command show nfsexports will display a list of the machines that can currently mount the directories through NFS.
Remote Backup Using NFS 3-7

3-8
Backing Up Centera Seek
Centera Seek Users Guide

4Invisible Body Tag
This chapter provides information on the following additional tools that you can use with Centera Seek.
◆ Query Browser....................................................................................4-2◆ Profile Driven Metadata Tools .........................................................4-6
Centera Seek Tools
Centera Seek Tools 4-1
4-2
Centera Seek Tools
Query BrowserThe Centera Seek Query Browser is a web-based tool that lets you search the Centera Seek index.
The Query Browser lets you enter queries using the FAST query language, submit the query, and browse the results. Query results are displayed in an expandable tree format that allows you to drill-down into the query results to see increasing levels of detail.
For information about the FAST query language, refer to the Centera Seek Query Language and Query Parameters Guide (P/N: 300-002-166).
To access the Query Browser, open a web browser (Internet Explorer or Mozilla Firefox) and enter the following URL:
http://host_name:16089/sqb
where:
host_name = the DNS name or IP address of the Centera Seek Appliance.
For information on using the Query Browser, refer to the Query Browser online help.
Creating an Access Profile for the Query Browser
To access the Centera, the Query Browser must be configured with an access profile with sufficient capabilities to query and read information from the Centera. This section provides the details on how to create that access profile. Instructions on configuring the Query Browser with the new access profile are contained in the Query Browser on-line help.
Notes:
This section assumes CenteraViewer is started and has the console window open.
◆ If you are using Centera v3.1, you must use the 3.1 version of Centera Viewer.
◆ If you are using a prior version of Centera, you should use Centera Viewer v2.3 or higher on a Centera Gen3 node and Centera Viewer v3.0 or higher on a Centera Gen4 node.
Centera Seek Users Guide

Centera Seek Tools
Creating the PasswordFile for the Access
Profile
1. On the Windows machine, create a file called c:\querybrowser.pwd using Notepad.
2. Within this new file, simply type a password at the top of the file. This password will be the one used for the Query Browser access profile.
Note: Be careful not to add a carriage return/line feed to the end of the file, this will cause authentication problems. The only text in the file should be a single text string representing the password.
Generated passwords cannot be used for the querybrowser profile.
Creating the QueryBrowser Profile
The procedure for creating the Query Browser profile varies depending on what version of CentraStar you are running. Use the following procedure that is appropriate to your CentraStar version:
◆ For CentraStar v2.4, refer to “Creating the Query Browser Profile Under CentraStar v2.4” on page 4-3.
◆ For CentraStar v3.0, refer to “Creating the Query Browser Profile Under CentraStar v3.0” on page 4-4.
◆ For CentraStar v3.1, refer to “Creating the Query Browser Profile Under CentraStar v3.1” on page 4-5.
Creating the Query Browser Profile Under CentraStar v2.41. Using the Command> prompt at the bottom of the
CenteraViewer CLI window, enter the following command:
profile create querybrowser
2. When prompted for information, use the information listed on the right in the following text:
Prompt Value
Profile secret [generate]: file c:\querybrowser.pwd
Profile rights [-]: rq
Enable profile? (yes, no) [no]: yes
Issue the command? (yes, no) [no]: yes
Establish a Pool Entry Authorization for application use? (yes, no) [no]:
no
Query Browser 4-3

4-4
Centera Seek Tools
Note: Once the access profile is created, the local c:\querybrowser.pwd file can be deleted – it is no longer used.
Creating the Query Browser Profile Under CentraStar v3.01. Using the Command> prompt at the bottom of the
CenteraViewer CLI window, enter the following command:
create profile querybrowser
2. When prompted for information, use the information listed on the right in the following text:
Note: Once the access profile is created, the local c:\querybrowser.pwd file can be deleted – it is no longer used.
Prompt Value
Profile Secret [generate]: file c:\querybrowser.pwd
Enable Profile? (yes, no) [no]: yes
Monitor role? (yes, no) [no]: no
Profile-Metadata Capability? (yes, no) [no]:
yes
Profile Type (access, cluster) [access]: cluster
Granted Rights for the Profile in the Home Pool [rdqeDcp-]: rq
Issue the command? (yes, no) [no]: yes
Establish a Pool Entry Authorization for application use? (yes, no) [no]:
no
Centera Seek Users Guide
Centera Seek Tools
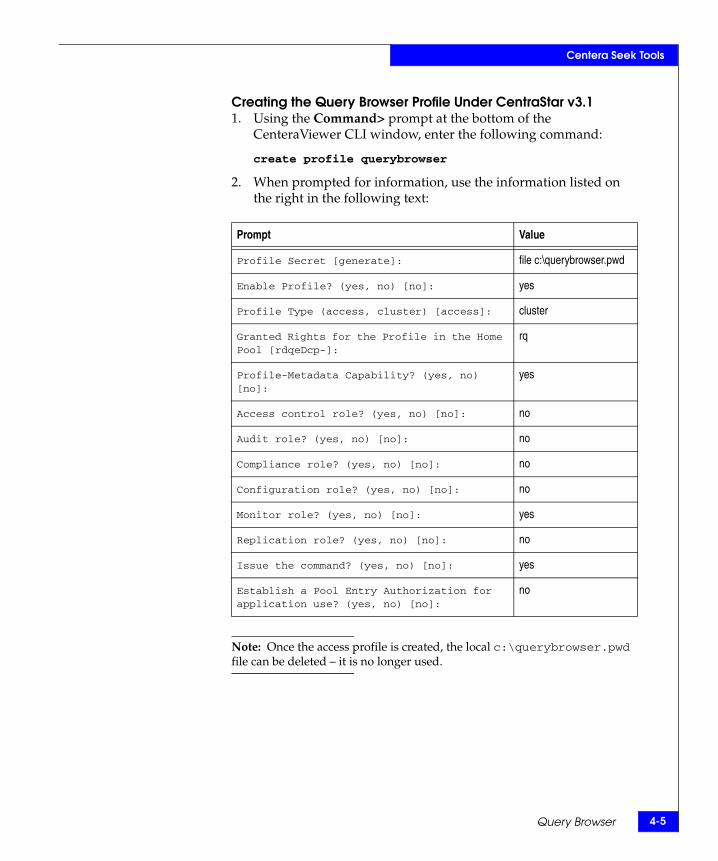
Creating the Query Browser Profile Under CentraStar v3.11. Using the Command> prompt at the bottom of the
CenteraViewer CLI window, enter the following command:
create profile querybrowser
2. When prompted for information, use the information listed on the right in the following text:
Note: Once the access profile is created, the local c:\querybrowser.pwd file can be deleted – it is no longer used.
Prompt Value
Profile Secret [generate]: file c:\querybrowser.pwd
Enable Profile? (yes, no) [no]: yes
Profile Type (access, cluster) [access]: cluster
Granted Rights for the Profile in the Home Pool [rdqeDcp-]:
rq
Profile-Metadata Capability? (yes, no) [no]:
yes
Access control role? (yes, no) [no]: no
Audit role? (yes, no) [no]: no
Compliance role? (yes, no) [no]: no
Configuration role? (yes, no) [no]: no
Monitor role? (yes, no) [no]: yes
Replication role? (yes, no) [no]: no
Issue the command? (yes, no) [no]: yes
Establish a Pool Entry Authorization for application use? (yes, no) [no]:
no
Query Browser 4-5

4-6
Centera Seek Tools
Profile Driven Metadata ToolsThe PDM Tools are a set of programs that allow Centera system administrators to attach metadata definitions to specific Centera Access Profiles. Centera Access Profiles are created and distributed by Centera system administrators to control access to Centera data. Any application writing new data to Centera must have a valid Centera Access Profile. The Centera SDK then automatically writes the metadata to the access profile of the application into each and every CDF written by that application.
The profile-driven metadata are a list of name/value pairs that are stored as attributes in the "profile-meta" XML tag in the CDF. For example, an administrator may choose to attach the name/value pair of COMPANY=ACME to the Centera Access Profile that is used by all applications that ACME company uses to archive content to Centera. All such data will then have a <profile-meta COMPANY=ACME \> tag in their CDFs data that is indexed by Centera Seek.
In addition to hard coded metadata definitions, such as DIVISION=SALES, administrators can use macros in the value field of their definitions. A value of %h will automatically be replaced with the hostname of the application server writing data to Centera. A value %p will automatically write the name of the Centera Access Profile that was used when writing the data."
Note: To enable the use of profile-driven metadata, the system administrator must first enable the Profile-Metadata Capability when creating the access profile via the Centera Viewer Command Line Interface (CLI).
PDM Tools are available from the EMC Powerlink Web site: http://powerlink.emc.com. To download Centera documents, go to the Powerlink home page and select Support > Downloads and Patches > Downloads A-C > Centera Enterprise Software.
Note: You need Centera SDK 3.0 or greater in order to use the PDM tool.
Centera Seek Users Guide

5Invisible Body Tag
This chapter provides information about how to use the Centera Seek Command Line Interface (CLI), the Centera Seek commands, and their usage.
◆ Starting the Centera Seek CLI ..........................................................5-2◆ Command Overview .........................................................................5-3◆ Configuration Settings ......................................................................5-5◆ Schedule Settings ...............................................................................5-8◆ Email Settings ...................................................................................5-10◆ Centera Settings................................................................................5-12◆ Logging Settings...............................................................................5-13◆ Status Information ...........................................................................5-15
Centera Seek CLI
Centera Seek CLI 5-1

5-2
Centera Seek CLI
Starting the Centera Seek CLIAt a shell prompt on the Centera Seek index node, type:
seekcli
The CenteraSeek> prompt displays. You are now in Centera Seek CLI mode.
Note: When you enter commands via the CLI, the commands can be abbreviated. Example of an abbreviated command: sho con all
The above command would be the same as entering: show config all
Centera Seek Users Guide

Centera Seek CLI
Command OverviewTable 5-1 lists the Centera Seek commands and their associated subcommands.
Table 5-1 Centera Seek Commands and Subcommands
Command Subcommands Description
set Allows Centera Seek configuration settings to be changed.
config Sets configuration settings for Centera Seek.
schedule Sets schedule for the Query and Bundler Service.
email Sets EMC Connect Home email settings.
centera Sets information about the Centera connected to Centera Seek.
logging Sets the logging configuration for Seek services.
nfsexports Sets the IPs which have NFS access to the Seek directory.
show Displays current Centera Seek configuration settings.
config Shows configuration settings for Centera Seek.
schedule Shows schedule for the Query and Bundler Service.
email Shows EMC Connect Home email settings.
centera Shows information about the Centera connected to Centera Seek.
versions Shows display of version information for Centera Seek, Centera, and its SDK.
status Shows information about the current state of the Query, Bundler, and FAST Service.
logging Shows the logging configuration for Seek services.
nfsexports Shows the IPs which have NFS access to the Seek directory.
test Tests certain Centera Seek functions.
email Tests the EMC Connect Home to ensure its proper configuration.
queryservice Tests the Query Service to ensure its proper configuration.
bundlerservice Tests the Bundler Service to ensure its proper configuration.
Command Overview 5-3

5-4
Centera Seek CLI
start Manually starts the Query or Bundler Service.
queryservice Manually starts the Query Service.
bundlerservice Manually starts the Bundler Service.
stop Manually stops the Query or Bundler Service.
queryservice Manually stops the Query Service.
bundlerservice Manually stops the Bundler Service.
reset Resets Centera Seek's configuration to its original/installed values.
Note: This command clears the cache, bundle and log directories, and resets the configuration settings.
reingest Reingests all cached clips back into the /emc/seek/Bundle directory.
Table 5-1 Centera Seek Commands and Subcommands (continued)
Command Subcommands Description
Centera Seek Users Guide
Centera Seek CLI
Configuration SettingsYou use configuration settings to control how Centera Seek operates. Some of these configuration settings are specific to the Query Service, while others are specific to the Bundler Service.
◆ To set a specific configuration setting, use the following syntax at the CLI prompt:
set config <config-name> <config-value> <optional-value>
Example set config centerahost 10.241.55.2
◆ To display the current value of a particular configuration setting, use the following syntax at the CLI prompt:
show config <config-name>
Example show config centerahost
◆ To display the value of the ALL configuration setting, use the following syntax at the CLI prompt:
show config All
Available Configuration Settings
The following sections describe the available configuration settings and provide examples.
NumClipThreads This is the current number of threads working on Centera clips in the Query Service.
Example set config NumClipThreads 10show config NumClipThreads
Configuration Settings 5-5
5-6
Centera Seek CLI
CenteraHost The host name or IP of the Centera that Centera Seek's Query Service will connect to and query for new and deleted clips. When you set the Centera host name to use, the CLI asks if you want to retrieve additional information about Centera. You need to do this only when you change the host name or are setting it up for the first time. This additional information is used by the email alerts.
Note: You must set CenteraHost in order to run the Query Service.
Example set config centerahost 10.241.55.2
LastCompletedQueryDate
The date, in GMT, of the last successful query Centera Seek issued against Centera. This date indicates that all clips up to this date, both new and deleted, have been sent to the indexer to be indexed (or removed from the index). This configuration setting is updated automatically by the Query Service upon a successful query and index. The only time you need to manually set LastCompletedQueryDate is on initial setup of Centera Seek if you have a specific date from which you want the Query Service to start querying. The format of the date must be in the following format, in GTM: YYYY.MM.DD.HH.MM.SS. Otherwise this setting will default to the Linux beginning of time (1/1/1970).
Example set config lastcompletedquerydate 2004.04.10.23.00.00
CacheDirectory This is the directory where Centera Seek places CDFs after they have been sent to the indexer. Multiple CDFs are packaged up into single bundle files and then placed into this cache directory. The bundled CDFs can be useful for archiving purposes, DR, or cases where a complete reingest to the indexer is required or desired. This directory must be located on the /emc partition.
Note: The default location is $CENTERASEEK_HOME/cache.
Example set config cachedirectory /emc/tmp/mycache
CachingEnabled This setting tells Centera Seek whether or not to cache processed CDFs. Once a CDF is sent to the indexer, the CDF will be cached. Cached CDFs can be used to perform a complete reingest of all CDFs.
Example set config cachingenabled true
Centera Seek Users Guide
Centera Seek CLI
BundleStagingDir This is the directory where the Query Service places the query bundles. By default, this directory is the same as the bundle directory (Where the bundle service processes the bundles). The staging directory gives you a chance to edit the cdfs if needed. This directory must be on the /emc partition.
Example: set config bundlestagingdir /emc/tmp/staging
BundlerRunTime This is the duration (in minutes) for which the bundler service is allowed to run at one given time. This prevents the bundler from running too long and over whelming the indexer.
Example set config bundlerruntime 120
ContentProtection This setting is the content protection scheme that Centera uses when it stores data. Centera can mirror the content when storing or using parity. This setting has no direct connection to the setting on Centera and does not have an impact on Centera. This setting is merely in place to tell Centera Seek what storage strategy Centera is using. Centera Seek does, however, use this to calculate sizing information on the CDFs. The two possible values for this setting are CPP (parity) and CPM (mirroring). For Centera 3.1, the cpp threshold cannot be lower than 100 KB.
Note: The default value used for this setting is CPM.
Note: IMPORTANT: For Centera v2.4 customers only, this value must be manually kept in synch with the setting on Centera in order to calculate proper storage size information. For other version of Centera, this is automatically kept in synch.
Example set config contentprotection cpp 50
Configuration Settings 5-7

5-8
Centera Seek CLI
Schedule SettingsSchedule settings are used to control when the Centera Seek Query Service and Bundler Service run. Centera Seek is a scheduled-based application, which means the two main services (Query and Bundler) will run only when scheduled. Each service has its own schedule and will run independently and possibly concurrently.
◆ To set a schedule for a specific service, you can use one of the following two syntax. When using the first syntax to set the schedule, the CLI walks you through a set of questions to assist in setting up the schedule. The second syntax allows you set the schedule directly using the Linux crontab syntax (this should only be used by experts).
set schedule <service-name> set schedule <service-name> <direct-schedule>
Example set schedule queryservice
◆ To display the schedule of one of the services, use the following syntax at the CLI prompt:
show schedule <service-name>
Example show schedule queryservice
Available Services for Scheduling
The following sections describe the available scheduling services and provide examples.
QueryService The QueryService polls Centera for new and deleted clips and then stores them locally in bundles to be processed later by the Bundler Service. When scheduling the service, be aware of other factors that may have an impact on the overall Centera/Application. Factors include how much data is being written to Centera, how many users are using the application, and at what times. There is no hard and fast rule on how often to run the Query Service; it is dependent on the specific environment in which Centera Seek is installed.
Example set schedule queryservice
Centera Seek Users Guide

Centera Seek CLI
BundlerService The BundlerService processes CDF bundles that were created by the Query Service. The Bundler Service extracts the CDFs from the bundles, passes them to the indexer, and then caches them. The Bundler Service can be scheduled to run concurrently with the Query. Unlike the Query Service, the Bundler Service does not connect to Centera and has no impact on it.
Example set schedule bundlerservice
Schedule Settings 5-9
5-10
Centera Seek CLI
Email SettingsThe email settings are used for the EMC Connect Home feature of Centera Seek. If Centera Seek encounters a problem, such as it cannot connect to the Indexer, a disk full error, or critical runtime error, it uses the email settings to send an email to notify the appropriate people to take corrective action.
◆ To set a specific email setting, use the following syntax at the CLI prompt:
set email <email-setting> <value>
Example set email recipients [email protected]
◆ To display an email setting, use the following syntax at the CLI prompt:
show email <email-setting>
Example show email recipients
Available Email Settings
The following sections describe the available email settings and provide examples.
Recipients This is a semi-colon-separated list of email addresses. The recipients in this list can receive any or all email alerts generated by Centera Seek.
Example set email recipients [email protected];[email protected]
From This is a display name that appears in the email's From field.
Example set email from John Doe
ReplyTo This is an email address that is used in the Reply-To field of the email sent by Centera Seek.
Example set email replyto [email protected]
Centera Seek Users Guide

Centera Seek CLI
SendAlertsToEMC This flag indicates whether or not email alerts will be sent to EMC Support. If true, email alerts are sent to all defined recipients and EMC Support. If false, email alerts are sent only to defined recipients.
Example set email sendalertstoemc true
Email Settings 5-11

5-12
Centera Seek CLI
Centera SettingsThese settings are client-side (Centera Seek Index Node) settings and do not affect or alter any settings on Centera itself. These settings are merely static settings that Centera Seek uses to reference purposes. When initially setting up the Centera Host Name via the Centera SeekCLI (set config CenteraHost), the user is prompted on whether or not to retrieve additional Centera information. These settings can be overridden using this CLI command, if necessary.
◆ To override a specific Centera setting, use the following syntax at the CLI prompt:
set centera <centera-setting> <value>
Example set centera ClusterID ad10112c-1dd1-11b2-cc79a66
◆ To display a specific Centera setting, use the following syntax at the CLI prompt:
show centera <centera-setting>
Example set centera clusterid
◆ To display the value of ALL Centera settings, use the following syntax at the CLI prompt:
show centera All
Available Centera Settings
The following sections describe the available Centera settings.
ClusterID The ID number of the cluster.
SerialNumber The serial number of the cluster.
SiteName The site name.
Centera Seek Users Guide

Centera Seek CLI
Logging SettingsYou use logging settings to control how and what Centera Seek logs.
◆ To set a specific logging setting, use the following syntax at the CLI prompt:
set logging <log-setting> <log-value>
Example set logging level debug
◆ To display the current value of a particular logging setting, use the following syntax at the CLI prompt:
show logging <log-setting>
Example show logging level
Available Logging Settings
The following sections describe the available logging settings and provide examples.
Level The amount of text sent to the log file. This is typically used to control the amount of debug and info sent to the logs. Possible values are ALL, WARN, DEBUG, FATAL, INFO, OFF.
Example set logging level debug
MaxLogs The number of Query and Bundler Service logs to be rolled/archived. This is useful if you want to retain a certain number of logs for historical purposes.
Example set logging maxlogs 20
Version Information The Centera Seek CLI provides ways to display the versions of the installed Centera Seek software. The version information is accessible through the show command using the versions sub command.
◆ To display the version of all software related to Centera Seek, use the following syntax at the CLI prompt:
show versions
Example show versions
Logging Settings 5-13

5-14
Centera Seek CLI
Version InformationReturned
The following section describes the version information returned.
Value Description
Centera Seek The version of Centera Seek.
FAST InStream The version of FAST InStream.
Centera SDK The version of Centera SDK.
CentraStar The version of Centera (server).
Centera Seek Users Guide

Centera Seek CLI
Status InformationThe Centera SeekCLI provides ways to get the status of different Centera Seek services. You can determine the status of the QueryService and BundlerService process running on Centera and the current status of FAST. The status information is accessible through the show command using the status sub command.
◆ To display the status of a particular service, use the following syntax at the CLI prompt:
show status <service-name>
Example show status queryservice
◆ To display the status of all services. use the following syntax at the CLI prompt:
show status All
Example show status ALL
Status Information 5-15

5-16
Centera Seek CLI
Centera Seek Users Guide
Index
BBackup
automatic 3-4directory 3-3overview 3-2, 3-3
Bundler service 1-3, 1-6BundlerRunTime 5-7BundleStagingDir 5-7
CCA 1-2CacheDirectory 5-6CachingEnabled 5-6C-clip 1-2CDF 1-2CDFs
backing up 3-5CenteraHost 5-6Command
overview 5-3Components 1-3Configuration settings
email 5-10logging 5-13scheduling 5-8
Content address 1-2ContentProtection 5-7
DDirectories
/emc/seek/bundle 1-6/emc/seek/cache 1-6
FFAST 1-3, 1-7
GGlossary 1-2
LLastCompletedQueryDate 5-6
MMetadata 1-2
Profile Driven Metadata Tools 4-6querying 4-2retrieving 1-5
NNFS access 3-6NumClipThreads 5-5
QQuery browser 4-2
access profile 4-2Query Service 1-3, 1-4Querying metadata 4-2
SSeek architecture 1-3Status information 5-15
UUpgrade 2-4
requirements 2-2
1-1Centera Seek Users Guide

1-2
Index
Centera Seek Users Guide