embedded xerox ecspdownload.support.xerox.com/...os/...embedded_xerox_ecsp_august_… ·...
TRANSCRIPT
Embedded for Xerox ECSPSetup Guide
Software Version 5.3August 2014702P03156

©2014 Xerox Corporation. All rights reserved. XEROX®, XEROX and Design®, XEROX® ColorQubeTM and
Xerox Secure Access Unified ID System® are trademarks of Xerox Corporation in the United States and/or other countries.
Equitrac® and Follow-You Printing® are registered trademarks on Nuance Communications.
Document Version: 1.0 (August 2014)

Setup Guide iii
Table of Contents
1 Introduction . . . . . . . . . . . . . . . . . . . . . . . . . . . . . . . . . . . . . . . . . . . 1-1About User Authentication . . . . . . . . . . . . . . . . . . . . . . . . . . . . . . . . . . . . . . . . . . . . . . . . . 1-2Xerox ECSP Features . . . . . . . . . . . . . . . . . . . . . . . . . . . . . . . . . . . . . . . . . . . . . . . . . . . . . . . 1-3Installation and Configuration Requirements . . . . . . . . . . . . . . . . . . . . . . . . . . . . . . . 1-3
Licensing, Server, and MFP Requirements . . . . . . . . . . . . . . . . . . . . . . . . . . . . . . . 1-3System Requirements. . . . . . . . . . . . . . . . . . . . . . . . . . . . . . . . . . . . . . . . . . . . . . . . . . . . . . 1-4Supported MFPs . . . . . . . . . . . . . . . . . . . . . . . . . . . . . . . . . . . . . . . . . . . . . . . . . . . . . . . . . . . 1-4Supported Card Readers . . . . . . . . . . . . . . . . . . . . . . . . . . . . . . . . . . . . . . . . . . . . . . . . . . . 1-4
Magstripe Device Reader . . . . . . . . . . . . . . . . . . . . . . . . . . . . . . . . . . . . . . . . . . . . . 1-4Proximity Cards . . . . . . . . . . . . . . . . . . . . . . . . . . . . . . . . . . . . . . . . . . . . . . . . . . . . . . . 1-4
Additional Documentation . . . . . . . . . . . . . . . . . . . . . . . . . . . . . . . . . . . . . . . . . . . . . . . . . 1-5List of Terms . . . . . . . . . . . . . . . . . . . . . . . . . . . . . . . . . . . . . . . . . . . . . . . . . . . . . . . . . . . . . . 1-5
2 MFP Configuration . . . . . . . . . . . . . . . . . . . . . . . . . . . . . . . . . . . . . 2-1Configuring MFP Properties . . . . . . . . . . . . . . . . . . . . . . . . . . . . . . . . . . . . . . . . . . . . . . . . 2-1WorkCentre 57xx Series . . . . . . . . . . . . . . . . . . . . . . . . . . . . . . . . . . . . . . . . . . . . . . . . . . . . 2-2
Locating Custom Services . . . . . . . . . . . . . . . . . . . . . . . . . . . . . . . . . . . . . . . . . . . . . . 2-2On the MFP Console . . . . . . . . . . . . . . . . . . . . . . . . . . . . . . . . . . . . . . . . . . . . . . . . . . . 2-3Configuration Via the Internet Services Interface . . . . . . . . . . . . . . . . . . . . . . . 2-4
WorkCentre 75xx Series . . . . . . . . . . . . . . . . . . . . . . . . . . . . . . . . . . . . . . . . . . . . . . . . . . . 2-11Locating Custom Services . . . . . . . . . . . . . . . . . . . . . . . . . . . . . . . . . . . . . . . . . . . . . 2-11On the MFP Console . . . . . . . . . . . . . . . . . . . . . . . . . . . . . . . . . . . . . . . . . . . . . . . . . . 2-12Configuration Via the Internet Services Interface . . . . . . . . . . . . . . . . . . . . . . 2-13Set the Default Landing Page . . . . . . . . . . . . . . . . . . . . . . . . . . . . . . . . . . . . . . . . . 2-21
WorkCentre 58xx, 72xx, and 78xx Series . . . . . . . . . . . . . . . . . . . . . . . . . . . . . . . . . . . 2-22Locating Custom Services . . . . . . . . . . . . . . . . . . . . . . . . . . . . . . . . . . . . . . . . . . . . . 2-22On the MFP Console . . . . . . . . . . . . . . . . . . . . . . . . . . . . . . . . . . . . . . . . . . . . . . . . . . 2-23Configuration Via the Internet Services Interface . . . . . . . . . . . . . . . . . . . . . . 2-24Set the Default Landing Page . . . . . . . . . . . . . . . . . . . . . . . . . . . . . . . . . . . . . . . . . 2-31
ColorQubeTM 93xx, 92xx or 89xx Series . . . . . . . . . . . . . . . . . . . . . . . . . . . . . . . . . . . 2-32Locating Custom Services . . . . . . . . . . . . . . . . . . . . . . . . . . . . . . . . . . . . . . . . . . . . . 2-33On the MFP Console . . . . . . . . . . . . . . . . . . . . . . . . . . . . . . . . . . . . . . . . . . . . . . . . . . 2-34Configuration Via the Internet Services Interface . . . . . . . . . . . . . . . . . . . . . . 2-35
3 Server-Side Configuration . . . . . . . . . . . . . . . . . . . . . . . . . . . . . . 3-1Licensing Embedded Devices. . . . . . . . . . . . . . . . . . . . . . . . . . . . . . . . . . . . . . . . . . . . . . . 3-2
Assigning Licenses to Devices . . . . . . . . . . . . . . . . . . . . . . . . . . . . . . . . . . . . . . . . . . 3-2Configuring Printer Ports on DRE Print Servers . . . . . . . . . . . . . . . . . . . . . . . . . . . . . . . 3-4
Add a Printer on an Equitrac Printer Port . . . . . . . . . . . . . . . . . . . . . . . . . . . . . . . . 3-4Convert an Existing TCP/IP Port to Equitrac Port . . . . . . . . . . . . . . . . . . . . . . . . 3-5Configuring Physical Devices with the Configuration Wizard . . . . . . . . . . . . 3-9Enabling Secure Printing on the Queue . . . . . . . . . . . . . . . . . . . . . . . . . . . . . . . . 3-10
Configuring Authentication Prompts . . . . . . . . . . . . . . . . . . . . . . . . . . . . . . . . . . . . . . 3-11Setting Xerox Convenience Authentication Prompts . . . . . . . . . . . . . . . . . . . 3-12Enabling Release Key Prompt . . . . . . . . . . . . . . . . . . . . . . . . . . . . . . . . . . . . . . . . . 3-12
Configuring Card Self-Registration . . . . . . . . . . . . . . . . . . . . . . . . . . . . . . . . . . . . . . . . 3-14

Table of Contents Embedded for Xerox ECSP
iv Setup Guide
Configuring Embedded Devices . . . . . . . . . . . . . . . . . . . . . . . . . . . . . . . . . . . . . . . . . . . 3-15Configuring Print Tracking . . . . . . . . . . . . . . . . . . . . . . . . . . . . . . . . . . . . . . . . . . . . . . . . 3-18
Print Tracking Through Xerox Secure Access Ports . . . . . . . . . . . . . . . . . . . . . 3-18Print Tracking Using Xerox Network Accounting . . . . . . . . . . . . . . . . . . . . . . . 3-20Color Tracking Using Xerox Tiered Billing . . . . . . . . . . . . . . . . . . . . . . . . . . . . . . 3-23
4 User Workflow . . . . . . . . . . . . . . . . . . . . . . . . . . . . . . . . . . . . . . . . . .4-1Authenticating at a Card Reader . . . . . . . . . . . . . . . . . . . . . . . . . . . . . . . . . . . . . . . . . . . 4-2
Authenticating with a Magnetic Stripe Card . . . . . . . . . . . . . . . . . . . . . . . . . . . . 4-2Authenticating with a Proximity Card . . . . . . . . . . . . . . . . . . . . . . . . . . . . . . . . . . 4-2
Card Reader Status Messages . . . . . . . . . . . . . . . . . . . . . . . . . . . . . . . . . . . . . . . . . . . . . . 4-3Idle Mode . . . . . . . . . . . . . . . . . . . . . . . . . . . . . . . . . . . . . . . . . . . . . . . . . . . . . . . . . . . . 4-3Ready Mode . . . . . . . . . . . . . . . . . . . . . . . . . . . . . . . . . . . . . . . . . . . . . . . . . . . . . . . . . . 4-3
Logging In to a User Session . . . . . . . . . . . . . . . . . . . . . . . . . . . . . . . . . . . . . . . . . . . . . . . 4-4Xerox Server Authentication . . . . . . . . . . . . . . . . . . . . . . . . . . . . . . . . . . . . . . . . . . . 4-4
Selecting functions . . . . . . . . . . . . . . . . . . . . . . . . . . . . . . . . . . . . . . . . . . . . . . . . . . . . . . . . 4-4Using Follow-You Printing®. . . . . . . . . . . . . . . . . . . . . . . . . . . . . . . . . . . . . . . . . . . . . . . . 4-5
Using LDAP Email Search . . . . . . . . . . . . . . . . . . . . . . . . . . . . . . . . . . . . . . . . . . . . . . 4-65 Troubleshooting . . . . . . . . . . . . . . . . . . . . . . . . . . . . . . . . . . . . . . . .5-1
Symptoms and Solutions . . . . . . . . . . . . . . . . . . . . . . . . . . . . . . . . . . . . . . . . . . . . . . 5-1Configuration Tear Sheet . . . . . . . . . . . . . . . . . . . . . . . . . . . . . . . . . . . . . . . . . . . . . . 5-3
A Appendix: Third Party Software . . . . . . . . . . . . . . . . . . . . . . . . . A-1GNU General Public License v2.0 . . . . . . . . . . . . . . . . . . . . . . . . . . . . . . . . . . . . . . . A-8Apache License Version 2.0 . . . . . . . . . . . . . . . . . . . . . . . . . . . . . . . . . . . . . . . . . . . A-12Common Development and Distribution License 1.0 . . . . . . . . . . . . . . . . . . . A-12

Setup Guide 1-1
1Introduction
The Xerox Secure Access for Xerox Embedded Capture Send and Print (ECSP) application provides copy control and secure printing on Xerox manufactured multi-functional printers (MFPs). Embedded on the MFP, the application controls access to the MFP, valid account information is required before the MFP will unlock and be ready for use. Account information must be provided in the form of a supported ID card, personal identification numbers (PINs), or Windows credentials based on authentication settings on the server.
Xerox ECSP communicates with the print tracking and accounting application on your network to validate authentication information. Once successfully logged in, users can securely release print jobs, and use native device functions through Xerox ECSP. During the copy process, Xerox ECSP collects detailed document characteristics such as paper sizing, color, duplexing, stapling, or input trays on specific models.
CautionIn order to use the Xerox ECSP application, you must install the Device Web Server (DWS) component for Xerox Secure Access. See the Xerox Secure Access Installation Guide for information about this component. This document contains instructions and information about Xerox devices that can leverage the Xerox ECSP framework. Older model devices may not be able to use these functions. It is the responsibility of your install technician to determine the class of device before attempting to use this information.
Topics
About User Authentication
Xerox ECSP Features
Installation and Configuration Requirements
System Requirements
Supported MFPs
Supported Card Readers
Additional Documentation
List of Terms
Introduction Embedded for Xerox ECSP
1-2 Setup Guide
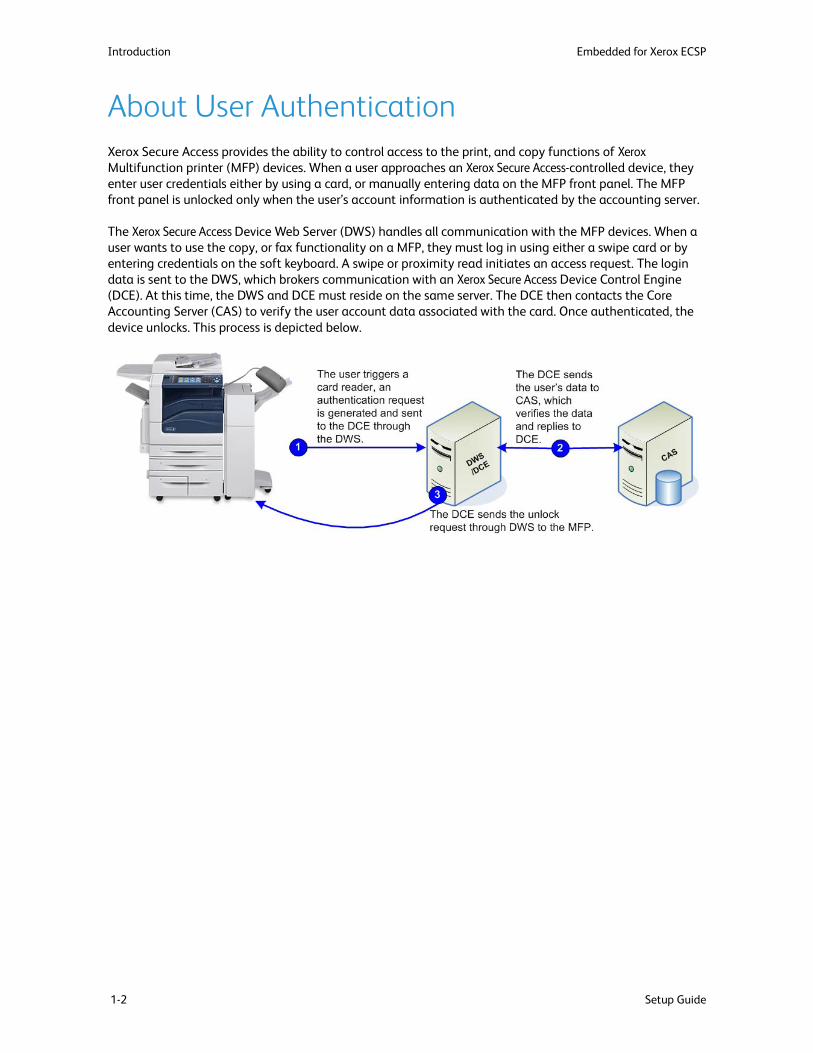
About User AuthenticationXerox Secure Access provides the ability to control access to the print, and copy functions of Xerox Multifunction printer (MFP) devices. When a user approaches an Xerox Secure Access-controlled device, they enter user credentials either by using a card, or manually entering data on the MFP front panel. The MFP front panel is unlocked only when the user’s account information is authenticated by the accounting server.
The Xerox Secure Access Device Web Server (DWS) handles all communication with the MFP devices. When a user wants to use the copy, or fax functionality on a MFP, they must log in using either a swipe card or by entering credentials on the soft keyboard. A swipe or proximity read initiates an access request. The login data is sent to the DWS, which brokers communication with an Xerox Secure Access Device Control Engine (DCE). At this time, the DWS and DCE must reside on the same server. The DCE then contacts the Core Accounting Server (CAS) to verify the user account data associated with the card. Once authenticated, the device unlocks. This process is depicted below.
Embedded for Xerox ECSP Introduction
Setup Guide 1-3
Xerox ECSP FeaturesXerox ECSP is a robust application that provides additional functionality beyond print and copy control. This version of Xerox ECSP supports the following features:
• Follow-You Printing® - After successful login at the MFP, the user can access the virtual print queue to "pull" a print job to this device. Through the Follow-You screen on the MFP, users can view documents in the queue, then select, delete, or release documents for printing. See Enabling Secure Printing on the Queue on page 10 for configuration instructions, and Using Follow-You Printing® on page 5 for end-user instructions.
• Card self-registration - Allows users to associate an unassigned card with their user credentials. Once associated, each time the user swipes the card, the system automatically recognizes the card and associated user. See Configuring Card Self-Registration on page 14for instructions.
• Configuration - All installation and configuration tasks can be accomplished easily to configure Xerox ECSP. See Installation and Configuration Requirements on page 3, and Server-Side Configuration on page 1.
Installation and Configuration RequirementsIf you have already set up and configured your Xerox Secure Access server and also installed the DWS component, you do not need to install the basic Xerox Secure Access application; you only need to follow configuration procedures.
For instructions on installing and configuring Xerox Secure Access, see the Xerox Secure Access Unified ID System® Installation Guide and the Xerox Secure Access Administration Guide.
Before configuring Xerox Secure Access, ensure you have Administrative access to Xerox Secure Access System Manager. For details, see Configuring Administrative Access in the Xerox Secure Access Administration Guide.
Licensing, Server, and MFP Requirements
To enable the Xerox Secure Access Embedded solution, you must obtain the following:
• Xerox Secure Access Software
Xerox Secure Access requires configuration of the MFPs and Xerox Secure Access core accounting server (CAS). For detailed information about setting up and configuring Xerox Secure Access see the Xerox Secure Access Unified ID System® Installation Guide.
• One embedded license per Xerox MFP
Each Xerox Device requires an embedded license applied in the Xerox Secure Access System Manager. For example, if you plan to control 20 Xerox MFPs, you need to obtain 20 corresponding embedded licenses (enabled for Xerox). See Licensing Embedded Devices on page 2 for instructions on adding licenses to the CAS.
• ECSP-enabled Xerox MFPs
Visit http://www.nuance.com/for-business/by-product/equitrac/supported-devices/xerox/index.htm for a list of supported MFP models.
Introduction Embedded for Xerox ECSP
1-4 Setup Guide
• One Network Accounting Enablement Option per Xerox MFP
Only required if you are tracking copy or fax usage through Xerox Secure Access. This is NOT required to track printing if you are using Xerox Secure Access printer ports.
This licensable device option obtained from Xerox enables the Xerox MFP to automatically track print, server fax and copy usage for each account.
• Open communications between the Xerox MFP and the DWS
To enable communication between the MFP and the server, copier access to the server requires ports 2939, 8080 and 8443.
System RequirementsTo review the system requirements for the machine or machines hosting the Xerox Secure Access server components (Core Accounting Server Device Web Server, and Device Control Engine), see the Xerox Secure Access Unified ID System® Installation Guide.
Supported MFPsFor a list of Xerox Secure Access supported MFP models, visit http://www.nuance.com/for-business/by-product/equitrac/supported-devices/xerox/index.htm.
Supported Card ReadersFor a list of Xerox Secure Access supported card readers, visit http://www.nuance.com/for-business/by-product/equitrac/supported-devices/xerox/index.htm.
All card readers are preconfigured from the manufacturer and require no further configuration.
Magstripe Device Reader
Xerox Secure Access supports external magnetic stripe reader devices. Users can enter validation data by swiping an encoded magnetic card through the card reader. The reader reads virtually any standard magnetic card medium on track 2, and accepts standard or custom encoded data.
Proximity Cards
Xerox Secure Access supports HID proximity cards. Users can enter validation data by passing the card within about one inch of the card reader.

Embedded for Xerox ECSP Introduction
Setup Guide 1-5
Additional DocumentationYou may need to refer to one of the following documents when performing server-side configuration tasks. These documents are located on the product CD, and are installed automatically with any server-side component in the Program Files\Xerox Secure Access folder.
List of TermsThe following unique terms are used within this guide.
Guide When to refer to this guide
Xerox Secure Access Planning Guide Before installing Xerox Secure Access, use this guide to select the appropriate combination of product variables to support the needs of your institution or organization.
Xerox Secure Access Installation Guide Use this guide to perform an initial installation or upgrade.
Xerox Secure Access Administration Guide After installing Xerox Secure Access, use this guide to configure advanced options for use on your campus or in your organization.
Term Description
Alternate Primary PIN A sequence of personal identification numbers that uniquely identifies a user who wants to release a print job. The alternate primary PIN can be data encoded on a magnetic swipe card or entered into an MFP keypad.
Authentication The process of entering a primary and optional secondary personal identification number to gain access to a controlled MFP. Users can authenticate via a card reader, or through the MFP control panel.
Core Accounting Server (CAS)
The Core Accounting Server is a core component of Xerox Secure Access. This service controls the accounting database that stores all printer, user, transaction and balance information. The CAS also verifies users, calculates printing charges and assigns charges to an appropriate user.
Convenience Authentication
A Xerox protocol that enables communication between the Authentication Device and the server to verify user information gathered user interaction at an MFP.
Device Control Engine (DCE)
A core component of Xerox Secure Access, the DCE communicates with terminals that control access to MFPs.
Document Routing Engine(DRE)
A core component of Xerox Secure Access, the DRE enables document flow from workstations to output devices. When a job is released, the DRE captures the job characteristics and communicates the characteristics to the CAS.
Device Web Server (DWS) A core component of Xerox Secure Access, the DWS acts as a virtual web server, and brokers communication between a Xerox MFP and the Device Control Engine (DCE).

Introduction Embedded for Xerox ECSP
1-6 Setup Guide
Follow-You Printing An secure printing feature that holds print jobs in a virtual print queue until the user “pulls” the print job to a selected device. A user can select a particular printer when they submit a print request, then walk to an entirely different compatible MFP and pull the job to that device.
Follow-You Printing screen
An application on the MFP when the Follow-You Printing extension is configured. Users can select one or more jobs from different print servers.
Multi-serverFollow-You
A secure printing feature that extends the Follow-You functionality to allow users to view and release secure print jobs from different print servers.
Network Accounting A feature of the Xerox MFP which automatically tracks print, server fax and copy usage for each user. Network accounting is run over a network and the accounting transactions are collected remotely by Xerox Secure Access server software.
Print Tracking The ability to track the attributes of a released network print job. For example, number of pages, page size, color, etc. You can configure Xerox Secure Access to track printing through the embedded device or through an Equitrac Port.
Primary PIN A sequence of numbers that act as a user ID to uniquely identify a user. The primary PIN can be entered on the MFP keypad.
Secondary PIN A sequence of numbers that act as a password when used in conjunction with a Primary PIN. After entering the Primary PIN, the user must enter the Secondary PIN code on a MFP keypad before accessing the device or applications. Secondary PINs are an optional configuration.
Term Description
Setup Guide 2-1
2MFP Configuration
To enable Xerox Secure Access, you must configure any MFP that will use it. Follow the steps for each MFP series in the order they are presented to ensure a successful install.
Configuring MFP PropertiesThe following are the main steps when configuring Xerox MFPs:
1. Ensure that the time zone on the MFP is correct. If the time zone is not correct, transaction times are incorrectly reported.
2. Confirm that the date and time setting on the MFP is within 24 hours of the date and time configured on the server that hosts the DCE component. If the settings are more than 24 hours apart, the Embedded application on the MFP will not connect to the server.
3. Configure the MFP to use Xerox Convenience Authentication and to communicate with the DWS Server.
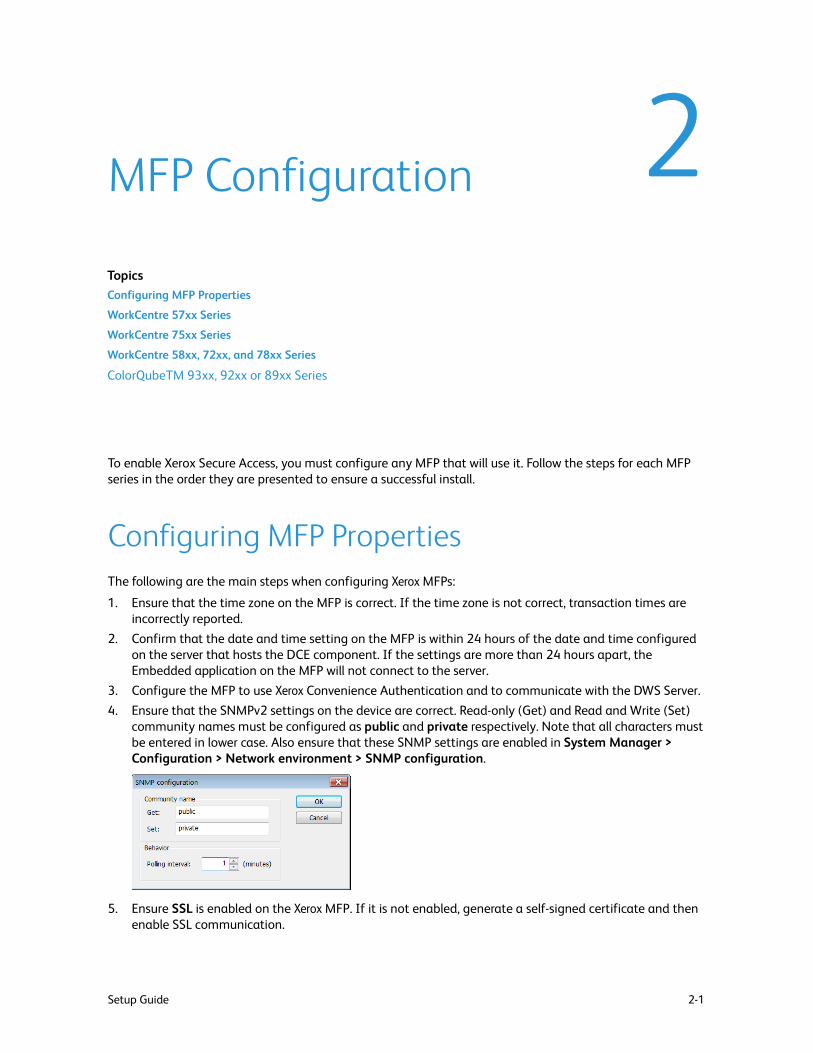
4. Ensure that the SNMPv2 settings on the device are correct. Read-only (Get) and Read and Write (Set) community names must be configured as public and private respectively. Note that all characters must be entered in lower case. Also ensure that these SNMP settings are enabled in System Manager > Configuration > Network environment > SNMP configuration.
5. Ensure SSL is enabled on the Xerox MFP. If it is not enabled, generate a self-signed certificate and then enable SSL communication.
Topics
Configuring MFP Properties
WorkCentre 57xx Series
WorkCentre 75xx Series
WorkCentre 58xx, 72xx, and 78xx Series
ColorQubeTM 93xx, 92xx or 89xx Series
MFP Configuration Embedded for Xerox ECSP
2-2 Setup Guide
WorkCentre 57xx SeriesYou must configure the WorkCentre 57xx series MFP from both the MFP Console and via the Internet Services interface. Before you perform the configuration, ensure that Custom Services is installed on the MFP.
Locating Custom Services
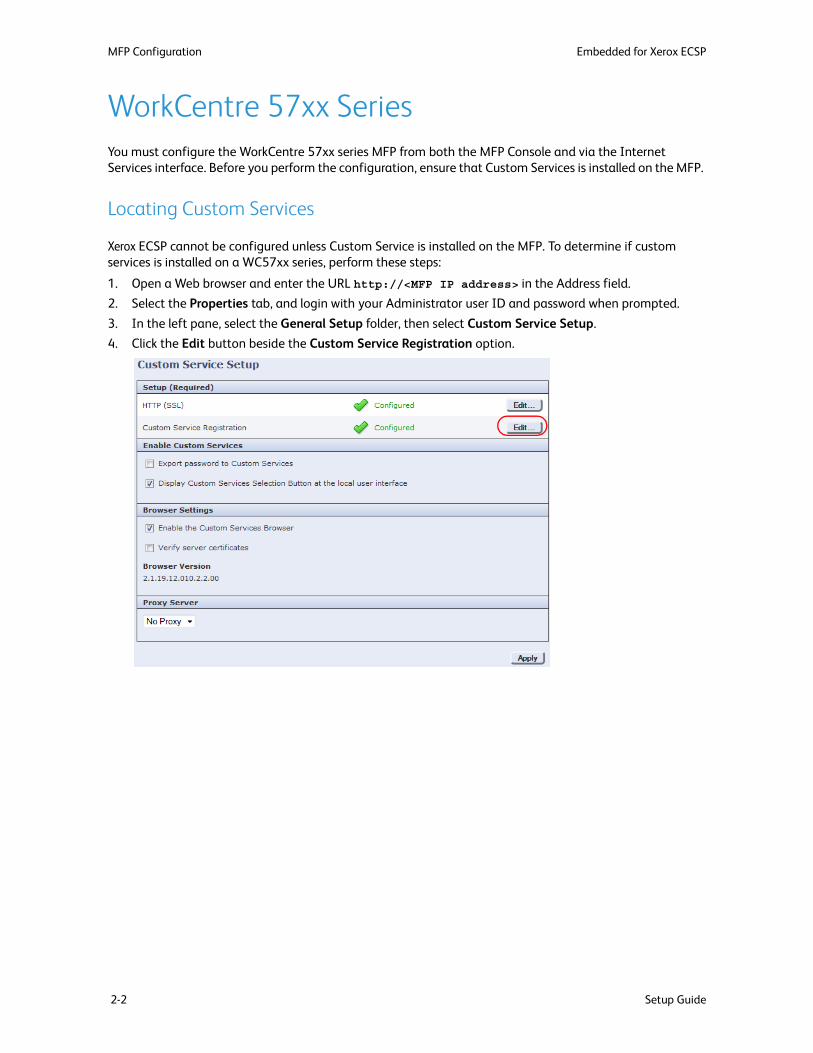
Xerox ECSP cannot be configured unless Custom Service is installed on the MFP. To determine if custom services is installed on a WC57xx series, perform these steps:
1. Open a Web browser and enter the URL http://<MFP IP address> in the Address field.
2. Select the Properties tab, and login with your Administrator user ID and password when prompted.
3. In the left pane, select the General Setup folder, then select Custom Service Setup.
4. Click the Edit button beside the Custom Service Registration option.

Embedded for Xerox ECSP MFP Configuration
Setup Guide 2-3
5. Click on Enable All, then click Save. The Custom Services button should now be present on the MFP user interface when All Services is selected.
If you cannot access or locate these options, contact Xerox regarding correct installation of Custom Services.
On the MFP Console1. Log into the Tools menu with your Administrator user ID and password.
2. Touch All Services. Ensure that you can see the Custom Services button. If not, power off/on the MFP and wait until the MFP is ready.
3. Enter the user name and password.
4. On the Machine Status screen, touch the Tools tab.
5. Touch Accounting Settings > Accounting Mode.
6. On the Accounting Mode screen, touch Network Accounting, then touch Customize Prompts.
7. On the Customize User Prompts screen, touch Display Prompt 1 and 2, then touch Save. Failure to set this option causes transactions to be recorded against “Unidentified user”.
8. Set Code Entry Validation to Disabled.
9. Touch the Save button again to save all changes, then log off the MFP Console. Configuration at the console itself is now complete. You now need to complete the rest of the configuration via the web interface.

MFP Configuration Embedded for Xerox ECSP
2-4 Setup Guide
Configuration Via the Internet Services Interface1. Open a Web browser and enter the URL http://<MFP IP address> in the Address field.
2. Select the Properties tab, and login with your User ID and Password when prompted.
3. In the left pane, click the General Setup folder, then select Custom Service Setup. The Custom Service Setup screen displays:
4. Click the Edit button beside the HTTP (SSL) option.
5. Ensure the Secure HTTP (SSL) option to Enabled (it is by default), then click Save to return to the Custom Service Setup screen.
6. Click the Edit button beside the Custom Service Registration option.
Embedded for Xerox ECSP MFP Configuration
Setup Guide 2-5
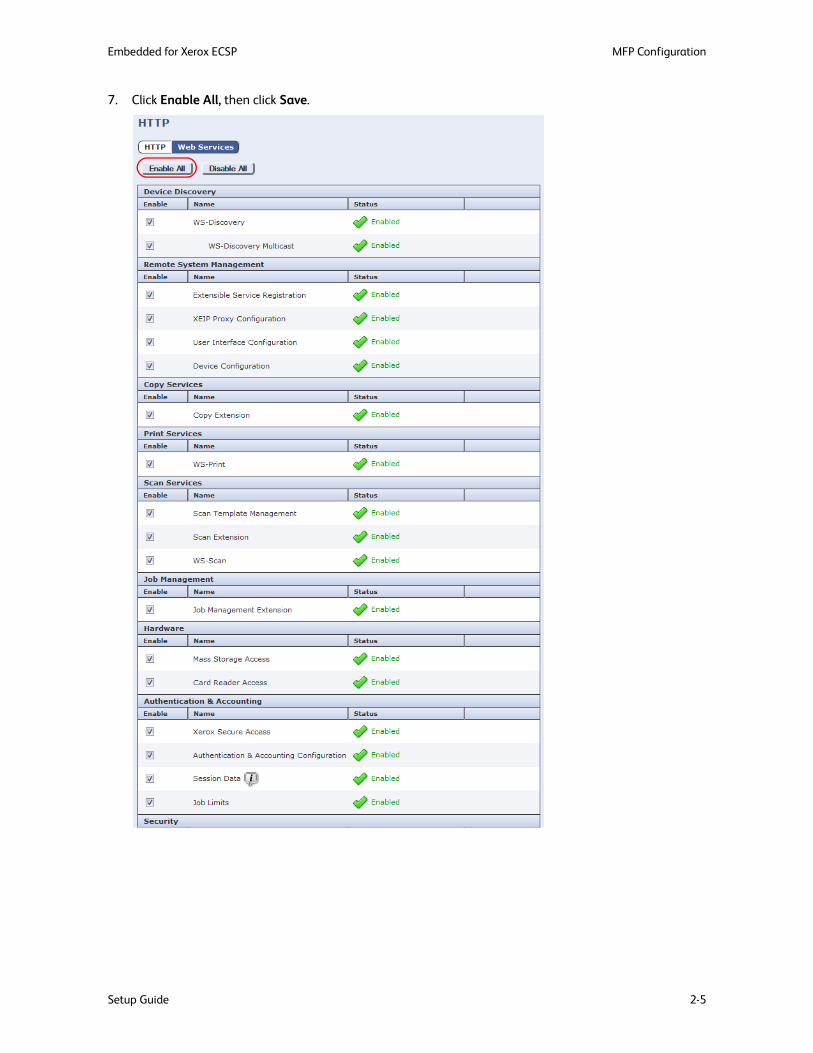
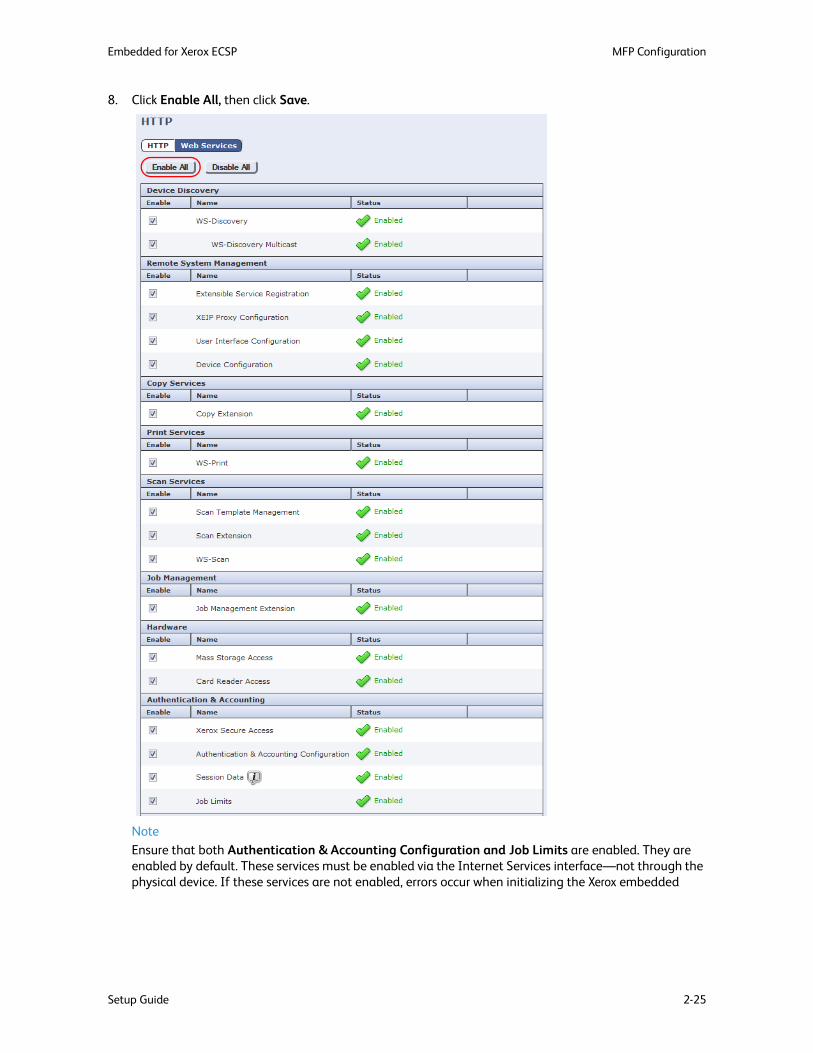
7. Click Enable All, then click Save.

MFP Configuration Embedded for Xerox ECSP
2-6 Setup Guide
Note
Ensure that both Authentication & Accounting Configuration and Job Limits are enabled. They are enabled by default. These services must be enabled via the Internet Services interface—not through the physical device. If these services are not enabled, errors occur when initializing the Xerox embedded device in System Manager, causing the Copy Stop feature to not work. Job Limits is not supported on all Xerox devices.
8. In the Browser Settings section on the Custom Service Setup page, ensure the Enable the Custom Services Browser check box is selected (it is by default), and click Apply.
9. In the left pane, click the Security folder, then the Authentication subfolder, and then Setup.
10. On the Authentication & Authorization Setup page, click the Edit button to change the Authentication method.

Embedded for Xerox ECSP MFP Configuration
Setup Guide 2-7
Note
If the copier has not been previously configured, you may need to click the Next button (instead of Edit) and then work through a wizard to configure the copier.
11. On the Authentication, Authorization and Personalization page, do the following:
a. Select Xerox Secure Access Unified ID System from the Authentication method on the machine’s touch interface drop-down list.
b. Select User Name/Password Validated Locally on the Xerox Machine from the Authentication method on the machine’s web user interface drop-down list.
c. Select Locally on the Xerox Machine from the Authorization information is stored drop-down list.
d. ClickSave to apply the changes.

MFP Configuration Embedded for Xerox ECSP
2-8 Setup Guide
12. On the Xerox Secure Access Setup page, click the Manually Override Settings button.
13. On the Manual Override page, set the following:
a. In the Server Communication section, select the Enabled check box under the Embedded option if you use a standard Xerox card reader. If you use a generic card reader, deselect the check box.
Note
The Embedded option must be Enabled on Xerox MFPs running ECSP firmware version 1.5 or 2.0 in order for the attached card reader to operate normally.
b. In the Device Log In Methods section, select the preferred method.
c. In the Accounting Information section, select Automatically apply Account Codes from the server.
Embedded for Xerox ECSP MFP Configuration
Setup Guide 2-9
14. Click Save to apply the changes, then click Close.
15. Click Close again to return to the Authentication & Authorization Setup page.
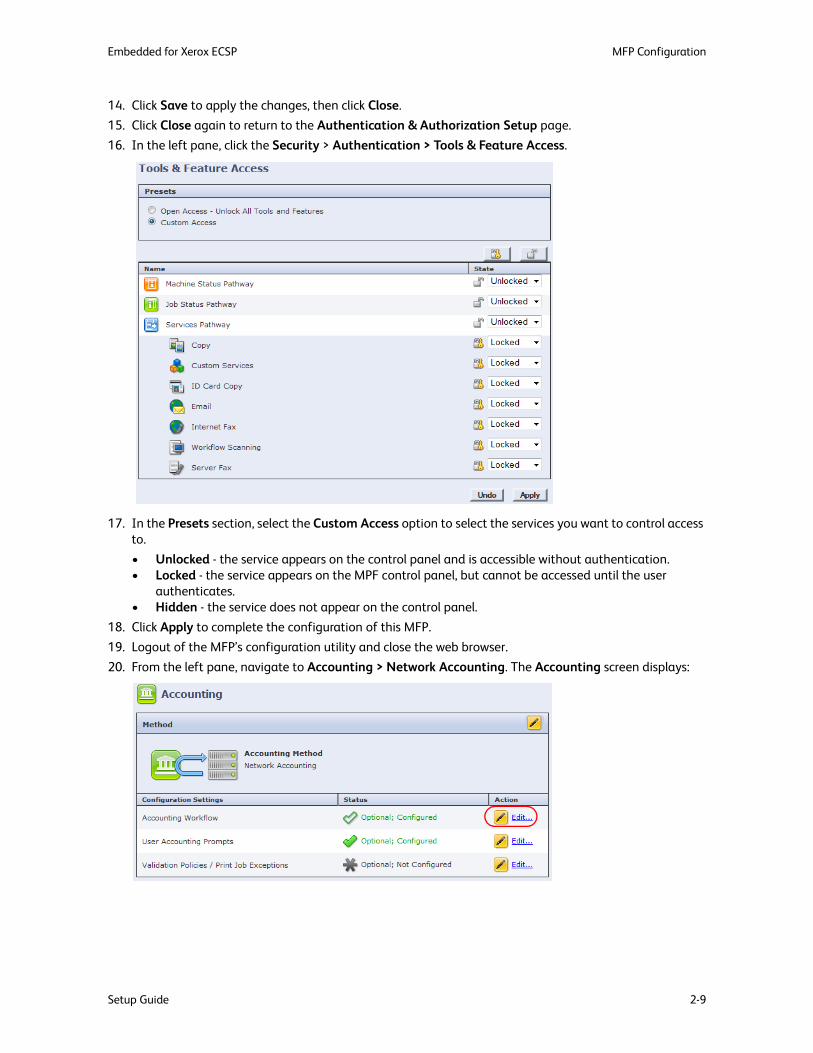
16. In the left pane, click the Security > Authentication > Tools & Feature Access.
17. In the Presets section, select the Custom Access option to select the services you want to control access to.
• Unlocked - the service appears on the control panel and is accessible without authentication.• Locked - the service appears on the MPF control panel, but cannot be accessed until the user
authenticates. • Hidden - the service does not appear on the control panel.
18. Click Apply to complete the configuration of this MFP.
19. Logout of the MFP’s configuration utility and close the web browser.
20. From the left pane, navigate to Accounting > Network Accounting. The Accounting screen displays:

MFP Configuration Embedded for Xerox ECSP
2-10 Setup Guide
21. From the Accounting Workflow row, click Edit... The Accounting Workflow screen displays:
22. Select Capture Usage from the drop-down list of any service from which you want to record transactions.
23. Click Save.

Embedded for Xerox ECSP MFP Configuration
Setup Guide 2-11
WorkCentre 75xx SeriesYou must configure the WorkCentre 75xx series MFPs from both the MFP Console and via the Internet Services interface. Before you perform the configuration, ensure that Custom Services is installed on the MFP.
Locating Custom Services
Xerox ECSP cannot be configured unless Custom Service is installed on the MFP. To determine if custom services is installed on a WorkCentre 75xx series, perform these steps:
1. Open a Web browser and enter the URL http://<MFP IP address> in the Address field.
2. Select the Properties tab, and login with your Administrator user ID and password when prompted.
3. In the left pane, select the General Setup folder, then select Extensible Service Setup.
4. Click the Edit button beside the Extensible Service Registration option.
5. Click Enable All. The Custom Services button should now be present on the MFP user interface when All Services is selected.
If you cannot access or locate these options, contact Xerox regarding correct installation of Custom Services.

MFP Configuration Embedded for Xerox ECSP
2-12 Setup Guide
On the MFP Console1. Log into the Tools menu with your Administrator user ID and password.
2. Touch All Services. Ensure that you can see the Custom Services button. If not, power off/on the MFP and wait until the MFP is ready.
3. Enter the user name and password.
4. On the Machine Status screen, touch the Tools tab.
5. Touch Accounting Settings > Accounting Mode.
6. On the Accounting Mode screen, touch Network Accounting, then touch Customize Prompts.
7. On the Customize User Prompts screen, touch Display Prompt 1 and 2, then touch Save. Failure to set this option causes transactions to be recorded against “Unidentified user”.
8. Set Code Entry Validation to Disabled.
9. Touch the Save button again to save all changes, then log off the MFP Console. Configuration at the console itself is now complete. You now need to complete the rest of the configuration via the web interface.

Embedded for Xerox ECSP MFP Configuration
Setup Guide 2-13
Configuration Via the Internet Services Interface1. Open a Web browser and enter the URL http://<MFP IP address> in the Address field.
2. Select the Properties tab, and login with your User ID and Password when prompted.
3. In the left pane, click the General Setup folder, then select Extensible Service Setup. The Extensible Service Setup screen displays:
4. Click the Edit button beside the HTTP (SSL) option.
5. Ensure the Secure HTTP (SSL) option is set to Enabled (it is by default), then click Save.
6. Click the Edit button beside the Extensible Service Registration option.
MFP Configuration Embedded for Xerox ECSP
2-14 Setup Guide
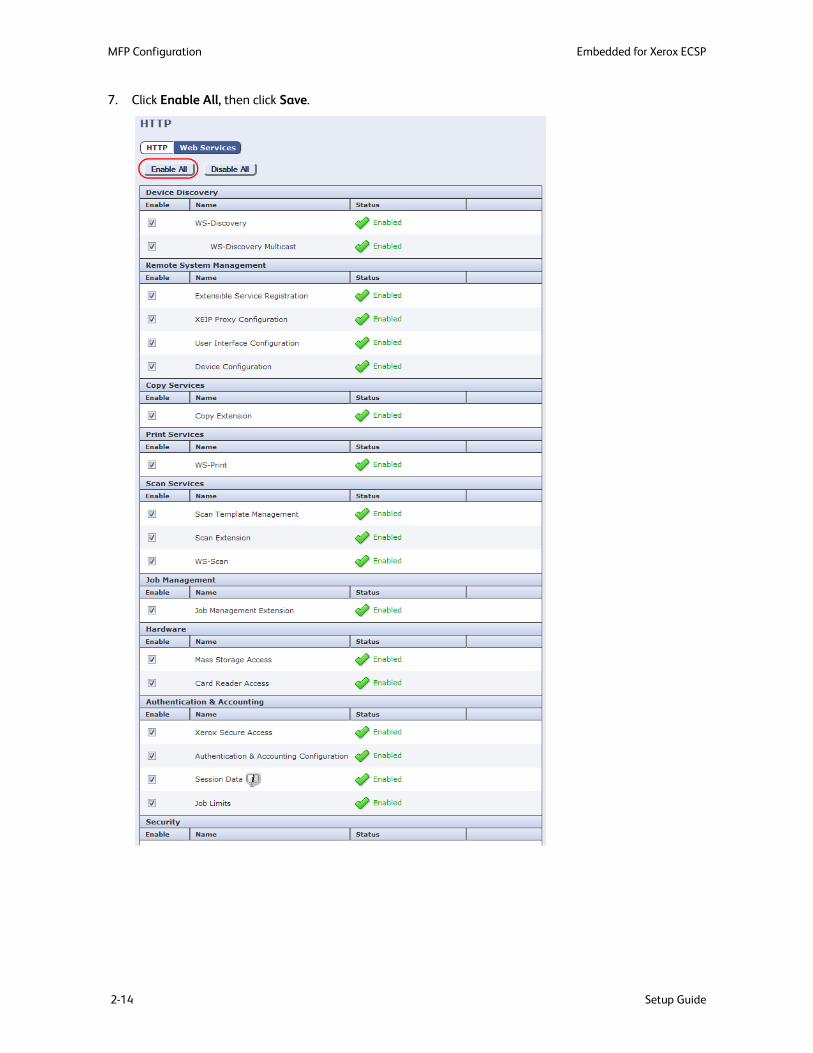
7. Click Enable All, then click Save.

Embedded for Xerox ECSP MFP Configuration
Setup Guide 2-15
Note
Ensure that both Authentication & Accounting Configuration and Job Limits are enabled. They are enabled by default. These services must be enabled via the Internet Services interface—not through the physical device. If these services are not enabled, errors occur when initializing the Xerox embedded device in System Manager, causing the Copy Stop feature to not work. Job Limits is not supported on all Xerox devices.
8. In the Browser Settings section on the Extensible Service Setup page, ensure the Enable the Extensible Services Browser check box is selected (it is by default). and click Apply.
9. In the left pane, click the Security >Authentication > Setup. The Authentication & Authorization Setup screen displays:
10. Click the Edit button to change the Authentication method.

MFP Configuration Embedded for Xerox ECSP
2-16 Setup Guide
Note
If the copier has not been previously configured, you may need to click the Next button (instead of Edit) and then work through a wizard to configure the copier.
11. On the Authentication, Authorization and Personalization page, do the following:
a. Select Xerox Secure Access Unified ID System from the Authentication method on the machine’s touch interface drop-down list.
b. Select User Name/Password Validated Locally on the Xerox Machine from the Authentication method on the machine’s web user interface drop-down list.
c. Select Locally on the Xerox Machine from the Authorization information is stored drop-down list.
d. Click Save to apply the changes.

Embedded for Xerox ECSP MFP Configuration
Setup Guide 2-17
12. On the Xerox Access Setup page, click the Edit button beside the Xerox Secure Access Setup option under Configuration Setting.
13. On the Xerox Secure Access Setup page, click the Manually Override Settings button. The Manual Override screen displays:

MFP Configuration Embedded for Xerox ECSP
2-18 Setup Guide
14. On the Manual Override page, set the following:
a. In the Server Communication section, select the Enabled check box under the Embedded option if you use a standard Xerox card reader. If you use a generic card reader, deselect the check box.
Note
The Embedded option must be Enabled on Xerox MFPs running ECSP firmware version 1.5 or 2.0 in order for the attached card reader to operate normally.
b. In the Device Log In Methods section, select the preferred method.
c. In the Accounting Information section, select Automatically apply Account Codes from the server.
15. Click Save to apply the changes, then click Close.
16. Click Close again on the Xerox Secure Access Setup page to return to the main Authentication Configuration page.
17. Click the Edit button beside the Service Registration option. The Service Registration screen displays.
18. Select the services you want users to access, then click Save.
Embedded for Xerox ECSP MFP Configuration
Setup Guide 2-19
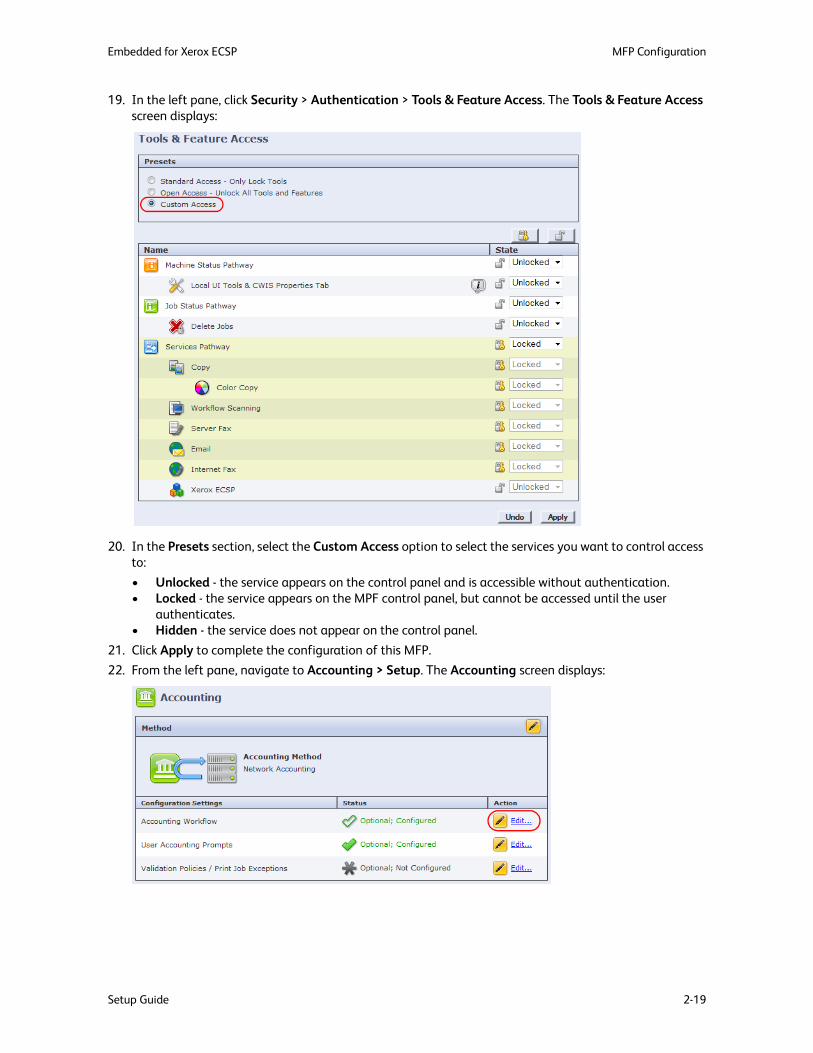
19. In the left pane, click Security > Authentication > Tools & Feature Access. The Tools & Feature Access screen displays:
20. In the Presets section, select the Custom Access option to select the services you want to control access to:
• Unlocked - the service appears on the control panel and is accessible without authentication.• Locked - the service appears on the MPF control panel, but cannot be accessed until the user
authenticates. • Hidden - the service does not appear on the control panel.
21. Click Apply to complete the configuration of this MFP.
22. From the left pane, navigate to Accounting > Setup. The Accounting screen displays:

MFP Configuration Embedded for Xerox ECSP
2-20 Setup Guide
23. From the Accounting Workflow row, click Edit... The Accounting Workflow screen displays:
24. Select Capture Usage from the drop-down list of any service from which you want to record transactions.
25. Click Save.
Embedded for Xerox ECSP MFP Configuration
Setup Guide 2-21
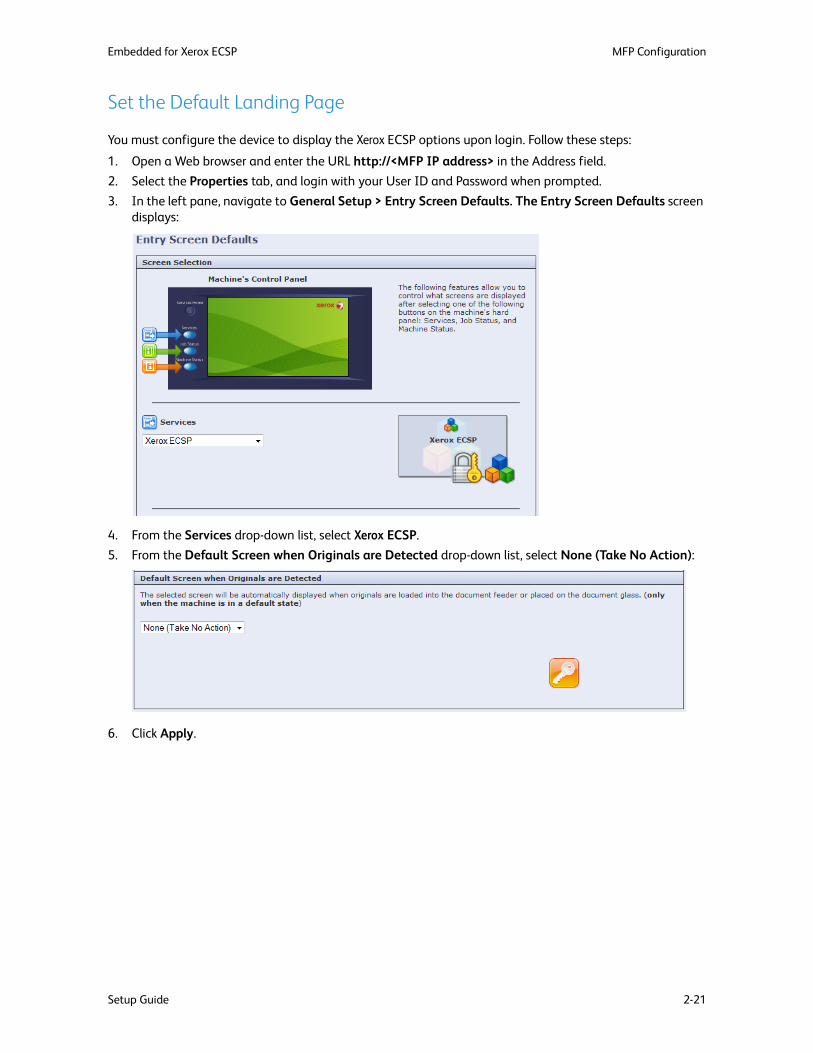
Set the Default Landing Page
You must configure the device to display the Xerox ECSP options upon login. Follow these steps:
1. Open a Web browser and enter the URL http://<MFP IP address> in the Address field.
2. Select the Properties tab, and login with your User ID and Password when prompted.
3. In the left pane, navigate to General Setup > Entry Screen Defaults. The Entry Screen Defaults screen displays:
4. From the Services drop-down list, select Xerox ECSP.
5. From the Default Screen when Originals are Detected drop-down list, select None (Take No Action):
6. Click Apply.

MFP Configuration Embedded for Xerox ECSP
2-22 Setup Guide
WorkCentre 58xx, 72xx, and 78xx SeriesYou must configure the WorkCentre 58xx and 78xx series MFP from both the MFP Console and via the Internet Services interface. Before you perform the configuration, ensure that Custom Services is installed on the MFP.
Locating Custom Services
Xerox ECSP cannot be configured unless Custom Service is installed on the MFP. To determine if custom services is installed on a WC75xx series, perform these steps:
1. Open a Web browser and enter the URL http://<MFP IP address> in the Address field.
2. Select the Properties tab, and login with your Administrator user ID and password when prompted.
3. In the left pane, select General Setup > Extensible Service Setup. The Extensible Service Setup screen displays.
4. Click the Edit button beside the Extensible Service Registration option.
5. Click on Enable All. The Custom Services button should now be present on the MFP user interface when All Services is selected.
If you cannot access or locate these options, contact Xerox regarding correct installation of Custom Services.

Embedded for Xerox ECSP MFP Configuration
Setup Guide 2-23
On the MFP Console1. Log into the Tools menu with your Administrator user ID and password.
2. Touch All Services. Ensure that you can see the Custom Services button. If not, power off/on the MFP and wait until the MFP is ready.
3. Enter the user name and password.
4. On the Machine Status screen, touch the Tools tab.
5. Touch Accounting Settings > Accounting Mode.
6. On the Accounting Mode screen, touch Network Accounting, then touch Customize Prompts.
7. On the Customize User Prompts screen, touch Display Prompt 1 and 2, then touch Save. Failure to set this option causes transactions to be recorded against “Unidentified user”.
8. Set Code Entry Validation to Disabled.
9. Touch the Save button again to save all changes, then log off the MFP Console. Configuration at the console itself is now complete. You now need to complete the rest of the configuration via the web interface.
MFP Configuration Embedded for Xerox ECSP
2-24 Setup Guide
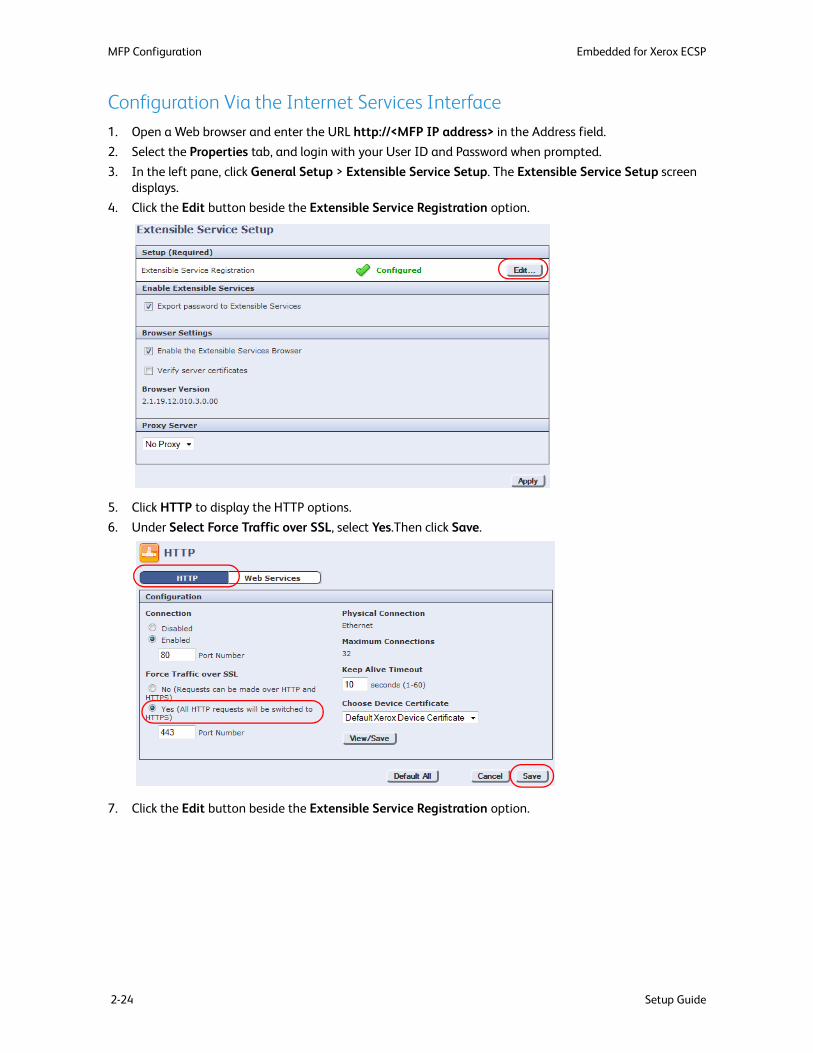
Configuration Via the Internet Services Interface1. Open a Web browser and enter the URL http://<MFP IP address> in the Address field.
2. Select the Properties tab, and login with your User ID and Password when prompted.
3. In the left pane, click General Setup > Extensible Service Setup. The Extensible Service Setup screen displays.
4. Click the Edit button beside the Extensible Service Registration option.
5. Click HTTP to display the HTTP options.
6. Under Select Force Traffic over SSL, select Yes.Then click Save.
7. Click the Edit button beside the Extensible Service Registration option.
Embedded for Xerox ECSP MFP Configuration
Setup Guide 2-25
8. Click Enable All, then click Save.
Note
Ensure that both Authentication & Accounting Configuration and Job Limits are enabled. They are enabled by default. These services must be enabled via the Internet Services interface—not through the physical device. If these services are not enabled, errors occur when initializing the Xerox embedded

MFP Configuration Embedded for Xerox ECSP
2-26 Setup Guide
device in System Manager, causing the Copy Stop feature to not work. Job Limits is not supported on all Xerox devices.
9. In the left pane, select General > Extensible Services Setup.
10. In the Browser Settings section on the Extensible Service Setup page, ensure the Enable the Extensible Services Browser check box is selected (it is by default). and click Apply.
11. In the left pane, click the Security > Authentication, and then Setup. The Login Methods screen opens:
12. Click the Edit icon in the Touch and Web User Interfaces title bar. The Edit Login Methods screen opens:
Embedded for Xerox ECSP MFP Configuration
Setup Guide 2-27
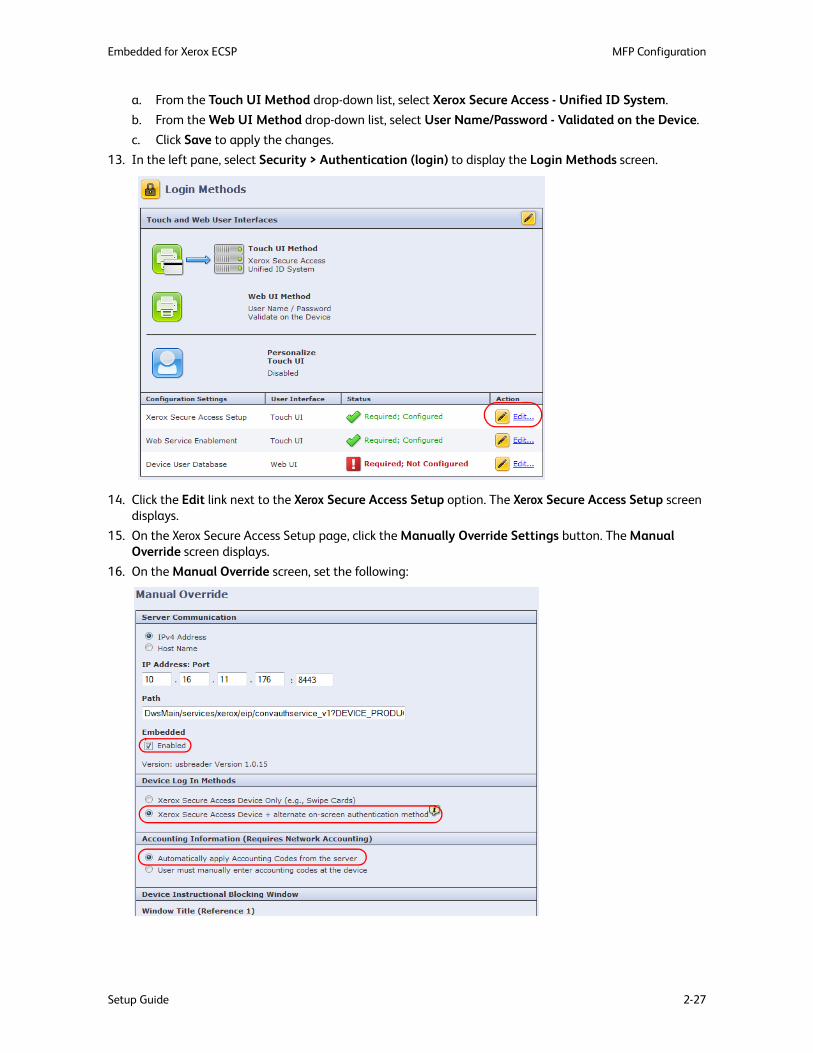
a. From the Touch UI Method drop-down list, select Xerox Secure Access - Unified ID System.
b. From the Web UI Method drop-down list, select User Name/Password - Validated on the Device.
c. Click Save to apply the changes.
13. In the left pane, select Security > Authentication (login) to display the Login Methods screen.
14. Click the Edit link next to the Xerox Secure Access Setup option. The Xerox Secure Access Setup screen displays.
15. On the Xerox Secure Access Setup page, click the Manually Override Settings button. The Manual Override screen displays.
16. On the Manual Override screen, set the following:

MFP Configuration Embedded for Xerox ECSP
2-28 Setup Guide
a. In the Server Communication section, select the Enabled check box under the Embedded option if you use a standard Xerox card reader. If you use a generic card reader, deselect the check box.
Note
The Embedded option must be Enabled on Xerox MFPs running ECSP firmware version 1.5 or 2.0 in order for the attached card reader to operate normally.
b. In the Device Log In Methods section, select the preferred method.
c. In the Accounting Information section, select Automatically apply Accounting Codes from the server.

Embedded for Xerox ECSP MFP Configuration
Setup Guide 2-29
17. Click Save to apply the changes, then click Close.
18. Click Close again on the Xerox Secure Access Setup page to return to the main Authentication Configuration page.
19. In the left pane, select Services > Service Registration. The Service Registration screen displays:
20. Select the services you want users to access, then click Apply.
21. From the left pane, navigate to Login/Permission/Accounting > Accounting Method. The Accounting screen displays:

MFP Configuration Embedded for Xerox ECSP
2-30 Setup Guide
22. From the Accounting Workflow row, click Edit... The Accounting Workflow screen displays:
23. Select Capture Usage from the drop-down list of any service from which you want to record transactions.
24. Click Save.

Embedded for Xerox ECSP MFP Configuration
Setup Guide 2-31
Set the Default Landing Page
You must configure the device to display the Xerox ECSP options upon login. Follow these steps:
1. Open a Web browser and enter the URL http://<MFP IP address> in the Address field.
2. Select the Properties tab, and login with your User ID and Password when prompted.
3. In the left pane, navigate to General Setup > Entry Screen Defaults. The Entry Screen Defaults screen displays:
4. From the Services drop-down list, select Xerox ECSP.
5. From the Default Screen when Originals are Detected drop-down list, select None (Take No Action):
6. Click Apply.

MFP Configuration Embedded for Xerox ECSP
2-32 Setup Guide
ColorQubeTM 93xx, 92xx or 89xx SeriesYou must configure the ColorQube 93xx, 92xx or 89xx Series MFP from both the MFP Console and via the Internet Services interface. Before you perform the configuration, ensure that Custom Services is installed on the MFP.
Note
This document assumes that any 89xx devices are running upgraded firmware that allows the device to function as a "ConnectKey" device. Devices with older firmware do not follow these instructions. For information about identifying which firmware version your device is running, see the Xerox support web site.
Embedded for Xerox ECSP MFP Configuration
Setup Guide 2-33
Locating Custom Services
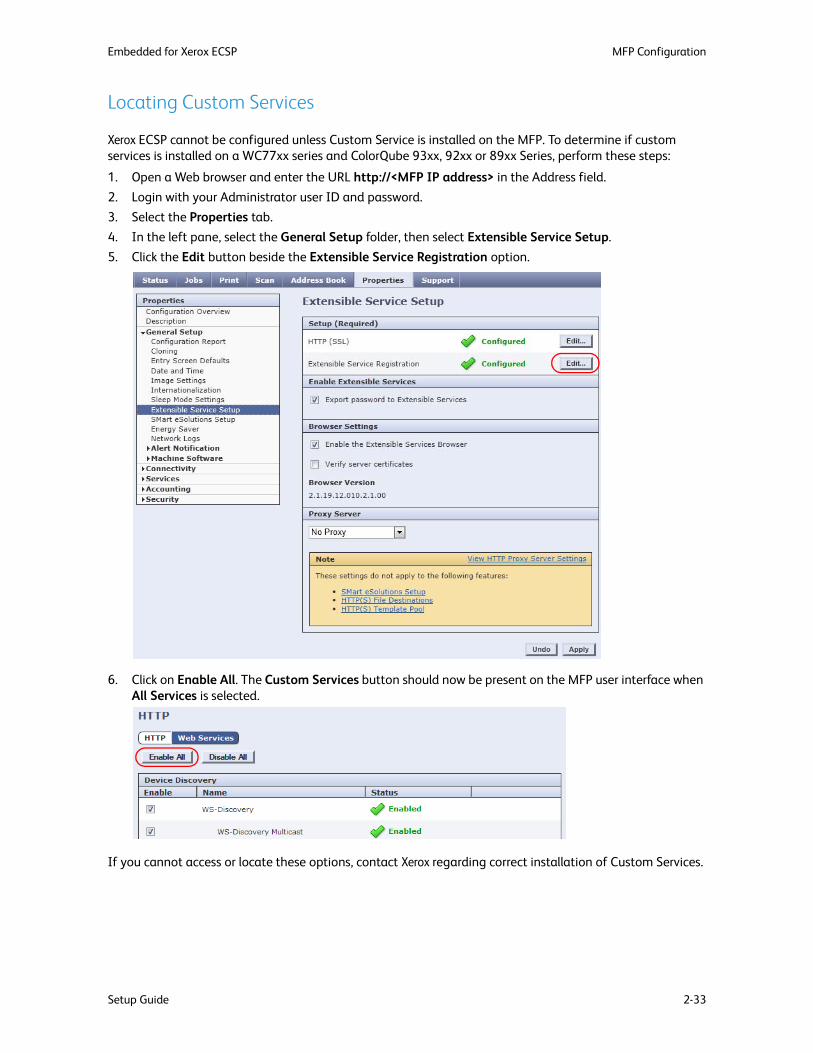
Xerox ECSP cannot be configured unless Custom Service is installed on the MFP. To determine if custom services is installed on a WC77xx series and ColorQube 93xx, 92xx or 89xx Series, perform these steps:
1. Open a Web browser and enter the URL http://<MFP IP address> in the Address field.
2. Login with your Administrator user ID and password.
3. Select the Properties tab.
4. In the left pane, select the General Setup folder, then select Extensible Service Setup.
5. Click the Edit button beside the Extensible Service Registration option.
6. Click on Enable All. The Custom Services button should now be present on the MFP user interface when All Services is selected.
If you cannot access or locate these options, contact Xerox regarding correct installation of Custom Services.

MFP Configuration Embedded for Xerox ECSP
2-34 Setup Guide
On the MFP Console1. Log into the Tools menu with your Administrator user ID and password.
2. Touch All Services. Ensure that you can see the Custom Services button. If not, power off/on the MFP and wait until the MFP is ready.
3. Enter the user name and password.
4. On the Machine Status screen, touch the Tools tab.
5. Touch Accounting Settings > Accounting Mode.
6. On the Accounting Mode screen, touch Network Accounting, then touch Customize Prompts.
7. On the Customize User Prompts screen, touch Display Prompt 1 and 2, then touch Save. Failure to set this option causes transactions to be recorded against “Unidentified user”.
8. Set Code Entry Validation to Disabled.
9. Touch the Save button again to save all changes, then log off the MFP Console. Configuration at the console itself is now complete. You now need to complete the rest of the configuration via the web interface.

Embedded for Xerox ECSP MFP Configuration
Setup Guide 2-35
Configuration Via the Internet Services Interface1. Open a Web browser and enter the URL http://<MFP IP address> in the Address field.
2. Select the Properties tab, and login with your User ID and Password when prompted.
3. In the left pane, click the General Setup folder, then select Extensible Service Setup.
4. Click the Edit button beside the HTTP (SSL) option.
5. Set the Secure HTTP (SSL) option to Enabled, then click Save.
6. In the Browser Settings section on the Extensible Service Setup page, ensure the Enable the Extensible Services Browser check box is selected (it is by default). and click Apply.
MFP Configuration Embedded for Xerox ECSP
2-36 Setup Guide
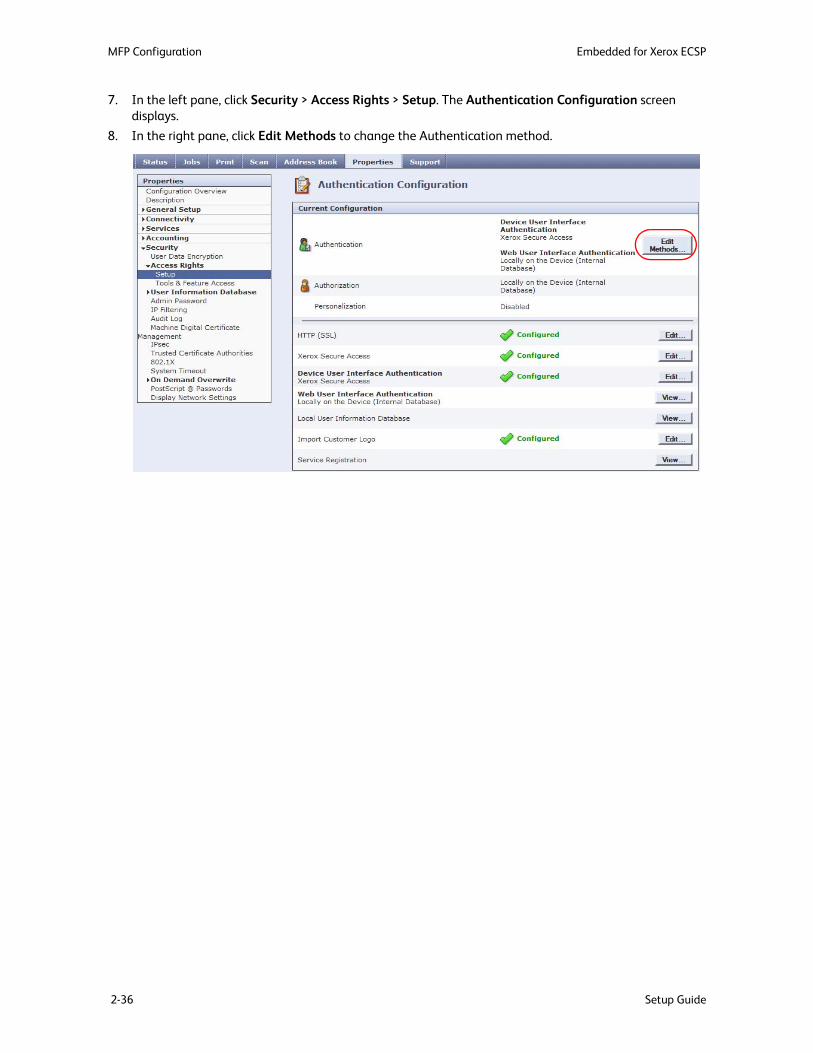
7. In the left pane, click Security > Access Rights > Setup. The Authentication Configuration screen displays.
8. In the right pane, click Edit Methods to change the Authentication method.

Embedded for Xerox ECSP MFP Configuration
Setup Guide 2-37
Note
If the copier has not been previously configured, you may need to click the Next button (instead of Edit Methods) and then work through a wizard to configure the copier.
9. Select Xerox Secure Access from the Device User Interface Authentication drop-down list. Leave both Web User Interface Authentication and Authorization options set to Locally on the Device.
10. Click Save to apply the changes.
11. On the Authentication Configuration page, click the Edit button beside the Device User Interface Authentication option.
12. On the Xerox Secure Access Setup page, click the Manually Override Settings button. The Manual Override screen displays:
13. On the Manual Override page, set the following:
a. In the Server Communication section, select the Enabled check box under the Embedded option if you use a standard Xerox card reader. If you use a generic card reader, deselect the check box.

MFP Configuration Embedded for Xerox ECSP
2-38 Setup Guide
b. In the Device Log In Methods section, select the preferred method.
14. In the Accounting Information section, select Automatically apply Account Codes from the server.
15. Click Save to apply the changes, then click Close.
16. Click Close again on the Xerox Secure Access Setup page to return to the main Authentication Configuration page.
17. Click the View button beside the Service Registration option.
18. Select the services you want users to access, then click Save.
19. In the left pane, click Security > Access Rights > Tools & Feature Access. The Tools & Feature Access screen displays:

Embedded for Xerox ECSP MFP Configuration
Setup Guide 2-39
20. In the Presets section, select the Custom Access option to select the services you want to control access to.
• Unlocked - the service appears on the control panel and is accessible without authentication.• Locked - the service appears on the MPF control panel, but cannot be accessed until the user
authenticates. • Hidden - the service does not appear on the control panel.
21. Click Apply to complete the configuration of this MFP.
22. Logout of the MFP’s configuration utility and close the web browser.

MFP Configuration Embedded for Xerox ECSP
2-40 Setup Guide

Setup Guide 3-1
3Server-Side Configuration
To enable Xerox Secure Access, you must configure the MFPs and the core accounting server (CAS). Follow the steps below in the order they are presented to ensure a successful install.
Topics
Licensing Embedded Devices
Configuring Printer Ports on DRE Print Servers
Configuring Authentication Prompts
Configuring Card Self-Registration
Configuring Embedded Devices
Configuring Embedded Devices
Configuring Print Tracking
Server-Side Configuration Embedded for Xerox ECSP
3-2 Setup Guide
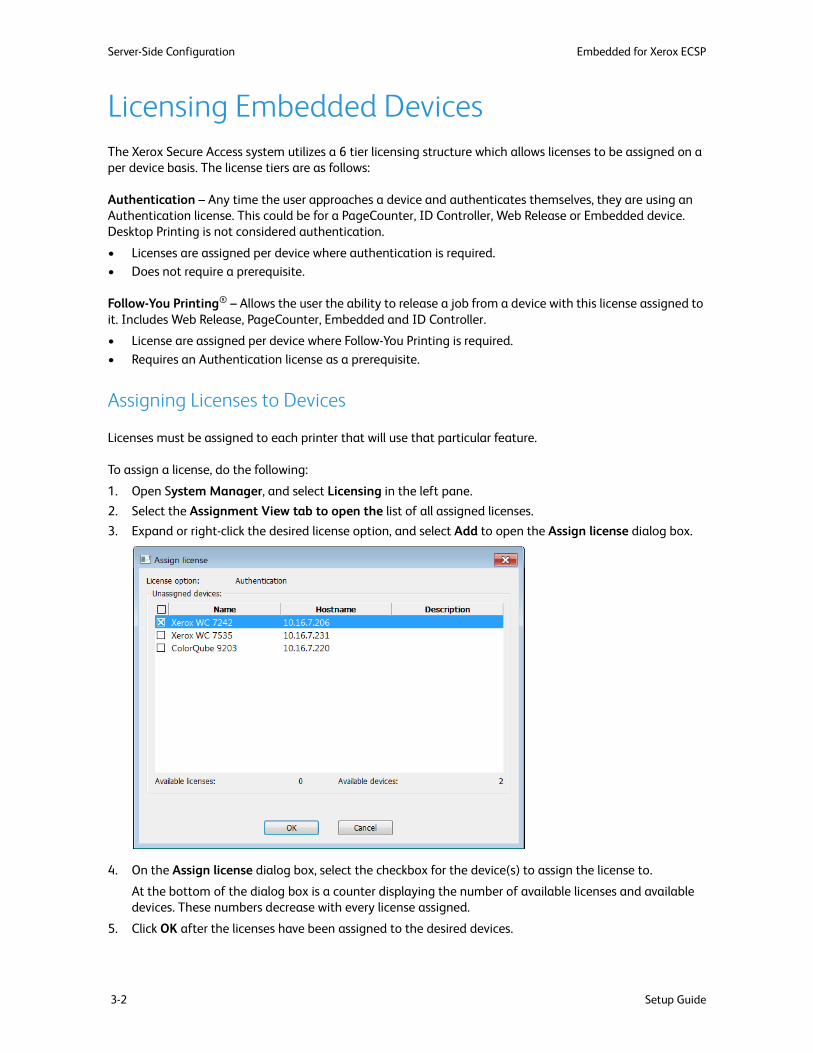
Licensing Embedded DevicesThe Xerox Secure Access system utilizes a 6 tier licensing structure which allows licenses to be assigned on a per device basis. The license tiers are as follows:
Authentication – Any time the user approaches a device and authenticates themselves, they are using an Authentication license. This could be for a PageCounter, ID Controller, Web Release or Embedded device. Desktop Printing is not considered authentication.
• Licenses are assigned per device where authentication is required.• Does not require a prerequisite.
Follow-You Printing® – Allows the user the ability to release a job from a device with this license assigned to it. Includes Web Release, PageCounter, Embedded and ID Controller.
• License are assigned per device where Follow-You Printing is required.
• Requires an Authentication license as a prerequisite.
Assigning Licenses to Devices
Licenses must be assigned to each printer that will use that particular feature.
To assign a license, do the following:
1. Open System Manager, and select Licensing in the left pane.
2. Select the Assignment View tab to open the list of all assigned licenses.
3. Expand or right-click the desired license option, and select Add to open the Assign license dialog box.
4. On the Assign license dialog box, select the checkbox for the device(s) to assign the license to.
At the bottom of the dialog box is a counter displaying the number of available licenses and available devices. These numbers decrease with every license assigned.
5. Click OK after the licenses have been assigned to the desired devices.
Embedded for Xerox ECSP Server-Side Configuration
Setup Guide 3-3
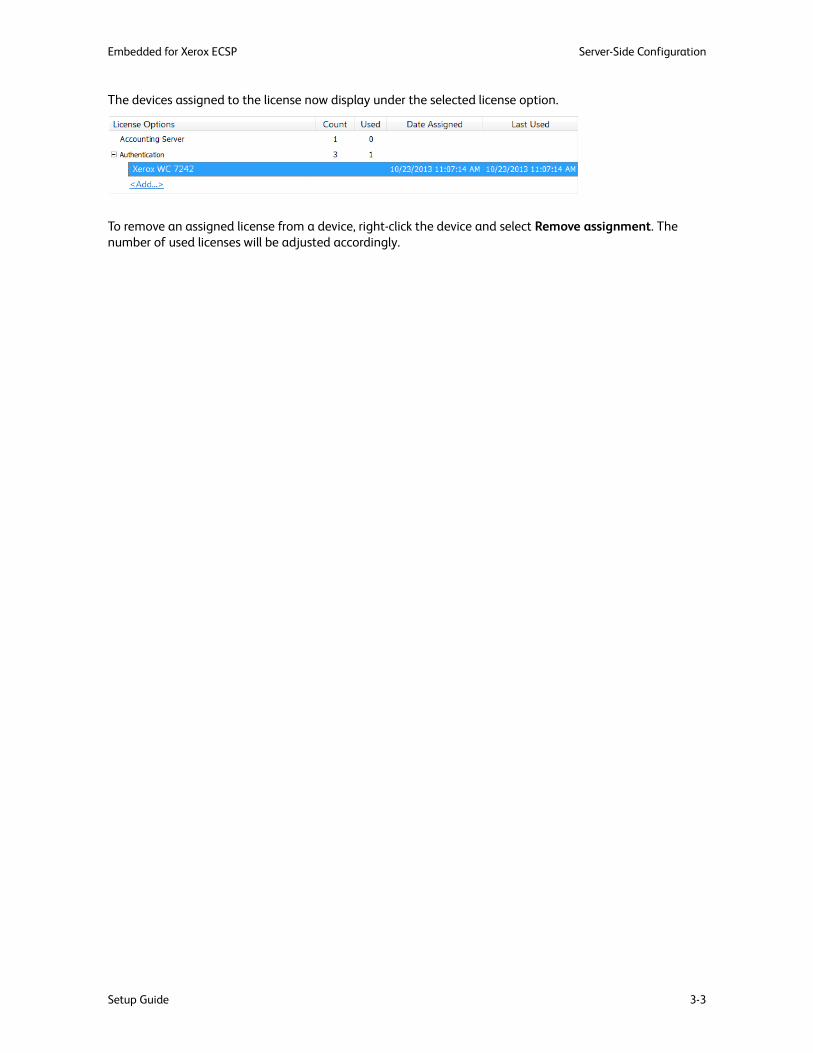
The devices assigned to the license now display under the selected license option.
To remove an assigned license from a device, right-click the device and select Remove assignment. The number of used licenses will be adjusted accordingly.

Server-Side Configuration Embedded for Xerox ECSP
3-4 Setup Guide
Configuring Printer Ports on DRE Print ServersControlled Xerox MFPs must use an Equitrac® Port (rather than standard TCP/IP ports) to enable secure printing. If you are configuring a secure print environment, ensure that your devices comply with this requirement.
You can create Xerox printer ports directly for new devices, or convert existing devices from standard TCP/IP ports into Xerox ports. For new devices, see Add a Printer on an Equitrac Printer Port (below). Alternatively, new devices can be created using standard TCP/IP ports and then converted it to Xerox ports. For existing devices, see Convert an Existing TCP/IP Port to Equitrac Port on page 5. Converting from TCP/IP to Xerox ports allows them to be quickly converted back to TCP/IP ports to determine if reported errors within the print environment are due to the server or the normal print environment.
Add a Printer on an Equitrac Printer Port
To create Xerox printer ports for new devices, do the following:
1. Using the standard Windows interface, open the Add Printer wizard.
2. Follow the prompts to add a local printer and create a new port.
3. Select Equitrac Port as the type of port you want to create and click Next.
4. The Add Equitrac Port wizard displays and you are prompted to ensure that the printer device is turned on, connected to the network, and properly configured. Click Next to continue.
5. Click Next and select Physical printer as your Device Type from the drop-down list.
6. Specify a Printer name or IP Address. The wizard supplies a Port name prefaced with "EQ_" based on the printer name or IP address. If another naming convention is preferred, rename the port accordingly.
7. Click Next to continue with the port configuration options. The Equitrac Port Configuration screen displays. The Detected device information displays automatically if the wizard is able to collect this data from the printer.
8. Select the Use custom settings option:
• If you select Raw port communication, identify the TCP Port number, and specify if the port monitor should hold the connection open.
• If you select LPR, specify the name of the print Queue on the physical device (e.g. PORT1).• If you select Specific device, select the appropriate Manufacturer and Model from the drop-down
lists. The device uses the relevant default communications parameters based on these selections.
9. Click Next and specify the Physical device name. This is the name of the device that is displayed within System Manager.
10. Review the details for this new port and device registration, and click Finish to close the Add Equitrac Printer Port wizard, or Back to change any of the settings.
11. Specify the Manufacture and model to install the printer driver, and click Next.

Embedded for Xerox ECSP Server-Side Configuration
Setup Guide 3-5
Note
If the device is part of a pull group, it must use the same drivers as all other devices in the pull group. You must select the model of the pull group driver, not the model of the device. If the DRE is a 64-bit server you must also load the 32-bit driver to the server.
12. Specify the version of the print driver to use, and click Next.
13. Enter the Printer name, and click Next. This is the name of the device that is displayed in System Manager.
14. Select to share or not to share the printer with others, and click Next. If sharing the printer, enter a Share name, and optionally provide a printer location and any comments.
15. Click the Print a test page button, and click Finish to close the Add Printer wizard.
16. Confirm that the test page printed successfully.
17. Verify that the physical device and its printer port and print queue appear in System Manager > Devices.
Convert an Existing TCP/IP Port to Equitrac Port
Use the Xerox Printer Configuration Wizard to convert from a TCP/IP port to Xerox ports. Converting from TCP/IP to Xerox ports allows them to be quickly converted back to TCP/IP ports if desired.
To convert from TCP/IP printer ports to Xerox ports, do the following:
1. Select Start > All Programs > Xerox Secure Access > Printer Configuration Wizard.
2. Click Next on the Welcome screen to continue with the conversion.

Server-Side Configuration Embedded for Xerox ECSP
3-6 Setup Guide
3. Select Convert printers to use Xerox Ports, and click Next. Optional – Deselect Auto-discover model if the printers are off-line or have SNMP disabled. If selected, the wizard sends an SNMP request to each device, and then times-out on each failed connection attempt, greatly increasing the time to run the conversion.
4. Select the desired print server(s) from the list, and click Next. Optionally, enter the name of other print servers in the Add field, and click the Add button to place them in the PrintServer list. Print servers can only be added one at a time.
5. Select the printer(s) to be converted, and click Next. If a printer exists on more than one print server, it displays multiple times in the Printer list along with the name of its associated server in the PrintServer list.

Embedded for Xerox ECSP Server-Side Configuration
Setup Guide 3-7
6. Set the Printer Name and Port Name as they will display in the System Manager Devices view. You can use the default naming templates for the printer "<port>_<printer>" and port "EQ_<ip>", or change the names as desired.
For example, you can change the printer default from "<port>_<printer>" to "2nd floor <printer>" to associate the selected printer(s) with the 2nd floor in your environment, or remove "<printer>" from the name to only display the printer’s port in System Manager (where <port> is typed, the printers port will be automatically replaced; where <printer> is typed, the queue name will be automatically replaced).
Server-Side Configuration Embedded for Xerox ECSP
3-8 Setup Guide
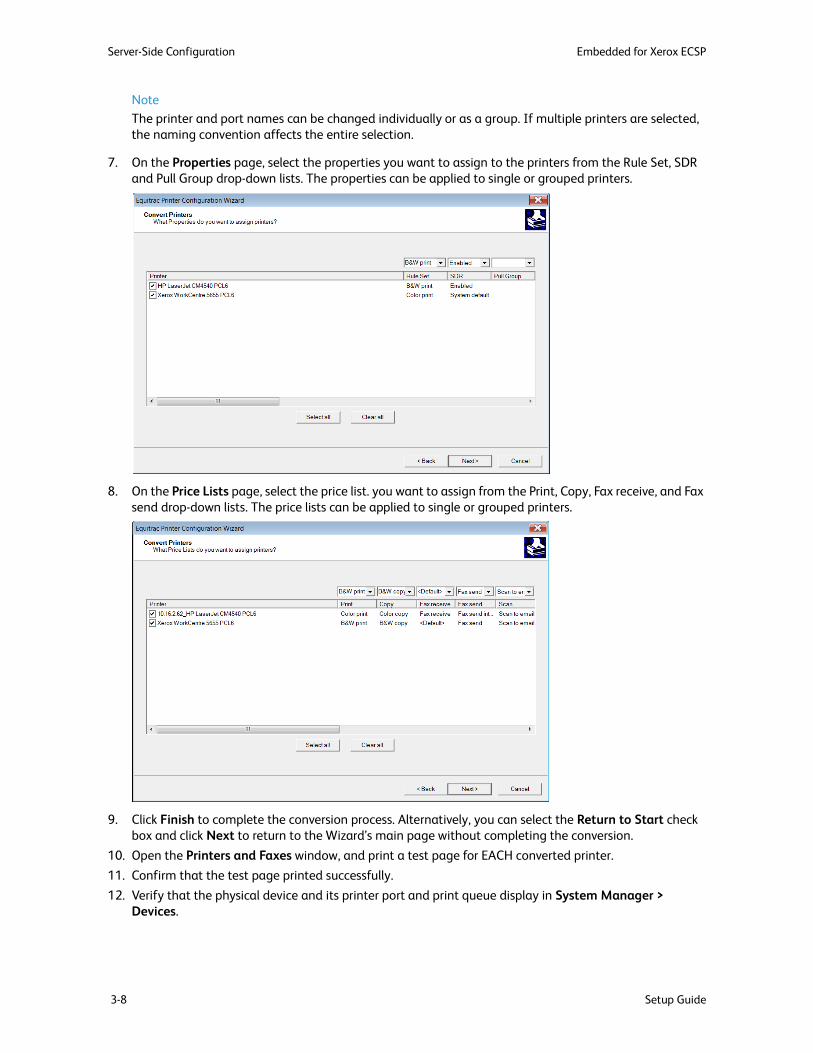
Note
The printer and port names can be changed individually or as a group. If multiple printers are selected, the naming convention affects the entire selection.
7. On the Properties page, select the properties you want to assign to the printers from the Rule Set, SDR and Pull Group drop-down lists. The properties can be applied to single or grouped printers.
8. On the Price Lists page, select the price list. you want to assign from the Print, Copy, Fax receive, and Fax send drop-down lists. The price lists can be applied to single or grouped printers.
9. Click Finish to complete the conversion process. Alternatively, you can select the Return to Start check box and click Next to return to the Wizard’s main page without completing the conversion.
10. Open the Printers and Faxes window, and print a test page for EACH converted printer.
11. Confirm that the test page printed successfully.
12. Verify that the physical device and its printer port and print queue display in System Manager > Devices.
Embedded for Xerox ECSP Server-Side Configuration
Setup Guide 3-9
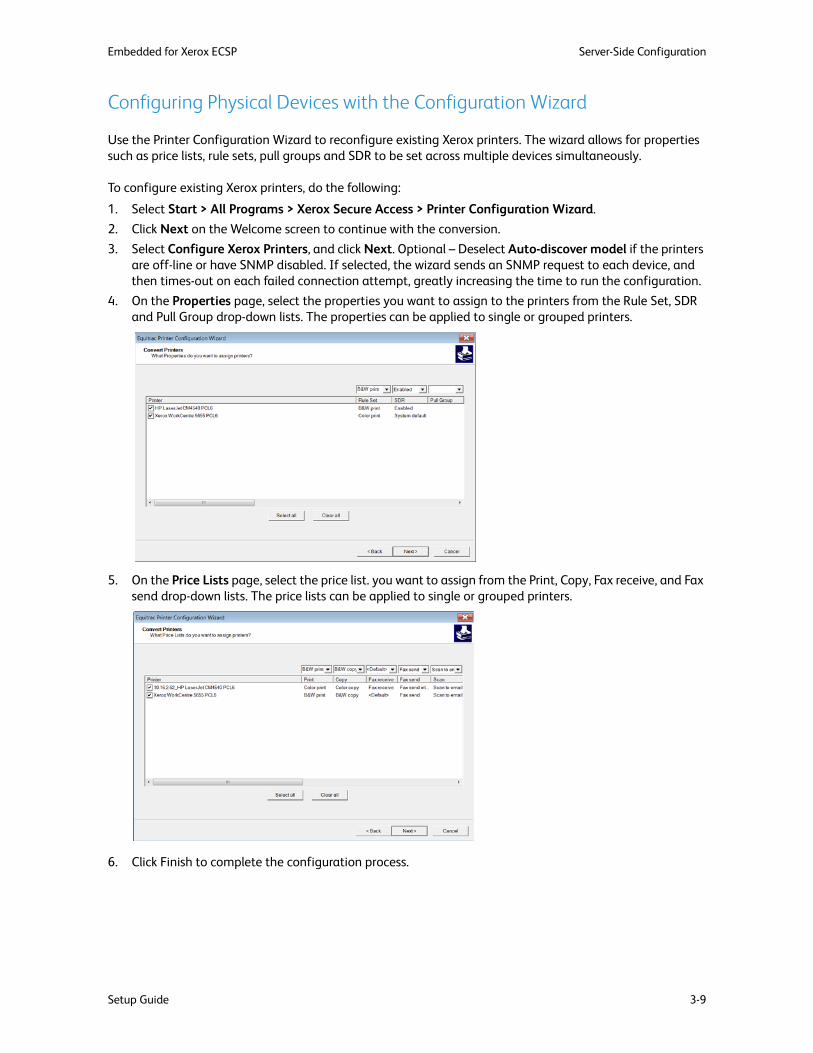
Configuring Physical Devices with the Configuration Wizard
Use the Printer Configuration Wizard to reconfigure existing Xerox printers. The wizard allows for properties such as price lists, rule sets, pull groups and SDR to be set across multiple devices simultaneously.
To configure existing Xerox printers, do the following:
1. Select Start > All Programs > Xerox Secure Access > Printer Configuration Wizard.
2. Click Next on the Welcome screen to continue with the conversion.
3. Select Configure Xerox Printers, and click Next. Optional – Deselect Auto-discover model if the printers are off-line or have SNMP disabled. If selected, the wizard sends an SNMP request to each device, and then times-out on each failed connection attempt, greatly increasing the time to run the configuration.
4. On the Properties page, select the properties you want to assign to the printers from the Rule Set, SDR and Pull Group drop-down lists. The properties can be applied to single or grouped printers.
5. On the Price Lists page, select the price list. you want to assign from the Print, Copy, Fax receive, and Fax send drop-down lists. The price lists can be applied to single or grouped printers.
6. Click Finish to complete the configuration process.
Server-Side Configuration Embedded for Xerox ECSP
3-10 Setup Guide
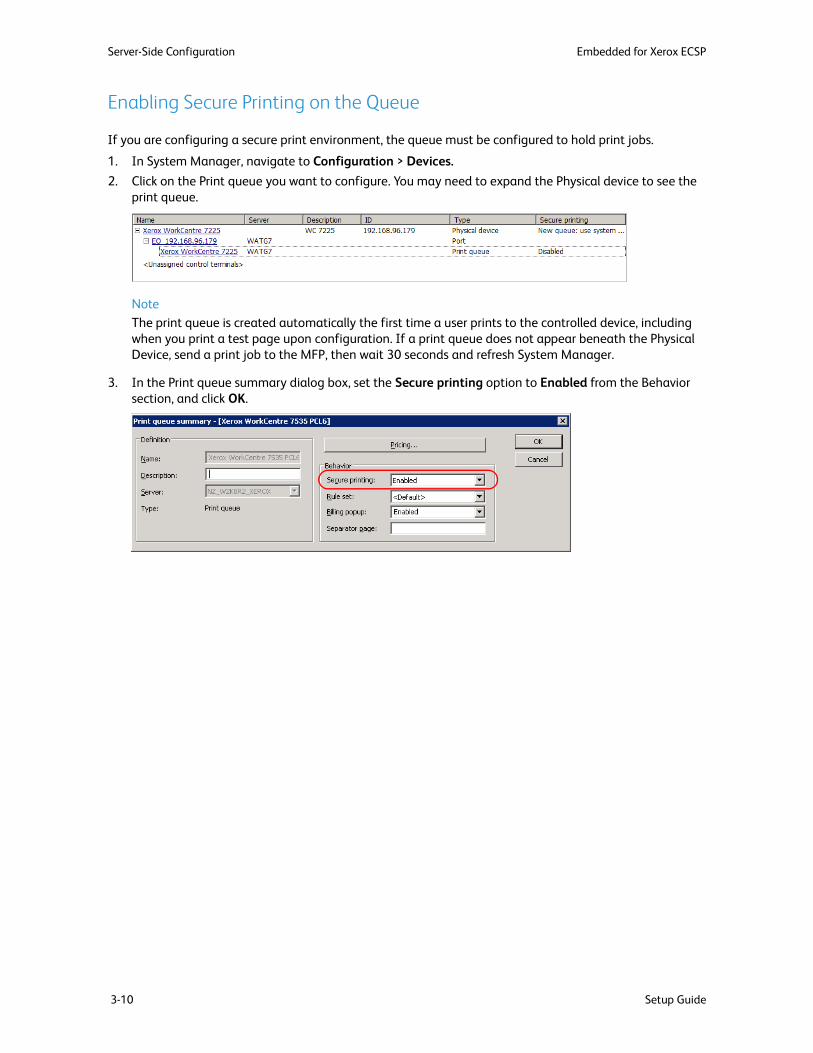
Enabling Secure Printing on the Queue
If you are configuring a secure print environment, the queue must be configured to hold print jobs.
1. In System Manager, navigate to Configuration > Devices.
2. Click on the Print queue you want to configure. You may need to expand the Physical device to see the print queue.
Note
The print queue is created automatically the first time a user prints to the controlled device, including when you print a test page upon configuration. If a print queue does not appear beneath the Physical Device, send a print job to the MFP, then wait 30 seconds and refresh System Manager.
3. In the Print queue summary dialog box, set the Secure printing option to Enabled from the Behavior section, and click OK.

Embedded for Xerox ECSP Server-Side Configuration
Setup Guide 3-11
Configuring Authentication PromptsThe user authentication prompts on the MFP login screen are determined by your Xerox Secure Access configuration.
1. In System Manager, navigate to Configuration > Security and authentication > User authentication.
2. Select one of the following Authentication options from the Input type drop-down list:
• Card swipe only – Users authenticate with a swipe card.• Card swipe or keypad entry – Users authenticate with a swipe card or at the MFP front panel. • Keypad only – Users authenticate at the MFP front panel
3. Select one of the following options from the Secondary prompt drop-down list:
• Always – User must enter a secondary PIN if issued via the keyboard after they swipe their card. • If PIN2 available – User must enter a secondary PIN if they have a PIN 2 value associated with
their user account. • If PIN2 available or keyboard login – User must enter a secondary PIN if they have a PIN 2 value
associated with their user account, or if they entered their primary PIN via the keyboard.• Never – Secondary PIN is not required.• Only with keyboard login – User must enter a secondary PIN if issued after they entered their
primary PIN via the keyboard (rather than with a swipe card). This option adds an extra layer of security, preventing users without a card from logging in without a secondary PIN.
4. In the Card setup area, enter the data start and stop positions in the Use data from position.
5. Select Auto-register primary PINs if you want users to register an unrecognized swipe card for future use. An External authority must be selected to allow card self-registration. See Configuring Card Self-Registration on page 14 for details.
6. Click OK to save the change.
For more detailed user authentication options see Accounts System Configuration in the Xerox Secure Access Administration Guide.
Server-Side Configuration Embedded for Xerox ECSP
3-12 Setup Guide
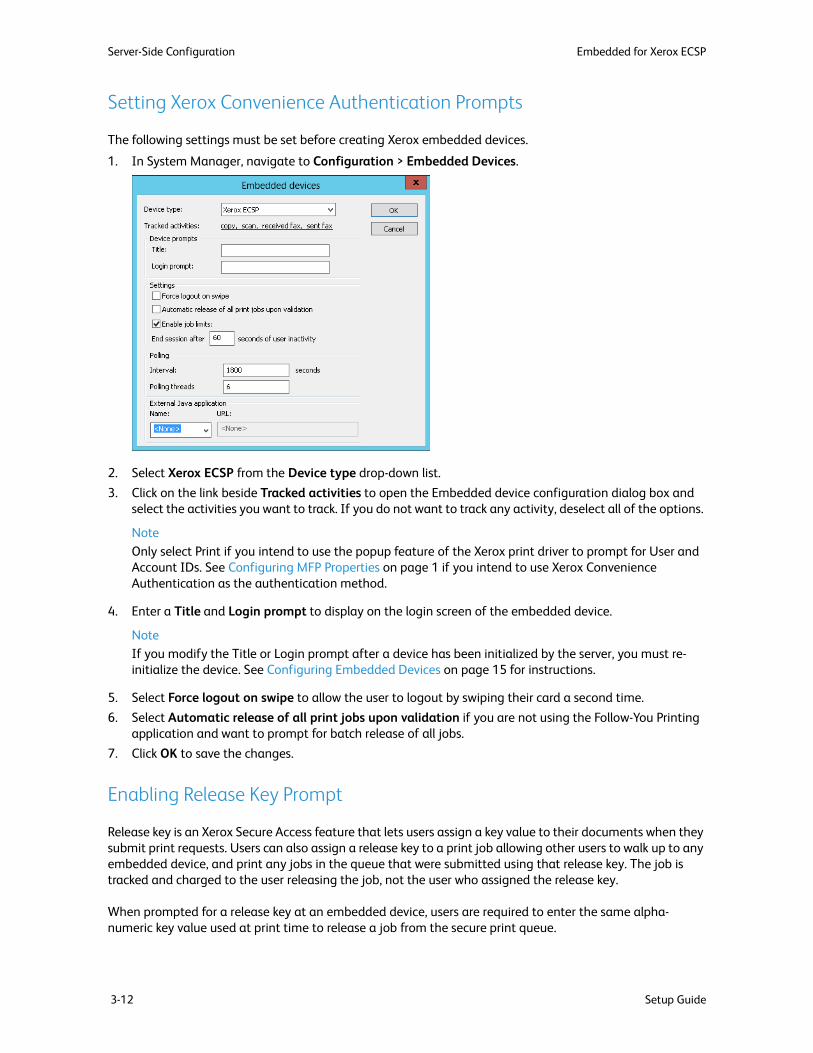
Setting Xerox Convenience Authentication Prompts
The following settings must be set before creating Xerox embedded devices.
1. In System Manager, navigate to Configuration > Embedded Devices.
2. Select Xerox ECSP from the Device type drop-down list.
3. Click on the link beside Tracked activities to open the Embedded device configuration dialog box and select the activities you want to track. If you do not want to track any activity, deselect all of the options.
Note
Only select Print if you intend to use the popup feature of the Xerox print driver to prompt for User and Account IDs. See Configuring MFP Properties on page 1 if you intend to use Xerox Convenience Authentication as the authentication method.
4. Enter a Title and Login prompt to display on the login screen of the embedded device.
NoteIf you modify the Title or Login prompt after a device has been initialized by the server, you must re-initialize the device. See Configuring Embedded Devices on page 15 for instructions.
5. Select Force logout on swipe to allow the user to logout by swiping their card a second time.
6. Select Automatic release of all print jobs upon validation if you are not using the Follow-You Printing application and want to prompt for batch release of all jobs.
7. Click OK to save the changes.
Enabling Release Key Prompt
Release key is an Xerox Secure Access feature that lets users assign a key value to their documents when they submit print requests. Users can also assign a release key to a print job allowing other users to walk up to any embedded device, and print any jobs in the queue that were submitted using that release key. The job is tracked and charged to the user releasing the job, not the user who assigned the release key.
When prompted for a release key at an embedded device, users are required to enter the same alpha-numeric key value used at print time to release a job from the secure print queue.

Embedded for Xerox ECSP Server-Side Configuration
Setup Guide 3-13
To enable release key prompts on the embedded device, do the following:
1. Open System Manager, and navigate to Configuration > User interaction > Session flow.
2. Select Prompt for release key in the Other prompts section to enable release keys.
3. From the Acknowledge and accept or deny copy job cost drop down, select the group to which the acknowledgment applies.
4. Click OK.

Server-Side Configuration Embedded for Xerox ECSP
3-14 Setup Guide
Configuring Card Self-Registration If you want users to self-register their swipe cards, you must enable this option in System Manager. When a user swipes an unregistered card, they are required to login to the MFP with valid User ID and Password. The User ID must already exist in CAS, or in the External authority defined to allow self-registration. The Password comes from one of the defined external authorities. The information the user must enter depends upon the authentication options that are set in System Manager. Two-level authentication is required to register new cards, and the user must manually enter both primary and secondary login credentials.
1. Open System Manager and navigate to Configuration > Security and authentication > User authentication.
2. In the Authentication options section, do the following:
a. Set Secondary Prompt to either If PIN2 available or keyboard login or Only on keyboard login to ensure that the password is prompted during card registration.
b. Select the Auto-register primary PINs check box. Optionally, you can select Register as alternate PIN to record the PIN as the Alternate PIN instead of the Primary PIN.
3. Select one or more Authentication mechanisms:
• Xerox Secure Access PINs – Select to connect a Xerox Secure Access print account with login information.
• External user ID and password – Select to verify all user information outside of Xerox Secure Access.
• Xerox Secure Access PIN with external password – Select if users swipe their cards for identification, and must also enter their domain user account password. Xerox Secure Access cross-checks the database for the corresponding Xerox Secure Access account name, then verifies the credentials against the selected external authority for network logon.
4. Click OK to save the changes and close the User authentication dialog box.
5. Navigate to Configuration > Security and authentication > External authentication and select an External authority – Windows or LDAP. Refer to External User Authentication in the Xerox Secure Access Administration Guide for more details on setting up an external user authentication method.
Once the user registers their card, their account information is automatically associated with that card. The next time the user swipes their card, they can login automatically without manually entering their password. However, if Secondary prompt is set to Always in System Manager, the user must enter a secondary PIN, or an external authority password after they swipe their card.

Embedded for Xerox ECSP Server-Side Configuration
Setup Guide 3-15
Configuring Embedded DevicesEmbedded devices are manufacturer-specific software components that handle the transfer of user authentication and transaction details between these devices and your accounting server database. Supported devices prompt users for valid user and account ID information for all print release, walk-up copy, and fax jobs.
You must create an embedded interface for each Xerox MFP that will be controlled by Xerox Secure Access. The System Manager component provides the tools to create these interfaces.
1. Open System Manager and select Devices in the left pane.
2. Right-click on a Xerox MFP physical device node in the right pane, then select Add embedded device from the menu.
3. Select Xerox ECSP from the Type drop-down list.
4. The Name and Description populate automatically. These are required fields, and cannot be left blank. The content can be changed if necessary. In the case of unknown devices, the user needs to provide this information.
5. Select the Server hosting the DCE associated with this physical and embedded device from the drop-down list. The Version field fills automatically.
Note
If you change the server associated with an embedded device that has already been initialized by the server, you must re-initialize the device.
6. Select the Card Reader HID decoding from the drop-down list.
For details on HID decoding, see the Xerox Secure Access Administration Guide.
7. Click the Override session timeout check box to set your own time interval for system timeout. Provide a value in seconds in the field provided.

Server-Side Configuration Embedded for Xerox ECSP
3-16 Setup Guide
Note
This feature is only available if the device is initialized using no tracking method. Devices initialized with Xerox Secure Access method cannot override session timeouts. See steps 12. and 13. for information about changing the tracking method. The Xerox idle timeouts are always respected for native operations. Therefore, in order for ECSP to cleanly exit upon timeout, the session timeout must be set at least 5 seconds less than the native timer.
8. Click Pricing to configure pricing at the embedded device level.
For pricing details, see Configuring Price Lists in the Xerox Secure Access Administration Guide.
Note
To configure the embedded device to use the price list for that device, select the default price list. If you select an alternate price list for the embedded device, the embedded device price list overrides the default price.
9. Click the link beside Tracked activities to override default tracking options for a particular embedded device. See Configuring Print Tracking on page 18.
10. Enter an Admin ID and Password to set up secure administrator access to the device.
Note
This login information is subsequently enforced at the MFP, and must match the MFP's settings. To validate you have the correct AdminID/Password consult the Internet Services web pages for the MFP. If left blank, this AdminID/Password defaults to the Xerox default user/password.
11. From the Name drop-down list, select any device feature you want to add to the device quick launch screen. Provide the URL pointing to the program files for the feature.
12. Click the Initialize button to open the Initialize device dialog box.
13. From the Method drop-down list, select the authentication method:
• Select Xerox Secure Access to control and track all device functions through Job Based Accounting (JBA).
• Select Xerox Secure Access without JBA to configure the device for authentication. The device remains locked until the user authenticates. Use this setting if there is no need to perform accounting, or tracking of transactions.
• Select None to track only Xerox Secure Access services at the device, and leave all native device functions untracked. Use this setting to allow access at the device with no authentication, and if you do not require MFP device side tracking. Xerox Secure Access functions such as Follow-You Printing will still require users to authenticate when they select the Xerox ECSP application on the Xerox All Services screen.

Embedded for Xerox ECSP Server-Side Configuration
Setup Guide 3-17
14. Click Initialize to configure communication between this device and the Xerox Secure Access server, and return to the Embedded device dialog box.
CautionClicking initialize changes the configuration on the device itself and may requrie some MFP’s to reboot. Ensure that the MFP is not in use before you click initialize. Click the Reboot button to the MFP’s web configuration page to accomplish the reboot remotely if necessary.
15. Click OK to save the embedded device details and close the dialog box. The new embedded device appears in the Devices list beneath the Physical device it is associated with.
16. Repeat these steps to create an embedded device on each supported Xerox MFP in the Devices list.
NoteIf initialization fails, and the Xerox device does not appear in System Manager, go back to Configuring Printer Ports on DRE Print Servers on page 4 and confirm that the MFP is properly configured.

Server-Side Configuration Embedded for Xerox ECSP
3-18 Setup Guide
Configuring Print TrackingThere are two methods to track printing—through Xerox ports or through the Xerox MFP’s firmware (also called Xerox JBA or Job-based Accounting). Each method has its own strengths:
• Equitrac Port tracking through DRE or DCE collects information about the print job directly from the print server, resulting in extremely granular information about the print job. This allows jobs to be costed properly based upon the intended resulting print.
• Xerox JBA tracking collects information from the logs of the printer itself, resulting in data derived from what was actually produced by the device, rather than what was intended by the print server. This results in potentially more accurate information about the resulting print job, especially in cases where the printer does not function as expected at the time of print. The data collected from the printer logs, however, lacks the granularity of the data collected by the DRE, which could result in the job being incorrectly costed.
Print Tracking Through Xerox Secure Access Ports
When DRE is set to track printing, it gathers details when the user submits a print job. When a job is released, DRE forwards these details to CAS based on the job characteristics determined by the Equitrac Port monitor.
The job details are gathered by the Port Monitor when the user releases the print job at a device. If the user decides to cancel the print job mid-way through printing, or if the user originally selected a print feature unavailable at the physical device, the precise page details are not captured at the time of output and therefore tracking may not be fully accurate.

Embedded for Xerox ECSP Server-Side Configuration
Setup Guide 3-19
Enable tracking from the physical device1. Open System Manager and select Devices in the left pane.
2. Select the physical device to open the Physical device summary dialog box.
3. In the Settings area, ensure Track and record print transactions on this device is selected from the Tracking Behavior drop-down list. This is the default setting.
4. Click OK to save the changes.
5. Navigate to Configuration > Devices > Embedded devices.
6. Select Xerox ECSP from the Device Type drop-down list.
7. Click on the link beside Tracked activities to open the Embedded device configuration dialog box.
8. Ensure that Print is NOT selected, then click OK.
Server-Side Configuration Embedded for Xerox ECSP
3-20 Setup Guide
Print Tracking Using Xerox Network Accounting
When tracking print jobs through a Xerox embedded device, configure the device and its print drivers to accept only authenticated print jobs. Users are prompted to enter user and account credentials prior to printing. The user authentication data is checked by the Xerox device when it receives the print job. The embedded device tracks printing and captures appropriate accounting information.
This method tracks precise job accounting details for cases where what is actually printed differs from what was requested. For instance if a job printed in black and white rather than the requested color printout, or if a job is canceled mid-printout. When using DRE tracking, similar capabilities can be leveraged through the use of SNMP or PJL job tracking features in EO/EE. See the Xerox Secure Access Administration Guide for details.
When the user releases a print job, the precise output details are gathered and held at the device after the job is completed. If the user cancels mid-way through a job, or if the device is not capable of producing output as the user intended (i.e. duplex was selected, but the device is not capable of duplexing and produces single-sided output only), the device calculates the precise output details only after the job is fully processed.
The DCE obtains the transaction details from the output device and forwards them to the CAS at a later interval.
This method requires additional configuration steps and your Xerox devices must meet the following prerequisites:
• JBA-supported Xerox device with the Network Accounting module installed and enabled and Authentication (Network Accounting option) enabled.
• TCP/IP enabled and configured on the devices. • A static IP Address or reserved DHCP IP Address (recommended).
• TCP/IP port 443 communication enabled on the network between the Xerox Secure Access server and the devices.
• Depending on the Xerox device and server operating system, you may require Xerox Advanced Services Management before you can enable the Accounting option on the printer driver. See the Xerox device documentation for details.
• Off-printer (also called off-box) validation must be configured on the Xerox Secure Access server. This option forces the device to send a request to Xerox to validate the data input by the user.
• For Xerox devices to accept authenticated print jobs and the embedded device to track print jobs correctly, the Xerox device and Xerox print drivers must be configured as described in the following table.
Device and Print Driver Configuration Notes
The Network Accounting module must be installed and enabled on each Xerox device.
Xerox Secure Access does not support the Internal Auditron authentication method. When you set the authentication mode on the device, ensure you select the Network Accounting option.
The Network Accounting Configuration > Authentication option must be enabled.
Depending on the Xerox device Authentication configuration, job information can be accurately tracked by the Xerox device regardless of whether or not the user and account information exists on that device. See the Xerox device documentation for details on configuring options for the physical device.

Embedded for Xerox ECSP Server-Side Configuration
Setup Guide 3-21
Once the prerequisites and configuration steps are complete, you must disable tracking on the physical device.
Installed Xerox print drivers must have the Accounting option enabled for each printer to prompt users for user and account ID prior to printing.
The location of the Accounting option in the Xerox print driver dialogs may not be the same for all printer connections you create. The option is located on the Properties > Document Details or the Printer Preferences dialogs. You may find that the location of the Accounting option varies by Windows platform, driver language type (Postscript or PCL), driver version, or device model. The Xerox device deletes print jobs to prevent anonymous (un-billable) printing when any of the following situations apply:The Xerox print driver does not have authentication features.The Accounting option for the print driver is disabled.
The device must use an Equitrac Port if configuring secure document release.
Secure Document Release is enabled through Xerox Ports only. Regardless of the print tracking method you choose, you must establish an Equitrac Port on the device if you plan to hold documents for secure release.
Configure the embedded device to perform print tracking.
By default, both the Equitrac Port and the embedded device track the print job. You must disable the tracking on the physical device and allow the embedded device to perform the tracking instead. See Disable tracking from the physical device on page 22
Device and Print Driver Configuration Notes

Server-Side Configuration Embedded for Xerox ECSP
3-22 Setup Guide
Disable tracking from the physical device1. Open System Manager and select Devices in the left pane.
2. Select the physical device to open the Physical device summary dialog box.
3. In the Settings area, select Do not track or record print transactions on this device is selected from the Tracking Behavior drop-down list. This is the default setting.
4. Click OK to save the changes.
5. Navigate to Configuration > Devices > Embedded devices.
6. Select Xerox ECSP from the Device Type drop-down list.
7. Click on the link beside Tracked activities to open the Embedded device configuration dialog box.
8. Ensure that Print is selected, then click OK.

Embedded for Xerox ECSP Server-Side Configuration
Setup Guide 3-23
9. Click OK again to save the change to the global options set in the Embedded devices dialog box.
Note
When print tracking from the device you must set the Tracking behavior to Do not track and record printing on this device on the Physical device summary screen, and select the Print check box on the Embedded device configuration dialog box. Failure to set these options results in double tracking or no tracking.
Color Tracking Using Xerox Tiered Billing
Tiered billing refers to a pricing scheme for color copies and prints based on the amount of actual color printed on the page, as opposed to a flat rate regardless of coverage. This coverage is categorized by two tiers (Xerox T1 and T2+) or three tiers (Xerox T1, T2, and T3), depending on the support provided by the Xerox device. Each tier denotes a percentage of color coverage area on the page.
Tiered billing requires additional configuration steps and must meet the following requirements:
• A Xerox color device enabled for tiered billing (e.g. Xerox ColorQube 9200 series)
• JBA-supported Xerox device with the Network Accounting module installed and enabled, and Authentication (Network Accounting option) enabled.
• Costing using the Xerox Secure Access Advanced price list with the prices set to reflect the tiered billing options.
• JBA print tracking must be used instead of the Equitrac port monitor.
• Follow-You Printing requires that the tracking behavior in System Manager must be set to Track and do not record print transactions on this device. If the tracking behavior is not set to this option, then the job is recorded twice—once by JBA, and once by the Equitrac port monitor.
• Validation of JBA data must be disabled on the Xerox device to prevent it from discarding the print job.
NoteThe cost of the job displayed in the Follow-You Printing screen on the Xerox device does not reflect the tiered billing price. However, once the job is released from the print queue, the tiered pricing information from the JBA log is recorded into the CAS database.

Server-Side Configuration Embedded for Xerox ECSP
3-24 Setup Guide
To set tiered billing for the Xerox device, do the following:
1. Open System Manager and select Price lists in the left pane.
2. Click Add advanced price list from the Current tasks section. An Advanced price list dialog box opens.
3. Enter a Name and Description for the price list.
4. Set the Job attributes, such as base price, finishing operations, and subcharges.
5. In the Page detail pricing section, specify a combination of page attributes.
a. Click Add from the Type column to create a new pricing rule.
b. Click the attribute fields (Type, Size, Color, Duplex, Tray, and Media) to select an option from the corresponding drop-down list.
c. Click the Col-type field to select the appropriate Xerox billing tier.
d. Enter a Price for the page detail pricing rule.
6. Click OK to save your Xerox tiered price list.
See the Xerox Secure Access Administration Guide for more details on configuring advanced price lists.

Setup Guide 4-1
4User Workflow
This section provides end-user instructions for authenticating and using the Xerox Secure Access Embedded functions at the Xerox MFP.
Topics
Authenticating at a Card Reader
Card Reader Status Messages
Logging In to a User Session
Selecting functions
Using Follow-You Printing®
Using LDAP Email Search

User Workflow Embedded for Xerox ECSP
4-2 Setup Guide
Authenticating at a Card ReaderWhen Xerox Secure Access controls an MFP, users can authenticate with a magnetic stripe card or proximity card before they are able to use the device functions.
Authenticating with a Magnetic Stripe Card1. Insert the card into the guide track with the magnetic stripe facing the indicated direction.
Ensure the card is pressed firmly against the guide.
2. Pull the card down through the guide track and remove the card.
Note
Do not run the card through at an angle or the terminal will not accept the data.
3. If the terminal cannot read the entry, the LED flashes red. Reinsert the card into the guide track and run the card through the reader again.
4. If Secondary prompt is enabled in System Manager, and a secondary PIN has been assigned in the database, the user must enter their ‘password’ on the MFP front panel when prompted. If the user has not been assigned a secondary PIN in the database, they can leave the field blank to proceed.
Authenticating with a Proximity Card
To enter data using a proximity card, pass the card within 1 inch or 2.5 cm of the proximity symbol located on the top of the card reader device. To locate the proximity card reader on the data reader module, look for this symbol:
If the swipe is invalid, the LED flashes red.
If secondary PINs are enabled, the user must enter their ‘password’ on the MFP front panel when prompted. If secondary PINs are enabled, but the user has not been assigned a secondary PIN, the user can leave the field blank to proceed.
Pass the proximity card over this symbol on the card
reader

Embedded for Xerox ECSP User Workflow
Setup Guide 4-3
Card Reader Status MessagesXerox Secure Access displays its authentication messages through an LED light on the card reader module.
The following signals may be displayed on the card reader:
The MFP has two functional modes, Idle mode or Ready mode.
Idle Mode
An MFP that is ready for use is in Idle mode. When a user passes a key fob or swipes a Magstripe card, the device changes to Ready mode.
The MFP returns to Idle mode when:
• No user is logged in to the device• After a specified period of inactivity in Ready mode (Sleep Mode Timer, as configured on the device)
When the device is in Idle mode, the LED light on the card reader is solid red.
Ready Mode
When the device is in Ready mode, the LED light on the card reader is solid green and the user can begin using the controlled device to perform a transaction.
LED Behavior Meaning
Solid red MFP is in Idle mode; it is ready but there is no active session.
Solid green MFP is in Ready mode and a session is active.
Slow flashing green Data received from card reader, awaiting authentication for active session. The light continues to flash green until the user enters their secondary PIN at the front panel. If the time-out expires and the user does not enter their PIN, the LED changes back to solid red and the device remains locked.
Slow flashing red No communication between card reader and MFP.
The LED light indicates the status

User Workflow Embedded for Xerox ECSP
4-4 Setup Guide
Logging In to a User SessionA user session begins when the user logs in with valid credentials through the MFP device interface. Once their login credentials have been authenticated, the user can manage and release documents via Follow-You Printing, or they can access any of the other device features, such as copying and faxing. Users are authenticated by CAS. See Configuring Embedded Devices on page 15 for details.
Xerox Server Authentication
To authenticate through Xerox Secure Access, do the following:
1. On the Login screen, the user enters their User ID or swipes their card. If System Manager is configured to prompt for Secondary PIN, the user may also need to enter a password.
Depending on how System Manager is configured, one of the following occurs after user authentication:
• The Launcher screen opens, and the user can proceed to the Follow-You Printing application to release their documents.
2. On the Launcher screen, the user can access the configured Xerox Secure Access functions.
Selecting functionsYou can select functions in the following ways:
• Xerox ECSP functions such as Follow-You Printing, Release All, or other external applications (if configured) are selected by touching the desired function on the Launcher screen.
• Native device functions such as fax are accessed by pressing the Services Home hard key on the device once you have authenticated. A new screen displays where you can select the desired function. Consult your Xerox device documentation for details about using native device functions.
When you finish using a Xerox ECSP function, press Logout to quit the function and return to the Login screen, or Launcher to return to the Launcher screen. You can then select another function, or you can touch Logout to end your current session.

Embedded for Xerox ECSP User Workflow
Setup Guide 4-5
Using Follow-You Printing®
The Follow-You Printing screen displays all the queued documents associated with your login credentials, or release key. By default, the list displays documents in order from longest-queued to most-recently queued.
If configured in System Manager to prompt for a release key on the device, the Release Key screen opens after Follow-You Printing is selected. The user enters the key code and clicks OK to continue.
Note
The print queue can only display up to the first 100 print jobs per user.
Each time you release a document from the Job list, Xerox ECSP checks your estimated available account balance. If account limits are enforced, and the total cost of the selected documents exceed the available account balance, an error message displays indicating that the estimated account balance would be exceeded and the items will not be printed.

User Workflow Embedded for Xerox ECSP
4-6 Setup Guide
Note
Account limits are a licensable feature available in Xerox Secure Access.
• Touch Print to release all selected documents (selected documents are highlighted).
• Touch Print&Save to release any selected print job and save them in the print queue.• Touch Delete to remove selected documents from the Job List without printing them.
• Touch Select All to select all documents. To deselect a document and not release it for printing, touch the document again to deselect it.
• Select Force B/W to force color jobs to print in black & white. When selected, all specified jobs print in black & white. Touch the button again to turn Force B/W "Off".
• Touch Refresh to update the document list.
• Touch Servers to select a different print server and pull your document from another print queue to this MFP. To use this feature, your print environment must be configured to support multi-server Follow-You™ printing.
• Touch the Up or Down arrow buttons to quickly move between pages if the list of documents are on more than one page.
• Touch Back to return to the previous screen.
• Touch Logout to end your current Xerox ECSP session.
When you select a job to Print, Print&Save, or Delete, the document details are displayed in the Job Details section.
Using LDAP Email Search
In oder to use LDAP search, it must be enabled and configured on the server. See the Xerox Secure Access Administration Guide for details. If not configured, the LDAP search magnifying glass icon does not appear. To perform a search, use the LDAP search buttons located beside the To and Cc fields.

Embedded for Xerox ECSP User Workflow
Setup Guide 4-7
To perform an email search, do the following:
1. Select the Magnifying glass button beside the To or Cc fields to search for and add addresses to the corresponding field. A Search screen opens:
2. Touch the Search Criteria field to display a soft keyboard.
3. Enter your search criteria and select the Magnifying glass icon again to display search results.
4. Use the Up and Down arrows to scroll through the list page by page.
5. Select one or more addresses, and touch OK to exit the Email Search feature.
6. Make a selection from the results, and touch OK. The information populates the To or Cc field.

User Workflow Embedded for Xerox ECSP
4-8 Setup Guide

Setup Guide 5-1
5Troubleshooting
Before contacting Technical Support for assistance, refer to the following table for symptoms that match the problem you are experiencing. Instructions for possible solutions are also provided.
Symptoms and Solutions
If you experience a problem with your Xerox Secure Access application at a device, refer to the table below for symptoms and solutions that match your problem before contacting Xerox Technical Support for help.
Symptom Possible Resolution
The indicator light on the card reader is off
When the light is not lit, this indicates a loss of power to the reader. Check the cable connection to the Authentication Device and ensure that it is firmly seated. If the light remains unlit, check the power to the Authentication Device. If the Authentication Device does not have power, neither does the card reader.
The card reader indicator light rapidly flashes red upon swipe
The swipe was invalid at the card reader. The Xerox Secure Access server has determined that the card ID does not correspond to a valid user on the network. Test the reader with another card for a user whose card is known to work at other readers. If the cards are not being read correctly at any reader, server configuration may be the cause. Read Configuring Authentication Prompts on page 11 to ensure the card data positions are set correctly.
The card reader indicator light stays red upon swipe
If the indicator light does not change color when you swipe, the reader has not detected the card. Verify that the swipe was performed correctly. A magnetic card may have been encoded with a different standard or swiped upside down or facing the wrong direction; a proximity card may not have been placed close enough to the reader, or may not be a supported card type. If the same card works at other readers at the same site, the reader module may be at fault. If the card does not work at other readers, verify the card technology with the card vendor and reference Supported Card Readers on page 4.
The Authentication Device is not listed in System Manager > Devices
Authentication Devices appear in the Devices list by MAC Address. Check the list of <Unassigned control terminals> to check for the IP Address of the Authentication Device in question.
If you manually configured the Authentication Device (without DHCP) ensure that you entered the correct DCE IP Address in the Web Admin utility.
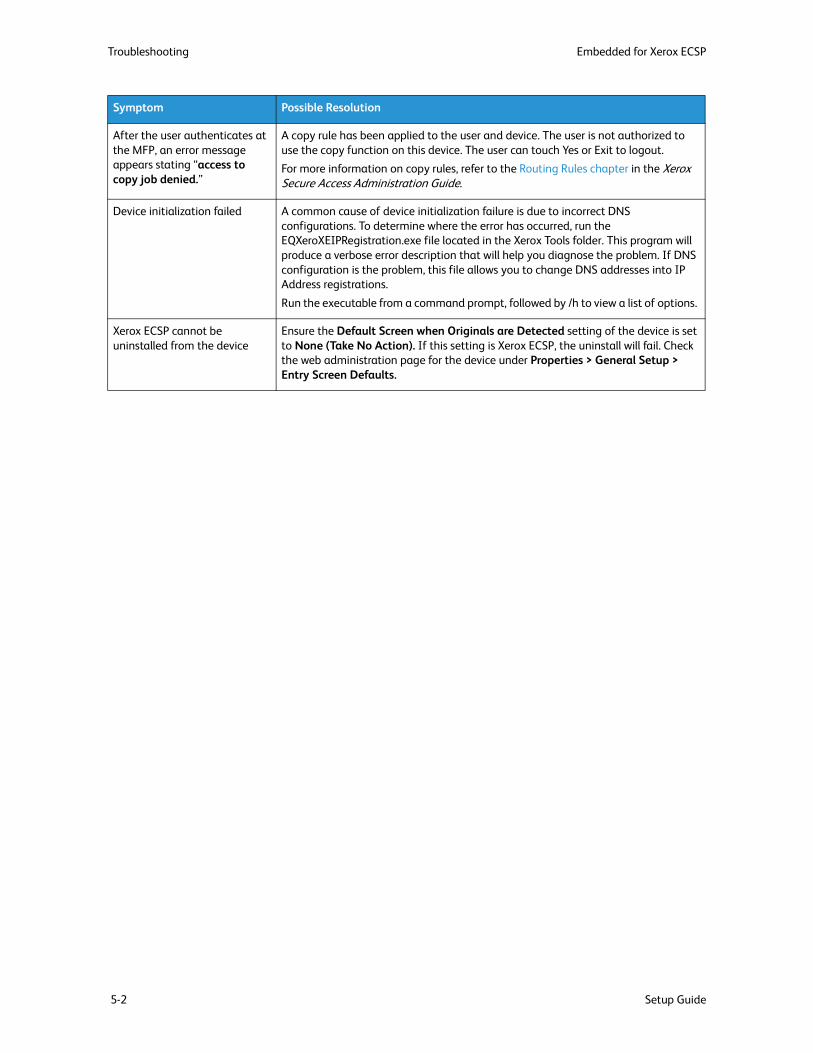
Troubleshooting Embedded for Xerox ECSP
5-2 Setup Guide
After the user authenticates at the MFP, an error message appears stating “access to copy job denied.”
A copy rule has been applied to the user and device. The user is not authorized to use the copy function on this device. The user can touch Yes or Exit to logout.
For more information on copy rules, refer to the Routing Rules chapter in the Xerox Secure Access Administration Guide.
Device initialization failed A common cause of device initialization failure is due to incorrect DNS configurations. To determine where the error has occurred, run the EQXeroXEIPRegistration.exe file located in the Xerox Tools folder. This program will produce a verbose error description that will help you diagnose the problem. If DNS configuration is the problem, this file allows you to change DNS addresses into IP Address registrations.
Run the executable from a command prompt, followed by /h to view a list of options.
Xerox ECSP cannot be uninstalled from the device
Ensure the Default Screen when Originals are Detected setting of the device is set to None (Take No Action). If this setting is Xerox ECSP, the uninstall will fail. Check the web administration page for the device under Properties > General Setup > Entry Screen Defaults.
Symptom Possible Resolution

Embedded for Xerox ECSP
Setup Guide 5-3
Configuration Tear Sheet
Tear this sheet out and use it when performing the physical setup of the Authentication Devices. You must keep careful track of the IP and MAC Address of each Authentication Device and the corresponding MFP that it will control. The MAC Address of the Authentication Device is printed on the serial number label.
Authentication Device Multifunction Device
MAC Address IP Address IP Address Hostname
1
2
3
4
5
6
7
8
9
10
11
12
13
14
15
16
17
18
19
20

Embedded for Xerox ECSP
5-4 Setup Guide

Setup Guide A-1
AAppendix: Third Party Software
This software contains the following third party software.
SAX XML Parsing Project
SAX XML Parsing Project (http://www.saxproject.org) covering packages org.sax.*
Copyright Status: SAX is free.
It is not possible to own a license to SAX, as it is public domain.
No Warranty
Because SAX is released to the public domain, there is no warranty for the design or for the software implementation, to the extent permitted by applicable law. Except when otherwise stated in writing the copyright holders and/or other parties provide SAX "as is" without warranty of any kind, either expressed or implied, including, but not limited to, the implied warranties of merchantability and fitness for a particular purpose. The entire risk as to the quality and performance of SAX is with you. Should SAX prove defective, you assume the cost of all necessary servicing, repair or correction.
In no event unless required by applicable law or agreed to in writing will any copyright holder, or any other party who may modify and/or redistribute SAX, be liable to you for damages, including any general, special, incidental or consequential damages arising out of the use or inability to use SAX (including but not limited to loss of data or data being rendered inaccurate or losses sustained by you or third parties or a failure of the SAX to operate with any other programs), even if such holder or other party has been advised of the possibility of such damages.
Copyright Disclaimers
This page includes statements to that effect by David Megginson, who would have been able to claim copyright for the original work.

Appendix: Third Party Software Embedded for Xerox ECSP
A-2 Setup Guide
SAX 1.0
Version 1.0 of the Simple API for XML (SAX), created collectively by the membership of the XML-DEV mailing list, is hereby released into the public domain.
No one owns SAX: you may use it freely in both commercial and non-commercial applications, bundle it with your software distribution, include it on a CD-ROM, list the source code in a book, mirror the documentation at your own web site, or use it in any other way you see fit.
David Megginson, Megginson Technologies Ltd.5/11/1998
SAX 2.0
I hereby abandon any property rights to SAX 2.0 (the Simple API for XML), and release all of the SAX 2.0 source code, compiled code, and documentation contained in this distribution into the Public Domain. SAX comes with NO WARRANTY or guarantee of fitness for any purpose.
David Megginson, Megginson Technologies Ltd.5/5/2000
Piccolo 1.04 XML Parser
Piccolo 1.04 XML Parser (com.bluecast.*) which contains the following copyright notice and license terms:
Copyright© 2002-2004 by Yuval Oren. All rights reserved.
Licensed under the Apache License, Version 2.0 (the "License"); you may not use this file except in compliance with the License. You may obtain a copy of the License at http://www.apache.org/licenses/LICENSE-2.0
Unless required by applicable law or agreed to in writing, software distributed under the License is distributed on an "AS IS" BASIS, WITHOUT WARRANTIES OR CONDITIONS OF ANY KIND, either express or implied.
See the License for the specific language governing permissions and limitations under the License.
The following software packages are licensed under GNU GPLv2 with Classpath Exception to support XML parsing through Piccolo:
• java.rmi.*
• javax.xml.parsers.*• javax.xml.rpc.*
• eq.java.lang.*
• eq.java.util.*
These packages contain the following copyright notice and license terms:
Copyright© 1998, 1999, 2001, 2002, 2005 Free Software Foundation, Inc.
GNU Classpath is free software; you can redistribute it and/or modify it under the terms of the GNU General Public License as published by the Free Software Foundation; either version 2, or (at your option) any later version.

Embedded for Xerox ECSP Appendix: Third Party Software
Setup Guide A-3
GNU Classpath is distributed in the hope that it will be useful, but WITHOUT ANY WARRANTY; without even the implied warranty of MERCHANTABILITY or FITNESS FOR A PARTICULAR PURPOSE. See the GNU General Public License for more details.
You should have received a copy of the GNU General Public License along with GNU Classpath; see the file COPYING. If not, write to the Free Software Foundation, Inc., 51 Franklin Street, Fifth Floor, Boston, MA 02110-1301 USA.
Linking this library statically or dynamically with other modules is making a combined work based on this library. Thus, the terms and conditions of the GNU General Public License cover the whole combination.
As a special exception, the copyright holders of this library give you permission to link this library with independent modules to produce an executable, regardless of the license terms of these independent modules, and to copy and distribute the resulting executable under terms of your choice, provided that you also meet, for each linked independent module, the terms and conditions of the license of that module. An independent module is a module which is not derived from or based on this library. If you modify this library, you may extend this exception to your version of the library, but you are not obligated to do so. If you do not wish to do so, delete this exception statement from your version.
Base64 Encoding
com.sun.midp.io.Base64.java supports Base64 encoding of data is based upon work carrying the following copyright legend and license terms:
Copyright© 2000 The Legion Of The Bouncy Castle (http://www.bouncycastle.org)
Permission is hereby granted, free of charge, to any person obtaining a copy of this software and associated documentation files (the "Software"), to deal in the Software without restriction, including without limitation the rights to use, copy, modify, merge, publish, distribute, sublicense, and/or sell copies of the Software, and to permit persons to whom the Software is furnished to do so, subject to the following conditions:
The above copyright notice and this permission notice shall be included in all copies or substantial portions of the Software.
THE SOFTWARE IS PROVIDED "AS IS", WITHOUT WARRANTY OF ANY KIND, EXPRESS OR IMPLIED, INCLUDING BUT NOT LIMITED TO THE WARRANTIES OF MERCHANTABILITY, FITNESS FOR A PARTICULAR PURPOSE AND NONINFRINGEMENT. IN NO EVENT SHALL THE AUTHORS OR COPYRIGHT HOLDERS BE LIABLE FOR ANY CLAIM, DAMAGES OR OTHER LIABILITY, WHETHER IN AN ACTION OF CONTRACT, TORT OR OTHERWISE, ARISING FROM, OUT OF OR IN CONNECTION WITH THE SOFTWARE OR THE USE OR OTHER DEALINGS IN THE SOFTWARE.
Apache's Log4j Project
Apache's Log4j Project (com.apache.log4j) carries the following copyright and license notice:
Copyright© 2003-2006 The Apache Software Foundation.
Licensed under the Apache License, Version 2.0 (the "License"); you may not use this file except in compliance with the License. You may obtain a copy of the License at http://www.apache.org/licenses/LICENSE-2.0.
Unless required by applicable law or agreed to in writing, software distributed under the License is distributed on an "AS IS" BASIS, WITHOUT WARRANTIES OR CONDITIONS OF ANY KIND, either express or implied.

Appendix: Third Party Software Embedded for Xerox ECSP
A-4 Setup Guide
See the License for the specific language governing permissions and limitations under the License.
Java Collections v1.1
The standard Java Collections v1.1 (com.sun.java.util.collections.*) is Copyright© Sun Microsystems Inc. and is released under the following license:
SUN MICROSYSTEMS, INC., THROUGH ITS JAVASOFT BUSINESS ("SUN") IS WILLING TO LICENSE THE ACCOMPANYING com.sun.java.util.collections.x PACKAGES AND DOCUMENTATION ("SOFTWARE") INCLUDING AUTHORIZED COPIES OF EACH (THE "SOFTWARE") TO LICENSEE ONLY ON THE CONDITION THAT LICENSEE ACCEPTS ALL OF THE TERMS IN THIS AGREEMENT.
PLEASE READ THE TERMS CAREFULLY BEFORE CLICKING ON THE "ACCEPT" BUTTON. BY CLICKING ON THE "ACCEPT" BUTTON, LICENSEE ACKNOWLEDGES THAT LICENSEE HAS READ AND UNDERSTANDS THIS AGREEMENT AND AGREES TO BE BOUND BY ITS TERMS AND CONDITIONS. IF LICENSEE DOES NOT ACCEPT THESE LICENSE TERMS, SUN DOES NOT GRANT ANY LICENSE TO THE SOFTWARE, AND LICENSEE SHOULD CLICK ON THE "REJECT" BUTTON TO EXIT THIS PAGE.
1. Limited License Grant. Licensee is granted a non-exclusive, non-transferable limited license to use the Software to assist in the development Java compatible software programs running on JDK 1.1 ("Developed Programs") provided that Licensee: (i) may not create or authorize your licensees to create additional classes, interfaces, or sub-packages that are contained in "java" or "sun" packages or similar as specified by Sun in any class file naming conventions; and (ii) agree to indemnify, hold harmless, and defend Sun and its licensors from and against any claims or lawsuits, including attorney's fees, that arise or result from the use of the Software or development performed by Licensee.
2. License to Distribute. Licensee is granted a royalty-fee right to reproduce and distribute the Software provided that Licensee: (i) distributes the Software complete and unmodified, only as part of, and for the sole purpose of running Licensee's Developed Program into which the Software is incorporated; (ii) do not distribute additional software intended to replace any component(s) of the Software; (iii) do not remove or alter any proprietary legends or notices contained in the Software; (iv) only distribute the Developed Program(s) subject to a license agreement that protects Sun's interest consistent with the terms contained herein; and (v) agree to indemnify, hold harmless, and defend Sun and its licensors from and against any claims or lawsuits, including attorney's fees, that arise or result from the distribution of the Developed Program(s).
3. Restrictions. Software is copyrighted and title to all copies is retained by Sun and/or its licensors. Licensee shall reproduce and apply all proprietary rights notices which appear on or in the Software on or in any copies of the Software made by Licensee. Unless enforcement of this provision is prohibited by applicable law, and only to that extent, Licensee shall not modify, decompile, disassemble, decrypt, extract, or otherwise reverse engineer Software. Software is not designed or licensed for use in on-line control equipment in hazardous environments such as operation of nuclear facilities, aircraft navigation or control, or direct life support machines.
4. Confidentiality. Software is confidential and proprietary information of Sun and/or its licensors. Licensee agrees to take adequate steps to protect Software from unauthorized disclosure or use.
5. Disclaimer of Warranty. The Software is provided "AS IS". ALL EXPRESS OR IMPLIED CONDITIONS, REPRESENTATIONS AND WARRANTIES, INCLUDING ANY IMPLIED WARRANTY OF MERCHANTABILITY, FITNESS FOR A PARTICULAR PURPOSE OR NON-INFRINGEMENT, ARE HEREBY EXCLUDED TO THE EXTENT ALLOWED BY APPLICABLE LAW.
6. Limitation of Liability. IN NO EVENT WILL SUN OR ITS LICENSORS BE LIABLE FOR ANY LOST REVENUE, PROFIT, OR DATA, OR FOR SPECIAL, INDIRECT, CONSEQUENTIAL, INCIDENTAL, OR PUNITIVE DAMAGES HOWEVER CAUSED AND REGARDLESS OF THE THEORY OF LIABILITY ARISING
Embedded for Xerox ECSP Appendix: Third Party Software
Setup Guide A-5
OUT OF THE USE OF OR INABILITY TO USE SOFTWARE, EVEN IF SUN HAS BEEN ADVISED OF THE POSSIBILITY OF SUCH DAMAGES.
7. Termination. This License is effective until terminated. Licensee may terminate this License at any time by destroying all copies of Software including any documentation. This License will terminate immediately without notice from Sun if Licensee fails to comply with any provision of this License. Upon termination, Licensee must destroy all copies of Software.
8. Export Regulations. Software, including technical data, is subject to U.S. export control laws, including the U.S. Export Administration Act and its associated regulations, and may be subject to export or import regulations in other countries. Licensee agrees to comply strictly with all such regulations and acknowledges that it has the responsibility to obtain licenses to export, re-export, or import Software.
9. U.S. Government Restricted Rights. Use, duplication or disclosure of the Software by the U.S. Government is subject to restrictions of FAR 52.227-14(g)(2)(6/87) and FAR 52.227-19(6/87), or DFAR 252.227-7015(b)(6/95) and DFAR 227.7202-3(a).
10. Governing Law. Any action related to this Agreement will be governed by California law and controlling U.S. federal law. No choice of law rules of any jurisdiction will apply.
11. Severability. If any of the above provisions are held to be in violation of applicable law, void, or unenforceable in any jurisdiction, then such provisions are herewith waived to the extent necessary for the License to be otherwise enforceable in such jurisdiction. However, if in Sun's opinion deletion of any provisions of the License by operation of this paragraph unreasonably compromises the rights or liabilities of Sun or its licensors, Sun reserves the right to terminate the License and refund the fee paid by Licensee as Licensee's sole and exclusive remedy.
12. Integration. This Agreement is the entire agreement between Licensee and Sun relating to Software and:
(i) supersedes all prior or contemporaneous oral or written communications,
(ii) prevails over any conflicting or additional terms of any quote, order, acknowledgment, or similar communication between the parties during the term of this Agreement. No modification to this Agreement will be binding, unless in writing and signed by a duly authorized representative of each party.
AES Encryption
AES Encryption is based upon aes.js provided through the BrowserSync project (http://code.google.com/p/browsersync/) under the following copyright and license terms:
Copyright© 2005, Google Inc.
Redistribution and use in source and binary forms, with or without modification, are permitted provided that the following conditions are met:
1. Redistributions of source code must retain the above copyright notice, this list of conditions and the following disclaimer.
2. Redistributions in binary form must reproduce the above copyright notice, this list of conditions and the following disclaimer in the documentation and/or other materials provided with the distribution.
3. Neither the name of Google Inc. nor the names of its contributors may be used to endorse or promote products derived from this software without specific prior written permission.
THIS SOFTWARE IS PROVIDED BY THE AUTHOR ``AS IS'' AND ANY EXPRESS OR IMPLIED WARRANTIES, INCLUDING, BUT NOT LIMITED TO, THE IMPLIED WARRANTIES OF MERCHANTABILITY AND FITNESS FOR A PARTICULAR PURPOSE ARE DISCLAIMED. IN NO EVENT SHALL THE AUTHOR BE LIABLE FOR ANY DIRECT, INDIRECT, INCIDENTAL, SPECIAL, EXEMPLARY, OR CONSEQUENTIAL DAMAGES (INCLUDING, BUT NOT LIMITED TO, PROCUREMENT OF SUBSTITUTE GOODS OR SERVICES; LOSS OF USE, DATA, OR

Appendix: Third Party Software Embedded for Xerox ECSP
A-6 Setup Guide
PROFITS; OR BUSINESS INTERRUPTION) HOWEVER CAUSED AND ON ANY THEORY OF LIABILITY, WHETHER IN CONTRACT, STRICT LIABILITY, OR TORT (INCLUDING NEGLIGENCE OR OTHERWISE) ARISING IN ANY WAY OUT OF THE USE OF THIS SOFTWARE, EVEN IF ADVISED OF THE POSSIBILITY OF SUCH DAMAGE.
Fast GUID Generation
Copyright©Fast GUID generation is provided under the following copyright and license terms:
Copyright© 2001-2004 The Apache Software Foundation.
Licensed under the Apache License, Version 2.0 (the "License"); you may not use this file except in compliance with the License. You may obtain a copy of the License at http://www.apache.org/licenses/LICENSE-2.0
Unless required by applicable law or agreed to in writing, software distributed under the License is distributed on an "AS IS" BASIS, WITHOUT WARRANTIES OR CONDITIONS OF ANY KIND, either express or implied. See the License for the specific language governing permissions and limitations under the License.
The Complete Apache License v2.0 is below:
Apache License Version 2.0, January 2004 http://www.apache.org/licenses/
TERMS AND CONDITIONS FOR USE, REPRODUCTION, AND DISTRIBUTION
1. Definitions.
"License" shall mean the terms and conditions for use, reproduction, and distribution as defined by Sections 1 through 9 of this document.
"Licensor" shall mean the copyright owner or entity authorized by the copyright owner that is granting the License.
"Legal Entity" shall mean the union of the acting entity and all other entities that control, are controlled by, or are under common control with that entity. For the purposes of this definition, "control" means (i) the power, direct or indirect, to cause the direction or management of such entity, whether by contract or otherwise, or (ii) ownership of fifty percent (50%) or more of the outstanding shares, or (iii) beneficial ownership of such entity.
"You" (or "Your") shall mean an individual or Legal Entity exercising permissions granted by this License.
"Source" form shall mean the preferred form for making modifications, including but not limited to software source code, documentation source, and configuration files.
"Object" form shall mean any form resulting from mechanical transformation or translation of a Source form, including but not limited to compiled object code, generated documentation, and conversions to other media types.
"Work" shall mean the work of authorship, whether in Source or Object form, made available under the License, as indicated by a copyright notice that is included in or attached to the work (an example is provided in the Appendix below).
"Derivative Works" shall mean any work, whether in Source or Object form, that is based on (or derived from) the Work and for which the editorial revisions, annotations, elaborations, or other modifications represent, as a whole, an original work of authorship. For the purposes of this License, Derivative Works shall not include works that remain separable from, or merely link (or bind by name) to the interfaces of, the Work and Derivative Works thereof.
"Contribution" shall mean any work of authorship, including the original version of the Work and any modifications or additions to that Work or Derivative Works thereof, that is intentionally submitted to

Embedded for Xerox ECSP Appendix: Third Party Software
Setup Guide A-7
Licensor for inclusion in the Work by the copyright owner or by an individual or Legal Entity authorized to submit on behalf of the copyright owner. For the purposes of this definition, "submitted" means any form of electronic, verbal, or written communication sent to the Licensor or its representatives, including but not limited to communication on electronic mailing lists, source code control systems, and issue tracking systems that are managed by, or on behalf of, the Licensor for the purpose of discussing and improving the Work, but excluding communication that is conspicuously marked or otherwise designated in writing by the copyright owner as "Not a Contribution."
"Contributor" shall mean Licensor and any individual or Legal Entity on behalf of whom a Contribution has been received by Licensor and subsequently incorporated within the Work.
2. Grant of Copyright License. Subject to the terms and conditions of this License, each Contributor hereby grants to You a perpetual, worldwide, non-exclusive, no-charge, royalty-free, irrevocable copyright license to reproduce, prepare Derivative Works of, publicly display, publicly perform, sublicense, and distribute the Work and such Derivative Works in Source or Object form.
3. Grant of Patent License. Subject to the terms and conditions of this License, each Contributor hereby grants to You a perpetual, worldwide, non-exclusive, no-charge, royalty-free, irrevocable (except as stated in this section) patent license to make, have made, use, offer to sell, sell, import, and otherwise transfer the Work, where such license applies only to those patent claims licensable by such Contributor that are necessarily infringed by their Contribution(s) alone or by combination of their Contribution(s) with the Work to which such Contribution(s) was submitted. If You institute patent litigation against any entity (including a cross-claim or counterclaim in a lawsuit) alleging that the Work or a Contribution incorporated within the Work constitutes direct or contributory patent infringement, then any patent licenses granted to You under this License for that Work shall terminate as of the date such litigation is filed.
4. Redistribution. You may reproduce and distribute copies of the Work or Derivative Works thereof in any medium, with or without modifications, and in Source or Object form, provided that You meet the following conditions:
a. You must give any other recipients of the Work or Derivative Works a copy of this License; and
b. You must cause any modified files to carry prominent notices stating that You changed the files; and
c. You must retain, in the Source form of any Derivative Works that You distribute, all copyright, patent, trademark, and attribution notices from the Source form of the Work, excluding those notices that do not pertain to any part of the Derivative Works; and
d. If the Work includes a "NOTICE" text file as part of its distribution, then any Derivative Works that You distribute must include a readable copy of the attribution notices contained within such NOTICE file, excluding those notices that do not pertain to any part of the Derivative Works, in at least one of the following places: within a NOTICE text file distributed as part of the Derivative Works; within the Source form or documentation, if provided along with the Derivative Works; or, within a display generated by the Derivative Works, if and wherever such third party notices normally appear. The contents of the NOTICE file are for informational purposes only and do not modify the License. You may add Your own attribution notices within Derivative Works that You distribute, alongside or as an addendum to the NOTICE text from the Work, provided that such additional attribution notices cannot be construed as modifying the License. You may add Your own copyright statement to Your modifications and may provide additional or different license terms and conditions for use, reproduction, or distribution of Your modifications, or for any such Derivative Works as a whole, provided Your use, reproduction, and distribution of the Work otherwise complies with the conditions stated in this License.
5. Submission of Contributions. Unless You explicitly state otherwise, any Contribution intentionally submitted for inclusion in the Work by You to the Licensor shall be under the terms and conditions of this License, without any additional terms or conditions. Notwithstanding the above, nothing herein shall

Appendix: Third Party Software Embedded for Xerox ECSP
A-8 Setup Guide
supersede or modify the terms of any separate license agreement you may have executed with Licensor regarding such Contributions.
6. Trademarks. This License does not grant permission to use the trade names, trademarks, service marks, or product names of the Licensor, except as required for reasonable and customary use in describing the origin of the Work and reproducing the content of the NOTICE file.
7. Disclaimer of Warranty. Unless required by applicable law or agreed to in writing, Licensor provides the Work (and each Contributor provides its Contributions) on an "AS IS" BASIS, WITHOUT WARRANTIES OR CONDITIONS OF ANY KIND, either express or implied, including, without limitation, any warranties or conditions of TITLE, NON-INFRINGEMENT, MERCHANTABILITY, or FITNESS FOR A PARTICULAR PURPOSE. You are solely responsible for determining the appropriateness of using or redistributing the Work and assume any risks associated with Your exercise of permissions under this License.
8. Limitation of Liability. In no event and under no legal theory, whether in tort (including negligence), contract, or otherwise, unless required by applicable law (such as deliberate and grossly negligent acts) or agreed to in writing, shall any Contributor be liable to You for damages, including any direct, indirect, special, incidental, or consequential damages of any character arising as a result of this License or out of the use or inability to use the Work (including but not limited to damages for loss of goodwill, work stoppage, computer failure or malfunction, or any and all other commercial damages or losses), even if such Contributor has been advised of the possibility of such damages.
9. Accepting Warranty or Additional Liability. While redistributing the Work or Derivative Works thereof, You may choose to offer, and charge a fee for, acceptance of support, warranty, indemnity, or other liability obligations and/or rights consistent with this License. However, in accepting such obligations, You may act only on Your own behalf and on Your sole responsibility, not on behalf of any other Contributor, and only if You agree to indemnify, defend, and hold each Contributor harmless for any liability incurred by, or claims asserted against, such Contributor by reason of your accepting any such warranty or additional liability.
GNU General Public License v2.0
The Complete GNU General Public License v2.0 is reproduced below. Please note that this software contains third party components released under the GNU Classpath license, which includes the GNU GPL v2 by reference.
GNU GENERAL PUBLIC LICENSE Version 2, June 1991
Copyright© 1989, 1991 Free Software Foundation, Inc. 51 Franklin Street, Fifth Floor, Boston, MA 02110-1301, USA
Everyone is permitted to copy and distribute verbatim copies of this license document, but changing it is not allowed.
The licenses for most software are designed to take away your freedom to share and change it. By contrast, the GNU General Public License is intended to guarantee your freedom to share and change free software--to make sure the software is free for all its users. This General Public License applies to most of the Free Software Foundation's software and to any other program whose authors commit to using it. (Some other Free Software Foundation software is covered by the GNU Lesser General Public License instead.) You can apply it to your programs, too.
When we speak of free software, we are referring to freedom, not price. Our General Public Licenses are designed to make sure that you have the freedom to distribute copies of free software (and charge for this service if you wish), that you receive source code or can get it if you want it, that you can change the software or use pieces of it in new free programs; and that you know you can do these things.

Embedded for Xerox ECSP Appendix: Third Party Software
Setup Guide A-9
To protect your rights, we need to make restrictions that forbid anyone to deny you these rights or to ask you to surrender the rights. These restrictions translate to certain responsibilities for you if you distribute copies of the software, or if you modify it.
For example, if you distribute copies of such a program, whether gratis or for a fee, you must give the recipients all the rights that you have. You must make sure that they, too, receive or can get the source code. And you must show them these terms so they know their rights.
We protect your rights with two steps: (1) copyright the software, and (2) offer you this license which gives you legal permission to copy, distribute and/or modify the software.
Also, for each author's protection and ours, we want to make certain that everyone understands that there is no warranty for this free software. If the software is modified by someone else and passed on, we want its recipients to know that what they have is not the original, so that any problems introduced by others will not reflect on the original authors' reputations.
Finally, any free program is threatened constantly by software patents. We wish to avoid the danger that redistributors of a free program will individually obtain patent licenses, in effect making the program proprietary. To prevent this, we have made it clear that any patent must be licensed for everyone's free use or not licensed at all.
The precise terms and conditions for copying, distribution and modification follow.
TERMS AND CONDITIONS FOR COPYING, DISTRIBUTION AND MODIFICATION
1. This License applies to any program or other work which contains a notice placed by the copyright holder saying it may be distributed under the terms of this General Public License. The "Program", below, refers to any such program or work, and a "work based on the Program" means either the Program or any derivative work under copyright law: that is to say, a work containing the Program or a portion of it, either verbatim or with modifications and/or translated into another language. (Hereinafter, translation is included without limitation in the term "modification".) Each licensee is addressed as "you".
Activities other than copying, distribution and modification are not covered by this License; they are outside its scope. The act of running the Program is not restricted, and the output from the Program is covered only if its contents constitute a work based on the Program (independent of having been made by running the Program). Whether that is true depends on what the Program does.
2. You may copy and distribute verbatim copies of the Program's source code as you receive it, in any medium, provided that you conspicuously and appropriately publish on each copy an appropriate copyright notice and disclaimer of warranty; keep intact all the notices that refer to this License and to the absence of any warranty; and give any other recipients of the Program a copy of this License along with the Program.
You may charge a fee for the physical act of transferring a copy, and you may at your option offer warranty protection in exchange for a fee.
3. You may modify your copy or copies of the Program or any portion of it, thus forming a work based on the Program, and copy and distribute such modifications or work under the terms of Section 1 above, provided that you also meet all of these conditions:
a. You must cause the modified files to carry prominent notices stating that you changed the files and the date of any change.
b. You must cause any work that you distribute or publish, that in whole or in part contains or is derived from the Program or any part thereof, to be licensed as a whole at no charge to all third parties under the terms of this License.

Appendix: Third Party Software Embedded for Xerox ECSP
A-10 Setup Guide
c. If the modified program normally reads commands interactively when run, you must cause it, when started running for such interactive use in the most ordinary way, to print or display an announcement including an appropriate copyright notice and a notice that there is no warranty (or else, saying that you provide a warranty) and that users may redistribute the program under these conditions, and telling the user how to view a copy of this License. (Exception: if the Program itself is interactive but does not normally print such an announcement, your work based on the Program is not required to print an announcement.)
These requirements apply to the modified work as a whole. If identifiable sections of that work are not derived from the Program, and can be reasonably considered independent and separate works in themselves, then this License, and its terms, do not apply to those sections when you distribute them as separate works. But when you distribute the same sections as part of a whole which is a work based on the Program, the distribution of the whole must be on the terms of this License, whose permissions for other licensees extend to the entire whole, and thus to each and every part regardless of who wrote it.
Thus, it is not the intent of this section to claim rights or contest your rights to work written entirely by you; rather, the intent is to exercise the right to control the distribution of derivative or collective works based on the Program.
In addition, mere aggregation of another work not based on the Program with the Program (or with a work based on the Program) on a volume of a storage or distribution medium does not bring the other work under the scope of this License.
4. You may copy and distribute the Program (or a work based on it, under Section 2) in object code or executable form under the terms of Sections 1 and 2 above provided that you also do one of the following:
a. Accompany it with the complete corresponding machine-readable source code, which must be distributed under the terms of Sections 1 and 2 above on a medium customarily used for software interchange; or,
b. Accompany it with a written offer, valid for at least three years, to give any third party, for a charge no more than your cost of physically performing source distribution, a complete machine-readable copy of the corresponding source code, to be distributed under the terms of Sections 1 and 2 above on a medium customarily used for software interchange; or,
c. Accompany it with the information you received as to the offer to distribute corresponding source code. (This alternative is allowed only for noncommercial distribution and only if you received the program in object code or executable form with such an offer, in accord with Subsection b above.)
The source code for a work means the preferred form of the work for making modifications to it. For an executable work, complete source code means all the source code for all modules it contains, plus any associated interface definition files, plus the scripts used to control compilation and installation of the executable. However, as a special exception, the source code distributed need not include anything that is normally distributed (in either source or binary form) with the major components (compiler, kernel, and so on) of the operating system on which the executable runs, unless that component itself accompanies the executable.
If distribution of executable or object code is made by offering access to copy from a designated place, then offering equivalent access to copy the source code from the same place counts as distribution of the source code, even though third parties are not compelled to copy the source along with the object code.
5. You may not copy, modify, sublicense, or distribute the Program except as expressly provided under this License. Any attempt otherwise to copy, modify, sublicense or distribute the Program is void, and will automatically terminate your rights under this License. However, parties who have received copies, or

Embedded for Xerox ECSP Appendix: Third Party Software
Setup Guide A-11
rights, from you under this License will not have their licenses terminated so long as such parties remain in full compliance.
6. You are not required to accept this License, since you have not signed it. However, nothing else grants you permission to modify or distribute the Program or its derivative works. These actions are prohibited by law if you do not accept this License. Therefore, by modifying or distributing the Program (or any work based on the Program), you indicate your acceptance of this License to do so, and all its terms and conditions for copying, distributing or modifying the Program or works based on it.
7. Each time you redistribute the Program (or any work based on the Program), the recipient automatically receives a license from the original licensor to copy, distribute or modify the Program subject to these terms and conditions. You may not impose any further restrictions on the recipients' exercise of the rights granted herein. You are not responsible for enforcing compliance by third parties to this License.
8. If, as a consequence of a court judgment or allegation of patent infringement or for any other reason (not limited to patent issues), conditions are imposed on you (whether by court order, agreement or otherwise) that contradict the conditions of this License, they do not excuse you from the conditions of this License. If you cannot distribute so as to satisfy simultaneously your obligations under this License and any other pertinent obligations, then as a consequence you may not distribute the Program at all. For example, if a patent license would not permit royalty-free redistribution of the Program by all those who receive copies directly or indirectly through you, then the only way you could satisfy both it and this License would be to refrain entirely from distribution of the Program.
If any portion of this section is held invalid or unenforceable under any particular circumstance, the balance of the section is intended to apply and the section as a whole is intended to apply in other circumstances.
It is not the purpose of this section to induce you to infringe any patents or other property right claims or to contest validity of any such claims; this section has the sole purpose of protecting the integrity of the free software distribution system, which is implemented by public license practices. Many people have made generous contributions to the wide range of software distributed through that system in reliance on consistent application of that system; it is up to the author/donor to decide if he or she is willing to distribute software through any other system and a licensee cannot impose that choice.
This section is intended to make thoroughly clear what is believed to be a consequence of the rest of this License.
9. If the distribution and/or use of the Program is restricted in certain countries either by patents or by copyrighted interfaces, the original copyright holder who places the Program under this License may add an explicit geographical distribution limitation excluding those countries, so that distribution is permitted only in or among countries not thus excluded. In such case, this License incorporates the limitation as if written in the body of this License.
10. The Free Software Foundation may publish revised and/or new versions of the General Public License from time to time. Such new versions will be similar in spirit to the present version, but may differ in detail to address new problems or concerns.
11. Each version is given a distinguishing version number. If the Program specifies a version number of this License which applies to it and "any later version", you have the option of following the terms and conditions either of that version or of any later version published by the Free Software Foundation. If the Program does not specify a version number of this License, you may choose any version ever published by the Free Software Foundation.
12. If you wish to incorporate parts of the Program into other free programs whose distribution conditions are different, write to the author to ask for permission. For software which is copyrighted by the Free Software Foundation, write to the Free Software Foundation; we sometimes make exceptions for this. Our decision will be guided by the two goals of preserving the free status of all derivatives of our free software and of promoting the sharing and reuse of software generally.
Appendix: Third Party Software Embedded for Xerox ECSP
A-12 Setup Guide
NO WARRANTY
13. BECAUSE THE PROGRAM IS LICENSED FREE OF CHARGE, THERE IS NO WARRANTY FOR THE PROGRAM, TO THE EXTENT PERMITTED BY APPLICABLE LAW. EXCEPT WHEN OTHERWISE STATED IN WRITING THE COPYRIGHT HOLDERS AND/OR OTHER PARTIES PROVIDE THE PROGRAM "AS IS" WITHOUT WARRANTY OF ANY KIND, EITHER EXPRESSED OR IMPLIED, INCLUDING, BUT NOT LIMITED TO, THE IMPLIED WARRANTIES OF MERCHANTABILITY AND FITNESS FOR A PARTICULAR PURPOSE. THE ENTIRE RISK AS TO THE QUALITY AND PERFORMANCE OF THE PROGRAM IS WITH YOU. SHOULD THE PROGRAM PROVE DEFECTIVE, YOU ASSUME THE COST OF ALL NECESSARY SERVICING, REPAIR OR CORRECTION.
14. IN NO EVENT UNLESS REQUIRED BY APPLICABLE LAW OR AGREED TO IN WRITING WILL ANY COPYRIGHT HOLDER, OR ANY OTHER PARTY WHO MAY MODIFY AND/OR REDISTRIBUTE THE PROGRAM AS PERMITTED ABOVE, BE LIABLE TO YOU FOR DAMAGES, INCLUDING ANY GENERAL, SPECIAL, INCIDENTAL OR CONSEQUENTIAL DAMAGES ARISING OUT OF THE USE OR INABILITY TO USE THE PROGRAM (INCLUDING BUT NOT LIMITED TO LOSS OF DATA OR DATA BEING RENDERED INACCURATE OR LOSSES SUSTAINED BY YOU OR THIRD PARTIES OR A FAILURE OF THE PROGRAM TO OPERATE WITH ANY OTHER PROGRAMS), EVEN IF SUCH HOLDER OR OTHER PARTY HAS BEEN ADVISED OF THE POSSIBILITY OF SUCH DAMAGES.
Apache License Version 2.0
Copyright 2013 Equitrac Corporation
Licensed under the Apache License, Version 2.0 (the "License"); you may not use this file except in compliance with the License. You may obtain a copy of the License at
http://www.apache.org/licenses/LICENSE-2.0
Unless required by applicable law or agreed to in writing, software distributed under the License is distributed on an "AS IS" BASIS, WITHOUT WARRANTIES OR CONDITIONS OF ANY KIND, either express or implied. See the License for the specific language governing permissions and limitations under the License.
Common Development and Distribution License 1.0
1. Definitions.
1.1. Contributor means each individual or entity that creates or contributes to the creation of Modifications.
1.2. Contributor Version means the combination of the Original Software, prior Modifications used by a Contributor (if any), and the Modifications made by that particular Contributor.
1.3. Covered Software means (a) the Original Software, or (b) Modifications, or (c) the combination of files containing Original Software with files containing Modifications, in each case including portions thereof.
1.4. Executable means the Covered Software in any form other than Source Code.
1.5. Initial Developer means the individual or entity that first makes Original Software available under this License.
1.6. Larger Work means a work which combines Covered Software or portions thereof with code not governed by the terms of this License.
Embedded for Xerox ECSP Appendix: Third Party Software
Setup Guide A-13
1.7. License means this document.
1.8. Licensable means having the right to grant, to the maximum extent possible, whether at the time of the initial grant or subsequently acquired, any and all of the rights conveyed herein.
1.9. Modifications means the Source Code and Executable form of any of the following:
a. A. Any file that results from an addition to, deletion from or modification of the contents of a file containing Original Software or previous Modifications;
b. B. Any new file that contains any part of the Original Software or previous Modification; or
c. C. Any new file that is contributed or otherwise made available under the terms of this License.
1.10. Original Software means the Source Code and Executable form of computer software code that is originally released under this License.
1.11. Patent Claims means any patent claim(s), now owned or hereafter acquired, including without limitation, method, process, and apparatus claims, in any patent Licensable by grantor.
1.12. Source Code means
(a) the common form of computer software code in which modifications are made and
(b) associated documentation included in or with such code.
1.13. You (or Your) means an individual or a legal entity exercising rights under, and complying with all of the terms of, this License. For legal entities, You includes any entity which controls, is controlled by, or is under common control with You. For purposes of this definition, control means (a) the power, direct or indirect, to cause the direction or management of such entity, whether by contract or otherwise, or (b) ownership of more than fifty percent (50%) of the outstanding shares or beneficial ownership of such entity.
2. License Grants.
2.1. The Initial Developer Grant.
Conditioned upon Your compliance with Section 3.1 below and subject to third party intellectual property claims, the Initial Developer hereby grants You a world-wide, royalty-free, non-exclusive license:
(a) under intellectual property rights (other than patent or trademark) Licensable by Initial Developer, to use, reproduce, modify, display, perform, sublicense and distribute the Original Software (or portions thereof), with or without Modifications, and/or as part of a Larger Work; and
(b) under Patent Claims infringed by the making, using or selling of Original Software, to make, have made, use, practice, sell, and offer for sale, and/or otherwise dispose of the Original Software (or portions thereof).
(c) The licenses granted in Sections 2.1(a) and (b) are effective on the date Initial Developer first distributes or otherwise makes the Original Software available to a third party under the terms of this License.
(d) Notwithstanding Section 2.1(b) above, no patent license is granted: (1) for code that You delete from the Original Software, or (2) for infringements caused by: (i) the modification of the Original Software, or (ii) the combination of the Original Software with other software or devices.
2.2. Contributor Grant.
Conditioned upon Your compliance with Section 3.1 below and subject to third party intellectual property claims, each Contributor hereby grants You a world-wide, royalty-free, non-exclusive license:
Appendix: Third Party Software Embedded for Xerox ECSP
A-14 Setup Guide
(a) under intellectual property rights (other than patent or trademark) Licensable by Contributor to use, reproduce, modify, display, perform, sublicense and distribute the Modifications created by such Contributor (or portions thereof), either on an unmodified basis, with other Modifications, as Covered Software and/or as part of a Larger Work; and
(b) under Patent Claims infringed by the making, using, or selling of Modifications made by that Contributor either alone and/or in combination with its Contributor Version (or portions of such combination), to make, use, sell, offer for sale, have made, and/or otherwise dispose of: (1) Modifications made by that Contributor (or portions thereof); and (2) the combination of Modifications made by that Contributor with its Contributor Version (or portions of such combination).
(c) The licenses granted in Sections 2.2(a) and 2.2(b) are effective on the date Contributor first distributes or otherwise makes the Modifications available to a third party.
(d) Notwithstanding Section 2.2(b) above, no patent license is granted: (1) for any code that Contributor has deleted from the Contributor Version; (2) for infringements caused by: (i) third party modifications of Contributor Version, or (ii) the combination of Modifications made by that Contributor with other software (except as part of the Contributor Version) or other devices; or (3) under Patent Claims infringed by Covered Software in the absence of Modifications made by that Contributor.
3. Distribution Obligations.
3.1. Availability of Source Code.
Any Covered Software that You distribute or otherwise make available in Executable form must also be made available in Source Code form and that Source Code form must be distributed only under the terms of this License. You must include a copy of this License with every copy of the Source Code form of the Covered Software You distribute or otherwise make available. You must inform recipients of any such Covered Software in Executable form as to how they can obtain such Covered Software in Source Code form in a reasonable manner on or through a medium customarily used for software exchange.
3.2. Modifications.
The Modifications that You create or to which You contribute are governed by the terms of this License. You represent that You believe Your Modifications are Your original creation(s) and/or You have sufficient rights to grant the rights conveyed by this License.
3.3. Required Notices.
You must include a notice in each of Your Modifications that identifies You as the Contributor of the Modification. You may not remove or alter any copyright, patent or trademark notices contained within the Covered Software, or any notices of licensing or any descriptive text giving attribution to any Contributor or the Initial Developer.
3.4. Application of Additional Terms.
You may not offer or impose any terms on any Covered Software in Source Code form that alters or restricts the applicable version of this License or the recipients rights hereunder. You may choose to offer, and to charge a fee for, warranty, support, indemnity or liability obligations to one or more recipients of Covered Software. However, you may do so only on Your own behalf, and not on behalf of the Initial Developer or any Contributor. You must make it absolutely clear that any such warranty, support, indemnity or liability obligation is offered by You alone, and You hereby agree to indemnify the Initial Developer and every Contributor for any liability incurred by the Initial Developer or such Contributor as a result of warranty, support, indemnity or liability terms You offer.

Embedded for Xerox ECSP Appendix: Third Party Software
Setup Guide A-15
3.5. Distribution of Executable Versions.
You may distribute the Executable form of the Covered Software under the terms of this License or under the terms of a license of Your choice, which may contain terms different from this License, provided that You are in compliance with the terms of this License and that the license for the Executable form does not attempt to limit or alter the recipients rights in the Source Code form from the rights set forth in this License. If You distribute the Covered Software in Executable form under a different license, You must make it absolutely clear that any terms which differ from this License are offered by You alone, not by the Initial Developer or Contributor. You hereby agree to indemnify the Initial Developer and every Contributor for any liability incurred by the Initial Developer or such Contributor as a result of any such terms You offer.
3.6. Larger Works.
You may create a Larger Work by combining Covered Software with other code not governed by the terms of this License and distribute the Larger Work as a single product. In such a case, You must make sure the requirements of this License are fulfilled for the Covered Software.
4. Versions of the License.
4.1. New Versions.
Sun Microsystems, Inc. is the initial license steward and may publish revised and/or new versions of this License from time to time. Each version will be given a distinguishing version number. Except as provided in Section 4.3, no one other than the license steward has the right to modify this License.
4.2. Effect of New Versions.
You may always continue to use, distribute or otherwise make the Covered Software available under the terms of the version of the License under which You originally received the Covered Software. If the Initial Developer includes a notice in the Original Software prohibiting it from being distributed or otherwise made available under any subsequent version of the License, You must distribute and make the Covered Software available under the terms of the version of the License under which You originally received the Covered Software. Otherwise, You may also choose to use, distribute or otherwise make the Covered Software available under the terms of any subsequent version of the License published by the license steward.
4.3. Modified Versions.
When You are an Initial Developer and You want to create a new license for Your Original Software, You may create and use a modified version of this License if You: (a) rename the license and remove any references to the name of the license steward (except to note that the license differs from this License); and (b) otherwise make it clear that the license contains terms which differ from this License.
5. DISCLAIMER OF WARRANTY.
COVERED SOFTWARE IS PROVIDED UNDER THIS LICENSE ON AN AS IS BASIS, WITHOUT WARRANTY OF ANY KIND, EITHER EXPRESSED OR IMPLIED, INCLUDING, WITHOUT LIMITATION, WARRANTIES THAT THE COVERED SOFTWARE IS FREE OF DEFECTS, MERCHANTABLE, FIT FOR A PARTICULAR PURPOSE OR NON-INFRINGING. THE ENTIRE RISK AS TO THE QUALITY AND PERFORMANCE OF THE COVERED SOFTWARE IS WITH YOU. SHOULD ANY COVERED SOFTWARE PROVE DEFECTIVE IN ANY RESPECT, YOU (NOT THE INITIAL DEVELOPER OR ANY OTHER CONTRIBUTOR) ASSUME THE COST OF ANY NECESSARY SERVICING, REPAIR OR CORRECTION. THIS DISCLAIMER OF WARRANTY CONSTITUTES AN ESSENTIAL PART OF THIS LICENSE. NO USE OF ANY COVERED SOFTWARE IS AUTHORIZED HEREUNDER EXCEPT UNDER THIS DISCLAIMER.
Appendix: Third Party Software Embedded for Xerox ECSP
A-16 Setup Guide
6. TERMINATION.
6.1. This License and the rights granted hereunder will terminate automatically if You fail to comply with terms herein and fail to cure such breach within 30 days of becoming aware of the breach. Provisions which, by their nature, must remain in effect beyond the termination of this License shall survive.
6.2. If You assert a patent infringement claim (excluding declaratory judgment actions) against Initial Developer or a Contributor (the Initial Developer or Contributor against whom You assert such claim is referred to as Participant) alleging that the Participant Software (meaning the Contributor Version where the Participant is a Contributor or the Original Software where the Participant is the Initial Developer) directly or indirectly infringes any patent, then any and all rights granted directly or indirectly to You by such Participant, the Initial Developer (if the Initial Developer is not the Participant) and all Contributors under Sections 2.1 and/or 2.2 of this License shall, upon 60 days notice from Participant terminate prospectively and automatically at the expiration of such 60 day notice period, unless if within such 60 day period You withdraw Your claim with respect to the Participant Software against such Participant either unilaterally or pursuant to a written agreement with Participant.
6.3. In the event of termination under Sections 6.1 or 6.2 above, all end user licenses that have been validly granted by You or any distributor hereunder prior to termination (excluding licenses granted to You by any distributor) shall survive termination.
7. LIMITATION OF LIABILITY.
UNDER NO CIRCUMSTANCES AND UNDER NO LEGAL THEORY, WHETHER TORT (INCLUDING NEGLIGENCE), CONTRACT, OR OTHERWISE, SHALL YOU, THE INITIAL DEVELOPER, ANY OTHER CONTRIBUTOR, OR ANY DISTRIBUTOR OF COVERED SOFTWARE, OR ANY SUPPLIER OF ANY OF SUCH PARTIES, BE LIABLE TO ANY PERSON FOR ANY INDIRECT, SPECIAL, INCIDENTAL, OR CONSEQUENTIAL DAMAGES OF ANY CHARACTER INCLUDING, WITHOUT LIMITATION, DAMAGES FOR LOST PROFITS, LOSS OF GOODWILL, WORK STOPPAGE, COMPUTER FAILURE OR MALFUNCTION, OR ANY AND ALL OTHER COMMERCIAL DAMAGES OR LOSSES, EVEN IF SUCH PARTY SHALL HAVE BEEN INFORMED OF THE POSSIBILITY OF SUCH DAMAGES. THIS LIMITATION OF LIABILITY SHALL NOT APPLY TO LIABILITY FOR DEATH OR PERSONAL INJURY RESULTING FROM SUCH PARTYS NEGLIGENCE TO THE EXTENT APPLICABLE LAW PROHIBITS SUCH LIMITATION. SOME JURISDICTIONS DO NOT ALLOW THE EXCLUSION OR LIMITATION OF INCIDENTAL OR CONSEQUENTIAL DAMAGES, SO THIS EXCLUSION AND LIMITATION MAY NOT APPLY TO YOU.
8. U.S. GOVERNMENT END USERS.
The Covered Software is a commercial item, as that term is defined in 48 C.F.R. 2.101 (Oct. 1995), consisting of commercial computer software (as that term is defined at 48 C.F.R. 252.227-7014(a)(1)) and commercial computer software documentation as such terms are used in 48 C.F.R. 12.212 (Sept. 1995). Consistent with 48 C.F.R. 12.212 and 48 C.F.R. 227.7202-1 through 227.7202-4 (June 1995), all U.S. Government End Users acquire Covered Software with only those rights set forth herein. This U.S. Government Rights clause is in lieu of, and supersedes, any other FAR, DFAR, or other clause or provision that addresses Government rights in computer software under this License.
9. MISCELLANEOUS.
This License represents the complete agreement concerning subject matter hereof. If any provision of this License is held to be unenforceable, such provision shall be reformed only to the extent necessary to make it enforceable. This License shall be governed by the law of the jurisdiction specified in a notice contained within the Original Software (except to the extent applicable law, if any, provides otherwise), excluding such jurisdictions conflict-of-law provisions. Any litigation relating to this License shall be subject to the jurisdiction of the courts located in the jurisdiction and venue specified in a notice contained within the

Embedded for Xerox ECSP Appendix: Third Party Software
Setup Guide A-17
Original Software, with the losing party responsible for costs, including, without limitation, court costs and reasonable attorneys fees and expenses. The application of the United Nations Convention on Contracts for the International Sale of Goods is expressly excluded. Any law or regulation which provides that the language of a contract shall be construed against the drafter shall not apply to this License. You agree that You alone are responsible for compliance with the United States export administration regulations (and the export control laws and regulation of any other countries) when You use, distribute or otherwise make available any Covered Software.
10. RESPONSIBILITY FOR CLAIMS.
As between Initial Developer and the Contributors, each party is responsible for claims and damages arising, directly or indirectly, out of its utilization of rights under this License and You agree to work with Initial Developer and Contributors to distribute such responsibility on an equitable basis. Nothing herein is intended or shall be deemed to constitute any admission of liability.
