electronic case opening user manual united states
TRANSCRIPT

ELECTRONIC CASE OPENING
USER MANUAL
United States District Court
Central District of California July 1, 2016

Electronic Case Opening User Manual
July 1, 2016 Page i
TABLE OF CONTENTS
I. GENERAL INFORMATION ............................................................................. 1
A) Overview...................................................................................................... 1
B) Before Opening a New Case ......................................................................... 2
C) Opening a New Case .................................................................................... 3
D) After Opening a New Case ........................................................................... 3
E) Assistance Available ..................................................................................... 4
II. INSTRUCTIONS FOR OPENING A NEW CASE ................................................. 4
A) Opening a Civil Case ..................................................................................... 5
B) Opening a Miscellaneous Case ................................................................... 11
C) Adding Parties ............................................................................................ 16
D) Editing Party Information ........................................................................... 20
E) Creating the Case ....................................................................................... 20
F) Docketing the Lead Event .......................................................................... 22
III. INSTRUCTIONS FOR E-FILING THE CASE-INITIATING DOCUMENT ............... 22
A) Beginning the Filing Process ....................................................................... 22
B) Selecting the Lead Event ............................................................................ 24
C) Selecting the Filer(s) .................................................................................. 25
D) Associating the Filing Attorney with the Filing Party .................................. 25
E) Selecting Party Roles .................................................................................. 26
F) Uploading PDF Documents ........................................................................ 27

Electronic Case Opening User Manual
July 1, 2016 Page ii
G) Identifying Filing Fee Status ....................................................................... 30
H) Paying the Fee Online ................................................................................ 31
I) Confirming Final Docket Entry ................................................................... 33
J) Receiving Confirmation .............................................................................. 34
IV. FILING OTHER DOCUMENTS REQUIRED AT CASE OPENING ....................... 35
A) Civil Cover Sheet ........................................................................................ 35
B) Summons ................................................................................................... 36
C) Notice of Interested Parties/Corporate Disclosure Statement ................... 36
D) Other Documents ...................................................................................... 37
V. AFTER INITIAL FILING HAS BEEN COMPLETED ............................................ 39
A) Judge Assignment ...................................................................................... 39
B) Motions ..................................................................................................... 40
C) Filing of Other Claim-Initiating Documents ................................................ 40
VI. REQUEST FOR REFUND .............................................................................. 42

Electronic Case Opening User Manual
July 1, 2016 Page 1
I. GENERAL INFORMATION
A) OVERVIEW
Since December 1, 2014, attorneys filing new civil actions have been required by Local Rule 3-2 to file their case-initiating document(s) electronically, using the Court’s Case Management/Electronic Case Filing System (CM/ECF), unless exempted from electronic filing by Local Rule 5-4.2. Initially, “miscellaneous” cases1 were exempt from this requirement, but as of July 20, 2015, those cases must also be opened electronically using CM/ECF. After July 20, 2015, therefore, every case-initiating document filed by an attorney in the Central District of California must be filed electronically, except: (a) in criminal cases; and (b) in sealed cases, or where leave to file the case under seal is sought. Case-initiating documents that must be filed electronically include2:
• Complaints • Notices of Removal • Motions to Vacate, Set Aside, or Correct Sentence • Motions to Withdraw Bankruptcy Reference • Petitions for Writ of Habeas Corpus • Requests for Appointment of Counsel/Stay of Execution (Capital Habeas
Corpus Petitions) • Registrations of judgments from other districts • Motions to quash, modify, or enforce subpoenas from other districts • Notices of receivership pursuant to 28 U.S.C. § 754 • Petitions to quash a third-party IRS summons
All other documents required to be filed concurrently with the case-initiating document, including the Civil Cover Sheet (Form CV-71) and Notice of Interested Parties, must also be filed electronically. Any filing fee that is required must be paid online at the time the case-initiating document is filed, unless a request to proceed in forma pauperis is filed concurrently.
1 Certain proceedings that are administrative or otherwise ancillary to civil actions are processed by the Court as “miscellaneous” cases, not as civil cases. The case number assigned will reflect the type of case (i.e., “14-cv-56789” vs. “14-mc-56789”). 2 This is not an exhaustive list. More complete lists of both civil and miscellaneous case-initiating documents are available on the Court’s website at www.cacd.uscourts.gov/e-filing/civil-case-opening.

Electronic Case Opening User Manual
July 1, 2016 Page 2
To file a document electronically – including a case-initiating document – an attorney must be a registered CM/ECF user. Attorneys already admitted to practice in the Central District may request a CM/ECF account online through the Court’s website. Registered CM/ECF users are reminded of their obligation to keep their personal contact information current – especially the e-mail address, to ensure receipt of electronic notice. See L.R. 5-4.8.1; L.R. 83-2.4.
In preparation for filing case-initiating documents electronically, it is strongly recommended that attorneys and support staff review both this Electronic Case Opening User Manual and the training videos available on the Court’s website at http://www.cacd.uscourts.gov/e-filing/civil-case-opening.
B) BEFORE OPENING A NEW CASE
� Familiarize yourself with all instructions in this Electronic Case Opening User Manual (“Manual”)
� Prepare the following documents for filing: • Case-Initiating Document (e.g., Complaint, Notice of Removal, etc.) • Civil Cover Sheet (Form CV-71) (if applicable) • Summons (if applicable) • Notice of Interested Parties (see Local Rule 7.1-1) • Corporate Disclosure Statement (if applicable; see Fed. R. Civ. P. 7.1) • Notice of Related Cases (if applicable; see Local Rule 83-1.3) • Notice of Pendency of Other Actions or Proceedings (if applicable; see
Local Rule 83-1.4) • Report on the Filing or Determination of an Action Regarding a Patent or
Trademark (Form AO-120) (if applicable; see Local Rule 3-1) • Report on the Filing or Determination of an Action or Appeal Regarding
a Copyright (Form AO-121) (if applicable; see Local Rule 3-1) • Request to Proceed In Forma Pauperis (if applicable) • Application of Non-Resident Attorney to Appear in a Specific Case Pro
Hac Vice (Form G-64) (if applicable, see L.R. 83-2.1.3) • Application for Temporary Restraining Order (if applicable) • any other necessary case-specific documents
During the case-opening process, you will receive your case number; add

Electronic Case Opening User Manual
July 1, 2016 Page 3
your case number to these documents, and, if not already in PDF format, convert them to PDF using your word processing program (DO NOT SCAN).
� Have your credit card available for the payment of filing fees, unless you are filing a case in which no fee is required or are filing a Request to Proceed In Forma Pauperis.
C) OPENING A NEW CASE
The electronic case-opening process consists of two steps. You must complete BOTH STEPS: (1) Open the case by providing sufficient information about the case for CM/ECF to create a docket; AND (2) file your case-initiating document. If you complete step (1) but do not complete step (2), your case will be closed. Detailed instructions for each of these steps are included in this Manual.
To successfully open a case electronically:
• Complete the entire process as instructed in this Manual. • Enter all necessary information on all CM/ECF screens. • Docket the lead event and upload all pdf documents. • Enter all necessary information on the Pay.gov screens. • DO NOT click the back button once you begin the process. • DO NOT electronically open cases that should be filed under seal, or upload
documents that should be filed under seal. • DO NOT attempt to open the same case twice.
In using CM/ECF to open your case electronically, please understand that CM/ECF was originally optimized for internal court use; allowing attorneys to open cases electronically requires that attorneys be given access to parts of the program not initially set up for use by the public. This means that some drop-down menus may contain choices that will never be applicable to you in opening a case, and that some fields are for internal use only, and should be left blank by you during the case-opening process.
D) AFTER OPENING A NEW CASE
Certain supporting documents, such as your Civil Cover Sheet, must be filed immediately after filing your case-initiating document. (See Section IV, below, for

Electronic Case Opening User Manual
July 1, 2016 Page 4
additional information.) If you intend to seek a TRO, file your application immediately after case opening, with your Civil Cover Sheet. However, do not file any subsequent motion until judges have been assigned to your case.
You will receive a case number during the case opening process, but judges will not be assigned to your case until after court staff have reviewed your case-initiating documents. For most cases, this process should be completed within 1-2 business days of case-opening.3 You will receive a Notice of Electronic Filing through CM/ECF when a Notice of Assignment is filed in your case.
AS SOON AS YOU RECEIVE A NOTICE OF ASSIGNMENT, YOU MUST IMMEDIATELY DELIVER MANDATORY CHAMBERS COPIES OF ALL DOCUMENTS TO YOUR ASSIGNED JUDGE(S).
E) ASSISTANCE AVAILABLE
Several training videos regarding the electronic case-opening process are available on the Court’s website at www.cacd.uscourts.gov/e-filing/civil-case-opening. After watching the videos and reading this Manual, please contact the Help Desk at (213) 894-0242 if you have any questions or need any further assistance. The Help Desk is staffed Monday to Friday, 8:00 a.m. to 5:00 p.m. (Pacific Time).
II. INSTRUCTIONS FOR OPENING A NEW CASE
Log in to CM/ECF. Click “Civil” on the blue menu bar at the top of the CM/ECF screen; this will take you to the “Civil Events” screen. On the “Civil Events” screen (Figure 1), under the “Open a Case” category, select either “Open Civil Case” or “Open Miscellaneous Case.”
3 Some miscellaneous cases are not initially assigned to judges.
Figure 1
For guidance about which type of case to open,
refer to www.cacd.uscourts.gov/e-filing/civil-case-opening

Electronic Case Opening User Manual
July 1, 2016 Page 5
Figure 2
Figure 3
If you are opening a civil case, follow the instructions in Section II.A., below. If you are opening a miscellaneous case, skip to Section II.B.
A) OPENING A CIVIL CASE
If you clicked the link to “Open Civil Case,” you should then see the following “Welcome” screen (Figure 2):
Note: Before proceeding further you must have completed a Form CV-071 Civil Cover Sheet. You must use the most recent version available from the Court’s website at www.cacd.uscourts.gov/court-procedures/forms. Information from the Civil Cover Sheet is required during the electronic case opening process, and previous versions of Form CV-71 will not provide you with all the information you need to open your case electronically. The Civil Cover Sheet itself must also be electronically filed separately during the case opening process.
On the “Welcome” screen (Figure 2), click “NEXT.” On the following screen (Figure 3), review the information provided and click “NEXT”:

Electronic Case Opening User Manual
July 1, 2016 Page 6
Figure 4
On the next screen (Figure 4), you will be prompted to select from drop-down menus for “Office” and “Case type.”
See below for instructions on selecting the correct “Office.” For “Case type,” select “cv” to indicate that you are opening a civil case.
The “Date filed” is automatically displayed on the screen and cannot be modified.
For cases that originated in either state or bankruptcy court, enter: (1) the name of the court from which this case is being removed or withdrawn (e.g., Los Angeles Superior Court or United States Bankruptcy Court) in the “Other court name” field; and (2) the corresponding state court or bankruptcy case number in the “Other court number” field (see Figure 5):
Figure 5

Electronic Case Opening User Manual
July 1, 2016 Page 7
Figure 6
For cases filed in the Central District in the first instance, leave “Other court name” and “Other court number” blank.
The “Office” drop-down menu provides three choices, equivalent to the three divisions of the Central District:
• Western Division: Los Angeles, Ventura, Santa Barbara, and San Luis Obispo Counties
• Eastern Division: Riverside and San Bernardino Counties • Southern Division: Orange County
The appropriate division for your case is determined by the Court’s General Orders. You may not choose a division based on your personal preference; you must select the division that is indicated in Question VIII.E. on page 2 of your completed Civil Cover Sheet (Form CV-71). If you do not have a “Question VIII.E.” on page 2 of your Civil Cover Sheet, you have used an outdated version of the form; please obtain the latest version of Form CV-71 from the Court’s website and complete it before continuing.
Select the division indicated in Question VIII.E. of your Civil Cover Sheet from the “Office” drop-down menu (see Figure 6):
Once you have made your selections for “Office” and “Case type” – and, if applicable, provided information regarding the state court or bankruptcy case – click “NEXT.”

Electronic Case Opening User Manual
July 1, 2016 Page 8
The following screen (Figure 7) collects statistical data about your case. Please read the instructions below carefully. The information required to complete this screen should be found either on your completed Form CV-71 Civil Cover Sheet or in the complaint.
Complete the fields on the statistical screen as detailed below, then click “NEXT”:
1) Jurisdiction: A drop-down menu is provided. You should choose the option that best reflects your basis for invoking federal court jurisdiction. Your choice here should match your selection in Section II of the Civil Cover Sheet. However, note that there are five options in the onscreen drop-down menu:
• U.S. Government Plaintiff • U.S. Government Defendant • Federal Question • Diversity • Local Question
Figure 7

Electronic Case Opening User Manual
July 1, 2016 Page 9
Only the first four of these options should be considered. Do not use the “local question” option; this is not a valid basis for asserting federal jurisdiction. The system default is “Federal Question”; please remember to choose another selection if this is not accurate.
2) Cause of action: Select the appropriate code from the drop-down list. If you have more than one cause of action, enter the first one only; your selection must match the civil statute number you entered in Section VI of the Civil Cover Sheet. It is not necessary to enter any information in the “filter” field, though you may find this field helpful in narrowing the choices in the drop-down menu; for instance, if the appropriate choice is 28 U.S.C. § 1391, you may type “1391” in the filter field rather than scrolling through all the choices in the drop-down list.
3) Nature of suit: Select the appropriate code from the drop-down list. Your selection must match the nature of suit you checked in Section VII of the Civil Cover Sheet. You may also type this code into the “filter” field to quickly locate the correct choice in the drop-down menu.
4) Origin: Though there are several options provided in the drop-down menu, you may select only “1 (Original Proceeding),” “2 (Removal from State Court),” or “8 (Multidistrict Litigation – Direct File).” All other options are for COURT USE ONLY. Select “1 (Original Proceeding)” when filing an original Complaint or a bankruptcy matter; select “2 (Removal from State Court)” when filing a Notice of Removal; select “8 (Multidistrict Litigation – Direct File)” when filing an original Complaint or Notice of Removal that you intend to identify as related to an MDL proceeding pending in this district. Your selection must match the option you checked in Section IV of the Civil Cover Sheet.
5) Citizenship plaintiff/Citizenship defendant: Complete these fields only if you selected “4 (Diversity)” in the “Jurisdiction” field. Your selections must match the options you checked in Section III of the Civil Cover Sheet. On both the Civil Cover Sheet and online, you should make your choices based on the citizenship of the first-named plaintiff and the first-named defendant.

Electronic Case Opening User Manual
July 1, 2016 Page 10
6) Jury Demand: Select the appropriate code from the drop-down menu. Note that marking this field is equivalent to marking the Civil Cover Sheet, and is not sufficient in itself to constitute a demand for a jury trial pursuant to Fed. R. Civ. P. 38. See Local Rule 38-2. As your choice should be based on the state of the record at the time of filing, it is unlikely that you will pick “b” or “d” at the time of e-filing a complaint or notice of removal:
• n (None): no party has yet requested a jury trial • b (Both): both plaintiff and defendant have requested a jury trial • d (Defendant): defendant has requested a jury trial and plaintiff has not • p (Plaintiff): plaintiff has requested a jury trial and defendant has not
7) Class Action: Select the appropriate code from the drop-down menu. Your selection must match your response to this question in Section V of the Civil Cover Sheet:
• n (no Class Action Alleged) • y (Class Action Alleged)
8) Demand ($000): Enter the dollar amount to the nearest thousand with no punctuation. That is, if the complaint asserts damages in the amount of $75,000, enter “75”; if the complaint asserts damages in the amount of $5,000,000, enter “5000.” The smallest amount which can be entered is “1” (for $1,000.00), and the largest is 9999 (for $9,999,000). Round up or down as needed to the nearest thousand (e.g., $750.00 = 1; $1,498.56 = 1; $25,501.99 = 26). If no specific dollar amount is demanded in the complaint, leave this field blank. If the complaint seeks more than $9,999,000 in damages, enter 9999. This is for statistics purposes only, and has no substantive impact; entering a larger number could cause a system error.
9) Arbitration Code: Leave this field blank.
10) County: The drop-down menu for “County” lists every county in California, as well as choices for “XX US, Outside California” and “XX Outside US.” In most cases, you should make your choice based on the residence of the first-named plaintiff. Where the United States is a plaintiff, make your

Electronic Case Opening User Manual
July 1, 2016 Page 11
selection based on the residence of the first-named defendant; or, in land condemnation cases, the county where the property at issue is located. Your choice here should match your answer in Section I(b) of the Civil Cover Sheet.
11) Fee Status: Ignore this field; the correct fee status will be generated by the system later in the filing process.
12) Fee Date: System generated. Do not modify.
13) Date Transfer: Leave this field blank.
Please skip to Section II.C. to continue opening a civil case.
B) OPENING A MISCELLANEOUS CASE
If you clicked the link to “Open Miscellaneous Case” shown in Figure 1, you should then see the following “Welcome” screen (Figure 8):
Click “NEXT.” On the following screen (Figure 9), review the information provided, then click “NEXT”:
Figure 8
Figure 9

Electronic Case Opening User Manual
July 1, 2016 Page 12
Figure 10
On the next screen (Figure 10), you will be prompted to select from drop-down menus for “Office” and “Case type.”
See below for instructions on selecting the correct “Office.”
For “Case type,” select “mc” to indicate that you are opening a miscellaneous case. This is extremely important. The default for this drop-down menu is “cv,” and unless you change it to “mc” now, you will not succeed in opening a miscellaneous case. This will cause significant problems for you both during and after the case opening process. The “Date filed” is automatically displayed on the screen and cannot be modified.
For miscellaneous cases related to a proceeding in another court or before an administrative agency, enter the name of that court or agency in the “Other court name” field, and the corresponding case or matter number in the “Other court number” field. If not related to any other matters, leave these fields blank.
The “Office” drop-down menu provides three choices, equivalent to the three divisions of the Central District:
• Western Division: Los Angeles, Ventura, Santa Barbara, and San Luis Obispo Counties
• Eastern Division: Riverside and San Bernardino Counties • Southern Division: Orange County

Electronic Case Opening User Manual
July 1, 2016 Page 13
Figure 11
The appropriate division for your case is determined by the Court’s General Orders. You may not choose a division based on your personal preference. For guidance in selecting the appropriate division, refer to the Court’s Civil Cover Sheet form (Form CV-71). Though you are not required to file a Civil Cover Sheet in a miscellaneous case, completing the Civil Cover Sheet form will help you determine which division is appropriate, and will generally assist you in the case opening process.
Select the division indicated in Question VIII.E of the Civil Cover Sheet from the “Office” drop-down menu (see Figure 11):
Once you have made your selections for “Office” and “Case type” – and, if applicable, provided information regarding any related matter in another forum – click “NEXT.”
The following screen (Figure 12) collects statistical data about your case. Please read the instructions below carefully. The information required to complete this screen should be found either on a completed Form CV-71 Civil Cover Sheet or in the complaint.
Remember, this MUST be changed to
“mc” from the default “cv.”

Electronic Case Opening User Manual
July 1, 2016 Page 14
Complete the fields on the statistical screen as detailed below, then click “NEXT”:
1) Jurisdiction: A drop-down menu is provided. You should choose the option that best reflects your basis for invoking federal court jurisdiction. However, note that there are five options in the onscreen drop-down menu:
• U.S. Government Plaintiff • U.S. Government Defendant • Federal Question • Diversity • Local Question
Only the first four of these options should be considered. Do not use the “local question” option; this is not a valid basis for asserting federal
Figure 12

Electronic Case Opening User Manual
July 1, 2016 Page 15
jurisdiction. The system default is “Federal Question”; please remember to choose another selection if this is not accurate.
2) Cause of action: Select “misc (Civil Miscellaneous Case)” from the drop-down menu (it appears at the bottom of the list).
3) Nature of suit: Select “890 (Other Statutory Action)” from the drop-down menu.
4) Origin: Select “1 (Original Proceeding)” from the drop-down menu.
5) Citizenship plaintiff/Citizenship defendant: Complete these fields only if you selected “4 (Diversity)” in the “Jurisdiction” field.
6) Jury Demand: This field is largely irrelevant to miscellaneous cases, as such cases generally do not result in jury trials. The default for this field is “n (None),” but be sure to choose a different option if it is more appropriate to your situation.
7) Class Action: Select the appropriate code from the drop-down menu:
• n (no Class Action Alleged) • y (Class Action Alleged)
8) Demand ($000): Enter the dollar amount to the nearest thousand with no punctuation. That is, if the complaint asserts damages in the amount of $75,000, enter “75”; if the complaint asserts damages in the amount of $5,000,000, enter “5000.” The smallest amount which can be entered is “1” (for $1,000.00), and the largest is 9999 (for $9,999,000). Round up or down as needed to the nearest thousand (e.g., $750.00 = 1; $1,498.56 = 1; $25,501.99 = 26). If no specific dollar amount is demanded in the complaint, leave this field blank. If the complaint seeks more than $9,999,000 in damages, enter 9999. This is for statistics purposes only, and has no substantive impact; entering a larger number could cause a system error.
9) Arbitration Code: Leave this field blank.
10) County: The drop-down menu for “County” lists every county in California,

Electronic Case Opening User Manual
July 1, 2016 Page 16
as well as choices for “XX US, Outside California” and “XX Outside US.” In most cases, you should make your choice based on the residence of the first-named plaintiff. Where the United States is a plaintiff, make your selection based on the residence of the first-named defendant; or, in land condemnation cases, the county where the property at issue is located.
11) Fee Status: Ignore this field; the correct fee status will be generated by the system later in the filing process.
12) Fee Date: System generated. Do not modify.
13) Date Transfer: Leave this field blank.
After completing the statistical screen, click “Next.” If you did not select the “mc” case type on the screen shown in Figure 11, you will see a warning (Figure 13).
You must follow the instructions, return to the screen shown in Figure 11, make the correct case-type selection, and then re-enter the information on the statistical screen before continuing. Otherwise, continue to Section II.C.
C) ADDING PARTIES
The following screen (Figure 14) displays an alert regarding the next step in the process, during which you will add all parties in the case to the docket, and provide basic information about those parties. This screen draws attention to two important points to keep in mind while entering party information on the following screens. Please review the message carefully, and then click “NEXT.”
• Do not enter any address information for a party unless that party is proceeding pro se.
• Do not alter the “Start date” or “Notice” fields.
Figure 13

Electronic Case Opening User Manual
July 1, 2016 Page 17
1) Party Name
You will now be asked to enter the name of each party named in the case-initiating document. This process will create the online docket for your case.
Add parties in the order in which they appear in the caption of the case-initiating document. If there is an “In re” party, enter the information for that party first. Use upper and lower case letters to input names (i.e., “Jane Doe” or “XYZ Corporation”). DO NOT USE ALL CAPS. Do not use the apostrophe, hyphen, or dash characters in any party name or address field, even if the correct spelling of a name includes one of those characters. Unfortunately, use of those characters may cause a system error that prevents service on the affected party, so please omit all apostrophes and replace hyphens and dashes with a space. For additional instructions regarding the proper entry of party names, please refer to the document on the Court’s website entitled “Instructions for Searching and Adding Parties for Attorney Civil Case Opening.” If there are more than 10 parties in your case, you may not be able to add all parties in one transaction. Please review our guide, “Instructions for Adding Additional Parties in CM/ECF,” for information about adding additional parties in such a case.
The first step in adding a party is to run a search to see if that party is already in the Court’s CM/ECF database. Large corporations, especially, may have been involved in prior litigation in the Central District, which means that their informa-tion will already have been added to the system. Please do not create a duplicate database entry for a person or company with an existing record in the database.
Look for the “Search for a party” option in the right pane of the screen shown in Figure 15. Type the party's last name – or if a business, the business name – in the “Last/Business Name” field. Complete the “First Name” and “Middle Name” fields, as applicable, and click “Search.”
Figure 14

Electronic Case Opening User Manual
July 1, 2016 Page 18
Figure 15 Search results will then be displayed (Figure 16). If one of the names displayed in the “Search Results” box matches the party in your case, double click on the party name. A pop-up box will appear displaying the party’s name – as well as the address, if an address has previously been entered for that party. DO NOT CHOOSE A PARTY FOR WHICH ADDRESS INFORMATION APPEARS IN THIS BOX. If you find a match with no associated address information, exit the dialog box. Your choice should be highlighted (Figure 16); click “Select Party.” If no appropriate match is found, click “Create New Party.”
2) Party Information
Whether or not you found a match for your party in the database, you will next see a screen with numerous fields for the entry of information about the person or entity you have identified as a party in your case (Figure 17.) Please note that, unless you know that the party you are entering is appearing pro se, most of these fields should be left blank: change only the “Role” field, and if applicable, the “Party text” and “Corporation” fields.
Important Note: Do not enter a party’s address or contact information (unless you know for sure that the party is appearing pro se), and do not change the “Start date,” or modify the “Notice” option.
Role: Select the correct party “Role.” Note that this field defaults to “Amicus,” which is extremely unlikely to be the appropriate choice for any party at the case-opening stage.
Party Text: Enter any descriptive “Party text” information appearing in the caption of the case-initiating document (i.e., “individually,” “a California corporation,” etc.). Add “1 through 10, inclusive” in the “Party text” field for Doe
Figure 16

Electronic Case Opening User Manual
July 1, 2016 Page 19
defendants, if applicable. Note: Do not enter any alias, corporate parent, or other affiliate information in this field (see the “Editing Party Information” section, below, for information about adding alias, corporate parent, or other affiliate information). After completing the few required fields on the screen shown in Figure 17, click the “Add Party” button.
A new search screen will be displayed, similar to Figure 18, from which the user can search for and add additional parties. Repeat the above process until ALL parties in your case have been entered. If there are more than 10 parties in your case, you may not be able to add all parties in one transaction. Please review our guide, “Instructions for Adding Additional Parties in CM/ECF,” for information about adding additional parties in such a case.
Figure 17

Electronic Case Opening User Manual
July 1, 2016 Page 20
D) EDITING PARTY INFORMATION
After searching for, selecting, and adding all parties, the parties’ names will appear in the left pane, in the “participant tree.” (Figure 18.) Parties added to civil cases will have control icons in the participant tree so the user can add aliases, corporate parents, etc., for the party during the case-opening process.
From this screen, the user can:
• Add an alias or corporate parent by clicking on the corresponding “add” icon;
• Edit the party information by clicking on the pencil “edit” icon;
• Delete the party by clicking the red X “delete” icon; or
• Add a new party by clicking on the “Add New Party” button at the top left of the screen.
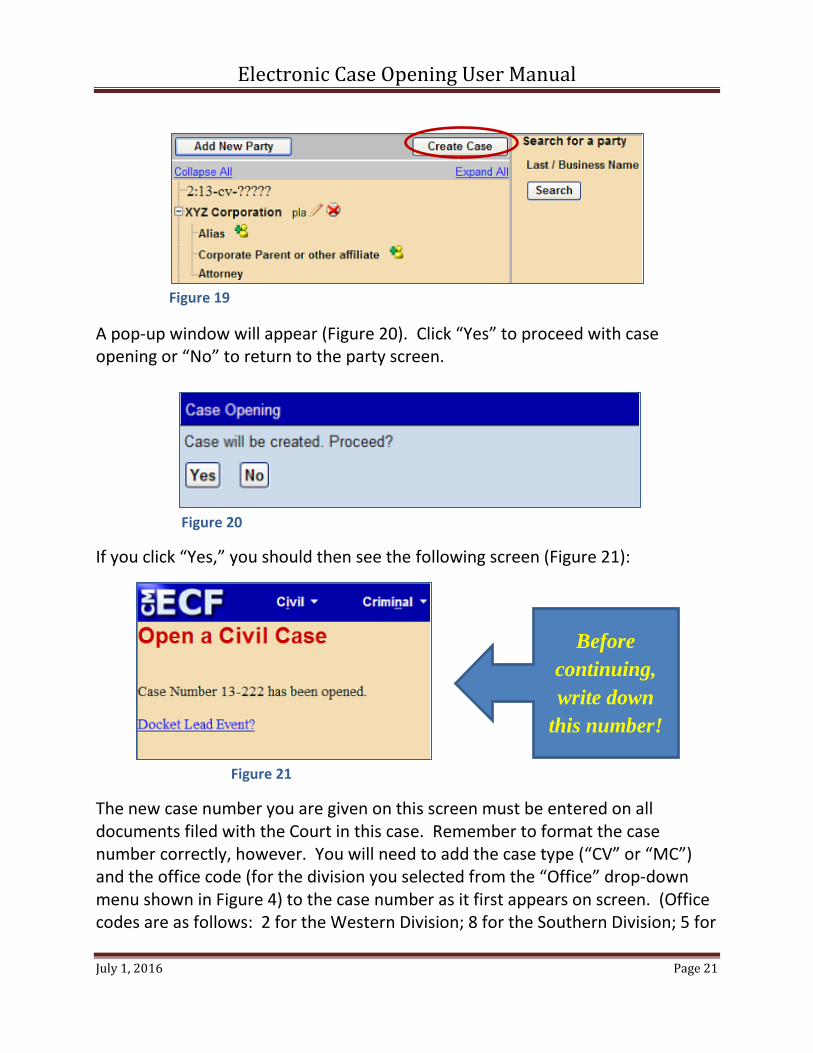
E) CREATING THE CASE
Once all parties have been entered, the correct roles assigned, and any necessary aliases or corporate parents/affiliates added, click “Create Case.” (Figure 19.)
Figure 18
Electronic Case Opening User Manual
July 1, 2016 Page 21
A pop-up window will appear (Figure 20). Click “Yes” to proceed with case opening or “No” to return to the party screen.
If you click “Yes,” you should then see the following screen (Figure 21):
The new case number you are given on this screen must be entered on all documents filed with the Court in this case. Remember to format the case number correctly, however. You will need to add the case type (“CV” or “MC”) and the office code (for the division you selected from the “Office” drop-down menu shown in Figure 4) to the case number as it first appears on screen. (Office codes are as follows: 2 for the Western Division; 8 for the Southern Division; 5 for
Figure 21
Figure 20
Figure 19
Before continuing, write down
this number!

Electronic Case Opening User Manual
July 1, 2016 Page 22
the Eastern Division.) For instance, in the example from Figure 21, the full case number is “2:13-CV-00222.” On subsequent documents, filed after judges have been assigned to your case, the case number should include the judges’ initials.
F) DOCKETING THE LEAD EVENT
You must now file and docket the case-initiating document, or “lead event,” to complete the opening of your new case. Otherwise, the case you just opened will be closed. See Section III, below, for instructions on how to file and docket case-initiating documents.
III. INSTRUCTIONS FOR E-FILING THE CASE-INITIATING DOCUMENT
A) BEGINNING THE FILING PROCESS
After successfully opening a new case, you must file and docket the case-initiating document, or “lead event.” If you proceed directly to this step when opening a case, you may begin the docketing process by clicking “Docket Lead Event” on the screen in which your case is assigned a case number (Figure 21).
Alternatively, you may begin the docketing process from the “Civil Events” Screen. Remember, however, that you must file and docket a case-initiating document after opening your case, or your case will be closed. If you do not proceed directly to this step when opening a case – perhaps you log out of the system briefly while adding your new case number to the case-initiating document you are about to file – you must resume the docketing process as soon as possible.
To resume the docketing process after logging out of the system, log in to CM/ECF, and click “Civil” on the blue menu bar at the top of the CM/ECF screen; this will take you to the “Civil Events” screen. On the “Civil Events” screen (Figure 22), under the “Initial Pleadings and Service” Category, click on “Complaints and Other Initiating Documents.”

Electronic Case Opening User Manual
July 1, 2016 Page 23
Whether you proceed to the docketing process directly after opening a case through the “Docket Lead Event” link shown in Figure 21, or through the “Complaints and Other Initiating Documents” link shown in Figure 22, you will next see a version of the following screen (Figure 23):
If you access this screen directly after opening a case through the “Docket Lead Event” link shown in Figure 21, the “Civil Case Number” field should be pre-populated with the case number of the case you just opened. Do not alter any information or click the “Clear” button.
If you access this screen through the “Complaints and Other Initiating Documents” link shown in Figure 22, you must enter the case number of your new case.
Figure 22
Figure 23

Electronic Case Opening User Manual
July 1, 2016 Page 24
Figure 25
Figure 19
When the correct case number has been entered, click “NEXT” to proceed. (You may be shown a screen with a list of multiple cases; if so, check the box next to the correct case, and click “NEXT.”) When you see the screen shown in Figure 24, verify that the case number and case title are correct, and click “NEXT.”
A button will be displayed on the following screen; click “NEXT.”
B) SELECTING THE LEAD EVENT
On the next screen (Figure 25), you will see a list of “Available Events.” You must choose one of these events to identify your case-initiating document, then click “NEXT.”
Figure 24

Electronic Case Opening User Manual
July 1, 2016 Page 25
Figure 26
C) SELECTING THE FILER(S)
On the next screen (Figure 26), indicate the party who is filing the case-initiating document by clicking on that party’s name in the “Select the Party” box. To select multiple filers, hold down the [Ctrl] key on your keyboard and click on the names of all applicable filers. After all filing parties are highlighted, click “Next.”
D) ASSOCIATING THE FILING ATTORNEY WITH THE FILING PARTY
Once you have identified the party filing the case-initiating document, you must identify the attorney who represents that party. However, your options are limited. At case opening, the system allows only the attorney whose CM/ECF login and password are being used to file the case-initiating document to be associated with the case. Once the case-initiating document is filed, additional attorneys who wish to appear on the docket as counsel of record for a specific party may file a “Notice of Appearance or Withdrawal of Counsel” (Form G-123, available on the Court’s website). This is not required for attorneys listed on the case-initiating document, all of whom will eventually be added to the docket by court staff even if no separate Notice of Appearance is filed. However, if an attorney uses his or her own CM/ECF login to file a Form G-123, that attorney will be added to the docket immediately, and will receive electronic notice of all filings from that point forward; otherwise, there may be some delay. Refer to the Court’s website at www.cacd.uscourts.gov/attorneys for additional information.

Electronic Case Opening User Manual
July 1, 2016 Page 26
The filing attorney, however, must be associated with a party as counsel of record when the case-initiating document is filed. After selecting the filing party on the screen shown in Figure 26, the next screen (Figure 27) will display a warning that “the following attorney/party associations do not exist.” The box on the left-hand side of the page must be checked for each party the filing attorney represents. If that attorney is lead counsel and wants to be identified as lead counsel on the docket sheet, click the “Lead” box to the right. The “Notice” box on the right should be pre-populated with a checkmark – DO NOT UNCHECK THIS BOX. When all necessary boxes are checked, click “NEXT.”
E) SELECTING PARTY ROLES
On the next screen (Figure 28), you must identify the “role” – i.e., plaintiff(s), defendant(s), etc. – of the party or parties filing the case-initiating document. Enter this information in the box indicated, and then click “NEXT.”
Figure 27
Figure 28

Electronic Case Opening User Manual
July 1, 2016 Page 27
Next (Figure 29), select the party or parties that this filing is against. To select multiple parties, hold down the “Ctrl” key on your keyboard and click all applicable parties. If you are sure the information you have entered to this point is correct, click “Next.”
F) UPLOADING PDF DOCUMENTS The general process for uploading documents will be the same regardless of the type of lead event you selected. Before proceeding, remember to add your new case number to the caption of all documents you intend to file, and make sure that each document is saved as a PDF file. (Either open your document using word processing software, add the case number, and then save the document as a PDF file, or use the “edit document text” or similar function of Adobe Acrobat to edit a previously created PDF file.)
In brief, upload your case-initiating document (e.g., a Complaint or a Notice of Removal) as your “Main Document,” and upload any exhibits to that document as “Attachments” to the Main Document. Then separately file and upload, using the appropriate events, the following documents:
• Civil Cover Sheet (Form CV-71) (if applicable) • Summons (if applicable) • Notice of Interested Parties (see Local Rule 7.1-1) • Corporate Disclosure Statement (if applicable; see Fed. R. Civ. P. 7.1)
Figure 29

Electronic Case Opening User Manual
July 1, 2016 Page 28
Figure 30
• Notice of Related Cases (if applicable; see Local Rule 83-1.3) • Notice of Pendency of Other Actions or Proceedings (if applicable; see
Local Rule 83-1.4) • Report on the Filing or Determination of an Action Regarding a Patent or
Trademark (Form AO-120) (if applicable; see Local Rule 3-1) • Report on the Filing or Determination of an Action or Appeal Regarding
a Copyright (Form AO-121) (if applicable; see Local Rule 3-1) • Request to Proceed In Forma Pauperis (if applicable) • Application of Non-Resident Attorney to Appear in a Specific Case Pro
Hac Vice (Form G-64) (if applicable, see L.R. 83-2.1.3) • Application for Temporary Restraining Order (if applicable)
After clicking “Next” on the screen shown in Figure 29, you will see some version of the following, depending on the type of lead event you selected (two possible examples shown in Figures 30 and 31; filing other types of case-initiating documents may result in slight variations of the screen sequence):
Figure 31

Electronic Case Opening User Manual
July 1, 2016 Page 29
Main Document: Under “Main Document,” click “Browse”; you will be able to select the PDF version of your case-initiating document from wherever it is stored on your system.
Attachments: Under “Attachments,” you may upload any exhibits attached to your case-initiating document. (Each State court document attached to a Notice of Removal must be separately uploaded under Attachments.) In line 1, click “Browse” to select the desired PDF document from your system, and either enter a description in the “Description” field or select the appropriate description from the drop-down menu in the “Category” field.
Important Note: The system requires that you upload a PDF document as your Main Document. A warning message appears (Figure 32) if you do not attach a PDF document, and you will not be able to complete the docket entry.
After you have attached all necessary documents, click “NEXT.” If you are filing something other than a complaint, you may see a screen asking for specific information, such as the state court case number for a removed case. Follow any applicable instructions. In a civil case, you will then be asked if you intend to file a request for a temporary restraining order or other emergency relief (Figure 33).
Figure 32
Figure 33

Electronic Case Opening User Manual
July 1, 2016 Page 30
Answer “yes” or “no,” then click “NEXT.” Click through until you are directed to the filing fee screen (Figure 34). If you choose “yes,” you must immediately file your application for a temporary restraining order after completing the case-opening process. (See Section IV.D., below.)
G) IDENTIFYING FILING FEE STATUS
On the next screen (Figure 34), you will be asked to indicate whether you are required to pay the filing fee. Remember, unless no fee is due, you must pay the fee online by credit card during the case-opening process. There are four available options:
• Pay filing fee (credit card required) • Filing on behalf of the United States • Request to proceed in forma pauperis will be filed • Fee exempt pursuant to statute
Make your selection, then click “NEXT.” If you selected “Pay filing fee,” the amount of the fee (for example, $400) will be displayed on the following screen (Figure 35); if you selected one of the other options, no fee will be displayed (Figure 36). Either way, click “NEXT.”
Figure 34

Electronic Case Opening User Manual
July 1, 2016 Page 31
If you are paying the fee, you will be automatically directed to Pay.gov, where you must enter your credit card information. Otherwise, you will be taken directly to the screen for reviewing and finalizing your docket entry (Figure 40); skip to Section III.I., below, for instructions.
H) PAYING THE FEE ONLINE
If you indicated that you are paying the filing fee, you will see the following screen (Figure 37) after clicking “NEXT” on the screen shown in Figure 35. Please wait while the online payment screen appears. DO NOT CLICK THE “BACK” BUTTON ONCE YOU START THE PAYMENT PROCESS.
Next, the online payment screen will be displayed (Figure 38):
Figure 37
Figure 35 Figure 36

Electronic Case Opening User Manual
July 1, 2016 Page 32
Complete all payment data fields as required in Figure 38 (required fields are indicated with a red asterisk). Make sure all information is correct, and then click “Continue with Plastic Card Payment.” A payment authorization screen will appear (Figure 39). You may enter one or more email addresses here to receive payment confirmation.
Figure 39
Figure 38

Electronic Case Opening User Manual
July 1, 2016 Page 33
If you need to make any changes to information on this screen, click the “Edit this information” link at the top left of the screen. Do not click the “back button.”
You must click the payment authorization checkbox next to the statement, “I authorize a charge to my card account for the above amount in accordance with my card issuer agreement.” When you have completed the form, click the “Submit Payment” button to proceed. Understand, however, that if you proceed past this point, you will not have the opportunity to make further corrections in your docket entry. If you think you made any errors in entering information, you may start over now (click the “Cancel” button or the “Return to your originating application” link in the upper right corner of the screen), but once you click “Submit Payment” you are committed to the transaction. If you choose to “Submit Payment,” you will be returned to the CM/ECF site, and should see a screen similar to that in Figure 36, above. Click “NEXT.”
I) CONFIRMING FINAL DOCKET ENTRY
You will next see a screen asking you to confirm your filing and the text of your docket entry (Figure 40). This screen should display the final docket text, the Pay.gov receipt number for your payment (if applicable), and descriptions of any attachments to your case-initiating document. Click “NEXT” to complete the filing process. Note that you cannot make any further changes to your docket entry at this point. If you have already paid the filing fee and you notice a problem now, you should nonetheless click “NEXT” to complete the filing, then file a “Notice of Errata” to correct any problem significant enough to merit correction. You will be charged the filing fee now whether you complete the transaction or not, and failure to complete the transaction could result in dismissal of your case. (If you did not pay the filing fee, however, you may abandon your transaction now and start over.)

Electronic Case Opening User Manual
July 1, 2016 Page 34
Figure 41
J) RECEIVING CONFIRMATION
Next, as a confirmation of your transaction, the Notice of Electronic Filing (“NEF”) is displayed (Figure 41). You should also receive a copy of this NEF, and all future NEFs, by e-mail. Remember that the Court’s local rules require you to update your e-mail address and other information within five days of any change. Local Rules 5-4.8.1, 83-2.4. See the “Attorneys” page on the Court’s website for additional information about keeping your contact information up to date: www.cacd.uscourts.gov/attorneys.
Figure 40

Electronic Case Opening User Manual
July 1, 2016 Page 35
IV. FILING OTHER DOCUMENTS REQUIRED AT CASE OPENING
After successfully opening the case and docketing the lead event (i.e., your complaint), you must immediately proceed to file all other documents required by Federal and Local Rules to be filed at the time of case opening (see below for instructions). Everyone who opens a civil case electronically must file a Civil Cover Sheet (Form CV-71). In addition, you may need to file one or more of the following:
• a Notice of Interested Parties (see Local Rule 7.1-1) • Corporate Disclosure Statement (if applicable; see Fed. R. Civ. P. 7.1) • Notice of Related Cases (if applicable; see Local Rule 83-1.3) • Notice of Pendency of Other Actions or Proceedings (if applicable; see
Local Rule 83-1.4) • Report on the Filing or Determination of an Action Regarding a Patent or
Trademark (Form AO-120) (if applicable; see Local Rule 3-1) • Report on the Filing or Determination of an Action or Appeal Regarding
a Copyright (Form AO-121) (if applicable; see Local Rule 3-1) • a Request to Proceed In Forma Pauperis (if applicable) • Application of Non-Resident Attorney to Appear in a Specific Case Pro
Hac Vice (Form G-64) (if applicable, see L.R. 83-2.1.3) • Proposed Subpoena (AO-88B) • Application for Temporary Restraining Order (if applicable)
You may also choose to submit a summons at the time you file your complaint, though doing so is not mandatory.
A) CIVIL COVER SHEET
ANYONE WHO OPENS A NEW CIVIL CASE MUST FILE A CIVIL COVER SHEET. To do so, click “Civil” on the blue menu bar at the top of any CM/ECF screen; this will take you to the “Civil Events” screen. On the “Civil Events” screen, under the “Other Filings” category, click on “Miscellaneous Filings.” The next screen will ask for your case number; enter or confirm the number as needed, and click “NEXT.” On the following screen, confirm the system has located the correct case, and click “NEXT.” Select “Civil Cover Sheet (CV-71)” from the “Available Events”

Electronic Case Opening User Manual
July 1, 2016 Page 36
menu, and click “NEXT.” Upload your Civil Cover Sheet (remember to use the latest version of Form CV-71, available from the Court’s website) on the next screen, follow the onscreen prompts, and proceed with the filing according to standard electronic filing protocols.
B) SUMMONS
You may submit a proposed Summons for issuance by the clerk at the time you file your complaint, or you may submit it later. Whenever you choose to submit your proposed Summons, follow these steps. Click “Civil” on the blue menu bar at the top of any CM/ECF screen; this will take you to the “Civil Events” screen. On the “Civil Events” screen, under the “Service Documents” category, click on “Service/Waivers of Summons and Complaints.” The next screen will ask for your case number; enter or confirm the number as needed, and click “NEXT.” On the following screen, confirm the system has located the correct case, and click “NEXT.” Select “Summons Request” from the “Available Events” menu, and click “NEXT.” Upload your proposed Summons on the next screen. Note that you should submit just one form of proposed Summons, addressed to all defendants, on Form AO-440, which is available from the Court’s website at www.cacd.uscourts.gov/court-procedures/forms. Discontinue using Summons Form CV-001A; this form will no longer be available on the Court’s website. After uploading your proposed Summons, proceed with the filing according to standard electronic filing protocols. The Clerk will subsequently issue the Summons, and an NEF will be generated. Upon receipt of the NEF, you may print a copy of the official Summons for service on each defendant.
C) NOTICE OF INTERESTED PARTIES/CORPORATE DISCLOSURE STATEMENT
PURSUANT TO LOCAL RULE 7.1-1, EVERY PARTY MUST FILE A NOTICE OF INTERESTED PARTIES WITH ITS FIRST APPEARANCE. To do so, click “Civil” on the blue menu bar at the top of any CM/ECF screen; this will take you to the “Civil Events” screen. On the “Civil Events” screen, under the “Other Filings” category, click on “Notices.” The next screen will ask for your case number; enter or confirm the number as needed, and click “NEXT.” On the following screen, confirm the system has located the correct case, and click “NEXT.” Select

Electronic Case Opening User Manual
July 1, 2016 Page 37
“Certificate/Notice of Interested Parties” from the “Available Events” menu, and click “NEXT.” Upload your Notice of Interested Parties on the next screen, and proceed with the filing according to standard electronic filing protocols.
Note that every corporate party is required by Fed. R. Civ. P. 7.1 to file a disclosure statement with its initial appearance in a case. If you provide the information required by Fed. R. Civ. P. 7.1 in your Notice of Interested Parties, you do not need to file a separate Corporate Disclosure Statement. However, you may file a separate Corporate Disclosure Statement, either at case-opening or if required by Fed. R. Civ. P. 7.1(b)(2), using the “Corporate Disclosure Statement” event under “Miscellaneous Filings” in the “Other Filings” category.
D) OTHER DOCUMENTS
The following documents, if applicable, should be filed using the events indicated:
Document Category Sub-Category Event (under “Available Events” menu)
Notice of Related Cases (see Local Rule 83-1.3)
Other Filings
Notices Related Case(s)
Notice of Pendency of Other Actions or Proceedings (see Local Rule 83-1.4)
Other Filings
Notices Related Case(s)
Report on the Filing or Determination of an Action Regarding a Patent or Trademark (Form AO-120) (see Local Rule 3-1)
Other Filings
Miscellaneous Filings
Report on Filing of Patent/Trademark Action (Initial Notification) (AO 120)

Electronic Case Opening User Manual
July 1, 2016 Page 38
Report on the Filing or Determination of an Action or Appeal Regarding a Copy-right (Form AO-121) (see Local Rule 3-1)
Other Filings
Miscellaneous Filings
Report on Filing of Copyright Action (Initial Notification) (AO 121)
Notice of Appearance (not required for attorneys listed on the case-initiating document) (Form G-123)
Other Filings
Notices Notice of Appearance or Withdrawal of Counsel (G-123)
Consent to Proceed Before a United States Magistrate Judge (Form CV-11B)
Other Filings
Case Referrals/ Consents to Proceed
Select appropriate event:
Consent to Proceed (CV-11C) before US Magistrate Judge Direct Assignment Program Non-Final
Consent to Proceed (CV-11C) DECLINED before US Magistrate Judge Direct Assignment Program
Consent to Proceed before U S Magistrate Judge (AUSA filers only)
Consent to Proceed before U S Magistrate Judge (non-AUSA)
Consent to Proceed before US Magistrate - DECLINED by Party
Request to Proceed In Forma Pauperis with Declaration in Support (Form CV-60)
Motions and Related Filings
Applications/ Ex Parte Applications/ Motions/ Petitions/ Requests
Select “Request,” then “Proceed in Forma Pauperis with Declaration in Support (CV-60)”

Electronic Case Opening User Manual
July 1, 2016 Page 39
Request to Proceed Without Prepayment of Fees with Declaration in Support (CV-60P)
Motions and Related Filings
Applications/ Ex Parte Applications/ Motions/ Petitions/ Requests
Select “Request,” then “Proceed Without Prepayment of Filing Fees (CV-60P)”
Application of Non-Resident Attorney to Appear in a Specific Case Pro Hac Vice (Form G-64)
Motions and Related Filings
Applications/ Ex Parte Applications/ Motions/ Petitions/ Requests
Select “Application,” then “Appear Pro Hac Vice”
Application for Temporary Restraining Order (see Local Rule 65-1)
Motions and Related Filings
Applications/ Ex Parte Applications/ Motions/ Petitions/ Requests
Select “Application,” then “Temporary Restraining Order”
V. AFTER INITIAL FILING HAS BEEN COMPLETED
A) JUDGE ASSIGNMENT
After you have opened your case and filed your case-initiating document, it will be subject to review by the Clerk. Upon the completion of this quality review process, judges will be assigned to your case in accordance with the General Orders of the Court. (In civil cases, judges will be assigned immediately; in some miscellaneous cases, judges may not be assigned at all.) When judges are assigned, a Notice of Assignment will be filed in your case, and an NEF for this filing will be sent to you by e-mail. Upon receipt of a Notice of Assignment, you must immediately deliver mandatory chambers copies of all documents

Electronic Case Opening User Manual
July 1, 2016 Page 40
previously filed in your case to the assigned judge(s), and you must provide mandatory chambers copies of any future filings as required by Local Rule 5-4.5.
B) MOTIONS
Do not e-file any subsequent motion until judges have been assigned to your case and a Notice of Assignment has been filed.
C) FILING OF OTHER CLAIM-INITIATING DOCUMENTS
All amended complaints and other claim-initiating documents must also be electronically filed, unless exempted from electronic filing pursuant to Local Rule 5-4.1. This includes third-party complaints, amended complaints, complaints in intervention, counterclaims, and crossclaims.
If you file a claim-initiating document that adds new parties to your case, you must follow the directions for adding parties set forth in Section II.D., above. However, if you file an amended pleading that does not include parties named in an earlier version of that document, DO NOT terminate any parties – this will be done by Clerk’s Office staff.
If your claim-initiating document names new parties, you may submit a proposed form of Summons electronically at the time you file your claim-initiating document. Submit just one form of proposed Summons, addressed to all affected parties, on Form AO-440 (Summons in a Civil Action) or Form AO-441 (Summons on Third-Party Complaint), which are available from the Court’s website at www.cacd.uscourts.gov/court-procedures/forms. Refer to Section IV.B. of this Manual for further details on e-filing a Summons request.
The appropriate civil events to use for claim-initiating documents are located under the category “Initial Pleadings and Answers,” in two sub-categories: “Complaints and Other Initiating Documents” and “Other Complaint Filings.”
The follow events are listed under “Complaints and Other Initiating Documents” (see Figure 42):
• Application/Motion/Request (Attorney Civil Case Opening) • Complaint (Attorney Civil Case Opening)

Electronic Case Opening User Manual
July 1, 2016 Page 41
Figure 42
• Counterclaim • Crossclaim • Intervenor Complaint • MISC – Motion Related to Subpoena from Another District • MISC – Notice of Receivership (28 USC 754) • MISC – Receipt of Letters Rogatory (Foreign Judicial Assistance) • MISC – Registration of Judgment from Another District (AO-451) • MISC – Subpoena to Identify Infringer (DMCA) • Motion to Vacate, Set Aside, or Correct Sentence (28:2255) (Attorney Civil
Case Opening) • Motion to Withdraw Bankruptcy Reference (Attorney Civil Case Opening) • Notice of Removal (Attorney Civil Case Opening) • Petition (Attorney Civil Case Opening) • Petition for Writ of Habeas Corpus (Attorney Civil Case Opening) • Request for Appointment of Counsel/Stay of Execution (Attorney Civil Case
Opening) • Third Party Complaint

Electronic Case Opening User Manual
July 1, 2016 Page 42
Figure 43
The following events are listed under “Other Complaint Filings” (see Figure 43):
• Add Additional Parties (Attorney Civil Case Opening) • Amended Complaint/Petition • Amended Counterclaim • Amended Crossclaim • Amended Third-Party Complaint • Consolidated Complaint
If you electronically file any of these documents and need to add more than 10 new parties to your case, you may not be able to add all parties in one transaction. Please review our guide, “Instructions for Adding Additional Parties in CM/ECF,” for information about adding additional parties in such a case.
VI. REQUEST FOR REFUND
Filing fees paid to open a case electronically will generally not be refundable, even if a case is filed in error or is dismissed by the Court.
To request a refund, complete and file an Application For Refund of Fees (Form G-124). Click “Civil” on the blue menu bar at the top of any CM/ECF screen; this will

Electronic Case Opening User Manual
July 1, 2016 Page 43
take you to the “Civil Events” screen. On the “Civil Events” screen, under the “Motions and Related Filings” category, click on “Applications/Ex Parte Applications/Motions/Petitions/Requests.” The next screen will ask for your case number; enter or confirm the number as needed, and click “NEXT.” On the following screen, confirm the system has located the correct case, and click “NEXT.” Select the “Application” radio button and click “Next,” then select “Refund of Fees Paid (G-124)” from the “Available Events” menu, and click “NEXT.” Select the filer or party as indicated and click “Next.” On the following screen, enter the party role of filer and click “NEXT.” Upload your Application For Refund of Fees on the next screen and click “NEXT.” On the following screen, check the box “Should the document you are filing link to another document in this case?” and click “NEXT.” On the following screen, check the box of the entry for which the refund is being sought and click “NEXT,” and proceed with the filing according to standard electronic filing protocols.