electron microscopy procedures … microscopy procedures manual october 2014 bobbie schneider 1...
TRANSCRIPT

[Type text]
ELECTRON MICROSCOPY PROCEDURES MANUAL
October 2014
Bobbie Schneider

1
CONTENTS
PROTOCOLS ............................................................................................................................................................................... 3
Specimen Preparation Protocol ................................................................................................................................................ 3
1. Fixation: ...................................................................................................................................................................... 3
2. Dehydration:................................................................................................................................................................ 3
3. Embedding: ................................................................................................................................................................. 4
4. Sectioning: .................................................................................................................................................................. 4
5. Post Staining: .............................................................................................................................................................. 4
Fixing Cells for Electron Microscopy ....................................................................................................................................... 4
Method 1: Scrape Cells with Cell Scraper ..................................................................................................................... 4
Method 2: Permeabilize Cells from Plate ....................................................................................................................... 5
Method 3: Leave on Petri Dish, Permanox Chamber Slides or Coverslips .................................................................... 5
Method 4: Transwell Permeable Supports ..................................................................................................................... 5
LRW Embedding ........................................................................................................................................................................ 6
Post-Embedding Immunogold Labeling on LRW Sections of Cells ........................................................................................... 7
Primary Antibodies: .............................................................................................................................................................. 7
Secondary Antibodies: .......................................................................................................................................................... 7
Dilutions: .............................................................................................................................................................................. 7
Protocol: ............................................................................................................................................................................... 7
Negative Staining Procedure ..................................................................................................................................................... 8
Scanning Electron Microscopy Protocol Using HMDS ............................................................................................................ 8
OPERATIONS ............................................................................................................................................................................. 9
JEOL 1400 TEM Operation ...................................................................................................................................................... 9
Signing on and General Settings:.......................................................................................................................................... 9
Sample Loading and Removal-For EM staff only: ............................................................................................................... 9
Turning on the Beam and Correcting Z-axis (Height of sample): ...................................................................................... 10
Voltage Center Adjustment (If Needed): ............................................................................................................................ 10

2
Using the Gatan Digital Imaging Camera and Software:.................................................................................................... 10
Imaging: .............................................................................................................................................................................. 10
To collect images: ............................................................................................................................................................... 11
End of Session: ................................................................................................................................................................... 11
sample holder Loading and Removal For the JEOL 1400 microscope ............................................................................... 12
JEOL JSM-6610LV SEM Operation........................................................................................................................................ 13
Specimen Loading and Exchange: ...................................................................................................................................... 13
Setting the Specimen: ......................................................................................................................................................... 13
Choosing a Recipe: ............................................................................................................................................................. 13
Observation:........................................................................................................................................................................ 14
Observation conditions: ...................................................................................................................................................... 14
Setting up to take a photo: .................................................................................................................................................. 16
Microscope shut down: ....................................................................................................................................................... 17
ADDITIONAL INFORMATION AND RESOURCES .......................................................................................................... 18
General Electron Microscopy Resources ................................................................................................................................ 18
Introduction to Electron Microscopy .................................................................................................................................. 18
Electron Microscopy – Web Course Notes and References ............................................................................................... 18
Transmission Electron Microscopy (TEM) Basics ............................................................................................................. 18
Listserv for Electron Microscopy Information ................................................................................................................... 18
Specific Protocol or Technique Resources .............................................................................................................................. 18
EM info for Caenorhabditis elegans .................................................................................................................................. 18
Immunogold labeling .......................................................................................................................................................... 18
Immunogold questions........................................................................................................................................................ 18
Optical Image Processing ................................................................................................................................................... 18

3
PROTOCOLS
SPECIMEN PREPARATION PROTOCOL
1. FIXATION:
Tissue can be fixed by immersion or perfusion. The most commonly used method is immersion. Fixation time is
variable, depending on tissue, but usually from 4 hours to overnight at 4 degrees (refrigerator).
a. Primary Fixative: 1/2 strength Karnovsky’s.
2% Paraformaldehyde/2.5% Glutaraldehyde
This is buffered with a 0.2M Cacodylate Buffer
Note: Always use the fixative in the fume hood and wear gloves. Glutaraldehyde fixes skin and
cacodylate buffer contains arsenic.
b. 0.1M Cacodylate Buffer wash 3X for 10min. each
c. Post Fixative: 2% aqueous OsO4/0.2 M Cacodylate Buffer
A 1:1 solution for 2 hours in the refrigerator
d. 0.1 M Cacodylate Buffer wash 3X for 10 min each
2. DEHYDRATION:
Dehydration with ethanol:
35% ETOH 15 min. and decant (optional)
50% ETCH 20 min. and decant
70% ETOH 20 min. and decant
95% ETOH 20 min. and decant
100%ETOH 20 min. and decant
100% ETOH 20 min. and decant
Propylene Oxide 15 min. and decant
Propylene Oxide 15 min. and decant
1:1 PO/Epon resin overnight
The dehydrating times should be adjusted to size and kind of tissue.
The resin is an Epon 812 recipe

4
3. EMBEDDING:
Embedding with Epon:
Next morning, change out to fresh Epon 812 for 1-3 hours.
Embed (always) in fresh Epon 812
Polyethylene capsules are placed in a holder and numbered strips of paper are inserted. A drop of fresh Epon 812 is placed in the capsules and the specimen is transferred to the appropriate capsule.
The “blocks” are cured for 48 hours in a 60 degree oven.
4. SECTIONING:
1 micron or thick sections are taken to find the area of interest
Take ultra thin sections (~70nm) and place on grids
5. POST STAINING:
Stain grids on uranyl acetate for 2 hrs.
Stain grids on lead citrate for 5-6 min.
** This procedure is the basic TEM procedure. Each and every sample that comes to us is evaluated and
the procedure is adjusted to make sure the best results will be obtained.
FIXING CELLS FOR ELECTRON MICROSCOPY
METHOD 1: SCRAPE CELLS WITH CELL SCRAPER
**We need 1-5 million cells in order to do our procedure**
Fixation:
Fixative = 1/2 Karnovsky's
Use fixative (from refrigerator) and warm it up to room temp. or 37 degrees.
Add fixative to media (1:1) and let it sit for 10 min to fix.
Take off fix and media (don't let cells dry out) leave a small amount to cover cells and then add pure fix for 30 min - 1 hr.
Scrape cells, put them into an Eppendorf tube, and spin down at a very low speed (1400 rpm).
Pipette off fix (Keep a little fix on to not let the cells dry out) and put on new fixative and then re-suspend cells.
Put cells in refrigerator overnight with fix or bring them down to the EM lab in fix.
Or
Wash media off with 0.1M Cacodylate buffer quickly and add ½ Karnovsky’s fixative and then scrape after
30min – 1 hr.

5
Wash:
Wash cells 3 x 5 minutes in 0.1M Cacodylate buffer.
Spin down each time.
Post Fixation:
1% Osmium Tetroxide in 0.1M Cacodylate buffer for 1 - 2 hr. at 4 degrees in the refrigerator.
Wash:
Wash 3 x 5 minutes in 0.1M Cacodylate buffer.
Dehydration:
In graded series of ETOH - 50%, 70%, 95%, 2 x 100% ETOH for 15 min. and 2 x Propylene Oxide for 15
min.
Embed:
1:1 PO/Epon resin overnight with Eppendorf tubes capped.
Next day, spin down cells and uncap Eppendorf tubes.
Add Fresh 100% Epon resin for 2- 4 hrs.
Polymerize:
In 60 degree C oven overnight in Eppendorf tubes.
METHOD 2: PERMEABILIZE CELLS FROM PLATE
Fixation: Do as above but permeabilize cells from plate instead of scrape.
METHOD 3: LEAVE ON PETRI DISH, PERMANOX CHAMBER SLIDES OR COVERSLIPS
Fixation: Do as above but leave cells on the plate in the fixative for 1 hr.
Embed: Change 2x to fresh Epon resin and then invert beam capsules full of slightly hardened resin over relevant
areas.
Polymerize: In 60 degree C oven overnight and then pop off beam capsules that contain the cells.
METHOD 4: TRANSWELL PERMEABLE SUPPORTS
Fixation: Fix the attached supports containing cells in plate for 2 hr. or overnight.
Wash, Post fixation, Dehydration: Same as above.
Embed: 100% fresh Epon resin for 1 hr., then punch out supports with an 8mm biopsy punch on wax containing
resin. Cut out relevant pieces and flat embed.
Polymerize: in 60 degree C oven overnight.

6
LRW EMBEDDING
**Note: Do not use OSO4 fixed tissue or cells
1. Fix tissue or cells in primary fixative.
2. Wash tissue 3X 10 min. in 0.1M Cacodylate buffer, pH 7.4.
3. Dehydrate in ethanol:
50% - 1X-5 min. sit in hood/ 2 min. spin for cells
70% - 1X-5 min. sit in hood/ 2 min. spin for cells
95% - 2X-7 min. sit in hood/ 2 min. spin for cells
100% - 2X-7 min. sit in hood/ 2 min. spin for cells
4. Infiltration with LRW:
a) Mix LRW Resin with ETOH – 1:1 in a scintillation vial. Put mixture in tissue or cells for 30 min.
b) After 30 min., make a 2:1 mixture of LRW to ETOH.
5. 100% LRW Resin – 3X-1 hour and leave overnight in the last change.
6. Embed in Ted Pella flat teflon mold or gelatin capsules. LRW will only polymerize anaerobically, seal tightly.
7. Next:
a) Cure in UV light cryo-chamber in 4 degree C walk in refrigerator overnight. Put pans of ice on the
bottom of the container.
OR
b) Polymerize in gelatin capsules in 50 degree C oven overnight.
7
POST-EMBEDDING IMMUNOGOLD LABELING ON LRW SECTIONS OF CELLS
Example: Cell pellets were fixed for 3 hrs. with 0.025%glut./3% paraf. then worked up with short dehydration times
(10 min starting at 50% ETOH) & polymerized at 4 degrees under UV light for 1.5 days with LRW in gelatin
capsules.
PRIMARY ANTIBODIES:
Rabbit Preimmune sera – Investigator supplies
SECONDARY ANTIBODIES:
Goat anti Rabbit 10 nm, IgG (H+L) from EMS – Investigator supplies
DILUTIONS:
Primary - Preimmune sera – 1:30
Secondary - 10 nm gold – Straight or 1:25
Control - No Primary/ Straight gold
PROTOCOL:
**Everything is filtered with a 0.2 micron filter before use and purchased from EMS.
1. 0.05 M Glycine – 20 min. at room temp.
2. PBS- 3 drops
3. 5% BSA – 45 min. at room temp. (optional)
4. BSA-C/PBS/Tween 20 – 3X5 min drops (PH 7.4)
5. Primary antibody – 1 hr - ? at room temp. or overnight at room temp. or at 4 degrees C in humidified petri dish. (spin Primary in a centrifuge for 5 min on high speed).
6. PBS – 3 drops OR Dip into beaker of PBS
7. BSA-C/PBS/Tween 20 – 6X5 min drops (PH 7.4)
8. Secondary – Gold – 1 hr. - ? at room temp. or overnight at 4 degrees C in humidified petri dish
9. BSA-C/PBS/Tween 20 – 6X5 min drops (PH 7.4)
10. PBS 3 drops
11. 2% glut/PBS for 10 min at room temp
12. Warm ddH20 wash
13. Post-stain with UA for 1 min and Lead citrate for 30 sec.

8
NEGATIVE STAINING PROCEDURE
1. Use 200 or 300 mesh formvar/carbon coated grids. (Grids may need to be glow discharged for sample to
adhere.)
2. Place a drop (approx. 25 ul) of specimen on wax plate and put the grid on top of the specimen. Leave for 15
min. to 1 hr.
3. Touch grids to drops of:
½ Karnovsky’s Fixative
0.1M Cacodylate Buffer
3 drops dH20
4. Touch grids to a drop of UA and onto a moistened filter paper to draw off excess UA. The percentage varies
with the sample.
5. Dry overnight in a Petri dish, in the desiccators, and view the next day in the microscope.
SCANNING ELECTRON MICROSCOPY PROTOCOL USING HMDS
1. Fix tissue in ½ Karnovsky’s Fixative and OsO4 as usual.
2. Wash tissue in 0.1M Cacodylate Buffer
3. Dehydrate using a series of ethanol washes:
50% Ethanol for 15 – 30 min.
70% Ethanol for 15 – 30 min.
95% Ethanol for 15 – 30 min.
100% Ethanol for 15 – 30 min.
100% Ethanol for 15 – 30 min.
4. Immerse tissue in pure HMDS for 15 min. x 2
5. Just cover the sample with fresh HMDS and leave under the hood until the HMDS evaporates off.
6. Specimens will be ready to mount onto stubs and sputter coated with Au/Pd in the morning or store
desiccated until coated.

9
OPERATIONS
JEOL 1400 TEM OPERATION
The following procedure is a general operating procedure that the majority of users will apply when working on the
JEOL TEM. The following should be used as a starting point for your particular work. The settings can be modified
to produce the best images of your samples. With that in mind please remember to return the scope to the standard
mode of operation for the next user.
SIGNING ON AND GENERAL SETTINGS:
1. Make sure that you sign on by recording your time onto the paper log sheet when you turn the beam on.
2. CL aperture: 2, OL aperture: 2, Spot size: 2 (recommend a new alignment when changing any of these – see alignment procedures), HT: 120kV
3. If system is logged into JEM Administrator account, log out and log into JEM User. Password: JEMUser
4. Bring up nanospace map and vacuum monitors, if not already onscreen.
5. Start Digital Micrograph software if it is not already on by double clicking DM icon on left monitor (Ultrascan camera will take approx. 20 minutes after software startup to cool down enough for good images)
6. Check to see that HT is at correct value (120kV normally). If HT is off or at a different value, let an EM staff person know so they can re-establish it.
SAMPLE LOADING AND REMOVAL-FOR EM STAFF ONLY:
**Please Note: If the 5-grid holder is in the Goniometer, be sure the “Exchange” white dot and the Number 1 (also with a white dot) are aligned before removing.**
1. Center the holder by tapping the LF2 button two times on the left console to turn off the beam and reset the holder.
2. Prepare to remove the specimen holder by making sure the beam is off.
3. Switch Goniometer from “Pump” to “Air”. Nothing should happen.
4. Pull Specimen holder straight out of Goniometer ~7cm until it stops then turn ~75 degrees Counter-Clockwise until it stops. You can now let go and reposition your hand.
5. Pull Specimen holder straight out of Goniometer ~0.5cm until it stops then turn ~15 degrees Counter-Clockwise until it stops. Let go. The square “seat” should be at 12:00. You will hear the Goniometer venting to air and green light will turn off. On the CPU the “Vacuum” chamber field should now read “Not Ready” and will climb to ~241.
6. Gently remove the holder straight out from the Goniometer. If there is resistance wait another ten seconds. Be careful not to touch the holder beyond the screw/collar, as this will introduce grease and dirt into the microscope.
7. Raise clamping mechanism on the specimen holder. Place your grid in the holder, then lower and clamp the mechanism.
**Again Please Note: If you are using the 5-grid specimen holder, be sure the “Exchange” white dot and the Number “1” (also with a white dot) are aligned.**
8. When carefully replacing the specimen holder, align the small pin with opening in side of Goniometer until seated in Goniometer.

10
9. With slight pressure pushing specimen holder in Toggle switch from “Air” to “Pump”. You should hear the valve opening and the CPU “vacuum” SPC field should still read “Air” but will drop to about 50uA.
10. Select the specimen holder you are using. Ex. Penta for the 5 grid specimen holder EM-11170.
11.Once the specimen chamber (PG4) reaches 50uA (Evac Ready) get a good grip on the specimen holder and turn clockwise ~15 degrees until it stops, then allow it to go into the chamber ~0.5cm.
12.Still with a good grip turn clockwise ~75 degrees until it stops and slowly allow it to go into the Goniometer until the square “seat” nestles into the Goniometer at 3:00. Eventually you will do both of these steps as one fluid step. (Please note: indicator will change from “Air” to “Ready” and then you can go ahead and turn the beam on)
13. Confirm the HT is at 120 KV and is READY.
TURNING ON THE BEAM AND CORRECTING Z-AXIS (HEIGHT OF SAMPLE):
1. Turn Beam on: After seeing that the HT is at the set value (120 kV), turn Beam on (on screen or tap Beam button on left console). Beam will take approximately 3 minutes to come up to target intensity. Often it is a good idea to beam blank the sample by pressing F6 key (key will illuminate) to protect your samples from beam damage while waiting for the beam to ramp up. Turn off beam blank when ready to view specimens (F6).
2. Set Z height: Set mag to 10,000x and click std focus on right console to neutralize the focus. Use Z controls and x or y wobbler on right console to bring image into fine focus. This can be done with stage binoculars or with a live camera image. Sample is now at x, y, z focal crossover (esp. important for tomography). When using the Penta holder, position 1 focuses at a Z value of about 200 - 250. Each specimen position will need a new Z height set and each successive position reduces Z by about 50.
3. Refocus image if necessary.
VOLTAGE CENTER ADJUSTMENT (IF NEEDED):
Click HT wobbler (right console), Bright Tilt on (left console) and use def/stig knobs (yellow) to align. The image should pulse on center (may have to bring beam to center with green Shift knobs).
The Voltage Center will most likely have to be checked if the Neutralize is used to neutralize all settings to home.
If the image shifts significantly while focusing, check Voltage Center again.
USING THE GATAN DIGITAL IMAGING CAMERA AND SOFTWARE:
1. Make sure the Gatan PC screen is on and make a folder on the desktop. Label with username or Hutch account_date. Example: jdoe_011814. No spaces please.
2. Open the Gatan Digital Micrograph application (if not open already) and insert the camera.
3. For the Ultrascan 1000XP bottom mounted camera-Lift up the screen by selecting [F1] on the right console. For the Orius side mounted camera-Make sure illumination is very dim and then insert the camera. Then select [Start View] on the right panel of the Gatan software and you will see a continuous, quick scan of your sample taken at low resolution (search mode). Be sure in the “intensity box” that the box is within the green field with the brightness knob.
IMAGING:
1. Using the Brightness knob, establish a comfortable illumination for imaging the sample. If using the camera to
scan your sample, make sure to keep the intensity in the green zone! Staying in the red zone will damage the
camera!

11
2. If the LF1 is not lit, click it once to set a brightness zoom to keep illumination in the same range at all
magnifications
3. To center the beam, use the green Shift knobs, X and Y, on the left and right consoles. It may help focus the
illumination before doing this.
4. Find your region of interest on the grid using the track ball, arrow keys on the track ball box or with the
nanospace map.
Focus:
Use coarse and fine knobs (right console).
Any controls are in the coarse mode when the CRS button nearby is illuminated.
Click CRS off to return to fine mode. Use X or Y wobbler to help with focus.
Turn off the wobbler when focus is established and before recording an image.
Magnification:
Change magnification up or down with the mag/cl knob.
Illuminating LF1 will set a brightness zoom to keep illumination in the same range at all magnifications.
Using the Nanospace Map:
Click on a target area on the graphic and click Shoot to move to the new area.
The area can be saved for future navigation in the window next to the map by clicking Memory.
Positions can be recalled by highlighting the location and clicking Go.
Image Orientation System (IOS):
You can use this system for rotating your sample for the best picture at certain magnifications.
TO COLLECT IMAGES:
To collect images, center the beam and bring the beam to a reasonable intensity (see above).
Bring the image to a final focus and click Start Acquire.
Set up your image file parameters under Global Info Setup.
Save images with either Save As or Save Numbered making sure you have the relevant information in the image
title, including magnification. Save images to a folder you have set up on the desktop.
END OF SESSION:
1. Lower the magnification to ~1000x.
2. Spread the beam maximally.
3. Tap F6 to beam blank the specimen.
12
4. Turn off the beam on the screen or by tapping the Beam button on the left console. Note that the Beam
button on the monitor turns darker green indicating the beam is beginning to ramp down.
5. Return the specimen rod to position 1.
6. Note the time off on the paper log sheet.
7. The staff will remove your sample from the specimen holder and reinsert it back into the microscope.
8. Batch convert images to TIFF’s by selecting Batch Convert under the File menu. Be sure to “Browse” to
choose the correct folder in the “Save To” box. Make sure Save Display As is selected or you will convert to the
wrong bit depth.
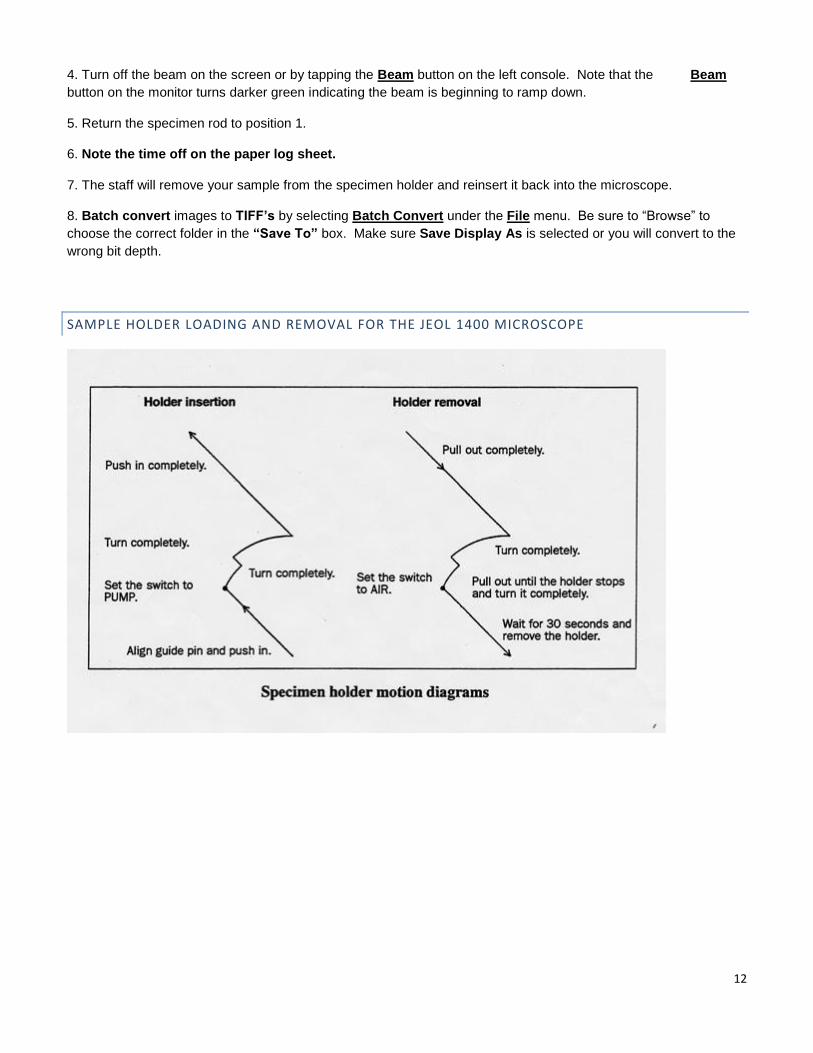
SAMPLE HOLDER LOADING AND REMOVAL FOR THE JEOL 1400 MICROSCOPE

13
JEOL JSM-6610LV SEM OPERATION
SPECIMEN LOADING AND EXCHANGE:
To Load Samples:
1. Screw in stubs to a specimen holder.
To Exchange Samples:
1. Vent the specimen chamber.
a) Click the HT icon to get HT OFF
b) Click the Sample Setting of the operation menu tab
c) Click the Removing the specimen button.
d) Click the Vent button
e) After the light of the Vent button turns ON, the stage can be withdrawn to remove the specimen holder.
f) Perform the “Sample height setting”. Set the height of the sample according to the procedures.
2. Evacuate the specimen chamber.
a) Click the Evacuating the Chamber button.
b) Close the specimen chamber and click the EVAC button. Evacuation in the specimen chamber will start.
c) Click the Sample Setting (or Stage) in the operation menu tab.
d) Click the Navigation button, and capture the navigation image according to the operational navigation.
e) Click the Capture (or SNS Capture) button to capture the image and the stage will move automatically to
the photographing position.
f) After the HT icon is turned on you can start image observation.
SETTING THE SPECIMEN:
a) Click the Sample Setting in the operation menu tab
b) Click the Setting button.
c) Select the specimen holder used, and click the Select button.
d) If the specimen protrudes above the holder, make sure to input the protruding height in the dialog box.
e) Set the specimen holder onto the specimen stage.
f) Close the door and hit the EVAC button.
CHOOSING A RECIPE:
a) Click Recipe in the operation menu tab.

14
b) From the displayed list of Standard recipe, select a recipe applicable to the sample. Select Universal if you are not sure.
c) The operation navigation is changed to the setup observation condition menu. Set observation conditions according to the questions you will be asked.
d) Click the OK button.
OBSERVATION:
1. Specimen(s) are loaded and HT icon has been pushed and is ready.
2. Click the ACB, AF, and AS icons to observe the image.
3. Move view of interest to the center of the main screen with “Click center”.
a) Double-click the left mouse button at any position in main screen. The double-clicked position moves to the center of the screen.
4. Find view of interest.
5. Adjust the image quality by using the Contrast, Brightness, Focus, and Stig X, Sig Y buttons.
6. For observing at high magnification it is recommended to focus at low magnification first and then increase magnification gradually.
OBSERVATION CONDITIONS:
For the observation conditions of a specimen, you must select optimum values from various factors, such as accelerating voltage, probe current, aperture, working distance, and specimen tilt. Also, the brightness adjustment, astigmatism correction and focus adjustment become important.
Choosing the Accelerating Voltage:
1. Generally, the more fine structure of the specimen surface appears when using a low accelerating voltage than using a high accelerating voltage.
15
2. Click the Accelerating voltage in the image data display and double-click on the desired accelerating voltage in
the list.
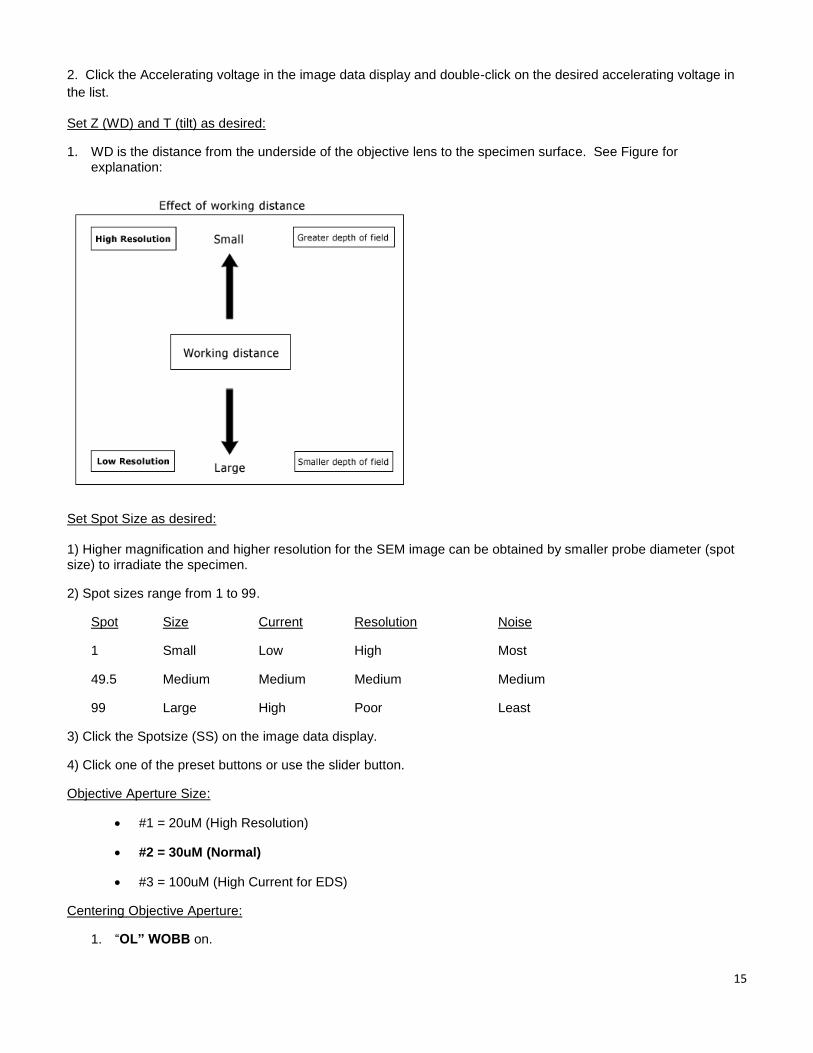
Set Z (WD) and T (tilt) as desired:
1. WD is the distance from the underside of the objective lens to the specimen surface. See Figure for explanation:
Set Spot Size as desired:
1) Higher magnification and higher resolution for the SEM image can be obtained by smaller probe diameter (spot size) to irradiate the specimen.
2) Spot sizes range from 1 to 99.
Spot Size Current Resolution Noise
1 Small Low High Most
49.5 Medium Medium Medium Medium
99 Large High Poor Least
3) Click the Spotsize (SS) on the image data display.
4) Click one of the preset buttons or use the slider button.
Objective Aperture Size:
#1 = 20uM (High Resolution)
#2 = 30uM (Normal)
#3 = 100uM (High Current for EDS)
Centering Objective Aperture:
1. “OL” WOBB on.

16
2. Increase Mag. to see image movement.
3. Adjust aperture knobs to minimize movement.
4. “OL” WOBB off.
Correct Stigmation:
1. The image is astigmatism-free if it has no unidirectional defocusing when the objective lens is changed to under- or over-focus.
2. This is done by adjusting the two knobs, x and y, of the stigmator with the STIG button pushed on the operation keyboard or on the main window of the menu bar.
Adjust Brightness and Contrast:
1. Brightness and Contrast can be set by pushing Scan 1 and the Contrast and Brightness buttons on the
main window menu bar and then adjusting with the mouse.
2. Adjustment also can be made with the knobs on the operation keyboard.
3. Bring the two bars in the middle.
Adjust Focus:
1. Place a mouse pointer on the Focus button:
Course Adjustment – While holding down the right mouse button move the mouse up (right) & down (left)
Fine Adjustment – While holding down the left mouse button move the mouse up (right) and down (left)
2. Focus can also be adjusted by using the focus knob on the operation keyboard or using the AF button
(automatic focus) on the main window menu bar
**Note: Set Desired Magnification, Focus, and Stigmate before taking a photo.**
SETTING UP TO TAKE A PHOTO:
A folder will be created for you on the desktop with your name and date Ex. Jdoe_012407.
1. Go to Set Up in the operation menu tab.
2. Go to Scan and Auto Save tab.
Set up the Auto Save Config.
Select for the photo speed (resolution of the image) – Select from 40s to 160s. The slower the speed the higher the resolution of the image.
3. Go to SEM Data Display tab to display selected SEM data on the image. Select Photo button (main menu or keyboard) and wait for the scan to finish and then select txt paste (optional) and Save.
4. Select for Image List tab to see images taken.
5. Click on L button and EXT ON button to switch over to the microscope.
6. Transfer files to your fred account or copy onto CD.

17
MICROSCOPE SHUT DOWN:
1. HT button should be pushed off.
2. Push the Vent button.
3. Take the samples out when venting is completed or ask the EM Staff to do this.
4. Minimize main JEOL SEM software.
5. Turn off the monitor screens.

18
ADDITIONAL INFORMATION AND RESOURCES
GENERAL ELECTRON MICROSCOPY RESOURCES
For more information on the topics listed below, please check the websites or publications listed below.
INTRODUCTION TO ELECTRON MICROSCOPY
http://www.sci.sdsu.edu/emfacility/555class/class1.html
http://www.amc.anl.gov/ (Select the PDF slides/lecture notes by Nestor Zaluzec)
ELECTRON MICROSCOPY – WEB COURSE NOTES AND REFERENCES
http://em-outreach.ucsd.edu/web-course/toc.html
TRANSMISSION ELECTRON MICROSCOPY (TEM) BASICS
http://www.matter.org.uk/tem/
LISTSERV FOR ELECTRON MICROSCOPY INFORMATION
http://www.microscopy.com
SPECIFIC PROTOCOL OR TECHNIQUE RESOURCES
For more information on the topics listed below, please check the websites or publications listed below.
EM INFO FOR CAENORHABDITIS ELEGANS
Electron Microscopy and Three-Dimensional Image Reconstruction.
By David H. Hall, Department of Neuroscience, Albert Einstein College of Medicine, Bronx, New York 10461
Methods in Cell Biology, Vol. 48, Ch. 17, pages 395-436.
IMMUNOGOLD LABELING
For additional information and literature, including company newsletters: http://www.aurion.nl/
IMMUNOGOLD QUESTIONS
http://www.emsdiasum.com or Electron Microscopy Sciences Catalog 2007-2010
OPTICAL IMAGE PROCESSING
http://microscopy.fsu.edu/primer/digitalimaging/russ/index.html
Course notes by John Russ, Florida State University