electric smoker stand - images-na.ssl-images …zstqyi1s.pdf · luego insértela por los orifi...
TRANSCRIPT

Masterbuilt Manufacturing, Inc. 1 Masterbuilt Ct.
Columbus, GA 31907 Servicio de atención al cliente: 1-800-489-1581
www.masterbuilt.com
SEA PARTE DE NUESTRA COMUNIDAD EN LÍNEA "DADGUM GOOD":www.masterbuilt.com | www.dadgumthatsgood.com | www.facebook.com/masterbuilt
Twitter @Masterbuilt @JohnMcLemore @DadgumTh atsGood
Masterbuilt Manufacturing, Inc. · 1 Masterbuilt Ct. Columbus, GA 31907 · Customer Service: 1-800-489-1581 · www.masterbuilt.com090513-23GHMADE IN CHINA
1
23
PART NO QTY DESCRIPTION1 1 Tabletop2 4 Leg3 1 Bottom Shelf
Tools needed for assembly (not included): Phillips Head Screw Driver, Adjustable Wrench
ELECTRIC SMOKER STANDFor use with the following models:
20070213, 20070312, 20071214, 20071314, 20071414, 20071514, 20071614, 20071714, 20072112, 20072212, 20072312, 20072412, 20072512, 20072712, 20072812, 20072912, 20100714, 20101213
M6 Flange Nut
Qty. 16
B
DO NOT RETURN TO RETAILER For Assembly Assistance, Missing or Damaged Parts
Call: MASTERBUILT Customer Service at 1-800-489-1581.
M6 x 50 ScrewQty. 4
M10 x 55 ScrewQty. 2
C DA
M6 x 12 ScrewQty. 16
E
M10 NutQty. 2
CALIFORNIA PROPOSITION 65This product contains chemicals, including lead and lead compounds, known to the State of
California to cause cancer, birth defects or other reproductive harm.Wash your hands after handling this product.
WARNING
Instructions For Use With Generation 2 Smokers

Carefully position smoker upside down as shown. Remove M10 footscrews D). Note: Remove racks, pans and trays before rotating. Place on soft surface to prevent damage. Do not disregard nut from screws (D). Save nut for step 3
Position stand on top of smoker, as shown below. Note: It is easier to assemble stand and smoker combination upside down. Position hardware (C). Leave hardware loose until M10 footscrews and M10 nut are started into the backside of the smoker body
1STEP 2STEPSMOKER STAND INSTALLATION
Masterbuilt Manufacturing, Inc. · 1 Masterbuilt Ct. Columbus, GA 31907 · Customer Service: 1-800-489-1581 · www.masterbuilt.com
1STEP 2STEPPosition leg (2) inside tabletop (1) as shown.Secure leg (2) to tabletop (1) using screws (A) and nuts (B). Repeat step for remaining legs.
21
Place bottom shelf (3) inside legs (2) as shown.Secure bottom shelf (3) to legs (2) using screws (A) and nuts (B).Repeat step for remaining legs.Note: Do not fully tighten hardware.
3
2
B
A
B
A
SMOKER STAND ASSEMBLY
CAUTION· DO NOT ATTEMPT TO LIFT SMOKER ALONE. GET A HELPER BEFORE
BEGINNING SMOKER INSTALLATION.· DO NOT LIFT SMOKER BY REAR HANDLE.
C
D
C
Comience por ajustar los tornillos (C) por la parte inferior del soporte de ahumador y dentro del cuerpo.Comience por ajustar el tornillo (D) por la parte inferior del soporte de ahumador y dentro del cuerpo. Repita el paso en el lado opuesto. Nota: Ajuste primero los tornillos (C) antes de ajustar los tornillos (D).
Vuelva a colocar el soporte de ahumador y ahumador unidos en pie. Vuelva a ajustar todos los componen-tes. La instalación ha fi nalizado.Nota: Retire las rejillas y bandejas.
6PASO
INSTALACIÓN DE SOPORTE DE AHUMADOR (CONTINUACIÓN)PASO 3 PASO 4
CD
Enrosque la tuerca M10 (E) sobre el tornillo M10 (D), luego insértela por los orifi cios traseros del soporte de ahumador. Enrosque la segunda tuerca M10 (F) sobre el tornillo, como se muestra en la fi gura, y asegúrelo en la base del ahumador.Nota: Las tuercas M10 (F) son de las patas originales (F). No ajuste por completo para permitir que el tornillo M10 (D) se enrosque en la unidad. La tuerca (F) se usa para nivelar el soporte con el tornillo (D) antes de ajustar la tuerca anterior (F)
5PASOEl tornillo M10 (D) tendrá roscas y se extenderá en la base del ahumador como se muestra en la fi gura Nota: La tuerca M10 (F) funciona como espaciador para nivelar el ahumador y brindar mayor estabilidad
PRECAUCIÓN· EL SOPORTE DE AHUMADOR ES SÓLO PARA USO CON AHUMADORES
DESIGNADOS DE MASTERBUILT.· NO SE SIENTE EN EL SOPORTE DE AHUMADOR.· NUNCA MUEVA EL SOPORTE DE AHUMADOR MIENTRAS ESTÉ EN USO.
Masterbuilt Manufacturing, Inc. · 1 Masterbuilt Ct. Columbus, GA 31907 · Servicio al Cliente: 1-800-489-1581 · www.masterbuilt.com
D
F
F
D
FF
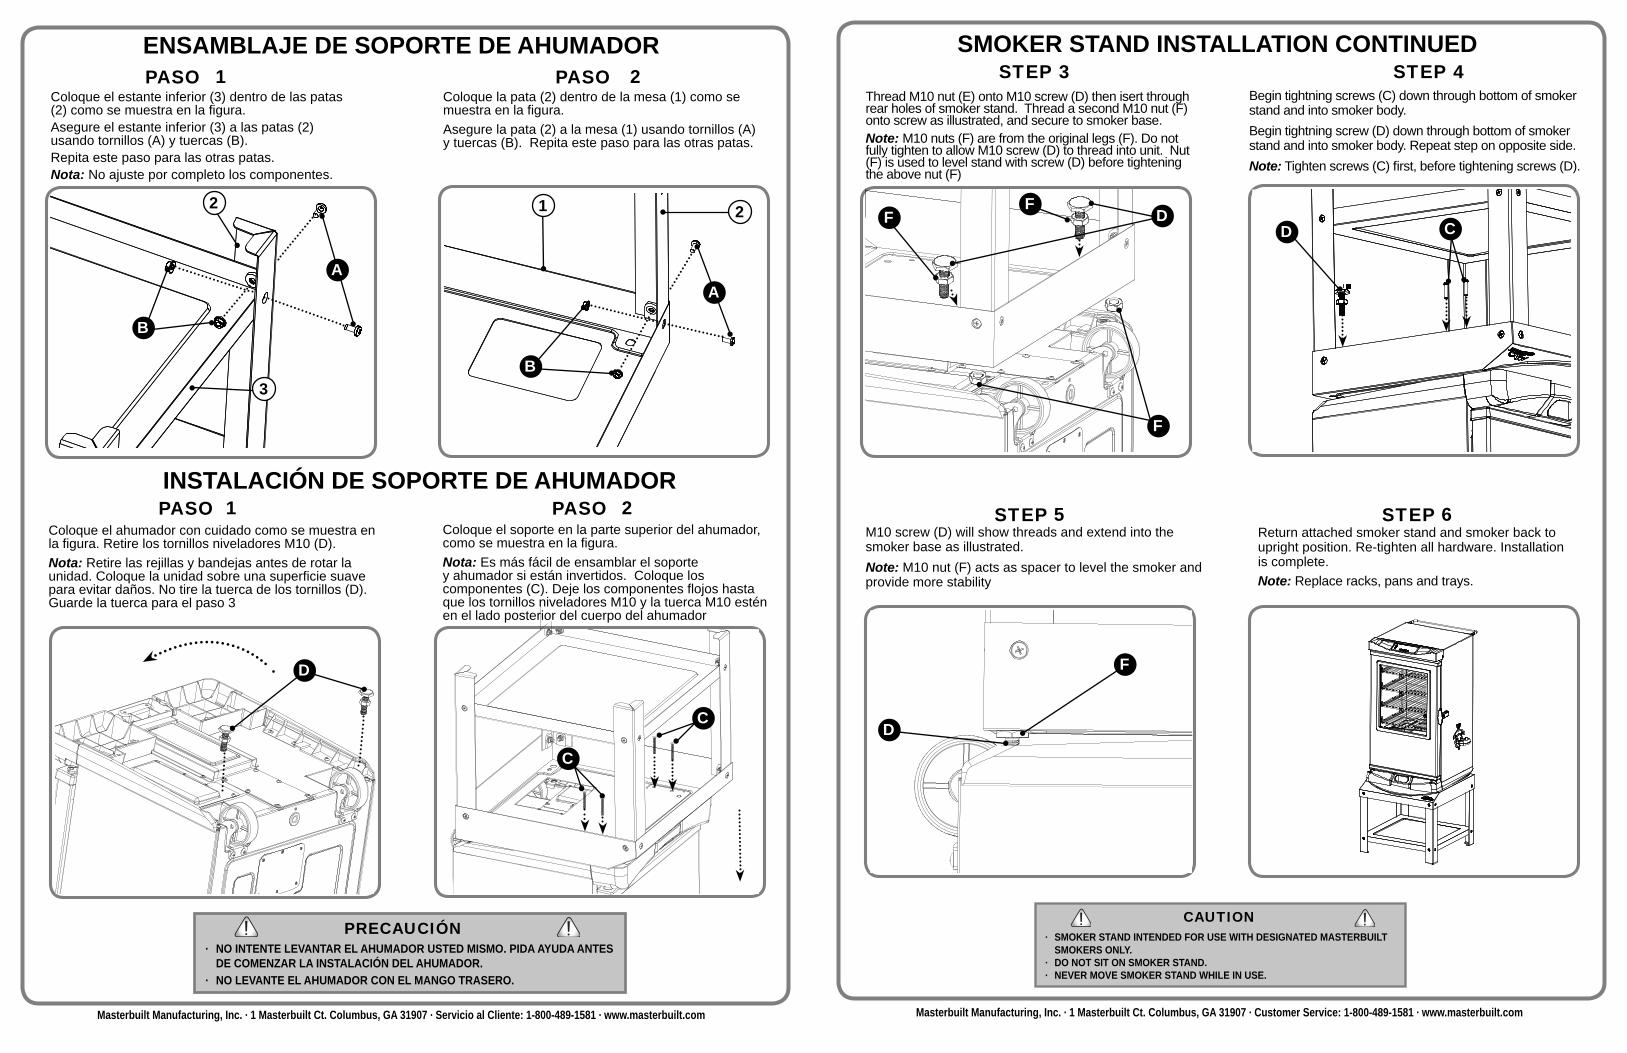
Coloque el ahumador con cuidado como se muestra en la fi gura. Retire los tornillos niveladores M10 (D). Nota: Retire las rejillas y bandejas antes de rotar la unidad. Coloque la unidad sobre una superfi cie suave para evitar daños. No tire la tuerca de los tornillos (D). Guarde la tuerca para el paso 3
Coloque el soporte en la parte superior del ahumador, como se muestra en la fi gura. Nota: Es más fácil de ensamblar el soporte y ahumador si están invertidos. Coloque los componentes (C). Deje los componentes fl ojos hasta que los tornillos niveladores M10 y la tuerca M10 estén en el lado posterior del cuerpo del ahumador
1PASO 2PASOINSTALACIÓN DE SOPORTE DE AHUMADOR
Masterbuilt Manufacturing, Inc. · 1 Masterbuilt Ct. Columbus, GA 31907 · Servicio al Cliente: 1-800-489-1581 · www.masterbuilt.com
1PASO 2PASOColoque la pata (2) dentro de la mesa (1) como se muestra en la fi gura.Asegure la pata (2) a la mesa (1) usando tornillos (A) y tuercas (B). Repita este paso para las otras patas.
21
Coloque el estante inferior (3) dentro de las patas (2) como se muestra en la fi gura.Asegure el estante inferior (3) a las patas (2) usando tornillos (A) y tuercas (B).Repita este paso para las otras patas.Nota: No ajuste por completo los componentes.
3
2
B
A
B
A
ENSAMBLAJE DE SOPORTE DE AHUMADOR
PRECAUCIÓN· NO INTENTE LEVANTAR EL AHUMADOR USTED MISMO. PIDA AYUDA ANTES
DE COMENZAR LA INSTALACIÓN DEL AHUMADOR.· NO LEVANTE EL AHUMADOR CON EL MANGO TRASERO.
C
D
C
Begin tightning screws (C) down through bottom of smoker stand and into smoker body.Begin tightning screw (D) down through bottom of smoker stand and into smoker body. Repeat step on opposite side. Note: Tighten screws (C) fi rst, before tightening screws (D).
Return attached smoker stand and smoker back to upright position. Re-tighten all hardware. Installation is complete.Note: Replace racks, pans and trays.
6STEP
SMOKER STAND INSTALLATION CONTINUEDSTEP 3 STEP 4
CD
Thread M10 nut (E) onto M10 screw (D) then isert through rear holes of smoker stand. Thread a second M10 nut (F) onto screw as illustrated, and secure to smoker base.Note: M10 nuts (F) are from the original legs (F). Do not fully tighten to allow M10 screw (D) to thread into unit. Nut (F) is used to level stand with screw (D) before tightening the above nut (F)
5STEPM10 screw (D) will show threads and extend into the smoker base as illustrated. Note: M10 nut (F) acts as spacer to level the smoker and provide more stability
CAUTION· SMOKER STAND INTENDED FOR USE WITH DESIGNATED MASTERBUILT
SMOKERS ONLY.· DO NOT SIT ON SMOKER STAND.· NEVER MOVE SMOKER STAND WHILE IN USE.
Masterbuilt Manufacturing, Inc. · 1 Masterbuilt Ct. Columbus, GA 31907 · Customer Service: 1-800-489-1581 · www.masterbuilt.com
D
F
F
D
FF

Masterbuilt Manufacturing, Inc. 1 Masterbuilt Ct.
Columbus, GA 31907 Customer Service 1-800-489-1581
www.masterbuilt.com
BE A PART OF OUR “DADGUM GOOD” COMMUNITY ONLINE:www.masterbuilt.com | www.dadgumthatsgood.com | www.facebook.com/masterbuilt
Twitter @Masterbuilt @JohnMcLemore @DadgumTh atsGood
Masterbuilt Manufacturing, Inc. · 1 Masterbuilt Ct. Columbus, GA 31907 · Servicio al Cliente: 1-800-489-1581 · www.masterbuilt.com090513-23GHHECHO EN CHINA
1
23
Nº DE PARTE CANT. DESCRIPCIÓN
1 1 Mesa2 4 Pata3 1 Estante inferior
Herramientas necesarias para el ensamblaje (no incluidas): Destornillador Phillips, llave ajustable
SOPORTE DE AHUMADOR ELÉCTRICOPara su uso con los siguientes modelos
20070213, 20070312, 20071214, 20071314, 20071414, 20071514, 20071614, 20071714, 20072112, 20072212, 20072312, 20072412, 20072512, 20072712, 20072812, 20072912, 20100714, 20101213
M6 Tuerca de
bridaCant. 16
B
NO VAYA AL ESTABLECIMIENTO MINORISTA Para solicitar asistencia en el montaje de la unidad, o para reclamar
partes faltantes o dañadas.Llame al: Departamento de Servicio al Cliente de MASTERBUILT al:
1-800-489-1581.
M6 x 50 TornilloCant. 4
M10 x 55 TornilloCant. 2
C DA
M6 x 12 Tornillo
Cant. 16
E
Tuerca M10Cant. 2
PROPOSICIÓN 65 DE CALIFORNIAEste producto contiene químicos, entre los cuales se incluye plomo y compuestos de plomo
cuyos efectos son reconocidos por el Estado de California por causar cáncer, defectos de nacimiento y otros daños reproductivos.
Lávese las manos después de manipular este producto.
ADVERTENCIA
Instrucciones de uso con ahumadores de 2º generación