electric micro mini bike owners manual - 3 · pdf fileelectric micro mini bike important...
TRANSCRIPT

Electric Micro Mini Bike
Important Information. Read thoroughly before riding the first time.
OWNERS MANUAL
MOTOVOX.COMVISIT US ON THE WEB FOR MORE INFORMATION
Attaching handlebars:See page 6
RIDERS REQUIRE ADULT SUPERVISION

This operators manual contains important safety information and maintenance information. Read it carefully before using this vehicle. Failing to follow the warnings contained in this operators manual could result in INJURY or DEATH.
Keep this manual in a safe place. It is very important that this owners manual be reviewed by any rider and it should remain with the vehicle when transferred to a new owner.
All information, images and specifications contained in this manual are based on the latest product information available at the time of publication. Due to improvements or production changes, there could be discrepancies in this manual. Motovox reserves the right to make product changes at any time, without notice and without obligation to make the same or similar changes to any vehicle previously built or sold.
DO NOT OPERATE THIS VEHICLE ON PUBLIC ROADWAYS or any location where there is vehicular traffic. Doing so would be very dangerous and could also be in violation of local traffic laws and restrictions. Always wear a helmet and protective eyewear and clothing.
No part of this owners manual may be reproduced or copied without express written permission from Motovox.
© Motovox, Inc. 2012
If you have any problems with this product
DO NOT RETURN TO THE STORE
contact us and we will make it right every time.
888-488-MOTO (6686)
or email [email protected]
Visitmotovox.com
to watch online maintenance videos

Limited Warranty IntroductionSafety Initial SetupOperating ControlsBefore You RideBasic OperationSlow Speed Safety SwitchMaintenanceTroubleshooting GuideRegister your MBxXSe
1
2
3 - 5
6 - 7
8 - 9
10 - 11
12 - 13
14
15 - 19
20 - 23
24 - 25
CONTENTSPRODUCT WARRANTY
Motovox warrants to the first buyer of the Product (“Buyer”) that on the date of purchase of the Product, as shown on Buyer’s sales receipt (“Purchase Date”) from an approved retail partner, the Product shall be free from defects in material or workmanship subject to and in accordance with the terms and conditions set forth herein. The duration of this Limited Warranty is ninety (90) days from the Purchase Date (the “Warranty Period”). Motovox will correct, at its option, by repair or by furnishing replacement parts, any parts determined in Motovox’s sole discretion to have a defect in material or workmanship of the Product reported to Motovox during the Warranty Period, subject to the terms, conditions and limitations of this Limited Warranty. At its option, Motovox may require the Buyer to return to Motovox, at its address set forth below, at Buyer’s expense, the part claimed to be defective for Moto-vox’s inspection. Motovox’s sole obligation under this Limited Warranty is to repair and/or replace parts on the Product. If Motovox determines that any claimed defect or problem reported by Buyer is not covered by this Limited Warranty, Buyer shall pay Motovox its then existing charge for any repair or replacement made by Motovox.
TO QUALIFY FOR WARRANTY SERVICE:1. You must present a copy of the sales receipt from an approved retail partner within 90 days of purchase.2. This product can not be used for rental or commercial use.3. This product can not be used for competition.
LIMITATIONS OF LIABILITY• This Limited Warranty is non-transferable after the Product’s initial sale.• No unapproved modifications can be made to the Product, its performance or otherwise, in order for this Limited Warranty to remain in effect.• No reimbursement is provided for towing, loss of time, loss of use, inconvenience, incidental or consequential damages.• This Limited Warranty covers only parts and labor due to manufacturer defect. Damage due to misuse or neglect, use other than as specified in the Owner’s Manual, or use under abnormal conditions are is not covered by this Limited Warranty. • Warranty is void if weather related water damage is determined. Owner is responsible for storage and protection from weather.• Motovox makes no warranty with respect to products or trade accessories not made by Motovox, including, but not limited to, motors, tires, wheels and batteries, such products or trade accessories, such items being subject to the original manufacturer’s warranty, if any.• This Limited Warranty does not cover minor surface blemishes, rips, tears, or other cosmetic damages due to normal use, or other intentional or unintentional damage to the Product.• This Limited Warranty will not cover any damage which results from the application of improper cleaners, solvents or chemicals to the Product, water damage, smoke or soot, or from exposure to saltwater, sea breeze or salt.• This Limited Warranty will not cover any damage which results from aging, such as fading of paint, deterioration of plated surfaces, deterioration of rubber or plastics, or rusting.• This Limited Warranty does not cover improper repair or misdiagnosis of problem.
OWNER’S WARRANTY RESPONSIBILITIESAs the vehicle owner, you are responsible for the performance of the required maintenance. You should maintain a record of all maintenance performed your vehicle and retain all receipts covering maintenance on your vehicle. You may be denied a warranty claim solely because of your failure to ensure the performance of all scheduled maintenance or lack of maintenance records or receipts. As the vehicle owner, you should be aware that you may be denied your warranty coverage if your vehicle or a part has failed due to abuse, neglect, improper maintenance, or unapproved modifications.
For any issue regarding your Motovox product, call toll free 1-888-488-MOTO (6686)
1
TROUBLE? DO NOT RETURN TO STORE contact us! 888-488-MOTO (6686) or email [email protected]
Your personal safety and the safety of those around you is our primary concern. Operating this mini bike safely is an important responsibility and should not be taken lightly.
Motovox has provided you with safe operating procedures,warning labels on your mini bike and in this manual. This information will alert you to potential hazards that could harm you or others.
It is understood that it is not practical or possible to warn you about all possible hazards associated with off-road riding and maintaining your mini bike. You must always use your own best judgement.
Safety information is presented in a variety of forms, including:
• Safety labels and tags on the mini bike • Safety messages proceeded by a safety symbol and one of these three signal words: DANGER, WARNING and CAUTION.
Any of the above labels can indicate a danger where you or someone around you can be KILLED or SERIOUSLY INJURED if the instructions that it accompanies are not followed carefully.
This manual is filled with important safety information, please read it carefully and be sure that you understand it.
INTRODUCTION IMPORTANT SAFETY INFORMATION
3SAFETY MESSAGES
Congratulations on choosing your Motovox MBxXSe Electric Powered Micro Mini Bike!
Your MBxXSe was designed as a recreational vehicle for off-road use only and by a single rider only. This mini bike is built for younger riders who are under 100 lbs. with minimal experience.
Before riding, please take your time to get acquainted with your mini bike and how it works. To protect your investment we urge you to keep it well maintained. In addition to regular maintenance, it is important to observe and perform all pre-ride and periodic checks outlined in this manual, where you will also find helpful safety information, instructions and helpful tips. Keep this book handy to refer to later on as questions may come up.
As you read through this manual you will find information that is noted with a NOTICE symbol. This is to point out key bits of information that will help you avoid damage to your mini bike and property around you. This manual covers basic maintenance procedures as well. For problems with your mini bike that are not covered in this manual, please refer to an authorized Motovox Service Center, which can be located at Motovox.com.
Read the warranty page careful so that you understand your rights and responsibilities.
Whenever you ride, tread lightly by staying on established trails and in approved areas. Protect the environment and keep off-road riding areas open for future use.
Please be sure to register your Motovox product and notify us of any address changes so we may contact you in the future with any important product information.
Enjoy your Motovox MBxXSe Electric Mini Bike!
2
TROUBLE? DO NOT RETURN TO STORE contact us! 888-488-MOTO (6686) or email [email protected]

At Motovox, safety is our number one priority. There is an inherent level of risk when using any motorized powersports product and an electric mini bike is no different. Read the following warnings carefully to understand how you can avoid injury to yourself, others and your MBxXSe.
RULE NUMBER 1READ THIS BOOK COMPLETELY BEFORE RIDING THE FIRST TIME.There is valuable and important information in this user guide that will keep you safe and protect your minibike from becoming damaged from neglect. Read it carefully and understand the contents. If you have any questions please call us at 888-488-6686.
RULE NUMBER 2PARENTAL SUPERVISION REQUIRED.An electric powersport product is not a toy. A child can not be left alone to play with this product. Any rider under the age of 8 should not ride this mini bike and all children must have parental supervision when riding. The age of 8 is only an estimate as it is affected by weight, height and riding ability. A parents’ decision to allow their child to ride this mini bike should be based on their child’s level of maturity and motor skills.
RULE NUMBER 3RIDE AT YOUR OWN RISK AND USE COMMON SENSE.Any mishap while using a powersports product can result in serious injury or death. Avoid situations where you can’t see what is in front of you or behind you, where other traffic is present and/or where your speed is too fast for the conditions. Always ride within your own limitations. Always obey local laws and regulations in your area. Do not ride your minibike where such vehicles are prohibited.
RULE NUMBER 4NEVER RIDE ON PUBLIC ROADWAYSThis minibike is designed for off-road use only. Never ride in roadways or near any motor vehicles.
RULE NUMBER 5RIDE SMART.Never attempt to carry a passenger. Keep both hands on the handlebars
at all times. Never ride while wearing headphones, earbuds, or while using a cell phone. Keep fingers and other body parts away from moving parts like the drive chain and sprocket as injuries may result. Never attempt to jump off of a ramp or near stairs. Never use near a pool or near spraying water. Always wear proper riding attire including gloves, knee pads, sturdy shoes, a properly fitting DOT approved helmet and goggles. Keep loose clothing and shoelaces away from moving parts like the drive chain and sprockets.
FAILURE TO ADHERE TO THE ABOVE RULES AND CAUTIONS COULD RESULT IN SERIOUS PERSONAL INJURY OR DEATH. USE WITH CAUTION, BE AWARE OF YOUR SURROUNDINGS AND PRACTICE SAFE RIDING TECHNIQUES.If you have determined that your child is ready to ride please remember the following points: • Never let your child ride without a helmet. • Your child’s safety is your responsibility. Do not take it lightly. • Never push you child to try things before they are ready. • Always supervise your child when they are riding. • Proper maintenance and upkeep of the mini bike is key to safe riding.
PLEASE NOTE:Any modifications or improper accessories added to the mini bike with parts that are not manufactured by Motovox can make it unsafe. Motovox strongly recommends that you do not remove any of the original equipment or make any modifications that alter the design and/or operation of the mini bike.
IMPORTANT SAFETY INFORMATION IMPORTANT SAFETY INFORMATION
54 SAFETY MESSAGES
TROUBLE? DO NOT RETURN TO STORE contact us! 888-488-MOTO (6686) or email [email protected]

STEP 2. ATTACH THE HANDLEBARS Your MBxXSe arrives almost completely assembled, making it easy to start riding. The only assembly that is required for your MBxXSe is to attach the adjustable handlebars. All cables and controls are already hooked up to the bike, so attaching the handlebars is easy:
1. Using the 6mm Allen wrench from your tool kit, remove the four bolts and two handlebar clamps from the top of the fork and set aside.2. Place the handlebars into position in the lower clamps. Take care to get the handlebars centered side to side, and set in your desired upright position.
Be careful not to lean the handlebars too far forward or backward as this will affect the bike’s handling and comfort of the ride.
3. Place the top clamps and bolts in position and tighten the four bolts securely to 12 ft. lbs. DO NOT OVERTIGHTEN.
STEP 3. CHARGE THE BATTERY First, be sure that the toggle switch on the top of the “tank” is switched to the off position.
Locate the battery charger port which is under the seat on the right side (shown at right) and flip up the small round black protective cap. Under this cap you will see a round connector with three small contact posts. Note that there is a small spline at the bottom of the connector
On the round end of the battery charger cord, you will see a plug that has three small holes and a notch which fits into the connector on the minibike. Insert the plug into the connector firmly. There is a round ring-nut that you can use to tighten the plug into the connector, but this is optional.
STEP 1. UNPACK YOUR MBxXSe. The contents is as follows:1. MBxXSe Electric Minibike2. Tool Pouch with tools 3. Battery Charger4. Owners Manual Once you have located all of these items, move on to step 2.
Now plug the other end of the charger into a regular 110-volt household outlet. There is a small indicator light on the charger that will light up and stay on which indicates that the battery is charging.
Battery Charger Battery Charger Port
NOTE: ALLOW AT LEAST 12 HOURS FOR YOUR FIRST BATTERY CHARGE
NEVER USE A NON-MOTOVOX BATTERY CHARGER ON YOUR MBxXSe. FIRE HAZARD, PERSONAL INJURY AND DAMAGE TO THE VEHICLES CHARGING SYSTEM MAY OCCUR.
DO NOT LEAVE THE BATTERY CHARGER CONNECTED TO THE BATTERIES FOR MORE THAN 48 HOURS AS SEALED LEAD ACID BATTERIES WILL BECOME OVERCHARGED. THIS CAUSES DIMINISHED STRENGTH AND LIFE SPAN OF THE BATTERIES.
STEP 4. CHECK OVER THE ENTIRE BIKE FOR LOOSE BOLTS OR PARTS. Some screws and bolts may become loosened during shipping. Look over the entire bike and pay particular attention to the axle bolts, brake caliper bolts and steering pivots. See the section entitled BEFORE YOU RIDE for additional suggestions.
INITIAL SET-UP INITIAL SET-UP
76 INITIAL SETUP
TROUBLE? DO NOT RETURN TO STORE contact us! 888-488-MOTO (6686) or email [email protected]

ON/OFF SWITCH
THROTTLE
BRAKE
The ON/OFF switch is conveniently located just ahead of the driver and is equipped with a flip-up cover. The cover, when closed also shuts off the On/Off switch. The switch should be left in the off position whenever the bike is not being used to protect the charge that is in the battery. You will know that the switch is on when the charge indicator lights are lit.
The throttle allows the rider to send power to the motor and make the bike move forward. The power and speed is variable due to the twist-grip throttle mechanism. When giving the throttle power, twist it slowly at first to avoid sudden acceleration.
When operating your MBxXSe there are some key operating controls and components that allow you to operate your mini bike. Their location and operation information is shown below. 1. On/Off Switch 2. Throttle 3. Brake
Your MBxXSe is equipped with a rear disc brake. The brake lever is hand operated and is on the left hand grip mounted to the handlebars. Squeeze the brake carefully with increasing force to stop the bike.
Applying the brakes too quickly can cause the bike to skid and you may lose control.
OPERATING CONTROLSOPERATING CONTROLS
98 OPERATING CONTROLS
TROUBLE? DO NOT RETURN TO STORE contact us! 888-488-MOTO (6686) or email [email protected]
To operate your electric mini bike you need to be able to operate the throttle, brake and other controls without stopping to look at them. Please study the image below carefully to become familiar with the function and the location of each control.
Battery Charge Level Indicator
Brake Lever
Folding Foot Pegs
Throttle
On/Off Switch
Battery Charge
PortKick Stand
PRE-RIDE CHECKLIST PRE-RIDE INSPECTION
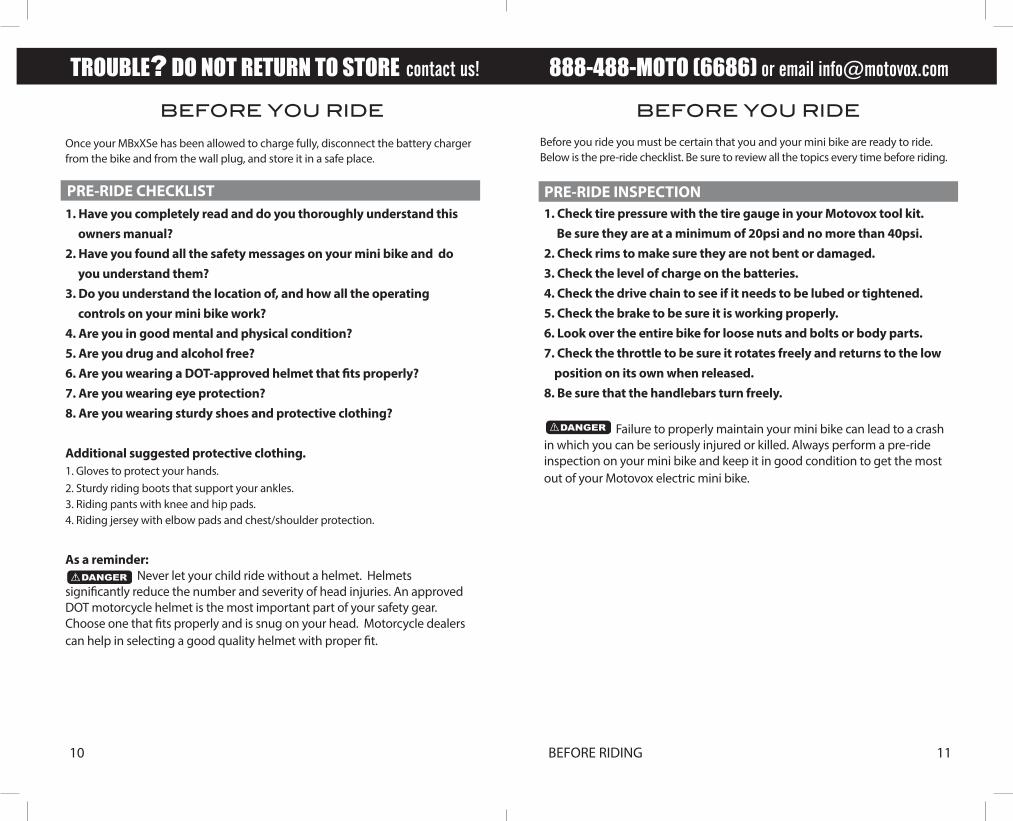
Once your MBxXSe has been allowed to charge fully, disconnect the battery charger from the bike and from the wall plug, and store it in a safe place.
Before you ride you must be certain that you and your mini bike are ready to ride. Below is the pre-ride checklist. Be sure to review all the topics every time before riding.
1. Have you completely read and do you thoroughly understand this owners manual?2. Have you found all the safety messages on your mini bike and do you understand them?3. Do you understand the location of, and how all the operating controls on your mini bike work?4. Are you in good mental and physical condition?5. Are you drug and alcohol free?6. Are you wearing a DOT-approved helmet that fits properly?7. Are you wearing eye protection?8. Are you wearing sturdy shoes and protective clothing?
Additional suggested protective clothing.1. Gloves to protect your hands.2. Sturdy riding boots that support your ankles.3. Riding pants with knee and hip pads.4. Riding jersey with elbow pads and chest/shoulder protection.
As a reminder: Never let your child ride without a helmet. Helmets significantly reduce the number and severity of head injuries. An approved DOT motorcycle helmet is the most important part of your safety gear. Choose one that fits properly and is snug on your head. Motorcycle dealers can help in selecting a good quality helmet with proper fit.
1. Check tire pressure with the tire gauge in your Motovox tool kit. Be sure they are at a minimum of 20psi and no more than 40psi.2. Check rims to make sure they are not bent or damaged.3. Check the level of charge on the batteries.4. Check the drive chain to see if it needs to be lubed or tightened.5. Check the brake to be sure it is working properly.6. Look over the entire bike for loose nuts and bolts or body parts.7. Check the throttle to be sure it rotates freely and returns to the low position on its own when released.8. Be sure that the handlebars turn freely.
Failure to properly maintain your mini bike can lead to a crash in which you can be seriously injured or killed. Always perform a pre-ride inspection on your mini bike and keep it in good condition to get the most out of your Motovox electric mini bike.
BEFORE YOU RIDE BEFORE YOU RIDE
1110 BEFORE RIDING
TROUBLE? DO NOT RETURN TO STORE contact us! 888-488-MOTO (6686) or email [email protected]

It is always best to park the minibike on a smooth, level surface to avoid damage from accidental tip-overs. Flip down the kickstand (located on the bottom of the frame on the left side) to rest the bike on. Turn the switch to the OFF position and flip down the toggle cover.
NOTE: IT IS VERY IMPORTANT TO STORE YOUR MBxXSe INSIDE, OUT OF THE WEATHER. THE ELECTRICAL SYSTEM IS COVERED BUT SHOULD NOT BE EXPECTED TO BE TOTALLY WATER TIGHT AND WATER DAMAGE CAN OCCUR IF LEFT OUT IN WEATHER. MOTOVOX WILL VOID THE WARRANTY IF PRODUCT HAS NOT BEEN PROPERLY STORED.
The MBxXSe is equipped with a main toggle switch that is within easy access of the rider. This switch cuts off all power to the motor. To turn the switch on, flip up the toggle cover and push the switch forward, or to the ON position.
You will see the battery charge indicator lights on the throttle twist grip light up, indicating how much charge is available.
NEVER TURN THE ACCELERATOR TWIST GRIP WHEN THE UNIT IS ON AND YOU ARE NOT SITTING ON IT. THE MINIBIKE CAN LURCH FORWARD CREATING A HAZARDOUS SITUATION.
To turn the switch off, you can move it backward, to the OFF position. Or, you will notice that by closing the toggle cover, the switch is automatically moved to the OFF position.
With the switch in the ON position and sitting on the minibike, put both hands on the handle grips with both feet on the ground. Very gradually, turn the inside portion of the right hand grip downward. You will feel the bike start to move forward. As you gain speed, you will be able to put both feet on the footpegs and ride.
The MBxXSe is equipped with a rear disc brake. To use the brake, gently squeeze the brake handle until the brake takes effect. Carefully apply the brake while moving as jamming on the brakes too quickly can cause you to go into a skid and lose control.
STEP ONE: TURN THE POWER ON
STEP TWO: ACCELERATE SLOWLY
STEP FOUR: STOPPING AND PARKING The XS in MBxXSe stands for “eXtra Small”, but don’t be fooled by its tiny size. The MBxXSe has a 250 Watt motor and 24 volts of electrical power. It is very important not to underestimate the MBxXSe. Avoid getting injured.
BASIC OPERATION BASIC OPERATION
1312 BASIC OPERATION
TROUBLE? DO NOT RETURN TO STORE contact us! 888-488-MOTO (6686) or email [email protected]
STEP THREE: BRAKING

The MBxXSe electric minibike is equipped with a special switch that reduces the speed to accommodate younger, smaller riders. The switch is located inside the battery case, under the battery in a hard to reach spot to limit access by inquisitive smaller children.
NOTE: THE SLOW SPEED SAFETY SWITCH IS SET AT THE FACTORY TO THE SLOWER SPEED. To switch from slow speed to regular speed, or vice-versa, follow the steps below.
1. Open the battery cover case by removing the knob screws on the front and back of the case and then carefully removing the right side of the battery case.2. Move the switch to your desired position. “O” for regular speed and “I“ for slow speed.3. Replace the battery cover case. The minibike will have a max speed of 10 mph in the “O” or fast position and 6.8 mph in the “I” or slow position.
Being an electric-powered vehicle, your MBxXSe is a relatively low maintenance machine. However, it is important to properly care for the unit to keep it operating properly and safely. Below are items that you will need to care for on a regular basis.
IT IS CRITICALLY IMPORTANT TO ALWAYS STORE YOUR MBxXSe INDOORS AND OUT OF THE WEATHER. THE ELECTRICAL SYSTEM IS COVERED BUT SHOULD NOT BE CONSIDERED SEALED. WATER CAN CAUSE SERIOUS DAMAGE TO THE POWER TRAIN AND CREATE A DANGEROUS SITUATION. WATER DAMAGE WILL VOID YOUR WARRANTY.
The drive chain transmits power from the motor to the rear wheel. To work properly it must be lubricated and properly tensioned at all times.
Check the tension on the drive chain by moving it up and down approximatelyhalfway between the sprockets. There should be no more than 1/2” vertical slack in the chain. If the chain seems too loose, it may be in danger of coming off while riding. To adjust the chain tension, follow the steps outlined below:
1. Be sure that the minibike is parked on a flat, level surface and leaning on the kickstand.2. Using a 15mm wrench, loosen the rear wheel axle nuts on each side. 3. After the axle nuts are loosened, use a 10mm wrench to turn the sprocket side tensioner bolt clockwise (to tighten) about one turn, then repeat this process on the other side tensioner bolt.4. Check the tension on the chain and see if
SLOW SPEED SAFETY SWITCH
1514 MAINTENANCE
STORE INSIDE, OUT OF THE WEATHER
DRIVE CHAIN TENSION
MAINTAINING YOUR MINI BIKE
TROUBLE? DO NOT RETURN TO STORE contact us! 888-488-MOTO (6686) or email [email protected]
10 MPH max (Fast Speed) 6.8 MPH max (Slow Speed)

it has changed enough. If not, repeat steps 3 & 4 until the proper tension is achieved.5. Tighten the axle nuts to 15 ft lbs.
NOTE: To loosen the chain tension, follow the steps above except turn the ten-sioner bolts counter-clockwise (outward) to loosen.
The drive chain on your MBxXSe must be kept lubricated often to avoid excessive wear. To lubricate the drive chain, follow the steps below:1. Park the bike on a level, flat surface using the kickstand.2. Lean the bike toward the kickstand so that the rear wheel comes off the ground an inch or two.3. As you rotate the rear tire, wipe down the chain with a clean cloth to remove as much grime and build up as possible.3. Again rotating the rear tire, spray a good chain lubricant on the chain so that the full length of the chain is lubricated. Use any spray lube, a household oil like 3-in-1 oil, or any bicycle-specific chain lube. Spray solvents like WD-40 are not recommended as they tend to dilute and remove oil from the chains. 4. Using a cloth, wipe off the excess lube.
NOTE: The chain should be thoroughly lubricated but without buildup of lube, which can collect dirt and grit which causes damage to the chain.
The MBxXSe is equipped with a 30-amp fuse to protect the system in the event of electrical shorts. When a short or overload in the system occurs, the fuse activates which will protect the wiring and help to avoid possible fire. Possible situations that can result in a blown fuse can be:1. A worn or pinched wire in the system that causes a short.2. Moisture in the system.3. Overloaded electrical system.
In the event of a burned-out fuse, your MBxXSe will not work when you turn it on and the indicator lights will not light up. To check and/or replace the fuse, follow the steps on the following page:
1. Open the plastic battery case by removing both knob screws (on the front and back of the battery case) and pulling the right side panel off.2. Locate the black rubber fuse housing, in the wiring above the battery.3. Open the rubber flip top lid and carefully pull out the fuse.4. Inspect the fuse and replace if necessary.5. Re-assemble the fuse holder and the body case, making sure it is clean and dry inside and that all the wiring is safely tucked inside. Watch carefully for pinched wires.
NOTE: IF THE FUSE CONTINUES TO BURNOUT YOU HAVE ENCOUNTERED ANELECTRICAL PROBLEM. CSTOP USING THE BIKE AND CALL MOTOVOX AT 888-488 MOTO (6686) OR EMAIL US [email protected] FOR ASSISTANCE.
The MBxXSe is equipped with a mechanical rear disc brake system. You should check the brake and make sure it is working properly before each ride. The brake should feel firm when the lever is pulled and you should not be able to pull the brake lever all the way back to where it touches the hand grip. If you can squeeze the brake lever all the way to the hand grip, your brake needs adjusting. There are two options to adjust the brakes:
OPTION 1: Adjust using the barrel roller.1. Loosen the set ring on the barrel adjuster.2. Screw the barrel adjuster out a few turns and then check the tension in the lever.3. If it feels right, re-tighten the set ring.4. If not, repeat step 2 until the brake feels right and then tighten the set ring nut.
MAINTAINING YOUR MINI BIKE
1716 MAINTENANCE
DRIVE CHAIN TENSION (CONTINUED)
LUBRICATING THE DRIVE CHAIN
REPLACING THE FUSE
ADJUSTING THE BRAKE
MAINTAINING YOUR MINI BIKE
TROUBLE? DO NOT RETURN TO STORE contact us! 888-488-MOTO (6686) or email [email protected]
Barrel Roller
Rear Knob Screw
Set Ring

MAINTAINING YOUR MINI BIKE
1918 MAINTENANCE
MAINTAINING YOUR MINI BIKE
The two batteries on your MBxXSe are removable and replaceable. To remove the batteries, follow the steps outlined below.1. Open the plastic battery case by removing both knob screws (on the front and back of the case) and pulling the right side panel off. 2. Unhook the rubber strap that holds the batteries in place.3. Slide the batteries partially out of the holder one at a time, removing the terminals by pulling them off. Remove the negative terminal first.
BE CAREFUL NOT TO TOUCH THE NEGATIVE CABLE TO THE CONNECTED POSITIVE CABLE AS IT MAY SPARK AND/OR CAUSE A FIRE.4. Once the cables are disconnected from the terminals, slide the batteries out .
THE MBxXSe USES LEAD ACID BATTERIES WHICH MUST BE DISPOSED OF PROPERLY. DROP THEM OFF AT ANY LOCATION THAT SELLS AUTOMOTIVE BATTERIES. DO NOT DISPOSE THEM IN YOUR HOUSEHOLD TRASH AND NEVER BURN A LEAD ACID BATTERY AS AN EXPLOSION COULD OCCUR. IF A BATTERY LEAK OCCURS, AVOID CONTACT WITH THE ACID AS IT IS CORROSIVE, POISONOUS AND DANGEROUS. IF ACID COMES INTO CONTACT WITH SKIN OR EYES, FLUSH WITH COOL WATER FOR AT LEAST 15 MINUTES AND SEE A PHYSICIAN IMMEDIATELY. DO NOT MIX OLD AND NEW BATTERIES. DO NOT MIX ALKALINE, STANDARD OR RECHARGEABLE BATTERIES TOGETHER, AND ONLY USE MOTOVOX SPECIFIED BATTERIES.
REMOVING THE BATTERIES
TROUBLE? DO NOT RETURN TO STORE contact us! 888-488-MOTO (6686) or email [email protected]
OPTION 2: Adjust using the actuator arm on the brake caliper.If you are not able to get enough adjustment using the barrel adjuster, you may need to adjust the brake using the actuator arm on the rear caliper. 1. Adjust the barrel adjuster on the brake lever all the way in, and tighten the set ring.2. Locate the rear brake actuator arm where the brake cable is connected to the rear brake caliper.3. Using a 10mm wrench, loosen the brake cable nut that secures the cable to the actuator arm so that the cable can slide freely through the bolt.4. Slide the actuator arm forward until it stops, then back it off about a half of an inch, making sure the cable slides freely through the bolt.5. Holding the actuator arm in position, carefully re-tighten the cable bolt until it is snug. 6. Check the brakes and make sure they work properly.
NOTE: Be sure the brake is not TOO TIGHT, which will impede performance and cause excessive wear on the brake.
It is very important to check the tire pressure before every ride. Running on low tire pressure can create a dangerous situation as the bike will not handle properly and could cause the rider to lose control. To check the tire pressure, locate the air stems inside the rims on each wheel and remove the black plastic cap. Using a tire gauge, check to make sure that there is at least 20, and no more than 36 lbs of pressure in each tire.
CHECK THE TIRE PRESSURE
ADJUSTING THE BRAKE (CONTINUED)
Actuator Arm Brake Cable
Brake cable nut
Rear Knob Screw
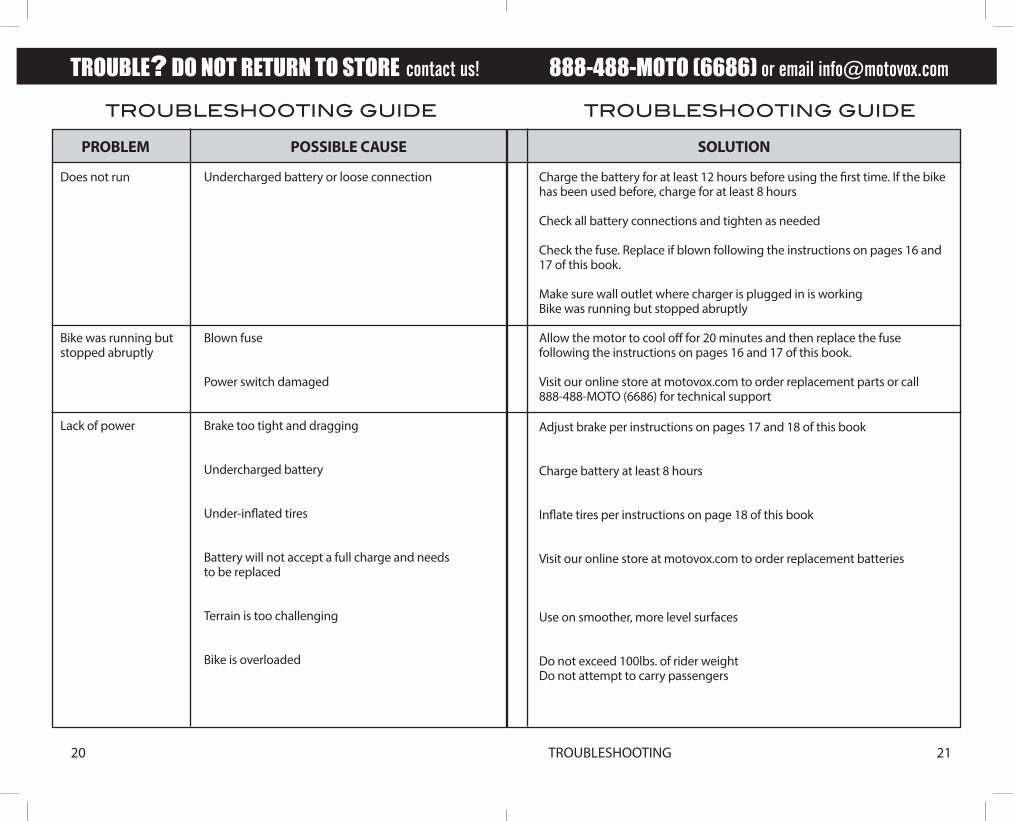
TROUBLESHOOTING GUIDE TROUBLESHOOTING GUIDE
2120 TROUBLESHOOTING
TROUBLE? DO NOT RETURN TO STORE contact us! 888-488-MOTO (6686) or email [email protected]
PROBLEM POSSIBLE CAUSE Does not run Undercharged battery or loose connection
Bike was running but Blown fusestopped abruptly
Power switch damaged
Lack of power Brake too tight and dragging
Undercharged battery
Under-inflated tires
Battery will not accept a full charge and needs to be replaced
Terrain is too challenging
Bike is overloaded
SOLUTION
Charge the battery for at least 12 hours before using the first time. If the bike has been used before, charge for at least 8 hours
Check all battery connections and tighten as needed
Check the fuse. Replace if blown following the instructions on pages 16 and 17 of this book.
Make sure wall outlet where charger is plugged in is workingBike was running but stopped abruptly
Allow the motor to cool off for 20 minutes and then replace the fuse following the instructions on pages 16 and 17 of this book.
Visit our online store at motovox.com to order replacement parts or call 888-488-MOTO (6686) for technical support
Adjust brake per instructions on pages 17 and 18 of this book
Charge battery at least 8 hours
Inflate tires per instructions on page 18 of this book
Visit our online store at motovox.com to order replacement batteries
Use on smoother, more level surfaces
Do not exceed 100lbs. of rider weightDo not attempt to carry passengers

TROUBLESHOOTING GUIDE TROUBLESHOOTING GUIDE
2322 TROUBLESHOOTING
TROUBLE? DO NOT RETURN TO STORE contact us! 888-488-MOTO (6686) or email [email protected]
PROBLEM POSSIBLE CAUSE
Charger gets warm Normalwhen in use
Bike does not stop Brake out of adjustment
Bike makes a grinding Chain needs adjustment and lubricationor squeaking noise when moving
Bike runs fine, but Slow Speed Safety Switch is onseems too slow
SOLUTION
No action is required. The charger will generate a small amount of heat as the battery is charging
Adjust brake per instructions on pages 17 and 18 of this book
Lubricate the chain per the instructions in the maintenance section of this book
Refer to the Slow Speed Safety Switch section on page 14 in this book to change the switch to regular speed

Register your Motovox MBxXSe Mini Bike so that we can provide you fast solutions to any problems you may have with
your product and so that we can keep in touch with you regarding any product updates.
Simply detach the registration form on the next page, fill it out and mail it to
Motovox8844 Hillcrest Road
Kansas City, Missouri 64138
Or go to motovox.com and click on ACTION to fill out your registration form online.
Motovox MBxXSe Product RegistrationPlease complete and mail this card within 10 days of purchase.
Name Age
Address
City State Zip
Home Phone
Work Phone
Purchase Date Purchased from
VIN Number
Male Female Occupation
Is this your first Motovox product?
Other similar product owned before
How did you hear about the MBxXSe?
Complete this form and mail it to:
8844 Hillcrest Road, Kansas City, Missouri 64138Attention: Product Registration
2524

For step-by-step maintenance videos and much more information about your Motovox MBxXSe, visit
motovox.com
TROUBLE? DO NOT RETURN TO STORE contact us! 888-488-MOTO (6686) or email [email protected]
Motovox would sincerely like to thank you for choosing one of our fine products and we hope you will have many years of
safe, fun enjoyment with your new electric mini bike!
2726

Motovox Motorsports8844 Hillcrest Road, Kansas City, MO 64138-3759
Toll Free: 1-888-488-MOTO (6686)Motovox.com
email [email protected]
IF YOU HAVE TROUBLE
DO NOT RETURN TO STORECALL MOTOVOX AND WE WILL MAKE IT RIGHT.
Electric Micro Mini Bike