ek-quantum reaction aio rx 6800/6900 d-rgb p240 - amd
TRANSCRIPT

USER GUIDE
EK-Quantum Reaction AIO RX 6800/6900 D-RGB P240 - AMD Radeon Edition

To ensure safe and easy installation, please read this manual carefully before starting with the installation process!
Safety PrecautionsBefore you start using this product, please follow these basic guidelines:
Check the component list and condition of the product before installation. If you encounter a problem, contact the vendor where you purchased the product to get a replacement or a refund.
EK is not responsible for any damages due to external causes, including but not limited to: improper use, problems with electrical power, accident, neglect, alteration, repair, improper installation, and improper testing.
Carefully read the manual before beginning with the installation process.
Remove your graphics card from the computer for the safest mounting process to prevent any possible damage to your GPU or its circuit board (PCB).
This product is an All-In-One liquid cooling solution. Disassembling it and combining it with parts other than EK products may lead to warranty loss.
The use of quality market-proven corrosion-inhibiting coolants is always strongly recommended for any liquid cooling system.
Do not use pure distilled water as a cooling liquid! For best results, EK recommends the use of EK-CryoFuel Coolants.

- 3 -
TABLE OF CONTENTSBOX CONTENTS 4DIMENSIONS 5INSTALLING THE GPU WATER BLOCK AND BACKPLATE 6FAN SPLITTER HUB 6ELECTRICAL CONNECTIONS Option 1 7
CONNECTING THE HUB TO THE POWER SUPPLY 7CONNECTING THE HUB TO THE MOTHERBOARD 7
ELECTRICAL CONNECTIONS Option 2 8CONNECTING THE PUMP DIRECTLY TO THE MOTHERBOARD FAN HEADER 8
AIO UNIT ORIENTATION LIMITATIONS 9INSTALLING THE AIO UNIT 10CONNECTING THE D-RGB LIGHTS 11
ALTERNATIVE 12SUPPORT AND SERVICE 13SOCIAL MEDIA 13

- 4 -
BOX CONTENTS
Self-Tapping Fan Mounting Screws
All-In-One GPU Liquid Cooling Unit With the Mounting Mechanism and Connection Cables
EK D-RGB 6-Way Splitter Cable
EK Cable Y-Splitter 2-Fan PWM
- 5 -
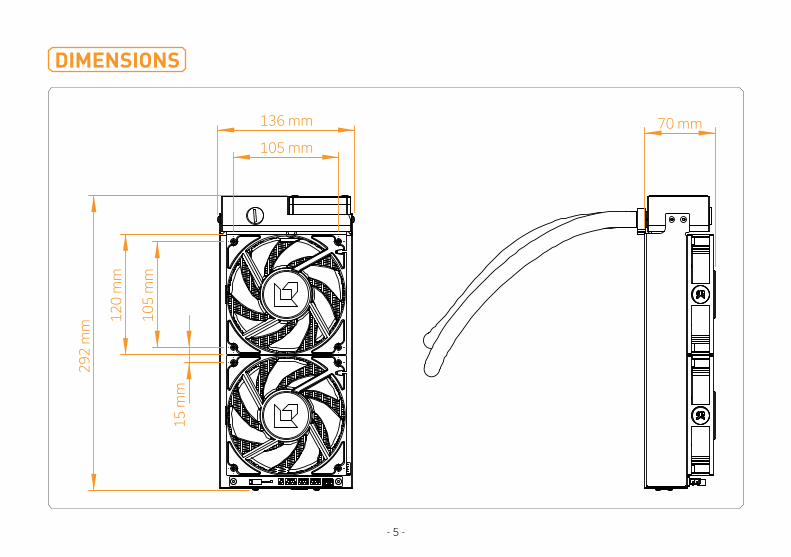
DIMENSIONS
70 mm
29
2 m
m
136 mm
10
5 m
m
15
mm
105 mm
12
0 m
m

- 6 -
INSTALLING THE GPU WATER BLOCK AND BACKPLATE
FAN SPLITTER HUB
To install the water block to your graphics card, follow the instructions in the link below:
https://www.ekwb.com/shop/EK-IM/EK-IM-3831109833391.pdf
General Characteristics: - 3x 4-Pin PWM Fan Header (Molex KK 254 Standard)- 1x 4-Pin PWM Pump Header (Molex KK 254 Standard)- 1x 2-Pin Tach/PWM Header (Molex KK 254 Standard)- 1x 2-Pin Power Header (Molex Mini-Fit Standard)- 1x Power LED Indicator Diode (Red) - Rectified PWM Input- Uniform PWM Control on All Headers
All the elements that need electricity to run are connected to the fan splitter hub, located on the back of the unit.
This fan splitter hub contains three 4-pin PWM fan headers for three fans and one pump.
A 2-pin header is used to connect the hub to the motherboard CPU fan header to allow the speed regulation of both fans and the pump. The 2-pin PCI Express Mini-Fit power header is used to provide power for the AIO unit.
Pump Fan 1Fan 2Fan 3
To the Power Supply UnitFan Splitter Hub
Pump Header
Fan 1/2/3 Header
RPM (tacho) and PWM Header Power LED Light
Unit main Power Header

- 7 -
ELECTRICAL CONNECTIONS Option 1CONNECTING THE HUB TO THE POWER SUPPLY
STEP 1Take the enclosed power cable and plug the 2-pin PCI Express Mini-Fit power connector into the fan splitter hub.
STEP 2Use the SATA POWER connector and plug it into the female connector found on the main power supply.
CONNECTING THE HUB TO THE MOTHERBOARDTo obtain the PWM fan speed control, you must follow these steps:
STEP 3Take the enclosed connection cable and plug the 2-pin cable connector into the fan splitter hub.
STEP 4Use the 4-pin connector and plug it into the male connector header located on the motherboard.
Always use a CPU fan header. On the majority of motherboards, these headers offer the best PWM regulation.
STEP 1 STEP 2
STEP 3 STEP 4

- 8 -
STEP 1
STEP 2
ELECTRICAL CONNECTIONS Option 2CONNECTING THE PUMP DIRECTLY TO THE MOTHERBOARD FAN HEADERIf you want to control the speed of the pump and fans separately, you should follow these steps:
STEP 1Disconnect the pump cable from the fan splitter hub. You need to remove cable ties to do so.
STEP 2Connect the pump’s connector to the CPU fan header (preferably) on the motherboard.

- 9 -
Pump
Pump
Pump
Pump
Pump
Pump
AIO UNIT ORIENTATION LIMITATIONS
CAUTION: The unit’s orientation is critical since incorrect installation can lead to poor cooling performance and premature unit failure.

- 10 -
STEP 1
STEP 2
INSTALLING THE AIO UNITSTEP 1Mounting the AIO unit into your PC chassis requires special attention. You will need eight fan mounting screws and a Phillips head screwdriver.
STEP 2The AIO unit’s position depends on the size, fan mounting holes, and hardware you have installed inside your chassis. You must make sure that the unit fits into the chassis. Usually, the cases come with pre-drilled standard fan mounting holes, and you should look for holes that have 105mm spacing (for standard 120mm cooling fans).

- 11 -
STEP 1 Connect the 3-pin D-RGB LED connector from the GPU water block and fans to the D-RGB header on the motherboard. The lights will work if the pin layout on the header is as follows: +5V, Data, Empty, Ground.
Please ensure the arrow indicated on the connector is plugged into the +5V line, as indicated on your motherboard. If you connect LEDs to the 12V RGB header, it will damage them.
D-RGB Header
RGB Header
STEP 3Once you have selected the mounting position within the case, you must align the fan mounting holes with the ones in the case. Use the enclosed self-tapping screws to install the unit firmly. Self-tapping screws require more torque than threaded screws but don’t overdo it with force applied.
STEP 3
STEP 1
CONNECTING THE D-RGB LIGHTS

- 12 -
ALTERNATIVEYou can use the enclosed 6-way D-RGB splitter cable to connect all the D-RGB cables into one header on your motherboard.6-Way D-RGB Male
Splitter Headers
D-RGB Connectors

In case you need assistance, please contact:https://www.ekwb.com/customer-support/
EKWB d.o.o.Pod lipami 181218 KomendaSlovenia - EU
EKWaterBlocks
@EKWaterBlocks
ekwaterblocks
ekwaterblocks
EKWBofficial
SUPPORT AND SERVICE
SOCIAL MEDIA