ejb 3 modeling example english translation from the new
TRANSCRIPT
EJB 3 modeling example English Translation from the New Jboss 4.2
and Eclipse Karim Djaafar’s book
Karim Djaafar (EJB 3 evangelist) Omondo Tunisia President
WebStock Application conception using EclipeUML Free Edition 2007 In this chapter, we are going to deploy our WebStock case with the help of EJB3/JSF2 technologies, using a development approach based on the model, also known as a MDA (Model Driven Architecture) approach. We have selected the EclipseUML 2007 Free Edition case tool, which was already used in my second book on Eclipse and Jboss (the reader could have more detailed UML information in my previous book on how to use the EclipseUML tool wizards). The EclipseUML 2007 solution from the ISV’s Omondo, covers now the full JEE cycle and allows using an iterative approach to generate almost all the needed code of an application. The java code generator is an AndroMDA Eclipse extension provided and customized by Omondo, which only requires that the developer add his specific application code, as described below in this chapter.
Introduction We will use the WebTools project, and the Dali subproject in order to build our case mapping Object/Relational which allows the JPA support. We will supplement our panoply of “perfect JEE developer” with the UML editor design tool “EclipseUML 2007” of the editor Omondo (http://www.omondo.com) which allows the implementation of a step MDA “from beginning to the end” of the cycle of development.. Let us recall that the solution EclipseUML 2007 Free Edition which is available for Windows/Linux platform and running on Eclipse 3.3 Europa is entirely free. EclipseUML will be prone of a short presentation in the following section of the chapter highlighting its architecture. Then we will pass to its implementation in the design and the development of the WebStock application by using JSF and EJB3/Seam technologies.
Model Driven Architecture We present here the step of proposed development which will be implemented by the EclipseUML 2007 workshop while starting with a definition of this Model Driven process of development in vogue currently in the Java/JEE developers community. This short recall is necessary before approaching under good conditions the implementation of the solution.

Definition The MDA (“Model Driven Architecture”) promoted by the OMG (Object Management Group) was conceived in order to model its application independently of the implementation target (material level or software), thus allowing a good re-use of models. This approach of development which makes it possible to cover the whole cycle of the project, from the design to the deployment, is based on an association of created models (PIM or Platform Independent Model which represents the business rules) with platform models forms (PM or Platform Model), and then transformed to obtain a model of specific application (PSM or Platform Specific Model which is specific to the technical aspect) as illustrated of figure 11.1:
Tools for automatic code generation, such as AndroMDA which is the most famous of them make it possible to directly create the program starting from the models. In short, the implementation of the MDA is entirely based on the models and their transformation, while being independent of any platform ensuring a portable development at the levels of the languages and technologies under unclaimed.

Methodology and Implementation MDA approach proceeds in two stages: • The stage of design
The first stage of the MDA process consists in carrying out an independent model of any platforms (PIM), usually expressed in UML. It is what we will implement in the first part of our study of the WebStock application model with the assistance of the EclipseUML2007 solution. Once the PIM is sufficiently detailed, it is projected towards a specific model (PSM). Omondo has been the first to decide to add PSM stereotype directly at the PIM level in order to make this PIM to PSM transformation possible and not to break the project development life cycle of JEE. To obtain a specific model, it is necessary to choose the platforms of execution (several platforms can be used to implement the same model) and just add stereotypes. The characteristics of execution and information of configuration which were defined in a generic way are converted to take account of specificities of the platform. In our case, specificities of platform will touch with the chosen JEE technologies for the presentation part, the transaction and the persistence which are respectively JSF, EJB 3 and JPA/Hibernate.
• The stage of Transformation This stage consists in projecting a sufficiently detailed model PIM towards a specific PSM model. To obtain a specific model, it is necessary to choose the platforms of execution. The characteristic of execution and information of configuration which were defined in a generic way are then converted to take account of specificities of platform target (in our case EJB3/JSF/JPA). We will implement it thanks to the code generation tool AndroMDA and its Omondo Eclipse extension. AndroMDA is an open source project able to generate code in any language starting from UML 2.0 models (Unified Modeling Language). Omondo has extended this open source project in order to support the latest UML 2.1 OMG specification and directly deploy running code within the Eclipse WTP 2.0 project. The generation of the code being carried out thanks to components calls “cartridge” (cartridges), each cartridge being conceived to generate Java code for standard technologies J2EE/JEE (Struts, Spring,…) and for specific platforms. The stages of our process of development being already describe, we are going to pass to its real implementation using EclipseUML 2007 Free Edition.
EclipseUML 2007 for JEE EclipseUML is an Eclipse project developed under the supervision of the OMONDO company, a contributively and active member of the OMG (Object Management Group). The product moreover is declined in two editions: Free and Studio. With these two editions, EclipseUML implements step MDA bringing into play the concept of UML profile. This implies an important set of standards which are implemented inside the product in terms of reference. EclipseUML is compatible with the UML 2.1specifications thus respecting the latest OMG UML2 standard. The first generations of this tool were intended for modelling UML and the java generation. The solution proposed nine UML diagrams in particular the classe, usecase and state diagrams. In June 2007, the solution EclipseUML 2007 “Europa” was born to offer to the JEE world a rather practical and complete MDA workshop.
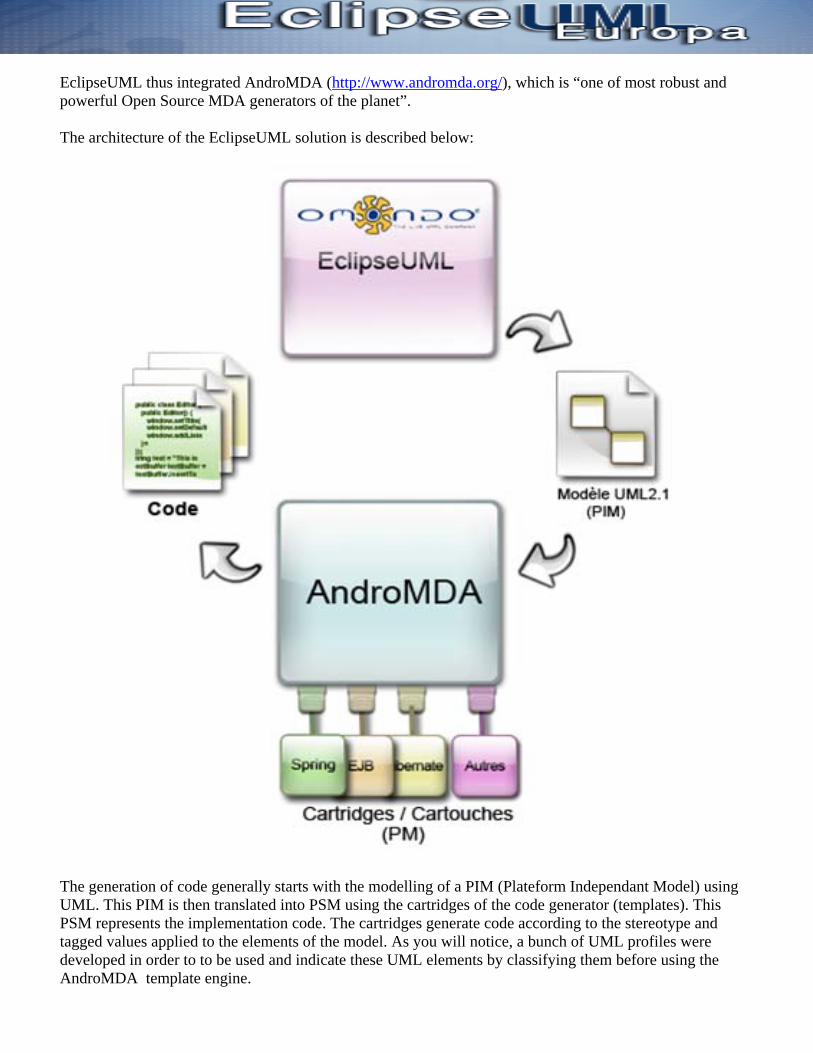
EclipseUML thus integrated AndroMDA (http://www.andromda.org/), which is “one of most robust and powerful Open Source MDA generators of the planet”. The architecture of the EclipseUML solution is described below:
The generation of code generally starts with the modelling of a PIM (Plateform Independant Model) using UML. This PIM is then translated into PSM using the cartridges of the code generator (templates). This PSM represents the implementation code. The cartridges generate code according to the stereotype and tagged values applied to the elements of the model. As you will notice, a bunch of UML profiles were developed in order to to be used and indicate these UML elements by classifying them before using the AndroMDA template engine.
The concept of Profiles A profile is an extension of UML metamodel in order to add new types and to include relating characteristics to a particular field. It is a set of stereotypes, tagged values and OCL constraints (Object constraint language) making it possible to refine the elements of the model. AndroMDA defines one profile for each layer of the JEE application which will be used during the different steps of the WebStock application modelling.
The Webstock application WebStock is a simple application of a stock of articles management intended to illustrate the advanced aspects of JEE development. This application meets the needs for the chain of sale of articles of WebStore. These needs can be extended to the consultation of the central system of the chain of shops. This application was detailed in my previous book. We will clarify in this part of the chapter and will propose a didactic way to present the application stages of creation within the a pure MDA step and framework of. MDA cycle should include/understand the following iterations: • Modelling the UML context of the trade of the WebStock field • Serialization and XMI export of UML model • Generation of code • Deployment and tests The MDA Process will surely hide certain details of JEE coding. We will anyway stop on certain basic concepts of EJB3 development by listing the extracts of the EJB3 generated code. First, we will focus ourselves on the modelling of the application and on the corresponding business.
The environment of work Our development environment, as previously mentioned, will be Eclipse 3.3 with WebTools. For the needs of our required study the pre ones are as follows: - EclipseUML 3.3for JEE free version or and downloadable starting from the http://www.ejb3.org/download_free_JEE_eclipse_3.3.html - Webtools 2 which is the compatible version for Eclipse 3.3. Downloadable from the Eclipse site with the http://www.eclipse.org/wtp . For the deployment we will use the JBoss 4.2.1 server which supports EJB 3 and is completely supported and controlled by WebTools. The installation is particularly simplified and supposes a version of Europa Eclipse containing the level of necessary “bundles” EMF/GEF (already pre packaged with the “JEE Developper” release of Eclipse). It is then enough to launch the provided installer and to follow the installation assistants. You can just download the EclipseUML 2007 Free JEE edition bundle to have erything you need at: http://www.download-omondo.com/eclipseUML_E330_2007_freeEdition_JEE_3.3.0.v20071030_including_eclipse-jee-europa-fall-win32.zip

Modelling with EclipseUML 2007 Free Edition In this section we will detail the design of the webStock application with the EclipseUML editor. We will highlight this architecture by the various N-third related diagrams architecture. Built Foundations of JEE application : With the JEE code generation, EclipseUML 2007 free edition will also provide us the framework of a N-third application respecting the good JEE practices. The MVC model is the inherent model of our application. For a better performance of the MDA step, we will focus all our efforts on the modelling of the various behaviours of each layer. With this intention, we will use three basic diagrams which will be in the order of the tool recommended step: - The UseCase diagrams will model the entry point of the application and its interaction with the physical user. - The Class diagrams will express the application model as well as the DAO. - The State diagrams will clarify the workflow for each usecase of the model.
The business Model In this section we will create our business model composed by EJB3 entities. With this intention, let us start by creating a usual Java project using Eclipse. In the repertory source let us create a new repertory which one will be called for example “book.webstock.entities”. This file will contain the whole information of our entities. For the remainder of the proceeded process as follows: - In the sight “Package Explorer” make simple a click on the file which you have just created - In the Eclipse menu top click on the button then in the drop-down list which has been just posted choose - In the UML editor who has just appeared, model your entities as shown in the figure 11.3 (refer to my previous work for the use of the class creation assistants, attributes and relations. The WebStock data model is provided in source code for the Java types to use, including the .ucd model of WebStock). I am sorry, but because of copyright law, I can not add the related code to my book on this website.
Figure 11.3: Business Model of the WebStock application

To create its EJB 3 entities An EJB3 entity in EclipseUML is a class carrying the stereotype “Persistence:: Entity”. - In the toolbar of the class diagram, click on a class and drag and drop the UML editor - In the UML editor which has been just created, type the name of your entity - To apply the stereotype corresponding, made a click right on the EJB class then select “properties” in the EJB class contextual menu. - In the “Stereotype” wizard of the window “properties”, click on “New Stereotype” to choose the stereotype to be applied which will be for the entities “Persistence:: Persistence” as shown below in the figure 11.4 following:
Figure 11.3: Business Model of the WebStock application
The Usecase We will count our model in a logical whole of usecases. All usecase must carry the stereotype “FrontEndUseCase” and only one will be allowed to carry the stereotype “FrontEndApplication”. This stereotype will indicate the welcome page, home or index of our application. In our case, the case of use will indicate “Lists customers” as welcome page. Several usecases are to be envisaged for the WebStock application: - Add/Delete and posting Box of each entity of the WebStock application uses - Uses box “Login” making possible to connect itself via a login/password to the application.
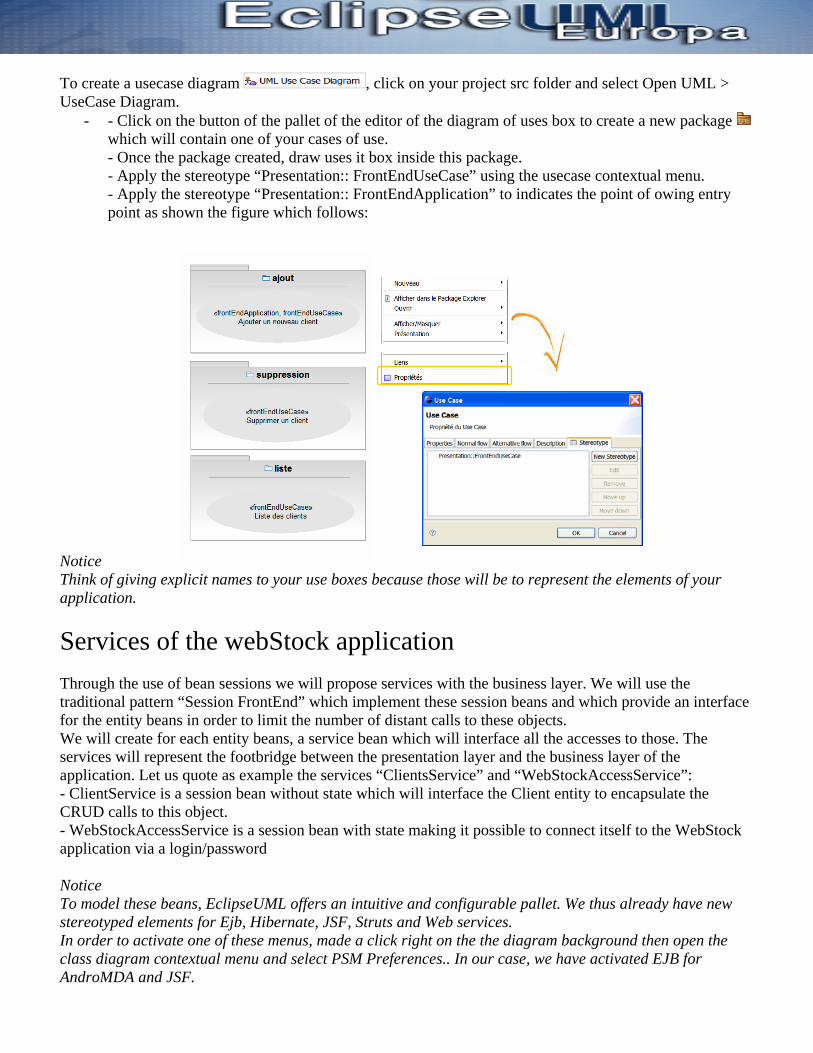
To create a usecase diagram , click on your project src folder and select Open UML > UseCase Diagram.
- - Click on the button of the pallet of the editor of the diagram of uses box to create a new package which will contain one of your cases of use. - Once the package created, draw uses it box inside this package. - Apply the stereotype “Presentation:: FrontEndUseCase” using the usecase contextual menu. - Apply the stereotype “Presentation:: FrontEndApplication” to indicates the point of owing entry point as shown the figure which follows:
Notice Think of giving explicit names to your use boxes because those will be to represent the elements of your application.
Services of the webStock application Through the use of bean sessions we will propose services with the business layer. We will use the traditional pattern “Session FrontEnd” which implement these session beans and which provide an interface for the entity beans in order to limit the number of distant calls to these objects. We will create for each entity beans, a service bean which will interface all the accesses to those. The services will represent the footbridge between the presentation layer and the business layer of the application. Let us quote as example the services “ClientsService” and “WebStockAccessService”: - ClientService is a session bean without state which will interface the Client entity to encapsulate the CRUD calls to this object. - WebStockAccessService is a session bean with state making it possible to connect itself to the WebStock application via a login/password Notice To model these beans, EclipseUML offers an intuitive and configurable pallet. We thus already have new stereotyped elements for Ejb, Hibernate, JSF, Struts and Web services. In order to activate one of these menus, made a click right on the the diagram background then open the class diagram contextual menu and select PSM Preferences.. In our case, we have activated EJB for AndroMDA and JSF.

Controllers of the WebStock application The controllers are classes which allow communication between the Web and the business layer. We will model a controller for each request which can be launched by the user of the application. In other words, we will have a controller for each uses box as shown in the figure 11.8.
Figure 11.8: Entities, services and contollers
To create a controller_usecase select the class and open the class contextual menu > Links > Web Interface. In the Web Interface property wizard select the usecase to be linked to the class.

The State Diagram The goal in this part is to carry out a diagram of state for each one of our usecases in order to clarify their behaviour and to draw the dynamic aspect of the system. The toolbar menu of EclipseUML for the State diagrams is rather rich (see following picture)
It gives us access to several elements which are presented on figure 11.10and shown in the figure 11.8.
Entry point End point State History Option Exit Terminate Enter Junction Fork Transition Note
To begin with, let us remind you some basic notions: - A diagram of state must have a starting point which must have one or two transitions which derive from them. - Each state in the diagram represents a state of the business process to model - States that require user interaction with the system will be required to wear "stereotype Presentation: FrontEndView." - Stats that designate a server-side behaviour are not supposed to wear a stereotype - We need to add an event or effect transitions from a state stereotyped "FrontEndView." A "effect" must pass parameters of the state source to the destination state. - Stereotypes applied to the attributes of a transition from a state on the client side will specify which type of display will be shown in the form. - If there is a final statement, it must bear the name of the use box implemented by the diagram. Here is an example of a state diagram associated with the use case "Adding a new client:

Figure 11.11 : diagramme d’état du cas d’utilisation « Ajout d’un nouveau client »
As it can be seen on the latter figure, we have three states intermediaries; "Debut Ajout Client (Beginning Adding customer)", adding " Formulaire Ajout client (Form)" and "Persister nouveau client (Persistence of new customer)." The second condition, as its name suggests, is an entry form parameters of the new customer and is therefore associated with the presentation layer. For this reason, we have applied the stereotype "Presentation: FrontEndView." In the third condition, we are going to execute the "ajoutClient" controller "AjoutClientController" which implements the use case "Adding a new customer." In order to gain access to this method through this state diagram, you must first assign the diagram in the case of use it represents. To do this, right-click on the use cases and then from the drop-down menu select Links>Links Struts/JSF. Finally, select the designate diagram of state. Figure 11.12 illustrates this process. To make your state diagram, proceed as follows: - Start by drawing the various states in the diagram using elements from the palette of the eclispseUML toolbar - Fill out the various statements which are in the order of five on the process "Adding customer" including the initial and final states. - Apply the stereotype "FrontEndView" in the "Customer" Adding form via the Properties menu accessed via a right click on it (see Figure 11.12) - Create the various transitions between different states

Figure 11.12 : Attribution d’un diagramme d’état à un cas d’utilisation
Since the state "Form Add Customer" represent a web page, it must pass parameters to the following state who represent the fields of the form posted on this page. To do this we must add an effect on the transition Drift. Add a transition effect to the "persisterClient" as follows: Via a right click on the transition, select Add Behavior> Effect - Give a name to the effect, such as "AjoutParamsEffect" Then in the state "Continuing New Customer" we are going to execute the "AjoutClient" controller "AjoutClientController." This method uses the parameters passed by the incoming transition and that we venionsdont we just give it effect. Proceed as follows: - Open the Properties of the state in question accessible via its corresponding pop-up menu - Choose Connection tab to add a new activity and the method that will represent the controller to run across this state underway. - In the window of definition of the new activity type in the name of the business, its type to specify the timing of its implementation and operation to be performed - Click on New Operation to point to Operation AjoutClient "in class" AjoutClientController. " Figure 11.13 summarizes the process of adding a new activity to a state of the diagram.
2
3 1
Figure 11 .13 : Exécution d’une opération à l’entrée d’une transition

Have a look now on what we have just added at the end of the transition state "Form" Adding Client: - Select Properties from the pop-up menu effect - Be aware of that the effect parameters just be four in number; Name, first name, address and telephone and comments. These settings are those that took the method AjoutClient who will run in the state target of this transition and will be entered in the form of the state source.
Figure 11.14 : Paramètres de l’effet « AjoutParamsEffect »
By default, the generator will we generate for the state form Adding Client, a form whose fields are texts. It is possible to change the type of fields by applying the values marked on them. To do this and still in the Properties window that we represent a capture (Figure 11.14), select the parameter in question and in the "Parameter Stereotypes", choose a value tagged "stereotype of Presentation: Presentation by clicking" Stereotype the New button (“ajouter” in French).
Export XMI Model The modeling phase is at this stage finished. As shown in the diagram of EclipseUML and MDA cycle, the second step is to export the model in a XMI (XML Metadata Interchange) standard. EclipseUML will do it for us. As you have seen in the modelling, stage each class diagram is exported to a file. Uml bearing his project name. There are also at the root of the project file. Uml bearing the name of the project. See Figure 11.15. This phase is really important because it is in this form that the standard model will undergo changes in the code generator to provide us with the body of our application.
Figure 11.15 : XMI Serialisation of EclipseUML

XML Metadata Interchange EclipseUML uses EMF (Eclipse Modeling Farmework) to preserve its models with XMI (XML Metadata Interchange). XMI is one of the standards upon which the MDA movement. It is a standard defined by the OMG, which requires a structured model in XML format and allowing the exchange and sharing models and metadata between different modeling tools.
New JEE Project To reach the phase of code generation we will have a JEE draft which will host the code of our application. To do this, we will use the EclipseUML wizard for us to generate a draft JEE signed AndroMDA. The project is broken down into n-tiers where each tier is represented by a self-Eclipse project and compatible with the draft Webtools. To create it the project proceed as follows: Click File-> New Project ...> AndroMDA> JEE Project. - For the first page of the wizard you must specify the name of the project, its description and the basic package which will be generated common resources and not are not modeled by the user. Put as an example "book.webstock" name as a basic package. - The second step is to choose the technology of the business tier and the packaging to use. Choose first EJB3 and check the EAR to have a kind of packaging - Then it will be necessary to specify the database to be used and connection settings. In our example, we used the Hypersonic database which is native with JBoss - The next step would be to specify the desired Web technology. Choose JSF then Facelets as technologies. We also use EJB3 and JSF activate support for the platform JBoss Seam. - Finally, click Finish to start generation project JEE
2
3 4
1
Figure 11.16 : Assistant EclipseUML de création d’un nouveau projet JEE

Figure 11.17 : Projet JEE généré par EclipseUML
The capture 11.17 introduced JEE draft as generated by EclipseUML. As you can see, we have five Eclipse projects that are generated at the same time where each project has its own nature: - The project EJB3_JSF_WebStock-app is a ear that will contain the different modules of the application JEE - The project EJB3_JSF_WebStock-common is a project that will contain each java class except the one for the application. As its name suggests this project is shared and used by all other layers of the application - The project EJB3_JSF_WebStock-core which is a project will contain the EJB components of the application - The project EJB3_JSF_WebStock -mda is a project without nature (?) This will contain the various configuration files and the UML model of the application - The project EJB3_JSF _WebStock -web is a web and it is the web tier of the application which includes web pages and JSF component of the application Remark Each of the layers of JEE project is a compatible Webtools project and does not have to be configured. It is important to add jar and descriptors directly in the project because it will saved a lot of time later. Indeed, the generator EclipseUML will do it for us as we will see if you use the tool.

Code Generation This step shows the phase of code generation for the deployment on the JBoss server. To do this, open the package explorer right-click on the file Uml modeling of the project and then select JEE UML Code Generation> Build All components. In the current assistant, select the project you have just created and the project which is to be selected to contain the code that will be generated. Click Finish to launch AndroMDAgeneration process. This may take several minutes. If no error is notified of model validation it means that the generation was done successfully.
Figure 11.18 : Assistant EclipseUML pour la génération de code EJB3

Generated code We will not explain the generated code because the concepts EJB3 is already welknown. However here we will give the reader some snippets to see how these concepts have been applied via UML specifications. Beans entities As we had previously modeled our business entities, we will move in this stage in order to make our application itself by showing the phase of code generation. For better visibility, we present in the figure 11.19 classes generated for the entity "Customer". The diagram in figure was obtained by reversing the code generated by EclipseUML.
Reverse of UML EclipseUML supports several new features including the Reverse Engineering from the source code to the model. The reverse is available via the pop-up menu of projects Java Open / Revrese UML. This feature allows us to gradually trace grader our model not only through the XMI but also through its business code. Thus, we can reverse our code to get our model that will generate and easily migrate to other platforms targets. The reverse targets multiple platforms including such as EJB3 / 2 and Hibernate 3 / 2. For more information, see the documentation EclipseUML available on its official website ( http://www.eclipsedownload.com/documentation.html ).
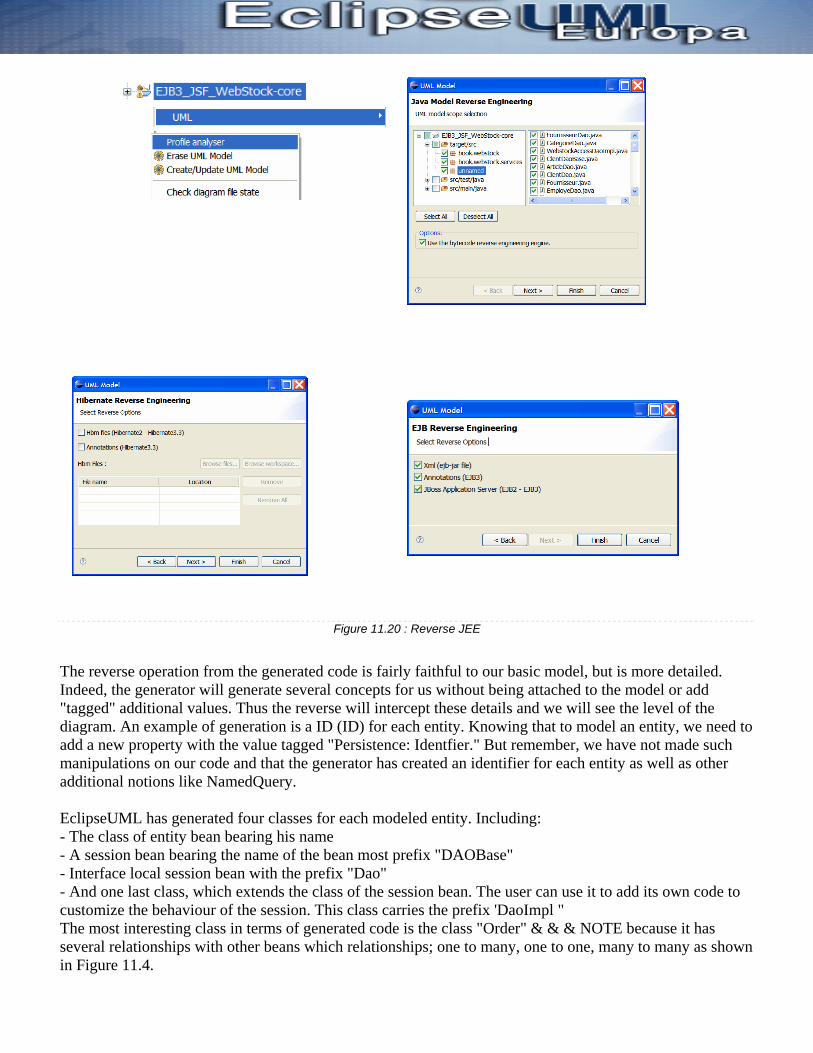
Figure 11.20 : Reverse JEE
The reverse operation from the generated code is fairly faithful to our basic model, but is more detailed. Indeed, the generator will generate several concepts for us without being attached to the model or add "tagged" additional values. Thus the reverse will intercept these details and we will see the level of the diagram. An example of generation is a ID (ID) for each entity. Knowing that to model an entity, we need to add a new property with the value tagged "Persistence: Identfier." But remember, we have not made such manipulations on our code and that the generator has created an identifier for each entity as well as other additional notions like NamedQuery. EclipseUML has generated four classes for each modeled entity. Including: - The class of entity bean bearing his name - A session bean bearing the name of the bean most prefix "DAOBase" - Interface local session bean with the prefix "Dao" - And one last class, which extends the class of the session bean. The user can use it to add its own code to customize the behaviour of the session. This class carries the prefix 'DaoImpl " The most interesting class in terms of generated code is the class "Order" & & & NOTE because it has several relationships with other beans which relationships; one to many, one to one, many to many as shown in Figure 11.4.

Here is the listing of the of previous "Rules” code :
@javax.persistence.Entity @javax.persistence.Table(name = "ARTICLE") @javax.persistence.NamedQuery(name = "Article.findAll", query = "select article from Article AS article") public class Article implements java.io.Serializable, Comparable<Article> { private static final long serialVersionUID = 1016923637013396942L; // ----------- Attribute Definitions ------------ private float poids; private java.lang.String nomArticle; private java.lang.String description; private java.lang.Long id; // --------- Relationship Definitions ----------- private java.util.Set<unnamed.Fournisseur> fournisseur = new java.util.TreeSet<unnamed.Fournisseur>(); private java.util.Set<unnamed.Inventaire> inventaire = new java.util.TreeSet<unnamed.Inventaire>(); private java.util.Set<unnamed.Categorie> categorie = new java.util.TreeSet<unnamed.Categorie>(); private java.util.Set<unnamed.Commande> commande = new java.util.TreeSet<unnamed.Commande>(); /** * Default empty constructor */ public Article() {} /** * Implementation for the constructor with all POJO attributes except auto incremented identifiers. * This method sets all POJO fields defined in this class to the values provided by * the parameters. * * @param poids Value for the poids property * @param nomArticle Value for the nomArticle property * @param description Value for the description property */ public Article(float poids, java.lang.String nomArticle, java.lang.String description) { setPoids(poids); setNomArticle(nomArticle); setDescription(description); } /** * Constructor with all POJO attribute values and CMR relations. * * @param poids Value for the poids property * @param nomArticle Value for the nomArticle property * @param description Value for the description property * @param fournisseur Value for the fournisseur relation * @param inventaire Value for the inventaire relation * @param categorie Value for the categorie relation * @param commande Value for the commande relation */ public Article(float poids, java.lang.String nomArticle, java.lang.String description, java.util.Set<unnamed.Fournisseur> fournisseur, java.util.Set<unnamed.Inventaire> inventaire, java.util.Set<unnamed.Categorie> categorie, java.util.Set<unnamed.Commande> commande) { setPoids(poids); setNomArticle(nomArticle); setDescription(description); setFournisseur(fournisseur); setInventaire(inventaire); setCategorie(categorie); setCommande(commande); }

@javax.persistence.Column(name = "POIDS", nullable = false, insertable = true, updatable = true) public float getPoids() { return poids; } /** * Set the poids property. * @param value the new value */ public void setPoids(float value) { this.poids = value; } … // l’implémentation des autres accesseurs /** * Get the id property. * * @return java.lang.Long The value of id */ @javax.persistence.Id @javax.persistence.GeneratedValue(strategy = javax.persistence.GenerationType.AUTO) @javax.persistence.Column(name = "ID", nullable = false, insertable = true, updatable = true) public java.lang.Long getId() { return id; } /** * Set the id property. * @param value the new value */ public void setId(java.lang.Long value) { this.id = value; } // ------------- Relations ------------------ /** * Get the fournisseur Collection * * @return java.util.Set<unnamed.Fournisseur> */ @javax.persistence.ManyToMany(mappedBy = "articles") public java.util.Set<unnamed.Fournisseur> getFournisseur() { return this.fournisseur; } /** * Set the fournisseur * * @param fournisseur */ public void setFournisseur (java.util.Set<unnamed.Fournisseur> fournisseur) { this.fournisseur = fournisseur; } /** * Get the inventaire Collection * * @return java.util.Set<unnamed.Inventaire> */ @javax.persistence.OneToMany(mappedBy = "article", fetch = javax.persistence.FetchType.EAGER) public java.util.Set<unnamed.Inventaire> getInventaire() { return this.inventaire; } /** * Set the inventaire * * @param inventaire */

public void setInventaire (java.util.Set<unnamed.Inventaire> inventaire) { this.inventaire = inventaire; } /** * Get the categorie Collection * * @return java.util.Set<unnamed.Categorie> */ @javax.persistence.ManyToMany() @javax.persistence.JoinTable ( name = "ARTICLE2CATEGORIE", joinColumns = {@javax.persistence.JoinColumn(name = "ARTICLE_IDC", referencedColumnName = "ID")}, inverseJoinColumns = {@javax.persistence.JoinColumn(name = "CATEGORIE_IDC", referencedColumnName = "ID")} ) public java.util.Set<unnamed.Categorie> getCategorie() { return this.categorie; } /** * Get the commande Collection * * @return java.util.Set<unnamed.Commande> */ @javax.persistence.OneToMany() public java.util.Set<unnamed.Commande> getCommande() { return this.commande; } ……………… //reste de l’implémentation } //fin classe
The second interesting class is the session bean « ArtcileDaoBase » generated for the entity bean « Artcile ». The second interesting class is the session bean which was generated for the CRUD methods. It gives acess to this entity bean. Below is a copy of the code of this class:
/** * <p> * Base EJB3 DAO Class: is able to create, update, remove, load, and find * objects of type <code>unnamed.Client</code>. * </p> * * @see unnamed.ClientDao */ @javax.ejb.TransactionAttribute(javax.ejb.TransactionAttributeType.REQUIRED) @javax.ejb.Local({unnamed.ClientDao.class}) public abstract class ClientDaoBase implements unnamed.ClientDao { // ------ Session Context Injection ------ @javax.annotation.Resource protected javax.ejb.SessionContext context; // ------ Persistence Context Injection -------- /** * Inject persistence context testNG */ @javax.persistence.PersistenceContext(unitName = "testNG") protected javax.persistence.EntityManager emanager; /** * @see unnamed.ClientDao#load(int,) */ public Object load(final int transform, final java.lang.Long id) throws unnamed.ClientDaoException { if (id == null) { throw new IllegalArgumentException( "Client.load - 'id' can not be null");

} try { final Object entity = (unnamed.Client)emanager.find(unnamed.Client.class, id); return transformEntity(transform, (unnamed.Client)entity); } catch (Exception ex) { throw new unnamed.ClientDaoException(ex); } } /** * @see unnamed.ClientDao#load() */ public unnamed.Client load( final java.lang.Long id) throws unnamed.ClientDaoException { return (unnamed.Client)this.load(TRANSFORM_NONE, id); } /** * @see unnamed.ClientDao#loadAll() */ @SuppressWarnings({"unchecked"}) public java.util.Collection<unnamed.Client> loadAll() throws unnamed.ClientDaoException { return (java.util.Collection<unnamed.Client>)this.loadAll(TRANSFORM_NONE); } /** * @see unnamed.ClientDao#loadAll(int) */ public java.util.Collection loadAll(final int transform) throws unnamed.ClientDaoException { try { javax.persistence.Query query = emanager.createNamedQuery("Client.findAll"); java.util.List<unnamed.Client> results = query.getResultList(); this.transformEntities(transform, results); return results; } catch (Exception ex) { throw new unnamed.ClientDaoException(ex); } } /** * @see unnamed.ClientDao#create(unnamed.Client) */ public unnamed.Client create(unnamed.Client client) throws unnamed.ClientDaoException { return (unnamed.Client)this.create(TRANSFORM_NONE, client); } /** * @see unnamed.ClientDao#create(int transform, unnamed.Client) */ public Object create(final int transform, final unnamed.Client client) throws unnamed.ClientDaoException { if (client == null) { throw new IllegalArgumentException( "Client.create - 'client' can not be null"); } try { emanager.persist(client); emanager.flush(); return this.transformEntity(transform, client); } catch (Exception ex) { throw new unnamed.ClientDaoException(ex); }

} /** * @see unnamed.ClientDao#create(java.util.Collection<unnamed.Client>) */ @SuppressWarnings({"unchecked"}) public java.util.Collection<unnamed.Client> create(final java.util.Collection<unnamed.Client> entities) throws unnamed.ClientDaoException { return create(TRANSFORM_NONE, entities); } /** * @see unnamed.ClientDao#create(int, java.util.Collection<unnamed.Client>) */ @SuppressWarnings({"unchecked"}) public java.util.Collection create(final int transform, final java.util.Collection<unnamed.Client> entities) throws unnamed.ClientDaoException { if (entities == null) { throw new IllegalArgumentException( "Client.create - 'entities' can not be null"); } java.util.Collection results = new java.util.ArrayList(); try { for (final java.util.Iterator entityIterator = entities.iterator(); entityIterator.hasNext();) { results.add(create(transform, (unnamed.Client)entityIterator.next())); } } catch (Exception ex) { throw new unnamed.ClientDaoException(ex); } return results; } /** * @see unnamed.ClientDao#create(java.lang.String, java.lang.String, java.lang.String, java.lang.String, java.lang.String) */ public unnamed.Client create( java.lang.String comments, java.lang.String telephone, java.lang.String adresse, java.lang.String prenom, java.lang.String nom) throws unnamed.ClientDaoException { return (unnamed.Client)this.create(TRANSFORM_NONE, comments, telephone, adresse, prenom, nom); } /** * @see unnamed.ClientDao#create(int, java.lang.String, java.lang.String, java.lang.String, java.lang.String, java.lang.String) */ public Object create( final int transform, java.lang.String comments, java.lang.String telephone, java.lang.String adresse, java.lang.String prenom, java.lang.String nom) throws unnamed.ClientDaoException { unnamed.Client entity = new unnamed.Client(); entity.setComments(comments); entity.setTelephone(telephone); entity.setAdresse(adresse); entity.setPrenom(prenom); entity.setNom(nom); return this.create(transform, entity); } /** * @see unnamed.ClientDao#update(unnamed.Client)

*/ public void update(unnamed.Client client) throws unnamed.ClientDaoException { if (client == null) { throw new IllegalArgumentException( "Client.update - 'client' can not be null"); } try { emanager.merge(client); emanager.flush(); } catch (Exception ex) { throw new unnamed.ClientDaoException(ex); } } /** * @see unnamed.ClientDao#update(java.util.Collection<unnamed.Client>) */ public void update(final java.util.Collection<unnamed.Client> entities) throws unnamed.ClientDaoException { if (entities == null) { throw new IllegalArgumentException( "Client.update - 'entities' can not be null"); } try { for (final java.util.Iterator entityIterator = entities.iterator(); entityIterator.hasNext();) { update((unnamed.Client)entityIterator.next()); } } catch (Exception ex) { throw new unnamed.ClientDaoException(ex); } } /** * @see unnamed.ClientDao#remove(unnamed.Client) */ public void remove(unnamed.Client client) throws unnamed.ClientDaoException { if (client == null) { throw new IllegalArgumentException( "Client.remove - 'client' can not be null"); } try { emanager.remove(client); emanager.flush(); } catch (Exception ex) { throw new unnamed.ClientDaoException(ex); } } /** * @see unnamed.ClientDao#remove(java.lang.Long) */ public void remove(java.lang.Long id) throws unnamed.ClientDaoException { if (id == null) { throw new IllegalArgumentException( "Client.remove - 'id' can not be null"); } try { final unnamed.Client entity = this.load(id); if (entity != null)

{ this.remove(entity); } } catch (Exception ex) { throw new unnamed.ClientDaoException(ex); } } /** * @see unnamed.ClientDao#remove(java.util.Collection<unnamed.Client>) */ public void remove(java.util.Collection<unnamed.Client> entities) throws unnamed.ClientDaoException { if (entities == null) { throw new IllegalArgumentException( "Client.remove - 'entities' can not be null"); } try { for (final java.util.Iterator entityIterator = entities.iterator(); entityIterator.hasNext();) { remove((unnamed.Client)entityIterator.next()); } } catch (Exception ex) { throw new unnamed.ClientDaoException(ex); } } /** * Allows transformation of entities into value objects * (or something else for that matter), when the <code>transform</code> * flag is set to one of the constants defined in <code>unnamed.ClientDao</code>, please note * that the {@link #TRANSFORM_NONE} constant denotes no transformation, so the entity itself * will be returned. * * If the integer argument value is unknown {@link #TRANSFORM_NONE} is assumed. * * @param transform one of the constants declared in {@link unnamed.ClientDao} * @param entity an entity that was found * @return the transformed entity (i.e. new value object, etc) * @see #transformEntities(int,java.util.Collection) */ protected Object transformEntity(final int transform, final unnamed.Client entity) { // Implémentation de la méthode } /** * Transforms a collection of entities using the * {@link #transformEntity(int, unnamed.Client)} * method. This method does not instantiate a new collection. * <p/> * This method is to be used internally only. * * @param transform one of the constants declared in <code>unnamed.ClientDao</code> * @param entities the collection of entities to transform * @return the same collection as the argument, but this time containing the transformed entities * @see #transformEntity(int, unnamed.Client) */ protected void transformEntities(final int transform, final java.util.Collection entities) { // Implémentation de la méthode }}

There is no need to postpone the generated code for classes "ArticleDaoImpl" and "ArticleDao", which are respectively the interface to customize the session bean "ArtcileDaoBase" and the local interface of the latter. Beans sessions Figure 11.19 illustrates classes generated for the beans sessions "ClientsService."
Figure 11.19 : classes générées pour le bean session « ClientsService »
Classes are generated in this way: "ClientsServiceBase" session bean class "ClientsServiceRemote" is the remote interface of the session bean "ClientsServiceBean" is a class that implements the class of the session bean. Notice that in this built-in projects this class resides in the source . That means that it can be edited by the user and it will not be crushed at the next generation of code.
Figure 11.20 : Injection de dépendance entre les sessions « ClientsServiceBean » et « CleintDaoBase »

You can see the notion of dependency injection so dear to EJB3 evangelists which is illustrated in the following code between the two beans "ClientDaoBase" and "ClientsServiceBean" as below:
@javax.ejb.TransactionAttribute(javax.ejb.TransactionAttributeType.REQUIRED) @javax.ejb.Remote({book.webstock.services.ClientsServiceRemote.class}) public abstract class ClientsServiceBase implements book.webstock.services.ClientsServiceRemote { // ------ Session Context Injection ------ @javax.annotation.Resource protected javax.ejb.SessionContext context; // ------ Persistence Context Definitions -------- /** * Inject persistence context testNG */ @javax.persistence.PersistenceContext(unitName = "Ejb3_JSF_WebStock") protected javax.persistence.EntityManager emanager; // ------ DAO Injection Definitions --------
/** * Inject DAO ClientDao */ @javax.ejb.EJB private unnamed.ClientDao clientDao; // --------------- Constructors --------------- public ClientsServiceBase() { super(); } // ------ DAO Getters -------- /** * Get the injected DAO ClientDao */ protected unnamed.ClientDao getClientDao() { return this.clientDao; } // -------- Business Methods --------------
@javax.ejb.TransactionAttribute(javax.ejb.TransactionAttributeType.REQUIRED) public void ajoutClient(java.lang.String nom, java.lang.String prenom, java.lang.String adresse, java.lang.String telephone, java.lang.String comments) { // implémentation de la méthode } /** * Performs the core logic for {@link #ajoutClient(java.lang.String, java.lang.String, java.lang.String, java.lang.String, java.lang.String)} */ protected abstract void handleAjoutClient(java.lang.String nom, java.lang.String prenom, java.lang.String adresse, java.lang.String telephone, java.lang.String comments) throws java.lang.Exception; @javax.ejb.TransactionAttribute(javax.ejb.TransactionAttributeType.REQUIRED) public void listeDesClients() { implémentation de la méthode } /** * Performs the core logic for {@link #listeDesClients()} */ protected abstract void handleListeDesClients() throws java.lang.Exception; @javax.ejb.TransactionAttribute(javax.ejb.TransactionAttributeType.REQUIRED) public void suppressionClient(long id) { implémentation de la méthode }

/** * Performs the core logic for {@link #suppressionClient(long)} */ protected abstract void handleSuppressionClient(long id) throws java.lang.Exception; }
Generated Descriptors: Three descriptors are entirely generated by the business tier or by the project EJB; Ejb-jar.xml, jboss.xml and persistence.xml. See Figure 11.21 following.
Figure 11.21 : Descripteurs générés dans le cadre de l’application WebStock
Figure 11.22 is a snapshot of the JBoss.xml descriptor generated for the application WebStock declaring beans sessions of the business tier.
Figure 11.22 : JBoss.xml
Figure 11.23 gives an overview of the ejb-jar.xml descriptor of the application WebStock which declares the different beans (sessions and entities) of the application.
Figure 11.23 : ejb-jar.xml

Figure 11.24 is an overview of part of the persistence.xml file configuration that allows you to configure the unit persistently applied by WebStock
Figure 11.24 : persistence.xml
Customizing its code As we have seen in the product code is sufficient to be deployed on the server JBoss. Take, for example, the scenario of inserting a new customer in the database. To complete the process we need to edit a number of classes including: AjoutClientControllerImpl.java and ClientsServiceBean.java. The editions is minor code, we give you the following classes to implement. We have implemented the "ajoutClient" controller "AjoutClientController"
/** * @see book.webstock.clients.ajout.AjoutClientController */ public class AjoutClientControllerImpl extends AjoutClientController { private static final long serialVersionUID = 1L; /** * @see book.webstock.clients.ajout.AjoutClientController#ajoutClient(java.lang.String nom, java.lang.String prenom, java.lang.String adresse, java.lang.String telephone, java.lang.String comments) */ public void ajoutClient(AjoutClientForm form) { book.webstock.services.ClientsServiceRemote clientsService; try { clientsService = (book.webstock.services.ClientsServiceRemote)ServiceLocator.instance().getService("testNG-1.0.0/ClientsServiceBean/remote");
clientsService.ajoutClient(form.getNom(), form.getPrenom(), form.getAdresse(), form.getTelephone(), form.getComments());
} catch (Exception e) { e.printStackTrace(); } } }

We must also implement the "handleAjoutClient" in class "ClientsServiceBean" by accessing the bean "ClientDao" injected through the session bean "ClientServiceBase" to gain access to his method "create (Client)," which we will create our new customer and insert it into the database. We give you the code below to the "handleAjoutClient.".
protected void handleAjoutClient(java.lang.String nom, java.lang.String prenom, java.lang.String adresse, java.lang.String telephone, java.lang.String comments) throws java.lang.Exception { getClientDao().create(comments, telephone, adresse, prenom, nom); }
JBoss Deployment We will use JBoss as application server. We will select the version 4.2, which is a version of migration to the specification JEE5 that implements the specification EJB3. It is the version JBoss4.2 that I used in my work because I use SEAM 2.0 & & . Other newer versions exist, but, for reasons of compatibility of the cartridge JSF, we will be confined to it. Remember that to install JBoss with support EJB3 for version4.2, you have to use the installer JEMS downloaded from the following link: http://labs.jboss.com/portal/jemsinstaller/downloads. The latter is an executable jar via a double click. During installation, select the option to install JBoss, which includes support for EJB3 as shown in Figure 11.25.
Figure 11.25 : Installeur JEMS de JBoss et support du profil Ejb3

Packaging the WebStock application Once we published our code as mentioned above, we then must re-code generation. This will update our sources if there are any changes in the model, otherwise it will be a stage of compilation and packaging.
In fact, check the file "target" of the draft of the EAR application EJB3_JSF_WebStock-app. " It contains the archive EAR and the DS which we will have to copy in the file for the deployment of our server. In our case, we will use JBoss, therefore copy these two files in the folder Default> Server> Deploy server. To check whether the deployment was completed successfully, let's see if the tables on our entities EJB3 were created automatically as specified in the descriptor persistence.xml (see Figure 11.24). To do this, go to the Hypersonic database via JMX by clicking on database = localDB, Hypersonic service => startDatabaseManager () Figure 11.27 shows that the tables of the application have been created successfully in the deployment.
Figure 11.27 : Création du schéma de la base de données de l’application WebStock
We can also see beans if our sessions have been deployed successfully by consulting the list of references JNDI server via service = JNDIView> List of MBean operations from the console JMX server. See Figure 11.28.

Figure 11.28 : Références JNDI relatifs à l’application « EJB3_JSF_WebStock »
To test the Webstock application type in the address http://127.0.0.1:8080/EJB3_JSF_WebStock and you get the page to add a new customer. See Figure 11.29.

Figure 11.29 : Exécution de l’application WebStock sur le serveur JBoss
In summary This chapter has allowed us to illustrate the EJB3 concepts apply them on a concrete example. The MDA movement was also tested with the tool EclipseUML 2007 Free Edition for Java EE modeler, which has led to a satisfactory result. The EJB3 context being richer it opens the horizon to new very exiting JEE projects.