e*gate integrator system administration and operations guide
TRANSCRIPT

e*Gate IntegratorSystem Administration and Operations Guide
Release 4.5.3
SeeBeyond Proprietary and Confidential

The information contained in this document is subject to change and is updated periodically to reflect changes to the applicable software. Although every effort has been made to ensure the accuracy of this document, SeeBeyond Technology Corporation (SeeBeyond) assumes no responsibility for any errors that may appear herein. The software described in this document is furnished under a License Agreement and may be used or copied only in accordance with the terms of such License Agreement. Printing, copying, or reproducing this document in any fashion is prohibited except in accordance with the License Agreement. The contents of this document are designated as being confidential and proprietary; are considered to be trade secrets of SeeBeyond; and may be used only in accordance with the License Agreement, as protected and enforceable by law. SeeBeyond assumes no responsibility for the use or reliability of its software on platforms that are not supported by SeeBeyond.
e*Gate, e*Insight, e*Way, e*Xchange, e*Xpressway, eBI, iBridge, Intelligent Bridge, IQ, SeeBeyond, and the SeeBeyond logo are trademarks and service marks of SeeBeyond Technology Corporation. All other brands or product names are trademarks of their respective companies.
© 1999–2002 by SeeBeyond Technology Corporation. All Rights Reserved. This work is protected as an unpublished work under the copyright laws.
This work is confidential and proprietary information of SeeBeyond and must be maintained in strict confidence.
Version 20021105120457.
e*Gate IntegratorSystem Administration and Operations Guide 2 SeeBeyond Proprietary and Confidential

Contents
Contents
List of Figures 8
List of Tables 10
Chapter 1
Introduction 11Document Purpose and Scope 11
Intended Audience 12
Organization of Information 12
Writing Conventions 13
Supporting Documents 14
SeeBeyond Web Site 15
Chapter 2
Managing the Host System 16Host System Architecture: Overview 16
Architectural Overview of e*Gate 17Distributed e*Gate System 17
Ordinary Networks 17e*Gate Networks 18e*Gate Registry and Hosts 20System Components 20
Adding New Participating Hosts to a Schema 21
Distributed Registry 22Architecture Overview 22Update Queuing 24Distributed Registry Operations 24
Starting and Stopping Registry Replication 25Modifying the Registry Replication Schema 26Multiple Registry Hosts and the Control Broker 26Modifications to Standard e*Gate Installation 26
Setting Up Replication Registries 27Installing Replicated Registries 27
e*Gate IntegratorSystem Administration and Operations Guide 3 SeeBeyond Proprietary and Confidential

Contents
Setting Up Secondary Registries 27Checking Results 29
Setting Up Three or More Registries 30Detailed Installation Steps 32
Registry Replication Troubleshooting 39Verifying Normal Operation 39Solving Problems 40
Backup and Recovery 42Backing Up the e*Gate System 42System Recovery 43
Chapter 3
Managing the Control Broker 44Monitoring and Managing e*Gate: Overview 44
Control Broker Operation 45Administering the Control Broker 45Operation of Real-Time Monitoring 45Control Broker and Schema Operation 46Multiple Schemas, Control Brokers, and the e*Gate Monitor 46
Working with the Control Broker 47Modifying Control Broker Startup Parameters 47Renaming the Control Broker 48Changing User/Password Information 49Removing the Control Broker Daemon/Service 50Running Multiple Control Brokers on the Same Host 50
Basic Troubleshooting 51Modules Do Not Start 51Control Broker Does Not Run 52
Chapter 4
Command-line Reference 53Using the Command Line: Overview 53
Using Common API Flags 54Common Flags for Most Commands 54Common Flags for Services/Daemons 55About User Names and Authentication 55Debug Logging 55AIX and CDE 55
Commands for Services/daemons 56Registry Daemon: stcregd 56
Version Control 58Manually Specifying Registry Ports 59The Registry Service and Repository File Cache 59
Control Broker: stccb 60
e*Gate IntegratorSystem Administration and Operations Guide 4 SeeBeyond Proprietary and Confidential

Contents
IQ Manager Service/Daemon: stciqmgrd 62Installer Service: stcinstd 62
e*Way and BOB Commands 64Multi-Mode e*Way: stceway 64Generic e*Way: stcewgenericmonk 65BOB Module: stcbob 65
Basic Utility Commands 66Registry Utility: stcregutil 66
Committing/Retrieving Files Using Team Registry Features 71Committing and Retrieving Files with -fr and -fc 71Format for .ctl Files 72Using .ctl Files 73Exporting or Importing User Names and Passwords 73Enabling Registry Logging 73
Security: stcaclutil 74Default Roles 76Supported Privileges 76Table Names for stcaclutil 77
Monk Engine: stctrans 78Launching an e*Gate GUI: stcguistart 80System Testing and Support: stcutil 80Monitor Command: stccmd 82
Chapter 5
Security 85Role-Based Security: Overview 85
Accessing ACL Security from the Enterprise Manager 86Access Control List GUI 86
Users 86Roles 86Privileges 87
Using the Security Feature 88Creating Users 89Creating Roles 91Associating Users with Roles 91Associating Privileges with Roles 93Assigning Privileges for a Specific Module 98Changing Your Password 100
Component Execution and User Names 100e*Gate User Names 101Operating-system User Names 101
Accessing ACL Security from the Command Line 102Enabling e*Gate Security 102Managing Users 102Using a Password File 103Managing Roles 104
VIEW Permissions for “Parent” Components 105Examples 106
e*Gate IntegratorSystem Administration and Operations Guide 5 SeeBeyond Proprietary and Confidential

Contents
File and Directory Permissions 106Registry Host Security 107Participating Host Security 107Client Security 107
Chapter 6
Migrating Schemas and Components 108Schema/Component Migration: Overview 108
Using Enterprise Manager Migration Features 108Schema Migration 109
Exporting Schemas 109Importing Schemas 110
Module Migration 115Exporting Module Definitions 116Importing Module Definitions 117
Using Command-line Migration Features 120Moving a Complete Schema 120
Full Schema Export 120Full Schema Import 121
Moving Individual Schema Components 122Overview 123Procedure 123
Deleting and Renaming Schemas 126
Chapter 7
System Parameters and Directory Structure 127Environment Variables 127
File Locations (.egate.store) 128
Team Registry Command Files 129
Directory Structure 129Registry Host 129Participating Host 131Enterprise Manager and e*Gate Monitor GUIs 132
Properties Files 133
Increasing Desktop Heap Memory 134
Appendix A
Configuring Windows Services 136System Operations 136
e*Gate IntegratorSystem Administration and Operations Guide 6 SeeBeyond Proprietary and Confidential

Contents
Windows Registry 136
Appendix B
Clearing Team-Registry Advisory Locks 138
Index 139
e*Gate IntegratorSystem Administration and Operations Guide 7 SeeBeyond Proprietary and Confidential

List of Figures
List of Figures
Figure 1 Common View of Software Systems 18
Figure 2 e*Gate Distributed System 19
Figure 3 e*Gate Environment 20
Figure 4 Distributed Registry Overview 23
Figure 5 Overview — e*Gate Network with Distributed Registry 25
Figure 6 Installation of two Replicated Registry Hosts 30
Figure 7 Installation of three Replicated Registry Hosts 31
Figure 8 Three Replicated Registry Hosts 31
Figure 9 Completed Installation of Four Replicated Registry Hosts 32
Figure 10 View->Summary->Collaboration Summary for after installation of the 3rd Registry prior to the manual intervention to complete the Schema34
Figure 11 Figure 6 Final View->Summary->Collaboration Summary of the completed RegsitryReplication Schema for 3 Registries37
Figure 12 Properties of the two PrimaryRegistry host collaborations for RegistryReplication38
Figure 13 Properties of the two RepServer01 host collaborations for RegistryReplication38
Figure 14 Properties of the two RepServer02 host collaborations for RegistryReplication39
Figure 15 Specifying the Registry Port 59
Figure 16 Configuring Security Globally in the Enterprise Manager 88
Figure 17 User Properties Dialog Box 90
Figure 18 New Role Component Dialog Box 91
Figure 19 Guest1 User Properties Dialog Box 92
Figure 20 Role Properties Dialog Box 93
Figure 21 Assign Privileges Dialog Box (All Components) 94
Figure 22 Assign Privileges Dialog Box 96
Figure 23 Role Properties Dialog Box — Security Tab 97
Figure 24 Control Broker Properties Dialog Box 98
Figure 25 Assign Privileges Dialog Box (Control Broker) 99
e*Gate IntegratorSystem Administration and Operations Guide 8 SeeBeyond Proprietary and Confidential

List of Figures
Figure 26 Assign Privileges—Role Added to List 99
Figure 27 Component View Permissions 106
Figure 28 Select Archive File Dialog Box 110
Figure 29 Import Wizard — Introduction 111
Figure 30 Import Wizard — Step 1 (Schema) 111
Figure 31 Import Wizard — Step 2 (Schema) 112
Figure 32 Import Wizard — Step 3 (Schema) 113
Figure 33 Rename Host/Change Port Dialog Box 113
Figure 34 Import Wizard — Finish 114
Figure 35 New Schema Dialog Box 115
Figure 36 Select Archive File Dialog Box — Modules 117
Figure 37 Import Wizard — Step 1 (Module) 118
Figure 38 Import Wizard — Step 2 (Module) 119
Figure 39 Import Component Dialog Box 119
Figure 40 Changing Control Broker and Host Names 124
e*Gate IntegratorSystem Administration and Operations Guide 9 SeeBeyond Proprietary and Confidential

List of Tables
e*Gate IntegratorSystem Administration and Operations Guide 10 SeeBeyond Proprietary and Confidential
List of Tables
Table 1 Common Command Flags 54
Table 2 Service/daemon Flags 55
Table 3 Command Arguments for stcregd 56
Table 4 Command Arguments for stccb 60
Table 5 Command Arguments for stciqmgrd 62
Table 6 Command Arguments for stcinstd 63
Table 7 Command Arguments for stceway 64
Table 8 Command Arguments for stcewgenericmonk 65
Table 9 Command Arguments for stcbob 66
Table 10 Command Arguments for stcregutil 67
Table 11 Command Arguments for stcaclutil 75
Table 12 Table Names for stcaclutil 77
Table 13 Command Arguments for stctrans 79
Table 14 Command Arguments stcguistart 80
Table 15 Command Arguments for stcutil 81
Table 16 Command Arguments for stccmd 83
Table 17 Monitor Commands 83
Table 18 Default Roles 104
Table 19 Privileges Supported by stcaclutil 105
Table 20 Contents of .egate.store 128
Table 21 Registry Host Directory Structure: Top-level Directories 129
Table 22 Registry Host Directory Structure: Schema Repository Directories 130
Table 23 Team Registry Directories 131
Table 24 Participating Host Directory Structure 131
Table 25 Enterprise Manager/e*Gate Monitor GUI Directory Structure 132

Chapter 1
Introduction
This chapter introduces you to this guide, its general purpose and scope, and its organization. It also provides sources of related documentation and information.
1.1 Document Purpose and ScopeThis guide contains information that system administrators require to keep the SeeBeyond Technology CorporationTM (SeeBeyondTM) e*GateTM Integrator system up and running. Topics include:
! Managing the host system
! Managing the Control Broker and schemas
! Using the command line
! Security features
! Schema/component import and export
Important: Any operation explanations given here are generic, for reference purposes only, and do not necessarily address the specifics of individual e*Gate systems.
This document does not contain information on software installation procedures, e*Gate deployment operations, or system requirements (see “Supporting Documents” on page 14). See the e*Gate Integrator Installation Guide and/or the appropriate Readme.txt file for e*Gate installation instructions.
Relevant Platforms
The e*Gate system operates on the following platforms:
Windows Systems: The e*Gate system is fully compliant with both Windows 2000 and Windows NT platforms. When this document refers to Windows, such statements apply to both Windows platforms.
UNIX and Linux Systems: This guide uses the backslash (“\”) as the separator within path names. If you are working on a UNIX or Linux system, make the appropriate substitutions.
e*Gate IntegratorSystem Administration and Operations Guide 11 SeeBeyond Proprietary and Confidential

Chapter 1 Section 1.2Introduction Intended Audience
1.2 Intended AudienceThis guide presumes that its reader is a developer or system administrator with the responsibility for setting up and/or maintaining the e*Gate system. This user/reader needs to have working knowledge of network operations and administration, as well as knowledge in the operation of UNIX, Linux, or Microsoft Windows 2000 (or Windows NT).
Such operation ideally includes a thorough familiarity with Windows-style graphical user interface (GUI) operations. When necessary, this document explains some Windows operations, but not those generic to all Windows systems.
When referring to the GUI, this document employs Windows-standard Microsoft terminology. For more information on how to use Windows features, as well as Windows terminology, see the appropriate Microsoft user’s guide.
For a complete Glossary of e*Gate terminology and definitions, see the e*Gate Integrator User’s Guide.
1.3 Organization of InformationThis document is organized topically as follows:
! Chapter 1 “Introduction” gives a general preview of this document, its purpose, scope, and organization.
! Chapter 2 “Managing the Host System” explains how to manage e*Gate’s Registry/Participating host system and organize its network features, including the Distributed Registry and Registry Replication.
! Chapter 3 “Managing the Control Broker” explains basic features of the e*Gate Control Broker and its operation within the schema, as well as information on how to monitor and control the e*Gate system, including control features of the e*Gate Monitor GUI.
! Chapter 4 “Command-line Reference” provides a series of comprehensive tables that list and explain the e*Gate application program interface (API) commands and command flags.
! Chapter 5 “Security” explains how to use the access control list (ACL) security feature in e*Gate, using both the Enterprise Manager GUI and the command line.
! Chapter 6 “Migrating Schemas and Components” explains how to export and import e*Gate schemas and components, using both the Enterprise Manager GUI and the command line.
! Chapter 7 “System Parameters and Directory Structure” explains the environmental variable, file, and directory properties of the e*Gate system.
In addition, there are the following appendixes:
! Appendix A “Configuring Windows Services” explains the operation of Windows Services under e*Gate.
e*Gate IntegratorSystem Administration and Operations Guide 12 SeeBeyond Proprietary and Confidential

Chapter 1 Section 1.4Introduction Writing Conventions
! Appendix B “Clearing Team-Registry Advisory Locks” contains information on how to override the advisory file-locking feature.
1.4 Writing ConventionsThe writing conventions listed in this section are observed throughout this document.
Hypertext Links
When you are using this guide online, cross-references are also hypertext links and appear in blue text as shown below. Click the blue text to jump to the section.
For information on these and related topics, see “Parameter, Function, and Command Names” on page 14.
Command Line
Text to be typed at the command line is displayed in a special font as shown below.
java -jar ValidationBuilder.jar
Variables within a command line are set in the same font and bold italic as shown below.
stcregutil -rh host-name -rs schema-name -un user-name-up password -ef output-directory
Code and Samples
Computer code and samples (including printouts) on a separate line or lines are set in Courier as shown below.
Configuration for BOB_Promotion
However, when these elements (or portions of them) or variables representing several possible elements appear within ordinary text, they are set in italics as shown below.
path and file-name are the path and file name specified as arguments to -fr in the stcregutil command line.
Notes and Cautions
Points of particular interest or significance to the reader are introduced with Note, Caution, or Important, and the text is displayed in italics, for example:
Note: The Actions menu is only available when a Properties window is displayed.
User Input
The names of items in the user interface such as icons or buttons that you click or select appear in bold as shown below.
Click Apply to save, or OK to save and close.
File Names and Paths
When names of files are given in the text, they appear in bold as shown below.
Use a text editor to open the ValidationBuilder.properties file.
e*Gate IntegratorSystem Administration and Operations Guide 13 SeeBeyond Proprietary and Confidential

Chapter 1 Section 1.5Introduction Supporting Documents
When file paths and drive designations are used, with or without the file name, they appear in bold as shown below.
In the Open field, type D:\setup\setup.exe where D: is your CD-ROM drive.
Parameter, Function, and Command Names
When names of parameters, functions, and commands are given in the body of the text, they appear in bold as follows:
The default parameter localhost is normally only used for testing.
The Monk function iq-put places an Event into an IQ.
You can use the stccb utility to start the Control Broker.
Additional Conventions
This guide uses the term “Windows” to refer generically to Microsoft Windows 2000 and/or Microsoft Windows NT 4.0 operating systems.
1.5 Supporting DocumentsThe following SeeBeyond documents provide additional information about the e*Gate Integrator system as explained in this guide:
! Creating an End-to-end Scenario with e*Gate Integrator
! e*Gate Integrator Alert Agent User’s Guide
! e*Gate Integrator Alert and Log File Reference Guide
! e*Gate Integrator Collaboration Services Reference Guide
! e*Gate Integrator Installation Guide
! e*Gate Integrator Intelligent Queue Services Reference Guide
! e*Gate Integrator SNMP Agent User’s Guide
! e*Gate Integrator Upgrade Guide
! e*Gate Integrator User’s Guide
! e*InsightTM Business Process Manager Implementation Guide
! e*Way Intelligent Adapter for SAP (ALE) User’s Guide
! Monk Developer’s Reference
! SeeBeyond eBusiness Integration Suite Deployment Guide
! SeeBeyond eBusiness Integration Suite Primer
! SeeBeyond JMS Intelligent Queue User’s Guide
! Standard e*WayTM Intelligent Adapters User’s Guide
! XML Toolkit
e*Gate IntegratorSystem Administration and Operations Guide 14 SeeBeyond Proprietary and Confidential

Chapter 1 Section 1.6Introduction SeeBeyond Web Site
The SeeBeyond eBusiness Integration Suite Primer provides a complete list of e*Gate-related documentation. You can also refer to the appropriate Microsoft Windows, UNIX, or Linux documents, if necessary.
Note: For information on how to use a specific add-on product (for example, an e*Way Intelligent Adapter or IQTM), see the user’s guide for that product.
1.6 SeeBeyond Web SiteThe SeeBeyond Web site is your best source for up-to-the-minute product news and technical support information. The site’s URL is
http://www.SeeBeyond.com/
e*Gate IntegratorSystem Administration and Operations Guide 15 SeeBeyond Proprietary and Confidential

Chapter 2
Managing the Host System
This chapter explains the e*Gate host system/network and how to manage it, as well as the system’s Distributed Registry features.
Chapter Topics
! “Host System Architecture: Overview” on page 16
! “Architectural Overview of e*Gate” on page 17
! “Distributed Registry” on page 22
! “Backup and Recovery” on page 42
2.1 Host System Architecture: OverviewThe e*Gate system is based on a distributed and open architecture, allowing components to reside on different workstations within a global network. This flexible architecture provides the following benefits:
! Intercommunication: Based on what communication protocols and adapters you choose, e*Gate can communicate with and link multiple applications and databases across a variety of operating systems.
! Scalability: As your system grows, you can add more hardware as needed, guaranteeing that you never run out of processing resources.
! Adaptability: The e*Gate system performs effectively with a wide variety of hardware, message standards, operating systems, databases, and communication protocols in both real-time and batch/scheduled integration modes.
! Integration: e*Gate can bridge older and newer systems, resulting in a centrally managed, intelligent, unified enterprise. This architecture gives administrators the flexibility to incorporate best-of-breed technology into their business strategy, without any need to uproot older information technology (IT) investments.
The e*Gate system components are organized into schemas. A schema is a configuration scheme that contains all of the modules and configuration parameters that control, route, and transform data as it travels through the e*Gate system. A schema also maintains the relationships between the components, including the publish/subscribe information that is at the heart of e*Gate’s data transportation process.
e*Gate IntegratorSystem Administration and Operations Guide 16 SeeBeyond Proprietary and Confidential

Chapter 2 Section 2.2Managing the Host System Architectural Overview of e*Gate
e*Gate delivers a high level of precision, accuracy, and flexibility in the definition, detection, and control of cross-application business processes. For more information on the e*Gate system network and how to operate and configure it, see the e*Gate Integrator User’s Guide.
2.2 Architectural Overview of e*GateThe e*Gate Integrator product suite implements a “transparent” architecture, well-suited for distributed computing environments. The different components of an e*Gate system network do not all have to reside on the same machine. Instead, they can be distributed across several different machines in the network.
Principal features of this architecture include:
! High scalability
! Parallelism
! High availability
! Protection through isolation
! Extensibility
! Avoidance of data processing bottlenecks and single points of failure
2.2.1 Distributed e*Gate SystemThe power of the e*Gate lies in its fundamental design that includes:
! Distributed computation
! Central management of computation
This section explains e*Gate’s system’s distributed network and how it operates.
Ordinary Networks
A common view of most software networks starts with a box representing a computer host. Programs or processes are added to the computer host and are represented as smaller boxes inside the bigger box.
Multiple software networks/systems are typically spread out over several physical hosts with no relationship or connection between the hosts. Figure 1 on page 18 shows the conceptual relationship among several different software systems that are commonly built to support business needs.
While it is possible to connect many different types of systems like those shown in Figure 1 on page 18, it is inconvenient and costly to manage the connections without a central point of access. In addition, economies of scale gained through reusable components are not likely to exist in the typical “hub-and-spoke” architecture that these types of networks require.
e*Gate IntegratorSystem Administration and Operations Guide 17 SeeBeyond Proprietary and Confidential

Chapter 2 Section 2.2Managing the Host System Architectural Overview of e*Gate
Figure 1 Common View of Software Systems
e*Gate Networks
The e*Gate system network turns this typical view around as follows:
! You can diagram an e*Gate network as a large box encompassing the systems that it connects (see Figure 2 on page 19). Computer hosts connected through e*Gate are indicated as boxes inside the main box. The host machine that manages the entire system is called the Registry Host (see Figure 5 on page 25).
! e*Gate encompasses all the computer machines within it. Client computers managed by the Registry host are called Participating Hosts (see Figure 5 on page 25). The e*Gate system becomes the connection that brings many computer hosts and processes together.
! Although e*Gate can be diagrammed as a big box, this portrayal does not mean that the system runs on its own dedicated host. The power of e*Gate is that its components can be distributed over as many hosts as needed.
! The e*Gate components communicate with each other, as well as with graphical user interfaces (GUIs) and a command-line application program interface (API). These interfaces provide central points of access to an integrated system.
Database Host
CustomerDatabase
MarketingDatabase
Sales andInventory Host
Orders andSales
InventoryControl
Accounting Host
AccountingSystem
e*Gate IntegratorSystem Administration and Operations Guide 18 SeeBeyond Proprietary and Confidential

Chapter 2 Section 2.2Managing the Host System Architectural Overview of e*Gate
Figure 2 e*Gate Distributed System
You can scale an existing e*Gate system simply by adding more memory, processors, or computer hosts to the total network, resulting in incremental benefits. Some examples are:
! If your company acquires a new business unit and needs to integrate pre-existing systems to an existing configuration, you network a new host to the existing e*Gate hosts and add new components to service the acquired systems. The existing e*Gate components do not change.
! If your business experiences growth in computer traffic, and you need more computing power to service it, you may add another processor to an existing host, or add another host and then move or duplicate some of the existing components to the new host. The existing e*Gate components do not change.
The entire e*Gate network represents the “big box.” One or more added Participating Hosts are the “smaller boxes” within the e*Gate system.
Database Host
CustomerDatabase
MarketingDatabase
AccountingHost
AccountingSystem
Sales andInventory Host
InventoryControl
Orders andSales
e*Gate System
e*Gate IntegratorSystem Administration and Operations Guide 19 SeeBeyond Proprietary and Confidential

Chapter 2 Section 2.2Managing the Host System Architectural Overview of e*Gate
e*Gate Registry and Hosts
The e*Gate Registry, managed by the Registry Service (stcregd.exe), is an e*Gate system’s master database. It is the storage place (in a directory) for all e*Gate configuration details and schema information, including file containment. In Windows, the Registry runs as a service, and in UNIX, as a daemon.
Note: See “Control Broker and Schema Operation” on page 46 for more information on schemas.
The Registry Host is the computer that runs the e*Gate Registry and acts as the e*Gate network server. This system also provides Registry services to other systems running e*Gate. The Registry Host centrally manages its associated e*Gate network.
The Registry Service handles all requests for updates to the e*Gate Registry and forwards updated files to Participating Hosts (clients) as necessary. The figure below shows a typical e*Gate environment.
Figure 3 e*Gate Environment
Note: It is vital that Registry Hosts are able to resolve hostnames of Participating Hosts to their IP addresses and vice versa. Make sure that you have DNS configured correctly on all associated hosts.
System Components
Since you can distribute a single e*Gate system network over as many hosts as you need to provide sufficient computing power, the primary variables you must take into account in your network are:
! Total number of hosts to employ
Enterprise Manager e*Gate Monitorand command line monitor
ExternalApplications
Registry Host
Participating Host(s)
Configuration
Monitoring andControl
Business Events
e*Gate IntegratorSystem Administration and Operations Guide 20 SeeBeyond Proprietary and Confidential

Chapter 2 Section 2.2Managing the Host System Architectural Overview of e*Gate
! Number of schemas to create (a host can contain more than one schema, and a schema can span more than one host)
! Choice of the number and types of components to build in each schema
The Control Broker is an automatically generated e*Gate component. At least one Control Broker must be running on each host within a schema. The Control Broker is responsible for starting and monitoring the e*Way Intelligent Adapters and Business Object Brokers (BOBs) within its schema.
Control Brokers, e*Ways, and BOBs are all vital e*Gate components. For more information on the role of the Control Broker and how it operates, see Chapter 3. For a list and explanations of all the e*Gate components, as well as how to create and configure them, see the e*Gate Integrator User’s Guide.
2.2.2 Adding New Participating Hosts to a SchemaIf you want to add a new Participating Host to a schema, simply use the standard installation procedure to install the new Participating Host.
Note: The discussion in this section presumes that each of your e*Gate Participating Hosts runs a single Control Broker. If you wish to set up a Participating Host to run more than one Control Broker, see “Running Multiple Control Brokers on the Same Host” on page 50.
The installation procedure automatically adds a Participating Host and Control Broker component to the schema and launches the installer service (see “Installer Service: stcinstd” on page 62 for more information).
After you install the new Participating Host, open the schema with the Enterprise Manager feature (or, if the schema is already open, pull down the View menu and select Refresh to reload the schema). When you open the Participating Hosts folder, you then see the new host and the current schema’s Control Broker.
For information on how to add more than one schema/Control Broker to an existing host, see Chapter 3.
Important Notes
When adding additional Participating Hosts, keep the following facts in mind:
! The Registry Host that supports a new Participating Host must have the appropriate files installed to support the operating system used by the new Participating Host (see the e*Gate Integrator User’s Guide for details).
! Be sure to create an Intelligent Queue (IQ) Manager to manage the IQs required by e*Ways or BOBs. The installation procedure does not automatically create an IQ Manager when the new Participating Host is set up.
! See the following additional references:
" For more information on using the Enterprise Manager graphical user interface (GUI) to configure new Participating Hosts, see the e*Gate Integrator User’s Guide.
e*Gate IntegratorSystem Administration and Operations Guide 21 SeeBeyond Proprietary and Confidential

Chapter 2 Section 2.3Managing the Host System Distributed Registry
" For information about installing e*Gate, see the e*Gate Integrator Installation Guide.
" For more information how to design an e*Gate system network, see the SeeBeyond eBusiness Integration Deployment Guide.
2.3 Distributed RegistryThe e*Gate Distributed Registry feature enables system administrators to create mirror copies of a master Registry, making Registry services available from more than a single system in an e*Gate network.
Maximum Availability Features
For more information on maximum availability and redundancy features in e*Gate, see the SeeBeyond eBusiness Integration Suite Deployment Guide.
2.3.1 Architecture OverviewFigure 4 on page 23 illustrates the basic architecture of the e*Gate Distributed Registry system.
e*Gate IntegratorSystem Administration and Operations Guide 22 SeeBeyond Proprietary and Confidential

Chapter 2 Section 2.3Managing the Host System Distributed Registry
Figure 4 Distributed Registry Overview
Distributed Registry architecture has the following basic properties:
! All Registry Hosts using the Distributed Registry system run a special schema called RegistryReplication. Within that schema runs a special Registry Service component that handles the publication and subscription of Registry information.
! The Registry Hosts publish all updates made to the Registry in a RegistryUpdateNotification Event.
! An internal e*Gate Registry Service e*Way Intelligent Adapter handles data transportation related to the Registry Replication feature. This e*Way is automatically installed with e*Gate, and its operation is also automatic and transparent to the user.
! The Registry Service e*Way subscribes to RegistryUpdateNotification Events. When those Events are received, the e*Way imports the changes contained in those Events to the appropriate schema.
Caution: Do not install Participating Hosts on the same machines that the replication Registry has been installed on. A Participating Host has already been installed
Other schemas
"RegistryReplication" Schema
Secondary Registry Host
Other schemas
"RegistryReplication" Schema
Primary Registry Host
"Registry Service"component
"Registry Service"component
e*Gate IntegratorSystem Administration and Operations Guide 23 SeeBeyond Proprietary and Confidential

Chapter 2 Section 2.3Managing the Host System Distributed Registry
automatically during the Registry replication phase of installation. Installing another Participating Host overwrites the replication files.
2.3.2 Update QueuingThe Distributed Registry system uses e*Gate’s robust queuing architecture to ensure that changes are properly distributed even if the connection breaks between primary and secondary Registry Hosts. If the secondary host loses the connection to the primary, changes made on the primary host are queued until the connection is restored and the secondary host picks up the updates.
Team Registry Role
The e*Gate Team Registry allows you to take files out of the run-time environment for development purposes, to an environment called the Sandbox. When you are finished, you can then promote these files back to run time. For more information on e*Gate’s Team Registry, see “Version Control” on page 58. For complete information on the Team Registry feature, see the e*Gate Integrator User’s Guide.
Before update queuing can begin, you must first be sure to promote all the system’s Events to run time. The system then handles the update queuing process as follows:
! It send all Events to the replication IQ on the primary host.
! The secondary host then subscribes to these Events.
! The secondary host system then populates its own Registry with these Events.
Note: For more information on queuing in e*Gate, refer to the e*Gate Integrator Intelligent Queue Services Reference Guide.
2.3.3 Distributed Registry OperationsOnce the Distributed Registry system is installed, operations are extremely simple as follows:
! Use the Enterprise Manager to make changes to schemas on any Registry Host. Since Registry Replication behaves bidirectionally, changes made on any Registry Host are propagated to all other Registry Hosts.
! Configure Participating Hosts to refer to any Registry Host, primary or secondary, as your installation may require. Figure 5 on page 25 illustrates a typical e*Gate system network with Distributed Registry features.
Note: You can point multiple Participating Hosts to the same Registry.
e*Gate IntegratorSystem Administration and Operations Guide 24 SeeBeyond Proprietary and Confidential

Chapter 2 Section 2.3Managing the Host System Distributed Registry
Figure 5 Overview — e*Gate Network with Distributed Registry
Starting and Stopping Registry Replication
Registry Replication is launched automatically when the Registry service is started. Do not use the e*Gate Monitor GUI to start or stop the Registry Service component, or change the component’s “Start Automatically” settings.
To install a second secondary host, you need to modify the Registry replication schema on all Registry Hosts to include this Registry. Do this operation by adding the Collaboration Service and a replication IQ.
Enterprise Manager
e*Gate Monitor
Enterprise Manager
Primary Registry Host
Secondary Registry Host
Participating HostParticipating Host Participating Host
Secondary Registry Host
e*Gate IntegratorSystem Administration and Operations Guide 25 SeeBeyond Proprietary and Confidential

Chapter 2 Section 2.3Managing the Host System Distributed Registry
Modifying the Registry Replication Schema
Important Information: Never change the name of the RegistryReplication schema, and never rename, assign a different Event Type Definition (ETD) to, or edit the ETD assigned to the RegistryUpdateNotification Event. Doing so causes the Registry replication process to function improperly or stop functioning entirely.
Caution: During replication, a replication Control Broker and a replication IQ Manager are both running to help perform the replication process. Do not stop either of these components during replication.
Multiple Registry Hosts and the Control Broker
Although the Control Broker can only communicate with one Registry Host at a time, you can specify multiple Registry Hosts to which the Control Broker tries to connect whenever it starts up.
The -rh command-line argument specifies the Registry Host to which the Control Broker connects. If you specify a comma-delimited list of Registry Host names (as in -rh host1,host2,host3), the Control Broker attempts to connect to each host in order until a connection is made. If the Control Broker has made no connection by the time it reaches the end of the list, it repeats the procedure beginning with the first host on the list.
Note: If you use a comma-delimited list, be sure to list the primary host first then the secondary hosts. Be sure there are no spaces between the host names.
Modifications to Standard e*Gate Installation
When you install hosts as members of a Distributed Registry, e*Gate automatically makes the following modifications:
1 A Control Broker is installed on each Registry Host (primary and secondary) to manage the Registry Service e*Way and its accompanying IQs.
2 The RegistryReplication schema is imported to each Registry Host (primary and secondary).
Caution: During the creation of new schemas, be sure to promote all files to run time.
3 Distributed-Registry arguments are added to the command line that launches the Registry service on each Registry Host. See Table 3 on page 56 for details.
4 Distributed-Registry arguments are added to the command line that launches the Control Broker service on each Registry Host. See Table 2 on page 55 for details.
5 When using a Distributed Registry, the individual components of the Registry must be configured to start with the same initial connect ports (23001). See “Manually Specifying Registry Ports” on page 59 for details.
For complete information on e*Gate’s command-line APIs, see Chapter 4.
e*Gate IntegratorSystem Administration and Operations Guide 26 SeeBeyond Proprietary and Confidential

Chapter 2 Section 2.3Managing the Host System Distributed Registry
2.3.4 Setting Up Replication RegistriesThis section describes how to set up two Replication Registries in an e*Gate environment. To add a third or more Registries, refer to “Setting Up Three or More Registries” on page 30.
These instructions use stcregutil and the -bu option to synchronize the Universal Unique Identifiers (UUIDs) on the Registries. This must be done if the Registries are on different platforms. If they are not, you can use the .rdb file to get the same effect. Perform all manual operations on the .rdb file, such as deleting or copying over, with the Registry service down.
For replicated Registries on UNIX, the HOME variable for each Registry must be set to a different location. If the HOME variables are set to the same location, certain e*Gate control files may overwrite each other.
Installing Replicated Registries
To install replicated registries
1 Install the primary Registry.
Note: Install the Registry only; do not install the Participating Host. If you install a Participating Host simultaneously during the Registry installation, it is overwritten by the installation of a second Participating Host.
2 Install the secondary Registry on all other replicated Registries.
3 Point to the Primary Host during the installation.
Setting Up Secondary Registries
To set up secondary registries
1 On the secondary Registry Hosts, shut down all e*Gate components including the Registry, the Control Broker, and the installation.
2 On the primary Registry Host, shut down the Control Broker and the installation, but leave the Registry on.
3 Back up the RegistryReplication schema by making a copy of the eGate/Server/Registry/RegistryReplication.rdb file. This allows you to roll back without re-installing if you encounter problems during this setup.
4 Open the RegistryReplication schema in the Enterprise Manager and check the Registry icon (the cogs) for all of the secondary Registries.
All but one of the Registries are empty. Go to the icon group for the secondary Registry that is not empty. This Registry has two Collaborations, cc_UpdateToPrimary and cc_NotificationFromPrimary.
5 Do a component-level export by right-clicking on the Registry icon and selecting from the pop-up menu the Export Definition and Files command.
6 Save this file as secondary_Registry.
e*Gate IntegratorSystem Administration and Operations Guide 27 SeeBeyond Proprietary and Confidential

Chapter 2 Section 2.3Managing the Host System Distributed Registry
The system creates a .zip file in the local directory.
7 Open the .zip file and copy the .exp file. It is the only file contained in the .zip file.
8 Open the Registry export file in a text editor and make the following changes:
" Globally search and replace the empty secondary Registry Host name with the secondary Host name.
" Search for and replace cc_NotificationFromPrimary with cc_NotificationFromPrimary_1.
" Search for and replace cc_UpdateToPrimary with cc_UpdateToPrimary_1.
" Save the export file. Repeat these steps for each of the secondary Registry Hosts to be set up.
Note: For additional Registries, increment the number to make each addition unique. For example, cc_NotificationFromPrimary_2 and cc_UpdateToPrimary_2.
9 Do a component-level export of the IQ Manager for the same group by right-clicking on the Registry icon and selecting from the shortcut menu the Export Definition and Files command.
10 Open the .zip file and move the IQ Manager’s export file to an accessible directory.
11 Open the iqmgr export file in a text editor and make the following changes:
" Globally search and replace the secondary Host name with the empty secondary Registry Host name.
" Search for and replace iq_SecondaryRegistryReplication with iq_SecondaryRegistryReplication_1.
" Save the export file. Repeat these steps for each Registry left.
12 Import all of the modified export files into the RegistryReplication schema on the Primary Host only using stcregutil. Then do the following actions:
" Open the RegistryReplication schema for the primary Registry in the Enterprise Manager.
" In the primary Registry group, modify the cc_NotificationFromSecondary Collaboration to subscribe to the Event Type et_RegistryUpdate from cc_UpdateToPrimary_1. You now have one entry for each secondary Registry.
Caution: Do not modify the subscription Collaboration to et_RegistryUpdate from <ANY>.
13 Export the RegistryReplication schema on the Primary Host using stcregutil with the -bu option.
This action exports the schema with all the new changes and adds the UUIDs. This export file is used to synchronize the Registries.
14 On the secondary Registry Hosts, delete the RegistryReplication.rdb file on the hosts, from the eGate/server/Registry directory.
Caution: Be sure the secondary Host Registries are down when you do this action.
e*Gate IntegratorSystem Administration and Operations Guide 28 SeeBeyond Proprietary and Confidential

Chapter 2 Section 2.3Managing the Host System Distributed Registry
15 After deleting the .rdb files, run the e*Gate Registry Service on the hosts.
16 Import the RegistryReplication export from the Primary Host (with the UUIDs) into both of the secondary Registry Hosts. Use the RegistryReplication schema name for both imports. This action must be done on a clean Registry with no pre-existing RegistryReplication.rdb file, to ensure proper synchronization.
17 For each of the multiple registries, open the RegistryReplication schema and set the Service to Pass Through.
18 Export the RegistryReplication schema on all the Registries, using stcregutil and the -ui option.
19 Compare the REGISTRY_MODULE section in all the export files. The UUIDs must match. If they do not, repeat steps 14 through 16 until they match.
20 Once you attain a successful match, copy the contents of the eGate/Server/Registry/repository directory from the Primary Host to the secondary Registry Hosts.
21 Delete the contents of the eGate/client/iq and eGate/client/NotificationQueue directories on all the hosts.
Note: This step is especially necessary if you have done a lot of stop-and-go work with the Control Brokers.
22 Start the Control Broker Service on all of the hosts.
The changes are now replicated.
Checking Results
Check to be sure the replication has happened correctly as follows:
! Be sure each host has the stcregd, stccb, and stciqmgrd processes running.
! Check that all of the Registry Services can connect to the Primary Host. You could see one or more of the following messages if there is a problem in the eGate/Server/logs/registry-host-name.log file:
08:13:07.961 API A 1744 (acquire.cxx:389): ConfigLoadFailedE:0x20000002 (invalid parameter passed)
08:13:08.082 REG W 1744 (egateloop.cxx:118): Unable to acquireSTC context. item not found (0x20000020)
08:13:08.162 REG W 1744 (egateloop.cxx:120): Registry replicationunable to load configuration using:
08:13:08.292 REG W 1744 (egateloop.cxx:124): Master Host[george], Master Port [23001], Schema [RegistryReplication],Master User [Administrator]
08:13:08.442 REG W 1744 (egateloop.cxx:126): make sure of thefollowing:
08:13:08.592 REG W 1744 (egateloop.cxx:128): o at least onesecondary Registry is installed
08:13:08.703 REG W 1744 (egateloop.cxx:130): o in the aboveschema there is a complete route (pub/sub)
08:13:08.803 REG W 1744 (egateloop.cxx:132): o the above masterparameters are correct
08:13:08.943 REG W 1744 (egateloop.cxx:135): Registry replicationwaiting 30 seconds to try again
e*Gate IntegratorSystem Administration and Operations Guide 29 SeeBeyond Proprietary and Confidential

Chapter 2 Section 2.3Managing the Host System Distributed Registry
! If there is a problem, it is probably because of an incomplete configuration in steps 8 and 11 in the unconnected Registry. Review any modifications to be sure they were done correctly.
2.3.5 Setting Up Three or More RegistriesWhen installing a third or more Registry into a Registry replication schema, some additional manual steps are required. This section describes how to add these additional Registries.
The following figures illustrate the process of creating the replicated Registry environment. Keep in mind that the terminology of primary and secondary Registries is not very accurate since it is possible to install any number of secondaries. A complete installation of multiple registries of any number should create a full peer-to-peer network of bi-directional communications between all hosts.
When the secondary Registry is installed, the installation process is aware of the primary Registry and creates and imports the appropriate RegistryReplication schema to facilitate the bi-directional replication of data between the two hosts.
Figure 6 Installation of two Replicated Registry Hosts
When a second Secondary Registry Host is installed it is also knowledgeable of the Primary Registry Host, however, the installation program does not account for existing Secondary Registry Hosts. Therefore when the RegistryReplication schema is imported it overrides the configuration of the First Secondary Registry. The end result is therefore similar to the first installation but creating a bi-directional communication between the Primary and the Second Secondary Registry Hosts. However, the First Secondary Registry Host should exist as an un-configured Participating Host.
PrimaryRegistryServer
Installation of 3 Registries:RegistryReplication Schema after First Secondary Installation
SecondaryRegistryServer 1
SecondaryRegistryServer 2
e*Gate IntegratorSystem Administration and Operations Guide 30 SeeBeyond Proprietary and Confidential

Chapter 2 Section 2.3Managing the Host System Distributed Registry
Figure 7 Installation of three Replicated Registry Hosts
It is therefore necessary to manually create the publish and subscribe relationships between the First Secondary and the Primary as well as between the two secondaries. The next subsection will describe the required manual steps in detail.
Figure 8 Three Replicated Registry Hosts
When installing a fourth or higher Secondary Registry the same situation as above will occur. In other words, after the installation the only publish/subscribe configuration will be between the last installed Secondary and the Primary. Therefore when adding
PrimaryRegistryServer
SecondaryRegistryServer 1
SecondaryRegistryServer 2
Installation of 3 Registries:RegistryReplication Schema after Second Secondary Installation
PrimaryRegistryServer
SecondaryRegistryServer 1
SecondaryRegistryServer 2
Installation of 3 Registries:RegistryReplication Schema after Manual Completion of Schema
e*Gate IntegratorSystem Administration and Operations Guide 31 SeeBeyond Proprietary and Confidential

Chapter 2 Section 2.3Managing the Host System Distributed Registry
each additional Replicated Registry Host, manual steps are required to complete the peer-to-peer network.
Figure 9 Completed Installation of Four Replicated Registry Hosts
Detailed Installation Steps
Prior to beginning the installation of a new Secondary Registry backup the RegistryReplication Schema on all existing Registries.
With all Registries and RegistryReplication Participating Hosts running, follow the instructions for adding a Secondary Registry detailed above for the appropriate OS. Remembering that when the instructions tell you to shutdown the Primary Registry so that you can copy the repository to the new Secondary Host, also shutdown the Secondary Registry to ensure that no users are accessing any schemas during this copy.
After the installation program is completed and the repository is copied, re-start all of the Registries and RegsitryReplication Participating Hosts. When this is complete log into the Primary Registry for the RegsitryReplication Schema. This should display the three (or N) Participating Hosts with configuration for the replication of data between the Primary Registry and the last installed Secondary Registry. The screen shot below demonstrates the schema as shown both in the Components Tab of the Enterprise Manager as well as the sub-window displaying the collaborations and their properties
PrimaryRegistryServer
SecondaryRegistryServer 1
SecondaryRegistryServer 2
SecondaryRegistryServer 3
Completed Installation of 4 Registries
e*Gate IntegratorSystem Administration and Operations Guide 32 SeeBeyond Proprietary and Confidential

Chapter 2 Section 2.3Managing the Host System Distributed Registry
(The Collaboration Summary Window can be displayed by navigating to the View->Summary->Collaborations menu option.
e*Gate IntegratorSystem Administration and Operations Guide 33 SeeBeyond Proprietary and Confidential

Chapter 2 Section 2.3Managing the Host System Distributed Registry
Figure 10 View->Summary->Collaboration Summary for after installation of the 3rd Registry prior to the manual intervention to complete the Schema
To configure the full peer-to-peer network of publish and subscribe relationships:
1 On the secondary registry machines, shut down all e*Gate services: The registry, the control broker, the installer.
2 On the primary registry machine, shut down the control broker and the installer. Leave the registry on. Back up the RegistryReplication schema by making a copy of the EGATE/Server/registry/RegistryReplication.rdb file in case there is some mess up in the following steps you can quickly roll back without re-installing.
3 Open the RegistryReplication schema in the Enterprise Manager. Check the registry icon (the cogs) for both of the secondary registries. One of them should be empty. Go to the icon group for the one that is not empty. (it should have two collaborations, cc_UpdateToPrimary, cc_NotificationFromPrimary).
4 Do a component level export by right clicking on the registry icon and selecting Export Definition and Files. Save this file as secondary_registry. It will create a .zip file in the local directory. Open the zip file and grab the .exp file. It should be the only file in the zip.
5 Do a component level export of the iqmgr for the same group by right clicking on the registry icon and selecting the Export Definitions and Files. Open the zip and take out the iqmgr export file.
" In the registry export file, open in a text editor and do these changes:
e*Gate IntegratorSystem Administration and Operations Guide 34 SeeBeyond Proprietary and Confidential

Chapter 2 Section 2.3Managing the Host System Distributed Registry
" Global search and replace the secondary host name with the empty secondary host name.
" Search and replace cc_NotificationFromPrimary with cc_NotificationFromPrimary_1
" Search and replace cc_UpdateToPrimary with cc_UpdateToPrimary_1
" Search and replace iq_SecondaryRegistryReplication with iq_SecondaryRegistryReplication_1
" Save file
Note: For additional registries above three, keep on incrementing the number to make each addition unique!
6 In the iqmgr export file, open in a text editor and do these changes:
" Global search and replace the secondary host name with the empty secondary host name.
" Search and replace iq_SecondaryRegistryReplication with iq_SecondaryRegistryReplication_1
" Save file
7 Import both of the modified export files into the RegistryReplication schema on the primary host only using stcregutil
8 Open the RegistryReplication schema for the primary registry in the Enterprise Manager. In the primary registry group, modifiy the cc_NotificationFromSecondary collaboration to subscribe to et_RegistryUpdate from cc_UpdateToPrimary_1. You should now have one entry for each secondary registry. DO NOT MODIFY THE COLLAB TO SUBSCRIBE TO et_RegistryUpdate from <ANY>. I repeat, do not.
9 In each Secondary registry group, modify the cc_NotificationFromPrimary(_n) to subscribe to each other cc_UpdateToPrimary(_n) collaboration to complete the peer-to-peer network.
10 After that, export the RegistryReplication schema on the primary host using stcregutil with the -ui option. This will export with all the new changes and add the UUIDs. This export file will be used to synch up the registries.
11 On the secondary machines, delete the RegistryReplication .rdb file on both machines from the EGATE/server/registry directory. Make sure the secondary registries are down when you do this!!! After deleting the .rdb files, turn the eGate Registry service back on on both machines.
12 Import the RegistryReplication export from the primary with the UUIDs into both of the secondary machines. Use the RegistryReplication schema name for both imports. This must be done on a clean registry with no pre-exissting RegistryReplication.rdb file to ensure synchronization.
13 Export the RegistryReplication schema on all three registries using stcregutil and the -ui option. Compare the REGISTRY_MODULE section in all three export files. The UUIDs much match up. If they do not, repeat steps 12-13 until they match.
e*Gate IntegratorSystem Administration and Operations Guide 35 SeeBeyond Proprietary and Confidential

Chapter 2 Section 2.3Managing the Host System Distributed Registry
14 After a match, copy the eGate/Server/registry/repository directory from the primary machine to the both the secondary machines.
15 To be safe, you may want to delete the eGate/client/iq and eGate/client/NotificationQueue on all machines if you have done a lot of stop and go and work with the control brokers.
16 Start the control broker service on all of the machines. Make sure each machine has an stcregd, stccb, and stciqmgrd process running. Check that all of the registry services can connect to the Master. You will see a message like the one below if in the eGate/Server/logs/<registry>.log file if there is a problem. If there is a problem it is probably due to an incomplete configuration in steps 8 and 9 in the unconnected registry. Review the modifications to make sure they were done correctly.
08:13:07.961 API A 1744 (acquire.cxx:389): ConfigLoadFailed E:0x20000002 (invalid parameter passed)08:13:08.082 REG W 1744 (egateloop.cxx:118): Unable to acquire STC context. item not found (0x20000020)08:13:08.162 REG W 1744 (egateloop.cxx:120): registry replication unable to load configuration using: 08:13:08.292 REG W 1744 (egateloop.cxx:124): Master Host [george], Master Port [23001], Schema [RegistryReplication], Master User [Administrator]08:13:08.442 REG W 1744 (egateloop.cxx:126): make sure of the following:08:13:08.592 REG W 1744 (egateloop.cxx:128): o at least one secondary registry is installed08:13:08.703 REG W 1744 (egateloop.cxx:130): o in the above schema there is a complete route (pub/sub)08:13:08.803 REG W 1744 (egateloop.cxx:132): o the above master parameters are correct08:13:08.943 REG W 1744 (egateloop.cxx:135): registry replication waiting 30 seconds to try again
17 Changes should now be replicated.
The following screen shot demonstrates the final RegistryReplication Schema for three Registries. The first figure shows the full schema and the next three show the publications and subscriptions for the Primary and the two Secondary Registry Host collaborations.
e*Gate IntegratorSystem Administration and Operations Guide 36 SeeBeyond Proprietary and Confidential

Chapter 2 Section 2.3Managing the Host System Distributed Registry
Figure 11 Figure 6 Final View->Summary->Collaboration Summary of the completed RegsitryReplication Schema for 3 Registries
e*Gate IntegratorSystem Administration and Operations Guide 37 SeeBeyond Proprietary and Confidential

Chapter 2 Section 2.3Managing the Host System Distributed Registry
Figure 12 Properties of the two PrimaryRegistry host collaborations for RegistryReplication
Figure 13 Properties of the two RepServer01 host collaborations for RegistryReplication
e*Gate IntegratorSystem Administration and Operations Guide 38 SeeBeyond Proprietary and Confidential

Chapter 2 Section 2.3Managing the Host System Distributed Registry
Figure 14 Properties of the two RepServer02 host collaborations for RegistryReplication
2.3.6 Registry Replication TroubleshootingThis section offers some tips and helps for troubleshooting any problems that could arise when using the Registry Replication feature.
Verifying Normal Operation
To verify that all Registry Replication services are installed and running normally
1 Verify the operation of the Primary Registry as follows:
! Be sure stcregd, stccb, and stciqmgrd processes are running.
! Verify that a “Minor Sequence” message has been logged in the Registry log file (egate/Server/logs/registry-host-name.log). See the following example:
16:42:21.097 API I 1569 (recovery.cxx:806): recovery: cr_RegistryReplicationToPrimary: Minor sequence number for IQ [iq_SecondaryRegistryReplication] and event type [et_RegistryUpdate] starts at [1]
! Verify that the IQ Manager log (egate/client/logs/registry-host-name_iqmgr.log) has two adjoining “Opening IQ” entries. See the following examples:
16:42:18.362 IQ I 1286 (iqinitialize.cxx:557): Opening IQ [iq_SecondaryRegistryReplication] IQ UUID [{4AA33CBD-E876-11D6-80D8-DB24BEFD2DF6}] Index directory [egate/client/iq/{4AA33CBD-
e*Gate IntegratorSystem Administration and Operations Guide 39 SeeBeyond Proprietary and Confidential

Chapter 2 Section 2.3Managing the Host System Distributed Registry
E876-11D6-80D8-DB24BEFD2DF6}/] Data directory [/home/jshaw/egate/client/iq/{4AA33CBD-E876-11D6-80D8-DB24BEFD2DF6}/]
16:42:20.180 IQ I 1287 (iqinitialize.cxx:557): Opening IQ [iq_SecondaryRegistryReplication] IQ UUID [{4AA33CBD-E876-11D6-80D8-DB24BEFD2DF6}] Index directory [egate/client/iq/{4AA33CBD-E876-11D6-80D8-DB24BEFD2DF6}/] Data directory [/home/jshaw/egate/client/iq/{4AA33CBD-E876-11D6-80D8-DB24BEFD2DF6}/]
2 To verify the correct functioning of the secondary Registry, do the same operations as those given previously, on the secondary. These operations ensure that the corresponding secondary services required for Registry Replication are also running normally.
If all services are not running as explained in the previous steps, see the next section for some common issues and their work-arounds. If these services are running normally and Registry Replication still does not work, contact SeeBeyond Customer Support.
Solving Problems
This section explains how to troubleshoot and solve some common problems with Registry replication.
Services Not Starting Normally
If all Registry Replication services are not running as explained under “Verifying Normal Operation” on page 39, the installation program could have had trouble starting the services.
Work-around: Try manually restarting the services in the following order:
1 Primary Registry
2 Primary Control Broker
3 Secondary Registry
4 Secondary Control Broker
Network Host Name Issues
The installation sometimes assigns a network host name with incorrect case or truncates the host name. If this is the case, stcupdater or stcinstd displays the error “gethostbyname_r: unable to find host” and replication does not work.
To check whether this is the problem, try doing a “ping” from one host to the other, that is, open a command prompt on the Primary and enter:
ping secondary-host-name
Normally, the secondary Registry Host returns a message indicating it is up and running. If there is a problem, the command times out, and there is no response. In the same way, you can “ping” the Primary from the secondary. If the “ping” fails in either direction, refer to the following work-around:
Work-around: Do the following:
1 Verify that the eGate Registry Service (stcregd) is running on the primary Registry host.
e*Gate IntegratorSystem Administration and Operations Guide 40 SeeBeyond Proprietary and Confidential

Chapter 2 Section 2.3Managing the Host System Distributed Registry
2 Connect to the Registry using the e*Gate Enterprise Manager and open the “RegistryReplication” schema.
3 Right-click the problem host and click Properties.
4 Change the network host name to the actual host name of the current system.
5 Repeat the previous steps with each secondary Registry.
Network Host Name Issues: Here are some examples of known network host name issues:
! If a Windows machine has a host name with more than 15 characters (for example, seebeyondhost_dell933), installing the Primary Registry on this machine can cause problems if the secondary Registry is running on a UNIX platform. The installation program would have installed a Primary Registry with a host name truncated to 15 characters (seebeyondhost_d). The corresponding network host name for this logical host name would also be seebeyondhost_d. Then, if you install a secondary Registry on a UNIX machine, it cannot communicate with the Primary (a “ping” fails). A UNIX machine in the same domain can only identify the primary host by the complete network host name of seebeyondhost_dell933.
! Machines with multiple host names (for example, a Windows NT and Windows 2000 dual boot) get assigned incorrect host names. For example, a Primary Registry with the Windows 2000 host name Precision_2000 has a corresponding Windows NT host name Precision_NT when it boots with Windows NT. Installation on the Windows 2000 boot however incorrectly assigns host name Precision_NT. In this case, Replication never starts up. The only solution is to rename the network host name for the Primary Registry.
! If the Primary Registry host QA_300PL gets a network host name qa_300pl during the installation, obviously the case of the network name is different. Although the installation proceeds normally, Replication does not work if the operating system (OS) is case-sensitive.
Failed IQ Service
If the Registry log file shows an IQ Service-related error, it is usually because of one or more human errors during installation. Check to see whether the following path exists on the host that logs the “Failed IQ Service” error:
egate/Server/Registry/repository/default/iqservices/current-platform/
This path contains the stc_iqstandard.dll file required for Registry Replication.
Required Platforms Omitted
A common mistake is to omit one or more required platforms (for example, Win32 or Sparc26) during the Replication Registry installation. Check to be sure the name of the platform where this error occurs is present in the iqservices folder in the path shown in the previous section. If not, you must reinstall this Registry with all the required client platforms selected.
Repository Folder in Wrong Path
It is a common mistake to copy the Repository folder from the primary Registry to the wrong location in the secondary. Be sure this folder was copied to the correct path.
e*Gate IntegratorSystem Administration and Operations Guide 41 SeeBeyond Proprietary and Confidential

Chapter 2 Section 2.4Managing the Host System Backup and Recovery
Corrupted IQ
If the Registry log (egate/server/logs/registry-host-name.log) contains one or both of the following trace entries, this may indicate a corrupted IQ.
16:34:36.701 API W 652 (workitems.cxx:2544): unable to open IQ [iq_PrimaryRegistryReplication]. Waiting 20 seconds. connection failed (0x20050000) 13:48:15.354 API W 1260 (workitems.cxx:2670): unable to open IQ [iq_SecondaryRegistryReplication]. Waiting 20 seconds. connection failed (0x20050000)
Work-around: Clean up the IQ and notification queue and restart the replication as follows:
1 Stop the primary Registry, the primary Control Broker, and the primary IQ Manager.
2 Stop the secondary Registry, the secondary Control Broker, and the secondary IQ Manager.
3 On the primary Registry, delete the IQ directory {xxxxxxxx-xxxx-xxxx-xxxx-xxxxxxxxxxxx} in the egate\client\iq directory.
4 On the secondary Registry, delete the IQ directory {xxxxxxxx-xxxx-xxxx-xxxx-xxxxxxxxxxxx} in the egate\client\iq directory.
5 On the primary Registry, delete the NotificationQueue directory in the egate\client directory.
6 On the secondary registry, delete the NotificationQueue directory in the egate\client.
7 Restart the primary Registry and the primary Control Broker.
8 Restart the secondary Registry and the secondary Control Broker.
2.4 Backup and RecoveryThis section explains how to back up your e*Gate system to facilitate the recovery of data in case of a widespread hardware problem or failure.
2.4.1 Backing Up the e*Gate SystemTape backup: To provide complete data security, it is best to back up each e*Gate system host (Registry and Participating) on a tape drive at the end of each day. For large systems with extremely high volumes of data, you may want to back up two or three times during each 24-hr period, as your system and schedule permit.
Schema backup: For convenience during recovery, it is best to back up each schema in your system. You only need to perform this action after a schema is created, modified, and/or reconfigured. Back up a schema by exporting it (see Chapter 6 for procedures) to a “safe” hard disk in an external system.
e*Gate IntegratorSystem Administration and Operations Guide 42 SeeBeyond Proprietary and Confidential

Chapter 2 Section 2.4Managing the Host System Backup and Recovery
2.4.2 System RecoveryFor a fast, convenient system recovery, take the following general steps:
1 Once your entire network is up and running again (hardware and software), reinstall e*Gate from the CD-ROM set.
2 Import each individual schema from its backup disk (see Chapter 6 for procedures). This step allows you to get your schemas up and running again fast.
3 Start any or all Control Brokers and start the e*Gate system as soon as you can.
4 Restore needed data from the backup tape drives.
5 Check and fine-tune the newly restored system as necessary.
Note: Be sure to keep accurate, detailed records of your system/host network setup, and keep them handy. Use these records to help you configure your host and e*Gate component architecture correctly during system recovery.
e*Gate IntegratorSystem Administration and Operations Guide 43 SeeBeyond Proprietary and Confidential

Chapter 3
Managing the Control Broker
This chapter explains the general operation of the e*Gate Control Broker and maintenance tasks necessary when you administer or modify the Control Broker. It also includes basic information on monitoring and controlling the e*Gate environment.
Chapter Topics
! “Monitoring and Managing e*Gate: Overview” on page 44
! “Control Broker Operation” on page 45
! “Working with the Control Broker” on page 47
! “Basic Troubleshooting” on page 51
3.1 Monitoring and Managing e*Gate: OverviewThe e*Gate monitoring system provides the following methods to check the status of your e*Gate system:
! Interactive Monitoring: Uses client applications to display real-time status information on the e*Gate system and enable you to start and stop e*Gate components. The e*Gate interactive monitors are:
" e*Gate Monitor: This graphical user interface (GUI) allows you to monitor and troubleshoot the day-to-day operation of your e*Gate environment. See the e*Gate Integrator Alert and Log Reference Guide for more information.
" Command Line: This application program interface (API) allows you to monitor and manage your e*Gate environment and its components. See Chapter 4 for details on how to use this feature.
! Non-Interactive Monitoring: Forwards Alert and status information through delivery channels, including e-mail and printing, but does not provide any means to control e*Gate components. The non-interactive notification system also provides an escalation system for unresolved problems and failures, to make sure that all notifications are properly delivered.
Managing e*Gate: The Control Broker component is central to all e*Gate monitoring and management operations. In addition to the e*Gate Monitor’s GUI system-management features, you can also use the e*Gate command line for these same purposes. No matter which feature you use to control e*Gate, all system monitoring and managing operates via the Control Broker component.
e*Gate IntegratorSystem Administration and Operations Guide 44 SeeBeyond Proprietary and Confidential

Chapter 3 Section 3.2Managing the Control Broker Control Broker Operation
3.2 Control Broker OperationThis section explains the basic operation of the Control Broker in the e*Gate system. It includes monitoring and control features of the Control Broker, as well as how this component functions within an e*Gate schema.
Note: Be advised that when you kill a process, different operating systems assign different exit codes to the process. Because of this, the Control Broker may respond differently depending on the operating system. For example, on one system it may attempt to restart, where on another it does not restart.
3.2.1 Administering the Control BrokerThe e*Gate monitoring and control systems depend heavily upon the Control Broker, both as a source of information and an intermediary for commands issued to the various e*Gate components.
Important: You must have a running Control Broker before you can use any e*Gate monitoring and/or control features. Both the host and the Control Broker must be active before the e*Gate Monitor and command line can connect to them.
Maintaining the Control Broker
Because of the Control Broker’s importance within the e*Gate monitor/control system, SeeBeyond recommends that system failures involving this component be addressed as quickly as possible.
For detailed information on monitoring and troubleshooting e*Gate and the Control Broker component, see the e*Gate Integrator Alert and Log File Reference Guide.
3.2.2 Operation of Real-Time MonitoringThe e*Gate real-time monitoring system operates as follows:
! Components send messages called Monitoring Events to the Control Broker. These Monitoring Events include an Event code and a description, for example, “10113020: IQ Manager Down Controlled,” plus other information such as time of occurrence and names of possibly affected components (see the e*Gate Integrator Alert and Log File Reference Guide for a list of these codes and what they mean).
! The Control Broker uses a Collaboration Rules script to convert Monitoring Events into Notifications, which contain not only the data from the Monitoring Event but a range of recipient information, such as e-mail addresses.
Note: You can configure this “Notification-routing” script to apply recipient information based on Monitoring-Event properties. For example, you can notify one set of users regarding fatal errors and others regarding non-fatal errors, or route Notifications via e-mail based on the component issuing the Monitoring Event. See the e*Gate Integrator Alert and Log File Reference Guide for details.
e*Gate IntegratorSystem Administration and Operations Guide 45 SeeBeyond Proprietary and Confidential

Chapter 3 Section 3.2Managing the Control Broker Control Broker Operation
! Notifications go directly from the Control Broker to monitors, applications that display Notifications. Non-interactive monitors merely display information or route that information through delivery channels such as e-mail, while interactive monitors also enable you to send commands to e*Gate components and mark which notifications have been resolved.
! The Control Broker can also execute command scripts (for example, to launch batch files, shell scripts, or executable files), either in addition to or instead of sending Notifications to monitors.
3.2.3 Control Broker and Schema OperationThe Control Broker component manages schema operations in e*Gate. An e*Gate schema includes files and associated stores created by e*Gate, which contain the parameters of all its associated components. Schema components, in turn, control, route, and transform data as it moves through e*Gate in a predefined system configuration.
You can create and configure multiple Control Brokers per host or per schema. Also, each e*Gate host must have at least one schema, and the Enterprise Manager enforces this restriction. However, a single host can support multiple schemas and run more than one Control Broker.
Multiple Schemas on the Same Host
If you want to run multiple schemas on the same host, you must follow these guidelines to ensure proper system operation:
! Each component that you create in the Enterprise Manager in each schema must have a unique name. No component, including Intelligent Queues (IQs) can share a name with any component in a schema.
! Each file referenced within each schema must have a unique name, unless you specifically want to share the file across more than one schema. For example, the default Notification Routing script file for all schemas is Notification.tsc. Unless you want all schemas to share the same Notification Routing logic, you must create a separate file for each schema and give that file a unique name.
! Port numbers for IQ Managers and Control Brokers must be unique.
Important: You must follow these guidelines. These restrictions are necessary because all the schemas share the same \egate\client directory tree. Using common file names causes operational conflicts and/or data corruption and could halt e*Gate system operation.
For procedures on how to set up more than one Control Broker and schema per Participating Host, see “Running Multiple Control Brokers on the Same Host” on page 50.
3.2.4 Multiple Schemas, Control Brokers, and the e*Gate MonitorWhenever you create a schema, the Enterprise Manager (by default) creates a Control Broker with the name host_cb, where host is the name of the Participating Host on which
e*Gate IntegratorSystem Administration and Operations Guide 46 SeeBeyond Proprietary and Confidential

Chapter 3 Section 3.3Managing the Control Broker Working with the Control Broker
the Control Broker runs. If you create multiple schemas on the same Registry Host to run on the same Participating Host, each Control Broker in every schema has the same name.
Note: If Registry Replication is used, the Control Broker name in the RegistryReplication schema must also be taken into consideration. The Control Broker name in the user schema should be different than the Control Broker name in the RegistryReplication schema.
If you only run one Control Broker at once, this configuration creates no problems for the running e*Gate system. However, be sure that when you run the e*Gate Monitor, only open the schema that supports the active Control Broker. If you open a schema with an inactive (non-running) Control Broker that has the same name as an active (running) Control Broker, you get inaccurate and undesirable results.
If you wish to avoid this situation, do either (or both) of the following actions:
! Give the Control Broker in each schema a unique name.
! Assign the Control Broker in each schema a different TCP/IP port range.
3.3 Working with the Control BrokerThis section explains procedures for the operation of basic Control Broker functions in the e*Gate system.
3.3.1 Modifying Control Broker Startup ParametersThe Control Broker executable, stccb.exe, is run as a daemon (UNIX) or service (Windows). The procedure to modify the Control Broker’s command parameters differs depending on the operating system under which it is run as follows:
Under UNIX
The Control Broker is launched by an e*Gate .rc file, an entry in the folder/etc/inittab, or in a user-generated script file. The exact location varies for each e*Gate installation.
To modify the Control Broker’s command parameters, you must edit the appropriate command file. The name of this file is /etc/inittab.
Under Windows
The Control Broker is launched by an entry in the Windows Registry. You could manually edit the Windows Registry using a utility such as regedit, but e*Gate provides a simpler (and safer) means to make the correction. The -sr, -sa, and -sm flags automatically handle the registration of the Control Broker service, and the procedures in this chapter recommend their use.
Note: For more information about the Control Broker’s command parameters, see “Control Broker: stccb” on page 60.
e*Gate IntegratorSystem Administration and Operations Guide 47 SeeBeyond Proprietary and Confidential

Chapter 3 Section 3.3Managing the Control Broker Working with the Control Broker
3.3.2 Renaming the Control BrokerWhen you use the Enterprise Manager to rename the Control Broker, you must change the Control Broker’s “logical name” command parameter.
The logical name of the Control Broker is specified by the -ln flag. For more information on how to use the command-line API, see Chapter 4.
To change the name of the Control Broker that is running on a UNIX system
1 Use the e*Gate monitor to shut down the Control Broker.
2 Locate the file that contains the command that launches the Control Broker (see “Modifying Control Broker Startup Parameters” on page 47).
3 Change the -ln parameter to reflect the new Control Broker name. Do not change any other command-line parameters.
4 Restart the Control Broker.
For example, if you renamed Control Broker “CB_1” to “CB_MAIN,” change the line:
stccb.exe -rh host1 -rs s_1 -ln CB_1 -un Administrator -up xxxx
to the following line:
stccb.exe -rh host1 -rs s_1 -ln CB_MAIN -un Administrator -up xxxx
To change the name of a Control Broker that is running on a Windows system
1 Use the e*Gate monitor to shut down the Control Broker.
2 At the command prompt, type the following (on a single command line), making the appropriate substitutions for your installation:
stccb.exe -rh host -rs schema -ln old_cbname -un user-up pass -sr
This removes the Control Broker entry from the Windows Registry.
3 At the command prompt, type the following (on a single command line), making the appropriate substitutions for your installation:
stccb.exe -rh host -rs schema -ln new_cbname -un user-up pass -sa
to register the Control Broker service to start automatically when the computer boots; or type
stccb.exe -rh host -rs schema -ln new_cbname -un user-up pass -sm
to register the Control Broker service to start manually.
For more information on the stccb command, its flags, and their descriptions, see “Control Broker: stccb” on page 60.
e*Gate IntegratorSystem Administration and Operations Guide 48 SeeBeyond Proprietary and Confidential

Chapter 3 Section 3.3Managing the Control Broker Working with the Control Broker
3.3.3 Changing User/Password InformationIf you change the user name or password under which the Control Broker runs (see “Component Execution and User Names” on page 100), you must take the following steps:
1 Modify the Control Broker’s startup parameters to use the new user name and/or password information.
2 Make sure an entry for the user name appears in the e*Gate password file.
This chapter only discusses the steps necessary to perform the first procedure. See “Using a Password File” on page 103 for more information about the second procedure. For more information on how to use the command-line API, see Chapter 4.
To change user/password information for a Control Broker that is running on a UNIX system
1 Use the e*Gate monitor to shut down the Control Broker.
2 Locate the file that contains the command that launches the Control Broker (see “Modifying Control Broker Startup Parameters” on page 47).
3 Change the -up or -un parameter to reflect the new information. Do not change any other command-line parameters.
4 Restart the Control Broker.
For example, if you are running the Control Broker under the user “egate_cb”, change the line
stccb.exe -rh host1 -rs s_1 -ln CB_1 -un Administrator -up xxxx
to the following line:
stccb.exe -rh host1 -rs s_1 -ln CB_1 -un egate_cb -up xxxx
To change user/password information for a Control Broker that is running on a Windows system
1 Use the e*Gate monitor to shut down the Control Broker.
2 At the command prompt, type the following (on a single command line), making the appropriate substitutions for your installation:
stccb.exe -rh host -rs schema -ln cbname -un old_user-up old_pass -sr
This operation removes the Control Broker entry from the Windows Registry.
3 At the command prompt, type the following (on a single command line), making the appropriate substitutions for your installation:
stccb.exe -rh host -rs schema -ln cbname -un new_user-up new_pass -sa
to register the Control Broker service to start automatically when the computer boots
e*Gate IntegratorSystem Administration and Operations Guide 49 SeeBeyond Proprietary and Confidential

Chapter 3 Section 3.3Managing the Control Broker Working with the Control Broker
Also, you can type:
stccb.exe -rh host -rs schema -ln cbname -un new_user-up new_pass -sm
This operation registers the Control Broker service to start manually.
For more information on the stccb command, its flags, and their descriptions, see “Control Broker: stccb” on page 60.
3.3.4 Removing the Control Broker Daemon/ServiceUse these procedures to remove the Control Broker without removing the Participating Host configuration. These procedures do not affect the Control Broker executable file stccb.exe.
To remove a Control Broker daemon from a UNIX system
1 Use the e*Gate monitor to shut down the Control Broker.
2 Locate the file that contains the command that launches the Control Broker (see “Modifying Control Broker Startup Parameters” on page 47).
3 Delete the Control Broker command line.
To remove a Control Broker service from a Windows system
1 Use the e*Gate monitor to shut down the Control Broker.
2 At the command prompt, type the following (on a single command line), making the appropriate substitutions for your installation:
stccb.exe -rh host -rs schema -ln cbname -un user-up pass -sr
This operation removes the Control Broker entry from the Windows Registry.
For more information on the stccb command, its flags, and their descriptions, see “Control Broker: stccb” on page 60.
3.3.5 Running Multiple Control Brokers on the Same HostUse these procedures when running multiple Control Brokers on a single Participating Host. For more information on how to use the command-line API, see Chapter 4.
To run an additional schema on the same UNIX Participating Host
1 Use the Enterprise Manager to define the new schema, following the important guidelines above.
e*Gate IntegratorSystem Administration and Operations Guide 50 SeeBeyond Proprietary and Confidential

Chapter 3 Section 3.4Managing the Control Broker Basic Troubleshooting
2 Locate the file that contains the command that launches the Control Broker (see “Modifying Control Broker Startup Parameters” on page 47).
3 Add a new command line to launch the new Control Broker, specifying the name of the new schema after the -rs flag.
For example:
stccb.exe -rh host1 -rs s_1 -ln CB_1 -un Administrator -up xxxxstccb.exe -rh host1 -rs s_2 -ln CB_2 -un Administrator -up xxxx
To run an additional schema on the same Windows Participating Host
1 Use the Enterprise Manager to define the new schema, following the important guidelines above.
2 At the command prompt, type the following (on a single command line), making the appropriate substitutions for your installation:
stccb.exe -rh host -rs NEW_schema -ln NEW_cbname -un user-up pass -sa
to register the Control Broker service to start automatically when the computer boots.
Also, you can type:
stccb.exe -rh host -rs NEW_schema -ln NEW_cbname -un user-up pass -sm
This operation registers the Control Broker service to start manually.
For more information on the stccb command, its flags, and their descriptions, see “Control Broker: stccb” on page 60.
3.4 Basic TroubleshootingThis section gives you troubleshooting tips and procedures you can use in administering the Control Broker.
3.4.1 Modules Do Not StartIn e*Gate, modules are components that require an executable file for its configuration. These components are:
! Control Brokers
! e*Ways
! BOBs
! IQ Managers
! SeeBeyond e*InsightTM Business Partner Manager Engines
e*Gate IntegratorSystem Administration and Operations Guide 51 SeeBeyond Proprietary and Confidential

Chapter 3 Section 3.4Managing the Control Broker Basic Troubleshooting
If any module does not start up, and the monitor displays the message “Module Start Failed,” check:
! That the Run as User field in the e*Way Properties dialog box contains a valid user name (it must not be blank)
! That the correct executable file is listed in the appropriate properties dialog box configuration for that module
For complete information on all e*Gate modules/components, see the e*Gate Integrator User’s Guide.
3.4.2 Control Broker Does Not RunThe Control Broker does not run on a UNIX system. No log file is generated, and files do not get downloaded from the e*Gate Registry. In such cases, take the following steps:
1 If the user who carried out the installation was logged in as “root,” then no other user is able to start the Control Broker.
2 If you installed e*Gate when logged in as one user, and you are now trying to run the Control Broker as another user, the new user must have the same permissions as the user who carried out the installation.
3 Check the .egate.store file to make sure that the directory paths are defined correctly for your system. See the e*Gate Integrator User’s Guide for more information about the commands in the .egate.store file.
For more information on troubleshooting your e*Gate system, see the e*Gate Integrator Alert and Log File Reference Guide.
e*Gate IntegratorSystem Administration and Operations Guide 52 SeeBeyond Proprietary and Confidential

Chapter 4
Command-line Reference
This chapter provides a reference that explains how to use services and utilities that can be run from the e*Gate application program interface (API) command line.
Chapter Topics
! “Using the Command Line: Overview” on page 53
! “Using Common API Flags” on page 54
! “Commands for Services/daemons” on page 56
! “e*Way and BOB Commands” on page 64
! “Basic Utility Commands” on page 66
4.1 Using the Command Line: OverviewThe command-line API is e*Gate’s primary system management and monitoring tool. This feature and the e*Gate Monitor graphical user interface (GUI) are the e*Gate system’s interactive monitoring interfaces. The command line carries out its control and monitoring operations via the Control Broker component.
Important: You must have a running Control Broker before you can use any e*Gate monitoring and/or control features. Both the host and the Control Broker must be active before the e*Gate Monitor and command line can connect to them.
This section provides an overview of the e*Gate command-line API then explains its basic usage properties, including text, naming, and the format conventions used in this chapter (and throughout this guide).
For more information on the Control Broker and how to operate this e*Gate component, as well as the e*Gate Monitor GUI, see Chapter 3.
e*Gate IntegratorSystem Administration and Operations Guide 53 SeeBeyond Proprietary and Confidential

Chapter 4 Section 4.2Command-line Reference Using Common API Flags
4.2 Using Common API FlagsThe e*Gate command line uses certain API flags that are common to almost all commands across the system. This section lists these flags and explains their basic use and meaning.
4.2.1 Common Flags for Most CommandsAll the API commands documented within this chapter share one or more of the command flags shown in Table 1.
Additional Information
! The -rh flag must be followed by a host name as an argument. e*Gate hosts must be listed within the Domain Name Service (DNS) of any system that executes e*Gate applications.
! The -up flag takes one of the following arguments:
" The actual password corresponding to the user name
" An exclamation mark (!) followed by the directory containing the password file
Passwords are stored in an encrypted format within the password file; use this argument if you do not want to have the password displayed in clear text. See “Using a Password File” on page 103 for more information.
! Required Flags: Each table in this chapter, which describes a command and its flags, has a Required column. If this column says “Yes,” then the corresponding flag is required. If this column is empty, the flag is not required.
Table 1 Common Command Flags
Flag Purpose
-h Displays the online help, which is a two-column list of supported command flags together with brief definitions of what each flag means and (by implication) does.
-v Verbose mode; shows additional information as commands are processed.
--ver Displays version information; note that this flag requires two dashes.
-rh host-name Name of the host on which the e*Gate Registry is running (see “Additional Information” on page 54).
-rs schema-name Name of the schema with which the command interacts.
-ln component-name Name of any component, as defined within the specified schema.
-un user-name Name of a user, as defined within the specified schema.
-up password or !directory-name
Password corresponding to the specified user name or the name of the directory containing the .egate.stcpass file (see “Additional Information” on page 54).
e*Gate IntegratorSystem Administration and Operations Guide 54 SeeBeyond Proprietary and Confidential

Chapter 4 Section 4.2Command-line Reference Using Common API Flags
4.2.2 Common Flags for Services/DaemonsNearly all the applications that run as services/daemons use the flags shown in Table 2.
Under Windows, you need sufficient privilege to add services to the Windows Registry (see the online Help system for the Windows utility regedt32 for more information about Windows registry security). Under UNIX, there are no privilege restrictions.
4.2.3 About User Names and AuthenticationMost of the utilities described in this document require -un and -up switches to specify user names and passwords. When you specify a user name for a component defined within a schema, for example, a Control Broker, e*Way Intelligent Adapter, or Business Object Broker (BOB), the user name must match the user name entered in that component’s Run as field.
For example, if the component is configured to run as Administrator, the command line for that module must specify the “Administrator” user name.
Normally, you only need to be concerned about this requirement if you are launching components manually, at the command line. The Enterprise Manager handles this requirement automatically based on the way you have configured the component.
4.2.4 Debug LoggingTo capture logging information, you use the -d flag. For the Participating Host, the log file is stored in \eGate\client\logs. For the Registry Host, the log file is stored in \eGate\server\logs.
If you want to enable logging with an increased level of logging information, you can use the stcregutil with the -st flag as described in “Enabling Registry Logging” on page 73.
For more information on debug logging, see the e*Gate Integrator Alert and Log File Reference Guide.
4.2.5 AIX and CDEA limitation in the Common Desktop Environment (CDE) under AIX requires you to set LIBPATH manually after login. This limitation normally only affect users who need
Table 2 Service/daemon Flags
Flag Purpose Under Windows Purpose under UNIX
-ss Run as service. Reserved for use within Windows registry service definition; has no effect in a shell.
Run as a daemon (as a child process of init)
-sa Install as service, start automatically on system startup.
No effect
-sm Install as service, manual startup. No effect
-sr Remove the service. No effect
e*Gate IntegratorSystem Administration and Operations Guide 55 SeeBeyond Proprietary and Confidential

Chapter 4 Section 4.3Command-line Reference Commands for Services/daemons
to launch e*Way executables from the command line. Set this variable to include the directory in which you have installed your e*Gate library files.
4.3 Commands for Services/daemonsThis section explains how to use commands for e*Gate services/daemons.
4.3.1 Registry Daemon: stcregdThis command launches and configures the e*Gate Registry service on a Registry Host and is normally issued within the Windows registry or a UNIX cron job rather than at a shell/command prompt. The Registry Service is launched automatically by the Registry Host installation procedure.
Usage
stcregd command-flags @command-file
Where command-flags (separated by spaces) are in the table in this section, and command-file is an optional ASCII text file containing command flags and their arguments. Table 3 shows the stcregd command arguments.
Table 3 Command Arguments for stcregd
Flag Purpose Required
-h Displays the online Help system, which is a two-column list of supported command flags together with brief definitions of what each flag means and (by implication) does..
-v Displays the verbose mode; shows additional information as commands are processed.
--ver Displays version information. Note that this flag requires two dashes.
-d Debug to log file.
-ln Registry-name Name of the Registry; SeeBeyond recommends that the name of the Registry be the same as the name of the host (host-name) on which it runs.
Yes
-pr number The port number for Registry clients. See “Manually Specifying Registry Ports” on page 59 for information about this subject.
-nu Do not forward update notification to the Control Broker.
-npr No port range; fail on bind failure. If set, the Registry does not try to bind the next port for the client connections and instead exits with a log failure message.
e*Gate IntegratorSystem Administration and Operations Guide 56 SeeBeyond Proprietary and Confidential

Chapter 4 Section 4.3Command-line Reference Commands for Services/daemons
-pc number The port number for Control Brokers.
-mc number The maximum number of connections. The default is the maximum, 1024.
-bd path The base directory in which to store registry files, from the perspective of the system running the daemon; it can be a path name using a mapped drive letter or a UNC path (Windows) or a local or mounted path (UNIX).
-extvcdll script_arg Link the e*Gate Registry to an external version-control system; script_arg is the word SCRIPT (all caps) or the name of a .dll file. See “External Version-control Interface” on page 58 for more information.
-acl Enable security; turn on access control list (ACL) enforcement (for more information, see Chapter 5).
-mode number Sets the legal file access mode. Available and displayed only on UNIX platforms. Run man chmod on your UNIX shell to see the permitted numeric values; these values are the same as the permitted numeric values for the chmod command. The mode you specify must at least have the “read by owner” privilege.
-slrole MASTER or SLAVE
Defines whether this Registry is a primary (MASTER) or secondary (SLAVE) Registry. If the role argument is omitted, the default is MASTER.†
-slhost host-name The name of the primary Registry Host (for secondary Registry Hosts only).†
Yes, if running as a secondary Registry Host
-slport number The port number of the primary Registry Host (for secondary Registry Hosts only).†
Yes, if running as a secondary Registry Host
-sluser user-name The e*Gate user name with which to access the primary Registry Host (for secondary Registry Hosts only).†
Yes, if running as a secondary Registry Host
-slpass password The e*Gate password corresponding to user name (for secondary Registry Hosts only).†
Yes, if running as a secondary Registry Host
-ss Run immediately, as a service.
-sa Install as a service; start automatically on system startup.*
Table 3 Command Arguments for stcregd (Continued)
Flag Purpose Required
e*Gate IntegratorSystem Administration and Operations Guide 57 SeeBeyond Proprietary and Confidential

Chapter 4 Section 4.3Command-line Reference Commands for Services/daemons
Version Control
External Version-control Interface
The -extvcdll flag enables you to link interactions with the e*Gate Registry to an external version control system. When the Registry Service runs with this flag, any operation performed using the Team Registry (unedit, edit, commit, promote, and delete) is automatically linked to a similar operation in the local version-control system.
The -extvcdll flag requires you to handle all of the supported file actions (functions) listed below, because it surrenders control over file movement between the run time and Sandbox directories by telling the Registry Service to handle file actions using either a command script or an external DLL.
This flag takes one of the following arguments:
! SCRIPT (all-caps) instructs stcregd to use e*Gate’s version-control interface. The command scripts /server/scripts/stcregvc.cmd (for Windows NT or Windows 2000) and /server/scripts/stcregvc.sh (for UNIX) provide the interface to the external version-control system. These scripts contain placeholders for installation-specific commands that perform the actual check-in/check-out operations within the local source-control system.
! The following functions are supported:
# Unedit allows you to release a file. Before you can edit a file, you must first release it from the run-time environment.
# Edit allows you to check a file out of run time and commit it to the Sandbox. An external command script or DLL using this function should also create advisory locks as needed for files that are being edited.
# Promote allows you to promote the file from the Sandbox to run time (check the file in).
# Commit saves the newly created or edited file to the Sandbox.
# Delete removes the selected source file.
To use the script files, insert the appropriate commands for your local version-control system within the placeholder areas. See the comments within the script files for more information about exact usage and syntax.
Note: For more information on the e*Gate system’s Team Registry feature, see the e*Gate Integrator User’s Guide.
-sm Install as a service, with manual startup required.*
-sr Remove the service.*
† = See Chapter 2 for more information about the Distributed Registry.* = See Table 2 on page 55 for Windows/UNIX differences.
Table 3 Command Arguments for stcregd (Continued)
Flag Purpose Required
e*Gate IntegratorSystem Administration and Operations Guide 58 SeeBeyond Proprietary and Confidential

Chapter 4 Section 4.3Command-line Reference Commands for Services/daemons
Manually Specifying Registry Ports
By default, the Registry binds port 23001 for clients to initially connect and get the “real” communication port. This “real” port is dynamic, starting at “regport” (23001) + 100 and adding +1 until it is able to bind. The Registry also binds a port for the control brokers, starting at 23002 and adding +1 until it is able to bind. When using a distributed Registry, the individual components of the Registry must be configured to start with the same initial connect ports (23001).
The -pr flag enables you to start the Registry service with a specific port number. This should only be done in cases where the default Registry port is in use by another product and that product cannot be reconfigured to use a different port number.
If you specify the port number manually on the stcregd command line, you must also do the following operation:
1 Modify the stccb command line to specify the Registry port number (see “Control Broker: stccb” on page 60 for more information).
2 When you log in to modify a schema supported on a different Registry port, enter the port number in the Registry Host box using the format host-name:port-number (for example, localhost:20001). See Figure 15.
Figure 15 Specifying the Registry Port
The Registry Service and Repository File Cache
The Registry service determines whether to download new copies of files to client systems based upon a cached list of file hashes, rather than timestamps. The service downloads a new file only if the file in its repository has a different byte count than the one listed in its cache.
If you copy files manually to a repository directory while the Registry service is running, you must do either of the following actions to ensure that the new versions are properly registered:
! Stop and restart the Registry service
! Use the stcregutil command, adding the -sf flag as follows:
stcregutil -rh host-name -un user-name -up password -sf
e*Gate IntegratorSystem Administration and Operations Guide 59 SeeBeyond Proprietary and Confidential
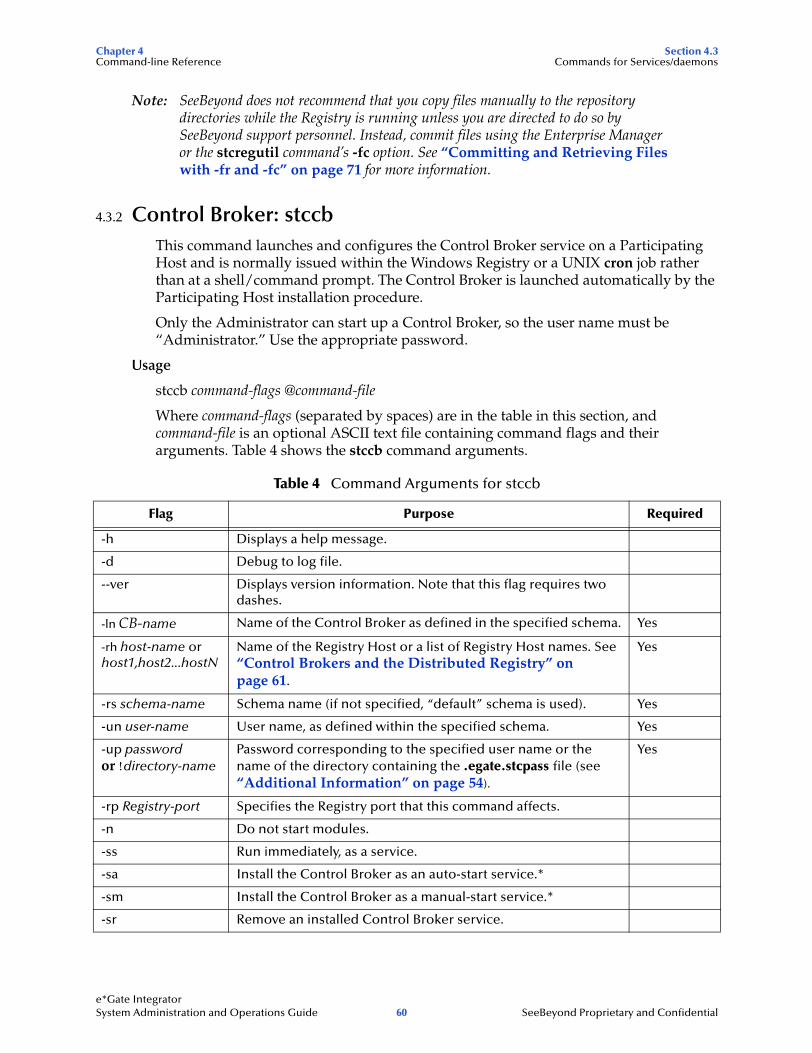
Chapter 4 Section 4.3Command-line Reference Commands for Services/daemons
Note: SeeBeyond does not recommend that you copy files manually to the repository directories while the Registry is running unless you are directed to do so by SeeBeyond support personnel. Instead, commit files using the Enterprise Manager or the stcregutil command’s -fc option. See “Committing and Retrieving Files with -fr and -fc” on page 71 for more information.
4.3.2 Control Broker: stccbThis command launches and configures the Control Broker service on a Participating Host and is normally issued within the Windows Registry or a UNIX cron job rather than at a shell/command prompt. The Control Broker is launched automatically by the Participating Host installation procedure.
Only the Administrator can start up a Control Broker, so the user name must be “Administrator.” Use the appropriate password.
Usage
stccb command-flags @command-file
Where command-flags (separated by spaces) are in the table in this section, and command-file is an optional ASCII text file containing command flags and their arguments. Table 4 shows the stccb command arguments.
Table 4 Command Arguments for stccb
Flag Purpose Required
-h Displays a help message.
-d Debug to log file.
--ver Displays version information. Note that this flag requires two dashes.
-ln CB-name Name of the Control Broker as defined in the specified schema. Yes
-rh host-name orhost1,host2...hostN
Name of the Registry Host or a list of Registry Host names. See “Control Brokers and the Distributed Registry” on page 61.
Yes
-rs schema-name Schema name (if not specified, “default” schema is used). Yes
-un user-name User name, as defined within the specified schema. Yes
-up password or !directory-name
Password corresponding to the specified user name or the name of the directory containing the .egate.stcpass file (see “Additional Information” on page 54).
Yes
-rp Registry-port Specifies the Registry port that this command affects.
-n Do not start modules.
-ss Run immediately, as a service.
-sa Install the Control Broker as an auto-start service.*
-sm Install the Control Broker as a manual-start service.*
-sr Remove an installed Control Broker service.
e*Gate IntegratorSystem Administration and Operations Guide 60 SeeBeyond Proprietary and Confidential

Chapter 4 Section 4.3Command-line Reference Commands for Services/daemons
Control Brokers and the Distributed Registry
The -rh command-line argument specifies the Registry Host to which the Control Broker connects. If you specify a comma-delimited list of Registry Host names (as in -rh host1,host2,host3), the Control Broker attempts to connect to each host in order until a connection is made.
Note: The Control Broker binds a port (this is configurable via a range in the Control Broker Properties dialog box), and the monitor connects to it. Likewise, the Enterprise Manager connects to the Registry on the initial connect port, and is handed the real port and connects to it.
If the Control Broker has made no connection by the time it reaches the end of the list, it repeats the procedure, beginning with the first host on the list. See “Distributed Registry” on page 22 for more information about this feature.
Note: If you are using an HPUX 11.00 system, make sure you first install the HPUX 11.00 ACE package (March 2000) before using the stccb command.
-acl Enable security; turn on access control list (ACL) enforcement (for more information, see Chapter 5).
-noe2n Disable Notification system; do not route Monitoring Events to Notifications.
-dm Add -d debug flags to all components supervised by this Control Broker.
-e2nlim nobytes Set the size limit for Event notification in schemas. The default is 1024 bytes.
-egst Notifies the Control Broker of the location of the .egate.store file. Available on both UNIX and Windows platforms. A copy of the participating host directory must be available at the location to which .egate.store points.
-mc number Specify the maximum number of components in schemas.
-spc seconds Specify the number of seconds for the Control Broker to wait after sending a shut down request to all modules. After the specified time has elapsed, the Control Broker shuts down all modules that are still running. This flag is available for Windows only for clustering support.
-sno Provides a custom service name for the Control Broker when it is started as a service. Available only on Windows platforms.
* = See Table 2 on page 55 for Windows/UNIX differences.
Table 4 Command Arguments for stccb (Continued)
Flag Purpose Required
e*Gate IntegratorSystem Administration and Operations Guide 61 SeeBeyond Proprietary and Confidential

Chapter 4 Section 4.3Command-line Reference Commands for Services/daemons
4.3.3 IQ Manager Service/Daemon: stciqmgrdThis command launches and configures the Intelligent Queue (IQ) Manager service/daemon on the specified host. The command is normally issued within the Windows Registry or a UNIX cron job rather than at a shell/command prompt.
Usage
stciqmgrd command-flags @command-file
Where command-flags (separated by spaces) are shown in the table in this section, and command-file is an optional ASCII text file containing command flags and their arguments. Table 5 shows the stciqmgrd command arguments.
Additional Information
For more detailed information on IQs and IQ Managers in the system, see the e*Gate Integrator Intelligent Queue Services Reference Guide.
4.3.4 Installer Service: stcinstdThis service serves the following purposes:
1 It registers the Participating Host within the e*Gate Registry as a valid host name. The most visible effect of this service is in the Enterprise Manager because it enables
Table 5 Command Arguments for stciqmgrd
Flag Purpose Required
-h Displays a help message.
-v Verbose mode; shows additional information as commands are processed.
--ver Displays version information. Note that this flag requires two dashes.
-d Debug log on.
-rh host-name Specify the Registry Host that this command affects. Yes
-rs schema-name Schema name (If not specified, “default” schema is used). Yes
-ln IQMgr-name Name of the IQ Manager as defined within the specified schema.
Yes
-un user-name User name as defined within the specified schema. Yes
-up password or !directory-name
Password corresponding to the specified user name or name of directory containing the .egate.stcpass file (see “Additional Information” on page 54).
Yes
-sa Install as a service; start automatically on system startup.*
-sm Install as service, manual startup.*
-sr Remove the service.
-ko Scheduled maintenance off.
* = See Table 2 on page 55 for Windows/UNIX differences.
e*Gate IntegratorSystem Administration and Operations Guide 62 SeeBeyond Proprietary and Confidential

Chapter 4 Section 4.3Command-line Reference Commands for Services/daemons
users to edit the network host and domain names under the Host Properties dialog box’s General tab. If this service has never run, those fields/text boxes are uneditable.
2 It keeps certain files current in the Registry by periodically updating the Registry. The stcinstd installer service does not move files, because file movement, when necessary, is handled by the Control Broker.
Usage
stcinstd command-flags @command-file
Where command-flags (separated by spaces) are in the table in this section, and command-file is an optional ASCII text file containing command flags and their arguments. Table 6 shows the stcinstd command arguments.
Table 6 Command Arguments for stcinstd
Flag Purpose Required
-h Displays a help message.
-v Verbose mode; shows additional information as commands are processed.
--ver Displays version information. Note that this flag requires two dashes.
-d Debug log on.
-rh host-name Specify the Registry Host that this command affects. Yes
-rs schema-name Schema name (If not specified, “default” schema is used). Yes
-un user-name User name as defined within the specified schema. Yes
-up password or !directory-name
Password corresponding to the specified user name or name of directory containing the .egate.stcpass file (see “Additional Information” on page 54).
Yes
-wm minutes Update the Registry at the frequency specified.
-ss Run immediately, as a service.
-sa Install as service, start automatically on system startup.*
-sm Install as service, with manual startup.*
-sr Remove the service.
* = See Table 2 on page 55 for Windows/UNIX differences.
e*Gate IntegratorSystem Administration and Operations Guide 63 SeeBeyond Proprietary and Confidential

Chapter 4 Section 4.4Command-line Reference e*Way and BOB Commands
4.4 e*Way and BOB CommandsThis section explains how to use commands for specialized e*Ways and for BOBs.
4.4.1 Multi-Mode e*Way: stcewayThis is the executable for the Multi-Mode e*Way module. This command is normally issued by the Enterprise Manager. See the e*Gate Integrator User’s Guide for more information about the purpose and function of this module.
Usage
stceway command-flags @command-file
Where command-flags (separated by spaces) are in the table in this section, and command-file is an optional ASCII text file containing command flags and their arguments. Table 7 shows the stceway command arguments.
Table 7 Command Arguments for stceway
Flag Purpose Required
-h Displays a help message.
-v Verbose mode; shows additional information as commands are processed.
--ver Displays version information. Note that this flag requires two dashes.
-d Debug log on.
-ln Multi-Mode e*Way-name
Name of the Multi-Mode e*Way as defined within the specified schema.
Yes
-rh host-name Name of the Registry Host. Yes
-rs schema-name Name of the schema. If not specified, “default” schema is used.
Yes
-un user-name User name as defined within the specified schema. Yes
-up password or !directory-name
Password corresponding to the specified user name or name of directory containing the .egate.stcpass file (see “Additional Information” on page 54).
Yes
-ss Run immediately, as service.
-sa Install as service, start automatically on system startup.*
-sm Install as service, manual startup.*
-sr Remove the service.
* = See Table 2 on page 55 for Windows/UNIX differences.
e*Gate IntegratorSystem Administration and Operations Guide 64 SeeBeyond Proprietary and Confidential

Chapter 4 Section 4.4Command-line Reference e*Way and BOB Commands
4.4.2 Generic e*Way: stcewgenericmonkThis is a generic e*Way based upon SeeBeyond’s Monk programming language. This e*Way feature enables you to use Monk services and extensions to connect to external systems.
This command is normally issued by the Enterprise Manager. For more information, see the Monk Developer’s Reference.
Usage
stcewgenericmonk command-flags @command-file
Where command-flags (separated by spaces) are in the table in this section, and command-file is an optional ASCII text file containing command flags and their arguments. Table 8 shows the stcewgenericmonk command arguments.
For information on the e*Gate standard e*Ways and their commands and functions, see the Standard e*Way Intelligent Adapters User’s Guide.
4.4.3 BOB Module: stcbobThis command is for the BOB module. This command is normally issued by the Enterprise Manager. See the e*Gate Integrator User’s Guide for more information about the purpose and function of this component.
Table 8 Command Arguments for stcewgenericmonk
Flag Purpose Required
-h Displays a help message.
-v Verbose mode; shows additional information as commands are processed.
--ver Displays version information. Note that this flag requires two dashes.
-d Debug log on.
-rh host-name Registry host. Yes
-rs schema-name Schema name (If not specified, “default” schema is used). Yes
-ln e*Way-name Name of the e*Way as defined within the specified schema. Yes
-un user-name User name as defined within the specified schema. Yes
-up password or !directory-name
Password corresponding to the specified user name or name of directory containing the .egate.stcpass file (see “Additional Information” on page 54).
Yes
-ss Run immediately, as service.
-sa Install as service, start automatically on system startup.*
-sm Install as service, manual start-up.*
-sr Remove the service.
* = See Table 2 on page 55 for Windows/UNIX differences.
e*Gate IntegratorSystem Administration and Operations Guide 65 SeeBeyond Proprietary and Confidential

Chapter 4 Section 4.5Command-line Reference Basic Utility Commands
Usage
stcbob command-flags @command-file
Where command-flags (separated by spaces) are in the table in this section, and command-file is an optional ASCII text file containing command flags and their arguments. Table 9 shows the stcbob command arguments.
4.5 Basic Utility CommandsThis section explains commands for e*Gate’s system administration utilities.
4.5.1 Registry Utility: stcregutilThis command modifies or displays information regarding a running Registry service.
Note: Be careful when making modifications to a running Registry. There is no “undo” functionality within e*Gate.
Table 9 Command Arguments for stcbob
Flag Purpose Required
-h Displays a help message.
-v Verbose mode; shows additional information as commands are processed.
--ver Displays version information. Note that this flag requires two dashes.
-d Debug log on.
-ln BOB-name Name of the BOB as defined within the specified schema. Yes
-rh host-name Name of the Registry Host. Yes
-rs schema-name Name of the schema. If not specified, “default” schema is used
-un user-name User name as defined within the specified schema. Yes
-up password or !directory-name
Password corresponding to the specified user name or name of directory containing the .egate.stcpass file (see “Additional Information” on page 54).
Yes
-ss Run immediately, as service.
-sa Install as service, start automatically on system startup.*
-sm Install as service, manual startup.*
-sr Remove the service.
* = See Table 2 on page 55 for Windows/UNIX differences.
e*Gate IntegratorSystem Administration and Operations Guide 66 SeeBeyond Proprietary and Confidential

Chapter 4 Section 4.5Command-line Reference Basic Utility Commands
Usage
stcregutil command-flags @command-file
Where command-flags (separated by spaces) are in the table in this section, and command-file is an optional ASCII text file containing command flags and their arguments. When flags require file names, the file name must be the last argument on the command line. Table 10 shows the stcregutil command arguments.
Table 10 Command Arguments for stcregutil
Flag Purpose Notes
Basic API Flags
-h Displays a help message.
-v Verbose mode; shows additional information as commands are processed.
--ver Displays version information. Note that this flag requires two dashes.
-d Debug log on.
-rh host-name Specifies the Registry Host that this command affects. Required
-rs schema-name Specifies the schema name that this command affects (If not specified, “default” schema is used).
Required
-rp Registry-port Specifies the Registry port that this command affects.
-un user-name User name as defined within the specified schema. Required if schema is specified
-up password or !directory-name
Password corresponding to the user name. Required if schema is specified
Schema Migration Flags
-i file-name Imports schema data from the named file.
Note: For more information on e*Gate’s schema migration features, see Chapter 6.
-if file-name Imports all schema data from the named file, including associated files (see “Importing Schemas” on page 110 for details).
Requires use of the -ctl flag
-e file-name Exports specified schema data to the named file. By default, user names, passwords, or the resource table are not exported (see -usr and -res in this table).
-ef directory-name Exports the full schema, including all associated files; specify the name of the output directory where you want the schema files exported.
-nc file-name Exports current settings without explanatory comments to the named file (otherwise, identical in function to -e).
e*Gate IntegratorSystem Administration and Operations Guide 67 SeeBeyond Proprietary and Confidential

Chapter 4 Section 4.5Command-line Reference Basic Utility Commands
-bu Imports/exports a “backup” of the schema; includes user information and IQ Universal Unique Identification (UUID) information. Use this command to import/export data when creating (or reloading) a backup of the specified schema.
Note: For an explanation of the UUID, see the e*Gate Integrator Intelligent Queue Services Reference Guide.
If you import schema data with -bu, the target import schema must not exist. Importing “backup” schema data into an existing schema causes unpredictable or undesirable behavior.
Caution: When you import a schema, do not use the same name as that of an existing schema.
-e, -nc, or -i required
-usr Includes user name/password information in the export file (see “Exporting or Importing User Names and Passwords” on page 73).
-e or -nc required
-rd Includes row dates in the export file. -e or -nc required
-res Includes resource table in the export file. -e or -nc required
-ui Includes the UUID in the export file. -e or -nc required
-ci Includes in the export file all referenced physical files in the default repository; only applies to component migration.
Registry Management Flags
-ls Lists schemas.
-sd Lists statistics for the specified schema.
-ur Updates the Registry’s resource table listing hard disk sizes on the Registry Host. You only need to use this command if you change the number and/or size of disks installed on the Host.
-ss Stops the Registry service.
-sf Flushes the repository cache and rehash. Use this flag after you physically copy files to repository directories (as opposed to committing files). See “The Registry Service and Repository File Cache” on page 59 for more information.
-sl on|off Selects whether the Registry outputs to a log file (on or off).
-st mask Sets a new trace mask for the Registry. For more information, refer to “Enabling Registry Logging” on page 73.
-ts Shows internal Registry tables.
Table 10 Command Arguments for stcregutil (Continued)
Flag Purpose Notes
e*Gate IntegratorSystem Administration and Operations Guide 68 SeeBeyond Proprietary and Confidential

Chapter 4 Section 4.5Command-line Reference Basic Utility Commands
Schema File Management Flags
-fr path file-name
*Requires two arguments
Retrieves (exports) the named file from the specified path within the repository. This path is relative to the root directory of the file repository, and must not begin with a leading slash (for example, monk_scripts). When used with –ctl (see “Using .ctl Files” on page 73), the specified path must be “.” (period), and the file name must be omitted.
* See “Committing and Retrieving Files with -fr and -fc” on page 71 for an explanation of the location of the retrieved file.
Bypasses “Team Registry” features; incompatible with -fcv flags
-fc path file-name
*Requires two arguments
Commits (imports) the local named file to the specified path within the file repository. The local file name can contain local path information; if no path information is specified, the file is committed from the connected directory. The specified path is relative to the root directory of the Registry, and must not begin with a leading slash (for example, monk_scripts).
When used with –ctl, path must be “.” (period), and the file name must be omitted.
Note: You must use a .ctl file (see “Format for .ctl Files” on page 72) if you wish to promote more than one file at a time to the Registry.
Bypasses the Team Registry features; incompatible with -fcv flags; promotes the file to the run-time directory
-fd Registry-pathfull-path
*Requires two arguments
Commits the directory full-path to the Registry-path within the file repository, including all files and subdirectories.
Caution: If any files/directories of the same name as those being committed exist within Registry-path, they are overwritten.
Bypasses the Team Registry features; incompatible with -fcv flags
-fe Registry-path Lists files registered within the specified schema, within the specified path. Specify “.” to view the top level of the schema. Only files/directories within the specified path are listed, not any subdirectory contents.
-fo system-type Specifies the operating system of the system to which the files are being committed. Requires as argument a hexadecimal operating system (OS) identifier (for example, 0x02010400 for Windows). To display the OS flag for a given OS, log in to a system on which e*Gate is installed and issue the stcutil -oi command.
Requires the use of the -fc flag
-ctl file-name Registers the files listed in the named file (used only with -fr or -fc). See “Format for .ctl Files” on page 72 for the format of the .ctl file.
Table 10 Command Arguments for stcregutil (Continued)
Flag Purpose Notes
e*Gate IntegratorSystem Administration and Operations Guide 69 SeeBeyond Proprietary and Confidential

Chapter 4 Section 4.5Command-line Reference Basic Utility Commands
Important: The –fr, –fc, –fd, and –fvcuX flags, and the equivalent functionality within the Enterprise Manager, provide the only means to commit files into or retrieve files from the e*Gate file repository. We recommend that you do not attempt to commit or retrieve files directly to e*Gate repository directories using the Windows Explorer or shell copy commands except when directed to do so by SeeBeyond support personnel.
Component Migration Flags
-cex component base-file-name
* Requires two arguments
Exports a component. For component, use the component’s logical name; creates an export file base file (with the name given) and a .ctl file base-file-name.ctl containing only the information required to migrate the specified component to another schema.See “Moving Individual Schema Components” on page 122 for more information.
-cei Allows you to export with the exported component all its associated files, including files only found in the default repository. Include the default repository for files. Default operation of the command is to only include files in the current schema.
Only use with -cex (see row above)
-gu Generates the UUID.
Team Registry Flags
-fvce pathfile-name
* Requires two arguments
Retrieves a copy of the named file from the repository specified path within the Registry, placing it within the e*Gate “client” directory. If the file exists in the run-time Registry, the command retrieves the file and copies the file to the Sandbox (replacing any existing copies). If the file exists in the Sandbox, the command retrieves the Sandbox file.
“FVC” stands for file version control
-fvcc pathfile-name
* Requires two arguments
Copies the named file in the repository specified path from the run-time Registry to the Sandbox; does not create a local copy.
-fvcp pathfile-name
* Requires two arguments
Promotes the named file in the repository specified path from the Sandbox to the run-time Registry.
-fvcu pathfile-name
* Requires two arguments
Removes the named file in the repository specified path from the Sandbox, discarding any changes that may have been made to the file; does not delete any local copies.
Table 10 Command Arguments for stcregutil (Continued)
Flag Purpose Notes
e*Gate IntegratorSystem Administration and Operations Guide 70 SeeBeyond Proprietary and Confidential

Chapter 4 Section 4.5Command-line Reference Basic Utility Commands
Committing/Retrieving Files Using Team Registry Features
The examples in this section are printed on more than one line for clarity, but must be issued as a single command line.
Note: See the e*Gate Integrator User’s Guide for more information on the Team Registry feature.
Use the following procedures to commit and retrieve files using the e*Gate Team Registry:
To check out the file monk_scripts/common/new.tsc to the Sandbox and retrieve a local copy for editing
stcregutil -rh host-name -rs schema-name -un user-name -up password -fvce monk_scripts/common new.tsc
To check out the file monk_scripts/common/new.tsc to the Sandbox but do not retrieve a local copy for editing
stcregutil -rh host-name -rs schema-name -un user-name -up password -fvcc monk_scripts/common new.tsc
To promote the file monk_scripts/common/new.tsc from the Sandbox to the run-time Registry
stcregutil -rh host-name -rs schema-name -un user-name -up password -fvcp monk_scripts/common new.tsc
To remove the file monk_scripts/common/new.tsc from the Sandbox, discarding any changes
stcregutil -rh host-name -rs schema-name -un user-name -up password -fvcu monk_scripts/common new.tsc
Note: If you attempt to check out a file that another user has checked out, stcregutil displays a warning message.
Committing and Retrieving Files with -fr and -fc
The examples in this section are printed on more than one line for clarity, but must be issued as a single command line. Use the following procedures to commit and retrieve files using the -fr and -fc flags:
To commit (import) the file new.tsc to the monk_scripts/common path within the file repository
stcregutil -rh host-name -rs schema-name -un user-name -up password -fc monk_scripts/common new.tsc
Note: You can also retrieve/commit one file at a time using the Enterprise Manager’s File menu options. See the e*Gate Integrator User’s Guide for more information.
To retrieve (export) the file Notification.tsc from the file repository
stcregutil -rh host-name -rs schema-name -un user-name -up password -fr monk_scripts/common Notification.tsc
e*Gate IntegratorSystem Administration and Operations Guide 71 SeeBeyond Proprietary and Confidential

Chapter 4 Section 4.5Command-line Reference Basic Utility Commands
There must be a space between the two arguments for –fr (in the previous example, between monk_scripts/common and Notification.tsc).
Caution: Do not export Registry files to the \egate\client directory.
If the “SystemData” variable in .egate.store is set to C:\egate\client, this command places a copy of Notification.tsc within the following directory:
C:\egate\client\monk_scripts\common
Files retrieved from the e*Gate Registry with the -fr flag are written to the directory:
Systemdatadir\path\file-name
Where:
Systemdatadir is the “SystemData” directory specified in the file %HOMEDRIVE%\%HOMEPATH%\.egate.store on Windows systems, or $HOMEPATH/.egate.store on UNIX systems
path and file-name are the path and file name specified as arguments to -fr on the stcregutil command line (see -fr in Table 10 on page 67)
Note: The values stored in the .egate.store file are set during installation.
Format for .ctl Files
Files with the extension .ctl are ASCII text files with each line in the following format:
file-name,directory-name,file-type
Where file-type is one of the following strings:
! FILETYPE_DLL
! FILETYPE_EXE
! FILETYPE_ASCIITEXT
! FILETYPE_BINTEXT
Examples
msg1.ssc,monk_scripts,FILETYPE_ASCIITEXTmsg2.ssc,monk_scripts,FILETYPE_ASCIITEXTstc_iqinternal.dll,iqservices,FILETYPE_DLLstcewfile.exe,bin,FILETYPE_EXE
IQput.isc,monk_scripts/common,FILETYPE_ASCIITEXTeater.sc,configs/stcewfile,FILETYPE_ASCIITEXTHTTP_SSL_NEWER.cfg,configs/stcewgenericmonk,FILETYPE_ASCIITEXThttp-init.monk,monk_library/ewhttp,FILETYPE_ASCIITEXT
Binary files are registered in a \host-type subdirectory of the directory specified in the .ctl file, where \host-type matches the operating system of the Registry Host (for example, win32, hpux11, sparc26, or ibm43).
e*Gate IntegratorSystem Administration and Operations Guide 72 SeeBeyond Proprietary and Confidential

Chapter 4 Section 4.5Command-line Reference Basic Utility Commands
Using .ctl Files
To retrieve (export) a set of files managed by the Registry under a schema
1 Create a .ctl file containing a list of the files you want to retrieve (see the previous section for the .ctl file format).
2 Type the following command to commit the files to the Registry:
stcregutil -rh host-name -rs schema-name -un user-name -up password -fc . -ctl text-file-name.ctl
3 To retrieve the same set of files:
stcregutil -rh host-name -rs schema-name -un user-name-up password -fr . -ctl text-file-name.ctl
Note: Before you can export the .ctl file, it must reside in the following directory:\egate\server\host-name\repository\schema_name\runtime
Exporting or Importing User Names and Passwords
By default, the -e (export) flag exports all schema data except user names and passwords. This enables you to store or exchange schema data without modifying a Participating Host’s defined users or user passwords.
You can export user name and password information only by adding the -usr flag to the command line as follows:
stcregutil -rh host-name -rs schema-name -un user-name -up password -e export-file-name -usr
When you next import the schema, the user information is also imported.
Note: See “Schema Migration” on page 109 for information on how you can use the e*Gate Enterprise Manager GUI for full schema export and import.
Enabling Registry Logging
To enable Registry logging you use the -sl flag in stcregutil as described below, or you can use the -d flag in stcregd as described in “Debug Logging” on page 55.
The log file is stored in \eGate\server\logs.
Once logging is enabled, you can then set the logging level with the -st flag. This flag requires the logging level specified as a hexidecimal value. You can find these values in the e*Gate Enterprise Manager as described below.
To enable Registry logging
! Type the following command line:
stcregutil -rh host-name -un user-name -up password -sl on
To set the logging to the maximum level
! Type the following command line:
stcregutil -rh host-name -un user-name -up password -st 0xffffffff-0xffff
e*Gate IntegratorSystem Administration and Operations Guide 73 SeeBeyond Proprietary and Confidential

Chapter 4 Section 4.5Command-line Reference Basic Utility Commands
To specify a different logging level
1 In e*Gate Enterprise Manager, expand the Participating Host folder, the IQ Manager folder, and the Control Broker folder.
2 Double-click an e*Way to display the e*Way Properties dialog box.
3 Click Advanced.
4 Click Log.
5 Under Debugging flags, click the required logging level.
The Value field shows the hexidecimal value for the logging level selected as shown in the screen below.
6 Make a note of the value and click Cancel twice.
7 Type the stcregutil command line as follows:
stcregutil -rh host-name -un user-name -up password -st hexvalue-0xffff
Where hexvalue is the hexidecimal value retrieved in step 6, for example:
stcregutil -rh host-name -un user-name -up password -st 0x00000022-0xffff
4.5.2 Security: stcaclutilThis command edits e*Gate access control list (ACL) privileges, roles, and user properties. e*Gate uses role-based access controls; you assign privileges to roles (such as Administration, Operations, or Monitor) and assign users to those roles. You cannot assign a privilege directly to a user.
Note: You can also make these changes in e*Gate Enterprise Manager. See Chapter 5 for more information about this and about security features in e*Gate.
Hexidecimal value for thedebugging flags selected
e*Gate IntegratorSystem Administration and Operations Guide 74 SeeBeyond Proprietary and Confidential

Chapter 4 Section 4.5Command-line Reference Basic Utility Commands
Usage
stcaclutil command-flags @command-file
Where command-flags (separated by spaces) are in the table in this section, and command-file is an optional ASCII text file containing command flags and their arguments.
Command flags may appear on the command line in any order, as long as they are followed by their appropriate arguments. Table 11 shows the stcaclutil command arguments.
Table 11 Command Arguments for stcaclutil
Flag Purpose Required
-h Displays a help message.
--ver Displays version information. Note that this flag requires two dashes.
-rh host-name Specify the Registry Host that this command affects.
Always
-un user-name e*Gate user name for user who is issuing the command.
Always
-up password or !directory-name
Password corresponding to the user name. Always
-co command Command (see below). Always
-ua user-name e*Gate user name for user affected by ACL command (see Chapter 5 for more information).
Required by adduser, rmuser, assignrole, unassignrole, chpass, and getroles
-pa password Password to be assigned to user specified by -ua flag.
Required by adduser and chpass
-ra role Name of role. Required by addrole, assignrole, unassignrole, addacl, and chacl
-ta table Name of the e*Gate table affected by the specified privilege (see Table 12 on page 77 for the table list).
Required by addacl and chacl
-aa ACL Privileges to assign to a role. Required by addacl and chacl
adduser Creates an e*Gate user; identical to “create new user” function in Enterprise Manager. After you have created a user, assign it to a role using the assignrole command.
-ua user-name -pa password
rmuser Removes a user; identical to “delete user” function in Enterprise Manager. Also removes that user’s role assignments.
-ua user-name
addrole Defines a role. Once you create a role, define its access with the addacl command.
-ra role-name
e*Gate IntegratorSystem Administration and Operations Guide 75 SeeBeyond Proprietary and Confidential

Chapter 4 Section 4.5Command-line Reference Basic Utility Commands
Default Roles
e*Gate is shipped with roles defined as shown in Table 18 on page 104. The default “Administrator” user is assigned to the Administration, Operations, and Monitor roles.
See “Examples” on page 106 for more information about using stcaclutil to administer roles and Chapter 5 for more information on e*Gate security.
Note: See Table 12 on page 77 for more information about Table names.
Supported Privileges
e*Gate roles support the privileges shown in Table 19 on page 105. When specifying multiple privileges on a command line, separate them with commas but without spaces; for example:
START,SHUTDOWN,VIEW (correct)
not
START, SHUTDOWN, VIEW (incorrect)
rmrole Deletes a role. Also removes all user assignments to that role and all ACL entries defined within that role.
-ra role-name
assignrole Assigns a user to a role. -ra role-name-ua user-name
unassignrole Removes a user’s assignment to a role. -ra role-name-ua user-name
addacl Creates the initial definition of a role’s privileges. This command, and the related command chacl maps the role and the name of the function (actually the tablename in the Registry database) to the privilege. You cannot issue this command more than once for a given role.
-ra role-name-ta table-name-aa privilegeSee Table 12 on page 77 for the Table name list, and Table 19 on page 105 for the ACL/privilege list.
chacl Changes an existing role’s privileges. This command can be used to add, replace, or remove privileges, but it cannot remove all privileges (use rmacl instead).
-ra role-name-ta table-name-aa privilege
rmacl Removes all privileges for the specified role. -ra role-name-ta table-name
chpass Changes an existing user’s password; identical to “modify user properties” in the Enterprise Manager.
-ua user-name-pa password
getroles Retrieves all the roles assigned to a user. -ua user-name
Table 11 Command Arguments for stcaclutil (Continued)
Flag Purpose Required
e*Gate IntegratorSystem Administration and Operations Guide 76 SeeBeyond Proprietary and Confidential

Chapter 4 Section 4.5Command-line Reference Basic Utility Commands
Table Names for stcaclutil
Role ACLs control privileges for all instances of a given component within the specified table. For example, the privilege to start modules enables a user to start all modules. Table 12 shows a list of these table names.
Table 12 Table Names for stcaclutil
Table Governs Valid Privileges
CONTROLBROKER Control Brokers CREATE, VIEW, EDIT, DELETE, EDITACL, SHUTDOWN, STATUS
USER Users CREATE, VIEW, EDIT, DELETE, EDITACL
MONITOR Monitors CREATE, VIEW, EDIT, DELETE, EDITACL
IQUEUE IQs CREATE, VIEW, EDIT, DELETE, EDITACL, REORGANIZE
MESSAGE Messages CREATE, VIEW, EDIT, DELETE, EDITACL
COLLAB Collaborations CREATE, VIEW, EDIT, DELETE, EDITACL
HOST Hosts CREATE, VIEW, EDIT, DELETE, EDITACL,
MODULE Executable files that run unattended; that is, data transport/ transformation modules (such as stcbob.exe) and daemons/services (such as stcregd.exe)
Note: Monitors, the only applications that run attended, have a separate ACL.
CREATE, VIEW, EDIT, DELETE, EDITACL, START, SHUTDOWN, SUSPEND, CONTINUE, RELOAD, STATUS
SCHEDULE Schedules CREATE, VIEW, EDIT, DELETE, EDITACL
IQSERVICE IQ Services CREATE, VIEW, EDIT, DELETE, EDITACL
COLLABSERVICE Collaboration Services CREATE, VIEW, EDIT, DELETE, EDITACL
MSGCOLLABMSG Applying collaborations to messages CREATE, VIEW, EDIT, DELETE, EDITACL
ROLE Roles CREATE, VIEW, EDIT, DELETE, EDITACL
SCHEMA_ACCESS Schema access VIEW
USERROLE Assigns users to roles CREATE, VIEW, EDIT, DELETE, EDITACL
e*Gate IntegratorSystem Administration and Operations Guide 77 SeeBeyond Proprietary and Confidential

Chapter 4 Section 4.5Command-line Reference Basic Utility Commands
Using Schema Access Checking
When you specify the SCHEMA_ACCESS table, you enable schema access checking. You can set this access for an entire schema and/or grant schema access to a particular user as follows:
! A SCHEMA_ACCESS entry for the role Administration is not normally needed since the Administrator user bypasses all security checks anyway.
! To disallow all users from viewing the schema, add only one ACL entry for the table SCHEMA_ACCESS, with the Administration role and the VIEW privilege (this is the single exception to the previous statement). This addition tells the Registry that Enable Schema Access Checking command is on, but no user (except the Administrator) has access to the schema.
! If no ACL entry exists for the SCHEMA_ACCESS table, the Enable Schema Access Checking command in the Enterprise Manager’s Options menu is considered off. So, to allow all users to view the schema (default behavior), you must delete ACL entries for the table SCHEMA_ACCESS for all roles, including Administration.
! If any ACL entry exists for the SCHEMA_ACCESS table, the Enable Schema Access Checking command in the Enterprise Manager’s Options menu is considered on. In other words, unless the Administrator user explicitly adds an ACL entry for the table SCHEMA_ACCESS for a given role, users belonging to that role are not able to view the schema.
For more information on using this feature, see “Schema Access Checking” on page 89.
Caution: Only enter the privilege VIEW for SCHEMA_ACCESS, as indicated in Table 12 on page 77. Entering any other privilege causes schema access checking to function incorrectly.
4.5.3 Monk Engine: stctransThis command launches a stand-alone version of the Monk engine. Use this command to test Monk Collaboration scripts, Monk functions, Event Type Definition (ETD) files, or any other type of Monk scripts. See the Monk Developer’s Reference for more information about the Monk programming language.
Usage
stctrans command-flags @command-file file-to-test
Where command-flags (separated by spaces) are in the table in this section, command-file is an optional ASCII text file containing command flags and their arguments, and file-to-
e*Gate IntegratorSystem Administration and Operations Guide 78 SeeBeyond Proprietary and Confidential

Chapter 4 Section 4.5Command-line Reference Basic Utility Commands
test is the file containing the Collaboration script or Monk Functions to be tested. Table 13 shows the stctrans command arguments.
Examples
In the following example, stctrans tests the functionality of a set of Monk Collaboration scripts that manipulate test data:
1 Use the ETD Editor to create ETD files to support the test data. You can use any file name you like for these files.
2 Use the Collaboration Rules Editor to create a Collaboration Rule script file (in this example, mytest.tsc).
3 Create a file with data to be converted (in this example, testdata.dat).
4 Use Notepad to create a file containing the commands necessary to load the Collaboration Rules script you want to test (in this example, the command file is test.txt). The file must contain the following commands:
(load-directory "C:\EGate\client\monk_library")(load "mytest.tsc")(display (mytest input-string1))(display "\n")
5 Use stctrans to test the Collaboration Rules with the following command:
stctrans -md -ims testdata.dat test.txt
To test Collaboration Rules that require more than one data file, use a command as shown in the following example:
stctrans -md -ims C:\Data\data1.dat,C:\Data\data2.dat test.txt
Table 13 Command Arguments for stctrans
Flag Purpose Required
-h Displays a help message.
-v Verbose mode; shows additional information as commands are processed.
--ver Displays version information. Note that this flag requires two dashes.
-d Debug log on.
-ims file1,file2,...fileN Files containing data (if testing scripts that require external data sources).
-md Monk debugging mode. See the Monk Developer’s Reference for more information.
-ne No e*Gate extensions.
-mi file-name Load the specified Monk initialization functions/parameters from file-name.
-acs file1,file2,...fileN Execute additional Collaboration scripts. File names must be separated by commas (no spaces).
e*Gate IntegratorSystem Administration and Operations Guide 79 SeeBeyond Proprietary and Confidential

Chapter 4 Section 4.5Command-line Reference Basic Utility Commands
The following example illustrates how to use stctrans to test a Monk function:
1 Use the Collaboration Rules Editor (or Notepad) to define the Monk function within a file, for example, test.monk.
2 If the function requires external files (such as data files or ETD files), create them as necessary.
3 Use stctrans to test the Monk function with the following command:
stctrans -md test.monk
For more information about the Monk language and how to debug Monk scripts, see the Monk Developer’s Reference.
4.5.4 Launching an e*Gate GUI: stcguistartThis command launches an e*Gate GUI. The command is issued by the Windows shortcut that launches an e*Gate GUI. See the Windows help system for more information about modifying shortcuts.
Usage
stcguistart command-flags @command-file
Where command-flags (separated by spaces) are in the table in this section, and command-file is an optional ASCII text file containing command flags and their arguments. Table 14 shows the stcguistart command arguments.
4.5.5 System Testing and Support: stcutilThis command provides utilities to facilitate system testing and support. Most users do not need these commands unless they are performing low-level system testing or are working with SeeBeyond support personnel.
Table 14 Command Arguments stcguistart
Flag Purpose Required
-h Displays a help message.
-v Verbose mode; shows additional information as commands are processed.
--ver Displays version information.
-d Debug log on.
-rc class-name Java class to run. Yes
-ra arglist List of parameters, separated by commas.
-jre path Full pathname to jre.exe or jrew.exe (for example:C:\ProgramFiles\JavaSoft\JRE\1.1\bin\jre.exe).
Yes
-ja jre-options Set JRE options
-c command Executes the command specified
e*Gate IntegratorSystem Administration and Operations Guide 80 SeeBeyond Proprietary and Confidential

Chapter 4 Section 4.5Command-line Reference Basic Utility Commands
Usage
stcutil command-flags @command-file
Where command-flags (separated by spaces) are in the table in this section, and command-file is an optional ASCII text file containing command flags and their arguments. Table 15 shows the stcutil command arguments.
Table 15 Command Arguments for stcutil
Flag Purpose Required
-h Displays a help message.
-v Verbose mode; shows additional information as commands are processed.
--ver Displays version information. Note that this flag requires two dashes.
--vn number Displays version number information. Note that this flag requires two dashes. number can be a build number, minor, major, patch. The number can include periods.
-vi dll-file Displays version information for the specified .dll file.Note: On hardware platforms where the version information is not displayed, use the -id parameter instead.
-id file-name Show CVS (RCS) IDs for the sources used to compile the specified file.
-hf MD5|SHA1 file-name
creates a hash for the specified file, using either the MD5 or SHA1 hash algorithms.
-vs Display the byte sizes for variables (such as int, char, or long).
-oi Display information on the currently running OS.
-ps Display configured e*Gate paths.
-set binary-path, data-path
Set paths within .egate.store. Binary-path sets the SharedExe field, data-path sets all other fields. Path names must be separated by a comma (no spaces).
-gr number-to-generate
Generate specified number of random 8 byte numbers (based on the system clock).
-sl seconds Sleep for specified number of seconds.
-bp For a bplus file: dump.
-bd directory For a bplus file: base directory. -bp required
-bs schema-name
For a bplus file: schema name. -bp required
-bt table-ID For a bplus file: table ID (optional). -bp required
-bk key-ID For a bplus file: key ID (optional). -bp required
e*Gate IntegratorSystem Administration and Operations Guide 81 SeeBeyond Proprietary and Confidential

Chapter 4 Section 4.5Command-line Reference Basic Utility Commands
4.5.6 Monitor Command: stccmdThis utility monitors the e*Gate system. It provides similar functionality to the e*Gate Monitor (the graphical monitor GUI), but with a text interface that you can use over slow network connections or in cron/batch files.
Note: For more information on this utility, see the e*Gate Integrator Alert and Log File Reference Guide.
On Windows systems, we recommend you use this utility for non-interactive (batch) applications only. The e*Gate Monitor provides superior functionality for interactive monitoring on Windows systems. For more information about e*Gate Monitor, refer to the e*Gate Integrator Alert and Log File Reference Guide.
-bc column-ID For a bplus file: column ID to print (optional). -bp required
-bl column-length
For a bplus file: column length to print (optional). -bp required
-pfo Generates a file .egate.stcpass in the connected directory, containing password data (used to generate hashed passwords); does not affect any Registry password files.
-pfu user-name Create an entry within the password file for the specified user name.
-pfo and -pfp required
-pfp password Create an entry within the password file for the specified password.
-pfo and -pfu required
-sf Display information from the status file.
-sc count status file: view file information for count repetitions (0=continuous).
-sf required
-sp seconds For a status file: pause time between counts. -sf required
-si For a status file: initialize status file. -sf required
-sr For a status file: read status file. -sf required
-gm file-name Generate test Events within the named file.
-gc count Number of test Events to generate. -gm required
-gs bytes Test Event size. -gm required
Table 15 Command Arguments for stcutil (Continued)
Flag Purpose Required
e*Gate IntegratorSystem Administration and Operations Guide 82 SeeBeyond Proprietary and Confidential

Chapter 4 Section 4.5Command-line Reference Basic Utility Commands
Usage
stccmd command-flags @command-file
Where command-flags (separated by spaces) are in the table in this section, and command-file is an optional ASCII text file containing command flags and their arguments. Table 16 shows the stccmd command arguments.
Monitor Commands
Once the e*Gate Monitor is invoked, commands can be issued to the Monitor. Many of these commands have corresponding commands in the e*Gate Monitor GUI. For more information about e*Gate Monitor, see the e*Gate Integrator Alert and Log File Reference Guide.
Table 17 shows a list of the commands that are available from the Monitor command prompt.
Table 16 Command Arguments for stccmd
Flag Purpose Required
-h Displays a help message.
-q Quiet mode; do not display command output (most useful for batch file operation).
--ver Displays version information. Note that this flag requires two dashes.
-rh host-name Name of the Registry Host. Yes
-rs schema-name Name of the schema (if not specified, “default” schema is used). Yes
-un user-name User name as defined within the specified schema. Yes
-up password or !directory-name
Password corresponding to the specified user name or name of directory containing the .egate.stcpass file (see “Additional Information” on page 54).
Yes
-rp Registry-port Specifies the Registry port that this command affects.
-cb Control Broker as defined within the specified schema. Yes
-cmd command Command to execute. For a list of commands, see Table 17 on page 83.
Table 17 Monitor Commands
Command Purpose
! <number> Re-executes command #<number>.
!! Repeats the last command.
? Lists the available commands.
activate <component name> Instructs an element to begin processing data. This is normally used after a suspend command.
attachiq <IQ name> Attaches to the specified IQ and enables it to be used by the system.
e*Gate IntegratorSystem Administration and Operations Guide 83 SeeBeyond Proprietary and Confidential

Chapter 4 Section 4.5Command-line Reference Basic Utility Commands
cls [cmd|stat] Clears the screen. Using the cmd parameter clears the command window. Using the stat parameter clears the status window.
debug <component name> [flag] Shows or changes an element’s debug flags.debug <component name> displays the current debug settings.debug <component name> <flags> changes the element’s debug settings to flags, a string representing the debugging channels to enable.debug <component name> ALL enables the debug flag for all elements.debug <component name> -ALL disables the debug flag for all elements.
detachiq <IQ name> Detaches from the specified IQ and disables it from use by the system.
exit Exits from the Monitor command.
help <command> Displays help for the commands. If a command is specified, a detailed description of that command is displayed. Otherwise, a summary of all commands is displayed.
history Displays a list of all commands that have been executed during this stccmd session.
list [all | monitors {-m} | alertors {-a} | iq {-i} | control {-c} ]
Displays a list of specified elements.
quit Quits the stccmd session.
reload <component name> [hard] Instructs the module to reload its configuration.
resolve <notification_number> Marks the specified notification as resolved.
sequence <component_name> [value]
Displays the current message sequence number for an element.sequence <component_name> [value] sets the element’s current message sequence number to [value].
shell <shell command> Executes the specified command outside the stccmd environment.
shutdown <component name> Sends the command to shut the module down.
shutdownall <shutdownall> Sends the command to shut down all modules.
start <component name> Starts (or restarts) the specified module.
startall <startall> Starts (or restarts) all modules.
status <component name> Displays the status for the specified module.
suspend <component name> Instructs a module to suspend data processing.
version <component name> Shows the version ID of the specified component.
Table 17 Monitor Commands (Continued)
Command Purpose
e*Gate IntegratorSystem Administration and Operations Guide 84 SeeBeyond Proprietary and Confidential

Chapter 5
Security
This chapter explains the security features available in e*Gate, their operation, and how to use them.
Chapter Topics
! “Role-Based Security: Overview” on page 85
! “Accessing ACL Security from the Enterprise Manager” on page 86
! “Accessing ACL Security from the Command Line” on page 102
! “File and Directory Permissions” on page 106
5.1 Role-Based Security: Overviewe*Gate security is role-based, a system based on the premise that while people in an organization may change, the roles they fill are relatively constant. For example, an information systems (IS) organization may have system operators who can restart systems but who cannot create user accounts, and system administrators that create or modify user accounts but who cannot reboot systems.
Any given employee may be an operator, an administrator, or fill both roles. Using the role-based model, privileges can be assigned to the roles, for example, “Operator” and “Administrator.” Then, users can be assigned to those roles.
This model has several advantages. Privileges are assigned once when a role is created, rather than each time a user changes responsibilities. Changing a user’s role assignment requires only one or two steps (creating a new role assignment and deleting the old assignment). Finally, should roles need to be redefined, changing each role’s privileges changes the privileges inherited by all users assigned to that role, automatically.
These features enable e*Gate’s Access Control List (ACL) security system. You can control the ACL system in the following ways:
! Using the e*Gate Enterprise Manager
! Using the command line
Important: The ability to change ACL security features in e*Gate is only available to the Administrator user. The Security folder in the GUI is only visible to this user.
e*Gate IntegratorSystem Administration and Operations Guide 85 SeeBeyond Proprietary and Confidential

Chapter 5 Section 5.2Security Accessing ACL Security from the Enterprise Manager
For complete information about the Enterprise Manager, refer to the e*Gate Integrator User’s Guide.
5.2 Accessing ACL Security from the Enterprise ManagerThis section explains how to access, enable, and control e*Gate security using the Enterprise Manager.
5.2.1 Access Control List GUIACL features in the Enterprise Manager enable the Administrator user to do the following tasks directly from the GUI:
! Create, rename, or delete users
! Modify user passwords
! Create or delete additional roles
! Assign privileges or rights to roles
The role-based e*Gate security system means that any employee may be an operator, an administrator, or could fill both roles. Using the role-based model, privileges can be assigned to roles, for example, “Operator” and “Administrator,” then individual users can be assigned to those roles.
Users
Within the Enterprise Manager, each executable component, for example, e*Way Intelligent Adapters, Business Object Brokers (BOBs), Control Brokers, and Agents, is run “as” an e*Gate user, under that user’s name and password.
Each e*Gate Registry Host maintains its own list of users. This user list applies to every schema on the Registry Host. An e*Gate user name and password are required for all e*Gate operations, including:
! Using the Enterprise Manager
! Using the e*Gate Monitor
! Running the command-line utility
! Launching services or other e*Gate modules, such as e*Ways, BOBs, Control Brokers, or Intelligent Queue (IQ) Managers
Note: A module is a component that requires an executable file (*.exe) for its configuration.
Roles
Roles define the operations that classes of users are allowed to perform. You define roles according to your business requirements. e*Gate defines four default roles:
e*Gate IntegratorSystem Administration and Operations Guide 86 SeeBeyond Proprietary and Confidential

Chapter 5 Section 5.2Security Accessing ACL Security from the Enterprise Manager
! Administration
! Operations
! Monitor
! Module
Users are assigned to roles. For example, the default “Administrator” user is assigned to the Administration, Operations, and Monitor roles. The Module role is reserved for executable e*Gate components (for example, BOBs and e*Ways).
Note: When a new role is created, at first it lacks all privileges. Users who have only this one role cannot view any modules until the role has been granted privileges.
Privileges
Privileges (abilities to do tasks) define the rights associated with a role for component categories (examples of component categories would be “IQs”, or “Collaborations”). You can assign privileges in either of the following ways:
! From the perspective of the role, that is, assigning privileges for each component category for a specific role
! From the perspective of the component categories, by assigning roles and privileges associated with the role for the specific component category
The following privileges apply to components within a schema:
" Create new components
" View components
" Change component properties or rename
" Delete components
" IQ clean-up and reorganizing (applies to IQs only)
The following privileges apply to modules:
" Starting
" Shutting down
" Suspending
" Continuing (opposite of suspending)
" Reloading
" Requesting status information
" Implementing user-defined commands
The following privilege applies only to e*Ways and BOBs:
" Debug
e*Gate IntegratorSystem Administration and Operations Guide 87 SeeBeyond Proprietary and Confidential

Chapter 5 Section 5.2Security Accessing ACL Security from the Enterprise Manager
5.2.2 Using the Security FeatureThe ACL security system requires setting security at different levels to achieve the desired effect. As stated previously, the ACL system is role-based, so all privileges are associated with different roles, and users are assigned to those roles. Privileges are not associated with specific users directly.
You can assign security to modules in two ways:
! At the global level, meaning privileges apply to all modules within a certain component category. For example, you can configure a role to have view privileges for all e*Ways in a schema.
! At the specific level, meaning privileges apply to a specific module in the schema. For example, users assigned to a given role may have view privileges for all e*Ways in a schema, but they may also have edit privileges for a specific e*Way, called Inbound.
Figure 16 illustrates the workflow for configuring security at the global level in the e*Gate Enterprise Manager.
Figure 16 Configuring Security Globally in the Enterprise Manager
To set up e*Gate’s security feature
1 Create users. This is always the first step no matter which path (approach) you take to assigning privileges later on.
2 Create roles. You must have roles defined before you can use them in other functions.
Create users.
OR
Create roles.
Assign usersto roles.
Assign rolesto users.
OR
Assigncomponent
categoryprivileges to
roles.
Assign roleprivileges tocomponentcategories.
e*Gate IntegratorSystem Administration and Operations Guide 88 SeeBeyond Proprietary and Confidential

Chapter 5 Section 5.2Security Accessing ACL Security from the Enterprise Manager
3 Associate users with roles. You can do this in one of the following ways:
" Select a user and assign roles to the user.
" Select a role and assign users to the role.
4 Associate roles with privileges for component categories. You can do this in one of two ways:
" Select a role, and assign privileges for each component category for that role.
" Select a component category, and assign privileges for each role for that category.
The following sections describe the procedures for each step in detail. For information on how to change security privileges at the specific level (for a specific module in the schema), see “Assigning Privileges for a Specific Module” on page 98.
Schema Access Checking
Enable schema-level security by clicking the Enable Schema Access Checking command on the Options menu in the Enterprise Manager. This command operates as a toggle. After this feature is enabled, you can implement schema access for any specific role in the current schema.
Once this access is granted to a role, every user assigned to that role is able to access the current schema, and the following conditions apply:
! If ACL is not in use, there is no schema access checking. In this case, all users have full access to the current schema.
! Schema access is on an all-or-none basis. If schema access check is implemented in a given schema, roles grant their assigned users either access to the schema or no access to the schema.
Note: If the System Administrator uses the Enable Schema Access Checking menu command, no other user can view the schema until schema access is assigned to one or more roles belonging to one or more users. See “To assign schema access to a role” on page 96 for instructions on how to assign schema access.
! If one or more roles in a schema has this privilege, only users assigned these roles have access to that schema.
! The Administrator user always has access to any schema.
! Schemas imported from earlier e*Gate releases are accessible by any user until or unless they are modified otherwise in the current release.
! If you want to give all users access to the current schema at any time, you can click (uncheck) the Enable Schema Access Checking command.
Creating Users
To create a new user
1 Log into the e*Gate Enterprise Manager as Administrator.
2 Open the desired schema.
e*Gate IntegratorSystem Administration and Operations Guide 89 SeeBeyond Proprietary and Confidential

Chapter 5 Section 5.2Security Accessing ACL Security from the Enterprise Manager
3 Select the Components tab.
4 In the Navigator, double-click the Security folder.
The following folders appear: Users, Roles, and Privileges.
5 Select the Users folder.
6 On the Palette, click the Create a New User button.
The User Properties dialog box appears (see Figure 17).
Figure 17 User Properties Dialog Box
7 Enter the name of the user you want to add.
8 Under Enter User Password, type the password for this user.
9 Retype the password to confirm it.
10 Assign roles to the user (see “Associating Users with Roles” on page 91), or click OK to close the dialog box.
Note: Names and passwords are case-sensitive and can only contain alphanumeric characters, dashes, and underscores (no spaces, commas, periods, or other punctuation). Names can be a maximum of 56 characters long and passwords can be up to 64 characters long. The password must be entered twice and both times must match exactly.
e*Gate IntegratorSystem Administration and Operations Guide 90 SeeBeyond Proprietary and Confidential

Chapter 5 Section 5.2Security Accessing ACL Security from the Enterprise Manager
Creating Roles
To create a new role
1 Log into the e*Gate Enterprise Manager as Administrator.
2 Open the desired schema.
3 Select the Components tab.
4 In the Navigator, double-click the Security folder.
The following folders appear: Users, Roles, and Privileges.
5 Select the Roles folder.
6 On the Palette, click the Create a New Role button.
The New Role Component dialog box appears (see Figure 18).
Figure 18 New Role Component Dialog Box
7 Enter the name of the role you want to add.
8 Click OK to close the dialog box.
Associating Users with Roles
You can associate roles with users in two ways: By assigning roles to a specific user or by assigning users to a specific role.
To assign roles to a user
1 Log into the e*Gate Enterprise Manager as Administrator.
2 Open the desired schema.
3 Select the Components tab.
4 In the Navigator, double-click the Security folder.
The following folders appear: Users, Roles, and Privileges.
5 Select the Users folder.
e*Gate IntegratorSystem Administration and Operations Guide 91 SeeBeyond Proprietary and Confidential

Chapter 5 Section 5.2Security Accessing ACL Security from the Enterprise Manager
6 Open the User Properties dialog box for the desired user. In this example the user is Guest1 (see Figure 19).
Figure 19 Guest1 User Properties Dialog Box
7 From the Available Roles list, select one or more roles to be assigned to the user.
8 Click the right arrow to move a role to the Selected Roles list.
9 Click OK to close the User Properties dialog box.
To assign users to a role
1 Log into the e*Gate Enterprise Manager as Administrator.
2 Open the desired schema.
3 Select the Components tab.
4 In the Navigator, double-click the Security folder.
The following folders appear: Users, Roles, and Privileges.
5 Select the Roles folder.
e*Gate IntegratorSystem Administration and Operations Guide 92 SeeBeyond Proprietary and Confidential

Chapter 5 Section 5.2Security Accessing ACL Security from the Enterprise Manager
6 Open the Role Properties dialog box for the desired role. In this example the role is Operations.
7 Select the General tab (see Figure 20).
Figure 20 Role Properties Dialog Box
8 In the Available Users list, select the user you want to assign to this role.
9 Click on the right arrow to move the desired user from the Available Users list to the Selected Users list.
10 Click OK to close the Role Properties dialog box.
Associating Privileges with Roles
You associate privileges globally in one of two ways: By assigning component privileges to a role, or by assigning role privileges to a component category. When you change the privileges associated with a role, the changes are automatically inherited by all users assigned to that role.
You assign privileges to component categories globally through the Privileges folder. To assign privileges for a specific component — superseding the global privileges for that component — see “Assigning Privileges for a Specific Module” on page 98.
For a complete list of e*Gate’s ACL privileges and what they govern, see Table 19 on page 105.
e*Gate IntegratorSystem Administration and Operations Guide 93 SeeBeyond Proprietary and Confidential

Chapter 5 Section 5.2Security Accessing ACL Security from the Enterprise Manager
To assign component privileges to a role
1 Log into the e*Gate Enterprise Manager as Administrator.
2 Open the desired schema.
3 Select the Components tab.
4 In the Navigator, double-click the Security folder.
The following folders appear: Users, Roles, and Privileges.
5 Select the Roles folder.
6 Open the Role Properties dialog box for the desired role. In this example the role is Operations.
7 Select the Security tab.
The Security portion of the Properties dialog box appears.
8 Click Privilege.
Note: For a complete list of privileges you can assign in e*Gate, see “Privileges” on page 87.
The Assign Privileges dialog box for the Operations role appears. This dialog box (Figure 21) shows all privileges assigned to this role for all components.
Figure 21 Assign Privileges Dialog Box (All Components)
Note: In Figure 21, a Message Collaboration Message (Msg Collaboration Msg in the Component Category column) defines the security information for a Monk Collaboration Rules component, and Collaboration Mappings defines that
e*Gate IntegratorSystem Administration and Operations Guide 94 SeeBeyond Proprietary and Confidential

Chapter 5 Section 5.2Security Accessing ACL Security from the Enterprise Manager
information for a Java Collaboration Rules component.
For more information on Collaboration Rules, Collaboration Mappings, and the Enterprise Manager’s Collaboration Rules Editors, see the e*Gate User’s Guide.
9 To add a new component category not listed, click Add Component Category.
When you add a new component category, you assign to the role the privileges shown for the component category. You add a new component category to this list when you want to assign a role with privileges for this component, to one or more users. Use this dialog box to choose the privileges you want to associate with the current component category.
10 Place a check in the boxes for the privileges you want to assign for this component category.
11 Click OK to close the dialog box.
To assign role privileges to a component category
1 Log into the e*Gate Enterprise Manager as Administrator.
2 Open the desired schema.
3 Select the Components tab.
4 In the Navigator, double-click the Security folder.
The following folders appear: Users, Roles, and Privileges.
5 Select the Privileges folder.
6 Select the component category to which you want to assign role privileges. In this example the component category is Control Brokers.
7 On the Toolbar, click the Properties button.
Note: If you create a new role with view permissions associated with each component, the user can change the logging levels and debug flags. This is especially useful for a “night administrator” or any other user who needs log-level authority without the ability to change the configuration.
The Assign Privileges dialog box for the Control Brokers component category appears (see Figure 22 on page 96). You will assign privileges associated with the component category to roles here. This dialog box shows only the privileges associated with a specific component category (“Control Brokers” in the example).
e*Gate IntegratorSystem Administration and Operations Guide 95 SeeBeyond Proprietary and Confidential

Chapter 5 Section 5.2Security Accessing ACL Security from the Enterprise Manager
Figure 22 Assign Privileges Dialog Box
8 To add a role, click Add Role.
The Add Role dialog box appears with available roles.
Note: Additional roles must be available (previously created) in order to be added to the list.
9 In the Add Role dialog box, select the role you want to add.
10 Click OK to close the dialog box and add the role.
The role is added to the component’s list of roles. Any users associated with the role inherit the privileges it contains.
11 Select the boxes for the privileges you want to assign to this role.
12 Click OK to close the dialog box.
Module Lock
You can enable user roles to allow the use of the Control Broker component. Roles that include Control Broker proviledges can modify all modules under all Control Brokers.
If you have done this and do not want users to be able to modify modules under a particular Control Broker, you must select the Module Lock privilege in the Control Broker’s Assign Privileges dialog box (see Figure 22 on page 96).
To assign schema access to a role
1 Log into the e*Gate Enterprise Manager as Administrator.
e*Gate IntegratorSystem Administration and Operations Guide 96 SeeBeyond Proprietary and Confidential

Chapter 5 Section 5.2Security Accessing ACL Security from the Enterprise Manager
2 Open the desired schema.
3 On the Options menu click the Enable Schema Access Checking command.
This action enables schema access checking. If this feature has already been enabled, you can skip this step.
Note: Schema access is always enabled, disabled, and assigned to roles in the current schema. No other schema is affected.
4 Select the Components tab.
5 In the Navigator, double-click the Security folder.
The following folders appear: Users, Roles, and Privileges.
6 Select the Roles folder.
7 Open the Role Properties dialog box for the desired role. In this example the role is Administration.
8 Select the Security tab.
The Security portion of the Properties dialog box appears as shown in Figure 23.
Figure 23 Role Properties Dialog Box — Security Tab
Note: The dialog box in the previous figure shows that schema-level security has been enabled. The upper section of the dialog box would be shaded if this feature had not been enabled.
e*Gate IntegratorSystem Administration and Operations Guide 97 SeeBeyond Proprietary and Confidential

Chapter 5 Section 5.2Security Accessing ACL Security from the Enterprise Manager
9 Click the Allow Schema Access check box.
10 Click OK to implement the access and close the dialog box.
The schema-level access feature handles privileges somewhat differently from the way other privileges are handled. For more information on using this feature, see “Schema Access Checking” on page 89.
Assigning Privileges for a Specific Module
To assign privileges for a specific module
1 Log into the e*Gate Enterprise Manager.
2 Open the desired schema.
3 Select the Navigator’s Components tab.
4 Double-click the Participating Host that contains the desired module.
5 Select the module to which you are assigning privileges.
6 On the Toolbar, click the Properties button.
The module’s Properties dialog box appears.
7 Click the Security tab (see Figure 24).
Figure 24 Control Broker Properties Dialog Box
8 Click Privilege.
The Assign Privileges dialog box appears (see Figure 25 on page 99).
e*Gate IntegratorSystem Administration and Operations Guide 98 SeeBeyond Proprietary and Confidential

Chapter 5 Section 5.2Security Accessing ACL Security from the Enterprise Manager
Figure 25 Assign Privileges Dialog Box (Control Broker)
Note: You can also use this dialog box to remove any roles previously assigned.
9 Click Add Role and select the desired role from the resulting Add Role dialog box. The new role appears in the list (see Figure 26).
Figure 26 Assign Privileges—Role Added to List
e*Gate IntegratorSystem Administration and Operations Guide 99 SeeBeyond Proprietary and Confidential

Chapter 5 Section 5.2Security Accessing ACL Security from the Enterprise Manager
10 Once you have added a role, click any desired check box to assign one or more privileges (View, Edit, Delete, Shutdown, or Status) for the module.
11 Click OK to return to the module’s Properties dialog box.
Note: If you create a role without any privileges for the IQ Manager module, the IQ Manager button is unavailabe for the user. Users assigned to that role can double-click the button to run the module, but cannot perform any operations. Additionally, if you create a role that does not include the View privilege for the IQ Manager, any users assigned to that role can run the module but cannot view any IQs.
Changing Your Password
You can change your password in the e*Gate Enterprise Manager as described below.
To change your password
1 Log into the e*Gate Enterprise Manager.
2 From the Enterprise Manager window, on the Options menu, click Change Password.
The Change Password dialog box appears.
3 Type the password you want to change.
4 In the Password box, type the new password.
5 In the Confirm Password box, type the new password a second time.
6 Click OK.
The e*Gate Registry records the changed password.
5.2.3 Component Execution and User NamesWithin the Enterprise Manager, each executable component, for example e*Ways, BOBs, Control Brokers, or Agents, is run “as” an e*Gate user, under that user’s name and password. From the operating system’s perspective, each process is run under a specific user’s name. This section explains how to select the user names under which a component runs in both environments.
e*Gate IntegratorSystem Administration and Operations Guide 100 SeeBeyond Proprietary and Confidential

Chapter 5 Section 5.2Security Accessing ACL Security from the Enterprise Manager
Note: In e*Gate, executable components are also called modules.
e*Gate User Names
You can configure components to “run as” any e*Gate user name that has sufficient privilege to access the necessary files and system resources (see the next section for more information about privileges). However, to make the most of Team Registry features, components should not run under the names of users who have checked out files into their Sandboxes.
For example, if the user “peter” is developing scripts or other files, no components should run under the “peter” user name.
e*GateComponent User
During development, you can run components under the“e*GateComponent” user, one of e*Gate’s default users. The default settings for this user include the role of Operations and a blank password. As a password must be provided to log into e*Gate Enterprise Manager, you will be assured that no one will use this user to log in and run components while you are developing them.
Note: You can delete the “e*GateComponent” user without bringing harm to the system. However, you will not be able to create another user with a blank password.
To change the user name under which components execute
1 Log into the Enterprise Manager as Administrator.
2 Open the desired schema, and select the Components tab.
3 Navigate to the component that you wish to configure, and display its properties.
4 From the Run As User list, select a user name.
Note: If you change the Run As user for a component that is started as a Windows service or is launched by a batch file, at job, or cron job, you must change the -un and -up flags for that component to match the new user name. For more information about command-line flags, see Chapter 4.
Operating-system User Names
Under Windows, services by default run under the “system” account. You can change this parameter using the Control Panel’s Service applet. See the Windows Help system for more information about configuring Windows services.
Under UNIX, the processes run under the e*Gate user name you specify. However, if the name is not a valid login name for the host system, an error message is written to the log and the process run as “root.” The Control Broker must run as “root” if you wish the components that it runs to start under different (non-root) user names; otherwise, the components that the Control Broker starts run under the same name as the Control Broker.
e*Gate IntegratorSystem Administration and Operations Guide 101 SeeBeyond Proprietary and Confidential

Chapter 5 Section 5.3Security Accessing ACL Security from the Command Line
5.3 Accessing ACL Security from the Command LineThis section explains how to access, enable, and control e*Gate security using the command-line API.
5.3.1 Enabling e*Gate SecuritySecurity in e*Gate is enabled by adding the -acl flag to the command line that launches the e*Gate Registry service and the Control Broker service.
If you wish to employ e*Gate’s role-based security system, we recommend that you do the following operation:
1 Create the new roles.
2 Add the -acl flag to both the Registry Service and the Control Broker Service.
These actions enable e*Gate’s ACL security system and ensure that this system protects both configuration and operations.
On UNIX systems, the e*Gate Registry daemon and the Control Broker daemon are launched by commands in /etc/inittab.
On Windows systems, the command lines that launch the e*Gate Registry Service and the Control Broker Service are located within the Windows Registry. See Appendix A for more information about e*Gate entries within the Windows Registry.
Note: When security is enabled, only an Administrator can use the Enterprise Manager to create or modify schemas. You must explicitly add other users to the appropriate roles before they can perform their required functions.
5.3.2 Managing UsersInstead of using the Enterprise Manager GUI, you can manage users with the command-line utility stcaclutil.exe. See “Security: stcaclutil” on page 74 for more information.
Note: User names are defined per Registry Host instead of per schema. When you open any schema within a single Registry Host, you see the same user list.
Each e*Gate Registry Host maintains its own list of users. This list applies to every schema on the Registry Host. A unique e*Gate user name (with a password) is required for all e*Gate operations, including:
! Using the Enterprise Manager
! Using the e*Gate Monitor
! Running any command-line utility
! Launching services or other e*Gate executable modules, such as e*Ways, BOBs, Control Brokers, or IQ Managers
e*Gate IntegratorSystem Administration and Operations Guide 102 SeeBeyond Proprietary and Confidential

Chapter 5 Section 5.3Security Accessing ACL Security from the Command Line
Note: The Enterprise Manager does not obtain or validate its user names against those required to log in to the operating system. However, to simplify administration, SeeBeyond recommends that you make e*Gate user names the same as the login names that are defined on the e*Gate host and client network systems.
User Name and Password Restrictions
User names and passwords are case-sensitive. User names have the same restrictions as all other e*Gate components. For complete guidelines on user names and passwords, see the e*Gate Integrator User’s Guide.
5.3.3 Using a Password FileThe e*Gate user names and passwords are stored in the Registry. However, you can store encrypted passwords in a file that e*Gate components can use when authenticating upon startup. This enables you to create command files to launch e*Gate components without requiring you to include user passwords in clear text.
The e*Gate password file is named
.egate.stcpass
This file is stored in the \SystemData directory specified in the .egate.store file. Password file contents are similar to the following example:
[UserPasswords]USER1=021738FUSER2=0413261ADMINISTRATOR=0388D080
Note: See the e*Gate Integrator User’s Guide for more information on the contents of the .egate.store file. It is a good idea to back up these files in separate directories, after your initial e*Gate installation.
To refer to the password file on a component’s command line
! Replace the clear-text user password with the string !directory where directory is the name of the directory containing the password file.
The installation procedure creates a single entry within the password file for the “Administrator” user. Creating users within the Enterprise Manager does not automatically update this file; you must create entries manually with the stcutil.exe command-line utility.
Note: The first time you run this utility, you overwrite the default password file created by the installation utility. Subsequent uses of the utility append entries to the file.
To add entries to the password file
! At a command prompt, type:
stcutil.exe -pfo -pfu user-name -pfp password
e*Gate IntegratorSystem Administration and Operations Guide 103 SeeBeyond Proprietary and Confidential

Chapter 5 Section 5.3Security Accessing ACL Security from the Command Line
Where user-name is the name of an e*Gate user and password is that user’s password.
If a user’s password is changed, you must update this file manually.
Note: For a complete list and description of all the arguments for the stcutil command see Table 15 on page 81.
5.3.4 Managing RolesRoles define the operations that classes of users are allowed to perform. Roles are administered using the e*Gate ACL utility, stcaclutil.exe (see Table 12 on page 77 for more information about component category names).
The e*Gate default roles define specific privileges as shown in Table 18.
The default “Administrator” user is assigned to the Administration, Operations, and Monitor roles. The Module role is reserved for e*Gate module components (such as e*Ways or BOBs).
Note: Roles are defined separately for each schema.
Table 18 Default Roles
Role Component Categories Privileges Purpose
Administration All CREATE, VIEW, EDIT, DELETE, EDITACL
Enables users to change the e*Gate configuration but not to operate the system.
Operations MODULE VIEW, START, SHUTDOWN, SUSPEND, CONTINUE, RELOAD, STATUS
Enables users to operate the e*Gate system, but not to change its configuration.
CONTROL-BROKER, IQUEUE, HOST
VIEW
Monitor MODULE VIEW, STATUS Enables users to view e*Gate’s status but to make no modifications.CONTROL-BROKER,
IQUEUE, HOSTVIEW
Module CONTROL-BROKER, IQUEUE, MESSAGE, COLLAB, HOST, IQSERVICE, COLLAB-SERVICE, MSGCOLLABMSG
VIEW Reserved for executable components (such as e*Ways and BOBs), which need certain privileges to obtain and change their own configuration information.
MODULE VIEW, EDIT
e*Gate IntegratorSystem Administration and Operations Guide 104 SeeBeyond Proprietary and Confidential

Chapter 5 Section 5.3Security Accessing ACL Security from the Command Line
Table 19 lists the privileges that you can assign to roles.
Note: For more information about the Module Lock privilege, see “Module Lock” on page 96.
VIEW Permissions for “Parent” Components
Whenever a component in the graphic schema tree is a “parent” to other components, you must assign VIEW privileges for those parent components before you assign any privileges for viewing or modifying child components (see the following figure).
Table 19 Privileges Supported by stcaclutil
Privilege Governs
Privileges that apply to components within a schema
CREATE Create new component
VIEW View component. Also allows user to change logging levels.
EDIT Change component properties or name
DELETE Delete component
EDITACL Edit component’s ACL
REORGANIZE Reorganize (clean up) IQs (applies to IQs only)
Privileges that apply to BOBs, e*Ways, IQ Managers, and e*Insight Engines
START Start module
SHUTDOWN Shutdown module
SUSPEND Suspend module
CONTINUE Continue (unsuspend) module
RELOAD Reload module
STATUS Request Status
USERCOMMAND User-defined command
Privileges that apply to BOBs and e*Ways
DEBUG Use the Java In-schema Debugger
Privileges that apply to Control Brokers
MODULE LOCK Prevents users from editing modules within a Control Broker.
e*Gate IntegratorSystem Administration and Operations Guide 105 SeeBeyond Proprietary and Confidential

Chapter 5 Section 5.4Security File and Directory Permissions
Figure 27 Component View Permissions
Be sure that any role that has privileges to view, modify, or control IQs, IQ Managers, BOBs, or e*Ways has the VIEW privilege, for those components’ Control Broker and Participating Host.
Examples
Some examples contained in this section are printed on more than one line due to space considerations. Keep in mind that you must issue all commands on a single command line.
To create the role “Module_Operator”
stcaclutil.exe -rh host-name –rs schema-name -un user-name -up password -co addrole -ra Module_Operator
To define the privileges of the Module_Operator role as being able to start up and shut down executable components (“modules”)
stcaclutil.exe -rh host-name -rs schema-name -un user-name -up password -co addacl -ra Module_Operator -ta MODULE -aa START,SHUTDOWN
To assign the user “peter” to the role “Module_Operator”
stcaclutil.exe -rh host-name -rs schema-name -un user-name -up password -co assignrole -ra Module_Operator -ua peter
To assign the user “peter” to an additional role, “Monitor”
stcaclutil.exe -rh host-name -rs schema-name -un user-name -up password -co assignrole -ra Monitor -ua peter
To change the password for user “peter” to “newpasswd”
stcaclutil.exe -rh host-name -rs schema-name -un user-name -up password -co chpass -ua peter –pa newpasswd
For more information about stcaclutil.exe, see “Security: stcaclutil” on page 74.
5.4 File and Directory PermissionsThe e*Gate files themselves should be adequately protected using operating-system file and directory protections. Avoid making any file within e*Gate writable by all users.
We recommend the following configuration:
On All Operating Systems
1 Restrict access to Participating and Registry Hosts to trusted, authorized users. These hosts not only contain the e*Gate configuration, but living data; apply the
To access these components ...
... you must have VIEW privilege for these components.
e*Gate IntegratorSystem Administration and Operations Guide 106 SeeBeyond Proprietary and Confidential

Chapter 5 Section 5.4Security File and Directory Permissions
same restrictions to these hosts as you would to any system containing the data that e*Gate transports.
2 Do not install the Enterprise Manager on Participating Hosts.
3 Do not install Participating Hosts and Registry Hosts that manage production systems on user computers.
5.4.1 Registry Host SecurityRegistry Hosts Running Windows
1 Install e*Gate as a user with Administrator privileges to a disk formatted as NTFS.
2 Create a user (for example, “egate-daemon”) that runs the e*Gate processes and owns the e*Gate files. Use any password that conforms to your site’s security requirements.
3 Open the Windows Control Panel and double-click Services.
4 For each e*Gate service, change the “log on as” parameter to the name of the user you created in step 2.
5 Exit the Service applet and close the Control Panel.
6 Change the permissions on the e*Gate root directory and all subsidiary files and directories to grant full control by the e*Gate user you created in step 2 and no access to all other users.
Registry Hosts Running UNIX
1 Make sure that all the files under the e*Gate root directory are owned by a single user. This user can be root, or an “egate” user created for such a purpose.
2 chmod all e*Gate files to 700.
5.4.2 Participating Host SecurityOn All Operating Systems
! All executing components must have full access to the e*Gate/client subdirectory and all subsidiary files and directories.
Note: The installation process for the Participating Host requires access to /etc/inittab to add settings that start the Control Broker automatically. Once that action has been accomplished, root access is not required by any e*Gate Participating Host process.
5.4.3 Client SecurityOn All Operating Systems
! Any user running the e*Gate GUIs must have full access to the e*Gate/client subdirectory and all subsidiary files and directories.
e*Gate IntegratorSystem Administration and Operations Guide 107 SeeBeyond Proprietary and Confidential

Chapter 6
Migrating Schemas and Components
This chapter explains how to migrate either an entire schema or a single schema component/module from one Registry Host to another.
Chapter Topics
! “Schema/Component Migration: Overview” on page 108
! “Using Enterprise Manager Migration Features” on page 108
! “Using Command-line Migration Features” on page 120
! “Deleting and Renaming Schemas” on page 126
6.1 Schema/Component Migration: OverviewUsing e*Gate features, you can migrate (import or export) an entire schema, with all its configuration parameters, Event Type Definitions (ETDs), Collaboration Rules scripts, and other relevant files from one Registry Host to another. You can also move a single schema component, such as an e*Way Intelligent Adapter with its associated Collaborations and scripts, from one schema to another.
In e*Gate, you can migrate schemas and/or components in the following ways:
! Using the e*Gate Enterprise Manager
! Using the command line
Use of the Enterprise Manager is graphical user interface (GUI) oriented while use of the command line is application programming interface (API) oriented. Each method has its own characteristics, advantages, and limitations. This chapter explains in detail how to use both methods. In addition, the chapter also explains how to delete and rename schemas.
6.2 Using Enterprise Manager Migration FeaturesThis section explains how to import and export entire schemas, schema definitions, and individual schema modules, using the e*Gate Enterprise Manager GUI. For complete
e*Gate IntegratorSystem Administration and Operations Guide 108 SeeBeyond Proprietary and Confidential

Chapter 6 Section 6.2Migrating Schemas and Components Using Enterprise Manager Migration Features
information on the Enterprise Manager GUI and how to use it, see the e*Gate Integrator User’s Guide.
6.2.1 Schema MigrationThis feature allows you either to import or export an entire schema. You can export a schema and its associated files, using a convenient dialog box. You can do a complete import, using either the e*Gate Login dialog box or the File menu in the e*Gate Enterprise Manager.
The schema migration feature allows you to:
! Export an entire schema
! Import an entire schema as a new schema or into an existing schema
Note: All schema-related files must be promoted to run time before starting schema migration.
Schema migration in e*Gate provides the following advantages:
! When exporting a schema, the general schema setup is exported as a schema definition into a newly created file by default. This file has an .exp (export) extension and contains the individual components that make up the schema.
! Using either the schema export or import feature, you can migrate an entire schema, including all associated physical files. When you are exporting a schema, using the Enterprise Manger, the .exp file is archived, along with all the associated files, into a single .zip file.
! You can import or export either an .exp file or a .zip file. Keep in mind, though, that if you import an .exp file, you have only the schema definition and not the full schema with all associated files.
! To import a schema, you can use the Enterprise Manager’s convenient Schema Import Wizard.
! The export and import operations (both GUI and command-line) include both run-time and Sandbox files. See “Moving a Complete Schema” on page 120 for details on the actual moved files.
Exporting Schemas
To export a schema and its associated files
1 Log on to the e*Gate Enterprise Manager.
2 Open the schema you want to export.
3 Select the Components tab.
4 On the File menu, click the Export Schema Definitions to File command.
5 The Select Archive File dialog box appears.
e*Gate IntegratorSystem Administration and Operations Guide 109 SeeBeyond Proprietary and Confidential

Chapter 6 Section 6.2Migrating Schemas and Components Using Enterprise Manager Migration Features
When this dialog box opens, it defaults to the egate\client directory. You can create new directories and folders to store these files in or accept the default directory (see Figure 28).
Figure 28 Select Archive File Dialog Box
6 Enter the file name you want to use to export the current schema definition and all associated files.
This option archives the .exp schema definition file into a .zip file along with all the associated files.
Note: In e*Gate version 4.5.1 and later, all export files are full schema .zip files and not .exp files.
7 Click Save.
An information dialog box opens to advise that the component definitions for the current schema have been exported to the archive file, for example:
D:\egate\client\schema_two_archive.zip
8 Click OK to close the dialog box.
Importing Schemas
Schema export files that were created with the Export Schema feature can be imported to another schema or another Registry.
To import a schema and its associated files into a current schema
1 Log on to the e*Gate Enterprise Manager.
Note: Using the Import Wizard GUI is not only the easiest way to import a schema, but it also allows you to change the host, Control Broker, or IQ Manager name, as well as change the port numbers.
e*Gate IntegratorSystem Administration and Operations Guide 110 SeeBeyond Proprietary and Confidential

Chapter 6 Section 6.2Migrating Schemas and Components Using Enterprise Manager Migration Features
2 Open the schema into which you want to import schema definitions.
3 Select the Components tab.
4 On the File menu, click the Import Definitions from File command.
The Import Wizard - Introduction appears (see Figure 29).
Figure 29 Import Wizard — Introduction
5 Click Next.
The Import Wizard - Step 1 (Schema) appears (see Figure 30).
Figure 30 Import Wizard — Step 1 (Schema)
e*Gate IntegratorSystem Administration and Operations Guide 111 SeeBeyond Proprietary and Confidential

Chapter 6 Section 6.2Migrating Schemas and Components Using Enterprise Manager Migration Features
6 Be sure the Schema option button is selected.
7 Click Next.
The Import Wizard - Step 2 (Schema) appears (see Figure 31).
Figure 31 Import Wizard — Step 2 (Schema)
8 Click Select.
A dialog box appears, allowing you to choose the schema definition (.zip) file you want to import.
9 Select the desired file from the dialog box and click Open.
The Import Wizard - Step 3 (Schema) appears (see Figure 32 on page 113).
e*Gate IntegratorSystem Administration and Operations Guide 112 SeeBeyond Proprietary and Confidential

Chapter 6 Section 6.2Migrating Schemas and Components Using Enterprise Manager Migration Features
Figure 32 Import Wizard — Step 3 (Schema)
10 This step is optional; click Next if you want to go to the next Wizard (step 14 in this procedure).
11 If you want to rename the host or change a port number for a Control Broker or IQ Manager, use the Schema Wizard Step 3 (Figure 32 on page 113). To proceed, click Show Hosts.
A dialog box appears that shows the hosts in the current schema in a tree-graphic display, similar to the Component view in the Enterprise Manager (see Figure 33).
Figure 33 Rename Host/Change Port Dialog Box
Note: When you rename a host and/or change a port number, you are changing the information for the schema definition and not in the current schema/host.
e*Gate IntegratorSystem Administration and Operations Guide 113 SeeBeyond Proprietary and Confidential

Chapter 6 Section 6.2Migrating Schemas and Components Using Enterprise Manager Migration Features
12 Right-click on the desired component and choose a command from the pop-up menu as follows:
" Rename allows you to rename the selected host; you can also use this command to rename a Control Broker or IQ Manager.
" Properties allows you to change the port number for the desired component.
In either case, a dialog box appears allowing you to enter the appropriate information for the selected component.
13 Click OK to enter your changes and close the dialog box.
14 When you are finished with this wizard, click Next.
The Import Wizard - Finish appears (see Figure 34).
Figure 34 Import Wizard — Finish
15 Click Finish to complete the schema import operation.
The system imports the desired schema definition file into the current schema. The appropriate schema components appear in the Enterprise Manager’s Main window.
To import a schema and its associated files as a new schema
1 Log on to the Enterprise Manager.
After you log in from the e*Gate Login dialog box, the Open Schema on Registry Host dialog box appears.
e*Gate IntegratorSystem Administration and Operations Guide 114 SeeBeyond Proprietary and Confidential

Chapter 6 Section 6.2Migrating Schemas and Components Using Enterprise Manager Migration Features
2 From this dialog box, click New.
The New Schema dialog box appears (see Figure 35).
Figure 35 New Schema Dialog Box
Note: You can also use the New Schema command in the Enterprise Manager’s File menu in the same way as you use these steps.
3 Enter the name for your new schema.
Give the new schema a name that helps identify the contents. You are importing an existing (already exported) definition file, which the e*Gate system adds to the newly created schema.
4 If you do not want to use the Import Wizard, click the check box Create from export, and take the following steps:
" Click Find.
" If you are creating a new schema from an exported schema, be sure that you do not use an exported module file. This type of file does not work for this purpose because it does not contain host or Control Broker information.
" Select the file you want to import.
" Click Open.
The Enterprise Manager opens your imported schema definition.
5 If you want to use the Import Wizard, click Open (do not click the Create from export check box).
The Enterprise Manger Main window opens.
6 On the File menu, click the Import Definitions from File command.
7 Follow the rest of the steps given under “To import a schema and its associated files into a current schema” on page 110. The Enterprise Manager then imports the old schema into the empty schema you have just created, giving it your new schema name.
6.2.2 Module MigrationUsing this feature, a user can export or import any of the individual modules (executable components) that make up the schema. The module migration feature’s options are:
e*Gate IntegratorSystem Administration and Operations Guide 115 SeeBeyond Proprietary and Confidential

Chapter 6 Section 6.2Migrating Schemas and Components Using Enterprise Manager Migration Features
! Export module definitions from a schema to a file
! Import a module definitions file into a schema, using a Wizard
Modules are defined as any of the following executable components: e*Ways, Business Object Brokers (BOBs), Intelligent Queue (IQ) Managers, and e*Insight Business Process Manager Engines.
Note: Modules and their associated files cannot be imported to or exported from the e*Gate Sandbox. All modules and their associated files must be promoted to run time before you can apply this feature to them.
Important: Modules exported from e*Gate 4.5 or 4.5.1 using the Include files from the default Repository option cannot be imported into e*Gate 4.5.2 or higher.
Exporting Module Definitions
When you export modules, the system creates a .zip file and exports that file. This .zip file archives the module-related files and contains the following file types:
! Export file: .exp
! Physical files: With their own extensions
! Control file (only if physical files are present): .ctl
Note: When exporting e*Ways with a Monk configuration (for example the Batch e*Way), be sure the dependency files are listed by name in the e*Way Editor (Monk Configuration) under Auxiliary Library Directories. Otherwise these files are not exported.
To export module definitions to a file
1 Log on to the Enterprise Manager.
2 Open the schema that contains the components you want to export.
3 Select the Components tab.
4 Open all levels in the Participating Hosts folder in the Navigator pane.
5 Open the Participating Host you want to use.
6 Open the Control Broker.
7 From the Navigator pane, select the module from the current schema you want to export.
8 On the File menu, click the Export Module Definitions to File command.
e*Gate IntegratorSystem Administration and Operations Guide 116 SeeBeyond Proprietary and Confidential

Chapter 6 Section 6.2Migrating Schemas and Components Using Enterprise Manager Migration Features
The Select Archive File dialog box appears (see Figure 36).
Figure 36 Select Archive File Dialog Box — Modules
9 Type in the file name you want to use to export the module. Assign a name that helps to identify the module exported.
10 Check the box Include files from default repository.
After you assign a name to the file, the system archives all configuration files associated with the module into a .zip file.
Caution: When exporting modules, do not use the <eGate>\client directory as a destination when the Include files from default repository check box is checked.
11 Click Save to export the module definitions and files for the module, including all files in the default repository.
An information dialog box opens to advise that the definitions and files for the module have been exported to the archive file, for example:
X:\temp\client\sample_schema_iqmgr.zip
12 Click OK to close the information dialog box.
Note: When you are exporting and importing modules, the program creates extra empty folders while it extracts the .zip files. Once you are finished, be sure to delete these folders.
Importing Module Definitions
To import module definitions from a file into a schema
1 Log on to the Enterprise Manager.
2 Open the schema you want to use.
e*Gate IntegratorSystem Administration and Operations Guide 117 SeeBeyond Proprietary and Confidential

Chapter 6 Section 6.2Migrating Schemas and Components Using Enterprise Manager Migration Features
3 Select the Components tab.
4 On the File menu, click the Import Definitions from File command.
The Introduction Import Wizard appears (see Figure 29 on page 111).
5 Click Next.
The Import Wizard - Step 1 (Module) appears (see Figure 37).
Figure 37 Import Wizard — Step 1 (Module)
6 Click the Module option button (see Figure 37).
7 Click Next.
The Import Wizard - Step 2 (Module) appears (see Figure 38 on page 119).
e*Gate IntegratorSystem Administration and Operations Guide 118 SeeBeyond Proprietary and Confidential

Chapter 6 Section 6.2Migrating Schemas and Components Using Enterprise Manager Migration Features
Figure 38 Import Wizard — Step 2 (Module)
8 Click Select.
A dialog box appears, allowing you to choose the module definition (.zip) file you want to import.
9 Select the desired file from the dialog box and click Open.
The Import Wizard - Finish appears (see Figure 34 on page 114).
10 Click Finish to complete the module import operation.
The Import Component dialog box appears (see Figure 39).
Figure 39 Import Component Dialog Box
11 Use the Import Component Dialog box to select the desired host and Control Broker, where you want to import the module.
12 Click OK.
e*Gate IntegratorSystem Administration and Operations Guide 119 SeeBeyond Proprietary and Confidential

Chapter 6 Section 6.3Migrating Schemas and Components Using Command-line Migration Features
The system imports the desired module definition file into the schema for the selected host/Control Broker. The appropriate module appears in the Enterprise Manager’s Main window.
6.3 Using Command-line Migration FeaturesThis section explains how to export and import schemas and individual components, using the command line API.
Note: The procedures explained in this section only apply to e*Gate version 4.5.1 or later. If you are using an earlier version of e*Gate, refer to the appropriate version of this guide for that release.
6.3.1 Moving a Complete SchemaThis section explains how to export and import an entire schema, including the configuration requirements, using the stcregutil command. For more information on this command, see “Registry Utility: stcregutil” on page 66.
Migrating a schema includes either of the following actions:
! Exporting the schema configuration and associated files
! Importing the schema configuration and associated files
When any user moves a schema via the command line, files stored in that user’s Sandbox on the source system are moved to the current user’s Sandbox on the target system. Any files in the run-time Registry of the source system remain in the run-time Registry of the target system.
Note: See the e*Gate Integrator User’s Guide for more information about Team Registry features.
Important
The procedures explained in this section presume that either of the following facts is true:
! The default schema for the source and target Registry Hosts are identical.
! The schema that is being moved relies upon no files that are stored in the default schema; in other words, all the files that the schema requires are stored in the schema directory instead of in the \default directory.
Full Schema Export
The -ef (export, full) flag allows you to export an entire schema, including all associated Repository run-time and the current user’s Sandbox files. When you use this flag, you
e*Gate IntegratorSystem Administration and Operations Guide 120 SeeBeyond Proprietary and Confidential

Chapter 6 Section 6.3Migrating Schemas and Components Using Command-line Migration Features
must specify the name of the output directory where you want the files exported. See the following example:
stcregutil -rh host-name -rs schema-name -un user-name-up password -ef output-directory
Note: The output directory that you name cannot be an existing directory. During the export process, stcregutil creates a new directory with the name you specify.
Using this command stores the following items in the output directory:
! Schema export file named with the schema name followed by the extension .exp
! A .ctl file, schema-name.ctl, a text file providing a list all the files contained in the following subdirectories:
" Subdirectory named after the schema and containing the additional subdirectories \runtime and \sandbox
" These additional subdirectories contain the actual files associated with the schema, for example, files with the extensions .cfg, .ssc, .xsc, .tsc, and so on
The following line shows the export file/directory format:
\output-directory\schema-name.exp\output-directory\schema-name.ctl\output-directory\schema-name\runtime\contains associated files\output-directory\schema-name\sandbox\contains associated files
The .ctl file lists all the associated files but does not break them down by their \runtime and \sandbox directory locations.
Note: See “Schema Migration” on page 109 for information on how you can use the e*Gate Enterprise Manager GUI for full schema export.
Full Schema Import
The -if (import, full) flag allows you to import an entire schema, including all of its associated Repository run-time and the current user’s Sandbox files. When you use this flag, you must specify the name of the schema file you want to import. You must also use the -ctl flag and specify the name of the .ctl (text) file listing the associated files. See the following example:
stcregutil -rh host-name -rs schema-name -un user-name-up password -if schema-file.exp -ctl text-file-name.ctl
Use of this command requires:
! Name of the schema export file, that is, the name of the schema you want to import, followed by the extension .exp
! Name of the .ctl file, text-file-name.ctl, listing the associated Repository run-time files, including binary files
! Associated files themselves (including binary) must be in a subdirectory with the same name as the .ctl file and located in the same directory as the .exp and .ctl files. See the following example:
e*Gate IntegratorSystem Administration and Operations Guide 121 SeeBeyond Proprietary and Confidential
Chapter 6 Section 6.3Migrating Schemas and Components Using Command-line Migration Features
C:\schemas\MySchema\MySchema.expC:\schemas\MySchema\Assoc_Files.ctlC:\schemas\MySchema\Assoc_Files\runtime\contains associated filesC:\schemas\MySchema\Assoc_Files\sandbox\contains associated files
! Any binary files you want to commit are listed in the .ctl file as follows:
stcewfile.exe, bin, FILE-TYPE_EXEAnnotateX.dll, bin, FILE-TYPE_DLL
! However, in the subdirectory, binary files must be located under bin\host-type, where host-type is the file’s platform. For example:
C:\schemas\mySchema\sampleSchema\runtime\bin\win32\stewfile.exeC:\schemas\mySchema\sampleSchema\sandbox\bin\win32\stewfile.exeC:\schemas\mySchema\sampleSchema\runtime\bin\aix43\stewfile.exeC:\schemas\mySchema\sampleSchema\sandbox\bin\aix43\stewfile.exe
See Chapter 4 for information about command-line arguments and Appendix A for more information about e*Gate services under Windows.
Note: If you use the -fc . -ctl command to promote files to run time, you must first move the appropriate .ctl file to the run-time directory. See Table 10 on page 67 for details.
Importing from Earlier e*Gate Versions
If you are importing a schema from an e*Gate schema in a version earlier than 4.5.1, the only export product you have is the .exp schema definition file. To import a full schema, you must first manually export the rest of the schema elements. Do this operation as follows:
1 Create the following file/directory format, as described in the previous section:
\output-directory\schema-name.exp\output-directory\for .ctl file\output-directory\schema-name\runtime\for run-time files\output-directory\schema-name\sandbox\for Sandbox files
2 Copy the .exp schema file into \output-directory.
3 Create a .ctl file for the imported schema and copy it into \output-directory. See “Create Export Files” on page 123 for an explanation of how to create a .ctl file.
4 Copy the imported schema’s Repository files into the \runtime directory.
5 Copy the imported schema’s desired Sandbox files into the \sandbox directory. You can populate this directory with just one or a few files, if desired.
6 Finish the import operation as explained under “Full Schema Import” on page 121.
6.3.2 Moving Individual Schema ComponentsUse this procedure to migrate an individual schema component (for example, an e*Way or BOB) from one schema to another.
e*Gate IntegratorSystem Administration and Operations Guide 122 SeeBeyond Proprietary and Confidential

Chapter 6 Section 6.3Migrating Schemas and Components Using Command-line Migration Features
Overview
These steps use the example of moving test schema components into a production schema. The general steps in moving individual schema components are:
1 Create a duplicate (“mirror”) copy of the production schema in a test environment.
2 Within the test environment, make whatever modifications are required.
3 Create the component-export file and .ctl (text) file.
4 Edit the export file, changing the host and Control Broker names to those used by the production schema.
5 Use the .ctl file to export the required files from the test schema.
6 Use the .ctl file to import the required files to the production schema (the files must be in the current working directory).
7 Import the edit schema-configuration file to the production schema.
Procedure
Copy Production Schema
Create a duplicate copy of the production schema within the test environment. See the previous section “Moving a Complete Schema” on page 120 for more information.
Make Modifications
Within the test environment, make whatever modifications are required. Make whatever modifications you propose within the test schema to confirm that they work in the production environment.
If the test schema and the production schema are on the same network, you can ensure that all processes run on the local system by changing the network host name (using the appropriate Participating Host Properties dialog box) within hosts in the test schema to localhost.
Create Export Files
Create the component-export file and control (.ctl) file. To create the files necessary to export an individual component, type the following at the command line (although the line is split on the printed page, it must be input as a single line):
stcregutil -cex component-name -rh registry-host-name-rs schema-name -un user-name -up password base-file-name
Where:
! component-name is the name of the component you wish to migrate. If you export an e*Way or BOB, all assigned Collaborations are also exported. However, if you export a Control Broker, only the Control Broker, instead of all subsidiary components, are exported.
! base-file-name is the base name for the Registry-data file and the control file. The Registry-data file are assigned the base name, and the control file has the base name plus the .ctl extension (for example, given the base name my_schema, the file
e*Gate IntegratorSystem Administration and Operations Guide 123 SeeBeyond Proprietary and Confidential

Chapter 6 Section 6.3Migrating Schemas and Components Using Command-line Migration Features
my_schema would contain Registry data and my_schema.ctl would be the control file).
! registry-host-name, schema-name, user-name, and password are the standard arguments to all e*Gate command-line utilities (see Table 1 on page 54).
For example, to export the e*Way tcpip_in from the schema my_tcpip_schema running on my_host, issue the following command:
stcregutil -cex tcpip_in -rh my_host -rs my_tcpip_schema -unAdministrator -up mypassword my_tcpip_schema
Edit the export file, changing the host and Control Broker names to those used by the production schema.
The export file contains the names of the test system’s Control Broker and host. Change these to the names used within the production schema using any suitable text editor (such as Notepad, WordPad, or vi). Comments in the file remind you which entries to change (see Figure 40 on page 124).
Figure 40 Changing Control Broker and Host Names
Reminder comments
Host and Control Broker names
e*Gate IntegratorSystem Administration and Operations Guide 124 SeeBeyond Proprietary and Confidential

Chapter 6 Section 6.3Migrating Schemas and Components Using Command-line Migration Features
Use the .ctl file to export the required files from the test schema
Use the .ctl file generated by the -cex command-line argument to export the required files from the test schema’s Registry repository to the client system. Use the following commands, making the appropriate substitutions:
1 Before exporting the files, you must promote (import) the .ctl file to the run-time Registry using the following command:
stcregutil -rh Test_host -rs schema-name -un user-name-up password -fc . text-file-name.ctl
Note: This step ensures that all the files are in the run-time directory. You must do this step before retrieving the files.
2 Use the following command to export the files:
stcregutil -rh Test_host -rs schema-name -un user-name-up password -fr . -ctl text-file-name.ctl
Use the .ctl file to import the required files to the production schema
Use the same .ctl file to commit the required files to the production Registry repository. Use the following command, making the appropriate substitutions:
stcregutil -rh Production_host -rs schema-name -un user-name-up password -fc . -ctl text-file-name.ctl
The .ctl file must be in the current working directory before you execute this command.
Import the edit schema-configuration file to the production schema
Finally, make the changes to the production schema by importing the Registry-data file. Use the following command, making the appropriate substitutions:
stcregutil -rh Production_host -rs schema-name -un user-name-up password -i Registry-data-file-name
Optionally, you may add the -v flag to the previous command to display additional information while the Registry data is being committed.
Note: If you export an e*Way from one schema and import it into another, the one or more Collaborations associated with that e*Way are also migrated. The original Collaboration set is maintained through multiple migrations. For example, an e*Way in schema A has two Collaborations. If you import the e*Way from schema A to schema B, delete a Collaboration in schema A and re-import, both Collaborations still end up in the e*Way in schema B. You must delete the desired Collaboration in schema B.
To export multiple modules
! Use the following command:
stcregutil -rh host-name -rs schema-name -un user-name-up password -cex module1,module2,module3 base-file-name
This operation creates a .zip file with .exp, .ctl, and associated files.
e*Gate IntegratorSystem Administration and Operations Guide 125 SeeBeyond Proprietary and Confidential

Chapter 6 Section 6.4Migrating Schemas and Components Deleting and Renaming Schemas
6.4 Deleting and Renaming SchemasThis section explains how to delete and how to rename a schema. The file where the schema information resides has the following structure:
schema-name.rdb
Caution: Be careful when deleting schemas. e*Gate provides no undo feature.
To rename a schema
1 Stop the e*Gate Registry service/daemon.
2 From the command line or operating system, change directories to the following directory:
drive:\egate\Server\registry
3 Using the command line or operating system, rename the appropriate .rdb file to the name you want.
4 Change directories to the following directory:
drive:\egate\Server\registry\repository\schema-name
5 Rename the old \schema-name directory to the name of your new schema.
6 Restart the e*Gate Registry service/daemon.
To delete a schema
1 Stop the e*Gate Registry service/daemon.
2 Using the command line or operating system, delete the following file:
drive:\egate\Server\registry\schema-name.rdb
3 Delete the \schema-name directory at the following path location:
drive:\egate\Server\registry\repository\schema-name
4 Restart the e*Gate Registry service/daemon.
e*Gate IntegratorSystem Administration and Operations Guide 126 SeeBeyond Proprietary and Confidential

Chapter 7
System Parameters and Directory Structure
This chapter explains environmental variable, file, directory, and other operating system (OS) properties of the e*Gate system.
Chapter Topics
! “Environment Variables” on page 127
! “File Locations (.egate.store)” on page 128
! “Team Registry Command Files” on page 129
! “Directory Structure” on page 129
! “Properties Files” on page 133
! “Increasing Desktop Heap Memory” on page 134
7.1 Environment VariablesThe e*Gate system uses only the following environment variables:
Windows
! %HOMEDRIVE%: By default, drive C (C:).
! %HOMEPATH%: By default, the “Users” directory (\Users).
! %PATH%: Modified to include e*Gate executable files.
! %CLASSPATH%: Modified to include e*Gate Java files.
All the variables shown in the previous list are set at run time. e*Gate does not set or modify system-wide variables.
Note: The X/Exceed environment (required to run the Monk Event Type Definition (ETD) Editor, the Collaboration-ID Rules Editor, and the Monk Collaboration Rules Editor) requires its own set of environment variables. See the appropriate Exceed documentation for further information.
UNIX
! $HOME: Defined per user upon login.
! $PATH: Modified to include e*Gate executable files.
e*Gate IntegratorSystem Administration and Operations Guide 127 SeeBeyond Proprietary and Confidential

Chapter 7 Section 7.2System Parameters and Directory Structure File Locations (.egate.store)
! $CLASSPATH: Modified to include e*Gate Java files.
! $LD_LIBRARY_PATH (Solaris only) or $SHLIB_PATH (HP-UX): For library files.
7.2 File Locations (.egate.store)The locations of major directories within Clients and Participating Hosts are configured within the .egate.store file (the file name begins with a leading dot). The .egate.store file can be found in either of the following locations:
! %HOMEDRIVE%%HOMEPATH% (Windows)
! $HOME (UNIX)
This file defines the location for the contents shown in Table 20.
The following text is an example from a typical .egate.store on a Windows system. The selection of directories reflects the suggested installation default (C:\eGate):
[Directories]SharedExe=c:\eGate\clientLogs=c:\eGate\client\logsIQueueData=c:\eGate\client\iqIQueueIndex=c:\eGate\client\iqMessageServiceData=c:\eGate\client\stcmsSystemData=c:\eGate\clientExchange=c:\eGate\client
Note: If the default user HOME directory location changes, .egate.store may be created in multiple locations when the Windows system is restarted and auto-started components (such as stccb.exe) come up. One known consequence of this situation is that after changing the directories for the IQ index and DATA by editing the .egate.store file, IQs are still generated in the default directory.
Table 20 Contents of .egate.store
Entry in .egate.store Purpose
SharedExe Common executable files.
Logs Log files generated by executable components, for example, e*Way Intelligent Adapters, BOBs, IQ Managers, and Control Brokers.
IQueueData Temporary storage for data within IQs. Applicable only for IQs using the STC_Standard IQ Service.
IQueueIndex Temporary storage for IQ index files. Applicable only for IQs using the STC_Standard IQ Service.
MessageServiceData Location where database files for the JMS are stored.
SystemData Root directory for data (used by many e*Gate components).
Exchange Used by e*Exchange
e*Gate IntegratorSystem Administration and Operations Guide 128 SeeBeyond Proprietary and Confidential

Chapter 7 Section 7.3System Parameters and Directory Structure Team Registry Command Files
7.3 Team Registry Command FilesA command file governs the actual mechanics of file check-out, check-in, and promotion. Most e*Gate installations never require any modifications to this file. It is recommended that you do not make any changes to the following files without consulting SeeBeyond support personnel:
! On Windows systems, the file is eGate\Server\scripts\stcregvc.cmd.
! On UNIX systems, the file is eGate/Server/stcregvc.sh.
See the comments within each file for more information.
7.4 Directory StructureThe specifications in this section presume that you have installed e*Gate using all suggested installation defaults. If you are using directory names other than those that were suggested during installation, make the appropriate substitutions.
7.4.1 Registry HostThe e*Gate Registry host is installed into the \Server subdirectory of the e*Gate root directory (eGate).
In the tables within this section, all directories are subdirectories of the \eGate\Server directory (see Table 21).
Within the directory \eGate\Server\registry, the most important directory is \repository, which provides storage for all files required by any Participating Host or schema serviced by this Registry. Under this directory is a \default subdirectory, which contains the files required for the default schema. All non-default schema directories (for the schemas that you create) contain the files that differ from those in the default schema.
Table 21 Registry Host Directory Structure: Top-level Directories
Directory Purpose
bin Registry executable files
registry Schema-related files
setup Uninstall information
e*Gate IntegratorSystem Administration and Operations Guide 129 SeeBeyond Proprietary and Confidential

Chapter 7 Section 7.4System Parameters and Directory Structure Directory Structure
All schema repository directories use a similar directory structure, as shown in Table 22.
Under the directory \eGate\Server\registry\repository, additional subdirectories are created for each schema (in addition to the default) that this Registry Host supports. These schema-specific directories contain files that differ from those in the default directory.
Table 22 Registry Host Directory Structure: Schema Repository Directories
Directory Purpose
bin Contains all executable files; the executable files specific to each OS required to support the Registry Host are stored in a separate subdirectory (win32, hp-ux11, and so on).
collabservices The library files required to support the installed Collaboration services; the files specific to each OS required to support the Registry Host are stored in a separate subdirectory.
configs The configuration files required to support the e*Ways installed on this Registry Host. Each e*Way stores its configuration file in a separate subdirectory.
convert_library Settings for DART and SAP conversion tools in the Event Type Definition (ETD) Editor.
docs Contains documentation.
iqservices The library files required to support the installed IQ Services. The files specific to each OS required to support the Registry Host are stored in a separate subdirectory.
monk_library Monk library files required by various e*Gate components. Component-specific files are stored in separate subdirectories.
monk_scripts Monk scripts created/edited, for example, by the Event Type Definition Editor and Collaboration Rules Editor.
monk_scripts\collabs Monk files required to support specific user-written Collaborations.
monk_scripts\common Monk files required to support e*Gate system components or that are common to several Collaborations.
monk_scripts\components
Reserved for user components.
monk_scripts\templates ETD templates for common message formats.
schedules Schedule files used by the stcewscheduler e*Way (see the Standard e*Way Intelligent Adapters User’s Guide for more information).
stcgui Support files for the Enterprise Manager and e*Gate Monitor graphical user interfaces (GUIs).
XResource Xresource files required for Monk-related editor features, for example, the ETD Editor and Collaboration Rules Editor.
e*Gate IntegratorSystem Administration and Operations Guide 130 SeeBeyond Proprietary and Confidential

Chapter 7 Section 7.4System Parameters and Directory Structure Directory Structure
Team Registry Directory Structure
In addition to the basic structure described in Table 22 on page 130, the repository organizes files into three subtrees that help e*Gate manage the Team Registry features, as shown in Table 23.
The repository maintains each of the above “subtrees” within individual schema directories. For example, the Sandbox for schema “S1” would be stored in Server\registry\repository\S1\sandbox, the run-time repository would be stored in Server\registry\repository\S1\runtime, and the “lock files” would be stored in Server\registry\repository\S1\userlocks. The Sandbox and run-time directories use the same directory structure described in Table 22 on page 130.
7.4.2 Participating HostThe e*Gate Participating Host files are installed in the client subdirectory of the e*Gate root directory (eGate). Participating Host and GUI files are installed to the same “client” node because all these applications are clients of the e*Gate Registry server.
In the tables within this section, all directories are subdirectories of the \eGate\client directory (see Table 24).
Table 23 Team Registry Directories
Directory Directory Contents
sandbox Contains a separate directory for each user who has “checked out” e*Gate files. Within each user directory, checked-out files are stored using the same directory structure described in Table 22 on page 130.
runtime Contains files promoted to the run-time repository. Promoted files are stored using the same directory structure described in Table 22 on page 130.
userlocks Contains lock files that e*Gate uses to track which users have checked out which files
Table 24 Participating Host Directory Structure
Directory Purpose
advanced Utility functions.
bin All executable files.
convert_library Files required by the ETD Editor’s “Build” tool.
logs Log files generated by components (see e*Gate Integrator Alert and Log File Reference Guide for more information).
monk_library Monk library files.
monk_library\monkext Monk files defining SeeBeyond standard Monk extensions.
monk_library\templates Template functions.
e*Gate IntegratorSystem Administration and Operations Guide 131 SeeBeyond Proprietary and Confidential

Chapter 7 Section 7.4System Parameters and Directory Structure Directory Structure
Note: e*Gate creates .lockdir directories at various positions within the Participating Host \client directory structure. These directories are for e*Gate’s internal use and must not be disturbed.
7.4.3 Enterprise Manager and e*Gate Monitor GUIsThe e*Gate client files are installed in the client subdirectory of the e*Gate root directory (eGate). Participating Host and GUI files are installed to the same “client” node because all these applications are clients of the e*Gate Registry server.
In the tables within this section, all directories are subdirectories of the \eGate\client directory (see Table 25).
monk_scripts Monk scripts created/edited, for example, by the ETD Editor and Collaboration Rules Editor.
monk_scripts\common Monk files required to support e*Gate system components or files that are common to several Collaborations.
NotificationQueue Temporary storage for notifications sent by the Control Broker.
registry Files pertaining to the local copy of Registry-specific settings.
registry\import Schema settings created for the installation of this Participating Host.
setup Uninstall information.
Ui Monk files to support other SeeBeyond products.
Ux Monk files to support other SeeBeyond products.
Table 25 Enterprise Manager/e*Gate Monitor GUI Directory Structure
Directory Purpose
bin All executable files.
classes Java class/jar files.
docs Contains documentation.
msg NLS files for the GUIs.
setup Uninstall information.
stcgui Support files for the GUIs.
tmp Temporary files.
XResource Xresource files required for Monk-related editor features, for example, the ETD Editor and Collaboration Rules Editor.
Table 24 Participating Host Directory Structure (Continued)
Directory Purpose
e*Gate IntegratorSystem Administration and Operations Guide 132 SeeBeyond Proprietary and Confidential

Chapter 7 Section 7.5System Parameters and Directory Structure Properties Files
7.5 Properties FilesThe e*Gate system uses .properties files to store preferences for the Enterprise Manager and e*Gate Monitor GUIs. These files are stored in the same location as .egate.store (see “File Locations (.egate.store)” on page 128).
Parameters stored in these files include:
! Last entered Registry Host and user name
! GUI preferences
! Last dimensions of GUI elements and the GUI’s location on the screen
! External editor (Enterprise Manager only)
Every parameter except the external editor is set automatically by the Enterprise Manager GUI itself. The editor preference must be set manually by editing the .properties file.
To specify the external editor
1 Use a text editor (such as Notepad or vi) to open the egate.properties file.
2 Change the external.gui.editor parameter to the name of the editor executable file. If you do not specify a full path name, the executable file must be in the system “path” variable.
3 Save the file and exit the editor.
4 Restart the Enterprise Manager.
A typical egate.properties file sample follows:
#EGate Program Attributes#Tue Sep 21 13:56:08 PDT 1999toolbar.showRollOver=falseexternal.gui.editor=notepad.exeselectedSchema=rpuser.name=Administratortoolbar.showText=falsemainframe.width=800registry.host=STC_DOCmainframe.dividerLocation=239mainframe.height=600configurator.table.column0.width=150configurator.table.column1.width=150configurator.table.column2.width=150mainframe.selectedTabIndex=1
A typical egatemon.properties file sample follows:
#EGate Monitor Attributes#Wed Sep 22 11:49:27 PDT 1999toolbar.showRollOver=falsealertTable.column.comments=falsestatusTable.column.elementType=falseselectedSchema=rpstatusTable.column.comments=falsestatusTable.column.elementName=truealertTable.column.id=falsealertTable.column.resolvedTime=false
e*Gate IntegratorSystem Administration and Operations Guide 133 SeeBeyond Proprietary and Confidential

Chapter 7 Section 7.6System Parameters and Directory Structure Increasing Desktop Heap Memory
statusTable.column.id=falsealertTable.column.resolvedDate=falseoption.resolvedNotificationMessage=truealertTable.column.alertName=truestatusTable.column.statusName=truealertTable.column.resolved=trueuser.name=unalertTable.column.observed=truetoolbar.showText=falsestatusTable.column.eventName=truealertTable.column.issueNumber=falseoption.connectAllCBs=truealertTable.column.elementType=falsestatusTable.column.time=truealertTable.column.elementName=truealertTable.column.eventName=trueoption.blinkingAlert=truealertTable.column.time=truemainframe.width=773registry.host=STC_DOC_HOSTmainframe.dividerLocation=231mainframe.height=537statusTable.column.date=trueconfigurator.table.column0.width=150configurator.table.column1.width=150configurator.table.column2.width=150alertTable.column.date=truemainframe.selectedTabIndex=0alertTable.max.unresolvedAlerts=500alertTable.max.resolvedAlerts=50statusTable.max.status=50
7.6 Increasing Desktop Heap MemoryIf your e*Gate system is large enough, you may discover an apparent limitation that you cannot run more than 58 modules/processes when the Control Broker is started as a service on Windows 2000. This is actually a problem with the Windows Desktop heap memory. You can solve this problem by editing the Windows 2000 registry.
To increase Desktop heap memory in Windows 2000
1 Run the Windows 2000 Registry Editor (RegEdt32.exe).
2 Under the HKEY_LOCAL_MACHINE subtree, locate the following subkey:
\System\CurrentControlSet\Control\Session Manager\SubSystems
3 Select the Windows value.
4 From the Edit menu, choose Modify.
5 Increase the SharedSection parameter.
SharedSection specifies the system and Desktop heaps and uses the following format:
SharedSection=xxxx,yyyy
Where xxxx defines the maximum size of the system-wide heap (in kilobytes) and yyyy defines the size of the per desktop heap. The default value of the per desktop
e*Gate IntegratorSystem Administration and Operations Guide 134 SeeBeyond Proprietary and Confidential

Chapter 7 Section 7.6System Parameters and Directory Structure Increasing Desktop Heap Memory
heap under Windows 2000 (512KB) can support approximately 2500 windows. Increasing the desktop heap by 256KB or 512KB normally provides enough memory to correct “Out of Memory” error messages.
Note: If there is not enough memory, the Windows 2000 system may fail without giving you an error message.
6 When you are finished, reboot your system.
Note: You may need to increase the memory size to a larger value, if you believe your system needs the extra Desktop heap.
The SharedSection key is a long string when viewed using the Registry Editor. An example follows:
%SystemRoot%\system32\csrss.exeObjectDirectory=\WindowsSharedSection=1024,3072Windows=OnSubSystemType=WindowsServerDll=basesrv,1ServerDll=winsrv:GdiServerDllInitialization,4ServerDll=winsrv:UserServerDllInitialization,3ServerDll=winsrv:ConServerDllInitialization,2ProfileControl=OffMaxRequestThreads=16
For more information, see the following Web site:
http://support.microsoft.com/directory/article.asp?ID=KB;EN-US;Q126962
e*Gate IntegratorSystem Administration and Operations Guide 135 SeeBeyond Proprietary and Confidential

Appendix A
Configuring Windows Services
This chapter explains how to configure e*Gate system operations on Windows 2000 and Windows NT 4.0.
Chapter Topics
! “System Operations” on page 136
! “Windows Registry” on page 136
A.1 System Operationse*Gate hosts that use Windows run the following e*Gate system operations:
! Registry Hosts run the Registry Service (stcregd.exe) and the Installer Service (stcinstd.exe) as services.
! Participating Hosts run the Control Broker (stccb.exe) as a service.
! All other e*Gate components, including e*Way Intelligent Adapters, Business Object Brokers (BOBs), and Intelligent Queue (IQ) Managers, are run simply as processes.
Caution: Use extreme care when editing the Windows Registry directly. We recommend that only advanced users who are thoroughly familiar with the Windows Registry attempt to edit it. Errors committed while editing the Windows Registry can render your system unusable. See the appropriate Microsoft Windows documentation for details on this operation.
If you prefer not to edit the Windows Registry directly, use the -sr and -sa/-sm flags to un-register and register e*Gate services. See Chapter 3 and Chapter 4 for more information.
A.2 Windows RegistryThe e*Gate system is fully compliant with both Windows 2000 and Windows NT 4.0 platforms. On Windows systems, e*Gate services are stored within the Windows Registry under the following key:
e*Gate IntegratorSystem Administration and Operations Guide 136 SeeBeyond Proprietary and Confidential

Appendix A Section A.2Configuring Windows Services Windows Registry
HKEY_LOCAL_MACHINE\SYSTEM\CurrentControlSet\Services\executablename (name)
Where executablename is the name of the executable file minus the .exe extension (for example: stccb or stcregd) and name is the name of the registry host (for stcregd) or the schema (for stccb) that the service supports.
The command line that launches the executable file is stored in the ImagePath key, and must contain the –ss (“start service”) flag.
When you install an e*Gate Registry Host, you are prompted for the host name; when you install a Participating Host, you are prompted for both the host name and the schema name under which the Control Broker runs. This information is added to the command line that starts the respective services on the e*Gate host.
You only need to change the service’s command line if you change a Registry Host’s name or if you want an existing Control Broker to support a different schema; see Chapter 4 for more information about the command-line options for each e*Gate service.
Use the Windows commands regedit or regedt32 to edit the Windows Registry. For more information about the Windows Registry, see the appropriate Windows user’s guides or the Windows Help system.
e*Gate IntegratorSystem Administration and Operations Guide 137 SeeBeyond Proprietary and Confidential

e*Gate IntegratorSystem Administration and Operations Guide 138 SeeBeyond Proprietary and Confidential
Appendix B
Clearing Team-Registry Advisory Locks
The e*Gate Team Registry provides a method for several developers to contribute files to a single schema, using a system of advisory locks. If you attempt to “check out” a file that is already under development, you receive a warning message advising you of this condition.
Note: If a second user ignores the lock advisory and checks out a file contrary to the warning, the original user’s lock remains in place. However, you are then able to use and edit the file, but it is strongly recommended that you respect advisory locks whenever possible.
To clear an advisory lock condition, the original user (and only the original user) must do either of the following actions:
! Close the Sandbox file without saving, discarding any changes that might have been copied over to the sandbox by selecting remove from sandbox.
! Check in the Sandbox file, overwriting the copy currently in the run-time Registry.
No e*Gate user, including the Administrator user, can clear another user’s advisory lock.
For more information on e*Gate’s Team Registry feature, see the e*Gate Integrator User’s Guide.

Index
Index
Symbols.ctl files 72.egate.stcpass 103.egate.store 128.properties files 133
Aaccess control list (ACL) 86ACL security feature GUI
assigning privileges 93assigning roles to users 91assigning users to roles 92changing your password 100creating new roles 91managing security from the properties dialog
box 98managing users 91overview 86
Administrator defaultsrole assignments 104
advisory locks (Team Registry), clearing 138architecture 17assigning ACL privileges 87
BBOBs, see Business Object BrokerBusiness Object Broker
command arguments 66
CCLASSPATH environment variable 127clearing Team Registry advisory locks 138command-line ACL security feature 102committing files to the registry 71components
"running as" users 101version, displaying 54, 81
Control Brokerdaemon/service command arguments 60modifying startup parameters 47modifying user/password flags 49
removing the daemon/service 50renaming 48running multiple on a single host 50
conventions, writing in document 13
Ddaemons
Control Broker 60installer 62IQ Manager 62Registry 56
directories, setting system 128directory structure
Enterprise Manager and e*Gate Monitor 132Participating Host 131Registry Host 129
displaying component version information 54, 81Distributed Registry 22distributed systems introduction 17document
conventions 11document purpose and scope 11
Ee*Gate Monitor
directory structure 132e*GateComponent User 101e*Ways
stcewgenericmonk 65egate.properties files 133egatemon.properties file 133Enterprise Manager
directory structure 132Environment Variables 127exporting files from the Registry, see retrieving files
Ffile cache (Registry), flushing 59
Ggeneric e*Way 65"generic Monk" e*Way 65
HHOMEDRIVE environment variable 127HOMEPATH environment variable 127
e*Gate IntegratorSystem Administration and Operations Guide 139 SeeBeyond Proprietary and Confidential

Index
Iimporting files to the Registry, see committing filesInstaller Daemon/Service command arguments 62intended audience, document 12IQ
specifying data- and index-storage directories 128
IQ Managerdaemon/service command arguments 62
Llocks (Team Registry), clearing 138log files
determining log directories 128
Mmanually specifying registry ports 59migrating schema to new Registry Hosts 120module migration GUI
exporting module definitions 116importing module definitions 117overview 115
modules, list and troubleshooting 51Monitor commands
command line 83monitors
Control Broker required 45Monk engine, stand-alone 78Monk-based e*Way 65Multi-Mode e*Way 64
command arguments 64
Oorganization of information, document 12
PParticipating Host
adding to a schema 21directory structure 131running multiple Control Brokers 50
password fileabout 103creating with stcutil 103
passwordschanging with stcaclutil 106length and other restrictions 103password file 103
PATH environment variable 127port numbers (e*Gate registry) 59
privilegesavailable 105defining using stcaclutil 75
product architecture 17
RRegistry
committing files 71registry utility 67retrieving files 71
registry (Windows), service-defining keys 136Registry Daemon/Service 56Registry file cache, flushing 59Registry Host
directory structure 129primary and secondary, explained 22
Registry ports, manually specifying 59RegistryReplication schema 23retrieving files from the registry 71roles
default 104defining using stcaclutil 75
Sscaling, examples 19schema
deleting 126migrating to new Registry Hosts 120running multiple on a single host 50
schema export, full 120, 121schema migration GUI
exporting schema definitions 109importing a schema as a new schema 114importing a schema into a current schema 110overview 109
securitychanging security settings 75enabling 102exporting/importing user information 73file/directory permissions 107password file 103passwords 103privileges 105role-based model 85roles 104stcaclutil utility 75user names 103
SeeBeyond Web site 15services
Control Broker 60entries in the Windows Registry 136Installer 62
e*Gate IntegratorSystem Administration and Operations Guide 140 SeeBeyond Proprietary and Confidential

Index
IQ Manager 62Registry 56
software systems, common view 17stcaclutil 75stcbob 66stccb 60stccmd
command arguments 83Monitor commands 83
stceway 64stcewgenericmonk 65stcguistart 80stcinstd 62stciqmgrd 62stcregd 56stcregutil 67stcregvc.cmd 58stcregvc.sh 58stctrans 78stcutil 81supporting documents 14
TTeam Registry and stcregutil 71Team Registry locks, clearing 138
Uuser names 103
exporting/importing with schema data 73running components under user names 101
Vversion information, displaying 54, 81version-control systems, interface to 58
WWindows Registry, service entries 136
e*Gate IntegratorSystem Administration and Operations Guide 141 SeeBeyond Proprietary and Confidential