education and student administration system - …€¦ · online manual for the oasis web...
TRANSCRIPT

Online Manual for the OASIS Web Application 1
Education and Student Administration System
OASIS for Students


Online Manual for the OASIS Web Application i
Table of Contents
1 About OASIS 2 2 Getting Started 3
2.1 Log In to the OASIS Web Application 3 2.2 The Home Page 5
2.3 Students and Prospects 7 3 Exchange Applications for Incoming Exchange Students 9 4 My OASIS: personal information 30 5 How to Re-enrol for the Next Academic Year 31
5.1 Re-enrol for a Current Contract 33
5.2 Enrol for a Subsequent Programme 37 5.3 Enrol for a New Diploma Contract 42 5.4 Enrol for Course Units (Credit Contract) 44 5.5 Enrolling for a Programme Requiring Special Permission 47
5.6 Enrolling Late 53 6 Curriculum 59
6.1 Consult Your Curriculum 61
6.2 Edit Your Curriculum 65 6.3 Submit Your Curriculum for the Faculty’s Approval 70
6.4 Accept Your Curriculum 73 6.5 Your Exam Marks 74
6.6 Print Your Curriculum 76 6.7 Curriculum Legend 78
7 Certificates 79
8 Master’s Dissertations 80 8.1 Fill In the Details of Your Master’s Dissertation 81
8.2 Submit Your Master’s Dissertation for Approval 85
9 Applying for Housing 87
9.1 Rent Allowance 87 9.2 Housing Applications 88
10 Definitions 99

Online Manual for the OASIS Web Application 2
1 About OASIS
The OASIS Project
OASIS is the new system for the administration of the courses taught at Ghent University and the
students enrolled at the university. The recent changes in higher education entailed by the Bologna
Declaration and the Flemish government’s 2004 decree on the flexibility of higher education required
software accommodating the Bachelor/Master structure, study flexibility, new types of contracts... On
March 22, 2007, the Management Committee decided on the creation of a new software system to
support one of our university’s elementary tasks: the processes and activities concerning the
administration of education and students. This was the onset of the OASIS project.
The OASIS System
There are two different platforms for accessing OASIS: the decentralised end users (students,
lecturers…) use the OASIS web application, a user friendly web portal tailored to their needs. The
central administration and the faculties’ student administration offices, however, are provided with a
rich and comprehensive desktop application. Additional functionality is released at frequent intervals
for the web application as well as the desktop application, and the software is under constant
evaluation in order to better fulfil the end users’ needs.
The OASIS Web Application
The OASIS web application provides students as well as lecturers with the information they need to
see throughout the academic year. It also allows them to send back information to OASIS. For
example, lecturers can consult and edit the course details and offering sessions of their courses via the
OASIS web application. Students can enrol online, print certificates or consult their curriculum.
About this Online Help
The lay-out and appearance of the web application shown in this help is preliminary and subject to
change.
Note
If you encounter any technical problems with this web application, please contact the
helpdesk at [email protected].
With questions concerning your curriculum or enrolment, please contact the faculty’s
student administration office or the central administration.

Online Manual for the OASIS Web Application 3
2 Getting Started
2.1 Log In to the OASIS Web Application
To access the OASIS web application and log in:
1 Go to http://oasis.ugent.be.
The UGent authentication page appears.
2 Fill in your UGent username and password, and click the login button.
The OASIS web application home page appears.

Online Manual for the OASIS Web Application 4
UGent-account
If you do not yet have a UGent accout, you do not have a UGent username or password
either. In this case, you have to use the Prospect website (http://prospect.ugent.be) to
register at Ghent University. You can then apply for enrolment and housing at UGent.
Logging Out
To log out of the web application, click the logout button in the upper-right-hand corner.

Online Manual for the OASIS Web Application 5
2.2 The Home Page
When you login to the OASIS web application, the homepage appears.
The homepage of the OASIS web application
Upper Navigation
Use the buttons NL and EN to switch between the Dutch and English version of the web
application.
Click the university logo to go to UGent’s homepage.
In the upper-right-hand corner are the name of the person logged in, a button for searching in
UGent’s internal pages, and a logout button.
Below the yellow title bar is a grey menu bar with the different functions of the person logged
in to OASIS. If you have more than one function – for example, you are a student as well as a
Choose your language with the buttons in the upper-left-hand corner of the
website, or go to the UGent homepage.
Choose your function at the top of the page, below the yellow bar. The content
of the website differs according to the function
Choose a menu option in the left navigation panel.
Use the buttons in the yellow bar to contact the helpdesk, open the
UGent phone book or open the general manual.
Use the buttons in the upper-right-hand corner to search the UGent internal web pages or log off
from OASIS.

Online Manual for the OASIS Web Application 6
lecturer-in-charge – all these functions will be displayed. As soon as you select a certain
function, the related menu-options and content appear on the page.
Similar to the other UGent web pages and applications, you can access contact information, the
UGent phone book and a page with FAQ’s. There is also a search field for all the UGent web
pages.
The Help button opens the general online help. You can open specific help with the button
on the various pages of the web application, providing more information about the page you are
on.
Navigation Panel
On the left side of the page is a navigation panel. At the top are useful links, followed by the tasks
available to you in the OASIS web application. The information displayed in this navigation panel
depends on your role and function. A member of the faculty student administration office will have
access to other tasks than you.
Click on a link in the navigation panel, and the corresponding page appears on the screen.
Logging Out
To log out of the web application, click the logout button in the upper-right-hand corner.

Online Manual for the OASIS Web Application 7
2.3 Students and Prospects
Student
As soon as you are enrolled in a study programme at Ghent University, you are a student. You will
have received a UGent account and can log in to the OASIS website with your UGent username and
password. On the OASIS website, you can see that you are a student at the top of the page, below the
yellow menu bar.
Prospect
If you have already registered on the Prospect website (http://prospect.ugent.be for degree students or
http://prospect.ugent.be/exchange for exchange students), but have not yet confirmed your enrolment
at the central student administration, then you are not yet officially enrolled at UGent. In this case, you
are still a prospect and not yet a student. You cannot yet log in to http://oasis.ugent.be, only to
http://prospect.ugent.be or http://prospect.ugent.be/exchange. Depending on whether you personal data
has been confirmed by the central student administration, a different page appears when you log in to
the Prospect website:

Online Manual for the OASIS Web Application 8
As long as your personal data has not been confirmed, the Prospect website appears when you
log in. You can still change your personal data and apply for enrolment and housing.
When your personal data has been confirmed, but your enrolment has not, you are redirected to
the OASIS website as a prospect. For the moment, you can only apply for housing on the
OASIS website if you are still a prospect. You cannot change your personal data anymore and
you cannot apply for enrolment. It is advised to confirm your enrolment as soon as possible at
the central student administration, so that you can use the OASIS website as a student and gain
access to more information.

Online Manual for the OASIS Web Application 9
3 Exchange Applications for Incoming
Exchange Students
When you are coming to Ghent University as an exchange student, you start by submitting your
exchange application on the website http://prospect.ugent.be/exchange. As soon as your home
institution approves your application, you can complete your exchange application on that website.
Later, when you are enrolled at Ghent University, you will receive a UGent account and you will be
able to access all the information concerning your application on http://oasis.ugent.be.
1 Go to http://prospect.ugent.be/exchange.
1 Click the button Click here to log in.
2 Fill in your email address and password. Click the button Log in.

Online Manual for the OASIS Web Application 10
You are redirected to the OASIS-website for prospective students. You can complete your
application on this website.
3 In the menu on the left, select the academic year during which you want to come to Ghent
University.
4 Open the menu Curriculum and select the option Exchange.
Your preliminary application is shown on this screen.

Online Manual for the OASIS Web Application 11
5 Click the link Select to complete your application.
In the menu on the left, you can see the different items that you have to complete before
submitting your application. Each item is followed by an icon:
□ a red exclamation mark means that is item is mandatory and incomplete
□ a yellow exclamation mark means that this item is not mandatory and incomplete
□ a green check mark means this item is complete.
6 Select each item and fill in the required information.
□ Exchange application details
□ Learning agreement
□ Motivation
□ Language skills
□ Contact person
□ Documents

Online Manual for the OASIS Web Application 12
Exchange Application Details
First of all, you need to fill in information about the funding of your exchange, the faculty and area of
discipline, the mobility type, and the period during which you plan to stay at Ghent University.
1 Select the item Exchange application in the menu on the left.
2 Click the button Update.
The following page appears.
3 Select the study level.

Online Manual for the OASIS Web Application 13
4 Select the mobility type.
5 Select the faculty at which you will be following courses at Ghent University.
6 Select your field of study.
7 Select your means of funding.

Online Manual for the OASIS Web Application 14
8 Select the period during which you plan to come to Ghent University.
9 Fill in the planned starting and end dates of the period of your exchange with Ghent Unviersity.
Type in the dates in the format dd-mm-yyyy or use the calender icons.
10 Click the Save button.
The page with your exchange application is now displayed. The first item is complete.

Online Manual for the OASIS Web Application 15
Learning agreement
The second item is your learning agreement. This is the list of courses that you wish to follow during
your stay at Ghent University.
1 Select the item Learning agreement in the menu on the left.
2 Click the button Update to complete your learning agreement.

Online Manual for the OASIS Web Application 16
A page appears with the courses that are currently in your learning agreement. At first, this leist
is empty. You can add courses to it.
3 Click the button Add course.
A pop-up window displaying the UGent programme catalogue appears.
4 Browse the programme catalogue and go to the faculty, programme type and programme
from which you want to select courses. Open the complete programme view.

Online Manual for the OASIS Web Application 17
5 Click the green plus-sign before each course that you want to add to your learning agreement.
You can add more than one course from the programme catalogue.
If you cannot add a course to your curriculum for a certain reason, this is mentioned at the
top of the pop-up window.
6 Click the Back to editing screen button to close this window and
return to your learning agreement.

Online Manual for the OASIS Web Application 18
7 To remove courses from your learning agreement, click the Delete button next to a course in
your curriculum on the upper right-hand side of the window.
8 Click the button Back to exchange application to continue with your application.
Motivation
An important part of your application is your motivation.
1 Select the item Motivation in the menu on the left.
2 Click the button Update to fill in your motivation.
A new page appears on which you can fill in your motivation.
3 Fill in a motivation that is at least ten characters long and then click the button Confirm.

Online Manual for the OASIS Web Application 19
Language Skills
1 Select the item Language Skills in the menu on the left.
2 Click the button Update.
The following page appears.
3 Choose your level of Dutch and English language skills from the dropdown menus under the
titles Dutch and English.

Online Manual for the OASIS Web Application 20
4 For your English language skills its recommended to upload a language certificate. Click the
button Add language certificate.
A pop up window appears in which you can fill in all the information concerning the
certificate. Mandatory fields are marked with *.
1 Choose the right type of certificate from the list.
2 Fill in the date when you obtained this certificate.
3 Fill in the result.
4 Click the Browse button to choose and upload the certificate.
A new window appears in which you can browse to the right location on your computer.
5 Upload the certificate.
6 You can add a comment to the certificate before clicking the button Save and close.
The certificate has now been added to your file.
You can also fill in your knowledge of other languages than Dutch or English with the button
Other languages.

Online Manual for the OASIS Web Application 21
5 Click the button Other languages.
A pop up window appears.
6 Fill in both Language and Level.
Click the button Save and close.
7 Click the button Back to overview to continue filling in your application.
Contact person
You have to fill in at least one contact person in order to submit your exchange application at Ghent
University. This is someone you know well, whom we can contact in case of an emergency.
1 Select the item Contact person in the menu on the left.

Online Manual for the OASIS Web Application 22
2 Click the button Update.
The following page appears.
3 Click the button Add contact.
A pop up window appears in which you can fill in the name and contact information of your
contact person.

Online Manual for the OASIS Web Application 23
4 Select your affiliation with the contact person.
5 Fill in the first name and name.
6 Fill in at least one telephone number or a mobile number, in the following format:
+32912345678.
7 You can also fill in an emailaddress and a remark or comment.
8 Click the button Save.
The pop up window is closed
9 Click the button Back to overview to continue filling in your application..
Documents
In this menu, you can upload and download documents. It is required that you upload your most recent
transcript of records and a learning agreement signed by yourself and your home institution.
1 Select the item Documents in the menu on the left.

Online Manual for the OASIS Web Application 24
2 Click the button Upload Transcript of Records to add this document to your exchange
application.
The following pop up window appears.
1 Click the button Choose file to browse your computer.
A new pop up window appears.

Online Manual for the OASIS Web Application 25
2 Select the right file and click the button Open.
3 You can add a comment before saving the document.
4 Click the button Save and close.
The document has now been uploaded.
3 If you want to upload another type of document, click the button Update in the menu
Documents.
The following page appears.

Online Manual for the OASIS Web Application 26
4 Click the button Add to upload a document.
A pop up window appears.
1 Choose the type of file.
2 Click the button Choose file to select and upload a file.
3 You can add a remark before saving the document.
You have now filled in all the required information and you can submit your application. Please note
that you cannot change your application after it has been submitted.

Online Manual for the OASIS Web Application 27
Submit Your Application
1 Select the item Submit in the menu on the left.
2 Click the button Submit.
A pop up window appears. Confirm the submission of your application. You cannot change the
details of your application after it has been submitted.


Online Manual for the OASIS Web Application 30
4 My OASIS: personal information
In the My OASIS menu, you can check and update some of the personal information in your
administrative file:
Your address
Your contact information.
Language skills
The bank account used for any reimbursements of your tuition fee.
People who can be contacted in case of an emergency.
Yo can edit and add contact information and bank accounts.
Please note: UGent will send all official communication to your UGent email address.
To consult and/or edit this information:
3 Go to the OASIS website at http://oasis.ugent.be.
4 Log in with your UGent username and password.
The Home Page appears.
5 Go to the menu My OASIS and choose one of the options.

Online Manual for the OASIS Web Application 31
5 How to Re-enrol for the Next Academic Year
To re-enrol for the following academic year:
1 Go to the OASIS website at http://oasis.ugent.be.
2 Log in with your UGent username and password.
The home page appears.
3 If necessary, choose the function Student at the top of the page, in the grey menu bar.
4 Go to the menu for the following Academic Year, choose the option Curriculum and choose
the menu-option Re-enrol.
The following page appears:

Online Manual for the OASIS Web Application 32
This page gives you an overview of your current and concluded contracts. It lists contracts to
obtain a diploma (diploma contracts and exam contracts to obtain a diploma) as well as
contracts to obtain credits (credit contracts and exam contracts to obtain credits).
□ My Current Contracts: these are the programmes in which you were enrolled in the
previous academic year, and for which you have not yet obtained a diploma. Next to each
programme, the following information is listed:
the type of contract (diploma or credit);
the name of the programme for which you had a contract;
the academic year of your first enrolment in the programme;
your most recent enrolment in the programme;
the amount of ECTS credits that you still need to obtain in order to obtain the
diploma.
You can re-enrol online for one of your current programmes or enrol for a subsequent
programme via the links in the Action column (see Re-enrol for a Current on page 33
and Enrol for a Subsequent Programme on page 37).
□ My Concluded Contracts: these are the programmes for which you have obtained a
diploma or that you have terminated. In addition, any credit contracts you have followed in
previous academic years are listed here. Next to each programme, the following
information is listed:
the type of contract (diploma or credit);
the name of the programme for which you had a contract;
the academic year of your first enrolment in the programme;
the academic year in which you ended the programme;
the contract status.
You can enrol online for a subsequent programme via the links in the Action column
(see Enrol for a Subsequent Programme on page 37).
□ New Diploma Contract: below the list with your current and concluded programmes,
there is a button to enrol for new programmes. (See Enrol for a New Diploma Contract on
page 42).
□ New Credit Contract: this link allows you to enrol for a contract to obtain credits. In this
contract, you can enrol for individual course units for the following academic year. (See
Enrol for Course Units (Credit Contract) on page 44).
Note
You cannot re-enrol online for a diploma contract that you have terminated.
You cannot enrol for a new bachelor’s programme if you are already enrolled in that
programme, or if you have already obtained the diploma.
You cannot (re-)enrol online for the following academic year if you still have to take
exams in the second examination period.

Online Manual for the OASIS Web Application 33
5.1 Re-enrol for a Current Contract
You were enrolled for a study programme in the previous academic year and you wish to continue this
programme in the following academic year. To re-enrol for this programme:
1 Go to the OASIS website at http://oasis.ugent.be.
2 Log in with your UGent username and password.
The home page appears.
3 If necessary, choose the function Student at the top of the page, in the grey menu bar.
4 Go to the menu for the following Academic Year, choose the option Curriculum and choose
the menu-option Re-enrol.
The following page appears:
5 In the list of your current contracts, click on the link Re-enrol next to the programme in which
you wish to re-enrol.
A pop-up window appears with the name of the programme in which you are re-enrolling.
Depending on the amount of ECTS credits for which you were enrolled in the previous
academic year, a different pop-up window appears.
□ If you were a full-time student the previous academic year (you enrolled for ≥ 54 ECTS
credits), the following window appears:

Online Manual for the OASIS Web Application 34
□ If you were a part-time student the previous academic year (you enrolled for < 54 ECTS
credits), the following window appears. You can indicate whether you wish to study full
time (enrol for approximately 60 ECTS credits) or part time (enrol for approximately 30
ECTS credits) the following academic year:

Online Manual for the OASIS Web Application 35
6 Indicate whether you choose for the full-time learning path or the two-part learning path in
the following academic year (when in doubt, choose full-time learning path).
7 You need to agree to several requirements before you can confirm your re-enrolment. Check
the corresponding boxes.
8 Click the button Confirm re-enrolment, or Cancel.
If you clicked the button Confirm re-enrolment, you need to confirm your re-enrolment again.

Online Manual for the OASIS Web Application 36
The pop-up window is closed. A message is displayed confirming your re-enrolment. The most
recent academic year in which you are enrolled is updated in the list of My current contracts.
After you are re-enrolled, you will receive an email in your UGent inbox. This email contains
an overview of your re-enrolment, the initial tuition fee and additional, important information.
9 After re-enrolling, you need to consult and, if necessary, complete your curriculum. Go to
Curriculum on page 59 for more information.
Note
In some cases you can enrol for a subsequent programme after re-enrolling in a current
programme. For example, if you have re-enrolled for a bachelor’s programme in which you
only have to obtain 10 ECTS credits to obtain your diploma, you can enrol for the
subsequent master’s programme or another subsequent programme. For more information,
go to Enrol for a Subsequent Programme on page 37.
.

Online Manual for the OASIS Web Application 37
5.2 Enrol for a Subsequent Programme
You can enrol for a programme subsequent to one of your current or concluded contracts. Examples of
subsequent programmes are a master’s programme or a specific teacher training programme. You can
only enrol for a subsequent programme if you were enrolled in the preceding programme through a
diploma contract (programmes for which you enrol through a credit contract do not have subsequent
programmes).
There are various scenarios :
you obtained the degree of the preceding programme the previous academic year;
you were enrolled in the preceding programme during the previous academic year, but have not
yet obtained the diploma.
Enrol for a Subsequent Programme After Concluding the Preceding Programme
1 Go to the OASIS website at http://oasis.ugent.be.
2 Log in with your UGent username and password.
The home page appears.
3 If necessary, choose the function Student at the top of the page, in the grey menu bar.
4 Go to the menu for the following Academic Year, choose the option Curriculum and choose
the menu-option Re-enrol.
5 In the list My Concluded Contracts, click the link Enrolment subsequent programme in the
action column next to the concluded preceding programme.
A pop-up window appears in which you can enrol for the subsequent programme.
6 Choose the subsequent programme for which you wish to re-enrol.

Online Manual for the OASIS Web Application 38
Note
If you need special permission to enrol for a subsequent programme, please go to Enrolling
for a Programme Requiring Special Permission on page 47.
7 If necessary, indicate whether you choose for the full-time learning path or the two-part
learning path in the following academic year (when in doubt, choose full-time learning path).
8 You need to agree to several requirements before you can confirm your re-enrolment. Check
the corresponding boxes.
9 Click the button Confirm re-enrolment, or Cancel.
If you clicked the button Confirm re-enrolment, you need to confirm your re-enrolment again.

Online Manual for the OASIS Web Application 39
The pop-up window is closed. A message is displayed confirming your re-enrolment. The
programme for which you have enrolled is listed in My current contracts. Next to it is a link
Enrolment subsequent programme, which you can use to enrol for the subsequent teacher
training programme, for example.
After you are re-enrolled, you will receive an email in your UGent inbox. This email contains
an overview of your re-enrolment, the initial tuition fee and additional, important information.
10 After re-enrolling, you need to consult and, if necessary, complete your curriculum. Go to
Curriculum on page 59 for more information.
Enrol for a Subsequent Programme While Following the Preceding Programme
1 Go to the OASIS website at http://oasis.ugent.be.
2 Log in with your UGent username and password.
The home page appears.
3 If necessary, choose the function Student at the top of the page, in the grey menu bar.
4 Go to the menu for the following Academic Year, choose the option Curriculum and choose
the menu-option Re-enrol.
5 First, you need to re-enrol for the preceding programme. In the list My Current Contracts,
click the link Re-enrol in the column action next to the preceding programme.
6 Complete the enrolment wizard (see Re-enrol for a Current on page 33).
You can now enrol for the subsequent programme.

Online Manual for the OASIS Web Application 40
7 In the list My Current Contracts, click the link Enrolment subsequent programme in the
action column next to the preceding programme.
A pop-up window appears in which you can enrol for the subsequent programme.
8 Choose the subsequent programme in which you wish to re-enrol.

Online Manual for the OASIS Web Application 41
Note
If you need special permission to enrol for a subsequent programme, please go to Enrolling
for a Programme Requiring Special Permission on page 47.
9 If necessary, indicate whether you choose for the full-time learning path or the two-part
learning path in the following academic year (when in doubt, choose full-time learning path).
10 You need to agree to several requirements before you can confirm your re-enrolment. Check
the corresponding boxes.
11 Click the button Confirm re-enrolment, or Cancel.
If you clicked the button Confirm re-enrolment, you need to confirm your re-enrolment again.
The pop-up window is closed. A message is displayed confirming your re-enrolment. The
programme for which you have enrolled is listed in My current contracts. Next to it is a link
Enrolment subsequent programme, which you can use to enrol for the subsequent teacher
training programme, for example.
12 After re-enrolling, you need to consult and, if necessary, complete your curriculum. Go to
Curriculum on page 59 for more information.
.
Online Manual for the OASIS Web Application 42
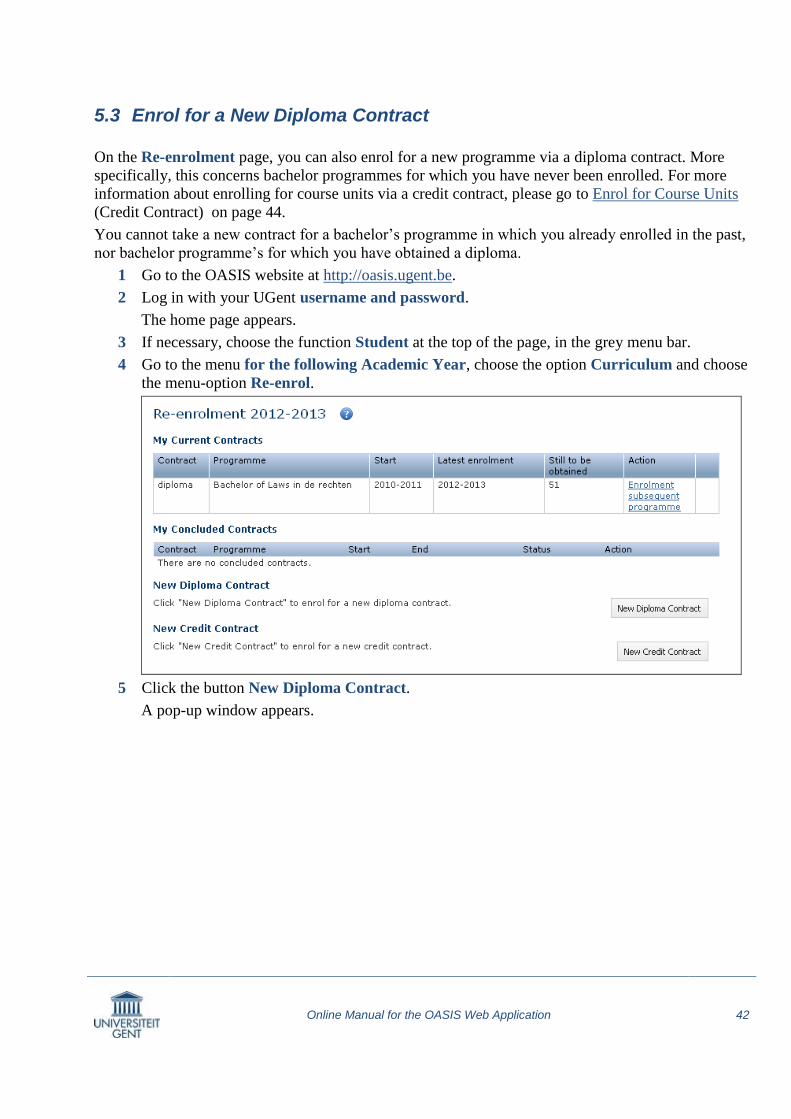
5.3 Enrol for a New Diploma Contract
On the Re-enrolment page, you can also enrol for a new programme via a diploma contract. More
specifically, this concerns bachelor programmes for which you have never been enrolled. For more
information about enrolling for course units via a credit contract, please go to Enrol for Course Units
(Credit Contract) on page 44.
You cannot take a new contract for a bachelor’s programme in which you already enrolled in the past,
nor bachelor programme’s for which you have obtained a diploma.
1 Go to the OASIS website at http://oasis.ugent.be.
2 Log in with your UGent username and password.
The home page appears.
3 If necessary, choose the function Student at the top of the page, in the grey menu bar.
4 Go to the menu for the following Academic Year, choose the option Curriculum and choose
the menu-option Re-enrol.
5 Click the button New Diploma Contract.
A pop-up window appears.

Online Manual for the OASIS Web Application 43
6 Choose the faculty in which you wish to enrol and the study programme. You can only enrol
for a bachelor’s programme via this wizard. If you do not know in which faculty the
programme is offered, please consult the UGent programme catalogue.
7 If necessary, choose the learning path you wish to follow (when in doubt, choose full-time).
If you are not required to make this choice, you were enrolled for at least 54 ECTS credit units
during the previous academic year, and you will be enrolled automatically as a full-time student
the following academic year.
8 You need to agree to several requirements before you can confirm your re-enrolment. Check
the corresponding boxes.
9 Click the button Confirm re-enrolment, or Cancel.
If you clicked the button Confirm re-enrolment, you need to confirm your re-enrolment again.
The pop-up window is closed. A message is displayed confirming your re-enrolment. The
programme for which you have enrolled is listed in My Current Contracts.

Online Manual for the OASIS Web Application 44
After you are re-enrolled, you will receive an email in your UGent inbox. This email contains
an overview of your re-enrolment, the initial tuition fee and additional, important information.
10 After enrolling, you need to consult and, if necessary, complete your curriculum. Go to
Curriculum on page 59 for more information.
5.4 Enrol for Course Units (Credit Contract)
The Re-enrolment page also allows you to enrol for individual course units through a new credit
contract.
1 Go to the OASIS website at http://oasis.ugent.be.
2 Log in with your UGent username and password.
The home page appears.
3 If necessary, choose the function Student at the top of the page, in the grey menu bar.
4 Go to the menu for the following Academic Year, choose the option Curriculum and choose
the menu-option Re-enrol.
5 Click the button New Credit Contract.
A pop-up window appears.
6 Choose the faculty in which you wish to enrol and the programme. You can only enrol for
course units via a credit contract in the selected faculty.

Online Manual for the OASIS Web Application 45
7 You need to agree to several requirements before you can confirm your re-enrolment. Check
the corresponding boxes.
8 Click the button Confirm re-enrolment, or Cancel.
If you clicked the button Confirm re-enrolment, you need to confirm your re-enrolment again.
The pop-up window is closed. A message is displayed confirming your re-enrolment. The
programme for which you have enrolled is listed in My Current Contracts.

Online Manual for the OASIS Web Application 46
After you are re-enrolled, you will receive an email in your UGent inbox. This email contains
an overview of your re-enrolment, the initial tuition fee and additional, important information.
9 After re-enrolling, you need to complete your curriculum. Go to Curriculum on page 59 for
more information.
Students who cannot enrol online
Students who did not pass all their exams in the first examination period must wait until
after the second examination period to enrol.
The following students cannot re-enrol online:
students without a UGent account;
students who are still following the old structure (not Ba/Ma structure);
doctoral students who follow the old structure and who do not belong to a doctoral
school;
students who may not enrol based on article art. 22 § 2 of the UGent Education and
Examination Code;
students who were enrolled as guest or exchange students in the previous academic
year.

Online Manual for the OASIS Web Application 47
5.5 Enrolling for a Programme Requiring Special Permission
Some programmes require special permission by the faculty in order for students to enrol.
If the programme is in the list of programmes subsequent to one of your current or completed
bachelor or linking programmes, you can apply for permission online on the OASIS website.
As soon as the faculty allows you to enrol, you can enrol online.
In any other case, contact the faculty’s student administration office to apply for permission. As
soon as the faculty allows you to enrol, you can enrol online.
Applying for Enrolment in a Programme Requiring Special Permission
If you want to enrol for a subsequent programme requiring the faculty’s permission, follow these steps:
1 Go to the OASIS website at http://oasis.ugent.be.
2 Log in with your UGent username and password.
The home page appears.
3 If necessary, choose the function Student at the top of the page, in the grey menu bar.
4 Go to the menu for the following academic year. In the list My Current Contracts, click the
link Enrolment subsequent programme in the action column next to the preceding
programme.
A pop-up window appears in which you can enrol for the subsequent programme.

Online Manual for the OASIS Web Application 48
5 Choose the subsequent programme in which you wish to re-enrol.
6 You need to agree to several requirements before you can confirm your re-enrolment. Check
the corresponding boxes.

Online Manual for the OASIS Web Application 49
7 Click the button Confirm re-enrolment, or Cancel.
If you clicked the button Confirm re-enrolment, you need to confirm your re-enrolment again.
A pop-up window appears, explaining that you need to apply for permission to enrol in this
programme.
8 Motivate your application and click the button Submit application to apply for permission to
enrol in this programme.
Your application is added to the overview of your current contracts and applications in the Re-
enrolment menu. Please note that you are not yet enrolled in the programme at this point.

Online Manual for the OASIS Web Application 50
As soon as the faculty grants you permission to enrol in this programme, you can enrol online
on the OASIS website.
Enrolling with the Faculty’s Permission
As soon as you apply for enrolment, or when the faculty registers this application for you, it is listed in
the overview of your current programmes and applications in the Re-enrolment menu.
When the faculty grants you permission to enrol, you will receive an email to inform you of this at
your UGent email address. You can then enrol for this programme online via the Re-enrolment menu
on the OASIS website.

Online Manual for the OASIS Web Application 51
1 Click the link Enrol.
A pop-up window appears with the programme in which you want to enrol.
2 You need to agree to several requirements before you can confirm your re-enrolment. Check
the corresponding boxes.
3 Click the button Confirm re-enrolment, or Cancel.
If you clicked the button Confirm re-enrolment, you need to confirm your re-enrolment again.

Online Manual for the OASIS Web Application 52
The pop-up window is closed. A message is displayed confirming your re-enrolment. The
programme for which you have enrolled is listed in My Current Contracts.

Online Manual for the OASIS Web Application 53
5.6 Enrolling Late
There is an enrolment deadline for each study programme. Up and until this deadline, you can enrol or
re-enrol in this programme provided that you comply with the admission requirements. After the
deadline, you need to apply for permission to enrol late. As soon as you have been granted permission
to enrol late, you can enrol on the OASIS website.
Enrolment deadlines can vary depending on the study programme. For most study programmes,
however, the enrolment deadline for the academic year is September 30th.
.
Applying for Permission to Enrol Late
To (re)enrol after the enrolment deadline, you first need to apply for permission on the OASIS website
as follows:
1 Go to the OASIS website at http://oasis.ugent.be.
2 Log in with your UGent username and password.
The home page appears.
3 If necessary, choose the function Student at the top of the page, in the grey menu bar.
4 Go to the menu for the following Academic Year, choose the option Curriculum and choose
the menu-option Re-enrol.
The following page appears:
5 Depending on the programme in which you want to enrol, click a different link or button.
□ To re-enrol in a programme which you have not yet completed, click the link Re-enrol
next to this programme.

Online Manual for the OASIS Web Application 54
□ To enrol in a programme subsequent to one of your current or completed programmes,
click the link Enrol subsequent programme.
Please note: if you are following two study programmes simultaneously, for example, a
bachelor and a master programme, you need to enrol in the preceding programme before
you can enrol in the subsequent programme.
□ To enrol in a new bachelor programme, click the button New diploma contract.
□ To enrol for individual courses through a creditcontract, click the button New credit
contract.
In each case, a pop-up window appears in which you can select the programme in which you
want to enrol. When re-enrolling, the programme is already filled in for you.
6 You need to agree to several requirements before you can confirm your re-enrolment. Check
the corresponding boxes.
7 Click the button Confirm re-enrolment, or Cancel.
If you clicked the button Confirm re-enrolment, you need to confirm your re-enrolment again.

Online Manual for the OASIS Web Application 55
A pop-up window appears stating that you need to apply for the faculty’s permission to enrol
late.
8 Motivate your application and click the button Submit application to apply for late enrolment.
An enrolment application is created. It is listed among your current contracts and applications
in the Re-enrolment menu. You are not yet enrolled at this point.
As soon as the faculty allows you to enrol late, you can enrol on the OASIS website.

Online Manual for the OASIS Web Application 56
Enrolling Late with the Faculty’s Permission
As soon as you apply for late enrolment for one or more programmes, these applications are listed
among your current programmes and applications on the Re-enrolment page.
When the faculty grants you permission to enrol late, you will receive an email about this at your
UGent email address. You can then (re)enrol until the date specified by the faculty on the OASIS
website, on the Re-enrolment page.

Online Manual for the OASIS Web Application 57
1 Click the link Enrol.
A pop-up window appears with the programme for which you want to enrol.
2 You need to agree to several requirements before you can confirm your re-enrolment. Check
the corresponding boxes.
3 Click the button Confirm re-enrolment, or Cancel.
If you clicked the button Confirm re-enrolment, you need to confirm your re-enrolment again.

Online Manual for the OASIS Web Application 58
The pop-up window is closed. A message is displayed confirming your re-enrolment. The
programme for which you have enrolled is listed in My Current Contracts.

Online Manual for the OASIS Web Application 59
6 Curriculum
Your curriculum is the entire set of courses and other didactic activities that you follow at UGent.
Within the hour after you are enrolled, your curriculum is initialized. When your curriculum is
initialized at the beginning of the academic year, courses are added to your curriculum in accordance
with the standard learning path (you can consult the learning paths of your programme in the
programme catalogue).
About initialization
If your curriculum is initialized with a full set of 60 ECTS credits according to the
standard learning path year in which you are enrolled, the faculty can automatically
approve your curriculum. This is typically the case when enrolling for the first time
in a bachelor’s programme which does not offer any elective courses in the first year
of the standard learning path. You do not need to edit your curriculum unless you
wish to deviate from the model learning path. In that case, please contact the
faculty’s student administration office. You can, of course, always consult your
curriculum on the OASIS website.
If your curriculum is initialized with less than 60 ECTS credits (for example,
because you need to choose certain elective courses), you are required to complete
your curriculum yourself and submit it for approval by the faculty.
The menu Edit Curriculum shows all the programmes in which you are enrolled in the selected
academic year. There is a separate menu item Edit Curriculum for each faculty in which you are
enrolled. The faculty letters are mentioned between brackets next to the menu item Edit Curriculum.
The list of all the programmes in which you are enrolled in the current academic year
Note
If you enrol in a different faculty than the faculty in which you were enrolled the previous
academic year, it may take at the most 6 hours before the menu-item ‘Curriculum’ for the
new faculty is displayed.

Online Manual for the OASIS Web Application 60
In the Edit Curriculum menu, you can consult and, if necessary, edit the curriculum of each
programme in which you are enrolled in the current academic year. You can complete your curriculum
and submit it for approval by the faculty. Depending on the programme in which you are enrolled, you
can only edit your curriculum during a certain period of time in the academic year. You can, however,
consult your curriculum during the entire academic year. At the end of the examination period, your
exam marks are displayed here.
As soon as the curriculum committee has approved your proposed curriculum, you can accept and sign
it on the OASIS website. This forms the basis for your exams and also triggers a recalculation of the
tuition fee. If you do not accept the curriculum approved by the faculty, contact the faculty’s student
administration office as soon as possible. As of December 1st, it is implicitly understood that you agree
to the curriculum approved by the curriculum committee.

Online Manual for the OASIS Web Application 61
6.1 Consult Your Curriculum
1 Go to the OASIS website at http://oasis.ugent.be.
2 Log in with your UGent username and password.
The home page appears.
3 If necessary, choose the function Student at the top of the page, in the grey menu bar.
4 Go to the menu for the following academic year, Curriculum and choose the menu-option
Edit Curriculum, followed by the letters of the faculty in which you are enrolled.
The following page appears:
the name and code of each
programme. the status of your
curriculum
Click the link History for an overview of the approval process of your curriculum, and for
possible comments and remarks from the faculty.
Open your curriculum with the link Curriculum.
your student
number and name

Online Manual for the OASIS Web Application 62
This page shows the various programmes in which you are enrolled in the selected academic
year, within a certain faculty. Next to each programme, you will find:
□ the curriculum status
draft: as long as the curriculum is still a draft curriculum, you can edit it (add or
remove courses).
proposal: when you submit the curriculum for approval by the faculty, the status
changes to ‘proposal’. You cannot edit a proposed curriculum. If you want to edit it,
please contact the faculty’s student administration office.
approved: when the curriculum committee approves your curriculum, you will see the
status change to ‘approved’. You cannot edit an approved curriculum. If you want to
edit it, please contact the faculty’s student administration office. You can accept an
approved curriculum with an digital signature.
□ a link History: this link opens a window with the various steps in your enrolment (the date
of enrolment, the date when your curriculum was submitted for approval,...). It also shows
your comments and remarks and those of the faculty concerning your curriculum. The
History window does not show the courses you followed in the past. You can find these
courses in the Curriculum window.
□ a link Curriculum: this opens a window in which you can consult and, as long as the
curriculum is still a draft, edit the curriculum. Not only are the courses of the current
The person who initiated this specific step (originator), and, if
relevant, the person who is addressed in this step. For example,
when the student submits the curriculum for approval, the recipient
is a member of the faculty responsible for the programme in which
the student is enrolled.
Any comments or remarks belonging to this
step in the history of the curriculum. These
comments can be automatically generated
messages, or remarks by the student or the
faculty.
The action accompanying this specific step in the curriculum’s
history. For example, if the faculty gives advice about the
curriculum, the accompanying action can be ‘positive’ or
‘negative’.
The left column shows the date of the
action mentioned in the history
overview, for example, the day that you
(re-)enrolled.
The curriculum status: draft, proposal or
approved.

Online Manual for the OASIS Web Application 63
academic year listed. The courses you took in the past in this programme are also shown.
At the end of the examination period, your exam marks are shown here.
5 Click on the link Curriculum next to a programme.
The following window appears.
At the top of the window is the name of the programme of which you are consulting the
curriculum. The programme version of the current academic year is also mentioned. Below are
two tab pages:
□ View entire curriculum: this page shows your entire curriculum for this programme: the
courses for which you obtained credits in the past, as well as the courses you are following
in the current academic year. At the beginning of the academic year, your curriculum may
already be complete, or only contain a few courses. It may also be empty. This depends on
the extent to which the system was able to initialise your curriculum.
□ Edit this year’s curriculum: you can complete your curriculum on this page. It is only
available when your curriculum has been initialised and is still in ‘draft’ status. For more
information, see Edit Your Curriculum on page 65.
The page View entire curriculum always appears first.
6 Use the checkbox This year’s curriculum to show or hide the courses you obtained in
previous academic years in this programme version. If you are enrolled in a new programme
version this academic year, all your obtained courses are displayed in this year’s curriculum.

Online Manual for the OASIS Web Application 64
□ Above the list of your courses, on the upper-right hand side, you can see the amount of
ECTS credits which you are taking up in the current programme, during the current
academic year. You can also see the total amount of credits you are taking up in the current
academic year, in all the programmes in which you are enrolled (if you are enrolled in
more than one programme).
□ The courses are ordered according to the programme structure: general courses, courses
related to the main subject, elective courses,… You can find the entire programme in the
UGent programme catalogue.
□ The column AY shows the academic year in which the course was added to the curriculum
of the current study programme version.
□ The column CR shows the course’s amount of ECTS credits.
□ Courses for which you are exempted or for which you obtained a credit in a different study
programme or study programme version, are indicated by a code in the column Realis
(realised in). For example:
ovrdr spr: you obtained a credit for this course (or an equivalent thereof) in a
previous version of the study programme;
ovrdr trjw: you obtained a credit for this course (or an equivalent thereof) in a
different study programme;
vrst EVK or vrst EVC: you are exempted for this course because of a previously
acquired qualification or competency (EVK or EVC respectively).
□ The columns Res 1 and Res 2 show the respective results of the first and second
examination periods. The marks are quoted on a total of 20.
7 In the upper right-hand corner of this screen there is a button to open the UGent programme
catalogue and consult the UGent study programmes:
8 Click the Save and close button in the upper right-hand corner to return to the
overview of your study programmes.

Online Manual for the OASIS Web Application 65
6.2 Edit Your Curriculum
You can complete and edit your curriculum on the page Edit this year’s curriculum. It is possible
that some or all of the courses that you will follow in the new academic year have already been added
to your curriculum. This is because each curriculum is initialised immediately after (re-)enrolment,
according to the standard learning path of the study programme in which you are enrolled. However, if
you are following courses from different years in the standard learning path, if you wish to deviate
from the standard learning path, or if you are required to choose elective courses, you can add or
remove courses to and from your curriculum yourself.
Note
You can only edit a curriculum in ‘draft’ status. If you have already submitted your
curriculum to the faculty’s approval, or if your curriculum has been approved, you
cannot edit it any more.
Should you wish to edit a proposed or approved curriculum, please contact the
faculty’s student administration office.
To open the page Edit this year’s curriculum:
1 Go to the OASIS website at http://oasis.ugent.be.
2 Log in with your UGent username and password.
The home page appears.
3 If necessary, choose the function Student at the top of the page, in the grey menu bar.
4 Go to the menu for the following academic year, choose Curriculum and choose the menu-
option Edit Curriculum, followed by the letters of the faculty in which you are enrolled.
An overview of the study programme(s) in which you are enrolled appears:
5 Click the Curriculum link next to the name of a study programme.
A pop-up window with two tab pages appears: View entire curriculum and Edit this year’s
curriculum.
6 Select the page Edit this year’s curriculum.
□ Go to About this Page for more information about what you’ll find on this page.
□ Go to Add and Remove Courses for more information on adding and removing courses to
and from your curriculum.

Online Manual for the OASIS Web Application 66
About this Page
On the left side of the window is an overview of the entire programme structure, with the
various programme modules from which you can select courses. A programme module can
contain general courses, courses related to the main subject, elective courses,...
□ If there is an arrow before a module, click it to expand the underlying modules;
□ If there are rules defining how to choose from the underlying modules, these rules are
printed in blue italics;
□ As soon as you select a module, the corresponding courses appear on the lower right-hand
side of the window.
If there is a rule defining how to choose courses from this module, it is mentioned above
the list of courses

Online Manual for the OASIS Web Application 67
The first column shows the number of the courses.
The column MT1 shows in which year of the model learning path this course is
offered.
The third column shows the course reference, if applicable. This may be important
when interpreting the rule defining how to choose courses.
The column CR lists the amount of ECTS credits of each course.
The column Course shows the course code and name.
The column Status shows whether you can take this course in your curriculum
(Available) or whether you have already added it to your curriculum this year or
acquired it in the past (Taken or realised). If you cannot add a course to your
curriculum because you have already taken or acquired all the courses allowed by the
rule in the module, you will see the status Module realised.
□ If you select a module allowing you to choose courses from the entire UGent programme
catalogue, a pop-up window appears displaying the programme catalogue.
On the upper-right hand side of the window is the curriculum you are taking this year in this
study programme. The amount of ECTS credits currently taken in this programme, in this
academic year, are mentioned, as well as the total amount of ECTS credits in the current

Online Manual for the OASIS Web Application 68
academic year (in the case that you are enrolled in more than one study programme this
academic year).
Add and Remove Courses
1 Select the programme module from which you want to add courses to your curriculum.
The courses belonging to this module appear in the lower right-hand corner of the screen. If
there is a rule defining how to choose courses from this module, it is mentioned above the list
of courses.

Online Manual for the OASIS Web Application 69
2 Click the Add button in the Action column to add courses to your curriculum. You can only
add the same course to your curriculum once, as long as you have not acquired it. If you have
chosen all the courses allowed by the rule in the module, you cannot add any other courses
from this module to your curriculum. You can, however, remove courses from your curriculum
and replace them with other courses.
3 If you have chosen a module allowing to add courses from the entire UGent programme
catalogue, a pop-up window displaying the UGent programme catalogue appears.
1 Browse the programme catalogue and go to the faculty, programme type and
programme from which you want to select courses. Open the complete programme view.

Online Manual for the OASIS Web Application 70
2 Click the green plus-sign before each course that you want to add to your curriculum. You
can add more than one course from the programme catalogue.
If you cannot add a course to your curriculum for a certain reason, this is mentioned at the
top of the pop-up window.
3 Click the Back to editing screen button to close this window and
return to your curriculum.
4 In the upper right-hand corner of the editing screen is a button to open the programme
catalogue. This does not allow you to add courses to your curriculum, it is merely a tool to
consult the programme catalogue. You can only add courses from the programme catalogue to
your curriculum via a programme module allowing this.
5 To remove courses from your curriculum, click the Remove button next to a course in your
curriculum on the upper right-hand side of the window.
You can only remove courses from your curriculum which you added yourself or which were
added to your curriculum during the initialisation. You cannot remove courses added to your
curriculum by the faculty. If you want to change the curriculum composed for you, please
contact the faculty’s student administration office.
6 When you have completed your curriculum, click the Save and close button in the upper right-
hand corner of the window .
Minerva
After you have completed your curriculum in OASIS, your courses are automatically sent to
Minerva as your official curriculum. In addition to these courses, you can subscribe to other
courses on a voluntary basis in Minerva.
6.3 Submit Your Curriculum for the Faculty’s Approval
When you have completed your curriculum, you have to submit it for the faculy’s approval. As soon
as you have done this, your curriculum reaches the status ‘proposal’ and you cannot edit it anymore.
1 Go to the OASIS website at http://oasis.ugent.be.
2 Log in with your UGent username and password.
The home page appears.
3 If necessary, choose the function Student at the top of the page, in the grey menu bar.

Online Manual for the OASIS Web Application 71
4 Go to the menu Curriculum and choose the menu-option Edit Curriculum, followed by the
letters of the faculty in which you are enrolled.
An overview of the study programme(s) in which you are enrolled appears:
5 Select the study programmes of which you want to submit the curriculum by checking the
check box in the left column.
The button Submit for approval is now available.
6 Click the button Submit for approval.
A pop-up window appears, allowing you to send an accompanying message to the faculty.

Online Manual for the OASIS Web Application 72
7 Add comments if necessary, and click the Continue curriculum submission button to submit
your curriculum for approval. Click the Cancel button if you reconsider.
As soon as you have submitted your curriculum for approval, it is sent to the curriculum
committee. Your curriculum is now in status ‘proposal’ and you cannot edit it yourself
anymore. The faculty will now consider your curriculum and either approve it, or return it to
you and ask you to change it. They may also change the curriculum themselves.
When your curriculum is approved, you can accept it and add your digital signature online.
The History window (see Consult Your Curriculum on page 61) now shows extra information
about the step you have just taken.
Questions
With questions about the contents of your curriculum, please contact the faculty’s
student administration office.
If you encounter any problems while using the website, please contact the helpdesk

Online Manual for the OASIS Web Application 73
6.4 Accept Your Curriculum
After the faculty has approved your curriculum, you have to accept it by adding your digital signature
on the OASIS website.
To accept your curriculum:
1 Go to the OASIS website at http://oasis.ugent.be.
2 Log in with your UGent username and password.
The home page appears.
3 If necessary, choose the function Student at the top of the page, in the grey menu bar.
4 Go to the menu Curriculum and choose the menu-option Edit Curriculum, followed by the
letters of the faculty in which you are enrolled.
An overview of the study programme(s) in which you are enrolled appears:
5 Select the programmes of which you want to accept the curriculum by checking the check box
in the left column.
6 Click the button Accept curriculum.
A pop-up window appears, allowing you to send an accompanying message to the faculty.

Online Manual for the OASIS Web Application 74
7 Add comments if necessary, and click the Confirm button to add your digital signature, or
Cancel if you reconsider.
Note
As of December 1st, it is implicitly understood that you accept the curriculum approved by
the faculty.
6.5 Your Exam Marks
At the end of the examination period, you can consult your exam marks on the OASIS website by
printing a transcript of records. For more information, please go to:
Print a Transcript of Records
You can check the results of previous academic years online, or by printing your curriculum:
Consult Your Previous Exam Marks Online
Print Your Curriculum
Print a Transcript of Records
At the end of the examination period, after deliberations, the exam results are published on the OASIS
website. you can consult the exam marks of the current academic year by printing the transcript of
records of the study programme or main subject in which you are enrolled:
1 Go to the OASIS website at http://oasis.ugent.be.
2 Log in with your UGent username and password.
The home page appears.
3 If necessary, choose the function Student at the top of the page, in the grey menu bar.

Online Manual for the OASIS Web Application 75
4 Go to the menu Curriculum and choose the menu-option Edit Curriculum, followed by the
letters of the faculty in which you are enrolled.
An overview of the study programme(s) in which you are enrolled appears:
5 Select one programme and click the button Print Transcript of Records. At the end of the
examination period, the exam marks of that examination period are shown on the transcript of
records.
Note
You can only print one transcript of records at a time. The button Print Transcript of
Records is only available when one study programme is selected.
Consult Your Previous Exam Marks Online
The exam marks of the previous academic years are displayed in the Curriculum window:
1 Go to the OASIS website at http://oasis.ugent.be.
2 Log in with your UGent username and password.
The home page appears.
3 If necessary, choose the function Student at the top of the page, in the grey menu bar.
4 Go to the menu Curriculum and choose the menu-option Edit Curriculum, followed by the
letters of the faculty in which you are enrolled.
An overview of the study programme(s) in which you are enrolled appears:

Online Manual for the OASIS Web Application 76
5 Click on the link Curriculum next to the name of a study programme. A window appears
showing all the courses you are following this year, and the exam results of the courses you
followed in the previous academic years.
For more information, please go to Curriculum Legend on page 78.
Note
To see the exam marks of the current academic year, you have to print the transcript of
records.
6.6 Print Your Curriculum
You can print the curriculum of each study programme or main subject in which you are enrolled via
the Curriculum menu. The printed curriculum shows the courses you are following during the current
academic year, and those you followed previously. The exam marks of the current academic year are
not shown on the printed curriculum (only on the transcript of records), but those of the previous
academic years are shown.
1 Go to the OASIS website at http://oasis.ugent.be.
2 Log in with your UGent username and password.
The home page appears.
3 If necessary, choose the function Student at the top of the page, in the grey menu bar.
4 Go to the menu Curriculum and choose the menu-option Edit Curriculum, followed by the
letters of the faculty in which you are enrolled.

Online Manual for the OASIS Web Application 77
An overview of the study programme(s) in which you are enrolled appears:
5 Select one programme and click the button Print curriculum.
Note
You can only print one curriculum at a time. The button Print curriculum is only available
when one study programme is selected.

Online Manual for the OASIS Web Application 78
6.7 Curriculum Legend
Below, you will find an example of a curriculum displayed on the OASIS webapplication, with more
information about the various columns and abbreviations.
The courses are ordered according to the programme structure: general courses, courses
related to the main subject, elective courses,… You can find the entire programme in the
UGent programme catalogue.
The column AY shows the academic year in which the course was added to the curriculum of
the current study programme version.
The column CR shows the course’s amount of ECTS credits.
Courses for which you are exempted or for which you obtained a credit in a different study
programme or study programme version, are indicated by a code in the column Realis (realised
in). For example:
□ ovrdr spr: you obtained a credit for this course (or an equivalent thereof) in a previous
version of the study programme.
□ ovrdr trjw: you obtained a credit for this course (or an equivalent thereof) in a different
study programme.
□ vrst EVK or vrst EVC: you are exempted for this course because of a previously acquired
qualification or competency (EVK or EVC respectively).
The columns Res 1 and Res 2 show the respective results of the first and second examination
periods. The marks are quoted on a total of 20.
Other abbreviations used in OASIS:
□ EVK: previously acquired qualification
□ EVC: previously acquired competency
□ UWV: exchange course
□ AO: other course units
□ EVO: a course unit from the former software

Online Manual for the OASIS Web Application 79
7 Certificates
After you have (re-)enrolled, you can print various certificates in the menu Certificates: a certificate
of enrolment, an insurance certificate,…
1 Go to the OASIS website at http://oasis.ugent.be.
2 Log in with your UGent username and password.
The home page appears.
3 If necessary, choose the function Student at the top of the page, in the grey menu bar.
4 Go to the menu Curriculum and choose the menu-option Certificates.
5 Select the certificate that you want to print and the academic year for which you want to print
it.
6 Make sure your browser’s pop-up blocker is disabled.
7 Click the button Print certificate.
A pdf-version of the certificate appears. You can either save or print it. If you have already
printed this certificate previously, you can choose whether you want to print the existing
certificate again, or whether you want to print a new version of the certificate. If you print a
new version of the certificate, the previous version is no longer valid.

Online Manual for the OASIS Web Application 80
8 Master’s Dissertations
If you are making a master’s dissertation this academic year, you can fill in the details of your master’s
dissertation on http://oasis.ugent.be and send this information to the faculty. You can fill in the title
and language of your master’s dissertation. If it is not written in Dutch or English, you can also fill in
the title in that other language. In addition, you can add your dissertation’s promotor.
For more information, go to:
Master’s Dissertation Title and Language on page 81;
Master’s Dissertation Promotors on page 83.
The master’s dissertation has various statuses. As long as it is in ‘draft’ status, you can fill in and edit
its details. When you have filled in all the necessary information and submitted the master dissertation
to the faculty for approval, the status changes to ‘proposal’, and you can no longer change the master’s
dissertation details. You can however, always consult the details and approval history. For more
information, see Submit Your Master’s Dissertation for Approval on page 85.
Note
If you don’t find any information in the master’s dissertation menu, please contact
the faculty’s student administration office.
If you encounter any problems with the website, please contact

Online Manual for the OASIS Web Application 81
8.1 Fill In the Details of Your Master’s Dissertation
As long as you haven’t submitted your master’s dissertation to the faculty for approval, it is in ‘draft’
status and you can fill in the following details:
the Dutch and English title of your master’s dissertation;
the language in which your master’s dissertation is written;
if the master’s dissertation is not written in English or Dutch, you can fill in the title in the
language in which it is written;
the promotor(s).
Master’s Dissertation Title and Language
1 Go to the OASIS website at http://oasis.ugent.be.
2 Log in with your UGent username and password.
The home page appears.
3 If necessary, choose the function Student at the top of the page, in the grey menu bar.
4 Go to the menu of the current academic year, submenu Master’s dissertation, and select the
menu option Manage individual courses.
The following page appears, showing the master’s dissertation you are following this year.
5 Click the link Edit to fill in the details of your master’s dissertation.
The following pop-up window appears.

Online Manual for the OASIS Web Application 82
6 If your master’s dissertation has a Dutch title, select the tab page Dutch and fill it in.
1 Select the text entry field on the tab page.
A text editor appears in which you can fill in the title of your master’s dissertation, with
limited formatting options. You can also add symbols or text in superscript or subscript.
2 Click the Save button to save the Dutch title and continue.
7 If your master’s dissertation has an English title, select the tab page English, fill in the title
and click the Save button.
8 Select the language in which the master’s dissertation is written.

Online Manual for the OASIS Web Application 83
If you select a language other than Dutch or English, a third tab page appears for filling in the
master’s dissertation’s title.
9 Fill in the title on this third tab page and click the Save button.
Master’s Dissertation Promotors
1 Go to http://oasis.ugent.be, open the menu for the current academic year, and select the menu
option Master’s dissertation – Manage individual courses.
2 Click the link Edit to fill in the details of your master’s dissertation.
The following pop-up window appears.

Online Manual for the OASIS Web Application 84
3 Click the button New to add one or more promotors.
A pop-up window appears in which you can look up a lecturer.
4 Look up the person who promotes your master’s dissertation: fill in the (first)letters of the last
name, first name, UGent ID or the phonetic name and click the button Search.
A list of search results appears.

Online Manual for the OASIS Web Application 85
Note
If you can’t find your promotor, please contact the faculty’student administration office.
5 Click the link Select next to the person you want to add as promotor.
6 Select the person’s function. You can only add promotors and copromotors on the OASIS
webapplication.
7 Click Save and close.
8 Click the button New to add another (co)promotor.
8.2 Submit Your Master’s Dissertation for Approval
When you have filled in all the details about your master’s dissertation on the OASIS webapplication,
you can submit this information to the faculty for approval. As soon as you have done this, you can no
longer change the master’s dissertation details.
1 Go to http://oasis.ugent.be, open the menu for the current academic year, and select the menu
option Master’s dissertation – Manage individual courses.
2 Select the master’s dissertation that you want to submit in the left column.
The button Submit for approval is now available.
3 Click the button Submit for approval.
A new window appears in which you can add extra information for the faculty.

Online Manual for the OASIS Web Application 86
4 Add extra information if necessary and click the button Continue submission to submit the
curriculum to the faculty for approval, or Cancel.
When you submit your master’s dissertation to the faculty, the faculty can evaluate the
information you submitted and approve it. The master’s dissertation is now in status ‘proposal’;
you cannot change the details anymore.
The History window now shows extra information about the step you have just taken.
Questions
With questions about your master’s dissertation, please contact the faculty’s student
administration office.
If you encounter any problems while using the website, please contact the helpdesk

Online Manual for The OASIS Web Application 87
9 Applying for Housing
The Housing menu allows you to apply for rent allowance or financial help, to apply for a room and to
follow up your application.
The UGentHousing Office
Please contact theHousing Office with questionis about the terms and conditions for
applying for housing. Go to http://www.ugent.be/nl/voorzieningen/huisvesting for more
information.
9.1 Rent Allowance
The first step in the Housing menu refers to rent allowance. Depending on the information you
submitted previously, the system checks whether you are eligible for rent allowance.
If you are not eligible for rent allowance, a message appears informing you that you are not eligible
and you can immediately go to the next step. Go to Housing Applications on page 88 for more
information on applying for a room.
If you are eligible for rent allowance, the following page appears:
1 If you are eligible for rent allowance because you have a full or partial scholarship, or if you
think you are eligible for rent allowance, select one of the first three options.
2 Make sure to print the application form for rent allowance by clicking the button
.
The application form appears in a pdf document. Print it, fill it in and mail it to the UGent.

Online Manual for the OASIS Web Application 88
3 If you are applying for financial help from the Social Service, select the corresponding
option.’
4 Click the button to print the form to apply for financial aid.
The application form appears in a pdf document. Print it, fill it in and mail it to the UGent.
5 If you are not eligible for rent allowance and will not apply for financial aid, select the
corresponding option.
6 Click the button Next step to continue.
The menu Housing Applications appears. You can apply for a room, studio or apartment in
this menu.
9.2 Housing Applications
The menu Housing Applications allows you to apply for a room, studio or apartment in one of the
UGent homes. Your application is processed by the UGentHousing Office. On the OASIS website,
you can follow up your application and check whether or not your application has been approved.
When a room is assigned to you, you will receive an email and you will also see it on this website.
Depending on the programme in which you are enrolled, you can apply for a room, studio or
apartment. If you already have a room or apartment in one of the UGent homes, you can choose
whether you want to submit a new application or reapply for the same room.
Terms and conditions for renting rooms, studios or apartments
For more information about the terms and conditions for renting rooms, studios or
apartments in a UGent home, please go to theHousing Office webpages at
http://www.ugent.be/housing.
Applying for a New Room or Studio
To apply for a new room or studio:
1 Go to the menu Housing Applications.
Click the button Application room/studio.

Online Manual for The OASIS Web Application 89
Use this button to create a new application. If you want to reapply for a room, go to Reapplying
for a Room, Studio or Apartment on page 95 for more information.
A pop-up window appears allowing you to apply for a room or studio.
2 Select whether you apply for a room or studio, or both. You have to select at least one of these
options. If you select both, the studio application takes priority over the application for a room.
If you only select one of the options, you will not be assigned a studio if there are no rooms
available and if you only applied for a room and vice versa.
3 If you want, you can add extra remarks.
4 If you want to accompany a student with a disability, select the corresponding option and
contact the organisation Cursief (zie http://www.cursiefvzw.be).
5 In the middle of the screen is a list with all the homes in which you can be assigned a room or
studio. The homes are listed according to preference; the home with the highest preference is
at the top of the list, the home with lowest preference is at the bottom. You can arrange the
homes according to your preference by selecting a home and using the arrows to move it up or
down.
1 Select a home in the list of available homes.
2 Use the arrows to move it up or down in the list, according to preference in descending
order.

Online Manual for the OASIS Web Application 90
6 Click on the arrow in the field Period and select the period during which you need housing: the
first or second semester, or the entire year.
The first and last day of the selected period are automatically filled in for you.
7 Select the corresponding option if you have a disability.
8 You need to agree to the Internal Rules and Regulations of theHousing Office to submit your
application. You can read these rules by clicking the link in the pop-up window.
9 When you have filled in all the necessary information, you can save or submit your
application.
□ If you only save your application, the information you filled in is saved but not sent to
theHousing Office. In this case, you have not yet applied for housing and your application
will not be processed. You can still change the information in your application.
□ If you submit your application, it is sent to theHousing Office. When your application is
submitted, it is processed and you cannot change it any more.
□ If you do not want to save or submit your application, click Cancel. The information you
filled in is not saved.
If you were making a new application, nothing is saved.
If you were editing a saved application, the original data is saved but your changes to
it are not.
The pop-up window is closed. You can follow up your application on the page Housing
Applications. See Following Up Your Application on page 97.
Applying for an Apartment
Single parents with one child or students with a partner are in some cases eligible for renting an
apartment in one of the UGent homes. To apply for an apartment:
1 Go to the page Housing Applications.

Online Manual for The OASIS Web Application 91
2 Click the button Application apartment.
A pop-up window appears allowing you to fill in the details of your application.
3 Select whether you are a single parent with one child, or whether you have a partner.
□ If you are a single parent with one child, select the first option and go to the next step.
□ If you have a partner who is currently a student at Ghent University, select the second
option and fill in your partner’s student number.

Online Manual for the OASIS Web Application 92
□ If your partner is a future student at UGent, select the third option and fill in your
partners prospect number and last name. When your partner registered on the Prospect
website, he or she will have received an email confirming the enrolment. The prospect
number is in this email.
□ If your partner is a student at one of the colleges of the Ghent University Association,
select the fourth option and fill in your partner’s student number and personal
information.

Online Manual for The OASIS Web Application 93
□ If your partner is not a (future) student at UGent or the Ghent University Association,
select the fifth option and fill in your partner’s personal information.

Online Manual for the OASIS Web Application 94
4 You can add remarks.
5 You need to agree to the Internal Rules and Regulations of theHousing Office to submit your
application. You can read these rules by clicking the link in the pop-up window.
6 When you have filled in all the necessary information, you can save or submit your
application.
□ If you only save your application, the information you filled in is saved but not sent to
theHousing Office. In this case, you have not yet applied for housing and your application
will not be processed. You can still change the information in your application.
□ If you submit your application, it is sent to theHousing Office. When your application is
submitted, it is processed and you cannot change it any more.
□ If you do not want to save or submit your application, click Cancel. The information you
filled in is not saved.
If you were making a new application, nothing is saved.
If you were editing a saved application, the original data is saved but your changes to
it are not.

Online Manual for The OASIS Web Application 95
The pop-up window is closed. You can follow up your application on the page Housing
Applications. See Following Up Your Application on page 97.
Reapplying for a Room, Studio or Apartment
If you already have a room ar apartment in one of the UGent homes, you can reapply for the following
academic year. Please go to http://www.ugent.be/nl/voorzieningen/huisvesting for the specific
conditions for reapplications.
To fill in a reapplication:
1 Go to the page Housing Applications for the next academic year.
2 Select the approved room application of the current academic year.
3 Click the button Reapplication.
A pop-up window appears allowing you to fill in the details of your reapplication.

Online Manual for the OASIS Web Application 96
If you are reapplying for a room or studio, the following pop-up window appears:
1 Indicate if you want to keep your current room, or if you want a different room in the
same home, or a room in a different home. In the last case, you have to select a home as
well.
2 Select the period during which you want to rent a room.
3 You can add remarks to your application.
4 If you want to accompany a student with a disability, select the corresponding option and
contact the organisation Cursief (zie http://www.cursiefvzw.be).
5 If you have a disability, select the corresponding checkbox.
6 If you have a master’s degree, select the corresponding checkbox.
4 You need to agree to the Internal Rules and Regulations of theHousing Office to submit your
application. You can read these rules by clicking the link in the pop-up window.
5 When you have filled in all the necessary information, you can save or submit your
application.
□ If you only save your application, the information you filled in is saved but not sent to
theHousing Office. In this case, you have not yet applied for housing and your application
will not be processed. You can still change the information in your application.
□ If you submit your application, it is sent to theHousing Office. When your application is
submitted, it is processed and you cannot change it any more.
□ If you do not want to save or submit your application, click Cancel. The information you
filled in is not saved.
If you were making a new application, nothing is saved.

Online Manual for The OASIS Web Application 97
If you were editing a saved application, the original data is saved but your changes to
it are not.
The pop-up window is closed. You can follow up your application on the page Housing
Applications. See See Following Up Your Application on page 97.
If you are reapplying for an apartment, the following pop-up window appears:
1 You can add remarks to your reapplication.
2 You need to agree to the Internal Rules and Regulations of theHousing Office to submit
your application. You can read these rules by clicking the link in the pop-up window.
3 When you have filled in all the necessary information, you can save or submit your
application.
□ If you only save your application, the information you filled in is saved but not sent to
theHousing Office. In this case, you have not yet applied for housing and your application
will not be processed. You can still change the information in your application.
□ If you submit your application, it is sent to theHousing Office. When your application is
submitted, it is processed and you cannot change it any more.
□ If you do not want to save or submit your application, click Cancel. The information you
filled in is not saved.
If you were making a new application, nothing is saved.
If you were editing a saved application, the original data is saved but your changes to
it are not.
The pop-up window is closed. You can follow up your application on the page Housing
Applications. See Following Up Your Application on page 97.
Following Up Your Application
When you have submitted your application, you will receive an email to confirm this. Your application
is processed by the UGentHousing Office. You can follow up the status of your application on the
page Housing Applications.

Online Manual for the OASIS Web Application 98
The status of your application is shown in the status column:
not yet submitted: you have started applying for a room, studio or apartment, but have not yet
submitted your application. Use the link Edit in the column Actions to open your application
and, if necessary, change it and submit it.
submitted: you have submitted your application, but it has not yet been processed. Use the link
Consult in the column Actions to open the details of your application.
denied: your application has been denied.
assigned: you have been assigned a room, studio or apartment. You will have received a mail
about this.
waiting list: your application has been approved, but you are on a waiting list for a room,
studio or apartment.
cancelled: you have cancelled your application by contacting theHousing Office.

Online Manual for The OASIS Web Application 99
10 Definitions
Contract to obtain credits (creditdoelcontract): a contract to obtain a credit certificate for a
particular course unit. There are two types of contracts to obtain credits: a credit contract and an exam
contract to obtain a credit certificate.
Contract to obtain a diploma (diplomadoelcontract) a contract to obtain a diploma or certificate for
a particular study programme. There are two types of contracts to obtain a diploma: a diploma contract
and an exam contract to obtain a diploma.