edmodo - wordpress.com · edmodo this is like an educational version of facebook. pupils seem to...
TRANSCRIPT
Edmodo This is like an educational version of Facebook. Pupils seem to like using it and do so with ease. It is often easier to edit your account and add files directly from your PC by going to www.edmodo.com.
Uses There are many ways to use Edmodo. Here are a few which have worked for me.
Post homework and reminders Give feedback or send messages to classes or individual pupils Initiate class discussion Store and share files in clearly accessible folders in a secure environment with large
storage capability Set quizzes/polls
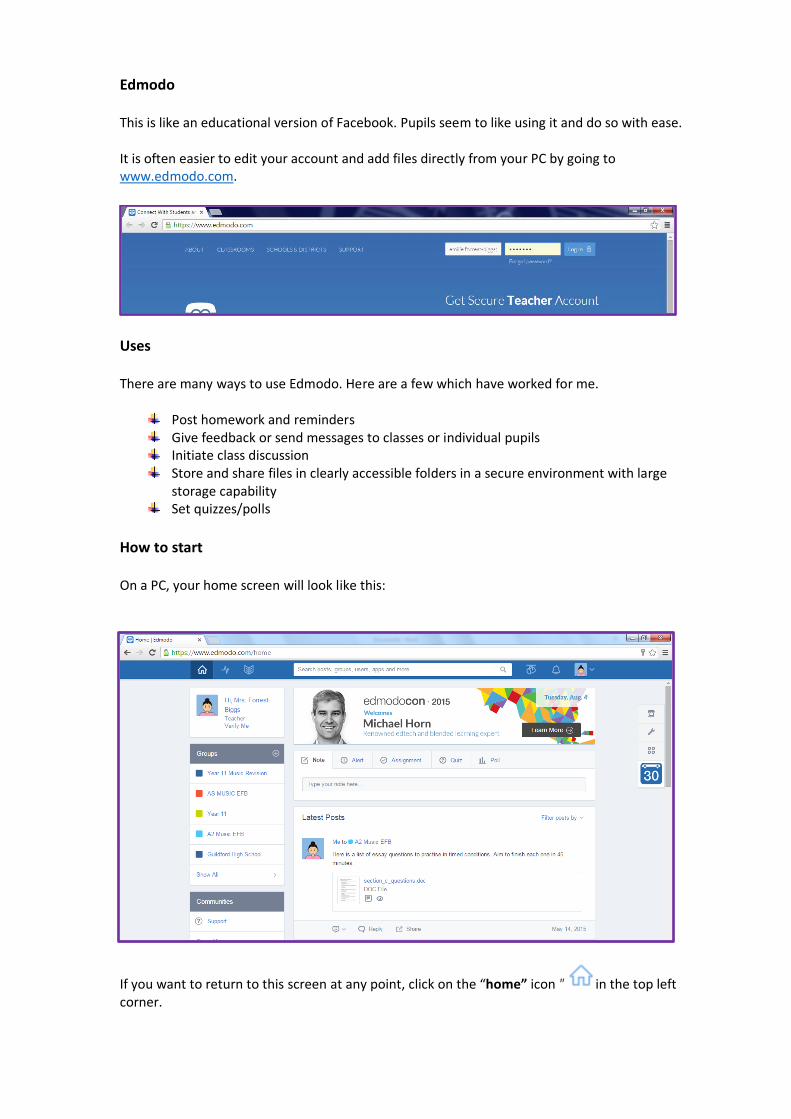
How to start On a PC, your home screen will look like this:
If you want to return to this screen at any point, click on the “home” icon " in the top left corner.

How to edit your profile
1. To access your Profile, click on the “Down Arrow” icon button on the top right of
your top toolbar and select "Profile." You can then complete the details.
2. To change a Profile Picture: hover over and click on the pencil icon to edit or change
your Profile Picture. You can also upload a photo.
How to create a group
1. Select the “+” button on the left side panel to create a group 2. Select “create” 3. Fill in the required information and select “Finish”
1
2
1 2
3

4. When a group is created, it is assigned a group code. You can find this at the top of the page.
Give this code to your pupils.
5. When all pupils have joined the group, you can lock the group code.
Select “group settings”.
6. Click on the open padlock. This will lock the padlock and the group.
7. You can reset the group code by clicking the down arrow next to the code and choosing ‘Reset’ to generate a new code.
Postings You can choose to post a note, alert, assignment, quiz or poll. For notes and assignments, you can also attach files and links from your computer or Edmodo library.
How to send a Note:
1. Click on "Note" at the top of your Edmodo Homepage.
2. Type your message in the text box.
3. Click the “Files,” “Links,” or “Library” link options to upload attachments to your post.
4. Choose to Send Now or Scheduled:
Send Now: Clicking the "Send" button will send the post immediately.
Scheduled: Clicking the "Scheduled" icon will automatically send the post at the
chosen time at the top of the hour.
5. Type the name of a Group or student into the “Send to” field. (Edmodo will provide auto
suggestions as you begin to type).
6. Click on “Send”.
4
5
6
7

To delete or edit a post, click on the “Down Arrow” icon to the right of the post and choose the option you require.
How to send an Assignment:
1. Click on "Assignment" at the top of your Edmodo Homepage.
2. Type your assignment title in the text box. Click the “Files,” “Links,” or “Library” link options
to upload attachments to your post.
3. Describe the assignment if necessary.
4. You can lock the assignment by clicking in the box.
5. Follow the instructions above to select the group and schedule the assignment.
1
2
3
4
5
6
1
2
3
4
5

How to create a quiz
1. Select the “Quiz” tab at the top of your Edmodo Homepage.
2. Click “Create a Quiz” to create a new Quiz.
3. Fill in the following details of your Quiz :
Quiz Title – write this in the box at the top.
Time Limit – you can set a time limit for students to complete the Quiz.
Description – you can add some information in the ‘about this quiz’ box.
Show Results - click this box under “Quiz Options” if you want students to see their Quiz
results.
Randomize questions - click this box for each student taking the Quiz to answer the
questions in a random order.
4. Select your question type from the drop-down menu.
5. Select “Add your first question”.
6. Type your question in the “question prompt” field.
7. Add responses. The response fields will vary depending on the type of question.
3
3
3
4
6
8 9
7
10
3
1
2

8. Select the “+” button on the left side panel to add a new question. You can go back
and edit questions, by selecting the question number from the left panel.
9. When you have finished, select “Preview Quiz” under the “Assign Quiz” button to preview
the Quiz (just as the pupils will see it).
10. Click the “Assign Quiz” button at the top right corner of the page to post the Quiz or return
to your homepage and assign the quiz later.
11. The quiz is automatically saved by Edmodo.
How to create a poll
Polls are a good way to get immediate feedback. They are anonymous and teachers cannot see
which pupil gave which response
1. Click on the "Poll" tab in the "top toolbar."
2. Click in the Question field and type your question. (You have a 140 character limit).
3. Type in answer choices in the fields for Answer #1 and Answer #2.
4. Click "Add Answer" if you would like to add more answer choices.
5. Click in the "Send to" field and choose a Group, student, or teacher to send the Poll to.
6. Click on the "Schedule" icon below the "Send to" field to send it out in the future. If
you don't click "Schedule", it will be sent out immediately.
7. When finished, click the "Send" button.
3
1
2
4
5
6

How to add Folders and resources
1. Select the group, and click “Folders” underneath the course name.
2. Click on “Add Folder”.
3. You will see another window which allows you to either select a folder you have already created by checking the box (very handy if you need to transfer resources year by year) or create a new Folder by selecting “New Folder”.
4. To add a new Folder, click on “New Folder”, add a title and click on “create”.
5. Click on the Folder name (this one is called Resources) to access or add resources.
6. Select “Add to Folder” and choose the files that you want to
upload.
Tip: When adding files, take time to label them properly at the start. This will save you a lot of time when you are trying to work out which of your resources is ‘Sheet 1’. Library
Another way to find your resources (and how pupils will find
them on their iPads) is to click the "Library" icon in the top
tool bar.
Use the left side panel to navigate around your library.
Note: Only the owner of a folder and any co-teachers can add
to a folder.
1
2
3
4
5
6