edmodo student guide
TRANSCRIPT


2
Table of Contents
Student Sign Up ……..................................................................................................... 3 Joining Groups …………….…………………….………………………………………..…..…… 4 Student Profile/Account Settings ……………….……………………………………...… 5 Posts …………………………………………..……………………….……………………..…… 6-13
Post with a File Attached …………………………………………..……………...………...... 6 Post from Library …………………….………………………………………..……………......... 7 Post with a Link Attached …………..……..……………………………………………......... 7 Submit Assignments …………………………..…………………………..…….………........ 8-9 Take a Quiz ………………………………………………..………………………………..…...... 10 Vote in a Poll …………………..…………………………………..…………………………....... 11 Sort/Filter Posts ………………..………………………………………..…………………....... 12 Tag Posts …………..……………………………………………………………………………...... 13
Calendar ………………………….……………………………………………………….…… 14-15 Create an Event …………………..…………………………….……………………………......15 Remove an Event …………………………..……..…………………………………………...... 15
Library ……………………………………………………….……………………………….… 16-19 Create Folders ………………………………………………...…………………………...... 17-18 Shared Folders ………………………………………………………...……..………………...... 19
Grades ………………………………………………………………………………….……..… 19-20 Mobile Website & Apps …………………………………………………………………....… 21

3
Student Sign Up This instruction set is for first-time registrations only. Before you can create your student account, you must first get a 6-digit group code from your teacher (you cannot create an Edmodo account without having a group to join). 1. Go to http://susd.edmodo.com 2. Click “I’m a Student”.
3. Enter registration information carefully and accurately.
Group Code: Use the group code provided by your teacher(s) Username: Create a unique username (this is what you will use to log in to Edmodo) Password: Create a unique password (this is what you will use to log in to Edmodo) Email: This is optional, not required First Name: Enter your first name Last Name: Enter your last name
4. Click “Sign up”
*Suggestion: Check with your teacher to see if he/she encourages a naming protocol for your username/password. Memorize/document your username and password!

4
Joining Groups Once you have an Edmodo account, you can easily join any Edmodo group you are invited to be a part of:
1. You must have the 6-digit group code to join any group.
2. After you login to Edmodo, click ‘Join’ on the left sidebar, and enter your class group code when prompted.
3. You will see a message indication that you have successfully joined the group.
The groups you belong to are listed to the left side of your homepage.
1. You can “filter” your feed to display only posts relating a specific group by clicking on the group in the list.
2. You can left-click on the colored square to the left of each group name to color-code your groups. *Once you are a member of a group, your teacher can grant you different access levels. “Read Only” access means that you can view all posts within the group, but you cannot contribute posts or add comments to posts. “Contributor” access gives you the rights to contribute posts and reply/comment to posts. Your contributor rights are a privilege and all students are expected to abide by acceptable usage guidelines and use Edmodo responsibly.
1 2

5
Student Profile/Account Settings: Student Profile Everyone on Edmodo has a profile, just like other social networking sites. You can view/edit your profile by clicking on the “Profile” link at the top-right side of your Edmodo home page. From this page, you can:
Add/edit information about yourself for others to see.
View your recent activity on Edmodo.
View all groups you are a member of.
View badges you have earned.
View classmates, grades, backpack items and posts/replies.
Specify your preferred learning style and career goals.
(You can view another person’s profile by clicking on their avatar picture beside a message they have posted. Their profile will list all their public posts.)
Account Settings This is where you can go to change your login username, password, profile picture and other
personal information. You can also set notifications (text or e-mail).
1. Click on “Account” at the top-right of your Edmodo screen. 2. Click on “Settings”.
6
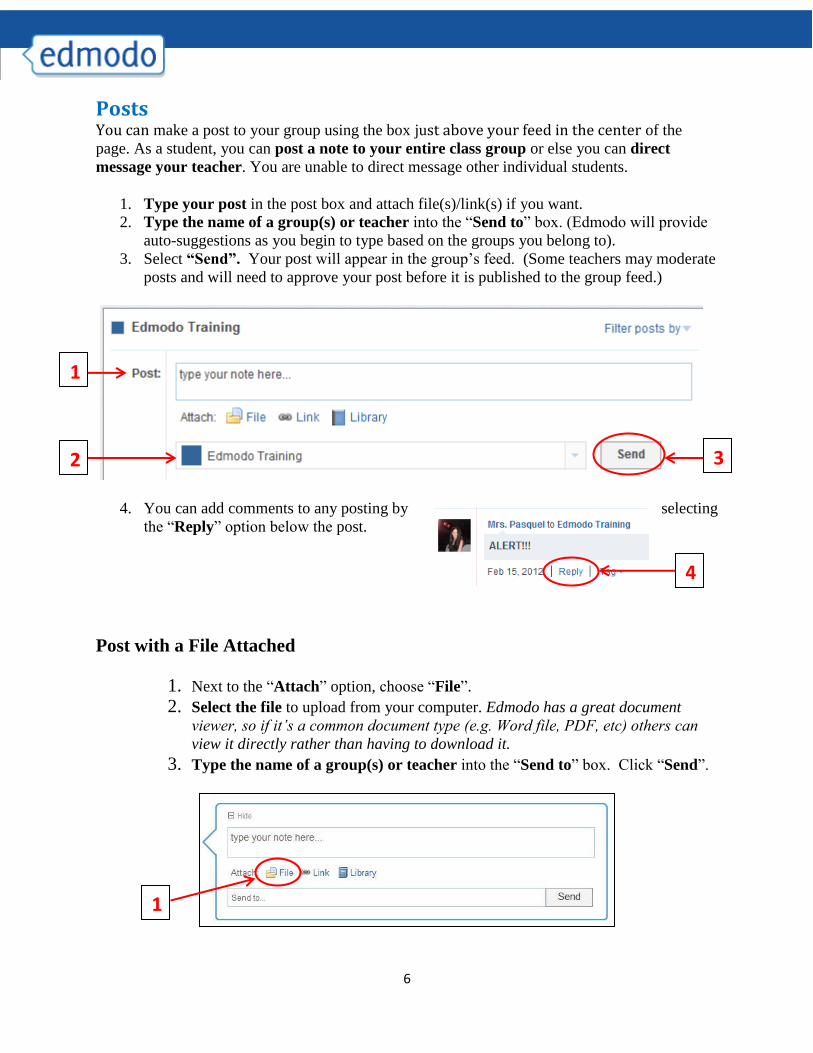
Posts You can make a post to your group using the box just above your feed in the center of the
page. As a student, you can post a note to your entire class group or else you can direct
message your teacher. You are unable to direct message other individual students.
1. Type your post in the post box and attach file(s)/link(s) if you want.
2. Type the name of a group(s) or teacher into the “Send to” box. (Edmodo will provide
auto-suggestions as you begin to type based on the groups you belong to).
3. Select “Send”. Your post will appear in the group’s feed. (Some teachers may moderate
posts and will need to approve your post before it is published to the group feed.)
4. You can add comments to any posting by selecting
the “Reply” option below the post.
Post with a File Attached
1. Next to the “Attach” option, choose “File”. 2. Select the file to upload from your computer. Edmodo has a great document
viewer, so if it’s a common document type (e.g. Word file, PDF, etc) others can
view it directly rather than having to download it.
3. Type the name of a group(s) or teacher into the “Send to” box. Click “Send”.
1
2
1
3
4

7
Post from your Library
1. Next to the “Attach” option, select “Library”.
2. Choose the item from your Library to attach. You can attach documents, files, links or
any other item in your library this way.
3. Type the name of a group(s) or teacher into the “Send to” box. Click “Send”.
For more information about your Library, see the “Library” section.
Post with a Link Attached
1. Next to the “Attach” option choose “Link”.
2. Type or paste the link details into the box, and give your link a short description (e.g.
title of the page or site you’re linking to). Edmodo will cleverly suggest a description for
most links.
3. Type the name of a group(s) or teacher into the “Send to” box. Click “Send”.
1
1

8
Submit Assignments When a teacher creates an assignment in Edmodo, you can submit your work directly to
them through Edmodo.
1. When you see an “Assignment” posted in the group feed, select the “Turn in” button
located next to the due date to submit your assignment.
2. Once the “turn in” button has been selected, you can attach your homework/file and
provide a comment/message with it.
3. Once you are ready to submit your work, select “Turn in Assignment”.
Teachers can view a list of all submissions and can add their own comments or annotate your
assignment. Teachers can also award points to your assignment within Edmodo, (but they
might not since they use the Synergy Gradebook for posting student grades).
1
3
2

9
4. Students will receive a notification that you have a new grade (if the assignment was
graded). When you click on the assignment title from the notification, you will be taken
to the assignment page where you can select “view” to see the assignment with your
teacher’s annotated remarks. Students can also view teacher’s annotations by clicking on
the assignment from the post.
5. If a teacher annotates your assignment, and you can resubmit it, the annotated notes
will disappear. If you would like to keep a record of the annotations, students should post
the new version of the assignment in the comment section (and be sure to save the
annotated file).
4

10
Take a Quiz
1. Once a quiz has been posted to a group, students can select the “Take Quiz” button
located next to the due date to take the quiz.
2. A page will appear with the name and details of the quiz (description, time limit, etc.).
Select “Start Quiz”. The time will start and you will be taken to the first quiz question.
3. After selecting your answer, you can select the “next” arrow at the top of the quiz screen
to move on to the next question. Repeat until the quiz is completed.
4. From the top panel, you can view how many questions you have completed and the
amount of time you have left to complete the quiz. On the left panel, you will be able to
view how many questions the quiz contains and what number you are on.
5. Once completed, you must select the “Submit Quiz” button at the top right corner.
6. You might have the option the “view results” immediately on some quizzes. If you
select this link, you will be able to review each quiz question and see the correct answers.
You can also view your results at any time by clicking on the “View Results” link on the
quiz posting.
5
4
6
3
1

11
Vote in a Poll Teachers can create polls that you can vote on.
1. You will see the poll in the post fee on your group page and have the option to vote for
one of the choices. You can only vote once and cannot retract your vote once submitted.
2. You will see the poll results directly on the posting. You cannot see which group
members voted for which answer- you will only see total voting results. Click “Refresh”
to update.
.

12
Sort/Filter Posts
The posts you see on the post feed will automatically show in chronological order based on the
most recent posting. You can sort/filter the posts that you see on the post feed by selecting one
of the “post” options below your profile picture.
View messages sent directly to you by your teacher. View Assignments posted. View anything posted by your teachers. Select “more” options, including view posts you wrote, alerts,
RSS feeds, polls, quizzes and recent replies.

13
Tag Posts
You can create your own set of personalized tags to help organize and sort all your posts. For
example, you might wish to tag posts as “extra credit”, “science”, “quiz”, etc.
1. To tag a post, click on the “tag” link below the post. This will call up a drop-down box
where you can create a new tag or select from the tags you’ve already created.
2. You can view your posts sorted by tags by visiting your Edmodo homepage. Your list
of tags will be located at the bottom-right of your page. Select any tag to call up the posts
associated with that tag.
1

14
Calendar
The Calendar can be accessed by clicking the link at the top of the page. Your calendar will
include assignment dates and other events set by your teacher. Calendar items will appear in your
spotlight as they approach.
1. You can view your calendar by month and can change the month at the top of the
calendar. 2. You can print or export your calendar. 3. You can sort your calendar events by group.
2 1
1

15
Create an Event To create an event, select a date from the calendar. A pop up box will appear where you can
add a description of the event and change the date (or add a date range. You can only create
calendar events for yourself.
Remove an Event To remove/delete an event you’ve created, click on the event and select the delete link within
the event post. (Note: You cannot edit calendar events once they have been created. You would
have to delete the event and then re-create it. You also cannot delete calendar events created by
your teacher)

16
Library Your library (also called your “backpack”) is cloud-based storage with unlimited storage space
(individual files cannot exceed 100MB). All the files, documents, web links or other
attachments attached to all the posts you have ever received/posted are kept together in your
personal library.
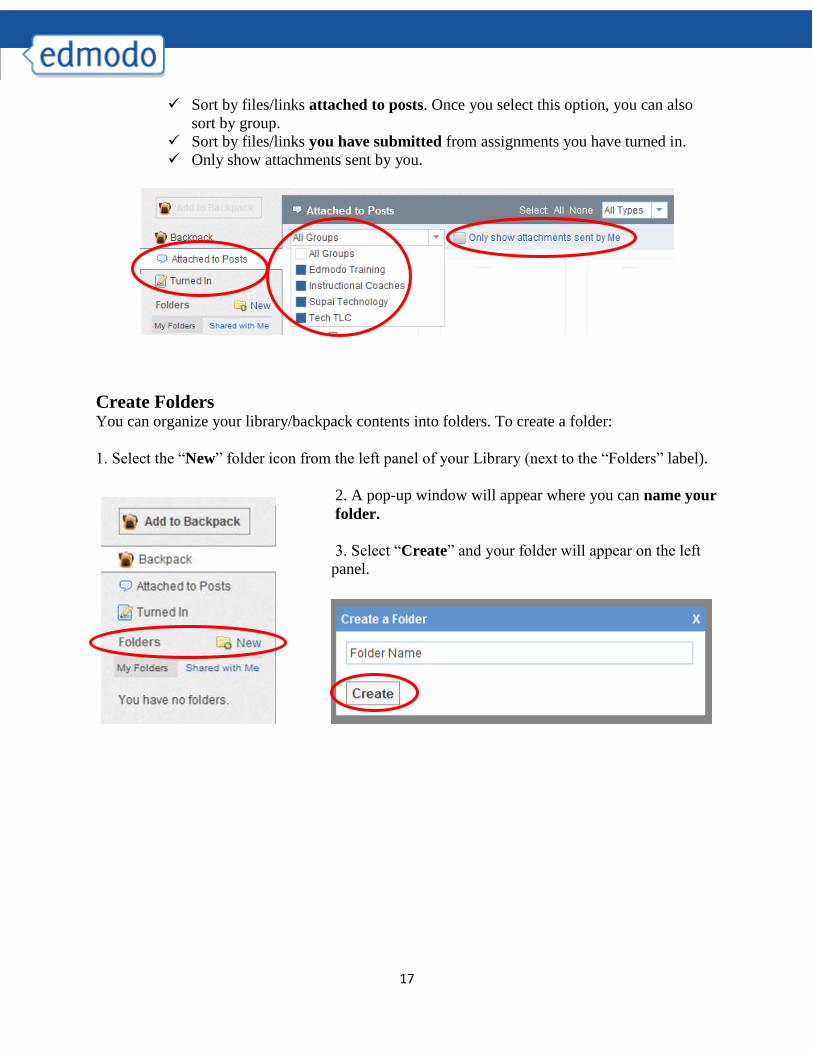
1. You can access your Library by clicking on the “Library” link at the top of the page.
Once you open your Library, Edmodo will refer to this storage space as your “Backpack”.
2. You can add any type of file (photo, video, document, etc.), in any format, or add web links to your library. Your library has unlimited storage space, however, each piece of content added must be under 100MB. Select “Add to Backpack” to add a file or link.
3. Select the “files” tab to add a file from your computer. Click on “Upload” to browse for your file. 4. Select the “link” tab to add a web page to your library.
5. Library items can be viewed or downloaded, and like posts, they can be filtered by group
or type.
2
3 4
1
17
Sort by files/links attached to posts. Once you select this option, you can also
sort by group.
Sort by files/links you have submitted from assignments you have turned in.
Only show attachments sent by you.
Create Folders
You can organize your library/backpack contents into folders. To create a folder:
1. Select the “New” folder icon from the left panel of your Library (next to the “Folders” label).
2. A pop-up window will appear where you can name your
folder.
3. Select “Create” and your folder will appear on the left
panel.

18
To add a library item to a specific folder:
4. Select the item (once selected, it will be highlighted) and on the right panel you will see
a preview of the item. You can “View” or “Download” the item as well as add it to a
folder.
5. Select the folder you wish to add the library item to.
6. Click “Apply” to save your changes. Note: You can select multiple library items to move
them at the same time.
7. Once the items have been added to the folder, you can select the folder from the left
panel and drag and drop library items to organize them within the folder.
8. Once you select the item, you can “Remove from Folder” or add it to another folder too.
9. You can delete the entire folder, or edit the folder name, once the folder is selected.
4
5
6
7 8
9
19
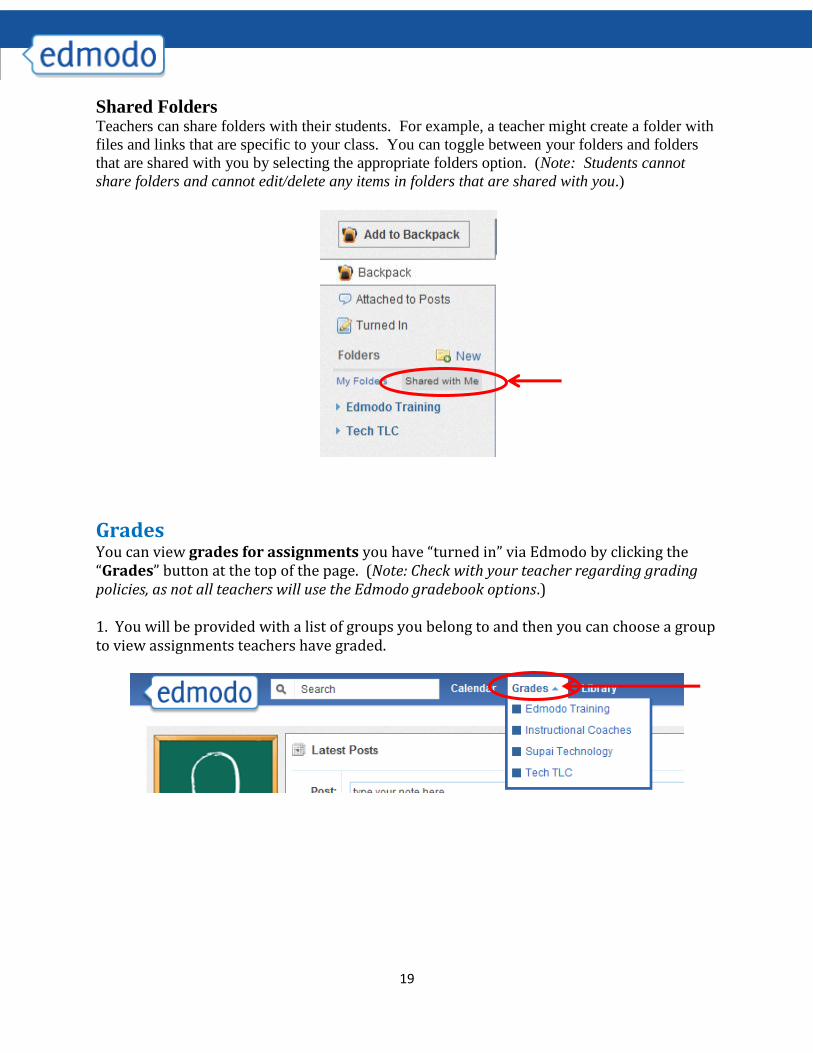
Shared Folders
Teachers can share folders with their students. For example, a teacher might create a folder with
files and links that are specific to your class. You can toggle between your folders and folders
that are shared with you by selecting the appropriate folders option. (Note: Students cannot
share folders and cannot edit/delete any items in folders that are shared with you.)
Grades You can view grades for assignments you have “turned in” via Edmodo by clicking the “Grades” button at the top of the page. (Note: Check with your teacher regarding grading policies, as not all teachers will use the Edmodo gradebook options.)
1. You will be provided with a list of groups you belong to and then you can choose a group to view assignments teachers have graded.

20
2. You will see a list of assignments and some information about each one. You can choose to see your grade for “Each Assignment” or “Total Over Time”.
3. You can select an individual assignment and see details about each one including teacher’s comments. You also have the option to “Resubmit this Assignment”.
2
3

21
Mobile Website & Apps
Edmodo offers a mobile website that is available via any Internet enabled mobile
device at m.edmodo.com (or you can also go to http://susd.edmodo.com).
From the mobile website, you can:
Read and reply to posts
Post notes to your groups
View your notifications
Join groups
Edmodo also offers apps for Android and iPhone devices (including iPod Touch
and iPad).