edge network appliance how to guide: tools · edge network appliance how to guide: tools ... - ping...
TRANSCRIPT

Edge Network Appliance How To Guide:
Tools
How To Guide
v 4.01

Edge Network Appliance How To Guide:
Tools
©2007 XRoads Networks
17165 Von Karman, Suite 112
888-9-XROADS
updated 08/31/07v 4.01

How To Guide – Tools�
Table of Contents
Tools Overview
Components
Initial Setup
- Registration
- Email Alerts
- Time/Data
- Admin Access (password)
- Remote Access
- Port Speed / Duplex
XGM Control
XFlow Reporting
Verifying Connectivity
- PING
- Route
- Traceroute
- ARP
PacketSniffing
Bandwidth Testing
Virtual Technician
Hardware High Availability
4
5
8
8
9
11
12
13
14

How To Guide – Tools4
Edge Configuration Series Tools OverviewThe Edge platform incorporates a number of tools for configuring
and fine tuning the various system modules. These tools can be
used by the administrator to verify connectivity, confirm how the
routing is setup, change how the Edge tests the various network
connections, and even modify how the packets are sent and re-
ceived from the appliance.
The tools section can be accessed via the main tab selection Tools.

How To Guide – Tools�
Initial Setup
When setting up the Edge platform one of the first steps should be to enter your
registration information. Doing this ensures that you are kept up-to-date on the
latest firmware releases, and provides for an easy method for recognizing each
WAN interface (see below).
Email Alerts
The Edge appliance is uniquely suited to provide complete alerting via both standard
email messages and SMS messages to text based cell phone and pager systems.
There is no limit to the number of emails that can be configured.
Default bandwidth shaping policy (based on groups setup in Policy Shaping,
which is outlined in the Policy Shaping section of this guide).
PPTP configuration for this IP host.
When configured, the WAN tags provide simple designation for each WAN interface on
the Home page.
How To Guide – Tools�
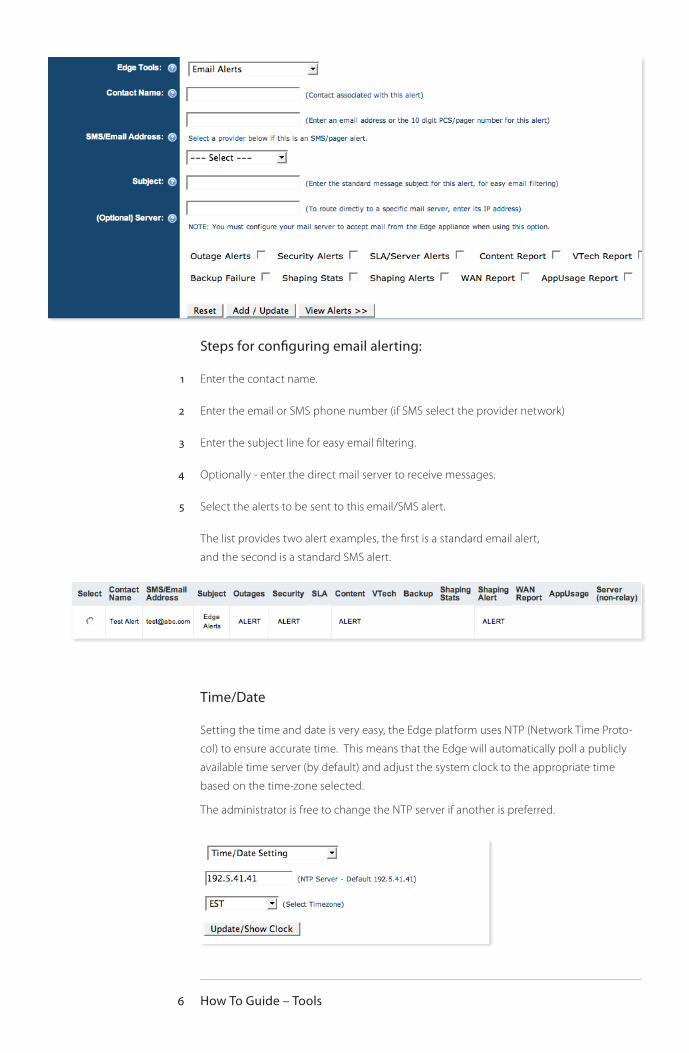
Steps for configuring email alerting:
Enter the contact name.
Enter the email or SMS phone number (if SMS select the provider network)
Enter the subject line for easy email filtering.
Optionally - enter the direct mail server to receive messages.
Select the alerts to be sent to this email/SMS alert.
The list provides two alert examples, the first is a standard email alert,
and the second is a standard SMS alert.
1
2
3
4
5
Time/Date
Setting the time and date is very easy, the Edge platform uses NTP (Network Time Proto-
col) to ensure accurate time. This means that the Edge will automatically poll a publicly
available time server (by default) and adjust the system clock to the appropriate time
based on the time-zone selected.
The administrator is free to change the NTP server if another is preferred.

How To Guide – Tools7
Admin Access
Used to change the primary login authentication, when updated you will be asked to log
back in using the new password. This password also changes the CLI login.
Remote Access
Used to enable or disable remote access to the unit via ports http:8088, https:44380, or
ssh:2022. This parameter is also available under the firewall tab.
Port Speed / Duplex
By default each interface is set to auto-negotiate its connectivity, however in some cases
the directly connected device, router, switch, hub, modem, bridge, does not negotiate
correctly. In those cases you may need to manually set the correct port speed and duplex
settings.
CABLING: Keep in mind that you may need to use a cross-over cable when connecting
the Edge platform directly to a router or firewall device. You should get a yellow or green
link light indicating that the cable is working correctly.
NOTE: Typically if auto-negotia-tion does not work, use 10 / full.

How To Guide – Tools�
XGM Control
The XGM (XOS Global Manager) is used when maintaining a large number of Edge
appliances. After entering the information here the Edge appliance will automati-
cally sync its database information with our hosted XGM servers. Once sync’d
(which takes up to 24 hours) the Edge appliance will be viewable via the XGM
interface. All Edge appliances linked to the users account via the PassCode will
quickly accessible via a single device monitoring screen.
The XGM provides easy of management, rolled up reporting, device monitoring,
and configuration tracking. Contact a sales representative for more information.
XFlow Reporting
XFlow was developed by XRoads Networks to provide detailed network reporting
using the Edge appliances. When enabled (by default) the XFlow module will col-
lect network statistics based on sessions traversing through the appliance.
High traffic, small packet environments may wish to disable this feature.
NOTE: Enabling XFlow may add some latency to the network as it is recording all packet data, however the latency is minimal for most environments.
How To Guide – Tools�
Verifying Connectivity
The following tools should be used when troubleshooting various
connectivity issues.
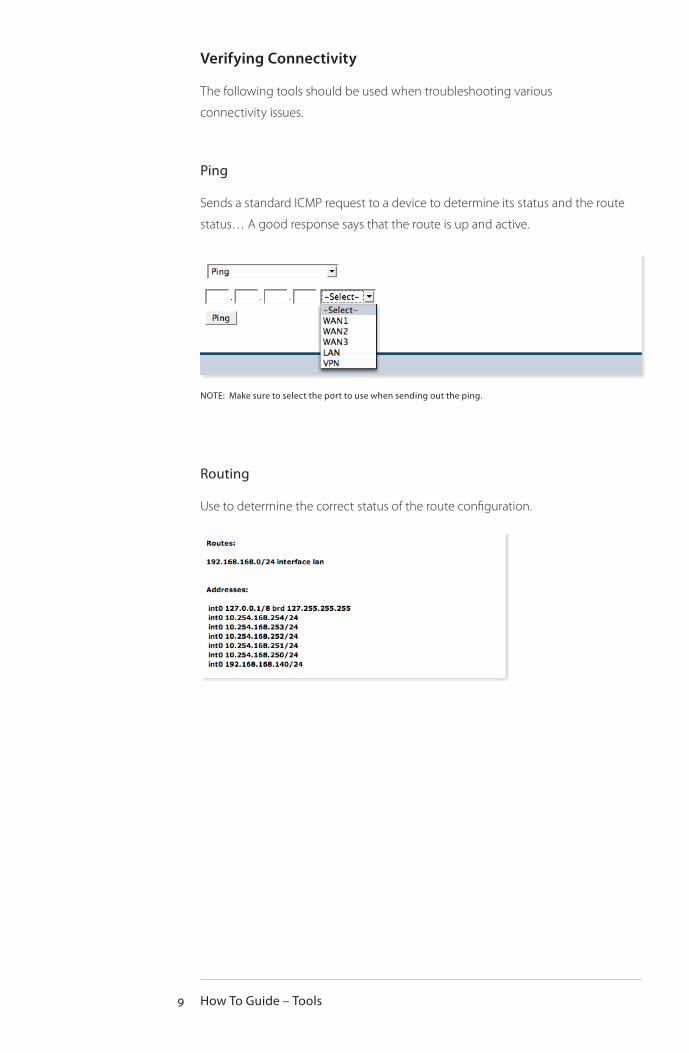
Ping
Sends a standard ICMP request to a device to determine its status and the route
status… A good response says that the route is up and active.
NOTE: Make sure to select the port to use when sending out the ping.
Routing
Use to determine the correct status of the route configuration.
How To Guide – Tools10
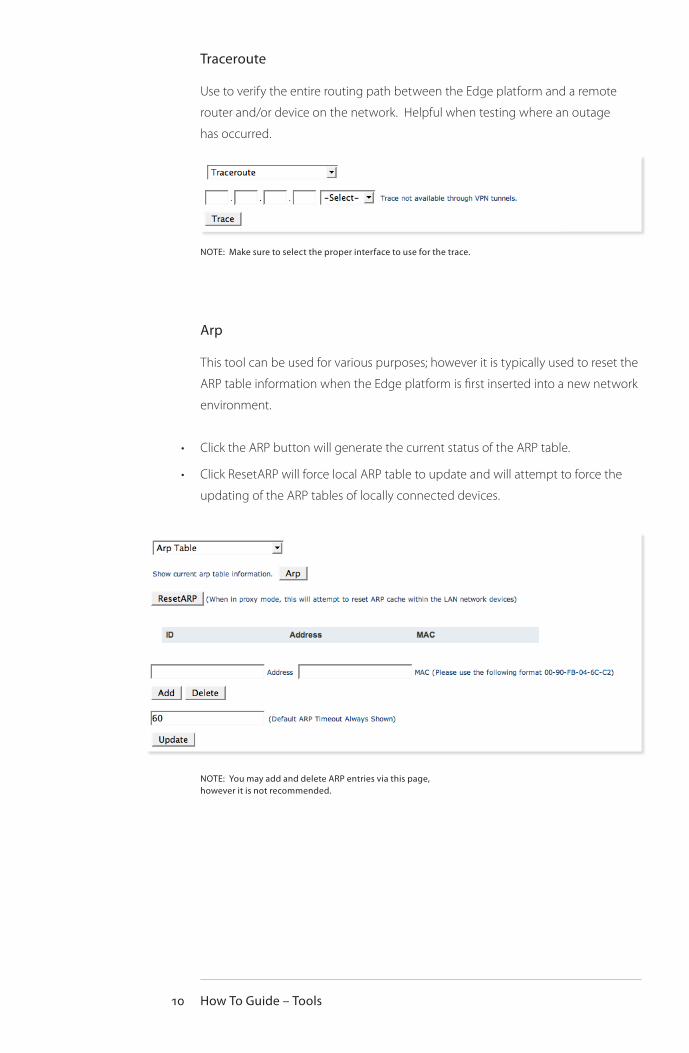
Traceroute
Use to verify the entire routing path between the Edge platform and a remote
router and/or device on the network. Helpful when testing where an outage
has occurred.
NOTE: Make sure to select the proper interface to use for the trace.
Arp
This tool can be used for various purposes; however it is typically used to reset the
ARP table information when the Edge platform is first inserted into a new network
environment.
Click the ARP button will generate the current status of the ARP table.
Click ResetARP will force local ARP table to update and will attempt to force the
updating of the ARP tables of locally connected devices.
•
•
NOTE: You may add and delete ARP entries via this page, however it is not recommended.

How To Guide – Tools11
Packet Sniffing
This feature provides the administrator with the ability to view network packets in
an attempt to troubleshoot various network problems.
Simply select the interface to monitor, view basic header information or complete
packet information (including HEX), filter type (if any), and the number of packets
to capture. Click the ‘Restart PacketSniffer’ button to begin capturing packets.
NOTE: The packet capture WILL NOT be displayed until the number of packets requested have been captured.
For more packet capturing requirements, it is recommended to use the firewall
logging feature instead of the Packet Sniffer. The packet sniffer is typically used for
long duration occasional packet traffic monitoring.

How To Guide – Tools12
Bandwidth Testing
Performing a bandwidth test out to the Internet after inserting the Edge platform
WILL NOT provide an accurate bandwidth speed. This is due to the bandwidth
testing application only using a single session for the speed test. Because only a
single session is used, the speed test will only use one of the available links for the
test.
For this reason, the Edge includes its own bandwidth testing module.
This module will perform a bandwidth speed test by downloading a 1Mb file and
then determine what the max download speed through each of the WAN links.
NOTE: The test takes up to five minutes to run, so do not attempt to re-run the test within a five minute period. Simply click the “Refresh” button to see if the update has occurred (as seen below).
Once the test has been completed the full download speed can be found for each
link as well as the total download speed.

How To Guide – Tools1�
Virtual Technician
The Virtual Technician provides a set of automated tools to assist in troubleshoot-
ing connectivity problems when an error occurs. The results of these automated
tests can then be emailed to the network administrator and support departments
of the service provider.
Automatic troubleshooting can be performed for the following issues:
Reports are generated automatically when errors are detected. Reports can be
emailed using the Email Alerts function under the Tools menu (see this guide).
How To Guide – Tools14
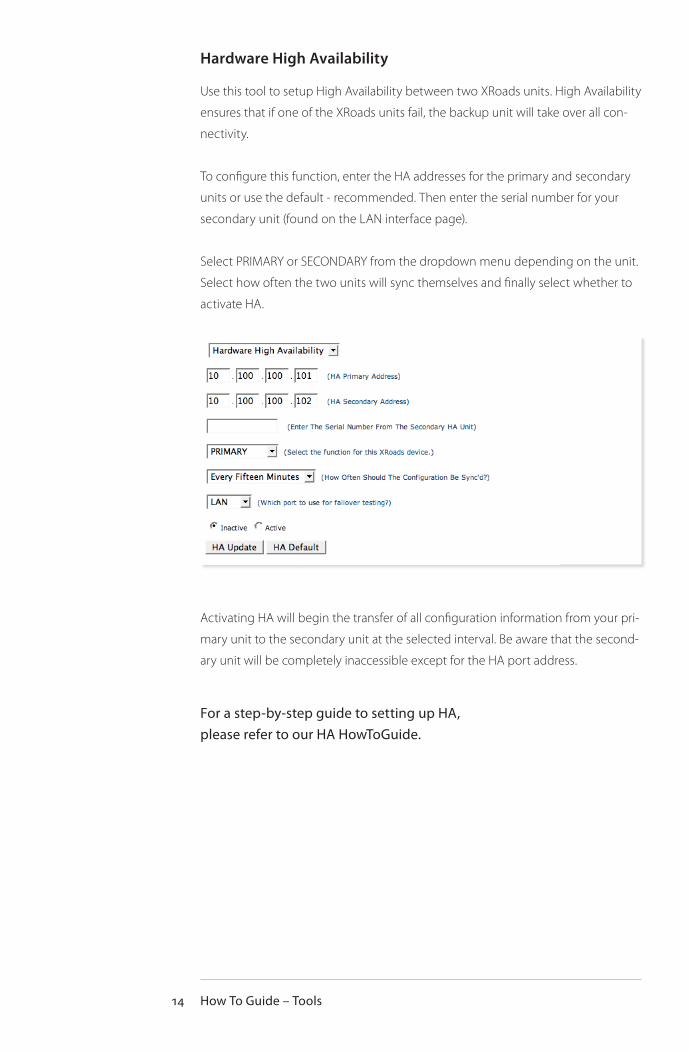
Hardware High Availability
Use this tool to setup High Availability between two XRoads units. High Availability
ensures that if one of the XRoads units fail, the backup unit will take over all con-
nectivity.
To configure this function, enter the HA addresses for the primary and secondary
units or use the default - recommended. Then enter the serial number for your
secondary unit (found on the LAN interface page).
Select PRIMARY or SECONDARY from the dropdown menu depending on the unit.
Select how often the two units will sync themselves and finally select whether to
activate HA.
Activating HA will begin the transfer of all configuration information from your pri-
mary unit to the secondary unit at the selected interval. Be aware that the second-
ary unit will be completely inaccessible except for the HA port address.
For a step-by-step guide to setting up HA, please refer to our HA HowToGuide.