ecoguard type w dust collection cover instruction manual · part no: ecogrdcw version 2 ecoguard...
TRANSCRIPT

Part No: ECOGRDCW Version 2
Ecoguard Type WDust Collection Cover Instruction Manual
(*Shown with angle grinder / sold separately)
Dust Collection Products • 837 Cornish Drive, San Diego, CA 92107 www.dustmuzzle.com • [email protected] • 877-223-2154 • 619 223-2154 • fax: 619 223-9690

2
TABLE OF CONTENTS
Introduction .................................................................................3
About the Symbols .....................................................................3
Ecoguard Type W Overview .......................................................4
Accessories ................................................................................4
Connectors & Flanges ................................................................5
Installation of the Dust Collection Cover.....................................6
Installing to Makita® High-speed Angle Grinder .........................6
Installing to other High-speed Angle Grinders with
included other connectors ..........................................................7
Mounting the Diamond Wheel ....................................................7
Adjusting the Cutting Depth ........................................................8
Attaching the Dust Collector .......................................................9
Ecoguard Type W Schematic ...................................................10
Ecoguard Type W Parts List .....................................................11

3
INTRODUCTIONThank you for purchasing the .revoC noitcelloC tsuD ”W epyT“ draugocE
.metsys noitcelloc tsud rehto ro ,muucav a htiw desu eb tsum W epyT draugocE ehTTo ensure correct use, read this Instruction Manual and the Instruction Manual for the power tool and follow the operating instructions. Keep this manual in a place where operators can access it easily whenever necessary!
ABOUT THE SYMBOLS
“DANGER”, “WARNING”, and “CAUTION”.
DANGER! Death or serious personal injury is imminent when handling this polisher incorrectly.
WARNING! There is a possibility of death or serious personal injury when handling this polisher incorrectly.
CAUTION! There is a possibility of personal injury or property damage when handling this polisher incorrectly.
Note: In some situations, failing to observe WARNING notes could result in death or serious personal injury. Be sure to read and observe the safety notes to ensure safety and correct use of the polisher.
PRECAUTIONS FOR USING DUST COLLECTION COVER1. The Dust Collection Cover is for use with a 4.5” (115mm) and 5” (125mm)
high-speed angle grinder.2. The Dust Collection Cover is designed for cutting concrete, stone and other
masonry products. Do not use when cutting metal or other materials.3. The Dust Collection Cover is solely designed for use with a diamond cutting
wheel. Do not use with any other type of blade such as a conventional abrasive blade or carbide tip saw blade.
4. Always check the Dust Collection Cover for damage, cracks or deformation before starting work. Do not use the Dust Collection Cover if it is damaged, cracked or bent as this could cause to injury.
5. Always wear eye protection. Dust mask, nonskid safety shoes, hard hat, or hearing protection must be used for appropriate conditions.
6. Keep the Dust Collection Cover away from gasoline, thinner, petroleum
7. The supplied connector may not connect securely to every high-speed angle grinder. In this case, do not use the Dust Collection Cover.

4
ECOGUARD TYPE W OVERVIEW
ACCESSORIES
Ecoguard Dust Collection Cover w/ Connector (Part# 500002) 1 pc Collar........................ ....................................................................2 pcs Additional Connector Assembly for Most 5” Grinders ...........3 pcs Flange and Locknut Set for Selective Grinders ........................1 set Hex Wrench........................ ...........................................................1 pc Rubber Hose Adapter ...................................................................1 pc Spacers ........................................................................................2 pcs Stainless Steel Hose Band ..........................................................1 pc Pin Wrench .................................................................................... 1 pc
Rubber Hose Adapter
Stainless Steel Hose Clamp
Dust Collector Hose*
Base Plate
Height Adjustment Knob
Connector Assembly
Knob
(*Sold separately)

5
ATTACHABLE GRINDERS
GRINDER SIZE MODEL5” HSG-125
MAKITA
4-1/2”
GA4530GA45349564CV9564PC9557NB9557PB
5”
GA5010ZGA5020
GA5020Y9558PB9565CV9565PC
6”
GA6020GA6010Z9566CV9566PC
HITACHI
4-1/2”
G12SA3G12SE2
G12SE2P9G12SVAG12SR3G12SS
5”
G13SC2G13SC2P9
G13SPG13VA
6
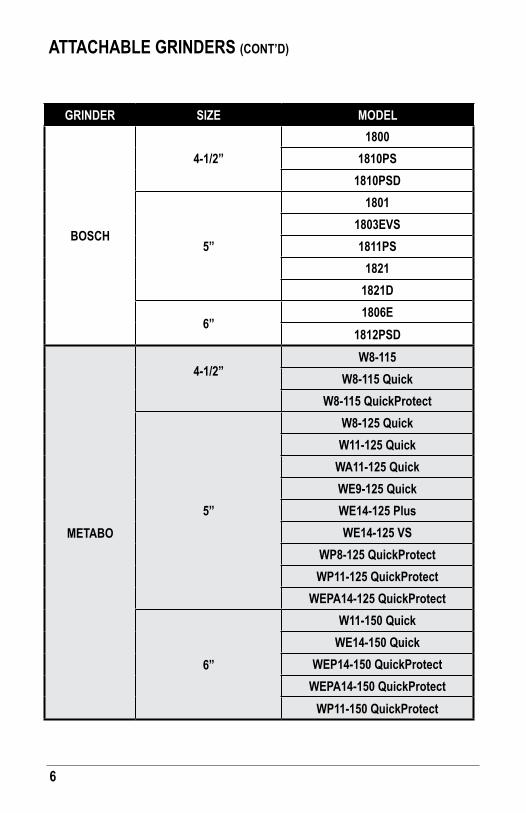
GRINDER SIZE MODEL
BOSCH
4-1/2”1800
1810PS1810PSD
5”
18011803EVS1811PS
18211821D
6”1806E
1812PSD
METABO
4-1/2”
W8-115W8-115 Quick
W8-115 QuickProtect
5”
W8-125 QuickW11-125 Quick
WA11-125 QuickWE9-125 QuickWE14-125 PlusWE14-125 VS
WP8-125 QuickProtectWP11-125 QuickProtect
WEPA14-125 QuickProtect
6”
W11-150 QuickWE14-150 Quick
WEP14-150 QuickProtectWEPA14-150 QuickProtect
WP11-150 QuickProtect
ATTACHABLE GRINDERS (CONT’D)

7
GRINDER SIZE MODEL
DEWALT
4-1/2”D28110D28112D28402
4-1/2” / 5”
D28065D28114D28115D28131
6”D28140D28144
MILWAUKEE
4/1/2”
6130-336140-306146-306146-316146-336147-306147-316121-306121-31
5”
6117-306117-316117-33
6117-33D6121-31A
6”
6124-306124-316161-306161-316161-33
ATTACHABLE GRINDERS

8
ECOGUARD TYPE W SPACERS AND CONNECTORS
5000
35
5000
22
5000
27
5000
12
5000
07
5000
07
5000
04
5000
08
5000
08
5000
02
5000
0350
0011
5000
07
5000
07
5000
08
5000
08
MA
KIT
A®/M
ILW
AU
KEE
BO
SCH
® /D
EWA
LT
MET
AB
OH
ITA
CH
I
9
INSTALLATION OF THE DUST COLLECTION COVER
WARNING!1. Be sure to turn off the high-speed angle grinder and remove the plug
from the electrical outlet before attaching and installing the Dust Col-lection Cover.
2. Make sure the Dust Collection Cover is securely attached; otherwise it may come loose which could cause injury.
3. If you installed the Dust Collection Cover to a high-speed angle grinder but the connector is loose and can not be securely attached, do not use the Dust Collection Cover. Using it in this state could cause injury.
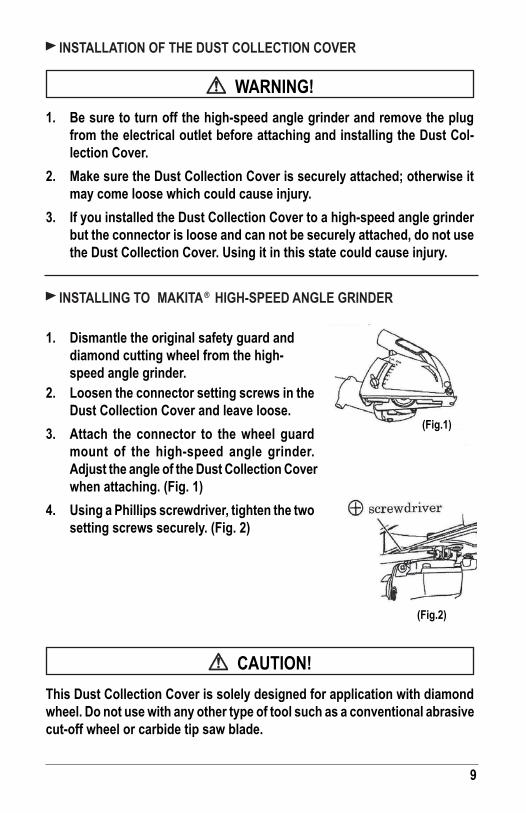
INSTALLING TO MAKITA® HIGH-SPEED ANGLE GRINDER
1. Dismantle the original safety guard and diamond cutting wheel from the high-speed angle grinder.
2. Loosen the connector setting screws in the Dust Collection Cover and leave loose.
3. Attach the connector to the wheel guard .rednirg elgna deeps-hgih eht fo tnuom
Adjust the angle of the Dust Collection Cover when attaching. (Fig. 1)
4. Using a Phillips screwdriver, tighten the two setting screws securely. (Fig. 2)
CAUTION!This Dust Collection Cover is solely designed for application with diamond wheel. Do not use with any other type of tool such as a conventional abrasive cut-off wheel or carbide tip saw blade.
(Fig.1)
(Fig.2)

10
INSTALLING TO OTHER HIGH-SPEED ANGLE GRINDERS WITH INCLUDED OTHER CONNECTORS
If you install the Dust Collection Cover to a high-speed angle grinder but the connector is loose and cannot be securely attached, it may be necessary to change the connector designed for other makes.
1. Using the hexagon Wrench, remove the three bolts in the connector attached to the Dust Collection Cover. (Fig. 3)
2. Attach the supplied connector by following the instruction in (1) above in reverse. (For Hitachi Grinder use Part No: 500003/ for Metabo / Bosch use Part No: 500004)
3. Subsequent procedures are the same as for attaching the adapter to a high-speed angle grinder in case changing the connector is not needed.
(Fig.3)
Bolt Connector
11
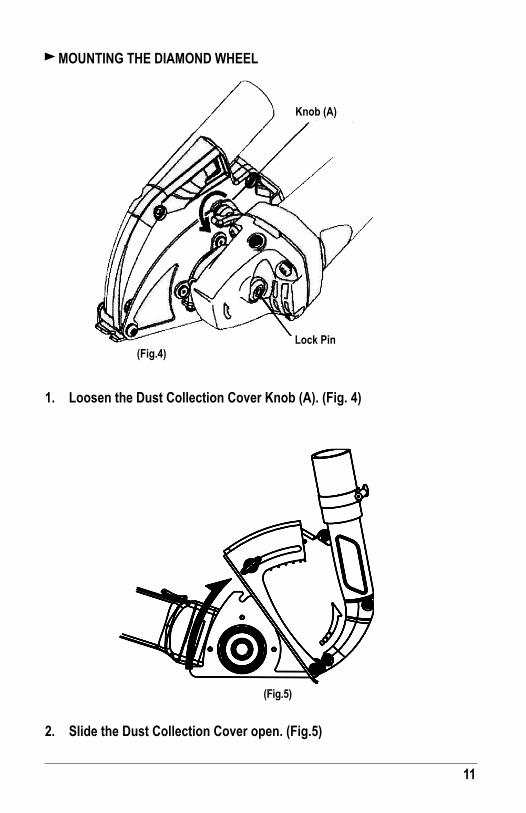
MOUNTING THE DIAMOND WHEEL
1. Loosen the Dust Collection Cover Knob (A). (Fig. 4)
2. Slide the Dust Collection Cover open. (Fig.5)
(Fig.5)
(Fig.4)
Knob (A)
Lock Pin

12
3. Mount the supplied spacer with the power tool or dedicated flange lock nut set on the spindle and then mount the diamond wheel. (Fig. 6)
4. Mount the inner flange on the spindle on top of the diamond wheel with the convex side of the inner flange on the diamond wheel side.
5. Press the lock pin to fix the spindle and securely tighten the lock nut with a pin wrench.
6. Replace the Dust Collection Cover (Fig. 4) and tighten the knob (A).
ADJUSTING THE CUTTING DEPTH
1. Loosen knob (B) on the Dust Col-lection Cover. (Fig. 7)
2. Slide the base plate to adjust the cutting depth and tighten knob (B) to fix the depth. (Fig. 8) Match the base plate matching surface to the scale to determine the ap-proximate cutting depth. (Fig. 9)
Spacer:Hitachi: 500011Metabo®: 500012
(Fig.7)
(Fig.8)
(Fig.6)
Lock Nut
DiamondWheel
InnerFlange
Knob (B)
Base Plate

13
ATTACHING THE DUST COLLECTOR
Attach the Dust Collection Cover to the hose. (Fig. 10)
*The hose opening of the Dust Collection Cover has an outside diameter of 34mm.
If necessary, use the Rubber Hose Adapter and Stainless Hose Band supplied with the Dust Collection Cover.
(Fig.9)
(Fig.10)
3. Use D115 scale for 4.5” (115mm) diameter blade and D125 scale for 5” (125mm) diameter blade. Cutting depth is indicated by millimeter.
Dust Connector Hose
Stainless Steel Hose Band
Rubber Hose Adapter
Matching Surface
Scale

14
ECOGUARD TYPE W SCHEMATIC

15
ECOGUARD TYPE W PARTS LIST
DRAWING NO. PART NO. DESCRIPTION QUANTITY1 500027 Cover Assembly 12 500009 Base 13 500010 Base Plate 1
4a 500002Connector Assembly ( Makita ®/ Milwaukee) 1
4b 500003 Connector Assembly (Hitachi) 14c 500004 Connector Assembly (Metabo®) 14d 500027 Connector Assembly (Bosch®/Dewalt) 15 500005 Rubber Hose Adapter 16 500006 Stainless Steel Hose Band 17 500007 Inner Flange 18 500008 Lock Nut 1
9e 500011 Spacer (Hitachi/T2.5) 19f 500012 Spacer (Metabo®/T5.0) 110 500015 Knob Bolt 211 500016 Shaft 112 500017 Screw 213 500018 Spring Washer 414 500019 Washer 315 500020 Flat Head Screw 316 500021 Taper Washer 317 500025 Brand Label 118 500022 Collar - M 119 500024 Hex. Wrench 120 210105 Pin Wrench 121 500035 Collar D 1
Optional Accessory:Shown on pg 4 500026 Flexible Connector Hose 18” 1
Spacer Washers (3)
If necessary, these can be used singly or in any combination to make small adjustments to the wheel so it is centered in the Ecoguard.
Shim The rubber band shim can be used to make small adjustments to the diameter of the bearing housing of the grinder to facilitate better clamping pressure of the EgoGuard
Cable Tie The Releasable Cable Tie should be used to tie the 1 ¼” vacuum hose to the handle of the grinder so the hose doesn’t interfere with the motion of the grinder.