easy-to-build jewelry cabinet - go.rockler.com · easy-to-build jewelry cabinet plans for more...
TRANSCRIPT

Easy-to-Build Jewelry Cabinet
PlansFor more plans, tools and hardware visit rockler.com
Decorative Tandem Door Hinges add stylish storage space for valuables.
What you’ll find inside:• Elevation drawings• Complete materials list• Step-by-step plans
2
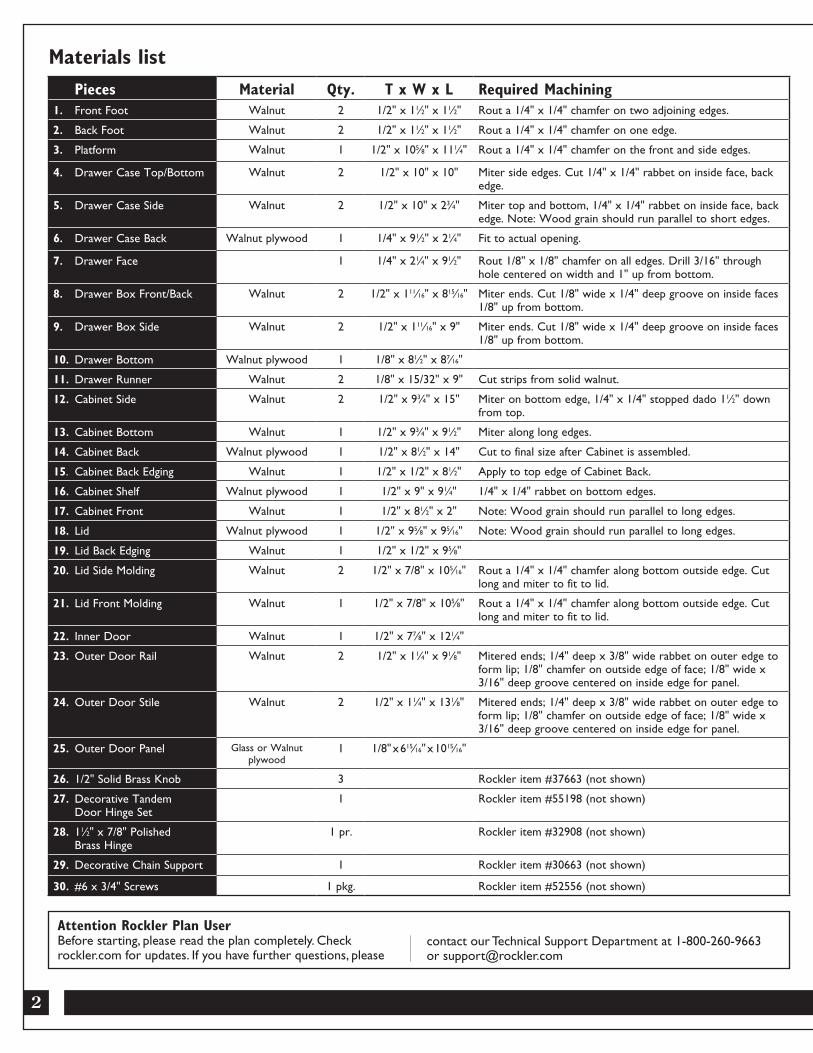
Materials list Pieces Material Qty. T x W x L Required Machining1. Front Foot Walnut 2 1/2" x 11⁄2" x 11⁄2" Rout a 1/4" x 1/4" chamfer on two adjoining edges.
2. Back Foot Walnut 2 1/2" x 11⁄2" x 11⁄2" Rout a 1/4" x 1/4" chamfer on one edge.
3. Platform Walnut 1 1/2" x 105⁄8" x 111⁄4" Rout a 1/4" x 1/4" chamfer on the front and side edges.
4. Drawer Case Top/Bottom Walnut 2 1/2" x 10" x 10" Miter side edges. Cut 1/4" x 1/4" rabbet on inside face, back edge.
5. Drawer Case Side Walnut 2 1/2" x 10" x 23⁄4" Miter top and bottom, 1/4" x 1/4" rabbet on inside face, back edge. Note: Wood grain should run parallel to short edges.
6. Drawer Case Back Walnut plywood 1 1/4" x 91⁄2" x 21⁄4" Fit to actual opening.
7. Drawer Face 1 1/4" x 21⁄4" x 91⁄2" Rout 1/8" x 1/8" chamfer on all edges. Drill 3/16" through hole centered on width and 1" up from bottom.
8. Drawer Box Front/Back Walnut 2 1/2" x 111⁄16" x 815⁄16" Miter ends. Cut 1/8" wide x 1/4" deep groove on inside faces 1/8" up from bottom.
9. Drawer Box Side Walnut 2 1/2" x 111⁄16" x 9" Miter ends. Cut 1/8" wide x 1/4" deep groove on inside faces 1/8" up from bottom.
10. Drawer Bottom Walnut plywood 1 1/8" x 81⁄2" x 87⁄16"
11. Drawer Runner Walnut 2 1/8" x 15/32" x 9" Cut strips from solid walnut.
12. Cabinet Side Walnut 2 1/2" x 93⁄4" x 15" Miter on bottom edge, 1/4" x 1/4" stopped dado 11⁄2" down from top.
13. Cabinet Bottom Walnut 1 1/2" x 93⁄4" x 91⁄2" Miter along long edges.
14. Cabinet Back Walnut plywood 1 1/2" x 81⁄2" x 14" Cut to final size after Cabinet is assembled.
15. Cabinet Back Edging Walnut 1 1/2" x 1/2" x 81⁄2" Apply to top edge of Cabinet Back.
16. Cabinet Shelf Walnut plywood 1 1/2" x 9" x 91⁄4" 1/4" x 1/4" rabbet on bottom edges.
17. Cabinet Front Walnut 1 1/2" x 81⁄2" x 2" Note: Wood grain should run parallel to long edges.
18. Lid Walnut plywood 1 1/2" x 95⁄8" x 95⁄16" Note: Wood grain should run parallel to long edges.
19. Lid Back Edging Walnut 1 1/2" x 1/2" x 95⁄8"
20. Lid Side Molding Walnut 2 1/2" x 7/8" x 105⁄16" Rout a 1/4" x 1/4" chamfer along bottom outside edge. Cut long and miter to fit to lid.
21. Lid Front Molding Walnut 1 1/2" x 7/8" x 105⁄8" Rout a 1/4" x 1/4" chamfer along bottom outside edge. Cut long and miter to fit to lid.
22. Inner Door Walnut 1 1/2" x 77⁄8" x 121⁄4"
23. Outer Door Rail Walnut 2 1/2" x 11⁄4" x 91⁄8" Mitered ends; 1/4" deep x 3/8" wide rabbet on outer edge to form lip; 1/8" chamfer on outside edge of face; 1/8" wide x 3/16" deep groove centered on inside edge for panel.
24. Outer Door Stile Walnut 2 1/2" x 11⁄4" x 131⁄8" Mitered ends; 1/4" deep x 3/8" wide rabbet on outer edge to form lip; 1/8" chamfer on outside edge of face; 1/8" wide x 3/16" deep groove centered on inside edge for panel.
25. Outer Door Panel Glass or Walnut plywood
1 1/8" x 615⁄16" x 1015⁄16"
26. 1/2" Solid Brass Knob 3 Rockler item #37663 (not shown)
27. Decorative Tandem Door Hinge Set
1 Rockler item #55198 (not shown)
28. 11⁄2" x 7/8" Polished Brass Hinge
1 pr. Rockler item #32908 (not shown)
29. Decorative Chain Support 1 Rockler item #30663 (not shown)
30. #6 x 3/4" Screws 1 pkg. Rockler item #52556 (not shown)
Attention Rockler Plan User Before starting, please read the plan completely. Check rockler.com for updates. If you have further questions, please
contact our Technical Support Department at 1-800-260-9663 or [email protected]

3
Exploded View
1
2
3
4
20
4
5
24
24
5
6
19
7
8
18
8
9
9
1011
11
1217
22
2325
23
16
20
21
12
13
14
15

4
Build the Drawer Case
1. Cut the Top/Bottom pieces (4) and Sides (5) to size. Note: The wood grain on the Sides should run parallel to the shorter edges. This is necessary to avoid cross-grain joints that could result in splitting.
2. Miter the cross-grain ends of the Top, Bottom and Sides so they fit together to form the box.
3. Cut a 1/2" wide x 1/8" deep dado in the inside face of each Side. These dadoes are for the Drawer Runners; be sure they are located the same distance from the bottom so the drawer will be straight. We cut ours 1" up from the bottom outside edge. See Drawer Case Side Profile drawing.
1/4" x 1/4" rabbets
Grain direction
Gra
in
dire
ctio
n
Drawer CaseSide ProfileRear view
1/2"
1"
1/8"Drawer CaseRear view
Make the Feet and the Platform
1. Rip a piece of 1/2" thick x 7" long stock 11⁄2" wide.
2. Use a 45˚ chamfer bit to rout a 1/4" chamfer along the ends and one edge of the stock.
Note: Use a backer board and rout the ends first, then the edge. That way, any tear-out on the ends will be removed on the long-grain cut.
3. Cross-cut the pieces for both Front and Back Feet (1 and 2) to size. (The pieces for the Front Feet will come from the ends.)
4. If desired, sand and stain the feet. We used General Finishes’ Black Gel Stain on the cabinet pictured.
5. Rout a 1/4" chamfer on both ends and one edge of the Platform.
Note: Use a backer board and rout the ends first, then the edge.
1/4" x 1/4" chamfers
11⁄2"
11⁄2"
Foot DetailNote: Rout chamfers before cross-cutting pieces to size
1 12 2
4. Cut a 1/4" x 1/4" rabbet on the inside face of the Top, Bottom and Sides to form a recess to accept the Back (6). See Drawer Case drawing.
Note: Use a backer board for safety and a cleaner cut, especially when machining the Sides.
5. Spread glue on the mitered edges and clamp the pieces. Make sure that the joints are tight and the assembly is square.
6. Double-check the dimensions of the opening for the Back. Cut the Back to fit and glue it in place.
7. If desired, sand and stain the case.
5
4
65
4

5
Build the Drawer Box
1. Cut the drawer box Front, Back and Sides (8 and 9)slightly longer than the final dimensions.
2. Cut a 1/8" wide x 1/4" deep groove on the inside face of each piece. Locate the groove 1/8" from the bottom edge.
Note: If you plan to apply velvet or felt to the drawer bottom and want to do so before assembling the drawer, cut the groove a hair wider than 1/8" to accommodate the material’s thickness.
3. Cut the drawer box pieces to final size, mitering the ends.
4. Cut the Drawer Bottom (10) to final size. If desired, apply felt or velvet and trim to size.
5. Apply glue to the miters. Position three of the sides, insert the drawer bottom into the grooves (without glue), position the fourth side and then clamp the assembly. Make sure the assembly is square.
6. When the glue has cured, determine the location for the Drawer Runners (11). Make sure the runners are positioned so the drawer will not scrape against the drawer case bottom. (A spacer strip made from scrap can make this step easier.) Glue and clamp the runners in place. Wipe away any excess glue.
Drawer Box
1/8" x 1/8" chamfer on all edges of front face
1"
43⁄4"
1/8"
1/8"
15/32"
15/32"
1/4"
Drawer Box Side Profile 7. Cut the piece for the Drawer Face (7) to size. Rout a
1/8" chamfer on all edges. Again, use a backer board and rout the ends first, then the sides.
8. If desired, sand and stain the Drawer Face.
Mount the Drawer Face to the Drawer Box
1. Drill a 3/16" diameter hole centered on the length of the Drawer Face (7) and 1" down from the top edge. This hole is for the Brass Knob (26; not shown), but it also will help with positioning the Drawer Face during mounting.
2. Slide the drawer box into the drawer case.
3. Center the Drawer Face on the front of the drawer case and hold it there. Press a sharp point through the center of the hole in the drawer face to mark the front of the drawer box.
4. Remove the drawer box and drill a 3/16" diameter hole through the front at the mark.
5. Install the mounting screw from the inside of the drawer box and position the door front, then thread on the Brass Knob. Hand tighten.
6. Slide the drawer back into the case, fine-tune the Drawer Face position and further tighten the pull.
7. Pull the drawer out and install a few pin nails from the inside of the drawer box into the Drawer Face.
10
7
8
9
11
11 9
9
8
11

6
1/4" (to match hinge depth)
1/2"
11⁄2" (to match hinge width)
Mortising Cabinet Back for Hinges
1/4"
1/4"
Cabinet Shelf ProfileNote: Rabbet runs along all four edges on underside of shelf
Cabinet
1/4"
1/4"
11⁄2"
Gra
in
dire
ctio
n
Grain direction
Hinge mortises (cut before assembling the cabinet)
Through dadoes in Front, Back
17
16
16
12
13
14
14
15
15
28
Build the Cabinet
1. Cut the Sides (12), Bottom (13), Front (17) and Shelf (16) to size. Note that the wood grain on the Bottom should run parallel to its shorter edges.
2. Miter the longer (cross-grain) edges of the Bottom.
3. Miter the bottom edge of each Side.
4. Cut the plywood Back to size.
5. Cut a 1/2" x 1/2" x 81⁄2" strip of matching solid wood for the Cabinet Back Edging (15) and glue it to the top edge of the plywood Back. Let dry.
6. Cut mortises in the Cabinet Back Edging for the butt hinges that will attach the lid to the cabinet. If you want the lid to lie flat to the cabinet, cut the mortises to match the thickness of the closed hinge at the knuckle.
12

7
7. Rout 1/4" wide x 1/4" deep stopped dadoes in the inside faces of the Sides and through dadoes in the inside faces of the Front and the Back. All dadoes should be positioned 11⁄2" down from the tops of the pieces. (On the Back, that measurement includes the Cabinet Back Edging.)
8. Cut the Cabinet Shelf (16) to size, then cut 1/4" x 1/4" rabbets on all edges of the underside. If you plan to face the Shelf with felt or velvet, make the rabbets slightly deeper to account for the thickness of the material.
9. Determine where you will mount the Decorative Tandem Door Hinges to the cabinet. Follow the instructions for the hinges (available online) to mark and cut the required mortises in the cabinet side. It is very difficult to cut the mortises after the cabinet has been assembled.
10. Assemble the cabinet by inserting the Shelf in the dadoes (without glue) while gluing and clamping the other pieces. Make sure all edges are flush. Check to be sure the assembly is square.
Build the Lid
1. Cut the plywood Lid (18) to size.
2. Cut a 1/2" x 1/2" x 95⁄8" strip of matching solid wood (19) and glue it to the back of the plywood Lid.
3. Rout a 1/4" x 1/4" chamfer on one edge of the stock for the Side and Front Lid Moldings (20 qnd 21), then cut the moldings to size, mitering the ends that will meet at the front corners of the lid.
4. Glue and clamp the moldings to the lid.
Lid
1/4"
1/4"
Lid MoldingProfile
Grain direction
Outer Door Rail and Stile Profile
1/8"
1/8"
1/8"
1/4"
3/16"3/8"
Outer Door
20
20
19
18
20
21
21
23
25
23
23
24
24
24

8Rev 07/16
Distributed by Rockler Companies Inc.© 2016 Rockler Woodworking and Hardware
Make the Doors
1. Cut the Inner Door (22) to size.
2. Rip the pieces for the Outer Door Rails and Stiles (23 and 24) and crosscut them slightly longer than their finished dimensions.
3. Machine a 1/8" wide x 1/4" deep groove for the glass or plywood Panel (25) along the inside edge of the Rails and Stiles.
4. Miter the Rails and Stiles to final dimensions.
5. If applicable, cut solid plywood Panel (25) to final dimensions.
6. Spread glue on the miters and assemble the door frame. Slide the Panel into the grooves (without glue) before clamping the assembly. Make sure the clamped assembly is square.
7. Once the glue has fully cured, cut a 3/8" wide x 1/4" deep rabbet around the outside edge on the back of the door. Use a backer board to prevent tear-out on the trailing end of the cut.
8. Follow the instructions for the Decorative Tandem Door Hinges to cut the required mortises in both the inner and outer doors.
Attach feet, platform, drawer case and cabinet
1. Working from the bottom, drill and countersink a through hole in the center of each Foot (1 and 2).
2. Position each Front Foot (1) at the front of the platform so that the corner of the chamfer aligns with the corner of the platform. Use the through holes in the Feet to mark the locations for stopped pilot holes for the screws.
3. Position each Back Foot (2) so that the chamfer lines up with the side of the platform and the back edge is flush to the platform. Use the through holes in the Feet to mark the locations for stopped pilot holes.
4. Drill pilot holes and then attach the Feet with #6 x 3/4" flat-head screws. If feet rotate, drive a small pin nail through the Feet into the platform to secure.
5. Position the drawer case on the platform, aligning the back edges and centering the case side to side. Clamp in place.
6. Carefully turn the pieces over; drill and countersink stopped pilot holes for #6 x 3/4" flat-head screws. Secure the platform to the drawer case with screws.
7. If you stained the drawer case, spread quick-set epoxy on the top (staying at least 1" from the edges to avoid squeeze-out) and position the cabinet on the drawer case, aligning the back edges and centering the cabinet side to side. If you didn't stain the drawer case, use standard wood glue. Clamp the assembly or add weight to the top and allow adhesive to cure.
Finishing touches
1. Remove any hardware you’ve installed and sand unstained surfaces through 220 grit.
2. Apply topcoat of your choice.
3. Install the Decorative Tandem Door Hinges and doors as described in the hinge instructions.
4. Install other hardware as shown or as desired. Note: When deciding where to mount hardware
like necklace hangers on the inner door, take the location of the hinges into account to prevent potentially damaging contact between the two. Also, if you're using glass in the outer door, locate the hardware on the inner door so it will positioned in a visually pleasing configuration when viewed through the outer door.