easy! smooth! for gp 3000 m class users …€¦ · * 1 it does not support display video function,...
TRANSCRIPT

1
Copyright © 2012.9 Digital Electronics Corporation. All Rights Reserved.
Easy! Smooth!
For GP 3000 M Class users
Replacement Guidebook
1st Edition Apr. 2017

2
Introduction
This guidebook introduces the procedures to replace the GP-3000 M Class.
First of all, please check the multimedia function and the image unit function you are using.
Functions that need to be
checked
Setting items that can be confirmed
by GP-Pro EX
Suggested
replacement plan
If you are using the built-in Video I/F
Video / Movie
Display Video
Camera Output
[System Settings] -> [Video/Movie]
(Basic Setting)
[Parts (P)] -> [Movie Player Settings]
See
Replacement plan B
*1
Recording Video
[System Settings] -> [Video/Movie]
(Basic, Save to CF/USB, Record to FTP,
Event Recorder) See
Replacement plan A
Playing Movies
[Common Settings (R)] -> [Movie (O)]
(Play List)
[Parts (P)] -> [Movie Player Settings]
Camera-Viewer EX
Display / Record [System Settings] -> [Display Unit] ->
[Remote Viewer] -> [Camera Viewer]
See
Replacement plan A
If you are not using the built-in Video I/F
Video / Movie
Recording Video
[System Settings] -> [Video/Movie]
(Basic, Save to CF/USB, Record to FTP,
Event Recorder) See
Replacement plan A
Playing Movies
[Common Settings (R)] -> [Movie (O)]
(Play List)
[Parts (P)] -> [Movie Player Settings]
Camera-Viewer EX
Display / Record [System Settings] -> [Display Unit] ->
[Remote Viewer] -> [Camera Viewer]
See
Replacement plan A
If you are using the image unit
Display Video /Saving Video (VM Unit)
Display Video
Camera Output
[System Settings] -> [Image Unit] (VM Unit)
[Screen] -> [Screens of Type]
(Image Unit Window) See
Replacement plan A Saving Video
Output as Still
Images
[System Settings] -> [Image Unit] (VM Unit)
[Screen] -> [Screens of Type]
(Image Unit Window)
Displaying the Computer Screen (VM Unit, DVI Unit, RGB Unit )
Displaying the
Computer Screen
[System Settings] -> [Image Unit] (*** Unit)
[Screen] -> [Screens of Type]
(Image Unit Window)
See
Replacement plan A
*1 For the GP3750 and GP3360, the video I / F function cannot be replaced. Please refer to the replacement plan A.

3
Replacement plan A
If you are not using the multimedia function or if you are using an Image Unit, you can replace the product using the same system configuration. If you are using the multimedia function (Recording Video, Playing Movie and Camera - Viewer EX), there are some restrictions on function. The replacement plan is as follows. Please replace it according to the specified replacement Guidebook.
Model in use / Model No. Recommended Substitutes / Model No. Reference to Replacement
Guidebook
GP-3750T
AGP3750-T1-AF (PFXGP3750TAA)
SP-5700T *1
PFXSP5700TPD + PFXSP5B10 See Easy! Smooth! Replacement Guidebook GP-3750T -> SP-5700TP(Premium Display) + SP-5B10(Power Box)
AGP3750-T1-D24 (PFXGP3750TAD)
GP-3750T Coated model
AGP3750-T1-AF-M (PFXGP3750TAAC) PFXSP5700TPDF0C +
PFXSP5B10F0C AGP3750-T1-D24-M (PFXGP3750TADC)
GP-3650U High luminance
model
AGP3650-U1-D24 (PFXGP3650UADC)
GP-3600U *2
AGP3600-U1-D24-CA1M (PFXGP3600UADCA)
-
GP-3650T AGP3650-T1-AF (PFXGP3650TAA)
GP-4601T *2
PFXGP4601TAA See Easy! Smooth! GP3600 Series->GP4600 Series Replacement Guidebook
GP-3650T Coated model
AGP3650-T1-AF-M (PFXGP3650TAAC)
PFXGP4601TAAC
AGP3650-T1-D24-M (PFXGP3650TADC)
PFXGP4601TADC
GP-3560T AGP3560-T1-AF (PFXGP3560TAA)
SP-5500T *1
PFXSP5500TPD + PFXSP5B10 See Easy! Smooth! Replacement Guidebook GP-3500T/GP-3510T Series ->SP-5500TP(Premium Display) + SP-5B10(Power Box)
GP-3560T Coated model
AGP3560-T1-AF-M (PFXGP3560TAAC)
PFXSP5500TPDF0C + PFXSP5B10F0C
GP-3550T AGP3550-T1-AF (PFXGP3550TAA) GP-4501T
*2
PFXGP4501TAA See Easy! Smooth! GP/ST-3500 Series-> GP4000 Series Replacement Guidebook
GP-3550T Coated model
AGP3550-T1-AF-M (PFXGP3550TAAC)
PFXGP4501TAAC
GP-3450T AGP3450-T1-D24 (PFXGP3450TAD) GP-4401T
*2
PFXGP4401TAD See Easy! Smooth! GP-3310, GP/ST-3400 Series -> GP4000 Series Replacement Guidebook
GP-3450T Coated model
AGP3450-T1-D24-M (PFXGP3450TADC)
PFXGP4401TADF0C
GP-3360T AGP3360-T1-D24 (PFXGP3360TAD)
GP-4401T *1
PFXGP4401TAD
* 1 It does not support Display Video function, Recording Video function and Playing Movies function.
* 2 It does not support Recording Video function and Playing Movie function.

4
Replacement plan B
If you are using the multimedia function (Recording Video, Playing Movie and Camera - Viewer EX), there are restrictions on function. The replacement plan is as follows. Please replace the product according to this document.
Model in use / Model No. Recommended Substitutes / Model No. Reference to Replacement
Guidebook
GP-3650U High luminance
model
AGP3650-U1-D24 (PFXGP3650UADC)
GP3600U + VM unit *2
AGP3600-U1-D24-CA1M (PFXGP3600UADCA) + GP3000-VM01 (PFXZGPEUVM31)
See Chapter 1. Specification Comparison 1.1 GP-365 and GP-3600+VM unit specification comparison
GP-3650T AGP3650-T1-AF (PFXGP3650TAA)
GP3600T + VM unit *2
AGP3600-T1-AF-D81C (PFXGP3600TAADC) AGP3600-T1-AF-D81K (PFXGP3600TAADK) + GP3000-VM01 (PFXZGPEUVM31)
GP-3650T Coated model
*1
AGP3650-T1-AF-M (PFXGP3650TAAC)
AGP3650-T1-D24-M (PFXGP3650TADC)
AGP3600-T1-D24-D81C (PFXGP3600TADDC) AGP3600-T1-D24-D81K (PFXGP3600TADDK) + GP3000-VM01 (PFXZGPEUVM31)
GP-3560T AGP3560-T1-AF (PFXGP3560TAA)
AGP3600-T1-AF-D81C (PFXGP3600TAADC) AGP3600-T1-AF-D81K (PFXGP3600TAADK) + GP3000-VM01 (PFXZGPEUVM31)
See Chapter 1. Specification Comparison 1.3 GP-3560 and GP-3600+VM unit specification comparison
GP-3560T Coated model
*1
AGP3560-T1-AF-M (PFXGP3560TAAC)
GP-3550T AGP3550-T1-AF (PFXGP3550TAA)
GP3500T + VM unit *2
AGP3500-T1-AF-D81C (PFXGP3500TAADC) AGP3500-T1-AF-D81K (PFXGP3500TAADK) + GP3000-VM01 (PFXZGPEUVM31)
See Chapter 1. Specification Comparison 1.2 GP-3550 and GP-3500+VM unit specification comparison
GP-3550T Coated model
*1
AGP3550-T1-AF-M (PFXGP3550TAAC)
GP-3450T AGP3450-T1-D24 (PFXGP3450TAD)
GP3500T + VM unit *2
AGP3500-T1-D24-D81C (PFXGP3500TADDC) AGP3500-T1-D24-D81K (PFXGP3500TADDK) + GP3000-VM01 (PFXZGPEUVM31)
See Chapter 1. Specification Comparison 1.4 GP-3450 and GP-3500+VM unit specification comparison
GP-3450T Coated model
*1
AGP3450-T1-D24-M (PFXGP3450TADC)
* 1 The recommended replacement models for the coated models are not coated. * 2 It does not support Recording Video function and Playing Movie function.
5
Safety Information
HAZARD OF OPERATOR INJURY, OR UNINTENDED EQUIPMENT DAMAGE
Before operating any of these products, be sure to read all related manuals thoroughly.
Failure to follow these instructions can result in death, serious injury or unintended equipment
damage.
Registered trademarks
Microsoft and Windows are registered trademarks of Microsoft corporation in the United States
and/or other countries.

6
Contents
Introduction 2
Replacement plan A 3
Replacement plan B 4
Contents 6
Chapter 1. Specification Comparison 7
1.1 GP-365 and GP-3600+VM unit specification comparison 7
1.2 GP-3550 and GP-3500+VM unit specification comparison 8
1.3 GP-3560 and GP-3600+VM unit specification comparison 9
1.4 GP-3450 and GP-3500+VM unit specification comparison 10
Chapter 2. Hardware Compatibility 11
2.1 Differences in function locations 11
GP-3650/GP-3550/GP-3560 and GP-3600/GP-3500 + VM unit function
locations 11
GP-3450 and GP-3500 + VM unit function locations 12
2.2 multimedia functions 13
Chapter 3. Replacement of system structures 14
3.1 Work Flow 14
3.2 Change the Display Unit Type 15
3.3 Change The Video / Movie Setting. 16

7
Chapter 1. Specification Comparison
1.1 GP-365 and GP-3600+VM unit specification comparison
GP-3650 GP-3600+VM unit
Display Type TFT Color LCD Display Colors 65,536 colors (without blink)/16,384 colors (with blink)
Display Resolution SVGA(800×600 pixels)
Panel Cutout Dimensions W301.5 × H227.5mm [11.87 x 8.96 in]
Panel Thickness:1.6 to 10.0 mm[0.06 to 0.39 in]
External Dimensions W313 × H239 × D56mm
[W12.32 x H9.41 x D2.20in] W313 × H239 × D83mm
[W12.32 x H9.41 x D3.27in]
Touch Panel Type Resistive Film (analog)
Memory Application
F FLASH EPROM 10MB / 8MB *1
FLASH EPROM 16MB / 8MB *2
SRAM SRAM 320KB Backup Battery Secondary Battery (Rechargeable Lithium battery) Input Voltage AC100 to 240V / DC24V
Serial I/F
COM1 RS-232C/422/485,
Connector D-Sub 9-pin plug
COM2 RS-422/485,
Connector D-Sub 9-pin socket Ethernet I/F 10BASE-T/100BASE-TX CF Card I/F CF Card Slot (TYPE-II)
USB I/F(Type A) Conforms to USB1.1.(TYPE-A conn.) x 2
Auxiliary I/O I/F Output: Alarm/RUN/Buzzer, Input: Remote Reset,
Connector Two piece type terminal block
Video Input I/F *3 NTSC/PAL Input ,Connector RCA
Non
Audio Input I/F *3 MIC/LINE Input, Connector MINI-JACK
Non
Sound Output I/F Speaker Output,
Connector Two piece type terminal block (Same as Auxiliary I/O I/F)
Expansion Unit I/F (For Video Unit)
-
VM Unit(GP3000-VM01) Video: NTSC/PAL, 4ch,
Connector RCA DVI IN: VESA/TMDS,
Connector DVI-I29pin socket *1 Depending on the GP-Pro EX version, the amount of internal memory will vary.
10MB: GP-Pro EX V2.6 or higher, 8MB: GP-Pro EX V2.5 or lower *2 Depending on GP revision and the GP-Pro EX version, the amount of internal memory
will vary. 16MB: Rev 4 or more and GP-Pro EX V 2.6 or higher, 8MB: Below Rev.4
*3 This interface is built in M class model.

8
1.2 GP-3550 and GP-3500+VM unit specification comparison
GP-3550 GP-3500+VM unit
Display Type TFT Color LCD Display Colors 65,536 colors (without blink)/16,384 colors (with blink)
Display Resolution VGA(640×480 pixels)
Panel Cutout Dimensions W259 × H201mm [10.20 x 7.91 in]
Panel Thickness:1.6 to 10.0mm[0.06 to 0.39in]
External Dimensions W270.5 × H212.5 × D57mm [W10.65 x H8.37 x D2.24in]
W270.5 × H212.5 × D84mm [W10.65 x H8.37 x D3.31in]
Touch Panel Type Resistive Film (analog)
Memory Application
FLASH EPROM 10MB / 8MB *1
FLASH EPROM 16MB / 8MB *2
SRAM SRAM 320KB Backup Battery Secondary Battery (Rechargeable Lithium battery) Input Voltage AC100 to 240V
Serial I/F COM1
RS-232C/422/485, Connector D-Sub 9-pin plug
COM2 RS-422/485, Connector D-Sub 9-pin socket
Ethernet I/F 10BASE-T/100BASE-TX CF Card I/F CF Card Slot (TYPE-II)
USB I/F(Type A) Conforms to USB1.1.(TYPE-A conn.) x 2
Auxiliary I/O I/F Output: Alarm/RUN/Buzzer, Input: Remote Reset,
Connector Two piece type terminal block
Video Input I/F *3 NTSC/PAL,
Connector RCA Non
Audio Input I/F *3 MIC/LINE Input,
Connector MINI-JACK Non
Sound Output I/F Speaker Output,
Connector Two piece type terminal block (Same as Auxiliary I/O I/F)
Expansion Unit I/F (For Video Unit) -
VM Unit(GP3000-VM01) Video: NTSC/PAL,
Connector RCA,4ch DVI IN: VESA/TMDS,
Connector DVI-I29pin socket *1 Depending on the GP-Pro EX version, the amount of internal memory will vary.
10MB: GP-Pro EX V2.6 or higher, 8MB: GP-Pro EX V2.5 or lower *2 Depending on GP revision and the GP-Pro EX version, the amount of internal memory
will vary. 16MB: Rev 4 or more and GP-Pro EX V 2.6 or higher, 8MB: Below Rev.4
*3 This interface is built in M class model.

9
1.3 GP-3560 and GP-3600+VM unit specification comparison
GP-3560 GP-3600+VM unit
Display Type TFT Color LCD Display Colors 65,536 colors (without blink)/16,384 colors (with blink)
Display Resolution SVGA(800×600 pixels)
Panel Cutout Dimensions
W259 × H201mm [10.20 x 7.91 in]
Panel Thickness:1.6 to 10.0mm[0.06 to 0.39in]
W301.5 × H227.5mm [11.87 x 8.96 in]
Panel Thickness:1.6 to 10.0mm[0.06 to 0.39in]
External Dimensions W270.5 × H212.5 × D57mm [W10.65 x H8.37 x D2.24in]
W313 × H239 × D83mm [W12.32 x H9.41 x D3.27in]
Touch Panel Type Resistive Film (analog)
Memory Application
FLASH EPROM 10MB / 8MB *1
FLASH EPROM 16MB / 8MB *2
SRAM SRAM 320KB Backup Battery Secondary Battery (Rechargeable Lithium battery) Input Voltage AC100 to 240V
SerialI/F COM1
RS-232C/422/485, Connector D-Sub 9-pin plug
COM2 RS-422/485,
Connector D-Sub 9-pin socket Ethernet I/F 10BASE-T/100BASE-TX CF Card I/F CF Card Slot (TYPE-II)
USB I/F(Type A) Conforms to USB1.1.(TYPE-A conn.) x 2
Auxiliary I/O I/F Output: Alarm/RUN/Buzzer, Input: Remote Reset,
Connector Two piece type terminal block
Video Input I/F *3 NTSC/PAL,
Connector RCA Non
Audio Input I/F *3 MIC/LINE Input, Connector MINI-JACK
Non
Sound Output I/F Speaker Output,
Connector Two piece type terminal block (Same as Auxiliary I/O I/F)
Expansion Unit I/F (For Video Unit)
-
VM Unit(GP3000-VM01) Video: NTSC/PAL, 4ch,
Connector RCA DVI IN: VESA/TMDS,
Connector DVI-I29pin socket *1 Depending on the GP-Pro EX version, the amount of internal memory will vary.
10MB: GP-Pro EX V2.6 or higher, 8MB: GP-Pro EX V2.5 or lower *2 Depending on GP revision and the GP-Pro EX version, the amount of internal memory
will vary. 16MB: Rev 4 or more and GP-Pro EX V 2.6 or higher, 8MB: Below Rev.4
*3 This interface is built in M class model.

10
1.4 GP-3450 and GP-3500+VM unit specification comparison
GP-3450 GP-3500 VM unit
Display Type TFT Color LCD Display Colors 65,536 colors (without blink)/16,384 colors (with blink)
Display Resolution VGA(640×480 pixels)
Panel Cutout Dimensions
W204.5 × H159.5mm[8.05 x 6.28 in]
Panel Thickness:1.6 to 10.0mm[0.06 to 0.39in]
W259 × H201mm[10.20 x 7.91 in]
Panel Thickness:1.6 to 10.0mm[0.06 to 0.39in]
External Dimensions W215 × H170 × D60mm
[W8.46 x H6.69 x D2.36in] W270.5 × H212.5 × D84mm [W10.65 x H8.37 x D3.31in]
Touch Panel Type Resistive Film (analog)
Memory Application
FLASH EPROM 10MB / 8MB *1
FLASH EPROM 16MB / 8MB *2
SRAM SRAM 320KB Backup Battery Secondary Battery (Rechargeable Lithium battery) Input Voltage DC24V
Serial I/F COM1
RS-232C/422/485, Connector D-Sub 9-pin plug
COM2 RS-422/485,
Connector D-Sub 9-pin socket Ethernet I/F 10BASE-T/100BASE-TX CF Card I/F CF Card Slot (TYPE-II)
USB I/F(Type A) Conforms to USB1.1.(TYPE-A conn.) x 2
Auxiliary I/O I/F Speaker Output,
Connector Two piece type terminal block (Same as Auxiliary I/O I/F)
Video Input I/F *3 NTSC/PAL,
Connector RCA Non
Audio Input I/F *3 MIC/LINE Input,
Connector MINI-JACK Non
Sound Output I/F Speaker Output,
Connector Two piece type terminal block (Same as Auxiliary I/O I/F)
Expansion Unit I/F (For Video Unit)
-
VM Unit(GP3000-VM01) Video: NTSC/PAL, 4ch,
Connector RCA DVI IN: VESA/TMDS,
Connector DVI-I29pin socket *1 Depending on the GP-Pro EX version, the amount of internal memory will vary.
10MB: GP-Pro EX V2.6 or higher, 8MB: GP-Pro EX V2.5 or lower *2 Depending on GP revision and the GP-Pro EX version, the amount of internal memory
will vary. 16MB: Rev 4 or more and GP-Pro EX V 2.6 or higher, 8MB: Below Rev.4
*3 This interface is built in M class model.

11
Chapter 2. Hardware Compatibility
2.1 Differences in function locations
The locations of the various functions differ on the GP3000 M Class and the GP3000 + VM unit as shown below.
GP-3650/GP-3550/GP-3560 and GP-3600/GP-3500 + VM unit function locations
GP-3650/GP-3550/GP-3560
GP-3600/GP-3500 + VM unit
GP-3000
1 Power Input Terminal Block (AC) /
Power Connector (DC)
2 Serial I/F(COM1/COM2)
3 Ethernet I/F
4 USB I/F(Type A)
5 CF Card I/F
6 Expansion Unit I/F
(For Communication Unit)
7 Auxiliary I/O /
Sound Output I/F (AUX)
8 Expansion Unit I/F
(For VM Unit)
9 Function Expansion Memory I/F
10 Audio Input I/F
11 Video Input I/F
12 DVI-I Output I/F
13 DVI-I Input I/F
① ② ③ ④ ⑤ ⑥ ⑦ ⑧ ⑨ ⑩ ⑪
⑫
⑬

12
GP-3450 and GP-3500 + VM unit function locations
GP-3450
GP-3500 + VM unit
GP-3000
1 Power Input Terminal Block (AC) /
Power Connector (DC)
2 Serial I/F(COM1/COM2)
3 Ethernet I/F
4 USB I/F(Type A)
5 CF Card I/F
6 Expansion Unit I/F
(For Communication Unit)
7 Auxiliary I/O /
Sound Output I/F (AUX)
8 Expansion Unit I/F
(For VM Unit)
9 Function Expansion Memory I/F
10 Audio Input I/F
11 Video Input I/F
12 DVI-I Output I/F
13 DVI-I Input I/F
① ② ③ ④ ⑤ ⑥ ⑦ ⑧ ⑨
⑩
⑪
⑫
⑬

13
2.2 multimedia functions
There are restrictions on function and compatibility regarding multimedia function. (See the table below) Please be careful.
Functions Compatibility Invalid Setting / Function Multimedia functions
Video / Movie
Display Video Camera Output
Video input: 1 ch only / SECAM cannot be used.
Video / Movie Settings Basic Settings / Extended Video Input Record Size Image quality for camera Image quality for video Video quality for playing a movie Save to CF/USB Save to FTP Event Recorder Movie Player Settings Basic Settings / Details Playback Method Play List Play Control Word Address Operation Zoom / Move Switch
Recording Video
It cannot be used.
Playing Movies It cannot be used.
Camera-Viewer EX
Display / Record
It cannot be used. Remote Viewer
Camera Viewer

14
Chapter 3. Replacement of system structures
3.1 Work Flow
Check the function you are
using in the GP - Pro EX
reference manual.
Prepare the GP3000 M
class project file.
ex. Receive the screen
data from the GP3000
series.
change the system setting
(Display Unit Type,
video/movie Setting) of the
project file in GP - Pro EX.
Check and modify the
project file in GP-Pro EX.
Connect the GP3000
series and the PLC with a
cable.
Start connection and
check the communication. Connect the power cord.
Check the performance
and start operation.
Installation Screen Communication
Install the GP3000
replacement model.
Check the compatibility of
the hardware in the
Introduction and Chapter
2 of this document.
Check the connection
between the GP3000
series and a PLC in the
GP-Pro EX Device/PLC
Connection Manual.
Remove the GP3000 M
class.
Transfer the screen data to
the GP3000 series.
15
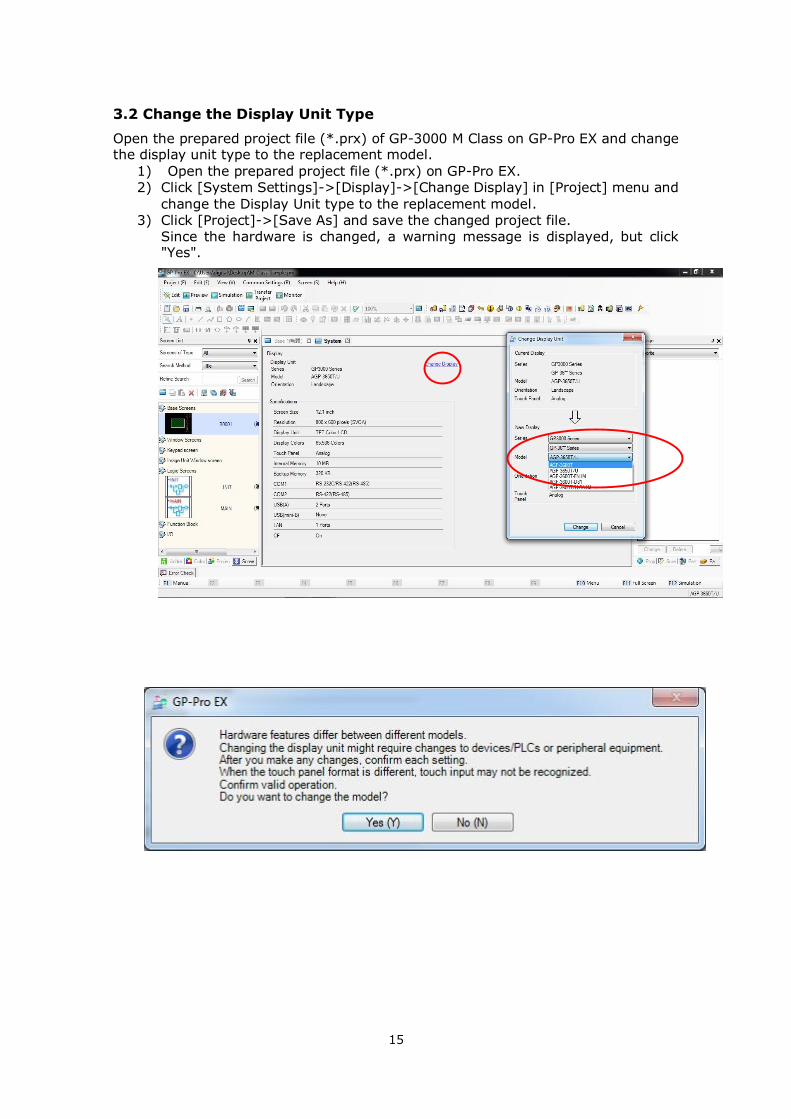
3.2 Change the Display Unit Type
Open the prepared project file (*.prx) of GP-3000 M Class on GP-Pro EX and change the display unit type to the replacement model.
1) Open the prepared project file (*.prx) on GP-Pro EX. 2) Click [System Settings]->[Display]->[Change Display] in [Project] menu and
change the Display Unit type to the replacement model. 3) Click [Project]->[Save As] and save the changed project file.
Since the hardware is changed, a warning message is displayed, but click "Yes".

16
3.3 Change The Video / Movie Setting.
When video image is displayed, the difference of the setting contents between GP 3000 M Class and GP 3000 + VM Unit is as follows:
GP 3000 M Class and GP 3000 + VM Unit have different basic configurations, so the setting contents are different. In order to replace the GP3000 M Class, it is necessary to newly configure the image unit setting.
The following will describe the procedures of configuring the video image display setting of GP3000 + VM unit. Please refer to the procedures and perform the replacement work.
Image Unit Settings
Configures the basic settings
of the optional Video Module
Unit.
[Settings to use]
Image Unit
Video Signal
Image Unit Window Settings
Configures the basic settings
for the display window.
[Settings to use]
Window Type
Display
GP3000 M Class GP3000 + VM unit
Video/Movie Setting
Configures the settings for
video image display.
[Settings used]
Basic Settings-Video Input
Syste
m S
ettin
gs
Syste
m S
ett
ings
Cre
ate
Scre
en –
Image U
nit W
indow
Cre
ate
Scre
en -
Base
Movie Player Settings
This part defines the content
and the display position.
[Settings used]
Playback Method
Display size
Play List
Cre
ate
Scre
en –
B
ase
Image Unit Display Settings
This part defines the content
and the image position.
[Settings to use]
Video Layout
Video List
17
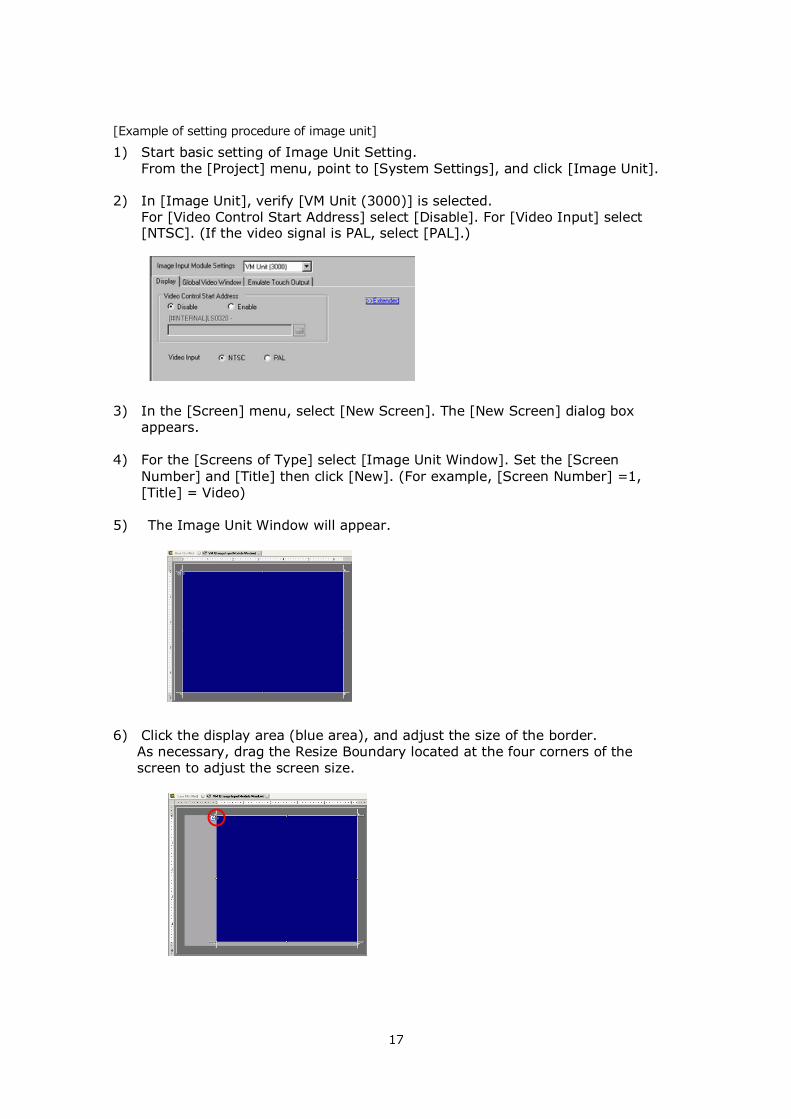
[Example of setting procedure of image unit]
1) Start basic setting of Image Unit Setting.
From the [Project] menu, point to [System Settings], and click [Image Unit].
2) In [Image Unit], verify [VM Unit (3000)] is selected. For [Video Control Start Address] select [Disable]. For [Video Input] select [NTSC]. (If the video signal is PAL, select [PAL].)
3) In the [Screen] menu, select [New Screen]. The [New Screen] dialog box
appears.
4) For the [Screens of Type] select [Image Unit Window]. Set the [Screen
Number] and [Title] then click [New]. (For example, [Screen Number] =1, [Title] = Video)
5) The Image Unit Window will appear.
6) Click the display area (blue area), and adjust the size of the border.
As necessary, drag the Resize Boundary located at the four corners of the screen to adjust the screen size.

18
7) Double-click the blue display area. The following dialog box appears. In [Video Layout] click.
8) In the [Display] area, click one screen mark, and under the [Channel], select
the camera image to be displayed in this upper left area (for example, Channel
0).
Also select the size of the image (for example, Nomal).。
Note
o If the selected [Display Size] is larger than the display unit or the
blue display area, the entire image will not display. You can use [Video Display position] on the [Custom Settings] tab to specify
which part of the input image to be displayed. If you want to display the entire image, set the [Display Size] smaller than the size of the blue display area.
9) Click [OK] to finish and exit the [Image Unit Window] settings.
10) Click the [Base 1] tab to display the base screen.
On the [Parts (P)] menu, select [Image Unit Display (V)] to place the [Image Unit Display] on the screen.
11) Double-click the [Image Unit Display]. The following dialog box appears.
19
12) In the [Video Layout] list, click [ON/OFF display] and select the video screen
number (for example, 1) in the [Video Number]. Note After you set up the Video Screen, the icon appears on the [Image Unit Display]. Click the icon to display the corresponding video screen. This
feature is useful for checking or changing the video settings.。
13) The basic setting of Image Unit Setting is completed.