easy mp network op guide
TRANSCRIPT

8182019 Easy Mp Network Op Guide
httpslidepdfcomreaderfulleasy-mp-network-op-guide 147
EasyMP Network Projection Operation Guide
8182019 Easy Mp Network Op Guide
httpslidepdfcomreaderfulleasy-mp-network-op-guide 247
8182019 Easy Mp Network Op Guide
httpslidepdfcomreaderfulleasy-mp-network-op-guide 347
Cannot connect in Advanced Connection Mode or Wired LAN connection 40
The Slide Show cannot be displayed on the desired display when the multi-screendisplay function is being executed 41
Applications are no longer displayed from the computer screen when the multi-screen display function is executed 41
The mouse cursor is not displayed on the computer screen 41
When connecting with EasyMP Network Projection the image is not displayed orthe image is slow to appear 41
When a connection is made using EasyMP Network Projection a PowerPoint SlideShow cannot be started 42
When a connection has been made using EasyMP Network Projection the screenwill not be refreshed when using an Office application 42
Error message when starting up EasyMP Network Projection 42
Network settings are not restored after cutting the connection to the computerwith EasyMP Network Projection 44
Glossary 45
General Notes 46
About Notations 46General Notice 46
Index 47
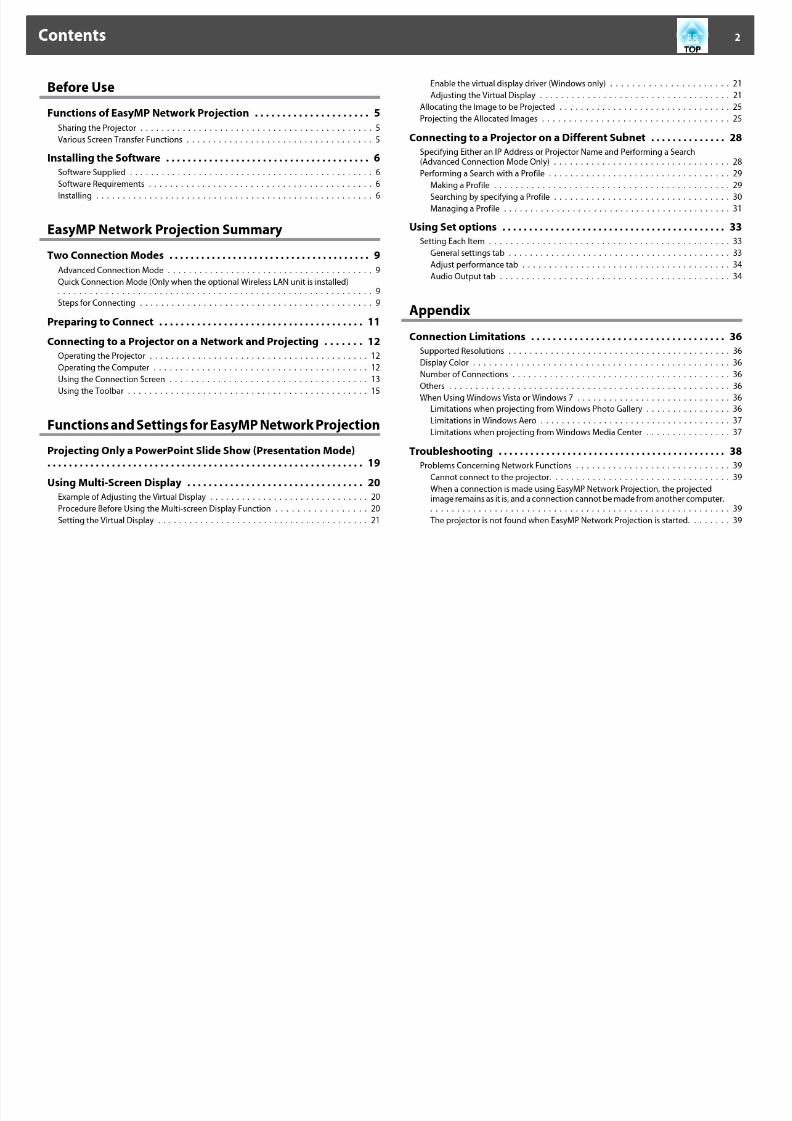
Contents 3
8182019 Easy Mp Network Op Guide
httpslidepdfcomreaderfulleasy-mp-network-op-guide 447
Before UseThis guide describes useful functions for EasyMP Network Projection and how to install the software
8182019 Easy Mp Network Op Guide
httpslidepdfcomreaderfulleasy-mp-network-op-guide 547
You can use EasyMP Network Projection to project your computer screen
from the projector via a network Sharing the projector over the network and using various screen transfer functions allow you to hold effectivemeetings and presentations
Sharing the Projector
If the projector is connected to a network you can share the projector fromcomputers on the network When projecting data from different computersduring a meeting or presentation you can progress smoothly withoutchanging the signal cable between each computerEven a distance between the projector and the computer does not cause any
problems
Various Screen Transfer Functions
You can use the following screen transfer functions
bull Presentation Mode s p19
This function can project a PowerPoint Slide Show running on acomputer You can give stylish presentations by projecting a black screenwhile making preparations and so on and when not performing a SlideShow
bull Distribution function
The screen being displayed by a remote computer can be simultaneously displayed by up to four projectors on the same network
bull Switching functionBy using the meeting switching function if EasyMP Network Projection isinstalled on all of the computers the presenters can take turns and projecttheir own images without changing cables
Functions of EasyMP Network Projection 5
8182019 Easy Mp Network Op Guide
httpslidepdfcomreaderfulleasy-mp-network-op-guide 647
You can find the software for using the projector efficiently on the supplied
EPSON Projector Software for Meeting amp Monitoring CD-ROM Installthe software on the computer you are using
Software Supplied
You can find the following software on the EPSON Projector Software forMeeting amp Monitoring CD-ROM
bull EasyMP Network Projection
Software for sending computer screen images to a projector via a network connection
bull EasyMP Monitor
Software that lists the current status of Epson projectors connected to thenetwork and monitors and controls those projectors You can collectively manage multiple projectors by using EasyMP Monitor For details on
using EasyMP Monitor see the EasyMP Monitor Operation Guides EasyMP Monitor Operation Guide
Software Requirements
EasyMP Network Projection runs on computers that meet the following
requirementsOS Windows series (32-bit versions only)
bull Windows 2000 (Service Pack 4)bull Windows XPbull Windows XP (Service Pack 1 or later)
bull Windows Vistabull Windows Vista (Service Pack 1 or later)bull Windows 7
Mac OS X series
bull Mac OS X 103xbull Mac OS X 104xbull Mac OS X 1051 or later
bull Mac OS X 106xRecommended Mac OS X 1039104111055
CPU Mobile Pentium III 12GHz or faster
Power PC G3 900MHz or faster
Recommended Pentium M 16GHz or faster
CoreDuo 15GHz or faster
Amount of Memory 256MB or more
Recommended 512MB or more
Hard Disk
Free Space
20MB or more
Display Resolution of no less than XGA (1024x768) andno higher than UXGA (1600x1200)
Display color of 16-bit color or greater (approx32000 display colors)
Operation is not guaranteed in Mac OS X 1050 because the Firewall settings arenot set correctly when the version is updated
Installing
Make sure you check the following points before starting installation
bull When using a computer running any of the following operating systemsyou must have administrator authority to install EasyMP Network Projection
bull Windows 2000 bull Windows XP
bull Windows Vista bull Windows 7
bull Make sure that you close all running applications before startinginstallation
Installing the Software 6
8182019 Easy Mp Network Op Guide
httpslidepdfcomreaderfulleasy-mp-network-op-guide 747
bull When the language selected for the installation varies from that of the
OS being used the screens may not be displayed correctly
qFor EMP NS Connection users
The EMP NS Connection name has changed
Before change EMP NS Connection
After change EasyMP Network Projection
When using the same function as EMP NS Connection on the
projector install EasyMP Network Projection after uninstalling EMPNS Connection You cannot connect to the projector correctly usingEMP NS Connection
Procedure
For Windows
A Turn on your computer
B Insert the EPSON Projector Software for Meeting ampMonitoring CD-ROM into the computer
The installer starts automatically
C Click Easy Install
To select the software you want to install select Custom Install Tochange the sofrware display language click Language
D Select the applications you want to install and then click Install
E When the License Agreement screen is displayed click Yes
F When the Add-Remove EPSON Virtual Display screen is
displayed click OKTo use Multi-screen display you need to set up EPSON VirtualDisplay If you do not want to set it now you can do so laters p20
G Click Exit to complete the installation
For Mac OS
A Turn on your computer
B Insert the EPSON Projector Software for Meeting amp
Monitoring CD-ROM into the computer
C Double-click the ENPvxxx_Installer icon in the EPSON
window
Installation starts
D Click Exit to complete the installation
q bull When installation does not start automatically (Windows only)
Select Start - Run and in the Run dialog box type the letter for
your CD-ROM drive followed by EPsetupexe and then click OK
bull Uninstalling
For Windows
Select Start - Settings - Control Panel - Add-Remove Programs orAdd or Remove Programs and then remove EasyMP Network Projection
For Mac OS
From Applications delete the EasyMP Network Projection folder
Installing the Software 7
8182019 Easy Mp Network Op Guide
httpslidepdfcomreaderfulleasy-mp-network-op-guide 847
EasyMP Network Projection SummaryThis chapter explains how to connect the computer and the projector via a network and the procedure for projecting images from your computers screen withthe projector
8182019 Easy Mp Network Op Guide
httpslidepdfcomreaderfulleasy-mp-network-op-guide 947
There are two methods of connecting a computer and the projector via a
network by using EasyMP Network Projection
Advanced Connection Mode
Advanced Connection Mode is an infrastructure connection and connectsto an existing network system via a network cableWhen connecting to a network via Wired LAN connect the projector to
the network hub with a commercially available LAN cableIf you install the optional Wireless LAN unit in the projector you canconnect to the network via a wireless LAN access point
Quick Connection Mode (Only when the optional
Wireless LAN unit is installed)
Quick Connection Mode is only available when you install the optionalWireless LAN unit in the projector
Quick Connection Mode temporarily assigns the projectors SSID to acomputer creating an ad hocg connection and restores the computersnetwork settings after disconnectings p11
bull You can easily connect to a computer and project images from thecomputer without making network settings
bull This lets you connect easily without a connector cable and you caneven connect if the projector and the computer are at remote locations
Steps for Connecting
Use the following steps to connect the computer to the projector andproject in EasyMP Network Projection
You need to perform steps 1 to 4 only the first time you connect
1 Install EasyMP Network Projection on the computer to be connecteds p6
2 Make network settings on the computer and put it into network connection status s p11
3 For Quick Connection Mode Install the optional Wireless LAN unit inthe projector (if already installed go to step 5)For Advanced Connection Mode Enable the Wired LAN or WirelessLAN adapter in Port Configurations s Computers documentation
Two Connection Modes 9
8182019 Easy Mp Network Op Guide
httpslidepdfcomreaderfulleasy-mp-network-op-guide 1047
4 Make network settings on the projector and put it into network
connection status s Users Guide Network Menu
5 Start EasyMP Network Projection on the computer and connect with theprojector s p12
When the computer you are using is normally connected to the network youdo not need to make network settings on the computer
Two Connection Modes 10
8182019 Easy Mp Network Op Guide
httpslidepdfcomreaderfulleasy-mp-network-op-guide 1147
Use the following procedure to set up the computer for connection
For Windows
Make network settings for the computer by using the utility softwaresupplied with the LAN adapter For more information on the utility software see the Users Guide supplied with your LAN adapterFor example as shown in the following illustration when a red cross (^) isdisplayed over the network icon on the taskbar you cannot connect to theprojector
For Mac OS
Set the network port and communication status For more details on settingthe communication status see the Userrsquos Guides for your computer or theAirPort card
Preparing to Connect 11
8182019 Easy Mp Network Op Guide
httpslidepdfcomreaderfulleasy-mp-network-op-guide 1247
Operating the ProjectorBefore connecting put the projector into connection standby statusMake sure the projector network settings are complete and the projector isconnected to network equipment such as a network hub via a commercially available network cable
Procedure
A Press the [t] button on the remote control to turn the poweron
B Press the [LAN] button on the Remote Control
The LAN standby screen is displayed
If there is no signal for the current input source it automatically
switches to the LAN source If it does not automatically switch to theLAN source press the [LAN] button
Operating the ComputerIn the following explanations unless otherwise noted Windows screenshots are used The similar screens are also displayed for Mac OS
Procedure
A Start EasyMP Network Projection
For Windows
Select Start - Programs (or All Programs) - EPSON Projector -EasyMP Network Projection - EasyMP Network ProjectionV2XX
For Mac OS
Double-click the Applications folder of the hard drive volume inwhich EasyMP Network Projection is installed and then double-click the EasyMP Network Projection icon
B Select Quick Connection Mode (only available when the
optional Wireless LAN unit is installed) or AdvancedConnection Mode and then click OK
The projector search results are displayed To always connect using
Advanced Connection Mode select Set the selected ConnectionMode as the default mode for future connections
C Select the projector you want to connect to and then click
Connect
If the projector you want to connect to is not displayed in the searchresults click the Automatic search button The search takes about 30
secondsFor details on the connection screen see Using the ConnectionScreen s p13
Connecting to a Projector on a Network and Projecting 12
8182019 Easy Mp Network Op Guide
httpslidepdfcomreaderfulleasy-mp-network-op-guide 1347
D When Projector Keyword is set to On from the projector the
Keyword entry screen is displayed Enter the keyworddisplayed on the LAN standby screen and then click OK
When the connection is complete the computer screen is projectedThe following EasyMP Network Projection toolbar is displayed on thecomputer screen You can use this toolbar to operate the projectorand make settings and to disconnect the network connection Fordetails on the toolbar see Using the Toolbar s p15
qWhen connecting from another computer such as when changingpresenters start EasyMP Network Projection from the computer youwant to connect The computer that is currently connected isdisconnected and the projector is then connected with the computerthat is trying to connect now
If a connection is made while Disable interrupt connection is set theconnection is not switched to another computer
Using the Connection Screen
Start EasyMP Network Projection to display the following screen Theoperation of each button or item is described in the following table
When the system starts in Advanced Connection Mode
Connecting to a Projector on a Network and Projecting 13
8182019 Easy Mp Network Op Guide
httpslidepdfcomreaderfulleasy-mp-network-op-guide 1447
When the system starts in Quick Connection Mode
A Automatic search
In Advanced Connection Mode you can search for available projectorson the network system to which the computer is connected
In Quick Connection Mode you can search for the projector based onthe SSID
B Manual search
In Advanced Connection Mode you can search for a projector based ona specified IP address or projector name
In Quick Connection Mode you can search for the projector based onthe SSID selected from a list
C Status
The following six icons indicate the status of the detected projectors
Standby Select for connecting
Busy Select for connecting When you click Connect the computer currently
connected is disconnected and yourcomputer is connected
Busy (Disable
interrupt con‐nection)
Cannot be selected Disable interrupt
connection is set on another computerwhich is already connected
Currently inuse by anotherapplication
The projectors Configuration Menu isopen You can select it after closing theConfiguration menu and running thesearch again
Searching Displayed while running Manual search orProfile
Not found Displayed when a projector cannot be foundas a result of Manual search or Profile InQuick Connection Mode you can only select multiple projectors with the sameSSID
D Projector name
The projectors name is displayed
E Disable interrupt connection
Check the box to prevent an interrupt connection by other computers whileconnected to the selected projector
F Use multi-display
Check the box to use the Multi-screen display function When this is selectedDisplay layout and Display properties are displayed at the bottom of the screens p20
G Troubleshooting
If there is a problem and you cannot have a connection press this button to openthe EasyMP Network Projection Troubleshooting screen
H Connect
Connect to the projector you selected from the search results list When aconnection is made with a projector a toolbar is displayed
I Set options
You can set general setting options such as the processing method when startingEasyMP Network Projection For details see Set optionss p33
J Save in the profileSaves the results of a network projector search as a Profiles p29
Connecting to a Projector on a Network and Projecting 14
8182019 Easy Mp Network Op Guide
httpslidepdfcomreaderfulleasy-mp-network-op-guide 1547
K Clear list
Deletes all search resultsL IP address (Advanced Connection Mode only)
The projectors IP address is displayed
M Display
(Select the number displayed (when Use multi-display is selected)s p25
N Profile
You can search for a projector on the network using a Profile savedusing Save in the profiles p29
O SSID (Quick Connection Mode only)
The projectors SSID is displayed
P Signal intensity
This is displayed when the connection is made in Quick Connection Mode As theSignal intensity increases so does the number of lit indicators
Q Update list (Quick Connection Mode only)
Updates Status and Signal intensity
Using the Toolbar
The toolbar is displayed on the computer screen after EasyMP Network Projection starts and a connection is made with the projector You can usethis toolbar to operate and make settings for the projector
Select target projector
Click to limit the projectors operated from the toolbar when projectingfrom multiple projectors using the distribution function or Multi-screen display The indication below the icon shows the projectors thatcan be controlledALL indicates that all of the connected projectors can be controlledFor example when 1 3 is displayed projectors No 1 and No 3 can becontrolled
Click to display the following screen
A Select the projector to be controlled
B Indicates the No of an allocated projector This No indicates theNo of the projector that you can control from the toolbar
C Indicates the status of the projector
Stop
Connecting to a Projector on a Network and Projecting 15
8182019 Easy Mp Network Op Guide
httpslidepdfcomreaderfulleasy-mp-network-op-guide 1647
Stops projection while connected to the projector A black screen is
projected while stopped Audio does not stop To stop the audio or todisplay a Users Logo while projection is stopped use the AV Mutefunction
Show
Releases Stop or Pause
Pause
Pauses projected images while connecting to the projector The audio isnot paused
Presentation Mode
Each time this is clicked Presentation Mode switches between enableddisableds p19
Projector control
While the projector is connected to the network the projectors AVMute Switch PC source and Switch video source functions can becontrolled from both the Remote Control and the projectors Control
panel
Click to display the following toolbar
AV Mute
The same function as the [AV Mute] button on theRemote Control
s Users Guide Remote Control
Switch PC source
The Source alternates between Computer1Computer2 USB Display USB and LAN each timeyou click
Switch video source
The Source alternates between S-Video and Videoeach time you click S-Video does not switch if thecable is not connected
Screen Preview
Displays the multi-screen preview screen
Click to display a preview with the settings you have made Click
each display to enlarge each Screen Preview to full-screen
Set options
Transmission performance during the transfer of computer images canbe adjusteds p33
Movie Sending Mode
Not enabled on this projector The message The connected projectorsdo not support Movie Sending is displayed
DisconnectDisconnects the connection to the projector
Signal intensity
This is displayed when a connection is made in Quick ConnectionMode As the Signal intensity increases so does the number of litindicators
Switch toolbar display
Connecting to a Projector on a Network and Projecting 16
8182019 Easy Mp Network Op Guide
httpslidepdfcomreaderfulleasy-mp-network-op-guide 1747
The toolbar display is switched as follows The toolbar display remains
as is until switched againFull
Normal
Simple
Connecting to a Projector on a Network and Projecting 17
8182019 Easy Mp Network Op Guide
httpslidepdfcomreaderfulleasy-mp-network-op-guide 1847
Functions and Settings for EasyMP Network ProjectionThis chapter explains the functions that may be useful in a meeting or presentation such as the Multi-Screen Display which allows you to send images tomultiple projectors from a single computer
8182019 Easy Mp Network Op Guide
httpslidepdfcomreaderfulleasy-mp-network-op-guide 1947
In Presentation Mode the images are only displayed when performing a
PowerPoint Slide Show on a computer When you stop Slide Show theprojector displays a black screen This is useful when you only want todisplay the Slide ShowIn addition to PowerPoint Keynote is compatible with Presentation Modefor Mac OS
Procedure
A If necessary select another projector to be controlleds p15
B Click the button on the toolbar
Presentation Mode begins
C Click the button again to exit Presentation Mode
Projecting Only a PowerPoint Slide Show (Presentation Mode) 19
8182019 Easy Mp Network Op Guide
httpslidepdfcomreaderfulleasy-mp-network-op-guide 2047
Example of Adjusting the Virtual Display
By arranging the virtual display g allocation you can project only the imagethat you want to show or project different images from left to right in apresentation
Arrangement example 1
AA c tual mon i tor i mag e
PowerPoint file
B I mag e of v i r tua l d i s p lay
Excel file
Arrangement example 2
AA c tual mon i tor i mag e
PowerPoint file presenter tools
BI mag e of v i r tua l d i s p lay
Slide Show using a PowerPoint file
Procedure Before Using the Multi-screen Display
Function
1 Setting the Virtual Display s p21
In a Windows environment enable the virtual display g driver as necessary Alsofor both Windows and Mac OS set up the virtual display arrangement
2 Allocating the image to be projected s p25
Using Multi-Screen Display 20
8182019 Easy Mp Network Op Guide
httpslidepdfcomreaderfulleasy-mp-network-op-guide 2147
Open the file to be projected and then move the screen to the virtual display
according to the actual projection arrangement3 Projecting the allocated images s p25
Allocate a virtual display number to a projector that is connected through thenetwork and then start projection
Setting the Virtual Display
This chapter explains the virtual display for arrangement example 1s p20
Enable the virtual display driver (Windows only)
Enable the virtual display g driver Those users listed below do not have toperform this operation Go to procedure s Adjusting the Virtual Display
p21bull Those users who have enabled virtual displays installing EasyMP
Network Projection
bull For Mac OS users
Procedure
A Start Windows on the computer and then select Start -Programs (or All Programs) - EPSON Projector - EasyMP
Network Projection - Add-Remove EPSON Virtual Display
The Add-Remove EPSON Virtual Display screen is displayed
B Select the virtual display you want to use
Up to four monitors can be added In this example a single virtual
display is to be used When setting multiple virtual displays select asmany displays as is necessaryAny one of the displays can be selected
C Click OK
When you click OK the drivers for the virtual display are enabled Atthis point it is normal for the display to flicker Wait for the Add-Remove EPSON Virtual Display screen to close
Adjusting the Virtual Display
After starting EasyMP Network Projection the procedure for setting up the virtual displays differs for Windows and Mac OS The procedures areexplained separately below
qCheck the following points before starting EasyMP Network Projectionwhen connecting via Wireless LAN If the following points are not setcorrectly Multi-screen display cannot be used
bull The SSID for the computer and each projector must be the same
bull The wireless LAN system for the computer and each projector mustbe the sameYou can modify the SSID and Wireless LAN system for theprojector from the Network menu in the projectors Configurationmenus Users Guide Wireless LAN Menu
Using Multi-Screen Display 21
8182019 Easy Mp Network Op Guide
httpslidepdfcomreaderfulleasy-mp-network-op-guide 2247
Procedure
For Windows
A Select Start - Programs (or All Programs) - EPSON
Projector - EasyMP Network Projection - EasyMP Network Projection V2XX to start EasyMP Network Projection
B Select the Use multi-display checkbox
Display layout and Display properties are added at the bottom of thescreen
C Click Display properties
The Display properties screen is displayed
D Click the Settings tab
Using Multi-Screen Display 22
8182019 Easy Mp Network Op Guide
httpslidepdfcomreaderfulleasy-mp-network-op-guide 2347
E Drag the displayed monitor icon and place it where desired
Here the actual monitor (1) is placed on the left while the virtualmonitor (3) is placed on the rightWhen the computer has multiple display output terminals thenumbers assigned to the virtual terminals will be sequential to thoseof the physical terminals
q bull When an external monitor is connected as a secondary monitor the
image for that screen cannot be projected
bull Depending on the hardware the number of the secondary monitormay be other than 2 When the monitor icon is displayed on thescreen click the icon and confirm that the monitor type shownunder Display is other than secondary
bull For the Screen Resolution settings see the followings p36
When the monitor icon is arranged a virtual display is connected asthe image like below
Using Multi-Screen Display 23
i l i i l
8182019 Easy Mp Network Op Guide
httpslidepdfcomreaderfulleasy-mp-network-op-guide 2447
F Click the OK button to close the Display properties screen
Up to this point the virtual display layout has been fixedAllocate the projecting images next s p25
For Mac OS
A Start EasyMP Network Projection Double-click the Applications
folder of the hard drive volume in which EasyMP Network Projection is installed and then double-click the EasyMP
Network Projection iconIn this example we select and start in Advanced ConnectionMode
B Select the Use multi-display checkbox
Display layout and Display preferences are added at the bottom of thescreen
C Click Display preferences
The display setting screen is displayed
D Click Arrangement
E Clear Mirror Displays
Using Multi-Screen Display 24
U i M lti S Di l
8182019 Easy Mp Network Op Guide
httpslidepdfcomreaderfulleasy-mp-network-op-guide 2547
F Drag the displayed monitor icon and place it where desired
G Close the display setting screen
Up to this point the screen layout has been fixed
Allocating the Image to be Projected
This section explains the virtual display for arrangement example 1s p20
Procedure
A Open the file to be projected
Start the PowerPoint and Excel files
B Drag the window to the desired virtual displayg monitor andallocate it where the image is to be projected
Drag the Excel window to the right until it cannot be seen As aresult the PowerPoint window appears on the actual monitor whilethe Excel window appears on the virtual display on the right
Projecting the Allocated Images
This section explains the virtual display for arrangement example 1s p20
Procedure
A Select the number of the virtual displayg
you want to fromDisplay and set which image to be projected from which
projector
Using Multi-Screen Display 25
Using M lti Screen Displa
8182019 Easy Mp Network Op Guide
httpslidepdfcomreaderfulleasy-mp-network-op-guide 2647
B Click Connect
The image allocated to each projector is projected
In a Windows environment you cannot view the image being sent toa virtual display on the computer To adjust the image on the virtualdisplay you must do so while viewing the projected imageTo perform mouse-based operations on the virtual display move themouse pointer in the direction of the virtual display such that thepointer appears on the virtual display
C To terminate multi-screen display click Disconnect on thetoolbar
Using Multi-Screen Display 26
Using Multi Screen Display 27
8182019 Easy Mp Network Op Guide
httpslidepdfcomreaderfulleasy-mp-network-op-guide 2747
q
In a Windows environment if the virtual display driver has been
enabled such that the mouse pointer can be moved outside the limitsof the screen there may be occasions when you lose track of thelocation of the pointer If you are not using a virtual display clear the virtual display checkbox on the Add-Remove EPSON Virtual Display screen so that the mouse pointer moves back inside the screensdisplay area To subsequently use multi-display again place a check mark against the required display under Add-Remove EPSON VirtualDisplayTo clear a check mark see the followings p21
Using Multi-Screen Display 27
Connecting to a Projector on a Different Subnet 28
8182019 Easy Mp Network Op Guide
httpslidepdfcomreaderfulleasy-mp-network-op-guide 2847
This chapter explains how to connect a computer to a projector on adifferent sub-net via a Wired LAN or a wireless LAN access point on anexisting network system
By default this application only searches for projectors on the same subnetas the computer Therefore even if you perform a search for projectors onthe network projectors on a different subnet will not be foundYou can however identify and connect to a projector on a different subnetas follows
bull Specify either an IP address or Projector name and perform a search
The IP Address can be input directly Also provided the Projector nameto be connected has been registered on the DNS server you can performa search simply by inputting that Projector names p28
bull Performing a search based on a Profile
Once you have performed a search for a projector on a different subnetby specifying either an IP Address or a Projector name you can save thesearch as a Profile with an easy-to-remember name and then use that
Profile whenever you subsequently want to search for a projector on adifferent subnets p29
q bull If a search fails to find a projector the most likely causes are as
follows Proceed as appropriate depending on the cause of thefailure
For both Windows and Mac OS
If there is no wireless LAN signal or if the signal is weak check
whether there is anything that could be interfering with the signalWhen the optional Wireless LAN unit is installed in the projectorand connecting Mac OS to a wireless LAN
Check whether AirPort is set to On Or check whether anappropriate access point has been selected
bull When you use Manual search in Quick Connection Mode you canspecify the SSID When there are a lot of projectors you can narrow the search field by using SSID
Specifying Either an IP Address or Projector Name
and Performing a Search (Advanced ConnectionMode Only)
In the following explanations unless otherwise noted Windows screenshots are usedThe similar screens are also displayed for Mac OS
Procedure
A Click Manual search on the EasyMP Network Projectionprojector selection screen
B Enter the IP address or the projector name for the projectoryou want to connect to and click OK
Connecting to a Projector on a Different Subnet 28
Connecting to a Projector on a Different Subnet 29
8182019 Easy Mp Network Op Guide
httpslidepdfcomreaderfulleasy-mp-network-op-guide 2947
The search results are displayed on the EasyMP Network Projectionprojector selection screen
Provided the target projector has been identified select that projectorand then click Connect to establish a connectionWhen you will always be using that projector save the search as aProfile so that you do not have to specify the relevant details every time you perform a search s p29
Performing a Search with a ProfileYou can save a search for a frequently used projector as a Profile AProfile is a file containing all of the information pertaining to a givenprojector such as the projector name its IP address and SSID If youspecify that information from the next time you perform a search there willbe no need to specify the IP address or projector name each time youperform a search For example by creating a group of Profiles for eachplace where a projector is setup and managing them with folders the target
projector can be found quickly
A Building A E Floor 1
B Building B F Floor 2
C Building C G Floor 3
D Building D
This section explains how to create and edit a Profile
Making a Profile
Profiles are made by saving search results
For details on how to edit a previously saved Profile see the followingsection s p31
Procedure
A While the projector is displayed on the EasyMP Network Projection projector selection screen click Save in the
profile
Connecting to a Projector on a Different Subnet 29
Connecting to a Projector on a Different Subnet 30
8182019 Easy Mp Network Op Guide
httpslidepdfcomreaderfulleasy-mp-network-op-guide 3047
The Save in the profile screen is displayed
B Enter a Profile name and then click Add
Projector information is registered in the ProfileIf you have previously saved a Profile you are prompted to confirmwhether or not to overwrite To save a Profile with a different nameselect Save as If you have created a folder for a Profile the followingscreens are displayed After entering the Profile name and selectingthe Save in destination click Add
For Windows
For Mac OS
qFor details on how to create a folder for a Profile see the followingsection s p31
Searching by specifying a Profile
You can search by specifying the Profile you created
Connecting to a Projector on a Different Subnet 30
Connecting to a Projector on a Different Subnet 31
8182019 Easy Mp Network Op Guide
httpslidepdfcomreaderfulleasy-mp-network-op-guide 3147
Procedure
A Click Profile on the EasyMP Network Projection projector
selection screen
If no Profile is registered you cannot select Profile
B From the menu that is displayed select the projector you wantto connect to
The search results are displayed on the EasyMP Network Projectionprojector selection screenProvided the target projector has been identified select that projectorand then click Connect to establish a connection
Managing a Profile
You can change the name and the hierarchical structure of the Profile
Procedure
A Click Set options on the EasyMP Network Projection main
screen
The Set options screen is displayed
B Click Edit profile
The Edit profile screen is displayed
C Edit the contents registered in the Profile
Co ect g to a ojecto o a D e e t Sub et 31
Connecting to a Projector on a Different Subnet 32
8182019 Easy Mp Network Op Guide
httpslidepdfcomreaderfulleasy-mp-network-op-guide 3247
A Indicates a folder
B Indicates a Profile
Prof i le
Item F u nctio n
Profi le
You can display the registered Profile You can manageit by creating a folder You can change the order of theProfile or the folder by dragging amp dropping
Copy
You can copy the Profile The copied Profile is saved in
the same folder as the original with the same nameDelete
You can delete the Profile and the folder
Prof i le
Item F u n ctio n
R e n a m e
Displays the Rename dialog box allowing you to renamethe folder or the Profile You can enter up to 32characters in the Rename dialog box
Create folder
You can create a new folder
E x p or t
Exports a created Profile allowing you to import and usethat Profile
I mp or t
Used when you want to read and use an exportedProfile
Informa tion on selected prof i le
Item F u n ctio n
P r oj e c tor n am e
I P addr e s s
You can display the projector information registered inthe Profile
Delete
You can delete the information for the selectedprojector When all projector information is deleted theprofile is also deleted
D Click OK
Saves your edits and closes the Edit profile screen
g j
Using Set options 33
8182019 Easy Mp Network Op Guide
httpslidepdfcomreaderfulleasy-mp-network-op-guide 3347
You can make setting options such as the processing method when EasyMPNetwork Projection startsAccess Set options from the EasyMP Network Projection main screen
Procedure
A Click Set options on the EasyMP Network Projection main
screen
The Set options screen is displayed
B Set each of the items
Confirm the details of the set items in the next step When you havemade all the necessary settings click OK to close the Set optionsscreen
Setting Each ItemSet each item from the General settings tab and the Adjust performancetab
General settings tab
Use fu l l -screen
vi de o t r an s fe r
This setting is disabled because the projector does notsupport the movie sending function
E n c r y p t
c ommun i c at i on s
Select to Encrypt and transmit data Even if data isintercepted it cannot be decrypted
When using Quick Connection Mode make sure youalways select this checkbox
Display Connection
Mod e Selection
w i n dow on s tar tup
Set whether or not the Quick Connection ModeAdvancedConnection Mode screen is displayed when EasyMPNetwork Projection starts
Clear this checkbox once you have settled on a regularstartup method
S e ar c h me th od on
s tar tup
Select from the following projector search methodsexecuted when EasyMP Network Projection is started
Automatic search on startup
Specify search method after startupSearch with the last network configuration
g p
Using Set options 34
8182019 Easy Mp Network Op Guide
httpslidepdfcomreaderfulleasy-mp-network-op-guide 3447
Edit profi le
The Edit profile dialog box is displayeds p31
S w i tc h L A N
Windows only The Switch Network Adapter dialog box is displayed Thisis used when it is necessary to switch the network adapter tobe used for a search when a computer has multipleadapters
By default all of the network adapters are used to perform asearch When a Wired LAN is always used as theconnection method select a Wired LAN adapter
R e s tor e D e faul ts
You can reset all adjustment values on the General settingstab to their default settings except for Edit profile andSwitch LAN
Adjust performance tab
P e r for man c e
adj us tme n t s l i de r
The performance can be set to Fast Normal andFine
Set to Fast when movie projections are interrupted
T r a n s f er l a y er e d
w i n dow
Windows only (excluding Windows Vista andWindows 7)
Set whether or not to transfer a layered windowThe layered window is in use when contents such asmessages displayed on the computer are not projectedby the projector Select this checkbox to projectcontents such as messages that use the layeredwindow
Clear this checkbox if you do not want the mousepointer to flicker on the screen
R e s tor e D e faul ts
You can reset all adjustment values for the Adjustperformance tab to their default settings
q When you click on the toolbar only the Adjust performance tab
is displayed
Audio Output tab
Because this projector does not support the audio sending function settingson the Audio Output tab are disabled
8182019 Easy Mp Network Op Guide
httpslidepdfcomreaderfulleasy-mp-network-op-guide 3547
Appendix
Connection Limitations 36
8182019 Easy Mp Network Op Guide
httpslidepdfcomreaderfulleasy-mp-network-op-guide 3647
When projecting computer images while running EasyMP Network Projection the following restrictions apply Confirm these points
Supported Resolutions
The following computer screen resolutions can be projected You cannotconnect to a computer with a resolution greater than UXGAg
bull VGA g(640x480)
bull SVGA g(800x600)
bull XGA g(1024x768)
bull SXGA g(1280x960)
bull SXGA (1280x1024)
bull SXGA+ (1400x1050)
bull WXGA (1280x768)
bull WXGA (1280x800)
bull
WXGA+ (1440x900)bull UXGA (1600x1200)
Supported resolutions when multi-screen display function is on
If a computer with a special screen size is used where the ratio of heightand width is not represented a screen resolution closest to the width isselected from the list of 10 aboveIn this case in wide screen the horizontal margins are projected in narrow screen the empty vertical margins are black
Display Color
The number of colors for computer screens that can be projected
W ind o w s M a c O S
16-bit color About 32000 colors (16-bit)
32-bit color About 167 million colors (32-bit)
The operational guarantee for multi-screen display is 16-bit and 32-bitcolor
Number of Connections
You can connect up to four projectors to one computer and projectsimultaneouslyYou cannot connect multiple computers to one projector simultaneously
Others
bull If the transmission speed of the Wireless LAN is low the network might be cut off unexpectedly
bull Audio is not transmitted
bull When videos are played back they do not play back as smoothly as
when displayed on the computerbull Applications that use part of DirectX functions may not be displayed
correctly(Windows only)
bull Cannot project full screen MS-DOS prompts(Windows only)
bull There are times when the image on the computer screen and the imageprojected by the projector may not match exactly
When Using Windows Vista or Windows 7
Note the following points when using EasyMP Network Projection on acomputer running Windows Vista or Windows 7
Limitations when projecting from Windows Photo Gallery
Note the following two limitations when launching Windows Photo Gallery when EasyMP Network Projection is running
Connection Limitations 37
8182019 Easy Mp Network Op Guide
httpslidepdfcomreaderfulleasy-mp-network-op-guide 3747
bull Slide Show is played back in simple mode when projecting fromWindows Photo Gallery
Because the toolbar is not displayed you cannot make changes whileplaying a Theme (effects) regardless of the Windows Experience IndexratingOnce simple mode has started you cannot change modes while WindowsPhoto Gallery is running even if you close EasyMP Network ProjectionRestart Windows Photo Gallery
bull You cannot play movies
Limitations in Windows Aero
Note the following two limitations when the window design for yourcomputer is Windows Aero
bull The layered window is projected regardless of Transfer layered window from Set options in EasyMP Network Projection
For example when Transfer layered window for EasyMP Network Projection toolbar is disabled it is not projected even if it is displayed onthe computer screen however the toolbar is projected
bull A few minutes after you connect a computer to the projector over anetwork with EasyMP Network Projection the following message is
displayedIt is recommended that you select Keep the current color scheme anddont show this message again This selection is enabled until thecomputer is restarted
Limitations when projecting from Windows Media Center
You cannot project images in full screen display using Windows MediaCenter Switch to the window display mode to project the images
Similarly images cannot be projected with Quick Wireless Connection orUSB Display
Troubleshooting 38
8182019 Easy Mp Network Op Guide
httpslidepdfcomreaderfulleasy-mp-network-op-guide 3847
If any of the following problems occur refer to the pages given for eachproblem
Problems concerning network functions
Cannot connect to the projector s p39
When a connection is made using EasyMP Network Projection the projectedimage remains as it is and a connection cannot be made from anothercomputer s p39
The projector is not found when EasyMP Network Projection is
started s
p39Cannot connect in Advanced Connection Mode or Wired LANconnection s p40
The Slide Show cannot be displayed on the desired display when the multi-screendisplay function is being executed s p41
Applications are no longer displayed from the computer screen when the multi-screen display function is executed s p41
The mouse cursor is not displayed on the computer screen s
p41When connecting with EasyMP Network Projection the image is not displayed orthe image is slow to appear s p41
When a connection is made using EasyMP Network Projection a PowerPointSlide Show cannot be started s p42
When a connection has been made using EasyMP Network Projection the screenwill not be refreshed when using an Office application s p42
Error message when starting up EasyMP Network Projection s
p42Network settings are not restored after cutting the connection to the computerwith EasyMP Network Projection s p44
Troubleshooting 39
8182019 Easy Mp Network Op Guide
httpslidepdfcomreaderfulleasy-mp-network-op-guide 3947
Problems Concerning Network Functions
Cannot connect to the projector
Check the message on the screen and then apply the following countermeasures
E r r or M essa g es R em ed y
The application version used is not supported Install the latest version of the application on your computer
Install EasyMP Network Projection from the EPSON Projector Software for Meeting amp Monitoring CD-ROMsupplied with the projector
When a connection is made using EasyMP Network Projection the projected image remains as it is and a connection cannot be madefrom another computer
Ch eck R em ed y
Did the presenter leave the conference room without cutting off thenetwork connection
With EasyMP Network Projection the connection with the computer that was previously connected can be cut off when another computer tries to connect with the projector and it connects with the computer that is trying to
connectTherefore when a Projector Keyword is not set for the projector or if you know the Projector Keyword you can cutoff the current connection and if you perform a connection operation you can connect to the projector
When a Projector Keyword is set for the projector if you do not know the Projector Keyword restart the projector andreconnect
The projector is not found when EasyMP Network Projection is started
Check R em ed y
Is the Wireless LAN unit connected
For Wireless LAN
Check that the optional Wireless LAN unit is securely connected
Is the Network Configuration screen from the Configurationmenu displayed on the projector
When the Network Configuration screen is displayed on the projector network connection for EasyMP Network Projection is disabled Close network settings on the projector and return to the LAN standby screen
Are the computers LAN card and the built-in LAN function
available
Check that LAN is valid by checking Control Panel - System - Hardware in the device manager and so on
Troubleshooting 40
8182019 Easy Mp Network Op Guide
httpslidepdfcomreaderfulleasy-mp-network-op-guide 4047
Check R em ed y
Is the SSID the same as that of the access pointQuick Connection Mode
Set an SSID that is different from that of the access points
Users Guide Network Menu
Is the DHCP function for Wired LAN turned On
Quick Connection Mode
Turn Off the DHCP setting for Wired LAN from the Configuration Menus Users Guide Network Menu
Was the network adapter used selected correctly with EasyMPNetwork Projection
If the computer has multiple LAN environments it cannot connect unless the network adapter is selected correctlyWhen using a computer running Windows start EasyMP Network Projection and select the network adapter you areusing from Set options - Switch LANs p33
For Wireless LAN connection is the Wireless LAN setting enabledwhen the computer is in power save mode
Enable the Wireless LAN
Are there any obstacles between the access point and the computeror projector
For Wireless LAN
Sometimes the electromagnetic wave situation prevents the projector from being found in a search Check for any obstacles between the access point and the computer or projector and change their position to improve theelectromagnetic wave situation
Is the computers Wireless LAN electromagnetic wave set to low Set the electromagnetic wave strength to maximum
Does the Wireless LAN conform to 80211g 80211b or 80211a It is only compatible with standards 80211g 80211b and 80211a and not with other standards such as 80211
Is the firewall turned off or has the firewall been registered as anexception
When you do not wish to turn off the firewall or register the firewall as an exception make the necessary settings toopen the ports
The ports used by EasyMP Network Projection are 3620 3621 and 3629
Is the network cable connected correctly
For Wired LAN
Check that the network cable is connected correctly Reconnect it if it is not connected or not connected properly
Cannot connect in Advanced Connection Mode or Wired LAN connection
Check R em ed y
Is the SSID setting different Set the computer the access point and the projector to the same SSIDs Users Guide Network Menu
Is the same WEP key set When selecting WEP from Security set the access point the computer and the projector to the same WEP keys Users Guide Network Menu
Are the connection denial functions such as MAC Addressg
restrictions and port restrictions set correctly at the access point Set the projector to allow connections from the access point
Troubleshooting 41
8182019 Easy Mp Network Op Guide
httpslidepdfcomreaderfulleasy-mp-network-op-guide 4147
Check R em ed y
Are the IP address the Subnet Mask and the Gateway Address forthe access point and the projector set correctly When not using a DHCP adjust each settings
Users Guide Network Menu
Are the access point and the projectors subnet different Select Manual search from EasyMP Network Projection specify the IP address and connects p28
The Slide Show cannot be displayed on the desired display when the multi-screen display function is being executed
Check R em ed y
Are you using PowerPoint 2002 or an earlier version
For Windows
To set and use two or more virtual displaysg use PowerPoint 2003 or later or limit the number of virtual displays toone before displaying the Slide Show
Applications are no longer displayed from the computer screen when the multi-screen display function is executed
Check R em ed y
Is another application running on the virtual display g
For Windows
When EPSON Virtual Display is installed another application sometimes runs on the virtual display In this case setEPSON Virtual Display to Off in Screen properties
The mouse cursor is not displayed on the computer screen
Check R em ed y
Is EPSON Virtual Display installed
For Windows
The mouse cursor was moved onto the virtual display g When the virtual display checkbox is cleared on the Add-Remove EPSON Virtual Display screen the mouse pointer returns to the screen display area
When connecting with EasyMP Network Projection the image is not displayed or the image is slow to appear
Ch eck R em ed y
Did you try to play back movies with Media Player or try to operatethe screen saver preview
Depending on the computer the movie playback screen in Media Player may not be displayed and the screen saverpreview may not be displayed normally
Troubleshooting 42
8182019 Easy Mp Network Op Guide
httpslidepdfcomreaderfulleasy-mp-network-op-guide 4247
Ch eck R em ed y
Is WEP encryption effective or are multiple projectors connected The display speed decreases when WEP encryption is effective or multiple projectors are connectedHave you enabled DHCP When DHCP is set to On in Advanced Connection Mode if an available DHCP server is not found it may take some
time to enter LAN standby status
Is Wireless LAN 80211gb being used in Quick ConnectionMode
Depending on the electromagnetic wave environment there are times when the image and sound for movies may stop When using the movie sending function use Advanced Connection Mode or Wireless LAN 80211a in Quick Connection Mode
When a connection is made using EasyMP Network Projection a PowerPoint Slide Show cannot be started
Ch eck R em ed y
Was EasyMP Network Projection started while PowerPoint wasrunning
For Windows
When connecting with EasyMP Network Projection make sure you close PowerPoint first Slide Show might not runif connecting while PowerPoint is running
When a connection has been made using EasyMP Network Projection the screen will not be refreshed when using an Office application
Ch eck R em ed y
Is the mouse moved continuously When you stop moving the mouse cursor the screen is updated If the screen does not update quickly stop moving themouse cursor
Error message when starting up EasyMP Network Projection
E r r or M essa g es R em ed y
Connection to the projector failed Try to connect again If it still does not connect check the network settings on the computer and the network settingsfor the projector
For details on the network settings to be made on the projector sees Users Guide Network Menu
The keyword does not match Re-enter the keyword displayed onthe projector screen
Check the Projector Keyword displayed on the LAN standby screen and enter the Projector Keyword
8182019 Easy Mp Network Op Guide
httpslidepdfcomreaderfulleasy-mp-network-op-guide 4347
Troubleshooting 44
8182019 Easy Mp Network Op Guide
httpslidepdfcomreaderfulleasy-mp-network-op-guide 4447
Network settings are not restored after cutting the connection to the computer with EasyMP Network Projection
Check R em ed y
Are you manually connecting to a Wireless LAN when thecomputer starts up
Quick Connection Mode
Try connecting to the Wireless LAN manually
Glossary 45
8182019 Easy Mp Network Op Guide
httpslidepdfcomreaderfulleasy-mp-network-op-guide 4547
This section briefly explains the difficult terms that are not explained in the text of this guide For details refer to other commercially available publications
A d h o c
A method of Wireless LAN connection that communicates with wireless LAN clients without using an access point It is not possible to communicatewith two or more devices simultaneously
M A C A d d r e ss
An abbreviation of Media Access Control The MAC Address is an ID number unique to each network adapter A unique number is assigned to eachnetwork adapter and data is transmitted between network adapters based on this identification
S V G A
A type of video signal with a resolution of 800 (horizontal) ^600 (vertical) dots that is used byIBM PCAT-compatible computers
S X G A
A type of video signal with a resolution of 1280 (horizontal) ^ 1024 (vertical) dots that is used by IBM PCAT-compatible computers
U X G A
A type of video signal with a resolution of 1600 (horizontal) ^ 1200 (vertical) dots that is used by IBM PCAT-compatible computers
V G A
A type of video signal with a resolution of 640 (horizontal) ^ 480 (vertical) dots that is used by IBM PCAT-compatible computers
V i r tual D i s p lay
The screen for one computer is output to multiple displays A large virtual screen can be created by using multiple displays
X G A
A type of video signal with a resolution of 1024 (horizontal) ^ 768 (vertical) dots that is used by IBM PCAT-compatible computers
8182019 Easy Mp Network Op Guide
httpslidepdfcomreaderfulleasy-mp-network-op-guide 4647
8182019 Easy Mp Network Op Guide
httpslidepdfcomreaderfulleasy-mp-network-op-guide 4747
8182019 Easy Mp Network Op Guide
httpslidepdfcomreaderfulleasy-mp-network-op-guide 247
8182019 Easy Mp Network Op Guide
httpslidepdfcomreaderfulleasy-mp-network-op-guide 347
Cannot connect in Advanced Connection Mode or Wired LAN connection 40
The Slide Show cannot be displayed on the desired display when the multi-screendisplay function is being executed 41
Applications are no longer displayed from the computer screen when the multi-screen display function is executed 41
The mouse cursor is not displayed on the computer screen 41
When connecting with EasyMP Network Projection the image is not displayed orthe image is slow to appear 41
When a connection is made using EasyMP Network Projection a PowerPoint SlideShow cannot be started 42
When a connection has been made using EasyMP Network Projection the screenwill not be refreshed when using an Office application 42
Error message when starting up EasyMP Network Projection 42
Network settings are not restored after cutting the connection to the computerwith EasyMP Network Projection 44
Glossary 45
General Notes 46
About Notations 46General Notice 46
Index 47
Contents 3
8182019 Easy Mp Network Op Guide
httpslidepdfcomreaderfulleasy-mp-network-op-guide 447
Before UseThis guide describes useful functions for EasyMP Network Projection and how to install the software
8182019 Easy Mp Network Op Guide
httpslidepdfcomreaderfulleasy-mp-network-op-guide 547
You can use EasyMP Network Projection to project your computer screen
from the projector via a network Sharing the projector over the network and using various screen transfer functions allow you to hold effectivemeetings and presentations
Sharing the Projector
If the projector is connected to a network you can share the projector fromcomputers on the network When projecting data from different computersduring a meeting or presentation you can progress smoothly withoutchanging the signal cable between each computerEven a distance between the projector and the computer does not cause any
problems
Various Screen Transfer Functions
You can use the following screen transfer functions
bull Presentation Mode s p19
This function can project a PowerPoint Slide Show running on acomputer You can give stylish presentations by projecting a black screenwhile making preparations and so on and when not performing a SlideShow
bull Distribution function
The screen being displayed by a remote computer can be simultaneously displayed by up to four projectors on the same network
bull Switching functionBy using the meeting switching function if EasyMP Network Projection isinstalled on all of the computers the presenters can take turns and projecttheir own images without changing cables
Functions of EasyMP Network Projection 5
8182019 Easy Mp Network Op Guide
httpslidepdfcomreaderfulleasy-mp-network-op-guide 647
You can find the software for using the projector efficiently on the supplied
EPSON Projector Software for Meeting amp Monitoring CD-ROM Installthe software on the computer you are using
Software Supplied
You can find the following software on the EPSON Projector Software forMeeting amp Monitoring CD-ROM
bull EasyMP Network Projection
Software for sending computer screen images to a projector via a network connection
bull EasyMP Monitor
Software that lists the current status of Epson projectors connected to thenetwork and monitors and controls those projectors You can collectively manage multiple projectors by using EasyMP Monitor For details on
using EasyMP Monitor see the EasyMP Monitor Operation Guides EasyMP Monitor Operation Guide
Software Requirements
EasyMP Network Projection runs on computers that meet the following
requirementsOS Windows series (32-bit versions only)
bull Windows 2000 (Service Pack 4)bull Windows XPbull Windows XP (Service Pack 1 or later)
bull Windows Vistabull Windows Vista (Service Pack 1 or later)bull Windows 7
Mac OS X series
bull Mac OS X 103xbull Mac OS X 104xbull Mac OS X 1051 or later
bull Mac OS X 106xRecommended Mac OS X 1039104111055
CPU Mobile Pentium III 12GHz or faster
Power PC G3 900MHz or faster
Recommended Pentium M 16GHz or faster
CoreDuo 15GHz or faster
Amount of Memory 256MB or more
Recommended 512MB or more
Hard Disk
Free Space
20MB or more
Display Resolution of no less than XGA (1024x768) andno higher than UXGA (1600x1200)
Display color of 16-bit color or greater (approx32000 display colors)
Operation is not guaranteed in Mac OS X 1050 because the Firewall settings arenot set correctly when the version is updated
Installing
Make sure you check the following points before starting installation
bull When using a computer running any of the following operating systemsyou must have administrator authority to install EasyMP Network Projection
bull Windows 2000 bull Windows XP
bull Windows Vista bull Windows 7
bull Make sure that you close all running applications before startinginstallation
Installing the Software 6
8182019 Easy Mp Network Op Guide
httpslidepdfcomreaderfulleasy-mp-network-op-guide 747
bull When the language selected for the installation varies from that of the
OS being used the screens may not be displayed correctly
qFor EMP NS Connection users
The EMP NS Connection name has changed
Before change EMP NS Connection
After change EasyMP Network Projection
When using the same function as EMP NS Connection on the
projector install EasyMP Network Projection after uninstalling EMPNS Connection You cannot connect to the projector correctly usingEMP NS Connection
Procedure
For Windows
A Turn on your computer
B Insert the EPSON Projector Software for Meeting ampMonitoring CD-ROM into the computer
The installer starts automatically
C Click Easy Install
To select the software you want to install select Custom Install Tochange the sofrware display language click Language
D Select the applications you want to install and then click Install
E When the License Agreement screen is displayed click Yes
F When the Add-Remove EPSON Virtual Display screen is
displayed click OKTo use Multi-screen display you need to set up EPSON VirtualDisplay If you do not want to set it now you can do so laters p20
G Click Exit to complete the installation
For Mac OS
A Turn on your computer
B Insert the EPSON Projector Software for Meeting amp
Monitoring CD-ROM into the computer
C Double-click the ENPvxxx_Installer icon in the EPSON
window
Installation starts
D Click Exit to complete the installation
q bull When installation does not start automatically (Windows only)
Select Start - Run and in the Run dialog box type the letter for
your CD-ROM drive followed by EPsetupexe and then click OK
bull Uninstalling
For Windows
Select Start - Settings - Control Panel - Add-Remove Programs orAdd or Remove Programs and then remove EasyMP Network Projection
For Mac OS
From Applications delete the EasyMP Network Projection folder
Installing the Software 7
8182019 Easy Mp Network Op Guide
httpslidepdfcomreaderfulleasy-mp-network-op-guide 847
EasyMP Network Projection SummaryThis chapter explains how to connect the computer and the projector via a network and the procedure for projecting images from your computers screen withthe projector
8182019 Easy Mp Network Op Guide
httpslidepdfcomreaderfulleasy-mp-network-op-guide 947
There are two methods of connecting a computer and the projector via a
network by using EasyMP Network Projection
Advanced Connection Mode
Advanced Connection Mode is an infrastructure connection and connectsto an existing network system via a network cableWhen connecting to a network via Wired LAN connect the projector to
the network hub with a commercially available LAN cableIf you install the optional Wireless LAN unit in the projector you canconnect to the network via a wireless LAN access point
Quick Connection Mode (Only when the optional
Wireless LAN unit is installed)
Quick Connection Mode is only available when you install the optionalWireless LAN unit in the projector
Quick Connection Mode temporarily assigns the projectors SSID to acomputer creating an ad hocg connection and restores the computersnetwork settings after disconnectings p11
bull You can easily connect to a computer and project images from thecomputer without making network settings
bull This lets you connect easily without a connector cable and you caneven connect if the projector and the computer are at remote locations
Steps for Connecting
Use the following steps to connect the computer to the projector andproject in EasyMP Network Projection
You need to perform steps 1 to 4 only the first time you connect
1 Install EasyMP Network Projection on the computer to be connecteds p6
2 Make network settings on the computer and put it into network connection status s p11
3 For Quick Connection Mode Install the optional Wireless LAN unit inthe projector (if already installed go to step 5)For Advanced Connection Mode Enable the Wired LAN or WirelessLAN adapter in Port Configurations s Computers documentation
Two Connection Modes 9
8182019 Easy Mp Network Op Guide
httpslidepdfcomreaderfulleasy-mp-network-op-guide 1047
4 Make network settings on the projector and put it into network
connection status s Users Guide Network Menu
5 Start EasyMP Network Projection on the computer and connect with theprojector s p12
When the computer you are using is normally connected to the network youdo not need to make network settings on the computer
Two Connection Modes 10
8182019 Easy Mp Network Op Guide
httpslidepdfcomreaderfulleasy-mp-network-op-guide 1147
Use the following procedure to set up the computer for connection
For Windows
Make network settings for the computer by using the utility softwaresupplied with the LAN adapter For more information on the utility software see the Users Guide supplied with your LAN adapterFor example as shown in the following illustration when a red cross (^) isdisplayed over the network icon on the taskbar you cannot connect to theprojector
For Mac OS
Set the network port and communication status For more details on settingthe communication status see the Userrsquos Guides for your computer or theAirPort card
Preparing to Connect 11
8182019 Easy Mp Network Op Guide
httpslidepdfcomreaderfulleasy-mp-network-op-guide 1247
Operating the ProjectorBefore connecting put the projector into connection standby statusMake sure the projector network settings are complete and the projector isconnected to network equipment such as a network hub via a commercially available network cable
Procedure
A Press the [t] button on the remote control to turn the poweron
B Press the [LAN] button on the Remote Control
The LAN standby screen is displayed
If there is no signal for the current input source it automatically
switches to the LAN source If it does not automatically switch to theLAN source press the [LAN] button
Operating the ComputerIn the following explanations unless otherwise noted Windows screenshots are used The similar screens are also displayed for Mac OS
Procedure
A Start EasyMP Network Projection
For Windows
Select Start - Programs (or All Programs) - EPSON Projector -EasyMP Network Projection - EasyMP Network ProjectionV2XX
For Mac OS
Double-click the Applications folder of the hard drive volume inwhich EasyMP Network Projection is installed and then double-click the EasyMP Network Projection icon
B Select Quick Connection Mode (only available when the
optional Wireless LAN unit is installed) or AdvancedConnection Mode and then click OK
The projector search results are displayed To always connect using
Advanced Connection Mode select Set the selected ConnectionMode as the default mode for future connections
C Select the projector you want to connect to and then click
Connect
If the projector you want to connect to is not displayed in the searchresults click the Automatic search button The search takes about 30
secondsFor details on the connection screen see Using the ConnectionScreen s p13
Connecting to a Projector on a Network and Projecting 12
8182019 Easy Mp Network Op Guide
httpslidepdfcomreaderfulleasy-mp-network-op-guide 1347
D When Projector Keyword is set to On from the projector the
Keyword entry screen is displayed Enter the keyworddisplayed on the LAN standby screen and then click OK
When the connection is complete the computer screen is projectedThe following EasyMP Network Projection toolbar is displayed on thecomputer screen You can use this toolbar to operate the projectorand make settings and to disconnect the network connection Fordetails on the toolbar see Using the Toolbar s p15
qWhen connecting from another computer such as when changingpresenters start EasyMP Network Projection from the computer youwant to connect The computer that is currently connected isdisconnected and the projector is then connected with the computerthat is trying to connect now
If a connection is made while Disable interrupt connection is set theconnection is not switched to another computer
Using the Connection Screen
Start EasyMP Network Projection to display the following screen Theoperation of each button or item is described in the following table
When the system starts in Advanced Connection Mode
Connecting to a Projector on a Network and Projecting 13
8182019 Easy Mp Network Op Guide
httpslidepdfcomreaderfulleasy-mp-network-op-guide 1447
When the system starts in Quick Connection Mode
A Automatic search
In Advanced Connection Mode you can search for available projectorson the network system to which the computer is connected
In Quick Connection Mode you can search for the projector based onthe SSID
B Manual search
In Advanced Connection Mode you can search for a projector based ona specified IP address or projector name
In Quick Connection Mode you can search for the projector based onthe SSID selected from a list
C Status
The following six icons indicate the status of the detected projectors
Standby Select for connecting
Busy Select for connecting When you click Connect the computer currently
connected is disconnected and yourcomputer is connected
Busy (Disable
interrupt con‐nection)
Cannot be selected Disable interrupt
connection is set on another computerwhich is already connected
Currently inuse by anotherapplication
The projectors Configuration Menu isopen You can select it after closing theConfiguration menu and running thesearch again
Searching Displayed while running Manual search orProfile
Not found Displayed when a projector cannot be foundas a result of Manual search or Profile InQuick Connection Mode you can only select multiple projectors with the sameSSID
D Projector name
The projectors name is displayed
E Disable interrupt connection
Check the box to prevent an interrupt connection by other computers whileconnected to the selected projector
F Use multi-display
Check the box to use the Multi-screen display function When this is selectedDisplay layout and Display properties are displayed at the bottom of the screens p20
G Troubleshooting
If there is a problem and you cannot have a connection press this button to openthe EasyMP Network Projection Troubleshooting screen
H Connect
Connect to the projector you selected from the search results list When aconnection is made with a projector a toolbar is displayed
I Set options
You can set general setting options such as the processing method when startingEasyMP Network Projection For details see Set optionss p33
J Save in the profileSaves the results of a network projector search as a Profiles p29
Connecting to a Projector on a Network and Projecting 14
8182019 Easy Mp Network Op Guide
httpslidepdfcomreaderfulleasy-mp-network-op-guide 1547
K Clear list
Deletes all search resultsL IP address (Advanced Connection Mode only)
The projectors IP address is displayed
M Display
(Select the number displayed (when Use multi-display is selected)s p25
N Profile
You can search for a projector on the network using a Profile savedusing Save in the profiles p29
O SSID (Quick Connection Mode only)
The projectors SSID is displayed
P Signal intensity
This is displayed when the connection is made in Quick Connection Mode As theSignal intensity increases so does the number of lit indicators
Q Update list (Quick Connection Mode only)
Updates Status and Signal intensity
Using the Toolbar
The toolbar is displayed on the computer screen after EasyMP Network Projection starts and a connection is made with the projector You can usethis toolbar to operate and make settings for the projector
Select target projector
Click to limit the projectors operated from the toolbar when projectingfrom multiple projectors using the distribution function or Multi-screen display The indication below the icon shows the projectors thatcan be controlledALL indicates that all of the connected projectors can be controlledFor example when 1 3 is displayed projectors No 1 and No 3 can becontrolled
Click to display the following screen
A Select the projector to be controlled
B Indicates the No of an allocated projector This No indicates theNo of the projector that you can control from the toolbar
C Indicates the status of the projector
Stop
Connecting to a Projector on a Network and Projecting 15
8182019 Easy Mp Network Op Guide
httpslidepdfcomreaderfulleasy-mp-network-op-guide 1647
Stops projection while connected to the projector A black screen is
projected while stopped Audio does not stop To stop the audio or todisplay a Users Logo while projection is stopped use the AV Mutefunction
Show
Releases Stop or Pause
Pause
Pauses projected images while connecting to the projector The audio isnot paused
Presentation Mode
Each time this is clicked Presentation Mode switches between enableddisableds p19
Projector control
While the projector is connected to the network the projectors AVMute Switch PC source and Switch video source functions can becontrolled from both the Remote Control and the projectors Control
panel
Click to display the following toolbar
AV Mute
The same function as the [AV Mute] button on theRemote Control
s Users Guide Remote Control
Switch PC source
The Source alternates between Computer1Computer2 USB Display USB and LAN each timeyou click
Switch video source
The Source alternates between S-Video and Videoeach time you click S-Video does not switch if thecable is not connected
Screen Preview
Displays the multi-screen preview screen
Click to display a preview with the settings you have made Click
each display to enlarge each Screen Preview to full-screen
Set options
Transmission performance during the transfer of computer images canbe adjusteds p33
Movie Sending Mode
Not enabled on this projector The message The connected projectorsdo not support Movie Sending is displayed
DisconnectDisconnects the connection to the projector
Signal intensity
This is displayed when a connection is made in Quick ConnectionMode As the Signal intensity increases so does the number of litindicators
Switch toolbar display
Connecting to a Projector on a Network and Projecting 16
8182019 Easy Mp Network Op Guide
httpslidepdfcomreaderfulleasy-mp-network-op-guide 1747
The toolbar display is switched as follows The toolbar display remains
as is until switched againFull
Normal
Simple
Connecting to a Projector on a Network and Projecting 17
8182019 Easy Mp Network Op Guide
httpslidepdfcomreaderfulleasy-mp-network-op-guide 1847
Functions and Settings for EasyMP Network ProjectionThis chapter explains the functions that may be useful in a meeting or presentation such as the Multi-Screen Display which allows you to send images tomultiple projectors from a single computer
8182019 Easy Mp Network Op Guide
httpslidepdfcomreaderfulleasy-mp-network-op-guide 1947
In Presentation Mode the images are only displayed when performing a
PowerPoint Slide Show on a computer When you stop Slide Show theprojector displays a black screen This is useful when you only want todisplay the Slide ShowIn addition to PowerPoint Keynote is compatible with Presentation Modefor Mac OS
Procedure
A If necessary select another projector to be controlleds p15
B Click the button on the toolbar
Presentation Mode begins
C Click the button again to exit Presentation Mode
Projecting Only a PowerPoint Slide Show (Presentation Mode) 19
8182019 Easy Mp Network Op Guide
httpslidepdfcomreaderfulleasy-mp-network-op-guide 2047
Example of Adjusting the Virtual Display
By arranging the virtual display g allocation you can project only the imagethat you want to show or project different images from left to right in apresentation
Arrangement example 1
AA c tual mon i tor i mag e
PowerPoint file
B I mag e of v i r tua l d i s p lay
Excel file
Arrangement example 2
AA c tual mon i tor i mag e
PowerPoint file presenter tools
BI mag e of v i r tua l d i s p lay
Slide Show using a PowerPoint file
Procedure Before Using the Multi-screen Display
Function
1 Setting the Virtual Display s p21
In a Windows environment enable the virtual display g driver as necessary Alsofor both Windows and Mac OS set up the virtual display arrangement
2 Allocating the image to be projected s p25
Using Multi-Screen Display 20
8182019 Easy Mp Network Op Guide
httpslidepdfcomreaderfulleasy-mp-network-op-guide 2147
Open the file to be projected and then move the screen to the virtual display
according to the actual projection arrangement3 Projecting the allocated images s p25
Allocate a virtual display number to a projector that is connected through thenetwork and then start projection
Setting the Virtual Display
This chapter explains the virtual display for arrangement example 1s p20
Enable the virtual display driver (Windows only)
Enable the virtual display g driver Those users listed below do not have toperform this operation Go to procedure s Adjusting the Virtual Display
p21bull Those users who have enabled virtual displays installing EasyMP
Network Projection
bull For Mac OS users
Procedure
A Start Windows on the computer and then select Start -Programs (or All Programs) - EPSON Projector - EasyMP
Network Projection - Add-Remove EPSON Virtual Display
The Add-Remove EPSON Virtual Display screen is displayed
B Select the virtual display you want to use
Up to four monitors can be added In this example a single virtual
display is to be used When setting multiple virtual displays select asmany displays as is necessaryAny one of the displays can be selected
C Click OK
When you click OK the drivers for the virtual display are enabled Atthis point it is normal for the display to flicker Wait for the Add-Remove EPSON Virtual Display screen to close
Adjusting the Virtual Display
After starting EasyMP Network Projection the procedure for setting up the virtual displays differs for Windows and Mac OS The procedures areexplained separately below
qCheck the following points before starting EasyMP Network Projectionwhen connecting via Wireless LAN If the following points are not setcorrectly Multi-screen display cannot be used
bull The SSID for the computer and each projector must be the same
bull The wireless LAN system for the computer and each projector mustbe the sameYou can modify the SSID and Wireless LAN system for theprojector from the Network menu in the projectors Configurationmenus Users Guide Wireless LAN Menu
Using Multi-Screen Display 21
8182019 Easy Mp Network Op Guide
httpslidepdfcomreaderfulleasy-mp-network-op-guide 2247
Procedure
For Windows
A Select Start - Programs (or All Programs) - EPSON
Projector - EasyMP Network Projection - EasyMP Network Projection V2XX to start EasyMP Network Projection
B Select the Use multi-display checkbox
Display layout and Display properties are added at the bottom of thescreen
C Click Display properties
The Display properties screen is displayed
D Click the Settings tab
Using Multi-Screen Display 22
8182019 Easy Mp Network Op Guide
httpslidepdfcomreaderfulleasy-mp-network-op-guide 2347
E Drag the displayed monitor icon and place it where desired
Here the actual monitor (1) is placed on the left while the virtualmonitor (3) is placed on the rightWhen the computer has multiple display output terminals thenumbers assigned to the virtual terminals will be sequential to thoseof the physical terminals
q bull When an external monitor is connected as a secondary monitor the
image for that screen cannot be projected
bull Depending on the hardware the number of the secondary monitormay be other than 2 When the monitor icon is displayed on thescreen click the icon and confirm that the monitor type shownunder Display is other than secondary
bull For the Screen Resolution settings see the followings p36
When the monitor icon is arranged a virtual display is connected asthe image like below
Using Multi-Screen Display 23
i l i i l
8182019 Easy Mp Network Op Guide
httpslidepdfcomreaderfulleasy-mp-network-op-guide 2447
F Click the OK button to close the Display properties screen
Up to this point the virtual display layout has been fixedAllocate the projecting images next s p25
For Mac OS
A Start EasyMP Network Projection Double-click the Applications
folder of the hard drive volume in which EasyMP Network Projection is installed and then double-click the EasyMP
Network Projection iconIn this example we select and start in Advanced ConnectionMode
B Select the Use multi-display checkbox
Display layout and Display preferences are added at the bottom of thescreen
C Click Display preferences
The display setting screen is displayed
D Click Arrangement
E Clear Mirror Displays
Using Multi-Screen Display 24
U i M lti S Di l
8182019 Easy Mp Network Op Guide
httpslidepdfcomreaderfulleasy-mp-network-op-guide 2547
F Drag the displayed monitor icon and place it where desired
G Close the display setting screen
Up to this point the screen layout has been fixed
Allocating the Image to be Projected
This section explains the virtual display for arrangement example 1s p20
Procedure
A Open the file to be projected
Start the PowerPoint and Excel files
B Drag the window to the desired virtual displayg monitor andallocate it where the image is to be projected
Drag the Excel window to the right until it cannot be seen As aresult the PowerPoint window appears on the actual monitor whilethe Excel window appears on the virtual display on the right
Projecting the Allocated Images
This section explains the virtual display for arrangement example 1s p20
Procedure
A Select the number of the virtual displayg
you want to fromDisplay and set which image to be projected from which
projector
Using Multi-Screen Display 25
Using M lti Screen Displa
8182019 Easy Mp Network Op Guide
httpslidepdfcomreaderfulleasy-mp-network-op-guide 2647
B Click Connect
The image allocated to each projector is projected
In a Windows environment you cannot view the image being sent toa virtual display on the computer To adjust the image on the virtualdisplay you must do so while viewing the projected imageTo perform mouse-based operations on the virtual display move themouse pointer in the direction of the virtual display such that thepointer appears on the virtual display
C To terminate multi-screen display click Disconnect on thetoolbar
Using Multi-Screen Display 26
Using Multi Screen Display 27
8182019 Easy Mp Network Op Guide
httpslidepdfcomreaderfulleasy-mp-network-op-guide 2747
q
In a Windows environment if the virtual display driver has been
enabled such that the mouse pointer can be moved outside the limitsof the screen there may be occasions when you lose track of thelocation of the pointer If you are not using a virtual display clear the virtual display checkbox on the Add-Remove EPSON Virtual Display screen so that the mouse pointer moves back inside the screensdisplay area To subsequently use multi-display again place a check mark against the required display under Add-Remove EPSON VirtualDisplayTo clear a check mark see the followings p21
Using Multi-Screen Display 27
Connecting to a Projector on a Different Subnet 28
8182019 Easy Mp Network Op Guide
httpslidepdfcomreaderfulleasy-mp-network-op-guide 2847
This chapter explains how to connect a computer to a projector on adifferent sub-net via a Wired LAN or a wireless LAN access point on anexisting network system
By default this application only searches for projectors on the same subnetas the computer Therefore even if you perform a search for projectors onthe network projectors on a different subnet will not be foundYou can however identify and connect to a projector on a different subnetas follows
bull Specify either an IP address or Projector name and perform a search
The IP Address can be input directly Also provided the Projector nameto be connected has been registered on the DNS server you can performa search simply by inputting that Projector names p28
bull Performing a search based on a Profile
Once you have performed a search for a projector on a different subnetby specifying either an IP Address or a Projector name you can save thesearch as a Profile with an easy-to-remember name and then use that
Profile whenever you subsequently want to search for a projector on adifferent subnets p29
q bull If a search fails to find a projector the most likely causes are as
follows Proceed as appropriate depending on the cause of thefailure
For both Windows and Mac OS
If there is no wireless LAN signal or if the signal is weak check
whether there is anything that could be interfering with the signalWhen the optional Wireless LAN unit is installed in the projectorand connecting Mac OS to a wireless LAN
Check whether AirPort is set to On Or check whether anappropriate access point has been selected
bull When you use Manual search in Quick Connection Mode you canspecify the SSID When there are a lot of projectors you can narrow the search field by using SSID
Specifying Either an IP Address or Projector Name
and Performing a Search (Advanced ConnectionMode Only)
In the following explanations unless otherwise noted Windows screenshots are usedThe similar screens are also displayed for Mac OS
Procedure
A Click Manual search on the EasyMP Network Projectionprojector selection screen
B Enter the IP address or the projector name for the projectoryou want to connect to and click OK
Connecting to a Projector on a Different Subnet 28
Connecting to a Projector on a Different Subnet 29
8182019 Easy Mp Network Op Guide
httpslidepdfcomreaderfulleasy-mp-network-op-guide 2947
The search results are displayed on the EasyMP Network Projectionprojector selection screen
Provided the target projector has been identified select that projectorand then click Connect to establish a connectionWhen you will always be using that projector save the search as aProfile so that you do not have to specify the relevant details every time you perform a search s p29
Performing a Search with a ProfileYou can save a search for a frequently used projector as a Profile AProfile is a file containing all of the information pertaining to a givenprojector such as the projector name its IP address and SSID If youspecify that information from the next time you perform a search there willbe no need to specify the IP address or projector name each time youperform a search For example by creating a group of Profiles for eachplace where a projector is setup and managing them with folders the target
projector can be found quickly
A Building A E Floor 1
B Building B F Floor 2
C Building C G Floor 3
D Building D
This section explains how to create and edit a Profile
Making a Profile
Profiles are made by saving search results
For details on how to edit a previously saved Profile see the followingsection s p31
Procedure
A While the projector is displayed on the EasyMP Network Projection projector selection screen click Save in the
profile
Connecting to a Projector on a Different Subnet 29
Connecting to a Projector on a Different Subnet 30
8182019 Easy Mp Network Op Guide
httpslidepdfcomreaderfulleasy-mp-network-op-guide 3047
The Save in the profile screen is displayed
B Enter a Profile name and then click Add
Projector information is registered in the ProfileIf you have previously saved a Profile you are prompted to confirmwhether or not to overwrite To save a Profile with a different nameselect Save as If you have created a folder for a Profile the followingscreens are displayed After entering the Profile name and selectingthe Save in destination click Add
For Windows
For Mac OS
qFor details on how to create a folder for a Profile see the followingsection s p31
Searching by specifying a Profile
You can search by specifying the Profile you created
Connecting to a Projector on a Different Subnet 30
Connecting to a Projector on a Different Subnet 31
8182019 Easy Mp Network Op Guide
httpslidepdfcomreaderfulleasy-mp-network-op-guide 3147
Procedure
A Click Profile on the EasyMP Network Projection projector
selection screen
If no Profile is registered you cannot select Profile
B From the menu that is displayed select the projector you wantto connect to
The search results are displayed on the EasyMP Network Projectionprojector selection screenProvided the target projector has been identified select that projectorand then click Connect to establish a connection
Managing a Profile
You can change the name and the hierarchical structure of the Profile
Procedure
A Click Set options on the EasyMP Network Projection main
screen
The Set options screen is displayed
B Click Edit profile
The Edit profile screen is displayed
C Edit the contents registered in the Profile
Co ect g to a ojecto o a D e e t Sub et 31
Connecting to a Projector on a Different Subnet 32
8182019 Easy Mp Network Op Guide
httpslidepdfcomreaderfulleasy-mp-network-op-guide 3247
A Indicates a folder
B Indicates a Profile
Prof i le
Item F u nctio n
Profi le
You can display the registered Profile You can manageit by creating a folder You can change the order of theProfile or the folder by dragging amp dropping
Copy
You can copy the Profile The copied Profile is saved in
the same folder as the original with the same nameDelete
You can delete the Profile and the folder
Prof i le
Item F u n ctio n
R e n a m e
Displays the Rename dialog box allowing you to renamethe folder or the Profile You can enter up to 32characters in the Rename dialog box
Create folder
You can create a new folder
E x p or t
Exports a created Profile allowing you to import and usethat Profile
I mp or t
Used when you want to read and use an exportedProfile
Informa tion on selected prof i le
Item F u n ctio n
P r oj e c tor n am e
I P addr e s s
You can display the projector information registered inthe Profile
Delete
You can delete the information for the selectedprojector When all projector information is deleted theprofile is also deleted
D Click OK
Saves your edits and closes the Edit profile screen
g j
Using Set options 33
8182019 Easy Mp Network Op Guide
httpslidepdfcomreaderfulleasy-mp-network-op-guide 3347
You can make setting options such as the processing method when EasyMPNetwork Projection startsAccess Set options from the EasyMP Network Projection main screen
Procedure
A Click Set options on the EasyMP Network Projection main
screen
The Set options screen is displayed
B Set each of the items
Confirm the details of the set items in the next step When you havemade all the necessary settings click OK to close the Set optionsscreen
Setting Each ItemSet each item from the General settings tab and the Adjust performancetab
General settings tab
Use fu l l -screen
vi de o t r an s fe r
This setting is disabled because the projector does notsupport the movie sending function
E n c r y p t
c ommun i c at i on s
Select to Encrypt and transmit data Even if data isintercepted it cannot be decrypted
When using Quick Connection Mode make sure youalways select this checkbox
Display Connection
Mod e Selection
w i n dow on s tar tup
Set whether or not the Quick Connection ModeAdvancedConnection Mode screen is displayed when EasyMPNetwork Projection starts
Clear this checkbox once you have settled on a regularstartup method
S e ar c h me th od on
s tar tup
Select from the following projector search methodsexecuted when EasyMP Network Projection is started
Automatic search on startup
Specify search method after startupSearch with the last network configuration
g p
Using Set options 34
8182019 Easy Mp Network Op Guide
httpslidepdfcomreaderfulleasy-mp-network-op-guide 3447
Edit profi le
The Edit profile dialog box is displayeds p31
S w i tc h L A N
Windows only The Switch Network Adapter dialog box is displayed Thisis used when it is necessary to switch the network adapter tobe used for a search when a computer has multipleadapters
By default all of the network adapters are used to perform asearch When a Wired LAN is always used as theconnection method select a Wired LAN adapter
R e s tor e D e faul ts
You can reset all adjustment values on the General settingstab to their default settings except for Edit profile andSwitch LAN
Adjust performance tab
P e r for man c e
adj us tme n t s l i de r
The performance can be set to Fast Normal andFine
Set to Fast when movie projections are interrupted
T r a n s f er l a y er e d
w i n dow
Windows only (excluding Windows Vista andWindows 7)
Set whether or not to transfer a layered windowThe layered window is in use when contents such asmessages displayed on the computer are not projectedby the projector Select this checkbox to projectcontents such as messages that use the layeredwindow
Clear this checkbox if you do not want the mousepointer to flicker on the screen
R e s tor e D e faul ts
You can reset all adjustment values for the Adjustperformance tab to their default settings
q When you click on the toolbar only the Adjust performance tab
is displayed
Audio Output tab
Because this projector does not support the audio sending function settingson the Audio Output tab are disabled
8182019 Easy Mp Network Op Guide
httpslidepdfcomreaderfulleasy-mp-network-op-guide 3547
Appendix
Connection Limitations 36
8182019 Easy Mp Network Op Guide
httpslidepdfcomreaderfulleasy-mp-network-op-guide 3647
When projecting computer images while running EasyMP Network Projection the following restrictions apply Confirm these points
Supported Resolutions
The following computer screen resolutions can be projected You cannotconnect to a computer with a resolution greater than UXGAg
bull VGA g(640x480)
bull SVGA g(800x600)
bull XGA g(1024x768)
bull SXGA g(1280x960)
bull SXGA (1280x1024)
bull SXGA+ (1400x1050)
bull WXGA (1280x768)
bull WXGA (1280x800)
bull
WXGA+ (1440x900)bull UXGA (1600x1200)
Supported resolutions when multi-screen display function is on
If a computer with a special screen size is used where the ratio of heightand width is not represented a screen resolution closest to the width isselected from the list of 10 aboveIn this case in wide screen the horizontal margins are projected in narrow screen the empty vertical margins are black
Display Color
The number of colors for computer screens that can be projected
W ind o w s M a c O S
16-bit color About 32000 colors (16-bit)
32-bit color About 167 million colors (32-bit)
The operational guarantee for multi-screen display is 16-bit and 32-bitcolor
Number of Connections
You can connect up to four projectors to one computer and projectsimultaneouslyYou cannot connect multiple computers to one projector simultaneously
Others
bull If the transmission speed of the Wireless LAN is low the network might be cut off unexpectedly
bull Audio is not transmitted
bull When videos are played back they do not play back as smoothly as
when displayed on the computerbull Applications that use part of DirectX functions may not be displayed
correctly(Windows only)
bull Cannot project full screen MS-DOS prompts(Windows only)
bull There are times when the image on the computer screen and the imageprojected by the projector may not match exactly
When Using Windows Vista or Windows 7
Note the following points when using EasyMP Network Projection on acomputer running Windows Vista or Windows 7
Limitations when projecting from Windows Photo Gallery
Note the following two limitations when launching Windows Photo Gallery when EasyMP Network Projection is running
Connection Limitations 37
8182019 Easy Mp Network Op Guide
httpslidepdfcomreaderfulleasy-mp-network-op-guide 3747
bull Slide Show is played back in simple mode when projecting fromWindows Photo Gallery
Because the toolbar is not displayed you cannot make changes whileplaying a Theme (effects) regardless of the Windows Experience IndexratingOnce simple mode has started you cannot change modes while WindowsPhoto Gallery is running even if you close EasyMP Network ProjectionRestart Windows Photo Gallery
bull You cannot play movies
Limitations in Windows Aero
Note the following two limitations when the window design for yourcomputer is Windows Aero
bull The layered window is projected regardless of Transfer layered window from Set options in EasyMP Network Projection
For example when Transfer layered window for EasyMP Network Projection toolbar is disabled it is not projected even if it is displayed onthe computer screen however the toolbar is projected
bull A few minutes after you connect a computer to the projector over anetwork with EasyMP Network Projection the following message is
displayedIt is recommended that you select Keep the current color scheme anddont show this message again This selection is enabled until thecomputer is restarted
Limitations when projecting from Windows Media Center
You cannot project images in full screen display using Windows MediaCenter Switch to the window display mode to project the images
Similarly images cannot be projected with Quick Wireless Connection orUSB Display
Troubleshooting 38
8182019 Easy Mp Network Op Guide
httpslidepdfcomreaderfulleasy-mp-network-op-guide 3847
If any of the following problems occur refer to the pages given for eachproblem
Problems concerning network functions
Cannot connect to the projector s p39
When a connection is made using EasyMP Network Projection the projectedimage remains as it is and a connection cannot be made from anothercomputer s p39
The projector is not found when EasyMP Network Projection is
started s
p39Cannot connect in Advanced Connection Mode or Wired LANconnection s p40
The Slide Show cannot be displayed on the desired display when the multi-screendisplay function is being executed s p41
Applications are no longer displayed from the computer screen when the multi-screen display function is executed s p41
The mouse cursor is not displayed on the computer screen s
p41When connecting with EasyMP Network Projection the image is not displayed orthe image is slow to appear s p41
When a connection is made using EasyMP Network Projection a PowerPointSlide Show cannot be started s p42
When a connection has been made using EasyMP Network Projection the screenwill not be refreshed when using an Office application s p42
Error message when starting up EasyMP Network Projection s
p42Network settings are not restored after cutting the connection to the computerwith EasyMP Network Projection s p44
Troubleshooting 39
8182019 Easy Mp Network Op Guide
httpslidepdfcomreaderfulleasy-mp-network-op-guide 3947
Problems Concerning Network Functions
Cannot connect to the projector
Check the message on the screen and then apply the following countermeasures
E r r or M essa g es R em ed y
The application version used is not supported Install the latest version of the application on your computer
Install EasyMP Network Projection from the EPSON Projector Software for Meeting amp Monitoring CD-ROMsupplied with the projector
When a connection is made using EasyMP Network Projection the projected image remains as it is and a connection cannot be madefrom another computer
Ch eck R em ed y
Did the presenter leave the conference room without cutting off thenetwork connection
With EasyMP Network Projection the connection with the computer that was previously connected can be cut off when another computer tries to connect with the projector and it connects with the computer that is trying to
connectTherefore when a Projector Keyword is not set for the projector or if you know the Projector Keyword you can cutoff the current connection and if you perform a connection operation you can connect to the projector
When a Projector Keyword is set for the projector if you do not know the Projector Keyword restart the projector andreconnect
The projector is not found when EasyMP Network Projection is started
Check R em ed y
Is the Wireless LAN unit connected
For Wireless LAN
Check that the optional Wireless LAN unit is securely connected
Is the Network Configuration screen from the Configurationmenu displayed on the projector
When the Network Configuration screen is displayed on the projector network connection for EasyMP Network Projection is disabled Close network settings on the projector and return to the LAN standby screen
Are the computers LAN card and the built-in LAN function
available
Check that LAN is valid by checking Control Panel - System - Hardware in the device manager and so on
Troubleshooting 40
8182019 Easy Mp Network Op Guide
httpslidepdfcomreaderfulleasy-mp-network-op-guide 4047
Check R em ed y
Is the SSID the same as that of the access pointQuick Connection Mode
Set an SSID that is different from that of the access points
Users Guide Network Menu
Is the DHCP function for Wired LAN turned On
Quick Connection Mode
Turn Off the DHCP setting for Wired LAN from the Configuration Menus Users Guide Network Menu
Was the network adapter used selected correctly with EasyMPNetwork Projection
If the computer has multiple LAN environments it cannot connect unless the network adapter is selected correctlyWhen using a computer running Windows start EasyMP Network Projection and select the network adapter you areusing from Set options - Switch LANs p33
For Wireless LAN connection is the Wireless LAN setting enabledwhen the computer is in power save mode
Enable the Wireless LAN
Are there any obstacles between the access point and the computeror projector
For Wireless LAN
Sometimes the electromagnetic wave situation prevents the projector from being found in a search Check for any obstacles between the access point and the computer or projector and change their position to improve theelectromagnetic wave situation
Is the computers Wireless LAN electromagnetic wave set to low Set the electromagnetic wave strength to maximum
Does the Wireless LAN conform to 80211g 80211b or 80211a It is only compatible with standards 80211g 80211b and 80211a and not with other standards such as 80211
Is the firewall turned off or has the firewall been registered as anexception
When you do not wish to turn off the firewall or register the firewall as an exception make the necessary settings toopen the ports
The ports used by EasyMP Network Projection are 3620 3621 and 3629
Is the network cable connected correctly
For Wired LAN
Check that the network cable is connected correctly Reconnect it if it is not connected or not connected properly
Cannot connect in Advanced Connection Mode or Wired LAN connection
Check R em ed y
Is the SSID setting different Set the computer the access point and the projector to the same SSIDs Users Guide Network Menu
Is the same WEP key set When selecting WEP from Security set the access point the computer and the projector to the same WEP keys Users Guide Network Menu
Are the connection denial functions such as MAC Addressg
restrictions and port restrictions set correctly at the access point Set the projector to allow connections from the access point
Troubleshooting 41
8182019 Easy Mp Network Op Guide
httpslidepdfcomreaderfulleasy-mp-network-op-guide 4147
Check R em ed y
Are the IP address the Subnet Mask and the Gateway Address forthe access point and the projector set correctly When not using a DHCP adjust each settings
Users Guide Network Menu
Are the access point and the projectors subnet different Select Manual search from EasyMP Network Projection specify the IP address and connects p28
The Slide Show cannot be displayed on the desired display when the multi-screen display function is being executed
Check R em ed y
Are you using PowerPoint 2002 or an earlier version
For Windows
To set and use two or more virtual displaysg use PowerPoint 2003 or later or limit the number of virtual displays toone before displaying the Slide Show
Applications are no longer displayed from the computer screen when the multi-screen display function is executed
Check R em ed y
Is another application running on the virtual display g
For Windows
When EPSON Virtual Display is installed another application sometimes runs on the virtual display In this case setEPSON Virtual Display to Off in Screen properties
The mouse cursor is not displayed on the computer screen
Check R em ed y
Is EPSON Virtual Display installed
For Windows
The mouse cursor was moved onto the virtual display g When the virtual display checkbox is cleared on the Add-Remove EPSON Virtual Display screen the mouse pointer returns to the screen display area
When connecting with EasyMP Network Projection the image is not displayed or the image is slow to appear
Ch eck R em ed y
Did you try to play back movies with Media Player or try to operatethe screen saver preview
Depending on the computer the movie playback screen in Media Player may not be displayed and the screen saverpreview may not be displayed normally
Troubleshooting 42
8182019 Easy Mp Network Op Guide
httpslidepdfcomreaderfulleasy-mp-network-op-guide 4247
Ch eck R em ed y
Is WEP encryption effective or are multiple projectors connected The display speed decreases when WEP encryption is effective or multiple projectors are connectedHave you enabled DHCP When DHCP is set to On in Advanced Connection Mode if an available DHCP server is not found it may take some
time to enter LAN standby status
Is Wireless LAN 80211gb being used in Quick ConnectionMode
Depending on the electromagnetic wave environment there are times when the image and sound for movies may stop When using the movie sending function use Advanced Connection Mode or Wireless LAN 80211a in Quick Connection Mode
When a connection is made using EasyMP Network Projection a PowerPoint Slide Show cannot be started
Ch eck R em ed y
Was EasyMP Network Projection started while PowerPoint wasrunning
For Windows
When connecting with EasyMP Network Projection make sure you close PowerPoint first Slide Show might not runif connecting while PowerPoint is running
When a connection has been made using EasyMP Network Projection the screen will not be refreshed when using an Office application
Ch eck R em ed y
Is the mouse moved continuously When you stop moving the mouse cursor the screen is updated If the screen does not update quickly stop moving themouse cursor
Error message when starting up EasyMP Network Projection
E r r or M essa g es R em ed y
Connection to the projector failed Try to connect again If it still does not connect check the network settings on the computer and the network settingsfor the projector
For details on the network settings to be made on the projector sees Users Guide Network Menu
The keyword does not match Re-enter the keyword displayed onthe projector screen
Check the Projector Keyword displayed on the LAN standby screen and enter the Projector Keyword
8182019 Easy Mp Network Op Guide
httpslidepdfcomreaderfulleasy-mp-network-op-guide 4347
Troubleshooting 44
8182019 Easy Mp Network Op Guide
httpslidepdfcomreaderfulleasy-mp-network-op-guide 4447
Network settings are not restored after cutting the connection to the computer with EasyMP Network Projection
Check R em ed y
Are you manually connecting to a Wireless LAN when thecomputer starts up
Quick Connection Mode
Try connecting to the Wireless LAN manually
Glossary 45
8182019 Easy Mp Network Op Guide
httpslidepdfcomreaderfulleasy-mp-network-op-guide 4547
This section briefly explains the difficult terms that are not explained in the text of this guide For details refer to other commercially available publications
A d h o c
A method of Wireless LAN connection that communicates with wireless LAN clients without using an access point It is not possible to communicatewith two or more devices simultaneously
M A C A d d r e ss
An abbreviation of Media Access Control The MAC Address is an ID number unique to each network adapter A unique number is assigned to eachnetwork adapter and data is transmitted between network adapters based on this identification
S V G A
A type of video signal with a resolution of 800 (horizontal) ^600 (vertical) dots that is used byIBM PCAT-compatible computers
S X G A
A type of video signal with a resolution of 1280 (horizontal) ^ 1024 (vertical) dots that is used by IBM PCAT-compatible computers
U X G A
A type of video signal with a resolution of 1600 (horizontal) ^ 1200 (vertical) dots that is used by IBM PCAT-compatible computers
V G A
A type of video signal with a resolution of 640 (horizontal) ^ 480 (vertical) dots that is used by IBM PCAT-compatible computers
V i r tual D i s p lay
The screen for one computer is output to multiple displays A large virtual screen can be created by using multiple displays
X G A
A type of video signal with a resolution of 1024 (horizontal) ^ 768 (vertical) dots that is used by IBM PCAT-compatible computers
8182019 Easy Mp Network Op Guide
httpslidepdfcomreaderfulleasy-mp-network-op-guide 4647
8182019 Easy Mp Network Op Guide
httpslidepdfcomreaderfulleasy-mp-network-op-guide 4747

8182019 Easy Mp Network Op Guide
httpslidepdfcomreaderfulleasy-mp-network-op-guide 547
You can use EasyMP Network Projection to project your computer screen
from the projector via a network Sharing the projector over the network and using various screen transfer functions allow you to hold effectivemeetings and presentations
Sharing the Projector
If the projector is connected to a network you can share the projector fromcomputers on the network When projecting data from different computersduring a meeting or presentation you can progress smoothly withoutchanging the signal cable between each computerEven a distance between the projector and the computer does not cause any
problems
Various Screen Transfer Functions
You can use the following screen transfer functions
bull Presentation Mode s p19
This function can project a PowerPoint Slide Show running on acomputer You can give stylish presentations by projecting a black screenwhile making preparations and so on and when not performing a SlideShow
bull Distribution function
The screen being displayed by a remote computer can be simultaneously displayed by up to four projectors on the same network
bull Switching functionBy using the meeting switching function if EasyMP Network Projection isinstalled on all of the computers the presenters can take turns and projecttheir own images without changing cables
Functions of EasyMP Network Projection 5
8182019 Easy Mp Network Op Guide
httpslidepdfcomreaderfulleasy-mp-network-op-guide 647
You can find the software for using the projector efficiently on the supplied
EPSON Projector Software for Meeting amp Monitoring CD-ROM Installthe software on the computer you are using
Software Supplied
You can find the following software on the EPSON Projector Software forMeeting amp Monitoring CD-ROM
bull EasyMP Network Projection
Software for sending computer screen images to a projector via a network connection
bull EasyMP Monitor
Software that lists the current status of Epson projectors connected to thenetwork and monitors and controls those projectors You can collectively manage multiple projectors by using EasyMP Monitor For details on
using EasyMP Monitor see the EasyMP Monitor Operation Guides EasyMP Monitor Operation Guide
Software Requirements
EasyMP Network Projection runs on computers that meet the following
requirementsOS Windows series (32-bit versions only)
bull Windows 2000 (Service Pack 4)bull Windows XPbull Windows XP (Service Pack 1 or later)
bull Windows Vistabull Windows Vista (Service Pack 1 or later)bull Windows 7
Mac OS X series
bull Mac OS X 103xbull Mac OS X 104xbull Mac OS X 1051 or later
bull Mac OS X 106xRecommended Mac OS X 1039104111055
CPU Mobile Pentium III 12GHz or faster
Power PC G3 900MHz or faster
Recommended Pentium M 16GHz or faster
CoreDuo 15GHz or faster
Amount of Memory 256MB or more
Recommended 512MB or more
Hard Disk
Free Space
20MB or more
Display Resolution of no less than XGA (1024x768) andno higher than UXGA (1600x1200)
Display color of 16-bit color or greater (approx32000 display colors)
Operation is not guaranteed in Mac OS X 1050 because the Firewall settings arenot set correctly when the version is updated
Installing
Make sure you check the following points before starting installation
bull When using a computer running any of the following operating systemsyou must have administrator authority to install EasyMP Network Projection
bull Windows 2000 bull Windows XP
bull Windows Vista bull Windows 7
bull Make sure that you close all running applications before startinginstallation
Installing the Software 6
8182019 Easy Mp Network Op Guide
httpslidepdfcomreaderfulleasy-mp-network-op-guide 747
bull When the language selected for the installation varies from that of the
OS being used the screens may not be displayed correctly
qFor EMP NS Connection users
The EMP NS Connection name has changed
Before change EMP NS Connection
After change EasyMP Network Projection
When using the same function as EMP NS Connection on the
projector install EasyMP Network Projection after uninstalling EMPNS Connection You cannot connect to the projector correctly usingEMP NS Connection
Procedure
For Windows
A Turn on your computer
B Insert the EPSON Projector Software for Meeting ampMonitoring CD-ROM into the computer
The installer starts automatically
C Click Easy Install
To select the software you want to install select Custom Install Tochange the sofrware display language click Language
D Select the applications you want to install and then click Install
E When the License Agreement screen is displayed click Yes
F When the Add-Remove EPSON Virtual Display screen is
displayed click OKTo use Multi-screen display you need to set up EPSON VirtualDisplay If you do not want to set it now you can do so laters p20
G Click Exit to complete the installation
For Mac OS
A Turn on your computer
B Insert the EPSON Projector Software for Meeting amp
Monitoring CD-ROM into the computer
C Double-click the ENPvxxx_Installer icon in the EPSON
window
Installation starts
D Click Exit to complete the installation
q bull When installation does not start automatically (Windows only)
Select Start - Run and in the Run dialog box type the letter for
your CD-ROM drive followed by EPsetupexe and then click OK
bull Uninstalling
For Windows
Select Start - Settings - Control Panel - Add-Remove Programs orAdd or Remove Programs and then remove EasyMP Network Projection
For Mac OS
From Applications delete the EasyMP Network Projection folder
Installing the Software 7
8182019 Easy Mp Network Op Guide
httpslidepdfcomreaderfulleasy-mp-network-op-guide 847
EasyMP Network Projection SummaryThis chapter explains how to connect the computer and the projector via a network and the procedure for projecting images from your computers screen withthe projector
8182019 Easy Mp Network Op Guide
httpslidepdfcomreaderfulleasy-mp-network-op-guide 947
There are two methods of connecting a computer and the projector via a
network by using EasyMP Network Projection
Advanced Connection Mode
Advanced Connection Mode is an infrastructure connection and connectsto an existing network system via a network cableWhen connecting to a network via Wired LAN connect the projector to
the network hub with a commercially available LAN cableIf you install the optional Wireless LAN unit in the projector you canconnect to the network via a wireless LAN access point
Quick Connection Mode (Only when the optional
Wireless LAN unit is installed)
Quick Connection Mode is only available when you install the optionalWireless LAN unit in the projector
Quick Connection Mode temporarily assigns the projectors SSID to acomputer creating an ad hocg connection and restores the computersnetwork settings after disconnectings p11
bull You can easily connect to a computer and project images from thecomputer without making network settings
bull This lets you connect easily without a connector cable and you caneven connect if the projector and the computer are at remote locations
Steps for Connecting
Use the following steps to connect the computer to the projector andproject in EasyMP Network Projection
You need to perform steps 1 to 4 only the first time you connect
1 Install EasyMP Network Projection on the computer to be connecteds p6
2 Make network settings on the computer and put it into network connection status s p11
3 For Quick Connection Mode Install the optional Wireless LAN unit inthe projector (if already installed go to step 5)For Advanced Connection Mode Enable the Wired LAN or WirelessLAN adapter in Port Configurations s Computers documentation
Two Connection Modes 9
8182019 Easy Mp Network Op Guide
httpslidepdfcomreaderfulleasy-mp-network-op-guide 1047
4 Make network settings on the projector and put it into network
connection status s Users Guide Network Menu
5 Start EasyMP Network Projection on the computer and connect with theprojector s p12
When the computer you are using is normally connected to the network youdo not need to make network settings on the computer
Two Connection Modes 10
8182019 Easy Mp Network Op Guide
httpslidepdfcomreaderfulleasy-mp-network-op-guide 1147
Use the following procedure to set up the computer for connection
For Windows
Make network settings for the computer by using the utility softwaresupplied with the LAN adapter For more information on the utility software see the Users Guide supplied with your LAN adapterFor example as shown in the following illustration when a red cross (^) isdisplayed over the network icon on the taskbar you cannot connect to theprojector
For Mac OS
Set the network port and communication status For more details on settingthe communication status see the Userrsquos Guides for your computer or theAirPort card
Preparing to Connect 11
8182019 Easy Mp Network Op Guide
httpslidepdfcomreaderfulleasy-mp-network-op-guide 1247
Operating the ProjectorBefore connecting put the projector into connection standby statusMake sure the projector network settings are complete and the projector isconnected to network equipment such as a network hub via a commercially available network cable
Procedure
A Press the [t] button on the remote control to turn the poweron
B Press the [LAN] button on the Remote Control
The LAN standby screen is displayed
If there is no signal for the current input source it automatically
switches to the LAN source If it does not automatically switch to theLAN source press the [LAN] button
Operating the ComputerIn the following explanations unless otherwise noted Windows screenshots are used The similar screens are also displayed for Mac OS
Procedure
A Start EasyMP Network Projection
For Windows
Select Start - Programs (or All Programs) - EPSON Projector -EasyMP Network Projection - EasyMP Network ProjectionV2XX
For Mac OS
Double-click the Applications folder of the hard drive volume inwhich EasyMP Network Projection is installed and then double-click the EasyMP Network Projection icon
B Select Quick Connection Mode (only available when the
optional Wireless LAN unit is installed) or AdvancedConnection Mode and then click OK
The projector search results are displayed To always connect using
Advanced Connection Mode select Set the selected ConnectionMode as the default mode for future connections
C Select the projector you want to connect to and then click
Connect
If the projector you want to connect to is not displayed in the searchresults click the Automatic search button The search takes about 30
secondsFor details on the connection screen see Using the ConnectionScreen s p13
Connecting to a Projector on a Network and Projecting 12
8182019 Easy Mp Network Op Guide
httpslidepdfcomreaderfulleasy-mp-network-op-guide 1347
D When Projector Keyword is set to On from the projector the
Keyword entry screen is displayed Enter the keyworddisplayed on the LAN standby screen and then click OK
When the connection is complete the computer screen is projectedThe following EasyMP Network Projection toolbar is displayed on thecomputer screen You can use this toolbar to operate the projectorand make settings and to disconnect the network connection Fordetails on the toolbar see Using the Toolbar s p15
qWhen connecting from another computer such as when changingpresenters start EasyMP Network Projection from the computer youwant to connect The computer that is currently connected isdisconnected and the projector is then connected with the computerthat is trying to connect now
If a connection is made while Disable interrupt connection is set theconnection is not switched to another computer
Using the Connection Screen
Start EasyMP Network Projection to display the following screen Theoperation of each button or item is described in the following table
When the system starts in Advanced Connection Mode
Connecting to a Projector on a Network and Projecting 13
8182019 Easy Mp Network Op Guide
httpslidepdfcomreaderfulleasy-mp-network-op-guide 1447
When the system starts in Quick Connection Mode
A Automatic search
In Advanced Connection Mode you can search for available projectorson the network system to which the computer is connected
In Quick Connection Mode you can search for the projector based onthe SSID
B Manual search
In Advanced Connection Mode you can search for a projector based ona specified IP address or projector name
In Quick Connection Mode you can search for the projector based onthe SSID selected from a list
C Status
The following six icons indicate the status of the detected projectors
Standby Select for connecting
Busy Select for connecting When you click Connect the computer currently
connected is disconnected and yourcomputer is connected
Busy (Disable
interrupt con‐nection)
Cannot be selected Disable interrupt
connection is set on another computerwhich is already connected
Currently inuse by anotherapplication
The projectors Configuration Menu isopen You can select it after closing theConfiguration menu and running thesearch again
Searching Displayed while running Manual search orProfile
Not found Displayed when a projector cannot be foundas a result of Manual search or Profile InQuick Connection Mode you can only select multiple projectors with the sameSSID
D Projector name
The projectors name is displayed
E Disable interrupt connection
Check the box to prevent an interrupt connection by other computers whileconnected to the selected projector
F Use multi-display
Check the box to use the Multi-screen display function When this is selectedDisplay layout and Display properties are displayed at the bottom of the screens p20
G Troubleshooting
If there is a problem and you cannot have a connection press this button to openthe EasyMP Network Projection Troubleshooting screen
H Connect
Connect to the projector you selected from the search results list When aconnection is made with a projector a toolbar is displayed
I Set options
You can set general setting options such as the processing method when startingEasyMP Network Projection For details see Set optionss p33
J Save in the profileSaves the results of a network projector search as a Profiles p29
Connecting to a Projector on a Network and Projecting 14
8182019 Easy Mp Network Op Guide
httpslidepdfcomreaderfulleasy-mp-network-op-guide 1547
K Clear list
Deletes all search resultsL IP address (Advanced Connection Mode only)
The projectors IP address is displayed
M Display
(Select the number displayed (when Use multi-display is selected)s p25
N Profile
You can search for a projector on the network using a Profile savedusing Save in the profiles p29
O SSID (Quick Connection Mode only)
The projectors SSID is displayed
P Signal intensity
This is displayed when the connection is made in Quick Connection Mode As theSignal intensity increases so does the number of lit indicators
Q Update list (Quick Connection Mode only)
Updates Status and Signal intensity
Using the Toolbar
The toolbar is displayed on the computer screen after EasyMP Network Projection starts and a connection is made with the projector You can usethis toolbar to operate and make settings for the projector
Select target projector
Click to limit the projectors operated from the toolbar when projectingfrom multiple projectors using the distribution function or Multi-screen display The indication below the icon shows the projectors thatcan be controlledALL indicates that all of the connected projectors can be controlledFor example when 1 3 is displayed projectors No 1 and No 3 can becontrolled
Click to display the following screen
A Select the projector to be controlled
B Indicates the No of an allocated projector This No indicates theNo of the projector that you can control from the toolbar
C Indicates the status of the projector
Stop
Connecting to a Projector on a Network and Projecting 15
8182019 Easy Mp Network Op Guide
httpslidepdfcomreaderfulleasy-mp-network-op-guide 1647
Stops projection while connected to the projector A black screen is
projected while stopped Audio does not stop To stop the audio or todisplay a Users Logo while projection is stopped use the AV Mutefunction
Show
Releases Stop or Pause
Pause
Pauses projected images while connecting to the projector The audio isnot paused
Presentation Mode
Each time this is clicked Presentation Mode switches between enableddisableds p19
Projector control
While the projector is connected to the network the projectors AVMute Switch PC source and Switch video source functions can becontrolled from both the Remote Control and the projectors Control
panel
Click to display the following toolbar
AV Mute
The same function as the [AV Mute] button on theRemote Control
s Users Guide Remote Control
Switch PC source
The Source alternates between Computer1Computer2 USB Display USB and LAN each timeyou click
Switch video source
The Source alternates between S-Video and Videoeach time you click S-Video does not switch if thecable is not connected
Screen Preview
Displays the multi-screen preview screen
Click to display a preview with the settings you have made Click
each display to enlarge each Screen Preview to full-screen
Set options
Transmission performance during the transfer of computer images canbe adjusteds p33
Movie Sending Mode
Not enabled on this projector The message The connected projectorsdo not support Movie Sending is displayed
DisconnectDisconnects the connection to the projector
Signal intensity
This is displayed when a connection is made in Quick ConnectionMode As the Signal intensity increases so does the number of litindicators
Switch toolbar display
Connecting to a Projector on a Network and Projecting 16
8182019 Easy Mp Network Op Guide
httpslidepdfcomreaderfulleasy-mp-network-op-guide 1747
The toolbar display is switched as follows The toolbar display remains
as is until switched againFull
Normal
Simple
Connecting to a Projector on a Network and Projecting 17
8182019 Easy Mp Network Op Guide
httpslidepdfcomreaderfulleasy-mp-network-op-guide 1847
Functions and Settings for EasyMP Network ProjectionThis chapter explains the functions that may be useful in a meeting or presentation such as the Multi-Screen Display which allows you to send images tomultiple projectors from a single computer
8182019 Easy Mp Network Op Guide
httpslidepdfcomreaderfulleasy-mp-network-op-guide 1947
In Presentation Mode the images are only displayed when performing a
PowerPoint Slide Show on a computer When you stop Slide Show theprojector displays a black screen This is useful when you only want todisplay the Slide ShowIn addition to PowerPoint Keynote is compatible with Presentation Modefor Mac OS
Procedure
A If necessary select another projector to be controlleds p15
B Click the button on the toolbar
Presentation Mode begins
C Click the button again to exit Presentation Mode
Projecting Only a PowerPoint Slide Show (Presentation Mode) 19
8182019 Easy Mp Network Op Guide
httpslidepdfcomreaderfulleasy-mp-network-op-guide 2047
Example of Adjusting the Virtual Display
By arranging the virtual display g allocation you can project only the imagethat you want to show or project different images from left to right in apresentation
Arrangement example 1
AA c tual mon i tor i mag e
PowerPoint file
B I mag e of v i r tua l d i s p lay
Excel file
Arrangement example 2
AA c tual mon i tor i mag e
PowerPoint file presenter tools
BI mag e of v i r tua l d i s p lay
Slide Show using a PowerPoint file
Procedure Before Using the Multi-screen Display
Function
1 Setting the Virtual Display s p21
In a Windows environment enable the virtual display g driver as necessary Alsofor both Windows and Mac OS set up the virtual display arrangement
2 Allocating the image to be projected s p25
Using Multi-Screen Display 20
8182019 Easy Mp Network Op Guide
httpslidepdfcomreaderfulleasy-mp-network-op-guide 2147
Open the file to be projected and then move the screen to the virtual display
according to the actual projection arrangement3 Projecting the allocated images s p25
Allocate a virtual display number to a projector that is connected through thenetwork and then start projection
Setting the Virtual Display
This chapter explains the virtual display for arrangement example 1s p20
Enable the virtual display driver (Windows only)
Enable the virtual display g driver Those users listed below do not have toperform this operation Go to procedure s Adjusting the Virtual Display
p21bull Those users who have enabled virtual displays installing EasyMP
Network Projection
bull For Mac OS users
Procedure
A Start Windows on the computer and then select Start -Programs (or All Programs) - EPSON Projector - EasyMP
Network Projection - Add-Remove EPSON Virtual Display
The Add-Remove EPSON Virtual Display screen is displayed
B Select the virtual display you want to use
Up to four monitors can be added In this example a single virtual
display is to be used When setting multiple virtual displays select asmany displays as is necessaryAny one of the displays can be selected
C Click OK
When you click OK the drivers for the virtual display are enabled Atthis point it is normal for the display to flicker Wait for the Add-Remove EPSON Virtual Display screen to close
Adjusting the Virtual Display
After starting EasyMP Network Projection the procedure for setting up the virtual displays differs for Windows and Mac OS The procedures areexplained separately below
qCheck the following points before starting EasyMP Network Projectionwhen connecting via Wireless LAN If the following points are not setcorrectly Multi-screen display cannot be used
bull The SSID for the computer and each projector must be the same
bull The wireless LAN system for the computer and each projector mustbe the sameYou can modify the SSID and Wireless LAN system for theprojector from the Network menu in the projectors Configurationmenus Users Guide Wireless LAN Menu
Using Multi-Screen Display 21
8182019 Easy Mp Network Op Guide
httpslidepdfcomreaderfulleasy-mp-network-op-guide 2247
Procedure
For Windows
A Select Start - Programs (or All Programs) - EPSON
Projector - EasyMP Network Projection - EasyMP Network Projection V2XX to start EasyMP Network Projection
B Select the Use multi-display checkbox
Display layout and Display properties are added at the bottom of thescreen
C Click Display properties
The Display properties screen is displayed
D Click the Settings tab
Using Multi-Screen Display 22
8182019 Easy Mp Network Op Guide
httpslidepdfcomreaderfulleasy-mp-network-op-guide 2347
E Drag the displayed monitor icon and place it where desired
Here the actual monitor (1) is placed on the left while the virtualmonitor (3) is placed on the rightWhen the computer has multiple display output terminals thenumbers assigned to the virtual terminals will be sequential to thoseof the physical terminals
q bull When an external monitor is connected as a secondary monitor the
image for that screen cannot be projected
bull Depending on the hardware the number of the secondary monitormay be other than 2 When the monitor icon is displayed on thescreen click the icon and confirm that the monitor type shownunder Display is other than secondary
bull For the Screen Resolution settings see the followings p36
When the monitor icon is arranged a virtual display is connected asthe image like below
Using Multi-Screen Display 23
i l i i l
8182019 Easy Mp Network Op Guide
httpslidepdfcomreaderfulleasy-mp-network-op-guide 2447
F Click the OK button to close the Display properties screen
Up to this point the virtual display layout has been fixedAllocate the projecting images next s p25
For Mac OS
A Start EasyMP Network Projection Double-click the Applications
folder of the hard drive volume in which EasyMP Network Projection is installed and then double-click the EasyMP
Network Projection iconIn this example we select and start in Advanced ConnectionMode
B Select the Use multi-display checkbox
Display layout and Display preferences are added at the bottom of thescreen
C Click Display preferences
The display setting screen is displayed
D Click Arrangement
E Clear Mirror Displays
Using Multi-Screen Display 24
U i M lti S Di l
8182019 Easy Mp Network Op Guide
httpslidepdfcomreaderfulleasy-mp-network-op-guide 2547
F Drag the displayed monitor icon and place it where desired
G Close the display setting screen
Up to this point the screen layout has been fixed
Allocating the Image to be Projected
This section explains the virtual display for arrangement example 1s p20
Procedure
A Open the file to be projected
Start the PowerPoint and Excel files
B Drag the window to the desired virtual displayg monitor andallocate it where the image is to be projected
Drag the Excel window to the right until it cannot be seen As aresult the PowerPoint window appears on the actual monitor whilethe Excel window appears on the virtual display on the right
Projecting the Allocated Images
This section explains the virtual display for arrangement example 1s p20
Procedure
A Select the number of the virtual displayg
you want to fromDisplay and set which image to be projected from which
projector
Using Multi-Screen Display 25
Using M lti Screen Displa
8182019 Easy Mp Network Op Guide
httpslidepdfcomreaderfulleasy-mp-network-op-guide 2647
B Click Connect
The image allocated to each projector is projected
In a Windows environment you cannot view the image being sent toa virtual display on the computer To adjust the image on the virtualdisplay you must do so while viewing the projected imageTo perform mouse-based operations on the virtual display move themouse pointer in the direction of the virtual display such that thepointer appears on the virtual display
C To terminate multi-screen display click Disconnect on thetoolbar
Using Multi-Screen Display 26
Using Multi Screen Display 27
8182019 Easy Mp Network Op Guide
httpslidepdfcomreaderfulleasy-mp-network-op-guide 2747
q
In a Windows environment if the virtual display driver has been
enabled such that the mouse pointer can be moved outside the limitsof the screen there may be occasions when you lose track of thelocation of the pointer If you are not using a virtual display clear the virtual display checkbox on the Add-Remove EPSON Virtual Display screen so that the mouse pointer moves back inside the screensdisplay area To subsequently use multi-display again place a check mark against the required display under Add-Remove EPSON VirtualDisplayTo clear a check mark see the followings p21
Using Multi-Screen Display 27
Connecting to a Projector on a Different Subnet 28
8182019 Easy Mp Network Op Guide
httpslidepdfcomreaderfulleasy-mp-network-op-guide 2847
This chapter explains how to connect a computer to a projector on adifferent sub-net via a Wired LAN or a wireless LAN access point on anexisting network system
By default this application only searches for projectors on the same subnetas the computer Therefore even if you perform a search for projectors onthe network projectors on a different subnet will not be foundYou can however identify and connect to a projector on a different subnetas follows
bull Specify either an IP address or Projector name and perform a search
The IP Address can be input directly Also provided the Projector nameto be connected has been registered on the DNS server you can performa search simply by inputting that Projector names p28
bull Performing a search based on a Profile
Once you have performed a search for a projector on a different subnetby specifying either an IP Address or a Projector name you can save thesearch as a Profile with an easy-to-remember name and then use that
Profile whenever you subsequently want to search for a projector on adifferent subnets p29
q bull If a search fails to find a projector the most likely causes are as
follows Proceed as appropriate depending on the cause of thefailure
For both Windows and Mac OS
If there is no wireless LAN signal or if the signal is weak check
whether there is anything that could be interfering with the signalWhen the optional Wireless LAN unit is installed in the projectorand connecting Mac OS to a wireless LAN
Check whether AirPort is set to On Or check whether anappropriate access point has been selected
bull When you use Manual search in Quick Connection Mode you canspecify the SSID When there are a lot of projectors you can narrow the search field by using SSID
Specifying Either an IP Address or Projector Name
and Performing a Search (Advanced ConnectionMode Only)
In the following explanations unless otherwise noted Windows screenshots are usedThe similar screens are also displayed for Mac OS
Procedure
A Click Manual search on the EasyMP Network Projectionprojector selection screen
B Enter the IP address or the projector name for the projectoryou want to connect to and click OK
Connecting to a Projector on a Different Subnet 28
Connecting to a Projector on a Different Subnet 29
8182019 Easy Mp Network Op Guide
httpslidepdfcomreaderfulleasy-mp-network-op-guide 2947
The search results are displayed on the EasyMP Network Projectionprojector selection screen
Provided the target projector has been identified select that projectorand then click Connect to establish a connectionWhen you will always be using that projector save the search as aProfile so that you do not have to specify the relevant details every time you perform a search s p29
Performing a Search with a ProfileYou can save a search for a frequently used projector as a Profile AProfile is a file containing all of the information pertaining to a givenprojector such as the projector name its IP address and SSID If youspecify that information from the next time you perform a search there willbe no need to specify the IP address or projector name each time youperform a search For example by creating a group of Profiles for eachplace where a projector is setup and managing them with folders the target
projector can be found quickly
A Building A E Floor 1
B Building B F Floor 2
C Building C G Floor 3
D Building D
This section explains how to create and edit a Profile
Making a Profile
Profiles are made by saving search results
For details on how to edit a previously saved Profile see the followingsection s p31
Procedure
A While the projector is displayed on the EasyMP Network Projection projector selection screen click Save in the
profile
Connecting to a Projector on a Different Subnet 29
Connecting to a Projector on a Different Subnet 30
8182019 Easy Mp Network Op Guide
httpslidepdfcomreaderfulleasy-mp-network-op-guide 3047
The Save in the profile screen is displayed
B Enter a Profile name and then click Add
Projector information is registered in the ProfileIf you have previously saved a Profile you are prompted to confirmwhether or not to overwrite To save a Profile with a different nameselect Save as If you have created a folder for a Profile the followingscreens are displayed After entering the Profile name and selectingthe Save in destination click Add
For Windows
For Mac OS
qFor details on how to create a folder for a Profile see the followingsection s p31
Searching by specifying a Profile
You can search by specifying the Profile you created
Connecting to a Projector on a Different Subnet 30
Connecting to a Projector on a Different Subnet 31
8182019 Easy Mp Network Op Guide
httpslidepdfcomreaderfulleasy-mp-network-op-guide 3147
Procedure
A Click Profile on the EasyMP Network Projection projector
selection screen
If no Profile is registered you cannot select Profile
B From the menu that is displayed select the projector you wantto connect to
The search results are displayed on the EasyMP Network Projectionprojector selection screenProvided the target projector has been identified select that projectorand then click Connect to establish a connection
Managing a Profile
You can change the name and the hierarchical structure of the Profile
Procedure
A Click Set options on the EasyMP Network Projection main
screen
The Set options screen is displayed
B Click Edit profile
The Edit profile screen is displayed
C Edit the contents registered in the Profile
Co ect g to a ojecto o a D e e t Sub et 31
Connecting to a Projector on a Different Subnet 32
8182019 Easy Mp Network Op Guide
httpslidepdfcomreaderfulleasy-mp-network-op-guide 3247
A Indicates a folder
B Indicates a Profile
Prof i le
Item F u nctio n
Profi le
You can display the registered Profile You can manageit by creating a folder You can change the order of theProfile or the folder by dragging amp dropping
Copy
You can copy the Profile The copied Profile is saved in
the same folder as the original with the same nameDelete
You can delete the Profile and the folder
Prof i le
Item F u n ctio n
R e n a m e
Displays the Rename dialog box allowing you to renamethe folder or the Profile You can enter up to 32characters in the Rename dialog box
Create folder
You can create a new folder
E x p or t
Exports a created Profile allowing you to import and usethat Profile
I mp or t
Used when you want to read and use an exportedProfile
Informa tion on selected prof i le
Item F u n ctio n
P r oj e c tor n am e
I P addr e s s
You can display the projector information registered inthe Profile
Delete
You can delete the information for the selectedprojector When all projector information is deleted theprofile is also deleted
D Click OK
Saves your edits and closes the Edit profile screen
g j
Using Set options 33
8182019 Easy Mp Network Op Guide
httpslidepdfcomreaderfulleasy-mp-network-op-guide 3347
You can make setting options such as the processing method when EasyMPNetwork Projection startsAccess Set options from the EasyMP Network Projection main screen
Procedure
A Click Set options on the EasyMP Network Projection main
screen
The Set options screen is displayed
B Set each of the items
Confirm the details of the set items in the next step When you havemade all the necessary settings click OK to close the Set optionsscreen
Setting Each ItemSet each item from the General settings tab and the Adjust performancetab
General settings tab
Use fu l l -screen
vi de o t r an s fe r
This setting is disabled because the projector does notsupport the movie sending function
E n c r y p t
c ommun i c at i on s
Select to Encrypt and transmit data Even if data isintercepted it cannot be decrypted
When using Quick Connection Mode make sure youalways select this checkbox
Display Connection
Mod e Selection
w i n dow on s tar tup
Set whether or not the Quick Connection ModeAdvancedConnection Mode screen is displayed when EasyMPNetwork Projection starts
Clear this checkbox once you have settled on a regularstartup method
S e ar c h me th od on
s tar tup
Select from the following projector search methodsexecuted when EasyMP Network Projection is started
Automatic search on startup
Specify search method after startupSearch with the last network configuration
g p
Using Set options 34
8182019 Easy Mp Network Op Guide
httpslidepdfcomreaderfulleasy-mp-network-op-guide 3447
Edit profi le
The Edit profile dialog box is displayeds p31
S w i tc h L A N
Windows only The Switch Network Adapter dialog box is displayed Thisis used when it is necessary to switch the network adapter tobe used for a search when a computer has multipleadapters
By default all of the network adapters are used to perform asearch When a Wired LAN is always used as theconnection method select a Wired LAN adapter
R e s tor e D e faul ts
You can reset all adjustment values on the General settingstab to their default settings except for Edit profile andSwitch LAN
Adjust performance tab
P e r for man c e
adj us tme n t s l i de r
The performance can be set to Fast Normal andFine
Set to Fast when movie projections are interrupted
T r a n s f er l a y er e d
w i n dow
Windows only (excluding Windows Vista andWindows 7)
Set whether or not to transfer a layered windowThe layered window is in use when contents such asmessages displayed on the computer are not projectedby the projector Select this checkbox to projectcontents such as messages that use the layeredwindow
Clear this checkbox if you do not want the mousepointer to flicker on the screen
R e s tor e D e faul ts
You can reset all adjustment values for the Adjustperformance tab to their default settings
q When you click on the toolbar only the Adjust performance tab
is displayed
Audio Output tab
Because this projector does not support the audio sending function settingson the Audio Output tab are disabled
8182019 Easy Mp Network Op Guide
httpslidepdfcomreaderfulleasy-mp-network-op-guide 3547
Appendix
Connection Limitations 36
8182019 Easy Mp Network Op Guide
httpslidepdfcomreaderfulleasy-mp-network-op-guide 3647
When projecting computer images while running EasyMP Network Projection the following restrictions apply Confirm these points
Supported Resolutions
The following computer screen resolutions can be projected You cannotconnect to a computer with a resolution greater than UXGAg
bull VGA g(640x480)
bull SVGA g(800x600)
bull XGA g(1024x768)
bull SXGA g(1280x960)
bull SXGA (1280x1024)
bull SXGA+ (1400x1050)
bull WXGA (1280x768)
bull WXGA (1280x800)
bull
WXGA+ (1440x900)bull UXGA (1600x1200)
Supported resolutions when multi-screen display function is on
If a computer with a special screen size is used where the ratio of heightand width is not represented a screen resolution closest to the width isselected from the list of 10 aboveIn this case in wide screen the horizontal margins are projected in narrow screen the empty vertical margins are black
Display Color
The number of colors for computer screens that can be projected
W ind o w s M a c O S
16-bit color About 32000 colors (16-bit)
32-bit color About 167 million colors (32-bit)
The operational guarantee for multi-screen display is 16-bit and 32-bitcolor
Number of Connections
You can connect up to four projectors to one computer and projectsimultaneouslyYou cannot connect multiple computers to one projector simultaneously
Others
bull If the transmission speed of the Wireless LAN is low the network might be cut off unexpectedly
bull Audio is not transmitted
bull When videos are played back they do not play back as smoothly as
when displayed on the computerbull Applications that use part of DirectX functions may not be displayed
correctly(Windows only)
bull Cannot project full screen MS-DOS prompts(Windows only)
bull There are times when the image on the computer screen and the imageprojected by the projector may not match exactly
When Using Windows Vista or Windows 7
Note the following points when using EasyMP Network Projection on acomputer running Windows Vista or Windows 7
Limitations when projecting from Windows Photo Gallery
Note the following two limitations when launching Windows Photo Gallery when EasyMP Network Projection is running
Connection Limitations 37
8182019 Easy Mp Network Op Guide
httpslidepdfcomreaderfulleasy-mp-network-op-guide 3747
bull Slide Show is played back in simple mode when projecting fromWindows Photo Gallery
Because the toolbar is not displayed you cannot make changes whileplaying a Theme (effects) regardless of the Windows Experience IndexratingOnce simple mode has started you cannot change modes while WindowsPhoto Gallery is running even if you close EasyMP Network ProjectionRestart Windows Photo Gallery
bull You cannot play movies
Limitations in Windows Aero
Note the following two limitations when the window design for yourcomputer is Windows Aero
bull The layered window is projected regardless of Transfer layered window from Set options in EasyMP Network Projection
For example when Transfer layered window for EasyMP Network Projection toolbar is disabled it is not projected even if it is displayed onthe computer screen however the toolbar is projected
bull A few minutes after you connect a computer to the projector over anetwork with EasyMP Network Projection the following message is
displayedIt is recommended that you select Keep the current color scheme anddont show this message again This selection is enabled until thecomputer is restarted
Limitations when projecting from Windows Media Center
You cannot project images in full screen display using Windows MediaCenter Switch to the window display mode to project the images
Similarly images cannot be projected with Quick Wireless Connection orUSB Display
Troubleshooting 38
8182019 Easy Mp Network Op Guide
httpslidepdfcomreaderfulleasy-mp-network-op-guide 3847
If any of the following problems occur refer to the pages given for eachproblem
Problems concerning network functions
Cannot connect to the projector s p39
When a connection is made using EasyMP Network Projection the projectedimage remains as it is and a connection cannot be made from anothercomputer s p39
The projector is not found when EasyMP Network Projection is
started s
p39Cannot connect in Advanced Connection Mode or Wired LANconnection s p40
The Slide Show cannot be displayed on the desired display when the multi-screendisplay function is being executed s p41
Applications are no longer displayed from the computer screen when the multi-screen display function is executed s p41
The mouse cursor is not displayed on the computer screen s
p41When connecting with EasyMP Network Projection the image is not displayed orthe image is slow to appear s p41
When a connection is made using EasyMP Network Projection a PowerPointSlide Show cannot be started s p42
When a connection has been made using EasyMP Network Projection the screenwill not be refreshed when using an Office application s p42
Error message when starting up EasyMP Network Projection s
p42Network settings are not restored after cutting the connection to the computerwith EasyMP Network Projection s p44
Troubleshooting 39
8182019 Easy Mp Network Op Guide
httpslidepdfcomreaderfulleasy-mp-network-op-guide 3947
Problems Concerning Network Functions
Cannot connect to the projector
Check the message on the screen and then apply the following countermeasures
E r r or M essa g es R em ed y
The application version used is not supported Install the latest version of the application on your computer
Install EasyMP Network Projection from the EPSON Projector Software for Meeting amp Monitoring CD-ROMsupplied with the projector
When a connection is made using EasyMP Network Projection the projected image remains as it is and a connection cannot be madefrom another computer
Ch eck R em ed y
Did the presenter leave the conference room without cutting off thenetwork connection
With EasyMP Network Projection the connection with the computer that was previously connected can be cut off when another computer tries to connect with the projector and it connects with the computer that is trying to
connectTherefore when a Projector Keyword is not set for the projector or if you know the Projector Keyword you can cutoff the current connection and if you perform a connection operation you can connect to the projector
When a Projector Keyword is set for the projector if you do not know the Projector Keyword restart the projector andreconnect
The projector is not found when EasyMP Network Projection is started
Check R em ed y
Is the Wireless LAN unit connected
For Wireless LAN
Check that the optional Wireless LAN unit is securely connected
Is the Network Configuration screen from the Configurationmenu displayed on the projector
When the Network Configuration screen is displayed on the projector network connection for EasyMP Network Projection is disabled Close network settings on the projector and return to the LAN standby screen
Are the computers LAN card and the built-in LAN function
available
Check that LAN is valid by checking Control Panel - System - Hardware in the device manager and so on
Troubleshooting 40
8182019 Easy Mp Network Op Guide
httpslidepdfcomreaderfulleasy-mp-network-op-guide 4047
Check R em ed y
Is the SSID the same as that of the access pointQuick Connection Mode
Set an SSID that is different from that of the access points
Users Guide Network Menu
Is the DHCP function for Wired LAN turned On
Quick Connection Mode
Turn Off the DHCP setting for Wired LAN from the Configuration Menus Users Guide Network Menu
Was the network adapter used selected correctly with EasyMPNetwork Projection
If the computer has multiple LAN environments it cannot connect unless the network adapter is selected correctlyWhen using a computer running Windows start EasyMP Network Projection and select the network adapter you areusing from Set options - Switch LANs p33
For Wireless LAN connection is the Wireless LAN setting enabledwhen the computer is in power save mode
Enable the Wireless LAN
Are there any obstacles between the access point and the computeror projector
For Wireless LAN
Sometimes the electromagnetic wave situation prevents the projector from being found in a search Check for any obstacles between the access point and the computer or projector and change their position to improve theelectromagnetic wave situation
Is the computers Wireless LAN electromagnetic wave set to low Set the electromagnetic wave strength to maximum
Does the Wireless LAN conform to 80211g 80211b or 80211a It is only compatible with standards 80211g 80211b and 80211a and not with other standards such as 80211
Is the firewall turned off or has the firewall been registered as anexception
When you do not wish to turn off the firewall or register the firewall as an exception make the necessary settings toopen the ports
The ports used by EasyMP Network Projection are 3620 3621 and 3629
Is the network cable connected correctly
For Wired LAN
Check that the network cable is connected correctly Reconnect it if it is not connected or not connected properly
Cannot connect in Advanced Connection Mode or Wired LAN connection
Check R em ed y
Is the SSID setting different Set the computer the access point and the projector to the same SSIDs Users Guide Network Menu
Is the same WEP key set When selecting WEP from Security set the access point the computer and the projector to the same WEP keys Users Guide Network Menu
Are the connection denial functions such as MAC Addressg
restrictions and port restrictions set correctly at the access point Set the projector to allow connections from the access point
Troubleshooting 41
8182019 Easy Mp Network Op Guide
httpslidepdfcomreaderfulleasy-mp-network-op-guide 4147
Check R em ed y
Are the IP address the Subnet Mask and the Gateway Address forthe access point and the projector set correctly When not using a DHCP adjust each settings
Users Guide Network Menu
Are the access point and the projectors subnet different Select Manual search from EasyMP Network Projection specify the IP address and connects p28
The Slide Show cannot be displayed on the desired display when the multi-screen display function is being executed
Check R em ed y
Are you using PowerPoint 2002 or an earlier version
For Windows
To set and use two or more virtual displaysg use PowerPoint 2003 or later or limit the number of virtual displays toone before displaying the Slide Show
Applications are no longer displayed from the computer screen when the multi-screen display function is executed
Check R em ed y
Is another application running on the virtual display g
For Windows
When EPSON Virtual Display is installed another application sometimes runs on the virtual display In this case setEPSON Virtual Display to Off in Screen properties
The mouse cursor is not displayed on the computer screen
Check R em ed y
Is EPSON Virtual Display installed
For Windows
The mouse cursor was moved onto the virtual display g When the virtual display checkbox is cleared on the Add-Remove EPSON Virtual Display screen the mouse pointer returns to the screen display area
When connecting with EasyMP Network Projection the image is not displayed or the image is slow to appear
Ch eck R em ed y
Did you try to play back movies with Media Player or try to operatethe screen saver preview
Depending on the computer the movie playback screen in Media Player may not be displayed and the screen saverpreview may not be displayed normally
Troubleshooting 42
8182019 Easy Mp Network Op Guide
httpslidepdfcomreaderfulleasy-mp-network-op-guide 4247
Ch eck R em ed y
Is WEP encryption effective or are multiple projectors connected The display speed decreases when WEP encryption is effective or multiple projectors are connectedHave you enabled DHCP When DHCP is set to On in Advanced Connection Mode if an available DHCP server is not found it may take some
time to enter LAN standby status
Is Wireless LAN 80211gb being used in Quick ConnectionMode
Depending on the electromagnetic wave environment there are times when the image and sound for movies may stop When using the movie sending function use Advanced Connection Mode or Wireless LAN 80211a in Quick Connection Mode
When a connection is made using EasyMP Network Projection a PowerPoint Slide Show cannot be started
Ch eck R em ed y
Was EasyMP Network Projection started while PowerPoint wasrunning
For Windows
When connecting with EasyMP Network Projection make sure you close PowerPoint first Slide Show might not runif connecting while PowerPoint is running
When a connection has been made using EasyMP Network Projection the screen will not be refreshed when using an Office application
Ch eck R em ed y
Is the mouse moved continuously When you stop moving the mouse cursor the screen is updated If the screen does not update quickly stop moving themouse cursor
Error message when starting up EasyMP Network Projection
E r r or M essa g es R em ed y
Connection to the projector failed Try to connect again If it still does not connect check the network settings on the computer and the network settingsfor the projector
For details on the network settings to be made on the projector sees Users Guide Network Menu
The keyword does not match Re-enter the keyword displayed onthe projector screen
Check the Projector Keyword displayed on the LAN standby screen and enter the Projector Keyword
8182019 Easy Mp Network Op Guide
httpslidepdfcomreaderfulleasy-mp-network-op-guide 4347
Troubleshooting 44
8182019 Easy Mp Network Op Guide
httpslidepdfcomreaderfulleasy-mp-network-op-guide 4447
Network settings are not restored after cutting the connection to the computer with EasyMP Network Projection
Check R em ed y
Are you manually connecting to a Wireless LAN when thecomputer starts up
Quick Connection Mode
Try connecting to the Wireless LAN manually
Glossary 45
8182019 Easy Mp Network Op Guide
httpslidepdfcomreaderfulleasy-mp-network-op-guide 4547
This section briefly explains the difficult terms that are not explained in the text of this guide For details refer to other commercially available publications
A d h o c
A method of Wireless LAN connection that communicates with wireless LAN clients without using an access point It is not possible to communicatewith two or more devices simultaneously
M A C A d d r e ss
An abbreviation of Media Access Control The MAC Address is an ID number unique to each network adapter A unique number is assigned to eachnetwork adapter and data is transmitted between network adapters based on this identification
S V G A
A type of video signal with a resolution of 800 (horizontal) ^600 (vertical) dots that is used byIBM PCAT-compatible computers
S X G A
A type of video signal with a resolution of 1280 (horizontal) ^ 1024 (vertical) dots that is used by IBM PCAT-compatible computers
U X G A
A type of video signal with a resolution of 1600 (horizontal) ^ 1200 (vertical) dots that is used by IBM PCAT-compatible computers
V G A
A type of video signal with a resolution of 640 (horizontal) ^ 480 (vertical) dots that is used by IBM PCAT-compatible computers
V i r tual D i s p lay
The screen for one computer is output to multiple displays A large virtual screen can be created by using multiple displays
X G A
A type of video signal with a resolution of 1024 (horizontal) ^ 768 (vertical) dots that is used by IBM PCAT-compatible computers
8182019 Easy Mp Network Op Guide
httpslidepdfcomreaderfulleasy-mp-network-op-guide 4647
8182019 Easy Mp Network Op Guide
httpslidepdfcomreaderfulleasy-mp-network-op-guide 4747
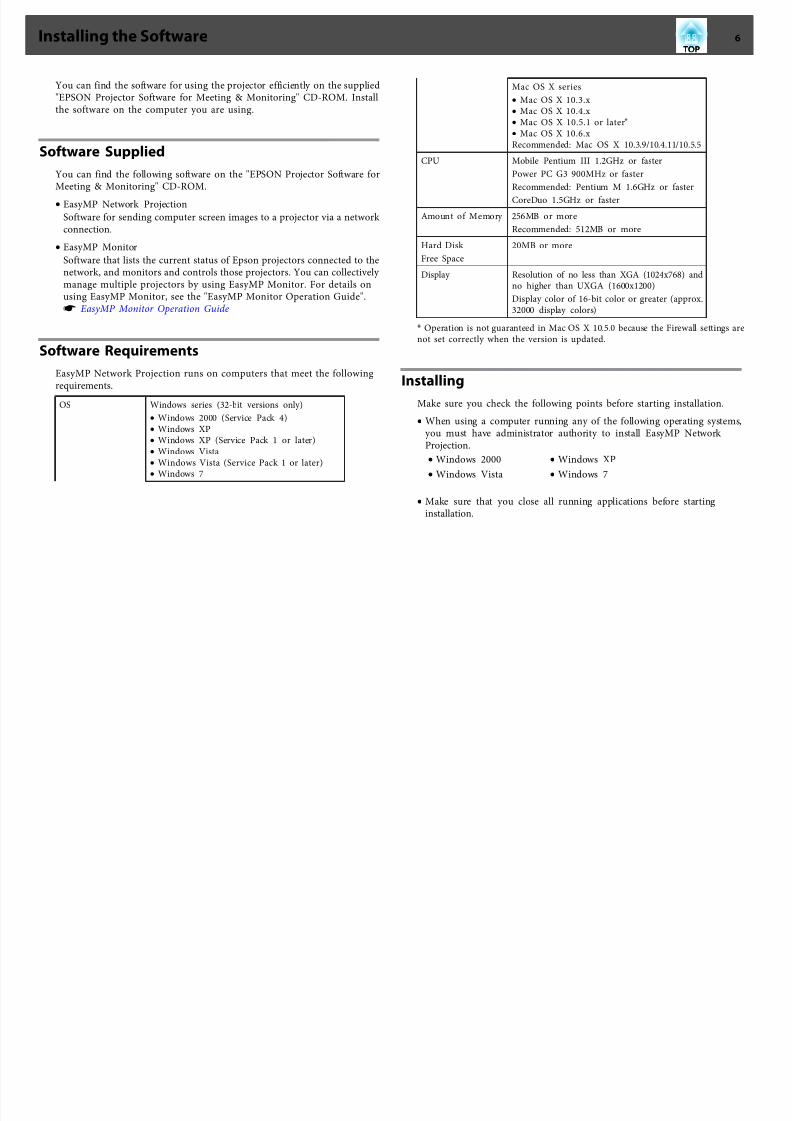
8182019 Easy Mp Network Op Guide
httpslidepdfcomreaderfulleasy-mp-network-op-guide 1047
4 Make network settings on the projector and put it into network
connection status s Users Guide Network Menu
5 Start EasyMP Network Projection on the computer and connect with theprojector s p12
When the computer you are using is normally connected to the network youdo not need to make network settings on the computer
Two Connection Modes 10
8182019 Easy Mp Network Op Guide
httpslidepdfcomreaderfulleasy-mp-network-op-guide 1147
Use the following procedure to set up the computer for connection
For Windows
Make network settings for the computer by using the utility softwaresupplied with the LAN adapter For more information on the utility software see the Users Guide supplied with your LAN adapterFor example as shown in the following illustration when a red cross (^) isdisplayed over the network icon on the taskbar you cannot connect to theprojector
For Mac OS
Set the network port and communication status For more details on settingthe communication status see the Userrsquos Guides for your computer or theAirPort card
Preparing to Connect 11
8182019 Easy Mp Network Op Guide
httpslidepdfcomreaderfulleasy-mp-network-op-guide 1247
Operating the ProjectorBefore connecting put the projector into connection standby statusMake sure the projector network settings are complete and the projector isconnected to network equipment such as a network hub via a commercially available network cable
Procedure
A Press the [t] button on the remote control to turn the poweron
B Press the [LAN] button on the Remote Control
The LAN standby screen is displayed
If there is no signal for the current input source it automatically
switches to the LAN source If it does not automatically switch to theLAN source press the [LAN] button
Operating the ComputerIn the following explanations unless otherwise noted Windows screenshots are used The similar screens are also displayed for Mac OS
Procedure
A Start EasyMP Network Projection
For Windows
Select Start - Programs (or All Programs) - EPSON Projector -EasyMP Network Projection - EasyMP Network ProjectionV2XX
For Mac OS
Double-click the Applications folder of the hard drive volume inwhich EasyMP Network Projection is installed and then double-click the EasyMP Network Projection icon
B Select Quick Connection Mode (only available when the
optional Wireless LAN unit is installed) or AdvancedConnection Mode and then click OK
The projector search results are displayed To always connect using
Advanced Connection Mode select Set the selected ConnectionMode as the default mode for future connections
C Select the projector you want to connect to and then click
Connect
If the projector you want to connect to is not displayed in the searchresults click the Automatic search button The search takes about 30
secondsFor details on the connection screen see Using the ConnectionScreen s p13
Connecting to a Projector on a Network and Projecting 12
8182019 Easy Mp Network Op Guide
httpslidepdfcomreaderfulleasy-mp-network-op-guide 1347
D When Projector Keyword is set to On from the projector the
Keyword entry screen is displayed Enter the keyworddisplayed on the LAN standby screen and then click OK
When the connection is complete the computer screen is projectedThe following EasyMP Network Projection toolbar is displayed on thecomputer screen You can use this toolbar to operate the projectorand make settings and to disconnect the network connection Fordetails on the toolbar see Using the Toolbar s p15
qWhen connecting from another computer such as when changingpresenters start EasyMP Network Projection from the computer youwant to connect The computer that is currently connected isdisconnected and the projector is then connected with the computerthat is trying to connect now
If a connection is made while Disable interrupt connection is set theconnection is not switched to another computer
Using the Connection Screen
Start EasyMP Network Projection to display the following screen Theoperation of each button or item is described in the following table
When the system starts in Advanced Connection Mode
Connecting to a Projector on a Network and Projecting 13
8182019 Easy Mp Network Op Guide
httpslidepdfcomreaderfulleasy-mp-network-op-guide 1447
When the system starts in Quick Connection Mode
A Automatic search
In Advanced Connection Mode you can search for available projectorson the network system to which the computer is connected
In Quick Connection Mode you can search for the projector based onthe SSID
B Manual search
In Advanced Connection Mode you can search for a projector based ona specified IP address or projector name
In Quick Connection Mode you can search for the projector based onthe SSID selected from a list
C Status
The following six icons indicate the status of the detected projectors
Standby Select for connecting
Busy Select for connecting When you click Connect the computer currently
connected is disconnected and yourcomputer is connected
Busy (Disable
interrupt con‐nection)
Cannot be selected Disable interrupt
connection is set on another computerwhich is already connected
Currently inuse by anotherapplication
The projectors Configuration Menu isopen You can select it after closing theConfiguration menu and running thesearch again
Searching Displayed while running Manual search orProfile
Not found Displayed when a projector cannot be foundas a result of Manual search or Profile InQuick Connection Mode you can only select multiple projectors with the sameSSID
D Projector name
The projectors name is displayed
E Disable interrupt connection
Check the box to prevent an interrupt connection by other computers whileconnected to the selected projector
F Use multi-display
Check the box to use the Multi-screen display function When this is selectedDisplay layout and Display properties are displayed at the bottom of the screens p20
G Troubleshooting
If there is a problem and you cannot have a connection press this button to openthe EasyMP Network Projection Troubleshooting screen
H Connect
Connect to the projector you selected from the search results list When aconnection is made with a projector a toolbar is displayed
I Set options
You can set general setting options such as the processing method when startingEasyMP Network Projection For details see Set optionss p33
J Save in the profileSaves the results of a network projector search as a Profiles p29
Connecting to a Projector on a Network and Projecting 14
8182019 Easy Mp Network Op Guide
httpslidepdfcomreaderfulleasy-mp-network-op-guide 1547
K Clear list
Deletes all search resultsL IP address (Advanced Connection Mode only)
The projectors IP address is displayed
M Display
(Select the number displayed (when Use multi-display is selected)s p25
N Profile
You can search for a projector on the network using a Profile savedusing Save in the profiles p29
O SSID (Quick Connection Mode only)
The projectors SSID is displayed
P Signal intensity
This is displayed when the connection is made in Quick Connection Mode As theSignal intensity increases so does the number of lit indicators
Q Update list (Quick Connection Mode only)
Updates Status and Signal intensity
Using the Toolbar
The toolbar is displayed on the computer screen after EasyMP Network Projection starts and a connection is made with the projector You can usethis toolbar to operate and make settings for the projector
Select target projector
Click to limit the projectors operated from the toolbar when projectingfrom multiple projectors using the distribution function or Multi-screen display The indication below the icon shows the projectors thatcan be controlledALL indicates that all of the connected projectors can be controlledFor example when 1 3 is displayed projectors No 1 and No 3 can becontrolled
Click to display the following screen
A Select the projector to be controlled
B Indicates the No of an allocated projector This No indicates theNo of the projector that you can control from the toolbar
C Indicates the status of the projector
Stop
Connecting to a Projector on a Network and Projecting 15
8182019 Easy Mp Network Op Guide
httpslidepdfcomreaderfulleasy-mp-network-op-guide 1647
Stops projection while connected to the projector A black screen is
projected while stopped Audio does not stop To stop the audio or todisplay a Users Logo while projection is stopped use the AV Mutefunction
Show
Releases Stop or Pause
Pause
Pauses projected images while connecting to the projector The audio isnot paused
Presentation Mode
Each time this is clicked Presentation Mode switches between enableddisableds p19
Projector control
While the projector is connected to the network the projectors AVMute Switch PC source and Switch video source functions can becontrolled from both the Remote Control and the projectors Control
panel
Click to display the following toolbar
AV Mute
The same function as the [AV Mute] button on theRemote Control
s Users Guide Remote Control
Switch PC source
The Source alternates between Computer1Computer2 USB Display USB and LAN each timeyou click
Switch video source
The Source alternates between S-Video and Videoeach time you click S-Video does not switch if thecable is not connected
Screen Preview
Displays the multi-screen preview screen
Click to display a preview with the settings you have made Click
each display to enlarge each Screen Preview to full-screen
Set options
Transmission performance during the transfer of computer images canbe adjusteds p33
Movie Sending Mode
Not enabled on this projector The message The connected projectorsdo not support Movie Sending is displayed
DisconnectDisconnects the connection to the projector
Signal intensity
This is displayed when a connection is made in Quick ConnectionMode As the Signal intensity increases so does the number of litindicators
Switch toolbar display
Connecting to a Projector on a Network and Projecting 16
8182019 Easy Mp Network Op Guide
httpslidepdfcomreaderfulleasy-mp-network-op-guide 1747
The toolbar display is switched as follows The toolbar display remains
as is until switched againFull
Normal
Simple
Connecting to a Projector on a Network and Projecting 17
8182019 Easy Mp Network Op Guide
httpslidepdfcomreaderfulleasy-mp-network-op-guide 1847
Functions and Settings for EasyMP Network ProjectionThis chapter explains the functions that may be useful in a meeting or presentation such as the Multi-Screen Display which allows you to send images tomultiple projectors from a single computer
8182019 Easy Mp Network Op Guide
httpslidepdfcomreaderfulleasy-mp-network-op-guide 1947
In Presentation Mode the images are only displayed when performing a
PowerPoint Slide Show on a computer When you stop Slide Show theprojector displays a black screen This is useful when you only want todisplay the Slide ShowIn addition to PowerPoint Keynote is compatible with Presentation Modefor Mac OS
Procedure
A If necessary select another projector to be controlleds p15
B Click the button on the toolbar
Presentation Mode begins
C Click the button again to exit Presentation Mode
Projecting Only a PowerPoint Slide Show (Presentation Mode) 19
8182019 Easy Mp Network Op Guide
httpslidepdfcomreaderfulleasy-mp-network-op-guide 2047
Example of Adjusting the Virtual Display
By arranging the virtual display g allocation you can project only the imagethat you want to show or project different images from left to right in apresentation
Arrangement example 1
AA c tual mon i tor i mag e
PowerPoint file
B I mag e of v i r tua l d i s p lay
Excel file
Arrangement example 2
AA c tual mon i tor i mag e
PowerPoint file presenter tools
BI mag e of v i r tua l d i s p lay
Slide Show using a PowerPoint file
Procedure Before Using the Multi-screen Display
Function
1 Setting the Virtual Display s p21
In a Windows environment enable the virtual display g driver as necessary Alsofor both Windows and Mac OS set up the virtual display arrangement
2 Allocating the image to be projected s p25
Using Multi-Screen Display 20
8182019 Easy Mp Network Op Guide
httpslidepdfcomreaderfulleasy-mp-network-op-guide 2147
Open the file to be projected and then move the screen to the virtual display
according to the actual projection arrangement3 Projecting the allocated images s p25
Allocate a virtual display number to a projector that is connected through thenetwork and then start projection
Setting the Virtual Display
This chapter explains the virtual display for arrangement example 1s p20
Enable the virtual display driver (Windows only)
Enable the virtual display g driver Those users listed below do not have toperform this operation Go to procedure s Adjusting the Virtual Display
p21bull Those users who have enabled virtual displays installing EasyMP
Network Projection
bull For Mac OS users
Procedure
A Start Windows on the computer and then select Start -Programs (or All Programs) - EPSON Projector - EasyMP
Network Projection - Add-Remove EPSON Virtual Display
The Add-Remove EPSON Virtual Display screen is displayed
B Select the virtual display you want to use
Up to four monitors can be added In this example a single virtual
display is to be used When setting multiple virtual displays select asmany displays as is necessaryAny one of the displays can be selected
C Click OK
When you click OK the drivers for the virtual display are enabled Atthis point it is normal for the display to flicker Wait for the Add-Remove EPSON Virtual Display screen to close
Adjusting the Virtual Display
After starting EasyMP Network Projection the procedure for setting up the virtual displays differs for Windows and Mac OS The procedures areexplained separately below
qCheck the following points before starting EasyMP Network Projectionwhen connecting via Wireless LAN If the following points are not setcorrectly Multi-screen display cannot be used
bull The SSID for the computer and each projector must be the same
bull The wireless LAN system for the computer and each projector mustbe the sameYou can modify the SSID and Wireless LAN system for theprojector from the Network menu in the projectors Configurationmenus Users Guide Wireless LAN Menu
Using Multi-Screen Display 21
8182019 Easy Mp Network Op Guide
httpslidepdfcomreaderfulleasy-mp-network-op-guide 2247
Procedure
For Windows
A Select Start - Programs (or All Programs) - EPSON
Projector - EasyMP Network Projection - EasyMP Network Projection V2XX to start EasyMP Network Projection
B Select the Use multi-display checkbox
Display layout and Display properties are added at the bottom of thescreen
C Click Display properties
The Display properties screen is displayed
D Click the Settings tab
Using Multi-Screen Display 22
8182019 Easy Mp Network Op Guide
httpslidepdfcomreaderfulleasy-mp-network-op-guide 2347
E Drag the displayed monitor icon and place it where desired
Here the actual monitor (1) is placed on the left while the virtualmonitor (3) is placed on the rightWhen the computer has multiple display output terminals thenumbers assigned to the virtual terminals will be sequential to thoseof the physical terminals
q bull When an external monitor is connected as a secondary monitor the
image for that screen cannot be projected
bull Depending on the hardware the number of the secondary monitormay be other than 2 When the monitor icon is displayed on thescreen click the icon and confirm that the monitor type shownunder Display is other than secondary
bull For the Screen Resolution settings see the followings p36
When the monitor icon is arranged a virtual display is connected asthe image like below
Using Multi-Screen Display 23
i l i i l
8182019 Easy Mp Network Op Guide
httpslidepdfcomreaderfulleasy-mp-network-op-guide 2447
F Click the OK button to close the Display properties screen
Up to this point the virtual display layout has been fixedAllocate the projecting images next s p25
For Mac OS
A Start EasyMP Network Projection Double-click the Applications
folder of the hard drive volume in which EasyMP Network Projection is installed and then double-click the EasyMP
Network Projection iconIn this example we select and start in Advanced ConnectionMode
B Select the Use multi-display checkbox
Display layout and Display preferences are added at the bottom of thescreen
C Click Display preferences
The display setting screen is displayed
D Click Arrangement
E Clear Mirror Displays
Using Multi-Screen Display 24
U i M lti S Di l
8182019 Easy Mp Network Op Guide
httpslidepdfcomreaderfulleasy-mp-network-op-guide 2547
F Drag the displayed monitor icon and place it where desired
G Close the display setting screen
Up to this point the screen layout has been fixed
Allocating the Image to be Projected
This section explains the virtual display for arrangement example 1s p20
Procedure
A Open the file to be projected
Start the PowerPoint and Excel files
B Drag the window to the desired virtual displayg monitor andallocate it where the image is to be projected
Drag the Excel window to the right until it cannot be seen As aresult the PowerPoint window appears on the actual monitor whilethe Excel window appears on the virtual display on the right
Projecting the Allocated Images
This section explains the virtual display for arrangement example 1s p20
Procedure
A Select the number of the virtual displayg
you want to fromDisplay and set which image to be projected from which
projector
Using Multi-Screen Display 25
Using M lti Screen Displa
8182019 Easy Mp Network Op Guide
httpslidepdfcomreaderfulleasy-mp-network-op-guide 2647
B Click Connect
The image allocated to each projector is projected
In a Windows environment you cannot view the image being sent toa virtual display on the computer To adjust the image on the virtualdisplay you must do so while viewing the projected imageTo perform mouse-based operations on the virtual display move themouse pointer in the direction of the virtual display such that thepointer appears on the virtual display
C To terminate multi-screen display click Disconnect on thetoolbar
Using Multi-Screen Display 26
Using Multi Screen Display 27
8182019 Easy Mp Network Op Guide
httpslidepdfcomreaderfulleasy-mp-network-op-guide 2747
q
In a Windows environment if the virtual display driver has been
enabled such that the mouse pointer can be moved outside the limitsof the screen there may be occasions when you lose track of thelocation of the pointer If you are not using a virtual display clear the virtual display checkbox on the Add-Remove EPSON Virtual Display screen so that the mouse pointer moves back inside the screensdisplay area To subsequently use multi-display again place a check mark against the required display under Add-Remove EPSON VirtualDisplayTo clear a check mark see the followings p21
Using Multi-Screen Display 27
Connecting to a Projector on a Different Subnet 28
8182019 Easy Mp Network Op Guide
httpslidepdfcomreaderfulleasy-mp-network-op-guide 2847
This chapter explains how to connect a computer to a projector on adifferent sub-net via a Wired LAN or a wireless LAN access point on anexisting network system
By default this application only searches for projectors on the same subnetas the computer Therefore even if you perform a search for projectors onthe network projectors on a different subnet will not be foundYou can however identify and connect to a projector on a different subnetas follows
bull Specify either an IP address or Projector name and perform a search
The IP Address can be input directly Also provided the Projector nameto be connected has been registered on the DNS server you can performa search simply by inputting that Projector names p28
bull Performing a search based on a Profile
Once you have performed a search for a projector on a different subnetby specifying either an IP Address or a Projector name you can save thesearch as a Profile with an easy-to-remember name and then use that
Profile whenever you subsequently want to search for a projector on adifferent subnets p29
q bull If a search fails to find a projector the most likely causes are as
follows Proceed as appropriate depending on the cause of thefailure
For both Windows and Mac OS
If there is no wireless LAN signal or if the signal is weak check
whether there is anything that could be interfering with the signalWhen the optional Wireless LAN unit is installed in the projectorand connecting Mac OS to a wireless LAN
Check whether AirPort is set to On Or check whether anappropriate access point has been selected
bull When you use Manual search in Quick Connection Mode you canspecify the SSID When there are a lot of projectors you can narrow the search field by using SSID
Specifying Either an IP Address or Projector Name
and Performing a Search (Advanced ConnectionMode Only)
In the following explanations unless otherwise noted Windows screenshots are usedThe similar screens are also displayed for Mac OS
Procedure
A Click Manual search on the EasyMP Network Projectionprojector selection screen
B Enter the IP address or the projector name for the projectoryou want to connect to and click OK
Connecting to a Projector on a Different Subnet 28
Connecting to a Projector on a Different Subnet 29
8182019 Easy Mp Network Op Guide
httpslidepdfcomreaderfulleasy-mp-network-op-guide 2947
The search results are displayed on the EasyMP Network Projectionprojector selection screen
Provided the target projector has been identified select that projectorand then click Connect to establish a connectionWhen you will always be using that projector save the search as aProfile so that you do not have to specify the relevant details every time you perform a search s p29
Performing a Search with a ProfileYou can save a search for a frequently used projector as a Profile AProfile is a file containing all of the information pertaining to a givenprojector such as the projector name its IP address and SSID If youspecify that information from the next time you perform a search there willbe no need to specify the IP address or projector name each time youperform a search For example by creating a group of Profiles for eachplace where a projector is setup and managing them with folders the target
projector can be found quickly
A Building A E Floor 1
B Building B F Floor 2
C Building C G Floor 3
D Building D
This section explains how to create and edit a Profile
Making a Profile
Profiles are made by saving search results
For details on how to edit a previously saved Profile see the followingsection s p31
Procedure
A While the projector is displayed on the EasyMP Network Projection projector selection screen click Save in the
profile
Connecting to a Projector on a Different Subnet 29
Connecting to a Projector on a Different Subnet 30
8182019 Easy Mp Network Op Guide
httpslidepdfcomreaderfulleasy-mp-network-op-guide 3047
The Save in the profile screen is displayed
B Enter a Profile name and then click Add
Projector information is registered in the ProfileIf you have previously saved a Profile you are prompted to confirmwhether or not to overwrite To save a Profile with a different nameselect Save as If you have created a folder for a Profile the followingscreens are displayed After entering the Profile name and selectingthe Save in destination click Add
For Windows
For Mac OS
qFor details on how to create a folder for a Profile see the followingsection s p31
Searching by specifying a Profile
You can search by specifying the Profile you created
Connecting to a Projector on a Different Subnet 30
Connecting to a Projector on a Different Subnet 31
8182019 Easy Mp Network Op Guide
httpslidepdfcomreaderfulleasy-mp-network-op-guide 3147
Procedure
A Click Profile on the EasyMP Network Projection projector
selection screen
If no Profile is registered you cannot select Profile
B From the menu that is displayed select the projector you wantto connect to
The search results are displayed on the EasyMP Network Projectionprojector selection screenProvided the target projector has been identified select that projectorand then click Connect to establish a connection
Managing a Profile
You can change the name and the hierarchical structure of the Profile
Procedure
A Click Set options on the EasyMP Network Projection main
screen
The Set options screen is displayed
B Click Edit profile
The Edit profile screen is displayed
C Edit the contents registered in the Profile
Co ect g to a ojecto o a D e e t Sub et 31
Connecting to a Projector on a Different Subnet 32
8182019 Easy Mp Network Op Guide
httpslidepdfcomreaderfulleasy-mp-network-op-guide 3247
A Indicates a folder
B Indicates a Profile
Prof i le
Item F u nctio n
Profi le
You can display the registered Profile You can manageit by creating a folder You can change the order of theProfile or the folder by dragging amp dropping
Copy
You can copy the Profile The copied Profile is saved in
the same folder as the original with the same nameDelete
You can delete the Profile and the folder
Prof i le
Item F u n ctio n
R e n a m e
Displays the Rename dialog box allowing you to renamethe folder or the Profile You can enter up to 32characters in the Rename dialog box
Create folder
You can create a new folder
E x p or t
Exports a created Profile allowing you to import and usethat Profile
I mp or t
Used when you want to read and use an exportedProfile
Informa tion on selected prof i le
Item F u n ctio n
P r oj e c tor n am e
I P addr e s s
You can display the projector information registered inthe Profile
Delete
You can delete the information for the selectedprojector When all projector information is deleted theprofile is also deleted
D Click OK
Saves your edits and closes the Edit profile screen
g j
Using Set options 33
8182019 Easy Mp Network Op Guide
httpslidepdfcomreaderfulleasy-mp-network-op-guide 3347
You can make setting options such as the processing method when EasyMPNetwork Projection startsAccess Set options from the EasyMP Network Projection main screen
Procedure
A Click Set options on the EasyMP Network Projection main
screen
The Set options screen is displayed
B Set each of the items
Confirm the details of the set items in the next step When you havemade all the necessary settings click OK to close the Set optionsscreen
Setting Each ItemSet each item from the General settings tab and the Adjust performancetab
General settings tab
Use fu l l -screen
vi de o t r an s fe r
This setting is disabled because the projector does notsupport the movie sending function
E n c r y p t
c ommun i c at i on s
Select to Encrypt and transmit data Even if data isintercepted it cannot be decrypted
When using Quick Connection Mode make sure youalways select this checkbox
Display Connection
Mod e Selection
w i n dow on s tar tup
Set whether or not the Quick Connection ModeAdvancedConnection Mode screen is displayed when EasyMPNetwork Projection starts
Clear this checkbox once you have settled on a regularstartup method
S e ar c h me th od on
s tar tup
Select from the following projector search methodsexecuted when EasyMP Network Projection is started
Automatic search on startup
Specify search method after startupSearch with the last network configuration
g p
Using Set options 34
8182019 Easy Mp Network Op Guide
httpslidepdfcomreaderfulleasy-mp-network-op-guide 3447
Edit profi le
The Edit profile dialog box is displayeds p31
S w i tc h L A N
Windows only The Switch Network Adapter dialog box is displayed Thisis used when it is necessary to switch the network adapter tobe used for a search when a computer has multipleadapters
By default all of the network adapters are used to perform asearch When a Wired LAN is always used as theconnection method select a Wired LAN adapter
R e s tor e D e faul ts
You can reset all adjustment values on the General settingstab to their default settings except for Edit profile andSwitch LAN
Adjust performance tab
P e r for man c e
adj us tme n t s l i de r
The performance can be set to Fast Normal andFine
Set to Fast when movie projections are interrupted
T r a n s f er l a y er e d
w i n dow
Windows only (excluding Windows Vista andWindows 7)
Set whether or not to transfer a layered windowThe layered window is in use when contents such asmessages displayed on the computer are not projectedby the projector Select this checkbox to projectcontents such as messages that use the layeredwindow
Clear this checkbox if you do not want the mousepointer to flicker on the screen
R e s tor e D e faul ts
You can reset all adjustment values for the Adjustperformance tab to their default settings
q When you click on the toolbar only the Adjust performance tab
is displayed
Audio Output tab
Because this projector does not support the audio sending function settingson the Audio Output tab are disabled
8182019 Easy Mp Network Op Guide
httpslidepdfcomreaderfulleasy-mp-network-op-guide 3547
Appendix
Connection Limitations 36
8182019 Easy Mp Network Op Guide
httpslidepdfcomreaderfulleasy-mp-network-op-guide 3647
When projecting computer images while running EasyMP Network Projection the following restrictions apply Confirm these points
Supported Resolutions
The following computer screen resolutions can be projected You cannotconnect to a computer with a resolution greater than UXGAg
bull VGA g(640x480)
bull SVGA g(800x600)
bull XGA g(1024x768)
bull SXGA g(1280x960)
bull SXGA (1280x1024)
bull SXGA+ (1400x1050)
bull WXGA (1280x768)
bull WXGA (1280x800)
bull
WXGA+ (1440x900)bull UXGA (1600x1200)
Supported resolutions when multi-screen display function is on
If a computer with a special screen size is used where the ratio of heightand width is not represented a screen resolution closest to the width isselected from the list of 10 aboveIn this case in wide screen the horizontal margins are projected in narrow screen the empty vertical margins are black
Display Color
The number of colors for computer screens that can be projected
W ind o w s M a c O S
16-bit color About 32000 colors (16-bit)
32-bit color About 167 million colors (32-bit)
The operational guarantee for multi-screen display is 16-bit and 32-bitcolor
Number of Connections
You can connect up to four projectors to one computer and projectsimultaneouslyYou cannot connect multiple computers to one projector simultaneously
Others
bull If the transmission speed of the Wireless LAN is low the network might be cut off unexpectedly
bull Audio is not transmitted
bull When videos are played back they do not play back as smoothly as
when displayed on the computerbull Applications that use part of DirectX functions may not be displayed
correctly(Windows only)
bull Cannot project full screen MS-DOS prompts(Windows only)
bull There are times when the image on the computer screen and the imageprojected by the projector may not match exactly
When Using Windows Vista or Windows 7
Note the following points when using EasyMP Network Projection on acomputer running Windows Vista or Windows 7
Limitations when projecting from Windows Photo Gallery
Note the following two limitations when launching Windows Photo Gallery when EasyMP Network Projection is running
Connection Limitations 37
8182019 Easy Mp Network Op Guide
httpslidepdfcomreaderfulleasy-mp-network-op-guide 3747
bull Slide Show is played back in simple mode when projecting fromWindows Photo Gallery
Because the toolbar is not displayed you cannot make changes whileplaying a Theme (effects) regardless of the Windows Experience IndexratingOnce simple mode has started you cannot change modes while WindowsPhoto Gallery is running even if you close EasyMP Network ProjectionRestart Windows Photo Gallery
bull You cannot play movies
Limitations in Windows Aero
Note the following two limitations when the window design for yourcomputer is Windows Aero
bull The layered window is projected regardless of Transfer layered window from Set options in EasyMP Network Projection
For example when Transfer layered window for EasyMP Network Projection toolbar is disabled it is not projected even if it is displayed onthe computer screen however the toolbar is projected
bull A few minutes after you connect a computer to the projector over anetwork with EasyMP Network Projection the following message is
displayedIt is recommended that you select Keep the current color scheme anddont show this message again This selection is enabled until thecomputer is restarted
Limitations when projecting from Windows Media Center
You cannot project images in full screen display using Windows MediaCenter Switch to the window display mode to project the images
Similarly images cannot be projected with Quick Wireless Connection orUSB Display
Troubleshooting 38
8182019 Easy Mp Network Op Guide
httpslidepdfcomreaderfulleasy-mp-network-op-guide 3847
If any of the following problems occur refer to the pages given for eachproblem
Problems concerning network functions
Cannot connect to the projector s p39
When a connection is made using EasyMP Network Projection the projectedimage remains as it is and a connection cannot be made from anothercomputer s p39
The projector is not found when EasyMP Network Projection is
started s
p39Cannot connect in Advanced Connection Mode or Wired LANconnection s p40
The Slide Show cannot be displayed on the desired display when the multi-screendisplay function is being executed s p41
Applications are no longer displayed from the computer screen when the multi-screen display function is executed s p41
The mouse cursor is not displayed on the computer screen s
p41When connecting with EasyMP Network Projection the image is not displayed orthe image is slow to appear s p41
When a connection is made using EasyMP Network Projection a PowerPointSlide Show cannot be started s p42
When a connection has been made using EasyMP Network Projection the screenwill not be refreshed when using an Office application s p42
Error message when starting up EasyMP Network Projection s
p42Network settings are not restored after cutting the connection to the computerwith EasyMP Network Projection s p44
Troubleshooting 39
8182019 Easy Mp Network Op Guide
httpslidepdfcomreaderfulleasy-mp-network-op-guide 3947
Problems Concerning Network Functions
Cannot connect to the projector
Check the message on the screen and then apply the following countermeasures
E r r or M essa g es R em ed y
The application version used is not supported Install the latest version of the application on your computer
Install EasyMP Network Projection from the EPSON Projector Software for Meeting amp Monitoring CD-ROMsupplied with the projector
When a connection is made using EasyMP Network Projection the projected image remains as it is and a connection cannot be madefrom another computer
Ch eck R em ed y
Did the presenter leave the conference room without cutting off thenetwork connection
With EasyMP Network Projection the connection with the computer that was previously connected can be cut off when another computer tries to connect with the projector and it connects with the computer that is trying to
connectTherefore when a Projector Keyword is not set for the projector or if you know the Projector Keyword you can cutoff the current connection and if you perform a connection operation you can connect to the projector
When a Projector Keyword is set for the projector if you do not know the Projector Keyword restart the projector andreconnect
The projector is not found when EasyMP Network Projection is started
Check R em ed y
Is the Wireless LAN unit connected
For Wireless LAN
Check that the optional Wireless LAN unit is securely connected
Is the Network Configuration screen from the Configurationmenu displayed on the projector
When the Network Configuration screen is displayed on the projector network connection for EasyMP Network Projection is disabled Close network settings on the projector and return to the LAN standby screen
Are the computers LAN card and the built-in LAN function
available
Check that LAN is valid by checking Control Panel - System - Hardware in the device manager and so on
Troubleshooting 40
8182019 Easy Mp Network Op Guide
httpslidepdfcomreaderfulleasy-mp-network-op-guide 4047
Check R em ed y
Is the SSID the same as that of the access pointQuick Connection Mode
Set an SSID that is different from that of the access points
Users Guide Network Menu
Is the DHCP function for Wired LAN turned On
Quick Connection Mode
Turn Off the DHCP setting for Wired LAN from the Configuration Menus Users Guide Network Menu
Was the network adapter used selected correctly with EasyMPNetwork Projection
If the computer has multiple LAN environments it cannot connect unless the network adapter is selected correctlyWhen using a computer running Windows start EasyMP Network Projection and select the network adapter you areusing from Set options - Switch LANs p33
For Wireless LAN connection is the Wireless LAN setting enabledwhen the computer is in power save mode
Enable the Wireless LAN
Are there any obstacles between the access point and the computeror projector
For Wireless LAN
Sometimes the electromagnetic wave situation prevents the projector from being found in a search Check for any obstacles between the access point and the computer or projector and change their position to improve theelectromagnetic wave situation
Is the computers Wireless LAN electromagnetic wave set to low Set the electromagnetic wave strength to maximum
Does the Wireless LAN conform to 80211g 80211b or 80211a It is only compatible with standards 80211g 80211b and 80211a and not with other standards such as 80211
Is the firewall turned off or has the firewall been registered as anexception
When you do not wish to turn off the firewall or register the firewall as an exception make the necessary settings toopen the ports
The ports used by EasyMP Network Projection are 3620 3621 and 3629
Is the network cable connected correctly
For Wired LAN
Check that the network cable is connected correctly Reconnect it if it is not connected or not connected properly
Cannot connect in Advanced Connection Mode or Wired LAN connection
Check R em ed y
Is the SSID setting different Set the computer the access point and the projector to the same SSIDs Users Guide Network Menu
Is the same WEP key set When selecting WEP from Security set the access point the computer and the projector to the same WEP keys Users Guide Network Menu
Are the connection denial functions such as MAC Addressg
restrictions and port restrictions set correctly at the access point Set the projector to allow connections from the access point
Troubleshooting 41
8182019 Easy Mp Network Op Guide
httpslidepdfcomreaderfulleasy-mp-network-op-guide 4147
Check R em ed y
Are the IP address the Subnet Mask and the Gateway Address forthe access point and the projector set correctly When not using a DHCP adjust each settings
Users Guide Network Menu
Are the access point and the projectors subnet different Select Manual search from EasyMP Network Projection specify the IP address and connects p28
The Slide Show cannot be displayed on the desired display when the multi-screen display function is being executed
Check R em ed y
Are you using PowerPoint 2002 or an earlier version
For Windows
To set and use two or more virtual displaysg use PowerPoint 2003 or later or limit the number of virtual displays toone before displaying the Slide Show
Applications are no longer displayed from the computer screen when the multi-screen display function is executed
Check R em ed y
Is another application running on the virtual display g
For Windows
When EPSON Virtual Display is installed another application sometimes runs on the virtual display In this case setEPSON Virtual Display to Off in Screen properties
The mouse cursor is not displayed on the computer screen
Check R em ed y
Is EPSON Virtual Display installed
For Windows
The mouse cursor was moved onto the virtual display g When the virtual display checkbox is cleared on the Add-Remove EPSON Virtual Display screen the mouse pointer returns to the screen display area
When connecting with EasyMP Network Projection the image is not displayed or the image is slow to appear
Ch eck R em ed y
Did you try to play back movies with Media Player or try to operatethe screen saver preview
Depending on the computer the movie playback screen in Media Player may not be displayed and the screen saverpreview may not be displayed normally
Troubleshooting 42
8182019 Easy Mp Network Op Guide
httpslidepdfcomreaderfulleasy-mp-network-op-guide 4247
Ch eck R em ed y
Is WEP encryption effective or are multiple projectors connected The display speed decreases when WEP encryption is effective or multiple projectors are connectedHave you enabled DHCP When DHCP is set to On in Advanced Connection Mode if an available DHCP server is not found it may take some
time to enter LAN standby status
Is Wireless LAN 80211gb being used in Quick ConnectionMode
Depending on the electromagnetic wave environment there are times when the image and sound for movies may stop When using the movie sending function use Advanced Connection Mode or Wireless LAN 80211a in Quick Connection Mode
When a connection is made using EasyMP Network Projection a PowerPoint Slide Show cannot be started
Ch eck R em ed y
Was EasyMP Network Projection started while PowerPoint wasrunning
For Windows
When connecting with EasyMP Network Projection make sure you close PowerPoint first Slide Show might not runif connecting while PowerPoint is running
When a connection has been made using EasyMP Network Projection the screen will not be refreshed when using an Office application
Ch eck R em ed y
Is the mouse moved continuously When you stop moving the mouse cursor the screen is updated If the screen does not update quickly stop moving themouse cursor
Error message when starting up EasyMP Network Projection
E r r or M essa g es R em ed y
Connection to the projector failed Try to connect again If it still does not connect check the network settings on the computer and the network settingsfor the projector
For details on the network settings to be made on the projector sees Users Guide Network Menu
The keyword does not match Re-enter the keyword displayed onthe projector screen
Check the Projector Keyword displayed on the LAN standby screen and enter the Projector Keyword
8182019 Easy Mp Network Op Guide
httpslidepdfcomreaderfulleasy-mp-network-op-guide 4347
Troubleshooting 44
8182019 Easy Mp Network Op Guide
httpslidepdfcomreaderfulleasy-mp-network-op-guide 4447
Network settings are not restored after cutting the connection to the computer with EasyMP Network Projection
Check R em ed y
Are you manually connecting to a Wireless LAN when thecomputer starts up
Quick Connection Mode
Try connecting to the Wireless LAN manually
Glossary 45
8182019 Easy Mp Network Op Guide
httpslidepdfcomreaderfulleasy-mp-network-op-guide 4547
This section briefly explains the difficult terms that are not explained in the text of this guide For details refer to other commercially available publications
A d h o c
A method of Wireless LAN connection that communicates with wireless LAN clients without using an access point It is not possible to communicatewith two or more devices simultaneously
M A C A d d r e ss
An abbreviation of Media Access Control The MAC Address is an ID number unique to each network adapter A unique number is assigned to eachnetwork adapter and data is transmitted between network adapters based on this identification
S V G A
A type of video signal with a resolution of 800 (horizontal) ^600 (vertical) dots that is used byIBM PCAT-compatible computers
S X G A
A type of video signal with a resolution of 1280 (horizontal) ^ 1024 (vertical) dots that is used by IBM PCAT-compatible computers
U X G A
A type of video signal with a resolution of 1600 (horizontal) ^ 1200 (vertical) dots that is used by IBM PCAT-compatible computers
V G A
A type of video signal with a resolution of 640 (horizontal) ^ 480 (vertical) dots that is used by IBM PCAT-compatible computers
V i r tual D i s p lay
The screen for one computer is output to multiple displays A large virtual screen can be created by using multiple displays
X G A
A type of video signal with a resolution of 1024 (horizontal) ^ 768 (vertical) dots that is used by IBM PCAT-compatible computers
8182019 Easy Mp Network Op Guide
httpslidepdfcomreaderfulleasy-mp-network-op-guide 4647
8182019 Easy Mp Network Op Guide
httpslidepdfcomreaderfulleasy-mp-network-op-guide 4747
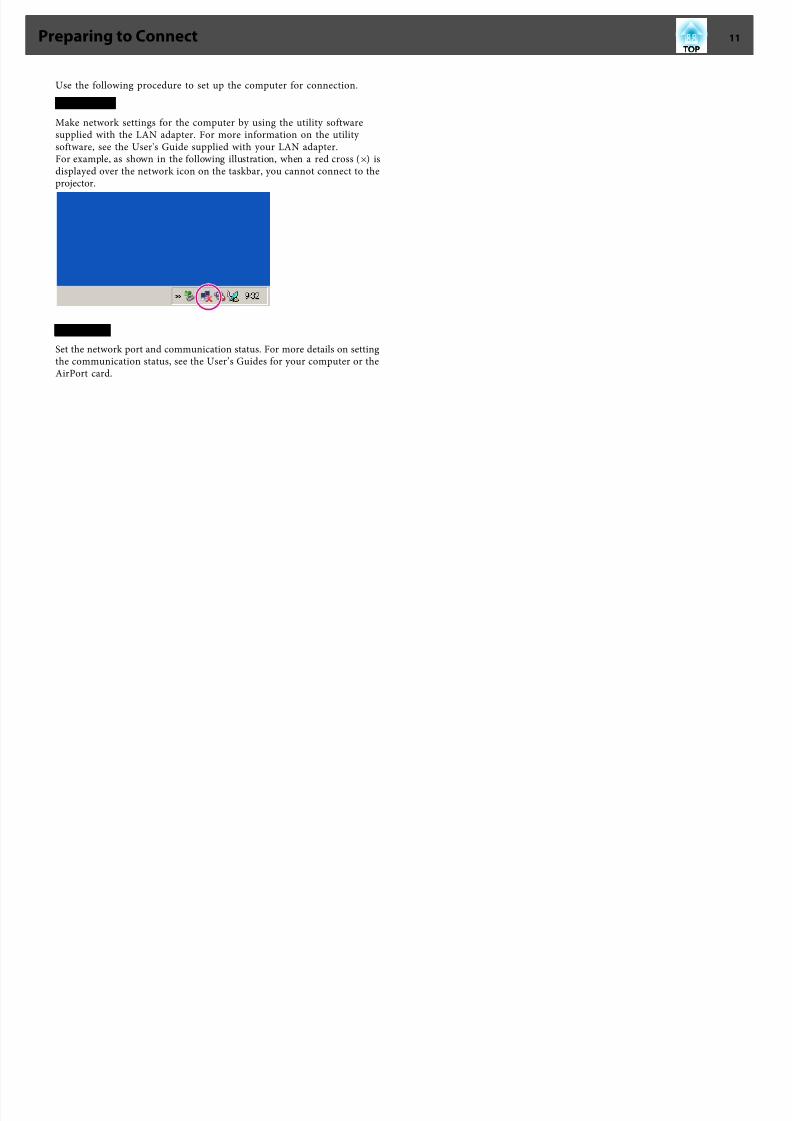
8182019 Easy Mp Network Op Guide
httpslidepdfcomreaderfulleasy-mp-network-op-guide 1147
Use the following procedure to set up the computer for connection
For Windows
Make network settings for the computer by using the utility softwaresupplied with the LAN adapter For more information on the utility software see the Users Guide supplied with your LAN adapterFor example as shown in the following illustration when a red cross (^) isdisplayed over the network icon on the taskbar you cannot connect to theprojector
For Mac OS
Set the network port and communication status For more details on settingthe communication status see the Userrsquos Guides for your computer or theAirPort card
Preparing to Connect 11
8182019 Easy Mp Network Op Guide
httpslidepdfcomreaderfulleasy-mp-network-op-guide 1247
Operating the ProjectorBefore connecting put the projector into connection standby statusMake sure the projector network settings are complete and the projector isconnected to network equipment such as a network hub via a commercially available network cable
Procedure
A Press the [t] button on the remote control to turn the poweron
B Press the [LAN] button on the Remote Control
The LAN standby screen is displayed
If there is no signal for the current input source it automatically
switches to the LAN source If it does not automatically switch to theLAN source press the [LAN] button
Operating the ComputerIn the following explanations unless otherwise noted Windows screenshots are used The similar screens are also displayed for Mac OS
Procedure
A Start EasyMP Network Projection
For Windows
Select Start - Programs (or All Programs) - EPSON Projector -EasyMP Network Projection - EasyMP Network ProjectionV2XX
For Mac OS
Double-click the Applications folder of the hard drive volume inwhich EasyMP Network Projection is installed and then double-click the EasyMP Network Projection icon
B Select Quick Connection Mode (only available when the
optional Wireless LAN unit is installed) or AdvancedConnection Mode and then click OK
The projector search results are displayed To always connect using
Advanced Connection Mode select Set the selected ConnectionMode as the default mode for future connections
C Select the projector you want to connect to and then click
Connect
If the projector you want to connect to is not displayed in the searchresults click the Automatic search button The search takes about 30
secondsFor details on the connection screen see Using the ConnectionScreen s p13
Connecting to a Projector on a Network and Projecting 12
8182019 Easy Mp Network Op Guide
httpslidepdfcomreaderfulleasy-mp-network-op-guide 1347
D When Projector Keyword is set to On from the projector the
Keyword entry screen is displayed Enter the keyworddisplayed on the LAN standby screen and then click OK
When the connection is complete the computer screen is projectedThe following EasyMP Network Projection toolbar is displayed on thecomputer screen You can use this toolbar to operate the projectorand make settings and to disconnect the network connection Fordetails on the toolbar see Using the Toolbar s p15
qWhen connecting from another computer such as when changingpresenters start EasyMP Network Projection from the computer youwant to connect The computer that is currently connected isdisconnected and the projector is then connected with the computerthat is trying to connect now
If a connection is made while Disable interrupt connection is set theconnection is not switched to another computer
Using the Connection Screen
Start EasyMP Network Projection to display the following screen Theoperation of each button or item is described in the following table
When the system starts in Advanced Connection Mode
Connecting to a Projector on a Network and Projecting 13
8182019 Easy Mp Network Op Guide
httpslidepdfcomreaderfulleasy-mp-network-op-guide 1447
When the system starts in Quick Connection Mode
A Automatic search
In Advanced Connection Mode you can search for available projectorson the network system to which the computer is connected
In Quick Connection Mode you can search for the projector based onthe SSID
B Manual search
In Advanced Connection Mode you can search for a projector based ona specified IP address or projector name
In Quick Connection Mode you can search for the projector based onthe SSID selected from a list
C Status
The following six icons indicate the status of the detected projectors
Standby Select for connecting
Busy Select for connecting When you click Connect the computer currently
connected is disconnected and yourcomputer is connected
Busy (Disable
interrupt con‐nection)
Cannot be selected Disable interrupt
connection is set on another computerwhich is already connected
Currently inuse by anotherapplication
The projectors Configuration Menu isopen You can select it after closing theConfiguration menu and running thesearch again
Searching Displayed while running Manual search orProfile
Not found Displayed when a projector cannot be foundas a result of Manual search or Profile InQuick Connection Mode you can only select multiple projectors with the sameSSID
D Projector name
The projectors name is displayed
E Disable interrupt connection
Check the box to prevent an interrupt connection by other computers whileconnected to the selected projector
F Use multi-display
Check the box to use the Multi-screen display function When this is selectedDisplay layout and Display properties are displayed at the bottom of the screens p20
G Troubleshooting
If there is a problem and you cannot have a connection press this button to openthe EasyMP Network Projection Troubleshooting screen
H Connect
Connect to the projector you selected from the search results list When aconnection is made with a projector a toolbar is displayed
I Set options
You can set general setting options such as the processing method when startingEasyMP Network Projection For details see Set optionss p33
J Save in the profileSaves the results of a network projector search as a Profiles p29
Connecting to a Projector on a Network and Projecting 14
8182019 Easy Mp Network Op Guide
httpslidepdfcomreaderfulleasy-mp-network-op-guide 1547
K Clear list
Deletes all search resultsL IP address (Advanced Connection Mode only)
The projectors IP address is displayed
M Display
(Select the number displayed (when Use multi-display is selected)s p25
N Profile
You can search for a projector on the network using a Profile savedusing Save in the profiles p29
O SSID (Quick Connection Mode only)
The projectors SSID is displayed
P Signal intensity
This is displayed when the connection is made in Quick Connection Mode As theSignal intensity increases so does the number of lit indicators
Q Update list (Quick Connection Mode only)
Updates Status and Signal intensity
Using the Toolbar
The toolbar is displayed on the computer screen after EasyMP Network Projection starts and a connection is made with the projector You can usethis toolbar to operate and make settings for the projector
Select target projector
Click to limit the projectors operated from the toolbar when projectingfrom multiple projectors using the distribution function or Multi-screen display The indication below the icon shows the projectors thatcan be controlledALL indicates that all of the connected projectors can be controlledFor example when 1 3 is displayed projectors No 1 and No 3 can becontrolled
Click to display the following screen
A Select the projector to be controlled
B Indicates the No of an allocated projector This No indicates theNo of the projector that you can control from the toolbar
C Indicates the status of the projector
Stop
Connecting to a Projector on a Network and Projecting 15
8182019 Easy Mp Network Op Guide
httpslidepdfcomreaderfulleasy-mp-network-op-guide 1647
Stops projection while connected to the projector A black screen is
projected while stopped Audio does not stop To stop the audio or todisplay a Users Logo while projection is stopped use the AV Mutefunction
Show
Releases Stop or Pause
Pause
Pauses projected images while connecting to the projector The audio isnot paused
Presentation Mode
Each time this is clicked Presentation Mode switches between enableddisableds p19
Projector control
While the projector is connected to the network the projectors AVMute Switch PC source and Switch video source functions can becontrolled from both the Remote Control and the projectors Control
panel
Click to display the following toolbar
AV Mute
The same function as the [AV Mute] button on theRemote Control
s Users Guide Remote Control
Switch PC source
The Source alternates between Computer1Computer2 USB Display USB and LAN each timeyou click
Switch video source
The Source alternates between S-Video and Videoeach time you click S-Video does not switch if thecable is not connected
Screen Preview
Displays the multi-screen preview screen
Click to display a preview with the settings you have made Click
each display to enlarge each Screen Preview to full-screen
Set options
Transmission performance during the transfer of computer images canbe adjusteds p33
Movie Sending Mode
Not enabled on this projector The message The connected projectorsdo not support Movie Sending is displayed
DisconnectDisconnects the connection to the projector
Signal intensity
This is displayed when a connection is made in Quick ConnectionMode As the Signal intensity increases so does the number of litindicators
Switch toolbar display
Connecting to a Projector on a Network and Projecting 16
8182019 Easy Mp Network Op Guide
httpslidepdfcomreaderfulleasy-mp-network-op-guide 1747
The toolbar display is switched as follows The toolbar display remains
as is until switched againFull
Normal
Simple
Connecting to a Projector on a Network and Projecting 17
8182019 Easy Mp Network Op Guide
httpslidepdfcomreaderfulleasy-mp-network-op-guide 1847
Functions and Settings for EasyMP Network ProjectionThis chapter explains the functions that may be useful in a meeting or presentation such as the Multi-Screen Display which allows you to send images tomultiple projectors from a single computer
8182019 Easy Mp Network Op Guide
httpslidepdfcomreaderfulleasy-mp-network-op-guide 1947
In Presentation Mode the images are only displayed when performing a
PowerPoint Slide Show on a computer When you stop Slide Show theprojector displays a black screen This is useful when you only want todisplay the Slide ShowIn addition to PowerPoint Keynote is compatible with Presentation Modefor Mac OS
Procedure
A If necessary select another projector to be controlleds p15
B Click the button on the toolbar
Presentation Mode begins
C Click the button again to exit Presentation Mode
Projecting Only a PowerPoint Slide Show (Presentation Mode) 19
8182019 Easy Mp Network Op Guide
httpslidepdfcomreaderfulleasy-mp-network-op-guide 2047
Example of Adjusting the Virtual Display
By arranging the virtual display g allocation you can project only the imagethat you want to show or project different images from left to right in apresentation
Arrangement example 1
AA c tual mon i tor i mag e
PowerPoint file
B I mag e of v i r tua l d i s p lay
Excel file
Arrangement example 2
AA c tual mon i tor i mag e
PowerPoint file presenter tools
BI mag e of v i r tua l d i s p lay
Slide Show using a PowerPoint file
Procedure Before Using the Multi-screen Display
Function
1 Setting the Virtual Display s p21
In a Windows environment enable the virtual display g driver as necessary Alsofor both Windows and Mac OS set up the virtual display arrangement
2 Allocating the image to be projected s p25
Using Multi-Screen Display 20
8182019 Easy Mp Network Op Guide
httpslidepdfcomreaderfulleasy-mp-network-op-guide 2147
Open the file to be projected and then move the screen to the virtual display
according to the actual projection arrangement3 Projecting the allocated images s p25
Allocate a virtual display number to a projector that is connected through thenetwork and then start projection
Setting the Virtual Display
This chapter explains the virtual display for arrangement example 1s p20
Enable the virtual display driver (Windows only)
Enable the virtual display g driver Those users listed below do not have toperform this operation Go to procedure s Adjusting the Virtual Display
p21bull Those users who have enabled virtual displays installing EasyMP
Network Projection
bull For Mac OS users
Procedure
A Start Windows on the computer and then select Start -Programs (or All Programs) - EPSON Projector - EasyMP
Network Projection - Add-Remove EPSON Virtual Display
The Add-Remove EPSON Virtual Display screen is displayed
B Select the virtual display you want to use
Up to four monitors can be added In this example a single virtual
display is to be used When setting multiple virtual displays select asmany displays as is necessaryAny one of the displays can be selected
C Click OK
When you click OK the drivers for the virtual display are enabled Atthis point it is normal for the display to flicker Wait for the Add-Remove EPSON Virtual Display screen to close
Adjusting the Virtual Display
After starting EasyMP Network Projection the procedure for setting up the virtual displays differs for Windows and Mac OS The procedures areexplained separately below
qCheck the following points before starting EasyMP Network Projectionwhen connecting via Wireless LAN If the following points are not setcorrectly Multi-screen display cannot be used
bull The SSID for the computer and each projector must be the same
bull The wireless LAN system for the computer and each projector mustbe the sameYou can modify the SSID and Wireless LAN system for theprojector from the Network menu in the projectors Configurationmenus Users Guide Wireless LAN Menu
Using Multi-Screen Display 21
8182019 Easy Mp Network Op Guide
httpslidepdfcomreaderfulleasy-mp-network-op-guide 2247
Procedure
For Windows
A Select Start - Programs (or All Programs) - EPSON
Projector - EasyMP Network Projection - EasyMP Network Projection V2XX to start EasyMP Network Projection
B Select the Use multi-display checkbox
Display layout and Display properties are added at the bottom of thescreen
C Click Display properties
The Display properties screen is displayed
D Click the Settings tab
Using Multi-Screen Display 22
8182019 Easy Mp Network Op Guide
httpslidepdfcomreaderfulleasy-mp-network-op-guide 2347
E Drag the displayed monitor icon and place it where desired
Here the actual monitor (1) is placed on the left while the virtualmonitor (3) is placed on the rightWhen the computer has multiple display output terminals thenumbers assigned to the virtual terminals will be sequential to thoseof the physical terminals
q bull When an external monitor is connected as a secondary monitor the
image for that screen cannot be projected
bull Depending on the hardware the number of the secondary monitormay be other than 2 When the monitor icon is displayed on thescreen click the icon and confirm that the monitor type shownunder Display is other than secondary
bull For the Screen Resolution settings see the followings p36
When the monitor icon is arranged a virtual display is connected asthe image like below
Using Multi-Screen Display 23
i l i i l
8182019 Easy Mp Network Op Guide
httpslidepdfcomreaderfulleasy-mp-network-op-guide 2447
F Click the OK button to close the Display properties screen
Up to this point the virtual display layout has been fixedAllocate the projecting images next s p25
For Mac OS
A Start EasyMP Network Projection Double-click the Applications
folder of the hard drive volume in which EasyMP Network Projection is installed and then double-click the EasyMP
Network Projection iconIn this example we select and start in Advanced ConnectionMode
B Select the Use multi-display checkbox
Display layout and Display preferences are added at the bottom of thescreen
C Click Display preferences
The display setting screen is displayed
D Click Arrangement
E Clear Mirror Displays
Using Multi-Screen Display 24
U i M lti S Di l
8182019 Easy Mp Network Op Guide
httpslidepdfcomreaderfulleasy-mp-network-op-guide 2547
F Drag the displayed monitor icon and place it where desired
G Close the display setting screen
Up to this point the screen layout has been fixed
Allocating the Image to be Projected
This section explains the virtual display for arrangement example 1s p20
Procedure
A Open the file to be projected
Start the PowerPoint and Excel files
B Drag the window to the desired virtual displayg monitor andallocate it where the image is to be projected
Drag the Excel window to the right until it cannot be seen As aresult the PowerPoint window appears on the actual monitor whilethe Excel window appears on the virtual display on the right
Projecting the Allocated Images
This section explains the virtual display for arrangement example 1s p20
Procedure
A Select the number of the virtual displayg
you want to fromDisplay and set which image to be projected from which
projector
Using Multi-Screen Display 25
Using M lti Screen Displa
8182019 Easy Mp Network Op Guide
httpslidepdfcomreaderfulleasy-mp-network-op-guide 2647
B Click Connect
The image allocated to each projector is projected
In a Windows environment you cannot view the image being sent toa virtual display on the computer To adjust the image on the virtualdisplay you must do so while viewing the projected imageTo perform mouse-based operations on the virtual display move themouse pointer in the direction of the virtual display such that thepointer appears on the virtual display
C To terminate multi-screen display click Disconnect on thetoolbar
Using Multi-Screen Display 26
Using Multi Screen Display 27
8182019 Easy Mp Network Op Guide
httpslidepdfcomreaderfulleasy-mp-network-op-guide 2747
q
In a Windows environment if the virtual display driver has been
enabled such that the mouse pointer can be moved outside the limitsof the screen there may be occasions when you lose track of thelocation of the pointer If you are not using a virtual display clear the virtual display checkbox on the Add-Remove EPSON Virtual Display screen so that the mouse pointer moves back inside the screensdisplay area To subsequently use multi-display again place a check mark against the required display under Add-Remove EPSON VirtualDisplayTo clear a check mark see the followings p21
Using Multi-Screen Display 27
Connecting to a Projector on a Different Subnet 28
8182019 Easy Mp Network Op Guide
httpslidepdfcomreaderfulleasy-mp-network-op-guide 2847
This chapter explains how to connect a computer to a projector on adifferent sub-net via a Wired LAN or a wireless LAN access point on anexisting network system
By default this application only searches for projectors on the same subnetas the computer Therefore even if you perform a search for projectors onthe network projectors on a different subnet will not be foundYou can however identify and connect to a projector on a different subnetas follows
bull Specify either an IP address or Projector name and perform a search
The IP Address can be input directly Also provided the Projector nameto be connected has been registered on the DNS server you can performa search simply by inputting that Projector names p28
bull Performing a search based on a Profile
Once you have performed a search for a projector on a different subnetby specifying either an IP Address or a Projector name you can save thesearch as a Profile with an easy-to-remember name and then use that
Profile whenever you subsequently want to search for a projector on adifferent subnets p29
q bull If a search fails to find a projector the most likely causes are as
follows Proceed as appropriate depending on the cause of thefailure
For both Windows and Mac OS
If there is no wireless LAN signal or if the signal is weak check
whether there is anything that could be interfering with the signalWhen the optional Wireless LAN unit is installed in the projectorand connecting Mac OS to a wireless LAN
Check whether AirPort is set to On Or check whether anappropriate access point has been selected
bull When you use Manual search in Quick Connection Mode you canspecify the SSID When there are a lot of projectors you can narrow the search field by using SSID
Specifying Either an IP Address or Projector Name
and Performing a Search (Advanced ConnectionMode Only)
In the following explanations unless otherwise noted Windows screenshots are usedThe similar screens are also displayed for Mac OS
Procedure
A Click Manual search on the EasyMP Network Projectionprojector selection screen
B Enter the IP address or the projector name for the projectoryou want to connect to and click OK
Connecting to a Projector on a Different Subnet 28
Connecting to a Projector on a Different Subnet 29
8182019 Easy Mp Network Op Guide
httpslidepdfcomreaderfulleasy-mp-network-op-guide 2947
The search results are displayed on the EasyMP Network Projectionprojector selection screen
Provided the target projector has been identified select that projectorand then click Connect to establish a connectionWhen you will always be using that projector save the search as aProfile so that you do not have to specify the relevant details every time you perform a search s p29
Performing a Search with a ProfileYou can save a search for a frequently used projector as a Profile AProfile is a file containing all of the information pertaining to a givenprojector such as the projector name its IP address and SSID If youspecify that information from the next time you perform a search there willbe no need to specify the IP address or projector name each time youperform a search For example by creating a group of Profiles for eachplace where a projector is setup and managing them with folders the target
projector can be found quickly
A Building A E Floor 1
B Building B F Floor 2
C Building C G Floor 3
D Building D
This section explains how to create and edit a Profile
Making a Profile
Profiles are made by saving search results
For details on how to edit a previously saved Profile see the followingsection s p31
Procedure
A While the projector is displayed on the EasyMP Network Projection projector selection screen click Save in the
profile
Connecting to a Projector on a Different Subnet 29
Connecting to a Projector on a Different Subnet 30
8182019 Easy Mp Network Op Guide
httpslidepdfcomreaderfulleasy-mp-network-op-guide 3047
The Save in the profile screen is displayed
B Enter a Profile name and then click Add
Projector information is registered in the ProfileIf you have previously saved a Profile you are prompted to confirmwhether or not to overwrite To save a Profile with a different nameselect Save as If you have created a folder for a Profile the followingscreens are displayed After entering the Profile name and selectingthe Save in destination click Add
For Windows
For Mac OS
qFor details on how to create a folder for a Profile see the followingsection s p31
Searching by specifying a Profile
You can search by specifying the Profile you created
Connecting to a Projector on a Different Subnet 30
Connecting to a Projector on a Different Subnet 31
8182019 Easy Mp Network Op Guide
httpslidepdfcomreaderfulleasy-mp-network-op-guide 3147
Procedure
A Click Profile on the EasyMP Network Projection projector
selection screen
If no Profile is registered you cannot select Profile
B From the menu that is displayed select the projector you wantto connect to
The search results are displayed on the EasyMP Network Projectionprojector selection screenProvided the target projector has been identified select that projectorand then click Connect to establish a connection
Managing a Profile
You can change the name and the hierarchical structure of the Profile
Procedure
A Click Set options on the EasyMP Network Projection main
screen
The Set options screen is displayed
B Click Edit profile
The Edit profile screen is displayed
C Edit the contents registered in the Profile
Co ect g to a ojecto o a D e e t Sub et 31
Connecting to a Projector on a Different Subnet 32
8182019 Easy Mp Network Op Guide
httpslidepdfcomreaderfulleasy-mp-network-op-guide 3247
A Indicates a folder
B Indicates a Profile
Prof i le
Item F u nctio n
Profi le
You can display the registered Profile You can manageit by creating a folder You can change the order of theProfile or the folder by dragging amp dropping
Copy
You can copy the Profile The copied Profile is saved in
the same folder as the original with the same nameDelete
You can delete the Profile and the folder
Prof i le
Item F u n ctio n
R e n a m e
Displays the Rename dialog box allowing you to renamethe folder or the Profile You can enter up to 32characters in the Rename dialog box
Create folder
You can create a new folder
E x p or t
Exports a created Profile allowing you to import and usethat Profile
I mp or t
Used when you want to read and use an exportedProfile
Informa tion on selected prof i le
Item F u n ctio n
P r oj e c tor n am e
I P addr e s s
You can display the projector information registered inthe Profile
Delete
You can delete the information for the selectedprojector When all projector information is deleted theprofile is also deleted
D Click OK
Saves your edits and closes the Edit profile screen
g j
Using Set options 33
8182019 Easy Mp Network Op Guide
httpslidepdfcomreaderfulleasy-mp-network-op-guide 3347
You can make setting options such as the processing method when EasyMPNetwork Projection startsAccess Set options from the EasyMP Network Projection main screen
Procedure
A Click Set options on the EasyMP Network Projection main
screen
The Set options screen is displayed
B Set each of the items
Confirm the details of the set items in the next step When you havemade all the necessary settings click OK to close the Set optionsscreen
Setting Each ItemSet each item from the General settings tab and the Adjust performancetab
General settings tab
Use fu l l -screen
vi de o t r an s fe r
This setting is disabled because the projector does notsupport the movie sending function
E n c r y p t
c ommun i c at i on s
Select to Encrypt and transmit data Even if data isintercepted it cannot be decrypted
When using Quick Connection Mode make sure youalways select this checkbox
Display Connection
Mod e Selection
w i n dow on s tar tup
Set whether or not the Quick Connection ModeAdvancedConnection Mode screen is displayed when EasyMPNetwork Projection starts
Clear this checkbox once you have settled on a regularstartup method
S e ar c h me th od on
s tar tup
Select from the following projector search methodsexecuted when EasyMP Network Projection is started
Automatic search on startup
Specify search method after startupSearch with the last network configuration
g p
Using Set options 34
8182019 Easy Mp Network Op Guide
httpslidepdfcomreaderfulleasy-mp-network-op-guide 3447
Edit profi le
The Edit profile dialog box is displayeds p31
S w i tc h L A N
Windows only The Switch Network Adapter dialog box is displayed Thisis used when it is necessary to switch the network adapter tobe used for a search when a computer has multipleadapters
By default all of the network adapters are used to perform asearch When a Wired LAN is always used as theconnection method select a Wired LAN adapter
R e s tor e D e faul ts
You can reset all adjustment values on the General settingstab to their default settings except for Edit profile andSwitch LAN
Adjust performance tab
P e r for man c e
adj us tme n t s l i de r
The performance can be set to Fast Normal andFine
Set to Fast when movie projections are interrupted
T r a n s f er l a y er e d
w i n dow
Windows only (excluding Windows Vista andWindows 7)
Set whether or not to transfer a layered windowThe layered window is in use when contents such asmessages displayed on the computer are not projectedby the projector Select this checkbox to projectcontents such as messages that use the layeredwindow
Clear this checkbox if you do not want the mousepointer to flicker on the screen
R e s tor e D e faul ts
You can reset all adjustment values for the Adjustperformance tab to their default settings
q When you click on the toolbar only the Adjust performance tab
is displayed
Audio Output tab
Because this projector does not support the audio sending function settingson the Audio Output tab are disabled
8182019 Easy Mp Network Op Guide
httpslidepdfcomreaderfulleasy-mp-network-op-guide 3547
Appendix
Connection Limitations 36
8182019 Easy Mp Network Op Guide
httpslidepdfcomreaderfulleasy-mp-network-op-guide 3647
When projecting computer images while running EasyMP Network Projection the following restrictions apply Confirm these points
Supported Resolutions
The following computer screen resolutions can be projected You cannotconnect to a computer with a resolution greater than UXGAg
bull VGA g(640x480)
bull SVGA g(800x600)
bull XGA g(1024x768)
bull SXGA g(1280x960)
bull SXGA (1280x1024)
bull SXGA+ (1400x1050)
bull WXGA (1280x768)
bull WXGA (1280x800)
bull
WXGA+ (1440x900)bull UXGA (1600x1200)
Supported resolutions when multi-screen display function is on
If a computer with a special screen size is used where the ratio of heightand width is not represented a screen resolution closest to the width isselected from the list of 10 aboveIn this case in wide screen the horizontal margins are projected in narrow screen the empty vertical margins are black
Display Color
The number of colors for computer screens that can be projected
W ind o w s M a c O S
16-bit color About 32000 colors (16-bit)
32-bit color About 167 million colors (32-bit)
The operational guarantee for multi-screen display is 16-bit and 32-bitcolor
Number of Connections
You can connect up to four projectors to one computer and projectsimultaneouslyYou cannot connect multiple computers to one projector simultaneously
Others
bull If the transmission speed of the Wireless LAN is low the network might be cut off unexpectedly
bull Audio is not transmitted
bull When videos are played back they do not play back as smoothly as
when displayed on the computerbull Applications that use part of DirectX functions may not be displayed
correctly(Windows only)
bull Cannot project full screen MS-DOS prompts(Windows only)
bull There are times when the image on the computer screen and the imageprojected by the projector may not match exactly
When Using Windows Vista or Windows 7
Note the following points when using EasyMP Network Projection on acomputer running Windows Vista or Windows 7
Limitations when projecting from Windows Photo Gallery
Note the following two limitations when launching Windows Photo Gallery when EasyMP Network Projection is running
Connection Limitations 37
8182019 Easy Mp Network Op Guide
httpslidepdfcomreaderfulleasy-mp-network-op-guide 3747
bull Slide Show is played back in simple mode when projecting fromWindows Photo Gallery
Because the toolbar is not displayed you cannot make changes whileplaying a Theme (effects) regardless of the Windows Experience IndexratingOnce simple mode has started you cannot change modes while WindowsPhoto Gallery is running even if you close EasyMP Network ProjectionRestart Windows Photo Gallery
bull You cannot play movies
Limitations in Windows Aero
Note the following two limitations when the window design for yourcomputer is Windows Aero
bull The layered window is projected regardless of Transfer layered window from Set options in EasyMP Network Projection
For example when Transfer layered window for EasyMP Network Projection toolbar is disabled it is not projected even if it is displayed onthe computer screen however the toolbar is projected
bull A few minutes after you connect a computer to the projector over anetwork with EasyMP Network Projection the following message is
displayedIt is recommended that you select Keep the current color scheme anddont show this message again This selection is enabled until thecomputer is restarted
Limitations when projecting from Windows Media Center
You cannot project images in full screen display using Windows MediaCenter Switch to the window display mode to project the images
Similarly images cannot be projected with Quick Wireless Connection orUSB Display
Troubleshooting 38
8182019 Easy Mp Network Op Guide
httpslidepdfcomreaderfulleasy-mp-network-op-guide 3847
If any of the following problems occur refer to the pages given for eachproblem
Problems concerning network functions
Cannot connect to the projector s p39
When a connection is made using EasyMP Network Projection the projectedimage remains as it is and a connection cannot be made from anothercomputer s p39
The projector is not found when EasyMP Network Projection is
started s
p39Cannot connect in Advanced Connection Mode or Wired LANconnection s p40
The Slide Show cannot be displayed on the desired display when the multi-screendisplay function is being executed s p41
Applications are no longer displayed from the computer screen when the multi-screen display function is executed s p41
The mouse cursor is not displayed on the computer screen s
p41When connecting with EasyMP Network Projection the image is not displayed orthe image is slow to appear s p41
When a connection is made using EasyMP Network Projection a PowerPointSlide Show cannot be started s p42
When a connection has been made using EasyMP Network Projection the screenwill not be refreshed when using an Office application s p42
Error message when starting up EasyMP Network Projection s
p42Network settings are not restored after cutting the connection to the computerwith EasyMP Network Projection s p44
Troubleshooting 39
8182019 Easy Mp Network Op Guide
httpslidepdfcomreaderfulleasy-mp-network-op-guide 3947
Problems Concerning Network Functions
Cannot connect to the projector
Check the message on the screen and then apply the following countermeasures
E r r or M essa g es R em ed y
The application version used is not supported Install the latest version of the application on your computer
Install EasyMP Network Projection from the EPSON Projector Software for Meeting amp Monitoring CD-ROMsupplied with the projector
When a connection is made using EasyMP Network Projection the projected image remains as it is and a connection cannot be madefrom another computer
Ch eck R em ed y
Did the presenter leave the conference room without cutting off thenetwork connection
With EasyMP Network Projection the connection with the computer that was previously connected can be cut off when another computer tries to connect with the projector and it connects with the computer that is trying to
connectTherefore when a Projector Keyword is not set for the projector or if you know the Projector Keyword you can cutoff the current connection and if you perform a connection operation you can connect to the projector
When a Projector Keyword is set for the projector if you do not know the Projector Keyword restart the projector andreconnect
The projector is not found when EasyMP Network Projection is started
Check R em ed y
Is the Wireless LAN unit connected
For Wireless LAN
Check that the optional Wireless LAN unit is securely connected
Is the Network Configuration screen from the Configurationmenu displayed on the projector
When the Network Configuration screen is displayed on the projector network connection for EasyMP Network Projection is disabled Close network settings on the projector and return to the LAN standby screen
Are the computers LAN card and the built-in LAN function
available
Check that LAN is valid by checking Control Panel - System - Hardware in the device manager and so on
Troubleshooting 40
8182019 Easy Mp Network Op Guide
httpslidepdfcomreaderfulleasy-mp-network-op-guide 4047
Check R em ed y
Is the SSID the same as that of the access pointQuick Connection Mode
Set an SSID that is different from that of the access points
Users Guide Network Menu
Is the DHCP function for Wired LAN turned On
Quick Connection Mode
Turn Off the DHCP setting for Wired LAN from the Configuration Menus Users Guide Network Menu
Was the network adapter used selected correctly with EasyMPNetwork Projection
If the computer has multiple LAN environments it cannot connect unless the network adapter is selected correctlyWhen using a computer running Windows start EasyMP Network Projection and select the network adapter you areusing from Set options - Switch LANs p33
For Wireless LAN connection is the Wireless LAN setting enabledwhen the computer is in power save mode
Enable the Wireless LAN
Are there any obstacles between the access point and the computeror projector
For Wireless LAN
Sometimes the electromagnetic wave situation prevents the projector from being found in a search Check for any obstacles between the access point and the computer or projector and change their position to improve theelectromagnetic wave situation
Is the computers Wireless LAN electromagnetic wave set to low Set the electromagnetic wave strength to maximum
Does the Wireless LAN conform to 80211g 80211b or 80211a It is only compatible with standards 80211g 80211b and 80211a and not with other standards such as 80211
Is the firewall turned off or has the firewall been registered as anexception
When you do not wish to turn off the firewall or register the firewall as an exception make the necessary settings toopen the ports
The ports used by EasyMP Network Projection are 3620 3621 and 3629
Is the network cable connected correctly
For Wired LAN
Check that the network cable is connected correctly Reconnect it if it is not connected or not connected properly
Cannot connect in Advanced Connection Mode or Wired LAN connection
Check R em ed y
Is the SSID setting different Set the computer the access point and the projector to the same SSIDs Users Guide Network Menu
Is the same WEP key set When selecting WEP from Security set the access point the computer and the projector to the same WEP keys Users Guide Network Menu
Are the connection denial functions such as MAC Addressg
restrictions and port restrictions set correctly at the access point Set the projector to allow connections from the access point
Troubleshooting 41
8182019 Easy Mp Network Op Guide
httpslidepdfcomreaderfulleasy-mp-network-op-guide 4147
Check R em ed y
Are the IP address the Subnet Mask and the Gateway Address forthe access point and the projector set correctly When not using a DHCP adjust each settings
Users Guide Network Menu
Are the access point and the projectors subnet different Select Manual search from EasyMP Network Projection specify the IP address and connects p28
The Slide Show cannot be displayed on the desired display when the multi-screen display function is being executed
Check R em ed y
Are you using PowerPoint 2002 or an earlier version
For Windows
To set and use two or more virtual displaysg use PowerPoint 2003 or later or limit the number of virtual displays toone before displaying the Slide Show
Applications are no longer displayed from the computer screen when the multi-screen display function is executed
Check R em ed y
Is another application running on the virtual display g
For Windows
When EPSON Virtual Display is installed another application sometimes runs on the virtual display In this case setEPSON Virtual Display to Off in Screen properties
The mouse cursor is not displayed on the computer screen
Check R em ed y
Is EPSON Virtual Display installed
For Windows
The mouse cursor was moved onto the virtual display g When the virtual display checkbox is cleared on the Add-Remove EPSON Virtual Display screen the mouse pointer returns to the screen display area
When connecting with EasyMP Network Projection the image is not displayed or the image is slow to appear
Ch eck R em ed y
Did you try to play back movies with Media Player or try to operatethe screen saver preview
Depending on the computer the movie playback screen in Media Player may not be displayed and the screen saverpreview may not be displayed normally
Troubleshooting 42
8182019 Easy Mp Network Op Guide
httpslidepdfcomreaderfulleasy-mp-network-op-guide 4247
Ch eck R em ed y
Is WEP encryption effective or are multiple projectors connected The display speed decreases when WEP encryption is effective or multiple projectors are connectedHave you enabled DHCP When DHCP is set to On in Advanced Connection Mode if an available DHCP server is not found it may take some
time to enter LAN standby status
Is Wireless LAN 80211gb being used in Quick ConnectionMode
Depending on the electromagnetic wave environment there are times when the image and sound for movies may stop When using the movie sending function use Advanced Connection Mode or Wireless LAN 80211a in Quick Connection Mode
When a connection is made using EasyMP Network Projection a PowerPoint Slide Show cannot be started
Ch eck R em ed y
Was EasyMP Network Projection started while PowerPoint wasrunning
For Windows
When connecting with EasyMP Network Projection make sure you close PowerPoint first Slide Show might not runif connecting while PowerPoint is running
When a connection has been made using EasyMP Network Projection the screen will not be refreshed when using an Office application
Ch eck R em ed y
Is the mouse moved continuously When you stop moving the mouse cursor the screen is updated If the screen does not update quickly stop moving themouse cursor
Error message when starting up EasyMP Network Projection
E r r or M essa g es R em ed y
Connection to the projector failed Try to connect again If it still does not connect check the network settings on the computer and the network settingsfor the projector
For details on the network settings to be made on the projector sees Users Guide Network Menu
The keyword does not match Re-enter the keyword displayed onthe projector screen
Check the Projector Keyword displayed on the LAN standby screen and enter the Projector Keyword
8182019 Easy Mp Network Op Guide
httpslidepdfcomreaderfulleasy-mp-network-op-guide 4347
Troubleshooting 44
8182019 Easy Mp Network Op Guide
httpslidepdfcomreaderfulleasy-mp-network-op-guide 4447
Network settings are not restored after cutting the connection to the computer with EasyMP Network Projection
Check R em ed y
Are you manually connecting to a Wireless LAN when thecomputer starts up
Quick Connection Mode
Try connecting to the Wireless LAN manually
Glossary 45
8182019 Easy Mp Network Op Guide
httpslidepdfcomreaderfulleasy-mp-network-op-guide 4547
This section briefly explains the difficult terms that are not explained in the text of this guide For details refer to other commercially available publications
A d h o c
A method of Wireless LAN connection that communicates with wireless LAN clients without using an access point It is not possible to communicatewith two or more devices simultaneously
M A C A d d r e ss
An abbreviation of Media Access Control The MAC Address is an ID number unique to each network adapter A unique number is assigned to eachnetwork adapter and data is transmitted between network adapters based on this identification
S V G A
A type of video signal with a resolution of 800 (horizontal) ^600 (vertical) dots that is used byIBM PCAT-compatible computers
S X G A
A type of video signal with a resolution of 1280 (horizontal) ^ 1024 (vertical) dots that is used by IBM PCAT-compatible computers
U X G A
A type of video signal with a resolution of 1600 (horizontal) ^ 1200 (vertical) dots that is used by IBM PCAT-compatible computers
V G A
A type of video signal with a resolution of 640 (horizontal) ^ 480 (vertical) dots that is used by IBM PCAT-compatible computers
V i r tual D i s p lay
The screen for one computer is output to multiple displays A large virtual screen can be created by using multiple displays
X G A
A type of video signal with a resolution of 1024 (horizontal) ^ 768 (vertical) dots that is used by IBM PCAT-compatible computers
8182019 Easy Mp Network Op Guide
httpslidepdfcomreaderfulleasy-mp-network-op-guide 4647
8182019 Easy Mp Network Op Guide
httpslidepdfcomreaderfulleasy-mp-network-op-guide 4747
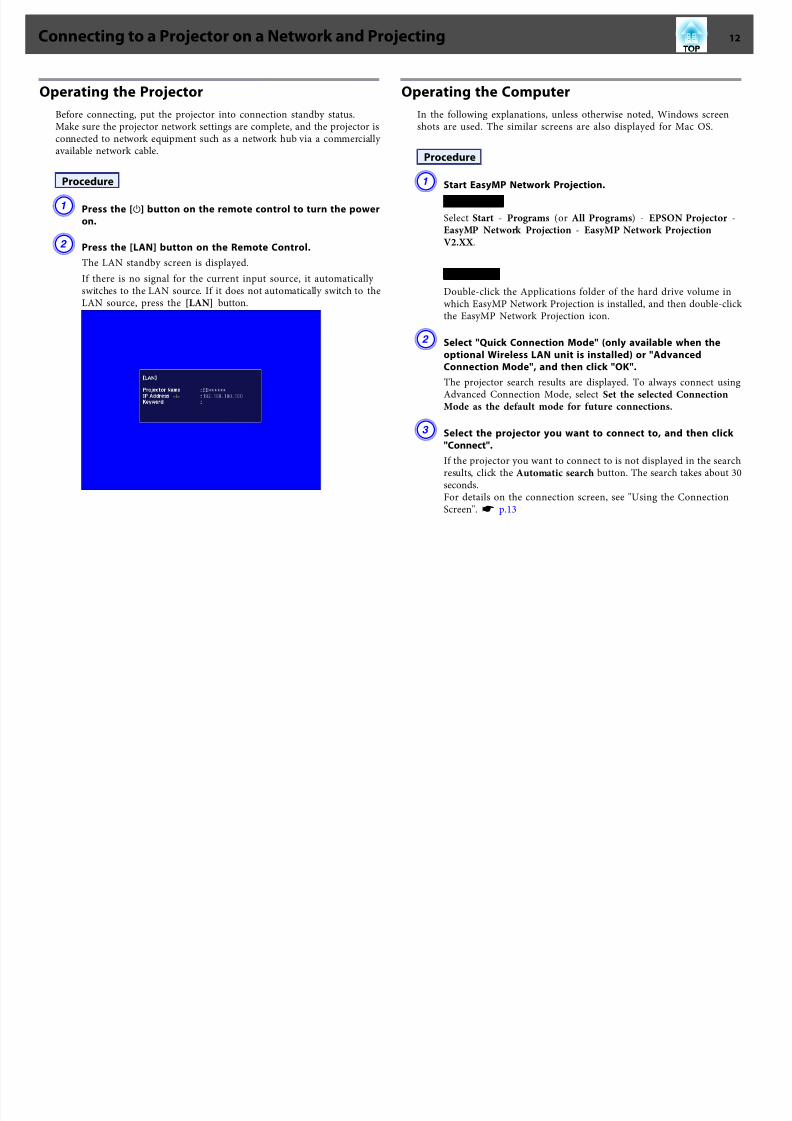
8182019 Easy Mp Network Op Guide
httpslidepdfcomreaderfulleasy-mp-network-op-guide 1247
Operating the ProjectorBefore connecting put the projector into connection standby statusMake sure the projector network settings are complete and the projector isconnected to network equipment such as a network hub via a commercially available network cable
Procedure
A Press the [t] button on the remote control to turn the poweron
B Press the [LAN] button on the Remote Control
The LAN standby screen is displayed
If there is no signal for the current input source it automatically
switches to the LAN source If it does not automatically switch to theLAN source press the [LAN] button
Operating the ComputerIn the following explanations unless otherwise noted Windows screenshots are used The similar screens are also displayed for Mac OS
Procedure
A Start EasyMP Network Projection
For Windows
Select Start - Programs (or All Programs) - EPSON Projector -EasyMP Network Projection - EasyMP Network ProjectionV2XX
For Mac OS
Double-click the Applications folder of the hard drive volume inwhich EasyMP Network Projection is installed and then double-click the EasyMP Network Projection icon
B Select Quick Connection Mode (only available when the
optional Wireless LAN unit is installed) or AdvancedConnection Mode and then click OK
The projector search results are displayed To always connect using
Advanced Connection Mode select Set the selected ConnectionMode as the default mode for future connections
C Select the projector you want to connect to and then click
Connect
If the projector you want to connect to is not displayed in the searchresults click the Automatic search button The search takes about 30
secondsFor details on the connection screen see Using the ConnectionScreen s p13
Connecting to a Projector on a Network and Projecting 12
8182019 Easy Mp Network Op Guide
httpslidepdfcomreaderfulleasy-mp-network-op-guide 1347
D When Projector Keyword is set to On from the projector the
Keyword entry screen is displayed Enter the keyworddisplayed on the LAN standby screen and then click OK
When the connection is complete the computer screen is projectedThe following EasyMP Network Projection toolbar is displayed on thecomputer screen You can use this toolbar to operate the projectorand make settings and to disconnect the network connection Fordetails on the toolbar see Using the Toolbar s p15
qWhen connecting from another computer such as when changingpresenters start EasyMP Network Projection from the computer youwant to connect The computer that is currently connected isdisconnected and the projector is then connected with the computerthat is trying to connect now
If a connection is made while Disable interrupt connection is set theconnection is not switched to another computer
Using the Connection Screen
Start EasyMP Network Projection to display the following screen Theoperation of each button or item is described in the following table
When the system starts in Advanced Connection Mode
Connecting to a Projector on a Network and Projecting 13
8182019 Easy Mp Network Op Guide
httpslidepdfcomreaderfulleasy-mp-network-op-guide 1447
When the system starts in Quick Connection Mode
A Automatic search
In Advanced Connection Mode you can search for available projectorson the network system to which the computer is connected
In Quick Connection Mode you can search for the projector based onthe SSID
B Manual search
In Advanced Connection Mode you can search for a projector based ona specified IP address or projector name
In Quick Connection Mode you can search for the projector based onthe SSID selected from a list
C Status
The following six icons indicate the status of the detected projectors
Standby Select for connecting
Busy Select for connecting When you click Connect the computer currently
connected is disconnected and yourcomputer is connected
Busy (Disable
interrupt con‐nection)
Cannot be selected Disable interrupt
connection is set on another computerwhich is already connected
Currently inuse by anotherapplication
The projectors Configuration Menu isopen You can select it after closing theConfiguration menu and running thesearch again
Searching Displayed while running Manual search orProfile
Not found Displayed when a projector cannot be foundas a result of Manual search or Profile InQuick Connection Mode you can only select multiple projectors with the sameSSID
D Projector name
The projectors name is displayed
E Disable interrupt connection
Check the box to prevent an interrupt connection by other computers whileconnected to the selected projector
F Use multi-display
Check the box to use the Multi-screen display function When this is selectedDisplay layout and Display properties are displayed at the bottom of the screens p20
G Troubleshooting
If there is a problem and you cannot have a connection press this button to openthe EasyMP Network Projection Troubleshooting screen
H Connect
Connect to the projector you selected from the search results list When aconnection is made with a projector a toolbar is displayed
I Set options
You can set general setting options such as the processing method when startingEasyMP Network Projection For details see Set optionss p33
J Save in the profileSaves the results of a network projector search as a Profiles p29
Connecting to a Projector on a Network and Projecting 14
8182019 Easy Mp Network Op Guide
httpslidepdfcomreaderfulleasy-mp-network-op-guide 1547
K Clear list
Deletes all search resultsL IP address (Advanced Connection Mode only)
The projectors IP address is displayed
M Display
(Select the number displayed (when Use multi-display is selected)s p25
N Profile
You can search for a projector on the network using a Profile savedusing Save in the profiles p29
O SSID (Quick Connection Mode only)
The projectors SSID is displayed
P Signal intensity
This is displayed when the connection is made in Quick Connection Mode As theSignal intensity increases so does the number of lit indicators
Q Update list (Quick Connection Mode only)
Updates Status and Signal intensity
Using the Toolbar
The toolbar is displayed on the computer screen after EasyMP Network Projection starts and a connection is made with the projector You can usethis toolbar to operate and make settings for the projector
Select target projector
Click to limit the projectors operated from the toolbar when projectingfrom multiple projectors using the distribution function or Multi-screen display The indication below the icon shows the projectors thatcan be controlledALL indicates that all of the connected projectors can be controlledFor example when 1 3 is displayed projectors No 1 and No 3 can becontrolled
Click to display the following screen
A Select the projector to be controlled
B Indicates the No of an allocated projector This No indicates theNo of the projector that you can control from the toolbar
C Indicates the status of the projector
Stop
Connecting to a Projector on a Network and Projecting 15
8182019 Easy Mp Network Op Guide
httpslidepdfcomreaderfulleasy-mp-network-op-guide 1647
Stops projection while connected to the projector A black screen is
projected while stopped Audio does not stop To stop the audio or todisplay a Users Logo while projection is stopped use the AV Mutefunction
Show
Releases Stop or Pause
Pause
Pauses projected images while connecting to the projector The audio isnot paused
Presentation Mode
Each time this is clicked Presentation Mode switches between enableddisableds p19
Projector control
While the projector is connected to the network the projectors AVMute Switch PC source and Switch video source functions can becontrolled from both the Remote Control and the projectors Control
panel
Click to display the following toolbar
AV Mute
The same function as the [AV Mute] button on theRemote Control
s Users Guide Remote Control
Switch PC source
The Source alternates between Computer1Computer2 USB Display USB and LAN each timeyou click
Switch video source
The Source alternates between S-Video and Videoeach time you click S-Video does not switch if thecable is not connected
Screen Preview
Displays the multi-screen preview screen
Click to display a preview with the settings you have made Click
each display to enlarge each Screen Preview to full-screen
Set options
Transmission performance during the transfer of computer images canbe adjusteds p33
Movie Sending Mode
Not enabled on this projector The message The connected projectorsdo not support Movie Sending is displayed
DisconnectDisconnects the connection to the projector
Signal intensity
This is displayed when a connection is made in Quick ConnectionMode As the Signal intensity increases so does the number of litindicators
Switch toolbar display
Connecting to a Projector on a Network and Projecting 16
8182019 Easy Mp Network Op Guide
httpslidepdfcomreaderfulleasy-mp-network-op-guide 1747
The toolbar display is switched as follows The toolbar display remains
as is until switched againFull
Normal
Simple
Connecting to a Projector on a Network and Projecting 17
8182019 Easy Mp Network Op Guide
httpslidepdfcomreaderfulleasy-mp-network-op-guide 1847
Functions and Settings for EasyMP Network ProjectionThis chapter explains the functions that may be useful in a meeting or presentation such as the Multi-Screen Display which allows you to send images tomultiple projectors from a single computer
8182019 Easy Mp Network Op Guide
httpslidepdfcomreaderfulleasy-mp-network-op-guide 1947
In Presentation Mode the images are only displayed when performing a
PowerPoint Slide Show on a computer When you stop Slide Show theprojector displays a black screen This is useful when you only want todisplay the Slide ShowIn addition to PowerPoint Keynote is compatible with Presentation Modefor Mac OS
Procedure
A If necessary select another projector to be controlleds p15
B Click the button on the toolbar
Presentation Mode begins
C Click the button again to exit Presentation Mode
Projecting Only a PowerPoint Slide Show (Presentation Mode) 19
8182019 Easy Mp Network Op Guide
httpslidepdfcomreaderfulleasy-mp-network-op-guide 2047
Example of Adjusting the Virtual Display
By arranging the virtual display g allocation you can project only the imagethat you want to show or project different images from left to right in apresentation
Arrangement example 1
AA c tual mon i tor i mag e
PowerPoint file
B I mag e of v i r tua l d i s p lay
Excel file
Arrangement example 2
AA c tual mon i tor i mag e
PowerPoint file presenter tools
BI mag e of v i r tua l d i s p lay
Slide Show using a PowerPoint file
Procedure Before Using the Multi-screen Display
Function
1 Setting the Virtual Display s p21
In a Windows environment enable the virtual display g driver as necessary Alsofor both Windows and Mac OS set up the virtual display arrangement
2 Allocating the image to be projected s p25
Using Multi-Screen Display 20
8182019 Easy Mp Network Op Guide
httpslidepdfcomreaderfulleasy-mp-network-op-guide 2147
Open the file to be projected and then move the screen to the virtual display
according to the actual projection arrangement3 Projecting the allocated images s p25
Allocate a virtual display number to a projector that is connected through thenetwork and then start projection
Setting the Virtual Display
This chapter explains the virtual display for arrangement example 1s p20
Enable the virtual display driver (Windows only)
Enable the virtual display g driver Those users listed below do not have toperform this operation Go to procedure s Adjusting the Virtual Display
p21bull Those users who have enabled virtual displays installing EasyMP
Network Projection
bull For Mac OS users
Procedure
A Start Windows on the computer and then select Start -Programs (or All Programs) - EPSON Projector - EasyMP
Network Projection - Add-Remove EPSON Virtual Display
The Add-Remove EPSON Virtual Display screen is displayed
B Select the virtual display you want to use
Up to four monitors can be added In this example a single virtual
display is to be used When setting multiple virtual displays select asmany displays as is necessaryAny one of the displays can be selected
C Click OK
When you click OK the drivers for the virtual display are enabled Atthis point it is normal for the display to flicker Wait for the Add-Remove EPSON Virtual Display screen to close
Adjusting the Virtual Display
After starting EasyMP Network Projection the procedure for setting up the virtual displays differs for Windows and Mac OS The procedures areexplained separately below
qCheck the following points before starting EasyMP Network Projectionwhen connecting via Wireless LAN If the following points are not setcorrectly Multi-screen display cannot be used
bull The SSID for the computer and each projector must be the same
bull The wireless LAN system for the computer and each projector mustbe the sameYou can modify the SSID and Wireless LAN system for theprojector from the Network menu in the projectors Configurationmenus Users Guide Wireless LAN Menu
Using Multi-Screen Display 21
8182019 Easy Mp Network Op Guide
httpslidepdfcomreaderfulleasy-mp-network-op-guide 2247
Procedure
For Windows
A Select Start - Programs (or All Programs) - EPSON
Projector - EasyMP Network Projection - EasyMP Network Projection V2XX to start EasyMP Network Projection
B Select the Use multi-display checkbox
Display layout and Display properties are added at the bottom of thescreen
C Click Display properties
The Display properties screen is displayed
D Click the Settings tab
Using Multi-Screen Display 22
8182019 Easy Mp Network Op Guide
httpslidepdfcomreaderfulleasy-mp-network-op-guide 2347
E Drag the displayed monitor icon and place it where desired
Here the actual monitor (1) is placed on the left while the virtualmonitor (3) is placed on the rightWhen the computer has multiple display output terminals thenumbers assigned to the virtual terminals will be sequential to thoseof the physical terminals
q bull When an external monitor is connected as a secondary monitor the
image for that screen cannot be projected
bull Depending on the hardware the number of the secondary monitormay be other than 2 When the monitor icon is displayed on thescreen click the icon and confirm that the monitor type shownunder Display is other than secondary
bull For the Screen Resolution settings see the followings p36
When the monitor icon is arranged a virtual display is connected asthe image like below
Using Multi-Screen Display 23
i l i i l
8182019 Easy Mp Network Op Guide
httpslidepdfcomreaderfulleasy-mp-network-op-guide 2447
F Click the OK button to close the Display properties screen
Up to this point the virtual display layout has been fixedAllocate the projecting images next s p25
For Mac OS
A Start EasyMP Network Projection Double-click the Applications
folder of the hard drive volume in which EasyMP Network Projection is installed and then double-click the EasyMP
Network Projection iconIn this example we select and start in Advanced ConnectionMode
B Select the Use multi-display checkbox
Display layout and Display preferences are added at the bottom of thescreen
C Click Display preferences
The display setting screen is displayed
D Click Arrangement
E Clear Mirror Displays
Using Multi-Screen Display 24
U i M lti S Di l
8182019 Easy Mp Network Op Guide
httpslidepdfcomreaderfulleasy-mp-network-op-guide 2547
F Drag the displayed monitor icon and place it where desired
G Close the display setting screen
Up to this point the screen layout has been fixed
Allocating the Image to be Projected
This section explains the virtual display for arrangement example 1s p20
Procedure
A Open the file to be projected
Start the PowerPoint and Excel files
B Drag the window to the desired virtual displayg monitor andallocate it where the image is to be projected
Drag the Excel window to the right until it cannot be seen As aresult the PowerPoint window appears on the actual monitor whilethe Excel window appears on the virtual display on the right
Projecting the Allocated Images
This section explains the virtual display for arrangement example 1s p20
Procedure
A Select the number of the virtual displayg
you want to fromDisplay and set which image to be projected from which
projector
Using Multi-Screen Display 25
Using M lti Screen Displa
8182019 Easy Mp Network Op Guide
httpslidepdfcomreaderfulleasy-mp-network-op-guide 2647
B Click Connect
The image allocated to each projector is projected
In a Windows environment you cannot view the image being sent toa virtual display on the computer To adjust the image on the virtualdisplay you must do so while viewing the projected imageTo perform mouse-based operations on the virtual display move themouse pointer in the direction of the virtual display such that thepointer appears on the virtual display
C To terminate multi-screen display click Disconnect on thetoolbar
Using Multi-Screen Display 26
Using Multi Screen Display 27
8182019 Easy Mp Network Op Guide
httpslidepdfcomreaderfulleasy-mp-network-op-guide 2747
q
In a Windows environment if the virtual display driver has been
enabled such that the mouse pointer can be moved outside the limitsof the screen there may be occasions when you lose track of thelocation of the pointer If you are not using a virtual display clear the virtual display checkbox on the Add-Remove EPSON Virtual Display screen so that the mouse pointer moves back inside the screensdisplay area To subsequently use multi-display again place a check mark against the required display under Add-Remove EPSON VirtualDisplayTo clear a check mark see the followings p21
Using Multi-Screen Display 27
Connecting to a Projector on a Different Subnet 28
8182019 Easy Mp Network Op Guide
httpslidepdfcomreaderfulleasy-mp-network-op-guide 2847
This chapter explains how to connect a computer to a projector on adifferent sub-net via a Wired LAN or a wireless LAN access point on anexisting network system
By default this application only searches for projectors on the same subnetas the computer Therefore even if you perform a search for projectors onthe network projectors on a different subnet will not be foundYou can however identify and connect to a projector on a different subnetas follows
bull Specify either an IP address or Projector name and perform a search
The IP Address can be input directly Also provided the Projector nameto be connected has been registered on the DNS server you can performa search simply by inputting that Projector names p28
bull Performing a search based on a Profile
Once you have performed a search for a projector on a different subnetby specifying either an IP Address or a Projector name you can save thesearch as a Profile with an easy-to-remember name and then use that
Profile whenever you subsequently want to search for a projector on adifferent subnets p29
q bull If a search fails to find a projector the most likely causes are as
follows Proceed as appropriate depending on the cause of thefailure
For both Windows and Mac OS
If there is no wireless LAN signal or if the signal is weak check
whether there is anything that could be interfering with the signalWhen the optional Wireless LAN unit is installed in the projectorand connecting Mac OS to a wireless LAN
Check whether AirPort is set to On Or check whether anappropriate access point has been selected
bull When you use Manual search in Quick Connection Mode you canspecify the SSID When there are a lot of projectors you can narrow the search field by using SSID
Specifying Either an IP Address or Projector Name
and Performing a Search (Advanced ConnectionMode Only)
In the following explanations unless otherwise noted Windows screenshots are usedThe similar screens are also displayed for Mac OS
Procedure
A Click Manual search on the EasyMP Network Projectionprojector selection screen
B Enter the IP address or the projector name for the projectoryou want to connect to and click OK
Connecting to a Projector on a Different Subnet 28
Connecting to a Projector on a Different Subnet 29
8182019 Easy Mp Network Op Guide
httpslidepdfcomreaderfulleasy-mp-network-op-guide 2947
The search results are displayed on the EasyMP Network Projectionprojector selection screen
Provided the target projector has been identified select that projectorand then click Connect to establish a connectionWhen you will always be using that projector save the search as aProfile so that you do not have to specify the relevant details every time you perform a search s p29
Performing a Search with a ProfileYou can save a search for a frequently used projector as a Profile AProfile is a file containing all of the information pertaining to a givenprojector such as the projector name its IP address and SSID If youspecify that information from the next time you perform a search there willbe no need to specify the IP address or projector name each time youperform a search For example by creating a group of Profiles for eachplace where a projector is setup and managing them with folders the target
projector can be found quickly
A Building A E Floor 1
B Building B F Floor 2
C Building C G Floor 3
D Building D
This section explains how to create and edit a Profile
Making a Profile
Profiles are made by saving search results
For details on how to edit a previously saved Profile see the followingsection s p31
Procedure
A While the projector is displayed on the EasyMP Network Projection projector selection screen click Save in the
profile
Connecting to a Projector on a Different Subnet 29
Connecting to a Projector on a Different Subnet 30
8182019 Easy Mp Network Op Guide
httpslidepdfcomreaderfulleasy-mp-network-op-guide 3047
The Save in the profile screen is displayed
B Enter a Profile name and then click Add
Projector information is registered in the ProfileIf you have previously saved a Profile you are prompted to confirmwhether or not to overwrite To save a Profile with a different nameselect Save as If you have created a folder for a Profile the followingscreens are displayed After entering the Profile name and selectingthe Save in destination click Add
For Windows
For Mac OS
qFor details on how to create a folder for a Profile see the followingsection s p31
Searching by specifying a Profile
You can search by specifying the Profile you created
Connecting to a Projector on a Different Subnet 30
Connecting to a Projector on a Different Subnet 31
8182019 Easy Mp Network Op Guide
httpslidepdfcomreaderfulleasy-mp-network-op-guide 3147
Procedure
A Click Profile on the EasyMP Network Projection projector
selection screen
If no Profile is registered you cannot select Profile
B From the menu that is displayed select the projector you wantto connect to
The search results are displayed on the EasyMP Network Projectionprojector selection screenProvided the target projector has been identified select that projectorand then click Connect to establish a connection
Managing a Profile
You can change the name and the hierarchical structure of the Profile
Procedure
A Click Set options on the EasyMP Network Projection main
screen
The Set options screen is displayed
B Click Edit profile
The Edit profile screen is displayed
C Edit the contents registered in the Profile
Co ect g to a ojecto o a D e e t Sub et 31
Connecting to a Projector on a Different Subnet 32
8182019 Easy Mp Network Op Guide
httpslidepdfcomreaderfulleasy-mp-network-op-guide 3247
A Indicates a folder
B Indicates a Profile
Prof i le
Item F u nctio n
Profi le
You can display the registered Profile You can manageit by creating a folder You can change the order of theProfile or the folder by dragging amp dropping
Copy
You can copy the Profile The copied Profile is saved in
the same folder as the original with the same nameDelete
You can delete the Profile and the folder
Prof i le
Item F u n ctio n
R e n a m e
Displays the Rename dialog box allowing you to renamethe folder or the Profile You can enter up to 32characters in the Rename dialog box
Create folder
You can create a new folder
E x p or t
Exports a created Profile allowing you to import and usethat Profile
I mp or t
Used when you want to read and use an exportedProfile
Informa tion on selected prof i le
Item F u n ctio n
P r oj e c tor n am e
I P addr e s s
You can display the projector information registered inthe Profile
Delete
You can delete the information for the selectedprojector When all projector information is deleted theprofile is also deleted
D Click OK
Saves your edits and closes the Edit profile screen
g j
Using Set options 33
8182019 Easy Mp Network Op Guide
httpslidepdfcomreaderfulleasy-mp-network-op-guide 3347
You can make setting options such as the processing method when EasyMPNetwork Projection startsAccess Set options from the EasyMP Network Projection main screen
Procedure
A Click Set options on the EasyMP Network Projection main
screen
The Set options screen is displayed
B Set each of the items
Confirm the details of the set items in the next step When you havemade all the necessary settings click OK to close the Set optionsscreen
Setting Each ItemSet each item from the General settings tab and the Adjust performancetab
General settings tab
Use fu l l -screen
vi de o t r an s fe r
This setting is disabled because the projector does notsupport the movie sending function
E n c r y p t
c ommun i c at i on s
Select to Encrypt and transmit data Even if data isintercepted it cannot be decrypted
When using Quick Connection Mode make sure youalways select this checkbox
Display Connection
Mod e Selection
w i n dow on s tar tup
Set whether or not the Quick Connection ModeAdvancedConnection Mode screen is displayed when EasyMPNetwork Projection starts
Clear this checkbox once you have settled on a regularstartup method
S e ar c h me th od on
s tar tup
Select from the following projector search methodsexecuted when EasyMP Network Projection is started
Automatic search on startup
Specify search method after startupSearch with the last network configuration
g p
Using Set options 34
8182019 Easy Mp Network Op Guide
httpslidepdfcomreaderfulleasy-mp-network-op-guide 3447
Edit profi le
The Edit profile dialog box is displayeds p31
S w i tc h L A N
Windows only The Switch Network Adapter dialog box is displayed Thisis used when it is necessary to switch the network adapter tobe used for a search when a computer has multipleadapters
By default all of the network adapters are used to perform asearch When a Wired LAN is always used as theconnection method select a Wired LAN adapter
R e s tor e D e faul ts
You can reset all adjustment values on the General settingstab to their default settings except for Edit profile andSwitch LAN
Adjust performance tab
P e r for man c e
adj us tme n t s l i de r
The performance can be set to Fast Normal andFine
Set to Fast when movie projections are interrupted
T r a n s f er l a y er e d
w i n dow
Windows only (excluding Windows Vista andWindows 7)
Set whether or not to transfer a layered windowThe layered window is in use when contents such asmessages displayed on the computer are not projectedby the projector Select this checkbox to projectcontents such as messages that use the layeredwindow
Clear this checkbox if you do not want the mousepointer to flicker on the screen
R e s tor e D e faul ts
You can reset all adjustment values for the Adjustperformance tab to their default settings
q When you click on the toolbar only the Adjust performance tab
is displayed
Audio Output tab
Because this projector does not support the audio sending function settingson the Audio Output tab are disabled
8182019 Easy Mp Network Op Guide
httpslidepdfcomreaderfulleasy-mp-network-op-guide 3547
Appendix
Connection Limitations 36
8182019 Easy Mp Network Op Guide
httpslidepdfcomreaderfulleasy-mp-network-op-guide 3647
When projecting computer images while running EasyMP Network Projection the following restrictions apply Confirm these points
Supported Resolutions
The following computer screen resolutions can be projected You cannotconnect to a computer with a resolution greater than UXGAg
bull VGA g(640x480)
bull SVGA g(800x600)
bull XGA g(1024x768)
bull SXGA g(1280x960)
bull SXGA (1280x1024)
bull SXGA+ (1400x1050)
bull WXGA (1280x768)
bull WXGA (1280x800)
bull
WXGA+ (1440x900)bull UXGA (1600x1200)
Supported resolutions when multi-screen display function is on
If a computer with a special screen size is used where the ratio of heightand width is not represented a screen resolution closest to the width isselected from the list of 10 aboveIn this case in wide screen the horizontal margins are projected in narrow screen the empty vertical margins are black
Display Color
The number of colors for computer screens that can be projected
W ind o w s M a c O S
16-bit color About 32000 colors (16-bit)
32-bit color About 167 million colors (32-bit)
The operational guarantee for multi-screen display is 16-bit and 32-bitcolor
Number of Connections
You can connect up to four projectors to one computer and projectsimultaneouslyYou cannot connect multiple computers to one projector simultaneously
Others
bull If the transmission speed of the Wireless LAN is low the network might be cut off unexpectedly
bull Audio is not transmitted
bull When videos are played back they do not play back as smoothly as
when displayed on the computerbull Applications that use part of DirectX functions may not be displayed
correctly(Windows only)
bull Cannot project full screen MS-DOS prompts(Windows only)
bull There are times when the image on the computer screen and the imageprojected by the projector may not match exactly
When Using Windows Vista or Windows 7
Note the following points when using EasyMP Network Projection on acomputer running Windows Vista or Windows 7
Limitations when projecting from Windows Photo Gallery
Note the following two limitations when launching Windows Photo Gallery when EasyMP Network Projection is running
Connection Limitations 37
8182019 Easy Mp Network Op Guide
httpslidepdfcomreaderfulleasy-mp-network-op-guide 3747
bull Slide Show is played back in simple mode when projecting fromWindows Photo Gallery
Because the toolbar is not displayed you cannot make changes whileplaying a Theme (effects) regardless of the Windows Experience IndexratingOnce simple mode has started you cannot change modes while WindowsPhoto Gallery is running even if you close EasyMP Network ProjectionRestart Windows Photo Gallery
bull You cannot play movies
Limitations in Windows Aero
Note the following two limitations when the window design for yourcomputer is Windows Aero
bull The layered window is projected regardless of Transfer layered window from Set options in EasyMP Network Projection
For example when Transfer layered window for EasyMP Network Projection toolbar is disabled it is not projected even if it is displayed onthe computer screen however the toolbar is projected
bull A few minutes after you connect a computer to the projector over anetwork with EasyMP Network Projection the following message is
displayedIt is recommended that you select Keep the current color scheme anddont show this message again This selection is enabled until thecomputer is restarted
Limitations when projecting from Windows Media Center
You cannot project images in full screen display using Windows MediaCenter Switch to the window display mode to project the images
Similarly images cannot be projected with Quick Wireless Connection orUSB Display
Troubleshooting 38
8182019 Easy Mp Network Op Guide
httpslidepdfcomreaderfulleasy-mp-network-op-guide 3847
If any of the following problems occur refer to the pages given for eachproblem
Problems concerning network functions
Cannot connect to the projector s p39
When a connection is made using EasyMP Network Projection the projectedimage remains as it is and a connection cannot be made from anothercomputer s p39
The projector is not found when EasyMP Network Projection is
started s
p39Cannot connect in Advanced Connection Mode or Wired LANconnection s p40
The Slide Show cannot be displayed on the desired display when the multi-screendisplay function is being executed s p41
Applications are no longer displayed from the computer screen when the multi-screen display function is executed s p41
The mouse cursor is not displayed on the computer screen s
p41When connecting with EasyMP Network Projection the image is not displayed orthe image is slow to appear s p41
When a connection is made using EasyMP Network Projection a PowerPointSlide Show cannot be started s p42
When a connection has been made using EasyMP Network Projection the screenwill not be refreshed when using an Office application s p42
Error message when starting up EasyMP Network Projection s
p42Network settings are not restored after cutting the connection to the computerwith EasyMP Network Projection s p44
Troubleshooting 39
8182019 Easy Mp Network Op Guide
httpslidepdfcomreaderfulleasy-mp-network-op-guide 3947
Problems Concerning Network Functions
Cannot connect to the projector
Check the message on the screen and then apply the following countermeasures
E r r or M essa g es R em ed y
The application version used is not supported Install the latest version of the application on your computer
Install EasyMP Network Projection from the EPSON Projector Software for Meeting amp Monitoring CD-ROMsupplied with the projector
When a connection is made using EasyMP Network Projection the projected image remains as it is and a connection cannot be madefrom another computer
Ch eck R em ed y
Did the presenter leave the conference room without cutting off thenetwork connection
With EasyMP Network Projection the connection with the computer that was previously connected can be cut off when another computer tries to connect with the projector and it connects with the computer that is trying to
connectTherefore when a Projector Keyword is not set for the projector or if you know the Projector Keyword you can cutoff the current connection and if you perform a connection operation you can connect to the projector
When a Projector Keyword is set for the projector if you do not know the Projector Keyword restart the projector andreconnect
The projector is not found when EasyMP Network Projection is started
Check R em ed y
Is the Wireless LAN unit connected
For Wireless LAN
Check that the optional Wireless LAN unit is securely connected
Is the Network Configuration screen from the Configurationmenu displayed on the projector
When the Network Configuration screen is displayed on the projector network connection for EasyMP Network Projection is disabled Close network settings on the projector and return to the LAN standby screen
Are the computers LAN card and the built-in LAN function
available
Check that LAN is valid by checking Control Panel - System - Hardware in the device manager and so on
Troubleshooting 40
8182019 Easy Mp Network Op Guide
httpslidepdfcomreaderfulleasy-mp-network-op-guide 4047
Check R em ed y
Is the SSID the same as that of the access pointQuick Connection Mode
Set an SSID that is different from that of the access points
Users Guide Network Menu
Is the DHCP function for Wired LAN turned On
Quick Connection Mode
Turn Off the DHCP setting for Wired LAN from the Configuration Menus Users Guide Network Menu
Was the network adapter used selected correctly with EasyMPNetwork Projection
If the computer has multiple LAN environments it cannot connect unless the network adapter is selected correctlyWhen using a computer running Windows start EasyMP Network Projection and select the network adapter you areusing from Set options - Switch LANs p33
For Wireless LAN connection is the Wireless LAN setting enabledwhen the computer is in power save mode
Enable the Wireless LAN
Are there any obstacles between the access point and the computeror projector
For Wireless LAN
Sometimes the electromagnetic wave situation prevents the projector from being found in a search Check for any obstacles between the access point and the computer or projector and change their position to improve theelectromagnetic wave situation
Is the computers Wireless LAN electromagnetic wave set to low Set the electromagnetic wave strength to maximum
Does the Wireless LAN conform to 80211g 80211b or 80211a It is only compatible with standards 80211g 80211b and 80211a and not with other standards such as 80211
Is the firewall turned off or has the firewall been registered as anexception
When you do not wish to turn off the firewall or register the firewall as an exception make the necessary settings toopen the ports
The ports used by EasyMP Network Projection are 3620 3621 and 3629
Is the network cable connected correctly
For Wired LAN
Check that the network cable is connected correctly Reconnect it if it is not connected or not connected properly
Cannot connect in Advanced Connection Mode or Wired LAN connection
Check R em ed y
Is the SSID setting different Set the computer the access point and the projector to the same SSIDs Users Guide Network Menu
Is the same WEP key set When selecting WEP from Security set the access point the computer and the projector to the same WEP keys Users Guide Network Menu
Are the connection denial functions such as MAC Addressg
restrictions and port restrictions set correctly at the access point Set the projector to allow connections from the access point
Troubleshooting 41
8182019 Easy Mp Network Op Guide
httpslidepdfcomreaderfulleasy-mp-network-op-guide 4147
Check R em ed y
Are the IP address the Subnet Mask and the Gateway Address forthe access point and the projector set correctly When not using a DHCP adjust each settings
Users Guide Network Menu
Are the access point and the projectors subnet different Select Manual search from EasyMP Network Projection specify the IP address and connects p28
The Slide Show cannot be displayed on the desired display when the multi-screen display function is being executed
Check R em ed y
Are you using PowerPoint 2002 or an earlier version
For Windows
To set and use two or more virtual displaysg use PowerPoint 2003 or later or limit the number of virtual displays toone before displaying the Slide Show
Applications are no longer displayed from the computer screen when the multi-screen display function is executed
Check R em ed y
Is another application running on the virtual display g
For Windows
When EPSON Virtual Display is installed another application sometimes runs on the virtual display In this case setEPSON Virtual Display to Off in Screen properties
The mouse cursor is not displayed on the computer screen
Check R em ed y
Is EPSON Virtual Display installed
For Windows
The mouse cursor was moved onto the virtual display g When the virtual display checkbox is cleared on the Add-Remove EPSON Virtual Display screen the mouse pointer returns to the screen display area
When connecting with EasyMP Network Projection the image is not displayed or the image is slow to appear
Ch eck R em ed y
Did you try to play back movies with Media Player or try to operatethe screen saver preview
Depending on the computer the movie playback screen in Media Player may not be displayed and the screen saverpreview may not be displayed normally
Troubleshooting 42
8182019 Easy Mp Network Op Guide
httpslidepdfcomreaderfulleasy-mp-network-op-guide 4247
Ch eck R em ed y
Is WEP encryption effective or are multiple projectors connected The display speed decreases when WEP encryption is effective or multiple projectors are connectedHave you enabled DHCP When DHCP is set to On in Advanced Connection Mode if an available DHCP server is not found it may take some
time to enter LAN standby status
Is Wireless LAN 80211gb being used in Quick ConnectionMode
Depending on the electromagnetic wave environment there are times when the image and sound for movies may stop When using the movie sending function use Advanced Connection Mode or Wireless LAN 80211a in Quick Connection Mode
When a connection is made using EasyMP Network Projection a PowerPoint Slide Show cannot be started
Ch eck R em ed y
Was EasyMP Network Projection started while PowerPoint wasrunning
For Windows
When connecting with EasyMP Network Projection make sure you close PowerPoint first Slide Show might not runif connecting while PowerPoint is running
When a connection has been made using EasyMP Network Projection the screen will not be refreshed when using an Office application
Ch eck R em ed y
Is the mouse moved continuously When you stop moving the mouse cursor the screen is updated If the screen does not update quickly stop moving themouse cursor
Error message when starting up EasyMP Network Projection
E r r or M essa g es R em ed y
Connection to the projector failed Try to connect again If it still does not connect check the network settings on the computer and the network settingsfor the projector
For details on the network settings to be made on the projector sees Users Guide Network Menu
The keyword does not match Re-enter the keyword displayed onthe projector screen
Check the Projector Keyword displayed on the LAN standby screen and enter the Projector Keyword
8182019 Easy Mp Network Op Guide
httpslidepdfcomreaderfulleasy-mp-network-op-guide 4347
Troubleshooting 44
8182019 Easy Mp Network Op Guide
httpslidepdfcomreaderfulleasy-mp-network-op-guide 4447
Network settings are not restored after cutting the connection to the computer with EasyMP Network Projection
Check R em ed y
Are you manually connecting to a Wireless LAN when thecomputer starts up
Quick Connection Mode
Try connecting to the Wireless LAN manually
Glossary 45
8182019 Easy Mp Network Op Guide
httpslidepdfcomreaderfulleasy-mp-network-op-guide 4547
This section briefly explains the difficult terms that are not explained in the text of this guide For details refer to other commercially available publications
A d h o c
A method of Wireless LAN connection that communicates with wireless LAN clients without using an access point It is not possible to communicatewith two or more devices simultaneously
M A C A d d r e ss
An abbreviation of Media Access Control The MAC Address is an ID number unique to each network adapter A unique number is assigned to eachnetwork adapter and data is transmitted between network adapters based on this identification
S V G A
A type of video signal with a resolution of 800 (horizontal) ^600 (vertical) dots that is used byIBM PCAT-compatible computers
S X G A
A type of video signal with a resolution of 1280 (horizontal) ^ 1024 (vertical) dots that is used by IBM PCAT-compatible computers
U X G A
A type of video signal with a resolution of 1600 (horizontal) ^ 1200 (vertical) dots that is used by IBM PCAT-compatible computers
V G A
A type of video signal with a resolution of 640 (horizontal) ^ 480 (vertical) dots that is used by IBM PCAT-compatible computers
V i r tual D i s p lay
The screen for one computer is output to multiple displays A large virtual screen can be created by using multiple displays
X G A
A type of video signal with a resolution of 1024 (horizontal) ^ 768 (vertical) dots that is used by IBM PCAT-compatible computers
8182019 Easy Mp Network Op Guide
httpslidepdfcomreaderfulleasy-mp-network-op-guide 4647
8182019 Easy Mp Network Op Guide
httpslidepdfcomreaderfulleasy-mp-network-op-guide 4747
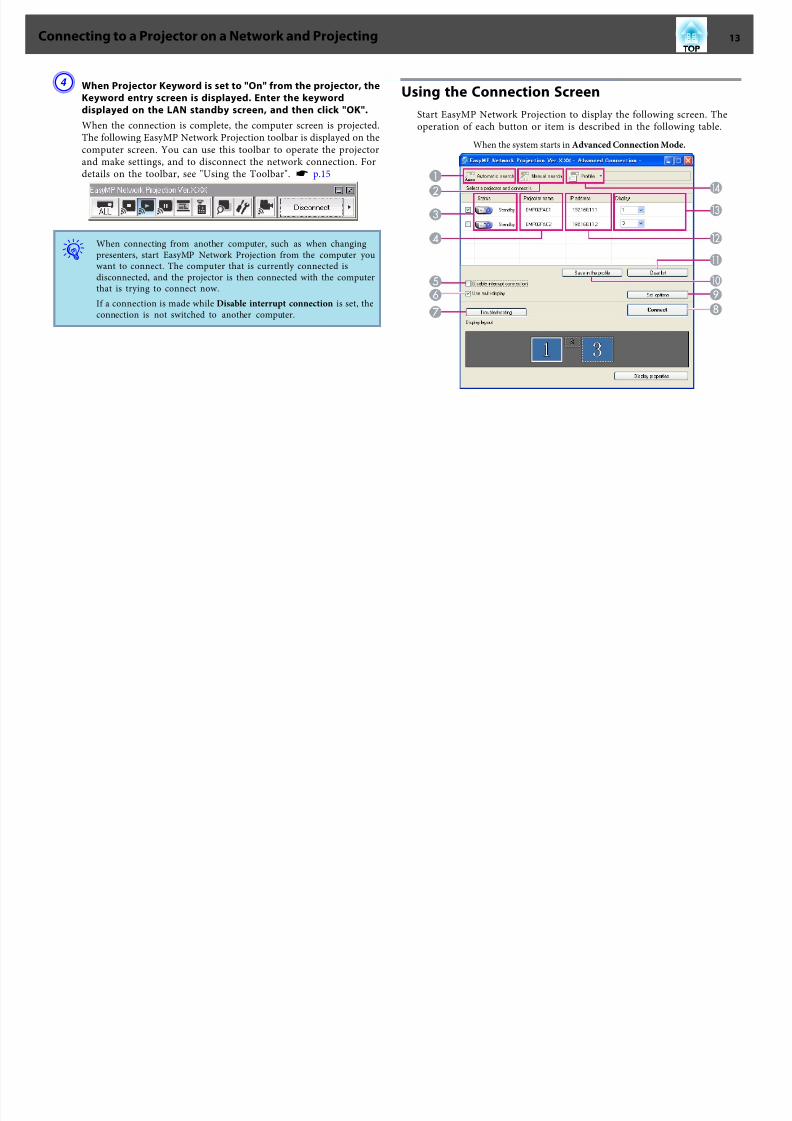
8182019 Easy Mp Network Op Guide
httpslidepdfcomreaderfulleasy-mp-network-op-guide 1347
D When Projector Keyword is set to On from the projector the
Keyword entry screen is displayed Enter the keyworddisplayed on the LAN standby screen and then click OK
When the connection is complete the computer screen is projectedThe following EasyMP Network Projection toolbar is displayed on thecomputer screen You can use this toolbar to operate the projectorand make settings and to disconnect the network connection Fordetails on the toolbar see Using the Toolbar s p15
qWhen connecting from another computer such as when changingpresenters start EasyMP Network Projection from the computer youwant to connect The computer that is currently connected isdisconnected and the projector is then connected with the computerthat is trying to connect now
If a connection is made while Disable interrupt connection is set theconnection is not switched to another computer
Using the Connection Screen
Start EasyMP Network Projection to display the following screen Theoperation of each button or item is described in the following table
When the system starts in Advanced Connection Mode
Connecting to a Projector on a Network and Projecting 13
8182019 Easy Mp Network Op Guide
httpslidepdfcomreaderfulleasy-mp-network-op-guide 1447
When the system starts in Quick Connection Mode
A Automatic search
In Advanced Connection Mode you can search for available projectorson the network system to which the computer is connected
In Quick Connection Mode you can search for the projector based onthe SSID
B Manual search
In Advanced Connection Mode you can search for a projector based ona specified IP address or projector name
In Quick Connection Mode you can search for the projector based onthe SSID selected from a list
C Status
The following six icons indicate the status of the detected projectors
Standby Select for connecting
Busy Select for connecting When you click Connect the computer currently
connected is disconnected and yourcomputer is connected
Busy (Disable
interrupt con‐nection)
Cannot be selected Disable interrupt
connection is set on another computerwhich is already connected
Currently inuse by anotherapplication
The projectors Configuration Menu isopen You can select it after closing theConfiguration menu and running thesearch again
Searching Displayed while running Manual search orProfile
Not found Displayed when a projector cannot be foundas a result of Manual search or Profile InQuick Connection Mode you can only select multiple projectors with the sameSSID
D Projector name
The projectors name is displayed
E Disable interrupt connection
Check the box to prevent an interrupt connection by other computers whileconnected to the selected projector
F Use multi-display
Check the box to use the Multi-screen display function When this is selectedDisplay layout and Display properties are displayed at the bottom of the screens p20
G Troubleshooting
If there is a problem and you cannot have a connection press this button to openthe EasyMP Network Projection Troubleshooting screen
H Connect
Connect to the projector you selected from the search results list When aconnection is made with a projector a toolbar is displayed
I Set options
You can set general setting options such as the processing method when startingEasyMP Network Projection For details see Set optionss p33
J Save in the profileSaves the results of a network projector search as a Profiles p29
Connecting to a Projector on a Network and Projecting 14
8182019 Easy Mp Network Op Guide
httpslidepdfcomreaderfulleasy-mp-network-op-guide 1547
K Clear list
Deletes all search resultsL IP address (Advanced Connection Mode only)
The projectors IP address is displayed
M Display
(Select the number displayed (when Use multi-display is selected)s p25
N Profile
You can search for a projector on the network using a Profile savedusing Save in the profiles p29
O SSID (Quick Connection Mode only)
The projectors SSID is displayed
P Signal intensity
This is displayed when the connection is made in Quick Connection Mode As theSignal intensity increases so does the number of lit indicators
Q Update list (Quick Connection Mode only)
Updates Status and Signal intensity
Using the Toolbar
The toolbar is displayed on the computer screen after EasyMP Network Projection starts and a connection is made with the projector You can usethis toolbar to operate and make settings for the projector
Select target projector
Click to limit the projectors operated from the toolbar when projectingfrom multiple projectors using the distribution function or Multi-screen display The indication below the icon shows the projectors thatcan be controlledALL indicates that all of the connected projectors can be controlledFor example when 1 3 is displayed projectors No 1 and No 3 can becontrolled
Click to display the following screen
A Select the projector to be controlled
B Indicates the No of an allocated projector This No indicates theNo of the projector that you can control from the toolbar
C Indicates the status of the projector
Stop
Connecting to a Projector on a Network and Projecting 15
8182019 Easy Mp Network Op Guide
httpslidepdfcomreaderfulleasy-mp-network-op-guide 1647
Stops projection while connected to the projector A black screen is
projected while stopped Audio does not stop To stop the audio or todisplay a Users Logo while projection is stopped use the AV Mutefunction
Show
Releases Stop or Pause
Pause
Pauses projected images while connecting to the projector The audio isnot paused
Presentation Mode
Each time this is clicked Presentation Mode switches between enableddisableds p19
Projector control
While the projector is connected to the network the projectors AVMute Switch PC source and Switch video source functions can becontrolled from both the Remote Control and the projectors Control
panel
Click to display the following toolbar
AV Mute
The same function as the [AV Mute] button on theRemote Control
s Users Guide Remote Control
Switch PC source
The Source alternates between Computer1Computer2 USB Display USB and LAN each timeyou click
Switch video source
The Source alternates between S-Video and Videoeach time you click S-Video does not switch if thecable is not connected
Screen Preview
Displays the multi-screen preview screen
Click to display a preview with the settings you have made Click
each display to enlarge each Screen Preview to full-screen
Set options
Transmission performance during the transfer of computer images canbe adjusteds p33
Movie Sending Mode
Not enabled on this projector The message The connected projectorsdo not support Movie Sending is displayed
DisconnectDisconnects the connection to the projector
Signal intensity
This is displayed when a connection is made in Quick ConnectionMode As the Signal intensity increases so does the number of litindicators
Switch toolbar display
Connecting to a Projector on a Network and Projecting 16
8182019 Easy Mp Network Op Guide
httpslidepdfcomreaderfulleasy-mp-network-op-guide 1747
The toolbar display is switched as follows The toolbar display remains
as is until switched againFull
Normal
Simple
Connecting to a Projector on a Network and Projecting 17
8182019 Easy Mp Network Op Guide
httpslidepdfcomreaderfulleasy-mp-network-op-guide 1847
Functions and Settings for EasyMP Network ProjectionThis chapter explains the functions that may be useful in a meeting or presentation such as the Multi-Screen Display which allows you to send images tomultiple projectors from a single computer
8182019 Easy Mp Network Op Guide
httpslidepdfcomreaderfulleasy-mp-network-op-guide 1947
In Presentation Mode the images are only displayed when performing a
PowerPoint Slide Show on a computer When you stop Slide Show theprojector displays a black screen This is useful when you only want todisplay the Slide ShowIn addition to PowerPoint Keynote is compatible with Presentation Modefor Mac OS
Procedure
A If necessary select another projector to be controlleds p15
B Click the button on the toolbar
Presentation Mode begins
C Click the button again to exit Presentation Mode
Projecting Only a PowerPoint Slide Show (Presentation Mode) 19
8182019 Easy Mp Network Op Guide
httpslidepdfcomreaderfulleasy-mp-network-op-guide 2047
Example of Adjusting the Virtual Display
By arranging the virtual display g allocation you can project only the imagethat you want to show or project different images from left to right in apresentation
Arrangement example 1
AA c tual mon i tor i mag e
PowerPoint file
B I mag e of v i r tua l d i s p lay
Excel file
Arrangement example 2
AA c tual mon i tor i mag e
PowerPoint file presenter tools
BI mag e of v i r tua l d i s p lay
Slide Show using a PowerPoint file
Procedure Before Using the Multi-screen Display
Function
1 Setting the Virtual Display s p21
In a Windows environment enable the virtual display g driver as necessary Alsofor both Windows and Mac OS set up the virtual display arrangement
2 Allocating the image to be projected s p25
Using Multi-Screen Display 20
8182019 Easy Mp Network Op Guide
httpslidepdfcomreaderfulleasy-mp-network-op-guide 2147
Open the file to be projected and then move the screen to the virtual display
according to the actual projection arrangement3 Projecting the allocated images s p25
Allocate a virtual display number to a projector that is connected through thenetwork and then start projection
Setting the Virtual Display
This chapter explains the virtual display for arrangement example 1s p20
Enable the virtual display driver (Windows only)
Enable the virtual display g driver Those users listed below do not have toperform this operation Go to procedure s Adjusting the Virtual Display
p21bull Those users who have enabled virtual displays installing EasyMP
Network Projection
bull For Mac OS users
Procedure
A Start Windows on the computer and then select Start -Programs (or All Programs) - EPSON Projector - EasyMP
Network Projection - Add-Remove EPSON Virtual Display
The Add-Remove EPSON Virtual Display screen is displayed
B Select the virtual display you want to use
Up to four monitors can be added In this example a single virtual
display is to be used When setting multiple virtual displays select asmany displays as is necessaryAny one of the displays can be selected
C Click OK
When you click OK the drivers for the virtual display are enabled Atthis point it is normal for the display to flicker Wait for the Add-Remove EPSON Virtual Display screen to close
Adjusting the Virtual Display
After starting EasyMP Network Projection the procedure for setting up the virtual displays differs for Windows and Mac OS The procedures areexplained separately below
qCheck the following points before starting EasyMP Network Projectionwhen connecting via Wireless LAN If the following points are not setcorrectly Multi-screen display cannot be used
bull The SSID for the computer and each projector must be the same
bull The wireless LAN system for the computer and each projector mustbe the sameYou can modify the SSID and Wireless LAN system for theprojector from the Network menu in the projectors Configurationmenus Users Guide Wireless LAN Menu
Using Multi-Screen Display 21
8182019 Easy Mp Network Op Guide
httpslidepdfcomreaderfulleasy-mp-network-op-guide 2247
Procedure
For Windows
A Select Start - Programs (or All Programs) - EPSON
Projector - EasyMP Network Projection - EasyMP Network Projection V2XX to start EasyMP Network Projection
B Select the Use multi-display checkbox
Display layout and Display properties are added at the bottom of thescreen
C Click Display properties
The Display properties screen is displayed
D Click the Settings tab
Using Multi-Screen Display 22
8182019 Easy Mp Network Op Guide
httpslidepdfcomreaderfulleasy-mp-network-op-guide 2347
E Drag the displayed monitor icon and place it where desired
Here the actual monitor (1) is placed on the left while the virtualmonitor (3) is placed on the rightWhen the computer has multiple display output terminals thenumbers assigned to the virtual terminals will be sequential to thoseof the physical terminals
q bull When an external monitor is connected as a secondary monitor the
image for that screen cannot be projected
bull Depending on the hardware the number of the secondary monitormay be other than 2 When the monitor icon is displayed on thescreen click the icon and confirm that the monitor type shownunder Display is other than secondary
bull For the Screen Resolution settings see the followings p36
When the monitor icon is arranged a virtual display is connected asthe image like below
Using Multi-Screen Display 23
i l i i l
8182019 Easy Mp Network Op Guide
httpslidepdfcomreaderfulleasy-mp-network-op-guide 2447
F Click the OK button to close the Display properties screen
Up to this point the virtual display layout has been fixedAllocate the projecting images next s p25
For Mac OS
A Start EasyMP Network Projection Double-click the Applications
folder of the hard drive volume in which EasyMP Network Projection is installed and then double-click the EasyMP
Network Projection iconIn this example we select and start in Advanced ConnectionMode
B Select the Use multi-display checkbox
Display layout and Display preferences are added at the bottom of thescreen
C Click Display preferences
The display setting screen is displayed
D Click Arrangement
E Clear Mirror Displays
Using Multi-Screen Display 24
U i M lti S Di l
8182019 Easy Mp Network Op Guide
httpslidepdfcomreaderfulleasy-mp-network-op-guide 2547
F Drag the displayed monitor icon and place it where desired
G Close the display setting screen
Up to this point the screen layout has been fixed
Allocating the Image to be Projected
This section explains the virtual display for arrangement example 1s p20
Procedure
A Open the file to be projected
Start the PowerPoint and Excel files
B Drag the window to the desired virtual displayg monitor andallocate it where the image is to be projected
Drag the Excel window to the right until it cannot be seen As aresult the PowerPoint window appears on the actual monitor whilethe Excel window appears on the virtual display on the right
Projecting the Allocated Images
This section explains the virtual display for arrangement example 1s p20
Procedure
A Select the number of the virtual displayg
you want to fromDisplay and set which image to be projected from which
projector
Using Multi-Screen Display 25
Using M lti Screen Displa
8182019 Easy Mp Network Op Guide
httpslidepdfcomreaderfulleasy-mp-network-op-guide 2647
B Click Connect
The image allocated to each projector is projected
In a Windows environment you cannot view the image being sent toa virtual display on the computer To adjust the image on the virtualdisplay you must do so while viewing the projected imageTo perform mouse-based operations on the virtual display move themouse pointer in the direction of the virtual display such that thepointer appears on the virtual display
C To terminate multi-screen display click Disconnect on thetoolbar
Using Multi-Screen Display 26
Using Multi Screen Display 27
8182019 Easy Mp Network Op Guide
httpslidepdfcomreaderfulleasy-mp-network-op-guide 2747
q
In a Windows environment if the virtual display driver has been
enabled such that the mouse pointer can be moved outside the limitsof the screen there may be occasions when you lose track of thelocation of the pointer If you are not using a virtual display clear the virtual display checkbox on the Add-Remove EPSON Virtual Display screen so that the mouse pointer moves back inside the screensdisplay area To subsequently use multi-display again place a check mark against the required display under Add-Remove EPSON VirtualDisplayTo clear a check mark see the followings p21
Using Multi-Screen Display 27
Connecting to a Projector on a Different Subnet 28
8182019 Easy Mp Network Op Guide
httpslidepdfcomreaderfulleasy-mp-network-op-guide 2847
This chapter explains how to connect a computer to a projector on adifferent sub-net via a Wired LAN or a wireless LAN access point on anexisting network system
By default this application only searches for projectors on the same subnetas the computer Therefore even if you perform a search for projectors onthe network projectors on a different subnet will not be foundYou can however identify and connect to a projector on a different subnetas follows
bull Specify either an IP address or Projector name and perform a search
The IP Address can be input directly Also provided the Projector nameto be connected has been registered on the DNS server you can performa search simply by inputting that Projector names p28
bull Performing a search based on a Profile
Once you have performed a search for a projector on a different subnetby specifying either an IP Address or a Projector name you can save thesearch as a Profile with an easy-to-remember name and then use that
Profile whenever you subsequently want to search for a projector on adifferent subnets p29
q bull If a search fails to find a projector the most likely causes are as
follows Proceed as appropriate depending on the cause of thefailure
For both Windows and Mac OS
If there is no wireless LAN signal or if the signal is weak check
whether there is anything that could be interfering with the signalWhen the optional Wireless LAN unit is installed in the projectorand connecting Mac OS to a wireless LAN
Check whether AirPort is set to On Or check whether anappropriate access point has been selected
bull When you use Manual search in Quick Connection Mode you canspecify the SSID When there are a lot of projectors you can narrow the search field by using SSID
Specifying Either an IP Address or Projector Name
and Performing a Search (Advanced ConnectionMode Only)
In the following explanations unless otherwise noted Windows screenshots are usedThe similar screens are also displayed for Mac OS
Procedure
A Click Manual search on the EasyMP Network Projectionprojector selection screen
B Enter the IP address or the projector name for the projectoryou want to connect to and click OK
Connecting to a Projector on a Different Subnet 28
Connecting to a Projector on a Different Subnet 29
8182019 Easy Mp Network Op Guide
httpslidepdfcomreaderfulleasy-mp-network-op-guide 2947
The search results are displayed on the EasyMP Network Projectionprojector selection screen
Provided the target projector has been identified select that projectorand then click Connect to establish a connectionWhen you will always be using that projector save the search as aProfile so that you do not have to specify the relevant details every time you perform a search s p29
Performing a Search with a ProfileYou can save a search for a frequently used projector as a Profile AProfile is a file containing all of the information pertaining to a givenprojector such as the projector name its IP address and SSID If youspecify that information from the next time you perform a search there willbe no need to specify the IP address or projector name each time youperform a search For example by creating a group of Profiles for eachplace where a projector is setup and managing them with folders the target
projector can be found quickly
A Building A E Floor 1
B Building B F Floor 2
C Building C G Floor 3
D Building D
This section explains how to create and edit a Profile
Making a Profile
Profiles are made by saving search results
For details on how to edit a previously saved Profile see the followingsection s p31
Procedure
A While the projector is displayed on the EasyMP Network Projection projector selection screen click Save in the
profile
Connecting to a Projector on a Different Subnet 29
Connecting to a Projector on a Different Subnet 30
8182019 Easy Mp Network Op Guide
httpslidepdfcomreaderfulleasy-mp-network-op-guide 3047
The Save in the profile screen is displayed
B Enter a Profile name and then click Add
Projector information is registered in the ProfileIf you have previously saved a Profile you are prompted to confirmwhether or not to overwrite To save a Profile with a different nameselect Save as If you have created a folder for a Profile the followingscreens are displayed After entering the Profile name and selectingthe Save in destination click Add
For Windows
For Mac OS
qFor details on how to create a folder for a Profile see the followingsection s p31
Searching by specifying a Profile
You can search by specifying the Profile you created
Connecting to a Projector on a Different Subnet 30
Connecting to a Projector on a Different Subnet 31
8182019 Easy Mp Network Op Guide
httpslidepdfcomreaderfulleasy-mp-network-op-guide 3147
Procedure
A Click Profile on the EasyMP Network Projection projector
selection screen
If no Profile is registered you cannot select Profile
B From the menu that is displayed select the projector you wantto connect to
The search results are displayed on the EasyMP Network Projectionprojector selection screenProvided the target projector has been identified select that projectorand then click Connect to establish a connection
Managing a Profile
You can change the name and the hierarchical structure of the Profile
Procedure
A Click Set options on the EasyMP Network Projection main
screen
The Set options screen is displayed
B Click Edit profile
The Edit profile screen is displayed
C Edit the contents registered in the Profile
Co ect g to a ojecto o a D e e t Sub et 31
Connecting to a Projector on a Different Subnet 32
8182019 Easy Mp Network Op Guide
httpslidepdfcomreaderfulleasy-mp-network-op-guide 3247
A Indicates a folder
B Indicates a Profile
Prof i le
Item F u nctio n
Profi le
You can display the registered Profile You can manageit by creating a folder You can change the order of theProfile or the folder by dragging amp dropping
Copy
You can copy the Profile The copied Profile is saved in
the same folder as the original with the same nameDelete
You can delete the Profile and the folder
Prof i le
Item F u n ctio n
R e n a m e
Displays the Rename dialog box allowing you to renamethe folder or the Profile You can enter up to 32characters in the Rename dialog box
Create folder
You can create a new folder
E x p or t
Exports a created Profile allowing you to import and usethat Profile
I mp or t
Used when you want to read and use an exportedProfile
Informa tion on selected prof i le
Item F u n ctio n
P r oj e c tor n am e
I P addr e s s
You can display the projector information registered inthe Profile
Delete
You can delete the information for the selectedprojector When all projector information is deleted theprofile is also deleted
D Click OK
Saves your edits and closes the Edit profile screen
g j
Using Set options 33
8182019 Easy Mp Network Op Guide
httpslidepdfcomreaderfulleasy-mp-network-op-guide 3347
You can make setting options such as the processing method when EasyMPNetwork Projection startsAccess Set options from the EasyMP Network Projection main screen
Procedure
A Click Set options on the EasyMP Network Projection main
screen
The Set options screen is displayed
B Set each of the items
Confirm the details of the set items in the next step When you havemade all the necessary settings click OK to close the Set optionsscreen
Setting Each ItemSet each item from the General settings tab and the Adjust performancetab
General settings tab
Use fu l l -screen
vi de o t r an s fe r
This setting is disabled because the projector does notsupport the movie sending function
E n c r y p t
c ommun i c at i on s
Select to Encrypt and transmit data Even if data isintercepted it cannot be decrypted
When using Quick Connection Mode make sure youalways select this checkbox
Display Connection
Mod e Selection
w i n dow on s tar tup
Set whether or not the Quick Connection ModeAdvancedConnection Mode screen is displayed when EasyMPNetwork Projection starts
Clear this checkbox once you have settled on a regularstartup method
S e ar c h me th od on
s tar tup
Select from the following projector search methodsexecuted when EasyMP Network Projection is started
Automatic search on startup
Specify search method after startupSearch with the last network configuration
g p
Using Set options 34
8182019 Easy Mp Network Op Guide
httpslidepdfcomreaderfulleasy-mp-network-op-guide 3447
Edit profi le
The Edit profile dialog box is displayeds p31
S w i tc h L A N
Windows only The Switch Network Adapter dialog box is displayed Thisis used when it is necessary to switch the network adapter tobe used for a search when a computer has multipleadapters
By default all of the network adapters are used to perform asearch When a Wired LAN is always used as theconnection method select a Wired LAN adapter
R e s tor e D e faul ts
You can reset all adjustment values on the General settingstab to their default settings except for Edit profile andSwitch LAN
Adjust performance tab
P e r for man c e
adj us tme n t s l i de r
The performance can be set to Fast Normal andFine
Set to Fast when movie projections are interrupted
T r a n s f er l a y er e d
w i n dow
Windows only (excluding Windows Vista andWindows 7)
Set whether or not to transfer a layered windowThe layered window is in use when contents such asmessages displayed on the computer are not projectedby the projector Select this checkbox to projectcontents such as messages that use the layeredwindow
Clear this checkbox if you do not want the mousepointer to flicker on the screen
R e s tor e D e faul ts
You can reset all adjustment values for the Adjustperformance tab to their default settings
q When you click on the toolbar only the Adjust performance tab
is displayed
Audio Output tab
Because this projector does not support the audio sending function settingson the Audio Output tab are disabled
8182019 Easy Mp Network Op Guide
httpslidepdfcomreaderfulleasy-mp-network-op-guide 3547
Appendix
Connection Limitations 36
8182019 Easy Mp Network Op Guide
httpslidepdfcomreaderfulleasy-mp-network-op-guide 3647
When projecting computer images while running EasyMP Network Projection the following restrictions apply Confirm these points
Supported Resolutions
The following computer screen resolutions can be projected You cannotconnect to a computer with a resolution greater than UXGAg
bull VGA g(640x480)
bull SVGA g(800x600)
bull XGA g(1024x768)
bull SXGA g(1280x960)
bull SXGA (1280x1024)
bull SXGA+ (1400x1050)
bull WXGA (1280x768)
bull WXGA (1280x800)
bull
WXGA+ (1440x900)bull UXGA (1600x1200)
Supported resolutions when multi-screen display function is on
If a computer with a special screen size is used where the ratio of heightand width is not represented a screen resolution closest to the width isselected from the list of 10 aboveIn this case in wide screen the horizontal margins are projected in narrow screen the empty vertical margins are black
Display Color
The number of colors for computer screens that can be projected
W ind o w s M a c O S
16-bit color About 32000 colors (16-bit)
32-bit color About 167 million colors (32-bit)
The operational guarantee for multi-screen display is 16-bit and 32-bitcolor
Number of Connections
You can connect up to four projectors to one computer and projectsimultaneouslyYou cannot connect multiple computers to one projector simultaneously
Others
bull If the transmission speed of the Wireless LAN is low the network might be cut off unexpectedly
bull Audio is not transmitted
bull When videos are played back they do not play back as smoothly as
when displayed on the computerbull Applications that use part of DirectX functions may not be displayed
correctly(Windows only)
bull Cannot project full screen MS-DOS prompts(Windows only)
bull There are times when the image on the computer screen and the imageprojected by the projector may not match exactly
When Using Windows Vista or Windows 7
Note the following points when using EasyMP Network Projection on acomputer running Windows Vista or Windows 7
Limitations when projecting from Windows Photo Gallery
Note the following two limitations when launching Windows Photo Gallery when EasyMP Network Projection is running
Connection Limitations 37
8182019 Easy Mp Network Op Guide
httpslidepdfcomreaderfulleasy-mp-network-op-guide 3747
bull Slide Show is played back in simple mode when projecting fromWindows Photo Gallery
Because the toolbar is not displayed you cannot make changes whileplaying a Theme (effects) regardless of the Windows Experience IndexratingOnce simple mode has started you cannot change modes while WindowsPhoto Gallery is running even if you close EasyMP Network ProjectionRestart Windows Photo Gallery
bull You cannot play movies
Limitations in Windows Aero
Note the following two limitations when the window design for yourcomputer is Windows Aero
bull The layered window is projected regardless of Transfer layered window from Set options in EasyMP Network Projection
For example when Transfer layered window for EasyMP Network Projection toolbar is disabled it is not projected even if it is displayed onthe computer screen however the toolbar is projected
bull A few minutes after you connect a computer to the projector over anetwork with EasyMP Network Projection the following message is
displayedIt is recommended that you select Keep the current color scheme anddont show this message again This selection is enabled until thecomputer is restarted
Limitations when projecting from Windows Media Center
You cannot project images in full screen display using Windows MediaCenter Switch to the window display mode to project the images
Similarly images cannot be projected with Quick Wireless Connection orUSB Display
Troubleshooting 38
8182019 Easy Mp Network Op Guide
httpslidepdfcomreaderfulleasy-mp-network-op-guide 3847
If any of the following problems occur refer to the pages given for eachproblem
Problems concerning network functions
Cannot connect to the projector s p39
When a connection is made using EasyMP Network Projection the projectedimage remains as it is and a connection cannot be made from anothercomputer s p39
The projector is not found when EasyMP Network Projection is
started s
p39Cannot connect in Advanced Connection Mode or Wired LANconnection s p40
The Slide Show cannot be displayed on the desired display when the multi-screendisplay function is being executed s p41
Applications are no longer displayed from the computer screen when the multi-screen display function is executed s p41
The mouse cursor is not displayed on the computer screen s
p41When connecting with EasyMP Network Projection the image is not displayed orthe image is slow to appear s p41
When a connection is made using EasyMP Network Projection a PowerPointSlide Show cannot be started s p42
When a connection has been made using EasyMP Network Projection the screenwill not be refreshed when using an Office application s p42
Error message when starting up EasyMP Network Projection s
p42Network settings are not restored after cutting the connection to the computerwith EasyMP Network Projection s p44
Troubleshooting 39
8182019 Easy Mp Network Op Guide
httpslidepdfcomreaderfulleasy-mp-network-op-guide 3947
Problems Concerning Network Functions
Cannot connect to the projector
Check the message on the screen and then apply the following countermeasures
E r r or M essa g es R em ed y
The application version used is not supported Install the latest version of the application on your computer
Install EasyMP Network Projection from the EPSON Projector Software for Meeting amp Monitoring CD-ROMsupplied with the projector
When a connection is made using EasyMP Network Projection the projected image remains as it is and a connection cannot be madefrom another computer
Ch eck R em ed y
Did the presenter leave the conference room without cutting off thenetwork connection
With EasyMP Network Projection the connection with the computer that was previously connected can be cut off when another computer tries to connect with the projector and it connects with the computer that is trying to
connectTherefore when a Projector Keyword is not set for the projector or if you know the Projector Keyword you can cutoff the current connection and if you perform a connection operation you can connect to the projector
When a Projector Keyword is set for the projector if you do not know the Projector Keyword restart the projector andreconnect
The projector is not found when EasyMP Network Projection is started
Check R em ed y
Is the Wireless LAN unit connected
For Wireless LAN
Check that the optional Wireless LAN unit is securely connected
Is the Network Configuration screen from the Configurationmenu displayed on the projector
When the Network Configuration screen is displayed on the projector network connection for EasyMP Network Projection is disabled Close network settings on the projector and return to the LAN standby screen
Are the computers LAN card and the built-in LAN function
available
Check that LAN is valid by checking Control Panel - System - Hardware in the device manager and so on
Troubleshooting 40
8182019 Easy Mp Network Op Guide
httpslidepdfcomreaderfulleasy-mp-network-op-guide 4047
Check R em ed y
Is the SSID the same as that of the access pointQuick Connection Mode
Set an SSID that is different from that of the access points
Users Guide Network Menu
Is the DHCP function for Wired LAN turned On
Quick Connection Mode
Turn Off the DHCP setting for Wired LAN from the Configuration Menus Users Guide Network Menu
Was the network adapter used selected correctly with EasyMPNetwork Projection
If the computer has multiple LAN environments it cannot connect unless the network adapter is selected correctlyWhen using a computer running Windows start EasyMP Network Projection and select the network adapter you areusing from Set options - Switch LANs p33
For Wireless LAN connection is the Wireless LAN setting enabledwhen the computer is in power save mode
Enable the Wireless LAN
Are there any obstacles between the access point and the computeror projector
For Wireless LAN
Sometimes the electromagnetic wave situation prevents the projector from being found in a search Check for any obstacles between the access point and the computer or projector and change their position to improve theelectromagnetic wave situation
Is the computers Wireless LAN electromagnetic wave set to low Set the electromagnetic wave strength to maximum
Does the Wireless LAN conform to 80211g 80211b or 80211a It is only compatible with standards 80211g 80211b and 80211a and not with other standards such as 80211
Is the firewall turned off or has the firewall been registered as anexception
When you do not wish to turn off the firewall or register the firewall as an exception make the necessary settings toopen the ports
The ports used by EasyMP Network Projection are 3620 3621 and 3629
Is the network cable connected correctly
For Wired LAN
Check that the network cable is connected correctly Reconnect it if it is not connected or not connected properly
Cannot connect in Advanced Connection Mode or Wired LAN connection
Check R em ed y
Is the SSID setting different Set the computer the access point and the projector to the same SSIDs Users Guide Network Menu
Is the same WEP key set When selecting WEP from Security set the access point the computer and the projector to the same WEP keys Users Guide Network Menu
Are the connection denial functions such as MAC Addressg
restrictions and port restrictions set correctly at the access point Set the projector to allow connections from the access point
Troubleshooting 41
8182019 Easy Mp Network Op Guide
httpslidepdfcomreaderfulleasy-mp-network-op-guide 4147
Check R em ed y
Are the IP address the Subnet Mask and the Gateway Address forthe access point and the projector set correctly When not using a DHCP adjust each settings
Users Guide Network Menu
Are the access point and the projectors subnet different Select Manual search from EasyMP Network Projection specify the IP address and connects p28
The Slide Show cannot be displayed on the desired display when the multi-screen display function is being executed
Check R em ed y
Are you using PowerPoint 2002 or an earlier version
For Windows
To set and use two or more virtual displaysg use PowerPoint 2003 or later or limit the number of virtual displays toone before displaying the Slide Show
Applications are no longer displayed from the computer screen when the multi-screen display function is executed
Check R em ed y
Is another application running on the virtual display g
For Windows
When EPSON Virtual Display is installed another application sometimes runs on the virtual display In this case setEPSON Virtual Display to Off in Screen properties
The mouse cursor is not displayed on the computer screen
Check R em ed y
Is EPSON Virtual Display installed
For Windows
The mouse cursor was moved onto the virtual display g When the virtual display checkbox is cleared on the Add-Remove EPSON Virtual Display screen the mouse pointer returns to the screen display area
When connecting with EasyMP Network Projection the image is not displayed or the image is slow to appear
Ch eck R em ed y
Did you try to play back movies with Media Player or try to operatethe screen saver preview
Depending on the computer the movie playback screen in Media Player may not be displayed and the screen saverpreview may not be displayed normally
Troubleshooting 42
8182019 Easy Mp Network Op Guide
httpslidepdfcomreaderfulleasy-mp-network-op-guide 4247
Ch eck R em ed y
Is WEP encryption effective or are multiple projectors connected The display speed decreases when WEP encryption is effective or multiple projectors are connectedHave you enabled DHCP When DHCP is set to On in Advanced Connection Mode if an available DHCP server is not found it may take some
time to enter LAN standby status
Is Wireless LAN 80211gb being used in Quick ConnectionMode
Depending on the electromagnetic wave environment there are times when the image and sound for movies may stop When using the movie sending function use Advanced Connection Mode or Wireless LAN 80211a in Quick Connection Mode
When a connection is made using EasyMP Network Projection a PowerPoint Slide Show cannot be started
Ch eck R em ed y
Was EasyMP Network Projection started while PowerPoint wasrunning
For Windows
When connecting with EasyMP Network Projection make sure you close PowerPoint first Slide Show might not runif connecting while PowerPoint is running
When a connection has been made using EasyMP Network Projection the screen will not be refreshed when using an Office application
Ch eck R em ed y
Is the mouse moved continuously When you stop moving the mouse cursor the screen is updated If the screen does not update quickly stop moving themouse cursor
Error message when starting up EasyMP Network Projection
E r r or M essa g es R em ed y
Connection to the projector failed Try to connect again If it still does not connect check the network settings on the computer and the network settingsfor the projector
For details on the network settings to be made on the projector sees Users Guide Network Menu
The keyword does not match Re-enter the keyword displayed onthe projector screen
Check the Projector Keyword displayed on the LAN standby screen and enter the Projector Keyword
8182019 Easy Mp Network Op Guide
httpslidepdfcomreaderfulleasy-mp-network-op-guide 4347
Troubleshooting 44
8182019 Easy Mp Network Op Guide
httpslidepdfcomreaderfulleasy-mp-network-op-guide 4447
Network settings are not restored after cutting the connection to the computer with EasyMP Network Projection
Check R em ed y
Are you manually connecting to a Wireless LAN when thecomputer starts up
Quick Connection Mode
Try connecting to the Wireless LAN manually
Glossary 45
8182019 Easy Mp Network Op Guide
httpslidepdfcomreaderfulleasy-mp-network-op-guide 4547
This section briefly explains the difficult terms that are not explained in the text of this guide For details refer to other commercially available publications
A d h o c
A method of Wireless LAN connection that communicates with wireless LAN clients without using an access point It is not possible to communicatewith two or more devices simultaneously
M A C A d d r e ss
An abbreviation of Media Access Control The MAC Address is an ID number unique to each network adapter A unique number is assigned to eachnetwork adapter and data is transmitted between network adapters based on this identification
S V G A
A type of video signal with a resolution of 800 (horizontal) ^600 (vertical) dots that is used byIBM PCAT-compatible computers
S X G A
A type of video signal with a resolution of 1280 (horizontal) ^ 1024 (vertical) dots that is used by IBM PCAT-compatible computers
U X G A
A type of video signal with a resolution of 1600 (horizontal) ^ 1200 (vertical) dots that is used by IBM PCAT-compatible computers
V G A
A type of video signal with a resolution of 640 (horizontal) ^ 480 (vertical) dots that is used by IBM PCAT-compatible computers
V i r tual D i s p lay
The screen for one computer is output to multiple displays A large virtual screen can be created by using multiple displays
X G A
A type of video signal with a resolution of 1024 (horizontal) ^ 768 (vertical) dots that is used by IBM PCAT-compatible computers
8182019 Easy Mp Network Op Guide
httpslidepdfcomreaderfulleasy-mp-network-op-guide 4647
8182019 Easy Mp Network Op Guide
httpslidepdfcomreaderfulleasy-mp-network-op-guide 4747
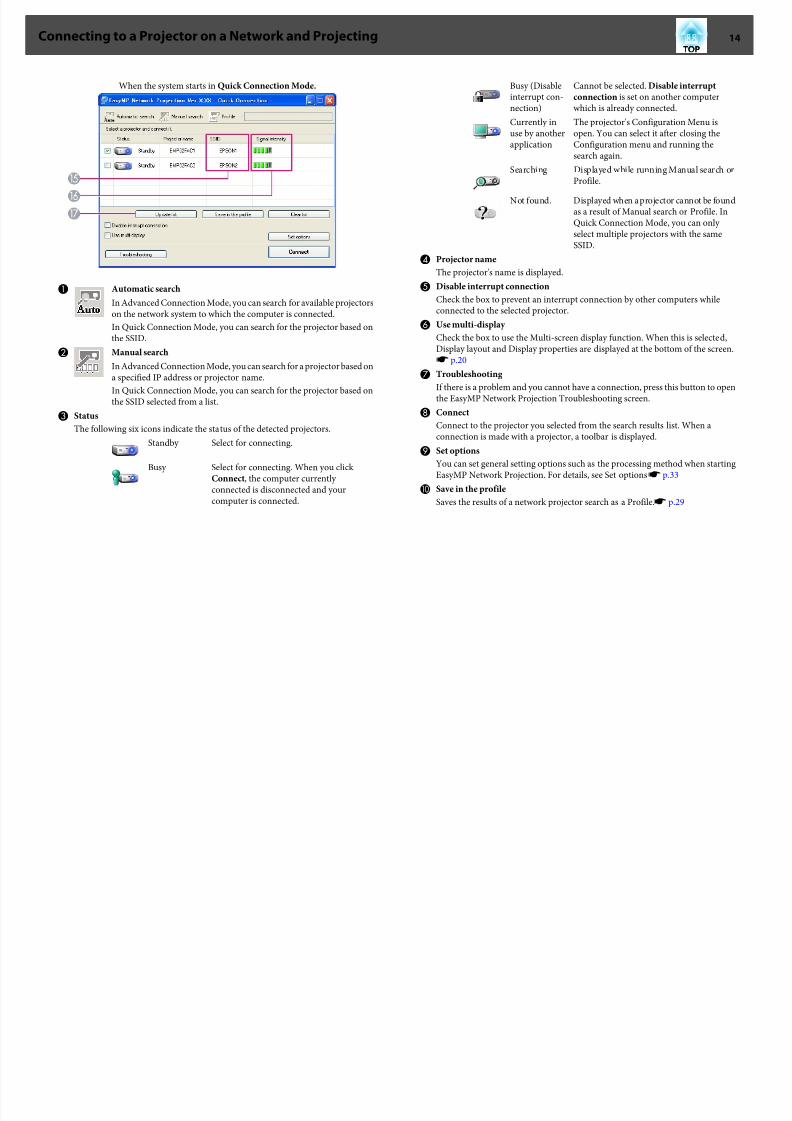
8182019 Easy Mp Network Op Guide
httpslidepdfcomreaderfulleasy-mp-network-op-guide 1447
When the system starts in Quick Connection Mode
A Automatic search
In Advanced Connection Mode you can search for available projectorson the network system to which the computer is connected
In Quick Connection Mode you can search for the projector based onthe SSID
B Manual search
In Advanced Connection Mode you can search for a projector based ona specified IP address or projector name
In Quick Connection Mode you can search for the projector based onthe SSID selected from a list
C Status
The following six icons indicate the status of the detected projectors
Standby Select for connecting
Busy Select for connecting When you click Connect the computer currently
connected is disconnected and yourcomputer is connected
Busy (Disable
interrupt con‐nection)
Cannot be selected Disable interrupt
connection is set on another computerwhich is already connected
Currently inuse by anotherapplication
The projectors Configuration Menu isopen You can select it after closing theConfiguration menu and running thesearch again
Searching Displayed while running Manual search orProfile
Not found Displayed when a projector cannot be foundas a result of Manual search or Profile InQuick Connection Mode you can only select multiple projectors with the sameSSID
D Projector name
The projectors name is displayed
E Disable interrupt connection
Check the box to prevent an interrupt connection by other computers whileconnected to the selected projector
F Use multi-display
Check the box to use the Multi-screen display function When this is selectedDisplay layout and Display properties are displayed at the bottom of the screens p20
G Troubleshooting
If there is a problem and you cannot have a connection press this button to openthe EasyMP Network Projection Troubleshooting screen
H Connect
Connect to the projector you selected from the search results list When aconnection is made with a projector a toolbar is displayed
I Set options
You can set general setting options such as the processing method when startingEasyMP Network Projection For details see Set optionss p33
J Save in the profileSaves the results of a network projector search as a Profiles p29
Connecting to a Projector on a Network and Projecting 14
8182019 Easy Mp Network Op Guide
httpslidepdfcomreaderfulleasy-mp-network-op-guide 1547
K Clear list
Deletes all search resultsL IP address (Advanced Connection Mode only)
The projectors IP address is displayed
M Display
(Select the number displayed (when Use multi-display is selected)s p25
N Profile
You can search for a projector on the network using a Profile savedusing Save in the profiles p29
O SSID (Quick Connection Mode only)
The projectors SSID is displayed
P Signal intensity
This is displayed when the connection is made in Quick Connection Mode As theSignal intensity increases so does the number of lit indicators
Q Update list (Quick Connection Mode only)
Updates Status and Signal intensity
Using the Toolbar
The toolbar is displayed on the computer screen after EasyMP Network Projection starts and a connection is made with the projector You can usethis toolbar to operate and make settings for the projector
Select target projector
Click to limit the projectors operated from the toolbar when projectingfrom multiple projectors using the distribution function or Multi-screen display The indication below the icon shows the projectors thatcan be controlledALL indicates that all of the connected projectors can be controlledFor example when 1 3 is displayed projectors No 1 and No 3 can becontrolled
Click to display the following screen
A Select the projector to be controlled
B Indicates the No of an allocated projector This No indicates theNo of the projector that you can control from the toolbar
C Indicates the status of the projector
Stop
Connecting to a Projector on a Network and Projecting 15
8182019 Easy Mp Network Op Guide
httpslidepdfcomreaderfulleasy-mp-network-op-guide 1647
Stops projection while connected to the projector A black screen is
projected while stopped Audio does not stop To stop the audio or todisplay a Users Logo while projection is stopped use the AV Mutefunction
Show
Releases Stop or Pause
Pause
Pauses projected images while connecting to the projector The audio isnot paused
Presentation Mode
Each time this is clicked Presentation Mode switches between enableddisableds p19
Projector control
While the projector is connected to the network the projectors AVMute Switch PC source and Switch video source functions can becontrolled from both the Remote Control and the projectors Control
panel
Click to display the following toolbar
AV Mute
The same function as the [AV Mute] button on theRemote Control
s Users Guide Remote Control
Switch PC source
The Source alternates between Computer1Computer2 USB Display USB and LAN each timeyou click
Switch video source
The Source alternates between S-Video and Videoeach time you click S-Video does not switch if thecable is not connected
Screen Preview
Displays the multi-screen preview screen
Click to display a preview with the settings you have made Click
each display to enlarge each Screen Preview to full-screen
Set options
Transmission performance during the transfer of computer images canbe adjusteds p33
Movie Sending Mode
Not enabled on this projector The message The connected projectorsdo not support Movie Sending is displayed
DisconnectDisconnects the connection to the projector
Signal intensity
This is displayed when a connection is made in Quick ConnectionMode As the Signal intensity increases so does the number of litindicators
Switch toolbar display
Connecting to a Projector on a Network and Projecting 16
8182019 Easy Mp Network Op Guide
httpslidepdfcomreaderfulleasy-mp-network-op-guide 1747
The toolbar display is switched as follows The toolbar display remains
as is until switched againFull
Normal
Simple
Connecting to a Projector on a Network and Projecting 17
8182019 Easy Mp Network Op Guide
httpslidepdfcomreaderfulleasy-mp-network-op-guide 1847
Functions and Settings for EasyMP Network ProjectionThis chapter explains the functions that may be useful in a meeting or presentation such as the Multi-Screen Display which allows you to send images tomultiple projectors from a single computer
8182019 Easy Mp Network Op Guide
httpslidepdfcomreaderfulleasy-mp-network-op-guide 1947
In Presentation Mode the images are only displayed when performing a
PowerPoint Slide Show on a computer When you stop Slide Show theprojector displays a black screen This is useful when you only want todisplay the Slide ShowIn addition to PowerPoint Keynote is compatible with Presentation Modefor Mac OS
Procedure
A If necessary select another projector to be controlleds p15
B Click the button on the toolbar
Presentation Mode begins
C Click the button again to exit Presentation Mode
Projecting Only a PowerPoint Slide Show (Presentation Mode) 19
8182019 Easy Mp Network Op Guide
httpslidepdfcomreaderfulleasy-mp-network-op-guide 2047
Example of Adjusting the Virtual Display
By arranging the virtual display g allocation you can project only the imagethat you want to show or project different images from left to right in apresentation
Arrangement example 1
AA c tual mon i tor i mag e
PowerPoint file
B I mag e of v i r tua l d i s p lay
Excel file
Arrangement example 2
AA c tual mon i tor i mag e
PowerPoint file presenter tools
BI mag e of v i r tua l d i s p lay
Slide Show using a PowerPoint file
Procedure Before Using the Multi-screen Display
Function
1 Setting the Virtual Display s p21
In a Windows environment enable the virtual display g driver as necessary Alsofor both Windows and Mac OS set up the virtual display arrangement
2 Allocating the image to be projected s p25
Using Multi-Screen Display 20
8182019 Easy Mp Network Op Guide
httpslidepdfcomreaderfulleasy-mp-network-op-guide 2147
Open the file to be projected and then move the screen to the virtual display
according to the actual projection arrangement3 Projecting the allocated images s p25
Allocate a virtual display number to a projector that is connected through thenetwork and then start projection
Setting the Virtual Display
This chapter explains the virtual display for arrangement example 1s p20
Enable the virtual display driver (Windows only)
Enable the virtual display g driver Those users listed below do not have toperform this operation Go to procedure s Adjusting the Virtual Display
p21bull Those users who have enabled virtual displays installing EasyMP
Network Projection
bull For Mac OS users
Procedure
A Start Windows on the computer and then select Start -Programs (or All Programs) - EPSON Projector - EasyMP
Network Projection - Add-Remove EPSON Virtual Display
The Add-Remove EPSON Virtual Display screen is displayed
B Select the virtual display you want to use
Up to four monitors can be added In this example a single virtual
display is to be used When setting multiple virtual displays select asmany displays as is necessaryAny one of the displays can be selected
C Click OK
When you click OK the drivers for the virtual display are enabled Atthis point it is normal for the display to flicker Wait for the Add-Remove EPSON Virtual Display screen to close
Adjusting the Virtual Display
After starting EasyMP Network Projection the procedure for setting up the virtual displays differs for Windows and Mac OS The procedures areexplained separately below
qCheck the following points before starting EasyMP Network Projectionwhen connecting via Wireless LAN If the following points are not setcorrectly Multi-screen display cannot be used
bull The SSID for the computer and each projector must be the same
bull The wireless LAN system for the computer and each projector mustbe the sameYou can modify the SSID and Wireless LAN system for theprojector from the Network menu in the projectors Configurationmenus Users Guide Wireless LAN Menu
Using Multi-Screen Display 21
8182019 Easy Mp Network Op Guide
httpslidepdfcomreaderfulleasy-mp-network-op-guide 2247
Procedure
For Windows
A Select Start - Programs (or All Programs) - EPSON
Projector - EasyMP Network Projection - EasyMP Network Projection V2XX to start EasyMP Network Projection
B Select the Use multi-display checkbox
Display layout and Display properties are added at the bottom of thescreen
C Click Display properties
The Display properties screen is displayed
D Click the Settings tab
Using Multi-Screen Display 22
8182019 Easy Mp Network Op Guide
httpslidepdfcomreaderfulleasy-mp-network-op-guide 2347
E Drag the displayed monitor icon and place it where desired
Here the actual monitor (1) is placed on the left while the virtualmonitor (3) is placed on the rightWhen the computer has multiple display output terminals thenumbers assigned to the virtual terminals will be sequential to thoseof the physical terminals
q bull When an external monitor is connected as a secondary monitor the
image for that screen cannot be projected
bull Depending on the hardware the number of the secondary monitormay be other than 2 When the monitor icon is displayed on thescreen click the icon and confirm that the monitor type shownunder Display is other than secondary
bull For the Screen Resolution settings see the followings p36
When the monitor icon is arranged a virtual display is connected asthe image like below
Using Multi-Screen Display 23
i l i i l
8182019 Easy Mp Network Op Guide
httpslidepdfcomreaderfulleasy-mp-network-op-guide 2447
F Click the OK button to close the Display properties screen
Up to this point the virtual display layout has been fixedAllocate the projecting images next s p25
For Mac OS
A Start EasyMP Network Projection Double-click the Applications
folder of the hard drive volume in which EasyMP Network Projection is installed and then double-click the EasyMP
Network Projection iconIn this example we select and start in Advanced ConnectionMode
B Select the Use multi-display checkbox
Display layout and Display preferences are added at the bottom of thescreen
C Click Display preferences
The display setting screen is displayed
D Click Arrangement
E Clear Mirror Displays
Using Multi-Screen Display 24
U i M lti S Di l
8182019 Easy Mp Network Op Guide
httpslidepdfcomreaderfulleasy-mp-network-op-guide 2547
F Drag the displayed monitor icon and place it where desired
G Close the display setting screen
Up to this point the screen layout has been fixed
Allocating the Image to be Projected
This section explains the virtual display for arrangement example 1s p20
Procedure
A Open the file to be projected
Start the PowerPoint and Excel files
B Drag the window to the desired virtual displayg monitor andallocate it where the image is to be projected
Drag the Excel window to the right until it cannot be seen As aresult the PowerPoint window appears on the actual monitor whilethe Excel window appears on the virtual display on the right
Projecting the Allocated Images
This section explains the virtual display for arrangement example 1s p20
Procedure
A Select the number of the virtual displayg
you want to fromDisplay and set which image to be projected from which
projector
Using Multi-Screen Display 25
Using M lti Screen Displa
8182019 Easy Mp Network Op Guide
httpslidepdfcomreaderfulleasy-mp-network-op-guide 2647
B Click Connect
The image allocated to each projector is projected
In a Windows environment you cannot view the image being sent toa virtual display on the computer To adjust the image on the virtualdisplay you must do so while viewing the projected imageTo perform mouse-based operations on the virtual display move themouse pointer in the direction of the virtual display such that thepointer appears on the virtual display
C To terminate multi-screen display click Disconnect on thetoolbar
Using Multi-Screen Display 26
Using Multi Screen Display 27
8182019 Easy Mp Network Op Guide
httpslidepdfcomreaderfulleasy-mp-network-op-guide 2747
q
In a Windows environment if the virtual display driver has been
enabled such that the mouse pointer can be moved outside the limitsof the screen there may be occasions when you lose track of thelocation of the pointer If you are not using a virtual display clear the virtual display checkbox on the Add-Remove EPSON Virtual Display screen so that the mouse pointer moves back inside the screensdisplay area To subsequently use multi-display again place a check mark against the required display under Add-Remove EPSON VirtualDisplayTo clear a check mark see the followings p21
Using Multi-Screen Display 27
Connecting to a Projector on a Different Subnet 28
8182019 Easy Mp Network Op Guide
httpslidepdfcomreaderfulleasy-mp-network-op-guide 2847
This chapter explains how to connect a computer to a projector on adifferent sub-net via a Wired LAN or a wireless LAN access point on anexisting network system
By default this application only searches for projectors on the same subnetas the computer Therefore even if you perform a search for projectors onthe network projectors on a different subnet will not be foundYou can however identify and connect to a projector on a different subnetas follows
bull Specify either an IP address or Projector name and perform a search
The IP Address can be input directly Also provided the Projector nameto be connected has been registered on the DNS server you can performa search simply by inputting that Projector names p28
bull Performing a search based on a Profile
Once you have performed a search for a projector on a different subnetby specifying either an IP Address or a Projector name you can save thesearch as a Profile with an easy-to-remember name and then use that
Profile whenever you subsequently want to search for a projector on adifferent subnets p29
q bull If a search fails to find a projector the most likely causes are as
follows Proceed as appropriate depending on the cause of thefailure
For both Windows and Mac OS
If there is no wireless LAN signal or if the signal is weak check
whether there is anything that could be interfering with the signalWhen the optional Wireless LAN unit is installed in the projectorand connecting Mac OS to a wireless LAN
Check whether AirPort is set to On Or check whether anappropriate access point has been selected
bull When you use Manual search in Quick Connection Mode you canspecify the SSID When there are a lot of projectors you can narrow the search field by using SSID
Specifying Either an IP Address or Projector Name
and Performing a Search (Advanced ConnectionMode Only)
In the following explanations unless otherwise noted Windows screenshots are usedThe similar screens are also displayed for Mac OS
Procedure
A Click Manual search on the EasyMP Network Projectionprojector selection screen
B Enter the IP address or the projector name for the projectoryou want to connect to and click OK
Connecting to a Projector on a Different Subnet 28
Connecting to a Projector on a Different Subnet 29
8182019 Easy Mp Network Op Guide
httpslidepdfcomreaderfulleasy-mp-network-op-guide 2947
The search results are displayed on the EasyMP Network Projectionprojector selection screen
Provided the target projector has been identified select that projectorand then click Connect to establish a connectionWhen you will always be using that projector save the search as aProfile so that you do not have to specify the relevant details every time you perform a search s p29
Performing a Search with a ProfileYou can save a search for a frequently used projector as a Profile AProfile is a file containing all of the information pertaining to a givenprojector such as the projector name its IP address and SSID If youspecify that information from the next time you perform a search there willbe no need to specify the IP address or projector name each time youperform a search For example by creating a group of Profiles for eachplace where a projector is setup and managing them with folders the target
projector can be found quickly
A Building A E Floor 1
B Building B F Floor 2
C Building C G Floor 3
D Building D
This section explains how to create and edit a Profile
Making a Profile
Profiles are made by saving search results
For details on how to edit a previously saved Profile see the followingsection s p31
Procedure
A While the projector is displayed on the EasyMP Network Projection projector selection screen click Save in the
profile
Connecting to a Projector on a Different Subnet 29
Connecting to a Projector on a Different Subnet 30
8182019 Easy Mp Network Op Guide
httpslidepdfcomreaderfulleasy-mp-network-op-guide 3047
The Save in the profile screen is displayed
B Enter a Profile name and then click Add
Projector information is registered in the ProfileIf you have previously saved a Profile you are prompted to confirmwhether or not to overwrite To save a Profile with a different nameselect Save as If you have created a folder for a Profile the followingscreens are displayed After entering the Profile name and selectingthe Save in destination click Add
For Windows
For Mac OS
qFor details on how to create a folder for a Profile see the followingsection s p31
Searching by specifying a Profile
You can search by specifying the Profile you created
Connecting to a Projector on a Different Subnet 30
Connecting to a Projector on a Different Subnet 31
8182019 Easy Mp Network Op Guide
httpslidepdfcomreaderfulleasy-mp-network-op-guide 3147
Procedure
A Click Profile on the EasyMP Network Projection projector
selection screen
If no Profile is registered you cannot select Profile
B From the menu that is displayed select the projector you wantto connect to
The search results are displayed on the EasyMP Network Projectionprojector selection screenProvided the target projector has been identified select that projectorand then click Connect to establish a connection
Managing a Profile
You can change the name and the hierarchical structure of the Profile
Procedure
A Click Set options on the EasyMP Network Projection main
screen
The Set options screen is displayed
B Click Edit profile
The Edit profile screen is displayed
C Edit the contents registered in the Profile
Co ect g to a ojecto o a D e e t Sub et 31
Connecting to a Projector on a Different Subnet 32
8182019 Easy Mp Network Op Guide
httpslidepdfcomreaderfulleasy-mp-network-op-guide 3247
A Indicates a folder
B Indicates a Profile
Prof i le
Item F u nctio n
Profi le
You can display the registered Profile You can manageit by creating a folder You can change the order of theProfile or the folder by dragging amp dropping
Copy
You can copy the Profile The copied Profile is saved in
the same folder as the original with the same nameDelete
You can delete the Profile and the folder
Prof i le
Item F u n ctio n
R e n a m e
Displays the Rename dialog box allowing you to renamethe folder or the Profile You can enter up to 32characters in the Rename dialog box
Create folder
You can create a new folder
E x p or t
Exports a created Profile allowing you to import and usethat Profile
I mp or t
Used when you want to read and use an exportedProfile
Informa tion on selected prof i le
Item F u n ctio n
P r oj e c tor n am e
I P addr e s s
You can display the projector information registered inthe Profile
Delete
You can delete the information for the selectedprojector When all projector information is deleted theprofile is also deleted
D Click OK
Saves your edits and closes the Edit profile screen
g j
Using Set options 33
8182019 Easy Mp Network Op Guide
httpslidepdfcomreaderfulleasy-mp-network-op-guide 3347
You can make setting options such as the processing method when EasyMPNetwork Projection startsAccess Set options from the EasyMP Network Projection main screen
Procedure
A Click Set options on the EasyMP Network Projection main
screen
The Set options screen is displayed
B Set each of the items
Confirm the details of the set items in the next step When you havemade all the necessary settings click OK to close the Set optionsscreen
Setting Each ItemSet each item from the General settings tab and the Adjust performancetab
General settings tab
Use fu l l -screen
vi de o t r an s fe r
This setting is disabled because the projector does notsupport the movie sending function
E n c r y p t
c ommun i c at i on s
Select to Encrypt and transmit data Even if data isintercepted it cannot be decrypted
When using Quick Connection Mode make sure youalways select this checkbox
Display Connection
Mod e Selection
w i n dow on s tar tup
Set whether or not the Quick Connection ModeAdvancedConnection Mode screen is displayed when EasyMPNetwork Projection starts
Clear this checkbox once you have settled on a regularstartup method
S e ar c h me th od on
s tar tup
Select from the following projector search methodsexecuted when EasyMP Network Projection is started
Automatic search on startup
Specify search method after startupSearch with the last network configuration
g p
Using Set options 34
8182019 Easy Mp Network Op Guide
httpslidepdfcomreaderfulleasy-mp-network-op-guide 3447
Edit profi le
The Edit profile dialog box is displayeds p31
S w i tc h L A N
Windows only The Switch Network Adapter dialog box is displayed Thisis used when it is necessary to switch the network adapter tobe used for a search when a computer has multipleadapters
By default all of the network adapters are used to perform asearch When a Wired LAN is always used as theconnection method select a Wired LAN adapter
R e s tor e D e faul ts
You can reset all adjustment values on the General settingstab to their default settings except for Edit profile andSwitch LAN
Adjust performance tab
P e r for man c e
adj us tme n t s l i de r
The performance can be set to Fast Normal andFine
Set to Fast when movie projections are interrupted
T r a n s f er l a y er e d
w i n dow
Windows only (excluding Windows Vista andWindows 7)
Set whether or not to transfer a layered windowThe layered window is in use when contents such asmessages displayed on the computer are not projectedby the projector Select this checkbox to projectcontents such as messages that use the layeredwindow
Clear this checkbox if you do not want the mousepointer to flicker on the screen
R e s tor e D e faul ts
You can reset all adjustment values for the Adjustperformance tab to their default settings
q When you click on the toolbar only the Adjust performance tab
is displayed
Audio Output tab
Because this projector does not support the audio sending function settingson the Audio Output tab are disabled
8182019 Easy Mp Network Op Guide
httpslidepdfcomreaderfulleasy-mp-network-op-guide 3547
Appendix
Connection Limitations 36
8182019 Easy Mp Network Op Guide
httpslidepdfcomreaderfulleasy-mp-network-op-guide 3647
When projecting computer images while running EasyMP Network Projection the following restrictions apply Confirm these points
Supported Resolutions
The following computer screen resolutions can be projected You cannotconnect to a computer with a resolution greater than UXGAg
bull VGA g(640x480)
bull SVGA g(800x600)
bull XGA g(1024x768)
bull SXGA g(1280x960)
bull SXGA (1280x1024)
bull SXGA+ (1400x1050)
bull WXGA (1280x768)
bull WXGA (1280x800)
bull
WXGA+ (1440x900)bull UXGA (1600x1200)
Supported resolutions when multi-screen display function is on
If a computer with a special screen size is used where the ratio of heightand width is not represented a screen resolution closest to the width isselected from the list of 10 aboveIn this case in wide screen the horizontal margins are projected in narrow screen the empty vertical margins are black
Display Color
The number of colors for computer screens that can be projected
W ind o w s M a c O S
16-bit color About 32000 colors (16-bit)
32-bit color About 167 million colors (32-bit)
The operational guarantee for multi-screen display is 16-bit and 32-bitcolor
Number of Connections
You can connect up to four projectors to one computer and projectsimultaneouslyYou cannot connect multiple computers to one projector simultaneously
Others
bull If the transmission speed of the Wireless LAN is low the network might be cut off unexpectedly
bull Audio is not transmitted
bull When videos are played back they do not play back as smoothly as
when displayed on the computerbull Applications that use part of DirectX functions may not be displayed
correctly(Windows only)
bull Cannot project full screen MS-DOS prompts(Windows only)
bull There are times when the image on the computer screen and the imageprojected by the projector may not match exactly
When Using Windows Vista or Windows 7
Note the following points when using EasyMP Network Projection on acomputer running Windows Vista or Windows 7
Limitations when projecting from Windows Photo Gallery
Note the following two limitations when launching Windows Photo Gallery when EasyMP Network Projection is running
Connection Limitations 37
8182019 Easy Mp Network Op Guide
httpslidepdfcomreaderfulleasy-mp-network-op-guide 3747
bull Slide Show is played back in simple mode when projecting fromWindows Photo Gallery
Because the toolbar is not displayed you cannot make changes whileplaying a Theme (effects) regardless of the Windows Experience IndexratingOnce simple mode has started you cannot change modes while WindowsPhoto Gallery is running even if you close EasyMP Network ProjectionRestart Windows Photo Gallery
bull You cannot play movies
Limitations in Windows Aero
Note the following two limitations when the window design for yourcomputer is Windows Aero
bull The layered window is projected regardless of Transfer layered window from Set options in EasyMP Network Projection
For example when Transfer layered window for EasyMP Network Projection toolbar is disabled it is not projected even if it is displayed onthe computer screen however the toolbar is projected
bull A few minutes after you connect a computer to the projector over anetwork with EasyMP Network Projection the following message is
displayedIt is recommended that you select Keep the current color scheme anddont show this message again This selection is enabled until thecomputer is restarted
Limitations when projecting from Windows Media Center
You cannot project images in full screen display using Windows MediaCenter Switch to the window display mode to project the images
Similarly images cannot be projected with Quick Wireless Connection orUSB Display
Troubleshooting 38
8182019 Easy Mp Network Op Guide
httpslidepdfcomreaderfulleasy-mp-network-op-guide 3847
If any of the following problems occur refer to the pages given for eachproblem
Problems concerning network functions
Cannot connect to the projector s p39
When a connection is made using EasyMP Network Projection the projectedimage remains as it is and a connection cannot be made from anothercomputer s p39
The projector is not found when EasyMP Network Projection is
started s
p39Cannot connect in Advanced Connection Mode or Wired LANconnection s p40
The Slide Show cannot be displayed on the desired display when the multi-screendisplay function is being executed s p41
Applications are no longer displayed from the computer screen when the multi-screen display function is executed s p41
The mouse cursor is not displayed on the computer screen s
p41When connecting with EasyMP Network Projection the image is not displayed orthe image is slow to appear s p41
When a connection is made using EasyMP Network Projection a PowerPointSlide Show cannot be started s p42
When a connection has been made using EasyMP Network Projection the screenwill not be refreshed when using an Office application s p42
Error message when starting up EasyMP Network Projection s
p42Network settings are not restored after cutting the connection to the computerwith EasyMP Network Projection s p44
Troubleshooting 39
8182019 Easy Mp Network Op Guide
httpslidepdfcomreaderfulleasy-mp-network-op-guide 3947
Problems Concerning Network Functions
Cannot connect to the projector
Check the message on the screen and then apply the following countermeasures
E r r or M essa g es R em ed y
The application version used is not supported Install the latest version of the application on your computer
Install EasyMP Network Projection from the EPSON Projector Software for Meeting amp Monitoring CD-ROMsupplied with the projector
When a connection is made using EasyMP Network Projection the projected image remains as it is and a connection cannot be madefrom another computer
Ch eck R em ed y
Did the presenter leave the conference room without cutting off thenetwork connection
With EasyMP Network Projection the connection with the computer that was previously connected can be cut off when another computer tries to connect with the projector and it connects with the computer that is trying to
connectTherefore when a Projector Keyword is not set for the projector or if you know the Projector Keyword you can cutoff the current connection and if you perform a connection operation you can connect to the projector
When a Projector Keyword is set for the projector if you do not know the Projector Keyword restart the projector andreconnect
The projector is not found when EasyMP Network Projection is started
Check R em ed y
Is the Wireless LAN unit connected
For Wireless LAN
Check that the optional Wireless LAN unit is securely connected
Is the Network Configuration screen from the Configurationmenu displayed on the projector
When the Network Configuration screen is displayed on the projector network connection for EasyMP Network Projection is disabled Close network settings on the projector and return to the LAN standby screen
Are the computers LAN card and the built-in LAN function
available
Check that LAN is valid by checking Control Panel - System - Hardware in the device manager and so on
Troubleshooting 40
8182019 Easy Mp Network Op Guide
httpslidepdfcomreaderfulleasy-mp-network-op-guide 4047
Check R em ed y
Is the SSID the same as that of the access pointQuick Connection Mode
Set an SSID that is different from that of the access points
Users Guide Network Menu
Is the DHCP function for Wired LAN turned On
Quick Connection Mode
Turn Off the DHCP setting for Wired LAN from the Configuration Menus Users Guide Network Menu
Was the network adapter used selected correctly with EasyMPNetwork Projection
If the computer has multiple LAN environments it cannot connect unless the network adapter is selected correctlyWhen using a computer running Windows start EasyMP Network Projection and select the network adapter you areusing from Set options - Switch LANs p33
For Wireless LAN connection is the Wireless LAN setting enabledwhen the computer is in power save mode
Enable the Wireless LAN
Are there any obstacles between the access point and the computeror projector
For Wireless LAN
Sometimes the electromagnetic wave situation prevents the projector from being found in a search Check for any obstacles between the access point and the computer or projector and change their position to improve theelectromagnetic wave situation
Is the computers Wireless LAN electromagnetic wave set to low Set the electromagnetic wave strength to maximum
Does the Wireless LAN conform to 80211g 80211b or 80211a It is only compatible with standards 80211g 80211b and 80211a and not with other standards such as 80211
Is the firewall turned off or has the firewall been registered as anexception
When you do not wish to turn off the firewall or register the firewall as an exception make the necessary settings toopen the ports
The ports used by EasyMP Network Projection are 3620 3621 and 3629
Is the network cable connected correctly
For Wired LAN
Check that the network cable is connected correctly Reconnect it if it is not connected or not connected properly
Cannot connect in Advanced Connection Mode or Wired LAN connection
Check R em ed y
Is the SSID setting different Set the computer the access point and the projector to the same SSIDs Users Guide Network Menu
Is the same WEP key set When selecting WEP from Security set the access point the computer and the projector to the same WEP keys Users Guide Network Menu
Are the connection denial functions such as MAC Addressg
restrictions and port restrictions set correctly at the access point Set the projector to allow connections from the access point
Troubleshooting 41
8182019 Easy Mp Network Op Guide
httpslidepdfcomreaderfulleasy-mp-network-op-guide 4147
Check R em ed y
Are the IP address the Subnet Mask and the Gateway Address forthe access point and the projector set correctly When not using a DHCP adjust each settings
Users Guide Network Menu
Are the access point and the projectors subnet different Select Manual search from EasyMP Network Projection specify the IP address and connects p28
The Slide Show cannot be displayed on the desired display when the multi-screen display function is being executed
Check R em ed y
Are you using PowerPoint 2002 or an earlier version
For Windows
To set and use two or more virtual displaysg use PowerPoint 2003 or later or limit the number of virtual displays toone before displaying the Slide Show
Applications are no longer displayed from the computer screen when the multi-screen display function is executed
Check R em ed y
Is another application running on the virtual display g
For Windows
When EPSON Virtual Display is installed another application sometimes runs on the virtual display In this case setEPSON Virtual Display to Off in Screen properties
The mouse cursor is not displayed on the computer screen
Check R em ed y
Is EPSON Virtual Display installed
For Windows
The mouse cursor was moved onto the virtual display g When the virtual display checkbox is cleared on the Add-Remove EPSON Virtual Display screen the mouse pointer returns to the screen display area
When connecting with EasyMP Network Projection the image is not displayed or the image is slow to appear
Ch eck R em ed y
Did you try to play back movies with Media Player or try to operatethe screen saver preview
Depending on the computer the movie playback screen in Media Player may not be displayed and the screen saverpreview may not be displayed normally
Troubleshooting 42
8182019 Easy Mp Network Op Guide
httpslidepdfcomreaderfulleasy-mp-network-op-guide 4247
Ch eck R em ed y
Is WEP encryption effective or are multiple projectors connected The display speed decreases when WEP encryption is effective or multiple projectors are connectedHave you enabled DHCP When DHCP is set to On in Advanced Connection Mode if an available DHCP server is not found it may take some
time to enter LAN standby status
Is Wireless LAN 80211gb being used in Quick ConnectionMode
Depending on the electromagnetic wave environment there are times when the image and sound for movies may stop When using the movie sending function use Advanced Connection Mode or Wireless LAN 80211a in Quick Connection Mode
When a connection is made using EasyMP Network Projection a PowerPoint Slide Show cannot be started
Ch eck R em ed y
Was EasyMP Network Projection started while PowerPoint wasrunning
For Windows
When connecting with EasyMP Network Projection make sure you close PowerPoint first Slide Show might not runif connecting while PowerPoint is running
When a connection has been made using EasyMP Network Projection the screen will not be refreshed when using an Office application
Ch eck R em ed y
Is the mouse moved continuously When you stop moving the mouse cursor the screen is updated If the screen does not update quickly stop moving themouse cursor
Error message when starting up EasyMP Network Projection
E r r or M essa g es R em ed y
Connection to the projector failed Try to connect again If it still does not connect check the network settings on the computer and the network settingsfor the projector
For details on the network settings to be made on the projector sees Users Guide Network Menu
The keyword does not match Re-enter the keyword displayed onthe projector screen
Check the Projector Keyword displayed on the LAN standby screen and enter the Projector Keyword
8182019 Easy Mp Network Op Guide
httpslidepdfcomreaderfulleasy-mp-network-op-guide 4347
Troubleshooting 44
8182019 Easy Mp Network Op Guide
httpslidepdfcomreaderfulleasy-mp-network-op-guide 4447
Network settings are not restored after cutting the connection to the computer with EasyMP Network Projection
Check R em ed y
Are you manually connecting to a Wireless LAN when thecomputer starts up
Quick Connection Mode
Try connecting to the Wireless LAN manually
Glossary 45
8182019 Easy Mp Network Op Guide
httpslidepdfcomreaderfulleasy-mp-network-op-guide 4547
This section briefly explains the difficult terms that are not explained in the text of this guide For details refer to other commercially available publications
A d h o c
A method of Wireless LAN connection that communicates with wireless LAN clients without using an access point It is not possible to communicatewith two or more devices simultaneously
M A C A d d r e ss
An abbreviation of Media Access Control The MAC Address is an ID number unique to each network adapter A unique number is assigned to eachnetwork adapter and data is transmitted between network adapters based on this identification
S V G A
A type of video signal with a resolution of 800 (horizontal) ^600 (vertical) dots that is used byIBM PCAT-compatible computers
S X G A
A type of video signal with a resolution of 1280 (horizontal) ^ 1024 (vertical) dots that is used by IBM PCAT-compatible computers
U X G A
A type of video signal with a resolution of 1600 (horizontal) ^ 1200 (vertical) dots that is used by IBM PCAT-compatible computers
V G A
A type of video signal with a resolution of 640 (horizontal) ^ 480 (vertical) dots that is used by IBM PCAT-compatible computers
V i r tual D i s p lay
The screen for one computer is output to multiple displays A large virtual screen can be created by using multiple displays
X G A
A type of video signal with a resolution of 1024 (horizontal) ^ 768 (vertical) dots that is used by IBM PCAT-compatible computers
8182019 Easy Mp Network Op Guide
httpslidepdfcomreaderfulleasy-mp-network-op-guide 4647
8182019 Easy Mp Network Op Guide
httpslidepdfcomreaderfulleasy-mp-network-op-guide 4747
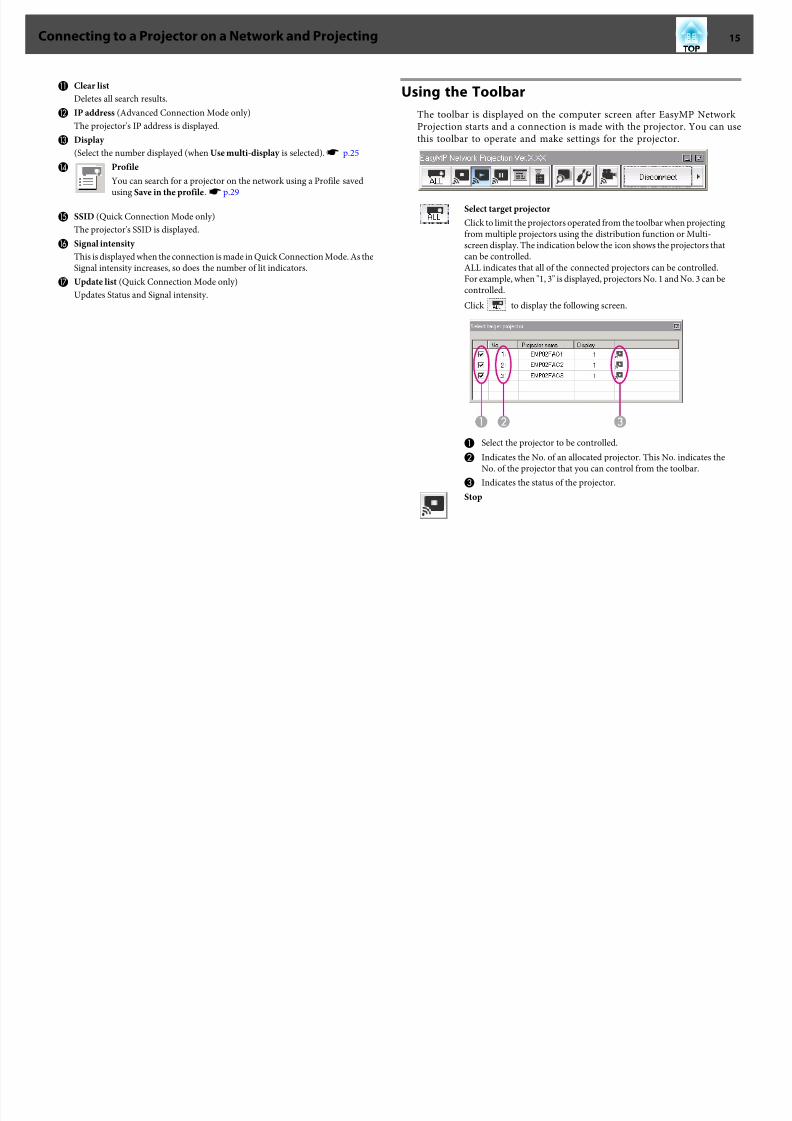
8182019 Easy Mp Network Op Guide
httpslidepdfcomreaderfulleasy-mp-network-op-guide 1547
K Clear list
Deletes all search resultsL IP address (Advanced Connection Mode only)
The projectors IP address is displayed
M Display
(Select the number displayed (when Use multi-display is selected)s p25
N Profile
You can search for a projector on the network using a Profile savedusing Save in the profiles p29
O SSID (Quick Connection Mode only)
The projectors SSID is displayed
P Signal intensity
This is displayed when the connection is made in Quick Connection Mode As theSignal intensity increases so does the number of lit indicators
Q Update list (Quick Connection Mode only)
Updates Status and Signal intensity
Using the Toolbar
The toolbar is displayed on the computer screen after EasyMP Network Projection starts and a connection is made with the projector You can usethis toolbar to operate and make settings for the projector
Select target projector
Click to limit the projectors operated from the toolbar when projectingfrom multiple projectors using the distribution function or Multi-screen display The indication below the icon shows the projectors thatcan be controlledALL indicates that all of the connected projectors can be controlledFor example when 1 3 is displayed projectors No 1 and No 3 can becontrolled
Click to display the following screen
A Select the projector to be controlled
B Indicates the No of an allocated projector This No indicates theNo of the projector that you can control from the toolbar
C Indicates the status of the projector
Stop
Connecting to a Projector on a Network and Projecting 15
8182019 Easy Mp Network Op Guide
httpslidepdfcomreaderfulleasy-mp-network-op-guide 1647
Stops projection while connected to the projector A black screen is
projected while stopped Audio does not stop To stop the audio or todisplay a Users Logo while projection is stopped use the AV Mutefunction
Show
Releases Stop or Pause
Pause
Pauses projected images while connecting to the projector The audio isnot paused
Presentation Mode
Each time this is clicked Presentation Mode switches between enableddisableds p19
Projector control
While the projector is connected to the network the projectors AVMute Switch PC source and Switch video source functions can becontrolled from both the Remote Control and the projectors Control
panel
Click to display the following toolbar
AV Mute
The same function as the [AV Mute] button on theRemote Control
s Users Guide Remote Control
Switch PC source
The Source alternates between Computer1Computer2 USB Display USB and LAN each timeyou click
Switch video source
The Source alternates between S-Video and Videoeach time you click S-Video does not switch if thecable is not connected
Screen Preview
Displays the multi-screen preview screen
Click to display a preview with the settings you have made Click
each display to enlarge each Screen Preview to full-screen
Set options
Transmission performance during the transfer of computer images canbe adjusteds p33
Movie Sending Mode
Not enabled on this projector The message The connected projectorsdo not support Movie Sending is displayed
DisconnectDisconnects the connection to the projector
Signal intensity
This is displayed when a connection is made in Quick ConnectionMode As the Signal intensity increases so does the number of litindicators
Switch toolbar display
Connecting to a Projector on a Network and Projecting 16
8182019 Easy Mp Network Op Guide
httpslidepdfcomreaderfulleasy-mp-network-op-guide 1747
The toolbar display is switched as follows The toolbar display remains
as is until switched againFull
Normal
Simple
Connecting to a Projector on a Network and Projecting 17
8182019 Easy Mp Network Op Guide
httpslidepdfcomreaderfulleasy-mp-network-op-guide 1847
Functions and Settings for EasyMP Network ProjectionThis chapter explains the functions that may be useful in a meeting or presentation such as the Multi-Screen Display which allows you to send images tomultiple projectors from a single computer
8182019 Easy Mp Network Op Guide
httpslidepdfcomreaderfulleasy-mp-network-op-guide 1947
In Presentation Mode the images are only displayed when performing a
PowerPoint Slide Show on a computer When you stop Slide Show theprojector displays a black screen This is useful when you only want todisplay the Slide ShowIn addition to PowerPoint Keynote is compatible with Presentation Modefor Mac OS
Procedure
A If necessary select another projector to be controlleds p15
B Click the button on the toolbar
Presentation Mode begins
C Click the button again to exit Presentation Mode
Projecting Only a PowerPoint Slide Show (Presentation Mode) 19
8182019 Easy Mp Network Op Guide
httpslidepdfcomreaderfulleasy-mp-network-op-guide 2047
Example of Adjusting the Virtual Display
By arranging the virtual display g allocation you can project only the imagethat you want to show or project different images from left to right in apresentation
Arrangement example 1
AA c tual mon i tor i mag e
PowerPoint file
B I mag e of v i r tua l d i s p lay
Excel file
Arrangement example 2
AA c tual mon i tor i mag e
PowerPoint file presenter tools
BI mag e of v i r tua l d i s p lay
Slide Show using a PowerPoint file
Procedure Before Using the Multi-screen Display
Function
1 Setting the Virtual Display s p21
In a Windows environment enable the virtual display g driver as necessary Alsofor both Windows and Mac OS set up the virtual display arrangement
2 Allocating the image to be projected s p25
Using Multi-Screen Display 20
8182019 Easy Mp Network Op Guide
httpslidepdfcomreaderfulleasy-mp-network-op-guide 2147
Open the file to be projected and then move the screen to the virtual display
according to the actual projection arrangement3 Projecting the allocated images s p25
Allocate a virtual display number to a projector that is connected through thenetwork and then start projection
Setting the Virtual Display
This chapter explains the virtual display for arrangement example 1s p20
Enable the virtual display driver (Windows only)
Enable the virtual display g driver Those users listed below do not have toperform this operation Go to procedure s Adjusting the Virtual Display
p21bull Those users who have enabled virtual displays installing EasyMP
Network Projection
bull For Mac OS users
Procedure
A Start Windows on the computer and then select Start -Programs (or All Programs) - EPSON Projector - EasyMP
Network Projection - Add-Remove EPSON Virtual Display
The Add-Remove EPSON Virtual Display screen is displayed
B Select the virtual display you want to use
Up to four monitors can be added In this example a single virtual
display is to be used When setting multiple virtual displays select asmany displays as is necessaryAny one of the displays can be selected
C Click OK
When you click OK the drivers for the virtual display are enabled Atthis point it is normal for the display to flicker Wait for the Add-Remove EPSON Virtual Display screen to close
Adjusting the Virtual Display
After starting EasyMP Network Projection the procedure for setting up the virtual displays differs for Windows and Mac OS The procedures areexplained separately below
qCheck the following points before starting EasyMP Network Projectionwhen connecting via Wireless LAN If the following points are not setcorrectly Multi-screen display cannot be used
bull The SSID for the computer and each projector must be the same
bull The wireless LAN system for the computer and each projector mustbe the sameYou can modify the SSID and Wireless LAN system for theprojector from the Network menu in the projectors Configurationmenus Users Guide Wireless LAN Menu
Using Multi-Screen Display 21
8182019 Easy Mp Network Op Guide
httpslidepdfcomreaderfulleasy-mp-network-op-guide 2247
Procedure
For Windows
A Select Start - Programs (or All Programs) - EPSON
Projector - EasyMP Network Projection - EasyMP Network Projection V2XX to start EasyMP Network Projection
B Select the Use multi-display checkbox
Display layout and Display properties are added at the bottom of thescreen
C Click Display properties
The Display properties screen is displayed
D Click the Settings tab
Using Multi-Screen Display 22
8182019 Easy Mp Network Op Guide
httpslidepdfcomreaderfulleasy-mp-network-op-guide 2347
E Drag the displayed monitor icon and place it where desired
Here the actual monitor (1) is placed on the left while the virtualmonitor (3) is placed on the rightWhen the computer has multiple display output terminals thenumbers assigned to the virtual terminals will be sequential to thoseof the physical terminals
q bull When an external monitor is connected as a secondary monitor the
image for that screen cannot be projected
bull Depending on the hardware the number of the secondary monitormay be other than 2 When the monitor icon is displayed on thescreen click the icon and confirm that the monitor type shownunder Display is other than secondary
bull For the Screen Resolution settings see the followings p36
When the monitor icon is arranged a virtual display is connected asthe image like below
Using Multi-Screen Display 23
i l i i l
8182019 Easy Mp Network Op Guide
httpslidepdfcomreaderfulleasy-mp-network-op-guide 2447
F Click the OK button to close the Display properties screen
Up to this point the virtual display layout has been fixedAllocate the projecting images next s p25
For Mac OS
A Start EasyMP Network Projection Double-click the Applications
folder of the hard drive volume in which EasyMP Network Projection is installed and then double-click the EasyMP
Network Projection iconIn this example we select and start in Advanced ConnectionMode
B Select the Use multi-display checkbox
Display layout and Display preferences are added at the bottom of thescreen
C Click Display preferences
The display setting screen is displayed
D Click Arrangement
E Clear Mirror Displays
Using Multi-Screen Display 24
U i M lti S Di l
8182019 Easy Mp Network Op Guide
httpslidepdfcomreaderfulleasy-mp-network-op-guide 2547
F Drag the displayed monitor icon and place it where desired
G Close the display setting screen
Up to this point the screen layout has been fixed
Allocating the Image to be Projected
This section explains the virtual display for arrangement example 1s p20
Procedure
A Open the file to be projected
Start the PowerPoint and Excel files
B Drag the window to the desired virtual displayg monitor andallocate it where the image is to be projected
Drag the Excel window to the right until it cannot be seen As aresult the PowerPoint window appears on the actual monitor whilethe Excel window appears on the virtual display on the right
Projecting the Allocated Images
This section explains the virtual display for arrangement example 1s p20
Procedure
A Select the number of the virtual displayg
you want to fromDisplay and set which image to be projected from which
projector
Using Multi-Screen Display 25
Using M lti Screen Displa
8182019 Easy Mp Network Op Guide
httpslidepdfcomreaderfulleasy-mp-network-op-guide 2647
B Click Connect
The image allocated to each projector is projected
In a Windows environment you cannot view the image being sent toa virtual display on the computer To adjust the image on the virtualdisplay you must do so while viewing the projected imageTo perform mouse-based operations on the virtual display move themouse pointer in the direction of the virtual display such that thepointer appears on the virtual display
C To terminate multi-screen display click Disconnect on thetoolbar
Using Multi-Screen Display 26
Using Multi Screen Display 27
8182019 Easy Mp Network Op Guide
httpslidepdfcomreaderfulleasy-mp-network-op-guide 2747
q
In a Windows environment if the virtual display driver has been
enabled such that the mouse pointer can be moved outside the limitsof the screen there may be occasions when you lose track of thelocation of the pointer If you are not using a virtual display clear the virtual display checkbox on the Add-Remove EPSON Virtual Display screen so that the mouse pointer moves back inside the screensdisplay area To subsequently use multi-display again place a check mark against the required display under Add-Remove EPSON VirtualDisplayTo clear a check mark see the followings p21
Using Multi-Screen Display 27
Connecting to a Projector on a Different Subnet 28
8182019 Easy Mp Network Op Guide
httpslidepdfcomreaderfulleasy-mp-network-op-guide 2847
This chapter explains how to connect a computer to a projector on adifferent sub-net via a Wired LAN or a wireless LAN access point on anexisting network system
By default this application only searches for projectors on the same subnetas the computer Therefore even if you perform a search for projectors onthe network projectors on a different subnet will not be foundYou can however identify and connect to a projector on a different subnetas follows
bull Specify either an IP address or Projector name and perform a search
The IP Address can be input directly Also provided the Projector nameto be connected has been registered on the DNS server you can performa search simply by inputting that Projector names p28
bull Performing a search based on a Profile
Once you have performed a search for a projector on a different subnetby specifying either an IP Address or a Projector name you can save thesearch as a Profile with an easy-to-remember name and then use that
Profile whenever you subsequently want to search for a projector on adifferent subnets p29
q bull If a search fails to find a projector the most likely causes are as
follows Proceed as appropriate depending on the cause of thefailure
For both Windows and Mac OS
If there is no wireless LAN signal or if the signal is weak check
whether there is anything that could be interfering with the signalWhen the optional Wireless LAN unit is installed in the projectorand connecting Mac OS to a wireless LAN
Check whether AirPort is set to On Or check whether anappropriate access point has been selected
bull When you use Manual search in Quick Connection Mode you canspecify the SSID When there are a lot of projectors you can narrow the search field by using SSID
Specifying Either an IP Address or Projector Name
and Performing a Search (Advanced ConnectionMode Only)
In the following explanations unless otherwise noted Windows screenshots are usedThe similar screens are also displayed for Mac OS
Procedure
A Click Manual search on the EasyMP Network Projectionprojector selection screen
B Enter the IP address or the projector name for the projectoryou want to connect to and click OK
Connecting to a Projector on a Different Subnet 28
Connecting to a Projector on a Different Subnet 29
8182019 Easy Mp Network Op Guide
httpslidepdfcomreaderfulleasy-mp-network-op-guide 2947
The search results are displayed on the EasyMP Network Projectionprojector selection screen
Provided the target projector has been identified select that projectorand then click Connect to establish a connectionWhen you will always be using that projector save the search as aProfile so that you do not have to specify the relevant details every time you perform a search s p29
Performing a Search with a ProfileYou can save a search for a frequently used projector as a Profile AProfile is a file containing all of the information pertaining to a givenprojector such as the projector name its IP address and SSID If youspecify that information from the next time you perform a search there willbe no need to specify the IP address or projector name each time youperform a search For example by creating a group of Profiles for eachplace where a projector is setup and managing them with folders the target
projector can be found quickly
A Building A E Floor 1
B Building B F Floor 2
C Building C G Floor 3
D Building D
This section explains how to create and edit a Profile
Making a Profile
Profiles are made by saving search results
For details on how to edit a previously saved Profile see the followingsection s p31
Procedure
A While the projector is displayed on the EasyMP Network Projection projector selection screen click Save in the
profile
Connecting to a Projector on a Different Subnet 29
Connecting to a Projector on a Different Subnet 30
8182019 Easy Mp Network Op Guide
httpslidepdfcomreaderfulleasy-mp-network-op-guide 3047
The Save in the profile screen is displayed
B Enter a Profile name and then click Add
Projector information is registered in the ProfileIf you have previously saved a Profile you are prompted to confirmwhether or not to overwrite To save a Profile with a different nameselect Save as If you have created a folder for a Profile the followingscreens are displayed After entering the Profile name and selectingthe Save in destination click Add
For Windows
For Mac OS
qFor details on how to create a folder for a Profile see the followingsection s p31
Searching by specifying a Profile
You can search by specifying the Profile you created
Connecting to a Projector on a Different Subnet 30
Connecting to a Projector on a Different Subnet 31
8182019 Easy Mp Network Op Guide
httpslidepdfcomreaderfulleasy-mp-network-op-guide 3147
Procedure
A Click Profile on the EasyMP Network Projection projector
selection screen
If no Profile is registered you cannot select Profile
B From the menu that is displayed select the projector you wantto connect to
The search results are displayed on the EasyMP Network Projectionprojector selection screenProvided the target projector has been identified select that projectorand then click Connect to establish a connection
Managing a Profile
You can change the name and the hierarchical structure of the Profile
Procedure
A Click Set options on the EasyMP Network Projection main
screen
The Set options screen is displayed
B Click Edit profile
The Edit profile screen is displayed
C Edit the contents registered in the Profile
Co ect g to a ojecto o a D e e t Sub et 31
Connecting to a Projector on a Different Subnet 32
8182019 Easy Mp Network Op Guide
httpslidepdfcomreaderfulleasy-mp-network-op-guide 3247
A Indicates a folder
B Indicates a Profile
Prof i le
Item F u nctio n
Profi le
You can display the registered Profile You can manageit by creating a folder You can change the order of theProfile or the folder by dragging amp dropping
Copy
You can copy the Profile The copied Profile is saved in
the same folder as the original with the same nameDelete
You can delete the Profile and the folder
Prof i le
Item F u n ctio n
R e n a m e
Displays the Rename dialog box allowing you to renamethe folder or the Profile You can enter up to 32characters in the Rename dialog box
Create folder
You can create a new folder
E x p or t
Exports a created Profile allowing you to import and usethat Profile
I mp or t
Used when you want to read and use an exportedProfile
Informa tion on selected prof i le
Item F u n ctio n
P r oj e c tor n am e
I P addr e s s
You can display the projector information registered inthe Profile
Delete
You can delete the information for the selectedprojector When all projector information is deleted theprofile is also deleted
D Click OK
Saves your edits and closes the Edit profile screen
g j
Using Set options 33
8182019 Easy Mp Network Op Guide
httpslidepdfcomreaderfulleasy-mp-network-op-guide 3347
You can make setting options such as the processing method when EasyMPNetwork Projection startsAccess Set options from the EasyMP Network Projection main screen
Procedure
A Click Set options on the EasyMP Network Projection main
screen
The Set options screen is displayed
B Set each of the items
Confirm the details of the set items in the next step When you havemade all the necessary settings click OK to close the Set optionsscreen
Setting Each ItemSet each item from the General settings tab and the Adjust performancetab
General settings tab
Use fu l l -screen
vi de o t r an s fe r
This setting is disabled because the projector does notsupport the movie sending function
E n c r y p t
c ommun i c at i on s
Select to Encrypt and transmit data Even if data isintercepted it cannot be decrypted
When using Quick Connection Mode make sure youalways select this checkbox
Display Connection
Mod e Selection
w i n dow on s tar tup
Set whether or not the Quick Connection ModeAdvancedConnection Mode screen is displayed when EasyMPNetwork Projection starts
Clear this checkbox once you have settled on a regularstartup method
S e ar c h me th od on
s tar tup
Select from the following projector search methodsexecuted when EasyMP Network Projection is started
Automatic search on startup
Specify search method after startupSearch with the last network configuration
g p
Using Set options 34
8182019 Easy Mp Network Op Guide
httpslidepdfcomreaderfulleasy-mp-network-op-guide 3447
Edit profi le
The Edit profile dialog box is displayeds p31
S w i tc h L A N
Windows only The Switch Network Adapter dialog box is displayed Thisis used when it is necessary to switch the network adapter tobe used for a search when a computer has multipleadapters
By default all of the network adapters are used to perform asearch When a Wired LAN is always used as theconnection method select a Wired LAN adapter
R e s tor e D e faul ts
You can reset all adjustment values on the General settingstab to their default settings except for Edit profile andSwitch LAN
Adjust performance tab
P e r for man c e
adj us tme n t s l i de r
The performance can be set to Fast Normal andFine
Set to Fast when movie projections are interrupted
T r a n s f er l a y er e d
w i n dow
Windows only (excluding Windows Vista andWindows 7)
Set whether or not to transfer a layered windowThe layered window is in use when contents such asmessages displayed on the computer are not projectedby the projector Select this checkbox to projectcontents such as messages that use the layeredwindow
Clear this checkbox if you do not want the mousepointer to flicker on the screen
R e s tor e D e faul ts
You can reset all adjustment values for the Adjustperformance tab to their default settings
q When you click on the toolbar only the Adjust performance tab
is displayed
Audio Output tab
Because this projector does not support the audio sending function settingson the Audio Output tab are disabled
8182019 Easy Mp Network Op Guide
httpslidepdfcomreaderfulleasy-mp-network-op-guide 3547
Appendix
Connection Limitations 36
8182019 Easy Mp Network Op Guide
httpslidepdfcomreaderfulleasy-mp-network-op-guide 3647
When projecting computer images while running EasyMP Network Projection the following restrictions apply Confirm these points
Supported Resolutions
The following computer screen resolutions can be projected You cannotconnect to a computer with a resolution greater than UXGAg
bull VGA g(640x480)
bull SVGA g(800x600)
bull XGA g(1024x768)
bull SXGA g(1280x960)
bull SXGA (1280x1024)
bull SXGA+ (1400x1050)
bull WXGA (1280x768)
bull WXGA (1280x800)
bull
WXGA+ (1440x900)bull UXGA (1600x1200)
Supported resolutions when multi-screen display function is on
If a computer with a special screen size is used where the ratio of heightand width is not represented a screen resolution closest to the width isselected from the list of 10 aboveIn this case in wide screen the horizontal margins are projected in narrow screen the empty vertical margins are black
Display Color
The number of colors for computer screens that can be projected
W ind o w s M a c O S
16-bit color About 32000 colors (16-bit)
32-bit color About 167 million colors (32-bit)
The operational guarantee for multi-screen display is 16-bit and 32-bitcolor
Number of Connections
You can connect up to four projectors to one computer and projectsimultaneouslyYou cannot connect multiple computers to one projector simultaneously
Others
bull If the transmission speed of the Wireless LAN is low the network might be cut off unexpectedly
bull Audio is not transmitted
bull When videos are played back they do not play back as smoothly as
when displayed on the computerbull Applications that use part of DirectX functions may not be displayed
correctly(Windows only)
bull Cannot project full screen MS-DOS prompts(Windows only)
bull There are times when the image on the computer screen and the imageprojected by the projector may not match exactly
When Using Windows Vista or Windows 7
Note the following points when using EasyMP Network Projection on acomputer running Windows Vista or Windows 7
Limitations when projecting from Windows Photo Gallery
Note the following two limitations when launching Windows Photo Gallery when EasyMP Network Projection is running
Connection Limitations 37
8182019 Easy Mp Network Op Guide
httpslidepdfcomreaderfulleasy-mp-network-op-guide 3747
bull Slide Show is played back in simple mode when projecting fromWindows Photo Gallery
Because the toolbar is not displayed you cannot make changes whileplaying a Theme (effects) regardless of the Windows Experience IndexratingOnce simple mode has started you cannot change modes while WindowsPhoto Gallery is running even if you close EasyMP Network ProjectionRestart Windows Photo Gallery
bull You cannot play movies
Limitations in Windows Aero
Note the following two limitations when the window design for yourcomputer is Windows Aero
bull The layered window is projected regardless of Transfer layered window from Set options in EasyMP Network Projection
For example when Transfer layered window for EasyMP Network Projection toolbar is disabled it is not projected even if it is displayed onthe computer screen however the toolbar is projected
bull A few minutes after you connect a computer to the projector over anetwork with EasyMP Network Projection the following message is
displayedIt is recommended that you select Keep the current color scheme anddont show this message again This selection is enabled until thecomputer is restarted
Limitations when projecting from Windows Media Center
You cannot project images in full screen display using Windows MediaCenter Switch to the window display mode to project the images
Similarly images cannot be projected with Quick Wireless Connection orUSB Display
Troubleshooting 38
8182019 Easy Mp Network Op Guide
httpslidepdfcomreaderfulleasy-mp-network-op-guide 3847
If any of the following problems occur refer to the pages given for eachproblem
Problems concerning network functions
Cannot connect to the projector s p39
When a connection is made using EasyMP Network Projection the projectedimage remains as it is and a connection cannot be made from anothercomputer s p39
The projector is not found when EasyMP Network Projection is
started s
p39Cannot connect in Advanced Connection Mode or Wired LANconnection s p40
The Slide Show cannot be displayed on the desired display when the multi-screendisplay function is being executed s p41
Applications are no longer displayed from the computer screen when the multi-screen display function is executed s p41
The mouse cursor is not displayed on the computer screen s
p41When connecting with EasyMP Network Projection the image is not displayed orthe image is slow to appear s p41
When a connection is made using EasyMP Network Projection a PowerPointSlide Show cannot be started s p42
When a connection has been made using EasyMP Network Projection the screenwill not be refreshed when using an Office application s p42
Error message when starting up EasyMP Network Projection s
p42Network settings are not restored after cutting the connection to the computerwith EasyMP Network Projection s p44
Troubleshooting 39
8182019 Easy Mp Network Op Guide
httpslidepdfcomreaderfulleasy-mp-network-op-guide 3947
Problems Concerning Network Functions
Cannot connect to the projector
Check the message on the screen and then apply the following countermeasures
E r r or M essa g es R em ed y
The application version used is not supported Install the latest version of the application on your computer
Install EasyMP Network Projection from the EPSON Projector Software for Meeting amp Monitoring CD-ROMsupplied with the projector
When a connection is made using EasyMP Network Projection the projected image remains as it is and a connection cannot be madefrom another computer
Ch eck R em ed y
Did the presenter leave the conference room without cutting off thenetwork connection
With EasyMP Network Projection the connection with the computer that was previously connected can be cut off when another computer tries to connect with the projector and it connects with the computer that is trying to
connectTherefore when a Projector Keyword is not set for the projector or if you know the Projector Keyword you can cutoff the current connection and if you perform a connection operation you can connect to the projector
When a Projector Keyword is set for the projector if you do not know the Projector Keyword restart the projector andreconnect
The projector is not found when EasyMP Network Projection is started
Check R em ed y
Is the Wireless LAN unit connected
For Wireless LAN
Check that the optional Wireless LAN unit is securely connected
Is the Network Configuration screen from the Configurationmenu displayed on the projector
When the Network Configuration screen is displayed on the projector network connection for EasyMP Network Projection is disabled Close network settings on the projector and return to the LAN standby screen
Are the computers LAN card and the built-in LAN function
available
Check that LAN is valid by checking Control Panel - System - Hardware in the device manager and so on
Troubleshooting 40
8182019 Easy Mp Network Op Guide
httpslidepdfcomreaderfulleasy-mp-network-op-guide 4047
Check R em ed y
Is the SSID the same as that of the access pointQuick Connection Mode
Set an SSID that is different from that of the access points
Users Guide Network Menu
Is the DHCP function for Wired LAN turned On
Quick Connection Mode
Turn Off the DHCP setting for Wired LAN from the Configuration Menus Users Guide Network Menu
Was the network adapter used selected correctly with EasyMPNetwork Projection
If the computer has multiple LAN environments it cannot connect unless the network adapter is selected correctlyWhen using a computer running Windows start EasyMP Network Projection and select the network adapter you areusing from Set options - Switch LANs p33
For Wireless LAN connection is the Wireless LAN setting enabledwhen the computer is in power save mode
Enable the Wireless LAN
Are there any obstacles between the access point and the computeror projector
For Wireless LAN
Sometimes the electromagnetic wave situation prevents the projector from being found in a search Check for any obstacles between the access point and the computer or projector and change their position to improve theelectromagnetic wave situation
Is the computers Wireless LAN electromagnetic wave set to low Set the electromagnetic wave strength to maximum
Does the Wireless LAN conform to 80211g 80211b or 80211a It is only compatible with standards 80211g 80211b and 80211a and not with other standards such as 80211
Is the firewall turned off or has the firewall been registered as anexception
When you do not wish to turn off the firewall or register the firewall as an exception make the necessary settings toopen the ports
The ports used by EasyMP Network Projection are 3620 3621 and 3629
Is the network cable connected correctly
For Wired LAN
Check that the network cable is connected correctly Reconnect it if it is not connected or not connected properly
Cannot connect in Advanced Connection Mode or Wired LAN connection
Check R em ed y
Is the SSID setting different Set the computer the access point and the projector to the same SSIDs Users Guide Network Menu
Is the same WEP key set When selecting WEP from Security set the access point the computer and the projector to the same WEP keys Users Guide Network Menu
Are the connection denial functions such as MAC Addressg
restrictions and port restrictions set correctly at the access point Set the projector to allow connections from the access point
Troubleshooting 41
8182019 Easy Mp Network Op Guide
httpslidepdfcomreaderfulleasy-mp-network-op-guide 4147
Check R em ed y
Are the IP address the Subnet Mask and the Gateway Address forthe access point and the projector set correctly When not using a DHCP adjust each settings
Users Guide Network Menu
Are the access point and the projectors subnet different Select Manual search from EasyMP Network Projection specify the IP address and connects p28
The Slide Show cannot be displayed on the desired display when the multi-screen display function is being executed
Check R em ed y
Are you using PowerPoint 2002 or an earlier version
For Windows
To set and use two or more virtual displaysg use PowerPoint 2003 or later or limit the number of virtual displays toone before displaying the Slide Show
Applications are no longer displayed from the computer screen when the multi-screen display function is executed
Check R em ed y
Is another application running on the virtual display g
For Windows
When EPSON Virtual Display is installed another application sometimes runs on the virtual display In this case setEPSON Virtual Display to Off in Screen properties
The mouse cursor is not displayed on the computer screen
Check R em ed y
Is EPSON Virtual Display installed
For Windows
The mouse cursor was moved onto the virtual display g When the virtual display checkbox is cleared on the Add-Remove EPSON Virtual Display screen the mouse pointer returns to the screen display area
When connecting with EasyMP Network Projection the image is not displayed or the image is slow to appear
Ch eck R em ed y
Did you try to play back movies with Media Player or try to operatethe screen saver preview
Depending on the computer the movie playback screen in Media Player may not be displayed and the screen saverpreview may not be displayed normally
Troubleshooting 42
8182019 Easy Mp Network Op Guide
httpslidepdfcomreaderfulleasy-mp-network-op-guide 4247
Ch eck R em ed y
Is WEP encryption effective or are multiple projectors connected The display speed decreases when WEP encryption is effective or multiple projectors are connectedHave you enabled DHCP When DHCP is set to On in Advanced Connection Mode if an available DHCP server is not found it may take some
time to enter LAN standby status
Is Wireless LAN 80211gb being used in Quick ConnectionMode
Depending on the electromagnetic wave environment there are times when the image and sound for movies may stop When using the movie sending function use Advanced Connection Mode or Wireless LAN 80211a in Quick Connection Mode
When a connection is made using EasyMP Network Projection a PowerPoint Slide Show cannot be started
Ch eck R em ed y
Was EasyMP Network Projection started while PowerPoint wasrunning
For Windows
When connecting with EasyMP Network Projection make sure you close PowerPoint first Slide Show might not runif connecting while PowerPoint is running
When a connection has been made using EasyMP Network Projection the screen will not be refreshed when using an Office application
Ch eck R em ed y
Is the mouse moved continuously When you stop moving the mouse cursor the screen is updated If the screen does not update quickly stop moving themouse cursor
Error message when starting up EasyMP Network Projection
E r r or M essa g es R em ed y
Connection to the projector failed Try to connect again If it still does not connect check the network settings on the computer and the network settingsfor the projector
For details on the network settings to be made on the projector sees Users Guide Network Menu
The keyword does not match Re-enter the keyword displayed onthe projector screen
Check the Projector Keyword displayed on the LAN standby screen and enter the Projector Keyword
8182019 Easy Mp Network Op Guide
httpslidepdfcomreaderfulleasy-mp-network-op-guide 4347
Troubleshooting 44
8182019 Easy Mp Network Op Guide
httpslidepdfcomreaderfulleasy-mp-network-op-guide 4447
Network settings are not restored after cutting the connection to the computer with EasyMP Network Projection
Check R em ed y
Are you manually connecting to a Wireless LAN when thecomputer starts up
Quick Connection Mode
Try connecting to the Wireless LAN manually
Glossary 45
8182019 Easy Mp Network Op Guide
httpslidepdfcomreaderfulleasy-mp-network-op-guide 4547
This section briefly explains the difficult terms that are not explained in the text of this guide For details refer to other commercially available publications
A d h o c
A method of Wireless LAN connection that communicates with wireless LAN clients without using an access point It is not possible to communicatewith two or more devices simultaneously
M A C A d d r e ss
An abbreviation of Media Access Control The MAC Address is an ID number unique to each network adapter A unique number is assigned to eachnetwork adapter and data is transmitted between network adapters based on this identification
S V G A
A type of video signal with a resolution of 800 (horizontal) ^600 (vertical) dots that is used byIBM PCAT-compatible computers
S X G A
A type of video signal with a resolution of 1280 (horizontal) ^ 1024 (vertical) dots that is used by IBM PCAT-compatible computers
U X G A
A type of video signal with a resolution of 1600 (horizontal) ^ 1200 (vertical) dots that is used by IBM PCAT-compatible computers
V G A
A type of video signal with a resolution of 640 (horizontal) ^ 480 (vertical) dots that is used by IBM PCAT-compatible computers
V i r tual D i s p lay
The screen for one computer is output to multiple displays A large virtual screen can be created by using multiple displays
X G A
A type of video signal with a resolution of 1024 (horizontal) ^ 768 (vertical) dots that is used by IBM PCAT-compatible computers
8182019 Easy Mp Network Op Guide
httpslidepdfcomreaderfulleasy-mp-network-op-guide 4647
8182019 Easy Mp Network Op Guide
httpslidepdfcomreaderfulleasy-mp-network-op-guide 4747
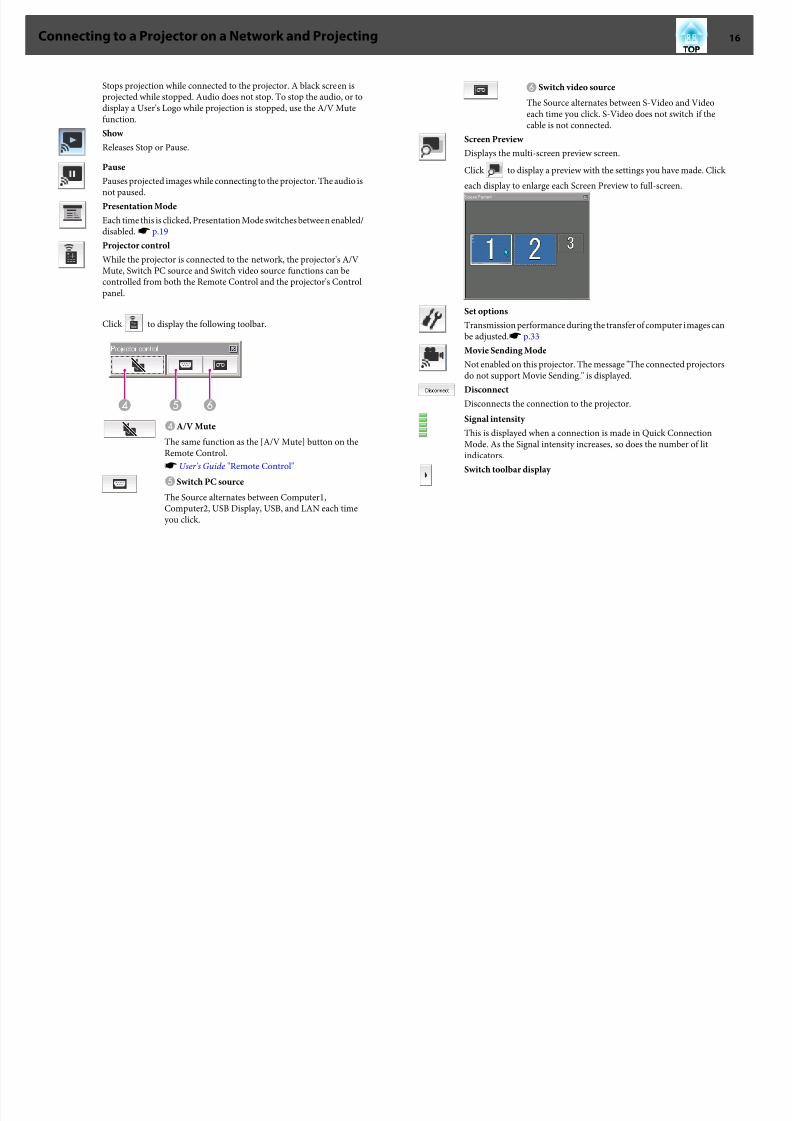
8182019 Easy Mp Network Op Guide
httpslidepdfcomreaderfulleasy-mp-network-op-guide 1947
In Presentation Mode the images are only displayed when performing a
PowerPoint Slide Show on a computer When you stop Slide Show theprojector displays a black screen This is useful when you only want todisplay the Slide ShowIn addition to PowerPoint Keynote is compatible with Presentation Modefor Mac OS
Procedure
A If necessary select another projector to be controlleds p15
B Click the button on the toolbar
Presentation Mode begins
C Click the button again to exit Presentation Mode
Projecting Only a PowerPoint Slide Show (Presentation Mode) 19
8182019 Easy Mp Network Op Guide
httpslidepdfcomreaderfulleasy-mp-network-op-guide 2047
Example of Adjusting the Virtual Display
By arranging the virtual display g allocation you can project only the imagethat you want to show or project different images from left to right in apresentation
Arrangement example 1
AA c tual mon i tor i mag e
PowerPoint file
B I mag e of v i r tua l d i s p lay
Excel file
Arrangement example 2
AA c tual mon i tor i mag e
PowerPoint file presenter tools
BI mag e of v i r tua l d i s p lay
Slide Show using a PowerPoint file
Procedure Before Using the Multi-screen Display
Function
1 Setting the Virtual Display s p21
In a Windows environment enable the virtual display g driver as necessary Alsofor both Windows and Mac OS set up the virtual display arrangement
2 Allocating the image to be projected s p25
Using Multi-Screen Display 20
8182019 Easy Mp Network Op Guide
httpslidepdfcomreaderfulleasy-mp-network-op-guide 2147
Open the file to be projected and then move the screen to the virtual display
according to the actual projection arrangement3 Projecting the allocated images s p25
Allocate a virtual display number to a projector that is connected through thenetwork and then start projection
Setting the Virtual Display
This chapter explains the virtual display for arrangement example 1s p20
Enable the virtual display driver (Windows only)
Enable the virtual display g driver Those users listed below do not have toperform this operation Go to procedure s Adjusting the Virtual Display
p21bull Those users who have enabled virtual displays installing EasyMP
Network Projection
bull For Mac OS users
Procedure
A Start Windows on the computer and then select Start -Programs (or All Programs) - EPSON Projector - EasyMP
Network Projection - Add-Remove EPSON Virtual Display
The Add-Remove EPSON Virtual Display screen is displayed
B Select the virtual display you want to use
Up to four monitors can be added In this example a single virtual
display is to be used When setting multiple virtual displays select asmany displays as is necessaryAny one of the displays can be selected
C Click OK
When you click OK the drivers for the virtual display are enabled Atthis point it is normal for the display to flicker Wait for the Add-Remove EPSON Virtual Display screen to close
Adjusting the Virtual Display
After starting EasyMP Network Projection the procedure for setting up the virtual displays differs for Windows and Mac OS The procedures areexplained separately below
qCheck the following points before starting EasyMP Network Projectionwhen connecting via Wireless LAN If the following points are not setcorrectly Multi-screen display cannot be used
bull The SSID for the computer and each projector must be the same
bull The wireless LAN system for the computer and each projector mustbe the sameYou can modify the SSID and Wireless LAN system for theprojector from the Network menu in the projectors Configurationmenus Users Guide Wireless LAN Menu
Using Multi-Screen Display 21
8182019 Easy Mp Network Op Guide
httpslidepdfcomreaderfulleasy-mp-network-op-guide 2247
Procedure
For Windows
A Select Start - Programs (or All Programs) - EPSON
Projector - EasyMP Network Projection - EasyMP Network Projection V2XX to start EasyMP Network Projection
B Select the Use multi-display checkbox
Display layout and Display properties are added at the bottom of thescreen
C Click Display properties
The Display properties screen is displayed
D Click the Settings tab
Using Multi-Screen Display 22
8182019 Easy Mp Network Op Guide
httpslidepdfcomreaderfulleasy-mp-network-op-guide 2347
E Drag the displayed monitor icon and place it where desired
Here the actual monitor (1) is placed on the left while the virtualmonitor (3) is placed on the rightWhen the computer has multiple display output terminals thenumbers assigned to the virtual terminals will be sequential to thoseof the physical terminals
q bull When an external monitor is connected as a secondary monitor the
image for that screen cannot be projected
bull Depending on the hardware the number of the secondary monitormay be other than 2 When the monitor icon is displayed on thescreen click the icon and confirm that the monitor type shownunder Display is other than secondary
bull For the Screen Resolution settings see the followings p36
When the monitor icon is arranged a virtual display is connected asthe image like below
Using Multi-Screen Display 23
i l i i l
8182019 Easy Mp Network Op Guide
httpslidepdfcomreaderfulleasy-mp-network-op-guide 2447
F Click the OK button to close the Display properties screen
Up to this point the virtual display layout has been fixedAllocate the projecting images next s p25
For Mac OS
A Start EasyMP Network Projection Double-click the Applications
folder of the hard drive volume in which EasyMP Network Projection is installed and then double-click the EasyMP
Network Projection iconIn this example we select and start in Advanced ConnectionMode
B Select the Use multi-display checkbox
Display layout and Display preferences are added at the bottom of thescreen
C Click Display preferences
The display setting screen is displayed
D Click Arrangement
E Clear Mirror Displays
Using Multi-Screen Display 24
U i M lti S Di l
8182019 Easy Mp Network Op Guide
httpslidepdfcomreaderfulleasy-mp-network-op-guide 2547
F Drag the displayed monitor icon and place it where desired
G Close the display setting screen
Up to this point the screen layout has been fixed
Allocating the Image to be Projected
This section explains the virtual display for arrangement example 1s p20
Procedure
A Open the file to be projected
Start the PowerPoint and Excel files
B Drag the window to the desired virtual displayg monitor andallocate it where the image is to be projected
Drag the Excel window to the right until it cannot be seen As aresult the PowerPoint window appears on the actual monitor whilethe Excel window appears on the virtual display on the right
Projecting the Allocated Images
This section explains the virtual display for arrangement example 1s p20
Procedure
A Select the number of the virtual displayg
you want to fromDisplay and set which image to be projected from which
projector
Using Multi-Screen Display 25
Using M lti Screen Displa
8182019 Easy Mp Network Op Guide
httpslidepdfcomreaderfulleasy-mp-network-op-guide 2647
B Click Connect
The image allocated to each projector is projected
In a Windows environment you cannot view the image being sent toa virtual display on the computer To adjust the image on the virtualdisplay you must do so while viewing the projected imageTo perform mouse-based operations on the virtual display move themouse pointer in the direction of the virtual display such that thepointer appears on the virtual display
C To terminate multi-screen display click Disconnect on thetoolbar
Using Multi-Screen Display 26
Using Multi Screen Display 27
8182019 Easy Mp Network Op Guide
httpslidepdfcomreaderfulleasy-mp-network-op-guide 2747
q
In a Windows environment if the virtual display driver has been
enabled such that the mouse pointer can be moved outside the limitsof the screen there may be occasions when you lose track of thelocation of the pointer If you are not using a virtual display clear the virtual display checkbox on the Add-Remove EPSON Virtual Display screen so that the mouse pointer moves back inside the screensdisplay area To subsequently use multi-display again place a check mark against the required display under Add-Remove EPSON VirtualDisplayTo clear a check mark see the followings p21
Using Multi-Screen Display 27
Connecting to a Projector on a Different Subnet 28
8182019 Easy Mp Network Op Guide
httpslidepdfcomreaderfulleasy-mp-network-op-guide 2847
This chapter explains how to connect a computer to a projector on adifferent sub-net via a Wired LAN or a wireless LAN access point on anexisting network system
By default this application only searches for projectors on the same subnetas the computer Therefore even if you perform a search for projectors onthe network projectors on a different subnet will not be foundYou can however identify and connect to a projector on a different subnetas follows
bull Specify either an IP address or Projector name and perform a search
The IP Address can be input directly Also provided the Projector nameto be connected has been registered on the DNS server you can performa search simply by inputting that Projector names p28
bull Performing a search based on a Profile
Once you have performed a search for a projector on a different subnetby specifying either an IP Address or a Projector name you can save thesearch as a Profile with an easy-to-remember name and then use that
Profile whenever you subsequently want to search for a projector on adifferent subnets p29
q bull If a search fails to find a projector the most likely causes are as
follows Proceed as appropriate depending on the cause of thefailure
For both Windows and Mac OS
If there is no wireless LAN signal or if the signal is weak check
whether there is anything that could be interfering with the signalWhen the optional Wireless LAN unit is installed in the projectorand connecting Mac OS to a wireless LAN
Check whether AirPort is set to On Or check whether anappropriate access point has been selected
bull When you use Manual search in Quick Connection Mode you canspecify the SSID When there are a lot of projectors you can narrow the search field by using SSID
Specifying Either an IP Address or Projector Name
and Performing a Search (Advanced ConnectionMode Only)
In the following explanations unless otherwise noted Windows screenshots are usedThe similar screens are also displayed for Mac OS
Procedure
A Click Manual search on the EasyMP Network Projectionprojector selection screen
B Enter the IP address or the projector name for the projectoryou want to connect to and click OK
Connecting to a Projector on a Different Subnet 28
Connecting to a Projector on a Different Subnet 29
8182019 Easy Mp Network Op Guide
httpslidepdfcomreaderfulleasy-mp-network-op-guide 2947
The search results are displayed on the EasyMP Network Projectionprojector selection screen
Provided the target projector has been identified select that projectorand then click Connect to establish a connectionWhen you will always be using that projector save the search as aProfile so that you do not have to specify the relevant details every time you perform a search s p29
Performing a Search with a ProfileYou can save a search for a frequently used projector as a Profile AProfile is a file containing all of the information pertaining to a givenprojector such as the projector name its IP address and SSID If youspecify that information from the next time you perform a search there willbe no need to specify the IP address or projector name each time youperform a search For example by creating a group of Profiles for eachplace where a projector is setup and managing them with folders the target
projector can be found quickly
A Building A E Floor 1
B Building B F Floor 2
C Building C G Floor 3
D Building D
This section explains how to create and edit a Profile
Making a Profile
Profiles are made by saving search results
For details on how to edit a previously saved Profile see the followingsection s p31
Procedure
A While the projector is displayed on the EasyMP Network Projection projector selection screen click Save in the
profile
Connecting to a Projector on a Different Subnet 29
Connecting to a Projector on a Different Subnet 30
8182019 Easy Mp Network Op Guide
httpslidepdfcomreaderfulleasy-mp-network-op-guide 3047
The Save in the profile screen is displayed
B Enter a Profile name and then click Add
Projector information is registered in the ProfileIf you have previously saved a Profile you are prompted to confirmwhether or not to overwrite To save a Profile with a different nameselect Save as If you have created a folder for a Profile the followingscreens are displayed After entering the Profile name and selectingthe Save in destination click Add
For Windows
For Mac OS
qFor details on how to create a folder for a Profile see the followingsection s p31
Searching by specifying a Profile
You can search by specifying the Profile you created
Connecting to a Projector on a Different Subnet 30
Connecting to a Projector on a Different Subnet 31
8182019 Easy Mp Network Op Guide
httpslidepdfcomreaderfulleasy-mp-network-op-guide 3147
Procedure
A Click Profile on the EasyMP Network Projection projector
selection screen
If no Profile is registered you cannot select Profile
B From the menu that is displayed select the projector you wantto connect to
The search results are displayed on the EasyMP Network Projectionprojector selection screenProvided the target projector has been identified select that projectorand then click Connect to establish a connection
Managing a Profile
You can change the name and the hierarchical structure of the Profile
Procedure
A Click Set options on the EasyMP Network Projection main
screen
The Set options screen is displayed
B Click Edit profile
The Edit profile screen is displayed
C Edit the contents registered in the Profile
Co ect g to a ojecto o a D e e t Sub et 31
Connecting to a Projector on a Different Subnet 32
8182019 Easy Mp Network Op Guide
httpslidepdfcomreaderfulleasy-mp-network-op-guide 3247
A Indicates a folder
B Indicates a Profile
Prof i le
Item F u nctio n
Profi le
You can display the registered Profile You can manageit by creating a folder You can change the order of theProfile or the folder by dragging amp dropping
Copy
You can copy the Profile The copied Profile is saved in
the same folder as the original with the same nameDelete
You can delete the Profile and the folder
Prof i le
Item F u n ctio n
R e n a m e
Displays the Rename dialog box allowing you to renamethe folder or the Profile You can enter up to 32characters in the Rename dialog box
Create folder
You can create a new folder
E x p or t
Exports a created Profile allowing you to import and usethat Profile
I mp or t
Used when you want to read and use an exportedProfile
Informa tion on selected prof i le
Item F u n ctio n
P r oj e c tor n am e
I P addr e s s
You can display the projector information registered inthe Profile
Delete
You can delete the information for the selectedprojector When all projector information is deleted theprofile is also deleted
D Click OK
Saves your edits and closes the Edit profile screen
g j
Using Set options 33
8182019 Easy Mp Network Op Guide
httpslidepdfcomreaderfulleasy-mp-network-op-guide 3347
You can make setting options such as the processing method when EasyMPNetwork Projection startsAccess Set options from the EasyMP Network Projection main screen
Procedure
A Click Set options on the EasyMP Network Projection main
screen
The Set options screen is displayed
B Set each of the items
Confirm the details of the set items in the next step When you havemade all the necessary settings click OK to close the Set optionsscreen
Setting Each ItemSet each item from the General settings tab and the Adjust performancetab
General settings tab
Use fu l l -screen
vi de o t r an s fe r
This setting is disabled because the projector does notsupport the movie sending function
E n c r y p t
c ommun i c at i on s
Select to Encrypt and transmit data Even if data isintercepted it cannot be decrypted
When using Quick Connection Mode make sure youalways select this checkbox
Display Connection
Mod e Selection
w i n dow on s tar tup
Set whether or not the Quick Connection ModeAdvancedConnection Mode screen is displayed when EasyMPNetwork Projection starts
Clear this checkbox once you have settled on a regularstartup method
S e ar c h me th od on
s tar tup
Select from the following projector search methodsexecuted when EasyMP Network Projection is started
Automatic search on startup
Specify search method after startupSearch with the last network configuration
g p
Using Set options 34
8182019 Easy Mp Network Op Guide
httpslidepdfcomreaderfulleasy-mp-network-op-guide 3447
Edit profi le
The Edit profile dialog box is displayeds p31
S w i tc h L A N
Windows only The Switch Network Adapter dialog box is displayed Thisis used when it is necessary to switch the network adapter tobe used for a search when a computer has multipleadapters
By default all of the network adapters are used to perform asearch When a Wired LAN is always used as theconnection method select a Wired LAN adapter
R e s tor e D e faul ts
You can reset all adjustment values on the General settingstab to their default settings except for Edit profile andSwitch LAN
Adjust performance tab
P e r for man c e
adj us tme n t s l i de r
The performance can be set to Fast Normal andFine
Set to Fast when movie projections are interrupted
T r a n s f er l a y er e d
w i n dow
Windows only (excluding Windows Vista andWindows 7)
Set whether or not to transfer a layered windowThe layered window is in use when contents such asmessages displayed on the computer are not projectedby the projector Select this checkbox to projectcontents such as messages that use the layeredwindow
Clear this checkbox if you do not want the mousepointer to flicker on the screen
R e s tor e D e faul ts
You can reset all adjustment values for the Adjustperformance tab to their default settings
q When you click on the toolbar only the Adjust performance tab
is displayed
Audio Output tab
Because this projector does not support the audio sending function settingson the Audio Output tab are disabled
8182019 Easy Mp Network Op Guide
httpslidepdfcomreaderfulleasy-mp-network-op-guide 3547
Appendix
Connection Limitations 36
8182019 Easy Mp Network Op Guide
httpslidepdfcomreaderfulleasy-mp-network-op-guide 3647
When projecting computer images while running EasyMP Network Projection the following restrictions apply Confirm these points
Supported Resolutions
The following computer screen resolutions can be projected You cannotconnect to a computer with a resolution greater than UXGAg
bull VGA g(640x480)
bull SVGA g(800x600)
bull XGA g(1024x768)
bull SXGA g(1280x960)
bull SXGA (1280x1024)
bull SXGA+ (1400x1050)
bull WXGA (1280x768)
bull WXGA (1280x800)
bull
WXGA+ (1440x900)bull UXGA (1600x1200)
Supported resolutions when multi-screen display function is on
If a computer with a special screen size is used where the ratio of heightand width is not represented a screen resolution closest to the width isselected from the list of 10 aboveIn this case in wide screen the horizontal margins are projected in narrow screen the empty vertical margins are black
Display Color
The number of colors for computer screens that can be projected
W ind o w s M a c O S
16-bit color About 32000 colors (16-bit)
32-bit color About 167 million colors (32-bit)
The operational guarantee for multi-screen display is 16-bit and 32-bitcolor
Number of Connections
You can connect up to four projectors to one computer and projectsimultaneouslyYou cannot connect multiple computers to one projector simultaneously
Others
bull If the transmission speed of the Wireless LAN is low the network might be cut off unexpectedly
bull Audio is not transmitted
bull When videos are played back they do not play back as smoothly as
when displayed on the computerbull Applications that use part of DirectX functions may not be displayed
correctly(Windows only)
bull Cannot project full screen MS-DOS prompts(Windows only)
bull There are times when the image on the computer screen and the imageprojected by the projector may not match exactly
When Using Windows Vista or Windows 7
Note the following points when using EasyMP Network Projection on acomputer running Windows Vista or Windows 7
Limitations when projecting from Windows Photo Gallery
Note the following two limitations when launching Windows Photo Gallery when EasyMP Network Projection is running
Connection Limitations 37
8182019 Easy Mp Network Op Guide
httpslidepdfcomreaderfulleasy-mp-network-op-guide 3747
bull Slide Show is played back in simple mode when projecting fromWindows Photo Gallery
Because the toolbar is not displayed you cannot make changes whileplaying a Theme (effects) regardless of the Windows Experience IndexratingOnce simple mode has started you cannot change modes while WindowsPhoto Gallery is running even if you close EasyMP Network ProjectionRestart Windows Photo Gallery
bull You cannot play movies
Limitations in Windows Aero
Note the following two limitations when the window design for yourcomputer is Windows Aero
bull The layered window is projected regardless of Transfer layered window from Set options in EasyMP Network Projection
For example when Transfer layered window for EasyMP Network Projection toolbar is disabled it is not projected even if it is displayed onthe computer screen however the toolbar is projected
bull A few minutes after you connect a computer to the projector over anetwork with EasyMP Network Projection the following message is
displayedIt is recommended that you select Keep the current color scheme anddont show this message again This selection is enabled until thecomputer is restarted
Limitations when projecting from Windows Media Center
You cannot project images in full screen display using Windows MediaCenter Switch to the window display mode to project the images
Similarly images cannot be projected with Quick Wireless Connection orUSB Display
Troubleshooting 38
8182019 Easy Mp Network Op Guide
httpslidepdfcomreaderfulleasy-mp-network-op-guide 3847
If any of the following problems occur refer to the pages given for eachproblem
Problems concerning network functions
Cannot connect to the projector s p39
When a connection is made using EasyMP Network Projection the projectedimage remains as it is and a connection cannot be made from anothercomputer s p39
The projector is not found when EasyMP Network Projection is
started s
p39Cannot connect in Advanced Connection Mode or Wired LANconnection s p40
The Slide Show cannot be displayed on the desired display when the multi-screendisplay function is being executed s p41
Applications are no longer displayed from the computer screen when the multi-screen display function is executed s p41
The mouse cursor is not displayed on the computer screen s
p41When connecting with EasyMP Network Projection the image is not displayed orthe image is slow to appear s p41
When a connection is made using EasyMP Network Projection a PowerPointSlide Show cannot be started s p42
When a connection has been made using EasyMP Network Projection the screenwill not be refreshed when using an Office application s p42
Error message when starting up EasyMP Network Projection s
p42Network settings are not restored after cutting the connection to the computerwith EasyMP Network Projection s p44
Troubleshooting 39
8182019 Easy Mp Network Op Guide
httpslidepdfcomreaderfulleasy-mp-network-op-guide 3947
Problems Concerning Network Functions
Cannot connect to the projector
Check the message on the screen and then apply the following countermeasures
E r r or M essa g es R em ed y
The application version used is not supported Install the latest version of the application on your computer
Install EasyMP Network Projection from the EPSON Projector Software for Meeting amp Monitoring CD-ROMsupplied with the projector
When a connection is made using EasyMP Network Projection the projected image remains as it is and a connection cannot be madefrom another computer
Ch eck R em ed y
Did the presenter leave the conference room without cutting off thenetwork connection
With EasyMP Network Projection the connection with the computer that was previously connected can be cut off when another computer tries to connect with the projector and it connects with the computer that is trying to
connectTherefore when a Projector Keyword is not set for the projector or if you know the Projector Keyword you can cutoff the current connection and if you perform a connection operation you can connect to the projector
When a Projector Keyword is set for the projector if you do not know the Projector Keyword restart the projector andreconnect
The projector is not found when EasyMP Network Projection is started
Check R em ed y
Is the Wireless LAN unit connected
For Wireless LAN
Check that the optional Wireless LAN unit is securely connected
Is the Network Configuration screen from the Configurationmenu displayed on the projector
When the Network Configuration screen is displayed on the projector network connection for EasyMP Network Projection is disabled Close network settings on the projector and return to the LAN standby screen
Are the computers LAN card and the built-in LAN function
available
Check that LAN is valid by checking Control Panel - System - Hardware in the device manager and so on
Troubleshooting 40
8182019 Easy Mp Network Op Guide
httpslidepdfcomreaderfulleasy-mp-network-op-guide 4047
Check R em ed y
Is the SSID the same as that of the access pointQuick Connection Mode
Set an SSID that is different from that of the access points
Users Guide Network Menu
Is the DHCP function for Wired LAN turned On
Quick Connection Mode
Turn Off the DHCP setting for Wired LAN from the Configuration Menus Users Guide Network Menu
Was the network adapter used selected correctly with EasyMPNetwork Projection
If the computer has multiple LAN environments it cannot connect unless the network adapter is selected correctlyWhen using a computer running Windows start EasyMP Network Projection and select the network adapter you areusing from Set options - Switch LANs p33
For Wireless LAN connection is the Wireless LAN setting enabledwhen the computer is in power save mode
Enable the Wireless LAN
Are there any obstacles between the access point and the computeror projector
For Wireless LAN
Sometimes the electromagnetic wave situation prevents the projector from being found in a search Check for any obstacles between the access point and the computer or projector and change their position to improve theelectromagnetic wave situation
Is the computers Wireless LAN electromagnetic wave set to low Set the electromagnetic wave strength to maximum
Does the Wireless LAN conform to 80211g 80211b or 80211a It is only compatible with standards 80211g 80211b and 80211a and not with other standards such as 80211
Is the firewall turned off or has the firewall been registered as anexception
When you do not wish to turn off the firewall or register the firewall as an exception make the necessary settings toopen the ports
The ports used by EasyMP Network Projection are 3620 3621 and 3629
Is the network cable connected correctly
For Wired LAN
Check that the network cable is connected correctly Reconnect it if it is not connected or not connected properly
Cannot connect in Advanced Connection Mode or Wired LAN connection
Check R em ed y
Is the SSID setting different Set the computer the access point and the projector to the same SSIDs Users Guide Network Menu
Is the same WEP key set When selecting WEP from Security set the access point the computer and the projector to the same WEP keys Users Guide Network Menu
Are the connection denial functions such as MAC Addressg
restrictions and port restrictions set correctly at the access point Set the projector to allow connections from the access point
Troubleshooting 41
8182019 Easy Mp Network Op Guide
httpslidepdfcomreaderfulleasy-mp-network-op-guide 4147
Check R em ed y
Are the IP address the Subnet Mask and the Gateway Address forthe access point and the projector set correctly When not using a DHCP adjust each settings
Users Guide Network Menu
Are the access point and the projectors subnet different Select Manual search from EasyMP Network Projection specify the IP address and connects p28
The Slide Show cannot be displayed on the desired display when the multi-screen display function is being executed
Check R em ed y
Are you using PowerPoint 2002 or an earlier version
For Windows
To set and use two or more virtual displaysg use PowerPoint 2003 or later or limit the number of virtual displays toone before displaying the Slide Show
Applications are no longer displayed from the computer screen when the multi-screen display function is executed
Check R em ed y
Is another application running on the virtual display g
For Windows
When EPSON Virtual Display is installed another application sometimes runs on the virtual display In this case setEPSON Virtual Display to Off in Screen properties
The mouse cursor is not displayed on the computer screen
Check R em ed y
Is EPSON Virtual Display installed
For Windows
The mouse cursor was moved onto the virtual display g When the virtual display checkbox is cleared on the Add-Remove EPSON Virtual Display screen the mouse pointer returns to the screen display area
When connecting with EasyMP Network Projection the image is not displayed or the image is slow to appear
Ch eck R em ed y
Did you try to play back movies with Media Player or try to operatethe screen saver preview
Depending on the computer the movie playback screen in Media Player may not be displayed and the screen saverpreview may not be displayed normally
Troubleshooting 42
8182019 Easy Mp Network Op Guide
httpslidepdfcomreaderfulleasy-mp-network-op-guide 4247
Ch eck R em ed y
Is WEP encryption effective or are multiple projectors connected The display speed decreases when WEP encryption is effective or multiple projectors are connectedHave you enabled DHCP When DHCP is set to On in Advanced Connection Mode if an available DHCP server is not found it may take some
time to enter LAN standby status
Is Wireless LAN 80211gb being used in Quick ConnectionMode
Depending on the electromagnetic wave environment there are times when the image and sound for movies may stop When using the movie sending function use Advanced Connection Mode or Wireless LAN 80211a in Quick Connection Mode
When a connection is made using EasyMP Network Projection a PowerPoint Slide Show cannot be started
Ch eck R em ed y
Was EasyMP Network Projection started while PowerPoint wasrunning
For Windows
When connecting with EasyMP Network Projection make sure you close PowerPoint first Slide Show might not runif connecting while PowerPoint is running
When a connection has been made using EasyMP Network Projection the screen will not be refreshed when using an Office application
Ch eck R em ed y
Is the mouse moved continuously When you stop moving the mouse cursor the screen is updated If the screen does not update quickly stop moving themouse cursor
Error message when starting up EasyMP Network Projection
E r r or M essa g es R em ed y
Connection to the projector failed Try to connect again If it still does not connect check the network settings on the computer and the network settingsfor the projector
For details on the network settings to be made on the projector sees Users Guide Network Menu
The keyword does not match Re-enter the keyword displayed onthe projector screen
Check the Projector Keyword displayed on the LAN standby screen and enter the Projector Keyword
8182019 Easy Mp Network Op Guide
httpslidepdfcomreaderfulleasy-mp-network-op-guide 4347
Troubleshooting 44
8182019 Easy Mp Network Op Guide
httpslidepdfcomreaderfulleasy-mp-network-op-guide 4447
Network settings are not restored after cutting the connection to the computer with EasyMP Network Projection
Check R em ed y
Are you manually connecting to a Wireless LAN when thecomputer starts up
Quick Connection Mode
Try connecting to the Wireless LAN manually
Glossary 45
8182019 Easy Mp Network Op Guide
httpslidepdfcomreaderfulleasy-mp-network-op-guide 4547
This section briefly explains the difficult terms that are not explained in the text of this guide For details refer to other commercially available publications
A d h o c
A method of Wireless LAN connection that communicates with wireless LAN clients without using an access point It is not possible to communicatewith two or more devices simultaneously
M A C A d d r e ss
An abbreviation of Media Access Control The MAC Address is an ID number unique to each network adapter A unique number is assigned to eachnetwork adapter and data is transmitted between network adapters based on this identification
S V G A
A type of video signal with a resolution of 800 (horizontal) ^600 (vertical) dots that is used byIBM PCAT-compatible computers
S X G A
A type of video signal with a resolution of 1280 (horizontal) ^ 1024 (vertical) dots that is used by IBM PCAT-compatible computers
U X G A
A type of video signal with a resolution of 1600 (horizontal) ^ 1200 (vertical) dots that is used by IBM PCAT-compatible computers
V G A
A type of video signal with a resolution of 640 (horizontal) ^ 480 (vertical) dots that is used by IBM PCAT-compatible computers
V i r tual D i s p lay
The screen for one computer is output to multiple displays A large virtual screen can be created by using multiple displays
X G A
A type of video signal with a resolution of 1024 (horizontal) ^ 768 (vertical) dots that is used by IBM PCAT-compatible computers
8182019 Easy Mp Network Op Guide
httpslidepdfcomreaderfulleasy-mp-network-op-guide 4647
8182019 Easy Mp Network Op Guide
httpslidepdfcomreaderfulleasy-mp-network-op-guide 4747
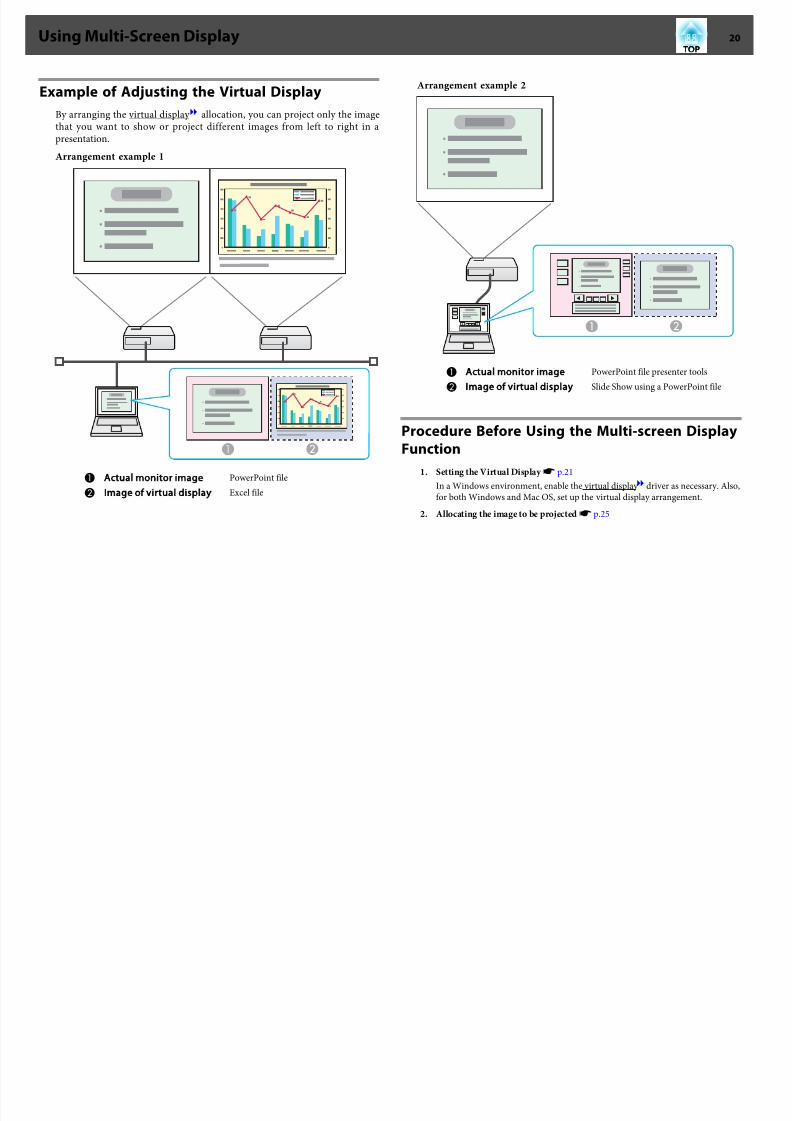
8182019 Easy Mp Network Op Guide
httpslidepdfcomreaderfulleasy-mp-network-op-guide 2147
Open the file to be projected and then move the screen to the virtual display
according to the actual projection arrangement3 Projecting the allocated images s p25
Allocate a virtual display number to a projector that is connected through thenetwork and then start projection
Setting the Virtual Display
This chapter explains the virtual display for arrangement example 1s p20
Enable the virtual display driver (Windows only)
Enable the virtual display g driver Those users listed below do not have toperform this operation Go to procedure s Adjusting the Virtual Display
p21bull Those users who have enabled virtual displays installing EasyMP
Network Projection
bull For Mac OS users
Procedure
A Start Windows on the computer and then select Start -Programs (or All Programs) - EPSON Projector - EasyMP
Network Projection - Add-Remove EPSON Virtual Display
The Add-Remove EPSON Virtual Display screen is displayed
B Select the virtual display you want to use
Up to four monitors can be added In this example a single virtual
display is to be used When setting multiple virtual displays select asmany displays as is necessaryAny one of the displays can be selected
C Click OK
When you click OK the drivers for the virtual display are enabled Atthis point it is normal for the display to flicker Wait for the Add-Remove EPSON Virtual Display screen to close
Adjusting the Virtual Display
After starting EasyMP Network Projection the procedure for setting up the virtual displays differs for Windows and Mac OS The procedures areexplained separately below
qCheck the following points before starting EasyMP Network Projectionwhen connecting via Wireless LAN If the following points are not setcorrectly Multi-screen display cannot be used
bull The SSID for the computer and each projector must be the same
bull The wireless LAN system for the computer and each projector mustbe the sameYou can modify the SSID and Wireless LAN system for theprojector from the Network menu in the projectors Configurationmenus Users Guide Wireless LAN Menu
Using Multi-Screen Display 21
8182019 Easy Mp Network Op Guide
httpslidepdfcomreaderfulleasy-mp-network-op-guide 2247
Procedure
For Windows
A Select Start - Programs (or All Programs) - EPSON
Projector - EasyMP Network Projection - EasyMP Network Projection V2XX to start EasyMP Network Projection
B Select the Use multi-display checkbox
Display layout and Display properties are added at the bottom of thescreen
C Click Display properties
The Display properties screen is displayed
D Click the Settings tab
Using Multi-Screen Display 22
8182019 Easy Mp Network Op Guide
httpslidepdfcomreaderfulleasy-mp-network-op-guide 2347
E Drag the displayed monitor icon and place it where desired
Here the actual monitor (1) is placed on the left while the virtualmonitor (3) is placed on the rightWhen the computer has multiple display output terminals thenumbers assigned to the virtual terminals will be sequential to thoseof the physical terminals
q bull When an external monitor is connected as a secondary monitor the
image for that screen cannot be projected
bull Depending on the hardware the number of the secondary monitormay be other than 2 When the monitor icon is displayed on thescreen click the icon and confirm that the monitor type shownunder Display is other than secondary
bull For the Screen Resolution settings see the followings p36
When the monitor icon is arranged a virtual display is connected asthe image like below
Using Multi-Screen Display 23
i l i i l
8182019 Easy Mp Network Op Guide
httpslidepdfcomreaderfulleasy-mp-network-op-guide 2447
F Click the OK button to close the Display properties screen
Up to this point the virtual display layout has been fixedAllocate the projecting images next s p25
For Mac OS
A Start EasyMP Network Projection Double-click the Applications
folder of the hard drive volume in which EasyMP Network Projection is installed and then double-click the EasyMP
Network Projection iconIn this example we select and start in Advanced ConnectionMode
B Select the Use multi-display checkbox
Display layout and Display preferences are added at the bottom of thescreen
C Click Display preferences
The display setting screen is displayed
D Click Arrangement
E Clear Mirror Displays
Using Multi-Screen Display 24
U i M lti S Di l
8182019 Easy Mp Network Op Guide
httpslidepdfcomreaderfulleasy-mp-network-op-guide 2547
F Drag the displayed monitor icon and place it where desired
G Close the display setting screen
Up to this point the screen layout has been fixed
Allocating the Image to be Projected
This section explains the virtual display for arrangement example 1s p20
Procedure
A Open the file to be projected
Start the PowerPoint and Excel files
B Drag the window to the desired virtual displayg monitor andallocate it where the image is to be projected
Drag the Excel window to the right until it cannot be seen As aresult the PowerPoint window appears on the actual monitor whilethe Excel window appears on the virtual display on the right
Projecting the Allocated Images
This section explains the virtual display for arrangement example 1s p20
Procedure
A Select the number of the virtual displayg
you want to fromDisplay and set which image to be projected from which
projector
Using Multi-Screen Display 25
Using M lti Screen Displa
8182019 Easy Mp Network Op Guide
httpslidepdfcomreaderfulleasy-mp-network-op-guide 2647
B Click Connect
The image allocated to each projector is projected
In a Windows environment you cannot view the image being sent toa virtual display on the computer To adjust the image on the virtualdisplay you must do so while viewing the projected imageTo perform mouse-based operations on the virtual display move themouse pointer in the direction of the virtual display such that thepointer appears on the virtual display
C To terminate multi-screen display click Disconnect on thetoolbar
Using Multi-Screen Display 26
Using Multi Screen Display 27
8182019 Easy Mp Network Op Guide
httpslidepdfcomreaderfulleasy-mp-network-op-guide 2747
q
In a Windows environment if the virtual display driver has been
enabled such that the mouse pointer can be moved outside the limitsof the screen there may be occasions when you lose track of thelocation of the pointer If you are not using a virtual display clear the virtual display checkbox on the Add-Remove EPSON Virtual Display screen so that the mouse pointer moves back inside the screensdisplay area To subsequently use multi-display again place a check mark against the required display under Add-Remove EPSON VirtualDisplayTo clear a check mark see the followings p21
Using Multi-Screen Display 27
Connecting to a Projector on a Different Subnet 28
8182019 Easy Mp Network Op Guide
httpslidepdfcomreaderfulleasy-mp-network-op-guide 2847
This chapter explains how to connect a computer to a projector on adifferent sub-net via a Wired LAN or a wireless LAN access point on anexisting network system
By default this application only searches for projectors on the same subnetas the computer Therefore even if you perform a search for projectors onthe network projectors on a different subnet will not be foundYou can however identify and connect to a projector on a different subnetas follows
bull Specify either an IP address or Projector name and perform a search
The IP Address can be input directly Also provided the Projector nameto be connected has been registered on the DNS server you can performa search simply by inputting that Projector names p28
bull Performing a search based on a Profile
Once you have performed a search for a projector on a different subnetby specifying either an IP Address or a Projector name you can save thesearch as a Profile with an easy-to-remember name and then use that
Profile whenever you subsequently want to search for a projector on adifferent subnets p29
q bull If a search fails to find a projector the most likely causes are as
follows Proceed as appropriate depending on the cause of thefailure
For both Windows and Mac OS
If there is no wireless LAN signal or if the signal is weak check
whether there is anything that could be interfering with the signalWhen the optional Wireless LAN unit is installed in the projectorand connecting Mac OS to a wireless LAN
Check whether AirPort is set to On Or check whether anappropriate access point has been selected
bull When you use Manual search in Quick Connection Mode you canspecify the SSID When there are a lot of projectors you can narrow the search field by using SSID
Specifying Either an IP Address or Projector Name
and Performing a Search (Advanced ConnectionMode Only)
In the following explanations unless otherwise noted Windows screenshots are usedThe similar screens are also displayed for Mac OS
Procedure
A Click Manual search on the EasyMP Network Projectionprojector selection screen
B Enter the IP address or the projector name for the projectoryou want to connect to and click OK
Connecting to a Projector on a Different Subnet 28
Connecting to a Projector on a Different Subnet 29
8182019 Easy Mp Network Op Guide
httpslidepdfcomreaderfulleasy-mp-network-op-guide 2947
The search results are displayed on the EasyMP Network Projectionprojector selection screen
Provided the target projector has been identified select that projectorand then click Connect to establish a connectionWhen you will always be using that projector save the search as aProfile so that you do not have to specify the relevant details every time you perform a search s p29
Performing a Search with a ProfileYou can save a search for a frequently used projector as a Profile AProfile is a file containing all of the information pertaining to a givenprojector such as the projector name its IP address and SSID If youspecify that information from the next time you perform a search there willbe no need to specify the IP address or projector name each time youperform a search For example by creating a group of Profiles for eachplace where a projector is setup and managing them with folders the target
projector can be found quickly
A Building A E Floor 1
B Building B F Floor 2
C Building C G Floor 3
D Building D
This section explains how to create and edit a Profile
Making a Profile
Profiles are made by saving search results
For details on how to edit a previously saved Profile see the followingsection s p31
Procedure
A While the projector is displayed on the EasyMP Network Projection projector selection screen click Save in the
profile
Connecting to a Projector on a Different Subnet 29
Connecting to a Projector on a Different Subnet 30
8182019 Easy Mp Network Op Guide
httpslidepdfcomreaderfulleasy-mp-network-op-guide 3047
The Save in the profile screen is displayed
B Enter a Profile name and then click Add
Projector information is registered in the ProfileIf you have previously saved a Profile you are prompted to confirmwhether or not to overwrite To save a Profile with a different nameselect Save as If you have created a folder for a Profile the followingscreens are displayed After entering the Profile name and selectingthe Save in destination click Add
For Windows
For Mac OS
qFor details on how to create a folder for a Profile see the followingsection s p31
Searching by specifying a Profile
You can search by specifying the Profile you created
Connecting to a Projector on a Different Subnet 30
Connecting to a Projector on a Different Subnet 31
8182019 Easy Mp Network Op Guide
httpslidepdfcomreaderfulleasy-mp-network-op-guide 3147
Procedure
A Click Profile on the EasyMP Network Projection projector
selection screen
If no Profile is registered you cannot select Profile
B From the menu that is displayed select the projector you wantto connect to
The search results are displayed on the EasyMP Network Projectionprojector selection screenProvided the target projector has been identified select that projectorand then click Connect to establish a connection
Managing a Profile
You can change the name and the hierarchical structure of the Profile
Procedure
A Click Set options on the EasyMP Network Projection main
screen
The Set options screen is displayed
B Click Edit profile
The Edit profile screen is displayed
C Edit the contents registered in the Profile
Co ect g to a ojecto o a D e e t Sub et 31
Connecting to a Projector on a Different Subnet 32
8182019 Easy Mp Network Op Guide
httpslidepdfcomreaderfulleasy-mp-network-op-guide 3247
A Indicates a folder
B Indicates a Profile
Prof i le
Item F u nctio n
Profi le
You can display the registered Profile You can manageit by creating a folder You can change the order of theProfile or the folder by dragging amp dropping
Copy
You can copy the Profile The copied Profile is saved in
the same folder as the original with the same nameDelete
You can delete the Profile and the folder
Prof i le
Item F u n ctio n
R e n a m e
Displays the Rename dialog box allowing you to renamethe folder or the Profile You can enter up to 32characters in the Rename dialog box
Create folder
You can create a new folder
E x p or t
Exports a created Profile allowing you to import and usethat Profile
I mp or t
Used when you want to read and use an exportedProfile
Informa tion on selected prof i le
Item F u n ctio n
P r oj e c tor n am e
I P addr e s s
You can display the projector information registered inthe Profile
Delete
You can delete the information for the selectedprojector When all projector information is deleted theprofile is also deleted
D Click OK
Saves your edits and closes the Edit profile screen
g j
Using Set options 33
8182019 Easy Mp Network Op Guide
httpslidepdfcomreaderfulleasy-mp-network-op-guide 3347
You can make setting options such as the processing method when EasyMPNetwork Projection startsAccess Set options from the EasyMP Network Projection main screen
Procedure
A Click Set options on the EasyMP Network Projection main
screen
The Set options screen is displayed
B Set each of the items
Confirm the details of the set items in the next step When you havemade all the necessary settings click OK to close the Set optionsscreen
Setting Each ItemSet each item from the General settings tab and the Adjust performancetab
General settings tab
Use fu l l -screen
vi de o t r an s fe r
This setting is disabled because the projector does notsupport the movie sending function
E n c r y p t
c ommun i c at i on s
Select to Encrypt and transmit data Even if data isintercepted it cannot be decrypted
When using Quick Connection Mode make sure youalways select this checkbox
Display Connection
Mod e Selection
w i n dow on s tar tup
Set whether or not the Quick Connection ModeAdvancedConnection Mode screen is displayed when EasyMPNetwork Projection starts
Clear this checkbox once you have settled on a regularstartup method
S e ar c h me th od on
s tar tup
Select from the following projector search methodsexecuted when EasyMP Network Projection is started
Automatic search on startup
Specify search method after startupSearch with the last network configuration
g p
Using Set options 34
8182019 Easy Mp Network Op Guide
httpslidepdfcomreaderfulleasy-mp-network-op-guide 3447
Edit profi le
The Edit profile dialog box is displayeds p31
S w i tc h L A N
Windows only The Switch Network Adapter dialog box is displayed Thisis used when it is necessary to switch the network adapter tobe used for a search when a computer has multipleadapters
By default all of the network adapters are used to perform asearch When a Wired LAN is always used as theconnection method select a Wired LAN adapter
R e s tor e D e faul ts
You can reset all adjustment values on the General settingstab to their default settings except for Edit profile andSwitch LAN
Adjust performance tab
P e r for man c e
adj us tme n t s l i de r
The performance can be set to Fast Normal andFine
Set to Fast when movie projections are interrupted
T r a n s f er l a y er e d
w i n dow
Windows only (excluding Windows Vista andWindows 7)
Set whether or not to transfer a layered windowThe layered window is in use when contents such asmessages displayed on the computer are not projectedby the projector Select this checkbox to projectcontents such as messages that use the layeredwindow
Clear this checkbox if you do not want the mousepointer to flicker on the screen
R e s tor e D e faul ts
You can reset all adjustment values for the Adjustperformance tab to their default settings
q When you click on the toolbar only the Adjust performance tab
is displayed
Audio Output tab
Because this projector does not support the audio sending function settingson the Audio Output tab are disabled
8182019 Easy Mp Network Op Guide
httpslidepdfcomreaderfulleasy-mp-network-op-guide 3547
Appendix
Connection Limitations 36
8182019 Easy Mp Network Op Guide
httpslidepdfcomreaderfulleasy-mp-network-op-guide 3647
When projecting computer images while running EasyMP Network Projection the following restrictions apply Confirm these points
Supported Resolutions
The following computer screen resolutions can be projected You cannotconnect to a computer with a resolution greater than UXGAg
bull VGA g(640x480)
bull SVGA g(800x600)
bull XGA g(1024x768)
bull SXGA g(1280x960)
bull SXGA (1280x1024)
bull SXGA+ (1400x1050)
bull WXGA (1280x768)
bull WXGA (1280x800)
bull
WXGA+ (1440x900)bull UXGA (1600x1200)
Supported resolutions when multi-screen display function is on
If a computer with a special screen size is used where the ratio of heightand width is not represented a screen resolution closest to the width isselected from the list of 10 aboveIn this case in wide screen the horizontal margins are projected in narrow screen the empty vertical margins are black
Display Color
The number of colors for computer screens that can be projected
W ind o w s M a c O S
16-bit color About 32000 colors (16-bit)
32-bit color About 167 million colors (32-bit)
The operational guarantee for multi-screen display is 16-bit and 32-bitcolor
Number of Connections
You can connect up to four projectors to one computer and projectsimultaneouslyYou cannot connect multiple computers to one projector simultaneously
Others
bull If the transmission speed of the Wireless LAN is low the network might be cut off unexpectedly
bull Audio is not transmitted
bull When videos are played back they do not play back as smoothly as
when displayed on the computerbull Applications that use part of DirectX functions may not be displayed
correctly(Windows only)
bull Cannot project full screen MS-DOS prompts(Windows only)
bull There are times when the image on the computer screen and the imageprojected by the projector may not match exactly
When Using Windows Vista or Windows 7
Note the following points when using EasyMP Network Projection on acomputer running Windows Vista or Windows 7
Limitations when projecting from Windows Photo Gallery
Note the following two limitations when launching Windows Photo Gallery when EasyMP Network Projection is running
Connection Limitations 37
8182019 Easy Mp Network Op Guide
httpslidepdfcomreaderfulleasy-mp-network-op-guide 3747
bull Slide Show is played back in simple mode when projecting fromWindows Photo Gallery
Because the toolbar is not displayed you cannot make changes whileplaying a Theme (effects) regardless of the Windows Experience IndexratingOnce simple mode has started you cannot change modes while WindowsPhoto Gallery is running even if you close EasyMP Network ProjectionRestart Windows Photo Gallery
bull You cannot play movies
Limitations in Windows Aero
Note the following two limitations when the window design for yourcomputer is Windows Aero
bull The layered window is projected regardless of Transfer layered window from Set options in EasyMP Network Projection
For example when Transfer layered window for EasyMP Network Projection toolbar is disabled it is not projected even if it is displayed onthe computer screen however the toolbar is projected
bull A few minutes after you connect a computer to the projector over anetwork with EasyMP Network Projection the following message is
displayedIt is recommended that you select Keep the current color scheme anddont show this message again This selection is enabled until thecomputer is restarted
Limitations when projecting from Windows Media Center
You cannot project images in full screen display using Windows MediaCenter Switch to the window display mode to project the images
Similarly images cannot be projected with Quick Wireless Connection orUSB Display
Troubleshooting 38
8182019 Easy Mp Network Op Guide
httpslidepdfcomreaderfulleasy-mp-network-op-guide 3847
If any of the following problems occur refer to the pages given for eachproblem
Problems concerning network functions
Cannot connect to the projector s p39
When a connection is made using EasyMP Network Projection the projectedimage remains as it is and a connection cannot be made from anothercomputer s p39
The projector is not found when EasyMP Network Projection is
started s
p39Cannot connect in Advanced Connection Mode or Wired LANconnection s p40
The Slide Show cannot be displayed on the desired display when the multi-screendisplay function is being executed s p41
Applications are no longer displayed from the computer screen when the multi-screen display function is executed s p41
The mouse cursor is not displayed on the computer screen s
p41When connecting with EasyMP Network Projection the image is not displayed orthe image is slow to appear s p41
When a connection is made using EasyMP Network Projection a PowerPointSlide Show cannot be started s p42
When a connection has been made using EasyMP Network Projection the screenwill not be refreshed when using an Office application s p42
Error message when starting up EasyMP Network Projection s
p42Network settings are not restored after cutting the connection to the computerwith EasyMP Network Projection s p44
Troubleshooting 39
8182019 Easy Mp Network Op Guide
httpslidepdfcomreaderfulleasy-mp-network-op-guide 3947
Problems Concerning Network Functions
Cannot connect to the projector
Check the message on the screen and then apply the following countermeasures
E r r or M essa g es R em ed y
The application version used is not supported Install the latest version of the application on your computer
Install EasyMP Network Projection from the EPSON Projector Software for Meeting amp Monitoring CD-ROMsupplied with the projector
When a connection is made using EasyMP Network Projection the projected image remains as it is and a connection cannot be madefrom another computer
Ch eck R em ed y
Did the presenter leave the conference room without cutting off thenetwork connection
With EasyMP Network Projection the connection with the computer that was previously connected can be cut off when another computer tries to connect with the projector and it connects with the computer that is trying to
connectTherefore when a Projector Keyword is not set for the projector or if you know the Projector Keyword you can cutoff the current connection and if you perform a connection operation you can connect to the projector
When a Projector Keyword is set for the projector if you do not know the Projector Keyword restart the projector andreconnect
The projector is not found when EasyMP Network Projection is started
Check R em ed y
Is the Wireless LAN unit connected
For Wireless LAN
Check that the optional Wireless LAN unit is securely connected
Is the Network Configuration screen from the Configurationmenu displayed on the projector
When the Network Configuration screen is displayed on the projector network connection for EasyMP Network Projection is disabled Close network settings on the projector and return to the LAN standby screen
Are the computers LAN card and the built-in LAN function
available
Check that LAN is valid by checking Control Panel - System - Hardware in the device manager and so on
Troubleshooting 40
8182019 Easy Mp Network Op Guide
httpslidepdfcomreaderfulleasy-mp-network-op-guide 4047
Check R em ed y
Is the SSID the same as that of the access pointQuick Connection Mode
Set an SSID that is different from that of the access points
Users Guide Network Menu
Is the DHCP function for Wired LAN turned On
Quick Connection Mode
Turn Off the DHCP setting for Wired LAN from the Configuration Menus Users Guide Network Menu
Was the network adapter used selected correctly with EasyMPNetwork Projection
If the computer has multiple LAN environments it cannot connect unless the network adapter is selected correctlyWhen using a computer running Windows start EasyMP Network Projection and select the network adapter you areusing from Set options - Switch LANs p33
For Wireless LAN connection is the Wireless LAN setting enabledwhen the computer is in power save mode
Enable the Wireless LAN
Are there any obstacles between the access point and the computeror projector
For Wireless LAN
Sometimes the electromagnetic wave situation prevents the projector from being found in a search Check for any obstacles between the access point and the computer or projector and change their position to improve theelectromagnetic wave situation
Is the computers Wireless LAN electromagnetic wave set to low Set the electromagnetic wave strength to maximum
Does the Wireless LAN conform to 80211g 80211b or 80211a It is only compatible with standards 80211g 80211b and 80211a and not with other standards such as 80211
Is the firewall turned off or has the firewall been registered as anexception
When you do not wish to turn off the firewall or register the firewall as an exception make the necessary settings toopen the ports
The ports used by EasyMP Network Projection are 3620 3621 and 3629
Is the network cable connected correctly
For Wired LAN
Check that the network cable is connected correctly Reconnect it if it is not connected or not connected properly
Cannot connect in Advanced Connection Mode or Wired LAN connection
Check R em ed y
Is the SSID setting different Set the computer the access point and the projector to the same SSIDs Users Guide Network Menu
Is the same WEP key set When selecting WEP from Security set the access point the computer and the projector to the same WEP keys Users Guide Network Menu
Are the connection denial functions such as MAC Addressg
restrictions and port restrictions set correctly at the access point Set the projector to allow connections from the access point
Troubleshooting 41
8182019 Easy Mp Network Op Guide
httpslidepdfcomreaderfulleasy-mp-network-op-guide 4147
Check R em ed y
Are the IP address the Subnet Mask and the Gateway Address forthe access point and the projector set correctly When not using a DHCP adjust each settings
Users Guide Network Menu
Are the access point and the projectors subnet different Select Manual search from EasyMP Network Projection specify the IP address and connects p28
The Slide Show cannot be displayed on the desired display when the multi-screen display function is being executed
Check R em ed y
Are you using PowerPoint 2002 or an earlier version
For Windows
To set and use two or more virtual displaysg use PowerPoint 2003 or later or limit the number of virtual displays toone before displaying the Slide Show
Applications are no longer displayed from the computer screen when the multi-screen display function is executed
Check R em ed y
Is another application running on the virtual display g
For Windows
When EPSON Virtual Display is installed another application sometimes runs on the virtual display In this case setEPSON Virtual Display to Off in Screen properties
The mouse cursor is not displayed on the computer screen
Check R em ed y
Is EPSON Virtual Display installed
For Windows
The mouse cursor was moved onto the virtual display g When the virtual display checkbox is cleared on the Add-Remove EPSON Virtual Display screen the mouse pointer returns to the screen display area
When connecting with EasyMP Network Projection the image is not displayed or the image is slow to appear
Ch eck R em ed y
Did you try to play back movies with Media Player or try to operatethe screen saver preview
Depending on the computer the movie playback screen in Media Player may not be displayed and the screen saverpreview may not be displayed normally
Troubleshooting 42
8182019 Easy Mp Network Op Guide
httpslidepdfcomreaderfulleasy-mp-network-op-guide 4247
Ch eck R em ed y
Is WEP encryption effective or are multiple projectors connected The display speed decreases when WEP encryption is effective or multiple projectors are connectedHave you enabled DHCP When DHCP is set to On in Advanced Connection Mode if an available DHCP server is not found it may take some
time to enter LAN standby status
Is Wireless LAN 80211gb being used in Quick ConnectionMode
Depending on the electromagnetic wave environment there are times when the image and sound for movies may stop When using the movie sending function use Advanced Connection Mode or Wireless LAN 80211a in Quick Connection Mode
When a connection is made using EasyMP Network Projection a PowerPoint Slide Show cannot be started
Ch eck R em ed y
Was EasyMP Network Projection started while PowerPoint wasrunning
For Windows
When connecting with EasyMP Network Projection make sure you close PowerPoint first Slide Show might not runif connecting while PowerPoint is running
When a connection has been made using EasyMP Network Projection the screen will not be refreshed when using an Office application
Ch eck R em ed y
Is the mouse moved continuously When you stop moving the mouse cursor the screen is updated If the screen does not update quickly stop moving themouse cursor
Error message when starting up EasyMP Network Projection
E r r or M essa g es R em ed y
Connection to the projector failed Try to connect again If it still does not connect check the network settings on the computer and the network settingsfor the projector
For details on the network settings to be made on the projector sees Users Guide Network Menu
The keyword does not match Re-enter the keyword displayed onthe projector screen
Check the Projector Keyword displayed on the LAN standby screen and enter the Projector Keyword
8182019 Easy Mp Network Op Guide
httpslidepdfcomreaderfulleasy-mp-network-op-guide 4347
Troubleshooting 44
8182019 Easy Mp Network Op Guide
httpslidepdfcomreaderfulleasy-mp-network-op-guide 4447
Network settings are not restored after cutting the connection to the computer with EasyMP Network Projection
Check R em ed y
Are you manually connecting to a Wireless LAN when thecomputer starts up
Quick Connection Mode
Try connecting to the Wireless LAN manually
Glossary 45
8182019 Easy Mp Network Op Guide
httpslidepdfcomreaderfulleasy-mp-network-op-guide 4547
This section briefly explains the difficult terms that are not explained in the text of this guide For details refer to other commercially available publications
A d h o c
A method of Wireless LAN connection that communicates with wireless LAN clients without using an access point It is not possible to communicatewith two or more devices simultaneously
M A C A d d r e ss
An abbreviation of Media Access Control The MAC Address is an ID number unique to each network adapter A unique number is assigned to eachnetwork adapter and data is transmitted between network adapters based on this identification
S V G A
A type of video signal with a resolution of 800 (horizontal) ^600 (vertical) dots that is used byIBM PCAT-compatible computers
S X G A
A type of video signal with a resolution of 1280 (horizontal) ^ 1024 (vertical) dots that is used by IBM PCAT-compatible computers
U X G A
A type of video signal with a resolution of 1600 (horizontal) ^ 1200 (vertical) dots that is used by IBM PCAT-compatible computers
V G A
A type of video signal with a resolution of 640 (horizontal) ^ 480 (vertical) dots that is used by IBM PCAT-compatible computers
V i r tual D i s p lay
The screen for one computer is output to multiple displays A large virtual screen can be created by using multiple displays
X G A
A type of video signal with a resolution of 1024 (horizontal) ^ 768 (vertical) dots that is used by IBM PCAT-compatible computers
8182019 Easy Mp Network Op Guide
httpslidepdfcomreaderfulleasy-mp-network-op-guide 4647
8182019 Easy Mp Network Op Guide
httpslidepdfcomreaderfulleasy-mp-network-op-guide 4747
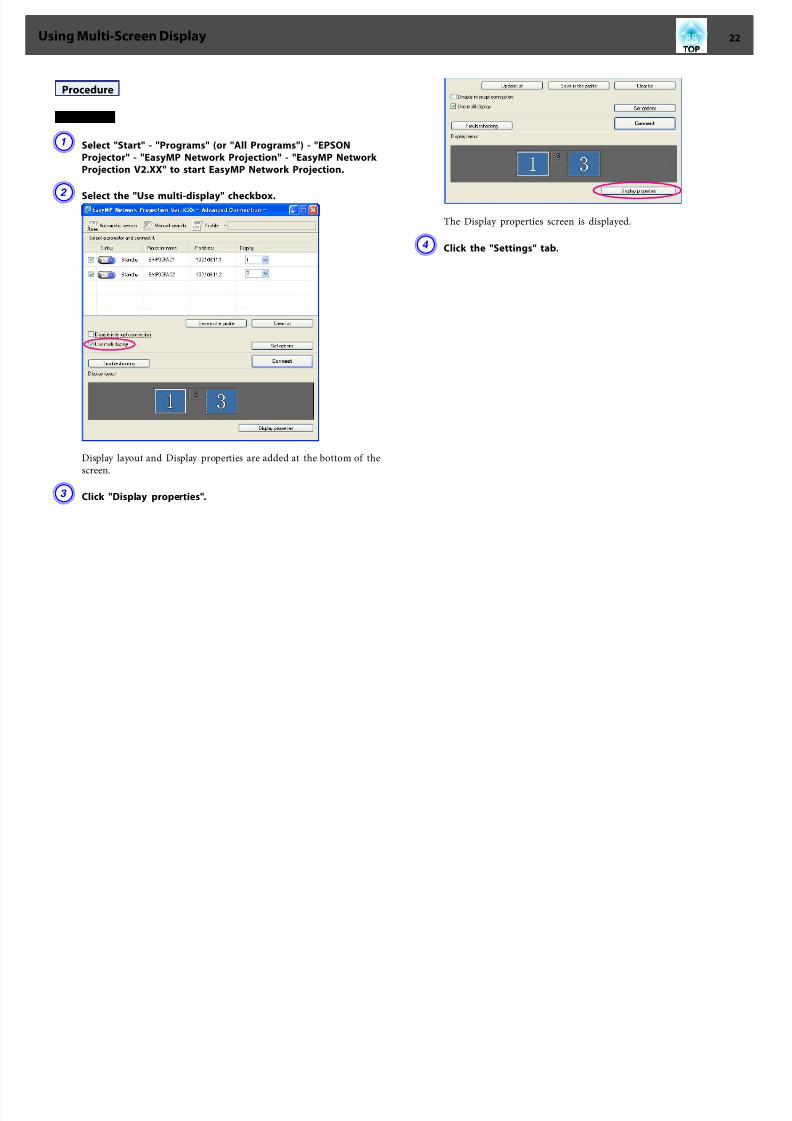
8182019 Easy Mp Network Op Guide
httpslidepdfcomreaderfulleasy-mp-network-op-guide 2347
E Drag the displayed monitor icon and place it where desired
Here the actual monitor (1) is placed on the left while the virtualmonitor (3) is placed on the rightWhen the computer has multiple display output terminals thenumbers assigned to the virtual terminals will be sequential to thoseof the physical terminals
q bull When an external monitor is connected as a secondary monitor the
image for that screen cannot be projected
bull Depending on the hardware the number of the secondary monitormay be other than 2 When the monitor icon is displayed on thescreen click the icon and confirm that the monitor type shownunder Display is other than secondary
bull For the Screen Resolution settings see the followings p36
When the monitor icon is arranged a virtual display is connected asthe image like below
Using Multi-Screen Display 23
i l i i l
8182019 Easy Mp Network Op Guide
httpslidepdfcomreaderfulleasy-mp-network-op-guide 2447
F Click the OK button to close the Display properties screen
Up to this point the virtual display layout has been fixedAllocate the projecting images next s p25
For Mac OS
A Start EasyMP Network Projection Double-click the Applications
folder of the hard drive volume in which EasyMP Network Projection is installed and then double-click the EasyMP
Network Projection iconIn this example we select and start in Advanced ConnectionMode
B Select the Use multi-display checkbox
Display layout and Display preferences are added at the bottom of thescreen
C Click Display preferences
The display setting screen is displayed
D Click Arrangement
E Clear Mirror Displays
Using Multi-Screen Display 24
U i M lti S Di l
8182019 Easy Mp Network Op Guide
httpslidepdfcomreaderfulleasy-mp-network-op-guide 2547
F Drag the displayed monitor icon and place it where desired
G Close the display setting screen
Up to this point the screen layout has been fixed
Allocating the Image to be Projected
This section explains the virtual display for arrangement example 1s p20
Procedure
A Open the file to be projected
Start the PowerPoint and Excel files
B Drag the window to the desired virtual displayg monitor andallocate it where the image is to be projected
Drag the Excel window to the right until it cannot be seen As aresult the PowerPoint window appears on the actual monitor whilethe Excel window appears on the virtual display on the right
Projecting the Allocated Images
This section explains the virtual display for arrangement example 1s p20
Procedure
A Select the number of the virtual displayg
you want to fromDisplay and set which image to be projected from which
projector
Using Multi-Screen Display 25
Using M lti Screen Displa
8182019 Easy Mp Network Op Guide
httpslidepdfcomreaderfulleasy-mp-network-op-guide 2647
B Click Connect
The image allocated to each projector is projected
In a Windows environment you cannot view the image being sent toa virtual display on the computer To adjust the image on the virtualdisplay you must do so while viewing the projected imageTo perform mouse-based operations on the virtual display move themouse pointer in the direction of the virtual display such that thepointer appears on the virtual display
C To terminate multi-screen display click Disconnect on thetoolbar
Using Multi-Screen Display 26
Using Multi Screen Display 27
8182019 Easy Mp Network Op Guide
httpslidepdfcomreaderfulleasy-mp-network-op-guide 2747
q
In a Windows environment if the virtual display driver has been
enabled such that the mouse pointer can be moved outside the limitsof the screen there may be occasions when you lose track of thelocation of the pointer If you are not using a virtual display clear the virtual display checkbox on the Add-Remove EPSON Virtual Display screen so that the mouse pointer moves back inside the screensdisplay area To subsequently use multi-display again place a check mark against the required display under Add-Remove EPSON VirtualDisplayTo clear a check mark see the followings p21
Using Multi-Screen Display 27
Connecting to a Projector on a Different Subnet 28
8182019 Easy Mp Network Op Guide
httpslidepdfcomreaderfulleasy-mp-network-op-guide 2847
This chapter explains how to connect a computer to a projector on adifferent sub-net via a Wired LAN or a wireless LAN access point on anexisting network system
By default this application only searches for projectors on the same subnetas the computer Therefore even if you perform a search for projectors onthe network projectors on a different subnet will not be foundYou can however identify and connect to a projector on a different subnetas follows
bull Specify either an IP address or Projector name and perform a search
The IP Address can be input directly Also provided the Projector nameto be connected has been registered on the DNS server you can performa search simply by inputting that Projector names p28
bull Performing a search based on a Profile
Once you have performed a search for a projector on a different subnetby specifying either an IP Address or a Projector name you can save thesearch as a Profile with an easy-to-remember name and then use that
Profile whenever you subsequently want to search for a projector on adifferent subnets p29
q bull If a search fails to find a projector the most likely causes are as
follows Proceed as appropriate depending on the cause of thefailure
For both Windows and Mac OS
If there is no wireless LAN signal or if the signal is weak check
whether there is anything that could be interfering with the signalWhen the optional Wireless LAN unit is installed in the projectorand connecting Mac OS to a wireless LAN
Check whether AirPort is set to On Or check whether anappropriate access point has been selected
bull When you use Manual search in Quick Connection Mode you canspecify the SSID When there are a lot of projectors you can narrow the search field by using SSID
Specifying Either an IP Address or Projector Name
and Performing a Search (Advanced ConnectionMode Only)
In the following explanations unless otherwise noted Windows screenshots are usedThe similar screens are also displayed for Mac OS
Procedure
A Click Manual search on the EasyMP Network Projectionprojector selection screen
B Enter the IP address or the projector name for the projectoryou want to connect to and click OK
Connecting to a Projector on a Different Subnet 28
Connecting to a Projector on a Different Subnet 29
8182019 Easy Mp Network Op Guide
httpslidepdfcomreaderfulleasy-mp-network-op-guide 2947
The search results are displayed on the EasyMP Network Projectionprojector selection screen
Provided the target projector has been identified select that projectorand then click Connect to establish a connectionWhen you will always be using that projector save the search as aProfile so that you do not have to specify the relevant details every time you perform a search s p29
Performing a Search with a ProfileYou can save a search for a frequently used projector as a Profile AProfile is a file containing all of the information pertaining to a givenprojector such as the projector name its IP address and SSID If youspecify that information from the next time you perform a search there willbe no need to specify the IP address or projector name each time youperform a search For example by creating a group of Profiles for eachplace where a projector is setup and managing them with folders the target
projector can be found quickly
A Building A E Floor 1
B Building B F Floor 2
C Building C G Floor 3
D Building D
This section explains how to create and edit a Profile
Making a Profile
Profiles are made by saving search results
For details on how to edit a previously saved Profile see the followingsection s p31
Procedure
A While the projector is displayed on the EasyMP Network Projection projector selection screen click Save in the
profile
Connecting to a Projector on a Different Subnet 29
Connecting to a Projector on a Different Subnet 30
8182019 Easy Mp Network Op Guide
httpslidepdfcomreaderfulleasy-mp-network-op-guide 3047
The Save in the profile screen is displayed
B Enter a Profile name and then click Add
Projector information is registered in the ProfileIf you have previously saved a Profile you are prompted to confirmwhether or not to overwrite To save a Profile with a different nameselect Save as If you have created a folder for a Profile the followingscreens are displayed After entering the Profile name and selectingthe Save in destination click Add
For Windows
For Mac OS
qFor details on how to create a folder for a Profile see the followingsection s p31
Searching by specifying a Profile
You can search by specifying the Profile you created
Connecting to a Projector on a Different Subnet 30
Connecting to a Projector on a Different Subnet 31
8182019 Easy Mp Network Op Guide
httpslidepdfcomreaderfulleasy-mp-network-op-guide 3147
Procedure
A Click Profile on the EasyMP Network Projection projector
selection screen
If no Profile is registered you cannot select Profile
B From the menu that is displayed select the projector you wantto connect to
The search results are displayed on the EasyMP Network Projectionprojector selection screenProvided the target projector has been identified select that projectorand then click Connect to establish a connection
Managing a Profile
You can change the name and the hierarchical structure of the Profile
Procedure
A Click Set options on the EasyMP Network Projection main
screen
The Set options screen is displayed
B Click Edit profile
The Edit profile screen is displayed
C Edit the contents registered in the Profile
Co ect g to a ojecto o a D e e t Sub et 31
Connecting to a Projector on a Different Subnet 32
8182019 Easy Mp Network Op Guide
httpslidepdfcomreaderfulleasy-mp-network-op-guide 3247
A Indicates a folder
B Indicates a Profile
Prof i le
Item F u nctio n
Profi le
You can display the registered Profile You can manageit by creating a folder You can change the order of theProfile or the folder by dragging amp dropping
Copy
You can copy the Profile The copied Profile is saved in
the same folder as the original with the same nameDelete
You can delete the Profile and the folder
Prof i le
Item F u n ctio n
R e n a m e
Displays the Rename dialog box allowing you to renamethe folder or the Profile You can enter up to 32characters in the Rename dialog box
Create folder
You can create a new folder
E x p or t
Exports a created Profile allowing you to import and usethat Profile
I mp or t
Used when you want to read and use an exportedProfile
Informa tion on selected prof i le
Item F u n ctio n
P r oj e c tor n am e
I P addr e s s
You can display the projector information registered inthe Profile
Delete
You can delete the information for the selectedprojector When all projector information is deleted theprofile is also deleted
D Click OK
Saves your edits and closes the Edit profile screen
g j
Using Set options 33
8182019 Easy Mp Network Op Guide
httpslidepdfcomreaderfulleasy-mp-network-op-guide 3347
You can make setting options such as the processing method when EasyMPNetwork Projection startsAccess Set options from the EasyMP Network Projection main screen
Procedure
A Click Set options on the EasyMP Network Projection main
screen
The Set options screen is displayed
B Set each of the items
Confirm the details of the set items in the next step When you havemade all the necessary settings click OK to close the Set optionsscreen
Setting Each ItemSet each item from the General settings tab and the Adjust performancetab
General settings tab
Use fu l l -screen
vi de o t r an s fe r
This setting is disabled because the projector does notsupport the movie sending function
E n c r y p t
c ommun i c at i on s
Select to Encrypt and transmit data Even if data isintercepted it cannot be decrypted
When using Quick Connection Mode make sure youalways select this checkbox
Display Connection
Mod e Selection
w i n dow on s tar tup
Set whether or not the Quick Connection ModeAdvancedConnection Mode screen is displayed when EasyMPNetwork Projection starts
Clear this checkbox once you have settled on a regularstartup method
S e ar c h me th od on
s tar tup
Select from the following projector search methodsexecuted when EasyMP Network Projection is started
Automatic search on startup
Specify search method after startupSearch with the last network configuration
g p
Using Set options 34
8182019 Easy Mp Network Op Guide
httpslidepdfcomreaderfulleasy-mp-network-op-guide 3447
Edit profi le
The Edit profile dialog box is displayeds p31
S w i tc h L A N
Windows only The Switch Network Adapter dialog box is displayed Thisis used when it is necessary to switch the network adapter tobe used for a search when a computer has multipleadapters
By default all of the network adapters are used to perform asearch When a Wired LAN is always used as theconnection method select a Wired LAN adapter
R e s tor e D e faul ts
You can reset all adjustment values on the General settingstab to their default settings except for Edit profile andSwitch LAN
Adjust performance tab
P e r for man c e
adj us tme n t s l i de r
The performance can be set to Fast Normal andFine
Set to Fast when movie projections are interrupted
T r a n s f er l a y er e d
w i n dow
Windows only (excluding Windows Vista andWindows 7)
Set whether or not to transfer a layered windowThe layered window is in use when contents such asmessages displayed on the computer are not projectedby the projector Select this checkbox to projectcontents such as messages that use the layeredwindow
Clear this checkbox if you do not want the mousepointer to flicker on the screen
R e s tor e D e faul ts
You can reset all adjustment values for the Adjustperformance tab to their default settings
q When you click on the toolbar only the Adjust performance tab
is displayed
Audio Output tab
Because this projector does not support the audio sending function settingson the Audio Output tab are disabled
8182019 Easy Mp Network Op Guide
httpslidepdfcomreaderfulleasy-mp-network-op-guide 3547
Appendix
Connection Limitations 36
8182019 Easy Mp Network Op Guide
httpslidepdfcomreaderfulleasy-mp-network-op-guide 3647
When projecting computer images while running EasyMP Network Projection the following restrictions apply Confirm these points
Supported Resolutions
The following computer screen resolutions can be projected You cannotconnect to a computer with a resolution greater than UXGAg
bull VGA g(640x480)
bull SVGA g(800x600)
bull XGA g(1024x768)
bull SXGA g(1280x960)
bull SXGA (1280x1024)
bull SXGA+ (1400x1050)
bull WXGA (1280x768)
bull WXGA (1280x800)
bull
WXGA+ (1440x900)bull UXGA (1600x1200)
Supported resolutions when multi-screen display function is on
If a computer with a special screen size is used where the ratio of heightand width is not represented a screen resolution closest to the width isselected from the list of 10 aboveIn this case in wide screen the horizontal margins are projected in narrow screen the empty vertical margins are black
Display Color
The number of colors for computer screens that can be projected
W ind o w s M a c O S
16-bit color About 32000 colors (16-bit)
32-bit color About 167 million colors (32-bit)
The operational guarantee for multi-screen display is 16-bit and 32-bitcolor
Number of Connections
You can connect up to four projectors to one computer and projectsimultaneouslyYou cannot connect multiple computers to one projector simultaneously
Others
bull If the transmission speed of the Wireless LAN is low the network might be cut off unexpectedly
bull Audio is not transmitted
bull When videos are played back they do not play back as smoothly as
when displayed on the computerbull Applications that use part of DirectX functions may not be displayed
correctly(Windows only)
bull Cannot project full screen MS-DOS prompts(Windows only)
bull There are times when the image on the computer screen and the imageprojected by the projector may not match exactly
When Using Windows Vista or Windows 7
Note the following points when using EasyMP Network Projection on acomputer running Windows Vista or Windows 7
Limitations when projecting from Windows Photo Gallery
Note the following two limitations when launching Windows Photo Gallery when EasyMP Network Projection is running
Connection Limitations 37
8182019 Easy Mp Network Op Guide
httpslidepdfcomreaderfulleasy-mp-network-op-guide 3747
bull Slide Show is played back in simple mode when projecting fromWindows Photo Gallery
Because the toolbar is not displayed you cannot make changes whileplaying a Theme (effects) regardless of the Windows Experience IndexratingOnce simple mode has started you cannot change modes while WindowsPhoto Gallery is running even if you close EasyMP Network ProjectionRestart Windows Photo Gallery
bull You cannot play movies
Limitations in Windows Aero
Note the following two limitations when the window design for yourcomputer is Windows Aero
bull The layered window is projected regardless of Transfer layered window from Set options in EasyMP Network Projection
For example when Transfer layered window for EasyMP Network Projection toolbar is disabled it is not projected even if it is displayed onthe computer screen however the toolbar is projected
bull A few minutes after you connect a computer to the projector over anetwork with EasyMP Network Projection the following message is
displayedIt is recommended that you select Keep the current color scheme anddont show this message again This selection is enabled until thecomputer is restarted
Limitations when projecting from Windows Media Center
You cannot project images in full screen display using Windows MediaCenter Switch to the window display mode to project the images
Similarly images cannot be projected with Quick Wireless Connection orUSB Display
Troubleshooting 38
8182019 Easy Mp Network Op Guide
httpslidepdfcomreaderfulleasy-mp-network-op-guide 3847
If any of the following problems occur refer to the pages given for eachproblem
Problems concerning network functions
Cannot connect to the projector s p39
When a connection is made using EasyMP Network Projection the projectedimage remains as it is and a connection cannot be made from anothercomputer s p39
The projector is not found when EasyMP Network Projection is
started s
p39Cannot connect in Advanced Connection Mode or Wired LANconnection s p40
The Slide Show cannot be displayed on the desired display when the multi-screendisplay function is being executed s p41
Applications are no longer displayed from the computer screen when the multi-screen display function is executed s p41
The mouse cursor is not displayed on the computer screen s
p41When connecting with EasyMP Network Projection the image is not displayed orthe image is slow to appear s p41
When a connection is made using EasyMP Network Projection a PowerPointSlide Show cannot be started s p42
When a connection has been made using EasyMP Network Projection the screenwill not be refreshed when using an Office application s p42
Error message when starting up EasyMP Network Projection s
p42Network settings are not restored after cutting the connection to the computerwith EasyMP Network Projection s p44
Troubleshooting 39
8182019 Easy Mp Network Op Guide
httpslidepdfcomreaderfulleasy-mp-network-op-guide 3947
Problems Concerning Network Functions
Cannot connect to the projector
Check the message on the screen and then apply the following countermeasures
E r r or M essa g es R em ed y
The application version used is not supported Install the latest version of the application on your computer
Install EasyMP Network Projection from the EPSON Projector Software for Meeting amp Monitoring CD-ROMsupplied with the projector
When a connection is made using EasyMP Network Projection the projected image remains as it is and a connection cannot be madefrom another computer
Ch eck R em ed y
Did the presenter leave the conference room without cutting off thenetwork connection
With EasyMP Network Projection the connection with the computer that was previously connected can be cut off when another computer tries to connect with the projector and it connects with the computer that is trying to
connectTherefore when a Projector Keyword is not set for the projector or if you know the Projector Keyword you can cutoff the current connection and if you perform a connection operation you can connect to the projector
When a Projector Keyword is set for the projector if you do not know the Projector Keyword restart the projector andreconnect
The projector is not found when EasyMP Network Projection is started
Check R em ed y
Is the Wireless LAN unit connected
For Wireless LAN
Check that the optional Wireless LAN unit is securely connected
Is the Network Configuration screen from the Configurationmenu displayed on the projector
When the Network Configuration screen is displayed on the projector network connection for EasyMP Network Projection is disabled Close network settings on the projector and return to the LAN standby screen
Are the computers LAN card and the built-in LAN function
available
Check that LAN is valid by checking Control Panel - System - Hardware in the device manager and so on
Troubleshooting 40
8182019 Easy Mp Network Op Guide
httpslidepdfcomreaderfulleasy-mp-network-op-guide 4047
Check R em ed y
Is the SSID the same as that of the access pointQuick Connection Mode
Set an SSID that is different from that of the access points
Users Guide Network Menu
Is the DHCP function for Wired LAN turned On
Quick Connection Mode
Turn Off the DHCP setting for Wired LAN from the Configuration Menus Users Guide Network Menu
Was the network adapter used selected correctly with EasyMPNetwork Projection
If the computer has multiple LAN environments it cannot connect unless the network adapter is selected correctlyWhen using a computer running Windows start EasyMP Network Projection and select the network adapter you areusing from Set options - Switch LANs p33
For Wireless LAN connection is the Wireless LAN setting enabledwhen the computer is in power save mode
Enable the Wireless LAN
Are there any obstacles between the access point and the computeror projector
For Wireless LAN
Sometimes the electromagnetic wave situation prevents the projector from being found in a search Check for any obstacles between the access point and the computer or projector and change their position to improve theelectromagnetic wave situation
Is the computers Wireless LAN electromagnetic wave set to low Set the electromagnetic wave strength to maximum
Does the Wireless LAN conform to 80211g 80211b or 80211a It is only compatible with standards 80211g 80211b and 80211a and not with other standards such as 80211
Is the firewall turned off or has the firewall been registered as anexception
When you do not wish to turn off the firewall or register the firewall as an exception make the necessary settings toopen the ports
The ports used by EasyMP Network Projection are 3620 3621 and 3629
Is the network cable connected correctly
For Wired LAN
Check that the network cable is connected correctly Reconnect it if it is not connected or not connected properly
Cannot connect in Advanced Connection Mode or Wired LAN connection
Check R em ed y
Is the SSID setting different Set the computer the access point and the projector to the same SSIDs Users Guide Network Menu
Is the same WEP key set When selecting WEP from Security set the access point the computer and the projector to the same WEP keys Users Guide Network Menu
Are the connection denial functions such as MAC Addressg
restrictions and port restrictions set correctly at the access point Set the projector to allow connections from the access point
Troubleshooting 41
8182019 Easy Mp Network Op Guide
httpslidepdfcomreaderfulleasy-mp-network-op-guide 4147
Check R em ed y
Are the IP address the Subnet Mask and the Gateway Address forthe access point and the projector set correctly When not using a DHCP adjust each settings
Users Guide Network Menu
Are the access point and the projectors subnet different Select Manual search from EasyMP Network Projection specify the IP address and connects p28
The Slide Show cannot be displayed on the desired display when the multi-screen display function is being executed
Check R em ed y
Are you using PowerPoint 2002 or an earlier version
For Windows
To set and use two or more virtual displaysg use PowerPoint 2003 or later or limit the number of virtual displays toone before displaying the Slide Show
Applications are no longer displayed from the computer screen when the multi-screen display function is executed
Check R em ed y
Is another application running on the virtual display g
For Windows
When EPSON Virtual Display is installed another application sometimes runs on the virtual display In this case setEPSON Virtual Display to Off in Screen properties
The mouse cursor is not displayed on the computer screen
Check R em ed y
Is EPSON Virtual Display installed
For Windows
The mouse cursor was moved onto the virtual display g When the virtual display checkbox is cleared on the Add-Remove EPSON Virtual Display screen the mouse pointer returns to the screen display area
When connecting with EasyMP Network Projection the image is not displayed or the image is slow to appear
Ch eck R em ed y
Did you try to play back movies with Media Player or try to operatethe screen saver preview
Depending on the computer the movie playback screen in Media Player may not be displayed and the screen saverpreview may not be displayed normally
Troubleshooting 42
8182019 Easy Mp Network Op Guide
httpslidepdfcomreaderfulleasy-mp-network-op-guide 4247
Ch eck R em ed y
Is WEP encryption effective or are multiple projectors connected The display speed decreases when WEP encryption is effective or multiple projectors are connectedHave you enabled DHCP When DHCP is set to On in Advanced Connection Mode if an available DHCP server is not found it may take some
time to enter LAN standby status
Is Wireless LAN 80211gb being used in Quick ConnectionMode
Depending on the electromagnetic wave environment there are times when the image and sound for movies may stop When using the movie sending function use Advanced Connection Mode or Wireless LAN 80211a in Quick Connection Mode
When a connection is made using EasyMP Network Projection a PowerPoint Slide Show cannot be started
Ch eck R em ed y
Was EasyMP Network Projection started while PowerPoint wasrunning
For Windows
When connecting with EasyMP Network Projection make sure you close PowerPoint first Slide Show might not runif connecting while PowerPoint is running
When a connection has been made using EasyMP Network Projection the screen will not be refreshed when using an Office application
Ch eck R em ed y
Is the mouse moved continuously When you stop moving the mouse cursor the screen is updated If the screen does not update quickly stop moving themouse cursor
Error message when starting up EasyMP Network Projection
E r r or M essa g es R em ed y
Connection to the projector failed Try to connect again If it still does not connect check the network settings on the computer and the network settingsfor the projector
For details on the network settings to be made on the projector sees Users Guide Network Menu
The keyword does not match Re-enter the keyword displayed onthe projector screen
Check the Projector Keyword displayed on the LAN standby screen and enter the Projector Keyword
8182019 Easy Mp Network Op Guide
httpslidepdfcomreaderfulleasy-mp-network-op-guide 4347
Troubleshooting 44
8182019 Easy Mp Network Op Guide
httpslidepdfcomreaderfulleasy-mp-network-op-guide 4447
Network settings are not restored after cutting the connection to the computer with EasyMP Network Projection
Check R em ed y
Are you manually connecting to a Wireless LAN when thecomputer starts up
Quick Connection Mode
Try connecting to the Wireless LAN manually
Glossary 45
8182019 Easy Mp Network Op Guide
httpslidepdfcomreaderfulleasy-mp-network-op-guide 4547
This section briefly explains the difficult terms that are not explained in the text of this guide For details refer to other commercially available publications
A d h o c
A method of Wireless LAN connection that communicates with wireless LAN clients without using an access point It is not possible to communicatewith two or more devices simultaneously
M A C A d d r e ss
An abbreviation of Media Access Control The MAC Address is an ID number unique to each network adapter A unique number is assigned to eachnetwork adapter and data is transmitted between network adapters based on this identification
S V G A
A type of video signal with a resolution of 800 (horizontal) ^600 (vertical) dots that is used byIBM PCAT-compatible computers
S X G A
A type of video signal with a resolution of 1280 (horizontal) ^ 1024 (vertical) dots that is used by IBM PCAT-compatible computers
U X G A
A type of video signal with a resolution of 1600 (horizontal) ^ 1200 (vertical) dots that is used by IBM PCAT-compatible computers
V G A
A type of video signal with a resolution of 640 (horizontal) ^ 480 (vertical) dots that is used by IBM PCAT-compatible computers
V i r tual D i s p lay
The screen for one computer is output to multiple displays A large virtual screen can be created by using multiple displays
X G A
A type of video signal with a resolution of 1024 (horizontal) ^ 768 (vertical) dots that is used by IBM PCAT-compatible computers
8182019 Easy Mp Network Op Guide
httpslidepdfcomreaderfulleasy-mp-network-op-guide 4647
8182019 Easy Mp Network Op Guide
httpslidepdfcomreaderfulleasy-mp-network-op-guide 4747
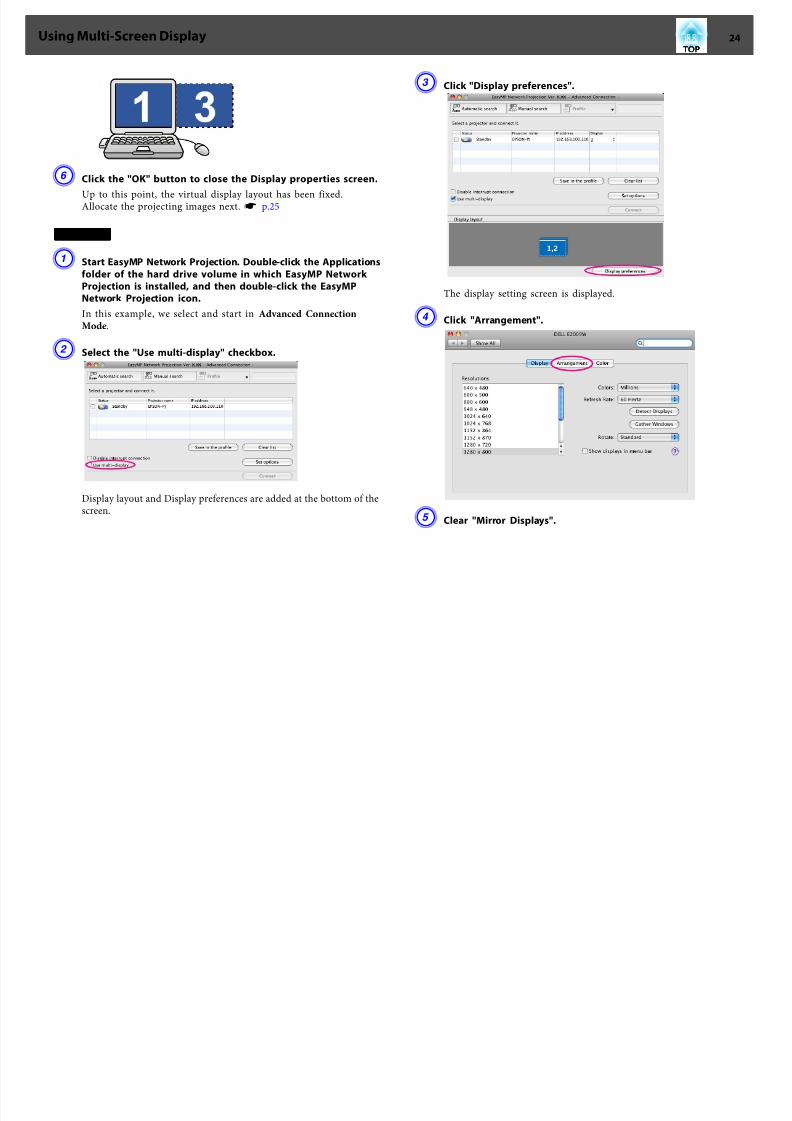
8182019 Easy Mp Network Op Guide
httpslidepdfcomreaderfulleasy-mp-network-op-guide 2847
This chapter explains how to connect a computer to a projector on adifferent sub-net via a Wired LAN or a wireless LAN access point on anexisting network system
By default this application only searches for projectors on the same subnetas the computer Therefore even if you perform a search for projectors onthe network projectors on a different subnet will not be foundYou can however identify and connect to a projector on a different subnetas follows
bull Specify either an IP address or Projector name and perform a search
The IP Address can be input directly Also provided the Projector nameto be connected has been registered on the DNS server you can performa search simply by inputting that Projector names p28
bull Performing a search based on a Profile
Once you have performed a search for a projector on a different subnetby specifying either an IP Address or a Projector name you can save thesearch as a Profile with an easy-to-remember name and then use that
Profile whenever you subsequently want to search for a projector on adifferent subnets p29
q bull If a search fails to find a projector the most likely causes are as
follows Proceed as appropriate depending on the cause of thefailure
For both Windows and Mac OS
If there is no wireless LAN signal or if the signal is weak check
whether there is anything that could be interfering with the signalWhen the optional Wireless LAN unit is installed in the projectorand connecting Mac OS to a wireless LAN
Check whether AirPort is set to On Or check whether anappropriate access point has been selected
bull When you use Manual search in Quick Connection Mode you canspecify the SSID When there are a lot of projectors you can narrow the search field by using SSID
Specifying Either an IP Address or Projector Name
and Performing a Search (Advanced ConnectionMode Only)
In the following explanations unless otherwise noted Windows screenshots are usedThe similar screens are also displayed for Mac OS
Procedure
A Click Manual search on the EasyMP Network Projectionprojector selection screen
B Enter the IP address or the projector name for the projectoryou want to connect to and click OK
Connecting to a Projector on a Different Subnet 28
Connecting to a Projector on a Different Subnet 29
8182019 Easy Mp Network Op Guide
httpslidepdfcomreaderfulleasy-mp-network-op-guide 2947
The search results are displayed on the EasyMP Network Projectionprojector selection screen
Provided the target projector has been identified select that projectorand then click Connect to establish a connectionWhen you will always be using that projector save the search as aProfile so that you do not have to specify the relevant details every time you perform a search s p29
Performing a Search with a ProfileYou can save a search for a frequently used projector as a Profile AProfile is a file containing all of the information pertaining to a givenprojector such as the projector name its IP address and SSID If youspecify that information from the next time you perform a search there willbe no need to specify the IP address or projector name each time youperform a search For example by creating a group of Profiles for eachplace where a projector is setup and managing them with folders the target
projector can be found quickly
A Building A E Floor 1
B Building B F Floor 2
C Building C G Floor 3
D Building D
This section explains how to create and edit a Profile
Making a Profile
Profiles are made by saving search results
For details on how to edit a previously saved Profile see the followingsection s p31
Procedure
A While the projector is displayed on the EasyMP Network Projection projector selection screen click Save in the
profile
Connecting to a Projector on a Different Subnet 29
Connecting to a Projector on a Different Subnet 30
8182019 Easy Mp Network Op Guide
httpslidepdfcomreaderfulleasy-mp-network-op-guide 3047
The Save in the profile screen is displayed
B Enter a Profile name and then click Add
Projector information is registered in the ProfileIf you have previously saved a Profile you are prompted to confirmwhether or not to overwrite To save a Profile with a different nameselect Save as If you have created a folder for a Profile the followingscreens are displayed After entering the Profile name and selectingthe Save in destination click Add
For Windows
For Mac OS
qFor details on how to create a folder for a Profile see the followingsection s p31
Searching by specifying a Profile
You can search by specifying the Profile you created
Connecting to a Projector on a Different Subnet 30
Connecting to a Projector on a Different Subnet 31
8182019 Easy Mp Network Op Guide
httpslidepdfcomreaderfulleasy-mp-network-op-guide 3147
Procedure
A Click Profile on the EasyMP Network Projection projector
selection screen
If no Profile is registered you cannot select Profile
B From the menu that is displayed select the projector you wantto connect to
The search results are displayed on the EasyMP Network Projectionprojector selection screenProvided the target projector has been identified select that projectorand then click Connect to establish a connection
Managing a Profile
You can change the name and the hierarchical structure of the Profile
Procedure
A Click Set options on the EasyMP Network Projection main
screen
The Set options screen is displayed
B Click Edit profile
The Edit profile screen is displayed
C Edit the contents registered in the Profile
Co ect g to a ojecto o a D e e t Sub et 31
Connecting to a Projector on a Different Subnet 32
8182019 Easy Mp Network Op Guide
httpslidepdfcomreaderfulleasy-mp-network-op-guide 3247
A Indicates a folder
B Indicates a Profile
Prof i le
Item F u nctio n
Profi le
You can display the registered Profile You can manageit by creating a folder You can change the order of theProfile or the folder by dragging amp dropping
Copy
You can copy the Profile The copied Profile is saved in
the same folder as the original with the same nameDelete
You can delete the Profile and the folder
Prof i le
Item F u n ctio n
R e n a m e
Displays the Rename dialog box allowing you to renamethe folder or the Profile You can enter up to 32characters in the Rename dialog box
Create folder
You can create a new folder
E x p or t
Exports a created Profile allowing you to import and usethat Profile
I mp or t
Used when you want to read and use an exportedProfile
Informa tion on selected prof i le
Item F u n ctio n
P r oj e c tor n am e
I P addr e s s
You can display the projector information registered inthe Profile
Delete
You can delete the information for the selectedprojector When all projector information is deleted theprofile is also deleted
D Click OK
Saves your edits and closes the Edit profile screen
g j
Using Set options 33
8182019 Easy Mp Network Op Guide
httpslidepdfcomreaderfulleasy-mp-network-op-guide 3347
You can make setting options such as the processing method when EasyMPNetwork Projection startsAccess Set options from the EasyMP Network Projection main screen
Procedure
A Click Set options on the EasyMP Network Projection main
screen
The Set options screen is displayed
B Set each of the items
Confirm the details of the set items in the next step When you havemade all the necessary settings click OK to close the Set optionsscreen
Setting Each ItemSet each item from the General settings tab and the Adjust performancetab
General settings tab
Use fu l l -screen
vi de o t r an s fe r
This setting is disabled because the projector does notsupport the movie sending function
E n c r y p t
c ommun i c at i on s
Select to Encrypt and transmit data Even if data isintercepted it cannot be decrypted
When using Quick Connection Mode make sure youalways select this checkbox
Display Connection
Mod e Selection
w i n dow on s tar tup
Set whether or not the Quick Connection ModeAdvancedConnection Mode screen is displayed when EasyMPNetwork Projection starts
Clear this checkbox once you have settled on a regularstartup method
S e ar c h me th od on
s tar tup
Select from the following projector search methodsexecuted when EasyMP Network Projection is started
Automatic search on startup
Specify search method after startupSearch with the last network configuration
g p
Using Set options 34
8182019 Easy Mp Network Op Guide
httpslidepdfcomreaderfulleasy-mp-network-op-guide 3447
Edit profi le
The Edit profile dialog box is displayeds p31
S w i tc h L A N
Windows only The Switch Network Adapter dialog box is displayed Thisis used when it is necessary to switch the network adapter tobe used for a search when a computer has multipleadapters
By default all of the network adapters are used to perform asearch When a Wired LAN is always used as theconnection method select a Wired LAN adapter
R e s tor e D e faul ts
You can reset all adjustment values on the General settingstab to their default settings except for Edit profile andSwitch LAN
Adjust performance tab
P e r for man c e
adj us tme n t s l i de r
The performance can be set to Fast Normal andFine
Set to Fast when movie projections are interrupted
T r a n s f er l a y er e d
w i n dow
Windows only (excluding Windows Vista andWindows 7)
Set whether or not to transfer a layered windowThe layered window is in use when contents such asmessages displayed on the computer are not projectedby the projector Select this checkbox to projectcontents such as messages that use the layeredwindow
Clear this checkbox if you do not want the mousepointer to flicker on the screen
R e s tor e D e faul ts
You can reset all adjustment values for the Adjustperformance tab to their default settings
q When you click on the toolbar only the Adjust performance tab
is displayed
Audio Output tab
Because this projector does not support the audio sending function settingson the Audio Output tab are disabled
8182019 Easy Mp Network Op Guide
httpslidepdfcomreaderfulleasy-mp-network-op-guide 3547
Appendix
Connection Limitations 36
8182019 Easy Mp Network Op Guide
httpslidepdfcomreaderfulleasy-mp-network-op-guide 3647
When projecting computer images while running EasyMP Network Projection the following restrictions apply Confirm these points
Supported Resolutions
The following computer screen resolutions can be projected You cannotconnect to a computer with a resolution greater than UXGAg
bull VGA g(640x480)
bull SVGA g(800x600)
bull XGA g(1024x768)
bull SXGA g(1280x960)
bull SXGA (1280x1024)
bull SXGA+ (1400x1050)
bull WXGA (1280x768)
bull WXGA (1280x800)
bull
WXGA+ (1440x900)bull UXGA (1600x1200)
Supported resolutions when multi-screen display function is on
If a computer with a special screen size is used where the ratio of heightand width is not represented a screen resolution closest to the width isselected from the list of 10 aboveIn this case in wide screen the horizontal margins are projected in narrow screen the empty vertical margins are black
Display Color
The number of colors for computer screens that can be projected
W ind o w s M a c O S
16-bit color About 32000 colors (16-bit)
32-bit color About 167 million colors (32-bit)
The operational guarantee for multi-screen display is 16-bit and 32-bitcolor
Number of Connections
You can connect up to four projectors to one computer and projectsimultaneouslyYou cannot connect multiple computers to one projector simultaneously
Others
bull If the transmission speed of the Wireless LAN is low the network might be cut off unexpectedly
bull Audio is not transmitted
bull When videos are played back they do not play back as smoothly as
when displayed on the computerbull Applications that use part of DirectX functions may not be displayed
correctly(Windows only)
bull Cannot project full screen MS-DOS prompts(Windows only)
bull There are times when the image on the computer screen and the imageprojected by the projector may not match exactly
When Using Windows Vista or Windows 7
Note the following points when using EasyMP Network Projection on acomputer running Windows Vista or Windows 7
Limitations when projecting from Windows Photo Gallery
Note the following two limitations when launching Windows Photo Gallery when EasyMP Network Projection is running
Connection Limitations 37
8182019 Easy Mp Network Op Guide
httpslidepdfcomreaderfulleasy-mp-network-op-guide 3747
bull Slide Show is played back in simple mode when projecting fromWindows Photo Gallery
Because the toolbar is not displayed you cannot make changes whileplaying a Theme (effects) regardless of the Windows Experience IndexratingOnce simple mode has started you cannot change modes while WindowsPhoto Gallery is running even if you close EasyMP Network ProjectionRestart Windows Photo Gallery
bull You cannot play movies
Limitations in Windows Aero
Note the following two limitations when the window design for yourcomputer is Windows Aero
bull The layered window is projected regardless of Transfer layered window from Set options in EasyMP Network Projection
For example when Transfer layered window for EasyMP Network Projection toolbar is disabled it is not projected even if it is displayed onthe computer screen however the toolbar is projected
bull A few minutes after you connect a computer to the projector over anetwork with EasyMP Network Projection the following message is
displayedIt is recommended that you select Keep the current color scheme anddont show this message again This selection is enabled until thecomputer is restarted
Limitations when projecting from Windows Media Center
You cannot project images in full screen display using Windows MediaCenter Switch to the window display mode to project the images
Similarly images cannot be projected with Quick Wireless Connection orUSB Display
Troubleshooting 38
8182019 Easy Mp Network Op Guide
httpslidepdfcomreaderfulleasy-mp-network-op-guide 3847
If any of the following problems occur refer to the pages given for eachproblem
Problems concerning network functions
Cannot connect to the projector s p39
When a connection is made using EasyMP Network Projection the projectedimage remains as it is and a connection cannot be made from anothercomputer s p39
The projector is not found when EasyMP Network Projection is
started s
p39Cannot connect in Advanced Connection Mode or Wired LANconnection s p40
The Slide Show cannot be displayed on the desired display when the multi-screendisplay function is being executed s p41
Applications are no longer displayed from the computer screen when the multi-screen display function is executed s p41
The mouse cursor is not displayed on the computer screen s
p41When connecting with EasyMP Network Projection the image is not displayed orthe image is slow to appear s p41
When a connection is made using EasyMP Network Projection a PowerPointSlide Show cannot be started s p42
When a connection has been made using EasyMP Network Projection the screenwill not be refreshed when using an Office application s p42
Error message when starting up EasyMP Network Projection s
p42Network settings are not restored after cutting the connection to the computerwith EasyMP Network Projection s p44
Troubleshooting 39
8182019 Easy Mp Network Op Guide
httpslidepdfcomreaderfulleasy-mp-network-op-guide 3947
Problems Concerning Network Functions
Cannot connect to the projector
Check the message on the screen and then apply the following countermeasures
E r r or M essa g es R em ed y
The application version used is not supported Install the latest version of the application on your computer
Install EasyMP Network Projection from the EPSON Projector Software for Meeting amp Monitoring CD-ROMsupplied with the projector
When a connection is made using EasyMP Network Projection the projected image remains as it is and a connection cannot be madefrom another computer
Ch eck R em ed y
Did the presenter leave the conference room without cutting off thenetwork connection
With EasyMP Network Projection the connection with the computer that was previously connected can be cut off when another computer tries to connect with the projector and it connects with the computer that is trying to
connectTherefore when a Projector Keyword is not set for the projector or if you know the Projector Keyword you can cutoff the current connection and if you perform a connection operation you can connect to the projector
When a Projector Keyword is set for the projector if you do not know the Projector Keyword restart the projector andreconnect
The projector is not found when EasyMP Network Projection is started
Check R em ed y
Is the Wireless LAN unit connected
For Wireless LAN
Check that the optional Wireless LAN unit is securely connected
Is the Network Configuration screen from the Configurationmenu displayed on the projector
When the Network Configuration screen is displayed on the projector network connection for EasyMP Network Projection is disabled Close network settings on the projector and return to the LAN standby screen
Are the computers LAN card and the built-in LAN function
available
Check that LAN is valid by checking Control Panel - System - Hardware in the device manager and so on
Troubleshooting 40
8182019 Easy Mp Network Op Guide
httpslidepdfcomreaderfulleasy-mp-network-op-guide 4047
Check R em ed y
Is the SSID the same as that of the access pointQuick Connection Mode
Set an SSID that is different from that of the access points
Users Guide Network Menu
Is the DHCP function for Wired LAN turned On
Quick Connection Mode
Turn Off the DHCP setting for Wired LAN from the Configuration Menus Users Guide Network Menu
Was the network adapter used selected correctly with EasyMPNetwork Projection
If the computer has multiple LAN environments it cannot connect unless the network adapter is selected correctlyWhen using a computer running Windows start EasyMP Network Projection and select the network adapter you areusing from Set options - Switch LANs p33
For Wireless LAN connection is the Wireless LAN setting enabledwhen the computer is in power save mode
Enable the Wireless LAN
Are there any obstacles between the access point and the computeror projector
For Wireless LAN
Sometimes the electromagnetic wave situation prevents the projector from being found in a search Check for any obstacles between the access point and the computer or projector and change their position to improve theelectromagnetic wave situation
Is the computers Wireless LAN electromagnetic wave set to low Set the electromagnetic wave strength to maximum
Does the Wireless LAN conform to 80211g 80211b or 80211a It is only compatible with standards 80211g 80211b and 80211a and not with other standards such as 80211
Is the firewall turned off or has the firewall been registered as anexception
When you do not wish to turn off the firewall or register the firewall as an exception make the necessary settings toopen the ports
The ports used by EasyMP Network Projection are 3620 3621 and 3629
Is the network cable connected correctly
For Wired LAN
Check that the network cable is connected correctly Reconnect it if it is not connected or not connected properly
Cannot connect in Advanced Connection Mode or Wired LAN connection
Check R em ed y
Is the SSID setting different Set the computer the access point and the projector to the same SSIDs Users Guide Network Menu
Is the same WEP key set When selecting WEP from Security set the access point the computer and the projector to the same WEP keys Users Guide Network Menu
Are the connection denial functions such as MAC Addressg
restrictions and port restrictions set correctly at the access point Set the projector to allow connections from the access point
Troubleshooting 41
8182019 Easy Mp Network Op Guide
httpslidepdfcomreaderfulleasy-mp-network-op-guide 4147
Check R em ed y
Are the IP address the Subnet Mask and the Gateway Address forthe access point and the projector set correctly When not using a DHCP adjust each settings
Users Guide Network Menu
Are the access point and the projectors subnet different Select Manual search from EasyMP Network Projection specify the IP address and connects p28
The Slide Show cannot be displayed on the desired display when the multi-screen display function is being executed
Check R em ed y
Are you using PowerPoint 2002 or an earlier version
For Windows
To set and use two or more virtual displaysg use PowerPoint 2003 or later or limit the number of virtual displays toone before displaying the Slide Show
Applications are no longer displayed from the computer screen when the multi-screen display function is executed
Check R em ed y
Is another application running on the virtual display g
For Windows
When EPSON Virtual Display is installed another application sometimes runs on the virtual display In this case setEPSON Virtual Display to Off in Screen properties
The mouse cursor is not displayed on the computer screen
Check R em ed y
Is EPSON Virtual Display installed
For Windows
The mouse cursor was moved onto the virtual display g When the virtual display checkbox is cleared on the Add-Remove EPSON Virtual Display screen the mouse pointer returns to the screen display area
When connecting with EasyMP Network Projection the image is not displayed or the image is slow to appear
Ch eck R em ed y
Did you try to play back movies with Media Player or try to operatethe screen saver preview
Depending on the computer the movie playback screen in Media Player may not be displayed and the screen saverpreview may not be displayed normally
Troubleshooting 42
8182019 Easy Mp Network Op Guide
httpslidepdfcomreaderfulleasy-mp-network-op-guide 4247
Ch eck R em ed y
Is WEP encryption effective or are multiple projectors connected The display speed decreases when WEP encryption is effective or multiple projectors are connectedHave you enabled DHCP When DHCP is set to On in Advanced Connection Mode if an available DHCP server is not found it may take some
time to enter LAN standby status
Is Wireless LAN 80211gb being used in Quick ConnectionMode
Depending on the electromagnetic wave environment there are times when the image and sound for movies may stop When using the movie sending function use Advanced Connection Mode or Wireless LAN 80211a in Quick Connection Mode
When a connection is made using EasyMP Network Projection a PowerPoint Slide Show cannot be started
Ch eck R em ed y
Was EasyMP Network Projection started while PowerPoint wasrunning
For Windows
When connecting with EasyMP Network Projection make sure you close PowerPoint first Slide Show might not runif connecting while PowerPoint is running
When a connection has been made using EasyMP Network Projection the screen will not be refreshed when using an Office application
Ch eck R em ed y
Is the mouse moved continuously When you stop moving the mouse cursor the screen is updated If the screen does not update quickly stop moving themouse cursor
Error message when starting up EasyMP Network Projection
E r r or M essa g es R em ed y
Connection to the projector failed Try to connect again If it still does not connect check the network settings on the computer and the network settingsfor the projector
For details on the network settings to be made on the projector sees Users Guide Network Menu
The keyword does not match Re-enter the keyword displayed onthe projector screen
Check the Projector Keyword displayed on the LAN standby screen and enter the Projector Keyword
8182019 Easy Mp Network Op Guide
httpslidepdfcomreaderfulleasy-mp-network-op-guide 4347
Troubleshooting 44
8182019 Easy Mp Network Op Guide
httpslidepdfcomreaderfulleasy-mp-network-op-guide 4447
Network settings are not restored after cutting the connection to the computer with EasyMP Network Projection
Check R em ed y
Are you manually connecting to a Wireless LAN when thecomputer starts up
Quick Connection Mode
Try connecting to the Wireless LAN manually
Glossary 45
8182019 Easy Mp Network Op Guide
httpslidepdfcomreaderfulleasy-mp-network-op-guide 4547
This section briefly explains the difficult terms that are not explained in the text of this guide For details refer to other commercially available publications
A d h o c
A method of Wireless LAN connection that communicates with wireless LAN clients without using an access point It is not possible to communicatewith two or more devices simultaneously
M A C A d d r e ss
An abbreviation of Media Access Control The MAC Address is an ID number unique to each network adapter A unique number is assigned to eachnetwork adapter and data is transmitted between network adapters based on this identification
S V G A
A type of video signal with a resolution of 800 (horizontal) ^600 (vertical) dots that is used byIBM PCAT-compatible computers
S X G A
A type of video signal with a resolution of 1280 (horizontal) ^ 1024 (vertical) dots that is used by IBM PCAT-compatible computers
U X G A
A type of video signal with a resolution of 1600 (horizontal) ^ 1200 (vertical) dots that is used by IBM PCAT-compatible computers
V G A
A type of video signal with a resolution of 640 (horizontal) ^ 480 (vertical) dots that is used by IBM PCAT-compatible computers
V i r tual D i s p lay
The screen for one computer is output to multiple displays A large virtual screen can be created by using multiple displays
X G A
A type of video signal with a resolution of 1024 (horizontal) ^ 768 (vertical) dots that is used by IBM PCAT-compatible computers
8182019 Easy Mp Network Op Guide
httpslidepdfcomreaderfulleasy-mp-network-op-guide 4647
8182019 Easy Mp Network Op Guide
httpslidepdfcomreaderfulleasy-mp-network-op-guide 4747
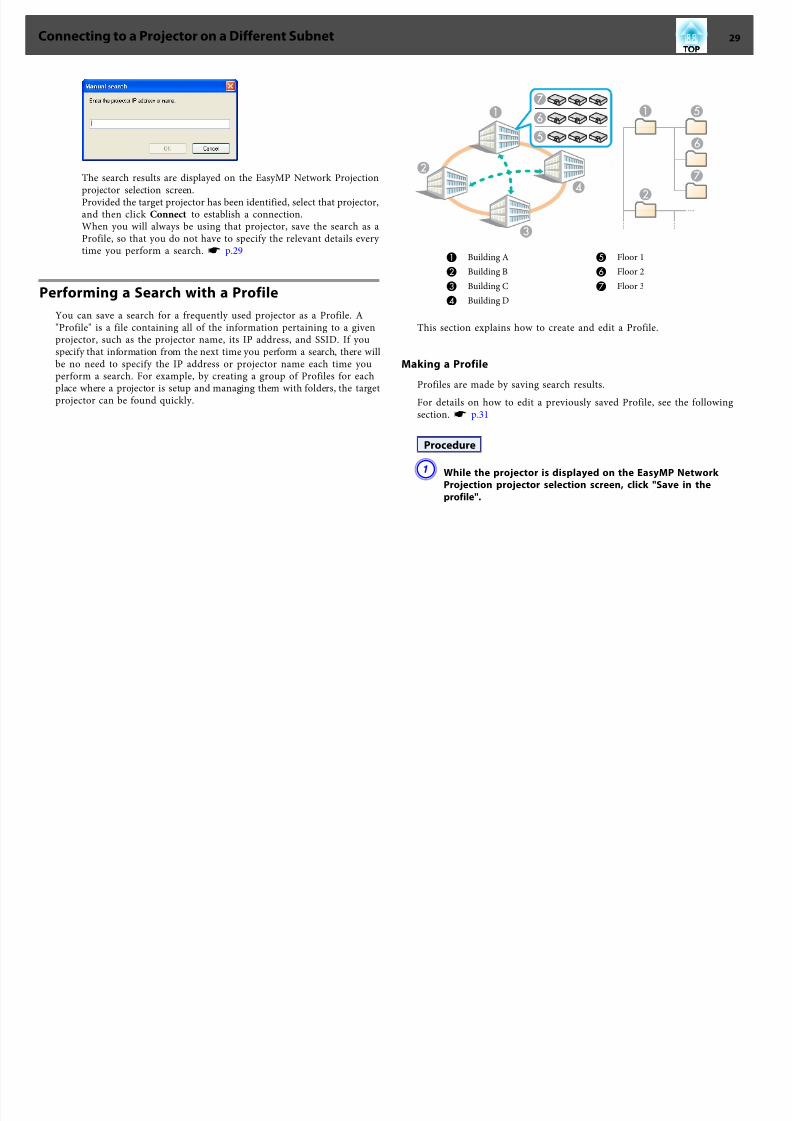
8182019 Easy Mp Network Op Guide
httpslidepdfcomreaderfulleasy-mp-network-op-guide 2947
The search results are displayed on the EasyMP Network Projectionprojector selection screen
Provided the target projector has been identified select that projectorand then click Connect to establish a connectionWhen you will always be using that projector save the search as aProfile so that you do not have to specify the relevant details every time you perform a search s p29
Performing a Search with a ProfileYou can save a search for a frequently used projector as a Profile AProfile is a file containing all of the information pertaining to a givenprojector such as the projector name its IP address and SSID If youspecify that information from the next time you perform a search there willbe no need to specify the IP address or projector name each time youperform a search For example by creating a group of Profiles for eachplace where a projector is setup and managing them with folders the target
projector can be found quickly
A Building A E Floor 1
B Building B F Floor 2
C Building C G Floor 3
D Building D
This section explains how to create and edit a Profile
Making a Profile
Profiles are made by saving search results
For details on how to edit a previously saved Profile see the followingsection s p31
Procedure
A While the projector is displayed on the EasyMP Network Projection projector selection screen click Save in the
profile
Connecting to a Projector on a Different Subnet 29
Connecting to a Projector on a Different Subnet 30
8182019 Easy Mp Network Op Guide
httpslidepdfcomreaderfulleasy-mp-network-op-guide 3047
The Save in the profile screen is displayed
B Enter a Profile name and then click Add
Projector information is registered in the ProfileIf you have previously saved a Profile you are prompted to confirmwhether or not to overwrite To save a Profile with a different nameselect Save as If you have created a folder for a Profile the followingscreens are displayed After entering the Profile name and selectingthe Save in destination click Add
For Windows
For Mac OS
qFor details on how to create a folder for a Profile see the followingsection s p31
Searching by specifying a Profile
You can search by specifying the Profile you created
Connecting to a Projector on a Different Subnet 30
Connecting to a Projector on a Different Subnet 31
8182019 Easy Mp Network Op Guide
httpslidepdfcomreaderfulleasy-mp-network-op-guide 3147
Procedure
A Click Profile on the EasyMP Network Projection projector
selection screen
If no Profile is registered you cannot select Profile
B From the menu that is displayed select the projector you wantto connect to
The search results are displayed on the EasyMP Network Projectionprojector selection screenProvided the target projector has been identified select that projectorand then click Connect to establish a connection
Managing a Profile
You can change the name and the hierarchical structure of the Profile
Procedure
A Click Set options on the EasyMP Network Projection main
screen
The Set options screen is displayed
B Click Edit profile
The Edit profile screen is displayed
C Edit the contents registered in the Profile
Co ect g to a ojecto o a D e e t Sub et 31
Connecting to a Projector on a Different Subnet 32
8182019 Easy Mp Network Op Guide
httpslidepdfcomreaderfulleasy-mp-network-op-guide 3247
A Indicates a folder
B Indicates a Profile
Prof i le
Item F u nctio n
Profi le
You can display the registered Profile You can manageit by creating a folder You can change the order of theProfile or the folder by dragging amp dropping
Copy
You can copy the Profile The copied Profile is saved in
the same folder as the original with the same nameDelete
You can delete the Profile and the folder
Prof i le
Item F u n ctio n
R e n a m e
Displays the Rename dialog box allowing you to renamethe folder or the Profile You can enter up to 32characters in the Rename dialog box
Create folder
You can create a new folder
E x p or t
Exports a created Profile allowing you to import and usethat Profile
I mp or t
Used when you want to read and use an exportedProfile
Informa tion on selected prof i le
Item F u n ctio n
P r oj e c tor n am e
I P addr e s s
You can display the projector information registered inthe Profile
Delete
You can delete the information for the selectedprojector When all projector information is deleted theprofile is also deleted
D Click OK
Saves your edits and closes the Edit profile screen
g j
Using Set options 33
8182019 Easy Mp Network Op Guide
httpslidepdfcomreaderfulleasy-mp-network-op-guide 3347
You can make setting options such as the processing method when EasyMPNetwork Projection startsAccess Set options from the EasyMP Network Projection main screen
Procedure
A Click Set options on the EasyMP Network Projection main
screen
The Set options screen is displayed
B Set each of the items
Confirm the details of the set items in the next step When you havemade all the necessary settings click OK to close the Set optionsscreen
Setting Each ItemSet each item from the General settings tab and the Adjust performancetab
General settings tab
Use fu l l -screen
vi de o t r an s fe r
This setting is disabled because the projector does notsupport the movie sending function
E n c r y p t
c ommun i c at i on s
Select to Encrypt and transmit data Even if data isintercepted it cannot be decrypted
When using Quick Connection Mode make sure youalways select this checkbox
Display Connection
Mod e Selection
w i n dow on s tar tup
Set whether or not the Quick Connection ModeAdvancedConnection Mode screen is displayed when EasyMPNetwork Projection starts
Clear this checkbox once you have settled on a regularstartup method
S e ar c h me th od on
s tar tup
Select from the following projector search methodsexecuted when EasyMP Network Projection is started
Automatic search on startup
Specify search method after startupSearch with the last network configuration
g p
Using Set options 34
8182019 Easy Mp Network Op Guide
httpslidepdfcomreaderfulleasy-mp-network-op-guide 3447
Edit profi le
The Edit profile dialog box is displayeds p31
S w i tc h L A N
Windows only The Switch Network Adapter dialog box is displayed Thisis used when it is necessary to switch the network adapter tobe used for a search when a computer has multipleadapters
By default all of the network adapters are used to perform asearch When a Wired LAN is always used as theconnection method select a Wired LAN adapter
R e s tor e D e faul ts
You can reset all adjustment values on the General settingstab to their default settings except for Edit profile andSwitch LAN
Adjust performance tab
P e r for man c e
adj us tme n t s l i de r
The performance can be set to Fast Normal andFine
Set to Fast when movie projections are interrupted
T r a n s f er l a y er e d
w i n dow
Windows only (excluding Windows Vista andWindows 7)
Set whether or not to transfer a layered windowThe layered window is in use when contents such asmessages displayed on the computer are not projectedby the projector Select this checkbox to projectcontents such as messages that use the layeredwindow
Clear this checkbox if you do not want the mousepointer to flicker on the screen
R e s tor e D e faul ts
You can reset all adjustment values for the Adjustperformance tab to their default settings
q When you click on the toolbar only the Adjust performance tab
is displayed
Audio Output tab
Because this projector does not support the audio sending function settingson the Audio Output tab are disabled
8182019 Easy Mp Network Op Guide
httpslidepdfcomreaderfulleasy-mp-network-op-guide 3547
Appendix
Connection Limitations 36
8182019 Easy Mp Network Op Guide
httpslidepdfcomreaderfulleasy-mp-network-op-guide 3647
When projecting computer images while running EasyMP Network Projection the following restrictions apply Confirm these points
Supported Resolutions
The following computer screen resolutions can be projected You cannotconnect to a computer with a resolution greater than UXGAg
bull VGA g(640x480)
bull SVGA g(800x600)
bull XGA g(1024x768)
bull SXGA g(1280x960)
bull SXGA (1280x1024)
bull SXGA+ (1400x1050)
bull WXGA (1280x768)
bull WXGA (1280x800)
bull
WXGA+ (1440x900)bull UXGA (1600x1200)
Supported resolutions when multi-screen display function is on
If a computer with a special screen size is used where the ratio of heightand width is not represented a screen resolution closest to the width isselected from the list of 10 aboveIn this case in wide screen the horizontal margins are projected in narrow screen the empty vertical margins are black
Display Color
The number of colors for computer screens that can be projected
W ind o w s M a c O S
16-bit color About 32000 colors (16-bit)
32-bit color About 167 million colors (32-bit)
The operational guarantee for multi-screen display is 16-bit and 32-bitcolor
Number of Connections
You can connect up to four projectors to one computer and projectsimultaneouslyYou cannot connect multiple computers to one projector simultaneously
Others
bull If the transmission speed of the Wireless LAN is low the network might be cut off unexpectedly
bull Audio is not transmitted
bull When videos are played back they do not play back as smoothly as
when displayed on the computerbull Applications that use part of DirectX functions may not be displayed
correctly(Windows only)
bull Cannot project full screen MS-DOS prompts(Windows only)
bull There are times when the image on the computer screen and the imageprojected by the projector may not match exactly
When Using Windows Vista or Windows 7
Note the following points when using EasyMP Network Projection on acomputer running Windows Vista or Windows 7
Limitations when projecting from Windows Photo Gallery
Note the following two limitations when launching Windows Photo Gallery when EasyMP Network Projection is running
Connection Limitations 37
8182019 Easy Mp Network Op Guide
httpslidepdfcomreaderfulleasy-mp-network-op-guide 3747
bull Slide Show is played back in simple mode when projecting fromWindows Photo Gallery
Because the toolbar is not displayed you cannot make changes whileplaying a Theme (effects) regardless of the Windows Experience IndexratingOnce simple mode has started you cannot change modes while WindowsPhoto Gallery is running even if you close EasyMP Network ProjectionRestart Windows Photo Gallery
bull You cannot play movies
Limitations in Windows Aero
Note the following two limitations when the window design for yourcomputer is Windows Aero
bull The layered window is projected regardless of Transfer layered window from Set options in EasyMP Network Projection
For example when Transfer layered window for EasyMP Network Projection toolbar is disabled it is not projected even if it is displayed onthe computer screen however the toolbar is projected
bull A few minutes after you connect a computer to the projector over anetwork with EasyMP Network Projection the following message is
displayedIt is recommended that you select Keep the current color scheme anddont show this message again This selection is enabled until thecomputer is restarted
Limitations when projecting from Windows Media Center
You cannot project images in full screen display using Windows MediaCenter Switch to the window display mode to project the images
Similarly images cannot be projected with Quick Wireless Connection orUSB Display
Troubleshooting 38
8182019 Easy Mp Network Op Guide
httpslidepdfcomreaderfulleasy-mp-network-op-guide 3847
If any of the following problems occur refer to the pages given for eachproblem
Problems concerning network functions
Cannot connect to the projector s p39
When a connection is made using EasyMP Network Projection the projectedimage remains as it is and a connection cannot be made from anothercomputer s p39
The projector is not found when EasyMP Network Projection is
started s
p39Cannot connect in Advanced Connection Mode or Wired LANconnection s p40
The Slide Show cannot be displayed on the desired display when the multi-screendisplay function is being executed s p41
Applications are no longer displayed from the computer screen when the multi-screen display function is executed s p41
The mouse cursor is not displayed on the computer screen s
p41When connecting with EasyMP Network Projection the image is not displayed orthe image is slow to appear s p41
When a connection is made using EasyMP Network Projection a PowerPointSlide Show cannot be started s p42
When a connection has been made using EasyMP Network Projection the screenwill not be refreshed when using an Office application s p42
Error message when starting up EasyMP Network Projection s
p42Network settings are not restored after cutting the connection to the computerwith EasyMP Network Projection s p44
Troubleshooting 39
8182019 Easy Mp Network Op Guide
httpslidepdfcomreaderfulleasy-mp-network-op-guide 3947
Problems Concerning Network Functions
Cannot connect to the projector
Check the message on the screen and then apply the following countermeasures
E r r or M essa g es R em ed y
The application version used is not supported Install the latest version of the application on your computer
Install EasyMP Network Projection from the EPSON Projector Software for Meeting amp Monitoring CD-ROMsupplied with the projector
When a connection is made using EasyMP Network Projection the projected image remains as it is and a connection cannot be madefrom another computer
Ch eck R em ed y
Did the presenter leave the conference room without cutting off thenetwork connection
With EasyMP Network Projection the connection with the computer that was previously connected can be cut off when another computer tries to connect with the projector and it connects with the computer that is trying to
connectTherefore when a Projector Keyword is not set for the projector or if you know the Projector Keyword you can cutoff the current connection and if you perform a connection operation you can connect to the projector
When a Projector Keyword is set for the projector if you do not know the Projector Keyword restart the projector andreconnect
The projector is not found when EasyMP Network Projection is started
Check R em ed y
Is the Wireless LAN unit connected
For Wireless LAN
Check that the optional Wireless LAN unit is securely connected
Is the Network Configuration screen from the Configurationmenu displayed on the projector
When the Network Configuration screen is displayed on the projector network connection for EasyMP Network Projection is disabled Close network settings on the projector and return to the LAN standby screen
Are the computers LAN card and the built-in LAN function
available
Check that LAN is valid by checking Control Panel - System - Hardware in the device manager and so on
Troubleshooting 40
8182019 Easy Mp Network Op Guide
httpslidepdfcomreaderfulleasy-mp-network-op-guide 4047
Check R em ed y
Is the SSID the same as that of the access pointQuick Connection Mode
Set an SSID that is different from that of the access points
Users Guide Network Menu
Is the DHCP function for Wired LAN turned On
Quick Connection Mode
Turn Off the DHCP setting for Wired LAN from the Configuration Menus Users Guide Network Menu
Was the network adapter used selected correctly with EasyMPNetwork Projection
If the computer has multiple LAN environments it cannot connect unless the network adapter is selected correctlyWhen using a computer running Windows start EasyMP Network Projection and select the network adapter you areusing from Set options - Switch LANs p33
For Wireless LAN connection is the Wireless LAN setting enabledwhen the computer is in power save mode
Enable the Wireless LAN
Are there any obstacles between the access point and the computeror projector
For Wireless LAN
Sometimes the electromagnetic wave situation prevents the projector from being found in a search Check for any obstacles between the access point and the computer or projector and change their position to improve theelectromagnetic wave situation
Is the computers Wireless LAN electromagnetic wave set to low Set the electromagnetic wave strength to maximum
Does the Wireless LAN conform to 80211g 80211b or 80211a It is only compatible with standards 80211g 80211b and 80211a and not with other standards such as 80211
Is the firewall turned off or has the firewall been registered as anexception
When you do not wish to turn off the firewall or register the firewall as an exception make the necessary settings toopen the ports
The ports used by EasyMP Network Projection are 3620 3621 and 3629
Is the network cable connected correctly
For Wired LAN
Check that the network cable is connected correctly Reconnect it if it is not connected or not connected properly
Cannot connect in Advanced Connection Mode or Wired LAN connection
Check R em ed y
Is the SSID setting different Set the computer the access point and the projector to the same SSIDs Users Guide Network Menu
Is the same WEP key set When selecting WEP from Security set the access point the computer and the projector to the same WEP keys Users Guide Network Menu
Are the connection denial functions such as MAC Addressg
restrictions and port restrictions set correctly at the access point Set the projector to allow connections from the access point
Troubleshooting 41
8182019 Easy Mp Network Op Guide
httpslidepdfcomreaderfulleasy-mp-network-op-guide 4147
Check R em ed y
Are the IP address the Subnet Mask and the Gateway Address forthe access point and the projector set correctly When not using a DHCP adjust each settings
Users Guide Network Menu
Are the access point and the projectors subnet different Select Manual search from EasyMP Network Projection specify the IP address and connects p28
The Slide Show cannot be displayed on the desired display when the multi-screen display function is being executed
Check R em ed y
Are you using PowerPoint 2002 or an earlier version
For Windows
To set and use two or more virtual displaysg use PowerPoint 2003 or later or limit the number of virtual displays toone before displaying the Slide Show
Applications are no longer displayed from the computer screen when the multi-screen display function is executed
Check R em ed y
Is another application running on the virtual display g
For Windows
When EPSON Virtual Display is installed another application sometimes runs on the virtual display In this case setEPSON Virtual Display to Off in Screen properties
The mouse cursor is not displayed on the computer screen
Check R em ed y
Is EPSON Virtual Display installed
For Windows
The mouse cursor was moved onto the virtual display g When the virtual display checkbox is cleared on the Add-Remove EPSON Virtual Display screen the mouse pointer returns to the screen display area
When connecting with EasyMP Network Projection the image is not displayed or the image is slow to appear
Ch eck R em ed y
Did you try to play back movies with Media Player or try to operatethe screen saver preview
Depending on the computer the movie playback screen in Media Player may not be displayed and the screen saverpreview may not be displayed normally
Troubleshooting 42
8182019 Easy Mp Network Op Guide
httpslidepdfcomreaderfulleasy-mp-network-op-guide 4247
Ch eck R em ed y
Is WEP encryption effective or are multiple projectors connected The display speed decreases when WEP encryption is effective or multiple projectors are connectedHave you enabled DHCP When DHCP is set to On in Advanced Connection Mode if an available DHCP server is not found it may take some
time to enter LAN standby status
Is Wireless LAN 80211gb being used in Quick ConnectionMode
Depending on the electromagnetic wave environment there are times when the image and sound for movies may stop When using the movie sending function use Advanced Connection Mode or Wireless LAN 80211a in Quick Connection Mode
When a connection is made using EasyMP Network Projection a PowerPoint Slide Show cannot be started
Ch eck R em ed y
Was EasyMP Network Projection started while PowerPoint wasrunning
For Windows
When connecting with EasyMP Network Projection make sure you close PowerPoint first Slide Show might not runif connecting while PowerPoint is running
When a connection has been made using EasyMP Network Projection the screen will not be refreshed when using an Office application
Ch eck R em ed y
Is the mouse moved continuously When you stop moving the mouse cursor the screen is updated If the screen does not update quickly stop moving themouse cursor
Error message when starting up EasyMP Network Projection
E r r or M essa g es R em ed y
Connection to the projector failed Try to connect again If it still does not connect check the network settings on the computer and the network settingsfor the projector
For details on the network settings to be made on the projector sees Users Guide Network Menu
The keyword does not match Re-enter the keyword displayed onthe projector screen
Check the Projector Keyword displayed on the LAN standby screen and enter the Projector Keyword
8182019 Easy Mp Network Op Guide
httpslidepdfcomreaderfulleasy-mp-network-op-guide 4347
Troubleshooting 44
8182019 Easy Mp Network Op Guide
httpslidepdfcomreaderfulleasy-mp-network-op-guide 4447
Network settings are not restored after cutting the connection to the computer with EasyMP Network Projection
Check R em ed y
Are you manually connecting to a Wireless LAN when thecomputer starts up
Quick Connection Mode
Try connecting to the Wireless LAN manually
Glossary 45
8182019 Easy Mp Network Op Guide
httpslidepdfcomreaderfulleasy-mp-network-op-guide 4547
This section briefly explains the difficult terms that are not explained in the text of this guide For details refer to other commercially available publications
A d h o c
A method of Wireless LAN connection that communicates with wireless LAN clients without using an access point It is not possible to communicatewith two or more devices simultaneously
M A C A d d r e ss
An abbreviation of Media Access Control The MAC Address is an ID number unique to each network adapter A unique number is assigned to eachnetwork adapter and data is transmitted between network adapters based on this identification
S V G A
A type of video signal with a resolution of 800 (horizontal) ^600 (vertical) dots that is used byIBM PCAT-compatible computers
S X G A
A type of video signal with a resolution of 1280 (horizontal) ^ 1024 (vertical) dots that is used by IBM PCAT-compatible computers
U X G A
A type of video signal with a resolution of 1600 (horizontal) ^ 1200 (vertical) dots that is used by IBM PCAT-compatible computers
V G A
A type of video signal with a resolution of 640 (horizontal) ^ 480 (vertical) dots that is used by IBM PCAT-compatible computers
V i r tual D i s p lay
The screen for one computer is output to multiple displays A large virtual screen can be created by using multiple displays
X G A
A type of video signal with a resolution of 1024 (horizontal) ^ 768 (vertical) dots that is used by IBM PCAT-compatible computers
8182019 Easy Mp Network Op Guide
httpslidepdfcomreaderfulleasy-mp-network-op-guide 4647
8182019 Easy Mp Network Op Guide
httpslidepdfcomreaderfulleasy-mp-network-op-guide 4747
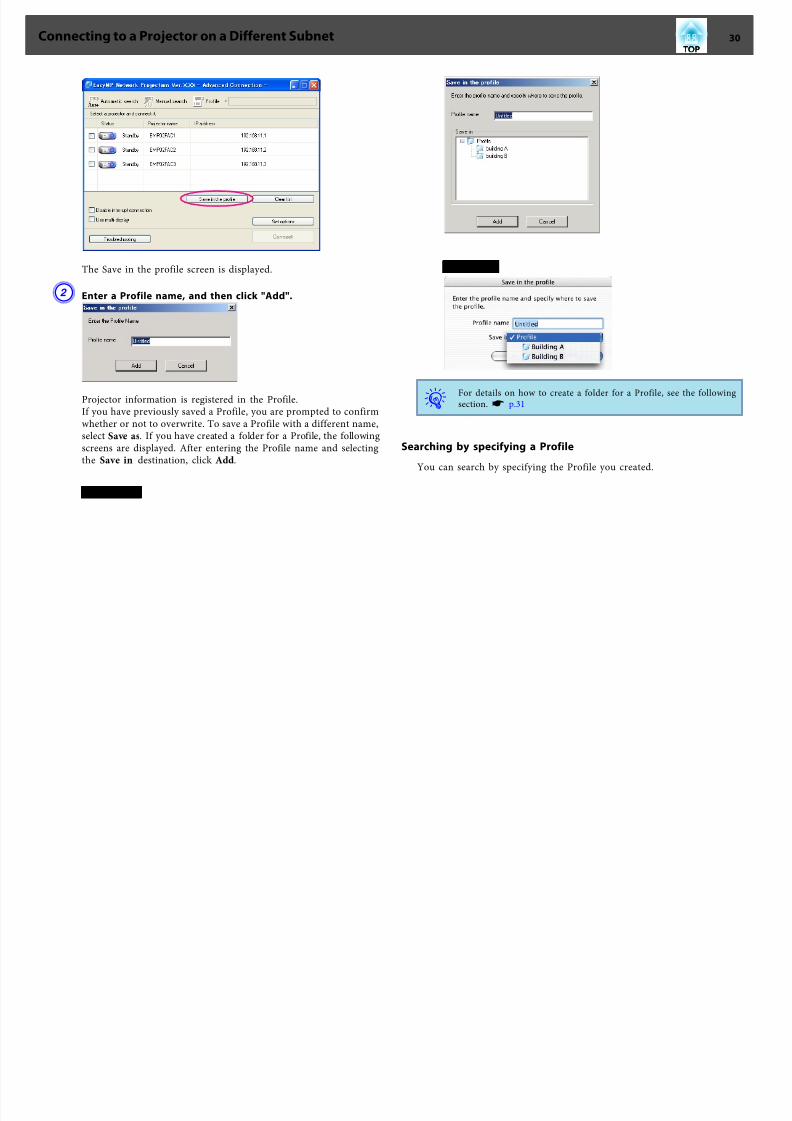
8182019 Easy Mp Network Op Guide
httpslidepdfcomreaderfulleasy-mp-network-op-guide 3047
The Save in the profile screen is displayed
B Enter a Profile name and then click Add
Projector information is registered in the ProfileIf you have previously saved a Profile you are prompted to confirmwhether or not to overwrite To save a Profile with a different nameselect Save as If you have created a folder for a Profile the followingscreens are displayed After entering the Profile name and selectingthe Save in destination click Add
For Windows
For Mac OS
qFor details on how to create a folder for a Profile see the followingsection s p31
Searching by specifying a Profile
You can search by specifying the Profile you created
Connecting to a Projector on a Different Subnet 30
Connecting to a Projector on a Different Subnet 31
8182019 Easy Mp Network Op Guide
httpslidepdfcomreaderfulleasy-mp-network-op-guide 3147
Procedure
A Click Profile on the EasyMP Network Projection projector
selection screen
If no Profile is registered you cannot select Profile
B From the menu that is displayed select the projector you wantto connect to
The search results are displayed on the EasyMP Network Projectionprojector selection screenProvided the target projector has been identified select that projectorand then click Connect to establish a connection
Managing a Profile
You can change the name and the hierarchical structure of the Profile
Procedure
A Click Set options on the EasyMP Network Projection main
screen
The Set options screen is displayed
B Click Edit profile
The Edit profile screen is displayed
C Edit the contents registered in the Profile
Co ect g to a ojecto o a D e e t Sub et 31
Connecting to a Projector on a Different Subnet 32
8182019 Easy Mp Network Op Guide
httpslidepdfcomreaderfulleasy-mp-network-op-guide 3247
A Indicates a folder
B Indicates a Profile
Prof i le
Item F u nctio n
Profi le
You can display the registered Profile You can manageit by creating a folder You can change the order of theProfile or the folder by dragging amp dropping
Copy
You can copy the Profile The copied Profile is saved in
the same folder as the original with the same nameDelete
You can delete the Profile and the folder
Prof i le
Item F u n ctio n
R e n a m e
Displays the Rename dialog box allowing you to renamethe folder or the Profile You can enter up to 32characters in the Rename dialog box
Create folder
You can create a new folder
E x p or t
Exports a created Profile allowing you to import and usethat Profile
I mp or t
Used when you want to read and use an exportedProfile
Informa tion on selected prof i le
Item F u n ctio n
P r oj e c tor n am e
I P addr e s s
You can display the projector information registered inthe Profile
Delete
You can delete the information for the selectedprojector When all projector information is deleted theprofile is also deleted
D Click OK
Saves your edits and closes the Edit profile screen
g j
Using Set options 33
8182019 Easy Mp Network Op Guide
httpslidepdfcomreaderfulleasy-mp-network-op-guide 3347
You can make setting options such as the processing method when EasyMPNetwork Projection startsAccess Set options from the EasyMP Network Projection main screen
Procedure
A Click Set options on the EasyMP Network Projection main
screen
The Set options screen is displayed
B Set each of the items
Confirm the details of the set items in the next step When you havemade all the necessary settings click OK to close the Set optionsscreen
Setting Each ItemSet each item from the General settings tab and the Adjust performancetab
General settings tab
Use fu l l -screen
vi de o t r an s fe r
This setting is disabled because the projector does notsupport the movie sending function
E n c r y p t
c ommun i c at i on s
Select to Encrypt and transmit data Even if data isintercepted it cannot be decrypted
When using Quick Connection Mode make sure youalways select this checkbox
Display Connection
Mod e Selection
w i n dow on s tar tup
Set whether or not the Quick Connection ModeAdvancedConnection Mode screen is displayed when EasyMPNetwork Projection starts
Clear this checkbox once you have settled on a regularstartup method
S e ar c h me th od on
s tar tup
Select from the following projector search methodsexecuted when EasyMP Network Projection is started
Automatic search on startup
Specify search method after startupSearch with the last network configuration
g p
Using Set options 34
8182019 Easy Mp Network Op Guide
httpslidepdfcomreaderfulleasy-mp-network-op-guide 3447
Edit profi le
The Edit profile dialog box is displayeds p31
S w i tc h L A N
Windows only The Switch Network Adapter dialog box is displayed Thisis used when it is necessary to switch the network adapter tobe used for a search when a computer has multipleadapters
By default all of the network adapters are used to perform asearch When a Wired LAN is always used as theconnection method select a Wired LAN adapter
R e s tor e D e faul ts
You can reset all adjustment values on the General settingstab to their default settings except for Edit profile andSwitch LAN
Adjust performance tab
P e r for man c e
adj us tme n t s l i de r
The performance can be set to Fast Normal andFine
Set to Fast when movie projections are interrupted
T r a n s f er l a y er e d
w i n dow
Windows only (excluding Windows Vista andWindows 7)
Set whether or not to transfer a layered windowThe layered window is in use when contents such asmessages displayed on the computer are not projectedby the projector Select this checkbox to projectcontents such as messages that use the layeredwindow
Clear this checkbox if you do not want the mousepointer to flicker on the screen
R e s tor e D e faul ts
You can reset all adjustment values for the Adjustperformance tab to their default settings
q When you click on the toolbar only the Adjust performance tab
is displayed
Audio Output tab
Because this projector does not support the audio sending function settingson the Audio Output tab are disabled
8182019 Easy Mp Network Op Guide
httpslidepdfcomreaderfulleasy-mp-network-op-guide 3547
Appendix
Connection Limitations 36
8182019 Easy Mp Network Op Guide
httpslidepdfcomreaderfulleasy-mp-network-op-guide 3647
When projecting computer images while running EasyMP Network Projection the following restrictions apply Confirm these points
Supported Resolutions
The following computer screen resolutions can be projected You cannotconnect to a computer with a resolution greater than UXGAg
bull VGA g(640x480)
bull SVGA g(800x600)
bull XGA g(1024x768)
bull SXGA g(1280x960)
bull SXGA (1280x1024)
bull SXGA+ (1400x1050)
bull WXGA (1280x768)
bull WXGA (1280x800)
bull
WXGA+ (1440x900)bull UXGA (1600x1200)
Supported resolutions when multi-screen display function is on
If a computer with a special screen size is used where the ratio of heightand width is not represented a screen resolution closest to the width isselected from the list of 10 aboveIn this case in wide screen the horizontal margins are projected in narrow screen the empty vertical margins are black
Display Color
The number of colors for computer screens that can be projected
W ind o w s M a c O S
16-bit color About 32000 colors (16-bit)
32-bit color About 167 million colors (32-bit)
The operational guarantee for multi-screen display is 16-bit and 32-bitcolor
Number of Connections
You can connect up to four projectors to one computer and projectsimultaneouslyYou cannot connect multiple computers to one projector simultaneously
Others
bull If the transmission speed of the Wireless LAN is low the network might be cut off unexpectedly
bull Audio is not transmitted
bull When videos are played back they do not play back as smoothly as
when displayed on the computerbull Applications that use part of DirectX functions may not be displayed
correctly(Windows only)
bull Cannot project full screen MS-DOS prompts(Windows only)
bull There are times when the image on the computer screen and the imageprojected by the projector may not match exactly
When Using Windows Vista or Windows 7
Note the following points when using EasyMP Network Projection on acomputer running Windows Vista or Windows 7
Limitations when projecting from Windows Photo Gallery
Note the following two limitations when launching Windows Photo Gallery when EasyMP Network Projection is running
Connection Limitations 37
8182019 Easy Mp Network Op Guide
httpslidepdfcomreaderfulleasy-mp-network-op-guide 3747
bull Slide Show is played back in simple mode when projecting fromWindows Photo Gallery
Because the toolbar is not displayed you cannot make changes whileplaying a Theme (effects) regardless of the Windows Experience IndexratingOnce simple mode has started you cannot change modes while WindowsPhoto Gallery is running even if you close EasyMP Network ProjectionRestart Windows Photo Gallery
bull You cannot play movies
Limitations in Windows Aero
Note the following two limitations when the window design for yourcomputer is Windows Aero
bull The layered window is projected regardless of Transfer layered window from Set options in EasyMP Network Projection
For example when Transfer layered window for EasyMP Network Projection toolbar is disabled it is not projected even if it is displayed onthe computer screen however the toolbar is projected
bull A few minutes after you connect a computer to the projector over anetwork with EasyMP Network Projection the following message is
displayedIt is recommended that you select Keep the current color scheme anddont show this message again This selection is enabled until thecomputer is restarted
Limitations when projecting from Windows Media Center
You cannot project images in full screen display using Windows MediaCenter Switch to the window display mode to project the images
Similarly images cannot be projected with Quick Wireless Connection orUSB Display
Troubleshooting 38
8182019 Easy Mp Network Op Guide
httpslidepdfcomreaderfulleasy-mp-network-op-guide 3847
If any of the following problems occur refer to the pages given for eachproblem
Problems concerning network functions
Cannot connect to the projector s p39
When a connection is made using EasyMP Network Projection the projectedimage remains as it is and a connection cannot be made from anothercomputer s p39
The projector is not found when EasyMP Network Projection is
started s
p39Cannot connect in Advanced Connection Mode or Wired LANconnection s p40
The Slide Show cannot be displayed on the desired display when the multi-screendisplay function is being executed s p41
Applications are no longer displayed from the computer screen when the multi-screen display function is executed s p41
The mouse cursor is not displayed on the computer screen s
p41When connecting with EasyMP Network Projection the image is not displayed orthe image is slow to appear s p41
When a connection is made using EasyMP Network Projection a PowerPointSlide Show cannot be started s p42
When a connection has been made using EasyMP Network Projection the screenwill not be refreshed when using an Office application s p42
Error message when starting up EasyMP Network Projection s
p42Network settings are not restored after cutting the connection to the computerwith EasyMP Network Projection s p44
Troubleshooting 39
8182019 Easy Mp Network Op Guide
httpslidepdfcomreaderfulleasy-mp-network-op-guide 3947
Problems Concerning Network Functions
Cannot connect to the projector
Check the message on the screen and then apply the following countermeasures
E r r or M essa g es R em ed y
The application version used is not supported Install the latest version of the application on your computer
Install EasyMP Network Projection from the EPSON Projector Software for Meeting amp Monitoring CD-ROMsupplied with the projector
When a connection is made using EasyMP Network Projection the projected image remains as it is and a connection cannot be madefrom another computer
Ch eck R em ed y
Did the presenter leave the conference room without cutting off thenetwork connection
With EasyMP Network Projection the connection with the computer that was previously connected can be cut off when another computer tries to connect with the projector and it connects with the computer that is trying to
connectTherefore when a Projector Keyword is not set for the projector or if you know the Projector Keyword you can cutoff the current connection and if you perform a connection operation you can connect to the projector
When a Projector Keyword is set for the projector if you do not know the Projector Keyword restart the projector andreconnect
The projector is not found when EasyMP Network Projection is started
Check R em ed y
Is the Wireless LAN unit connected
For Wireless LAN
Check that the optional Wireless LAN unit is securely connected
Is the Network Configuration screen from the Configurationmenu displayed on the projector
When the Network Configuration screen is displayed on the projector network connection for EasyMP Network Projection is disabled Close network settings on the projector and return to the LAN standby screen
Are the computers LAN card and the built-in LAN function
available
Check that LAN is valid by checking Control Panel - System - Hardware in the device manager and so on
Troubleshooting 40
8182019 Easy Mp Network Op Guide
httpslidepdfcomreaderfulleasy-mp-network-op-guide 4047
Check R em ed y
Is the SSID the same as that of the access pointQuick Connection Mode
Set an SSID that is different from that of the access points
Users Guide Network Menu
Is the DHCP function for Wired LAN turned On
Quick Connection Mode
Turn Off the DHCP setting for Wired LAN from the Configuration Menus Users Guide Network Menu
Was the network adapter used selected correctly with EasyMPNetwork Projection
If the computer has multiple LAN environments it cannot connect unless the network adapter is selected correctlyWhen using a computer running Windows start EasyMP Network Projection and select the network adapter you areusing from Set options - Switch LANs p33
For Wireless LAN connection is the Wireless LAN setting enabledwhen the computer is in power save mode
Enable the Wireless LAN
Are there any obstacles between the access point and the computeror projector
For Wireless LAN
Sometimes the electromagnetic wave situation prevents the projector from being found in a search Check for any obstacles between the access point and the computer or projector and change their position to improve theelectromagnetic wave situation
Is the computers Wireless LAN electromagnetic wave set to low Set the electromagnetic wave strength to maximum
Does the Wireless LAN conform to 80211g 80211b or 80211a It is only compatible with standards 80211g 80211b and 80211a and not with other standards such as 80211
Is the firewall turned off or has the firewall been registered as anexception
When you do not wish to turn off the firewall or register the firewall as an exception make the necessary settings toopen the ports
The ports used by EasyMP Network Projection are 3620 3621 and 3629
Is the network cable connected correctly
For Wired LAN
Check that the network cable is connected correctly Reconnect it if it is not connected or not connected properly
Cannot connect in Advanced Connection Mode or Wired LAN connection
Check R em ed y
Is the SSID setting different Set the computer the access point and the projector to the same SSIDs Users Guide Network Menu
Is the same WEP key set When selecting WEP from Security set the access point the computer and the projector to the same WEP keys Users Guide Network Menu
Are the connection denial functions such as MAC Addressg
restrictions and port restrictions set correctly at the access point Set the projector to allow connections from the access point
Troubleshooting 41
8182019 Easy Mp Network Op Guide
httpslidepdfcomreaderfulleasy-mp-network-op-guide 4147
Check R em ed y
Are the IP address the Subnet Mask and the Gateway Address forthe access point and the projector set correctly When not using a DHCP adjust each settings
Users Guide Network Menu
Are the access point and the projectors subnet different Select Manual search from EasyMP Network Projection specify the IP address and connects p28
The Slide Show cannot be displayed on the desired display when the multi-screen display function is being executed
Check R em ed y
Are you using PowerPoint 2002 or an earlier version
For Windows
To set and use two or more virtual displaysg use PowerPoint 2003 or later or limit the number of virtual displays toone before displaying the Slide Show
Applications are no longer displayed from the computer screen when the multi-screen display function is executed
Check R em ed y
Is another application running on the virtual display g
For Windows
When EPSON Virtual Display is installed another application sometimes runs on the virtual display In this case setEPSON Virtual Display to Off in Screen properties
The mouse cursor is not displayed on the computer screen
Check R em ed y
Is EPSON Virtual Display installed
For Windows
The mouse cursor was moved onto the virtual display g When the virtual display checkbox is cleared on the Add-Remove EPSON Virtual Display screen the mouse pointer returns to the screen display area
When connecting with EasyMP Network Projection the image is not displayed or the image is slow to appear
Ch eck R em ed y
Did you try to play back movies with Media Player or try to operatethe screen saver preview
Depending on the computer the movie playback screen in Media Player may not be displayed and the screen saverpreview may not be displayed normally
Troubleshooting 42
8182019 Easy Mp Network Op Guide
httpslidepdfcomreaderfulleasy-mp-network-op-guide 4247
Ch eck R em ed y
Is WEP encryption effective or are multiple projectors connected The display speed decreases when WEP encryption is effective or multiple projectors are connectedHave you enabled DHCP When DHCP is set to On in Advanced Connection Mode if an available DHCP server is not found it may take some
time to enter LAN standby status
Is Wireless LAN 80211gb being used in Quick ConnectionMode
Depending on the electromagnetic wave environment there are times when the image and sound for movies may stop When using the movie sending function use Advanced Connection Mode or Wireless LAN 80211a in Quick Connection Mode
When a connection is made using EasyMP Network Projection a PowerPoint Slide Show cannot be started
Ch eck R em ed y
Was EasyMP Network Projection started while PowerPoint wasrunning
For Windows
When connecting with EasyMP Network Projection make sure you close PowerPoint first Slide Show might not runif connecting while PowerPoint is running
When a connection has been made using EasyMP Network Projection the screen will not be refreshed when using an Office application
Ch eck R em ed y
Is the mouse moved continuously When you stop moving the mouse cursor the screen is updated If the screen does not update quickly stop moving themouse cursor
Error message when starting up EasyMP Network Projection
E r r or M essa g es R em ed y
Connection to the projector failed Try to connect again If it still does not connect check the network settings on the computer and the network settingsfor the projector
For details on the network settings to be made on the projector sees Users Guide Network Menu
The keyword does not match Re-enter the keyword displayed onthe projector screen
Check the Projector Keyword displayed on the LAN standby screen and enter the Projector Keyword
8182019 Easy Mp Network Op Guide
httpslidepdfcomreaderfulleasy-mp-network-op-guide 4347
Troubleshooting 44
8182019 Easy Mp Network Op Guide
httpslidepdfcomreaderfulleasy-mp-network-op-guide 4447
Network settings are not restored after cutting the connection to the computer with EasyMP Network Projection
Check R em ed y
Are you manually connecting to a Wireless LAN when thecomputer starts up
Quick Connection Mode
Try connecting to the Wireless LAN manually
Glossary 45
8182019 Easy Mp Network Op Guide
httpslidepdfcomreaderfulleasy-mp-network-op-guide 4547
This section briefly explains the difficult terms that are not explained in the text of this guide For details refer to other commercially available publications
A d h o c
A method of Wireless LAN connection that communicates with wireless LAN clients without using an access point It is not possible to communicatewith two or more devices simultaneously
M A C A d d r e ss
An abbreviation of Media Access Control The MAC Address is an ID number unique to each network adapter A unique number is assigned to eachnetwork adapter and data is transmitted between network adapters based on this identification
S V G A
A type of video signal with a resolution of 800 (horizontal) ^600 (vertical) dots that is used byIBM PCAT-compatible computers
S X G A
A type of video signal with a resolution of 1280 (horizontal) ^ 1024 (vertical) dots that is used by IBM PCAT-compatible computers
U X G A
A type of video signal with a resolution of 1600 (horizontal) ^ 1200 (vertical) dots that is used by IBM PCAT-compatible computers
V G A
A type of video signal with a resolution of 640 (horizontal) ^ 480 (vertical) dots that is used by IBM PCAT-compatible computers
V i r tual D i s p lay
The screen for one computer is output to multiple displays A large virtual screen can be created by using multiple displays
X G A
A type of video signal with a resolution of 1024 (horizontal) ^ 768 (vertical) dots that is used by IBM PCAT-compatible computers
8182019 Easy Mp Network Op Guide
httpslidepdfcomreaderfulleasy-mp-network-op-guide 4647
8182019 Easy Mp Network Op Guide
httpslidepdfcomreaderfulleasy-mp-network-op-guide 4747
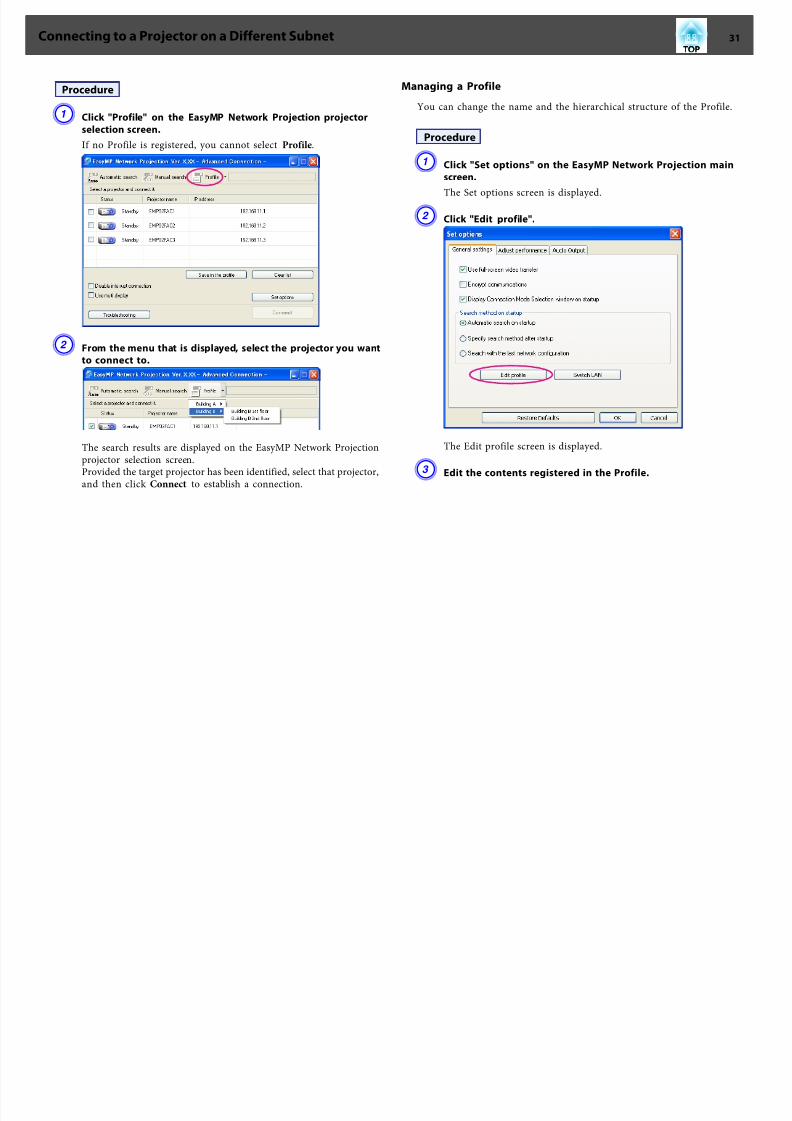
8182019 Easy Mp Network Op Guide
httpslidepdfcomreaderfulleasy-mp-network-op-guide 3247
A Indicates a folder
B Indicates a Profile
Prof i le
Item F u nctio n
Profi le
You can display the registered Profile You can manageit by creating a folder You can change the order of theProfile or the folder by dragging amp dropping
Copy
You can copy the Profile The copied Profile is saved in
the same folder as the original with the same nameDelete
You can delete the Profile and the folder
Prof i le
Item F u n ctio n
R e n a m e
Displays the Rename dialog box allowing you to renamethe folder or the Profile You can enter up to 32characters in the Rename dialog box
Create folder
You can create a new folder
E x p or t
Exports a created Profile allowing you to import and usethat Profile
I mp or t
Used when you want to read and use an exportedProfile
Informa tion on selected prof i le
Item F u n ctio n
P r oj e c tor n am e
I P addr e s s
You can display the projector information registered inthe Profile
Delete
You can delete the information for the selectedprojector When all projector information is deleted theprofile is also deleted
D Click OK
Saves your edits and closes the Edit profile screen
g j
Using Set options 33
8182019 Easy Mp Network Op Guide
httpslidepdfcomreaderfulleasy-mp-network-op-guide 3347
You can make setting options such as the processing method when EasyMPNetwork Projection startsAccess Set options from the EasyMP Network Projection main screen
Procedure
A Click Set options on the EasyMP Network Projection main
screen
The Set options screen is displayed
B Set each of the items
Confirm the details of the set items in the next step When you havemade all the necessary settings click OK to close the Set optionsscreen
Setting Each ItemSet each item from the General settings tab and the Adjust performancetab
General settings tab
Use fu l l -screen
vi de o t r an s fe r
This setting is disabled because the projector does notsupport the movie sending function
E n c r y p t
c ommun i c at i on s
Select to Encrypt and transmit data Even if data isintercepted it cannot be decrypted
When using Quick Connection Mode make sure youalways select this checkbox
Display Connection
Mod e Selection
w i n dow on s tar tup
Set whether or not the Quick Connection ModeAdvancedConnection Mode screen is displayed when EasyMPNetwork Projection starts
Clear this checkbox once you have settled on a regularstartup method
S e ar c h me th od on
s tar tup
Select from the following projector search methodsexecuted when EasyMP Network Projection is started
Automatic search on startup
Specify search method after startupSearch with the last network configuration
g p
Using Set options 34
8182019 Easy Mp Network Op Guide
httpslidepdfcomreaderfulleasy-mp-network-op-guide 3447
Edit profi le
The Edit profile dialog box is displayeds p31
S w i tc h L A N
Windows only The Switch Network Adapter dialog box is displayed Thisis used when it is necessary to switch the network adapter tobe used for a search when a computer has multipleadapters
By default all of the network adapters are used to perform asearch When a Wired LAN is always used as theconnection method select a Wired LAN adapter
R e s tor e D e faul ts
You can reset all adjustment values on the General settingstab to their default settings except for Edit profile andSwitch LAN
Adjust performance tab
P e r for man c e
adj us tme n t s l i de r
The performance can be set to Fast Normal andFine
Set to Fast when movie projections are interrupted
T r a n s f er l a y er e d
w i n dow
Windows only (excluding Windows Vista andWindows 7)
Set whether or not to transfer a layered windowThe layered window is in use when contents such asmessages displayed on the computer are not projectedby the projector Select this checkbox to projectcontents such as messages that use the layeredwindow
Clear this checkbox if you do not want the mousepointer to flicker on the screen
R e s tor e D e faul ts
You can reset all adjustment values for the Adjustperformance tab to their default settings
q When you click on the toolbar only the Adjust performance tab
is displayed
Audio Output tab
Because this projector does not support the audio sending function settingson the Audio Output tab are disabled
8182019 Easy Mp Network Op Guide
httpslidepdfcomreaderfulleasy-mp-network-op-guide 3547
Appendix
Connection Limitations 36
8182019 Easy Mp Network Op Guide
httpslidepdfcomreaderfulleasy-mp-network-op-guide 3647
When projecting computer images while running EasyMP Network Projection the following restrictions apply Confirm these points
Supported Resolutions
The following computer screen resolutions can be projected You cannotconnect to a computer with a resolution greater than UXGAg
bull VGA g(640x480)
bull SVGA g(800x600)
bull XGA g(1024x768)
bull SXGA g(1280x960)
bull SXGA (1280x1024)
bull SXGA+ (1400x1050)
bull WXGA (1280x768)
bull WXGA (1280x800)
bull
WXGA+ (1440x900)bull UXGA (1600x1200)
Supported resolutions when multi-screen display function is on
If a computer with a special screen size is used where the ratio of heightand width is not represented a screen resolution closest to the width isselected from the list of 10 aboveIn this case in wide screen the horizontal margins are projected in narrow screen the empty vertical margins are black
Display Color
The number of colors for computer screens that can be projected
W ind o w s M a c O S
16-bit color About 32000 colors (16-bit)
32-bit color About 167 million colors (32-bit)
The operational guarantee for multi-screen display is 16-bit and 32-bitcolor
Number of Connections
You can connect up to four projectors to one computer and projectsimultaneouslyYou cannot connect multiple computers to one projector simultaneously
Others
bull If the transmission speed of the Wireless LAN is low the network might be cut off unexpectedly
bull Audio is not transmitted
bull When videos are played back they do not play back as smoothly as
when displayed on the computerbull Applications that use part of DirectX functions may not be displayed
correctly(Windows only)
bull Cannot project full screen MS-DOS prompts(Windows only)
bull There are times when the image on the computer screen and the imageprojected by the projector may not match exactly
When Using Windows Vista or Windows 7
Note the following points when using EasyMP Network Projection on acomputer running Windows Vista or Windows 7
Limitations when projecting from Windows Photo Gallery
Note the following two limitations when launching Windows Photo Gallery when EasyMP Network Projection is running
Connection Limitations 37
8182019 Easy Mp Network Op Guide
httpslidepdfcomreaderfulleasy-mp-network-op-guide 3747
bull Slide Show is played back in simple mode when projecting fromWindows Photo Gallery
Because the toolbar is not displayed you cannot make changes whileplaying a Theme (effects) regardless of the Windows Experience IndexratingOnce simple mode has started you cannot change modes while WindowsPhoto Gallery is running even if you close EasyMP Network ProjectionRestart Windows Photo Gallery
bull You cannot play movies
Limitations in Windows Aero
Note the following two limitations when the window design for yourcomputer is Windows Aero
bull The layered window is projected regardless of Transfer layered window from Set options in EasyMP Network Projection
For example when Transfer layered window for EasyMP Network Projection toolbar is disabled it is not projected even if it is displayed onthe computer screen however the toolbar is projected
bull A few minutes after you connect a computer to the projector over anetwork with EasyMP Network Projection the following message is
displayedIt is recommended that you select Keep the current color scheme anddont show this message again This selection is enabled until thecomputer is restarted
Limitations when projecting from Windows Media Center
You cannot project images in full screen display using Windows MediaCenter Switch to the window display mode to project the images
Similarly images cannot be projected with Quick Wireless Connection orUSB Display
Troubleshooting 38
8182019 Easy Mp Network Op Guide
httpslidepdfcomreaderfulleasy-mp-network-op-guide 3847
If any of the following problems occur refer to the pages given for eachproblem
Problems concerning network functions
Cannot connect to the projector s p39
When a connection is made using EasyMP Network Projection the projectedimage remains as it is and a connection cannot be made from anothercomputer s p39
The projector is not found when EasyMP Network Projection is
started s
p39Cannot connect in Advanced Connection Mode or Wired LANconnection s p40
The Slide Show cannot be displayed on the desired display when the multi-screendisplay function is being executed s p41
Applications are no longer displayed from the computer screen when the multi-screen display function is executed s p41
The mouse cursor is not displayed on the computer screen s
p41When connecting with EasyMP Network Projection the image is not displayed orthe image is slow to appear s p41
When a connection is made using EasyMP Network Projection a PowerPointSlide Show cannot be started s p42
When a connection has been made using EasyMP Network Projection the screenwill not be refreshed when using an Office application s p42
Error message when starting up EasyMP Network Projection s
p42Network settings are not restored after cutting the connection to the computerwith EasyMP Network Projection s p44
Troubleshooting 39
8182019 Easy Mp Network Op Guide
httpslidepdfcomreaderfulleasy-mp-network-op-guide 3947
Problems Concerning Network Functions
Cannot connect to the projector
Check the message on the screen and then apply the following countermeasures
E r r or M essa g es R em ed y
The application version used is not supported Install the latest version of the application on your computer
Install EasyMP Network Projection from the EPSON Projector Software for Meeting amp Monitoring CD-ROMsupplied with the projector
When a connection is made using EasyMP Network Projection the projected image remains as it is and a connection cannot be madefrom another computer
Ch eck R em ed y
Did the presenter leave the conference room without cutting off thenetwork connection
With EasyMP Network Projection the connection with the computer that was previously connected can be cut off when another computer tries to connect with the projector and it connects with the computer that is trying to
connectTherefore when a Projector Keyword is not set for the projector or if you know the Projector Keyword you can cutoff the current connection and if you perform a connection operation you can connect to the projector
When a Projector Keyword is set for the projector if you do not know the Projector Keyword restart the projector andreconnect
The projector is not found when EasyMP Network Projection is started
Check R em ed y
Is the Wireless LAN unit connected
For Wireless LAN
Check that the optional Wireless LAN unit is securely connected
Is the Network Configuration screen from the Configurationmenu displayed on the projector
When the Network Configuration screen is displayed on the projector network connection for EasyMP Network Projection is disabled Close network settings on the projector and return to the LAN standby screen
Are the computers LAN card and the built-in LAN function
available
Check that LAN is valid by checking Control Panel - System - Hardware in the device manager and so on
Troubleshooting 40
8182019 Easy Mp Network Op Guide
httpslidepdfcomreaderfulleasy-mp-network-op-guide 4047
Check R em ed y
Is the SSID the same as that of the access pointQuick Connection Mode
Set an SSID that is different from that of the access points
Users Guide Network Menu
Is the DHCP function for Wired LAN turned On
Quick Connection Mode
Turn Off the DHCP setting for Wired LAN from the Configuration Menus Users Guide Network Menu
Was the network adapter used selected correctly with EasyMPNetwork Projection
If the computer has multiple LAN environments it cannot connect unless the network adapter is selected correctlyWhen using a computer running Windows start EasyMP Network Projection and select the network adapter you areusing from Set options - Switch LANs p33
For Wireless LAN connection is the Wireless LAN setting enabledwhen the computer is in power save mode
Enable the Wireless LAN
Are there any obstacles between the access point and the computeror projector
For Wireless LAN
Sometimes the electromagnetic wave situation prevents the projector from being found in a search Check for any obstacles between the access point and the computer or projector and change their position to improve theelectromagnetic wave situation
Is the computers Wireless LAN electromagnetic wave set to low Set the electromagnetic wave strength to maximum
Does the Wireless LAN conform to 80211g 80211b or 80211a It is only compatible with standards 80211g 80211b and 80211a and not with other standards such as 80211
Is the firewall turned off or has the firewall been registered as anexception
When you do not wish to turn off the firewall or register the firewall as an exception make the necessary settings toopen the ports
The ports used by EasyMP Network Projection are 3620 3621 and 3629
Is the network cable connected correctly
For Wired LAN
Check that the network cable is connected correctly Reconnect it if it is not connected or not connected properly
Cannot connect in Advanced Connection Mode or Wired LAN connection
Check R em ed y
Is the SSID setting different Set the computer the access point and the projector to the same SSIDs Users Guide Network Menu
Is the same WEP key set When selecting WEP from Security set the access point the computer and the projector to the same WEP keys Users Guide Network Menu
Are the connection denial functions such as MAC Addressg
restrictions and port restrictions set correctly at the access point Set the projector to allow connections from the access point
Troubleshooting 41
8182019 Easy Mp Network Op Guide
httpslidepdfcomreaderfulleasy-mp-network-op-guide 4147
Check R em ed y
Are the IP address the Subnet Mask and the Gateway Address forthe access point and the projector set correctly When not using a DHCP adjust each settings
Users Guide Network Menu
Are the access point and the projectors subnet different Select Manual search from EasyMP Network Projection specify the IP address and connects p28
The Slide Show cannot be displayed on the desired display when the multi-screen display function is being executed
Check R em ed y
Are you using PowerPoint 2002 or an earlier version
For Windows
To set and use two or more virtual displaysg use PowerPoint 2003 or later or limit the number of virtual displays toone before displaying the Slide Show
Applications are no longer displayed from the computer screen when the multi-screen display function is executed
Check R em ed y
Is another application running on the virtual display g
For Windows
When EPSON Virtual Display is installed another application sometimes runs on the virtual display In this case setEPSON Virtual Display to Off in Screen properties
The mouse cursor is not displayed on the computer screen
Check R em ed y
Is EPSON Virtual Display installed
For Windows
The mouse cursor was moved onto the virtual display g When the virtual display checkbox is cleared on the Add-Remove EPSON Virtual Display screen the mouse pointer returns to the screen display area
When connecting with EasyMP Network Projection the image is not displayed or the image is slow to appear
Ch eck R em ed y
Did you try to play back movies with Media Player or try to operatethe screen saver preview
Depending on the computer the movie playback screen in Media Player may not be displayed and the screen saverpreview may not be displayed normally
Troubleshooting 42
8182019 Easy Mp Network Op Guide
httpslidepdfcomreaderfulleasy-mp-network-op-guide 4247
Ch eck R em ed y
Is WEP encryption effective or are multiple projectors connected The display speed decreases when WEP encryption is effective or multiple projectors are connectedHave you enabled DHCP When DHCP is set to On in Advanced Connection Mode if an available DHCP server is not found it may take some
time to enter LAN standby status
Is Wireless LAN 80211gb being used in Quick ConnectionMode
Depending on the electromagnetic wave environment there are times when the image and sound for movies may stop When using the movie sending function use Advanced Connection Mode or Wireless LAN 80211a in Quick Connection Mode
When a connection is made using EasyMP Network Projection a PowerPoint Slide Show cannot be started
Ch eck R em ed y
Was EasyMP Network Projection started while PowerPoint wasrunning
For Windows
When connecting with EasyMP Network Projection make sure you close PowerPoint first Slide Show might not runif connecting while PowerPoint is running
When a connection has been made using EasyMP Network Projection the screen will not be refreshed when using an Office application
Ch eck R em ed y
Is the mouse moved continuously When you stop moving the mouse cursor the screen is updated If the screen does not update quickly stop moving themouse cursor
Error message when starting up EasyMP Network Projection
E r r or M essa g es R em ed y
Connection to the projector failed Try to connect again If it still does not connect check the network settings on the computer and the network settingsfor the projector
For details on the network settings to be made on the projector sees Users Guide Network Menu
The keyword does not match Re-enter the keyword displayed onthe projector screen
Check the Projector Keyword displayed on the LAN standby screen and enter the Projector Keyword
8182019 Easy Mp Network Op Guide
httpslidepdfcomreaderfulleasy-mp-network-op-guide 4347
Troubleshooting 44
8182019 Easy Mp Network Op Guide
httpslidepdfcomreaderfulleasy-mp-network-op-guide 4447
Network settings are not restored after cutting the connection to the computer with EasyMP Network Projection
Check R em ed y
Are you manually connecting to a Wireless LAN when thecomputer starts up
Quick Connection Mode
Try connecting to the Wireless LAN manually
Glossary 45
8182019 Easy Mp Network Op Guide
httpslidepdfcomreaderfulleasy-mp-network-op-guide 4547
This section briefly explains the difficult terms that are not explained in the text of this guide For details refer to other commercially available publications
A d h o c
A method of Wireless LAN connection that communicates with wireless LAN clients without using an access point It is not possible to communicatewith two or more devices simultaneously
M A C A d d r e ss
An abbreviation of Media Access Control The MAC Address is an ID number unique to each network adapter A unique number is assigned to eachnetwork adapter and data is transmitted between network adapters based on this identification
S V G A
A type of video signal with a resolution of 800 (horizontal) ^600 (vertical) dots that is used byIBM PCAT-compatible computers
S X G A
A type of video signal with a resolution of 1280 (horizontal) ^ 1024 (vertical) dots that is used by IBM PCAT-compatible computers
U X G A
A type of video signal with a resolution of 1600 (horizontal) ^ 1200 (vertical) dots that is used by IBM PCAT-compatible computers
V G A
A type of video signal with a resolution of 640 (horizontal) ^ 480 (vertical) dots that is used by IBM PCAT-compatible computers
V i r tual D i s p lay
The screen for one computer is output to multiple displays A large virtual screen can be created by using multiple displays
X G A
A type of video signal with a resolution of 1024 (horizontal) ^ 768 (vertical) dots that is used by IBM PCAT-compatible computers
8182019 Easy Mp Network Op Guide
httpslidepdfcomreaderfulleasy-mp-network-op-guide 4647
8182019 Easy Mp Network Op Guide
httpslidepdfcomreaderfulleasy-mp-network-op-guide 4747
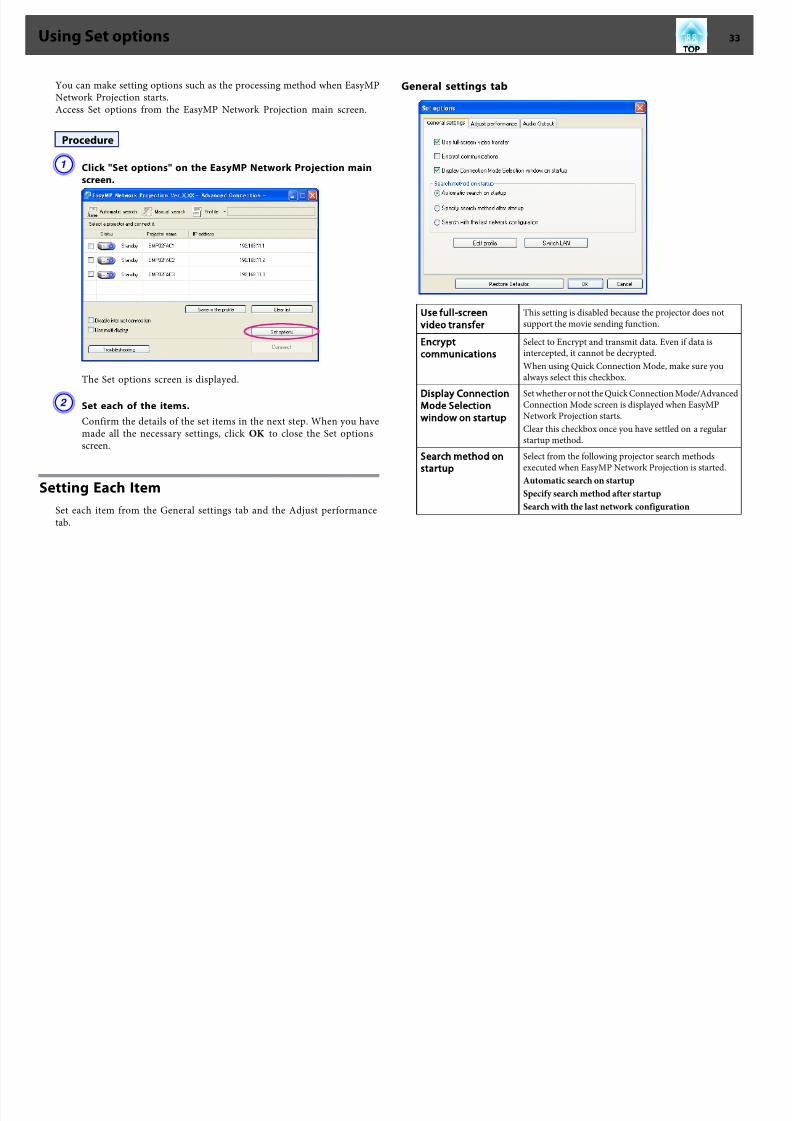
8182019 Easy Mp Network Op Guide
httpslidepdfcomreaderfulleasy-mp-network-op-guide 3547
Appendix
Connection Limitations 36
8182019 Easy Mp Network Op Guide
httpslidepdfcomreaderfulleasy-mp-network-op-guide 3647
When projecting computer images while running EasyMP Network Projection the following restrictions apply Confirm these points
Supported Resolutions
The following computer screen resolutions can be projected You cannotconnect to a computer with a resolution greater than UXGAg
bull VGA g(640x480)
bull SVGA g(800x600)
bull XGA g(1024x768)
bull SXGA g(1280x960)
bull SXGA (1280x1024)
bull SXGA+ (1400x1050)
bull WXGA (1280x768)
bull WXGA (1280x800)
bull
WXGA+ (1440x900)bull UXGA (1600x1200)
Supported resolutions when multi-screen display function is on
If a computer with a special screen size is used where the ratio of heightand width is not represented a screen resolution closest to the width isselected from the list of 10 aboveIn this case in wide screen the horizontal margins are projected in narrow screen the empty vertical margins are black
Display Color
The number of colors for computer screens that can be projected
W ind o w s M a c O S
16-bit color About 32000 colors (16-bit)
32-bit color About 167 million colors (32-bit)
The operational guarantee for multi-screen display is 16-bit and 32-bitcolor
Number of Connections
You can connect up to four projectors to one computer and projectsimultaneouslyYou cannot connect multiple computers to one projector simultaneously
Others
bull If the transmission speed of the Wireless LAN is low the network might be cut off unexpectedly
bull Audio is not transmitted
bull When videos are played back they do not play back as smoothly as
when displayed on the computerbull Applications that use part of DirectX functions may not be displayed
correctly(Windows only)
bull Cannot project full screen MS-DOS prompts(Windows only)
bull There are times when the image on the computer screen and the imageprojected by the projector may not match exactly
When Using Windows Vista or Windows 7
Note the following points when using EasyMP Network Projection on acomputer running Windows Vista or Windows 7
Limitations when projecting from Windows Photo Gallery
Note the following two limitations when launching Windows Photo Gallery when EasyMP Network Projection is running
Connection Limitations 37
8182019 Easy Mp Network Op Guide
httpslidepdfcomreaderfulleasy-mp-network-op-guide 3747
bull Slide Show is played back in simple mode when projecting fromWindows Photo Gallery
Because the toolbar is not displayed you cannot make changes whileplaying a Theme (effects) regardless of the Windows Experience IndexratingOnce simple mode has started you cannot change modes while WindowsPhoto Gallery is running even if you close EasyMP Network ProjectionRestart Windows Photo Gallery
bull You cannot play movies
Limitations in Windows Aero
Note the following two limitations when the window design for yourcomputer is Windows Aero
bull The layered window is projected regardless of Transfer layered window from Set options in EasyMP Network Projection
For example when Transfer layered window for EasyMP Network Projection toolbar is disabled it is not projected even if it is displayed onthe computer screen however the toolbar is projected
bull A few minutes after you connect a computer to the projector over anetwork with EasyMP Network Projection the following message is
displayedIt is recommended that you select Keep the current color scheme anddont show this message again This selection is enabled until thecomputer is restarted
Limitations when projecting from Windows Media Center
You cannot project images in full screen display using Windows MediaCenter Switch to the window display mode to project the images
Similarly images cannot be projected with Quick Wireless Connection orUSB Display
Troubleshooting 38
8182019 Easy Mp Network Op Guide
httpslidepdfcomreaderfulleasy-mp-network-op-guide 3847
If any of the following problems occur refer to the pages given for eachproblem
Problems concerning network functions
Cannot connect to the projector s p39
When a connection is made using EasyMP Network Projection the projectedimage remains as it is and a connection cannot be made from anothercomputer s p39
The projector is not found when EasyMP Network Projection is
started s
p39Cannot connect in Advanced Connection Mode or Wired LANconnection s p40
The Slide Show cannot be displayed on the desired display when the multi-screendisplay function is being executed s p41
Applications are no longer displayed from the computer screen when the multi-screen display function is executed s p41
The mouse cursor is not displayed on the computer screen s
p41When connecting with EasyMP Network Projection the image is not displayed orthe image is slow to appear s p41
When a connection is made using EasyMP Network Projection a PowerPointSlide Show cannot be started s p42
When a connection has been made using EasyMP Network Projection the screenwill not be refreshed when using an Office application s p42
Error message when starting up EasyMP Network Projection s
p42Network settings are not restored after cutting the connection to the computerwith EasyMP Network Projection s p44
Troubleshooting 39
8182019 Easy Mp Network Op Guide
httpslidepdfcomreaderfulleasy-mp-network-op-guide 3947
Problems Concerning Network Functions
Cannot connect to the projector
Check the message on the screen and then apply the following countermeasures
E r r or M essa g es R em ed y
The application version used is not supported Install the latest version of the application on your computer
Install EasyMP Network Projection from the EPSON Projector Software for Meeting amp Monitoring CD-ROMsupplied with the projector
When a connection is made using EasyMP Network Projection the projected image remains as it is and a connection cannot be madefrom another computer
Ch eck R em ed y
Did the presenter leave the conference room without cutting off thenetwork connection
With EasyMP Network Projection the connection with the computer that was previously connected can be cut off when another computer tries to connect with the projector and it connects with the computer that is trying to
connectTherefore when a Projector Keyword is not set for the projector or if you know the Projector Keyword you can cutoff the current connection and if you perform a connection operation you can connect to the projector
When a Projector Keyword is set for the projector if you do not know the Projector Keyword restart the projector andreconnect
The projector is not found when EasyMP Network Projection is started
Check R em ed y
Is the Wireless LAN unit connected
For Wireless LAN
Check that the optional Wireless LAN unit is securely connected
Is the Network Configuration screen from the Configurationmenu displayed on the projector
When the Network Configuration screen is displayed on the projector network connection for EasyMP Network Projection is disabled Close network settings on the projector and return to the LAN standby screen
Are the computers LAN card and the built-in LAN function
available
Check that LAN is valid by checking Control Panel - System - Hardware in the device manager and so on
Troubleshooting 40
8182019 Easy Mp Network Op Guide
httpslidepdfcomreaderfulleasy-mp-network-op-guide 4047
Check R em ed y
Is the SSID the same as that of the access pointQuick Connection Mode
Set an SSID that is different from that of the access points
Users Guide Network Menu
Is the DHCP function for Wired LAN turned On
Quick Connection Mode
Turn Off the DHCP setting for Wired LAN from the Configuration Menus Users Guide Network Menu
Was the network adapter used selected correctly with EasyMPNetwork Projection
If the computer has multiple LAN environments it cannot connect unless the network adapter is selected correctlyWhen using a computer running Windows start EasyMP Network Projection and select the network adapter you areusing from Set options - Switch LANs p33
For Wireless LAN connection is the Wireless LAN setting enabledwhen the computer is in power save mode
Enable the Wireless LAN
Are there any obstacles between the access point and the computeror projector
For Wireless LAN
Sometimes the electromagnetic wave situation prevents the projector from being found in a search Check for any obstacles between the access point and the computer or projector and change their position to improve theelectromagnetic wave situation
Is the computers Wireless LAN electromagnetic wave set to low Set the electromagnetic wave strength to maximum
Does the Wireless LAN conform to 80211g 80211b or 80211a It is only compatible with standards 80211g 80211b and 80211a and not with other standards such as 80211
Is the firewall turned off or has the firewall been registered as anexception
When you do not wish to turn off the firewall or register the firewall as an exception make the necessary settings toopen the ports
The ports used by EasyMP Network Projection are 3620 3621 and 3629
Is the network cable connected correctly
For Wired LAN
Check that the network cable is connected correctly Reconnect it if it is not connected or not connected properly
Cannot connect in Advanced Connection Mode or Wired LAN connection
Check R em ed y
Is the SSID setting different Set the computer the access point and the projector to the same SSIDs Users Guide Network Menu
Is the same WEP key set When selecting WEP from Security set the access point the computer and the projector to the same WEP keys Users Guide Network Menu
Are the connection denial functions such as MAC Addressg
restrictions and port restrictions set correctly at the access point Set the projector to allow connections from the access point
Troubleshooting 41
8182019 Easy Mp Network Op Guide
httpslidepdfcomreaderfulleasy-mp-network-op-guide 4147
Check R em ed y
Are the IP address the Subnet Mask and the Gateway Address forthe access point and the projector set correctly When not using a DHCP adjust each settings
Users Guide Network Menu
Are the access point and the projectors subnet different Select Manual search from EasyMP Network Projection specify the IP address and connects p28
The Slide Show cannot be displayed on the desired display when the multi-screen display function is being executed
Check R em ed y
Are you using PowerPoint 2002 or an earlier version
For Windows
To set and use two or more virtual displaysg use PowerPoint 2003 or later or limit the number of virtual displays toone before displaying the Slide Show
Applications are no longer displayed from the computer screen when the multi-screen display function is executed
Check R em ed y
Is another application running on the virtual display g
For Windows
When EPSON Virtual Display is installed another application sometimes runs on the virtual display In this case setEPSON Virtual Display to Off in Screen properties
The mouse cursor is not displayed on the computer screen
Check R em ed y
Is EPSON Virtual Display installed
For Windows
The mouse cursor was moved onto the virtual display g When the virtual display checkbox is cleared on the Add-Remove EPSON Virtual Display screen the mouse pointer returns to the screen display area
When connecting with EasyMP Network Projection the image is not displayed or the image is slow to appear
Ch eck R em ed y
Did you try to play back movies with Media Player or try to operatethe screen saver preview
Depending on the computer the movie playback screen in Media Player may not be displayed and the screen saverpreview may not be displayed normally
Troubleshooting 42
8182019 Easy Mp Network Op Guide
httpslidepdfcomreaderfulleasy-mp-network-op-guide 4247
Ch eck R em ed y
Is WEP encryption effective or are multiple projectors connected The display speed decreases when WEP encryption is effective or multiple projectors are connectedHave you enabled DHCP When DHCP is set to On in Advanced Connection Mode if an available DHCP server is not found it may take some
time to enter LAN standby status
Is Wireless LAN 80211gb being used in Quick ConnectionMode
Depending on the electromagnetic wave environment there are times when the image and sound for movies may stop When using the movie sending function use Advanced Connection Mode or Wireless LAN 80211a in Quick Connection Mode
When a connection is made using EasyMP Network Projection a PowerPoint Slide Show cannot be started
Ch eck R em ed y
Was EasyMP Network Projection started while PowerPoint wasrunning
For Windows
When connecting with EasyMP Network Projection make sure you close PowerPoint first Slide Show might not runif connecting while PowerPoint is running
When a connection has been made using EasyMP Network Projection the screen will not be refreshed when using an Office application
Ch eck R em ed y
Is the mouse moved continuously When you stop moving the mouse cursor the screen is updated If the screen does not update quickly stop moving themouse cursor
Error message when starting up EasyMP Network Projection
E r r or M essa g es R em ed y
Connection to the projector failed Try to connect again If it still does not connect check the network settings on the computer and the network settingsfor the projector
For details on the network settings to be made on the projector sees Users Guide Network Menu
The keyword does not match Re-enter the keyword displayed onthe projector screen
Check the Projector Keyword displayed on the LAN standby screen and enter the Projector Keyword
8182019 Easy Mp Network Op Guide
httpslidepdfcomreaderfulleasy-mp-network-op-guide 4347
Troubleshooting 44
8182019 Easy Mp Network Op Guide
httpslidepdfcomreaderfulleasy-mp-network-op-guide 4447
Network settings are not restored after cutting the connection to the computer with EasyMP Network Projection
Check R em ed y
Are you manually connecting to a Wireless LAN when thecomputer starts up
Quick Connection Mode
Try connecting to the Wireless LAN manually
Glossary 45
8182019 Easy Mp Network Op Guide
httpslidepdfcomreaderfulleasy-mp-network-op-guide 4547
This section briefly explains the difficult terms that are not explained in the text of this guide For details refer to other commercially available publications
A d h o c
A method of Wireless LAN connection that communicates with wireless LAN clients without using an access point It is not possible to communicatewith two or more devices simultaneously
M A C A d d r e ss
An abbreviation of Media Access Control The MAC Address is an ID number unique to each network adapter A unique number is assigned to eachnetwork adapter and data is transmitted between network adapters based on this identification
S V G A
A type of video signal with a resolution of 800 (horizontal) ^600 (vertical) dots that is used byIBM PCAT-compatible computers
S X G A
A type of video signal with a resolution of 1280 (horizontal) ^ 1024 (vertical) dots that is used by IBM PCAT-compatible computers
U X G A
A type of video signal with a resolution of 1600 (horizontal) ^ 1200 (vertical) dots that is used by IBM PCAT-compatible computers
V G A
A type of video signal with a resolution of 640 (horizontal) ^ 480 (vertical) dots that is used by IBM PCAT-compatible computers
V i r tual D i s p lay
The screen for one computer is output to multiple displays A large virtual screen can be created by using multiple displays
X G A
A type of video signal with a resolution of 1024 (horizontal) ^ 768 (vertical) dots that is used by IBM PCAT-compatible computers
8182019 Easy Mp Network Op Guide
httpslidepdfcomreaderfulleasy-mp-network-op-guide 4647
8182019 Easy Mp Network Op Guide
httpslidepdfcomreaderfulleasy-mp-network-op-guide 4747
8182019 Easy Mp Network Op Guide
httpslidepdfcomreaderfulleasy-mp-network-op-guide 3647
When projecting computer images while running EasyMP Network Projection the following restrictions apply Confirm these points
Supported Resolutions
The following computer screen resolutions can be projected You cannotconnect to a computer with a resolution greater than UXGAg
bull VGA g(640x480)
bull SVGA g(800x600)
bull XGA g(1024x768)
bull SXGA g(1280x960)
bull SXGA (1280x1024)
bull SXGA+ (1400x1050)
bull WXGA (1280x768)
bull WXGA (1280x800)
bull
WXGA+ (1440x900)bull UXGA (1600x1200)
Supported resolutions when multi-screen display function is on
If a computer with a special screen size is used where the ratio of heightand width is not represented a screen resolution closest to the width isselected from the list of 10 aboveIn this case in wide screen the horizontal margins are projected in narrow screen the empty vertical margins are black
Display Color
The number of colors for computer screens that can be projected
W ind o w s M a c O S
16-bit color About 32000 colors (16-bit)
32-bit color About 167 million colors (32-bit)
The operational guarantee for multi-screen display is 16-bit and 32-bitcolor
Number of Connections
You can connect up to four projectors to one computer and projectsimultaneouslyYou cannot connect multiple computers to one projector simultaneously
Others
bull If the transmission speed of the Wireless LAN is low the network might be cut off unexpectedly
bull Audio is not transmitted
bull When videos are played back they do not play back as smoothly as
when displayed on the computerbull Applications that use part of DirectX functions may not be displayed
correctly(Windows only)
bull Cannot project full screen MS-DOS prompts(Windows only)
bull There are times when the image on the computer screen and the imageprojected by the projector may not match exactly
When Using Windows Vista or Windows 7
Note the following points when using EasyMP Network Projection on acomputer running Windows Vista or Windows 7
Limitations when projecting from Windows Photo Gallery
Note the following two limitations when launching Windows Photo Gallery when EasyMP Network Projection is running
Connection Limitations 37
8182019 Easy Mp Network Op Guide
httpslidepdfcomreaderfulleasy-mp-network-op-guide 3747
bull Slide Show is played back in simple mode when projecting fromWindows Photo Gallery
Because the toolbar is not displayed you cannot make changes whileplaying a Theme (effects) regardless of the Windows Experience IndexratingOnce simple mode has started you cannot change modes while WindowsPhoto Gallery is running even if you close EasyMP Network ProjectionRestart Windows Photo Gallery
bull You cannot play movies
Limitations in Windows Aero
Note the following two limitations when the window design for yourcomputer is Windows Aero
bull The layered window is projected regardless of Transfer layered window from Set options in EasyMP Network Projection
For example when Transfer layered window for EasyMP Network Projection toolbar is disabled it is not projected even if it is displayed onthe computer screen however the toolbar is projected
bull A few minutes after you connect a computer to the projector over anetwork with EasyMP Network Projection the following message is
displayedIt is recommended that you select Keep the current color scheme anddont show this message again This selection is enabled until thecomputer is restarted
Limitations when projecting from Windows Media Center
You cannot project images in full screen display using Windows MediaCenter Switch to the window display mode to project the images
Similarly images cannot be projected with Quick Wireless Connection orUSB Display
Troubleshooting 38
8182019 Easy Mp Network Op Guide
httpslidepdfcomreaderfulleasy-mp-network-op-guide 3847
If any of the following problems occur refer to the pages given for eachproblem
Problems concerning network functions
Cannot connect to the projector s p39
When a connection is made using EasyMP Network Projection the projectedimage remains as it is and a connection cannot be made from anothercomputer s p39
The projector is not found when EasyMP Network Projection is
started s
p39Cannot connect in Advanced Connection Mode or Wired LANconnection s p40
The Slide Show cannot be displayed on the desired display when the multi-screendisplay function is being executed s p41
Applications are no longer displayed from the computer screen when the multi-screen display function is executed s p41
The mouse cursor is not displayed on the computer screen s
p41When connecting with EasyMP Network Projection the image is not displayed orthe image is slow to appear s p41
When a connection is made using EasyMP Network Projection a PowerPointSlide Show cannot be started s p42
When a connection has been made using EasyMP Network Projection the screenwill not be refreshed when using an Office application s p42
Error message when starting up EasyMP Network Projection s
p42Network settings are not restored after cutting the connection to the computerwith EasyMP Network Projection s p44
Troubleshooting 39
8182019 Easy Mp Network Op Guide
httpslidepdfcomreaderfulleasy-mp-network-op-guide 3947
Problems Concerning Network Functions
Cannot connect to the projector
Check the message on the screen and then apply the following countermeasures
E r r or M essa g es R em ed y
The application version used is not supported Install the latest version of the application on your computer
Install EasyMP Network Projection from the EPSON Projector Software for Meeting amp Monitoring CD-ROMsupplied with the projector
When a connection is made using EasyMP Network Projection the projected image remains as it is and a connection cannot be madefrom another computer
Ch eck R em ed y
Did the presenter leave the conference room without cutting off thenetwork connection
With EasyMP Network Projection the connection with the computer that was previously connected can be cut off when another computer tries to connect with the projector and it connects with the computer that is trying to
connectTherefore when a Projector Keyword is not set for the projector or if you know the Projector Keyword you can cutoff the current connection and if you perform a connection operation you can connect to the projector
When a Projector Keyword is set for the projector if you do not know the Projector Keyword restart the projector andreconnect
The projector is not found when EasyMP Network Projection is started
Check R em ed y
Is the Wireless LAN unit connected
For Wireless LAN
Check that the optional Wireless LAN unit is securely connected
Is the Network Configuration screen from the Configurationmenu displayed on the projector
When the Network Configuration screen is displayed on the projector network connection for EasyMP Network Projection is disabled Close network settings on the projector and return to the LAN standby screen
Are the computers LAN card and the built-in LAN function
available
Check that LAN is valid by checking Control Panel - System - Hardware in the device manager and so on
Troubleshooting 40
8182019 Easy Mp Network Op Guide
httpslidepdfcomreaderfulleasy-mp-network-op-guide 4047
Check R em ed y
Is the SSID the same as that of the access pointQuick Connection Mode
Set an SSID that is different from that of the access points
Users Guide Network Menu
Is the DHCP function for Wired LAN turned On
Quick Connection Mode
Turn Off the DHCP setting for Wired LAN from the Configuration Menus Users Guide Network Menu
Was the network adapter used selected correctly with EasyMPNetwork Projection
If the computer has multiple LAN environments it cannot connect unless the network adapter is selected correctlyWhen using a computer running Windows start EasyMP Network Projection and select the network adapter you areusing from Set options - Switch LANs p33
For Wireless LAN connection is the Wireless LAN setting enabledwhen the computer is in power save mode
Enable the Wireless LAN
Are there any obstacles between the access point and the computeror projector
For Wireless LAN
Sometimes the electromagnetic wave situation prevents the projector from being found in a search Check for any obstacles between the access point and the computer or projector and change their position to improve theelectromagnetic wave situation
Is the computers Wireless LAN electromagnetic wave set to low Set the electromagnetic wave strength to maximum
Does the Wireless LAN conform to 80211g 80211b or 80211a It is only compatible with standards 80211g 80211b and 80211a and not with other standards such as 80211
Is the firewall turned off or has the firewall been registered as anexception
When you do not wish to turn off the firewall or register the firewall as an exception make the necessary settings toopen the ports
The ports used by EasyMP Network Projection are 3620 3621 and 3629
Is the network cable connected correctly
For Wired LAN
Check that the network cable is connected correctly Reconnect it if it is not connected or not connected properly
Cannot connect in Advanced Connection Mode or Wired LAN connection
Check R em ed y
Is the SSID setting different Set the computer the access point and the projector to the same SSIDs Users Guide Network Menu
Is the same WEP key set When selecting WEP from Security set the access point the computer and the projector to the same WEP keys Users Guide Network Menu
Are the connection denial functions such as MAC Addressg
restrictions and port restrictions set correctly at the access point Set the projector to allow connections from the access point
Troubleshooting 41
8182019 Easy Mp Network Op Guide
httpslidepdfcomreaderfulleasy-mp-network-op-guide 4147
Check R em ed y
Are the IP address the Subnet Mask and the Gateway Address forthe access point and the projector set correctly When not using a DHCP adjust each settings
Users Guide Network Menu
Are the access point and the projectors subnet different Select Manual search from EasyMP Network Projection specify the IP address and connects p28
The Slide Show cannot be displayed on the desired display when the multi-screen display function is being executed
Check R em ed y
Are you using PowerPoint 2002 or an earlier version
For Windows
To set and use two or more virtual displaysg use PowerPoint 2003 or later or limit the number of virtual displays toone before displaying the Slide Show
Applications are no longer displayed from the computer screen when the multi-screen display function is executed
Check R em ed y
Is another application running on the virtual display g
For Windows
When EPSON Virtual Display is installed another application sometimes runs on the virtual display In this case setEPSON Virtual Display to Off in Screen properties
The mouse cursor is not displayed on the computer screen
Check R em ed y
Is EPSON Virtual Display installed
For Windows
The mouse cursor was moved onto the virtual display g When the virtual display checkbox is cleared on the Add-Remove EPSON Virtual Display screen the mouse pointer returns to the screen display area
When connecting with EasyMP Network Projection the image is not displayed or the image is slow to appear
Ch eck R em ed y
Did you try to play back movies with Media Player or try to operatethe screen saver preview
Depending on the computer the movie playback screen in Media Player may not be displayed and the screen saverpreview may not be displayed normally
Troubleshooting 42
8182019 Easy Mp Network Op Guide
httpslidepdfcomreaderfulleasy-mp-network-op-guide 4247
Ch eck R em ed y
Is WEP encryption effective or are multiple projectors connected The display speed decreases when WEP encryption is effective or multiple projectors are connectedHave you enabled DHCP When DHCP is set to On in Advanced Connection Mode if an available DHCP server is not found it may take some
time to enter LAN standby status
Is Wireless LAN 80211gb being used in Quick ConnectionMode
Depending on the electromagnetic wave environment there are times when the image and sound for movies may stop When using the movie sending function use Advanced Connection Mode or Wireless LAN 80211a in Quick Connection Mode
When a connection is made using EasyMP Network Projection a PowerPoint Slide Show cannot be started
Ch eck R em ed y
Was EasyMP Network Projection started while PowerPoint wasrunning
For Windows
When connecting with EasyMP Network Projection make sure you close PowerPoint first Slide Show might not runif connecting while PowerPoint is running
When a connection has been made using EasyMP Network Projection the screen will not be refreshed when using an Office application
Ch eck R em ed y
Is the mouse moved continuously When you stop moving the mouse cursor the screen is updated If the screen does not update quickly stop moving themouse cursor
Error message when starting up EasyMP Network Projection
E r r or M essa g es R em ed y
Connection to the projector failed Try to connect again If it still does not connect check the network settings on the computer and the network settingsfor the projector
For details on the network settings to be made on the projector sees Users Guide Network Menu
The keyword does not match Re-enter the keyword displayed onthe projector screen
Check the Projector Keyword displayed on the LAN standby screen and enter the Projector Keyword
8182019 Easy Mp Network Op Guide
httpslidepdfcomreaderfulleasy-mp-network-op-guide 4347
Troubleshooting 44
8182019 Easy Mp Network Op Guide
httpslidepdfcomreaderfulleasy-mp-network-op-guide 4447
Network settings are not restored after cutting the connection to the computer with EasyMP Network Projection
Check R em ed y
Are you manually connecting to a Wireless LAN when thecomputer starts up
Quick Connection Mode
Try connecting to the Wireless LAN manually
Glossary 45
8182019 Easy Mp Network Op Guide
httpslidepdfcomreaderfulleasy-mp-network-op-guide 4547
This section briefly explains the difficult terms that are not explained in the text of this guide For details refer to other commercially available publications
A d h o c
A method of Wireless LAN connection that communicates with wireless LAN clients without using an access point It is not possible to communicatewith two or more devices simultaneously
M A C A d d r e ss
An abbreviation of Media Access Control The MAC Address is an ID number unique to each network adapter A unique number is assigned to eachnetwork adapter and data is transmitted between network adapters based on this identification
S V G A
A type of video signal with a resolution of 800 (horizontal) ^600 (vertical) dots that is used byIBM PCAT-compatible computers
S X G A
A type of video signal with a resolution of 1280 (horizontal) ^ 1024 (vertical) dots that is used by IBM PCAT-compatible computers
U X G A
A type of video signal with a resolution of 1600 (horizontal) ^ 1200 (vertical) dots that is used by IBM PCAT-compatible computers
V G A
A type of video signal with a resolution of 640 (horizontal) ^ 480 (vertical) dots that is used by IBM PCAT-compatible computers
V i r tual D i s p lay
The screen for one computer is output to multiple displays A large virtual screen can be created by using multiple displays
X G A
A type of video signal with a resolution of 1024 (horizontal) ^ 768 (vertical) dots that is used by IBM PCAT-compatible computers
8182019 Easy Mp Network Op Guide
httpslidepdfcomreaderfulleasy-mp-network-op-guide 4647
8182019 Easy Mp Network Op Guide
httpslidepdfcomreaderfulleasy-mp-network-op-guide 4747
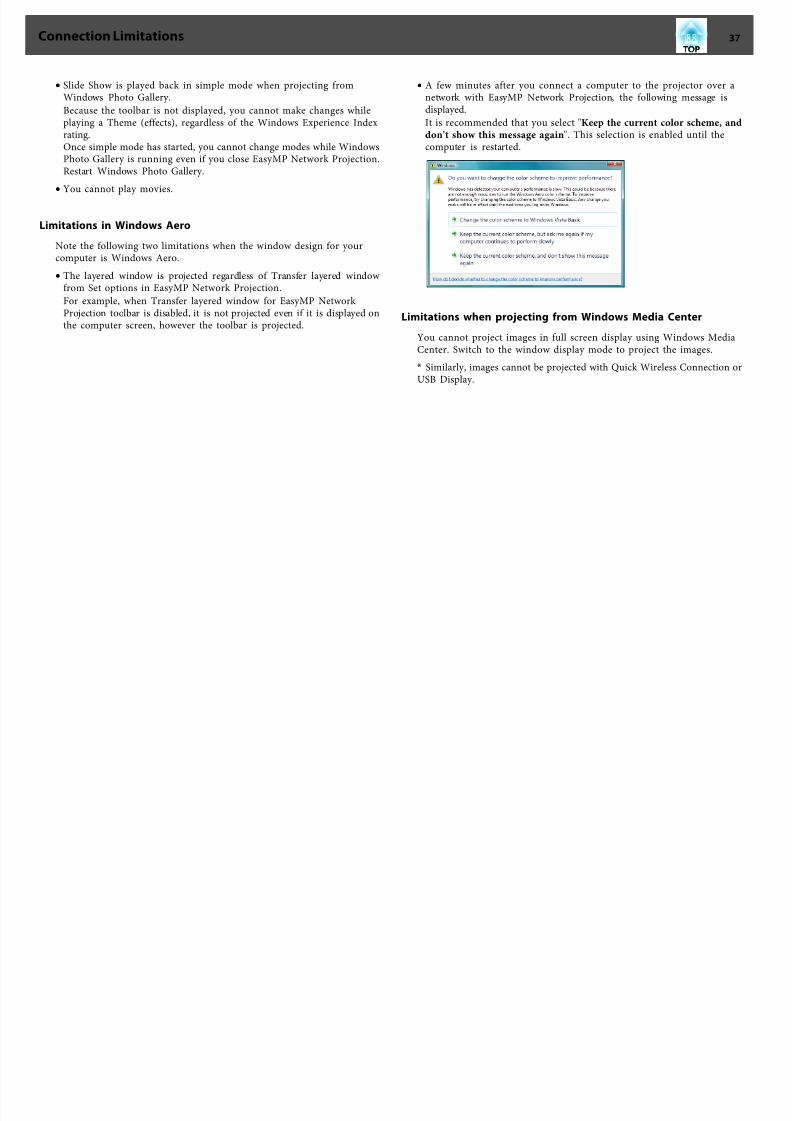
8182019 Easy Mp Network Op Guide
httpslidepdfcomreaderfulleasy-mp-network-op-guide 3747
bull Slide Show is played back in simple mode when projecting fromWindows Photo Gallery
Because the toolbar is not displayed you cannot make changes whileplaying a Theme (effects) regardless of the Windows Experience IndexratingOnce simple mode has started you cannot change modes while WindowsPhoto Gallery is running even if you close EasyMP Network ProjectionRestart Windows Photo Gallery
bull You cannot play movies
Limitations in Windows Aero
Note the following two limitations when the window design for yourcomputer is Windows Aero
bull The layered window is projected regardless of Transfer layered window from Set options in EasyMP Network Projection
For example when Transfer layered window for EasyMP Network Projection toolbar is disabled it is not projected even if it is displayed onthe computer screen however the toolbar is projected
bull A few minutes after you connect a computer to the projector over anetwork with EasyMP Network Projection the following message is
displayedIt is recommended that you select Keep the current color scheme anddont show this message again This selection is enabled until thecomputer is restarted
Limitations when projecting from Windows Media Center
You cannot project images in full screen display using Windows MediaCenter Switch to the window display mode to project the images
Similarly images cannot be projected with Quick Wireless Connection orUSB Display
Troubleshooting 38
8182019 Easy Mp Network Op Guide
httpslidepdfcomreaderfulleasy-mp-network-op-guide 3847
If any of the following problems occur refer to the pages given for eachproblem
Problems concerning network functions
Cannot connect to the projector s p39
When a connection is made using EasyMP Network Projection the projectedimage remains as it is and a connection cannot be made from anothercomputer s p39
The projector is not found when EasyMP Network Projection is
started s
p39Cannot connect in Advanced Connection Mode or Wired LANconnection s p40
The Slide Show cannot be displayed on the desired display when the multi-screendisplay function is being executed s p41
Applications are no longer displayed from the computer screen when the multi-screen display function is executed s p41
The mouse cursor is not displayed on the computer screen s
p41When connecting with EasyMP Network Projection the image is not displayed orthe image is slow to appear s p41
When a connection is made using EasyMP Network Projection a PowerPointSlide Show cannot be started s p42
When a connection has been made using EasyMP Network Projection the screenwill not be refreshed when using an Office application s p42
Error message when starting up EasyMP Network Projection s
p42Network settings are not restored after cutting the connection to the computerwith EasyMP Network Projection s p44
Troubleshooting 39
8182019 Easy Mp Network Op Guide
httpslidepdfcomreaderfulleasy-mp-network-op-guide 3947
Problems Concerning Network Functions
Cannot connect to the projector
Check the message on the screen and then apply the following countermeasures
E r r or M essa g es R em ed y
The application version used is not supported Install the latest version of the application on your computer
Install EasyMP Network Projection from the EPSON Projector Software for Meeting amp Monitoring CD-ROMsupplied with the projector
When a connection is made using EasyMP Network Projection the projected image remains as it is and a connection cannot be madefrom another computer
Ch eck R em ed y
Did the presenter leave the conference room without cutting off thenetwork connection
With EasyMP Network Projection the connection with the computer that was previously connected can be cut off when another computer tries to connect with the projector and it connects with the computer that is trying to
connectTherefore when a Projector Keyword is not set for the projector or if you know the Projector Keyword you can cutoff the current connection and if you perform a connection operation you can connect to the projector
When a Projector Keyword is set for the projector if you do not know the Projector Keyword restart the projector andreconnect
The projector is not found when EasyMP Network Projection is started
Check R em ed y
Is the Wireless LAN unit connected
For Wireless LAN
Check that the optional Wireless LAN unit is securely connected
Is the Network Configuration screen from the Configurationmenu displayed on the projector
When the Network Configuration screen is displayed on the projector network connection for EasyMP Network Projection is disabled Close network settings on the projector and return to the LAN standby screen
Are the computers LAN card and the built-in LAN function
available
Check that LAN is valid by checking Control Panel - System - Hardware in the device manager and so on
Troubleshooting 40
8182019 Easy Mp Network Op Guide
httpslidepdfcomreaderfulleasy-mp-network-op-guide 4047
Check R em ed y
Is the SSID the same as that of the access pointQuick Connection Mode
Set an SSID that is different from that of the access points
Users Guide Network Menu
Is the DHCP function for Wired LAN turned On
Quick Connection Mode
Turn Off the DHCP setting for Wired LAN from the Configuration Menus Users Guide Network Menu
Was the network adapter used selected correctly with EasyMPNetwork Projection
If the computer has multiple LAN environments it cannot connect unless the network adapter is selected correctlyWhen using a computer running Windows start EasyMP Network Projection and select the network adapter you areusing from Set options - Switch LANs p33
For Wireless LAN connection is the Wireless LAN setting enabledwhen the computer is in power save mode
Enable the Wireless LAN
Are there any obstacles between the access point and the computeror projector
For Wireless LAN
Sometimes the electromagnetic wave situation prevents the projector from being found in a search Check for any obstacles between the access point and the computer or projector and change their position to improve theelectromagnetic wave situation
Is the computers Wireless LAN electromagnetic wave set to low Set the electromagnetic wave strength to maximum
Does the Wireless LAN conform to 80211g 80211b or 80211a It is only compatible with standards 80211g 80211b and 80211a and not with other standards such as 80211
Is the firewall turned off or has the firewall been registered as anexception
When you do not wish to turn off the firewall or register the firewall as an exception make the necessary settings toopen the ports
The ports used by EasyMP Network Projection are 3620 3621 and 3629
Is the network cable connected correctly
For Wired LAN
Check that the network cable is connected correctly Reconnect it if it is not connected or not connected properly
Cannot connect in Advanced Connection Mode or Wired LAN connection
Check R em ed y
Is the SSID setting different Set the computer the access point and the projector to the same SSIDs Users Guide Network Menu
Is the same WEP key set When selecting WEP from Security set the access point the computer and the projector to the same WEP keys Users Guide Network Menu
Are the connection denial functions such as MAC Addressg
restrictions and port restrictions set correctly at the access point Set the projector to allow connections from the access point
Troubleshooting 41
8182019 Easy Mp Network Op Guide
httpslidepdfcomreaderfulleasy-mp-network-op-guide 4147
Check R em ed y
Are the IP address the Subnet Mask and the Gateway Address forthe access point and the projector set correctly When not using a DHCP adjust each settings
Users Guide Network Menu
Are the access point and the projectors subnet different Select Manual search from EasyMP Network Projection specify the IP address and connects p28
The Slide Show cannot be displayed on the desired display when the multi-screen display function is being executed
Check R em ed y
Are you using PowerPoint 2002 or an earlier version
For Windows
To set and use two or more virtual displaysg use PowerPoint 2003 or later or limit the number of virtual displays toone before displaying the Slide Show
Applications are no longer displayed from the computer screen when the multi-screen display function is executed
Check R em ed y
Is another application running on the virtual display g
For Windows
When EPSON Virtual Display is installed another application sometimes runs on the virtual display In this case setEPSON Virtual Display to Off in Screen properties
The mouse cursor is not displayed on the computer screen
Check R em ed y
Is EPSON Virtual Display installed
For Windows
The mouse cursor was moved onto the virtual display g When the virtual display checkbox is cleared on the Add-Remove EPSON Virtual Display screen the mouse pointer returns to the screen display area
When connecting with EasyMP Network Projection the image is not displayed or the image is slow to appear
Ch eck R em ed y
Did you try to play back movies with Media Player or try to operatethe screen saver preview
Depending on the computer the movie playback screen in Media Player may not be displayed and the screen saverpreview may not be displayed normally
Troubleshooting 42
8182019 Easy Mp Network Op Guide
httpslidepdfcomreaderfulleasy-mp-network-op-guide 4247
Ch eck R em ed y
Is WEP encryption effective or are multiple projectors connected The display speed decreases when WEP encryption is effective or multiple projectors are connectedHave you enabled DHCP When DHCP is set to On in Advanced Connection Mode if an available DHCP server is not found it may take some
time to enter LAN standby status
Is Wireless LAN 80211gb being used in Quick ConnectionMode
Depending on the electromagnetic wave environment there are times when the image and sound for movies may stop When using the movie sending function use Advanced Connection Mode or Wireless LAN 80211a in Quick Connection Mode
When a connection is made using EasyMP Network Projection a PowerPoint Slide Show cannot be started
Ch eck R em ed y
Was EasyMP Network Projection started while PowerPoint wasrunning
For Windows
When connecting with EasyMP Network Projection make sure you close PowerPoint first Slide Show might not runif connecting while PowerPoint is running
When a connection has been made using EasyMP Network Projection the screen will not be refreshed when using an Office application
Ch eck R em ed y
Is the mouse moved continuously When you stop moving the mouse cursor the screen is updated If the screen does not update quickly stop moving themouse cursor
Error message when starting up EasyMP Network Projection
E r r or M essa g es R em ed y
Connection to the projector failed Try to connect again If it still does not connect check the network settings on the computer and the network settingsfor the projector
For details on the network settings to be made on the projector sees Users Guide Network Menu
The keyword does not match Re-enter the keyword displayed onthe projector screen
Check the Projector Keyword displayed on the LAN standby screen and enter the Projector Keyword
8182019 Easy Mp Network Op Guide
httpslidepdfcomreaderfulleasy-mp-network-op-guide 4347
Troubleshooting 44
8182019 Easy Mp Network Op Guide
httpslidepdfcomreaderfulleasy-mp-network-op-guide 4447
Network settings are not restored after cutting the connection to the computer with EasyMP Network Projection
Check R em ed y
Are you manually connecting to a Wireless LAN when thecomputer starts up
Quick Connection Mode
Try connecting to the Wireless LAN manually
Glossary 45
8182019 Easy Mp Network Op Guide
httpslidepdfcomreaderfulleasy-mp-network-op-guide 4547
This section briefly explains the difficult terms that are not explained in the text of this guide For details refer to other commercially available publications
A d h o c
A method of Wireless LAN connection that communicates with wireless LAN clients without using an access point It is not possible to communicatewith two or more devices simultaneously
M A C A d d r e ss
An abbreviation of Media Access Control The MAC Address is an ID number unique to each network adapter A unique number is assigned to eachnetwork adapter and data is transmitted between network adapters based on this identification
S V G A
A type of video signal with a resolution of 800 (horizontal) ^600 (vertical) dots that is used byIBM PCAT-compatible computers
S X G A
A type of video signal with a resolution of 1280 (horizontal) ^ 1024 (vertical) dots that is used by IBM PCAT-compatible computers
U X G A
A type of video signal with a resolution of 1600 (horizontal) ^ 1200 (vertical) dots that is used by IBM PCAT-compatible computers
V G A
A type of video signal with a resolution of 640 (horizontal) ^ 480 (vertical) dots that is used by IBM PCAT-compatible computers
V i r tual D i s p lay
The screen for one computer is output to multiple displays A large virtual screen can be created by using multiple displays
X G A
A type of video signal with a resolution of 1024 (horizontal) ^ 768 (vertical) dots that is used by IBM PCAT-compatible computers
8182019 Easy Mp Network Op Guide
httpslidepdfcomreaderfulleasy-mp-network-op-guide 4647
8182019 Easy Mp Network Op Guide
httpslidepdfcomreaderfulleasy-mp-network-op-guide 4747
8182019 Easy Mp Network Op Guide
httpslidepdfcomreaderfulleasy-mp-network-op-guide 3847
If any of the following problems occur refer to the pages given for eachproblem
Problems concerning network functions
Cannot connect to the projector s p39
When a connection is made using EasyMP Network Projection the projectedimage remains as it is and a connection cannot be made from anothercomputer s p39
The projector is not found when EasyMP Network Projection is
started s
p39Cannot connect in Advanced Connection Mode or Wired LANconnection s p40
The Slide Show cannot be displayed on the desired display when the multi-screendisplay function is being executed s p41
Applications are no longer displayed from the computer screen when the multi-screen display function is executed s p41
The mouse cursor is not displayed on the computer screen s
p41When connecting with EasyMP Network Projection the image is not displayed orthe image is slow to appear s p41
When a connection is made using EasyMP Network Projection a PowerPointSlide Show cannot be started s p42
When a connection has been made using EasyMP Network Projection the screenwill not be refreshed when using an Office application s p42
Error message when starting up EasyMP Network Projection s
p42Network settings are not restored after cutting the connection to the computerwith EasyMP Network Projection s p44
Troubleshooting 39
8182019 Easy Mp Network Op Guide
httpslidepdfcomreaderfulleasy-mp-network-op-guide 3947
Problems Concerning Network Functions
Cannot connect to the projector
Check the message on the screen and then apply the following countermeasures
E r r or M essa g es R em ed y
The application version used is not supported Install the latest version of the application on your computer
Install EasyMP Network Projection from the EPSON Projector Software for Meeting amp Monitoring CD-ROMsupplied with the projector
When a connection is made using EasyMP Network Projection the projected image remains as it is and a connection cannot be madefrom another computer
Ch eck R em ed y
Did the presenter leave the conference room without cutting off thenetwork connection
With EasyMP Network Projection the connection with the computer that was previously connected can be cut off when another computer tries to connect with the projector and it connects with the computer that is trying to
connectTherefore when a Projector Keyword is not set for the projector or if you know the Projector Keyword you can cutoff the current connection and if you perform a connection operation you can connect to the projector
When a Projector Keyword is set for the projector if you do not know the Projector Keyword restart the projector andreconnect
The projector is not found when EasyMP Network Projection is started
Check R em ed y
Is the Wireless LAN unit connected
For Wireless LAN
Check that the optional Wireless LAN unit is securely connected
Is the Network Configuration screen from the Configurationmenu displayed on the projector
When the Network Configuration screen is displayed on the projector network connection for EasyMP Network Projection is disabled Close network settings on the projector and return to the LAN standby screen
Are the computers LAN card and the built-in LAN function
available
Check that LAN is valid by checking Control Panel - System - Hardware in the device manager and so on
Troubleshooting 40
8182019 Easy Mp Network Op Guide
httpslidepdfcomreaderfulleasy-mp-network-op-guide 4047
Check R em ed y
Is the SSID the same as that of the access pointQuick Connection Mode
Set an SSID that is different from that of the access points
Users Guide Network Menu
Is the DHCP function for Wired LAN turned On
Quick Connection Mode
Turn Off the DHCP setting for Wired LAN from the Configuration Menus Users Guide Network Menu
Was the network adapter used selected correctly with EasyMPNetwork Projection
If the computer has multiple LAN environments it cannot connect unless the network adapter is selected correctlyWhen using a computer running Windows start EasyMP Network Projection and select the network adapter you areusing from Set options - Switch LANs p33
For Wireless LAN connection is the Wireless LAN setting enabledwhen the computer is in power save mode
Enable the Wireless LAN
Are there any obstacles between the access point and the computeror projector
For Wireless LAN
Sometimes the electromagnetic wave situation prevents the projector from being found in a search Check for any obstacles between the access point and the computer or projector and change their position to improve theelectromagnetic wave situation
Is the computers Wireless LAN electromagnetic wave set to low Set the electromagnetic wave strength to maximum
Does the Wireless LAN conform to 80211g 80211b or 80211a It is only compatible with standards 80211g 80211b and 80211a and not with other standards such as 80211
Is the firewall turned off or has the firewall been registered as anexception
When you do not wish to turn off the firewall or register the firewall as an exception make the necessary settings toopen the ports
The ports used by EasyMP Network Projection are 3620 3621 and 3629
Is the network cable connected correctly
For Wired LAN
Check that the network cable is connected correctly Reconnect it if it is not connected or not connected properly
Cannot connect in Advanced Connection Mode or Wired LAN connection
Check R em ed y
Is the SSID setting different Set the computer the access point and the projector to the same SSIDs Users Guide Network Menu
Is the same WEP key set When selecting WEP from Security set the access point the computer and the projector to the same WEP keys Users Guide Network Menu
Are the connection denial functions such as MAC Addressg
restrictions and port restrictions set correctly at the access point Set the projector to allow connections from the access point
Troubleshooting 41
8182019 Easy Mp Network Op Guide
httpslidepdfcomreaderfulleasy-mp-network-op-guide 4147
Check R em ed y
Are the IP address the Subnet Mask and the Gateway Address forthe access point and the projector set correctly When not using a DHCP adjust each settings
Users Guide Network Menu
Are the access point and the projectors subnet different Select Manual search from EasyMP Network Projection specify the IP address and connects p28
The Slide Show cannot be displayed on the desired display when the multi-screen display function is being executed
Check R em ed y
Are you using PowerPoint 2002 or an earlier version
For Windows
To set and use two or more virtual displaysg use PowerPoint 2003 or later or limit the number of virtual displays toone before displaying the Slide Show
Applications are no longer displayed from the computer screen when the multi-screen display function is executed
Check R em ed y
Is another application running on the virtual display g
For Windows
When EPSON Virtual Display is installed another application sometimes runs on the virtual display In this case setEPSON Virtual Display to Off in Screen properties
The mouse cursor is not displayed on the computer screen
Check R em ed y
Is EPSON Virtual Display installed
For Windows
The mouse cursor was moved onto the virtual display g When the virtual display checkbox is cleared on the Add-Remove EPSON Virtual Display screen the mouse pointer returns to the screen display area
When connecting with EasyMP Network Projection the image is not displayed or the image is slow to appear
Ch eck R em ed y
Did you try to play back movies with Media Player or try to operatethe screen saver preview
Depending on the computer the movie playback screen in Media Player may not be displayed and the screen saverpreview may not be displayed normally
Troubleshooting 42
8182019 Easy Mp Network Op Guide
httpslidepdfcomreaderfulleasy-mp-network-op-guide 4247
Ch eck R em ed y
Is WEP encryption effective or are multiple projectors connected The display speed decreases when WEP encryption is effective or multiple projectors are connectedHave you enabled DHCP When DHCP is set to On in Advanced Connection Mode if an available DHCP server is not found it may take some
time to enter LAN standby status
Is Wireless LAN 80211gb being used in Quick ConnectionMode
Depending on the electromagnetic wave environment there are times when the image and sound for movies may stop When using the movie sending function use Advanced Connection Mode or Wireless LAN 80211a in Quick Connection Mode
When a connection is made using EasyMP Network Projection a PowerPoint Slide Show cannot be started
Ch eck R em ed y
Was EasyMP Network Projection started while PowerPoint wasrunning
For Windows
When connecting with EasyMP Network Projection make sure you close PowerPoint first Slide Show might not runif connecting while PowerPoint is running
When a connection has been made using EasyMP Network Projection the screen will not be refreshed when using an Office application
Ch eck R em ed y
Is the mouse moved continuously When you stop moving the mouse cursor the screen is updated If the screen does not update quickly stop moving themouse cursor
Error message when starting up EasyMP Network Projection
E r r or M essa g es R em ed y
Connection to the projector failed Try to connect again If it still does not connect check the network settings on the computer and the network settingsfor the projector
For details on the network settings to be made on the projector sees Users Guide Network Menu
The keyword does not match Re-enter the keyword displayed onthe projector screen
Check the Projector Keyword displayed on the LAN standby screen and enter the Projector Keyword
8182019 Easy Mp Network Op Guide
httpslidepdfcomreaderfulleasy-mp-network-op-guide 4347
Troubleshooting 44
8182019 Easy Mp Network Op Guide
httpslidepdfcomreaderfulleasy-mp-network-op-guide 4447
Network settings are not restored after cutting the connection to the computer with EasyMP Network Projection
Check R em ed y
Are you manually connecting to a Wireless LAN when thecomputer starts up
Quick Connection Mode
Try connecting to the Wireless LAN manually
Glossary 45
8182019 Easy Mp Network Op Guide
httpslidepdfcomreaderfulleasy-mp-network-op-guide 4547
This section briefly explains the difficult terms that are not explained in the text of this guide For details refer to other commercially available publications
A d h o c
A method of Wireless LAN connection that communicates with wireless LAN clients without using an access point It is not possible to communicatewith two or more devices simultaneously
M A C A d d r e ss
An abbreviation of Media Access Control The MAC Address is an ID number unique to each network adapter A unique number is assigned to eachnetwork adapter and data is transmitted between network adapters based on this identification
S V G A
A type of video signal with a resolution of 800 (horizontal) ^600 (vertical) dots that is used byIBM PCAT-compatible computers
S X G A
A type of video signal with a resolution of 1280 (horizontal) ^ 1024 (vertical) dots that is used by IBM PCAT-compatible computers
U X G A
A type of video signal with a resolution of 1600 (horizontal) ^ 1200 (vertical) dots that is used by IBM PCAT-compatible computers
V G A
A type of video signal with a resolution of 640 (horizontal) ^ 480 (vertical) dots that is used by IBM PCAT-compatible computers
V i r tual D i s p lay
The screen for one computer is output to multiple displays A large virtual screen can be created by using multiple displays
X G A
A type of video signal with a resolution of 1024 (horizontal) ^ 768 (vertical) dots that is used by IBM PCAT-compatible computers
8182019 Easy Mp Network Op Guide
httpslidepdfcomreaderfulleasy-mp-network-op-guide 4647
8182019 Easy Mp Network Op Guide
httpslidepdfcomreaderfulleasy-mp-network-op-guide 4747

8182019 Easy Mp Network Op Guide
httpslidepdfcomreaderfulleasy-mp-network-op-guide 4147
Check R em ed y
Are the IP address the Subnet Mask and the Gateway Address forthe access point and the projector set correctly When not using a DHCP adjust each settings
Users Guide Network Menu
Are the access point and the projectors subnet different Select Manual search from EasyMP Network Projection specify the IP address and connects p28
The Slide Show cannot be displayed on the desired display when the multi-screen display function is being executed
Check R em ed y
Are you using PowerPoint 2002 or an earlier version
For Windows
To set and use two or more virtual displaysg use PowerPoint 2003 or later or limit the number of virtual displays toone before displaying the Slide Show
Applications are no longer displayed from the computer screen when the multi-screen display function is executed
Check R em ed y
Is another application running on the virtual display g
For Windows
When EPSON Virtual Display is installed another application sometimes runs on the virtual display In this case setEPSON Virtual Display to Off in Screen properties
The mouse cursor is not displayed on the computer screen
Check R em ed y
Is EPSON Virtual Display installed
For Windows
The mouse cursor was moved onto the virtual display g When the virtual display checkbox is cleared on the Add-Remove EPSON Virtual Display screen the mouse pointer returns to the screen display area
When connecting with EasyMP Network Projection the image is not displayed or the image is slow to appear
Ch eck R em ed y
Did you try to play back movies with Media Player or try to operatethe screen saver preview
Depending on the computer the movie playback screen in Media Player may not be displayed and the screen saverpreview may not be displayed normally
Troubleshooting 42
8182019 Easy Mp Network Op Guide
httpslidepdfcomreaderfulleasy-mp-network-op-guide 4247
Ch eck R em ed y
Is WEP encryption effective or are multiple projectors connected The display speed decreases when WEP encryption is effective or multiple projectors are connectedHave you enabled DHCP When DHCP is set to On in Advanced Connection Mode if an available DHCP server is not found it may take some
time to enter LAN standby status
Is Wireless LAN 80211gb being used in Quick ConnectionMode
Depending on the electromagnetic wave environment there are times when the image and sound for movies may stop When using the movie sending function use Advanced Connection Mode or Wireless LAN 80211a in Quick Connection Mode
When a connection is made using EasyMP Network Projection a PowerPoint Slide Show cannot be started
Ch eck R em ed y
Was EasyMP Network Projection started while PowerPoint wasrunning
For Windows
When connecting with EasyMP Network Projection make sure you close PowerPoint first Slide Show might not runif connecting while PowerPoint is running
When a connection has been made using EasyMP Network Projection the screen will not be refreshed when using an Office application
Ch eck R em ed y
Is the mouse moved continuously When you stop moving the mouse cursor the screen is updated If the screen does not update quickly stop moving themouse cursor
Error message when starting up EasyMP Network Projection
E r r or M essa g es R em ed y
Connection to the projector failed Try to connect again If it still does not connect check the network settings on the computer and the network settingsfor the projector
For details on the network settings to be made on the projector sees Users Guide Network Menu
The keyword does not match Re-enter the keyword displayed onthe projector screen
Check the Projector Keyword displayed on the LAN standby screen and enter the Projector Keyword
8182019 Easy Mp Network Op Guide
httpslidepdfcomreaderfulleasy-mp-network-op-guide 4347
Troubleshooting 44
8182019 Easy Mp Network Op Guide
httpslidepdfcomreaderfulleasy-mp-network-op-guide 4447
Network settings are not restored after cutting the connection to the computer with EasyMP Network Projection
Check R em ed y
Are you manually connecting to a Wireless LAN when thecomputer starts up
Quick Connection Mode
Try connecting to the Wireless LAN manually
Glossary 45
8182019 Easy Mp Network Op Guide
httpslidepdfcomreaderfulleasy-mp-network-op-guide 4547
This section briefly explains the difficult terms that are not explained in the text of this guide For details refer to other commercially available publications
A d h o c
A method of Wireless LAN connection that communicates with wireless LAN clients without using an access point It is not possible to communicatewith two or more devices simultaneously
M A C A d d r e ss
An abbreviation of Media Access Control The MAC Address is an ID number unique to each network adapter A unique number is assigned to eachnetwork adapter and data is transmitted between network adapters based on this identification
S V G A
A type of video signal with a resolution of 800 (horizontal) ^600 (vertical) dots that is used byIBM PCAT-compatible computers
S X G A
A type of video signal with a resolution of 1280 (horizontal) ^ 1024 (vertical) dots that is used by IBM PCAT-compatible computers
U X G A
A type of video signal with a resolution of 1600 (horizontal) ^ 1200 (vertical) dots that is used by IBM PCAT-compatible computers
V G A
A type of video signal with a resolution of 640 (horizontal) ^ 480 (vertical) dots that is used by IBM PCAT-compatible computers
V i r tual D i s p lay
The screen for one computer is output to multiple displays A large virtual screen can be created by using multiple displays
X G A
A type of video signal with a resolution of 1024 (horizontal) ^ 768 (vertical) dots that is used by IBM PCAT-compatible computers
8182019 Easy Mp Network Op Guide
httpslidepdfcomreaderfulleasy-mp-network-op-guide 4647
8182019 Easy Mp Network Op Guide
httpslidepdfcomreaderfulleasy-mp-network-op-guide 4747
8182019 Easy Mp Network Op Guide
httpslidepdfcomreaderfulleasy-mp-network-op-guide 4347
Troubleshooting 44
8182019 Easy Mp Network Op Guide
httpslidepdfcomreaderfulleasy-mp-network-op-guide 4447
Network settings are not restored after cutting the connection to the computer with EasyMP Network Projection
Check R em ed y
Are you manually connecting to a Wireless LAN when thecomputer starts up
Quick Connection Mode
Try connecting to the Wireless LAN manually
Glossary 45
8182019 Easy Mp Network Op Guide
httpslidepdfcomreaderfulleasy-mp-network-op-guide 4547
This section briefly explains the difficult terms that are not explained in the text of this guide For details refer to other commercially available publications
A d h o c
A method of Wireless LAN connection that communicates with wireless LAN clients without using an access point It is not possible to communicatewith two or more devices simultaneously
M A C A d d r e ss
An abbreviation of Media Access Control The MAC Address is an ID number unique to each network adapter A unique number is assigned to eachnetwork adapter and data is transmitted between network adapters based on this identification
S V G A
A type of video signal with a resolution of 800 (horizontal) ^600 (vertical) dots that is used byIBM PCAT-compatible computers
S X G A
A type of video signal with a resolution of 1280 (horizontal) ^ 1024 (vertical) dots that is used by IBM PCAT-compatible computers
U X G A
A type of video signal with a resolution of 1600 (horizontal) ^ 1200 (vertical) dots that is used by IBM PCAT-compatible computers
V G A
A type of video signal with a resolution of 640 (horizontal) ^ 480 (vertical) dots that is used by IBM PCAT-compatible computers
V i r tual D i s p lay
The screen for one computer is output to multiple displays A large virtual screen can be created by using multiple displays
X G A
A type of video signal with a resolution of 1024 (horizontal) ^ 768 (vertical) dots that is used by IBM PCAT-compatible computers
8182019 Easy Mp Network Op Guide
httpslidepdfcomreaderfulleasy-mp-network-op-guide 4647
8182019 Easy Mp Network Op Guide
httpslidepdfcomreaderfulleasy-mp-network-op-guide 4747

8182019 Easy Mp Network Op Guide
httpslidepdfcomreaderfulleasy-mp-network-op-guide 4547
This section briefly explains the difficult terms that are not explained in the text of this guide For details refer to other commercially available publications
A d h o c
A method of Wireless LAN connection that communicates with wireless LAN clients without using an access point It is not possible to communicatewith two or more devices simultaneously
M A C A d d r e ss
An abbreviation of Media Access Control The MAC Address is an ID number unique to each network adapter A unique number is assigned to eachnetwork adapter and data is transmitted between network adapters based on this identification
S V G A
A type of video signal with a resolution of 800 (horizontal) ^600 (vertical) dots that is used byIBM PCAT-compatible computers
S X G A
A type of video signal with a resolution of 1280 (horizontal) ^ 1024 (vertical) dots that is used by IBM PCAT-compatible computers
U X G A
A type of video signal with a resolution of 1600 (horizontal) ^ 1200 (vertical) dots that is used by IBM PCAT-compatible computers
V G A
A type of video signal with a resolution of 640 (horizontal) ^ 480 (vertical) dots that is used by IBM PCAT-compatible computers
V i r tual D i s p lay
The screen for one computer is output to multiple displays A large virtual screen can be created by using multiple displays
X G A
A type of video signal with a resolution of 1024 (horizontal) ^ 768 (vertical) dots that is used by IBM PCAT-compatible computers
8182019 Easy Mp Network Op Guide
httpslidepdfcomreaderfulleasy-mp-network-op-guide 4647
8182019 Easy Mp Network Op Guide
httpslidepdfcomreaderfulleasy-mp-network-op-guide 4747
8182019 Easy Mp Network Op Guide
httpslidepdfcomreaderfulleasy-mp-network-op-guide 4647
8182019 Easy Mp Network Op Guide
httpslidepdfcomreaderfulleasy-mp-network-op-guide 4747

8182019 Easy Mp Network Op Guide
httpslidepdfcomreaderfulleasy-mp-network-op-guide 4747