e-learning: survival guide for medical educators
TRANSCRIPT

E-LEARNING: SURVIVAL GUIDE FOR MEDICAL EDUCATORS
by
Kadriye O. Lewis, Ed.D Professor of Pediatrics
Director of Evaluation and Program Development Children’s Mercy Hospital, Department of Pediatrics,
UMKC School of Medicine, Kansas City, MO Email: [email protected]
NOVEMBER 12, 2020

Developed by Kadriye O. Lewis, Ed.D
Children's Mercy Hospital, Department of Pediatrics, UMKC School of Medicine, Kansas City, MO
Contents E-LEARNING................................................................................................................................................... 1
The e-Learning Landscape ........................................................................................................................ 1
INSTRUCTIONAL DESIGN IN E-LEARNING ...................................................................................................... 2
Types of Learning and Content in e-Learning Design ............................................................................... 3
Instructional Design and Interactivity Scale for Interactive Module Development ................................. 4
The Four-Pronged Approach for Designing and Evaluating E-learning Modules ..................................... 5
Instructional Design and Interactivity Scale (IDIS) .................................................................................... 6
STEPS IN INTEGRATING E-LEARNING INTO MEDICAL CURRICULA .............................................................. 10
PRACTICAL TOOLS TO DEVELOP E-LEARNING MODULES ........................................................................... 11
Screencast-Based Video Creation Tools.................................................................................................. 11
Creating Your Own Videos Using Screencast-O-Matic ........................................................................... 11
Screencasts and Video Creation Tools: Pros and Cons ........................................................................... 12
Editing Your Screencast: File Format Is Key ............................................................................................ 13
Free Video Editing and Compressing Tools ............................................................................................. 14
Tips for Screencasting: A Checklist ......................................................................................................... 14
Progress Checklist ................................................................................................................................... 16
TED-Ed LESSONS .......................................................................................................................................... 16
How to create a TED-Ed lesson around any TED Talk, or any video on YouTube ................................... 16
A Sample TED-Ed Lesson Template ......................................................................................................... 17
TED-Ed Rubric .......................................................................................................................................... 18
Assignment Design .................................................................................................................................. 18
LECTURE AND FLIPPED LECTURE PLANNING .............................................................................................. 19
A Sample Flipped Lecture Design Template ........................................................................................... 19
Flipped Lecture Planning Grid ................................................................................................................. 20
Lecture Storyboard Template ................................................................................................................. 20
Instructional Design Plan: Castle Top Template for Creating an Instructional Strategy......................... 21
Castle Top Template (Fink, 2003) ........................................................................................................... 22
THE SKILLS OF LECTURING SURVEY ............................................................................................................. 22
HOW TO MAKE EVERY LESSON INTERACTIVE USING NEARPOD ................................................................. 25
TIPS FOR NOON CONFERENCES AND VIRTUAL TEACHING ......................................................................... 26
References .............................................................................................................................................. 27

1
Developed by Kadriye O. Lewis, Ed.D
Children's Mercy Hospital, Department of Pediatrics, UMKC School of Medicine, Kansas City, MO
“Someday, in the distant future, our grandchildren's grandchildren will develop a new equivalent of our classrooms. They will spend many hours in front of boxes with fires glowing within. May
they have the wisdom to know the difference between light and knowledge.” ~ Plato E-LEARNING Due to pandemic circumstances, medical training has partially moved online in an unexpected way. Of course, this has been a disappointment and the most tumultuous year for most medical professionals and learners. Part of this frustration rooted from not having any backup plan for “traditional” classroom medical teaching and learning methods. Now it is high time that we should educate ourselves in developing a progressive technology-infused learning environment as well as making commitment for change that may solve some of the barriers in medical education during this pandemic time. This survival guide will help you understand the nature of e-learning and develop effective e-learning materials tailored to your learners’ needs.
The e-Learning Landscape E-learning is an umbrella term for educational content that is delivered via electronic technologies. E-learning or Web-based learning can be divided into two categories: Synchronous (real-time) or asynchronous (not time dependent) learning. Also, when we look at this landscape, we see three domains regarding the format of e-learning.
1. Self-directed learning: It is all about transferring the onus of learning to the learner (rather than the instructor/teacher). Learners take initiative and responsibility for their own learning.
2. Instructor-led model: Online courses are the instructor-led model. That means, there is an instructor to facilitate the course and provide feedback to learners. Instructor presence, learner presence and social presence are key factors to determine the success of online learning.
3. Collaborative format: Collaborative learning can occur peer-to-peer or in larger groups of learners working together to solve a problem, complete a task, or create a product. Wikis, blogs and other collaborative platforms enable learners to create their own content in an online environment.
Except for these three categories of learning delivery, two sub-categories have emerged to deliver and manage learning as below:

2
Develop by Kadriye O. Lewis, Ed.D - Children's Mercy Hospital & UMKC School of Medicine, Kansas City, MO
• Facilitated Model: This method of learning requires learners to take more control of their learning. Instructor’s role is a facilitator or organizer who provides learning materials, resources, and support to learners. This learning approach is also called blended or flipped learning that combines elements of both learners’ engagement and instructor-led model. Before the actual classroom meeting, learners prepare themselves through content online by watching video lectures, readings, or complete specific assignments. Classroom time is spent for hands-on activities, discussion, and/or problem-solving activities. Instructor interaction with learners is more personalized with guidance instead of lecturing. In this way, learners apply concepts and engage creatively in the subject matter. Here are the benefits of flipped classroom:
o Provides learners with lessons and content more accessible o Allows us deliver learning materials in a variety of formats (multisensory) o Allows learners to have more control to capture key content (able to pause/
rewind/ replay) o Promotes learner-centered active learning and collaboration o Help learners establish spaces and time frames that permit them to interact and
reflect on their learning as needed. o Provides learners with different ways to learn content and demonstrate mastery. o Allows instructor to know their learners better o Provides opportunity for differentiated learning o Enables learners to become independent learners o Promotes active learning- focused on developing higher order skills o Promotes peer interaction and collaboration o Allows individuals to interact with content prior to class time o Provides learners with an opportunity to get more individualized attention o Helps learners to become self-directed in their learning o Increases efficiency by maximizing class time
• Embedded Model: Embedded instruction uses short teaching episodes or structured on-the-job learning activities that promote learning while doing. This learning approach is also called “just-in-time learning” that provides need-related training or help, and performance support systems be readily available exactly when and how it is needed by the learner.
M-learning and game-based learning are not included any categories since they are still emerging in education. INSTRUCTIONAL DESIGN IN E-LEARNING Instructional design is the systematic process of translating general principles of learning and instruction into plans for instructional materials and learning. Instructional design process consists of determining the needs of the learners, defining the end goals and objectives of instruction, designing and planning assessment tasks, and designing teaching and learning activities to ensure the quality of instruction. There are multiple benefits of good instructional design, some of which include:
• providing a clear roadmap; • maximizing learner engagement; • assigning the right content at the right time; • providing evidence-based methodologies to help learners learn; and • delivering measurable results.

3
Develop by Kadriye O. Lewis, Ed.D - Children's Mercy Hospital & UMKC School of Medicine, Kansas City, MO
Types of Learning and Content in e-Learning Design Traditionally, most e-learning courses use videos, text-based materials, visual diagrams, embedded quizzes, and/or pre/posttest. However, with the advanced technologies, the recent trends in e-learning design has shown massive growth in the delivery of dynamic instruction/ educational contents that is more engaging, interactive, and memorable to keep learners engaged in numerous ways. The following are some design examples that are used in e-learning development:
• Creating branching scenarios
• Emotionally connecting with compelling stories
• Developing interactive online presentations
• Turning case studies into immersive e-learning simulations
• Designing a story-centered serious game
• Producing character-driven e-learning videos
• Creating image-rich infographics When we develop educational content, we need to think about the types of learning and its purpose. Here are some categories of learning:
• Initial Learning: You apply this learning approach when you want to familiarize your learners with a new topic or want them acquire skills and knowledge for the first time on a specific topic.
• Continued Learning: This continuous learning requires self-motivation and persistence in acquiring knowledge, competencies and critical thinking skills that include discovering new ways of relating to previous knowledge in a particular domain to develop future opportunities. This learning is also referred as lifelong learning, which forms part of our personal and professional development to reach our own full potential.
• Remedial Learning: This learning strategy is used to assist learners to achieve expected competencies in core academic skills as well as targeting learners whose knowledge and skills have decayed. Specific remedial learning strategies are determined based on the identified needs of learners or learning difficulties experienced by challenged learners to form the foundation for learning a subject matter in greater details.
• Upgraded Learning: This learning approach aims to promote learning moving to a higher level of competence in skills and knowledge already acquired. Remember that Bloom’s six levels of hierarchical model of cognitive learning, from the simple recall or recognition of facts, as the lowest level, through increasingly more complex and abstract mental levels, to the highest order thinking skills which is classified as evaluation.
• Transfer Learning: This learning enables us to transfer skills and knowledge learned in one particular domain or context from completing one task to solve a different related problem. Transfer learning should not be confused with “transformational learning” since there is a “a change of state” involved related to what learning produces (Njiro, 2014). In an instructional sense, transforming is the process of deep, constructive, and meaningful learning through critically questioning assumptions, expectations, and context to achieve new perspectives that result in producing far-reaching changes in the learners than does learning in general (Njiro, 2014).

4
Develop by Kadriye O. Lewis, Ed.D - Children's Mercy Hospital & UMKC School of Medicine, Kansas City, MO
Instructional Design and Interactivity Scale for Interactive Module Development As we are talking about instructional design spectrum of education, the following Instructional Design and Interactivity Scale (IDIS) will help you to determine the instructional design features and quality of interactive modules. The IDS tool distinguishes an ideal instructional design component for a module in six key domains as described below:
1. Content Design: Content design comes in various forms (audio, video, text) uniting with the goals and objectives, and utilizes multiple teaching strategies to stimulate, engage, and motivate the learners. Content design also includes organization and sequential relationship of materials, including visual illustration of specific examples with the right level of vocabulary and terminology for the learners.
2. Assessment Items: Any questionnaires, tests, or other activities/tasks to measure critical content elements embedded in a module. The purpose is to evaluate whether a learner has achieved the objectives that have been established.
3. Feedback Mechanism: A system that provides a learner with specific, immediate feedback after completion of a task within a module whether the answers are correct or incorrect. The purpose is to guide learners toward understanding the content knowledge through questions or visual or textual clues.
4. Media Design: A design concerned with applying images, tactile-audio-visual elements, and videos to create a multisensory presentation of information that explains the core concepts of a selected subject to be taught. Media design also uses various structural forms to provide learners with a scaffolded, interactive, cognitive, and perceptual motivational learning experience.
5. Visual Design: A design that focuses on the aesthetic of a module and its related materials by strategically implementing images, graphics, colors, fonts, space, and other elements (screen titles, symbols or icons, audio narration, and videos) to improve the learner’s experience during the learning process.
6. Navigation: A user interface of a module that allows learners to identify their learning path. It is like a road map to all the different areas and information contained within the module, so learners always know where they are in the module with a consistent navigation scheme.
+ Interactivity Level: Interactivity is a fundamental aspect of most effective educational module design. The term “interactivity” is described as the dialog that occurs between a human being
IDISContent Design
Assessment Items
Feedback Mechanism
Media Design
Visual Design
Navigation
+ Interactivity
(Lewis et al., 2020)

5
Develop by Kadriye O. Lewis, Ed.D - Children's Mercy Hospital & UMKC School of Medicine, Kansas City, MO
and a computer program. In the e-learning module setting, interactivity refers to exchange of information, responsiveness, and some variation in user control over learning objects that increase learner engagement during the module review/study. We adopted the four levels of interactivity metrics guide below defined by the Virtual College. Now let us look at the four-pronged approach to understand the role of the IDIS tool in e-learning development and evaluation.
The Four-Pronged Approach for Designing and Evaluating E-learning Modules Lewis et al (2020) developed a four-pronged approach as a conceptual framework for evaluating interactive e-learning modules. However, this framework can be used for developing e-learning or any interactive modules to be delivered online. The benefit of using this model helps you gain a deeper understanding of the important variables in e-learning/module design and how to achieve the constructive alignment that illustrates the interrelationship between learning objectives, pedagogical approaches, and assessment of learning or evaluation strategies. The following diagram illustrates the four-pronged approach for designing and evaluating e-learning modules (Lewis et al., 2020):

6
Develop by Kadriye O. Lewis, Ed.D - Children's Mercy Hospital & UMKC School of Medicine, Kansas City, MO
Instructional Design and Interactivity Scale (IDIS) This tool is developed to evaluate the instructional design properties of interactive e-learning modules. The tool is divided into six domains, consisting of 50 items and one additional item for evaluating the level of interactivity for each module. If you have any questions about this form, please contact Kadriye O. Lewis, Ed.D at [email protected]. Evaluator’s Name: Please score each item on a 0 - 2 scale, with 0 = Poor and 2=Excellent.
Criteria Scoring
Content Design Poor (0)
Fair (.50)
Good (1)
Very Good (1.50)
Excellent (2)
1. The level of the content presented is appropriate and relevant to the target audience (e.g., medical or other healthcare professionals).
2. The information is “scaffolded” well to guide learners to complete the sections within the module.
3. The content is stimulating, engaging, motivating, and relevant to the targeted learners.
4. The content is informative and promotes deeper learning.
5. The module uses multiple interactive teaching strategies such as cases, videos, problem-based learning, discovery, and testing with teaching.
6. The vocabulary and terminology used in the module are clear and supported by references or glossaries.
7. The content presented in the module uses visuals such as graphs, pictures, and illustrations.
8. The module summarizes the information to be presented at the beginning of the module.
9. The module summarizes the information at the end of the module.
Assessment Items Poor (0)
Fair (.50)
Good (1)
Very Good (1.50)
Excellent (2)
1. The module includes a pre-and posttest.

7
Develop by Kadriye O. Lewis, Ed.D - Children's Mercy Hospital & UMKC School of Medicine, Kansas City, MO
2. The pre-/posttest and other assessment questions within the module are aligned to the module content and objectives.
3. Assessment items allow repeated or multiple attempts when appropriate.
4. Knowledge assessment questions incorporate interactive graphics, images or videos related to the core concept of the module.
5. The module uses multiple types of questions such as true-false, multiple choice, multiple answers, fill-in the blanks, matching, interactive graphs or drag/drop items, and quick check questions.
6. Assessment items have an appropriate level of rigor and/or demonstrate a progression of cognitive complexity to measure for a range of learners’ thinking and understanding.
7. Assessment items intend to measure critical content elements embedded in the module.
8. The number of questions is well-distributed within the module (not only at the end).
9. The format of the assessment matches the nature of interactive modules with a measurable progress.
Feedback Mechanism Poor (0)
Fair (.50)
Good (1)
Very Good (1.50)
Excellent (2)
1. The module provides immediate feedback after the completion of the pre-test, including correct and incorrect responses.
2. Assessment questions provide immediate explanatory feedback as to why the selected answer is true or false.
3. The module forces learners to find the right answer by giving guided feedback.
4. The module visually highlights/indicates the learner’s correct or incorrect responses to the assessment items.
5. The module provides unique explanations for each wrong answer as feedback.
6. Learning modules guide learners to external resources as feedback to enhance learners’ understanding.

8
Develop by Kadriye O. Lewis, Ed.D - Children's Mercy Hospital & UMKC School of Medicine, Kansas City, MO
7. Overall, the feedback mechanism is interactive, efficient, and guides learners toward understanding the content knowledge through questions.
Media Design Poor (0)
Fair (.50)
Good (1)
Very Good (1.50)
Excellent (2)
1. The module includes clearly narrated presentations during the delivery of the content (if applicable).
2. The narrator introduces the speaker and provides an explanation of the module with a brief introduction, including the sub-sections.
3. The instructions or directions given by the narrator are clear and simple.
4. The images, text, and audio are well-synchronized (sound and written text/video properly overlap) in the module.
5. The learner has the full control of narrators' audio and/or the videos (e.g., stop and start, rewind to a specific segment, or pause on a specific frame).
6. The audio-visual materials/videos work properly on different web browsers.
7. Overall media design elements are integrated in multimodal presentation that explains the core concepts of the module effectively.
Visual Design Poor (0)
Fair (.50)
Good (1)
Very Good (1.50)
Excellent (2)
1. Each page within the module has consistent color coding regarding the title, body of the text, and assessment activities.
2. The module has a consistent font size, color and text format which is easy to read.
3. The module uses captioning and/or bold, italic, and underscored text to highlight organization or important information.
4. The design of each page within the module shows an appealing visual organization (not crowded and text-heavy).
5. Text and audio-visual materials are well-balanced with appropriate whitespace (e.g., presented in aesthetic ways).
6. The positions of audio-visual materials on the screen are easy to follow and appealing to learners.
9
Develop by Kadriye O. Lewis, Ed.D - Children's Mercy Hospital & UMKC School of Medicine, Kansas City, MO
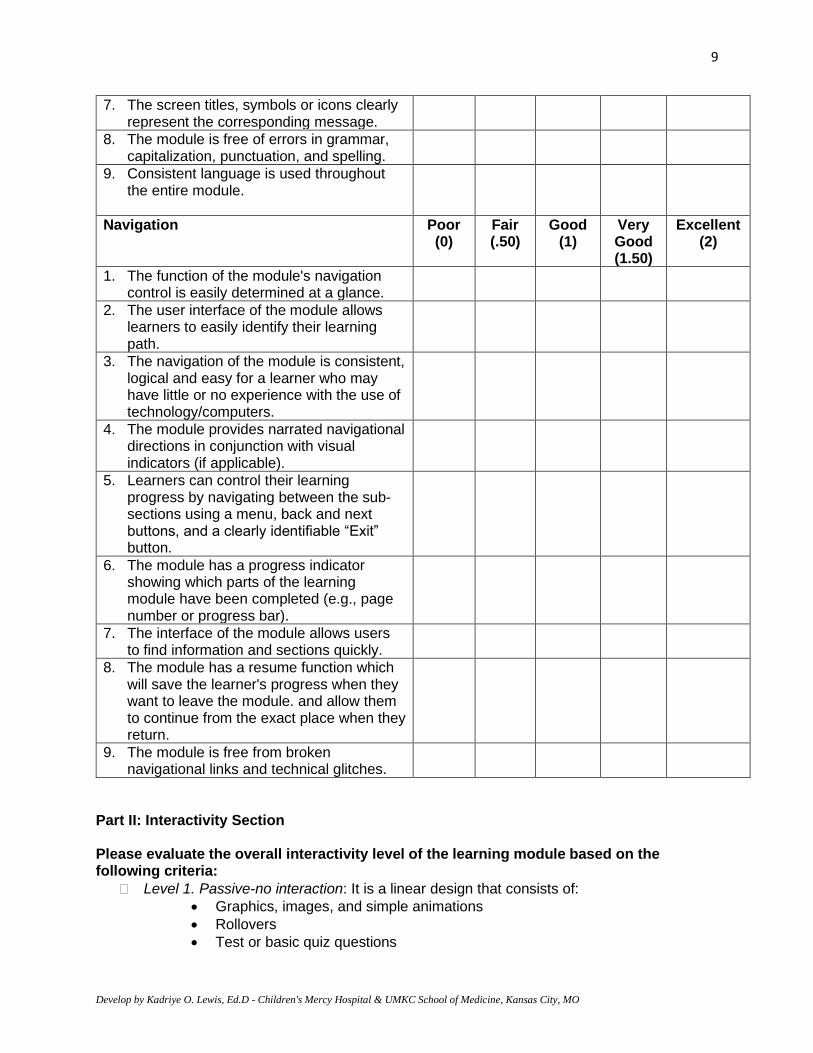
7. The screen titles, symbols or icons clearly represent the corresponding message.
8. The module is free of errors in grammar, capitalization, punctuation, and spelling.
9. Consistent language is used throughout the entire module.
Navigation Poor (0)
Fair (.50)
Good (1)
Very Good (1.50)
Excellent (2)
1. The function of the module's navigation control is easily determined at a glance.
2. The user interface of the module allows learners to easily identify their learning path.
3. The navigation of the module is consistent, logical and easy for a learner who may have little or no experience with the use of technology/computers.
4. The module provides narrated navigational directions in conjunction with visual indicators (if applicable).
5. Learners can control their learning progress by navigating between the sub-sections using a menu, back and next buttons, and a clearly identifiable “Exit” button.
6. The module has a progress indicator showing which parts of the learning module have been completed (e.g., page number or progress bar).
7. The interface of the module allows users to find information and sections quickly.
8. The module has a resume function which will save the learner's progress when they want to leave the module. and allow them to continue from the exact place when they return.
9. The module is free from broken navigational links and technical glitches.
Part II: Interactivity Section Please evaluate the overall interactivity level of the learning module based on the following criteria:
Level 1. Passive-no interaction: It is a linear design that consists of:
• Graphics, images, and simple animations
• Rollovers
• Test or basic quiz questions

10
Develop by Kadriye O. Lewis, Ed.D - Children's Mercy Hospital & UMKC School of Medicine, Kansas City, MO
The learner acts only as an information receiver and cannot interact with resources.
Level 2. Limited interaction: While the design is still basic, learners have more control over their learning with the content and resources such as:
• Clickable animated graphics
• Navigation menus, glossaries, and links to external resources
• Simple exercises (i.e. drag-and-drop, matching, and identification components)
• Audio and video
Level 3. Moderate interaction: The module design is non-linear and includes
• Animated videos
• Customized audio recording
• Simulated exercises where the learners enter data into fields Scenario-based cases
• Custom flash animations where learners can investigate The learner has more control over their learning and perceives the module as a participative and dynamic activity and not just a presentation of content.
Level 4. High level interaction (Full immersion- simulation and game-based learning): The module design includes all the elements of levels 1, 2, and 3, plus recharged interactivity with greater levels of sophistication to keep learners motivated. This nonlinear, multiple paths design for real-time learning uses a variety of advanced multimedia presentations such as:
• Real-time learning
• Gaming technology
• 3D simulations
• Variety of multimedia (i.e. custom videos and interactive 3D objects)
• Digital avatars (Lewis et al., 2020)
STEPS IN INTEGRATING E-LEARNING INTO MEDICAL CURRICULA The following are the four phases of integrating e-learning into the integrated medical curriculum (Dubois & Franson, 2009)
Phases Steps
Phase 1: The idea
• Develop ideas for e-learning
• Establish the need for your innovation
• Recognize applicability for your institute
Phase 2: The planning
• Formulate learning outcomes
• Build the e-learning program prototype based on requirements
• Develop a project team
Phase 3: The implementation • Develop and communicate the integration plan

11
Develop by Kadriye O. Lewis, Ed.D - Children's Mercy Hospital & UMKC School of Medicine, Kansas City, MO
• Determine content
• Integrate the program into courses/modules with regard to practical incorporation, content and assessment
• Assess the program (including costs)
• Assess learning
• Assess the degree of integration (for practical aspects, content, and assessment)
Phase 4: The institutionalization
• Update content continuously
• Review the integration regularly
• Introduce new technology when appropriate
PRACTICAL TOOLS TO DEVELOP E-LEARNING MODULES
Screencast-Based Video Creation Tools Screencast-based video creation tools have emerged as prominent and user-friendly teaching tools that allow us to go far beyond traditional text-based materials and PowerPoint presentations in our teaching online. The unique interactive capabilities of these technologies can be used to capture any instructional activity performed on a computer screen such as providing rotation orientations, digitally recording mini lectures/flipped learning materials, adding audio narration to images or text, and providing assignment and peer feedback. Screencasts can also be utilized for providing step-by-step instruction, explaining a complex concept, or presenting a PowerPoint presentation with narration and multimedia elements. These recordings provide learners an engaging learning experience regardless of instructional modality (e.g., online, blended/flipped teaching, and traditional teaching environments).
Creating Your Own Videos Using Screencast-O-Matic Screencast-o-Matic is totally web-based, and easy to use (https://screencast-o-matic.com/home). It works with both PC and Mac computers. It was used to record the screen for the Presentation Tools demonstration. Here are some pre-recording tips for you:
• Decide what one or two things you want your audience to learn
• Create a storyboard or outline of the content you plan to show or demonstrate and write a script before you begin recording.
• Practice what you will say and show several times until it is smooth
• Make a trial recording and play it back. Are the answers to these questions yes? o Is the purpose of the recording clear? o Does it tell what it will be about at the beginning? o Does it explain or teach what was planned? o Is there a summary at the end? o Is the audio clear?
• Now have a friend or colleague watch it and see if they also answer those questions with a yes.
• Celebrate your success! Reflect on how you could improve it in the future.

12
Develop by Kadriye O. Lewis, Ed.D - Children's Mercy Hospital & UMKC School of Medicine, Kansas City, MO
Screencasts and Video Creation Tools: Pros and Cons Screencast-O-Matic
• Go to the Screencast-O-Matic website, https://screencast-o-matic.com/home
• Screencast-O-Matic is a free tool that enables us to: o record “movies” of our screen with narration o record from our webcam o record both
Pros
• Very user friendly
• Can be used as an online application and installed on your computer to use offline
• Allows you to record in MP4, AVI or FLV file formats
Cons
• 15 minute time limit for recording
• A watermark will appear on your presentation
• There is no editing tool in the free version.
Jing
• Download Jing FREE for Mac or PC at http://jingproject.com/
• Jing is great for… o Screenshots o Tutorials o Troubleshooting
Pros
• Free!
• Works on both Macs and PCs
• Easy to download, learn, and use
• Allows for both image capture and video (screen) capture
Cons
• Recording cannot be cut or edited.
• If you mess up, you have to start over from the beginning.
• Recording stops automatically at 5 minutes.
Panopto
• Pantopod is an easy-to-use lecture capture system (https://www.panopto.com/).
• You can use Panopto to: o record your lectures so that your learners can review them later. o flip your classroom by creating mini-lectures for your learners to watch before
their classes. o record your learners’ presentations. o record talks by guests.
Note: If you have a faculty appointment through UMKC School of Medicine, you can access to Panopto.
Pros
• Panopto can be accessed in a LMS (Blackboard, D2L)
• Presentations can be shared with class
Cons
• Video files can be difficult to download, which makes saving backup copies difficult.

13
Develop by Kadriye O. Lewis, Ed.D - Children's Mercy Hospital & UMKC School of Medicine, Kansas City, MO
• Presentations can be edited within the tool
• Users can search the audio in a presentation for a specific word or phrase
360 Video
• 360 video is an innovative way to capture environments or group activities (https://support.google.com/youtube/answer/6178631?hl=en)
• You can use 360 videos to o give learners an opportunity to discover without restricting their viewpoint o allow learners to explore or become oriented to a new environment o record a large group activity such as a complex team simulation
Pros
• A complete 360 view is obtained so nothing in the scene is omitted
• Learner has full control of view promoting active engagement with environment
• May promote exploration rather than passive learning
• Spatial audio adds to immersion
• Reasonably priced, easy to use, cameras available
Cons
• A 360 video is non-linear in nature and may not be suitable for story-telling
• Some learners may be distracted
• Educator may need to include additional instructions to direct learner’s attention to key points
• Resolution can be low even in HD
• 360 videos are large and require a high bandwidth to stream or download
Editing Your Screencast: File Format Is Key You have several options for editing video files, depending on which tool you use. Screencast-O-Matic The free version does not offer editing, but for $15/ year you can upgrade to Screencast-O-Matic Pro and get access to editing tools. If you wish to just use the free version, save your recording as an MP4 file so that you can import it into an MP4-friendly tool for editing at a later time. Jing The beauty of Jing is its simplicity as a recording tool and the recording time limitations (succinctness). However, Jing does not offer editing tools so you should export your recording in MP4 format and edit in another tool. Panopto Recordings If you create your recording in Panopto, you can use the editing tools contained within the application. However, if you exported your Panopto recording as an MP4 file, you can import it into an MP4-friendly tool for editing later.

14
Develop by Kadriye O. Lewis, Ed.D - Children's Mercy Hospital & UMKC School of Medicine, Kansas City, MO
360 Video A 360 video is delivered as regular video file or stream. It is processed into a spherical video with video stitching software. The interactive 360 video player then remaps it to show only the portion of video that the user is viewing on a mobile phone, computer, or VR headset. Note: Once you export your video file from any of the above recording tools, you will not be able to edit/ manipulate mouse clicks, text, screen captures, etc. Video editing options will be limited to adding/editing audio and adding/deleting video content.
Free Video Editing and Compressing Tools iMovie (Mac) http://www.apple.com/mac/imovie/ Windows Movie Maker 2012 (PC) https://support.microsoft.com/en-us/help/14220/windows-movie-maker-download YouTube Editor https://www.youtube.com/editor Or, look for video editing apps for your mobile devices in the Android and Apple stores. Video Compressing Tool HandBrake: https://handbrake.fr/ Extract Audio from Any Video Using VLC Download VLC from here: http://www.videolan.org/vlc/index.html Then use these steps to extract the audio: http://ccm.net/faq/1266-extract-audio-from-any-video-using-vlc
Tips for Screencasting: A Checklist
Objectives “No wind serves him who addresses his voyage to no certain point.”
Can you list the specific things you expect your viewers to learn from your screencast? What are the main points you wish to focus on? Will your viewers be familiar with the terms you use during the screencast or must you
define those terms as part of the screencast? How will you assess your viewers’ understanding of the material covered?
Planning
“Measure twice, cut once.”
15
Develop by Kadriye O. Lewis, Ed.D - Children's Mercy Hospital & UMKC School of Medicine, Kansas City, MO
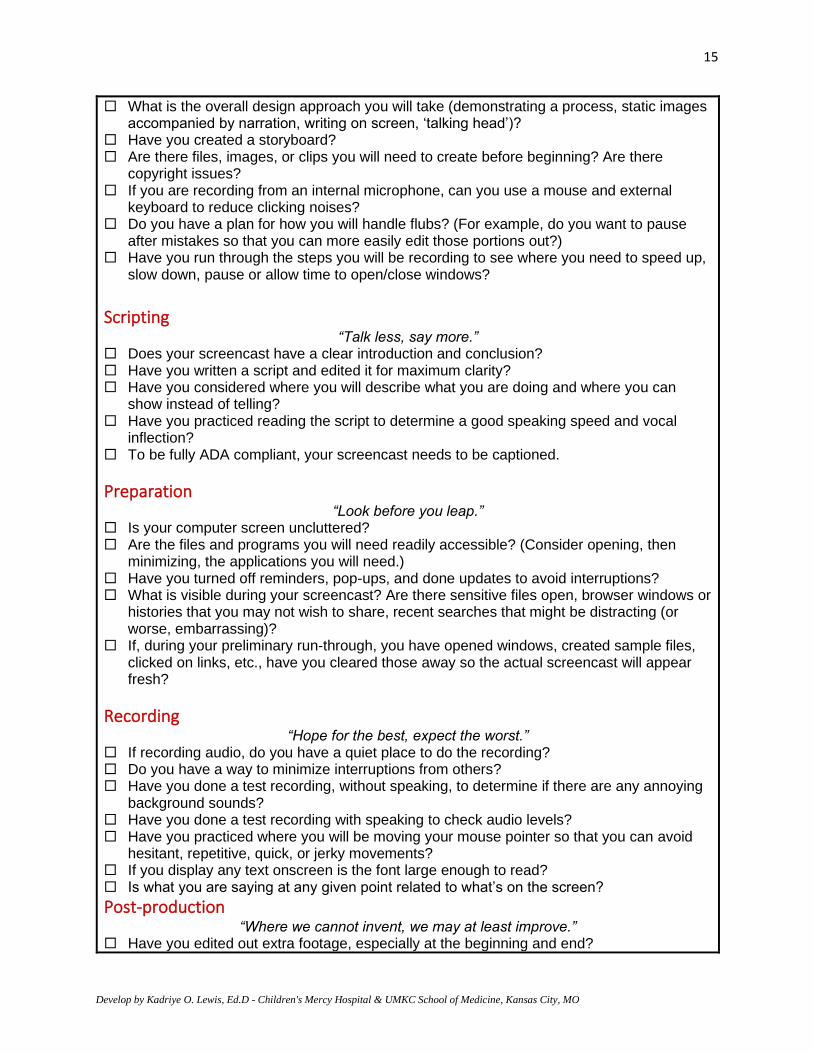
What is the overall design approach you will take (demonstrating a process, static images accompanied by narration, writing on screen, ‘talking head’)?
Have you created a storyboard? Are there files, images, or clips you will need to create before beginning? Are there
copyright issues? If you are recording from an internal microphone, can you use a mouse and external
keyboard to reduce clicking noises? Do you have a plan for how you will handle flubs? (For example, do you want to pause
after mistakes so that you can more easily edit those portions out?) Have you run through the steps you will be recording to see where you need to speed up,
slow down, pause or allow time to open/close windows?
Scripting
“Talk less, say more.” Does your screencast have a clear introduction and conclusion? Have you written a script and edited it for maximum clarity? Have you considered where you will describe what you are doing and where you can
show instead of telling? Have you practiced reading the script to determine a good speaking speed and vocal
inflection? To be fully ADA compliant, your screencast needs to be captioned.
Preparation “Look before you leap.”
Is your computer screen uncluttered? Are the files and programs you will need readily accessible? (Consider opening, then
minimizing, the applications you will need.) Have you turned off reminders, pop-ups, and done updates to avoid interruptions? What is visible during your screencast? Are there sensitive files open, browser windows or
histories that you may not wish to share, recent searches that might be distracting (or worse, embarrassing)?
If, during your preliminary run-through, you have opened windows, created sample files, clicked on links, etc., have you cleared those away so the actual screencast will appear fresh?
Recording “Hope for the best, expect the worst.”
If recording audio, do you have a quiet place to do the recording? Do you have a way to minimize interruptions from others? Have you done a test recording, without speaking, to determine if there are any annoying
background sounds? Have you done a test recording with speaking to check audio levels? Have you practiced where you will be moving your mouse pointer so that you can avoid
hesitant, repetitive, quick, or jerky movements? If you display any text onscreen is the font large enough to read? Is what you are saying at any given point related to what’s on the screen?
Post-production “Where we cannot invent, we may at least improve.”
Have you edited out extra footage, especially at the beginning and end?

16
Develop by Kadriye O. Lewis, Ed.D - Children's Mercy Hospital & UMKC School of Medicine, Kansas City, MO
Do you need any text or drawing overlays to clarify specific points? If you have both speaking and music tracks, are they balanced appropriately? Would zooms and highlights help your screencast? If your screencast is over 15 minutes long are there points where you can split it? Have you checked your captions or overlays for typos? Source: Hope Greenberg, Center for Teaching and Learning, The University of Vermont (UVM), Jan. 2014 www.uvm.edu/
Progress Checklist At the minimum, I have:
Written a script and practiced reading it to determine a good speaking speed and intonation.
A quiet place to record.
An uncluttered computer screen with a neutral background.
Opened and minimized the files and programs I will need so they are readily accessible.
Closed sensitive files and cleared recent searches that might be distracting (or worse, embarrassing).
Turned off reminders, pop-ups, and have updated my applications to avoid interruptions.
Ensured that the fonts for any text I use are clear enough to read after recording (advice for appropriate sizes especially for handhelds).
Decided to use a mouse and external keyboard to reduce clicking noises in the finished video (that usually sound more like hammering than clicking).
Done a test recording with speaking to check audio levels.
Done a test recording to determine if there are any annoying background sounds that can be prevented.
Determined how I will handle "flubs" (for example, if I misspeak, I will pause for several seconds then begin that section again so it will be easy to edit out the flub).
TED-Ed LESSONS
How to create a TED-Ed lesson around any TED Talk, or any video on YouTube Along with screencast technologies, other online open source, free platforms like TED-Ed are available for creating customized lessons using pre-made interactive videos. This powerful platform enables us to share and reuse educational content. Both screencasting and TED-Ed like technologies enhance educational deliveries with multimedia-rich and immersive learning experiences that will help meet different learning needs and enhance knowledge retention across the board. Here are the steps to create a TED-Ed lesson/module online: Step #1: Pick a video
• Visit https://ed.ted.com/videos

17
Develop by Kadriye O. Lewis, Ed.D - Children's Mercy Hospital & UMKC School of Medicine, Kansas City, MO
• Search for any video on YouTube, or simply paste the video's YouTube link (listed or unlisted) into the search bar.
• Select a video from the search results. Step #2: Use the TED-Ed lesson editor to build your lesson
• Create a custom title for your lesson, or just use the title of the YouTube video.
• Use the "Let's Begin" section to add context for your learner(s).
• Add questions (multiple choice or open answer), extra materials (you can include links and pictures) or discussion topics to the video.
Step #3: Publish and share your lesson!
• You can always revisit or revise any lesson draft or published lesson by visiting your TED-Ed activity page.
• You can share any published lesson privately via email or by using the lesson's unique URL. You can also share the lesson more publicly using the social sharing icons. Only individuals with the lesson's link will see your lesson.
• You can edit the settings and sections of your TED-Ed lessons at any time. o If you are ready to get started, but you are not sure what video to use, there is an easy way for you and fellow educators to take the TED-Ed lesson creator for a spin. Simply visit the ever-growing library of featured TED-Ed Lessons, navigate to the subject area you teach, and adapt on of the pre-existing lessons to suit the needs of your learners. If you need any help, you can contact TED support by visiting https://help.ted.com/hc/en-us or email the support team at [email protected] for help.
A Sample TED-Ed Lesson Template
Let’s Begin…
Find a Video
Watch Selected video
Think
Create Questions (Multiple Choice or Open Answer You can have only 15 questions. Remove or exclude a question to free up a slot.
Dig Deeper
Provide context to continue the learning experience and related content to explore (7500 character available)
Discuss
Review Old Discussions Add New Discussions
…..And Finally Leave your students with your closing thoughts or something to ponder (1000 Characters Available)
18
Develop by Kadriye O. Lewis, Ed.D - Children's Mercy Hospital & UMKC School of Medicine, Kansas City, MO
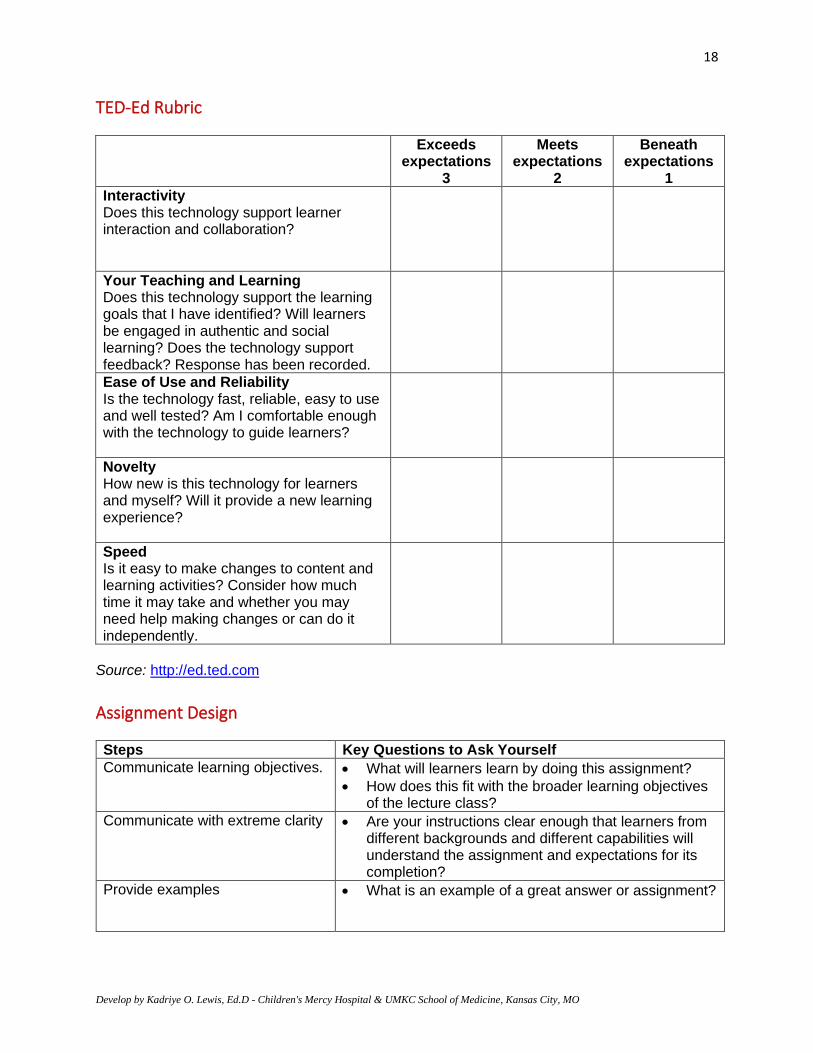
TED-Ed Rubric
Exceeds expectations
3
Meets expectations
2
Beneath expectations
1
Interactivity Does this technology support learner interaction and collaboration?
Your Teaching and Learning Does this technology support the learning goals that I have identified? Will learners be engaged in authentic and social learning? Does the technology support feedback? Response has been recorded.
Ease of Use and Reliability Is the technology fast, reliable, easy to use and well tested? Am I comfortable enough with the technology to guide learners?
Novelty How new is this technology for learners and myself? Will it provide a new learning experience?
Speed Is it easy to make changes to content and learning activities? Consider how much time it may take and whether you may need help making changes or can do it independently.
Source: http://ed.ted.com
Assignment Design
Steps Key Questions to Ask Yourself
Communicate learning objectives. • What will learners learn by doing this assignment?
• How does this fit with the broader learning objectives of the lecture class?
Communicate with extreme clarity
• Are your instructions clear enough that learners from different backgrounds and different capabilities will understand the assignment and expectations for its completion?
Provide examples
• What is an example of a great answer or assignment?

19
Develop by Kadriye O. Lewis, Ed.D - Children's Mercy Hospital & UMKC School of Medicine, Kansas City, MO
LECTURE AND FLIPPED LECTURE PLANNING
A Sample Flipped Lecture Design Template Session Design and Alignment Grid 1. Objectives At the end of this session, the learners will be able to:
• …………………..
• ………………….
• …………………. 2. Assessments: For each objective you define, think about how you will know when your
learners have met those session objectives. 3. Video Presentation/Demonstration/Practice: Define the content to be presented and/or
skills to be demonstrated. Decide how you will teach that content/your learners’ learning needs in order to meet your session objectives. And then decide how the learners will practice and what feedback is expected to obtain.
Video Presentation:
Video Lecture Practice with Feedback- Classroom Meeting
Reference/Reading Materials
Expected Interactions or Task Completion:
Expected Interactions or Task Completion:
Expected Interactions or Task Completion:
Demonstration:
Video Lecture Practice with Feedback - Classroom Meeting
Hands-On Activities
Expected Interactions or Task Completion:
Expected Interactions or Task Completion:
Expected Interactions or Task Completion:
Practice with Feedback: What practice opportunities (with feedback) will be used to apply the content?

20
Develop by Kadriye O. Lewis, Ed.D - Children's Mercy Hospital & UMKC School of Medicine, Kansas City, MO
Reference: Adapted from the University of Utah, Teaching and Learning Technologies Website:
5B Creating a Flipped Learning Activity Plan. Available at:
https://utah.instructure.com/courses/311724/pages/5b-creating-a-flipped-learning-activity-plan
Flipped Lecture Planning Grid
Session Objectives
Assessments
Flipped Lectures
In Class Activities
Technology Needs
Lecture Storyboard Template
Lecture Title: Slides ID: Date Reviewed:
Screen Mockup:
Narration Script:
Navigation Details:
Multimedia Notes:

21
Develop by Kadriye O. Lewis, Ed.D - Children's Mercy Hospital & UMKC School of Medicine, Kansas City, MO
Instructional Design Plan: Castle Top Template for Creating an Instructional Strategy Instructional Design Plan: Please complete the following information to aid in the design of your lecture or course.
Topic
Purpose
Targeted Audience
Estimated Time
Technology and Resources
Learning Objectives
Content Organization
Learning Activities
Assessment of Learning Outcomes
22
Develop by Kadriye O. Lewis, Ed.D - Children's Mercy Hospital & UMKC School of Medicine, Kansas City, MO
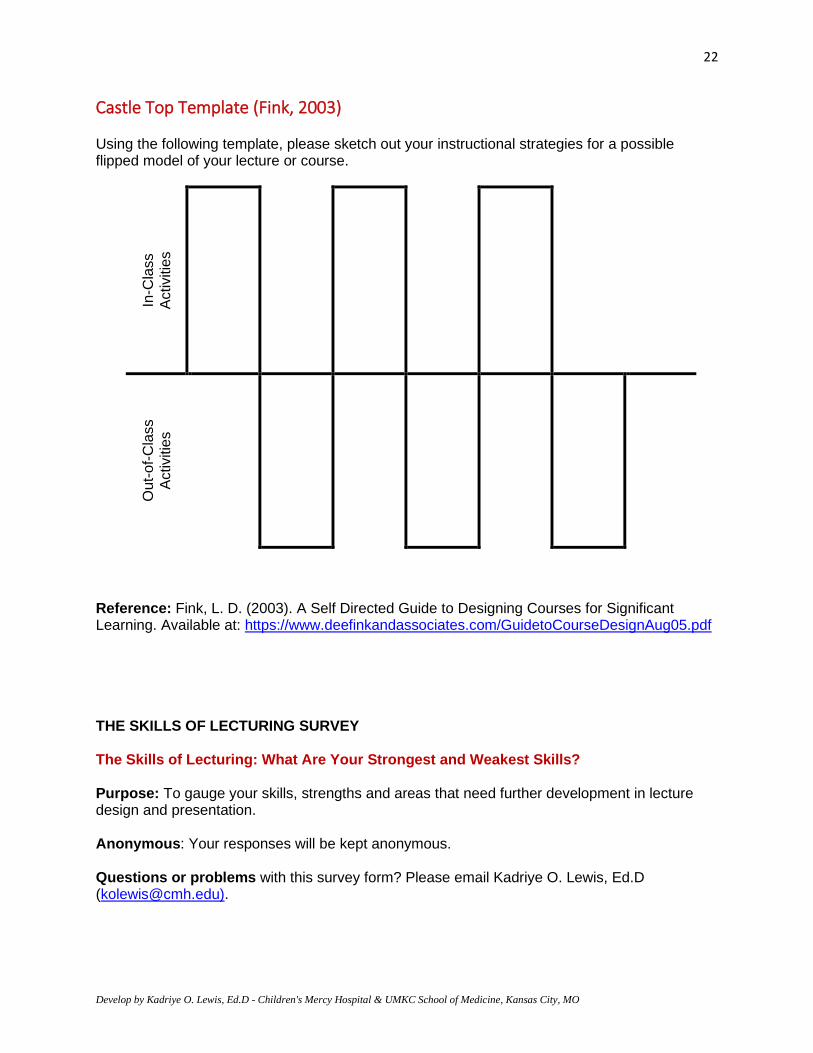
Castle Top Template (Fink, 2003) Using the following template, please sketch out your instructional strategies for a possible flipped model of your lecture or course.
In-C
lass
Activitie
s
Ou
t-of-
Cla
ss
Activitie
s
Reference: Fink, L. D. (2003). A Self Directed Guide to Designing Courses for Significant Learning. Available at: https://www.deefinkandassociates.com/GuidetoCourseDesignAug05.pdf THE SKILLS OF LECTURING SURVEY The Skills of Lecturing: What Are Your Strongest and Weakest Skills? Purpose: To gauge your skills, strengths and areas that need further development in lecture design and presentation. Anonymous: Your responses will be kept anonymous. Questions or problems with this survey form? Please email Kadriye O. Lewis, Ed.D ([email protected]).

23
Develop by Kadriye O. Lewis, Ed.D - Children's Mercy Hospital & UMKC School of Medicine, Kansas City, MO
Please score yourself regarding your strengths and weaknesses in the skills of lecturing
Skills
Strong Weak
Preparation • Outline clear objectives for the lecture to be presented
• Take account of the targeted audience’s knowledge
• Develop a lecture outline as well as selecting right technology or audiovisuals
• Provide structure with a logical sequence
• Prepare examples that are associated with the content to be presented
• Plan the lecture for diverse audiences
Opening • Start confidently, enthusiastically, and clearly
• Gain attention to make a connection early on as well as to set the tone for the rest of the lecture
• Use a quote, a dramatic visual, an anecdote, or other material relevant to the topic
• Establish rapport to get the audience on my side
• Provide a framework of the lecture to be presented
• Emphasize the presentation’s objectives and key points in the beginning
Explaining • Create understanding of the topic with the audience
• Simply clarify the complexity of the topic to be presented
• Utilize many of the lecturing skills and various pedagogies to elucidate the knowledge and skills of the audience that will increase their engagement and interaction
• Establish fluency in technical content utilizing prosodic cues and paralinguistic techniques that will help convey meaning
Presenting information
• Share the presentation outline with the audience
• Link new material to learners’ prior knowledge, such as common experiences or previous work
• Limit the main points in a lecture to a maximum of five
• Cover the essential facts and/or theories, providing sufficient details
• Observe the audience’s non-verbal communication (notetaking, response to questions, eye contact, seating patterns, and response to humor)
• Provide handouts that use particularly effective for presenting complex data, detailed material, examples, and diagrams
• Unpack and explain all visual information

24
Develop by Kadriye O. Lewis, Ed.D - Children's Mercy Hospital & UMKC School of Medicine, Kansas City, MO
Narrating • Tell a story of a patient, case or experience that captures the imagination of the audience and deepens their understanding
• Show enthusiasm for the topic and information
• Use verbal, visual, and kinesthetic approaches such as hands-on exercises and simulations
• Use headings and bullet points to make the presentation sound more conversational, and spontaneous
Comparing and contrasting
• Use a clear outline of what is to be compared and contrasted
• Utilize 2 X 2 matrices for paired comparisons
Design and use of educational media
• Use appropriate educational media for intellectual enlightenment
• Create effective visuals, analogies, demonstrations, and examples to reinforce the main points
• Integrate cutting-edge multimedia, and technology enhanced media into content design
Responsiveness to audience
• Monitor audience, reading reactions of audience and responding accordingly
• Give audience time to think and opportunities to respond
• Use some assessment techniques asking the audience to respond in one or two sentences to the questions, “What stood out as most important in today’s lecture?” and “What were the most confusing areas?”
Varying learning activity
Integrate multiple active learning strategies, small-group techniques, discussion, and peer instruction Quiz the audience periodically on lecture objectives
Summarizing • Emphasize the key points, show the links with the lecture topic and between the topic and cognate topics
• Summarize fundamental knowledge during a lecture as well as at the end of a lecture to make effectual conclusion
• Ask the audience for suggestions and comments on overall the lecture presented
What is your biggest challenge when you give a lecture? Please feel free to add any other comments:

25
Develop by Kadriye O. Lewis, Ed.D - Children's Mercy Hospital & UMKC School of Medicine, Kansas City, MO
Note: Skill domains are adapted from Brown, G. and Edmunds, S. (2013)”Lectures” in Dent, J.A. and Harden, R.M.(Eds.), A Practical Guide for Medical Teachers (4th Ed.) London: Churchill Livingstone Elsevier. HOW TO MAKE EVERY LESSON INTERACTIVE USING NEARPOD What is Nearpod? An instructional platform that merges formative assessment through interactive media including but not limited to videos, slides, and images, for collaborative learning experiences. Why use Nearpod?
• Find or create interactive lessons in minutes (using google slides or the Nearpod lesson templates)
• Assign self-paced lessons your learners’ access anytime, anywhere
• Synchronize and control learning during live instruction through all participants’ devices (cell phone, tablet, and/or computer)
• Works together with your favorite web conferencing platform (Teams or Zoom Meetings) for distance learning settings
• Classroom communities stay connected with collaborative activities and formative assessments like virtual reality, polls, collaborate boards, and game-based quizzes to name a few.
How do I Join? Instructors: Sign up for a FREE silver account at https://nearpod.com/signup/
Include your first and last name, email and create a password Participants: Join a lesson by entering a code at join.nearpod.com or through the Nearpod app How do I create a lesson?
1. Get started with what you already have. Upload and make any of your favorite resources (PowerPoints, Google Slides, and now, any video) interactive. You can even upload videos directly from YouTube.
2. Give every learner a chance to show what they know. Add real-time checks for understanding that have built-in accessibility features, like audio responses and Microsoft Immersive Reader.
3. Create lessons your learners love. Add media like Virtual Reality, simulations, and websites to support meaningful connections and keep every learner engaged.
4. Know where your learners are every step of the way. Get real-time insights into
learners’ learning during your lesson. Later, use reports to inform the next day’s instruction.
26
Develop by Kadriye O. Lewis, Ed.D - Children's Mercy Hospital & UMKC School of Medicine, Kansas City, MO
TIPS FOR NOON CONFERENCES AND VIRTUAL TEACHING Here are 9 quick tips to make your noon conferences or virtual teaching better:
1. Record your lectures: Due to pandemic condition, noon conferences are transformed into live streamed conferences. However, remote participation can be problematic if your learners have any difficulty with internet access and they may miss a live streamed lecture. Therefore, record your lectures during broadcasting to post them online so that your learners can watch them in their own time.
2. Show your face: If you are preparing a pre-recorded lecture, intersperse your slides with video of yourself. Research has shown that lecture videos that show presenters’ faces are more effective than simple narrated slideshows.
3. Avoid long lectures: Keep your lectures short, no more than 20 minutes due to
learners’ attention span and cognitive overload issues. If your topic requires longer videos, just break them into 15-minute self-standing chunks with activities or short exercises that will keep your learners engaged and active during the learning process. Your presentation should include the following elements:
• Outline of the main topics
• Key points for discussion
• Supplementary materials, video examples, and educational resources for further reading and research
4. Test out recording: After your recording, you should test your video on different technology devices such as desktop, laptop and smartphones. Special attentions should be given to the slide design for checking text readability (font size and styles), colors, and screen ratios to see how they look on each device.
5. Use existing resources: Producing high quality materials and videos may take a lot of time and efforts. In this case, you may consider using pre-developed resources available online and provide your learners with clickable links.
6. Give specific directions: Providing succinct descriptions and clear directions for each
online activity helps your learners complete all tasks and navigate the course sites easily. This also eliminates wasting time and increases learning efficiency.
7. Provide interactive activities: Interactive learning activities keep your learners
engaged with the content. Here are some ideas:
• Quizzes or embedded tests to check learning
• Realistic scenarios where the learners can make decisions and see for themselves the outcomes of their choices
• Videos to demonstrate processes and procedures • Case studies to depict real-life scenarios as they draw learners’ attention
8. Use learning analytics to measure attendance: You can use intelligent data produced by the learning management system to measure learners’ participation. If you let your learners know about it, this will increase compliance.
27
Develop by Kadriye O. Lewis, Ed.D - Children's Mercy Hospital & UMKC School of Medicine, Kansas City, MO
9. Set reasonable expectations: Setting expectations for your learners eliminates or reduces confusion while those expectations help your learners build confidence and self-esteem. Expectations also help you assess and evaluate your learners objectively, reasonably, and fairly.
References • Dubois, E.A. & Franson, K. L. (2009). Key steps for integrating a basic science throughout a
medical school curriculum using an e-learning approach. Medical Teacher, 31: 822–828
• Lewis K.O., Demiroz, E., Chen, H., Albold, C. & Mahan, J. (2020). A four-pronged approach for evaluating e-learning modules with a newly developed instructional design scale. J. Contemp. Med. Educ., 10:31–54.
• Njiro, E. 2014. Moving Transfer to Transformative Learning: A Curriculum Model for Adult Educators in Open Distance Learning (ODL). Journal of Educational and Social Research. 4, 3 (May 2014), 479.